#Analog vs Digital Controllers
Explore tagged Tumblr posts
Visit Tumblr Blog
Explore Tumblr blogs with no restrictions, modern design and the best experience.
Last Seen Tumblr Blogs


Fun Fact
25% of US internet users with an annual income of $80-100K use Tumblr.
Text
Analog vs. digital temperature controllers
For many industrial processes, temperature control is vital. Temperature controllers are essential for maintaining ideal conditions for processes and machinery. When it comes to temperature controllers, there are two basic technologies used: analog and digital. Today, we will explore the differences between the two while individually learning the pros and cons of each technology. 1. Analog…
#Analog vs Digital Controllers#Temperature Control Systems#temperature controllers#Temperature Sensors#Temperature Transmitter
0 notes
Text
Digimon and Appmon: Nature vs Domestication
So Digital World Archive posted an article How Appmon inherits Digimon's Legacy a while back and two paragraphs in particular caught my eye:
The biggest difference with Digimon, even when comparing just the original settings, is how the Appmon lack the focus in the “Law of the Jungle” that basically shaped the whole idea of fighting Digimon back in the day. I mean, Appmon have special moves and can fight, but it’s a lot less part of their identity as “Appmon” than it is for “Digimon”, which were basically built to fight (That is, you can’t really find a definition for Digimon in the early days that didn’t mention this nature, while Appmon’s definition only talks about how they “were made for the good of systems and humans”, which I see as a clear difference between Appmon and Digimon).
But at the same time, I can see this as an evolution from “Digimon” to “Appmon”. The late 1990s and early 2000s had the internet as a much more mysterious place that put fear in the minds of many people. So maybe if you were to understand “Digimon” as having the focus on “monsters” as symbolizing this chaotic nature of the early internet, then having the modern “Appmon” be first and foremost Apps that exist to help mankind could represent how nowadays our life is much more integrated to the internet than before (Even though I would say it’s much more dangerous nowadays exactly because of how integrated everything is).
To use an analogy: if Digimon are wolves (Canis lupus) then Appmon are domesticated dogs (Canis lupus familiaris)
This leads to my thoughts for how Digimon and Appmon can coexist:
Once upon a time there were the Wild Ones, the monsters that terrorized human myths and legends for centuries: These beings were known as the Kemonogami before they, along with their world, underwent the process of digitization due to humanity's development of digital technology, and specifically the Network, to become the first Digital Monsters: Digimon. Their home, now known as the Digital World, exists within the deepest depths of the Net Ocean: Beyond even the Dark Web and the reach of the most skilled hackers.

Eventually however, humanity discovered these Digital Monsters and became fascinated by them. And as is human nature, this fascination led to the desire to domesticate Digimon; just as Onmyōji purportedly tamed and controlled Kemonogami. After decades of research, programmers managed to reverse engineer the unique physiology of Digimon which was used to convert application programs into the second Digital Monsters: Appmon
And while humans can have partner Digimon, this is akin to bonding with a supernatural entity (think ghosts from Ghostbusters) that will battle to protect you hence why such people are called "Tamers," even when Digimon possess full sapience
9 notes
·
View notes
Text
Radio Tuning and Volume Controls, Part 1: The Rules
At the risk of too many technically dense posts in sequence, I’m following up my post on the minutiae of battery backups with two posts on the minutiae of radio tuning and volume controls! These “explainer” posts will likely be the most time-consuming for me to write, so I want to knock them out rather than turning them into Big Daunting Things in my head that I then procrastinate on.
In Part 2 of this post, we will explore the weirdnesses of radio tuning and volume controls. But first, we need to explore how they work in the first place. And before we explore that, we need to explore why alarm clocks have radios or other music-playing apparatuses in the first place. So let’s do it!
Why do so many alarm clocks have radios, CD players, or other music players?
There’s an obvious reason and a slightly less obvious reason! The obvious reason is that it saves space on a nightstand. I know my nightstand barely has enough space for everything on it, and I can imagine pretty much nobody wanted to cram a CD boombox and an alarm clock onto their bedside table. Combining these devices reduces their footprint!
The slightly less obvious reason is that these “combo” alarm clocks tried to give you a more pleasant sleeping and waking experience than alarm clocks of yore. Most people don’t enjoy waking up to bells ringing or obnoxious buzzing or beeping, though for some of us, it may be the only way to get us out of bed. But for others, it might be nicer to wake up to a favorite song, or the voice of your favorite anchor on NPR. That’s why alarm clocks with radios, CD players, or other audio sources typically let you set these sources as the alarm sound, which wouldn’t be possible if the radio or CD player was an entirely separate device.
Pretty much all of these alarm clocks also go a step further. They don’t just try to help you wake up peacefully, they also try to help you fall asleep peacefully too. Tons and tons of alarm clocks have a sleep timer, which shuts off the radio or CD player automatically after a set time. That way, you can put on soothing music or a boring news station to fall asleep to, and then have the sound shut off automatically once you’re asleep. I feel like sleep timers are something surprisingly few people use or even know about, though they’re included on practically every alarm clock with a radio or CD player ever made.
Now, here’s the tricky thing. The audio people want to fall asleep to is not the same as the audio they want to wake up to. (Or the audio they listen to during the day!) Maybe you’re the kind of person who puts on soothing classical at a low volume to lull you into slumber. But you’re a deep sleeper, so you need the guitars of heavy metal playing LOUD to get you out of bed. (If you’re that person, I applaud you for your rich and varied music tastes.)
I don’t think there are really that many people using their alarm clocks to the max in this way, setting the CD alarm, using the sleep timer, and letting their tastes meander across every genre and volume level of music. But when that rare human being comes along, alarm clocks have to be prepared. It’s helpful when they have the ability to play one thing at one volume (such as during the sleep timer), then switch themselves to a different thing at a different volume (such as for the alarm sound). And that leads nicely into our discussion today!
Analog vs. digital controls
If you’re young and sprightly like me, you may have no idea how radio works. (Well, I know a little about how radio works, but mostly because I’m an alarm clock nerd, not because I really listen to it. Though NPR slaps, I will say.) Both AM and FM radio stations broadcast at specific frequencies, measured in kilohertz (for AM) or megahertz (for FM). Using FM as an example, one station may be located at 91.1 MHz, then another at 91.3, then another at 91.5, etc. The important thing to know is that, unlike “stations” on an app like Spotify, real radio stations are arranged in a numeric sequence, and you change between them by changing the frequency the radio is set to receive. The process of changing this frequency to the number you want is called tuning.
If you’re an alarm clock designer, you might approach designing controls for radio tuning in a similar way as you might for volume. That’s because volume controls, like radio tuning controls, also need to move through a series of numbers in sequence. These numbers are more obvious. They are an arbitrary range the alarm clock designer chooses, from mute all the way up to super-super-loud.
Both radio tuning and volume controls (on alarm clocks or other devices) can be analog or digital. This is a surprisingly important distinction that I want to explain as carefully as I can.
Digital controls
I’m actually going to explain digital controls first, because they are more familiar to most people. With a digital control for radio tuning or volume, you press a button or turn a dial, and your action sends a command to the device’s motherboard, which changes the numeric value for radio frequency or volume by a preset amount. The resulting value is typically shown on a screen. You know when you press the volume-up button on your TV remote, and the screen shows that the volume changed from 29 to 30? That’s a digital control.
Below is a an alarm clock (a Sony ICF-CD853V) with a prototypical example of digital radio tuning. The radio frequency (87.5 MHz) is shown at the bottom of the screen. The “Tune / Time Set” buttons allow you to decrease or increase the radio frequency. And there are buttons numbered 1 through 5 on the top of the alarm clock for “Preset Tuning,” which is almost always a telltale sign of digital radio tuning. I’ll explain what those do in just a moment.

There are two crucial things to understand about digital controls. First, they change radio frequency or volume in discrete steps, rather than continuously. If volume is on a scale from 0 to 30, you can’t set the volume to 5.5, or 3.3333333, or 2.57684749249. You can set it to 2, or 3, or 4, or 5. This could be considered limiting for a volume control, because what if you want to listen to music at 5.5, and 5 is too quiet and 6 is too loud, gosh darn it? But alarm clock designers can usually resolve this problem by including enough volume options. And changing in discrete steps is actually really helpful for radio tuning, because radio stations are arranged in discrete steps. You want to move from 91.1 FM to 91.3 FM without ending up in between. If you end up at 91.2 FM, where no station exists, I believe you'll hear a little bit of both radio stations on either side simultaneously, which is what we call “not ideal.”
Second, you can use a digital control to change radio frequency or volume, or the electronics within the device can change the radio frequency or volume themselves. There are so, so many reasons why this is important. With radio frequency, it allows for preset stations, where you save the stations you listen to most, and at the touch of a button, the electronics within the device can leap from the old frequency to the one you selected, regardless of how far apart they are. (That’s what those 1 through 5 buttons do on the alarm clock pictured above! I could save NPR as preset 1 and jump to it whenever I want.) With alarm clocks specifically, digital controls also allow you to set a radio frequency or volume level for the alarm that is different from whatever you were last listening to. At the alarm time, the clock can change itself to the new radio frequency or volume level. Finally, digital controls also allow you to adjust the radio frequency or volume without physically interacting with the device, such as by using a remote control.
Analog controls
This is all in contrast to analog controls. With an analog control for radio tuning or volume, you turn a dial, and the dial physically interacts with the circuitry of the device in a way that I honestly don’t fully understand, and the radio frequency or volume changes along a continuum (not stepwise or discretely). The resulting radio frequency or volume is not shown on a screen, because (a) the device doesn’t know exactly what radio frequency or volume it’s set to (yes, really), and (b) the radio frequency or volume isn’t an exact, discrete number.
Below is an alarm clock (a Sony ICF-C630) with a prototypical example of analog radio tuning. An estimate of the radio frequency is shown on the dial scale, which looks like a ruler and is located below the display. The radio tuning dial is the small gray wheel on the lower-right side of the clock. As you rotate the dial, a mechanical linkage moves the red pointer on the dial scale, showing you roughly which station you are tuned to. (If you’re wondering why the frequencies on the dial scale are weird numbers, it’s because this isn’t a U.S.-market clock, and radio frequencies work differently in different countries.)

Analog controls will probably make more sense if we discuss the physical controls themselves. Both analog and digital controls can be dials. But a digital dial can make more than one full rotation, while an analog dial is restricted to one full rotation or less. An analog dial also never clicks from one “step” to the next, while some digital dials do. Using volume as an example, an analog volume control is usually a little dial or wheel on the side of a device that smoothly, freely rotates from one endpoint (mute) to another endpoint (the loudest volume possible). If you’ve ever had a Nintendo device (like a 3DS) with a volume slider on the side, that’s a perfect example of an analog volume control. (Though on alarm clocks, dials are much more common than sliders.)
As I said earlier, analog controls change radio frequency or volume continuously, not stepwise or discretely. They have an infinite amount of settings between their two endpoints. So you can dial in the perfect volume level for your listening (though you may get sucked into an obsessive loop doing it), but you can also find yourself tuned between two radio stations, which sucks. You’ll rarely, if ever, tune perfectly to 91.1 FM, so you better get comfortable with “good enough.” Devices with analog controls also can’t change these controls themselves. So if an alarm clock’s radio tuning dial or volume dial is set to a particular station or volume, that’s the station or volume the alarm clock will be using, until you physically rotate the dial. So no preset radio stations, no programming a unique radio station or volume level for the alarm, and no changing the station or volume using a remote control.
Analog volume controls don’t typically indicate the volume level, but it’s easy enough to hear if the music is already playing. Analog radio tuning controls do typically indicate the estimated radio frequency, because you don’t always know which station you’re on just by listening to it, unless the announcers tell you. Above, I showed you an example of a dial scale, which is the most common kind of radio frequency display for analog tuning. But there are others. Sometimes radio frequency numbers mechanically rotate through a little plastic window, like on the Sony ICF-CD815, shown below-left. And sometimes the radio frequency numbers are printed on the dial itself, like on the HoMedics SS-6000, shown below-right. (You might need to zoom in to see the radio tuning dial, which is on the lower-right side of the clock.)


Time for a break!
I know this is a pretty technically dense post, and I really appreciate you bearing with me. Here’s the good news: now that you’ve learned all this information, you will be better able to appreciate the weird and fun things I’m going to show you in Part 2! So go get hydrated, have a snack, touch grass, and then join me for Part 2!
Image credits:
Sony ICF-CD853V (digital tuning): Poshmark
Sony ICF-C630 (analog tuning with dial scale): Google Images
Sony ICF-CD815 (analog tuning with frequency windows): Google
HoMedics SS-6000 (analog tuning with numbers on the dial): eBay
8 notes
·
View notes
Text
Analog vs. Digital Meters: Understanding the Differences and Applications

In today’s increasingly connected and technologically advanced world, precise electrical measurement is critical for efficient power management and system monitoring. Two primary tools dominate the field of electrical measurement: analog meters and digital meters. While both serve the same fundamental purpose — measuring electrical quantities like voltage, current, and frequency — their technology, design, readability, and application differ significantly.
This article explores the key differences between analog and digital meters, their respective advantages, disadvantages, and common use cases to help you make an informed decision when selecting the right meter for your needs.
What Are Analog Meters?
Analog meters are traditional instruments that display measurement readings through a mechanical needle moving over a graduated scale. They have been widely used for decades in industries, commercial applications, and even residential setups.
Key Features of Analog Meters:
· Use of moving coil or iron vane mechanisms
· Continuous scale display
· Passive operation (no power required in many types)
· Simple, durable construction
Common Types:
· Analog Voltmeters
· Analog Ammeters
· Analog Frequency Meters
· Analog Power Factor Meters
Advantages of Analog Meters:
· Easy to interpret trends and fluctuations
· Cost-effective for basic applications
· Operate without auxiliary power
· Better tolerance to transient spikes and overloads
Limitations:
· Lower accuracy compared to digital meters
· Manual reading required
· Parallax error due to needle reading
· Limited data logging or interfacing capabilities
What Are Digital Meters?
Digital meters represent a more modern approach to electrical measurement. These devices convert analog signals into digital values, displaying results on an LCD or LED screen. They are widely used in automation, smart grids, and precision engineering environments.
Key Features of Digital Meters:
· High-resolution digital display
· Advanced microprocessor control
· MODBUS communication (RS-485 interface)
· Programmable settings and alarms
Common Types:
· Digital Voltmeters
· Digital Ammeters
· Digital Frequency Meters
· Digital Multifunction Meters (VAF, kWh, Power Factor, etc.)
Advantages of Digital Meters:
· High accuracy and readability
· Remote monitoring capabilities
· Compact and modern design
· Enhanced functionalities like data logging, alarms, and networking
Limitations:
· Higher initial cost
· Requires auxiliary power
· More complex installation in some cases

Applications of Analog and Digital Meters
Where Analog Meters Excel:
· Educational institutions for teaching fundamentals
· Industrial environments where ruggedness is key
· Backup or emergency systems where power is limited
· Low-budget installations
Where Digital Meters Lead:
· Smart panels and industrial automation
· Energy monitoring systems
· Commercial buildings and infrastructure
· Remote power distribution networks
Choosing the Right Meter: Factors to Consider
When deciding between analog and digital meters, consider the following:
1. Accuracy Requirements — For precision tasks, digital meters are the preferred choice.
2. Budget Constraints — Analog meters offer a cost-effective solution for basic needs.
3. Environment — Analog meters can be more tolerant in high-temperature or high-vibration areas.
4. Communication Needs — If integration with SCADA or monitoring systems is needed, go digital.
5. Data Analysis — For trend tracking and analytics, digital meters with memory and communication ports are ideal.
Enza Electric: Your Trusted Source for Analog and Digital Meters in the UAE
At Enza Electric, we provide a comprehensive range of analog and digital panel meters tailored to meet diverse electrical monitoring needs. Our digital meters support RS-485 MODBUS, enabling seamless integration into modern automation systems. Whether you’re looking for reliable analog meters for legacy systems or advanced digital meters for new installations, Enza Electric has the expertise and inventory to deliver.
We offer:
· Voltmeter, Ammeter, and Frequency meters in both analog and digital forms
· Multifunction VAF meters
· Panel meter sizes: 72x72mm and 96x96mm
· Customizable CT and PT ratios
Conclusion
Both analog and digital meters play important roles in today’s electrical systems. While analog meters offer simplicity and durability, digital meters bring precision, connectivity, and intelligence. Understanding their differences and applications is key to choosing the right tool for your project.
For expert guidance and high-quality meters, contact Enza Electric — one of the leading electrical measurement solution providers in the UAE.
#AnalogMeters#DigitalMeters#PanelMeters#ElectricalMeasurement#PowerMonitoring#ElectricalEngineering#EnergyMeters#IndustrialAutomation#MeteringSolutions#Instrumentation#electrical#switchgear#dubai#low voltage#uae
4 notes
·
View notes
Text
The Role of Mixers in Live Sound: A Comprehensive Overview
Imagine standing in the middle of a concert, surrounded by the perfect blend of instruments and vocals, every sound complementing the other seamlessly. This magic doesn’t happen by accident—it’s the work of a mixer. Mixers, often referred to as the heart of live sound systems, play a pivotal role in ensuring every performance sounds flawless. Whether it’s a small gig at a local café or a massive stadium concert, mixers are an essential part of live sound setups.
Let's understand what mixers do, why they’re important, and how they bring live performances to life. Whether you're an aspiring sound engineer, a musician, or simply curious, this comprehensive overview will break it all down in simple terms.
What is a Mixer?
At its core, a mixer is a device that takes multiple audio signals—like vocals, guitars, keyboards, and drums—and blends them into a cohesive output. Think of it as the control center for all the sounds in a live performance.
Mixers allow you to:
Adjust the volume of each input (like turning up the vocals or lowering the bass).
Shape the sound using equalizers (EQ) to balance frequencies.
Add effects like reverb or delay to enhance the audio.
Route signals to different outputs, such as speakers, monitors, or recording devices.

Whether you're using a compact analog mixer or a high-tech digital console, the principles remain the same: taking raw sound and refining it for the audience's ears.
Why Mixers Are Crucial for Live Sound
1. Balancing the Audio
Live performances often involve multiple sound sources—vocals, instruments, backing tracks, and sometimes even crowd noise. A mixer ensures that no single element overpowers the rest, creating a harmonious balance that’s pleasant to listen to. For instance, without a mixer, a loud drum kit could drown out a singer's voice, making the performance feel chaotic.
2. Customizing the Sound
Every venue has unique acoustics. What sounds great in a small indoor space might not work for an open-air festival. Mixers allow sound engineers to adapt the audio for different environments. By tweaking EQ settings, they can reduce echo in large halls or add warmth to a cold-sounding room.
3. Providing Real-Time Control
Live performances are unpredictable. A singer might step away from the mic, or a guitarist might accidentally play too loudly during a solo. With a mixer, sound engineers can make instant adjustments to keep everything running smoothly.
Key Features of Mixers
When exploring mixers, it’s important to understand their features. Here are some key components that make mixers so versatile:
1. Channels
Mixers have multiple channels, each dedicated to a specific input (e.g., a microphone or instrument). Small mixers might have 4-8 channels, while larger ones can have 32 or more. Each channel has its own controls for volume, EQ, and effects, giving you granular control over individual sound sources.
2. Equalization (EQ)
EQ lets you shape the tone of each input. For example:
Boost the treble for a brighter vocal sound.
Cut the bass to reduce rumbling noises.
Adjust midrange frequencies for clarity.
EQ is essential for ensuring that all elements in a mix complement each other without clashing.
3. Aux Sends and Effects
Auxiliary (aux) sends allow you to send specific audio signals to different destinations. For instance, you can send a mix of vocals and instruments to on-stage monitors so performers can hear themselves.
Many mixers also come with built-in effects like reverb, delay, and compression, which can add depth and polish to the sound.
4. Faders and Pan Controls
Faders control the volume of each channel, while pan controls adjust the stereo placement of a sound. For example, you can pan a guitar slightly to the left and a keyboard slightly to the right for a more immersive stereo effect.
5. Digital vs. Analog Mixers
Analog Mixers: Known for their simplicity and tactile controls, analog mixers are a great choice for beginners or smaller setups.
Digital Mixers: These offer advanced features like presets, wireless control via apps, and the ability to handle complex setups. They’re ideal for larger venues or tech-savvy users.

How Mixers Enhance the Audience Experience
A well-mixed performance can transform how the audience experiences live music. Here’s how mixers contribute to a great show:
Clarity: Mixers ensure that every instrument and vocal is heard clearly, even in a crowded or noisy environment.
Energy: By controlling dynamics, mixers can make the music feel more powerful and engaging.
Emotion: Effects like reverb and delay can add atmosphere and emotion to a performance, making it more memorable.
Tips for Using Mixers Effectively
If you’re new to mixers, here are some practical tips to get started:
Start Simple: Focus on getting the basics right—like balancing volume levels—before diving into advanced features.
Learn to Use EQ: Understanding how to use EQ can make a huge difference in the quality of your mix.
Practice in Real Settings: Mixing in a live environment is different from mixing in a studio. Practice in different venues to get a feel for how acoustics affect sound.
Invest in Quality Gear: A reliable mixer can make your life much easier, especially during live performances. Purchasing from reputable audio shops ensures you get equipment that’s durable and built to perform.
Conclusion
Mixers are more than just pieces of equipment—they’re the bridge between raw sound and a polished performance. By understanding their features and functions, you can unlock their full potential and deliver a live sound experience that captivates your audience.
Whether you’re a performer, a sound engineer, or just someone passionate about music, investing time in learning about mixers is well worth it. After all, great sound doesn’t happen by chance—it’s the result of careful planning, skilled mixing, and quality equipment.
So the next time you’re at a concert or gig, take a moment to appreciate the mixer and the person behind it. They’re the unsung heroes making the magic happen!
#audio#audio gear#music#dj#professional audio#audio shop in brooklyn#musician#brooklyn#live sound#dj gear#pro audio#pro audio gears
2 notes
·
View notes
Text
Arduino Due vs. Mega: A Comprehensive Comparison
What is Arduino Due and Mega?
The Arduino platform has revolutionized the world of DIY electronics, providing hobbyists and professionals alike with versatile and powerful microcontroller boards. Among the myriad of options, the Arduino Due and Arduino Mega stand out for their advanced features and robust performance. The Arduino Due, introduced in 2012, is the first Arduino board based on a 32-bit ARM core microcontroller, the Atmel SAM3X8E. In contrast, the Arduino Mega, built around the 8-bit ATmega2560 microcontroller, is known for its abundant I/O pins and memory. Understanding the differences between these two boards can help in selecting the right one for specific projects, enhancing both functionality and efficiency.
Processing Power and Performance
The processing capabilities of the Arduino Due and Mega are distinctly different, primarily due to their core microcontrollers. The Arduino Due, with its 32-bit ARM Cortex-M3 processor running at 84 MHz, offers significantly higher processing power compared to the Arduino Mega's 8-bit ATmega2560, which operates at 16 MHz. This difference in architecture and clock speed means that the Due can handle more complex calculations and tasks faster and more efficiently than the Mega. For projects requiring high computational power, such as real-time data processing or handling multiple sensors simultaneously, the Due is the superior choice. However, for simpler tasks, the Mega's processing power may suffice.
Memory and Storage Capabilities
Memory is another critical aspect where the Arduino Due and Mega diverge. The Arduino Due is equipped with 512 KB of flash memory for code storage and 96 KB of SRAM for data. On the other hand, the Arduino Mega has 256 KB of flash memory and 8 KB of SRAM. Additionally, the Due features a Direct Memory Access (DMA) controller, which allows for efficient memory operations, freeing up the CPU to handle other tasks. These memory enhancements make the Due more suitable for applications requiring large codebases and significant data handling, such as advanced robotics or sophisticated control systems. The Mega, with its more modest memory, is ideal for less demanding applications.
Input/Output Capabilities and Expansion
Both the Arduino Due and Mega are renowned for their extensive input/output (I/O) capabilities, yet they cater to different needs. The Mega boasts a whopping 54 digital I/O pins, 16 analog inputs, and 4 UARTs, making it ideal for projects that require multiple sensors, actuators, or communication interfaces. The Due, while offering fewer digital I/O pins at 54, includes 12 analog inputs and 4 UARTs, along with additional features like two DAC outputs for analog signal generation and enhanced PWM capabilities. These features provide the Due with superior analog output capabilities, making it suitable for applications like audio processing or advanced signal generation.
Power Consumption and Compatibility
Power consumption and compatibility are practical considerations when choosing between the Arduino Due and Mega. The Due operates at 3.3V logic levels, which makes it more power-efficient than the Mega, which uses 5V logic levels. This lower voltage operation is beneficial for battery-powered projects where energy efficiency is crucial. However, the 3.3V logic also means that the Due is not directly compatible with 5V components without level shifters. The Mega, with its 5V logic, offers broader compatibility with existing Arduino shields and components, making it a versatile choice for a wide range of projects. Understanding these power and compatibility nuances can help in making an informed decision based on the project's specific requirements.
2 notes
·
View notes
Text
Tips for Effectively Dehumidifying Your Car Interior
Dehumidifying your car interior is not just about comfort; it’s essential for maintaining the longevity of your vehicle and ensuring a healthy environment. Excess moisture can lead to mold growth, foul odors, and even damage to electronic components. This extensive guide will provide you with practical tips and powerhousecc.org tricks on how to effectively dehumidify your car, ensuring that every drive feels fresh and clean.
Understanding Humidity in Your Car What Causes Humidity in Vehicles?
Humidity inside your car can arise from various sources. One primary contributor is the weather. Rainy days or high humidity levels outdoors can seep into your vehicle when doors are opened. Additionally, moisture from wet clothes or shoes can accumulate, leading to increased humidity.
Why Is It Important to Control Humidity?
Maintaining optimal humidity levels is crucial for several reasons:
Mold Prevention: High humidity creates an ideal breeding ground for mold and mildew. Comfort: Excess humidity makes the air feel stuffy and uncomfortable. Vehicle Maintenance: High moisture levels can cause rust and damage electronic systems. Tips for Effectively Dehumidifying Your Car Interior 1. Use a Dehumidifier
One of the most effective methods for reducing moisture is using a dehumidifier designed specifically for vehicles.
Best Cordless Dehumidifier: Look for compact models that fit easily under your seat. Battery-Powered Options: These are convenient as they require no power outlet. 2. Consider Door Management
When using a dehumidifier, should I close the door when using a dehumidifier? Yes, keeping the doors closed while running the device will help trap moisture inside, allowing it to work more efficiently.
Dehumidifier Door Open or Closed?
Keeping doors closed during operation will enhance effectiveness by retaining the dry air within.
3. Use Absorbent Materials
Silica gel packets or desiccants placed around the car can absorb excess moisture effectively.
How to Use Silica Gel in Shoes: You can also place silica gel packets in shoes left inside the vehicle to prevent odors and dampness. 4. Ventilation Matters
Proper ventilation plays a significant role in managing humidity levels:
Crack open windows on dry days. Use fans strategically to circulate air within the cabin. Selecting the Right Tools for Humidity Control 5. Best Attic Dehumidifiers
While this might seem unrelated, understanding home dehumidifiers helps you appreciate portable options better. For example:
| Type | Features | Recommended Use | |-------------------|--------------------------------|-------------------------| | Battery-Powered | Portable & convenient | Small spaces like cars | | Corded Models | Powerful & continuous | Larger quiet dehumidifier for bedroom use areas at home |
6. Understanding Hygrometers
To monitor humidity levels accurately, you need a hygrometer:

Digital vs Analog Hygrometer: Digit
0 notes
Text
Digital vs Analog Hygrometer: What's Right for You?
Introduction
When it comes to monitoring humidity levels in your home, greenhouse, or any other environment, selecting the right hygrometer is crucial. The choices often boil down to two primary options: digital and analog hygrometers. Each has its advantages and disadvantages, making the decision somewhat tricky. In this article, we’ll dive deep into the nuances Get more information of both types to help you determine which one is right for you.
Why does humidity matter? High humidity can lead to mold growth and damage to your property, while low humidity can cause discomfort and health issues. Therefore, understanding how a hygrometer works is essential for maintaining optimal conditions.
Digital vs Analog Hygrometer: What's Right for You?
Choosing between a digital and an analog hygrometer ultimately depends on your specific needs and preferences. While digital hygrometers typically provide quick readings with higher precision, analog models boast a traditional appeal that many users still appreciate. Here are some factors to consider:

Accuracy of Readings Digital Hygrometers: Known for their high accuracy levels, many digital hygrometers offer readings within ±1% RH (Relative Humidity). Analog Hygrometers: These generally have wider tolerances—often around ±5% RH—which might suffice for casual use but may not be as reliable in precise applications like greenhouses. Ease of Use Digital Options: Generally user-friendly with straightforward displays showing numerical values. Analog Models: Often require reading a dial or needle position, which can sometimes be less intuitive. Power Source Battery Operated: Most digital hygrometers need batteries, meaning you'll have to replace them periodically. No Batteries Required: Analog models run without power sources; they function purely on mechanical principles. Durability Digital Devices: More prone to malfunction due to electronic components but can be protected by proper housing. Analog Devices: Generally robust; they can withstand minor impacts better than delicate electronics. Cost Considerations Digital hygrometers tend to range from budget-friendly options to more expensive models packed with features. Analog hygrometers are usually more affordable but may lack advanced functionalities. The Importance of Accurate Humidity Measurement
Understanding why accurate humidity measurement matters is key when choosing between these two types of hygrometers.
Health Concerns Related to Humidity Levels
Excess moisture fosters the growth of allergens such as mold and dust mites. Conversely, low humidity leads to dry skin and respiratory issues. Thus:
Maintaining an indoor relative humidity level between 30%-50% using accurate readings from a reliable hygrometer is essential for health. Humidity Control in Greenhouses
If you're cultivating plants, precision becomes paramount:
Knowing how to raise the humidity in a grow
0 notes
Text
Effective Techniques for Dehumidifying a Car Interior
Introduction
In the world of automotive care, one aspect that often gets overlooked is humidity control within the car interior. Excess moisture can lead to a myriad of issues, from mold growth to unpleasant odors, and even damage to your vehicle’s upholstery and electronics. In this comprehensive article, we will explore Effective Techniques for Dehumidifying a Car Interior, addressing various methods and tools you can utilize to maintain a dry and healthy environment inside your vehicle.

What Causes Humidity in Cars?
To effectively combat humidity, it's imperative first to understand what causes it. Factors contributing to increased moisture levels in cars include:
Weather Conditions: Rainy or humid climates can introduce excess moisture into the car. Wet Items: Leaving wet umbrellas, clothes, or shoes in the car can significantly raise humidity. Condensation: The difference in temperature between the outside and inside can lead to condensation on windows.
Understanding these factors allows you to take proactive measures against humidity buildup.
Effective Techniques for Dehumidifying a Car Interior 1. Utilizing Desiccants
Desiccants are materials that absorb moisture from the powerhousecc.org air. They come in various forms, including silica gel packets, which you might already have around your home.
Why Use Desiccants? Cost-effective: They are generally inexpensive and easy to find. No Power Needed: Since they don’t require electricity, they are perfect for emergency situations. How to Use Silica Gel
You can place silica gel packets under your seats or in the trunk to help absorb excess moisture from the air.
2. Investing in a Battery Operated Dehumidifier
A portable battery-operated dehumidifier is an excellent investment if you frequently face humidity issues.
Features of Battery Operated Dehumidifiers Portability: Can be easily moved around your car. Quiet Operation: Many models operate quietly without disturbing passengers.
These units typically extract moisture efficiently while being compact enough not to occupy much space.
3. Using Hygrometers for Monitoring Humidity Levels
To manage humidity effectively, consider using a hygrometer—either digital or analog—to monitor moisture levels inside your vehicle.
Digital vs Analog Hygrometers Digital Hygrometers: Provide accurate readings quickly and often come with additional features like temperature measurement. Analog Hygrometers: Generally less expensive but may require calibration over time.
By knowing when humidity levels rise above acceptable limits (ideally below 50%), you can take necessary action promptly.
4. Ventilation Techniques
Proper ventilation plays a crucial role in maintaining ideal humidity levels within your car.
How To Ventilate Your Car Open Windows When Parked: Allow fresh air circulation when parked in moderate weather conditions. Use Air Conditioning: Running your AC
0 notes
Text
Top McIntosh Labs 2-Channel Integrated Amplifiers: Ultimate Buyer’s Guide
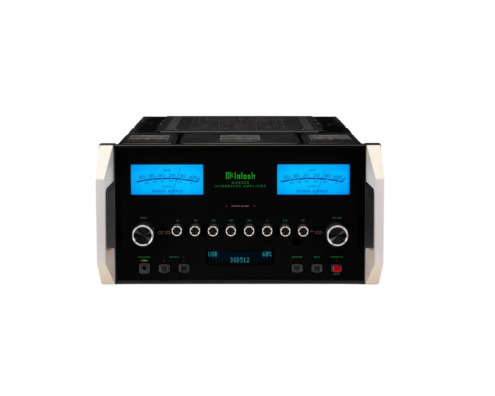
When it comes to high-fidelity audio, few names command as much respect as McIntosh Labs. Known for its signature blue watt meters, polished glass front panels, and robust power delivery, McIntosh has become synonymous with audio perfection. If you're an audiophile searching for the ultimate listening experience, investing in a McIntosh Labs 2-Channel Integrated Amplifier could be a transformative upgrade.
This guide explores some of the best McIntosh integrated amplifiers in the 2-channel category, helping you choose the perfect model for your stereo setup.
Why Choose a McIntosh 2-Channel Integrated Amplifier?
A McIntosh Labs 2-Channel Integrated Amplifier combines a preamplifier and power amplifier in one chassis, preserving signal integrity while minimizing component clutter. McIntosh amps are revered for:
Exceptional sound clarity and headroom
Handcrafted construction in the USA
Timeless design with signature blue meters
Durability and resale value
Wide speaker compatibility
Whether you're driving bookshelf speakers or high-end floorstanders, McIntosh delivers the dynamics and warmth every audiophile craves.
Top McIntosh Labs 2-Channel Integrated Amplifiers
1. McIntosh MA252 Hybrid Integrated Amplifier
Power Output: 100W per channel into 8 ohms Design: Tube preamp + solid-state power amp
The MA252 is McIntosh’s first hybrid integrated amplifier, merging retro tube warmth with modern solid-state muscle. It features 12AX7a and 12AT7 preamp tubes, paired with a powerful transistor-based amplifier section.
Ideal For: Listeners who love rich mids and smooth highs without sacrificing punch.
2. McIntosh MA5300 Solid-State Integrated Amplifier
Power Output: 100W per channel into 8 ohms Design: Solid-state, compact footprint
The MA5300 is the most compact McIntosh Labs 2-Channel Integrated Amplifier, making it perfect for small-to-medium-sized rooms. It includes a built-in DAC with support for DSD and DXD formats, making it ideal for digital music lovers.
Ideal For: Modern audiophiles with digital streaming setups and space constraints.
3. McIntosh MA7200 Integrated Amplifier
Power Output: 200W per channel into 8 ohms Design: Solid-state, robust build
The MA7200 delivers exceptional power and sonic precision, thanks to its Direct Coupled Output design. It also features the McIntosh DA1 Digital Audio Module for high-res playback and future-proofing.
Ideal For: Audiophiles with demanding speakers and a mix of analog and digital sources.
4. McIntosh MA8900 Integrated Amplifier
Power Output: 200W per channel into 8 ohms Design: Fully loaded with analog and digital features
The MA8900 brings the best of both worlds—vintage McIntosh aesthetics and cutting-edge digital technology. It includes the DA1 DAC module, tone controls, five-band equalizer, and McIntosh’s advanced Autoformers for consistent output.
Ideal For: Serious listeners who want custom control and audio versatility.
5. McIntosh MA12000 Hybrid Integrated Amplifier
Power Output: 350W per channel into 8 ohms Design: Tube preamp + solid-state powerhouse
The flagship McIntosh Labs 2-Channel Integrated Amplifier, the MA12000 combines a 350W solid-state amplifier with a 12AX7 tube preamplifier. It offers 17 inputs, cutting-edge DAC technology, and unmistakable McIntosh build quality.
Ideal For: Audiophiles who want it all—power, detail, flexibility, and iconic presence.
Key Features to Consider When Buying
Power Output: Match the wattage to your speakers’ sensitivity.
Digital Inputs: Choose models with DACs if you stream high-res music.
Tube vs. Solid-State: Tubes offer warmth; solid-state provides precision.
Size and Ventilation: McIntosh amps are heavy and need space to breathe.
Budget: Prices range from ₹4–15+ lakhs depending on model and features.
Final Thoughts
A McIntosh Labs 2-Channel Integrated Amplifier is not just an audio device—it's a statement piece. It promises decades of flawless performance, sophisticated design, and unmatched sonic delivery. Whether you're a purist chasing analog bliss or a modern listener streaming high-res tracks, there’s a McIntosh amp tailored for your dream setup.
0 notes
Text
Analog vs. Digital Dash Clusters: Which Is Better for Modern Vehicles?

When you sit inside a car, one of the first things you notice is the dashboard—the cluster of instruments that gives you key information like your speed, fuel level, engine temperature, and more. It’s the central hub that keeps drivers informed and in control while on the road. For decades, these clusters were entirely analog, featuring physical dials and needles that moved mechanically. They were simple, effective, and familiar to most drivers.
But now, with the rise of advanced technology, smarter vehicles, and higher expectations from drivers, digital dash clusters are quickly taking over. These modern systems use high-resolution screens to display the same essential information, but with greater flexibility, customization, and integration with other vehicle systems.
So, which one is better for modern vehicles—analog or digital? In this blog, we’ll explore the differences between analog and digital dash clusters, the pros and cons of each, and how they affect the overall driving experience. Whether you’re buying a new car, upgrading an old one, or just curious about automotive tech trends, this guide will help you understand what’s best for today’s vehicles and why dashboards are evolving fast.
What is a Dash Cluster?
A dash cluster, or instrument cluster, is the panel in front of the driver that displays key vehicle information. This includes:
Speedometer (vehicle speed)
Tachometer (engine RPM)
Fuel gauge
Temperature gauge
Warning lights (e.g., engine, oil, seatbelt)
There are two main types:
Analog Dash Clusters: Use physical dials and needles to show readings.
Digital Dash Clusters: Use electronic displays—like LCD or TFT screens—to show data in a visual, dynamic format.
Understanding Analog Dash Clusters
Analog dashboards have been standard for most of automotive history. These dashboards display readings using mechanical or electromechanical systems. You’ll see spinning needles, rotating dials, and often a simple digital odometer.
Pros of Analog Dash Clusters
Simplicity and Clarity:Analog gauges are easy to understand at a glance. Most drivers are familiar with them and don’t need time to adjust.
Lower Cost:Cars with analog clusters are generally more affordable. There are fewer electronic components to worry about.
Fewer Distractions:Analog displays are static and consistent, helping drivers focus without too many visual elements changing on-screen.
Durability:Mechanical gauges tend to be more resilient over time. They don’t suffer from dead pixels or software glitches.
Cons of Analog Dash Clusters
Limited Information:Analog clusters show only basic data. They can’t display navigation, media info, or custom alerts.
Lack of Customization:You can’t change how your gauges look or rearrange them. What you see is what you get.
No Integration with Advanced Systems:Modern cars come with advanced features like lane assist, real-time maps, and performance metrics, which analog systems can't support.
Understanding Digital Dash Clusters
A digital instrument cluster replaces traditional dials with a screen—often high-resolution and fully customizable. These clusters are becoming standard in luxury cars and are appearing in mid-range models as well.
Pros of Digital Dash Clusters
Customizable Layouts:Drivers can switch between different display modes—performance mode, eco mode, or navigation view. Some even support Custom Digital Dash settings, allowing you to personalize the screen.
More Data at a Glance:Digital clusters can show additional information like turn-by-turn navigation, media playback, weather updates, tire pressure, and more.
Enhanced Visual Appeal:These clusters often look sleek, modern, and futuristic—great for tech-savvy drivers or those who appreciate good design.
Integration with Vehicle Systems:They work seamlessly with infotainment systems, ADAS (Advanced Driver-Assistance Systems), and other smart features in the car.
Improved Night Driving:Brightness and contrast automatically adjust for better visibility without causing eye strain at night.
Cons of Digital Dash Clusters
Higher Cost:Vehicles with digital displays tend to be more expensive due to the advanced hardware and software involved.
Complexity:The abundance of information and custom settings can be overwhelming, especially for older or less tech-friendly drivers.
Potential for Glitches:As with any screen, software bugs or hardware malfunctions can occur. A faulty digital display could leave the driver with no readable info.
Distraction Risk:With animations, alerts, and switching modes, there’s a risk of drivers focusing too much on the screen instead of the road.
Analog vs. Digital: Side-by-Side Comparison

Which One Is Better for Modern Vehicles?
This depends on how you define “better.” For modern vehicles that aim to provide an advanced driving experience, digital instrument clusters offer greater flexibility, interactivity, and data. They are perfect for tech-driven cars with connected features and intelligent systems.
However, analog clusters still have a place in the market. They are easier to maintain, less prone to tech issues, and provide a nostalgic or minimalist driving feel. Budget vehicles and some classic-style models still favor analog clusters for their simplicity and reliability.
Ultimately, the “better” option depends on your preferences and driving needs:
Daily commuter? Analog might suit you just fine.
Tech lover or long-distance driver? You’ll likely benefit from a digital system.
Car enthusiast? You might prefer a custom digital dash for performance stats, track data, and visual flair.
The Rise of Hybrid Clusters
To bridge the gap, many manufacturers now offer hybrid instrument clusters, combining analog-style dials with a small digital screen in the center. This gives drivers the best of both worlds:
Familiar dials for basic info
A digital section for navigation, calls, or system alerts
Examples include models from Toyota, Hyundai, and Ford, which give buyers flexibility without fully committing to digital.
Use Cases: When Digital Really Shines
1. Navigation Support
Digital clusters often sync with GPS and show maps directly behind the steering wheel, reducing the need to look sideways at the infotainment screen.
2. Electric Vehicles (EVs)
EVs often need to display new types of information—like battery range, charging status, and energy usage. A digital display makes this easier to interpret.
3. Performance Driving
For sports cars or track use, drivers benefit from a custom digital dash that shows lap times, G-forces, and engine performance metrics.
4. Luxury Cars
Premium brands like Mercedes-Benz, BMW, and Audi are making fully digital clusters standard across their lineup to reflect modernity and status.
Future Trends in Dash Clusters
Augmented Reality (AR):Some vehicles now project data onto the windshield using AR, showing speed, navigation, and warnings in the driver’s line of sight.
Voice Integration:Dash clusters will soon be fully voice-enabled, letting you switch views or get information hands-free.
Cloud-Connected Dashboards:Expect real-time traffic, weather, and system diagnostics streamed directly to your display.
Full Personalization Profiles:Your driving profile might auto-load your preferred layout, lighting, and theme the moment you start the car.
Making the Right Choice
If you’re shopping for a car or upgrading your dash, ask yourself:
Do I want modern features or classic simplicity?
Am I comfortable with tech-heavy systems?
Do I need real-time maps, media info, or system alerts?
What’s my budget?
If customization, connectivity, and visual appeal matter most, a digital instrument cluster is the way to go. If simplicity and durability are your top priorities, analog still has its place.
Final Thoughts
The dashboard has come a long way��from a basic panel of gauges to a sophisticated, interactive display that plays a vital role in how we drive. It’s no longer just about speed and fuel—it’s about real-time data, seamless connectivity, and personalized driving experiences. Whether you’re drawn to the classic charm and simplicity of analog dials or excited by the sleek design and functionality of a digital display, there’s an option to suit every driver.
As the automotive industry continues to innovate, digital dash clusters—especially those offering custom digital dash features—are quickly becoming the new norm. With the ability to display a wide range of vehicle data, adapt to driving modes, and even integrate with smartphones and navigation, digital systems offer unmatched flexibility and convenience. However, analog dashboards still appeal to many drivers who appreciate their straightforward layout and traditional feel.
Ultimately, the right dashboard for you depends on your personal preferences, the type of vehicle you drive, and how comfortable you are with modern technology. Whether you're upgrading your current car or purchasing a new one, understanding your dashboard options can help you make a better, more informed choice.
In the end, the best dashboard is the one that enhances your driving experience—offering you confidence, clarity, and control every time you get behind the wheel.
0 notes
Text

Yamaha FZ-07 vs. MT-07: Key Differences Explained
Yamaha's middleweight naked bike carries two names—FZ-07 in North America and MT-07 globally—but are they identical? While mechanically similar, subtle variations exist in styling, features, and regional specifications. This breakdown clarifies what sets them apart.
1. Yamaha MT 07 and FZ 07
FZ-07: Sold in North America (2015–2017) before rebranding as MT-07.
MT-07: Global name used since 2014, adopted worldwide by 2018.
Why the change? Yamaha unified its "MT" (Master of Torque) naming strategy globally.
2. Styling & Color Options
FZ-07 (Early Models)
Round headlight with silver accents.
Analog speedometer (no gear indicator).
Basic color schemes: Matte Silver, Rapid Red, Liquid Graphite.
MT-07 (Current Models)
Angular "bugeye" LED headlight (post-2018).
Digital LCD dash (includes gear position, fuel economy).
Bolder colors: Icon Blue, Tech Black, Fluo Yellow.
3. Lighting System Upgrades
Early FZ-07 models used a single halogen bulb with limited nighttime visibility. The MT-07 refresh introduced Yamaha MT 07 headlight with a distinctive stacked design, improving illumination and modernizing the bike's front profile. Euro-spec MT-07s also added automatic headlight-on (AHO) functionality, while U.S. FZ-07s retained manual control.
4. Suspension & Braking Components
Both share the same non-adjustable 41mm forks and preload-only rear shock, but:
U.S. FZ-07: Softer spring rates for comfort.
Euro MT-07: Firmer setup for aggressive riding.
Brakes are identical (282mm front discs, ABS optional), but ABS was standard on MT-07s in Europe earlier than in North America.
5. Exhaust & Emissions Compliance
FZ-07: Unrestricted exhaust in early U.S. models.
MT-07: Euro 4/5-compliant systems with EXUP valve (post-2020) and catalytic converters.
6. Price & Availability
FZ-07: Discontinued in 2018; used market only.
MT-07: Current model, priced higher due to LED lights, LCD dash, and emissions gear.
Which One Should You Buy?
Choose FZ-07 for budget-friendly, mod-friendly used bikes.
Pick MT-07 for modern tech, better lighting, and warranty support.
Final Verdict: The MT-07 is the evolved version, but the FZ-07 remains a solid, affordable alternative.
0 notes
Text
Nakamichi Dragon The Iconic Cassette Deck That Changed Audio History
Introduction
The Nakamichi Dragon stands as a legendary name in the world of high-end audio. Known for its precision, innovation, and sound quality, the Dragon remains a symbol of audiophile excellence. Whether you're a collector or a music enthusiast, understanding the value and technology of the Nakamichi Dragon can elevate your appreciation of vintage audio gear.
What Makes the Nakamichi Dragon So Special?
Unique Auto Reverse and Azimuth Technology The Dragon was the first cassette deck to offer automatic reverse playback with real-time azimuth correction.
Audiophile-Grade Sound Reproduction With a frequency response and dynamic range ahead of its time, the Nakamichi Dragon offers unmatched analog sound quality.
Design and Build Quality
Luxury Aesthetics and Craftsmanship The deck's sleek, industrial design combined with premium materials makes it visually stunning and durable.
Engineering Behind the Precision From motors to head alignment, every component was engineered for top-tier performance.
Performance and Sound Testing
How the Nakamichi Dragon Handles Playback It delivers ultra-stable playback with minimal wow and flutter, perfect for detailed listening.
Recording Features and Quality Metrics Advanced calibration settings and bias tuning ensure high-fidelity recording across various tapes.
Modern Appeal in a Digital World
Why Nakamichi Dragon Still Matters Today In an age of streaming, the Dragon appeals to analog purists and collectors seeking nostalgic sound quality.
Collectors and Resale Market Trends This deck has become a prized possession, with used units fetching premium prices on the vintage audio market.
Maintenance and Repairs
Common Issues with the Nakamichi Dragon Aging belts, idlers, and motor control systems are typical concerns due to its vintage status.
How to Properly Service or Restore It Using certified technicians and original parts is key to preserving this legendary deck.

Comparison with Other High-End Cassette Decks
Dragon vs. Nakamichi 1000ZXL and CR-7A While all are high-end, the Dragon’s auto-azimuth system gives it a unique performance edge.
How It Compares to Modern Analog Decks Even by today’s standards, few cassette decks can match the Nakamichi Dragon’s sound precision.
Using the Nakamichi Dragon in Today’s Setup
Connecting to Modern Stereo Systems With the right adapters or vintage receivers, it integrates well into today’s audio setups.
Best Practices for Playback and Tape Preservation Using high-quality tapes and cleaning the heads regularly ensures peak performance and longevity.
Tips for Buying a Nakamichi Dragon
Where to Find Authentic Nakamichi Dragon Units Trusted sources include vintage audio dealers, collector forums, and specialized online platforms.
How to Avoid Counterfeits or Faulty Units Always request testing videos, service history, and original documentation when buying secondhand.
Conclusion
The Nakamichi Dragon is more than a cassette deck—it's a symbol of innovation and audio perfection. From its groundbreaking auto-reverse technology to its superior sound quality, it remains a benchmark in analog recording history. Whether you’re rediscovering analog sound or investing in a rare audio gem, the Nakamichi Dragon deserves a place in any serious collection.
Frequently Asked Questions (FAQs)
Is the Nakamichi Dragon still worth buying in 2025? Yes. Despite its age, the Nakamichi Dragon remains highly valued for its audio fidelity and collectible appeal.
How much does a working Nakamichi Dragon cost today? Prices vary, but well-maintained or restored units often sell between $3,000 and $5,000 depending on condition.
Can I use the Nakamichi Dragon with modern speakers? Absolutely. With the right receiver or amplifier, it connects seamlessly to modern audio systems.
How hard is it to maintain the Nakamichi Dragon? Maintenance can be complex and should be handled by experienced technicians due to the precision mechanics involved.
What tapes work best with the Nakamichi Dragon? High-quality Type II (Chrome) or Type IV (Metal) tapes offer the best playback and recording results.
Does Nakamichi still produce the Dragon or similar decks? No, Nakamichi discontinued these high-end cassette decks. All available units are now vintage.
1 note
·
View note
Text
What Sets Apart a Great Electronics Design Engineer and a Top-Tier PCB Designer
Developing cutting-edge products requires more than just a basic understanding of electronics—it demands specialized expertise at multiple levels of the design process. While the roles of an electronics design engineer and a PCB designer often overlap, each discipline has its own set of core skills, priorities, and best practices. Understanding these differences can help companies build stronger teams and ensure both functionality and manufacturability from concept to production.
1: Foundations: Concept vs. Layout
Electronics Design Engineer
System-level thinking: Architects circuits that meet performance, power, and cost targets.
Component selection: An electronics design engineer chooses processors, sensors, power supplies, and other parts based on specifications and availability.
Simulation and validation: Uses SPICE, MATLAB, or custom scripts to verify that circuits behave as intended under various conditions.
PCB Designer
Physical realization: Translates schematic diagrams into board layouts, deciding component placement, routing, and layer stacks.
Signal integrity: Manages trace lengths, impedance control, and differential pairs to prevent timing mismatches and noise.
Thermal management: Integrates heat sinks, copper pours, and thermal vias to maintain reliable operating temperatures.

2: Technical Skills: Breadth vs. Depth
Breadth of Knowledge (Engineer)
A great electronics engineer understands analog and digital domains, power management, RF techniques, and often systems integration. Their toolkit includes:
Circuit simulation tools (e.g., Cadence, LTspice)
Firmware debugging (e.g., JTAG, SWD)
Test equipment (oscilloscopes, spectrum analyzers)
Depth of Expertise (PCB Designer)
A top-tier PCB designer goes deep into board stack-up design, advanced routing strategies, and material characteristics:
PCB CAD software mastery (e.g., Altium Designer, Mentor Xpedition)
High-speed design considerations (e.g., controlled impedance, crosstalk analysis)
3: Collaboration and Workflow
Communication Styles
Electronics engineers often work in cross-functional teams—mechanical, software, and compliance—to validate overall design requirements. Their deliverables include schematics, block diagrams, and simulation reports.
PCB designers interact heavily with manufacturing partners. They must document fabrication drawings, assembly notes, and BOM details clearly to avoid production delays.
By recognizing the strengths each role brings—and fostering close collaboration between them—teams can bring innovative, reliable products to market faster and more efficiently.
Source: https://extrondesignservice.blogspot.com/2025/05/what-sets-apart-great-electronics.html
0 notes
Text
Bimetal Thermometer vs Digital: What to Know
Temperature measurement is critical across industries—from food safety and HVAC systems to manufacturing and scientific research. Choosing the right thermometer type can impact accuracy, reliability, and convenience. Two common options are bimetal thermometers and digital thermometers. Each has its own working principles, benefits, and ideal use cases. This post explores how they compare, helping you make an informed decision.
Understanding Bimetal Thermometers
Bimetal thermometers & thermowell for thermometer operate using the principle of thermal expansion. Inside the thermometer, two different metals are bonded together into a coil or strip. These metals expand at different rates when exposed to temperature changes. As the temperature rises or falls, the coil bends, moving the pointer on a dial to indicate the temperature.
Key Features:
Mechanical Operation: Requires no power source.
Analog Display: Typically shows temperature on a dial.
Durability: Often used in rugged environments.
Temperature Range: Suitable for moderate to high temperatures.
Bimetal thermometers are commonly used in HVAC systems, ovens, and industrial applications where simplicity and reliability are essential. They are less prone to electrical interference and work well in environments where electronics might fail.
Understanding Digital Thermometers
Digital thermometers use electronic sensors, such as thermistors or resistance temperature detectors (RTDs), to measure temperature. These sensors convert temperature into an electrical signal, which is then displayed digitally.
Key Features:
Electronic Operation: Requires battery or external power.
Digital Display: Offers precise, easy-to-read results.
High Accuracy: Especially in controlled environments.
Additional Functions: May include memory storage, data logging, or alarms.
Digital thermometers are often used in laboratories, medical applications, food processing, and anywhere precision and data tracking are vital.
Comparing Bimetal and Digital Thermometers
Here’s a side-by-side comparison of the two types:
Feature
Bimetal Thermometer
Digital Thermometer
Power Requirement
None
Battery or power source needed
Display Type
Analog dial
Digital screen
Accuracy
Moderate
High
Response Time
Slower
Faster
Durability
Very durable
Can be fragile, depending on design
Maintenance
Minimal
May need calibration or battery changes
Cost
Generally lower
Can be higher, depending on features
Data Logging
Not available
Often available
Ideal Use Case
Harsh or remote environments
Precision-required applications
Pros and Cons
Bimetal Thermometers:
Pros:
No need for electricity or batteries
Simple design, easy to use
Withstands tough environments
Cost-effective
Cons:
Lower accuracy than digital types
Harder to read precisely
Slower response time
No advanced features like data logging
Digital Thermometers:
Pros:
High precision and resolution
Fast response
Easy-to-read display
Extra features like alarms or memory
Cons:
Requires power source
May need recalibration
More expensive
Not always suitable for extreme environments
Which One Should You Choose?
Consider a Bimetal Thermometer If:
You need a rugged, maintenance-free device.
Power availability is limited or non-existent.
You’re measuring steady-state temperatures where quick readings are not crucial.
Simplicity is more important than precision.
Consider a Digital Thermometer If:
Accuracy and fast response are critical.
You need to record or log data.
You’re working in a clean, controlled environment.
You want to avoid manual reading errors.
The best choice often depends on your specific application. For example, a food production facility might rely on digital thermometers for their accuracy and compliance with regulations. On the other hand, a mechanical workshop or outdoor boiler system might benefit more from the durability of a bimetal thermometer.
Hybrid Solutions
Some setups use both types of thermometers—bimetal for quick visual checks and digital for precise monitoring or automation. This approach offers redundancy and flexibility, particularly in complex systems.
Final Thoughts
Both bimetal thermometer and digital thermometers play vital roles in modern temperature monitoring. While digital models offer precision and advanced features, bimetal thermometers excel in durability and independence from power sources. Understanding the strengths and limitations of each helps ensure you select the right tool for your needs.
When choosing a thermometer, think about more than just price. Consider the environment, accuracy requirements, maintenance capabilities, and whether additional functions like logging or alarms are important. With the right choice, you’ll get reliable temperature data and avoid costly mistakes or failures.
Read Also: Precision, Durability, and Innovation by Shanghai Jun Ying Instruments

0 notes
Text
Full-Stack Web Developer vs. Front-End vs. Back-End: What's the Real Difference?
In the digital age where almost every business, service, and hobby has an online presence, web development has become one of the most in-demand and fascinating fields. If you're someone considering a career in tech—or simply trying to understand who does what behind your favorite website—you’ve probably come across the terms Full-Stack Web Developer, Front-End Developer, and Back-End Developer.
But what do these roles really mean? And how are they different from one another?
Let’s break it down in simple, human language.
What is a Full-Stack Web Developer?
A Full-Stack Web Developer is like the Swiss Army knife of web development. They have the skills to build both the front end (what users see) and the back end (the server, database, and logic that power everything behind the scenes). In short, they can handle the entire web development process from start to finish.
They’re often hired by startups, small companies, or fast-paced teams where versatility is a must. Imagine someone who can design a beautiful website, code it, connect it to a database, and deploy it online—all by themselves. That’s a Full-Stack Web Developer.
Key Skills of a Full-Stack Web Developer:
HTML, CSS, and JavaScript (front-end basics)
Frameworks like React, Angular, or Vue.js
Server-side languages such as Node.js, Python, Ruby, or PHP
Databases like MySQL, MongoDB, or PostgreSQL
Version control systems like Git
Understanding of APIs, authentication, and security protocols
Front-End Developer: The Visual Storyteller
The Front-End Developer is responsible for what you see and interact with on a website. Their job is to make things look good and feel right.
Every button you click, every animation you admire, and every layout that adapts perfectly on your mobile phone—all of that is built by front-end developers.
They work closely with designers to bring creative concepts to life and ensure the website is both visually appealing and easy to use.
Key Responsibilities:
Writing HTML, CSS, and JavaScript to create website layouts and features
Making websites responsive (mobile-friendly)
Ensuring cross-browser compatibility
Working with UI/UX designers to implement design elements
Using front-end libraries and frameworks (like Bootstrap or React)
Back-End Developer: The Logic Builder
Now let’s talk about the brains behind the operation: the Back-End Developer. These developers build and maintain the server-side components of a website or application.
They write the code that powers database interactions, handles user authentication, processes form submissions, and ensures everything works correctly and securely behind the scenes.
Core Tasks of Back-End Developers:
Writing server-side logic in languages like Node.js, Python, Ruby, Java, or PHP
Connecting the application to a database (SQL or NoSQL)
Creating APIs to connect with front-end systems
Ensuring website security and data protection
Optimizing server performance and scalability
Full-Stack Web Developer vs. Front-End vs. Back-End: What's the Real Difference?
Here’s a simple analogy: Imagine you’re building a house.
Front-End Developer is the architect and interior designer—they make sure the house looks great and functions well for the people living in it.
Back-End Developer is the structural engineer—they make sure the plumbing, electricity, and foundation are strong and reliable.
Full-Stack Web Developer is the all-round builder who can do both. They can lay the bricks and also paint the walls.
Major Differences Summarized:
Front-End: Focuses on visuals and user experience
Back-End: Focuses on data, logic, and server-side functionality
Full-Stack: Bridges both sides—capable of building a complete, end-to-end solution
Why Companies Love Full-Stack Web Developers
In today's fast-paced tech world, companies often look for people who can wear multiple hats. A Full-Stack Web Developer is like a one-person army—especially valuable for startups, agencies, and small businesses.
Advantages of Hiring Full-Stack Web Developers:
They can work on a project from concept to launch
They understand how front-end and back-end interact, reducing miscommunication
They're often more cost-effective for small teams
Which Role is Right for You?
If you enjoy design, creativity, and user experience, Front-End may be your calling. If you're more into logic, data, and problem-solving, Back-End could be the better fit. And if you like having your hands in every part of the web development process, becoming a Full-Stack Web Developer might be the perfect path.
Final Thoughts
Full-Stack Web Developer vs. Front-End vs. Back-End: What's the Real Difference? It all comes down to specialization versus versatility. Each role plays a vital part in building modern web applications.
Whether you're just starting your journey or trying to hire the right talent, understanding the nuances between these roles can help you make better decisions—and maybe even inspire you to become a Full-Stack Web Developer yourself.
0 notes