#App.vue
Explore tagged Tumblr posts
Visit Tumblr Blog
Explore Tumblr blogs with no restrictions, modern design and the best experience.
Last Seen Tumblr Blogs


Fun Fact
The most popular pages on Tumblr are about Minecraft, GIFs, and David J. Peterson.
Text
React vs Vue vs Angular: Which One Should You Use in 2025

Overview: (React)
React continues to dominate the frontend development world in 2025, offering developers unmatched flexibility, performance, and community support. Built and maintained by Meta (formerly Facebook), React has matured into a robust UI library that startups and tech giants use.
What Is React?
React is an open-source JavaScript library designed for building fast, interactive user interfaces, primarily for single-page applications (SPAs). It's focused on the "View" layer of web apps, allowing developers to build encapsulated, reusable components that manage their state.
With the release of React 18 and innovations like Concurrent Rendering and Server Components, React now supports smoother UI updates and optimized server-side rendering, making it more future-ready than ever.
Key Aspects
Component-Based Architecture: React's modular, reusable component structure makes it ideal for building scalable UIs with consistent patterns.
Blazing-Fast UI Updates: Thanks to the virtual DOM, React efficiently updates only what's changed, ensuring smooth performance even in complex apps.
Hooks and Functional Components: With modern features like React Hooks, developers can manage state and lifecycle behavior cleanly in functional components—there is no need for class-based syntax.
Concurrent Rendering: React 18 introduced Concurrent Mode, improving performance by rendering background updates without blocking the main thread.
Massive Ecosystem: From Next.js for SSR to React Native for mobile apps, React integrates with an enormous ecosystem of tools, libraries, and extensions.
Code: App.jsx
Import React from 'react';
function App() {
return (
<div>
<h1>Hello, World! </h1>
</div>
);
}
export default App;
Entry Point: main.jsx
import React from 'react';
import ReactDOM from 'react-dom/client';
import App from './App.jsx';
ReactDOM.createRoot(document.getElementById('root')).render(
<React.StrictMode>
<App />
</React.StrictMode>
);
HTML Template: index.html
<!DOCTYPE html>
<html lang="en">
<head>
<meta charset="UTF-8" />
<title>React App</title>
</head>
<body>
<div id="root"></div>
<script type="module" src="/main.jsx"></script>
</body>
</html>
Overview (Aue)
Vue.js continues to be a strong contender in the frontend framework space in 2025, primarily for developers and teams seeking simplicity without sacrificing power. Created by Evan You, Vue has grown into a mature framework known for its clean syntax, detailed documentation, and ease of integration.
What Is Vue?
Vue is a progressive JavaScript framework for building web user interfaces. Its design philosophy emphasizes incrementality—you can use Vue for a small feature on a page or scale it up into a full-fledged single-page application (SPA).
With Vue 3 and the Composition API, Vue has evolved to offer better modularity, TypeScript support, and reusability of logic across components.
Key Aspects
Lightweight and Fast: Vue has a small footprint and delivers high performance out of the box. It's fast to load, compile, and render, making it an excellent choice for performance-sensitive projects.
Simple Integration: Vue can be dropped into existing projects or used as a complete app framework. It works well with legacy systems and new apps alike.
Easy to Learn: Vue's gentle learning curve and readable syntax make it a top choice for beginners and teams with mixed skill levels.
Composition API: The Composition API in Vue 3 allows for better code reuse and more scalable application architecture, similar to React's hooks.
Code: App.vue
<template>
<div>
<h1>Hello, World! </h1>
</div>
</template>
<script setup>
</script>
<style scoped>
h1 {
color: #42b983;
}
</style>
Entry Point: main.js
import { createApp } from 'vue';
import App from './App.vue';
createApp(App).mount('#app');
HTML Template: index.html
<!DOCTYPE html>
<html lang="en">
<head>
<meta charset="UTF-8" />
<title>Vue App</title>
</head>
<body>
<div id="app"></div>
<script type="module" src="/main.js"></script>
</body>
</html>
Overview (Angular)
Angular, developed and maintained by Google, remains a top choice for enterprise-level applications in 2025. As a fully integrated framework, Angular provides all the tools a development team needs to build large-scale, maintainable apps out of the box.
What Is Angular?
Angular is a TypeScript-based frontend framework that includes built-in solutions for routing, state management, HTTP communication, form handling, and more. Unlike React or Vue, Angular is opinionated and follows strict architectural patterns.
Angular 17 (and beyond) introduces Signals, a new reactive system designed to improve state management and performance by offering more predictable reactivity.
Key Aspects:
All-in-One Framework: Angular offers everything you need—from routing to testing—without needing third-party libraries. This consistency is great for large teams.
Strong Typing with TypeScript: TypeScript is the default language in Angular, making it ideal for teams that prioritize type safety and tooling.
Ideal for Enterprises: With its structured architecture, dependency injection, and modular system, Angular is built for scalability, maintainability, and long-term project health.
Improved Performance: Angular 17 introduces Signals, improving reactive programming, rendering speed, and resource efficiency.
Angular Drawbacks
A steep learning curve due to its complex concepts like decorators, DI, zones, etc.
More verbose code compared to Vue and React.
Slower adoption in smaller teams and startups.
Project Setup:
bash
Copy
Edit
ng new hello-world-app
cd hello-world-app
ng serve
Component: app.component.ts
import { Component } from '@angular/core';
@Component({
selector: 'app-root',
template: `<h1>Hello, World! </h1>`,
styles: [`h1 { color: #dd0031; }`]
})
export class AppComponent {}
Module: app.module.ts
import { NgModule } from '@angular/core';
import { BrowserModule } from '@angular/platform-browser';
import { AppComponent } from './app.component';
@NgModule({
declarations: [AppComponent],
imports: [BrowserModule],
bootstrap: [AppComponent]
})
export class AppModule {}
Entry Point: main.ts
import { platformBrowserDynamic } from '@angular/platform-browser-dynamic';
import { AppModule } from './app/app.module';
platformBrowserDynamic().bootstrapModule(AppModule)
.catch(err => console.error(err));
Which One Should Use
If you're looking for simplicity and speed, especially as a solo developer or on smaller projects, Vue.js is your best bet. Its gentle learning curve and clean syntax make it ideal for quick development and maintainable code.
For scalable, dynamic applications, React strikes the perfect balance. It offers flexibility, a vast ecosystem, and strong community support, making it a top choice for startups, SaaS products, and projects that may evolve over time.
If you're building large-scale, enterprise-grade apps, Angular provides everything out of the box—routing, forms, state management—with a highly structured approach. It's TypeScript-first and built for long-term maintainability across large teams.
In short:
Choose Vue for ease and speed.
Choose React for flexibility and modern workflows.
Choose Angular for structure and enterprise power.
0 notes
Link
In the previous articles we have discussed the benefits of using the Vue.js front-end framework. In this article, we are going to see how we can quickly create and deploy a web application using Vue. Of course, you can create any kind of web application according to your taste and need and the main focus of this tutorial-based article is not on the application itself but mostly on the configuration, installation of the packages, and deployment of the web application. As a result, we will consider the default written script in the App.vue and main.js as it is - You can replace your own code in them - And will work on using Netlify to host our files. If you are not familiar with Netlify we will introduce it in the first section of this article. What is Netlify? As web developers, we worry about how to distribute or serve our applications to customers after completing the main task of creating applications customers can use. To deploy your Vue JS application, you can use a variety of services. These services include GitHub Pages, GitLab Pages, and Bitbucket Pages, as well as Firebase, hosting, Heroku, Digital Ocean, AWS solutions, CloudFront, Now, and Surge, among others. In this article, we will be focusing on Netlify, one of the easiest platforms for setting up your Vue JS application. Using Netlify for your Vue JS web application is one of the fastest ways to deploy your Vue JS application. It is a serverless platform based on Git. In addition, it allows you to build, collaborate and publish your apps quickly. Moreover, Netlify provides solutions that cover cloud lambda functions and even JamStack architecture. It integrates with the most modern web development tools. There are three reasons to use Netlify to deploy your app. First of all, it is super-fast to set up and provides a 3-step process that is easy for even a novice to follow. the second reason is that it is free. And the third reason is that it will continuously deploy changes as soon as you push them. Step by Step Guide: Now that we know what we will do and why we will do it, let's get started. The first step is to make sure you have Vue installed on your operating system. If you have not installed it yet, the command below will do that for you. Coppied to clipboard. npm install -g @vue/cli We can also check the installation success and its version by the following command: Coppied to clipboard. vue --version Now we are ready to create a new project. To do so, you can use the below command: Coppied to clipboard. vue create TestVue It will then create a scaffold in the file location you selected of a Vue JS application based on your default settings. Now switch to the directory that has been created and run the default script created by Vue JS, using the below command. Coppied to clipboard. cd TestVue yarn serve Notice that if you are using npm instead of yarn, you can use the following: Coppied to clipboard. npm run start After that, if everything goes well, you will be able to see the following result in your localhost address given in the terminal:
0 notes
Text
Pinia nedir? Ne için kullanılır?

Bir süre önce iş değiştirdim ve burada kullanılan teknoloji vue js. Bende seneler öncesinde merak edip biraz bakmıştım. Bu vesileyle tekrardan vue yazmaya baslayacağım. Yeni projeye baslarken state management için çözüm ararken artık vuex degil pinia diye bir çözüm olduğunu gördüm. özetle geçelim.
Vue js state management çözümüdür.
Vue js core ekibinin bir üyesi tarafından geliştirilmiştir.
Bu kişi aynı zamanda vue routerda geliştirmiş. Vuex resmi önerilen bir çözümmüş. Şimdi işe vur js documenlarında bu çözüm öneriyor.
5-10 komponentlik bir projeniz varsa bu gerekli değil yani kucuk uygulamaysa state managenment gerek yok
Projenizin büyüme ihtimali varsa önerilir.
kurulum ---
yarn add pinia yada npm install pinia diyerek kuruyorsunuz.
sonrasında main.js de
import { createApp } from 'vue' import { createPinia } from 'pinia' import App from './App.vue' const pinia = createPinia() const app = createApp(App)
app.use(pinia) app.mount('#app')
sonra store.js diye bir dosya oluşturup . şunları ekliyoruz
import { defineStore } from 'pinia' //burada kütüphaneyi dahil ediyoruz
export const useCounterStore = defineStore('counter', { state: () => ({ count: 0, name: 'Eduardo' }), getters: { doubleCount: (state) => state.count * 2, }, actions: { increment() { this.count++ }, }, })
burada bir counter state oluşturduk .
sonra bunu kullanacagımız komponente store.js import edelim
import { useCounterStore } from 'store.js'
const store = useCounterStore() //proda tanımladıgımız magazayı cagırdık.
<template> <h1>{{ counter.count }}</h1>
yukarıda da degeri basmıs olduk. Bu kücük bir örnek. Burada amac bunun bir state yönetim çözümü oldugunu bilmekte. Daha fazlasını dokumanlardan bakın https://pinia.vuejs.org/
0 notes
Text
A Font-Like SVG Icon System for Vue
Managing a custom collection of icons in a Vue app can be challenging at times. An icon font is easy to use, but for customization, you have to rely on third-party font generators, and merge conflicts can be painful to resolve since fonts are binary files.
Using SVG files instead can eliminate those pain points, but how can we ensure they’re just as easy to use while also making it easy to add or remove icons?
Here is what my ideal icon system looks like:
To add icons, you just drop them into a designated icons folder. If you no longer need an icon, you simply delete it.
To use the rocket.svg icon in a template, the syntax is as simple as <svg-icon icon="rocket" />.
The icons can be scaled and colored using the CSS font-size and color properties (just like an icon font).
If multiple instances of the same icon appear on the page, the SVG code is not duplicated each time.
No webpack config editing is required.
This is what we will build by writing two small, single-file components. There are a few specific requirements for this implementation, though I’m sure many of you wizards out there could rework this system for other frameworks and build tools:
webpack: If you used the Vue CLI to scaffold your app, then you’re already using webpack.
svg-inline-loader: This allows us to load all of our SVG code and clean up portions we do not want. Go ahead and run npm install svg-inline-loader --save-dev from the terminal to get started.
The SVG sprite component
To meet our requirement of not repeating SVG code for each instance of an icon on the page, we need to build an SVG “sprite.” If you haven’t heard of an SVG sprite before, think of it as a hidden SVG that houses other SVGs. Anywhere we need to display an icon, we can copy it out of the sprite by referencing the id of the icon inside a <use> tag like this:
<svg><use xlink:href="#rocket" /></svg>
That little bit of code is essentially how our <SvgIcon> component will work, but let’s go ahead create the <SvgSprite> component first. Here is the entire SvgSprite.vue file; some of it may seem daunting at first, but I will break it all down.
<!-- SvgSprite.vue --> <template> <svg width="0" height="0" style="display: none;" v-html="$options.svgSprite" /> </template> <script> const svgContext = require.context( '!svg-inline-loader?' + 'removeTags=true' + // remove title tags, etc. '&removeSVGTagAttrs=true' + // enable removing attributes '&removingTagAttrs=fill' + // remove fill attributes '!@/assets/icons', // search this directory true, // search subdirectories /\w+\.svg$/i // only include SVG files ) const symbols = svgContext.keys().map(path => { // get SVG file content const content = svgContext(path) // extract icon id from filename const id = path.replace(/^\.\/(.*)\.\w+$/, '$1') // replace svg tags with symbol tags and id attribute return content.replace('<svg', `<symbol id="${id}"`).replace('svg>', 'symbol>') }) export default { name: 'SvgSprite', svgSprite: symbols.join('\n'), // concatenate all symbols into $options.svgSprite } </script>
In the template, our lone <svg> element has its content bound to $options.svgSprite. In case you’re unfamiliar with $options it contains properties that are directly attached to our Vue component. We could have attached svgSprite to our component’s data, but we don’t really need Vue to set up reactivity for this since our SVG loader is only going to run when our app builds.
In our script, we use require.context to retrieve all of our SVG files and clean them up while we’re at it. We invoke svg-inline-loader and pass it several parameters using syntax that is very similar to query string parameters. I’ve broken these up into multiple lines to make them easier to understand.
const svgContext = require.context( '!svg-inline-loader?' + 'removeTags=true' + // remove title tags, etc. '&removeSVGTagAttrs=true' + // enable removing attributes '&removingTagAttrs=fill' + // remove fill attributes '!@/assets/icons', // search this directory true, // search subdirectories /\w+\.svg$/i // only include SVG files )
What we’re basically doing here is cleaning up the SVG files that live in a specific directory (/assets/icons) so that they’re in good shape to use anywhere we need them.
The removeTags parameter strips out tags that we do not need for our icons, such as title and style. We especially want to remove title tags since those can cause unwanted tooltips. If you would like to preserve any hard-coded styling in your icons, then add removingTags=title as an additional parameter so that only title tags are removed.
We also tell our loader to remove fill attributes, so that we can set our own fill colors with CSS later. It’s possible you will want to retain your fill colors. If that’s the case, then simply remove the removeSVGTagAttrs and removingTagAttrs parameters.
The last loader parameter is the path to our SVG icon folder. We then provide require.context with two more parameters so that it searches subdirectories and only loads SVG files.
In order to nest all of our SVG elements inside our SVG sprite, we have to convert them from <svg> elements into SVG <symbol> elements. This is as simple as changing the tag and giving each one a unique id, which we extract from the filename.
const symbols = svgContext.keys().map(path => { // extract icon id from filename const id = path.replace(/^\.\/(.*)\.\w+$/, '$1') // get SVG file content const content = svgContext(path) // replace svg tags with symbol tags and id attribute return content.replace('<svg', `<symbol id="${id}"`).replace('svg>', 'symbol>') })
What do we do with this <SvgSprite> component? We place it on our page before any icons that depend on it. I recommend adding it to the top of the App.vue file.
<!-- App.vue --> <template> <div id="app"> <svg-sprite /> <!-- ... -->
The icon component
Now let’s build the SvgIcon.vue component.
<!-- SvgIcon.vue --> <template> <svg class="icon" :class="{ 'icon-spin': spin }"> <use :xlink:href="`#${icon}`" /> </svg> </template> <script> export default { name: 'SvgIcon', props: { icon: { type: String, required: true, }, spin: { type: Boolean, default: false, }, }, } </script> <style> svg.icon { fill: currentColor; height: 1em; margin-bottom: 0.125em; vertical-align: middle; width: 1em; } svg.icon-spin { animation: icon-spin 2s infinite linear; } @keyframes icon-spin { from { transform: rotate(0deg); } to { transform: rotate(359deg); } } </style>
This component is much simpler. As previously mentioned, we leverage the <use> tag to reference an id inside our sprite. That id comes from our component’s icon prop.
I’ve added a spin prop in there that toggles an .icon-spin class as an optional bit of animation, should we ever need. This could, for example, be useful for a loading spinner icon.
<svg-icon v-if="isLoading" icon="spinner" spin />
Depending on your needs, you may want to add additional props, such as rotate or flip. You could simply add the classes directly to the component without using props if you’d like.
Most of our component’s content is CSS. Other than the spinning animation, most of this is used to make our SVG icon act more like an icon font¹. To align the icons to the text baseline, I’ve found that applying vertical-align: middle, along with a bottom margin of 0.125em, works for most cases. We also set the fill attribute value to currentColor, which allows us to color the icon just like text.
<p style="font-size: 2em; color: red;"> <svg-icon icon="exclamation-circle" /><!-- This icon will be 2em and red. --> Error! </p>
That’s it! If you want to use the icon component anywhere in your app without having to import it into every component that needs it, be sure to register the component in your main.js file:
// main.js import Vue from 'vue' import SvgIcon from '@/components/SvgIcon.vue' Vue.component('svg-icon', SvgIcon) // ...
Final thoughts
Here are a few ideas for improvements, which I intentionally left out to keep this solution approachable:
Scale icons that have non-square dimensions to maintain their proportions
Inject the SVG sprite into the page without needing an additional component.
Make it work with vite, which is a new, fast (and webpack-free) build tool from Vue creator Evan You.
Leverage the Vue 3 Composition API.
If you want to quickly take these components for a spin, I’ve created a demo app based on the default vue-cli template. I hope this helps you develop an implementation that fits your app’s needs!
¹ If you’re wondering why we’re using SVG when we want it to behave like an icon font, then check out the classic post that pits the two against one another.
The post A Font-Like SVG Icon System for Vue appeared first on CSS-Tricks.
You can support CSS-Tricks by being an MVP Supporter.
A Font-Like SVG Icon System for Vue published first on https://deskbysnafu.tumblr.com/
2 notes
·
View notes
Photo

How to override App.vue to create page transitions ☞ http://go.codetrick.net/3818e5496d #vuejs #javascript
3 notes
·
View notes
Photo

How to override App.vue to create page transitions ☞ https://bit.ly/2Uzt4BQ #Vue #Gridsome
1 note
·
View note
Photo

How to override App.vue to create page transitions ☞ https://bit.ly/2Uzt4BQ #Vue #Gridsome
1 note
·
View note
Text
Vue JS 2 Tutorial #21 - Nesting Components Examples
Vue JS 2 Tutorial #21 – Nesting Components Examples
[ad_1] Hey gang, in this Vue.js tutorial we’ll create a simple web page by nesting multiple components into the root component. —– COURSE LINKS: + Repo … source [ad_2]
View On WordPress
#App.vue#components#Examples#Nesting#nesting components#root component#tutorial#vue#vue components#vue js#vue js 2#vue js 2 tutorial#vue js 2 tutorial for beginners#vue js tutorial#vue js tutorial for beginners#vuejs#vuejs 2 tutorial#vuejs tutorial#vujs tutorial for beginners
0 notes
Text
Building a full-stack application using Laravel, Vue 3, and Tailwind CSS can be a great choice. Laravel provides a robust backend framework, Vue 3 offers a powerful frontend library, and Tailwind CSS provides a flexible and utility-first CSS framework. Here's a step-by-step guide on how you can set up a full-stack application using these technologies: [tie_index]Setting up Laravel Backend[/tie_index] [padding top="0" bottom="0" right="5%" left="5%"] Step 1: Setting up Laravel Backend Install Laravel by following the official documentation: https://laravel.com/docs/installation Create a new Laravel project using Composer: bashCopy code composer create-project laravel/laravel your-project-name Navigate to the project directory: bashCopy code cd your-project-name Set up the database connection in the .env file. Create the necessary database tables and migrations: bashCopy code php artisan migrate Set up authentication (optional) if you want to add user registration and login features: bashCopy code php artisan make:auth [tie_index]Setting up Vue 3 Frontend[/tie_index] [padding top="0" bottom="0" right="5%" left="5%"] Step 2: Setting up Vue 3 Frontend Install Vue CLI globally (if not already installed): bashCopy code npm install -g @vue/cli Create a new Vue project: bashCopy code vue create client Choose the default preset or manually select features based on your requirements. Navigate to the client directory: bashCopy code cd client Start the development server: bashCopy code npm run serve [tie_index]Integrating Laravel with Vue[/tie_index] [padding top="0" bottom="0" right="5%" left="5%"] Step 3: Integrating Laravel with Vue Open the client folder in your favorite code editor. Update the src/App.vue file with your desired Vue components and layout. Make API requests to the Laravel backend using Axios or any other HTTP client library. For example: javascriptCopy code import axios from 'axios'; export default data() return users: [], ; , mounted() axios.get('/api/users') .then(response => this.users = response.data; ) .catch(error => console.log(error); ); , ; [tie_index]Styling with Tailwind CSS[/tie_index] [padding top="0" bottom="0" right="5%" left="5%"] Step 4: Styling with Tailwind CSS Install Tailwind CSS via npm: bashCopy code npm install tailwindcss Create a tailwind.config.js file in the root directory: bashCopy code npx tailwindcss init Update the client/main.js file to import Tailwind CSS: javascriptCopy code import 'tailwindcss/tailwind.css'; Use Tailwind CSS utility classes within your Vue components to style them. [tie_index]Deploying the Application[/tie_index] [padding top="0" bottom="0" right="5%" left="5%"] Step 5: Building and Deploying the Application Build the Vue project for production: bashCopy code npm run build Configure your Laravel project to serve the Vue app: In your Laravel routes/web.php file, add the following route at the end: phpCopy code Route::view('/any', 'app')->where('any', '.*'); In your Laravel resources/views/app.blade.php file, include the Vue app's production files: htmlCopy code Build and deploy your Laravel project as per your hosting environment. That's it! You've successfully set up a full-stack application using Laravel, Vue 3, and Tailwind CSS. Feel free to customize and extend the application based on your specific requirements.
0 notes
Text
Position of thumbnail in videolightbox

#Position of thumbnail in videolightbox how to#
#Position of thumbnail in videolightbox install#
#Position of thumbnail in videolightbox code#
Set to `true` to avoid scrolling views behind lightbox Time to stop at an image before move on to next image Index of the image that you want to start at Whether to show lightbox or not at the beginning Srcset: '.' // Optional for displaying responsive imagesĪutoplay: true, // Optional: Autoplay video when the lightbox opens Import CSS style require('vue-it-bigger/dist/')Ĭaption: 'caption to display.
#Position of thumbnail in videolightbox how to#
You can simply view App.vue to see how to use vue-it-bigger Then import it in your project at your entry point ( main.js normally) import Vue from 'vue'Īnd use the lightbox: import LightBox from 'vue-it-bigger'
#Position of thumbnail in videolightbox install#
Install the package: npm install vue-it-bigger
All interface elements have a background for better visibility.
Moved thumbnails to the top of the screen.
Moved caption bar and image counter off the media to the bottom of the screen.
When opening the lightbox the media doesn't flicker.
Lightbox opens and closes with a short fade.
Can skip to next / previous media programatically.
All of the graphics (previous, next and close buttons) can be customized via slots.
Can show an HTML enabled caption under each image or video.
Optional thumbnail strip with all of the gallery's media.
Unobtrusive interface that disappears after a few seconds, reappears on mouse activity.
#Position of thumbnail in videolightbox code#
* Copy all code for Video LightBox from the HEAD and BODY tags and paste it on your page in the HEAD tag and in the place where you want to have a gallery (inside the BODY tag). * Open the generated index.html file in any text editor. * Export your LightBox gallery using Video Lightbox app in any test folder on a local drive. blog with embedded video Videolightbox Thumbnail You can paste it in any place on your page where you want to add video popup. Step 4 - Add video embedd pop up vimeo videos inside your own page. To select the location of your project, just click the Browse folders button and choose a different location. So click Yes, then enter a name for your project. It's a good idea to save the project, because that will allow you to change the project in case you decide to do something different with future galleries. The project consists of the videos you choose to put on your website video gallery and all your settings. When you exit Video Lightbox, you'll be asked if you want to save your javascript flv video gallery project. Save your web video gallery as project file. If this website enables anonymous connections, just type in anonymous as the username and your e-mail address as the password. If you do not fill in this information, Video LightBox is unable to connect to your site and thus not able to upload your videos to website. Type in your username and password for the connection. If your web site uses another port, you will have to enter it here. The FTP port is normally located on port 21 thus this has been prefilled for you already. You will have to type in your hostname, e.g. Now type in a meaningful (this is not the actual hostname) name for your site and fill in the FTP details in the appropriate fields. You are able to add a new FTP site by clicking " Edit" to the right of the " Publish to FTP server" drop down list. The FTP Location Manager window enables you to define a number of connections for use when uploading your web site gallery to an FTP. You can also set " Open web page after publishing" option. To select a folder on your hard drive, just click the Browse folders button and choose a location.
0 notes
Photo

VuexをTypeScriptで利用するのに悩んだ https://ift.tt/2MOnODr
概要
Vue.jsをTypeScriptで開発する際にVuexを利用するのにしっくりくる実装方法を模索中で、いくつか方法を試してみました。
GitHubに利用したプロジェクトをUPしています。実際に試してみたい方どうぞ^^
https://github.com/kai-kou/vue-js-typescript-vuex
準備
ここではDockerを利用して環境構築していますが、ローカルで構築してもらってもOKです。
> mkdir 任意のディレクトリ > cd 任意のディレクトリ > vi Dockerfile > vi docker-compose.yml
Dockerfile
FROM node:10.8.0-stretch RUN npm install --global @vue/cli WORKDIR /projects
docker-compose.yml
version: '3' services: app: build: . ports: - "8080:8080" volumes: - ".:/projects" tty: true
> docker-compose up -d > docker-compose exec app bash
コンテナ内
> vue create app Vue CLI v3.0.1 ? Please pick a preset: Manually select features ? Check the features needed for your project: Babel, TS, Vuex, Linter, Unit ? Use class-style component syntax? Yes ? Use Babel alongside TypeScript for auto-detected polyfills? Yes ? Pick a linter / formatter config: TSLint ? Pick additional lint features: Lint on save ? Pick a unit testing solution: Mocha ? Where do you prefer placing config for Babel, PostCSS, ESLint, etc.? In dedicated config files ? Save this as a preset for future projects? No ? Pick the package manager to use when installing dependencies: (Use arrow keys) ❯ Use Yarn Use NPM
コンテナ内
> cd app > yarn serve
これで実装の準備が整いました。
Vue-Cli標準
vue create コマンドでプロジェクトを作成するとsrc直下にstore.tsが作成されているので、そこに実装をいれて利用するパターンです。
stateにcounter ってのを持っていて、それをインクリメントするアクションがあるだけです。
src/store.ts
import Vue from 'vue'; import Vuex from 'vuex'; Vue.use(Vuex); interface State { conuter: number; } export default new Vuex.Store({ state: { conuter: 0, } as State, getters: { getCounter: (state, getters) => () => { return state.conuter; }, }, mutations: { increment(state, payload) { state.conuter += 1; }, }, actions: { incrementAction(context) { context.commit('increment'); }, }, });
App.vueで使ってみます。 超適当ですが、画像にclickイベント定義して、HelloWorldコンポーネントでstateに定義しているcounter を表示してます。
src/App.vue
<template> <div id="app"> <img alt="Vue logo" src="./assets/logo.png" @click="increment"> <HelloWorld :msg="`Welcome to Your Vue.js + TypeScript App ${this.counter}`"/> </div> </template> <script lang="ts"> import { Component, Vue } from 'vue-property-decorator'; import HelloWorld from './components/HelloWorld.vue'; @Component({ components: { HelloWorld, }, }) export default class App extends Vue { private get counter(): number { return this.$store.getters.getCounter(); } private increment(): void { this.$store.dispatch('incrementAction'); } } </script> (略)
ブラウザで確認すると、画像をクリックするとcounterがインクリメントするのが、確認できます。

気になる点
実装はシンプルで良いのですが、規模が大きくなってくると、store.tsが肥大化してくるのが目に見えます。辛い。
this.$store を利用するので、メソッド名などを間違えていても実行時にしかエラーにならないので、せっかくTypeScript使っているのになーです。
src/App.vue
export default class App extends Vue { private get counter(): number { return this.$store.getters.getCounter2(); // 実行時にエラー } private increment(): void { this.$store.dispatch('incrementAction2'); // 実行時にエラー } }
vuex-type-helperを利用する
下記記事で紹介されていたvuex-type-helperを利用してみます。
Vue.js + Vuex + TypeScript を試行錯誤してみた https://logs.utahta.com/blog/2017/09/02/110000
ktsn/vuex-type-helper https://github.com/ktsn/vuex-type-helper
vuex-type-helperとvuex-classってのを追加します。
コンテナ内
> yarn add vuex-type-helper vuex-class
storeの実装を追加します。ここではモジュール化してみます。
> mkdir -pv store2/modules > touch store2/index.ts > touch store2/modules/app.ts
store2/index.ts
import Vue from 'vue'; import Vuex from 'vuex'; import { app } from '@/store2/modules/app'; Vue.use(Vuex); export default new Vuex.Store({ modules: { app, }, });
store2/modules/app.ts
import Vuex, { createNamespacedHelpers } from 'vuex'; import { DefineActions, DefineGetters, DefineMutations } from 'vuex-type-helper'; export interface State { counter: number; } export interface Getters { counter: number; } export interface Mutations { increment: {}; } export interface Actions { incrementAction: {}; } export const state: State = { counter: 0, }; export const getters: DefineGetters<Getters, State> = { counter: (state) => state.counter, }; export const mutations: DefineMutations<Mutations, State> = { increment(state, {}) { state.counter += 1; }, }; export const actions: DefineActions<Actions, State, Mutations, Getters> = { incrementAction({ commit }, payload) { commit('increment', payload); }, }; export const { mapState, mapGetters, mapMutations, mapActions, } = createNamespacedHelpers<State, Getters, Mutations, Actions>('app'); export const app = { namespaced: true, state, getters, mutations, actions, };
利用できるようにmain.tsとApp.vueを編集します。
src/main.ts
import Vue from 'vue'; import App from './App.vue'; -import store from './store'; +import store from './store2';
src/App.vue
import { Component, Vue } from 'vue-property-decorator'; import HelloWorld from './components/HelloWorld.vue'; import { Getter } from 'vuex-class'; import * as app from './store2/modules/app'; @Component({ components: { HelloWorld, }, methods: { ...app.mapActions(['incrementAction']), }, }) export default class App extends Vue { @Getter('app/counter') private counter!: number; private incrementAction!: (payload: {}) => void; private increment(): void { this.incrementAction({}); } } (略)
はい。
気になる点
こちらの利点としてはモジュール化しやすい点と、アクション名を間違えてたときにビルドエラー吐いてくれる点でしょうか。
メソッド名間違い
methods: { ...app.mapActions(['incrementAction2']), },
エラー出してくれる
Argument of type '"incrementAction2"[]' is not assignable to parameter of type '"incrementAction"[]'. Type '"incrementAction2"' is not assignable to type '"incrementAction"'.
getterで間違ってる場合は、ブラウザ側でエラーになります。惜しい。
プロパティ名間違い
@Getter('app/counter2') private counter!: number;
ブラウザでエラー

vuex-classを利用するとActionなんかも以下のような定義ができるけれど、getterと同様にメソッド名間違いがブラウザでしか検知できないので、��妙。
vuex-classでAction定義
@Action('app/incrementAction') private incrementAction!: (payload: {}) => void;
うーん。独自実装いれたらもっとブラウザエラーを回避できそうですが、どこまで実装しようか悩ましいところです。
Vue.js+TypeScriptで開発するときの参考記事まとめ https://qiita.com/kai_kou/items/19b494a41023d84bacc7
元記事こちら
「VuexをTypeScriptで利用するのに悩んだ」
September 20, 2018 at 04:00PM
1 note
·
View note
Text
Razorpay Payment Gateway Integration in Laravel and VueJS 2
In this latest technology world, the combination of Laravel and VueJS is unbeatable and very powerful to make any high-end application that runs smooth. There is an increasing need for e-commerce/content-driven websites. You now need a payment gateway to make easy transactions. So here is the way to integrate Razorpay payment gateway to your Laravel 6/7/8 versions along with VueJS.
Without further ado, let’s get started with the Razorpay Payment Gateway Integration in Laravel and VueJS 2.
Initial Set-Up: Laravel and NPM Dependencies Installation
First of all, you need a fresh Laravel version and node dependencies installed to get started; run the below commands mentioned one by one to install the required stuff.
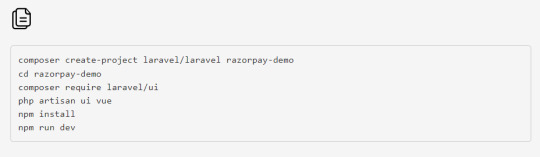
Note: If you face this error “Cannot find module ‘webpack/lib/rules/DescriptionDataMatcherRulePlugin’”

Then in the separate terminal, run the laravel server by using the following command

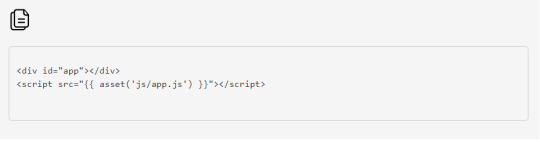
Include /js/app.js and app tag in the view
Your app.js file will be compiled and saved to public/js/app.js. Make sure to also have a root element with an id of the app to your HTML scaffolding. Otherwise, Vue won’t know where to mount the components.
// resources/views/app.blade.php

VueJS Set-Up: Razorpay Payment Gateway Integration in Laravel and VueJS 2
// resources/js/app.js
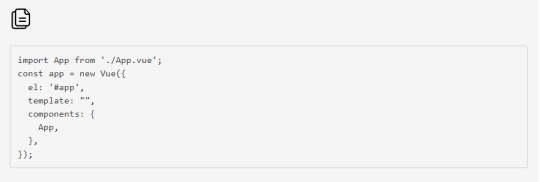
Read more to Create App.vue File
0 notes
Text
Razorpay Payment Gateway Integration in Laravel and VueJS 2
In this latest technology world, the combination of Laravel and VueJS is unbeatable and very powerful to make any high-end application that runs smooth. There is an increasing need for e-commerce/content-driven websites. You now need a payment gateway to make easy transactions. So here is the way to integrate Razorpay payment gateway to your Laravel 6/7/8 versions along with VueJS.
Without further, let’s get started with the Razorpay Payment Gateway Integration in Laravel and VueJS 2.
Initial Set-Up: Laravel and NPM Dependencies Installation
Include /js/app.js and app tag in the view
VueJS Set-Up: Razorpay Payment Gateway Integration in Laravel and VueJS 2
Create App.vue File
Create Razorpay Account
Set-Up and Install Razorpay Package
Create Razorpay Controller
Add Routes
Create Razorpay View
Check Transaction
#razorpay#payment#integration#laravel#vuejs#Transactions#programming#tutorial#softwaredevelopment#technology#agile#development#features
0 notes
Photo

How to override App.vue to create page transitions ☞ https://bit.ly/2Uzt4BQ #Vue #Gridsome
0 notes
Photo

Building a Shopping List App with the Vue Composition API
This article will show how the Vue Composition API is a great way to make your code more readable and maintainable. With the composition API introduced in Vue 3, handling of methods and component state is made more accessible.
The Composition API is a new and optional way of creating and organizing components in a Vue 3 application. It allows reactive component logic to be defined more intuitively by allowing all the code for a specific feature (search, for example) to be grouped. Using the Vue Composition API will make your application more scalable and reusable between several components.
In this article, we’ll build a simple shopping List app with the Vue Composition API.
You can check out a live demo of the app we’re building.
Prerequisites
For this tutorial, you’ll need:
a basic understanding of HTML, CSS, JavaScript, and Vue
a text editor
a web browser
Node.js
Vue CLI
Setting Up the Vue Application
Now let’s start by installing Vue Cli:
npm install -g vue-cli
This command will install Vue globally.
We’ll use the Vue CLI to build a simple application. To do that, open up your terminal and type the following:
vue create vueshoppinglist
After installation, move into the folder using the cd vueshoppinglist and run npm run serve.
This starts a development server that allows you to view your app on localhost:8080.
It’s now time to set up a nice Vue project.
The Vue Composition API
To Install the Composition API from the root of your project, run the following:
npm install --save @vue/composition-api
After successfully installing, we’ll import it into our project.
Modify src/main.vue to register the Composition API globally in our application, so that we can use it in all our application components:
import Vue from 'vue' import App from './App.vue' import VueCompositionApi from '@vue/composition-api' Vue.config.productionTip = false Vue.use(VueCompositionApi) new Vue({ render: h => h(App), }).$mount('#app')
Building Out the User Interface
We’ll need a component that will house the UI of our app. Create a new ShoppingList.vue component in the src/components/ directory and paste the following into the file:
<template> <section> <div class="form-container"> <h2>Add Item</h2> <form> <div> <label>Product name</label> <br /> <input type="text" /> </div> <div> <button type="submit" class="submit">Add Item</button> </div> </form> </div> <div class="list-container"> <ul> <li> Shopping List app <span style="float:right;padding-right:10px;"> <button>X</button> </span> </li> </ul> </div> </section> </template> <script> export default {}; </script> <style scoped> input { width: 20%; height: 30px; border: 2px solid green; } .submit { margin: 10px; padding: 10px; border-radius: 0px; border: 0px; background: green; color: white; } ul li { list-style: none; border: 2px solid green; width: 30%; margin-top: 10px; } </style>
The code snippet above is the initial boilerplate of our UI. We’ll now import our new component ShoppingList.vue to App.vue as shown below:
<template> <div id="app"> <img alt="Shoppingd List" src="./assets/shopping.png"> <shopping-list msg="Welcome to Your Vue.js App"/> </div> </template> <script> import ShoppingList from './components/ShoppingList.vue' export default { name: 'App', components: { ShoppingList } } </script> <style> #app { font-family: Avenir, Helvetica, Arial, sans-serif; -webkit-font-smoothing: antialiased; -moz-osx-font-smoothing: grayscale; text-align: center; color: #2c3e50; margin-top: 60px; } </style>
Continue reading Building a Shopping List App with the Vue Composition API on SitePoint.
by Deven Rathore via SitePoint https://ift.tt/2F241lS
0 notes