#Applique Digitizing
Text

Embroidery has been an integral part of branding and customization in various industries for decades. With advancements in technology, left chest digitizing and jacket back digitizing have become essential processes in the garment and promotional product sectors. These techniques allow for the transformation of digital designs into intricate embroidered logos or artwork, providing a professional and personalized touch to garments and accessories.
0 notes
Text


A short comic book I did for my university project. At the time I had no tablet to draw, so I tried to do everything with the mouse. I couldn’t make any lines properly with it though, my hands were too shaky, so I decided to stylize it as applique
#art#drawing#my art#original art#digital art#artwork#digital aritst#digital drawing#digital illustration#draweveryday#my draws#drawdrawdraw#clip studio paint#clip studio art#clip studio illustration#artists on tumblr#applique#digital arwork
8 notes
·
View notes
Photo

A black dress with triangle rainbow embellishments at the collar, cuffs, waist, and hem.
February 2023
#little black dress#digital art#fashion design#rainbow#applique#dress#long sleeve#wide waistband#madebymaryssa#artists on tumblr#pixel art#fashion illustration
5 notes
·
View notes
Text
Best Applique Digitizing Service in UK

APPLIQUE EMBROIDERY DIGITIZING
The Best Applique Embroidery Digitizing Service in UK. Elevate the customization of your child’s apparel, including shirts, robes, blankets, and onesies, or enhance the aesthetic of your kitchen aprons with precision and sophistication. Experts Punch delivers high-quality digitized files for embroidery, ensuring a seamless and professional touch to your projects. Our services are tailored for machine embroidery, providing not only premium quality but also an economical solution for your customization needs. Experience the epitome of professionalism with Experts Punch’s hassle-free and cost-effective digitizing services.
APPLIQUE WITH ZIG ZAG & SATIN STITCH | APPLIQUE EMBROIDERY DIGITIZING
Secure your fabric with meticulous satin and zigzag stitches, transforming it into captivating appliqué embroidery. Entrust the digitization of your appliqué to the expertise of Experts Punch, offering premium embroidery digitizing services at the most competitive prices. Benefit from swift turnaround times and witness real sewouts that bring your designs to life. Elevate your embroidery projects with the precision and excellence that define Experts Punch’s commitment to quality craftsmanship.
APPLIQUE WITH RUN STITCH
Secure the fabric with a meticulous outline and elevate it to appliqué perfection with Run Stitch detailing. Entrust the digitization of your appliqué to the embroidery expertise of Experts Punch, providing top-notch (Applique Embroidery Digitizing Service in UK) at the most economical prices. Benefit from a rapid turnaround and witness real sewouts that bring your designs to life with precision and finesse. Choose Experts Punch for embroidery digitizing that combines affordability with quality craftsmanship.
0 notes
Text
5 Expert Tips for Perfect Applique Embroidery Digitizing

Here are five expert tips for perfect appliqué embroidery digitizing:
Choose the Right Fabric: Selecting the appropriate fabric is crucial for appliqué embroidery. Opt for fabrics that are stable and don't stretch excessively, such as cotton or felt, to ensure clean and precise stitching.
Simplify Designs: Keep your designs simple and avoid intricate details, especially for appliqué embroidery. Complex designs can be challenging to digitize accurately and may not translate well onto fabric.
Use Quality Software: Invest in high-quality embroidery digitizing software that offers advanced features and customization options. Software programs like Wilcom or Hatch are popular choices among embroidery professionals for their robust capabilities.
Pay Attention to Stitch Density: Adjust the stitch density to suit the type of fabric you're working with. Dense stitching can cause puckering or distortion, especially on lightweight fabrics, so ensure the density is appropriate for the material.
Test and Adjust: Always test your digitized design on a sample piece of fabric before embroidering the final product. This allows you to identify any issues with the digitization, such as stitch tension or alignment, and make necessary adjustments for optimal results.
By following these expert tips, you can achieve flawless appliqué embroidery digitizing for your projects.
0 notes
Text


I was really inspired by @bixels take on human Discord and thought it would go very well with the original design of Ryuk from Death note. (Especially with how similar these characters are)
Unfortunately, i'm too lazy to study digital art so i tried to justify it by using this kind of applique style.
I also forgot about the horns, so now it's a play feature: "look behind this man's handsome facade and see his true devilish nature! Now, in every store, for only 4.99, this draconequus in a mortal coil is yours!"
213 notes
·
View notes
Text
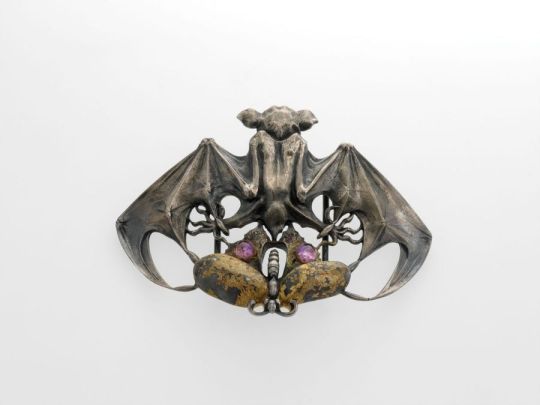
'Day and Night' Belt Applique by Phillipe Wolfers (Belgian, 1858–1929). Dated 1897, materials are silver, vermeil and amethyst, dimensions: h. 9 cm x w. 12.5 cm. Part of the Belgian Royal Museums of Art and History (MRAH), Phillipe and Marcel Wolfers Collection. Digitally archived by the Brussels-Capital Region Inventory of Moveable Heritage, inventory number: D2017.023.001
(Source: collections.heritage.brussels)
#buckle#clasp#jewelry#late 1800s#phillipe wolfers#belgian design#art nouveau#animal motif#bats#butterflies#metal#silver#gilding#stone#amethyst#grey#yellow#purple
119 notes
·
View notes
Text
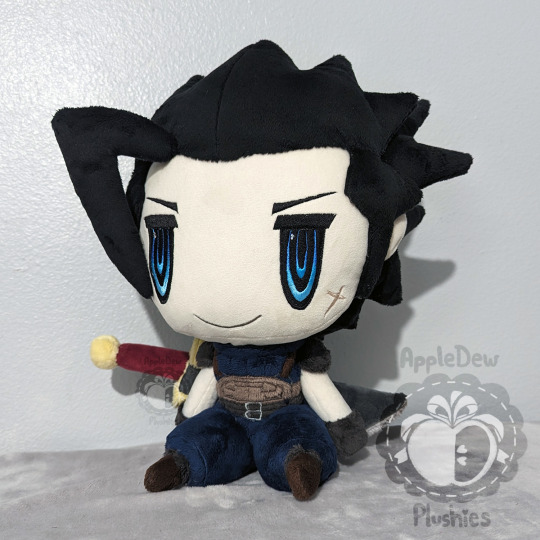
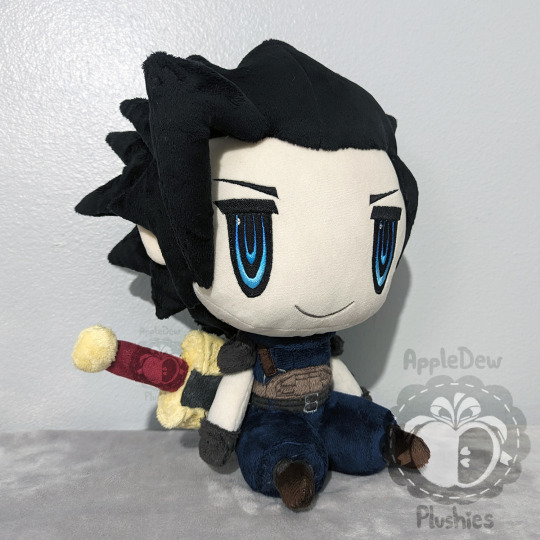
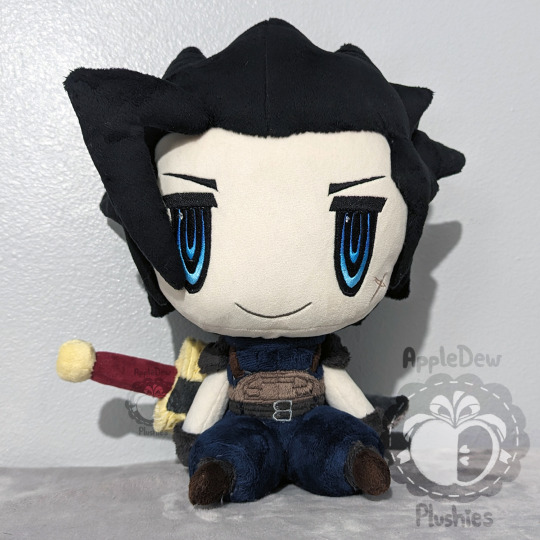

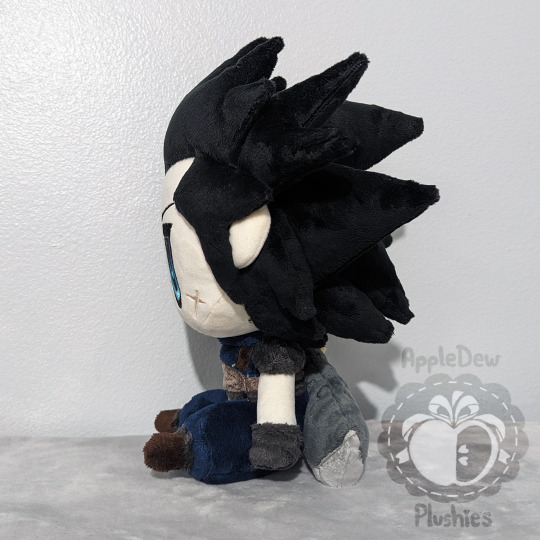
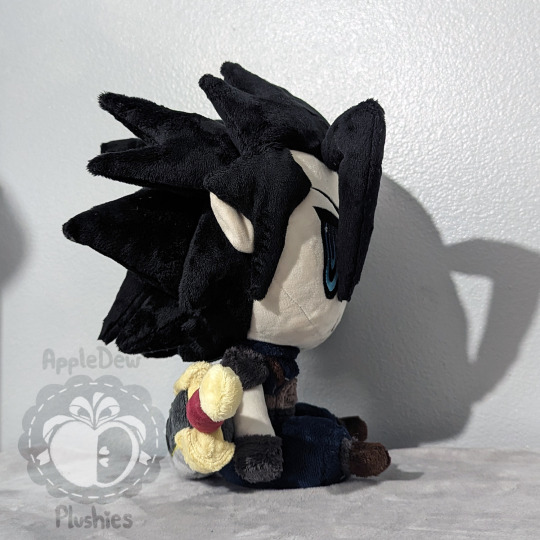
Here is Zack Fair!
Made for an anonymous user!
This plush is made with short pile minky, minky, and custom dyed minky. They sit at about 13 inches from the top base of the hair to the rump. Details are machine embroidered and appliqued. Their sword is not removable. Zack is VERY top heavy but with some readjustments (or support), he can sit up right!
------
I never expected to remake this plush! The original was made a little under 5 years ago! I made a few changes to this little one, biggest changes were in the embroidery of the face, pattern adjustments to the legs and cleaner handsewing on the forehead where the hair meets!
The sword went through the most changes; the original pattern got lost at some point. The pattern as a whole was back when I was still patterning on paper instead of digitally. But I did still have one piece of it, the darkest grey part. I ended up adding more details to the sword than the original, and I'm actually really proud of the results!
I'd love to tinker with this pattern a little more, but we shall see!
--------
Ko-fi: https://ko-fi.com/appledew
Trello queue: https://trello.com/b/FZKSnMo7/plushie-commission-to-do-list
Twitter: https://twitter.com/AppleDew_
Instagram: https://www.instagram.com/apple.dew
Tumblr: http://appledew.tumblr.com/
Furaffinity: http://www.furaffinity.net/user/appledew
deviantArt: https://www.deviantart.com/appledew
12 notes
·
View notes
Text
Left Chest Digitizing and Jacket Back Digitizing
Embroidery has been an integral part of branding and customization in various industries for decades. With advancements in technology, left chest digitizing and jacket back digitizing have become essential processes in the garment and promotional product sectors. These techniques allow for the transformation of digital designs into intricate embroidered logos or artwork, providing a professional and personalized touch to garments and accessories.
Introduction to Left Chest Digitizing
Left chest digitizing refers to the process of converting digital artwork into a format that embroidery machines can understand and replicate onto the left side of a garment, typically around the chest area. This technique is widely used for adding logos, emblems, or text onto apparel such as polo shirts, jackets, and uniforms. Left chest embroidery is favored for its subtlety and sophistication, making it a popular choice for corporate branding and promotional merchandise.
Understanding Left Chest Digitizing
The process of left chest digitizing begins with the selection of a high-quality digital image or artwork. This design is then translated into a stitch file using specialized software that determines the placement, stitch type, density, and color sequence for the embroidery machine to follow. Factors such as design complexity, fabric type, and intended use of the garment are carefully considered during the digitizing process to ensure optimal results.
Benefits of Left Chest Digitizing
Left chest digitizing offers several advantages, including precise replication of intricate designs, cost-effectiveness for bulk orders, and the ability to customize artwork according to specific branding requirements. Additionally, left chest embroidery provides a professional and polished appearance, enhancing the perceived value of the garment or product.
Factors to Consider in Left Chest Digitizing
When digitizing for left chest embroidery, it is crucial to consider the complexity of the design, the type and texture of the fabric, as well as the desired stitch count and density. These factors can significantly impact the quality and clarity of the final embroidered output, emphasizing the importance of meticulous planning and execution.
Techniques for Effective Left Chest Digitizing
To achieve optimal results in left chest digitizing, it is essential to use specialized digitizing software that offers advanced features for design manipulation and customization. Additionally, attention to detail in selecting appropriate file formats, stitch types, and densities is paramount for achieving crisp and durable embroidery on a variety of fabrics.
Common Mistakes to Avoid in Left Chest Digitizing
Some common pitfalls in left chest digitizing include overlooking design scalability, neglecting underlay and pull compensation, and failing to pay attention to small details such as letter spacing and line thickness. By avoiding these mistakes and focusing on precision and accuracy, embroiderers can ensure professional-quality results that meet or exceed client expectations.
Introduction to Jacket Back Digitizing
In contrast to left chest digitizing, jacket back digitizing involves the replication of larger designs or artwork onto the back of garments, such as jackets, hoodies, or vests. This technique allows for more prominent branding opportunities and creative expression, making it a popular choice for sports teams, corporate uniforms, and promotional merchandise.
Understanding Jacket Back Digitizing
The process of jacket back digitizing follows a similar workflow to left chest digitizing but with considerations for larger design dimensions and placement on the garment. Jacket back embroidery often requires specialized techniques for handling intricate details, color blending, and texture replication to achieve visually striking results on larger surfaces.
Benefits of Jacket Back Digitizing
Jacket back digitizing offers several benefits, including the ability to showcase elaborate artwork or logos on a larger scale, increased visibility for branding purposes, and enhanced garment aesthetics. Whether used for corporate branding or personalization, jacket back embroidery adds a touch of professionalism and style to any garment or accessory.
Factors to Consider in Jacket Back Digitizing
When digitizing for jacket back embroidery, factors such as design dimensions, placement on the garment, fabric compatibility, and color blending techniques must be carefully considered. Attention to detail in these areas ensures that the final embroidered output is visually appealing, durable, and aligned with the client's branding objectives.
Techniques for Effective Jacket Back Digitizing
To achieve optimal results in jacket back digitizing, embroiderers can utilize specialized techniques such as appliqué, 3D embroidery, and gradient effects to add depth and dimension to the design. Additionally, proper placement of the design on the garment and attention to stitch direction are crucial for achieving a polished and professional finish.
Common Mistakes to Avoid in Jacket Back Digitizing
Common pitfalls in jacket back digitizing include neglecting design proportionality, overlooking stitch direction on curved surfaces, and disregarding limitations imposed by garment construction or fabric texture. By avoiding these mistakes and focusing on precision and craftsmanship, embroiderers can ensure that jacket back embroidery enhances the overall quality and appeal of the garment.
Conclusion
Left chest digitizing and jacket back digitizing are essential techniques in the realm of embroidery, offering versatile solutions for branding, customization, and personalization. By understanding the intricacies of these processes and employing effective digitizing techniques, embroiderers can consistently deliver high-quality results that meet the demands of clients across various industries.
0 notes
Text
As I was working on Halloween costumes this year, it occurred to me to make a tutorial.
How to machine embroider a T-Shirt:
Start with a really cool design. I created this one in my digitizing software. It's applique, which I'll do a tutorial about later.

You can machine embroider anything that you can fit in or on a hoop, that you can pierce with a needle. You just need the correct stabilizer, or combination of stabilizers.

T-shirts are made of knit fabric. It will stretch, which is part of the point. Stretchy fabrics are comfortable and don't have to be fitted.
So we need two things: we need to stabilize the stretch, but also to provide a stable surface for the stitching.
This can be accomplished with a single piece of heavy weight cut away stabilizer, and some big shops just use that.
I prefer the following:
Flip the shirt inside-out. Cut a piece of stabilizer that is slightly larger than the design you plan to create.

Iron on a piece of no-show mesh fusible stabilizer. (sometimes called power mesh, soft and sheer, or something similar.) It's a strong, sheer cutaway stabilizer but it softens up in the laundry. It doesn't permanently change the hand of the fabric, but it does permanently hold the stitches very nicely.


Next, while the shirt is still inside out, fold it in half and press a crease. This gives you a center line to align later.
You can also use chalk to mark a line about 2" from the seam of the neckline.

If you have a "flatbed" one-needle machine, you will now hoop a piece of tear-away stabilizer in the hoop. Use adhesive to attach the shirt, using the crease for alignment. If you keep it folded in half, you can lay the fold right on the center line of the hoop!
If, like me, you have a multi-needle or commercial machine, you can hoop the shirt with a piece of tear away stabilizer. The tear away stabilizer needs to fit on all sides of the hoop. The fusible no show mesh only needs to be slightly larger than the design.

I didn't get a shot of it, but I also recommend a piece of water soluble topping. (Solvy or similar.) You can just "float' it on top; no need to hoop it.
Embroider your design.
Tear away the removable stabilizer from the back, and peel up the cut away stabilizer gently. Once you've done that, trim the cut away stabilizer, leaving about a half inch all around the design.
Press.

Delight your family with an awesome gift!!
#2023#machine embriodery#machine embroidery tutorial#how to embroider a Tshirt#tutorial#sewblr#crafting#craftblr
20 notes
·
View notes
Text

why do i feel like i'm gonna die in 7 days having drawn this lol
[id: a digital drawing of epel felmier from twisted wonderland. he's drawn wearing a sweet lolita coordinate consisting of a frilly white blouse with long, detachable sleeves, a red and blue jumperskirt with embroidered ribbon accents, a white half-apron with apple applique pockets, red and white socks, and brown calf boots. he's standing with one hand holding his skirt out and the other fist clenched to his chest, side-eying the viewer with a blank expression (as if plotting o.p.'s demise for sticking him in a dress). /end id]
#*feminizes epel at gunpoint* uwu#i know this is a very alpine jsk and epel's meant to be some kinda scandinavian or something but like?? come on#epel felmier#twisted wonderland#twst#twst lolita things#lolita fashion#tesla draws a thing
133 notes
·
View notes
Photo

A black dress with triangle rainbow embellishments at the collar, cuffs, waist, and hem.
February 2023
#little black dress#digital art#fashion design#rainbow#applique#dress#long sleeve#wide waistband#madebymaryssa#artists on tumblr#pixel art#fashion illustration
3 notes
·
View notes
Note
Sorry to bother you, my wife and I are working on making a Leonardo Da Vinci Caster cosplay for her and it's our first cosplay (I'm hoping to do a Warframe one eventually, but actual cloth costumes first)- do you have any advice on how to do details, etc? We seem to have the general shape of things down and already have the cloak & skirts done.
Ooh, Da Vinci! I'd say I'm still winging it with the fabric stuff; my experience is mostly with armor and props. If by details you mean stuff like the applique or something...

I did this for my sister a couple years back. Zhongli cosplay. Made pattern, cut fabric, applied clear nail polish to edges, pinned to base garment, used one of the buttonhole stitch settings on my sewing machine for the edges. I was improvising then. Something similar would probably be done on the stocking details, but I have no experience with stretchy fabric yet.
For the curvy edges... just. Lots of pins so they hold the shape while sewing.
The star patterns on the blue fabric... If it were me I'd just use a stencil and fabric paint if there's nowhere to buy it from. Several layers of it so the yellow looks good. However, the pattern might be generic enough that you can get fabric already printed with it somewhere.
The small accessories hanging from the collar (and hat depending on Ascension level)... small chains with gems... I'm not sure about your access to supplies so you might or might not have to make the gems and stuff yourself. Usually for these I use those rigid PVC sheets. Cut and whittle with cutters as needed. Maybe something like foam clay or resin stuff if you wanna be fancy. Put some thin wire hoops to attach them to the chains. Or you could use EVA foam here as well. 2mm. Also works with the fleur-de-lis looking brooch.
If Props:
Speaking of EVA foam... 5mm and 2mm thickness should cover all kinds of needs in this case. PVC piping for the staff. at this scale (and in most situations), contact cement for gluing together. Measure to proportion, make patterns, trace onto foam, cut with cutters. Make sure the blades are sharp for the smoothest cuts.
You can do a lot of stuff with EVA foam. So much stuff. If you plan on using it more in the future, I suggest getting a heat gun. Smooths out the foam. Priming before painting... I live in Japan so I use something like Zeque... rubber paint similar to Plastidip but much cheaper. For something much easier to get... Wood glue diluted with water, 3-4 coats of it or until satisfactory. Thin layers. Let previous layer dry before next one. This one's not flexible though - if the foam bends, wrinkles can't be avoided.
If Gauntlet:
5mm foam would probably be enough for the base gauntlet... or anything, really. Maybe 2mm foam for the smaller details. The gold filigree and trim detailing on the gauntlet... I'd paint them on. Paint those parts of the gauntlet gold first, have a pattern ready cut from some sticker paper of the details, put those on, paint the rest of the gauntlet. Once the dark blue paint dries, you can remove the sticker paper mask. The green bits... EVA foam as well, the final coat of paint would have to be something very glossy for the shine.
I'm not sure how you want to do the gauntlet. Will you keep the proportions, a.k.a. very big, or shrink it to fit the wearer's hand? Building it to proportion is more complicated - need to build a rig first that's fixed to the wearer's hand with something flexible for the core of the gauntlet digits, and string to pull the gauntlet digits. And since you'd hold the staff with the same hand, your hand has to be outside for the grip. Should be okay if the gauntlet digits are big enough to cover them.
If Staff:
The more organic-looking bits of the staff... I'd use foam clay, but if you think you can do it with just EVA foam, do that instead. Not sure how expensive foam clay is for you. Change your cutting angle to make sloped edges, trim with scissors - whatever works.
For ease of transport you may need to plan on splitting the staff in parts. Maybe the star, then the handle, then the bottom tip? Attachment might be complicated, so you may not want them detachable as well.
Clear plastic acetate for the star. This one's complicated. Hot glue could work. Lots of triangles. I'll just look this up if it were me. Don't be pressured to make this glow.
Not sure what else I can say about this unless you ask for something very specific, but I wish y'all well in this project!
2 notes
·
View notes
Text
10 Tips for Applique designs - Choosing the right fabric

Choosing the right fabric for appliqué designs is crucial for achieving the desired look and ensuring the longevity of your project. Here are some tips to help you select the appropriate fabric:
Cotton Fabric: Cotton is a popular choice for appliqué because it is easy to work with, holds its shape well, and comes in a wide range of colors and prints. Quilting cotton or cotton blends are commonly used for appliqué projects.
Fabric Weight: Consider the weight of the fabric in relation to your project. Lighter weight fabrics are ideal for delicate appliqué designs, while heavier fabrics provide more stability and structure for larger or more intricate appliqués.
Stabilizers: If you're working with lightweight or stretchy fabrics, using stabilizers can help prevent stretching or distortion during the appliqué process. Choose stabilizers appropriate for your fabric type and project needs.
Fusible Interfacing: Fusible interfacing can be applied to the back of appliqué fabrics to add stability and make them easier to work with. It also helps prevent fraying around the edges of your appliqué shapes.
Colorfastness: Ensure that the fabric you choose is colorfast, especially if you plan to wash your appliqué project. Test a small piece of the fabric by washing it to see if the colors bleed or fade.
Contrast: Consider the contrast between your appliqué fabric and background fabric. High contrast can make your appliqué design stand out, while low contrast can create a more subtle effect.
Texture: Experiment with different textures of fabric to add visual interest to your appliqué design. Fabrics like velvet, denim, or silk can create unique effects when used for appliqué.
Pre-washing: It's a good idea to pre-wash your fabrics before starting your appliqué project, especially if you're using multiple fabrics that may shrink at different rates. This helps prevent distortion or puckering after the project is completed.
Test First: Always test your chosen fabric for suitability before committing to your appliqué design. Cut out a small sample of your appliqué shape and test it on a scrap piece of fabric to ensure that it behaves as expected.
Consider the Application: Think about how your appliqué will be used. If it's for a garment, choose fabrics that are comfortable to wear and easy to care for. If it's for a quilt or home decor item, consider durability and washability.
By considering these factors and experimenting with different fabrics, you can choose the right fabric for your appliqué designs and create beautiful, long-lasting projects.
#applique#creative design#logo design#digitising#embroidelicious#digitization#artwork#digitial illustration
0 notes
Text
Free Embroidery Files
Hi all!
In the Google Drive link I have provided you will find machine embroidery files digitalized by yours truly! All the patterns are made to fit a 4 x 4 hoop or larger. Not all files are physically stitched out, but all are run through a realistic simulator. In the drive, any files marked with "*" means they have been tested. If you run across issues with any of the files please PM me so I can fix them! Thanks!
Files named something like "x minky embroidery" means different colours of fabric are appliqued on then satin stiched around to give a clean finish. Files named something like "x full embroidery" means the design is fully stitched out on the embroidery machine, with no need for different colours of fabric.
For all keychains once done embroidering cut a slit in the back of the second fabric piece that was stiched on top so you can flip the finished piece inside out. If you have any questions feel free to reach out.
Happy embroidering!
Many of the files are pokemon from pokemon cafe remix, but if you have suggestions I'm all ears! Just shoot me a PM :]
cavernzone's free embroidery files
4 notes
·
View notes
Text
Today, a customer asked how to make a patch on an embroidery machine.
So

Me, yesterday: "So machine embroidery isn't just plopping the file into the machine and walking away while it does it. Making DecaKumya took me multiple hours of actively doing applique work and babysitting the sewing machine, not counting the time it took me to make the file and select threads."
Me, at work: "Oh yeah, and from this point you plop the design in the machine, and now, as long as you're here when it beeps, you can pretty much go do something else."
Both. Both are true.
(Part a. I know my skill level and am okay challenging myself. I know my customer's skill level and show them things they can handle without worrying. If they get the machine they were looking for, and they like machine embroidery the same way I do, they will eventually be challenging themselves with more complex things
(Part b. Generally, when you're using embroidery files from professionals, they're digitized better than what I do. The file for DecaKumya requires me to repeatedly turn on and off the jump cut feature, because I didn't digitize that properly. It also needs some finessing in a certain spot because I didn't put underlay in the collar because I forgot that the software doesn't do it for you on spiral or radial fills because you're not supposed to use spiral or radial fills in the way that I use them. This means a design from a brand known for making good embroidery files will be much easier to run than the decakumya file is.
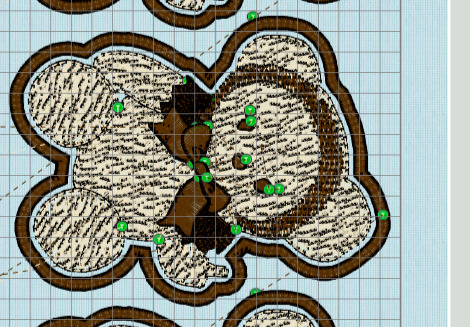
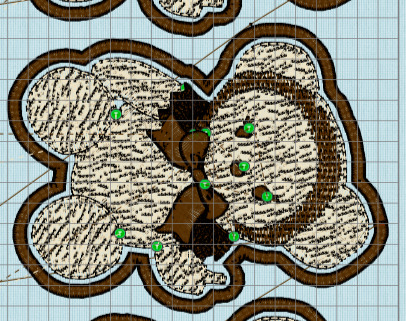
(I literally had to press "delete all trim commands" and then "automatically add trim commands" to make all my problems go away, and for some reason I just did not do that. Each green dot there is a trim command, and you want to have as few of those as possible. The machine likes to fuck up on trim commands, and each trim command uses way more thread than just a jump stitch. So, when you're digitizing things like a proper person, you'll remove those jump cuts or add a bridging stitch under some other stitching, instead of having four cuts in the space of 1/8".
(I also used a really dense spiral fill in the collar to make it look like the crocheted lace they use for her collar IRL. This is cool, except that the software doesn't expect you to ever set the density on a spiral fill to be so dense that you can't see the space under it. It probably surprises no one that I do not use the tools in the software in the specific way they were intended to be used. This means that it doesn't do automatic underlay, which is a web of stitching underneath a filled section. The purpose of underlay to support the fabric before dense topstitching is placed on it. All the dense spiral fill with no lattice underneath to hold it can distort the felt used in the patch, and cause the stitching to sink in. The proper way to handle this is either to DIY your own lattice or to just use the digitizing tools how the good lord intended and not do weird stuff.
says the girl making the patches of a beloved lolita icon giving you a rude hand gesture.
)
30 notes
·
View notes
Last Seen Blogs

catba-psicoint
Sin título

vijikuo
H O M E

lildaddymuffins
lil Daddy Muffins

klaudi1999
˚•‧✩✿Kℓαυ∂ι✿✩‧•˚

sanctifyingsammy
he ain’t heavy, he’s my brotherwife