#Arduino Application
Explore tagged Tumblr posts
Visit Tumblr Blog
Explore Tumblr blogs with no restrictions, modern design and the best experience.
Last Seen Tumblr Blogs


Fun Fact
Hackers stole 65M passwords from Tumblr in 2013.
Text
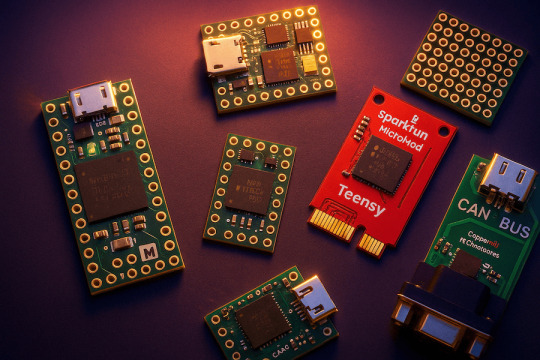
The Ultimate Guide to Teensy Microcontrollers: History, Specs & CAN Bus Applications
Discover the complete history and capabilities of Teensy microcontrollers, from early AVR models to the powerful 4.0 and 4.1 boards. Explore technical specs, software support, and CAN Bus products from Copperhill Technologies.
#teensy#microcontroller#embedded system#classical can#can fd#industrial#automotive#marine applications#arm cortex#ethernet#arduino
0 notes
Text
Importance of Mechatronics Engineering
Mechatronics and IoT Engineering are among the most crucial and rapidly evolving disciplines in modern technology.
Interdisciplinary Innovation: Mechatronics blends mechanical, electrical, computer, and control engineering, enabling the creation of smart, efficient systems. Automation & Robotics: Vital in the design and control of robots, CNC machines, and automated manufacturing systems, helping industries scale up productivity.
Enables development of intelligent systems like drones, autonomous vehicles, and smart appliances. Improves design and manufacturing processes, reducing errors and increasing system reliability.
Real-World Applications: Automotive, Medical devices, Aerospace.
Connectivity & Data-Driven Decisions: IoT connects devices to collect, share, and analyze data, enhancing decision-making in real time.
Smart Infrastructure: Enables smart homes, smart cities, and industrial automation.
youtube
#basic electronics#digital painting#digital circuit#arduino#integrated circuits#integrated esp arduino#iotsolutions#iot platform#iot applications#iotmanagement#iot circuits#iot projects#security systems#artificial intelligence#Youtube
0 notes
Text
#raspberry pi#pico#rp2040#flexible#flexible board#python#c language#circuitpython#arduino#arduino ide#iot applications#innovation#iot#electronics
1 note
·
View note
Text
one section of my origin story is the self hatred i perpetrated after i found out my focused friends got internships at northrop grumman in high school. they only had three spots for students going into engineering. i was intelligent and extremely straight edge so i could get into university for free. but i also spent most of my high school experience figuring out whos house id be sleeping at , going to the beach, getting in fights on field hockey turf because i was very angry all the time, and hiding in the yearbook room listening to grimes and bjork with the other non theatre queers using indesign for our lil art and literary magazines. no one in there was concerned with math or engineering and i was switching between so many loops i was never in one fully. it was an outdoor campus as most schools in southern california tend to be. sprawling and tucked into the canyons. we had a normal quad for white kids and popular black kids, an asian quad for the non brown asians, and the senior lot where all the rich kids hung out on the roofs of their range rovers - the latinos were near the cherry blossoms that never bloomed and everyone else huddled into their respective enclaves across campus. i didnt realize NG manufactured bombs and drones until i complained to my mother than i missed the application deadline and she reminded me san diego is the epicenter of the military industrial complex, have i learned nothing from her over the years (she worked on nuclear weapons out of college before ending up in la and dating the laker). i kept studying engineering stuff in hs and that got me my scholarship (less females in engineering, higher probability of college admission and scholarship, easier to study architecture) but i immediately tweaked upon arriving in ny, first stop was canal st to get both nipples pierced, i was finally free from my household in san diego and could do as i wished. i immediately plummeted into depression, was high all the time, got the boys to do my engineering homework for me, unsure how they did it because they were all addicted to blow, weed and xanax. my gpa suffered but i did just enough to not get my scholarship revoked. i was a huge brat with admissions, i begged them to let me take any art or reading classes, they said no, this is engineering. i got the drugs and infatuation with the city and myself out of my system but all professors were doing their research and i didnt care enough to go to office hours and maneuver the language barrier to learn physics better. it took me three years to switch out of engineering because i felt like a failure once again and overthink everything especially my image to my family, although come to find out, they literally did not care because i went free. still, all indian girls are suppose to be engineers doctors pharmacists with the occassional polisci major if you come from a wealthy family and plan on law school. i fucked off to london and milan instead , enrolled in a class at csm and modeled lol but i returned to finish my degree six months later, and silo’d myself to making installations with msp and arduino and debris i found around jay street metrotech. i missed my high school reunion but i heard theres an olympic size swimming pool now Lmao
9 notes
·
View notes
Text
Raspberry Pi 5 / RP1 chip support for Neopixels with Python bindings coming soon 🎉💡🖥️🌈🐍
Hot off the PIO-presses, our resident Jepler created a Python binding for the Raspberry Pi 5 that lets us use the RP1 chip
on the 5/500 series boards to drive Neopixels using PIO. This is great because we can now use Neopixels
and friends on the latest Pi boards, and we can use any pin because PIO is not limited by underlying peripherals. You do need the latest kernel and firmware, so it is not quite ready for prime-time, but once piolib
is more readily available, we'll be able to have folks test this out.
#raspberrypi5#rp1chip#neopixels#pythonprogramming#pio#raspberrypi#adafruit#technews#opensource#hardwarehacks#makercommunity#ledlights#diyprojects#pythoncode#hardwaredevelopment#microcontrollers#embeddedprogramming#ledart#firmwareupdate#raspberrypilovers#neopixelmagic#techinnovation#raspberrypiupdate#codingcommunity#makerspace#iotprojects#diyhardware#ledprogramming#technologynews#pythonista
10 notes
·
View notes
Text
SERVO DISTANCE INDICATOR USING ARDUINO UNO
INTRODUCTION
Distance measurement is a fundamental concept in various fields, including robotics, automation, and security systems. One common and efficient way to by emitting sound waves and calculating the time it takes for the waves to reflect back from an object, allowing accurate measurement of distance without physical contact.
In this project, we will use an HC-SR04 Ultrasonic Sensor in conjunction with an Arduino microcontroller to measure the distance between the sensor and an object. The sensor emits ultrasonic waves and measures the time it takes for the waves to return after reflecting off the object. By using the speed of sound and the time measured, the distance is calculated. This simple yet powerful setup can be applied in a variety of real-world applications such as obstacle detection in robots, parking assistance systems, and automatic door operations.

WORKING PRINCIPLE
1. Servo Movement: The servo motor rotates to different angles (0° to 180°). The ultrasonic sensor is mounted on top of the servo and moves with it.
2. Distance Measurement: At each position, the ultrasonic sensor sends out an ultrasonic pulse and waits for the echo to return after hitting an object. The Arduino records the time taken for the echo to return.
3. Distance Calculation: The Arduino calculates the distance to the object based on the time recorded and the speed of sound (0.0343 cm/µs).
4. Servo as Indicator: The servo motor's position provides a physical indication of the direction of the detected object. As the servo moves across a range of Image map out objects in different directions based on distance.
5. Visual Output: The Arduino can also send the distance and angle data to the serial monitor, creating a real-time visual representation of the detected object positions.
APPLICATIONS
1. Autonomous Robots and Vehicles
2. Radar Systems
3. Parking Assistance
4. Security Systems
5. Environmental Scanning in Drones
6. Warehouse Management and Automation
7. Industrial Automation
8. Robotic Arm Guidance
9. Collision Avoidance in UAVs/Robots
10.Interactive Displays or Art Installations
11.Smart Doors and Gates
CONCLUSION
The Servo Distance Indicator Project successfully demonstrates the integration of an ultrasonic sensor and a servo motor to create an effective distance measurement an object, the project provides real-time feedback through the movement of a servo motor, which indicates the measured distance via a visual representation.
7 notes
·
View notes
Text
5 Arduino Courses for Beginners
Robotics, automation, and do-it-yourself electronics projects have all been transformed by Arduino, an open-source electronics platform. Entering the world of Arduino may seem intimidating to novices, but the correct course may make learning easier and more fun.
Arduino Step-by-Step: Getting Started (Udemy)
This extensive Udemy course is designed for complete novices. It provides an overview of Arduino's fundamentals, describing how the platform functions and assisting students with easy tasks like using sensors and manipulating LEDs.
Key Highlights:
thorough explanations for novices.
practical projects with practical uses.
instructions for configuring and debugging your Arduino board.
Introduction to Arduino (Coursera)
The main objective of this course is to introduce Arduino programming with the Arduino IDE. It goes over the fundamentals of circuits, programming, and connecting various parts, such as motors and sensors.
Key Highlights:
instructed by academics from universities.
access to a certificate of completion and graded assignments.
Concepts are explained in length but in a beginner-friendly manner.
Arduino for Absolute Beginners (Skillshare)
For those who want a quick introduction to Arduino, this brief project-based course is perfect. You'll discover how to configure and program your Arduino board to produce interactive projects.
Key Highlights:
teachings in bite-sized chunks for speedy learning.
simple projects for beginners, such as sound sensors and traffic light simulations.
Peer support and community conversations.
Exploring Arduino: Tools and Techniques for Engineering Wizardry (LinkedIn Learning)
This course delves deeply into Arduino programming and hardware integration, drawing inspiration from Jeremy Blum's well-known book. It is intended to provide you with the skills and resources you need to produce complex projects.
Key Highlights:
advice on creating unique circuits.
combining displays, motors, and sensors.
Code optimization and debugging best practices.
Arduino Programming and Hardware Fundamentals with Hackster (EdX)
This course, which is being offered in partnership with Hackster.io, covers the basics of Arduino hardware and programming. You may experiment with real-world applications because it is project-based.
Key Highlights:
Course materials are freely accessible (certification is optional).
extensive robotics and Internet of Things projects.
interaction with teachers and other students in the community.
Arduino is a great place to start if you want to construct a robot, make a smart home gadget, or just pick up a new skill. The aforementioned courses accommodate a variety of learning preferences and speeds, so every novice can discover the ideal fit. Select a course, acquire an Arduino starter kit, and set out on an exciting adventure into programming and electronics!
To know more, click here.
2 notes
·
View notes
Text
The PAJ7620 is a highly capable gesture recognition sensor. It can detect a wide range of gestures such as up, down, left, right, forward, backward, and more. The sensor uses an array of infrared LEDs and a photodiode array to detect motion in its field of view. It communicates with a microcontroller (like Arduino) over the I2C interface, making it a versatile option for many gesture-controlled applications.
1 note
·
View note
Text
Arduino Mega 2560 Starter Learning Kit
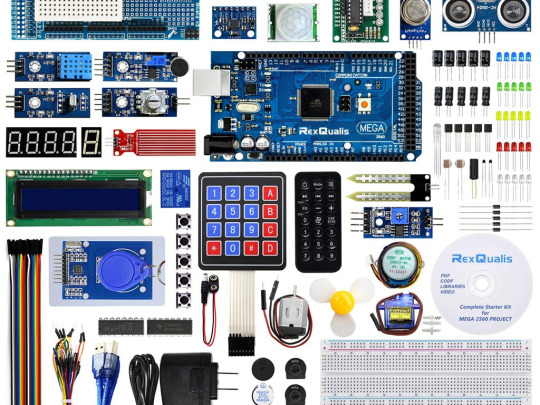
The AINOW Arduino Mega 2560 Starter Learning Kit is an ideal choice for those interested in microcontrollers and electronic components. It includes instructional videos and a guidebook to make learning easy. The tutorials cover basic coding using Arduino software and operating electronic devices. Previous experience is not necessary as the kit teaches coding and working with electronics from the ground up. And, there’s no need for soldering skills – simply plug and play for a fun learning experience.
The main idea is that repetition should be avoided when rephrasing the following paragraph with the same tone.
A fantastic set suitable for all levels, from novice to advanced.
These components have versatile applications and are built for durability.
The kit contains a diverse range of materials to create a multitude of Endless Projects.
An excellent method to gain knowledge on sensors of both analog and digital varieties.
The characteristic is a prominent aspect that sets it apart and makes it stand out.
This kit is ideal for both novices and seasoned professionals in this particular area.
Our selection includes both Analog and Digital Sensors, perfect for those looking to make their own DIY projects.
Discovering the world of microcontrollers is a breeze with Arduino Mega 2560.
Our resources include a User Guide, Codes/Sample Programs & Reference books/Video Tutorials, and other valuable materials.
3 notes
·
View notes
Text
Essential Electronic Items for IoT and Electronics Enthusiasts
Are you diving into the world of Internet of Things (IoT) and electronics? Whether you are a seasoned engineer or simply beginning out, having a stable list of essential components is key to bringing your initiatives to existence. Here’s a curated list of electronic objects that each maker and tech enthusiast ought to have of their toolkit:
1. Microcontrollers
Arduino Uno: Great for novices and versatile for diverse projects.
Raspberry Pi: Ideal for more complex duties and going for walks complete operating structures.
ESP8266/ESP32: Perfect for wireless communication and IoT projects.
2. Sensors
DHT22: For temperature and humidity readings.
PIR Sensor: Useful for movement detection.
Ultrasonic Distance Sensor: Measures distances with high accuracy.
3. Actuators
Servo Motors: For unique manage in robotics and mechanical structures.
Stepper Motors: Ideal for applications requiring particular movement.
Solenoids: Good for growing mechanical actions and locks.
4. Displays
LCD Display: Useful for showing records and debugging.
OLED Display: Compact and clean for exact photographs and texts.
5. Connectivity Modules
Bluetooth Module (HC-05/HC-06): For short-range wi-fi communication.
Wi-Fi Module (ESP8266): Connects gadgets to the internet.
GSM Module: Enables verbal exchange over mobile networks.
6. Power Supplies
Battery Packs: Various types for transportable electricity.
Voltage Regulators: Ensure solid voltage ranges in your circuits.
Power Banks: Handy for charging and powering devices on the move.
7. Prototyping Tools
Breadboards: Essential for prototyping with out soldering.
Jumper Wires: For making connections on breadboards.
Soldering Kit: For everlasting connections and circuit meeting.
eight. Additional Components
Resistors, Capacitors, and Diodes: Fundamental for circuit design and stability.
Transistors: Key for switching and amplification tasks.
Connectors and Switches: For interfacing and controlling circuits.
By preserving these objects handy, you'll be nicely-prepared to address a huge range of IoT and electronics projects. Whether you're constructing smart domestic devices, wearable tech, or computerized structures, having the right additives can make all the difference.
#IoT#Electronics#Arduino#RaspberryPi#ESP32#Sensors#Actuators#Displays#ConnectivityModules#PowerSupplies#Prototyping#Tech#DIY#Makers#Engineering#ElectronicComponents#TechProjects
2 notes
·
View notes
Text
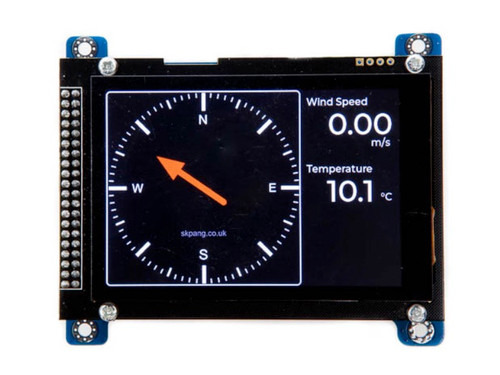
Exploring the Capabilities of the Teensy NMEA 2000 Board with 3.5” Touch LCD
Discover the Teensy 4.0 NMEA 2000 Board with 480x320 3.5” Touch LCD, a high-performance marine electronics solution for real-time data monitoring, navigation, and vessel automation. Perfect for DIY projects and professional applications.
1 note
·
View note
Text
Arduino Due vs. Mega: A Comprehensive Comparison
What is Arduino Due and Mega?
The Arduino platform has revolutionized the world of DIY electronics, providing hobbyists and professionals alike with versatile and powerful microcontroller boards. Among the myriad of options, the Arduino Due and Arduino Mega stand out for their advanced features and robust performance. The Arduino Due, introduced in 2012, is the first Arduino board based on a 32-bit ARM core microcontroller, the Atmel SAM3X8E. In contrast, the Arduino Mega, built around the 8-bit ATmega2560 microcontroller, is known for its abundant I/O pins and memory. Understanding the differences between these two boards can help in selecting the right one for specific projects, enhancing both functionality and efficiency.
Processing Power and Performance
The processing capabilities of the Arduino Due and Mega are distinctly different, primarily due to their core microcontrollers. The Arduino Due, with its 32-bit ARM Cortex-M3 processor running at 84 MHz, offers significantly higher processing power compared to the Arduino Mega's 8-bit ATmega2560, which operates at 16 MHz. This difference in architecture and clock speed means that the Due can handle more complex calculations and tasks faster and more efficiently than the Mega. For projects requiring high computational power, such as real-time data processing or handling multiple sensors simultaneously, the Due is the superior choice. However, for simpler tasks, the Mega's processing power may suffice.
Memory and Storage Capabilities
Memory is another critical aspect where the Arduino Due and Mega diverge. The Arduino Due is equipped with 512 KB of flash memory for code storage and 96 KB of SRAM for data. On the other hand, the Arduino Mega has 256 KB of flash memory and 8 KB of SRAM. Additionally, the Due features a Direct Memory Access (DMA) controller, which allows for efficient memory operations, freeing up the CPU to handle other tasks. These memory enhancements make the Due more suitable for applications requiring large codebases and significant data handling, such as advanced robotics or sophisticated control systems. The Mega, with its more modest memory, is ideal for less demanding applications.
Input/Output Capabilities and Expansion
Both the Arduino Due and Mega are renowned for their extensive input/output (I/O) capabilities, yet they cater to different needs. The Mega boasts a whopping 54 digital I/O pins, 16 analog inputs, and 4 UARTs, making it ideal for projects that require multiple sensors, actuators, or communication interfaces. The Due, while offering fewer digital I/O pins at 54, includes 12 analog inputs and 4 UARTs, along with additional features like two DAC outputs for analog signal generation and enhanced PWM capabilities. These features provide the Due with superior analog output capabilities, making it suitable for applications like audio processing or advanced signal generation.
Power Consumption and Compatibility
Power consumption and compatibility are practical considerations when choosing between the Arduino Due and Mega. The Due operates at 3.3V logic levels, which makes it more power-efficient than the Mega, which uses 5V logic levels. This lower voltage operation is beneficial for battery-powered projects where energy efficiency is crucial. However, the 3.3V logic also means that the Due is not directly compatible with 5V components without level shifters. The Mega, with its 5V logic, offers broader compatibility with existing Arduino shields and components, making it a versatile choice for a wide range of projects. Understanding these power and compatibility nuances can help in making an informed decision based on the project's specific requirements.
2 notes
·
View notes
Text
ESP32 Power Logger with 26V Power Range and Expandable I/O for Power Monitoring
#esp32#esp32 power logger#power logger#power monitoring#electronics#innovation#iot#iot applications#projects#smart home automation#smart home technology#energy management#energy efficiency#solar power system#solar power projects#industrial automation#micropython#circuitpython#arduino#breakout#esp32 microcontroller
0 notes
Text
EXG Synapse — DIY Neuroscience Kit | HCI/BCI & Robotics for Beginners
Neuphony Synapse has comprehensive biopotential signal compatibility, covering ECG, EEG, EOG, and EMG, ensures a versatile solution for various physiological monitoring applications. It seamlessly pairs with any MCU featuring ADC, expanding compatibility across platforms like Arduino, ESP32, STM32, and more. Enjoy flexibility with an optional bypass of the bandpass filter allowing tailored signal output for diverse analysis.
Technical Specifications:
Input Voltage: 3.3V
Input Impedance: 20⁹ Ω
Compatible Hardware: Any ADC input
Biopotentials: ECG EMG, EOG, or EEG (configurable bandpass) | By default configured for a bandwidth of 1.6Hz to 47Hz and Gain 50
No. of channels: 1
Electrodes: 3
Dimensions: 30.0 x 33.0 mm
Open Source: Hardware
Very Compact and space-utilized EXG Synapse
What’s Inside the Kit?:
We offer three types of packages i.e. Explorer Edition, Innovator Bundle & Pioneer Pro Kit. Based on the package you purchase, you’ll get the following components for your DIY Neuroscience Kit.
EXG Synapse PCB
Medical EXG Sensors
Wet Wipes
Nuprep Gel
Snap Cable
Head Strap
Jumper Cable
Straight Pin Header
Angeled Pin Header
Resistors (1MR, 1.5MR, 1.8MR, 2.1MR)
Capacitors (3nF, 0.1uF, 0.2uF, 0.5uF)
ESP32 (with Micro USB cable)
Dry Sensors
more info:https://neuphony.com/product/exg-synapse/
2 notes
·
View notes
Text
Thanks for the tag, @a-fox-studies! I don’t really know that many codeblrs, so I’m leaving this as an open tag for others.
At what point in your life did you decide that the world of computers was the one for you?
I wanted to make games long before I knew what it takes to make one. All I knew is that I enjoyed games, and that I wanted to make something enjoyable too. So I guess, from the start, I was going to get hooked to computers one way or another. Knowing past me, though, I would not have gone this path if I found programming too hard, so the incremental steps I was given was a factor.
Back in 8th grade, we had to take C++ in our computer subject. It was just a general computer subject but it was nothing like I had taken in earlier years. We didn’t glance at any of the STL aside from strings and iostream (for stdin/stdout), so it was really enjoyable for me. Plus, we were spared from pointers because we didn’t have enough time for the school year to discuss any of those.
The next year, I was invited by our teacher to join the robotics team. We didn’t do well, but I liked that time of my studies. We went to numerous seminars, all of which I enjoyed (especially that time where we controlled a robot with our phones; that was a blast making it roam all around the room). I tried to make a piezo electric speaker sing, but I didn’t like how the piezo sounded, so I stopped after a few notes. We tried to make an RFID reader work for a competition. It worked in practice but, without changing anything in our setup, failed during presentation. Thankfully, it wasn’t an on-stage presentation, so only the judges (and the teams beside us) saw us trying to figure out why our working code wasn’t working.
I tried C# on my own time. I asked our computer teacher about the programming language we use for the Arduino and he said “C#”. In hindsight, he probably didn’t know as well, but thought that it looked similar to C#. It challenged me, which was my main motivation for learning. However, it wasn’t too hard that I dropped it. My previous experience with C (C++ implies STL) meant that I knew the syntax. My experience with Arduino meant that strange problems weren’t that strange to me anymore. Plus, using Visual Studio made it easy for me to transfer my idea to code.
From then on, I knew that I wanted to pursue this path. I continued learning C#, explored other languages, and made some of my own packages, modules, and applications. I have yet to create a game of my own, but that will come when I can finally force myself to make sprite assets.
7 notes
·
View notes
Text
Top 10 Scale Gifts for the Gadget Enthusiast
Finding the ideal present for the gadget lover in your life may be thrilling and difficult at the same time because technology is continuously changing, and gadgets are becoming an essential part of our lives. The appropriate gadget may make their world come alive, whether it's for a birthday, an anniversary, or to express gratitude. We've put together a list of Top 10 Scale Gifts for the Gadget Enthusiast to aid you in your search for the perfect present.

High-end headphones
There's nothing quite like immersing yourself in music or podcasts with a pair of high-quality headphones. For the audiophile in your life, consider options like the Bose QuietComfort 35 II or Sony WH-1000XM4. These headphones not only offer exceptional sound quality but also come with noise-canceling features, making them perfect for music lovers on the go.
Smartwatch or Fitness Tracker
Smartwatches and fitness trackers have become more than just timekeeping devices; they're personal assistants for tracking health and staying connected. Due to their abundance of health and fitness capabilities, app compatibility, and stylish designs, the Apple Watch Series 7 and Fitbit Versa 3 are both fantastic options.
Drone
Drones have taken the world by storm, offering a unique perspective and endless possibilities for creativity. DJI's Mavic Air 2 and Skydio 2 are top-notch options, equipped with high-resolution cameras, obstacle avoidance, and impressive flight capabilities. A drone is an excellent gift for both tech enthusiasts and photography lovers.
Virtual Reality (VR) Headset
Step into another world with a VR headset. Oculus Quest 2 and Valve Index provide immersive gaming experiences and access to virtual reality applications. VR headsets are perfect for those who crave a new level of entertainment and want to explore virtual realms.
High-Performance Laptop
A powerful laptop is essential for the tech enthusiast who wants power on the run. Choose laptops are notorious for their exceptional speed, stunning defenses, and portability, similar as the MacBook Pro or Dell XPS 15. These laptops work well for a variety of operations, including videotape editing and programming.
Smart Home Devices
Transforming a house into a smart home is a trend that continues to gain momentum. Smart home devices like Amazon Echo, Google Nest, and Philips Hue lights offer convenience and automation. They allow control over lights, music, security, and more with just a voice command or a tap on your smartphone.
Streaming Device
Cutting the cord has never been more accessible with streaming devices like Roku Ultra and Apple TV 4K. These devices offer access to a vast library of streaming services, including Netflix, Disney+, and Hulu, in stunning 4K quality. Streaming devices are perfect for binge-watchers and movie buffs.
High-Resolution Camera
Capture life's moments in stunning detail with a high-resolution camera. The Sony Alpha a7R IV and Canon EOS R5 are recognized for their superb image quality and adaptability. For photographers who want to capture landscapes, portraiture, or wildlife, these cameras are perfect.
Gaming Console or Accessories
Gaming is a passion for many gadget enthusiasts. Consider the latest gaming consoles like the PlayStation 5 or Xbox Series X. Enhance the gaming experience with accessories like gaming chairs, mechanical keyboards, or gaming headsets.
Tech Toolkit or DIY Electronics Kit
For those who love to tinker and build, a tech toolkit or DIY electronics kit is the perfect gift. Arduino Starter Kits and Raspberry Pi Bundles provide endless opportunities for creating gadgets, robots, and electronic projects.
Conclusion
In conclusion, it need not be difficult to select the ideal present for a gadget fanatic. With the top 10 scale gifts we've outlined, you can surprise your loved one with a thoughtful and exciting present that aligns with their passion for technology. Remember, the best gift is one that shows you know their interests and cater to their tech-savvy side.
2 notes
·
View notes