#Automation testing Tutorial
Explore tagged Tumblr posts
Visit Tumblr Blog
Explore Tumblr blogs with no restrictions, modern design and the best experience.
Last Seen Tumblr Blogs


Fun Fact
Tumblr was created by web developers David Karp and Marco Arment.
Text
Automation Testing: Building an Effective Test Suite 2023
Automation testing has become an integral part of software development, offering numerous benefits such as faster execution, repeatability
0 notes
Text
#automation testing#automation testing for beginners#automation testing tutorial#automationtestingtutorial#automation#testing#testing tutorial#tutorial for automation#rahul shetty academy#bangalore#India#karnataka
0 notes
Text
AI Automated Testing Course with Venkatesh (Rahul Shetty) Join our AI Automated Testing Course with Venkatesh (Rahul Shetty) and learn how to test software using smart AI tools. This easy-to-follow course helps you save time, find bugs faster, and grow your skills for future tech jobs. To know more about us visit https://rahulshettyacademy.com/
#ai generator tester#ai software testing#ai automated testing#ai in testing software#playwright automation javascript#playwright javascript tutorial#playwright python tutorial#scrapy playwright tutorial#api testing using postman#online postman api testing#postman automation api testing#postman automated testing#postman performance testing#postman tutorial for api testing#free api for postman testing#api testing postman tutorial#postman tutorial for beginners#postman api performance testing#automate api testing in postman#java automation testing#automation testing selenium with java#automation testing java selenium#java selenium automation testing#python selenium automation#selenium with python automation testing#selenium testing with python#automation with selenium python#selenium automation with python#python and selenium tutorial#cypress automation training
0 notes
Text
Netflix's Chaos Monkey: Embracing Failure for Resilience
Chaos Monkey is an innovative tool developed by Netflix as part of their Simian Army suite of testing tools. It deliberately introduces failures into your cloud infrastructure to test system resilience and recovery capabilities. Chaos Monkey works by randomly terminating instances in your production environment. This might sound counterintuitive, but by forcing failures to occur, it helps…
#AWS#chaos engineering#chaos monkey#cloud infrastructure#cloud resilience#devops#disaster recovery#failure injection#fault tolerance#high availability#implementation tutorial#infrastructure automation#infrastructure testing#microservices testing#netflix chaos monkey#netflix open source#netflix technology#production testing#resilience testing#simian army#site reliability engineering#system architecture#system reliability#system resilience
0 notes
Text
Mastering Advanced Python Interview Questions for Automation Testing

Mastering Advanced Python Interview Questions for Automation Testing
Introduction
Are you ready to take your software testing skills to the next level and ace your automation testing interviews? In this comprehensive guide, we'll delve into advanced Python interview questions tailored for automation testing roles. Whether you're aiming for a junior or senior position, these questions will help you showcase your expertise and land your dream job.
Table of Contents
Sr#
Headings
1
Introduction
2
Python and Selenium WebDriver Overview
3
Advanced Python Concepts
4
Python Decorators and Generators
5
Exception Handling in Python
6
Python Multithreading and Multiprocessing
7
Python Best Practices for Automation Testing
8
Python Libraries for Automation Testing
9
Advanced Python Functions
10
Conclusion
11
Frequently Asked Questions (FAQs)
Python and Selenium WebDriver Overview
Python's versatility and readability make it a popular choice for automation testing, especially when combined with Selenium WebDriver. Selenium WebDriver is a powerful tool for automating web applications, and Python's integration with Selenium makes it a go-to language for automation testers.
Advanced Python Concepts
To excel in Automation with Python , you need a deep understanding of advanced Python concepts. From decorators and generators to multithreading and multiprocessing, these concepts play a crucial role in writing efficient and maintainable automation test scripts.
Python Decorators and Generators
Decorators and generators are advanced Python features that can significantly enhance your selenium with python scripts. Decorators allow you to modify or extend the behavior of functions, while generators enable you to create iterators efficiently.
Exception Handling in Python
Exception handling is crucial in automation testing to ensure that your scripts can gracefully handle errors and unexpected situations. python selenium tutorial provides robust support for exception handling through try-except blocks, allowing you to write more robust and reliable test scripts.
Python Multithreading and Multiprocessing
Multithreading and multiprocessing are essential concepts for improving the performance of your automation testing scripts. python automation testing provides built-in libraries such as threading and multiprocessing to support these concurrency models.
Python Best Practices for Automation Testing
Following best practices is key to writing maintainable and efficient automation testing scripts. From using descriptive names for functions and variables to organizing your code into modules, these practices will help you write better automation tests.
Python Libraries for Automation Testing
python for automation testing offers a plethora of libraries and frameworks that can streamline your automation testing efforts. From unit testing frameworks like pytest to web scraping libraries like BeautifulSoup, these libraries can significantly enhance your automation testing workflow.
Advanced Python Functions
Understanding advanced Python function concepts such as lambda functions, map, filter, and reduce can make your automation testing scripts more concise and readable. These concepts allow you to write more expressive code and handle complex data transformations effectively.
Conclusion
Mastering advanced Automation Testing with Python interview questions is essential for excelling in automation testing roles. By familiarizing yourself with these concepts and practicing with real-world scenarios, you can demonstrate your expertise and stand out in your automation testing interviews.
Frequently Asked Questions (FAQs)
What are the key differences between Python 2 and Python 3?
Python 3 introduced several syntax changes and improvements over Python 2, including better Unicode support, syntax enhancements, and improved security features.
How can I improve the performance of my Python automation testing scripts?
To improve performance, consider using multithreading or multiprocessing to parallelize your tasks. Additionally, optimizing your code and using efficient data structures can also help improve performance.
What are some common pitfalls to avoid in Python automation testing?
Some common pitfalls include using hard-coded values instead of variables, neglecting error handling, and not considering edge cases in your test scripts.
How can I handle dynamic elements in Selenium WebDriver using Python?
You can handle dynamic elements in selenium webdriver python using techniques such as waiting for the element to be present, using explicit waits, or using dynamic locators to locate the element.
What are some best practices for organizing Python automation testing scripts?
Some best practices include organizing your code into modules and packages, using descriptive names for functions and variables, and writing clear and concise documentation for your scripts.
By mastering these advanced Python interview questions, you'll be well-equipped to tackle any automation testing interview with confidence. Start practicing these concepts today and take your automation testing skills to new heights!
#selenium webdriver#Automation with Python#python selenium tutorial#python automation testing#python for automation testing#Automation Testing with Python#selenium webdriver python
0 notes
Note
Hi!! I wanted to say that I loved reading about your journey of creating a personal website. I'm still unsure between Vercel and Netlify. I have a small question to ask. See, one of the reasons I want to make a website is to archive drawings and journal/sketchbook. Would you have any tips for creating an area on my website just for the diary/journal, which has tags, files for each entry, etc.?
Bello!

Really happy to hear about your interest in websites! I want everyone to make their own site so I don't have to log into social media and get instant tummyaches ♥
Vercel vs Netlify: I think I settled on Vercel for absolutely no reason whatsoever. I just made a site on Netlify, then tested on Vercel, and now I have like 5 websites on Vercel so I just kept using it LOL. I'm sure a more tech-savvy person would know the difference - I think they have certain integrations with specific programs.
Creating a diary or journal with tags:
There's a couple of different ways you can do that, with different levels of work needed.
you got me yapping again:
This sadgrl tutorial might be outdated and may or may not work, but explains the process better than I can.
Easiest: make a journal on Dreamwidth, or another blogging site (wordpress??) that allows easy tags and RSS feed, and embed that RSS feed onto your site.
This requires almost no HTML set-up, and the easiest to organize tags, but you don't truly have the data on your own site since it's just embedded.
When I snuck into a web design class at college, this was one of the methods that the professor used for a blog within a portfolio site LOL.
Shit like wordpress is what a LOT of ~professional~ sites do for their blog section. They code it separately from the main site haha. It's the most popular thing, but not necessarily the best. And wait til you read on what the CEO of wordpress has been having meltdowns about... he owns tumblr too!
It's made with a tutorial for Neocities if that's what you use.
Medium: Set up zonelets.
It will require some HTML and JS editing, but will help automate making headers/footers for each page of a blog.
I've never used it myself, but I see other people speak highly of it.
HARD FOR ME CUZ I'M A GORILLA: I believe a lot of professional web devs will slap your face with their coding cock until you use a static site generator (SSG) to make your site.
You will need some coding knowledge to set up the tagging system since it doesn't come with it enabled by default. But it's made explicitly to be an alternative to big Static Site Generators which are...
It requires some more intimidating knowledge, because it's a lot of scripts that turn files that are not HTML/CSS/JS into plain HTML.
Also you have to use the command line, and that doesn't come with buttons that tell you what you can do. You have to copy/paste all that shit or memorize the code to 'dev build astro' and it all looks silly.
I've used Eleventy, and now am using Astro. Other people use Hugo or Jekyll or some other stuff with crazy names like Glup Shitto. I hate all these sites cuz none of the words mean anything to me. This is a common theme for me and tech. I don't know what NODES or CONTENT or ISLANDS are!!!
I had the most success attempting to learn how to use a SSG by downloading a template and altering it with github + VScodium. Here's the template page for Astro. You click on a theme you like, and it takes you to its github page. (If you don't want to use evil Microsoft stuff sorry. Skip this entire section.) Follow the instructions on the page for "forking" the glup shitto. When it tells you to run commands, I run those commands through the terminal window in VScodium. These tutorials never tell you what these commands do cuz they assume you already know. Usually those commands automatically install the files you need onto your computer, and create the final files.
You can see my wip here for a "tag system" that SHOULD show members of a web listing haha but I don't know what I'm doing and I have a reading disorder AND don't know cumputer good.
THEORETICALLY this will be the simplest and easiest way to maintain tags and files, because after you set it up you just have to write the "content" of the blog page. And you don't have to set up the header/footer ever again. I see the vision, and potential, but I am not there yet when it takes me 5 hours a day to figure out what any of the words in the documentation mean and I don't want to ask an actual tech person cuz they will be like 'obviously just press the Blip on the Repository and then Suck My Ass in the command line".
(side note I haven't updated fujofans in like a year cuz I'm struggling with this part to make updating easier).
Con: the final HTML/CSS code is really ugly if it's "minified", and a lot of themes use """"""professional"""""" CSS libraries like Bootstrap and Tailwind that I honestly think are ugly cuz that's what every fuckin' tech website uses to style their pages and make them look Professional and Minimalist with stupid code like style="500-w dark-gray-balls D-cup-bra" on every single element. Even Toyhouse uses Bootstrap. Eugh!
But maybe you're smarter than me and can wrangle these things better!
That was really long. Woops. I hope you can slug through this wall of text and find something helpful. Feel free to email me if you have any more specific questions. I may or may not be helpful.
If someone else sees this and has better suggestions for making BLOGS, please chime in. I'm begging you.
64 notes
·
View notes
Text
˚꒰ 🏹 DISCORD FORUMS TUTORIAL♡
i'm not sure if people have seen or tested out the forums on discord but i thought i'd make a tutorial on how i use it for roleplaying since i found it super fun and helpful for organization purposes!
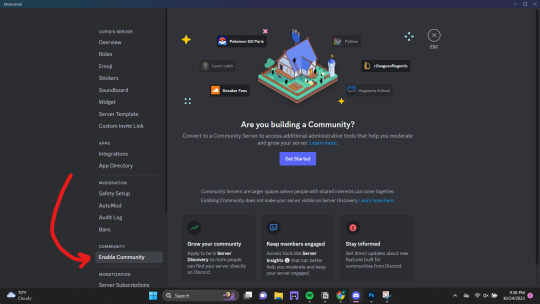
so what are forums? discord describes it as "a space for organized discussions". much like threads, the discussions can be contained in one post which makes it easy to keep your topics in order. the part that i find most useful is that you can organize your post by tags and filter through them! now in order to get forums in your server, you will have to enable 'Community' on your server. so let's start!

♡ . ) first thing you'll do is open your server setting. there will be an 'Enable Community' that you can click on and it will take you to a page like this
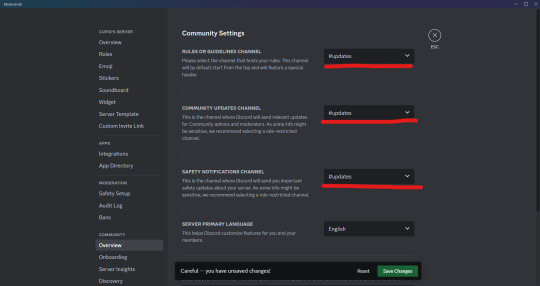
♡ . ) once you click 'Get Started' it will take you through a series of questions and system settings. you will need at least one "default channel" where discord will send automated updates. this channel is necessary if you want to use forums.

if you continue with the default settings, discord will automatically create two channels for you: one titled 'rules' and another titled 'moderators-only'. the announcements made whenever there's an update as mentioned above will be sent to the latter.
NOTE FROM CUPID ! i personally like to make a single channel titled something like 'updates' and keep it locked. this can be done before or after enabling community, you will just need to change the settings to go to the new channel first.
♡ . ) once you have community enable, you're free to make all the forums you want! when you go to create a new channel, 'forums' will show up as an option like this

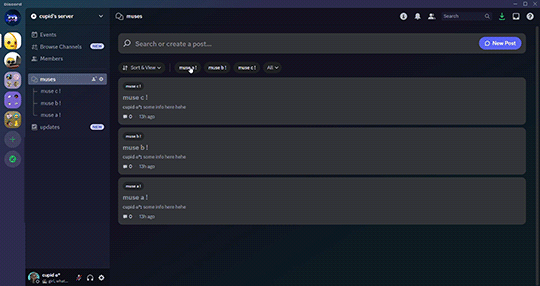
for this example, i'm going to show how i set up my muses' profiles for 1x1 writing server like a roster, but you can also do this for single muse / threads / sms / etc.
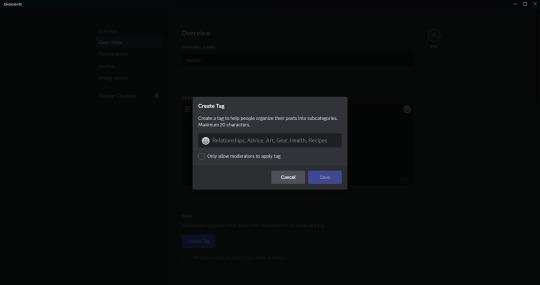
♡ . ) when you click into the forums channel you created, you will see a landing page like this. there are instructions on how to navigate the channel as well so feel free to read those as well! the first thing i like to do is create tags. you can open that setting by clicking either of these buttons.
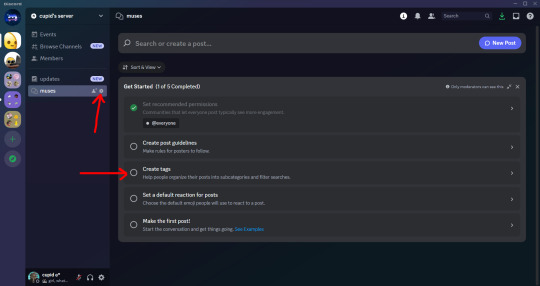
(navigate to the 'Tags' section and click 'Create Tag' if you need to) it will open a popup box like this. i like to create a tag for every muse that i want to add to my roster and you're able to add 20 tags!
when you're finished, they will be listed as you see below. there are other options in forums settings that you can play around with including a 'default reaction' emoji, 'slowmode', layout and sorting option, age restriction and 'hide after inactivity'. all these are based on preference!

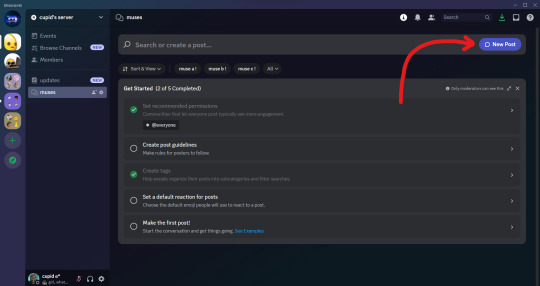
♡ . ) once you've saved your setting changes, you can leave this page and are now able to make your posts by clicking 'New Post' on the upper right hand corner.
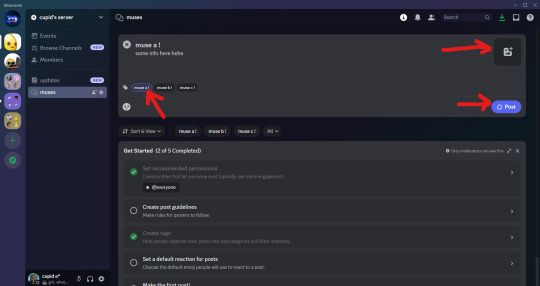
this is where you're pretty much able to do whatever suits your style including formatting how you like and adding photos, all you need to make sure to do is add the corresponding tag to the post! once you're finished making it look how you want, you can click 'Post'
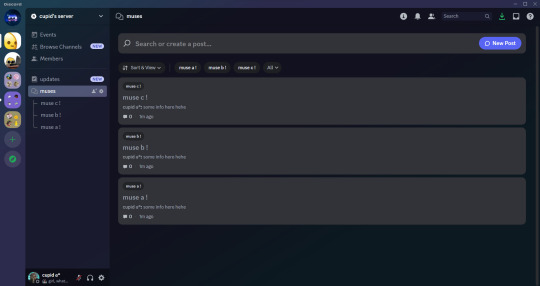
they will appear in the channel like this!
♡ . ) and by clicking on a post, you will be able to open it in a side view like this. if you want to see the post in full view, you will click the three dots in the upper right hand corner of the side view and then choose 'Open in Full View'.
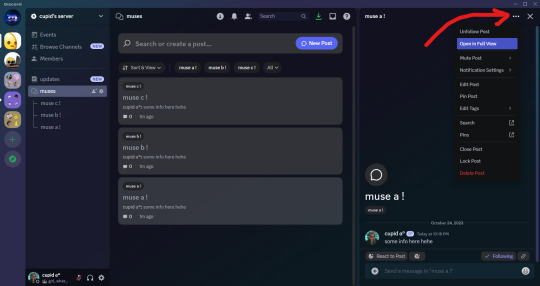
you're now able to add more messages within the post! for me, i like to add stats of my muses and headcanons that may be useful when i thread.
NOTE FROM CUPID ! one set back i found is that you are not able to use threads within a forum post so it may get a bit cluttered depending on what you send in a forum post. so if you are wanting multiple different sections for one topic, i suggest creating a forum instead. for example, if you are wanting to add musings, faceclaim pics, headcanons and stats all for one muse, i would create a single forum post just for that muse instead to avoid having important info getting lost!
and that pretty much covers how i use forums for discord rp! i encourage you to play around with it to find a style and format that best works for you. and if you have any questions, you're more than welcome to send it to my inbox. happy writing everyone♡♡♡
232 notes
·
View notes
Note
Heyy, I’ve been reading your wonderful one piece works for a while — and I couldn’t stop wondering how are you actually doing those magnificent headers?
Like… hello? The great quality, with additional 3D-alike details I could catch by my eyes? I got only Ibis Paint X on mobile, since I’m only a young man that literally two months ago went on a life-time ‘adventure’ of living alone in a small apartment.
In short — I got no money to pay for additional graphics/drawing programs, not yet at least
Hello!
Thank you! I'm glad you enjoy my writing - I'm curious to know what's your favorite piece / part? Also I'm so happy you like my headers? Makes it feel worth it to spend time on them! :D
I have excellent news for you, I used a mix of Canva and Photopea. They're both FREE!


I'll be explaining the process for making these two kinda? The full tutorial is below the cut, to be courteous to the other folks, hope you don't mind?
Though I am hearing that Canva has given people some grief. But Photopea is just *chefs kiss*
If you've ever used photoshop, Photopea is essentially a free photoshop, and it even has the automation tools! An absolute lifesaver when you have multiple layers you want to export (but that's for larger projects not this)
I'm going to assume you have basic knowledge of layers in digital drawing programs for this. If anything isn't clear: ask me, I'll clarify!
//-------------------------------------------------
My General Process is:
Search for official art / images
bring it into canva / photopea
crop / arrange images to match the dimensions
select a thematic color that is associated with the character
separate the foreground from the background
mess around and test things until they work
//--------------------------------------------------
Given "Louder than Words" is the latest one I've made, I'll start with the process for it.
Dimensions: 3000 x 1055 px dpi: 96
//-------------------------------------------
Let's Get Crackin'
Alright let's grab some official art so we're not using any fanart without the artist's permission
I try to pick images that feel relevant enough to what I'm trying to make. For example: the image for the Matching banner shows the ASCE tattoo which is super important in that fic
2. Let's arrange them onto a banner where each individual image has the same/similar dimensions to the rest
That's probably part of why you like these. To a certain extent they have similar dimensions, so they have a uniformity that's pleasing to the eye! (It's not perfect because I threw perfectionism to the wind because this is tumblr not my portfolio) Tip: if you have 3 images and only 2 that have similar dimensions, and the 3rd one can't be cropped logically: but the one that's a different aspect ratio in the middle!

3. lets arrange them in such a way that the borders all feel like they're the same/equal width/thickness
you might find that you have to shrink some images for this, that's fine.
ALTERNATIVELY: if you're going with one image crop it so it's just the relevant info and it matches the dimensions (3000 x 1055 px)

We have our base! Now let's add some color, and direct the viewer's eye together!
4. pick out a color that you think matches your character / vibe - that color is going to be your background Given I'm making an Ace banner: orange is the color I'm going with
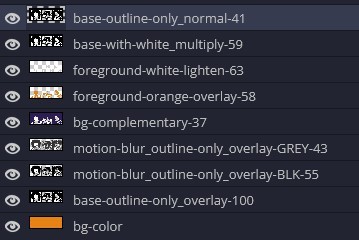
I went and named my layers for this lol. The numbers represent the opacity, and they aren't important. I just kept changing the opacity until I liked the way things looks. But here's the secret to the 3D feel:
Motionblur (+ moving it about)
Separating the foreground and background and dulling out the background.
I'm going to show you my process so you can see the effects, but first let's give you some quick skills:
//------------------------------------
SKILLS / THINGS I THINK ARE HELPFUL
//------- Select Similar
magic wand -> select something -> right-click -> select similar This works best when you have high contrast images (like manga panels that are black and white). You can select the black or the white areas. Depending on what works better for you. TIP! Invert selections with ctrl + i Say you know that you want to select everything but Ace's face in the second panel. Select his face with the magic wand then ctrl + i, and that's the only thing NOT selected

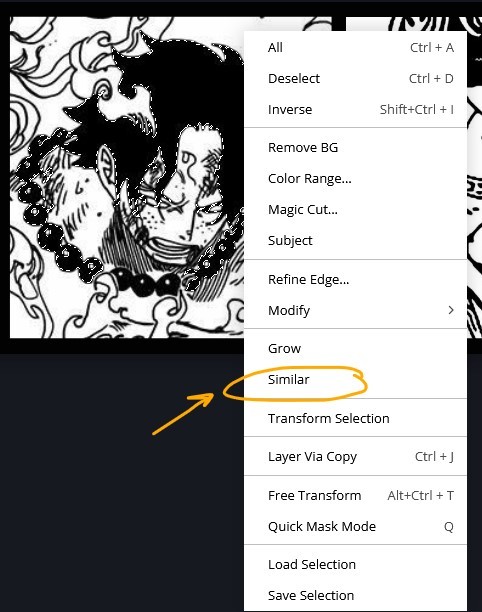


TIP!!!!!!!!!!!!!!! Please, please, please, duplicate your original image and work on the duplicate layer. This helps you SO much. !!!!!!!!!!!!!!!!! TIP! Check your selection tolerance! This could be why too little, or too much is being selected.

//------- The Move Tool
Shortcut key: v While the move tool is active, you can nudge the stuff on whatever layer with your arrow keys Shift + arrow key = 10 px move (generally)
//------- Layer Locking
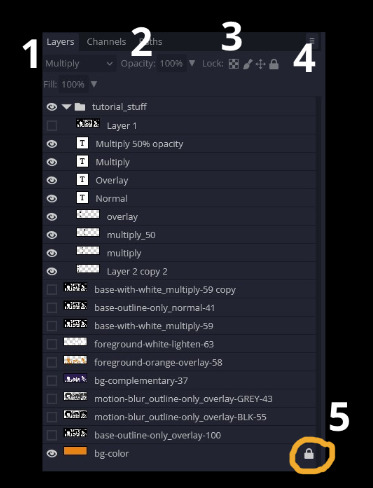
1- Layer Blending Mode (see Overlay vs Multiply vs Normal) for how this can affect results) 2- Opacity: how see through it is / isn't 3- Lock Transparency (it's the little checker board) 4- Lock Layer (looks like a lock) 5- Lock icon that appears when anything on the layer has been locked More on 3 Lock Transparency: You can only paint on / modify what's on that layer. You CANNOT add anything to any area that is already transparent Here's a demo of what you can do with this power:
Here's the original Image - notice how it's just the lineart with a transparent background.


It's powerful: abuse it
//------- Overlay vs Multiply vs Normal
I think seeing this is the best way to visualize how different modes can affect the color.
//--------------------------------
Back to the Tutorial
!!I IMPORTANT NOTE !!
Please play around with the opacity slider to figure out what opacity works best for you on the multiple different layers we're about to make / work with. It's up to your own style to figure this out. Next: please feel free to not follow all of it. Add more layers, add less layers, take the base principles and go wild! :D
5. Separate the lineart from the background and save it as a new layer 6. Duplicate it and set it to overlay, or set it to overlay immediately

7. Duplicate that lineart layer twice and set the blending mode to overlay 8. lock transparency on the top one and change it to be a dark grey 9. Apply motion blur to both:
Main menu bar -> Filter -> Motion Blur I made it so that the grey layer was blurrier than the black layer


10. More them around a little to give it a "3D effect" as you called it.
It creates shadows under the lines - I was aiming for an effect similar to chromatic aberration (chromatic aberration is a valid way to add punch to your stuff too!)

So this is what things look like now - painful, but let's keep going
11. Duplicate the ORIGINAL / BASE lineart layer, that you DID not apply motion blur to -> set the blend mode to multiply (reduce opacity for it to actually take effect)

okay that's less painful here's what the layers look like right now:
let's bring more focus to Ace's face, and push the background farther away:
12. Use the magic wand tool to quickly select large areas of the faces / focal area / foreground and the lasso tool to refine things
TIP! Hold shift + click -> add to selection Hold Alt + click -> subtract from selection
13. On a new layer with blending mode -> lighten, fill that selection to be white

If you look at it, you'll notice that it is ALREADY starting to draw our attention to his face, but the background is kinda aggressive, so let's dim that down
TIP! Right-click on the gradient tool to find the paint-bucket tool

TIP! Sample All Layers: Turning this option off makes it so that you only work with the content on THAT specific layer. Turning it on makes it so that it is working while taking all other layers into consideration.
14. ctrl + click on the "white foreground" layer to select the contents of that specific layer (pink thing is your mouse)
15. ctrl + i to invert selection and ON A NEW LAYER (layer mode -> multiply) fill that with a complementary color

16. I did one last thing where I took the original base (before we separated the lineart) and added it to the very top and played with the opacity to get something less in your face (layer blend mode was set to NORMAL)

And that's it!
More considerations that I take:
I want the banner to be "thin" or not square, so it doesn't take up too much screen real estate on people's devices
I don't want readers having to scroll too much to get to my writing (which is the whole point of the post, let's not waste their time making them look for things)
I want the banner content to be relevant enough?
ie: with Matching: I wanted the ASCE tattoo to be visible. With matching I wanted Ace to not look too happy in some of them.
I'm also trying to avoid spoilers, I hated getting things spoiled, so I'm trying to be careful that the images I pick don't spoil anything really.
Congrats on starting life on your own! I did that whole living by myself thing too! Tip: keep the pantry stocked with lentils, beans, pastas, baking essentials, rice. They really come in a clutch when you're hungry.
#photopea resources#photopea psd#tutorial#tutorials#tumblr banner#photoshop#photoshop tutorial#digital art#fuck adobe#adobe photoshop
39 notes
·
View notes
Text
Unlock creative insights with AI instantly
What if the next big business idea wasn’t something you “thought of”… but something you unlocked with the right prompt? Introducing Deep Prompt Generator Pro — the tool designed to help creators, solopreneurs, and future founders discover high-impact business ideas with the help of AI.
💡 The business idea behind this very video? Generated using the app. If you’re serious about building something real with ChatGPT or Claude, this is the tool you need to stop wasting time and start creating real results.
📥 Download the App: ✅ Lite Version (Free) → https://bit.ly/DeepPromptGeneratorLite 🔓 Pro Version (Full Access) → https://www.paypal.com/ncp/payment/DH9Z9LENSPPDS
🧠 What Is It? Deep Prompt Generator Pro is a lightweight desktop app built to generate structured, strategic prompts that help you:
✅ Discover profitable niches ✅ Brainstorm startup & side hustle ideas ✅ Find monetization models for content or products ✅ Develop brand hooks, angles, and offers ✅ Unlock creative insights with AI instantly
Whether you’re building a business, launching a new product, or looking for your first real side hustle — this app gives your AI the clarity to deliver brilliant results.
🔐 Features: Works completely offline No API or browser extensions needed Clean UI with categorized prompts One-click copy to paste into ChatGPT or Claude System-locked premium access for security
🧰 Who It’s For: Founders & solopreneurs Content creators Side hustlers AI power users Business coaches & marketers Anyone who’s tired of “mid” AI output
📘 PDF Guide Included – Every download includes a user-friendly PDF guide to walk you through features, categories, and how to get the best results from your prompts.
📂 Pro Version includes exclusive prompt packs + priority access to new releases.
🔥 Watch This If You’re Searching For: how to use ChatGPT for business ideas best prompts for startup founders AI tools for entrepreneurs side hustle generators GPT business prompt generator AI idea generator desktop app ChatGPT for content creators
📣 Final Call to Action: If this tool gave me a business idea worth filming a whole video about, imagine what it could help you discover. Stop guessing — start prompting smarter.
🔔 Subscribe to The App Vault for weekly tools, apps, and automation hacks that deliver real results — fast.🔓 Unlock Your PC's Full Potential with The App Vault Tiny Tools, Massive Results for Productivity Warriors, Creators & Power Users
Welcome to The App Vault – your ultimate source for lightweight desktop applications that deliver enterprise-grade results without bloatware or subscriptions. We specialize in uncovering hidden gem software that transforms how creators, freelancers, students, and tech enthusiasts work. Discover nano-sized utilities with macro impact that optimize workflows, turbocharge productivity, and unlock creative potential.
🚀 Why Our Community Grows Daily: ✅ Zero Fluff, Pure Value: 100% practical tutorials with actionable takeaways ✅ Exclusive Tools: Get first access to our custom-built apps like Deep Prompt Generator Pro ✅ Underground Gems: Software you won't find on mainstream tech channels ✅ Performance-First: Every tool tested for system efficiency and stability ✅ Free Resources: Download links + config files in every description
🧰 CORE CONTENT LIBRARY: ⚙️ PC Optimization Arsenal Windows optimization secrets for buttery-smooth performance System cleanup utilities that actually remove 100% of junk files Memory/RAM optimizers for resource-heavy workflows Startup managers to slash boot times by up to 70% Driver update automation tools no more manual hunting Real-time performance monitoring dashboards
🤖 AI Power Tools Local AI utilities that work offline for sensitive data Prompt engineering masterclass series Custom AI workflow automations Desktop ChatGPT implementations Niche AI tools for creators: image upscalers, script generators, audio enhancers AI-powered file organization systems
⏱️ Productivity Boosters Single-click task automators Focus enhancers with distraction-killing modes Micro-utilities for batch file processing Smart clipboard managers with OCR capabilities Automated backup solutions with versioning Time-tracking dashboards with productivity analytics
🎨 Creative Workflow Unlockers Content creation accelerators for YouTubers Automated thumbnail generators Lightweight video/audio editors 50MB Resource-efficient design tools Cross-platform project synchronizers Metadata batch editors for digital assets
🔍 Niche Tool Categories Open-source alternatives to expensive software Security tools for privacy-conscious users Hardware diagnostic toolkits Custom scripting utilities for power users Legacy system revival tools
youtube
#DeepPromptGenerator#BusinessIdeas#ChatGPTPrompts#SideHustleIdeas#StartupIdeas#TheAppVault#PromptEngineering#AIProductivity#SolopreneurTools#TinyToolsBigImpact#DesktopApp#ChatGPTTools#FiverrApps#Youtube
2 notes
·
View notes
Text
ChannelBuilderAI Review: The Ultimate Automated Video Creation Solution
Introduction: Revolutionizing Content Creation
In today's fast-paced digital landscape, content creators face immense pressure to produce high-quality videos consistently. ChannelBuilderAI emerges as a game-changing solution, promising to streamline the entire video production process—from scripting to publishing. After extensive testing across multiple niches, I’m convinced this platform represents a significant leap forward in AI-powered content creation.

Core Features and Capabilities
ChannelBuilderAI stands out with its comprehensive feature set, addressing every stage of video production:
Advanced Script Generation: Crafts engaging, structured narratives tailored to your niche (e.g., horror, business, or education).
Human-Like Voiceovers: 78 voice options across 12 languages with emotional inflection (excitement, suspense, authority).
Smart Visual Composition: Auto-matches visuals to scripts with 42+ art styles (photorealistic, anime, etc.).
Built-in SEO Optimization: Generates high-CTR titles, descriptions, and thumbnails.
Multi-Platform Publishing: Formats videos for YouTube, TikTok, Instagram, and more.
Real-World Performance and Results
I tested ChannelBuilderAI across three channels, and the results were undeniable:
History Facts Channel:
Output increased from 2 to 14 videos/week.
CTR jumped from 3% to 9%.
Subscribers grew by 287% in 45 days.
Motivational Content Channel:
Watch time increased by 420%.
Daily views skyrocketed from 1K to 18K.
Product Review Channel:
Conversion rates improved from 1.2% to 4.7%.
Affiliate earnings 5X’d due to higher engagement.
Why ChannelBuilderAI is a Must-Have for Video Marketing
Video marketing dominates in 2024, and ChannelBuilderAI gives you the edge:
1. Skyrocket Engagement
AI-optimized videos rank higher and retain viewers longer, thanks to:
Trend-aware scripts that hook audiences.
Professional pacing that reduces drop-off rates.
2. Dominate Social Algorithms
Auto-formatted videos for each platform (YouTube, TikTok, Reels).
AI-generated hashtags & captions to boost discoverability.
3. Scale Without Sacrificing Quality
Produce a week’s worth of content in hours.
Maintain consistent branding across all videos.
4. Monetize Faster
Perfect for affiliate reviews, product demos, and ads.
Agencies can offer video services at scale without hiring editors.
ChannelBuilderAI Pricing & Offers
Here’s a breakdown of each package and who it’s best for:
1. Starter Plan ($39) – For Solo Creators
Includes: Full access to AI scripting, voiceovers, and basic editing.
Best for: Beginners or creators testing AI tools.
ROI: Pays for itself in 1-2 videos (vs. hiring freelancers).
2. Gold Upgrade ($197) – For Serious Creators
Includes: Unlimited videos, 15 client seats, and HD rendering.
Best for: Full-time YouTubers or small agencies.
ROI: One client ($500+) covers the cost.
3. Elite Upgrade ($127) – Done-for-You Channels
Includes: 15 pre-built "cash cow" channels + multilingual support.
Best for: Marketers who want plug-and-play content.
ROI: Resell one channel for $1,000+.
4. Enterprise Tier ($197/year) – For Agencies
Includes: Whitelabel rights, 100 client seats, team collaboration.
Best for: Studios selling video services.
ROI: Charge $997+/month per client.
👉 See All Offers Here: ChannelBuilderAI Official Page
Who Should Use ChannelBuilderAI?
This tool is perfect for:
Faceless YouTube/TikTok creators tired of editing.
Affiliate marketers scaling product reviews.
E-commerce brands needing demo videos.
Agencies offering video services.
Educators turning lessons into engaging content.
Limitations to Consider
Learning curve: Takes 2-3 days to master.
Human review needed: AI isn’t perfect—always check outputs.
No free trial (but 30-day money-back guarantee).
Frequently Asked Questions (FAQ)
Q: Can I edit AI-generated videos?
A: Yes! The drag-and-drop editor allows full customization.
Q: Is it beginner-friendly?
A: Absolutely. Tutorials walk you through everything.
Q: What if I’m not satisfied?
A: 30-day refund policy—no risk.
Q: Does it work for non-English content?
A: Yes, 12 languages are supported.
Q: How often is it updated?
A: Monthly improvements keep it cutting-edge.

Conclusion
ChannelBuilderAI is the most powerful AI video tool I’ve tested. It’s not magic—you’ll still need to guide the AI—but it cuts production time by 90% while improving quality.
For creators, marketers, and agencies, this is a profit multiplier.
🚀 Ready to transform your content? 👉 Try ChannelBuilderAI Risk-Free Today 👈 you can also read a long version review by clicking here: ChannelBuilderAi review
or listen to this podcast:
2 notes
·
View notes
Text
Such is life! Behold, a new Post published on Greater And Grander about 12 Game-Changing Ways Artists Can Ethically Use AI to Boost Their Creative Business
See into my soul, as a new Post has been published on https://greaterandgrander.com/12-game-changing-ways-artists-can-ethically-use-ai-to-boost-their-creative-business/
12 Game-Changing Ways Artists Can Ethically Use AI to Boost Their Creative Business

In today’s fast-paced digital landscape, visual artists and creatives face mounting pressure to produce compelling content that not only captivates audiences but also aligns with marketing goals. With artificial intelligence (AI) revolutionizing content creation, artists can either embrace it as a powerful tool or risk falling behind. But how can creatives ethically harness AI without compromising their originality?
This week on The Producers Lounge Podcast, we’re diving deep into this very topic with Rachid El Guerrab, an industry innovator who has worked on Emmy-winning shorts, Oscar-nominated projects, and groundbreaking VR experiences. Tune in as we discuss how AI can help, not hinder, artistic storytelling. Mark your calendars—the episode drops this Thursday!
Meanwhile, let’s explore 12 ethical ways artists can leverage AI to elevate their craft and business while staying true to their creative vision.
1. Supercharge Your Social Media Presence
AI tools can generate engaging captions, hashtags, and post ideas, making social media marketing easier. Platforms like Canva and Jasper AI help artists create eye-catching visuals and copy that enhance their online presence.
2. Automate Email Blasts for Audience Engagement
Email marketing remains a powerful tool for client outreach. AI-driven platforms like Mailchimp and Constant Contact can personalize emails, segment audiences, and optimize send times for better engagement.
3. Craft Clear & Compelling Synopses
Writing a strong synopsis for your project, whether it's a film, a gallery exhibit, or a product launch, is crucial. AI-assisted writing tools can help refine and polish your summaries, ensuring they resonate with potential clients or investors.
4. Perfect Your Artist Statement
An artist statement communicates your vision and values. AI-powered grammar and style checkers like Grammarly or Hemingway Editor can fine-tune your messaging while keeping your unique voice intact.
5. Boost Creativity with AI Brainstorming Tools
Struggling with creative block? AI brainstorming platforms like ChatGPT and Notion AI can provide fresh ideas, concept variations, and even suggest new angles for your work.
6. Create Proof of Concept Work Quickly
Before investing significant time into a project, AI can help generate mood boards, concept sketches, or even 3D models to test ideas with potential clients and collaborators.
7. Generate Web Content with Pro Tips & Tricks
Artists can use AI to craft informative blog posts, tutorials, and how-to guides that showcase expertise and attract new clients. AI-driven content tools ensure consistency and SEO optimization.
8. Write Business Emails That Convert
Professional communication is key for securing commissions and collaborations. AI email assistants like Copy.ai can craft clear, persuasive messages tailored to different audiences.
9. Convert Speech to Text for Seamless Documentation
Artists who prefer to talk through ideas rather than type can use AI transcription services like Otter.ai or Descript to transform voice recordings into well-structured prose.
10. Optimize Product Listings for Art Sales
Selling art online? AI-powered description generators can help craft engaging product listings that highlight unique selling points and boost visibility on marketplaces like Etsy and Redbubble.
11. Write Persuasive Website Copy
Your website is your digital storefront. AI can refine your bio, service pages, and project descriptions, ensuring clarity and impact while maintaining your artistic identity.
12. Design Sales & Feature Sheets with AI
Artists looking to pitch their work to clients, galleries, or investors can use AI-powered design tools like Adobe Sensei to create polished promotional materials.
Why Greater & Grander Media Services is Your Best Partner in Visual Content Creation
At Greater & Grander, we understand that marketing visuals are more than just images—they tell stories that resonate. Whether you need dynamic social media campaigns, expertly written sales materials, or AI-enhanced marketing strategies, our media services ensure you stand out. Let us help bring your vision to life with compelling content that makes an impact.
Ready to take your creative business to the next level? Contact Greater & Grander today!
And don’t forget to tune in this Thursday for our conversation with Rachid El Guerrab on The Producers Lounge Podcast!
Do you have your own thoughts? Let us know in the comments! Or join our community of successful creators on Patreon!
#AI, #ArtSales, #ArtificialIntelligence, #ArtistStatement, #EmailBlast, #ProductListing, #RachidElGuerrab, #SocialMedia, #SocialMediaManagement, #TheProducersLoungePodcast, #WebContent
#AI#Art Sales#Artificial Intelligence#artist statement#Email Blast#Product Listing#Rachid El Guerrab#Social Media#Social Media Management#The Producers Lounge Podcast#Web Content
2 notes
·
View notes
Text
#automation#automation testing#automation testing tutorial#automationtestingforbeginners#testing tutorial#testing#tutorial academy#tutorial for automation#tutorials
0 notes
Text
The Role of AI in Modern Software Testing Practices
AI is reshaping the way software testing is done. With AI automated testing, businesses can achieve higher efficiency, better accuracy, and faster software releases. Whether it’s AI software testing, AI generator testers, or AI-driven automation, the future of software testing is AI-powered.
#ai generator tester#ai software testing#ai automated testing#ai in testing software#playwright automation javascript#playwright javascript tutorial#playwright python tutorial#scrapy playwright tutorial#api testing using postman#online postman api testing#postman automation api testing#postman automated testing#postman performance testing#postman tutorial for api testing#free api for postman testing#api testing postman tutorial#postman tutorial for beginners#postman api performance testing#automate api testing in postman#java automation testing#automation testing selenium with java#automation testing java selenium#java selenium automation testing#python selenium automation#selenium with python automation testing#selenium testing with python#automation with selenium python#selenium automation with python#python and selenium tutorial#cypress automation training
0 notes
Video
youtube
Complete Hands-On Guide: Upload, Download, and Delete Files in Amazon S3 Using EC2 IAM Roles
Are you looking for a secure and efficient way to manage files in Amazon S3 using an EC2 instance? This step-by-step tutorial will teach you how to upload, download, and delete files in Amazon S3 using IAM roles for secure access. Say goodbye to hardcoding AWS credentials and embrace best practices for security and scalability.
What You'll Learn in This Video:
1. Understanding IAM Roles for EC2: - What are IAM roles? - Why should you use IAM roles instead of hardcoding access keys? - How to create and attach an IAM role with S3 permissions to your EC2 instance.
2. Configuring the EC2 Instance for S3 Access: - Launching an EC2 instance and attaching the IAM role. - Setting up the AWS CLI on your EC2 instance.
3. Uploading Files to S3: - Step-by-step commands to upload files to an S3 bucket. - Use cases for uploading files, such as backups or log storage.
4. Downloading Files from S3: - Retrieving objects stored in your S3 bucket using AWS CLI. - How to test and verify successful downloads.
5. Deleting Files in S3: - Securely deleting files from an S3 bucket. - Use cases like removing outdated logs or freeing up storage.
6. Best Practices for S3 Operations: - Using least privilege policies in IAM roles. - Encrypting files in transit and at rest. - Monitoring and logging using AWS CloudTrail and S3 access logs.
Why IAM Roles Are Essential for S3 Operations: - Secure Access: IAM roles provide temporary credentials, eliminating the risk of hardcoding secrets in your scripts. - Automation-Friendly: Simplify file operations for DevOps workflows and automation scripts. - Centralized Management: Control and modify permissions from a single IAM role without touching your instance.
Real-World Applications of This Tutorial: - Automating log uploads from EC2 to S3 for centralized storage. - Downloading data files or software packages hosted in S3 for application use. - Removing outdated or unnecessary files to optimize your S3 bucket storage.
AWS Services and Tools Covered in This Tutorial: - Amazon S3: Scalable object storage for uploading, downloading, and deleting files. - Amazon EC2: Virtual servers in the cloud for running scripts and applications. - AWS IAM Roles: Secure and temporary permissions for accessing S3. - AWS CLI: Command-line tool for managing AWS services.
Hands-On Process: 1. Step 1: Create an S3 Bucket - Navigate to the S3 console and create a new bucket with a unique name. - Configure bucket permissions for private or public access as needed.
2. Step 2: Configure IAM Role - Create an IAM role with an S3 access policy. - Attach the role to your EC2 instance to avoid hardcoding credentials.
3. Step 3: Launch and Connect to an EC2 Instance - Launch an EC2 instance with the IAM role attached. - Connect to the instance using SSH.
4. Step 4: Install AWS CLI and Configure - Install AWS CLI on the EC2 instance if not pre-installed. - Verify access by running `aws s3 ls` to list available buckets.
5. Step 5: Perform File Operations - Upload files: Use `aws s3 cp` to upload a file from EC2 to S3. - Download files: Use `aws s3 cp` to download files from S3 to EC2. - Delete files: Use `aws s3 rm` to delete a file from the S3 bucket.
6. Step 6: Cleanup - Delete test files and terminate resources to avoid unnecessary charges.
Why Watch This Video? This tutorial is designed for AWS beginners and cloud engineers who want to master secure file management in the AWS cloud. Whether you're automating tasks, integrating EC2 and S3, or simply learning the basics, this guide has everything you need to get started.
Don’t forget to like, share, and subscribe to the channel for more AWS hands-on guides, cloud engineering tips, and DevOps tutorials.
#youtube#aws iamiam role awsawsaws permissionaws iam rolesaws cloudaws s3identity & access managementaws iam policyDownloadand Delete Files in Amazon#IAMrole#AWS#cloudolus#S3#EC2
2 notes
·
View notes
Text
Blogg post #7 - Creating my Final Instrument
As part of our upcoming "Best of Booth" event on June 7th, I’ve started a unique final project that showcases everything I’ve learned in Max MSP over the past six months. The project revolves around creating a distinctive musical instrument for my performance, using live recordings of the djembe drum.
The core idea is to develop a patch that can sort these recordings into sample files and then play them back in polyrhythmic forms, essentially mimicking a djembe player. My djembe, a solo model, will be used for playing fills over the percussion sequences, triggering laser lights to enhance the visual aspect of the performance.
One of the main challenges is ensuring the patch isn’t too large to prevent my computer from crashing. With numerous processes running simultaneously, I’m considering using two computers to manage the load effectively. Another challenge is devising a way to change up the lighting show so it feels both natural and unexpected.
Here’s a breakdown of my current progress and plans:
Objective:
Initially, my goal was to trigger the venue's unique lights with a drum for our event. However, I’ve decided to complicate things slightly to simplify the drumming aspect for myself, as I’m not a seasoned djembe player.
Current Progress:
Inspired by a tutorial from UMUT Hearing Glass—a channel I highly recommend—I’ve developed a polyrhythmic generator. This system allows you to input a sample into one or more boxes, where a clock (which you can adjust) plays the sample in varying lengths. Currently, the system randomizes the sample length with each trigger, creating dynamic polyrhythms.
Lighting Patch:
The patch for controlling the lights is a bit more complex. It’s still under development, but the plan is to integrateing the Polyrymic patch with the Lighthing Patch. This will give me three weeks to practice and fine-tune the system, ensuring it’s engaging and reliable.
Potential of the Patch:
This project could fill several important gaps in the market if i would like to further develop it.
It eliminates the need for a lighting specialist/VDJ to control lighting, as the artist can manage this through triggers like MIDI, automation, or sound transients.
It enhances the artistic experience by directly linking the music and lighting, allowing for a more immersive atmosphere.
It simplifies the control interface, making it more adaptable and user-friendly.
Future Steps:
Before considering a public release, I need to:
Test the system extensively to ensure reliability, which involves accessing enough DMX lights to fill a DMX universe (512 channels).
Develop a user-friendly interface.
Find an affordable yet functional DMX unit.
Add lighting fixtures to the library, explaining each DMX channel's function.
I’m excited about the potential of this project and look forward to seeing how it evolves in the coming weeks.
3 notes
·
View notes
Text
Level Up Your Selenium Skills: The Ultimate Course for Test Automation
Are you looking to enhance your test automation skills and become a proficient Selenium user? Look no further! In this article, we will introduce you to the ultimate course that can help you level up your Selenium skills and take your test automation abilities to new heights. Whether you are a beginner or have some prior experience with Selenium, this course is designed to cater to all skill levels. So, let's dive into the details and explore the exciting journey of becoming a Selenium pro!

Why Test Automation Education Matters
In today's rapidly evolving IT industry, staying ahead of the curve is crucial for success. With software systems becoming increasingly complex, manual testing alone cannot keep up with the pace of development. Test automation has become a necessity to ensure the efficiency, accuracy, and scalability of testing processes.
By investing in test automation education, you empower yourself with the knowledge and skills required to excel in the competitive job market. Test automation specialists are in high demand, and having expertise in Selenium can open numerous career opportunities. Furthermore, by leveraging Selenium, you can save time, reduce effort, and deliver reliable results, making it an indispensable tool for any software tester.
The Power of Selenium in Test Automation
Selenium is a powerful open-source framework that has revolutionized the world of test automation. It provides robust capabilities for automating web browsers and enables testers to perform cross-browser testing effortlessly. With Selenium, you can write automation scripts in various programming languages like Java, Python, C#, and more. Its vast ecosystem of plugins and frameworks further extends its potential, making it the go-to choice for many automation professionals.
Key Features of Selenium
Selenium boasts a rich set of features that make it highly suitable for test automation. Some of the notable features include:
Cross-Browser Compatibility: Selenium allows you to test web applications across multiple browsers, ensuring your website functions flawlessly regardless of the platform.
Multi-Language Support: Selenium supports multiple programming languages, enabling you to choose your preferred language based on your comfort and project requirements.
Fast and Reliable: Selenium empowers you to execute tests swiftly and consistently, providing accurate results while maintaining the integrity of your automation suite.
Flexible and Extensible: Selenium's architecture allows you to integrate it with various frameworks and tools, providing flexibility in designing automation solutions that fit your specific needs.
Parallel Execution: Selenium allows you to run tests in parallel, significantly reducing execution time and enhancing productivity.
Community Support: Selenium enjoys a vast user community, providing ample resources, tutorials, and support when encountering challenges during automation implementation.
The Ultimate Course for Leveling Up Your Selenium Skills
Now that you understand the significance of Selenium in test automation, let's explore the ultimate course that can skyrocket your skills in this domain. This comprehensive course is designed by industry experts with extensive experience in test automation using Selenium. It covers everything from the fundamentals to advanced topics, ensuring a comprehensive and well-rounded learning experience.
Course Curriculum Highlights
Here's a glimpse of what you can expect to learn from this ultimate Selenium course:
Introduction to Selenium and its various components
Understanding Selenium WebDriver and its core functionalities
Hands-on exercises to master Selenium IDE and Selenium Grid
In-depth exploration of best practices for test automation using Selenium
Utilizing TestNG for efficient test case management and optimization
Advanced techniques for handling dynamic elements, AJAX, and other challenging scenarios
Integrating Selenium with frameworks like JUnit and Cucumber for improved test reporting and maintenance
Leveraging Selenium with Continuous Integration tools like Jenkins for seamless integration into the development pipeline
Exploring Selenium's compatibility with cloud platforms for distributed test execution
Target Audience and Prerequisites
Whether you are a beginner stepping into the world of test automation or a seasoned professional aiming to enhance your Selenium skills, this course caters to all skill levels. However, having a basic understanding of programming concepts and web technologies will be beneficial in grasping the core concepts effectively.
In conclusion, if you are looking to take your test automation skills to the next level, investing in the ultimate Selenium course at ACTE Technologies is the perfect choice. With Selenium's powerful capabilities and the comprehensive curriculum of this course, you will acquire the knowledge and expertise needed to excel in the field of test automation. So, why wait? Embark on this exciting journey and empower yourself with the skills that will set you apart in the competitive IT industry. Level up your Selenium skills and unlock endless opportunities!
8 notes
·
View notes