#Best Embroidery Applique Machine
Explore tagged Tumblr posts
Visit Tumblr Blog
Explore Tumblr blogs with no restrictions, modern design and the best experience.
Last Seen Tumblr Blogs


Fun Fact
Post activity is at the highest at 4:00 pm EDT; notes peak at 10:00 pm EDT.
Photo
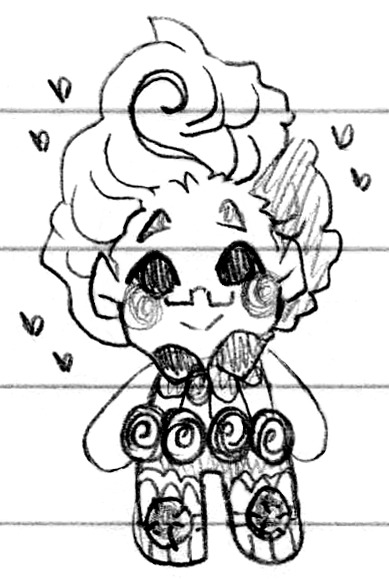
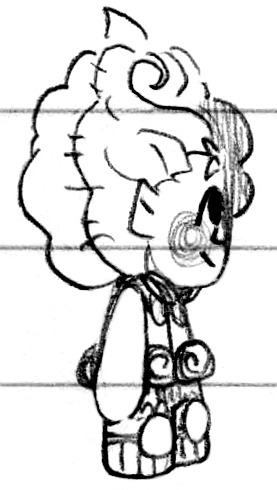

Charm doll, someday.... (Patreon)
#Doodles#Just Desserts#Villainsona#In the style of two PiyoPicco dolls - the one I have printed for my current tests and then also the curvy/long-legged one very cute :)#The long-legged style would work so well to showcase Charm's shoes! One of my favourites of her details#But if she's based on me then she'd have proportionately short legs....#Well whatever either way she'll be cute ♥ She always is#There's no example for it in Piyo's dolls but the idea of having blushy cheek patches is so adorable#The main issue I keep running up against whenever I think about adding shapes it keeping the silhouette smooth!#Will the rosy cheeks bulge? I mean not if it's sewn taut but how can that be ensured hmm#Same with her eyebrows too would be so cute as little patches but hmm#I think I'm still too much of a novice with fabric to be able to imagine it properly haha#As much as I admire embroidery/applique patches it does create a bump in its own right and I think the texture just wouldn't quite fit#The swirls in her hair would be best embroidered too to be distinct but ah!#Just have to improve my machine stitches! And by that I mean practice ever lol#It is nice to think about what all materials I'd like for her - not just the fabric and thread but like Charm bear for example!#A heart and a smell thing - she is meant to smell sweet being a candy resident haha#I actually wonder how all her different candy smells would work together :0 If they were all in one lol#Chocolate on the bon bons and cotton candy in her hair and sugar cookie on her knees#They're not exactly conflicting smells lol but it would be A Lot#Maybe I can find some candles with those smells and smell them together lol#Olfactory moodboard haha ♪
2 notes
·
View notes
Text
And All the Stars of Heaven's Field
While I've been doing a lot of machine embroidery with Tolkien's heraldic devices, that was kind of a recent whim. I've always been put in the mind of quilt blocks before. And while I have some experience sewing, I haven't quilted before.
But it was my New Year's Resolution for 2024 to learn to quilt. And I finally finished the first block of the first project I SOMEHOW decided was my best option (in October, so...success?):
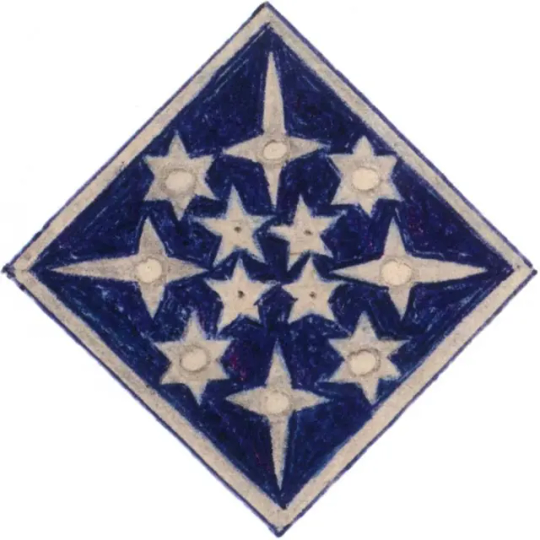

The original thought was to make a pair of Gil-Galad throw pillows! With the first side of one done, I now have to make THREE MORE OF THESE. Each of which have twelve needle-turned applique stars, eight of which have needle-turned applique centers and four of which I did some hand-worked eyelets on in order to get the center dot (the easiest and fastest part of this whole process).
Needle-turned applique boot camp aside, I'm really thrilled with how this is going. Sure, it's going to take me a million years, but I'm getting a lot better at this technique. I have also learned that just because something has a manageable number of colors in nice, geometric shapes DOES NOT MEAN it is efficient or possible to piece together.
(Am I learning proper quilting from this? Probably not. But when one is in the throes of Silm obsession, one does sometimes have to learn new crafts in an unnecessary way.)
(and at least I am not doing a bed sized quilt. At my current rate that would probably take me an appropriately elvish timescale)
#silm#craft#fiber arts#quilting#silmarillion#and all the stars of heaven's field#is what I have been calling this project in my head#at first it was poetic#now it's a taunt#do you know how many stars are in heaven's field?#DO YOU?#THERE ARE SO MANY#when you have to sew them all down by hand#erenion gil galad#tolkien#elvish heraldry
113 notes
·
View notes
Note
You’ve officially convinced me to buy some cheap felt and make a few plushies how dare you /lh
That's excellent! But I would recommend working with cheap fabric over felt. Felt can be frustrating and it tears easily if you try to work it inside out. Also it's better sewn with strands of embroidery floss or thick crochet string. [I use a blanket stitch. Look at the jester shoes on my plushies to see how that looks.]
And as an aside; for anyone who attempts my DCA pattern- it's actually a decent first project because you'll learn how to -Work on things on the wrong side and turn them right side out. And add features by putting extra pieces into a seam. Which is basic plushie stuff. -Do a small amount of applique and see how you feel about it. [Some people find it frustrating.] -Sew buttons on. -The bare bones of how pants are constructed. -Use stuffing and make doll joints by leaving parts pinched/sewn and without any. -Make a crude ruffle. It's a nice quiet hobby that's fairly portable. And at the end of it you have a little guy. None of this pattern requires a machine and if the fabric you get is thin, then it'll just put up less resistance when sewn by hand. HOT TIPS - Do not sew hand-dyed-type batik fabric with a needle and thread. It looks like regular cotton but it's very dense. - Best place to get a sewing machine is Goodwill. Look for the heaviest metal machine you can find. Singer and Kenmore are the best. And places still exist to get them tuned up and fixed if needed. - When stuffing tear small bits of fluff and poke them into little crevices with a chopstick or similar. Don't over-stuff. Keep it light. - Ignore tutorials that sew stretch fabric on a regular sewing machine. You won't get good or durable results. You need a Baby-Lock sewing machine for stretch fabric. Turn your current t-shirt inside out and look at the seams. It makes a four thread seam just like that. - Slick fabric paint needs a minimum of four hours to cure. Don't try to cheat this, you cannot touch it until it's dry. If you're painting on something that's not flat; pin it to some Styrofoam like you're dissecting a frog to prevent accidents. - Always wash fabric before use. It's okay to stomp cotton/poly around in the shower with whatever soap comes off you hair and just hang dry. Don't use the finished edge of the fabric for anything. Just cut it off and pitch it. - Paper clothing patterns can be ironed flat on the lowest setting. Go quick and don't push hard. ALSO - You guys can always ask me anything if you get stuck! My grandma and my mother taught me the basics and I figured out quite a bit on my own. :)
40 notes
·
View notes
Text
How to Select the Best Digitizer for Your Embroidery Needs

In today’s fast-paced embroidery industry, choosing the right digitizer is more than just a choice—it’s a critical decision that impacts the quality, efficiency, and overall satisfaction of your embroidery projects. A professional digitizer can transform your designs into embroidery-ready files that seamlessly combine creativity with technical precision. Here's how you can select the best digitizer for your embroidery needs.
1. Understand What an Embroidery Digitizer Does
An embroidery digitizer is the bridge between your design and the final embroidered product. They convert artwork into stitch files that your embroidery machine can read. Without accurate digitizing, even the most stunning design can fall flat when embroidered.
A skilled digitizer must:
Adapt the design to suit the fabric type.
Optimize stitch types for clarity and texture.
Minimize thread breaks and production downtime.
Enhance the visual appeal of the embroidery.
By understanding their role, you can better evaluate their expertise.
2. Look for Expertise and Experience
When selecting a digitizer, their experience speaks volumes. Look for professionals who specialize in a variety of embroidery styles, including:
3D puff embroidery for raised effects.
Applique embroidery for intricate layering.
Custom patches for detailed branding.
Experienced digitizers often understand the nuances of various embroidery machines and fabric types, which is vital for delivering flawless results.
3. Review Their Portfolio
A robust portfolio is a window into the digitizer’s capabilities. When reviewing their work, consider the following:
Clarity: Are the stitches smooth and precise?
Complexity: Can they handle detailed designs like logos or intricate patterns?
Diversity: Do they have experience with multiple fabric types, such as cotton, polyester, or denim?
Pay attention to how well their digitized designs translate into actual embroidery, as this reflects their skill level.
4. Check Their Technical Proficiency
A proficient digitizer should be adept at using professional software like Wilcom, Pulse, or Hatch. Their expertise with these tools ensures:
Accurate stitch placement.
Proper density settings to avoid puckering or thread breaks.
High-quality output files compatible with your embroidery machine.
Ask them about their technical process and the software they use to understand their approach.
5. Prioritize Customization Capabilities
Each embroidery project is unique, and a good digitizer should tailor their work to match your specific needs. Look for services offering:
Custom logo digitizing for branding.
Monogram digitizing for personalized designs.
Anime or complex graphic digitizing for detailed artwork.
The ability to adapt and innovate sets exceptional digitizers apart from the rest.
6. Assess Turnaround Time and Communication
Efficiency and responsiveness are key when working with a digitizer. Delays can disrupt your project timelines, so choose a professional who guarantees prompt delivery. Evaluate their communication style by noting:
How quickly they respond to queries.
Whether they provide clear timelines for project completion.
Their willingness to incorporate feedback and revisions.
7. Consider Pricing and Value
While cost is a factor, the cheapest option isn’t always the best. Instead, focus on value. A reliable digitizer may charge a premium, but its work saves you money in the long run by reducing machine downtime and material waste. Look for pricing models that align with your budget without compromising on quality.
8. Seek Recommendations and Reviews
Ask for referrals from other embroidery professionals or check online reviews to learn about the digitizer’s reputation. Testimonials and ratings can provide insight into:
Consistency of quality.
Reliability and professionalism.
Customer satisfaction.
9. Test Their Services
Before committing to a digitizer, consider ordering a sample project to evaluate their performance. This trial run can help you assess their attention to detail, problem-solving skills, and overall quality.
10. Look for Long-Term Collaboration Potential
Building a strong relationship with a trusted digitizer benefits your business over time. A digitizer who understands your brand’s needs and preferences can deliver consistent results while helping you scale your embroidery operations efficiently.
0 notes
Text
Best Applique Digitizing Service in UK

APPLIQUE EMBROIDERY DIGITIZING
The Best Applique Embroidery Digitizing Service in UK. Elevate the customization of your child’s apparel, including shirts, robes, blankets, and onesies, or enhance the aesthetic of your kitchen aprons with precision and sophistication. Experts Punch delivers high-quality digitized files for embroidery, ensuring a seamless and professional touch to your projects. Our services are tailored for machine embroidery, providing not only premium quality but also an economical solution for your customization needs. Experience the epitome of professionalism with Experts Punch’s hassle-free and cost-effective digitizing services.
APPLIQUE WITH ZIG ZAG & SATIN STITCH | APPLIQUE EMBROIDERY DIGITIZING
Secure your fabric with meticulous satin and zigzag stitches, transforming it into captivating appliqué embroidery. Entrust the digitization of your appliqué to the expertise of Experts Punch, offering premium embroidery digitizing services at the most competitive prices. Benefit from swift turnaround times and witness real sewouts that bring your designs to life. Elevate your embroidery projects with the precision and excellence that define Experts Punch’s commitment to quality craftsmanship.
APPLIQUE WITH RUN STITCH
Secure the fabric with a meticulous outline and elevate it to appliqué perfection with Run Stitch detailing. Entrust the digitization of your appliqué to the embroidery expertise of Experts Punch, providing top-notch (Applique Embroidery Digitizing Service in UK) at the most economical prices. Benefit from a rapid turnaround and witness real sewouts that bring your designs to life with precision and finesse. Choose Experts Punch for embroidery digitizing that combines affordability with quality craftsmanship.
0 notes
Text
Digitizing Embroidery of Applique Design
Applique Digitizing design is one of the best ways to add variety and style. In modern machine brooding, replicating appliques in comparison to traditional applications is very easy and fast. It is a reality that apps are easy to search, but you have to consider the factors and conditions when you are working. Sticking also forms the basis of the sticking application, such as sticking technology. Wondering how to digitize an applique style for embroidery? Be mindful that an embroidery digitizer should have the required experience when introducingdigitization to recognize the specifications of sewing applique design.
Would you like to digitize your embroidery design? You will contact Dynamic Design in order to get the professionals working. With on-time delivery at reasonable rates, you get high quality jobs.
Apps for your comprehension are split in good quantities, which makes the application's embroidery digitization very important. It is a common assumption that digitizing applications is very easy, but due to bugs, it can be worse. Most of the implementations are, however, of poor quality.
Implementation of Digitizing Embroidery
Do you ever wonder if the digitization of embroidery will be implemented? Tips for application scanning applique sticking designs start with importing the image file into the sticking software. You have to increase the size accordingly if you have a tiny imported file. First, it takes time for you to monitor the image. Remember that there is an application method in your computer program for doing this work. In order to trace the image, you need to place the anchor points or nodes on the design's contours. Drag them and move them closer to the real contours until the nodes are closed. You'll zoom in closely when you do this to see the details and edit them.
Consider outsourcing the service to us at (https://embexpert.net/index.php
0 notes
Text
FAS3003 - Selecting final samples for my final outcome
This week, I will now be selecting and producing my best samples to use in my final outcome. After getting some helpful feedback, I decided to produce a range of feathers in the image below. I have created a list for the quantity of samples that is needed.


During the private study week and the following week, I started producing my:
disperse dye feathers on polyester crepe back satin and Vilene interfacing
procion dye screen prints on natural cotton fabric for my quilted feathers and sequins with quilting technique.
embroidered lace sequins, layered with Aquafilm, white netting and orange and blue organza with the design on top.
machine embroidery and applique techniques on print feathers.
Completing these processes were very time consuming due to repeating some of the designs by hand such as re-painting and applying the screen for my procion dye screen prints. Another technique that took a lot of time was painting and printing my feather prints onto the fabric and interfacing.
I have resolved these problems by:
using multiple disperse dye prints in one go to save time.
using more screens in rotation to finish prints more quickly.
prepared different coloured bobbins and used one colour to complete part of my embroidered lace sequins.
If I were to do these techniques again, I would definitely plan my time more precisely (e.g. disperse dye printing in the morning session) so that I wouldn't overwork myself.


0 notes
Text
Discover our best choice of alphabet for embroidery machine

Stitching Style: Choosing the Best Alphabet for Your Embroidery Machine
The world of embroidery machine fonts, also known as alphabets, can be vast and dazzling. From classic block letters to whimsical scripts, the options seem endless. But with so many choices, selecting the perfect alphabet for your project can feel overwhelming. Fear not, embroidery enthusiasts! This blog post delves into our top picks for embroidery machine alphabets, helping you find the ideal font to bring your creative vision to life. Factors to Consider When Choosing an Alphabet: Before diving into specific fonts, let's explore some key factors to consider when selecting an alphabet for your embroidery machine: Project Style: Is your project classic and elegant, or playful and whimsical? Choose an alphabet that complements the overall style of your project. Fabric Type: Some alphabets are better suited for specific fabrics. Bold, blocky letters work well on sturdier fabrics like denim, while delicate scripts might be more appropriate for lighter fabrics like cotton voile. Stitch Density: Densely stitched alphabets will appear bolder and more pronounced, while alphabets with lower stitch density create a more delicate look. Consider the desired level of detail for your project. Letter Size: Ensure the alphabet offers the size range you need for your project. Some alphabets might not be available in very small or very large sizes. Our Top Picks for Embroidery Machine Alphabets: Now, let's explore some fantastic alphabet options to inspire your next project: Classic Block: A timeless choice, the classic block alphabet is perfect for adding bold lettering to bags, shirts, or home decor accents. Its clean lines and good stitch density ensure readability even in smaller sizes. Satin Stitch Alphabet: This alphabet utilizes the satin stitch technique, creating a smooth, filled look ideal for a more formal or elegant touch. It pairs beautifully with monograms or personalized gifts. Applique Alphabet: This alphabet allows you to combine embroidery with applique techniques. Each letter is outlined in stitching, and you can then fill it with fabric scraps for a unique, textured look. Outline Alphabet: A versatile option, the outline alphabet offers a clean, minimalist look. It's perfect for projects where you want the lettering to be subtle or for layering with other decorative elements. Script Alphabet: For a touch of whimsy, a script alphabet adds a personal and elegant feel. Script alphabets come in various styles, from flowing calligraphy to playful handwriting fonts. Bonus Tip: Many embroidery software programs allow you to test different alphabets with your chosen design before stitching. This is a great way to visualize the final outcome and ensure the font complements your project perfectly. Beyond Our Top Picks: Exploring the Font Frontier The world of embroidery alphabets extends far beyond our top picks. Here are some additional resources to help you explore further: Online Embroidery Stores: Many online embroidery stores offer a wide variety of downloadable alphabets in various styles. Embroidery Design Websites: Websites specializing in embroidery designs often have collections of alphabets included with their designs. Free Embroidery Fonts: While quality might vary, some websites offer free downloadable embroidery alphabets. Remember: The best alphabet for your project is the one that speaks to your creative vision and complements the overall style of your creation. Don't be afraid to experiment and explore different fonts to find the perfect match! Happy Stitching! With a diverse selection of alphabets at your fingertips and the knowledge to choose the right one for your project, you're well on your way to creating stunning and personalized embroidery designs. So, fire up your embroidery machine, unleash your creativity, and let the stitching magic begin! Direct Access To Shop /Fonts More of 100 fonts available ... ... ... Read the full article
0 notes
Text
Types of Embroidery Machines and their Functions

The art of embellishing fabric or other materials with the use of thread or yarn is called embroidery. Moreover, embroidery can use other materials like sequins, beads, pearls, and quills. These days, you can see embroidery on skirts, jeans, golf shorts, caps, headgear, coats, overlays, blankets, dress shirts, and stockings. In embroidery, a vast array of colors and thread types are employed. It’s also utilized for materials for clothes and gifts. Machine embroidery is the term for the technique of creating a pattern on textile material with the use of an embroidery or sewing machine. It is mostly used for corporate advertising, uniform decoration, and product branding (logo). In the fashion sector, it’s also utilized to embellish clothing. Fanciers and craftsmen utilize machine embroidery on garments and home decor to enhance the present. Consider designing wall hangings, quilts, etc. We shall discuss all of the many kinds of embroidery machines in the below section. Additionally, there are contemporary embroidery machines. That is computer-controlled machine embroidery that has been computerized. Weavetech, being the best textile machinery manufacturer in Gujarat, delivers innovation and quality. So why look anywhere else when you can connect with us for innovation and quality.
Mechanical Embroidery Machine
There are other kinds of embroidery machines, but this is the first one that functions similarly to a household sewing machine. Here, the machine uses the needle to pierce the fabric material; the real fabric, needle, and treads are not attached. This machine pulls the stretched thread through the hole to make the embroidery design over the fabric. Additionally, this machine functions just like a standard sewing machine.
Free-motion Machine Embroidery
This kind of free-motion machine embroidery uses a regular zigzag sewing machine to create embroidered motifs. This is primarily utilized for customization, meaning that it has less automation and innovation. The machine’s feeding dog was covered, and a human manipulated the cloth by hand to create a design. The running stitch will be used to make the embroidery. Thicker lines are needed for patterns so that the machine can perform a zigzag stitch. Whatever the design created for this, it is unique and cannot be duplicated exactly. Another name for it is a free-hand sewing machine. Here, visualize the needle as a pencil and use it to create the design on the fabric by moving it in the direction you want.
Cornely Hand-guided Embroidery
Hand-guided embroidery requires one human operator to control the machine’s speed and accuracy while utilizing the artistic ability of a trained embroiderer. Special chain stitch, satin stitch, long and short stitch, cording, and applique may all be produced with this machine. Interior designers are well familiar with this hand-guided needlework. The cost of the embroidered job will vary based on design times, size, intricacy, and size. Following the creation of this machine, individuals realized that more diverse embroidery machine designs were required, which led to the introduction of computer-controlled embroidery machines.
Computer-Controlled Embroidery Machines
All contemporary embroidery machines are solely computer-controlled. The devices we observed in the previous section are sewing machines that also function as embroidery machines. However, these are exclusively meant to be embroidered. With these kinds of machines, the design is pre-programmed into the machine by the program format. The fabric is then put into the hoop, which is then fastened onto the machine. At that point, the machine automatically begins to embroider in accordance with the program. This computerized embroidery machine requires a variety of inputs.
The machine’s straightforward, independent touchscreen interface will let users adjust many parameters, including design, stitch type, stitch length, and other necessary factors. This activity does not require the hiring of professional labor because the machine generates an accurate design based on input instructions. Here, all that is required is the creation of a simple pattern in software, which must then be fed into the machine interface and turned on. The machine will then automatically begin to embroider the fabric, stopping itself if a thread breaks.
1- Single-head embroidery machine: This machine has a single embroidery head, as the name would imply. The machine’s arms move in accordance with directions, and the embroidery head remains stationary. This device will have seven to fifteen needles. operating at a speed of roughly 300–1000 stitches per minute (the machine’s manufacturer may have an impact on the number of needles and stitches per minute).
2- Multi-head embroidery machine: This machine has a single embroidery head, as the name would imply. The machine’s arms move in accordance with directions, and the embroidery head remains stationary. This device will have seven to fifteen needles. operating at a speed of roughly 300–1000 stitches per minute (the machine’s manufacturer may have an impact on the number of needles and stitches per minute).
3- Schiffli embroidery machine: These devices are used in the Schiffli product line. The fabric that requires embroidery is fed into the Schiffli machines vertically, which is a unique characteristic that is achieved entirely through the use of a device. The method of stitching will be horizontal needle entry. At the same height, every needle is positioned in a straight line and simultaneously pierces the fabric. Here, the cloth is gripped, and as it moves both horizontally and vertically, a design is eventually created on the fabric. Two textiles in total can be treated. Due to the individual handling of each needle, color shift is possible. Depending on the type of machine, 2200 needles can be inserted into fabric in a single shot.
Transform your textile operations with Weavetech, your gateway to the best textile machinery in Gujarat. Elevate your production standards and efficiency. Choose Weavetech for cutting-edge technology and unmatched quality. Seize the opportunity to enhance your textile business contact us now to weave success together.
This Blog Originally Posted Here:
https://www.weavetech.com/types-of-embroidery-machines-and-their-functions/
0 notes
Text
Second Printing Workshop 10th October
In this workshop, we were taught the basics of screen printing and collaging techniques you can create with the process. In this session I tried my best to focus more on the religious aspects of this project and finding a way to visually communicate that connection.


I began by finding some already processed screens so I could take the patterns that had been created in them. I was quite successful in this aspect as I found some great patterns that were nature-esque that I used to my advantage.
The photo on the right shows one of my final outcomes using only the patterns that were available to me at the time. I didn't like this sample very much as it was mainly experimentation with colour composition and getting used to the screen printing process again. Later on at home, I added to this piece on top, using free-machine stitch embroidery and applique which improved it drastically. The use of these techniques helped secure the relationships between each printed piece and tie them together in a way that further displays my narrative.


Another way we were taught to use screen printing was to use an empty screen, taping stencils and masking tape onto the wrong end, so the printing ink gets blocked to create a particular pattern that you want. I used this technique with the photos above, the left being the stencil itself using only old newspaper. The second photo shows the finished outcome using this stencil. Again, I did work back into it later with hand stitching around the crown of her head. I like the layering on this one, as the yellow circle design reminds me of the pagan wheel of the year (the traditional yearly celebrations) which I think works really well because I follow this calendar. However, the negatives to this print work, I think, is that its very simple piece and could be more developed than what it is. Perhaps I would print a darker colour with pattern over the top of the green silhouette to create some depth to the piece.

Overall, I think this workshop was successful because I left with lots of decent samples that I then had the opportunity to work back into with various techniques to improve the pieces but also my skills.
0 notes
Text
15 most important uses of zig-zag sewing machine

The versatility and power of the modern zigzag sewing machine has revolutionised the textile industry. This machine’s distinctive stitch pattern expands its usefulness much beyond that of standard straight stitching.
A zig-zag sewing machine is versatile, able to do everything from hemming and mending to decorative stitching and quilting.
This blog post will examine fifteen of the most significant ways in which zigzag sewing machines are used nowadays.
Zig Zag Sewing Machine: One Tool, Multiple Uses
Part One: Needlework Fundamentals
1. Hemming And Mending:
One of the most typical functions of a zigzag sewing machine is hemming clothing and repairing holes. The elasticity of the zigzag stitch prevents the fabric from tearing at the seams. The machine can also easily repair tears or frayed edges, giving your garments a polished and long-lasting appearance.
2. Seam Finishing:
Zigzag stitching is great for binding off unfinished seams and hemming raw cloth edges. Using a zigzag stitch, you may securely fix the cloth and stop it from fraying by sewing near to the edge. This method is great for adding durability to seams in lightweight materials.
Part Two: Embroidery Decorations
3. Appliqué:
Zigzag threads are best. The machine makes it simple to sew appliques onto a background fabric for use in clothing, pillowcases, or quilts. The zigzag stitch is both functional and decorative, providing a strong join and a unique aesthetic to your work.
4. Embroidery:
Because of the versatility of zigzag sewing machines in terms of stitch width and length, they can be used to create elaborate embroidered patterns. Create eye-catching patterns on fabric to elevate your apparel, accessories, and home decor by combining different zig-zag stitch settings.
Part Three: Stretchable Fabrics And Extensions
5. Stretch Fabrics and Sewing:
When dealing with knits or spandex, zigzag stitches are a necessity. Because of their elasticity, these textiles call for special stitching. The pliability of the fabric is ensured by the zigzag stitch, which prevents the seams from popping and allows the cloth to stretch without tearing.
6. Attaching Elastic:
The elastic of underwear, bathing suits, and waistbands is easily attached with a zigzag sewing machine. A secure and comfortable fit is achieved thanks to the combination of the stretchy fabric and the zig-zag stitch.
Part Four: Closures and Buttons
7. Button Holes:
Zig-zag sewing machines are great for making a variety of buttonholes, which brings us to our seventh use case. Different looks, such keyholes and rounded buttonholes, can be achieved by adjusting the parameters. Using this function, sewing buttons onto clothing is a breeze.
8. Attaching Buttons:
Zig-zag stitches are a tried and true method of button attachment. A strong bond is formed between the button and the fabric thanks to the zigzag stitch’s many passes.
Part Five: Patchwork and Quilting
9. Quilting:
Zig-zag stitches are frequently employed in quilting to bind the layers of fabric and batting. This stitch reinforces and stabilises the quilt, making it more durable and reliable for everyday usage, and it also enhances the aesthetic appeal of the blanket.
10. Patchwork:
A zigzag stitch is frequently used for putting together cloth patches for patchwork crafts. It’s a beautiful and functional way to bind fabric pieces together. The width of the zigzag stitch can be adjusted to suit the needs of various patchwork patterns.
Part Six: Overcasting and Seam Reinforcement
11. Seam Reinforcement:
The crotch seam of pants and the underarm seam of a blouse are two examples of seams that require reinforcing stitches due to their high stress potential. Extra strength and resistance to tearing are provided by zigzag stitches in these stress points.
12. Overcasting:
Zigzag stitches are used for overcasting to minimise fraying of the fabric’s raw edges. This method produces a smooth final product and guarantees the fabric won’t wear out quickly.
Part Seven: Gathering and Ruffles
13. Make Your Own Ruffles:
Using zigzag stitches, you may make lovely ruffles for your clothing, drapes, or other textile projects. You may alter the volume and depth of the ruffles by modifying the stitch length and width, giving your products more depth and dimension.
Part Eight: Free-Motion Embroidery and Darning
14. Darning:
For darning, all you need is a darning foot to convert your zigzag sewing machine into a darning machine. Socks and sweaters, for example, can have their holes or tears patched up in this way. The zigzag stitch is shaped to fit the damaged region, making the patch nearly invisible.
15. Free Motion Embroidery:
For free-motion embroidery, a zigzag sewing machine can have the feed dogs removed or a free-motion foot attached. By freely repositioning the fabric under the needle, you can stitch elaborate patterns, decorations, or even letters. The zigzag stitch allows you more leeway as an artist by providing dimension and substance to your embroidery.
Conclusion
The zigzag stitch is a time-saving technique for gathering fabric. Controlled gathers can be made for skirts, sleeves, and other embellishments by stitching two parallel lines with a long stitch length and then tugging the bobbin threads.
To sum up, zigzag sewing machines are fantastic resources for any sewer. There is no limit to what you can do with one of these machines, from simple mending and hemming to complex embroidery and quilting.
Discover the full potential of your zig-zag sewing machine by reading about its 15 most significant uses in this blog post. Then, utilise that knowledge to confidently and creatively take on fascinating sewing projects.
0 notes
Text
Unleashing Creativity with Custom Embroidery Near Me
Custom embroidery is an art form that has been around for centuries, and it continues to be a popular method for personalizing and decorating items. With the rise of technology, finding a custom embroidery service near you has never been easier. This article will guide you through the process of finding and choosing the best custom embroidery service in your area, as well as provide some creative ideas for your next embroidery project. Nyc Custom Embroidery
What is Custom Embroidery?
Definition and History
Custom embroidery is a process where thread is sewn onto a material to create a design.
This art form dates back to ancient times, with evidence of embroidered clothing found in archaeological sites.
With the invention of the sewing machine in the 19th century, embroidery became more accessible and widespread.
Today, modern technology has made it possible to create intricate and detailed designs with the help of computerized embroidery machines.
Types of Custom Embroidery
Monogramming: This involves embroidering initials or names onto items, often used for personalizing gifts or marking belongings.
Logo embroidery: Businesses often use this type to brand their uniforms, promotional items, or merchandise.
Applique: This involves sewing a piece of fabric onto another for a multi layer effect.
Cross-stitch: A popular type of embroidery that uses x-shaped stitches to create a picture or pattern.
Finding Custom Embroidery Near Me
Online Search: The easiest way to find a custom embroidery service near you is by doing an online search. Websites like Google and Yelp can provide a list of nearby businesses, along with reviews from previous customers. Custom t shirts nyc
Local Directories: Check your local business directory or yellow pages for embroidery services in your area.
Word of Mouth: Ask friends, family, or colleagues if they can recommend a good embroidery service.
Local Craft Stores: Some craft stores offer custom embroidery services, or they may be able to recommend a local business.
Creative Ideas for Custom Embroidery
Personalize your clothing: Add a stylish touch to your wardrobe by embroidering your initials, a favorite quote, or a unique design onto your clothes.
Create custom gifts: Embroidered items make thoughtful and personalized gifts. Consider monogrammed towels for a wedding gift, or a custom embroidered baby blanket for a new arrival.
Brand your business: Make your business stand out by embroidering your logo onto uniforms, tote bags, or hats.
Decorate your home: Embroidered cushions, wall hangings, or tablecloths can add a unique and personal touch to your home decor.
Embroidery is a versatile and creative way to personalize and decorate items. Whether you’re looking to add a personal touch to your clothing, create a unique gift, or brand your business, custom embroidery offers endless possibilities. So why wait? Start exploring the world of custom embroidery near you today!
0 notes
Text
Embroidery Digitizing Service Tips From the Best in the Business

Embroidery digitizing is an art form, a delicate blend of creativity and precision. For those who have walked the path of transforming beautiful designs into intricate stitches, the journey is filled with passion and expertise. Here, we share the secrets of the trade, offering you a comprehensive guide to mastering embroidery digitizing.
Understanding Embroidery Digitizing
Embroidery digitizing begins with understanding the fundamental concepts. Before diving into complex embroidery designs, it’s crucial to grasp the basics. This foundation will set you up for success as you advance in your craft. This digital embroidery file, often in a format like .DST or .PES, contains the instructions for the machine to follow, ensuring that each stitch is placed with absolute precision. The process involves several key steps:
Artwork Preparation: Begin with a high-quality image. The clarity and detail of your artwork directly affect the final output.
Choosing the Right Software: Professional digitizing software is essential. Programs like Wilcom, Hatch, and Brother PE-Design offer a wide range of tools and functionalities.
Setting Up the Design: This includes deciding on the stitch type, direction, density, and order. Each decision impacts the texture and appearance of the final embroidery.
Test and Adjust: After the initial digitization, run a test stitch. This helps identify any adjustments needed to perfect the design.
Key Elements of Professional Embroidery Digitizing
1. Quality of Artwork
The foundation of exceptional embroidery digitizing lies in the quality of the artwork. A clean, high-resolution image ensures that every detail is captured accurately. Pay attention to:
Clarity: Ensure the image is free from blurs and distortions.
Detail: Fine details should be prominent. Simplify complex images to ensure they translate well into stitches.
Contrast: High contrast images help in defining the edges and details clearly.
2. Choosing the Right Stitches
Selecting the appropriate stitch types is crucial. Here are some common stitches used in embroidery digitizing:
Satin Stitches: Ideal for outlining and creating smooth, shiny surfaces.
Fill stitches: Used for filling large areas. They can be varied to create different textures.
Running stitches: best for outlining and detailing small areas.
3. Stitch Direction and Angle
The direction and angle of stitches can significantly affect the final look of the embroidery. Properly aligned stitches enhance the design's aesthetic appeal and durability. Consider the following:
Consistency: Maintain consistent stitch angles for uniformity.
Flow: Ensure the stitches follow the natural flow of the design.
Overlap: Overlapping stitches can prevent gaps and add dimension to the embroidery.
4. Stitch Density
sew viscosity refers to how nearly the aches are placed together. It impacts the texture, weight, and overall appearance of the embroidery. Key points to consider include:
Balance: Avoid overly dense stitches that can cause fabric puckering or breaking of threads.
Coverage: Ensure sufficient coverage without overcrowding.
Fabric Type: Adjust stitch density based on the fabric being used to prevent damage and ensure a smooth finish.
Advanced Techniques for Superior Digitizing
1. Applique Embroidery
Applique is a technique where pieces of fabric are stitched onto a larger piece to create patterns or images. It adds depth and color variation to the embroidery. Key steps include:
Design Planning: Outline the areas where the appliqué fabric will be placed.
Secure Stitching: Use tack-down stitches to hold the appliqué fabric in place.
Finish Edges: Apply satin or zigzag stitches along the edges to prevent fraying.
2. 3D puff embroidery
3D puff embroidery creates a raised effect, adding dimension and texture to the design. It's commonly used for hats and sports apparel. To achieve this:
Foam Selection: Use embroidery foam beneath the stitches to create the puff effect.
Stitch Coverage: Ensure the stitches completely cover the foam to prevent it from peeking through.
Edge Sealing: Apply satin stitches to seal the edges and maintain the 3D effect.
3. Blending and Gradient Effects
Blending colors and creating gradients can create a stunning visual effect in your embroidery. Techniques include:
Layering Stitches: Gradually change the stitch colors to blend from one shade to another.
Density Variation: Adjust stitch density to create smooth transitions.
Direction Change: Alter stitch angles to enhance the blending effect.
Tips from the Embroidery Businesses Experts
1. Continuous Learning
The world of embroidery digitizing is constantly evolving. Stay streamlined with the latest trends, techniques, and software updates by:
Joining Forums and Communities: Engage with other digitizers to share knowledge and experiences.
Attending workshops and webinars: Learn from industry experts and expand your skillset.
Exploring Online Tutorials: Utilize online resources to master new techniques and software tools.
2. Invest in quality equipment.
High-quality equipment can significantly improve your digitizing experience and output. Consider:
Software: Invest in professional digitizing software with advanced features.
Embroidery Machine: Choose a reliable machine with precise stitching capabilities.
Hardware Upgrades: Ensure your computer has the necessary specifications to run the software smoothly.
3. Attention to Detail
Success in embroidery digitizing lies in the details. Pay close attention to:
Stitch Placement: Ensure each stitch is accurately placed to enhance the design.
Color Choices: Select thread colors that complement the fabric and design.
Testing: Always run test stitches to identify and correct any issues before final production.
4. Customer Collaboration
Work closely with your clients to understand their vision and requirements. Effective communication can lead to better results and higher customer satisfaction. Key points include:
Design Consultation: Discuss the design details, colors, and fabric choices with your clients.
Feedback and Revisions: Encourage clients to provide feedback and be open to making necessary adjustments.
Transparency: Keep clients informed about the process and any potential challenges.
Conclusion
Embroidery digitizing is a skill that combines art and precision. By focusing on quality artwork, appropriate stitch selection, advanced techniques, and continuous learning, you can master this craft. Remember, attention to detail and effective client collaboration are key to delivering exceptional results. Embark on your digitizing journey with passion and dedication, and watch as your creations come to life, stitch by stitch.
#digitizing#embroidery pattern#embroidery#custom patches#custom embroidery#business#apparel#artwork#embroidelicious#machine embroidery#clothing#fashion trends#fashion#support services
0 notes
Link
Its me Lenore, a crafter and a sewer. In this post, I am gonna sharing an amazing that helped me to buy the top embroidery machine for patches. Its embroik.com where I read the complete review and buying guide of patches embroidery machine and bought my first embroidery equipment. Thanks.
#embroiderymachine#embroidery#patches#patch#embroik#embroiderydesign#machineembroidery#patch embroidery#patch embroidery machine#embroidery machine for patches#best embroidery machine for patches#embroiderydesigns#embroideryart#machineembroiderydesigns#sewing#embroideryartist#embroiderylove#embroideryhoop#embroiderythread#applique#embroiderywork#machineembroiderydesign#quilting#embroideryhoopart#handmade#embroiderypattern
11 notes
·
View notes
Text
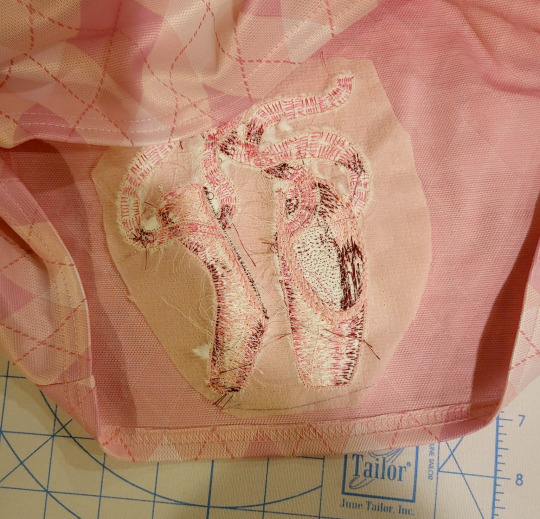
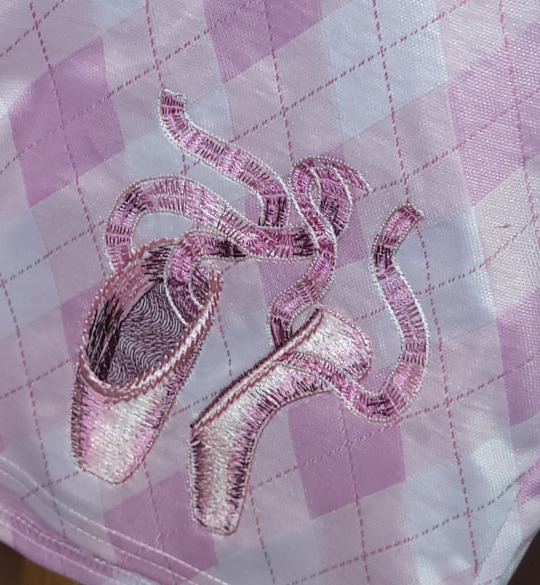
Machine embroidery tutorial: Shaded pointe shoes.
I know from working in a sewing machine store that a lot of people are intimidated by machine embroidery. So, I made this pattern the other day, and let's go into how I stitched it out.
Embroidery does not need to be this hard. If you've never used the embroidery part of your sewing machine before, stick some cheap stabilizer in the hoop with some fabric, grab a random pattern from inside your machine, and run all or part of it. Once you do this, you will be much less afraid of it. Some brands of machines will include some stabilizer and fabric for you to run an initial test on.
So, let's get into something more complicated. There's a few things that we're going to do to make this more complicated. The first is the surface that we're embroidering on. I'm using a dress from Five Below, which is made of a knit fabric without a whole lot of stretch. The surface that you embroider on does impact how you want to set up the design. I also want to do the embroidery very close to the bottom edge of the dress, so it's won't fit in the whole hoop. The third difficult thing about this design is that there's a machine applique in the very start. This applique will let you embroider this on a fabric that isn't pink, and the shoes will stay pink.
Regarding the applique, I've been told that it's small enough that you could cut up an actual pointe shoe and use the satin from that, if you want to. I don't have a shoe on me, since I don't dance (I just do the costumes). But, if you're making a gift for someone who dances on a level where they're throwing away dead pointe shoes instead of keeping them in a memory box, it could be a fun addition. Here is a template to show you how big the pieces need to be. Important: do not cut out the appliques using this template. The machine will cut them out for you later. You can use this template to know if the pieces of fabric you are using for your applique will be big enough. You want your pieces to be larger than this template, but they don't need to be significantly larger.

The first problem that we're going to deal with is the fact that the dress has a small amount of stretch in it. We don't want the section of the dress that has our embroidery to stretch at all. At best, it'll look bad, and at worst, it'll destroy the whole embroidery. To stop the area with the embroidery from stretching, we're fusing a fusible non-showing mesh stabilizer onto the area to be embroidered. I'm doing this design in 6x6 hoop, so I got a piece that was about 8x8 and fused it on the area.
When you're using fusible stabilizer, you want to iron it on from the fabric side. Some nylon meshes will melt if you iron them, but most importantly you want the face of the fabric to be perfectly smooth.
When the design is done, this stabilizer will remain in the design forever. This stops the design from stretching, even when the garment is worn or washed. The mesh is light and flexible enough that it doesn't drastically change the way the fabric moves.

The next thing we need to do is add stabilizer to the hoop. Embroidery machines put a lot of stress on the fabric, and so it's not usually possible to embroider without stabilizer. In this case, we're also using the stabilizer to hold the fabric, since we can't get it in our hoop.
This is two layers of soluble tear-away stabilizer. If I'm using tear-away, I always use lightweight tear-away. Using multiple layers of tear-away will put less stress on the stitching when you rip it away, because you rip one layer at a time. This requires less force than ripping a thicker layer away all at once. We're using tear-away because we don't want to keep all this stabilizer in the design. The specific one I'm using is a tear-and-wash stabilizer, where the extra bits of tear-away can be washed out of the finished design.
The other thing that I did while the iron was still hot was to press the pink satin that I'm going to use for my applique. Applique is much easier if the fabric you're using isn't wrinkled.

We're going to pop the hoop into the machine. Now is a good time to go into your machine's manual and find out where the basting line setting is. Bernina, Viking, and Pfaff all make this super easy, and Baby Lock and Brother do not. For Brother and Baby Lock, it's often in the "embroidery edit" mode. If it really gives you trouble, tell me what hoop you need it for, and I'll make you a version of this file with a predone basting line.
Some people like to spray-baste into the hoop. I do not like this, because it makes your hoop and your machine all ugly and coated in spray shit. If you are one of those people who likes spray, 100% take the hoop outside to spray! It's not good for your body and you'll get overspray glue all over your shit. If you're not a person who spray-bastes, do not become one.
Some people like to use tacky or sticky tear-away for this. That's a completely fine and valid option, but that shit is expensive. Basting line is cheap. A general stabilizer rule is that you can cheap out on tear-away and cut-away, go mid-price on fusible, and buy a good brand of tacky or wash-away. This is because it's pretty hard to fuck up cut-away stabilizer, but also pretty hard to make a good stabilizer that's also tacky and n'gones when you need it to. Since I have 200 things I'd rather do with $86 than buy a roll of stabilizer, I just use the basting program for 99% of my embroideries.
Before you run the design, flip through your color blocks. Make sure that your design starts with five blocks of the same color. If your machine decides to "help" you and merge the color blocks together, this won't work properly.
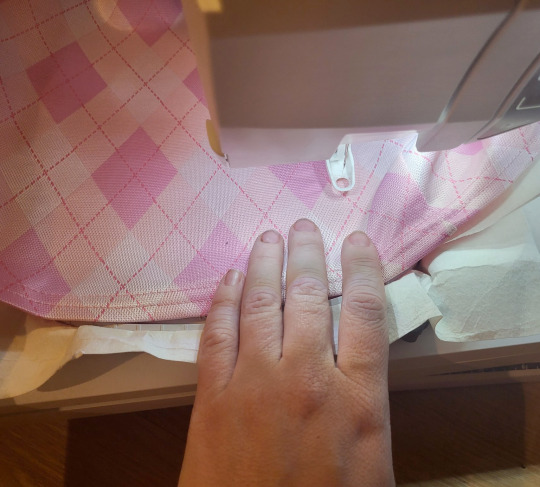
Now, put your fabric in the hoop, wherever you want the final design to go. I lined the hem up with the bottom of my hoop. Run your basting line, holding your fabric flat on the hooped stabilizer. You might need to pause and unpause the machine several times to move your hand and keep the fabric flat. Remember that as long as your hand is flat on the fabric, and you have a presser foot on your machine, you can't hit your fingers with the needle. Despite what this image shows, I often hold the fabric down with my whole hand in the center of the hoop.
Floating the fabric like this, instead of hooping, also allows you to line the fabric up very precisely. It's hard to hoop something 100% straight, but it's pretty easy to float it 100% straight.
Another advantage of floating with a basting line is that the line will show you exactly where the design is going to go. If you don't like where it's going to go, you only have about 50 stitches to rip out so that you can change the location. You'll know that your embroidery unit will have enough space to move. All hail the basting line.

The machine is going to sew an outline, and then stop. This is showing you where to place your applique fabric.
A good general rule is that any time a pattern sews an outline and then stops, you're supposed to put fabric down there. If your pattern does this, and you're not sure why, see if there's any instructions that tell you what applique fabric to use where.
If your machine sewed this outline and then kept going, make sure you have color block merge turned off, and that you're not in monochrome mode.
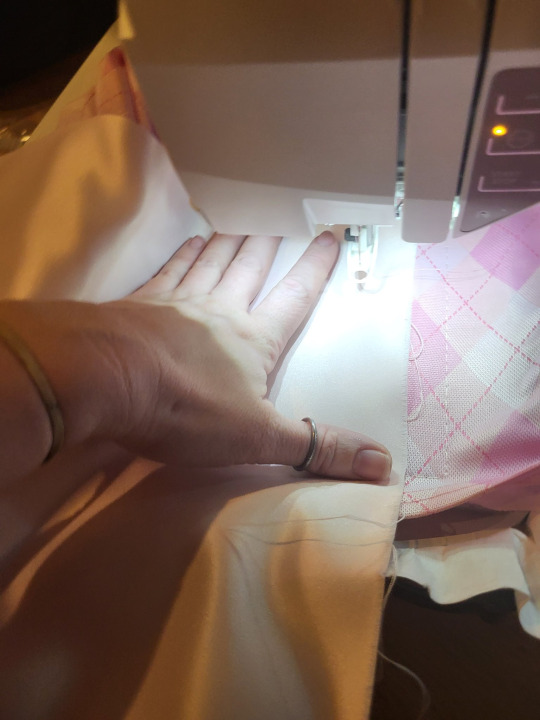
Just like when you were basting your garment onto the hoop, you're going to hold the applique fabric over the outlined area, and keep it there while your machine runs the next color.

Once the machine has sewn the applique fabric down, you'll want to trim away the excess. I use some very small curved scissors for this, since the curve lets me get very close to the stitching line. Generally, you want to be as close as possible to that line.
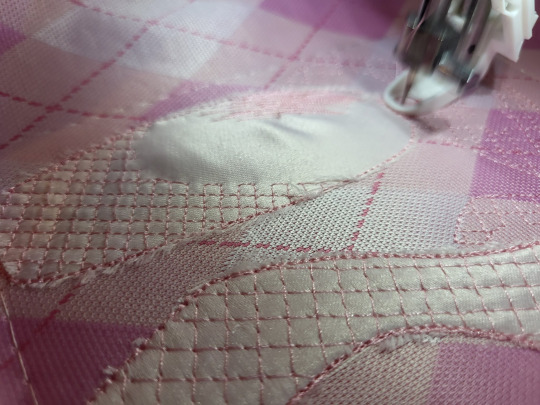
Once you have your applique fabric sewn in, you can more or less just watch the machine and change the colors when it asks you to. You'll see that I have a bulge in my applique fabric on the lefthand shoe. This isn't ideal, but since this design has so much stitching, it all got flattened down in the end.
You'll see that there's a lot of crosshatching on the surface before the colors go on. This is to stabilize the fabric and keep it in place when the big feathered stitches start. These stitches also sew the stabilizer to the back of the fabric, which means that if your fusible mesh starts to lose fusion, it'll still be completely sewn down.
If your machine has manual tension, you'll want to lower it after the crosshatching layers are done. You can change it after color block 5.

The reason that you're lowering your tension is that these stitches are particularly lorge and lomg, and that means the machine can pull just a bit harder than normal when it moved form place to place.
If your machine doesn't cut jump stitches (the long stitch the machine leaves when it jumps from one section of embroidery to another), you will want to trim them between color blocks, instead of waiting until the end.
If you're watching this stitch out and going, "Wait, I was told my machine embroidered at 1200 stitches per minute! This isn't going at 1200 stitches per minute! What gives?" well, I'll tell you. Your machine's stitch speed was rated by the absolute fastest that the machine head can go. It doesn't actually take into account how fast the embroidery unit can move. Since these are longer stitches, the embroidery unit can't move fast enough to keep up with the machine going 1200 stitches a minute, so the machine has to slow down to deal with the e-unit's speed.
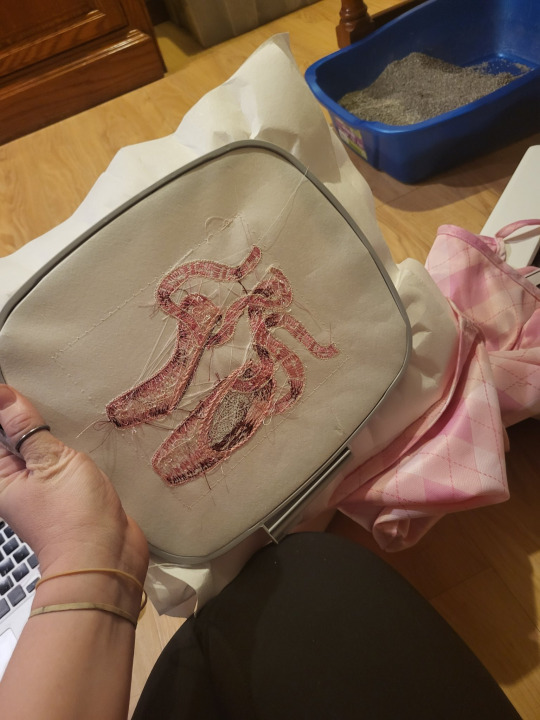
If you did this correctly, the back of your embroidery will not be sewn to the front of your embroidery, and you'll have something that looks like this.

You'll need to cut your bobbin thread about every 10 stitches in your basting line. This is pretty easy, because the stitches are so big. I do this from the back side because the stabilizer protects the fabric from my scissors.
Then, flip it over and rip out your tear-away, one layer at a time. You'll notice that my back side is really ugly. This is because Viking and Pfaff don't cut the bobbin thread between jump stitches. In the old days, this meant that they jammed and locked up significantly less than other brands, but now there's things like wiper feet and tail-clearing programs that work a lot better. No, there's no way to activate bobbin jump cuts. If there was, I'd have done it by now.
Now, using your iron if you need to, peel back the extra fusible mesh and trim around your design. You can get closer to it than I did here. I'm just lazy.
If you're using polyester embroidery thread, you get some pretty good results by sticking a press cloth over the design and ironing it. This will make sure the threads line up and stay extra shiny.

And that's important because polyester thread already doesn't have the same luster as rayon thread. It's more sparkly than lustrous. However, some brands of thread are just easier to work with. When we're testing machine problems in my store, we test with isacord, since it's the least likely to have problems, so we can rule out thread problems. But man, I just think it's so ugly. I used polyester for this design, because it's long stitches on a garment, and I need that strength, but I'm not happy about it.
Anyway, there you go, that's the basics of a somewhat complex machine embroidery pattern.
I'm considering making a separate blog for embroidery stuff. I'm really tired of the embroidery industry charging for tutorials like this or instructions on the embroidery software (looking at you, Floriani Total Control University DVD for $218), but this blog isn't really for my vendetta against the embroidery industry.
#machine embroidery#tutorial#not lolita#applique#pointe shoes#ballet shoes#you know that moment in welcome to the black parade where they modulate and it's just such a good moment
50 notes
·
View notes
Text
I received a small sample of threads by Aurifil when I renewed a subscription to a quilt magazine last year. The first time I used the thread was for a friend's quilt (finished the top) and this stuff is phenomenal. Zero lint, strong stitches, sharp seams, no tangling, and fell in love with it. Buuuut this stuff isn't cheap. At all. I dream of having their entire collection of thread, but that's a long way down the road. This here? $160 Each spool has 1422 yards/1300 meters, which is nearly twice more than the spools of Gutterman I use (Gutterman is the best affordable thread Joann Fabrics offers IMHO).
For piecing, you want to use 50 wt thread with an 80/12 size needle. The larger the number for piecing thread, the more fine it is. 28 wt is really thick, 80 wt is very fine. The thread needs to fit the needle, or you'll end up with torn threads, tangling, and skipped stitches. For 50 wt, 80/12 is best.
For quilting, it depends on what kind of quilting you're doing and the look you want. Pearl Cotton is very thick and adds serious boldness, but you need an embroidery needle because the threads are too thick for a standard handsewing or quilting needle. The standard thread weight is 28 wt, which makes for a more visible bolder look than finer threads. I prefer variegated threads done with my machine because the tension never breaks the thread, whereas I end up breaking the thread when handquilting. Thread made for handquilting also tends to be stiff, and only tangles if cut too long (18 inches is recommended, but I tend to cut 24 inches). Using a thread wax, like Thread Magic, prevents tangling and bearding (batting coming through the sewing stitches), and it also makes the thread pass through the layers very smoothly.
My dream is to have Aurifil's enter 50 wt solid spools collection, and their entire 28 wt collection (which includes variegated) buuuut that's really expensive. I'm talking over $2k worth of thread. I'll be happy with just a collection of Aurifil's neutral colors 50 wt collection.
Here are the link to their full 28 wt threads. It's $1800 USD aka waaaaaay outta my price range.
Here's the link to their 50 wt collection of neutral colors. It's $160 USD, which is outta my price right as well.
My favorite, more affordable, brand for piecing and handquilting is Gutterman. 100% cotton, low lint, good color selection (when Joann Fabrics has it in stock), and 800 meters per spool. The dream, however, is Aurifil.
Here's a link to Aurifil's info website. You'll learn a lot about thread that way.
As for needles, this is what I use. I have enough needles to last several years. They're sharper the more well known brand Shmetz, and I absolutely love these.
16 notes
·
View notes