#Bootable Pendrive
Explore tagged Tumblr posts
Visit Tumblr Blog
Explore Tumblr blogs with no restrictions, modern design and the best experience.
Last Seen Tumblr Blogs


Fun Fact
Premium Tumblr themes are available from anywhere between $9 to $49.
Text
youtube
BOOTABLE PENDRIVE KAISE BANAYE IN HINDI | Windows 7, 8, 8.1, 10 | Power ISO, Rufus |By Sachin Sharma
#bootablependrivekaisebanayeIN HINDI#bootablependrivekaisebanayewindows10IN HINDI#bootable pendrive kaise banaye windows7IN HINDI#bootablependrivekaisebanayewindows8IN HINDI#bootable pendrive kaise banaye windwos 10 rufusIN HINDI#bootable pendrive kaise banaye windows 10 power iso#making bootable pendrive IN HINDI#create bootable pendrive IN HINDI#Youtube
0 notes
Text
0 notes
Text
Price: [price_with_discount] (as of [price_update_date] - Details) [ad_1] Universal Compatibility: This 4-in-1 flash drive features Micro USB, USB A, Type-C, and Lightning interfaces, making it compatible with iOS, iPad, Android, and PC devices. Ample Storage: With 64GB of storage capacity, you can conveniently store and access a vast amount of data, including photos, videos, documents, and more. Effortless Data Transfer: Seamlessly transfer files between different devices, freeing up space and ensuring your important data is accessible whenever and wherever you need it. Compact and Hangable Design: The mini-sized pendrive is not only compact but also hangable, allowing you to attach it to your keychain, lanyard, or bag for easy access on the go. Quick and Secure Backup: Use the built-in Lightning connector to back up your iOS and iPad devices, ensuring your valuable data is safe and easily recoverable. Tired of receiving low quality images of special trips via online apps. Here is a cheap , fancy and best external mini pendrive pendrive for mobile phone compatible with iphone or android. Pen drive with c type otg - Type C pen drive connects with almost all latest mobile phones in market. Multi use - This high speed bootable pen drive 64gb can is ultra light in weight and comes with 64 gb storage and keyring holder which can easily fit in your car key, carry your music on move. Multi port pendrive 64gb c type otg and usb - Pendrive 64 gb is cheapest price solution for your phone internal storage system issue. Multiple Connector Options: It features C-Type, OTG, USB-A Micro, and Lightning connectors, allowing you to connect to various devices without the need for additional adapters or cables. [ad_2]
0 notes
Text
All About your Ultimate Solution for Writing Windows ISO Images to USB Drives
In the realm of technology, where versatility and efficiency are paramount, Win32 Disk Imager stands tall as a beacon of reliability and convenience. For those seeking to harness the potential of their Windows operating systems through ISO images, this tool emerges as an indispensable asset. With its seamless capability to write Windows 10 or Windows 11 ISO images onto removable drives like USB pendrives, win32diskimager epitomizes speed, security, and dependability.
At its core, Win32 Disk Imager represents a fusion of simplicity and power. Its intuitive interface belies its robust functionality, catering to both novice users and seasoned tech enthusiasts alike. With just a few clicks, users can initiate the process of writing boot images onto SD cards or USB flash drives, paving the way for effortless system installations or recoveries.
In the fast-paced digital landscape, time is of the essence. win32diskimager portable recognizes this urgency, boasting exceptional speed in writing ISO images. Whether you’re embarking on a fresh Windows installation or creating backup drives for emergencies, Win32 Disk Imager ensures prompt execution, sparing you the agonizing wait times associated with conventional methods.
Security is non-negotiable when dealing with critical system files. win32 disk imager download upholds this principle with unwavering dedication, employing robust encryption protocols to safeguard your data throughout the writing process. Bid farewell to concerns about data breaches or corruption—win disk 32 imager prioritizes the confidentiality and integrity of your ISO images, allowing you to proceed with peace of mind.
In the realm of software, reliability reigns supreme. Win32 Disk Imager earns its stripes as a stalwart ally, consistently delivering flawless performance when entrusted with the task of writing ISO images. Say goodbye to frustrating glitches or unpredictable errors—Win32 Disk Imager stands as a beacon of dependability, ensuring that your system installations proceed without a hitch.
The hallmark of Win32 Disk Imager lies in its seamless integration into your workflow. Whether you’re a seasoned IT professional or a casual user, Win32 Disk Imager accommodates your needs with unparalleled ease. Its user-friendly interface eliminates the complexities typically associated with disk imaging tools, empowering you to accomplish your objectives with effortless efficiency.
Versatility is the cornerstone of Win32 Disk Imager’s appeal. Beyond its primary function of writing Windows ISO images, this tool serves as a Swiss army knife for tech enthusiasts. From creating bootable Linux distributions to cloning entire drives, Win32 Disk Imager adapts to a myriad of scenarios, emerging as a versatile companion in your digital endeavors.
As technology evolves, so does Win32 Disk Imager. With each new iteration, this tool evolves to address the ever-changing needs of its user base. Whether it’s enhancing compatibility with the latest Windows versions or introducing innovative features, Win32 Disk Imager remains at the forefront of innovation, ensuring that you always have access to the most advanced disk imaging capabilities.
Ready to embark on your journey with Win32 Disk Imager? Downloading the latest version is a breeze, thanks to its user-friendly website and streamlined installation process. With just a few clicks, you can harness the full potential of this powerful tool, unlocking a world of possibilities for writing Windows ISO images to USB drives with unparalleled speed and reliability.
In a digital landscape fraught with challenges, Win32 Disk Imager stands as a beacon of reliability, security, and efficiency. Whether you’re a seasoned IT professional or a casual user, this tool empowers you to unleash the full potential of your Windows operating system with unparalleled ease. Say goodbye to tedious installation processes and hello to seamless system deployments—Win32 Disk Imager is your ultimate solution for writing Windows ISO images to USB drives. Download the latest version today and experience the difference for yourself.
[Related site1] [Related site2]
0 notes
Text
HOW TO CREAT BOOTABLE PENDRIVE
Rufus is a popular utility software used for creating bootable USB drives. It is widely used for various purposes, including installing operating systems, running live Linux distributions, updating firmware, and more. Here are some key features and functionalities of Rufus:
Bootable USB Creation: Rufus allows you to create bootable USB drives from ISO image files for operating systems such as Windows, Linux, and others.
UEFI and BIOS Support: Rufus supports both UEFI and BIOS boot modes, making it compatible with a wide range of systems and devices.
Partition Schemes and File Systems: You can choose from various partition schemes (MBR, GPT) and file systems (FAT32, NTFS, exFAT) when creating bootable USB drives, depending on your requirements.
Bad Block Detection: Rufus includes a feature to check for bad blocks on the target USB drive before creating the bootable drive, helping to ensure data integrity.
Fast and Lightweight: Rufus is known for its speed and efficiency. It is a lightweight application that launches quickly and performs USB drive operations rapidly.
User-Friendly Interface: The interface of Rufus is simple and easy to use, making it accessible to users of all skill levels.
Open Source: Rufus is open-source software, which means its source code is freely available for inspection, modification, and distribution by anyone.
Overall, Rufus is a versatile and reliable tool for creating bootable USB drives, and it's a popular choice among users who need to install or run operating systems from USB media. However, as with any software, it's essential to download Rufus from a trusted source to avoid potential security risks from downloading malware-infected versions.
0 notes
Text
How To Create Norton Ghost Bootable Pendrive | Make Ghost File | Install...
youtube
0 notes
Text
Creating Bootable-Flashdrive using RUFUS
RUFUS
is a utility that helps format and create bootable USB flash drives, such as USB keys/pendrives, memory sticks, etc. It can be especially useful for cases where: you need to create USB installation media from bootable ISOs (Windows, Linux, UEFI, etc.) you need to work on a system that doesn't have an OS installed.
This Vlog will show you what Rufus is and how to use it to create a working Bootable Flashdrive.
SCRIPT
Vlogger 1:
Background and trivia about rufus
Vlogger 2:
step by step instruction/tutorial to download and operate Rufus in order to create bootable flashdrive.
Vlogger 1:
cessation
Tools needed for the vlog/blog post:
Computer/laptop
Flashdrive ( 8-16GB recommended size)
Camera
Capcut (editor app)
Google Drive
0 notes
Text
Make a bootable pen drive using system recovery tools such as antivirus software, disc repair utilities, and backup applications. Using a trusted password manager application, create a safe, encrypted password database on the pen drive. Use it to display your work at art shows, creative meet-ups, and networking events. Visit Our Company And Order Now!!
1 note
·
View note
Link
With the advent of ultraportable laptops, optical drives are a thing of the past. Although not having optical drives allows manufacturers to make devices lighter, it causes problems for users when they want to install new operating systems, since most of them are still available in the form of downloadable CDs, DVDs, and ISOs. For users of these devices, the only option left is to use a flash drive to install the operating system of their choice.
1 note
·
View note
Text
youtube
Create Multi Bootable Pendrive From ISO | All in One |Windows 7,8,10| Boot Pendrive | By Sachin Sharma
0 notes
Video
youtube
How to Make Bootable Pendrive Ate 2021 In Hindi | कोई भी बूटेबल Pendrive...
#how to make windows 11 bootable pendrive in 2021#zupphacked#windows 11#bootable pendrive#new oprating system#tech youtber#youtube
0 notes
Photo

How to Make Bootable PenDrive | Amazing Trick 2020
Hey, do you want to know the process of making bootable pendrive? Check this post (How to Make Bootable PenDrive) to make your pendrive bootable.
0 notes
Text
New Post has been published on Strange Hoot - How To’s, Reviews, Comparisons, Top 10s, & Tech Guide
New Post has been published on https://strangehoot.com/how-to-make-bootable-pendrive-using-cmd/
How to Make Bootable Pendrive Using CMD

How to Boot Pendrive
In older days, computers/laptops were available with DVD/CD drives. These drives were used to install any application or operating system. Nowadays, these drives are no longer available with new generations of computers/laptops. USB Pen Drives have taken the place of DVD/CD drives.
Why boot pendrive?
There are times when your operating system is corrupted or somehow, it is not working properly. A need to install the operating system arises. But, the problem is when your operating system doesn’t work, you cannot proceed beyond booting your computer. In such a situation, you can boot the operating system via bootable pendrive.
There can be other symptoms that your operating system doesn’t work properly. Some of them are – hardware drivers are outdated or corrupted, some of the system files are corrupted, hard drive issues such as a bad sector or other hardware failures.

Bootable pendrive helps to repair, recover and re-install the operating system. The USB port(s) are available in all computers/laptops/MacBooks. It is a simple step thereafter. Insert your bootable pendrive in the USB port, select the bootable pendrive from your BIOS setup and continue the process of repairing the operating system.
Assuming you already have created a bootable pendrive, let us see the steps how to boot the pendrive from different machines having Windows, Linus, Mac OS operating systems.
How to boot pendrive – Windows 10
In the USB slot of your computer, insert the pendrive which is bootable.
Press the POWER button to start your computer/laptop.
Press the F2 key on your keyboard. You will be on the BIOS setup of your machine.
Make sure you are on the Main tab of the window.
Press the RIGHT-ARROW key on your keyboard to navigate to the Boot tab. You will see the Boot Settings section as shown below.
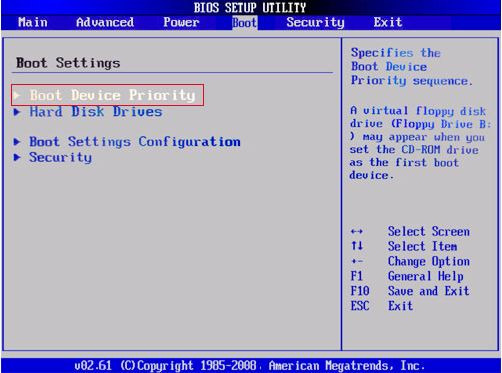
Make sure you are on the Boot Device Priority menu. Press the UP ARROW key if required to be there.
Press ENTER. Make sure you are on the 1st Boot Device list item.
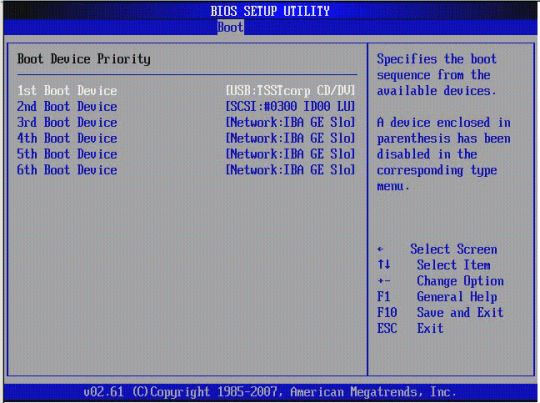
Press the UP ARROW key if required to navigate to the 1st Boot Device list item.
Press ENTER. The list of options appears. For example – CD/DVD drive, HDD or USB Flash drive.
Select the USB-HDD option.
Press ENTER. The option is selected.
Press the F10 key to save and reflect the changes.
Press the ESCAPE key. You will be moved out from the BIOS menu.
Now, your operating system, Window 10 will be loaded from the bootable pendrive.
How to boot pendrive – Windows 7
Insert the pendrive which is bootable in the USB port of your computer/laptop.
Press the POWER button to start your computer/laptop.
While booting, the Boot Menu prompt appears. (In some computers, you may not have this option. In that case, press F2 to open the BIOS setup and change the boot settings from there.)
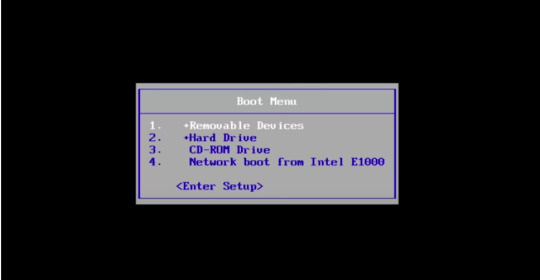
Use the ARROW keys of your keyboard and go to the Removable Devices option.
Press ENTER. Select the USB option from the list.
OR
Alternatively, from the BIOS menu, select the Advanced BIOS Features list item.
Make sure the First Boot Device list item is highlighted. If not, please press the UP ARROW key on your keyboard to go there.
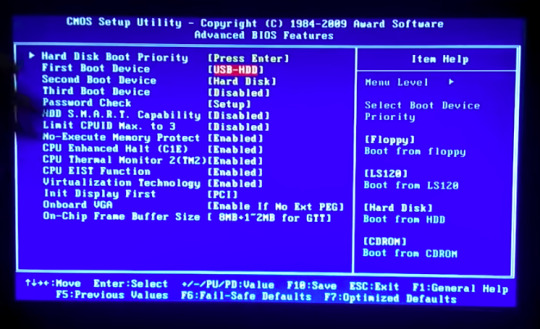
Press ENTER. A menu with the list of options appears.
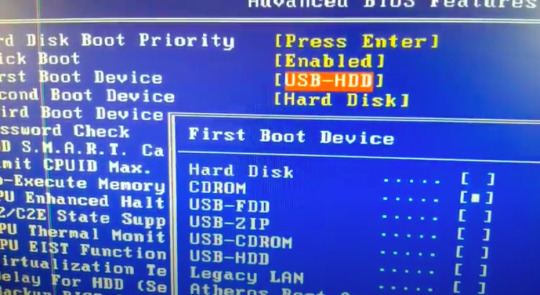
Move to the USB-HDD option using the DOWN ARROW key on the keyboard.
Press ENTER. The above mentioned option is selected with a square bullet sign in the square brackets.
Press the F10 key to reflect the changes of your bootable device option.
Press the ESC key to exit the BIOS setup.
How to boot pendrive – Linux
Press the POWER button to switch off your computer/laptop.
Insert your bootable pendrive in the USB slot of your computer/laptop.
Press the POWER button again to power on your machine.
Press the F2 key or the F10 key of your keyboard. You will see the list of methods in the list.
Choose the boot method as Full installation media (DVD or USB).
The Linux operating system will automatically be loaded from the inserted bootable pendrive.
How to boot pendrive – Mac OS
Power of your MacBook.
Insert your bootable pendrive in the USB slot of your Mac.
Use the POWER button to switch on your Mac.
Press and hold the Option (alt) key quickly on the startup. The macOS Utilities screen appears.
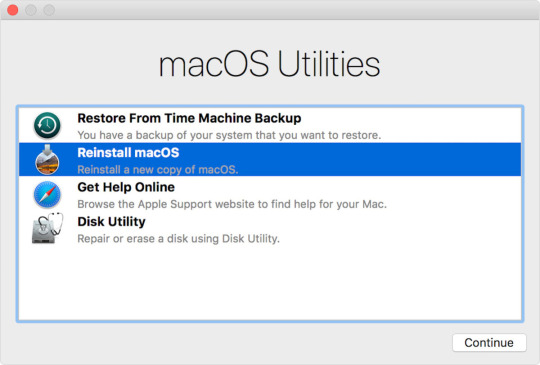
Click to select the Reinstall macOS option. Click the Continue button.
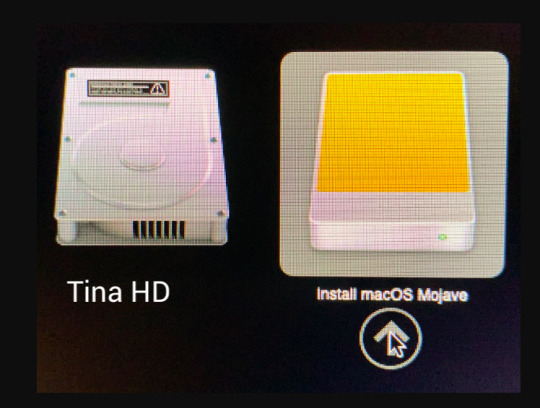
Click the USB drive icon where Install MacOS Mojave label option is shown. The Mac OS will be loaded from the USB drive.
We have seen the steps of booting the different operating systems from the USB drive using the Boot menu option from the BIOS. In the next section, we will see how to make a USB drive or a pendrive bootable.
Operating systems are installed from the hard disk drive of your computer/laptop. If the operating system is not working properly or giving issues booting from your machine’s hard drive, there is a need to make the bootable pendrive. To repair and re-install the operating system, a bootable pendrive can be used to fix the issue.
There are two ways to make the pendrive bootable.
Make bootable pendrive using the User Interface
Make bootable pendrive using the Command Line option (CMD)
We will go through steps of making a bootable pendrive using CMD option in different operating systems.
Make Bootable Pendrive using CMD in Windows
A USB flash drive with at least 16 GB storage is required to make it bootable. Follow the steps below to create the USB pendrive bootable in Windows OS.
Format the pendrive. We will use the command prompt for formatting the drive.
Press the Windows key + X on your keyboard. The command window appears.
Insert the pendrive in the USB slot of your computer/laptop.
Make sure you are in the “Windows → System32” directory.
If not, type cd.. You will need to type this command till you are in your C:/ drive.
Then, enter cd Windows. You will be in the Windows directory.
Enter cd System32. You will be in the System32 directory.
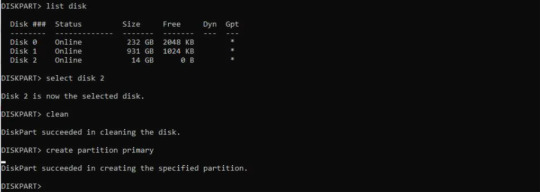
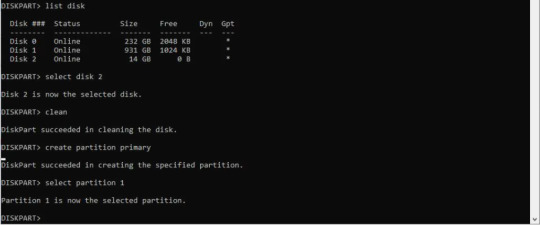
Enter the command, diskpart.
Press ENTER.
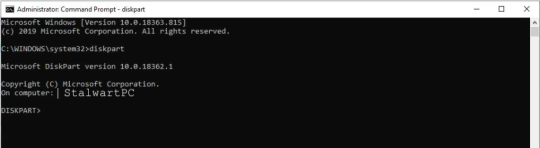
Enter the command, list disk, press ENTER. You will see a list of disks available in your computer including your USB flash drive.
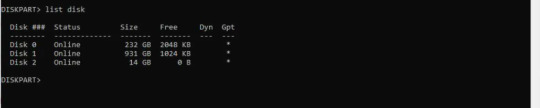
In the screen above, the Disk 2 option with the 14GB size looks like it is the USB disk drive.
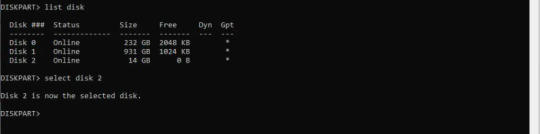
Enter the command, select Disk 2. Press ENTER. You will see the message as the selected disk is now disk 2.
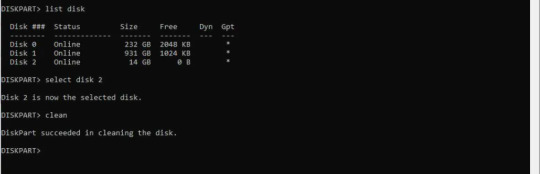
Enter the command, clean. Press ENTER. The formatting starts.
Once the formatting process is finished, you will see the success message.
After formatting the pendrive, you need to create the bootable.
Based on your Windows version, you can create the bootable format. There are 2 options for bootable format. 1) Master Boot Record – MBR (used for Windows 7) 2) GUID Partition Table – GPT (used for Window 8 and later)
For Master Boot Record bootable:
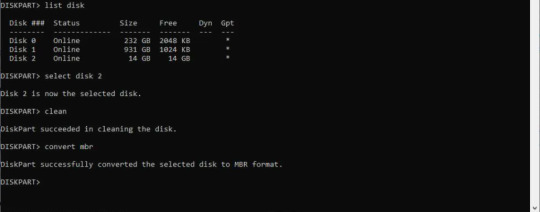
Enter the command, convert mbr.
Press ENTER. The successful conversion to the Master Boot Record format message appears as below.
Enter the command, create partition primary. Press ENTER.
The partition success message appears as below.
Enter the command, select partition 1 and press ENTER.
Enter the command, active. Press ENTER. The current partition is enabled.

Enter the command, format fs=ntfs quick. Press ENTER. The partition is formatted as NTFS file system.

The formatting process of a pendrive is completed successfully.
Enter the exit command to come out from DISKPART. You have successfully created the Master Boot Record bootable format.
For GUID Partition Table bootable:
You will need to create two partitions instead of one. In this case, the Operating System (Windows 8 or later) recognises the FAT32 file format.
All the steps are the same as mentioned in the Master Boot Record formatting the drive.
Enter the command, convert gpt. Press ENTER.

Type the command, create partition primary size=64. Press ENTER. This creates an EFI partition. EFI partition supports the hard drive drivers available with Windows 8 or later.
Now, type the command, create partition primary. Press ENTER. This creates a data partition.

Type the command, select partition 1. Press ENTER. The partition 1 is selected.
Type the command, format fs=fat32 quick. Press ENTER.

Type the command, select partition 2. Press ENTER. The partition 2 is selected.
Type the command, format fs=ntfs quick. Press ENTER.

For Master Boot Record bootable: Now, copy the ISO image file from your computer to your pendrive. NOTE: ISO image file is the image of a disc. The file format is .iso and used as a compressed format of installation software.
To do the above step, go to the directory where your ISO file is stored.
Type the command, copy f:\<filename>.ISO /s/e/f g:.
Press ENTER. NOTE: In the above command, the f: drive is the source drive where your ISO file is located. You will need to replace <filename> to the actual ISO name. G: drive is your USD drive slot.
You have successfully created the bootable pendrive for Windows 7 or earlier versions.
For GUID Partition Table bootable: Go to https://efi.akeo.ie/downloads/efifs-latest/.
Download these folders: ntfs_x64.efi, ntfs_ia32.efi, ntfs_aa64.efi, ntfs_arm.efi from the above URL.
Copy these folders in the partition 1 you have created in your pendrive.
Copy the ISO image of the operating system in the partition 2 you have created in your pendrive.
You have successfully created the bootable pendrive for Windows 8 or later versions.
Make Bootable USB using CMD in Linux
Prerequisite – your computer should be powered on.
Insert the USB pen drive in the USB slot of your computer/notebook.
Open the terminal. To open the terminal, press the CTRL + ALT +T keys on your keyboard.
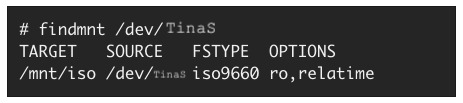
Enter the command, dmesg. In the terminal window, you will see the message logs. In the screen below, TinaS is the name of the USB flash drive you have inserted in the USB slot.

Type the command su. Press ENTER.
Enter the root password. Press ENTER.
Now, enter the command, findmnt device. Replace device with the USB drive name you found in the above screen.

Press ENTER.
The next step is to unmount the pendrive.
Look at the TARGET column in the above screen. It shows /mnt/iso.
Enter the command, umount /mnt/iso. Press ENTER. The unmount process is successful.

Enter the command, dd if =/image_direction/image.iso of =/dev/device bs=blocksize. Press ENTER. This command copies the installation ISO image directly to your pendrive.
In the above command, replace /image_directory/image.iso with the actual directory path of the ISO file you have stored. (The bs command is used to increase the speed of the writing process.)

Let’s take an example: If the ISO image is located in /home/devuser/Downloads/rhel-server-7-x86_64-boot.iso and the detected device name is TinaS. The command will be as follows.

The command, dd will finish copying the image to the pendrive.
Wait for a few seconds to complete the process.
Log out from the root account. Remove your USB drive from the USB slot of your computer.
You have successfully created the bootable pendrive.
Make Bootable USB using CMD in Mac OS
Prerequisite – Your USB flash drive should have at least 12GB free space available.
Make sure your USB flash drive is formatted as Mac OS Extended.
For more information, click here: https://support.apple.com/en-us/HT208496. You can perform the steps from the MacOS Utilities → Disk Utility option.
Inject your USB flash drive in any one of the USB slots of your Mac.
Press the POWER button to start your Mac.
Open the terminal.
Press the command + SPACEBAR keys on your keyboard. The spotlight search bar appears.
Enter the text, terminal.app and press ENTER. The terminal is open.
Enter the command, createinstallmedia when you are in the Resources folder. The command will look like below. (For each Mac OS version, the command is given.)
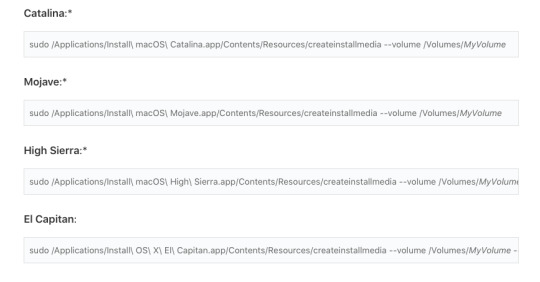
In the above command, replace MyVolume with your USB drive name.
Press ENTER after entering the createinstallmedia command.
Enter your password when prompted. Press ENTER.
Enter y when prompted. This will format the volume. Press ENTER.
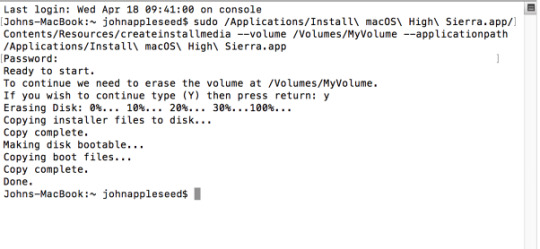
When it shows the Done message, and you are at root, quit the terminal. To quit the terminal, enter the command, exit. Press ENTER.
Eject the USB flash drive. Your bootable USB drive is ready.
Conclusion
It is recommended to make pendrive bootable or your USB drive bootable with the command line (CMD) window. There are chances that your drive is not formatted properly using the User Interface (UI) or the partitions may not get created appropriately using the User Interface.
The steps to make a bootable device via CMD are lengthy, but it ensures that the bootable drive is made without any errors and while you want to load the operating system using your bootable pendrive, it loads successfully.
It is always suggested to keep the USB drive bootable of your operating system and keep it as backup. Whenever you encounter any issues with the operating system, you are ready with the bootable pendrive.
Read: How to update BIOS software of computer
0 notes
Link
Bootable Pendrive से तात्पर्य है, Windows Vista, Windows 7, Windows 8 और Windows 10 को Install करने के लिए Pendrive को Bootable बनाने की आवश्यकता है इस प्रक्रिया के लिए आपको Minimum 8 GB की एक Pendrive और Windows USB/DVD Tool नामक एक Software की आवश्यकता होगी।
0 notes
Text
PEN DRIVE or FLASH DRIVE : HOW TO CHOOSE IT
PEN DRIVE or FLASH DRIVE : HOW TO CHOOSE IT

Pen drive or USB flash drives are must-have gadgets in today’s Era. Everybody wants to own it. However, Cloud storage is a new and innovative solution, But you cannot ignore the importance of USB pen drives. So, let’s take a look at some important features that every buyer should know before owning it.
WHAT IS A PEN DRIVE
A Pen drive is a data storage device that includes flash memorywi…
View On WordPress
#best flash drive#Best pen drives of 2019#bootable pendrive#computer pen drive#hp#kingston#sandisk#sony#usb disk#USB flash drive
0 notes