#CSS Button Maker
Explore tagged Tumblr posts
Visit Tumblr Blog
Explore Tumblr blogs with no restrictions, modern design and the best experience.
Last Seen Tumblr Blogs


Fun Fact
28.6 is the average number of monthly visits per US mobile user.
Text
CSS Button Maker
In the realm of web design, buttons play a pivotal role in enhancing user interaction and navigation. They serve as clickable elements that guide users through various actions, such as submitting forms, navigating to different pages, or initiating transactions. While the functionality of buttons is crucial, their visual appeal is equally important in creating an engaging user experience. This is where the CSS Button Maker steps in, offering designers a seamless way to create captivating buttons that seamlessly integrate into their websites.
Understanding CSS Buttons
Before delving into the CSS Button Maker, it's essential to understand the significance of CSS (Cascading Style Sheets) in web design. CSS provides the styling instructions that dictate how HTML elements should appear on a webpage. By leveraging CSS properties and selectors, designers can customize the look and feel of buttons, including their size, shape, color, and animation effects.
Traditionally, crafting CSS buttons involved writing code manually, which could be time-consuming and prone to errors, especially for complex designs. However, advancements in web development tools have led to the emergence of intuitive solutions like the CSS Button Maker, simplifying the button creation process and empowering designers to unleash their creativity.
The CSS Button Maker: A Game-Changer for Designers
The CSS Button Maker is a user-friendly tool designed to streamline the creation of custom buttons without the need for extensive coding knowledge. With its intuitive interface and robust features, it enables designers to generate stylish buttons quickly and effortlessly. Let's explore some of the key functionalities offered by this innovative tool:
1. Template Library:
The CSS Button Maker provides a diverse range of pre-designed button templates, catering to various styles and purposes. Whether you're aiming for a minimalist look or a vibrant, attention-grabbing design, you can find templates that suit your needs. These templates serve as a starting point, allowing designers to customize them according to their preferences.
2. Customization Options:
Flexibility is a hallmark of the CSS Button Maker, offering a plethora of customization options to tailor buttons to your exact specifications. From adjusting dimensions and border radius to selecting colors and typography, designers have full control over every aspect of button design. Furthermore, advanced options such as hover effects and transitions enable designers to add interactive elements that enhance user engagement.
3. Real-Time Preview:
One of the standout features of the CSS Button Maker is its real-time preview functionality, which allows designers to visualize changes instantaneously. As you tweak various parameters and apply different styles, the preview pane reflects these modifications in real-time, providing immediate feedback. This iterative design process enables designers to fine-tune their buttons until they achieve the desired aesthetic and functionality.
4. Code Generation:
Once the desired button design is finalized, the CSS Button Maker generates the corresponding CSS and HTML code automatically. This eliminates the need for manual coding, making it accessible to designers of all skill levels. The generated code is clean, concise, and well-structured, ensuring seamless integration into any web project.
Conclusion
In conclusion, the CSS Button Maker is a versatile tool that empowers designers to create visually stunning buttons with ease. By combining intuitive functionality with robust customization options, it streamlines the button creation process and enhances the overall user experience. Whether you're a seasoned web designer or a novice exploring the world of CSS, the CSS Button Maker offers a user-friendly solution for crafting captivating buttons that captivate and engage users. Embrace the power of CSS Button Maker and elevate your web design projects to new heights.
0 notes
Text
index (I hope to follow this tag system lol)
#blinkies #stamps #gifs #favicons
edit: thx for the love on this post. im going to try and continually update this!
⇩ ⠀websites that are FULL of other web graphics below ⇩ ⇩ (+ some html tools!) ⇩
Graphics: blinkie maker : make your own blinkies! DOLLZ REVIVAL : a revival of pixel dolls where you can create and share your own. very cute! GlowTxt : create glowing transparent text gifs that say whatever u want HOARDER'S PILE : contains blinkies, buttons, stamps, and teddies plasticdino.neocities.org : blinkies Glitter Graphics : contains gifs, blinkies, dividers, and just sooo many web graphics Cute Kawaii Resources : contains gifs, blinkies, stamps, favicons, dividers, buttons, fonts, literally everything you need. its an insane resource Adrian's blinkie collection : collection of blinkies, stamps, and buttons ☆ (supplies.ju.mp) : blinkies, stamps, buttons, & favicons twigbranch.carrd.co : blinkies lallys.carrd.co : blinkies, stamps, dividers, and other resources Bugleeblinkie.carrd.co : blinkies, and 3 very special gifs at the end ;) unshinesblinkies.carrd.co : blinkies The 88x31 GIF Collection : buttons. there are 5 parts! huge collection! Bonnibel's Graphic Collection : blinkies WELCOME TO GIFCITY : blinkies, dividers, favicons, stamps cass-tastrophe.carrd.co : blinkies, stamps kotatsuOS : blinkies Cute web graphics : blinkies, stamps, dividers, and a LOT of other graphics, all very cute
HTMLS/neocities Stuff: MDN (mozilla.org) : if you're just starting out like me this is super helpful HTML Tutorial (w3schools.com): same here! (offers other programming languages as well!) Accessibility Checker(Free Scan) : a site you can use to check accessibility/ADA compliance when making your website! it will point out what needs to be changed. it is free, but they also offer paid services if you need more help imagecolorpicker.com : hex code picker. i use this one because you can upload an image, paste clipboard, OR type in the website and it'll grab a screenshot for you! something simple that was made really well. cssgradient.io : helps you make css gradients for backgrounds or whatever else you need them for smartgb.com : a free guestbook service FC2 Counter! : free "site visits" and "online now" counters. fully customizable Unclosed Tag Checker by Alicia Ramirez : does as it says, checks for unclosed tags (although I recommend using a program that does this as you write anyways. I use Visual Studio Code. Status Cafe : an updateable and embeddable status that you can stick anywhere on your site! it is mostly customizable with CSS but I have noticed a few small quirks with it
e10's web (neocities.org) <- shameless site plug. show it some love :P
#blinkies#stamps#favicons#gifs#old web graphics#old web aesthetic#old web stamps#old internet#old web#old webcore#2000s web#90s web#html#html css#html5#css#htmlcoding#web design#web resources#early web#early internet#neocities graphics#neocities#geocities#gifcities#web graphics#webcore
488 notes
·
View notes
Text
Neocities Websites for Decor (& Other Resources)
9/4 2:10pm
i've been working on my neocities website and wanted to compile a bunch of places where one can find decor. this is not an extensive list, but rather a bunch of places where you can start finding resources.
please note that various pages could strain the eyes, including flashing lights or colors. pages called 'blinkies' usually have flashing colors throughout. [* = prominent flashing lights]
all websites, resources, and thoughts are beneath the cut
decor
effects for mouse cursors, text, and sites - https://www.mf2fm.com/rv/
assorted decor, images, and more - https://shishka.neocities.org/shishka/toybox
* random gifs from the internet archive - https://gifcities.org
https://pinkukingdom.neocities.org/toybox
http://whimsical.heartette.net/material [has tos you need to follow]
https://cinni.net/?z=/toybox/ [love this website so much]
* assorted early internet graphics - https://www.glitter-graphics.com
https://graphic.neocities.org
https://strawberry-gashes.gensoukai.net/v2/
archived images - https://web.archive.org/web/20100211160439/http://neskaya.net/pixels.php
* https://kawaiiness.net/home.php [potential eye strain]
https://www.asterism-m.com/item/ [japanese site]
https://pixelsafari.neocities.org
https://foollovers.com/mat/index.html [japanese site. has tos]
* https://gothiclolita.neocities.org/materials
https://sozai.pooftie.me [pastels. very low contrast, hard to read warning]
https://scripted.neocities.org
https://arunyi.art/#goodies
https://nonkiru.art/resources
* https://animatedglittergraphics-n-more.tumblr.com / @animatedglittergraphics-n-more
https://drive.google.com/drive/folders/1eQx_UiPvEvI4ZZECoPOuRrLhIE_6XbBy [content guide here... 4k+ gifs and graphics by @topadie]
* https://cutewebgraphics.tumblr.com/directory / @cutewebgraphics
https://pngfarm.tumblr.com / @pngfarm
https://lostsozai.tumblr.com / @lostsozai
decor directories
https://directory.cinni.net/sozai/
https://pixelsafari.neocities.org/links/directory/
https://www.tumblr.com/gender444/680981849679511552/favorite-sozaiblog-materials-sites-fool-lovers
definitions
(for those who don't know and/or are just getting into website creation)
webmaster: person who coded/created the website
favicons: small icons or graphics, usually 16x16 pixels.
pixels: graphics either custom-made or found. i've seen this term used for favicons, adoptables, and other graphics.
emoticons: old term for emojis. typically custom emoji expressions
* blinkies: thin flashing or sparkling banners, usually with text, an image, and flashing lights. collectible.
toybox: collections of favicons, stamps, blinkies, buttons, and more. all up to the webmaster's discretion and preferences
* glitters: glittering or shimmering text or images
stamps: collectible rectangular images, usually 99x56px
buttons: images that are hyperlinked to other websites. often custom-made for one particular webmaster or site.
avatars: typically 100x100 pixel images
other websites
beginner's guide to html and css - https://webguide.neocities.org
dnd style character generator - https://harlekine.neocities.org
templates/themes - https://neothemes.neocities.org
photo editor - https://photomosh.com
rainbow text maker - https://www.glitter-graphics.com/generators/rainbow.php
various other resources - https://scripted.neocities.org
learn more about websites & neocities - https://sadgrl.online
assorted resources - https://www.tumblr.com/punkwasp/725206601551773696/neocitiesindie-webmastery-resources
get started with website creation - https://www.tumblr.com/oddmerit/685644129978499072/note-cause-im-getting-sick-and-tired-of-terfs
all types of resources - https://punkwasp.leprd.space/resources/
* = prominent flashing lights/colors

i suggest not linking back (aka hotlinking) to the resources on the website. instead upload it yourself onto either neocities or an image hosting site and include credit. this way, if the person hosting the image deletes their page or loses the image somehow, your website will still be fine. (i didn't do this and had to find everything all over again... )
i have found that the best websites to use as companions to neocities are w3schools, pinterest, tumblr, and any image hosting site. w3schools for coding tutorials. pinterest for inspiration or for graphics. tumblr for any type of decor and advice. to edit my code and have a live preview, i use codepen.io.
since you read through all this, maybe take a look at my neocities site and follow me! <3
#neocities#html#css#html css#neocity#favicon#web graphics#web design#web decor#pixel art#pixels#banners#webcore#read later#resources#website#carrd resources#indie website#indiedev#webdeveloper#2000s web#old web#geocities#geocity#neopets#neo y2k#y2k aesthetic
1K notes
·
View notes
Text

ATHENA - GIF PAGE !!!
This page is completely free. Please support me and my work by liking or reblogging this post.
[ INFORMATION ]
THIS CODE IS 100% JAVASCRIPT FREE!!!
The code comes in three versions!
All three versions include: Trigger code, Parting Code, Back to top Button
Version 1 and 2 include Infomation Pop Up
The parting part is easily removable if you don't want all gifs on one page.
The CSS part is shortened in all versions. The long CSS is available upon request for more editing options.
The Gif page works for all gif and gif icon sizes.
All Credits can be found in the page code!
All explanations on how to edit can be found in the page code!
The gifs in the not active parts (part 2 and further) will only start loading when the link is clicked and the part is opened.
Up to 5 parts can be added!
[ GUIDELINES ]
Do not claim as your own.
Do not remove the credit!
Do not use as a base code or take parts of this code for your theme.
Feel free to edit as much as you want!
If you are a gif maker and want the base code for the trigger or parting code shoot me a message.
Click the SOURCE LINK to be redirected to the preview and the code!
262 notes
·
View notes
Text

Advice; Where to Make Rules and About Pages
If you've read my advice post about the difference between about and rules pages and why they're both important, you may not be wondering the best way to make them. The good news is, there are plenty of options!
Tumblr
The simplest choice. In the past, people would make custom pages on their theme. However, since dash view has become popular (and you can't view custom pages via it, nor can you view them on mobile), most people simply post their about/rules page as a normal text post, and link to it in their pinned post. If you have a custom theme, make sure to link the pages in the navigation bar too!
Using a plain Tumblr post increases your page's readability, but reduces the amount of formatting you can do. If you make your pages elsewhere, you will be able to customise them a lot more.
Carrd
A free website maker. You can make a small site with a free account, and the prices are pretty reasonable if you need to make a bigger site. Carrd has a minimalist aesthetic, and it will also adjust what you make to fit a mobile browser (though this may break your formatting if you have designed something complicated).
Carrd is easy to use, but it is best used for simple designs. If you want to do something more complicated than a basic Carrd layout, you're going to spend a lot of time trying to make the formatting work. If you want multiple pages for your site, you're also going to spend a lot of time formatting as you can't clone pages, therefore have to recreate each one every time instead.
It uses markdown for formatting text. If you're familiar with it, this can speed up writing, but it may slow you down if you've never used it before.
One of the benefits of Carrd is that there are lots of free templates available within the rpc! Here are resources I found with a quick Google search, but there are plenty more out there if you look for them: [x] [x] [x]
Weebly
Another free website maker. You can make more for free here than you can on Carrd. Weebly sites should adapt to work on a mobile browser.
I've never seen anybody use Weebly for about/rules pages, but I do recommend it! It's very easy to use, and, unlike Carrd, you can copy and paste entire pages. This makes it ideal if you have lots of muses that you want to make individual about pages for.
It uses a more typical text editor than Carrd. Instead of markdown, it's more like Microsoft Word - where you highlight text and click buttons to add formatting. You also have HTML/CSS options.
Weebly does offer some free templates, but you're likely to want to edit them to suit your needs more. This is okay! It isn't difficult to do!
Google Docs
A popular, completely free option. As with Carrd, there are plenty of templates and resources within the rpc (here are three examples: [x] [x] [x]). These pages will be viewable on a mobile browser, but the theme may not translate well. Keep readability in mind if you use this option.
If you use this option, also make sure the link you share is viewer only and doesn't have editor permissions!
Other Options (WordPress, Self-Hosting, etc)
Don't feel you have to follow the crowd. If you like to use WordPress, use WordPress. You could also use Neocities, or any other website builder!
Personally, I already own a web domain because I have websites for other online activities, so I use about pages that I've coded from scratch and host them myself. For my rules page, I just use a Tumblr text post that's linked in my pinned post. In the past, I've used Carrd and Tumblr pages for about pages.
If you want to write your site using HTML, some free website hosters will allow you to do this (Neocities, for example). If you're interested in coding, I do recommend this! It allows you to have full customisability, and coding can be a really useful skill. However, one downside of this is it can make your pages hard to read on a mobile browser. It's up to you to decide how important this is.
If you're interested in learning HTML (as well as CSS, JavaScript, and other coding languages), this site is a great resource!
39 notes
·
View notes
Note
how do you make your blog look so cool and good on computer screen thing?? :')
hello ! :] i'm not entirely sure i understand the question, but if you mean this,,,
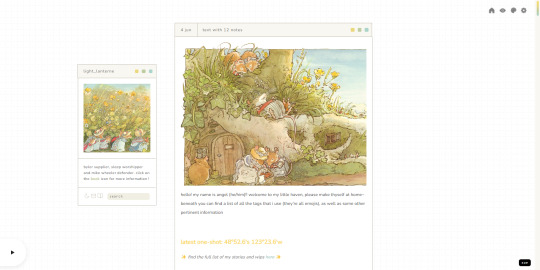
,,,then that's just my custom theme !!
you have to be on desktop to enable it (go to your blog settings and turn on the "enable custom theme" thingy that's near the top). once you do that, tumblr gives you a default theme that looks a lot like the one you already have ~
for instance, this is what my default would look like :S
it works, but it's not the most appealing in my opinion :\
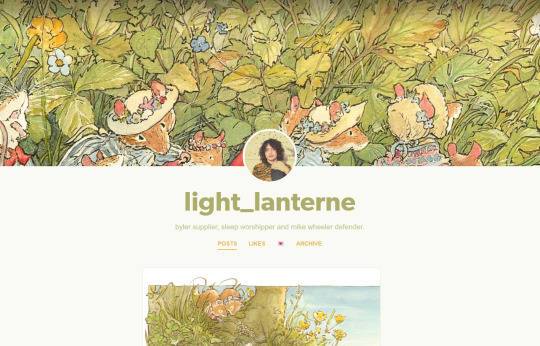
to change it, you need to once again go to the blog settings and click on the "edit theme" button. you are then taken to the customisation page, where you can make some adjustments to that default theme you're given,,,
,,,or you can change it to a completely different one ! :D
first, you need to find a theme you like. you can browse "tumblr theme" tag if you want, or go to theme-hunter and look around for stuff. there are a looot of themes with a lot of different styles to chose from, most of which are relatively easy to edit.
once you find something you like, you need to get the code. it's usually linked on the maker's post, near the top, and most of them take you to pastebin. you select the whole code and put it in your clipboard,,,
,,,and then add it to your blog. go to the customisation page i mentioned before, then click on this little button i've marked in the image.

once there, you just delete everything currently in there (at this point, the code for the default theme) and paste the code you picked instead.
update preview, save the changes, then go back to the main customisation page.
scroll down a little and you'll find the theme options and voilà ! you can edit the theme to make it into whatever you want :O for instance, the theme i have has a lot of colour options
you can also change out the font,,, or the images,,, there are a lot of options available; it just depends on the theme you picked :]
if you have some css and / or html knowledge, you can also change out some stuff in the code :O the sky's the limit ~
so yeah,,, that was a basic breakdown of how to apply a tumblr theme :] hope it was helpful !! if you need any help please don't hesitate to reach out :D also, please forgive me if i misinterpreted your question altogether or if this was too confusing. i'm not great at explaining this stuff u.u
although, even if i misunderstood, i highly encourage picking a nice theme for your blog ! it's a nice option to make your blog a bit more you or go along with your aesthetic (for instance, here's the theme i picked for my dark academia-ish blog). it's also really fun to edit these themes, in my opinion, so that's a bonus !! :]
more than anything, please do enable the custom theme thing. even if you keep the default theme, it's important to have that on because it allows you to use the archive, a vital part of blog navigation in this site :O
11 notes
·
View notes
Text
Highlighting Key Data: How to Animate Tables in Google Slides
1.How do I add animation in Google Sites?
Google Sites does not support built-in animation features. However, you can add animated elements by embedding animated GIFs or using HTML/CSS animations through the Embed code option. To do this, insert an Embed block, paste the code for your animation, or upload your GIF directly. Keep in mind that options may be limited compared to other website builders.
2. Can you time animations in Google Slides?
Yes, you can time animations in Google Slides. You can set the duration of each animation and choose when they start, such as "On click," "With previous," or "After previous." This allows you to control the flow of your presentation and ensure animations align with your speaking points or other elements on the slide.
3. How do you convert Google Slides to animated gifs?
To convert Google Slides to animated GIFs, first, download your slides as images (PNG or JPEG). Then, use an online GIF maker to upload the images and create the GIF. Adjust the settings for timing and loop options as needed, and finally, download the GIF.
4. How to animate a table in Google Slides?
To animate a table in Google Slides, first select the table you want to animate. Then, click on the "Insert" menu and choose "Animation." In the Animation panel that appears on the right, click "Add an animation." Choose your desired effect (e.g., "Fade in," "Fly in") from the dropdown menu. You can customize the timing and order of the animation. To preview, click the "Play" button. Adjust settings as needed, and when you present, the table will animate according to your specifications.
5. How do I clear animations in Google Slides?
To clear animations in Google Slides, open your presentation and select the slide with the animations you want to remove. Click on "View" in the menu, then select "Animation." In the Animation pane, click on the animation you want to delete and press the trash can icon or click "Remove." Repeat for any other animations you wish to clear.
Visit: VS Website See: VS Portfolio
0 notes
Text
Full Stack Web Development Expert Near Me: Modern & Scalable Solutions
In the convenient modernized world, having an particularly made, responsive, and valuable location is major for affiliations and affiliations. If you're looking for a "full stack web advancement pro close me," you're most likely looking for a pro who can oversee both the front-end (client involvement) and back-end (server-side) progress of your webpage. Full stack fashioners are specialists who can make all out web diversion plans without any arranging, making them a noteworthy asset for any trade needing to gotten to be on the web.

What Does a Full Stack Web Enhancement Master Do?
A Full Stack Web Development Expert Near Me pro is talented in both front-end and back-end headways. This proposes they handle the whole course of building a site or web application, guaranteeing everything works dependably from arrange to instructive list organization. Here is a more heightened gander at their scope of capacities:
Front-End Advancement: The front-end is what clients connected with — buttons, pictures, content, and plans. Full stack specialists utilize moves like HTML, CSS, JavaScript, and front-end structures like Reply, Correct, or Vue.js to make clearly captivating and responsive locales.
Back-End Advancement: The back-end keeps up the esteem of the location and joins working with educational files, servers, and APIs (Application Programming Affiliation centers). Full stack specialists work with programming vernaculars like Python, PHP, Ruby, and Node.js, and handle information bases like MySQL, PostgreSQL, and MongoDB.
Informational collection Organization: Guaranteeing information is taken care of and recovered effectively is a key hazard. Full stack specialists are skilled in administering social and non-social educational collections, guaranteeing your location works easily.
Server Course of action: Full stack plans so also oversee the working with environment, ensuring your location runs capably on a server and performs well beneath distinctive activity conditions.
Why Select a Full Stack Web Advancement Master Close Me?
Selecting a full stack web change expert who is neighborhood goes with an degree of benefits, particularly when you really require hand made offer assistance, clear correspondence, and speedy times anticipated to return again.
Altered Correspondence: Working with somebody near by considers more secret trading. You can without a exceptionally exceptional extend meet eye to eye to see at your endeavor, address concerns, and keep the enhancement association clear. This lessens the wagered of miscommunication and guarantees that your vision is clearly seen and executed.
Faster Reaction Time: When you utilize locally, you get speedier reactions to distinctive sorts of feedback. If any specific issue emerges, a nearby master will without a doubt offer brief help, guaranteeing your site's relaxation time is restricted.
Cognizance of Neighboring Trade segment Needs: A nearby originator will have a more critical discernment of the nearby commerce environment and your particular gather. They can offer assistance you with making a web encounter that reverberates with the neighborhood neighborhood, is especially colossal for secretly claimed businesses and modern organizations focusing in on common clients.
Sharp Plans: Selecting a full stack expert close you can be more sensible over an amplified time. You maintain a strategic distance from preposterous costs related with miscommunication or delays frequently experienced whereas moving to distant off makers. Moreover, you bolster neighborhood capacity, which can prompt way better long extend participation.
The best technique to Discover the Right Full Stack Web Movement Expert
While looking for a full stack web advancement pro close you, it's essential to do all fundamental examination and choose somebody who obliges your endeavor needs and investing arrange. The taking after are a couple of clues to offer assistance you with seeing as the right expert:
Truly explore Their Portfolio: Consider their past endeavors to learn approximately their dominance and such goals they've made. See for models that line up with your endeavor to guarantee they have noteworthy experience.
Demand Client Acknowledgments: A full stack fashioner's standing is gigantic. Get a handle on surveys, client awards, or setting situated examinations that appear off how they've made a difference different affiliations with winning with web change projects.
Handle Their Participation: Some time recently utilizing, get a few information almost their enhancement cycle. How might they arrange the endeavor? Will they allow you invigorates all through? An obvious cycle appears incomprehensible mastery and guarantees your errand remained on track.
Post-Improvement Sponsorship: Regions require progressing offer assistance to keep alarm to-date and utilitarian. Ensure the master offers display goodbye help on offer assistance you with controlling restores, security patches, and any future upgrades your location seem require.
End
Utilizing a full stack web advancement pro close you is a canny choice for affiliations that require competent, in all cases web progress organizations. Near by originators provide the potential pick up of revamped correspondence, a speedier reaction time, and a noteworthy cognizance of your showcase needs. By picking the right master, you can make ranges of quality for a, to comprehend location that meets as well as beats your trade objectives.
For more info. Visit us:
Mobile Application Development Company In India
fantasy sports app development company in india
0 notes
Text
How to Add a Popup Form in WordPress for Free

Table of Contents
Introduction to Popup Forms
Choosing the Best Popup Plugin for WordPress
Installing and Activating the Plugin
Creating Your First Popup Form
Customizing Your Popup Form
Setting Display Rules
Integrating with Email Marketing Services
Testing Your Popup Form
Troubleshooting Common Issues
Conclusion
1. Introduction to Popup Forms
What is a Popup Form?
A popup form is a small window that appears on top of the webpage you’re viewing. It can pop up for various reasons, like when you first visit a site, when you scroll down, or when you're about to leave the page. Popups usually ask visitors to enter their email address or other information.
Why Use Popup Forms?
Increase Subscriptions: Popups are effective in getting visitors to subscribe to your newsletter.
Promote Offers: You can highlight special deals or discounts.
Gather Feedback: Use popups to collect opinions and improve your site.
2. Choosing the Best Popup Plugin for WordPress
To add a popup form to your WordPress site, you need a plugin. A plugin is like an app for your website. There are many free plugins available that can help you create popup forms easily.

Recommended Free Popup Plugins
Popup Maker: A popular and easy-to-use free popup maker.
WP Popups: Another great option with a lot of customization features.
Icegram: Offers good functionality and is user-friendly.
For this guide, we’ll use Popup Maker because it’s the best popup plugin for WordPress, being beginner-friendly and highly rated.
3. Installing and Activating the Plugin
Step-by-Step Installation
Log in to your WordPress Dashboard.
Go to Plugins > Add New.
Search for "Popup Maker" in the search bar.
Click on the "Install Now" button next to Popup Maker.
After installation, click on "Activate."
You now have Popup Maker installed and activated on your WordPress site.
4. Creating Your First Popup Form
Step-by-Step Guide to Creating a Popup
Go to the Popup Maker menu in your WordPress Dashboard.
Click on "Add Popup."
Give your popup a name. This is for your reference only.
Add a title and content for your popup. This is what visitors will see.
Adding a Form to Your Popup
Click on the "Add Form" button within the content area.
Select the type of form you want. You can use the built-in form builder or integrate with other form plugins like Contact Form 7.
Customize the form fields. Add fields for name, email, or any other information you need.
5. Customizing Your Popup Form
Basic Customization
Design the Popup: Use the visual editor to change the look of your popup. You can change colors, fonts, and sizes.
Set the Size and Position: Choose where and how big your popup will be on the screen.
Add Images or Videos: Make your popup more engaging by adding media.
Advanced Customization
CSS and JavaScript: For those comfortable with coding, you can add custom CSS or JavaScript for more control over your popup’s appearance and behavior.
Triggers and Cookies: Decide what will trigger your popup (e.g., time delay, scroll percentage) and how often it should appear to the same visitor.
6. Setting Display Rules
When Should Your Popup Appear?
Time Delay: Show the popup after a visitor has been on the site for a certain number of seconds.
Scroll Percentage: Show the popup after the visitor has scrolled a certain percentage of the page.
Exit Intent: Show the popup when the visitor is about to leave the page.
Who Should See Your Popup?
Targeting Options: Show the popup to all visitors or only to those on certain pages, posts, or categories.
Device Targeting: Show the popup only on desktop or mobile devices.
7. Integrating with Email Marketing Services
To make the most of your popup form, you can integrate it with an email marketing service. This allows you to automatically add new subscribers to your email list.
Popular Email Marketing Services
Mailchimp
AWeber
Constant Contact
How to Integrate
Go to the Integrations or Settings page of Popup Maker.
Select your email marketing service from the list.
Follow the instructions to connect your account.
8. Testing Your Popup Form
Before you go live, it's important to test your popup form to make sure it works correctly.
How to Test
Preview the Popup: Use the preview option in Popup Maker to see how your popup will look and behave.
Test on Different Devices: Check the popup on both desktop and mobile devices to ensure it looks good and functions properly.
Test the Form: Submit the form to make sure it correctly captures and sends the information.
9. Troubleshooting Common Issues
Popup Not Showing Up
Check Your Triggers: Make sure the trigger settings are correctly configured.
Clear Cache: Sometimes cached pages can prevent the popup from appearing.
Form Submissions Not Working
Check Integration: Ensure your email marketing service is correctly integrated.
Check Form Settings: Make sure all required fields are set up and there are no validation errors.
Conclusion
Adding a popup form to your WordPress site is a powerful way to engage with your visitors and grow your audience. By following the steps outlined in this guide, you can create and customize a popup form for free using the best WordPress popup plugin, Popup Maker. Remember to test your popup thoroughly and monitor its performance to make sure it’s effective.
Creating a successful popup form is all about finding the right balance between engagement and user experience. With a well-designed popup form, you can increase subscriptions, promote offers, and gather valuable feedback from your visitors.
Want to read more about WordPress Themes and Plugins Click Here
0 notes
Text
Weekly News for Designers № 729 - Google Bard is Now Gemini, Animating Font Palette, SVG Filter Maker
New Post has been published on https://thedigitalinsider.com/weekly-news-for-designers-%e2%84%96-729-google-bard-is-now-gemini-animating-font-palette-svg-filter-maker/
Weekly News for Designers № 729 - Google Bard is Now Gemini, Animating Font Palette, SVG Filter Maker
Google Bard is Now Gemini Bard evolves into Gemini, introducing a mobile app and the advanced Ultra 1.0 for broader, more sophisticated AI collaboration.
In Loving Memory of Square Checkbox Tonsky mourns the decline of the square checkbox in UI design, replaced by round ones, marking a significant shift from a long-standing user interface convention.
Web Development Is Getting Too Complex Juan Diego Rodríguez explores the growing complexity in web development, highlighting the overwhelming choice of tools and frameworks, and advocates for simplicity and project-specific technology selection.
How Subscription Fatigue Impacts Web Designers Everything’s a subscription. And it impacts web designers and their clients in numerous ways. We look at what this means for our industry.
Animating Font Palette This tutorial explores the new feature in Chrome 121 that allows for animating transitions between font palettes in color fonts using CSS.
SVG Filter Maker SVG Filter Maker is a tool by Chris Kirk Nielsen for easily creating SVG filters with a graphical interface, enhancing designs without coding knowledge.
Going Beyond Pixels and (R)ems in CSS Brecht De Ruyte discusses using font-based relative length units in CSS for responsive designs, highlighting alternatives to pixels and rems that adapt to user settings.
Top Transition Packs for DaVinci Resolve A collection of the best transition packs for DaVinci Resolve, including high-quality free options. Professional-grade transition effects.
SVG Flag Icons Over 200 optimized SVG country flag icons, crafted for perfect alignment on a 32px grid. Copy and paste.
Figicon Icon Library A comprehensive library of high-quality, minimal, and pixel-perfect icons designed specifically for Figma projects.
Best Premiere Pro Transition Packs A comprehensive collection of Premiere Pro transitions for video editors. Includes dynamic, seamless, creative, and essential transitions.
In Praise of Buttons Niko Kitsakis discusses the evolution of button designs in UI, advocating for buttons that clearly indicate their function over minimalist designs for better usability.
Best Premiere Pro LUT Packs We share the best LUTs for Premiere Pro (both free and premium). Add a professional touch to your color grading!
Performance Lab WordPress Plugin This new plugin by the WordPress Performance Team, enhances website speed with modules for image optimization, WebP support, and performance checks, aiming for future WordPress core integration.
#ai#app#bard#buttons#chrome#coding#Collaboration#Color#complexity#comprehensive#CSS#DaVinci Resolve#Design#Designer News#designers#development#effects#EMS#Evolution#fatigue#figma#filter#Filters#fonts#Future#gemini#Google#Google BARD#grid#how
1 note
·
View note
Text
a masterlist for web resources for you to use! includes a bit of this and that, categorized in appropriate genres & updating whenever i find more stuff.
graphics category may include flashing content!
graphics;
Bonnibel’s Graphic Collection
Gifcities
88x31 buttons (1 + 2)
Glitter Graphics
90′s Tiled Backgrounds
Infini-D Resource Page
Upscaled Hypnospace Backgrounds
Sierra Death Generator
88x31 Button Maker
Backgrounds Archive
Blinkie Makers
ezGIF
Gifcam
Web Badges World
learning & page editing;
W3Schools
A Beginner’s Guide to HTML and CSS
What is the web?
Lilac Lynx’s Responsive Web Guide
Word to HTML
CodePen
Construct your CSS
Leon Arnott’s CSS for animated text
Neocities
Notepad++
3K notes
·
View notes
Text
CSS Button Maker
Introducing our latest tool: CSS Button Maker! 🎨💻 Create sleek and stylish buttons effortlessly with just a few clicks. Customize your buttons with various shapes, colors, and effects to suit your website's design perfectly. Say goodbye to generic buttons and hello to a more engaging user experience! Try it out now and elevate your web design game.
0 notes
Text
Neocities: Reliving the Past

haii everyone! i think a lot of people know by now that geocities was shut down last year, 2019 :( which totally sucks because, duh, this blog is all about the old internet!! fortunately for us, an alternative exists, neocities!
i’ve been learning html specifically to make an epic website for myself, here’s some pics!!


Resources for making your own neocities below the cut :)
Archives of old geocities sites for inspiration and graphics. If you want to save the background of a certain one, you’ll need to inspect element, find <body background=“imagelink”> (it’s usually near the top of the code, below <head>) click on the line of code, right click the link that pops up, and then select open link in new tab and voila!
Here are some good links to learn html! You’ll also have to learn a bit of CSS for the stylesheet but that’s relatively easy. Don’t shy away from forum posts that ask the same question you do, a lot of times certain ways they tell you to code don’t work, so you have to try multiple things until you get it right. I’m also always here if you have any questions, I’ll answer them as best I can, either drop an ask in my inbox (or a submission if you want to show me what’s not working/the line of code you’re trying to make work) or you can dm me at @spacezeea !
Gifcities is a great place for geocities-esque gifs so you don’t have to sort through all those modern, clean cut ones (ew :P) Cameronsworld has a huge collection of graphics for you to use too, and here’s a collection of 88x31 gifs, aka buttons. Most button makers don’t work anymore unfortunately because the sites no longer host those things and a lot have been lost to time, so I make my own!


I personally use aseprite to make mine but that costs money, so any pixel art maker works fine, as does mspaint! I usually size up my canvas to 176x62 just so I can add finer details.
Here are some blinkie makers and collections for anyone who wants to make their own.
And yeah, that’s pretty much all I can think of right now! If I have any more resources I’ll reblog with more info, and as I said you can send an ask/dm me if you have any questions! Happy creating :D
#rawrdotzip original#rawrdottext#not scenecore#webcore#old internet#old web#nostalgiacore#neocities#geocities#html#website#early 2000s#scenecore#emocore#teencore#nostalgia#nostalgic#angelfire#tutorial#resources#blinkies#blingee#blingees#88x31#88x31 buttons#mod tech
653 notes
·
View notes
Note
how did you make ur neocities website and how do you come up with comic ideas?
HEHEHE THIS GOT LONG <3 WHOOPSIE <3
hm hm... basically i just looked at w3schools.com HTML and CSS tutorials until i understood enough to feel confident enough to start sharing the site 😌😌😌 GKJLDFSH
plain HTML and CSS isn't really all that complicated for the most part!
they are markup and styling sheets so there's no actual programming involved but there is a lot of adjusting for CSS elements to make things look the way i want them ! i know neocities also has its own guides + links + tips and such somewhere!!
what is complicated is actually adding interacting javascript stuff which i havent learned yet 😔 i wanted the little email application to be more interactive and have functioning tabs + buttons so you could look at the other emails but i never got around 2 learning how 2 do that...
FOR THE COMING UP WITH IDEAS PART: man i dont know (JOKE MOSTLY) <3 my tip for just coming up with ideas is READ A LOT OF THINGS and THINK ABOUT THEM but in a writing sort of way. what did you like about it ? what DIDN'T you like? what made this story work or what pulled you out of it? what themes and patterns reoccur in the media that you like ?
then just let that roll around in your head + write down literally any vague idea that you have EVER somewhere to look at later.
i often see things and go haha i can do that Better (or at least, interesting to me specifically).
BASICALLY I MAKE THINGS THAT ARE INTERESTING AND ENTERTAINING TO ME SPECIFICALLY. i see a neat idea and bat it around in my head like a cat.
how would i have done this idea? how could it have gone differently? how much of an effect does the setting and worldbuilding have on this? would this idea/character/thing behave the same in a different location? and so on !
my process usually comes from me seeing an element in Media of some sort and it lives in my head forever now. then i scribble out a character design or two based around said elements and themes, then try to build the basics of a world around them.
for example, i designed daisy, salesman, and k2 first! all of dreamland was originally informed by the designs and basic personalities of those three :-D! mostly it was just "i want a character who is just a REALLY regular, sorta dick-ish guy, trying to do errands in a dream logic vaporwave hell where people try to sell them things constantly and are incapable of sincerity"
then i let myself get really invested in the world itself and started just. populating the setting with people who Live there and just try to go about their lives, before i went back to refining the actual story/plot !
that is just my process of making stories and it may not work for everyone, but that is usually how i do things <3
i make the basics of the major characters, start to detail the world they live in + background elements, then go back to working the main plot!
just, dont be afraid of being unoriginal! nothing exists in a vacuum, basically any idea has been done in Some way before. things get rearranged and reused constantly. dont be afraid of shelving ideas to look at for later, or cutting things from stories completely! feel free to rearrange and reuse your Own ideas !
also get into weirder or more obscure media. get into media that Kind Of Sucks Bad and dissect it like a bug. play free rpg maker games. watch animated childrens movies from the 80s but the ones you never watched as a kid. look at weird abandonware games! youtube web series with only 4 episodes!
let yourself Dislike Things and analyses Why you dislike it, but also look at what it does good or interesting! what made some things intriguing and what made some things fall flat?
even with things you do like a lot! what could it do better? what felt unsatisfying? why did it feel unsatisfying?
and by god. write it down <3
27 notes
·
View notes
Note
Hi! I'm not using one of your themes so if you don't want to answer the question I don't blame you. On my side blog RachRiposte the ask box loads in a weird way. When I click the Ask button from the main page or from a post it does a bounce that's kind of angled. The other links do a bounce so I assume it's part of the loading, but the ask page is weird. I also want to round the corners of the ask box like the rest of the theme if it's possible. Can you help please? Thank you!
as you've said, it's not one of my themes, so i went ahead and checked the theme maker's terms of use for you - since they say it's cool to make minor edits, good news! i can try and answer this for you :D
by "bounce", i'm assuming you mean the way the whole page loads a little below where it's supposed to be, then after a second jumps up to the correct position? i'm not seeing any other movement that could qualify as a bounce on either the Ask link in the navigation bar or the actual ask box... if that's what you mean, then yeah, it looks like it's part of the loading done by tumblr and the theme itself. can't help you there, sorry :(
HOWEVER! for rounding the corners of the ask box (assuming you mean the light gray container here, not the actual white ask frame) - you can add the following line to your blog's Custom CSS (found under Advanced Options at the bottom of your Customize page):
.entry-text { border-radius: 5px }
2 notes
·
View notes
Note
The lack of them is intentional on the part of the theme maker, so you’ll have to code them in yourself.
(This ask is in response to this post)
Oh darn, you seem to be right, how disappointing. I suppose they weren't there before, that was just an oversight on my part.
While I have been learning a bit more about CSS lately, my skills are still far too minimal to code something like that. So until that time, anyone who wants to "like" or reblog a post from my blog on desktop will need to either do it via the mobile view on the desktop, their dash, or by navigating to the individual post on my blog. To do the third of these options, just select the "X number of people read this post" text at the bottom of every post, just above the tags. From there, go to the top of the page to find Tumblr's built-in buttons for liking and reblogging. They're near the "follow" button, if that helps (or the “unfollow” button if you are following me.)

[Image Description: Screenshot of eight icons beside the "follow" button: Like, Reblog, Embed, Dashboard, Open in Dashboard, Message, and Blog. End Image Description.]
4 notes
·
View notes