#Chipboard Boxes
Explore tagged Tumblr posts
Visit Tumblr Blog
Explore Tumblr blogs with no restrictions, modern design and the best experience.
Last Seen Tumblr Blogs


Fun Fact
Premium Tumblr themes are available from anywhere between $9 to $49.
Text

Discover the Ideal & Optimal Chipboard Boxes
Experience the charm of Carton Service chipboard boxes, seamlessly combining style and functionality for your packaging needs. Elevate your brand with our reliable, eye-catching boxes, ensuring your products stand out on the shelf. Unleash the potential of packaging excellence.
https://www.cartonservice.com/products/chipboard-boxes/
0 notes
Text
Explore About Chipboard & Corrugated Boxes Packaging
Chipboard boxes, made from compressed paperboard, provide a sturdy, elegant option for retail packaging. Corrugated boxes, with their layered cardboard structure, excel in shipping due to strength and cushioning. Choose chipboard for aesthetics, and corrugated for durability in transit.

0 notes
Text


13" dick. next? my foyer needs a robin so bad.
573 notes
·
View notes
Text


SAM - combo pedal
cred: facebook.com/Samuel Lavisse
25 notes
·
View notes
Note
I too have an inexplicable fear of using ebay. I think it may be the older website with less sleek listing that makes me feel like everything on there came from a scummy garage sale
tbh that's how I feel when I buy something off amazon
#I have been using ebay For Ever so there's nothing to demystify for moi bc like#i bUY ALL MY BUSINESS SUPPLIES ON THERE LMAO#you can get really great deals on envelopes.. and mailers........ chipboard and shit#also new-in-box skincare items. that people like. presumably stole while they worked at sephora#I haven't paid full price for skincare in. awhile#sergle answers
59 notes
·
View notes
Text

Bottle Solutions
Wine is not just an intoxicating beverage; it is the symbol of culture, history, and craftsmanship. It is a premium liquid that has been cherished for centuries. However, the packaging of this beverage has a certain charming procedure. You have to keep all these in mind. At the very beginning, you have to notice the bottle. It is made of glass which is non-reactive to any chemical. The second thing is the cork for winebottles. This blocks the wine bottle, so it prevents the wine from coming out.
https://www.worldwinebottles.com/blog/the-purpose-of-wine-bottle-corks-and-capsules-a-deep-dive/MjA=
#Wine Bottle Suppliers#Wine Bottles#World Wine#Corks For Bottles#Corks And Bottles#Corrugated Partitions#Printed Wine Boxes#Printed Spirit Boxes#Chipboard Partitions#Wine Dividers#Portocork#Lafitte Capsule & Corks#Amorim#Maverick#Spirits Bottle#Spirit Packaging#Wine Bottles Wholesale#Bottle And Packaging#Wine Bottle Container#Wine Bittles#Winebottles#Wine Bottle Capsules Suppliers#Packaging For Wine Bottles#Wine Bottle Decorating#Owens-Illinois Bottle Catalog#Boxes For Wine Bottles#Wine Bottle Wholesale#Worldwide Wine & Spirits#Worldwide Wine And Spirits#Wine Bottles Wholesale Near Me
0 notes
Text
#rbrpaper#grayboard#chipboard#packaging solutions#product boxes#book covers#gift boxes#packaging applications#boxes
0 notes
Note
hi! your art is sososo gorgeous. i was wondering if you had any advice for artists looking to sell their work like you do? like, what kind of supplies you need/use to make and ship prints? i'm considering trying to sell my own art, though i don't have a following at all right now. thank you for sharing your art and being such a kind soul. i hope you have a great day!
Thank you!! I don't make my own prints sadly- I don't have the room with everything else I make myself all in my room! Some advice:
-I make mine with Catprint, heavy plain cardstock option. It's a nice thickness that does well flat or rolled and feels very sturdy.
-it costs less to ship rolled, but people prefer flat and tracking is safer as flats! Tubes take longer to arrive due to being non-machinable.
-i have classroom shelves like this I keep under my work table, I can fit two of them perfectly under it and it keeps things condensed and organized.
-don't be hard on yourself about how quickly you get business and start slow! I started smaller with stickers- people gravitate more toward things they can use than art for the wall currently, it's easier to justify the purchase.
I'd probably recommend a heat press over a printer if I was starting out, if you were planning to invest in a printer. You can use DTF transfers on fabrics to make your own tote bags, pouches, patches, clothing and even wood things- I make bookmarks, jewelry boxes, and soon wooden wall hangings with it. My heat press was 175$- far less than a decent printer, too. With a wide option of things you can make at whatever pace you want, it's way easier to get started in IRL art markets too!
My final advice is.. be careful with respecting your own feelings and what you want with your work. Sure, if selling your work is all you can do (it was for me, I was on disability) you want to make sellable work but.. make work that's important to you still over what will sell "better". Burnout can be really rough, and then comes art block. Take care of yourself mentally, it's a lot of pressure between marketing yourself, shipping everything, customer service, making the physical items and still needing time to actually make the art.
If you need any more advice or resources I'm always happy to help and send links! And thank you for being very sweet yourself! ❤️
Materials: (I buy in bulk so upfront is a lot but cheaper overall) Print Mailers Cardboard inserts (for stability in shipping) envelopes (fits up to 5x7 mini prints) 5x7 chipboard (backers for mini prints) bubble mailers (fits folded tote bags and non-print things)
#long post#hyde replied#if you need links to things id prefer off anon to make sure you see my response! i often get anxious and#delete my replies#also: if you use a platform like etsy keep track of the FEES! they can be brutal.#art shop advice#funny aside but the heat press is also great if any clothing of mine is wrinkly and i don't want to run the dryer. 🧍♂️#also.. work that is important to you can be anything. it can be fanart of characters you love. drawings of ants kissing. literally anything#i just know that drawing things that make my heart happy are all that's made me able to handle the “job” part of things#i started with my stickers when i had a few hundred followers.. it takes time and persistence but where there's a will there's a way! 😭#also: it took 2 years of constant effort before i could begin to think about trying to live off my art.. so please know it does take time n#be patient with yourself#you'll probably want smaller quantities of shipping materials when starting but it's probably helpful to see what i use!
163 notes
·
View notes
Text
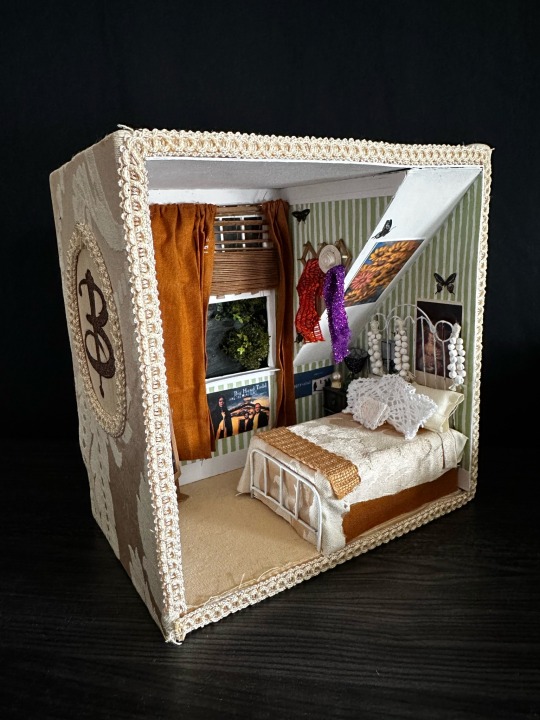
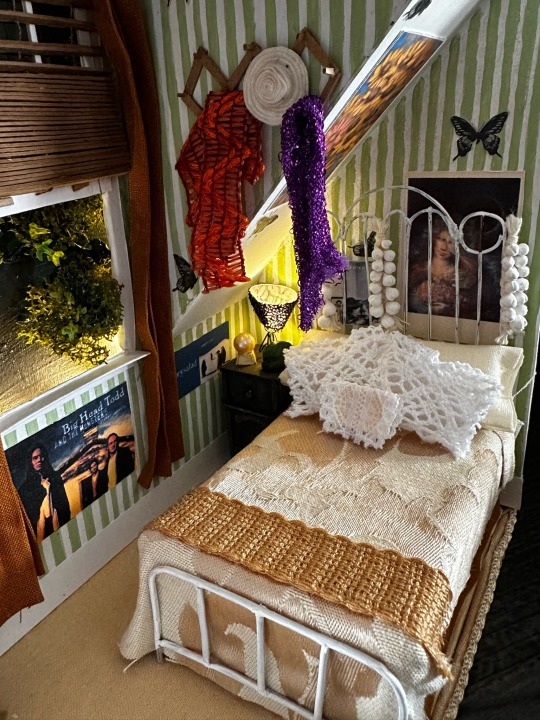


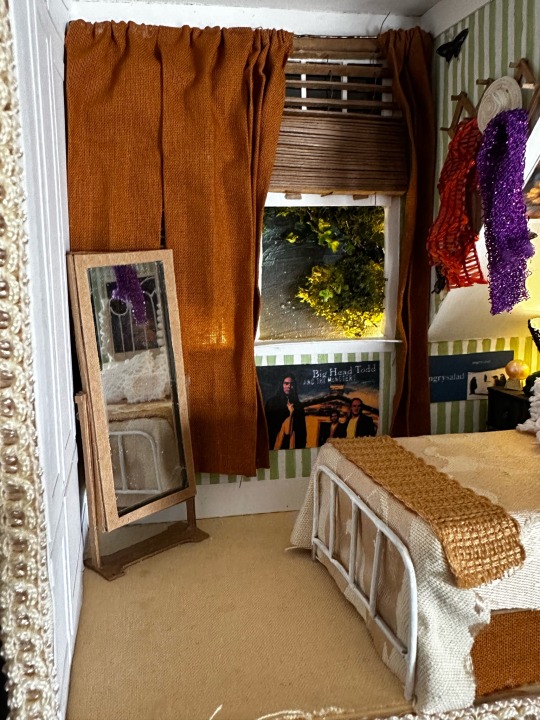
Sometimes the fun of miniature making is capturing something— in this case, the feeling I had watching Buffy the Vampire Slayer on a bulky tv in my bedroom as a teenager and finding her room to be a comforting place ❤️🪦 Wood box with an interior of cardstock, chipboard, fabric, wire, paint and scrap material, 7”x7”
#my art#miniatures#diorama#btvs#buffy the vampire slayer#Buffy summers#dollhouse#diy projects#Buffy#fanart
2K notes
·
View notes
Text
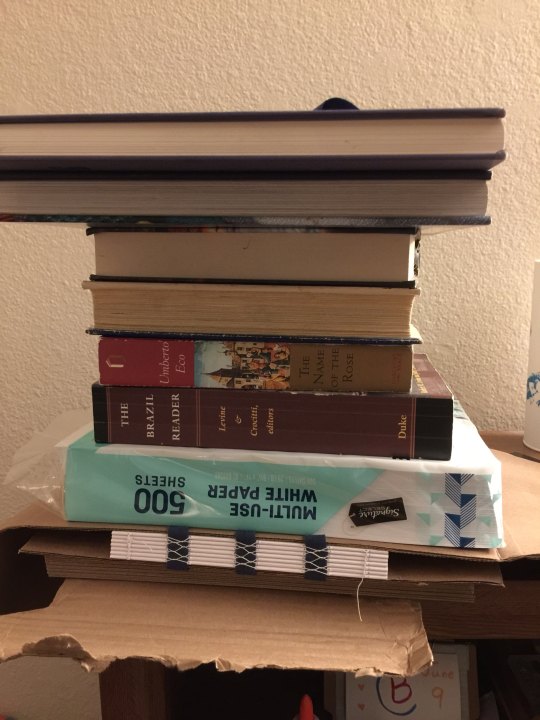
I've always wanted to learn bookbinding, ever since I was a wee little nerd, but there are a lot of things I've always wanted to learn, and this one has both a daunting upfront materials cost and a daunting upfront research cost. however, my sister is a jewel among siblings and gave me for christmas last year a handy dandy bookbinding manual, a block of good paper, and a little bag of tools.
but I still didn't have a suitable workspace, nor any of the many important tools and materials that she didn't include in her gift. so I just read the manual and pined. until maybe a month ago I got fed up with pining, flattened a cardboard box for a cutting mat, and went to town.
and I'm real proud of myself, so here's me rambling, plus photos!
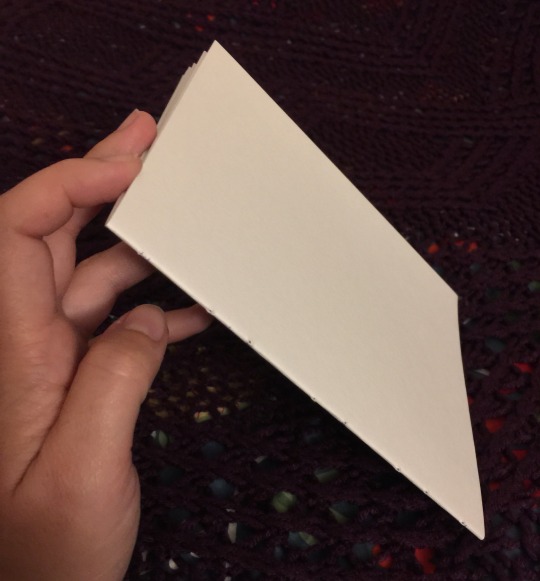
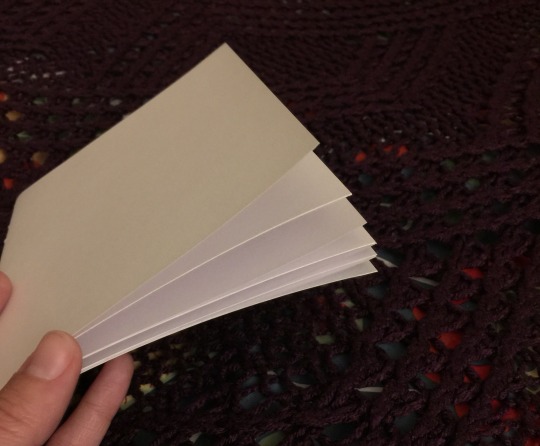
I went to the thrift store and got glue + some fabric to bind the cover, went to Michaels for a paintbrush (and later went back for a metal ruler lmao it's amazing how useful it is to have a straightedge for cutting the paper), and...could not find material for the cover boards. so I went home and pined some more. but the urges were too strong, so after a couple hours of moping I got a stack of printer paper at the grocery store (I could not bring myself to use the good paper for my first, inevitably weak attempts, I just couldn't do it) and started making a little booklet. which was a great idea, it turned out, since it makes for good practice with cutting the paper, measuring things, punching holes in the signatures, etc.
I have a big box of greeting cards from Michaels, which I used for the covers. it didn't feel like I was making a Real Book, so I got some colored paper from the stationery store and used that for end papers.
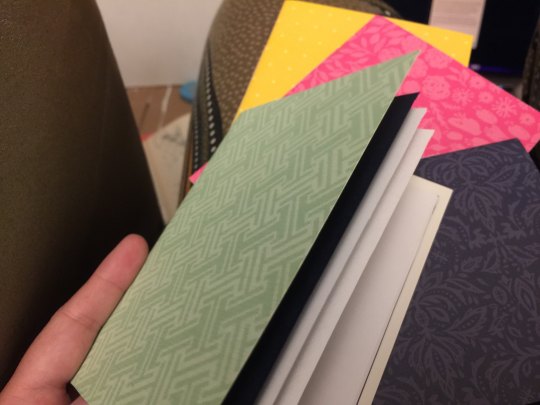
so fancy~
galvanized by this success, I ordered a stack of chipboard online to use for cover boards; and once I was confident that I could cut paper without making it look too stupid (getting that straightedge ruler sure helped lol), I made signatures out of the good paper, left them under some heavy books overnight since I don't have a book press, and then punched holes in them! (huzzah for this nice video on getting the holes right)
my sister's gift included good linen thread. it's unwaxed, but after some poking around on r/bookbinding it looks like that just means I'll have to be more careful to avoid tangles and keep good tension. I am fine with this. I can be extra attentive. (I considered just running it over a beeswax candle, but one commenter said if your wax has paraffin in it, it could melt in a hot car, ruining the spine. I can't guarantee my candle is 100% beeswax, I didn't make it, so maybe we just move on.)
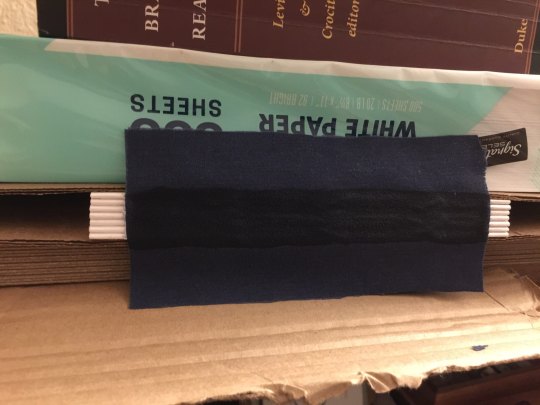
I don't have good linen fabric to use for the tapes, but the important part there is that the fabric be thin, sturdy, and not stretchy. the probably-cotton I got from the thrift store fits the bill, so it'll do!

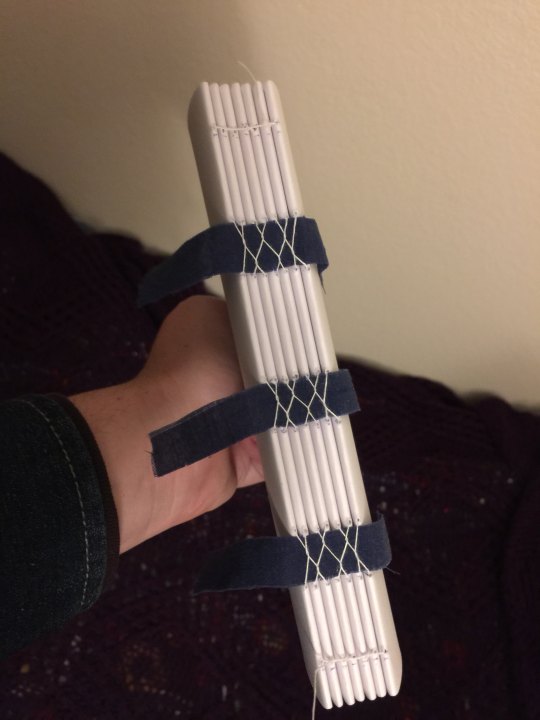
this is a french link stitch, which I got from this exceedingly good tutorial. apparently it's strong enough on its own that for a book of this size, I don't actually need tapes, but I'd already cut the things so eh here we are. and tapes plus french link will make it a stronger binding still (according to a friendly redditor on r/bookbinding), so we carry on.
specifically we carry on to the gluing step. now as I mentioned, I do not have a book press, and you....kinda need one for this step. you need to hold the book block in place with the signatures facing upwards, pressed together hard enough that the glue won't run down between them and stick the pages together (though you do want the glue to get between them just a little, just for like a 16th of an inch). you at least need some clamps and a couple boards to sandwich the book block with.
but you know what? I'm not a professional, this is my first ever book, if it's a little bit off it'll be fine. so we grab all the heaviest books off the bookshelf and improvise.
it's fine! I'm sure it's fine! and just in case it's not, I've tucked a bit of cardboard underneath to catch any glue that drips down so it won't land on the floor. see? I'm prepared! I'm acing this.
and actually, it really was fine. I used clear elmer's glue, applied with a flat paintbrush from the art supplies aisle at Michael's, and frankly I liked the way the flat paintbrush let me slip glue in between the signatures. I did poke around on a couple bookbinding sites to see what kind of glue I should use, and the gist is that although there are better options than this, elmer's glue is perfectly serviceable, and the main downside is it's not archival grade. but I don't need my first bookbinding attempts to last 200 years, that's fine.
the next step is to add the mull. mull is a specific type of fabric – extremely loose-weave linen – and the idea is to paste it down over the spine to essentially hold the tapes and signatures all in place in relation to each other.
but I don't have mull! so I'm using more of the thrift store probably-cotton, because it's thin enough and not really stretchy at all. I'm sure this will be fine too. I painted a layer of glue onto the spine, then left it to dry a bit while I measured and cut the fabric, then painted a generous stripe of glue down the center, where it'll affix onto the spine. then I added a bit more glue to the spine, just to be sure, and pressed the mull into place, rubbing it thoroughly to make sure it's firmly affixed to every signature, with no creases in the fabric or air bubbles beneath it.
honestly I might have overdone it on the glue. I've never done this before, I don't know! I think it's okay, though – I tried not to ever let it become a thick layer, just a slight coating, since the danger of too much glue is that it might crack once dry and weaken the spine.
and now we leave it in the press overnight to dry, and pick up the next step in the morning!
#finx rambles#bookbinding#finx makes stuff#technically this is the second hardcover book I've made#but it's the first I'm making using Approved Techniques™#instead of watching a handful of half-relevant youtube videos and making up the rest#which was fun!#but did mean that once I was done I didn't know where to go from there#and at the time I couldn't find better resources#(I really wanted better youtube videos! just didn't know how to find them idk)#(it was 2020 I was unwell. as I'm sure we all understand)#but now I have an abundance of good sources#and I'm determined
585 notes
·
View notes
Text
I wasn't satisfied with the gag on Catharsis so I decided maybe I needed more room to work. So I wrote this great book (Maybe you've heard of it?) and carved out room for a box.


My initial thought was to use mirror vinyl to wrap the chipboards but that shit doesn't take a corner at all. So I moved up in price and toxicity to mirrored acrylic sheets. Which of course needed to, itself, be mirrored on its obverse- so the vinyl did reappear. That yielded this.


The cover was very sparse- because, you know, it was about the inset- but the placement needed to be exacting. Thusly, as I was prioritizing the face, the spine and the back got cattywampus.
I also had this worry if I set the endpaper right to the edge of the cutout, it would overly darken the inset. So I cut an interior mirror for the front cover. That was probably silly. And I hate how it looks. But dot dot dot.


Also I bought some foil to maybe do the edges but I liked the garbage streaky look so much, I failed to investigate further. Some day, I suppose.
It's a shame I still didn't get what I wanted, vis á vis the hall-of-mirrors thing, but I was growing increasingly worried I'd need to get into lighting and wiring and dear god, Dear God. I'm not emotionally ready to plug in a book quite yet.
Edit: I just noticed I didn't add a Read More and/or make this a tidy visual experience. That must be tough.
96 notes
·
View notes
Text
Multi-pamphlet book tutorial
Last week, I showed you how to make a mini pamphlet book.
And that's GREAT, but what I really need for my purposes is multiple types of paper in their own separate booklets bound together into one thicker book.
Guess what! I've already shown you the hard part. The rest is easy.
You will need:
Several pamphlet booklets, tutorial here
Scissors
Xacto knife
Thick cardstock or thin cardboard
Something heavy and flat
Glue
So you have made a pamphlet book.
Now make more of them!
I am using a different pamphlet for each type of paper: blank sketch paper, graph paper, watercolor paper, tissue paper (for pressing flowers, duh), and one that's literally an empty cover with no papers in it. (I'll show you what that's about later.)


Take all the evenly-sized pamphlets and stack them on top of each other. These are also called 'signatures' in the fancy world of book making.
Glue their covers together.
For best results, spread the glue evenly. The easiest way to spread glue evenly is by using the edge of a piece of cardboard to swirl the glue around until it's thin.

Stick something heavy and flat on to and let dry.
This is Harold, who is not flat, but he is a heavy object. So I stick a book under him. It's just easier to illustrate that the booklets go under this way.


Once it is dry, we cut the cover.
Lay the book stack on your cover paper, mark the width, the height, and the spine, so that the paper wraps around the whole thing like a taco.
Cut the excess. Crease the folds where you marked the spine so that the stack of booklets fits nicely. If your cardboard is very dense (more like chipboard), then use an exact knife to score the fold*.
*'scoring' means making a shallow cut that doesn't go all the way through so that the thick piece is easier to fold.


Glue the crap out of the inside, lots of glue on the interior of the spine. Spread evenly with the edge of spare cardboard.
Set the papers inside, make sure the spines on the pamphlets sit snug in the cover spine.
Put Harold back on it. Wait for it to dry.
Once it's dry, you have a book! This is not tge most elegant way of binding a book together, I know, but it is a simple way to do it using skills that most people know.
Maybe one day I'll get into coptic stitches and hard backs and all that, but today? Today you know how to make a book that makes the brain go brrrr.
"But Lee! What's the thing you were gonna do with the empty spot in the back?"
Great question!
When you make your own stuff, that means you can do whatever you want with it. So I am taking that back panel and I am gluing an envelope to it.
Why?

SO I CAN KEEP STICKERS IN IT!
Now slap a sticker on the cover and you're done!

Nice.
Cheddar Bay Biscuits approved.
I thought the safety icons on the box I made this with were cool, so I cut the repeat of them out and made them part of the cover. I especially like the one that says 'fear rain.'
Anyhow, now you know how to make something out of garbage!
72 notes
·
View notes
Text
Custom Chipboard Boxes Packaging Product Perfectly
Crafting custom chipboard boxes for flawless packaging solutions. Our products are tailored to perfection, ensuring ideal protection and presentation for your items. Elevate your packaging experience with our precision-engineered chipboard boxes.

0 notes
Text
Make a pamphlet
Tons of people are realizing that you can make books at home, a fact that totally floored me two years ago when I found out about it. Is that you? You should make a pamphlet!
Sometimes, people show up to the bookbinding community and ask something like, “I would like to bind a 100,000-word fan fiction into an heirloom object/gift. Where do I start?” You should start by making a pamphlet.
I think some of them don’t like hearing that, and I think I understand why. They are not approaching bookbinding as a hobby to learn and explore; they want a DIY project that will result in An Object. But this isn’t like when I painted my shutters, and all I needed was a paint sprayer, some fasteners, a chisel, and YouTube to get me going. For most folks, it’s more like if you wanted to design and build a shed from scratch, and you’d never held a saw. Why not draw up and make a little firewood shelter out of cheap lumber first?
Why not make a pamphlet?
Now, if you are coming from a strong crafter background, and especially if you already do a lot of papercraft or chipboard box-making, you can admittedly skip the pamphlet phase. But should you?
Pamphlets are cheap! Quick! Fun! Pamphlets and other simple bindings let you play with tools, materials, and techniques without expending excessive time or precious materials. You probably have everything you need already. Bookbinding is a craft with dozens of best practices and rules of thumb and recommended materials, and each one is negotiable. If you truly understand the importance of a given recommendation or standard, you can decide how much it’s worth to you and your projects. If you’re a novice crafter, you’ll quickly figure out if this fussy paper-bending nonsense is enjoyable for you at all–without buying a bunch of tools you may not use again. If you’re experienced, you’ll have a quick win, get to play with new kinds of paper, and see how different materials work together.
And you can explore how to decorate books!
So please, if you’re even curious about bookbinding, make a pamphlet.
I’ll even tell you how. With pictures!

101 notes
·
View notes
Text
Glad to see these guys are still in business. Some of them have a 10 day battery life lol.
7 notes
·
View notes
Text

Wine Bottle Capsules Suppliers
Wine is not just an intoxicating beverage; it is the symbol of culture, history, and craftsmanship. It is a premium liquid that has been cherished for centuries. However, the packaging of this beverage has a certain charming procedure. You have to keep all these in mind. At the very beginning, you have to notice the bottle. It is made of glass which is non-reactive to any chemical. The second thing is the cork for winebottles. This blocks the wine bottle, so it prevents the wine from coming out.
#Wine Bottle Suppliers#Wine Bottles#World Wine#Corks For Bottles#Corks And Bottles#Corrugated Partitions#Printed Wine Boxes#Printed Spirit Boxes#Chipboard Partitions#Wine Dividers#Portocork#Lafitte Capsule & Corks#Amorim#Maverick#Spirits Bottle#Spirit Packaging#Wine Bottles Wholesale#Bottle And Packaging#Wine Bottle Container#Wine Bittles#Winebottles#Wine Bottle Capsules Suppliers#Packaging For Wine Bottles#Wine Bottle Decorating#Owens-Illinois Bottle Catalog#Boxes For Wine Bottles#Wine Bottle Wholesale#Worldwide Wine & Spirits#Worldwide Wine And Spirits#Wine Bottles Wholesale Near Me
0 notes