#CodeSnippets
Explore tagged Tumblr posts
Visit Tumblr Blog
Explore Tumblr blogs with no restrictions, modern design and the best experience.
Last Seen Tumblr Blogs


Fun Fact
Tumblr.com is the 103rd most visited website in the world.
Text
💻 Need Ready-to-Use Programming Code?

🎯 Download or Buy 5000+ Verified Code Snippets, Scripts & Projects!
Welcome to Free Code Programming – your ultimate resource for high-quality programming solutions! Whether you're a student, freelancer, or pro developer, we’ve got you covered.
✅ 5000+ Free & Premium Codes
✅ Covering Multiple Languages (Python, Java, PHP, HTML, JS & more)
✅ Save time. Build faster. Code smarter.
✅ Perfect for assignments, freelance projects, or learning new tech!
📥 Browse & Download Now: https://freecodeprogramminglanguages.blogspot.com/
Join a growing community of smart coders who don’t waste time reinventing the wheel. 🚀
#FreeCode#ProgrammingCodes#CodeSnippets#DeveloperTools#CodingHelp#PythonCode#JavaProjects#PHPCode#SourceCodeFree#LearnToCode#FreelanceDev#CodeMarketplace#WebDevelopment
0 notes
Text
Welcome to Marketfav.com, the ultimate destination for buying and selling high-quality digital products. Whether you're a creator looking to showcase your expertise and generate income or a buyer seeking top-notch digital solutions, Marketfav.com is your one-stop marketplace designed to cater to all your digital needs.
Our platform features a vast catalog of digital products tailored for various industries and audiences. You can explore a wide range of creative assets, including:
Software: From powerful tools to productivity apps and utilities, find cutting-edge software to meet your personal or professional needs.
Templates: Browse through customizable templates for websites, presentations, resumes, business proposals, and more.
eBooks and Learning Resources: Gain access to insightful eBooks, guides, and resources on a plethora of topics, from technology and business to self-development and hobbies.
Online Courses: Expand your knowledge and skills with expertly crafted courses covering everything from programming and design to marketing and personal growth.
Stock Resources: Find premium stock photos, videos, audio files, and other media assets to elevate your creative projects.
Scripts and Code Snippets: Discover source codes, plugins, and scripts to kickstart your development projects in various programming languages.
For Creators:
Marketfav.com is designed to empower creators by offering a secure, user-friendly platform to monetize their skills and share their work with a global audience. As a seller, you can:
List and showcase your digital products effortlessly.
Reach a targeted audience of buyers who value high-quality digital solutions.
Enjoy secure transactions and timely payouts.
Manage your inventory and monitor sales through an intuitive dashboard.
For Buyers:
If you’re looking for innovative digital products to streamline your work or enhance your creative projects, Marketfav.com provides:
A wide selection of curated, high-quality products.
An intuitive search and browsing experience to help you find exactly what you need.
Secure payment gateways to ensure safe and reliable transactions.
Opportunities to connect with talented creators and access personalized solutions.
Why Choose Marketfav.com?
Quality Assurance: Every product on Marketfav.com undergoes thorough checks to ensure it meets our standards.
Secure Transactions: We prioritize the safety of both buyers and sellers with reliable payment systems and robust data protection.
User-Friendly Platform: Easy navigation, detailed product descriptions, and a smooth purchasing experience make Marketfav.com stand out.
Global Reach: Connect with creators and buyers from around the world, expanding your opportunities and network.
Constant Updates: Our marketplace is continuously updated with new products, ensuring you always have access to the latest innovations.
Join the Marketfav.com community today and experience the perfect blend of creativity and commerce. Whether you’re starting a new project, scaling your business, or simply exploring new opportunities, Marketfav.com is here to help you succeed in the digital marketplace. Explore, connect, and thrive with Marketfav.com!
#DigitalMarketplace#BuyDigitalProducts#SellDigitalProducts#OnlineMarketplace#CreativeAssets#SoftwareMarketplace#TemplatesForSale#eBooksDownload#OnlineCoursesMarketplace#DigitalSolutions#StockPhotos#StockVideos#StockAudio#CodeSnippets#SourceCodeDownload#WebTemplates#MobileAppTemplates#DigitalProductsForSale#MarketplaceForCreators#MonetizeSkills#SecureTransactions#GlobalMarketplace#CreativeProjects#DigitalEconomy#GraphicDesignAssets#PremiumTemplates#PluginMarketplace#ScriptMarketplace#DevelopmentTools#BuySourceCode
1 note
·
View note
Photo

Learn how web developers can mimic the input field's placeholder attribute for select form fields. Compatible with WordPress' Contact Form 7 and jQuery Validate. #WordPressExpert #RepublishedAutomatically Originally published on October 30th, 2023 https://aurisecreative.com/blog/2023/10/how-to-add-a-placeholder-to-a-select-field/?utm_source=tumblr&utm_medium=social&utm_campaign=revive
0 notes
Text

Translate your visions into digital victories with us.
#ITDevelopment#SoftwareDevelopment#Programming#CodeLife#TechDevelopment#WebDevelopment#AppDevelopment#SoftwareEngineering#CodeIsLife#DevLife#CodingCommunity#TechSolutions#DeveloperLife#CodeQuality#AgileDevelopment#CodeNewbie#TechInnovation#OpenSource#DeveloperCommunity#CodeSnippets
0 notes
Text
youtube
Session 9 : Aiming for Generalization | Overcoming Underfit and Overfit Models
Welcome to Session 9, where we unravel the intricacies of machine learning, focusing on the critical theme of generalization. Join us as we address the challenges posed by underfitting and overfitting models, providing actionable insights to enhance your machine learning endeavours.
youtube
Subscribe to "Learn And Grow Community" YouTube : https://www.youtube.com/@LearnAndGrowCommunity LinkedIn Group : https://linkedin.com/company/LearnAndGrowCommunity
#MLTips#ModelOptimization#UnderfittingFixes#OverfittingPrevention#MachineLearning#DataScience#PrecisionInML#Session9#TechTalks#AIInsights#CodeSnippets#TechEducation#DataAnalysis#TechSolutions#ProgrammingTips#TensorFlow#PyTorch#AICommunity#LearningML#PracticalML#DataScientists#TechInnovation#AIProgramming#CodingSkills#AlgorithmOptimization#MLJourney#SessionHighlights#TechExplained#MLChallenges#GeneralizationStrategies
1 note
·
View note
Text
"Embarking on the Python Learning Journey: A Step-by-Step Guide for Beginners"
Learning Python is a great choice, especially for beginners. Here’s a step-by-step guide to help you get started:1. **Understand Why You Want to Learn Python:** Clarify your goals. Do you want to develop web applications, work with data, or dive into artificial intelligence? Knowing your objectives will guide your learning path.2. **Set Up Your Environment:** Install Python on your computer. You…

View On WordPress
#Algorithm#ArtificialIntelligence#CodeLearning#CodePractice#CodeProjects#CodeSnippets#Coding#CodingChallenges#CodingJourney#ComputerScience#DataScience#Debugging#DevelopmentTools#LearnToCode#Programming#ProgrammingBeginner#ProgrammingEducation#ProgrammingLanguages#Python#PythonCommunity#PythonCourses#PythonLearning#PythonLibraries#PythonProgramming#PythonProjects#PythonTips#SoftwareDevelopment#TechLearning#TechSkills#WebDevelopment
0 notes
Text
Exploring Record Classes in Java: The Future of Immutable Data Structures
A record in Java is a special type of class designed specifically for holding immutable data. Introduced in Java 14 as a preview feature and made stable in Java 16, records eliminate the need for writing repetitive boilerplate code while still providing all the essential functionalities of a data model.
Key Characteristics of Java Records
Immutable by Default – Once created, the fields of a record cannot be modified.
Automatic Methods – Java automatically generates equals(), hashCode(), and toString() methods.
Compact Syntax – No need for explicit constructors and getters.
Final Fields – Fields inside a record are implicitly final, meaning they cannot be reassigned.
How to Define a Record Class in Java
Defining a record class is straightforward. You simply declare it using the record keyword instead of class.
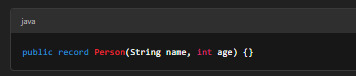
Example: Creating a Simple Record
java
Using the Record Class
java
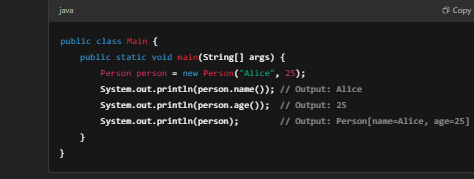
Notice how we access fields using methods like name() and age() instead of traditional getter methods (getName() and getAge()).
Comparing Records vs. Traditional Java Classes
Before records, we had to manually write constructors, getters, setters, and toString() methods for simple data structures.
Traditional Java Class (Without Records)
java
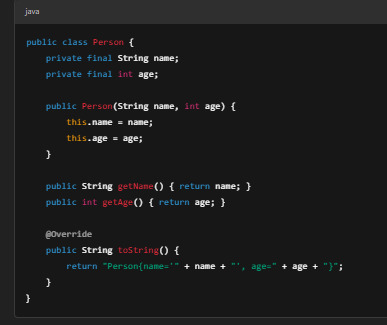
This approach requires extra lines of code and can become even more verbose when dealing with multiple fields.
With records, all of this is reduced to just one line:
java

When to Use Records?
Records are ideal for: ✔ DTOs (Data Transfer Objects) ✔ Immutable Data Representations ✔ Returning Multiple Values from a Method ✔ Reducing Boilerplate Code in Simple Models
Customizing Records: Adding Methods and Static Fields
Though records are immutable, you can still add methods and static fields for additional functionality.
Example: Adding a Custom Method
java
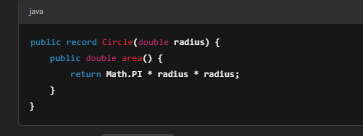
Now you can call circle.area() to calculate the area of a circle.
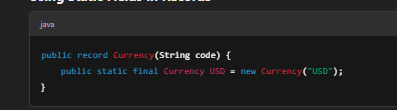
Using Static Fields in Records
java
Limitations of Java Record Classes
While records are powerful, they do have some limitations: ❌ Cannot Extend Other Classes – Records implicitly extend java.lang.Record, so they cannot inherit from any other class. ❌ Immutable Fields – Fields are final, meaning you cannot modify them after initialization. ❌ Not Suitable for Complex Objects – If your object has behavior (methods that modify state), a traditional class is better.
Conclusion: Are Java Record Classes the Future?
Record classes offer a modern, efficient, and elegant way to work with immutable data structures in Java. By removing repetitive boilerplate code, they improve code readability and maintainability.
If you’re working with data-heavy applications, DTOs, or immutable objects, adopting records is a great way to simplify your Java code while ensuring efficiency.
What’s your experience with Java records? Share your thoughts in the comments! 🚀
FAQs
1. Can I modify fields in a Java record?
No, records are immutable, meaning all fields are final and cannot be changed after object creation.
2. Are Java records faster than regular classes?
Performance-wise, records are similar to normal classes but offer better readability and maintainability due to their compact syntax.
3. Can a record extend another class?
No, records cannot extend any other class as they already extend java.lang.Record. However, they can implement interfaces.
4. How are records different from Lombok’s @Data annotation?
While Lombok’s @Data generates similar boilerplate-free code, it requires an external library. Java records, on the other hand, are built into the language.
5. What Java version supports records?
Records were introduced as a preview feature in Java 14 and became a stable feature in Java 16. For more Info : DevOps with Multi Cloud Training in KPHB
#Java#CoreJava#JavaProgramming#JavaDeveloper#LearnJava#Coding#Programming#Tech#SoftwareDevelopment#ImmutableObjects#JavaRecords#OOP#CleanCode#CodeNewbie#DevLife#BackendDevelopment#Java21#TechBlog#CodeWithMe#100DaysOfCode#CodeSnippet#ProgrammingTips#TechTrends
0 notes
Text
🚀 How to Copy an Image using Java!
Here's a simple code snippet to get you started:
import java.io.File; import java.io.FileInputStream; import java.io.FileOutputStream; import java.io.IOException;
public class cacms { public static void main(String[] args) { String sourcePath = "C:\\Users\\Administrator\\Desktop\\cacms Institute\\LOGO.png";
String destinationPath = "C:\\Users\\Administrator\\Desktop\\cacms Institute\\LOGO COPY.png";
File sourceFile = new File(sourcePath); File destinationFile = new File(destinationPath);
try (FileInputStream fis = new FileInputStream(sourceFile); FileOutputStream fos = new FileOutputStream(destinationFile)) {
byte[] buffer = new byte[1024]; int length;
while ((length = fis.read(buffer)) > 0) { fos.write(buffer, 0, length); }
System.out.println("File copied successfully!");
} catch (IOException e) { System.err.println("File copy failed: " + e.getMessage()); } } }
Want to learn more Java? 💻 Enroll at CACMS Institute today! Follow us for more tips and tutorials @cacms.institute
📞 Contact us at +91 8288040281 or visit the link below for further details.
0 notes
Text
Sticky Footer with Flexbox CSS
Are you tired of struggling with sticky footers that just won't stay put? Say goodbye to your layout woes as we dive into an easy and elegant solution using Flexbox CSS.
#CSS#CSS3Flexbox#FrontEndDevelopment#StickyFooter#FooterStayBottom#FlexboxFooter#CSSFooterSticky#TechTutorial#UIUX#WebDevelopment#StylingTips#CSSShapes#CodeSnippet
1 note
·
View note
Video
youtube
Rendering list in react #shorts #viralshort #reactjs #reactvideo #reacts...
#youtube#ReactRendering ReactList ReactComponents ReactDevelopment ReactJS ReactProgramming FrontendDevelopment WebDevelopment JavaScript CodeSnippet
0 notes
Video
youtube
Code Like A Pro With ChatGPT: Create JSON, SQL, XML, RegEx, Shell, & YAML Commands!
#youtube#FreeTool#Programming#Shell#RegEx#SoftwareDevelopment#CodeSnippet#TechTips#ProgrammingTutorial#OpenAI#NaturalLanguageProcessing#MachineLearning#ArtificialIntelligence#ProductivityHacks#Automation#DataFormats#ProgrammingTips#CodeGeneration#ShellCommands#RegularExpressions#SQL#YAML#XML#JSON#ChatGPT
1 note
·
View note
Text
Tài khoản Code Snippets
Tài khoản Code Snippets là gì?
Tài khoản Code Snippets trong Visual Studio Code là một đoạn code được định nghĩa sẵn và gắn vào một từ khoá nào đó, giúp tiết kiệm thời gian khi viết những đoạn code thường xuyên lặp lại. Khi cần sử dụng, người dùng chỉ cần gọi từ khoá đó để chèn nội dung đã định nghĩa trước một cách đơn giản
Ưu và nhược điểm khi sử dụng tài khoản Code Snippets
Ưu điểm khi sử dụng tài khoản Code Snippets trong Visual Studio Code:
Tiết kiệm thời gian: Với Code Snippets, bạn không cần phải gõ lại những đoạn code thường xuyên lặp lại, mà chỉ cần gọi từ khoá đã định nghĩa sẵn.
Tăng năng suất: Việc sử dụng Code Snippets giúp quá trình viết code của bạn trở nên nhanh chóng và hiệu quả hơn.
Tùy biến linh hoạt: Bạn có thể tự tạo các Code Snippets riêng cho từng ngôn ngữ lập trình hoặc từng dự án cụ thể.
Nhược điểm khi sử dụng tài khoản Code Snippets:
Cần thời gian để tạo và quản lý: Việc tạo và quản lý các Code Snippets riêng yêu cầu một khoảng thời gian nhất định.
Có thể gây nhầm lẫn nếu sử dụng không cẩn thận: Nếu không đặt tên và mô tả Code Snippets rõ ràng, có thể dẫn đến nhầm lẫn khi sử dụng.
Tóm lại, tài khoản Code Snippets trong Visual Studio Code mang lại nhiều lợi ích về tăng năng suất và tùy biến linh hoạt, nhưng cũng cần thời gian để tạo và quản lý, đồng thời cần sử dụng cẩn thận để tránh nhầm lẫn.
Những tính năng nổi bật của tài khoản Code Snippets
Tài khoản Code Snippets cung cấp các tính năng nổi bật sau:
Bộ sưu tập mẫu mã phong phú: Codesnippets cung cấp kho tàng khổng lồ các đoạn mã mẫu cho nhiều ngôn ngữ lập trình phổ biến, bao gồm Python, Java, JavaScript, C++, C#, v.v..
Tìm kiếm thông minh: Thanh tìm kiếm thông minh giúp bạn dễ dàng tìm kiếm mã mẫu phù hợp với nhu cầu của bạn thông qua các từ khóa, ngôn ngữ lập trình, chủ đề, chức năng, v.v..
Chỉnh sửa và lưu trữ: Bạn có thể chỉnh sửa mã mẫu có sẵn hoặc viết mã mới trực tiếp trên nền tảng, lưu trữ và quản lý kho mã cá nhân của bạn.
Chia sẻ và cộng tác: Chia sẻ mã mẫu của bạn với cộng đồng, đóng góp cho sự phát triển chung và nhận được sự đánh giá từ các lập trình viên khác. Hợp tác với đồng nghiệp trong các dự án lập trình, cùng nhau chỉnh sửa và hoàn thiện mã mẫu.
Phân tích mã: Các công cụ phân tích mã giúp bạn xác định lỗi, tối ưu hóa hiệu suất và nâng cao chất lượng mã.
Tích hợp với IDE: Codesnippets tích hợp với nhiều IDE phổ biến, giúp bạn dễ dàng truy cập và sử dụng mã mẫu ngay trong môi trường lập trình quen thuộc.
Tài khoản Code Snippets là một công cụ hữu ích cho các lập trình viên, giúp họ tiết kiệm thời gian, nâng cao hiệu quả lập trình và phát triển kỹ năng.
Nguồn: https://eliskey.com/tai-khoan-codesnippets/
0 notes
Photo
19659001 Automobile type impact On text utilizing Javascript|| @Theyogeshpal01 #CodeJourney #TechMagic #html 5 19659002 2023 # 2024 #newyear #coding #webdesign 19459006 #CodingShorts #ProgrammingBytes 19459006 #CodeSnippets #TechShorts 19459006 #DevSnippets #CodeExplained 19459006 #ShortCodeTutorial 19459006 #ByteSizeCoding 19459006 #DeveloperShorts #CodeIn 60Seconds 19459006 #WebDevWonders #CodeCrafting #HTMLHeroes #CSSCreators #JavaScriptJourney #WebDesignWizardry #FrontEndFiesta #BackEndBlast #FullStackFantasy #DevOpsDreams #ResponsiveRealms #CodeOnTheCloud #CodeLife #ProgrammingWizard #CodeJourney #DevelopersRealm #TechGenius…
0 notes
Text

Are you ready to dive into the world of Python and unlock endless possibilities? Join us for an exhilarating demo on October 3, 2023, at 12:00 PM and embark on a journey of discovery!
Mark Your Calendar:
Date: October 3, 2023
Time: 12:00 PM
Don't miss this chance to ignite your passion for Python and accelerate your learning journey.

#Programming#Coding#CodeNewbie#Developer#LearnToCode#WebDevelopment#SoftwareEngineering#Python#JavaScript#Java#Cplusplus#Ruby#DataScience#MachineLearning#AI#CodeChallenge#TechCommunity#OpenSource#GitHub#ProgrammingHumor#StackOverflow#DeveloperLife#CodeReview#FrontEnd#BackEnd#FullStack#DevOps#CyberSecurity#CodeSnippets#CodeArt
0 notes
Text
Der Einstieg in die Python-Programmierung mit dem BBC micro:bit

In vorherigen Artikeln habe ich ausführlich über den BBC micro:bit berichtet und verschiedene kreative Projekte damit vorgestellt. In diesem Beitrag liegt der Fokus darauf, wie du diesen Mikrocontroller mithilfe der Python-Programmiersprache nutzen und spannende Anwendungen entwickeln kannst.

Ich werde dir nachfolgend Schritt-für-Schritt zeigen, wie du diesen Mikrocontroller und deinen PC für die Programmierung in Python einrichtest und kleine Schaltung programmierst. Der BBC micro:bit verfügt bereits über einige Sensoren & Aktoren, womit wir schon ohne zusätzliche Komponenten starten können. Der BBC micro:bit ist derzeit in der Version 2.21 erhältlich, du kannst die Beispiele jedoch auch mit dem Vorgängermodell der Version 1.5 nachbauen, da sich diese im Grunde nur marginal unterscheiden.

BBC micro:bit v2.2

BBC micro:bit v1.5 Den hier verwendeten Mikrocontroller habe ich dir bereits im Beitrag BBC micro:bit V2.2 vorgestellt. Ich empfehle dir jedoch noch ein Set, welches dir gleich eine Vielzahl von Sensoren & Aktoren liefert, welches ich dir ebenso bereits in einem gleichnamigen Beitrag Vorstellung Microbit Starter Kit für den BBC micro:bit präsentiert habe.
Technische Daten & Features des BBC micro:bit
Schauen wir uns zunächst die technischen Daten und Feature des BBC micro:bit v2.2 an: FeatureBBC micro:bit V2.2Prozessor32-bit Arm® Cortex-M4 mit FPUGeschwindigkeit64 MHzFlash ROM512 KBRAM128 KBBluetoothBluetooth Low Energy (BLE) 5.0SensorenBewegungssensor ST LSM 303, Temperatursensor nRF51, 3 Achsen Lagesensor, MagnetometerAktorenkapazitiver Touch Sensor (Logo), Mikrofon, Speaker, Power On LED, 5x5 LED Matrix, Pushbuttons (A & B, Vorderseite)Abmaße (Breite x Höhe)5 cm x 4 cmTechnische Daten des BBC micro:bit V2
Programmierung des BBC micro:bit in Python
Starten wir nun mit der Programmierung des BBC micro:bit in Python, in dem wir den Editor unter https://python.microbit.org/v/3 öffnen. Es wird hier auch gleich ein Beispiel angezeigt, wo auf der 5x5 LED Matrix ein Herz und das englische Wort "Hello" ausgegeben wird.

Um diesen Code auf den BBC micro:bit zu übertragen, stehen uns zwei Optionen zur Verfügung. Erstens können wir ihn direkt aus dem Browser an den Mikrocontroller senden. Zweitens können wir eine HEX-Datei speichern und diese über den Dateimanager auf das Laufwerk des BBC micro:bit kopieren. Option 1 - übertragen des Codes via Browser Zuerst müssen wir die Verbindung zum Mikrocontroller herstellen, dazu klicken wir unten links auf die Schaltfläche "Send to micro:bit". Es öffnet sich nun ein Wizard, welcher uns durch diesen Prozess begleitet.


Im letzten Schritt müssen wir den Mikrocontroller aus dem Dialog wählen und dieses mit der Schaltfläche "Verbinden". Bei jeden weiteren klick auf die Schaltfläche "Send to micro:bit" wird das Programm direkt auf den Mikrocontroller kopiert und somit sparen wir uns sehr viel Zeit. Option 2 - übertragen des Codes über den Dateimanager Wenn wir den BBC micro:bit mit dem Computer verbunden haben, dann sollten wir das Laufwerk "MICROBIT" im Dateimanager sehen. Im Browser wählen wir die Schaltfläche "Save" und vergeben dem Projekt einen Namen. Danach wird die HEX-Datei heruntergeladen und die kopieren wir dann auf das genannte Laufwerk.


Codesnippets aus der Referenz verwenden
Wie erwähnt ist der BBC micro:bit für Anfänger bestens geeignet, dieses spiegelt sich auch in diesem Editor wider. Wenn wir links auf "References" klicken, dann finden wir verschiedene Kategorien, welche die Funktionen des Microbit widerspiegeln. Hier finden wir dann wiederum einzelne Codeschnipsel (auch Snippets genannt) welche wir per Drag'n Drop in unseren Quellcode ziehen können.
Hinweise zum Programmieren in Python
Bevor wir mit dem Programmieren einzelner Beispiele kommen, möchte ich zur Syntax von Python kommen. Hier gibt es einige Hinweise, welche du beachten solltest und manchmal auch musst. Einrücken von Code Der Code muss immer eingerückt werden, hier kannst du entweder 3 Leerzeichen oder einen Tab benutzen. Das siehst du am bereits vorgeladenen Beispiel sehr deutlich, der Beginn der While-Schleife ist auf Ebene 0 und der Code innerhalb der Schleife eine Ebene tiefer. Wenn wir nun das Codesnippet zum Taster in diese Schleife einfügen, dann wird wiederum dieser Code der If-Bedingung ebenso eine Ebene tiefer gesetzt. while True: if button_a.is_pressed(): display.scroll('A') display.show(Image.HEART) sleep(1000) display.scroll('Hello') Sprechende Variablennamen verwenden Damit du jederzeit in deinem Code weißt, welche Variable für welche Funktion steht, solltest du sprechende Namen verwenden. Wenn du einfache mathematische Operationen durchführen möchtest, dann möge das vielleicht wie im nachfolgenden Beispiel noch gehen: if button_a.is_pressed(): a = 1 b = 2 c = a + b display.show(c) Jedoch für komplexe Anwendungen solltest du sprechende Bezeichnungen verwenden. message = "" while True: if button_a.is_pressed(): message = "Hallo Welt!" if button_b.is_pressed(): message = "Test 123" display.scroll(message) Quellcode Dokumentation Im Code selber kannst du Text schreiben, welcher zu keiner Ausführung kommt, dieses nennt man Dokumentation. Hier solltest du besonders am Anfang gebrauch von machen, denn so kannst du deinen Code beschreiben und weißt auch noch am nächsten Tag oder Woche was diese Zeile Code macht. Mit einer Raute "#" startest du einen einzeiligen Kommentar und mit drei einfache Anführungszeichen einen mehrzeiligen Kommentar. while True: #Hier steht ein einzeiliger Kommentar ''' Ein mehrzeiliger Kommentar wird mit drei einfachen Anführungszeichen gestartet und beendet. '''
Beispiel - Taster abfragen
Der Microbit verfügt über zwei Taster und einen kapazitiven Touch-Sensor, welcher sich auf der Vorderseite hinter dem Logo versteckt. Diese können wir nun abfragen und auf den jeweiligen Status reagieren. Wenn wir prüfen möchten ob der Taster gedrückt ist, prüfen wir dieses mit "is_pressed" ab und erhalten ein TRUE wenn dieses so ist oder ein FALSE wenn nicht. from microbit import * while True: #Taster A gedrückt? if button_a.is_pressed(): display.show(Image.ANGRY) #Taster B gedrückt? if button_b.is_pressed(): display.show(Image.HAPPY) #kapazitiver Taster gedrückt? if pin_logo.is_touched(): display.show(Image.SAD) Wenn wir diesen Code jetzt ausführen und einen der drei Taster betätigen, dann wird auf der 5x5 LED Matrix ein Smiley angezeigt. Read the full article
0 notes
Text
How to Concatenate Strings in JavaScript
Learn how to concatenate strings in JavaScript with various methods including the + operator, += operator, concat() method, template literals, and the join() method. Discover tips and best practices for efficiently combining text data in your projects.
0 notes