#Collada files loading correctly
Explore tagged Tumblr posts
Visit Tumblr Blog
Explore Tumblr blogs with no restrictions, modern design and the best experience.
Last Seen Tumblr Blogs


Fun Fact
Tumblr has a low social media market share in South America.
Text
Let’s Rip A Sim...Again ( A TS4 SimRipper Tutorial for Blender 2.8x)
I got a request from the sweetest anon the other day to do an updated tutorial and I couldn’t say no. So, let’s get into it!
You’re gonna need the following things:
TS4 SimRipper
Blender 2.8x (The ‘x’ stands for any number after .8, this could make it 2.80, 2.81, etc)
Blank Posing Rig from Sims 4 Studio or a premade pose from a pose maker
A basic to intermediate understanding of Blender. ( I assume that if you’re using 2.8x, you at least understand how to use 2.79 )
Fun fact! This process is the exact same as my last tutorial for 2.79, but if it were in cycles render instead of blender render!
If you do not already have SimRipper downloaded, please download, install, and open SimRipper . Load your save file by pressing “Select”.

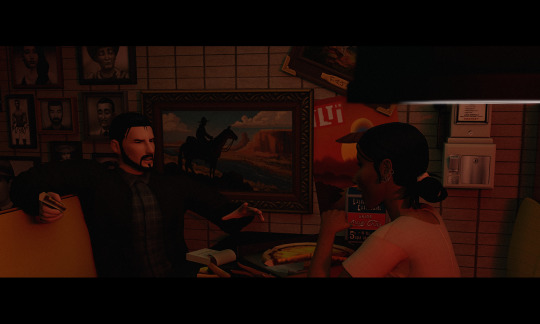
Unlike in the last tutorial, we will actually be using Aaliyah lol
Use the filters on the left to narrow down your chosen sim. Select your sim from the list. Using the controls on the right, select the outfit you want your sim to wear.
For this tutorial, I am using SimRipper version 3.1.0.0. Because of that, my right sidebar might look different, if you are using an older version of SimRipper. Don’t worry, this process will be exactly the same for the older version.
If you are using the updated version of SimRipper, make sure that instead of “Single mesh and texture”, the right hand dropdown box says “Solid and Glass meshes and textures.” Click on the button on the right that reads: “Save as DAE”
Importing The Ripped Sim
Open Blender. Open the blank rig.
Click file and click on import. Import as Collada (.DAE)
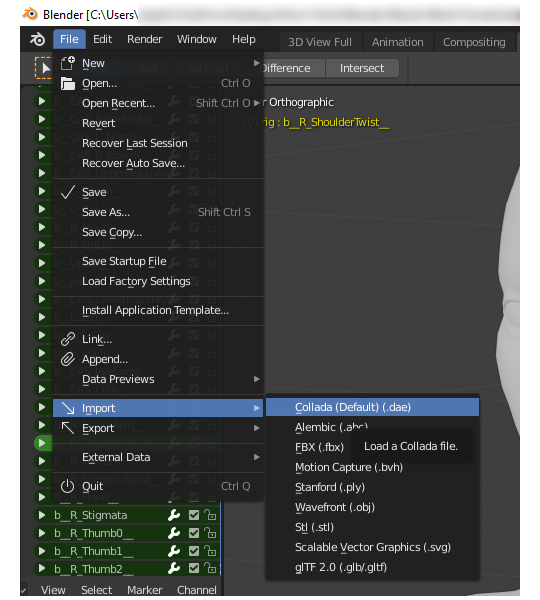
Delete the base Sims4Studio sim from your imported rig or pose. Also, delete the Rig.001 that imports with your sim’s .DAE file. Do not delete your sim, please.
Attaching the Rig
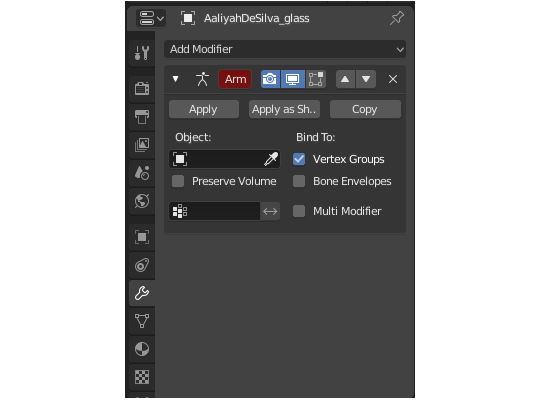
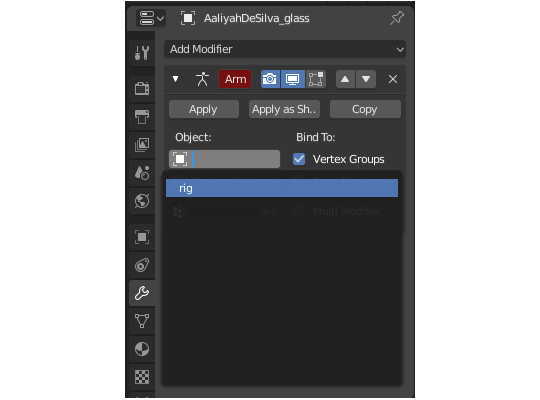
Click on the modifier tab, which looks like a wrench, or spanner if you’re not American, on the bottom left panel. Click on the “Object:” box and select “rig”.
NOTE: The face area might be slightly unaligned to the rig and that is NORMAL. It is supposed to be. When you move things around in CAS, the rig stays the same. Do not worry about it.
NONE #2: If you are using height sliders, you sim will not align to the blank rig at all. You have to have made your sim without the height sliders and use height rigs like this one with this tutorial to have an accurate height for you sim. Basically, have two versions of your sim, one with the height sliders and one without, and use the height rig to have your sim be the right size while posing.
Adding The Texture
Now, for this part of the tutorial, I am going to split the glass textures up into two parts, because Cycles and Eevee renders transparent textures slightly differently and I want to make sure I’m as clear about that process as possible.
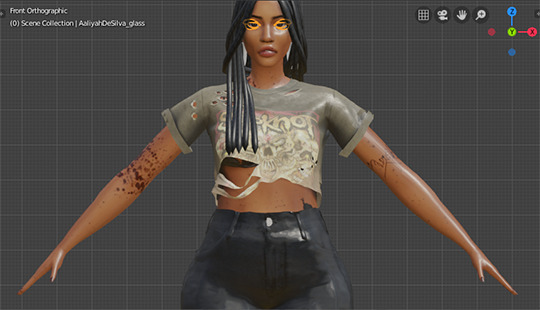
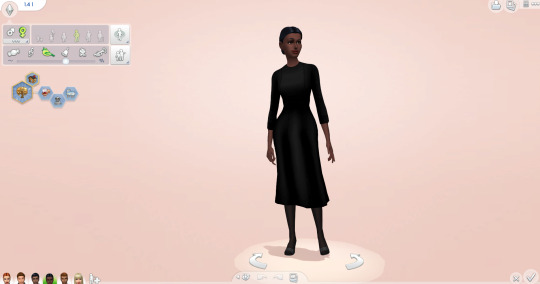
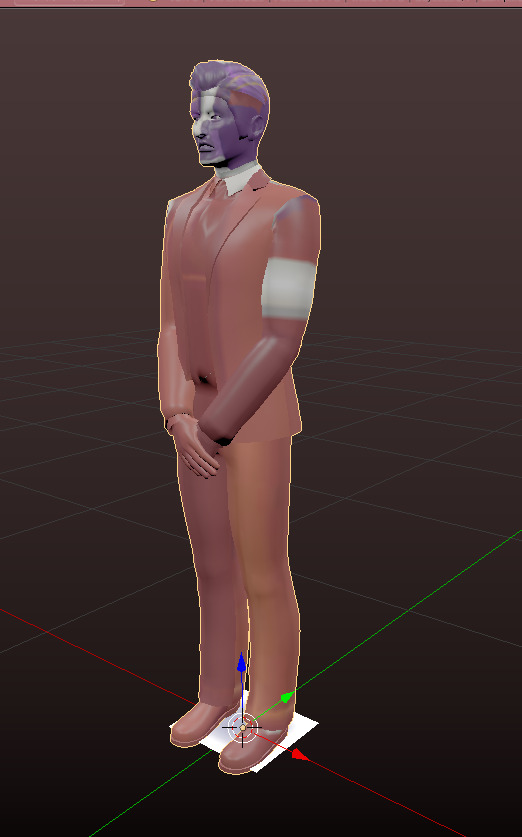
If you are using the most recent version of Simripper ( as of making this tutorial, that version is 3.1.0.0 ), when you import your .DAE file, it will also import the texture along with it, which is helpful if you do not want to do a lot of work, but not so much if you want your glass textures to show up correctly. As you see below, there is Aaliyah in all her shiny glory.
If you are using an older version of SR, it will not automatically add the texture to your sim for you, so let’s do it together.
Select your sim and go the materials tab. There, you will see a button that says “New”. Click on it. After doing so, there will be different sections. We’ll focus on the “Surface” section. Under Surface, there is another button that reads “Principled BSDF”. Under that, there is another button that reads “Base Color”. This is where our image texture is gonna go.
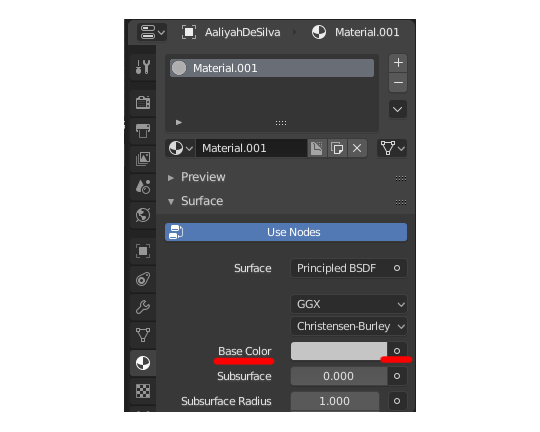
There is a small circle next to Base Color, click on it and it will open a menu. Select “Image Texture” under the “Texture” column. Click “Open” next to your new image texture shader and locate and open your texture. If you already have your image in Blender, click on the small picture icon and select it from that menu.

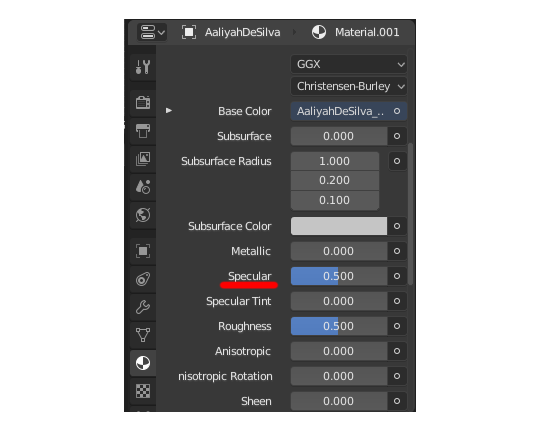
Now we have a textured, but shiny sim. To quickly fix that, scroll down the material tab and you’ll find a value input labeled “Specular”. Make it 0.00. Now your sim isn’t shiny! Yay!
Glass Textures
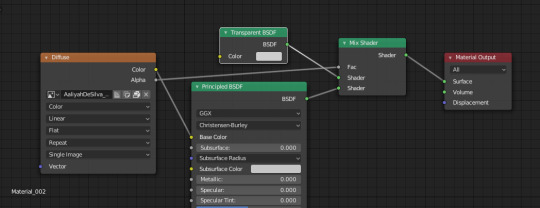
To add your Glass textures a lot easier, you’re gonna need to open the node editor. Follow the above instructions for your Glass object exactly, except use you glass texture. Yes, including the specular step. Luckily the only thing you have to do add two nodes, the “Mix” shader and the “Transparent” Shader.

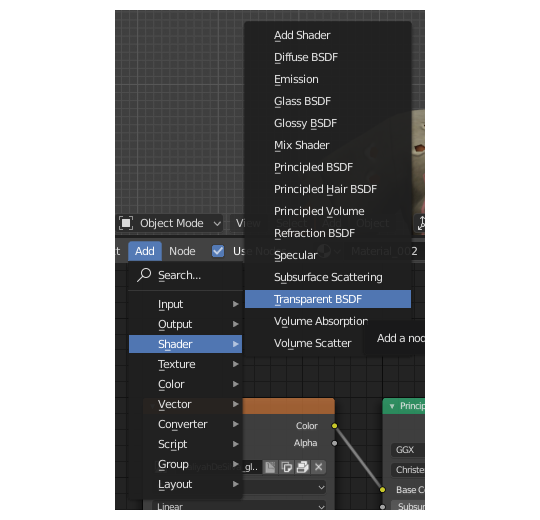
After doing so, situate your nodes as below:
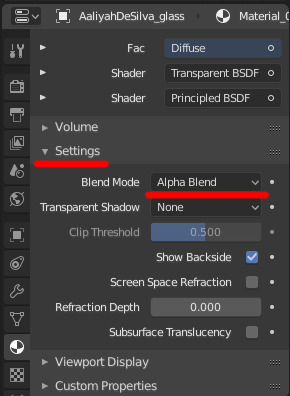
For Eevee, you’re going to want to do one really important thing. Scroll down the material tab and find settings. Under there change Blend Mode from “Opaque” to “Alpha Blend”. If you are working with more complex transparent objects ( Like hair or fluffy objects ) use “Alpha Hashed” instead.
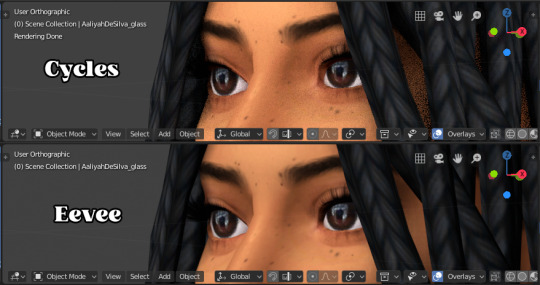
Here is a comparison of Cycles and Eevee for glass textures. It is very subtle.
Now, your sim is in Blender 2.8x. Like last time, this tutorial is not a posing tutorial, so and questions that are off the topic of SimRipper or have already been answered in my tag for this tutorial will be ignored. Here are some good tutorials for posing.
My own posing tutorial
Simmerberlin
Voila!
Before you send me a message for this tutorial, please refer to this tag and this post. Also, I am not a Blender expert and becuase of that I am not the best person to ask for help in regards to Blender. @thefoxburyinstitute has a whole database of great tutorials and resources for Blender!
125 notes
·
View notes
Photo


Tutorial - Decor crowds (and decor sims)
Hi everyone! Someone asked me if I could make a tutorial showing how I make decor crowds. Now my university stress is mostly gone so I finally have the time and energy to show the procress.
I am not going to show how to make poses, so if you don’t already know how to make poses, I recommend this tutorial.
This tutorial works for both one sim and for crowds. You just need to skip some parts if you only want to make one sim.
Now, let’s get started.
You will need:
TS4 SimRipper
Sims 4 Studio and Blender (preferably 2.70 if you want to follow along with my tutorial in the same version)
Image editing tool of your choosing, I use Paint Tool Sai, but you can use any that supports files with transparent backgrounds (PNG-files).
I recommend that you create one folder which you work within to keep track on all files, but that it up to your own preference!
Edit: 3/8-2020 Hello everyone! I can recommend checking out this tutorial if you experience any problems with shadows! It’s extremely useful and made by the talented @theroyalthornoliachronicles
Step 1 - Make one or a bunch of sims.
Make one or more sims that you want to have as your decor sims/crowd. Name them something easy like A A or 1 1. Each of these sims are names 1.1 1, 1.2 1, 1.3 1, etc. This makes them very easy to locate later.
When you’re finished, save your game and close/minimize it.
Step 2 - Launch TS4 SimRipper

TS4 SimRipper is super easy to use. Place it in a folder so you have every file at the same place, unzip it, install it and then launch the program. If you cannot find the file, it should be a program file, look below for a guide.
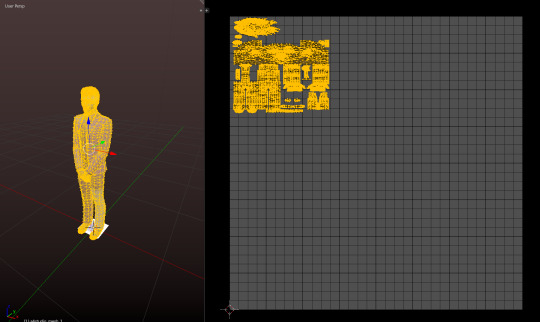
When it launches, press Select (1) and choose the file at the top of the list. Let it load (don’t click anything).
When it’s finished, choose the sim you want to export (2). Again wait, it may take a while but that is normal.
When the sim is loaded, press Save as .dae (3). This is going to also take a while, so you can do other stuff in the meantime. For example, you may proceed to the next step in this tutorial. Remember to name them something easy to find, like 1, 2, 3, etc.
Remember to check if the program is finished every now and then to export the other sims you made.

If you cannot find the program, it should look like this. My system language is Swedish, but it should be named something along the line of program under the type-category.
Step 3 - Export files and rigs from Sims4Studio.
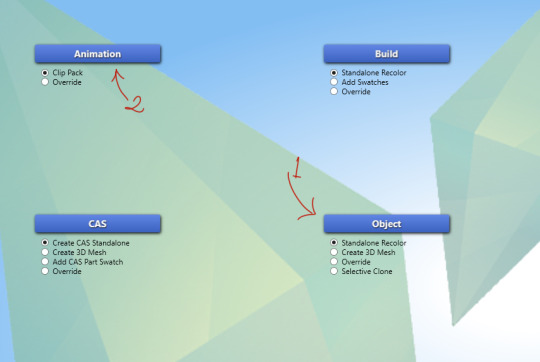
Now it’s time to start making the decor sims. Either start with Objects (1) or Poses (2). If you want a tutorial on how to make poses, please follow the tutorial I linked above.
When it comes to Object (2), choose create 3D Mesh and then the blue button.
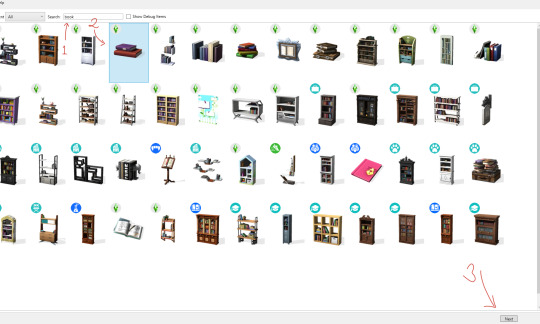
Like my last tutorial, we are going to use these books are our base. Start by searching for them (1), click on them (2) and then press Next (3). Name it whatever, but I recommend a name that will make sense a mod folder.
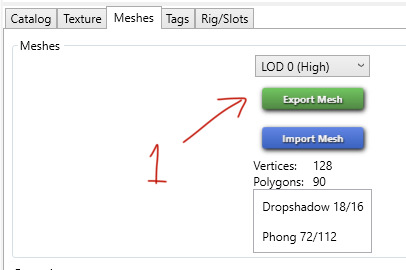
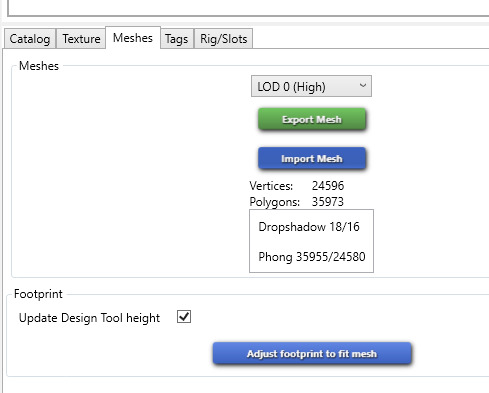
When it has loaded, click on Meshes and choose Export Mesh (1). Again, name the file whatever you want. I named my Grund - which means base in Swedish.
Step 4 - Working in Blender

Open the newly exported mesh in Blender by double-clicking on it. You should be met with something that looks like this.
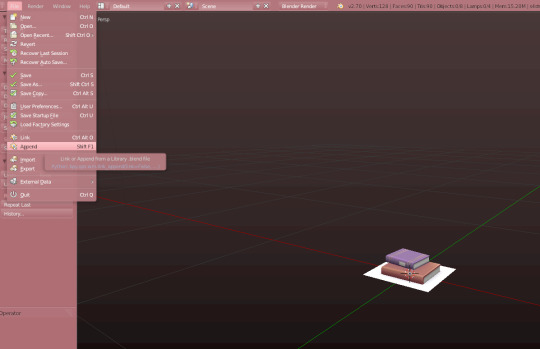
Open the File-folder and press Append, or just click Shift + F1.
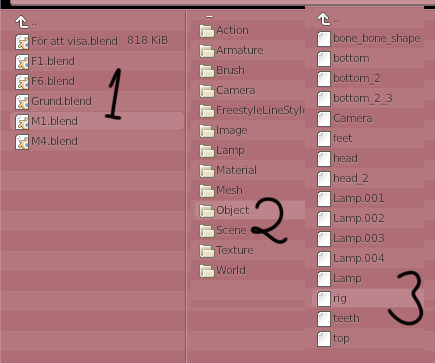
Choose one of the poses you made in advance or just import the rig you exported earlier. I am using a pose from my Mourning pose pack. Click on the pose (1), then Object (2) and finally rig (3). You do not need any of the other pieces in this tutorial.
If you are using another creator’s cc, like a pose, be sure to ask for permission before sharing the decor sim with the public.

When done correctly, it should look like this. This is the sim’s frame which we will base our decor sim on. This rig will be named rig.001, just leave it be.
Step 5 - Import the .dae file
Unlike my last tutorial, this step is super easy and takes almost no time.
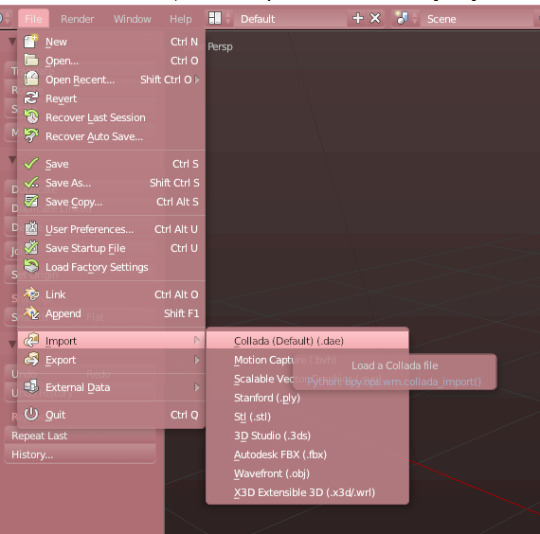
Go to file, then down to Import. Choose Collada (Default) (.dae). This is your sim with its rig and body exported from the game. This means that you can make decor sims of any body size, skin colour or other feature.
Click on any of the .dae files you exported eariler.
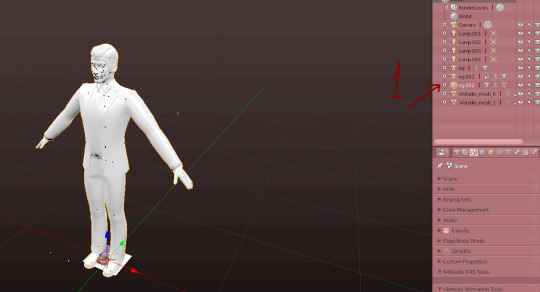
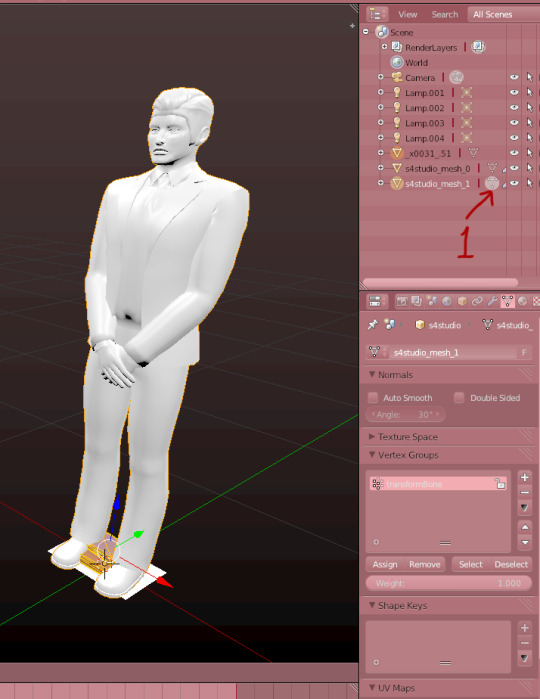
Now you will have a new rig named rig.002. Go right ahead and delete it.
Now the body will be named something like this instead, just keep an eye what it turns into.

Now press the modifier-button (1). Then click on the Object bar on the rig modifier (2). Choose the second rig (3) and press Apply (4).
After pressing the Apply button, you cannot move the sim’s body, so if there is something that needs to be fixed, do that before.
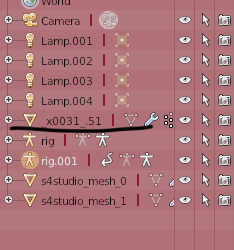
When that is done, delete rig.001.
Step 6 - Preparing the meshes to be merged

Now we’re gonna delete any trace that this sim used to be a moving object. Start by removing every vertex group from the sim. Delete them by clicking on the - button a whole bunch of times (1). Then rename the first UV-map to uv_0 (2) and delete the second one (3).
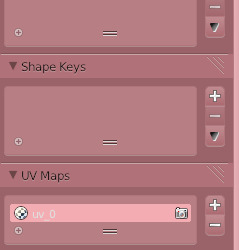
This is what it should look like when you’re done.
Now we’re gonna merge the two meshes. Start by clicking on the Sims4Studio-file’s thingy I marked (1). Then press A so it looks like it does on the image. When the mesh is orange, press X to delete it. You’ll need its values, so do not delete the whole thing, only it’s mesh.
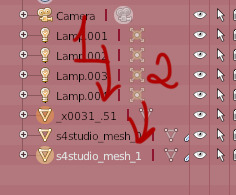
Now, click on the sim in the list of things (1). Then hold shift and click on the S4S-mesh (2).

When they’re both marked like in the picture, press Ctrl + J, or the join button to the left.
Now it should look like this, if it’s all black, you need to go back and rename the uv-maps to uv_0. You go back by pressing Ctrl + Alt + Z.
Step 7 - Save and finish up the project.
Now save your project before doing this step.
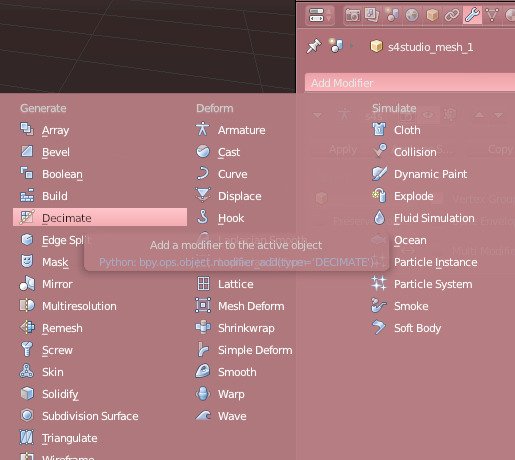
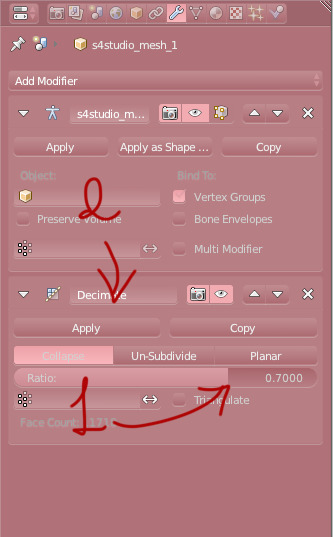
When it’s saved, go back to modifiers and add the Decimate-modifier.
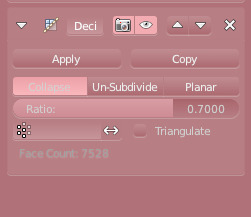
Chance the Ratio to anywhere between 0.6 to 0.8. I usually go with 0.7. Click apply when you’re satisfied.
Save your project again.
If you are only making one decor sim, you’re finished here for now!! You only need to add the other LODs, so you can skip the next step.
Step 8 - Fixing the uv-map (Not necessary for only one sim).
The uv-map is already finished if you are making only one sim, but if you are going to make a crowd, this is a very important step. Don’t worry, it’s really easy.
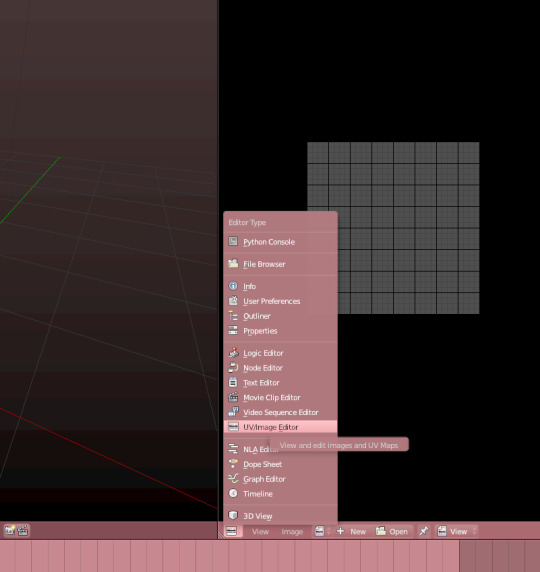
Open the uv-map by opening a new window and then choosing the UV/imagine Editor. Remember to enter the edit-mode on the mesh.
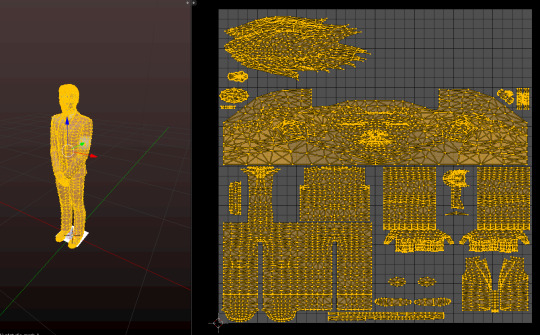
Press A on both windows to highlight everything.
When it’s highlighted, scale it down so that it can fit more uv-maps on it. You make it smaller by pressing S on your keyboard and you can move it by pressing G.
Make sure that it’s big enough to still be able to show textures. but small enough to allow other sims’ uv-maps to be placed beside them.
Now you’re done. Now, redo all the steps you just did but place the uv-map on another spots. You do not want them to overlap or they’ll look ugly.
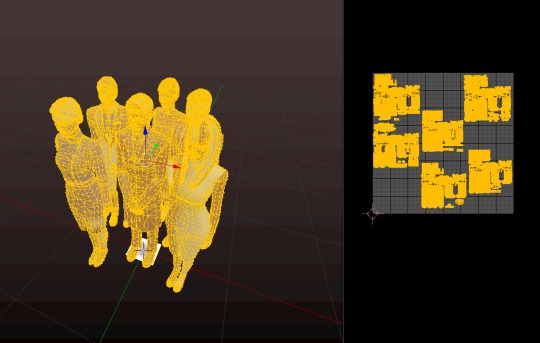
When you done all that, append the decor sims together so they form one mesh and uv-map. If done correctly, it should look like this.

After that, export the uv-map like this. Name it whatever you want.
Save your work again, and decimate the mesh. Try to make it to a 0.5 ratio. This make the crowd more manageable for the game.
Save it again and minimize Blender.
Step 9 - Making the object and fixing the texture.
Okay, here comes the annoying part. Now it’s time for a lot of waiting and to put a texture on your uv-map.
Unless you’re only making one sim, which means that you only need to import both files you just created!
Start by importing your mesh into Sim4Studio. Now this is going to make a while, the more sims you added to your crowd, the longer the waiting. I made 6 sims, so that is a very big file.
When it’s loaded into S4S, save your file, so you don’t lose any progress.
While its loading, open your imagine editing tool and prepare yourself for a lot of fiddling.
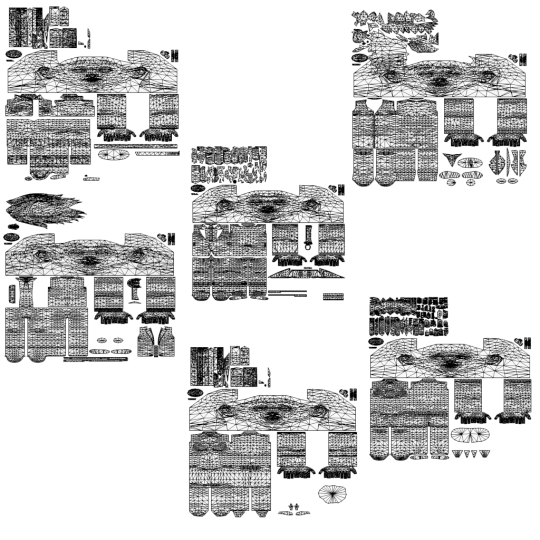
Your uv-map should look like this. So now it’s time to open every diffuse map you exported earlier in your editing tool and start matching them up.
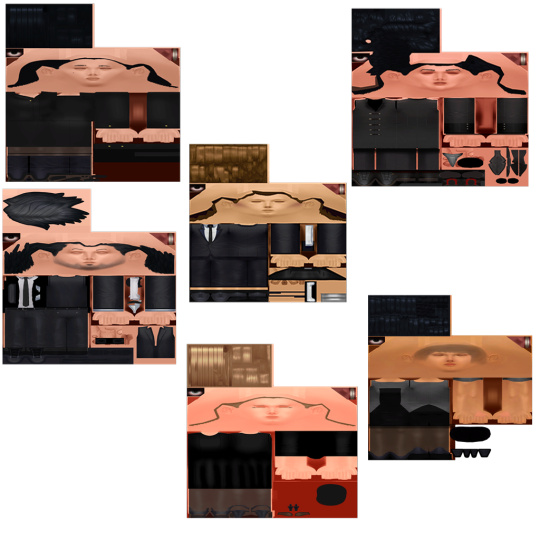
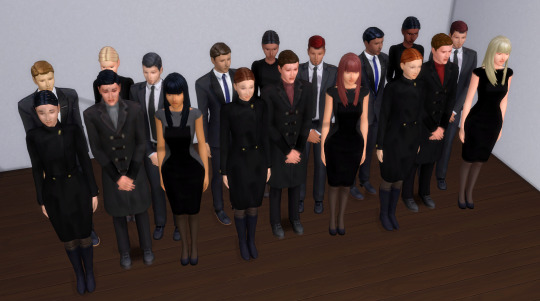
When you’ve managed to fix the uv-map, it looks like this. This took a lot of time, as one pixel makes a big difference. Have patience when you do this part.
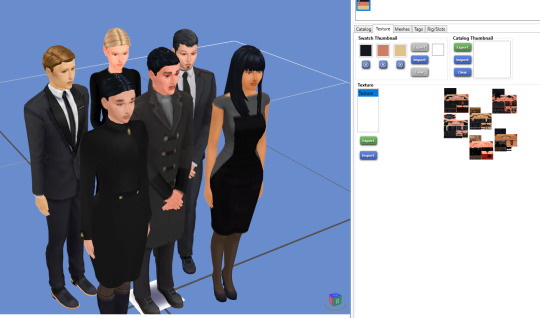
When you take the time, the crowd looks something like this, or hopefully a little more dapper, as mine is quite... depressed.
Step 10 - LODS and Shadow-LODS
ANYWAY let’s fix the LODs. Go back to your blender-file and decimate it with a ratio between 0.6 - 0.8. Again, I use 0.7. Press save and import it into Sims4Studio. Repeat once more for the last LOD. Save between each LOD if you are worried about losing the progress.

Last step in Blender is to make a shadow LOD.
Start by deleting this mesh (1). This is the shadow when you have the “full” object, so now it is just in the way.
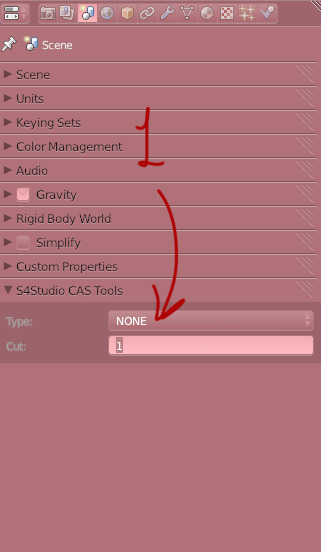
When its gone, change the Cut from 1 to 0. This makes it into a shadow mesh. Save and go back into Sims4Studio.
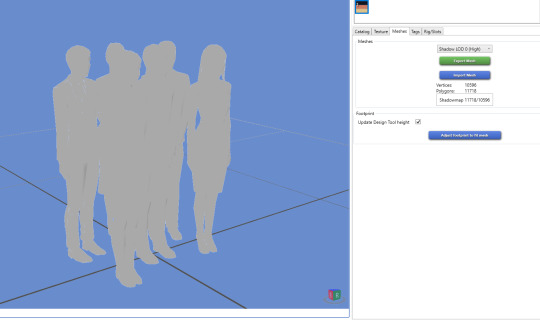
Now you can import that same shadow-mesh into every shadow LOD. Then it’s finished, you’re done!
Now all that’s left is to fix the Catalog name, description and tags.
Thank you so much for following my tutorial! If you have any questions, feel free to ask me🌸
404 notes
·
View notes
Text
Export 3D Scene to GLTF 2.0 Format & Customize Non-PBR to PBR Materials using .NET
What’s new in this release?
Aspose team is pleased to announce the release of Aspose.3D for .NET 17.05.0. The new version 17.5 of the API adds support of importing GLTF 2.0 (ASCII and Binary) files in the Aspose.3D API as well as allows developers to apply Physically Based Rendering (PBR) material to 3D entities. Developers may then save the final 3D scene to any supported file format. All other internal improvements are also incorporated. Developers can install Aspose.3D Nuget package in their .NET applications because we publish each version as a NuGet package on the NuGet gallery. Aspose team recommends clients to upgrade old version of the Aspose.3D API with this latest one. GLTF 2.0 (GL Transmission Format) improves the way of storing, transferring and rendering 3D models. With the help of Aspose.3D for .NET API, developers can import existing GLTF 2.0 (ASCII and Binary) models, and then save in any other supported 3D format. Aspose.3D for .NET offers the capabilities to create an instance of any supported 3D entities, set position in a 3D scene, and then save in the supported file format. Developers would now be able to apply Physically Based Rendering material to that entity instance before saving. This help topic helps to know the way of applying Physically Based Rendering material to an instance of 3D entity. This release includes plenty of new features as listed below
New PBR material to support physically based rendering
Allow Aspose.3D API to import GLTF 2.0 ASCII files
Allow Aspose.3D API to import GLTF 2.0 Binary files
Newly added documentation pages and articles
Some new tips and articles have now been added into Aspose.3D for .NET documentation that may guide users briefly how to use Aspose.3D for performing different tasks like the followings.
Create and Read an Existing 3D Scene
Use of the Google Draco (.drc) Save Options
Overview: Aspose.3D for .NET
Aspose.3D for .NET is a feature-rich component and class library for .NET that empowers Mono and .NET application including ASP.NET, Windows Forms and Web Services to connect with prevalent 3D document formats automatically without the 3D modeling and rendering software being installed on the server. It supports FBX (ASCII, Binary) and STL (ASCII, Binary) file formats and developers can easily create, read, convert, modify and control the substance of these 3D document formats using Aspose.3D API.
More about Aspose.OCR for .NET
Homepage of Aspose.3D for .NET
Download Aspose.3D for .NET
Online documentation of Aspose.3D for .NET
#Export 3D Scene to GLTF 2.0#Customize Non-PBR to PBR Materials#Collada files loading correctly#Detect Type of a 3D File#.NET 3d API#.NET 3D library#3D modeling in .NET
0 notes
Text
Autodesk revit 2017 x64 無料ダウンロード.30 日間の Revit 無償体験版
Autodesk revit 2017 x64 無料ダウンロード.Autodesk Revit 2017 製品 Update

Interesting tutorials.Autodesk FBX Review - Windows 64 Bit | Revit | Autodesk App Store
Autodesk 3ds Max Download. on 30 votes. Autodesk 3ds Max is a professional 3D editing and animation tool. Autodesk 3ds Max is a professional compatible with Autodesk Revit, Inventor, Fusion Autodesk Revit コンテンツ. 下記のリンクは、���ポート対象のすべての言語とロケールの Revit 製品インストールに含まれている、ファミリ テンプレート、プロジェクト テンプレート、ファミリ ライブラリを表しています。. 目的のコンテンツの実行 Mar 22, · Descargar X-Force , aplicación para activar cualquier producto de Autodesk Con X-Force podremos activar AutoCAD , Revit , ted Reading Time: 2 mins
Autodesk revit 2017 x64 無料ダウンロード.Download autodesk revit for free (Windows)
Autodesk Revit Autodesk Revit LT Parallels Desktop ® 11 for Mac: 推奨レベルの構成; ホストのオペレーティング システムとハードウェアの種類: Mac ® OS X ® (El Capitan) MacBook Pro ® 10,1、iMac ® 14,1 以降: メモリ: 16 GB: CPU の種類: GHz クアッドコア Intel ® Core i7™ を Autodesk 3ds Max Download. on 30 votes. Autodesk 3ds Max is a professional 3D editing and animation tool. Autodesk 3ds Max is a professional compatible with Autodesk Revit, Inventor, Fusion Mar 14, · Autodesk® FBX® Review is a lightweight, standalone software tool for reviewing 3D assets and animations quickly and efficiently. FBX Review enables users to view 3D content without using a 3D authoring tool, to help speed up asset sharing and iteration
FBX Review enables users to view 3D content without using a 3D authoring tool, to help speed up asset sharing and iteration. More at www. Customer Support: fbxreview autodesk. I've been using it on Windows where it works seamlessly for reasonably small models.
Reading larger files is super slow but works, at least. Tuning the options in such cases is hardly possible, and also unclear because not documented it seems, not even popup bubbles. Also missing basic help about keyboard shortcuts etc.
Not sure if we will ever get higher quality rendering on modern GPUs like lighting with an HDR image. It does open fbx models however it lacks an option to change blend modes like in noesis and I think it need more features because my assets aren't shown by this programm correctly.
FBX review tool is good to view models. I need to convert FBX to DAE Collada format. But it doesn't work. Also, for DAE there are no options to choose from export. Any idea how to export to DAE from AutoDesk FBX review? then again that Converter did ruin the Normals or Texture. never been able to use this app, crashes every time when trying to load on W7.
Best software, make my work simple and fast in order to open, view and analyze the FBX before using it in my project. FBX Review is a very cool application. It could even be a light "game engine" if it would be possible to package this app as redistributable and to remote it.
It should be able to represent a background e. HDR , to add and remove a single actor to the scene, to play remotely a motion on the actor, to send remotely the user inputs, to change the coordinates, size and angle of the actor. The best would be if an additional scene could hiddenly be prepared. So that different scenes could be represented and walked through.
Morphs and Morph animation is not displayed? I made a simple FBX to test if this supported basic morphs and it does not. Would be perfect for our asset review workflow but unfortunately doesn't include the bones which have been animated inside 3ds max. We work mainly in Site Design using InfraWorks. Being that you can only export FBX models out of AIW, it seems like a great tool.
However, the performance of navigating the AIW export its disappointing. Wish there was ways to adjust the quality or geometry fidelity like anti-aliasing. The options under settings are geared more towards the animation products. drag and drop worked in version 1. Just like the Windows App, this could not even open up Unity Chan FBX only the disembodied head mesh appears. However, once I regenerated the UnityChan rig with Adobe's Mixamo it worked.
A bad SDK version? Anyway, this app should have 1 better error handling to display to the user that something is amiss, and 2 a quick-help to assist new users with navigation - a UI is only 'obvious' to those that already know how to use it ;.
Just what I was looking for with a need to interactively display electric transmission data draped on a terrain model. Using windows 10, never been able to use this app, crashes every time when trying to load a fbx. I have tried this software in late and twice in I realy would love some sort of fix pls.. Please put the FBX title into the window title bar, and grow the drop-down box containing the take name as the window is resized - they're all too truncated to read!
Would also love to see skeleton joint names and coordinates on mouse-over. On Win7 can't open even simple box exported to fbx , 3ds , obj from 3ds max Older fbx files also cause crash.
FBX Review 1. Some models are rendered with a "bulgy" look. we were working, and thought to check for update to V1. and found 64Bit v1. However, now the system refuses to allow FBX files to be opened into the FBXReviewer tool as MotionBuilder opens instead. Maya has been around for such a LONG time and I've seen and used many software's to view so many file formats. MA files?
Autodesk would please so many users out there and make life that little more pleasing. I can't use this application cause of appcrash fail it isn't open What should I do? is there any suggestion? Muy buena Herramienta sin consumir memoria!.. Aunque algunas veces se pierden materiales y no aguanta las animaciones de Fluidos I have been trying to play an animation in fbx review, but have some issue with this.
I have keyed the material in maya and then exported as fbx and opened it in fbx review. I tried with texture also, but same problem. my question is why textures are not visible when you fbx in fbx review and some of the animations are also not playing. I exported fbx from Maya LT. 问题事件名称: APPCRASH 应用程序名: fbxreview.
exe 应用程序版本: 1. dll 故障模块版本: 8. One of the best things about this tool is that it is very quick compared to the software Autodesk released in the past. FBX converter was the next best thing - it looks like this is what we'll be using going forward! Hopefully they deploy this with Max, Maya, MotionBuilder and Mudbox going forward. There's a substantially lacking feature though. If you're an animator, particularly for games, and only want to export the skeletal animation - you cannot preview that alone.
Only if there is a skinned mesh in the scene will FBX review show you the skeleton drawn over the mesh. I don't understand why the skeleton cannot be displayed if that's all there is in the scene. I tried exporting a hierarchy, yet I was left with an empty FBX reviewer.
The timeline was appropriate in length, though. its perfect. my only suggestion for improvement is if you can give preferences on shortcut keys, this will help. simple example is showing skeleton on off etc.. Autodesk FBX Review - Windows 64 Bit.
Autodesk, Inc. Toggle between wireframe, shading, texture, and lighting options. Review animated 3D assets using familiar play, pause, and scrub-through controls. Review assets while on-the-go without having to rely on a 3D content creation tool. Formats supported:. Free FBX Sample File! ヘルプ ドキュメントを読む. このバージョンについて バージョン 1. New in FBX Review 1. カスタマ レビュー. レビューを書くにはサインインしてください テクニカル ヘルプを表示.
Steffen Roemer 11月 30, 確認済みダウンロード これは何ですか? Riki Risnandar 11月 16, 確認済みダウンロード これは何ですか? this tool is times much better than 3d viewer internal software in win ac6eb63 ss 9月 25, Shree Nandan 3月 15, 確認済みダウンロード これは何ですか? Jcr Jcr 11月 29, you should be able to convert using Blender. Nefily Nefily 4月 06, 確認済みダウンロード これは何ですか? Andrew Chapman 1月 07, Riki Risnandar 11月 16, Christopher Campbell 8月 26, 確認済みダウンロード これは何ですか?
0 notes