#ComputerName
Explore tagged Tumblr posts
Visit Tumblr Blog
Explore Tumblr blogs with no restrictions, modern design and the best experience.
Last Seen Tumblr Blogs


Fun Fact
Forty percent of Tumblr users are between the ages of 18 to 25.
Text
Change Active Directory Domain name from dot local to dot com
In this article, we will learn how to change Active Directory Domain name from dot local to dot com (.local to .com.). Since global DNS does not recognise .local domains, and they lack global uniqueness. Also, they are not suitable for services that require access beyond the local network. While this is generally not problematic for internal domains, it can pose challenges when connecting…

View On WordPress
#Active Directory#Active Directory Administrative Center#Active Directory Domain Services#AD#AD DS#create Lookup Zones#Microsoft Windows#netdom computername#Windows#Windows Server#Windows Server 2012#Windows Server 2019#Windows Server 2022#Windows Server 2025
0 notes
Text
How to Modify the Computer Name and MAC Address to Achieve a Higher Anonymity?

In VMLogin, you can customize the modification of the computer name and MAC address of each virtual browser, and the modification is completed to be completely different from the local device and other virtual browsers, in order to prevent the leakage of information and to avoid the detection of the association, and to achieve a higher degree of anonymity.
By using the VMLogin Fingerprint Browser to modify the computer name and MAC address, you can increase the level of anonymity and privacy protection on the Internet. This method can help you protect your privacy and data security, prevent your personal devices from being tracked and identified; and most critically stop platforms and websites from detecting multiple account associations.
VMLogin Free trial: https://www.vmlogin.us/free-trial.html
#incognito#protection#software#searchsafely#dataprotection#virtualbrowser#browser#virtualplatform#mac address#computernames#modify#anonymity#anonymous#antidetectbrowser
0 notes
Text
New PowerShell Program
So the other day I was at work and was wondering if there was a way to check all the PC's on the network and find out when the last time they were active.
I then began to write something in PowerShell. I also wanted the Computer name and the last user who was logged into the PC. Just to make a list of older PCs on the network, and users we need to clean up in AD.
Using AD, I could get most of the information I needed, and then using SSH to reach out to every PC and update the latest information. How it would work is it would ping the pc to see if it was active, then using SSH to get the information I wanted. I also wanted it to be placed into a spreadsheet to be able to send it to the Sys Admins.
Now, to use this, you will need to run PowerShell as an administrator.
Here is the code
$computers = Get-ADComputer -Filter * -Property Name, LastLogonTimestamp
$results = @()
foreach ($computer in $computers) { $compName = $computer.Name $lastLogon =[DateTime]::FromFileTime($computer.LastLogonTimestamp)
Write-Host "Checking $compName..." -ForegroundColor Cyan
# Set a default value
$lastUser = "Unknown or Offline"
# Try to ping and connect if the machine is online
if (Test-Connection -ComputerName $compName -Count 1 -Quiet) { try {
# Try to grab the last logged-on user
$sysInfo = Get-CimInstance -ClassName Win32_ComputerSystem -ComputerName $compName
$lastUser = $sysInfo.UserName $model = $sysInfo.Model } catch { $lastUser = "Access Denied" } } else { $lastUser = "Offline" }
$results += [PSCustomObject]@{ ComputerName = $compName LastLogonToAD = $lastLogon LastLoggedInUser = $lastUser SystemModel = $model } }
Display
$results | Sort-Object LastLogonToAD -Descending | Format-Table -AutoSize
Optional: export to CSV
$desktop = [Environment]::GetFolderPath("Desktop") $path = Join-Path -Path $desktop -ChildPath "PC_LastLogonAndUser.xlsx"
$results | Export-Excel -Path $path -AutoSize -BoldTopRow -Title "PC Last Logon and User Report" -WorksheetName "Report"
0 notes
Text
Fun fact: Tim Berners-Lee actually regrets his "//" and wishes that URLs worked similarly to how it was done back in the JANET times:
I have to say that now I regret that the syntax is so clumsy. I would like http://www.example.com/foo/bar/baz to be just written http:com/example/foo/bar/baz where the client would figure out that www.example.com existed and was the server to contact. But it is too late now. It turned out the shorthand "//www.example.com/foo/bar/baz" is rarely used and so we could dispense with the "//".
Also, the reason for the double-slash weirdness:
[I] needed an extension to add the service name (hostname). In fact this was similar to the problem the Apollo domain system had had when they created a network file system. They had extended the filename syntax to allow //computername/file/path/as/usual. So I just copied Apollo. Apollo was a brand of unix workstation. (The Apollo folks, who invented domain and Apollo's Remote procedure call system later I think went largely to Microsoft, and rumor has it that much of Microsoft's RPC system was).
So you can blame Apollo Computer in large part for it (and Berners-Lee, too, of course) (Although I'm still not quite sure why they reversed the domain direction...)
Source: https://www.w3.org/People/Berners-Lee/FAQ.html#etc
fun fact: in the UK, they used JANET Name Registration Scheme (NRS) through the 80s and early 90s, instead of the Domain Name System (DNS), which is what the internet works now. This is basically the same as how domain names work today... except they were BACKWARDS.
NRS started with the top level domain (TLD), then the domain, then any subdomains.
So if the UK has stuck with their old naming scheme and it had caught on instead of the american DNS, you'd be reading this on com.tumblr.www
#I had to go looking for the source on this one because people can't link their shit#EDIT: Nevermind I'm a dumbass; the original source that got me here actually did cite properly I just overlooked it
177 notes
·
View notes
Text
Blog: Checking Open/Closed Ports with Test-NetConnection
In the realm of network troubleshooting and security, the ability to check open or closed ports is a fundamental task. PowerShell, a powerful scripting language, offers a convenient cmdlet known as Test-NetConnection for this purpose. This tool allows users to verify the status of ports on a target system, aiding in diagnosing connectivity issues and ensuring network security.
Understanding Test-NetConnection
Test-NetConnection is a versatile cmdlet that comes in handy for network administrators and IT professionals. By utilizing this command, one can quickly determine whether a specific port on a remote host is open or closed. This functionality is crucial for verifying network configurations, identifying firewall restrictions, and troubleshooting connectivity problems.
How to Use Test-NetConnection
The process of checking ports with Test-NetConnection is straightforward. Users can specify the target host and port number they wish to examine. The cmdlet then performs a series of tests to ascertain the status of the port, providing valuable feedback on whether it is open or closed.To initiate a port check using Test-NetConnection, one can follow these simple steps:
Open PowerShell on your system.
Enter the command: Test-NetConnection -ComputerName <TargetHost> -Port <PortNumber>
By executing this command, users can swiftly determine the accessibility of a specific port on the designated host.
Practical Applications
The utility of Test-NetConnection extends across various scenarios. From verifying the availability of essential services to conducting security assessments, this cmdlet serves as a valuable tool in the arsenal of network administrators. By promptly identifying open or closed ports, professionals can streamline troubleshooting processes and fortify network defenses.In conclusion, Test-NetConnection stands out as a reliable solution for assessing port status in network environments. Its simplicity and effectiveness make it an indispensable resource for individuals tasked with maintaining robust and secure networks.By leveraging PowerShell’s Test-NetConnection cmdlet, users can gain valuable insights into their network infrastructure, empowering them to address connectivity issues proactively and enhance overall system resilience.For more detailed information on using Test-NetConnection and its capabilities, refer to the provided resources from SID-500.COM, Acronis Knowledge Base, Reddit’s PowerShell community, Stack Overflow, and Microsoft Learn.
0 notes
Text
PowerShell: Check Remote Computer Disk Capacity
PowerShell: Check Remote Computer Disk Capacity

From time to time, I get tickets where one of many possible root causes may be a full disk. While accessing this information over RDP is often an option, it is rather more intrusive than needed. What’s more, I usually don’t have access to access file servers over RDP. Enter PowerShell and the get-WmiObject query!
By using the Win32_LogicalDiskclass, and specifying the computer I want to access…
View On WordPress
0 notes
Photo

0 notes
Text
Wynis - Audit Windows Security With Best Practice
Wynis - Audit Windows Security With Best Practice #Antivirus #audit #Auditing #DirectoryOutput #firewall #Netstat
Just a powershell scripts for auditing security with CIS BEST Practices Windows 10 and Window Server 2016 You just need to run the script, it will create a directory named : AUDIT_CONF_%DATE% The directory output will contain the files belows: -Antivirus-%COMPUTERNAME% : List installed Antivirus software -APPDATA%COMPUTERNAME% : List all executable file in APPDATA…
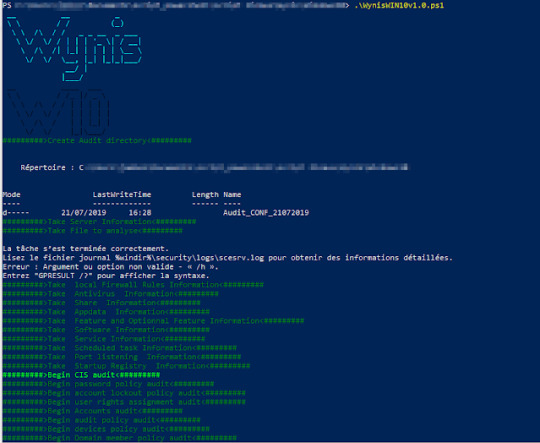
View On WordPress
#Antivirus#audit#Auditing#Directory Output#firewall#Netstat#PowerShell#Practice#security#Security Audit#windows#Windows Security#Wynis
2 notes
·
View notes
Text
Get Installed Programs
Problem
You need to understand how similar or different the programs installed on one or more servers are. There’s many use cases, but for me this was part of a migration effort.
Solution
Run the following in PowerShell with Administrator Privileges
Get-ItemProperty HKLM:\Software\Wow6432Node\Microsoft\Windows\CurrentVersion\Uninstall\* | Select-Object DisplayName, DisplayVersion, Publisher,…
View On WordPress
0 notes
Text
SCCM - Deploy Unknown Computers with Assettag as computername
SCCM – Deploy Unknown Computers with Assettag as computername
Hi, In a recent Windows 10 deployment project (with SCCM) a customer of mine wanted to use the Serialnumber as the computername within Active Directory. The customer is using Unknown Computersso they don’t the need to import them first. Also there was the need to identify if a computer was a desktop or laptop, this was needed to make sure the computer was joined in the right OU depending of that…
View On WordPress
#Assettag#bitlocker#ComputerName#configuration manager#Current Branch#Customization#Operating System Deployment#osd#OSDComputerName#SCCM#Script#Task sequence#VBS
0 notes
Text
How to Convert OST file to PST File in Outlook 2019/2016/2013/2010/2007
Why do we need to convert Outlook OST to PST
The OST file contains all your mail items in an offline mode on your hard drive. Every time you log in to your account, all the mail items are synchronized and downloaded into this. These OST files work in synchronization with the MS Outlook PST file. It helps in keeping the mailbox up-to-date with new mails, meeting request, delivery reports etc. However, there are situations when such mail items become inaccessible. In such a situation, you need to convert mails in the OST file into a different Outlook compatible file format like PST.
Quick Solution: Try Sysvita Converter for OST to convert Exchange OST file to PST in few steps. Software Supports Convert OST into multiple saving option with Google, Office 365 file type & Repair Corrupt OST File for all MS Outlook versions: Outlook 2019, 2016, 2013, 2010, 2007, 2003, 2002, and 2000.

Some of the reasons, when it becomes necessary to import ost into pst, are mentioned below.
MS-Exchange server can unexpectedly crash due to power failure, malicious software, virus attacks, or any other reason.
In the case of Exchange Server downtime or Exchange Server maintenance, you will not be able to access your mailbox. However, at times it becomes very necessary to have access to the mailbox items.
By converting Outlook OST to PST file format, the data can be recovered even after accidental deletion of user mailboxes on the Exchange server.
Converting OST to PST helps in migrating the data from one place to another. This is very helpful in case the organization is shifting, or you want to move your important data on a different system.
While working with an MS Outlook client, you might come across the following error messages.
'Your offline folder file could not be configured.\\ComputerName\FolderName\Outlook.ost.'
'The operation failed due to a registry or installation problem. Restart Outlook and try again. If the problem persists, please reinstall.' Also, the following message might appear when you are working in a networked environment and the system having the OST file is not shared.
The OST file gets corrupt due to several reasons, as mentioned below.
Software related issues
Unexpected hardware failures
Abnormal termination
Application shutdown
Damage induced on the database
Server breakdown
Virus Attacks
Trojans Infections
Lack of Storage Space
Accidental deletion of the user account
Here's How you can convert OST to PST File
Method 1: Export mailbox as a PST file
Login to Outlook with the Exchange account that was used to create the OST files. And to export the OST mailboxes to PST, follow the simple procedure:
Go to Files >Open & Export and click Import & Export.
Select Export to a file; then click Next.
Select the second option—Outlook Data File (.pst)—and click Next.
Select the folder which you want to export and click Next.
Browse the location where you want to save the new PST file and choose the options regarding the duplicate items.
Convert OST File to PST File using SysVita OST Software
Sysvita Software for Exchange OST Recovery is a powerful tool to convert corrupt OST files into PST files. The Microsoft OST to PST converter software is highly recommended by MVPs & Exchange Experts for its ability to repair and safely convert all Exchange mailbox objects within OST files into Outlook importable PST file.
The Sysvita software OST PST conversion tool converts inaccessible OST files into easily accessible MS Outlook PST files. It actually doesn't matter even if Exchange Server has gone corrupt, the tool can easily repair the corrupt OST file and restore the entire mailbox quite easily. Download Online OST to PST Converter to preview your mailbox data.
This Sysvita Software help you easily convert your OST File to PST File Sometimes you may experience an error that the OST is not an Outlook Data file; this happens when you try to open an encrypted OST file. In such situation, Sysvita Software Converter for OST easily converts the inaccessible encrypted OST file to outlook PST file. OST PST Converter tool supports all versions of Outlook such as 2019, 2016, 2013, 2010, 2007, 2003, 2002, and 2000.

Some Most Important features of Sysvita OST to PST Converter Software.
Sysvita OST to PST Converter software support encrypted & password Protected OST file.
Repair corrupted offline OST file and Recover Mailbox Data.
Repair & Recover OST Mails data easily Preview before Conversion.
100% help to Retrieve Offline OST File Mails Properties and Component Such as Inbox, Outbox, Sent Items, Drafts, Deleted Items, Contacts, Calendar, Tasks, Notes, Journals etc. and recover data Save into Outlook PST file formats.
Faster Conversion Process to Converter OST to PST File.
Multiple File formats saving option to Save OST mailbox database.
This Software recover any size of OST file data.
Users Directly Export offline OST file to office365, Outlook.com and Exchange Server.
Migrate Offline OST file Into Web-based Google Mail Account.
No requirement Install Outlook in System of Conversion Process.
Software support 32 bit & 64 Bit Outlook & Windows.
Read More: How to Manually Convert OST file into Gmail Account Conclusion
if you convert OST FIle to PST File manually you have a huge risk of loosing data and corrupting your file it will damage or permanetlty loose your file if you know how to do it manually step by step then only take risk of doing it manually otherwise you can choose Sysvita software it will guide you step by step and you can easily Convert your OST file to PST covering all your doubts and risk it will make your data save without any lose.
#ost#ost to pst converter#free ost to pst converter#ost recovery#ost to pst conversion#convert ost to outlook 2016#convert ost to pst#ost pst conversion#Exchange ost to outlook 2019
1 note
·
View note
Video
youtube
How to Modify Computer Names for Multiple Browsers to Prevent Account Association in VMLogin?@Vmlogin
#youtube#computernames#undetected#undetectable#software development#antidetect#antidetectbrowser#business#marketing#marketingdigital#customized#facebook#modify
0 notes
Text
Sims 2 Pink Flash & Crash FIX!
Hey penguins, wanted to follow up with my previous post about my Sims 2 crashing and the tricks I used to get it working again! Since applying them, I haven’t had one crash or purple flashing since! (At this point, I have played the game several hours, switched households multiple times and loaded a ton of lots to make sure the issues are gone)
============================================================= Tip#1: Make sure to check that your Graphics Card is listed in the Video Cards.sgr files in your Sims 2 installation folder! If not, use the Graphics Rules Maker , add your GPU to the list and double-check that it HAS been added there (I had problems with this and had to do it manually in the end!). Make sure to copy the new Graphics Rules AND Video Cards files to both folders in the installation location (Config and CSConfig).
Tip #2: Make sure that you have to correct texture memory amount assigned for your game! If you haven’t already, run DxDiag on your computer ( https://support.microsoft.com/en-us/help/4028644/windows-open-and-run-dxdiagexe ) , click “Save all info” on the bottom and save it on your desktop. Open and check your Display Memory under “Display Devices”. That Display Memory is the amount you need to change for your Graphic Rules-files. See Leefish post for more info: http://www.leefish.nl/mybb/showthread.php?tid=7909
Tip #3: If you have applied the “4 gig patch”, make sure that it is working properly. Check your Documents > EA Games > The Sims 2 > Logs folder and open a file called “COMPUTERNAME-config-log”. If the memory under “Machine info” (top of the list) is anything less than 4000MB (mine says 4096 MB), the patch hasn’t been fully applied. Jessa shows in this VIDEO how to download AND fix the patch: https://youtu.be/-0iwuLZyjMg
Tip #4: Especially if you are playing on Windows 10, make sure to do the Memory Allocation Fix that Jessa shows in the video above! You NEED this! This fix also helps Windows 7 users!!
Tip #5: (Not sure if this is necessary after applying #4, but I did it before I fixed the memory leak issue and didn’t have any crashes after that either) Make sure your Virtual Memory amount is set high enough in Control Panel > System > Advanced settings > Advanced tab > Performance settings > Advanced > Virtual Memory. Set the custom amount for your main drive to be 25,000-30,000 and click “Set”. === Thanks so much to Gina for this tip!===
Check out Jessa’s post on ModTheSims for more links and important information: http://modthesims.info/showthread.php?t=610641
I’m listing here all the tricks I did both for you guys and for myself aswell, in case I need to go through this whole thing again at some point in the future (after switching Graphics Cards, which thankfully won’t happen in a few years!). Hopefully it’ll be useful and helpful for you guys!
Special thanks to Jessa, Gina and everyone on Leefish forums for all the useful information and tips on how to fix the graphical problems!
Now, on to more Sims 2 livestreams!!! ============================================================== EDIT// Even after applying all the tips above, the flashing pink glitch and the crashing that followed came back to my game after few days. If you continue to have these issues despite of applying the changes above, try these methods! (My game has FINALLY stopped crashing and flashing after I tried these and made permanent changes to the game itself!) -------- IMPORTANT! Watch THIS VIDEO to learn about the flashing pink issue and apply one or more of these tricks: Tip#6: Use “boolProp UseShaders false” to stop the flashing (I’ve added this to my userStartup.cheat file so it will stay on automaticly, especially since I have certain neighborhoods that will always flash pink in the neighborhood view... *cough* Clayfield *cough). Tip#7: Delete the game thumbnails from your Documents > EA Games > The Sims 2 > Thumbnails. -------- If you start getting the flashing pink glitch while playing on a lot (can happen especially if you’ve been running the game for a long time), save and exit the game and delete all thumbnails before restarting the game. I have to delete the thumbnails every time before I load up the game. Tip#8: Change your settings in-game to match the ones shown in the video above! (Shadows: off, Lighting: medium, view distance: medium) This will help prevent any further issues. I’m running Win10 with Nvidia GTX 1070 graphics card and Intel i7-8700 processor, and disabling the shaders AND deleting thumbnails regularly has proven to be the only way of me playing the game without random crashes because of the flashing pink texture issues.
2K notes
·
View notes
Text
Computer Parts Name | Computer parts name in English and Tamil| கணினியின...
youtube
#computername
#computerpartsname
#computerpartsnameintamil
#computerparts inenglish
0 notes