#Create Windows Bootable USB Drive From ISO File & Installation
Explore tagged Tumblr posts
Visit Tumblr Blog
Explore Tumblr blogs with no restrictions, modern design and the best experience.
Last Seen Tumblr Blogs


Fun Fact
The “We are the 99%” Tumblr blog became the slogan for the Occupy Wall Street movement.
Text
If you don’t like Windows 10, Windows 11, or other mainstream desktop operating systems for whatever reason, consider using linux. It isn’t as hard as you think.
I switched from Windows 10 to Linux Mint a few months ago, and it went pretty smoothly for me.
Linux has a reputation for being difficult to use, and while it is somewhat deserved, it is quite overblown.
For myself, I think the hardest part of switching was installing Linux on my device. It required me to learn some new software and took about 3 hours on my first try. After setting up my laptop, it was pretty easy. The user interface took a few days to adjust to, and I fiddled around with some settings to my preference, but it was not difficult to adjust from Windows 10 to Linux Mint.
And if you can get someone else to install linux for you, all you need to do it get used to some user interface changes!
INSTALLING LINUX ON YOUR COMPUTER
Here’s an installation guide for Linux Mint if you want more detail than what I give. Link: https://linuxmint-installation-guide.readthedocs.io/en/latest/
You will need: a laptop or desktop, a USB stick, and USB writing software.
Download a linux ISO file. An ISO file is all the data used to install an operating system onto a computer.
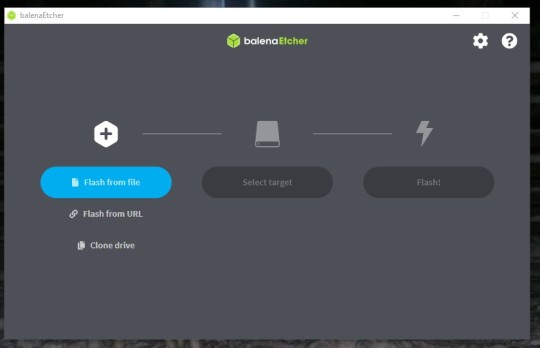
Then you will need to download a USB writing program. Then you can use USB writing software to put the ISO file onto a USB drive. This will create the “bootable media” which will be used to install linux onto your computer. For installing Linux Mint on my device, I used Balena Etcher to write the ISO file.

64 notes
·
View notes
Text
Installing Kali Linux on a USB Stick: A Step-by-Step Guide
If you want a portable, powerful cybersecurity toolkit you can carry in your pocket, installing Kali Linux on a USB stick is the perfect solution. With Kali on a USB, you can boot into your personalized hacking environment on almost any computer without leaving a trace — making it a favorite setup for ethical hackers, penetration testers, and cybersecurity enthusiasts.

In this guide, we'll walk you through how to install Kali Linux onto a USB drive — step-by-step — so you can have a portable Kali environment ready wherever you go.
Why Install Kali Linux on a USB?
Before we dive into the steps, here’s why you might want a Kali USB:
Portability: Carry your entire hacking setup with you.
Privacy: No need to install anything on the host machine.
Persistence: Save your settings, files, and tools even after rebooting.
Flexibility: Boot into Kali on any system that allows USB boot.
There are two main ways to use Kali on a USB:
Live USB: Runs Kali temporarily without saving changes after reboot.
Persistent USB: Saves your files and system changes across reboots.
In this article, we’ll focus on setting up a Live USB, and I'll also mention how to add persistence if you want. and if you seek knowledge about kali linux you can visit our website any time
Website Name : Linux Tools Guide
What You’ll Need
✅ A USB drive (at least 8GB; 16GB or more recommended if you want persistence). ✅ Kali Linux ISO file (download it from the official Kali website). ✅ Rufus (for Windows) or Etcher/balenaEtcher (for Mac/Linux/Windows). ✅ A computer that can boot from USB.
Step 1: Download the Kali Linux ISO
Go to the Kali Linux Downloads page and grab the latest version of the ISO. You can choose between the full version or a lightweight version depending on your USB size and system requirements.
Tip: Always verify the checksum of the ISO to ensure it hasn't been tampered with!
Step 2: Insert Your USB Drive
Plug your USB stick into your computer. ⚠️ Warning: Installing Kali onto the USB will erase all existing data on it. Backup anything important first!
Step 3: Create a Bootable Kali Linux USB
Depending on your operating system, the tool you use may vary:
For Windows Users (using Rufus):
Download and open Rufus (Get Rufus here).
Select your USB drive under Device.
Under Boot selection, choose the Kali Linux ISO you downloaded.
Keep the Partition scheme as MBR (for BIOS) or GPT (for UEFI) based on your system.
Click Start and wait for the process to complete.
For Mac/Linux Users (using balenaEtcher):
Download and open balenaEtcher (Get Etcher here).
Select the Kali ISO.
Select the USB drive.
Click Flash and wait until it's done.
That's it! You now have a Live Kali USB ready.
Step 4: Boot Kali Linux from the USB
Restart your computer with the USB plugged in.
Enter the BIOS/UEFI settings (usually by pressing a key like F12, Esc, Del, or F2 right after starting the computer).
Change the boot order to boot from the USB first.
Save changes and reboot.
You should now see the Kali Linux boot menu! Select "Live (amd64)" to start Kali without installation.
(Optional) Step 5: Adding Persistence
Persistence allows you to save files, system changes, or even installed tools across reboots — super useful for real-world usage.
Setting up persistence requires creating an extra partition on the USB and tweaking a few settings. Here's a quick overview:
Create a second partition labeled persistence.
Format it as ext4.
Mount it and create a file /persistence.conf inside it with the content: cppCopyEdit/ union
When booting Kali, choose the "Live USB Persistence" option.
Persistence is a little more technical but absolutely worth it if you want a real working Kali USB system!
Troubleshooting Common Issues
USB not showing up in boot menu?
Make sure Secure Boot is disabled in BIOS.
Ensure the USB was properly written (try writing it again if necessary).
Kali not booting properly?
Verify the ISO file integrity.
Try a different USB port (preferably USB 2.0 instead of 3.0 sometimes).
Persistence not working?
Double-check the /persistence.conf file and make sure it's correctly placed.
Conclusion
Installing Kali Linux onto a USB stick is one of the smartest ways to carry a secure, full-featured hacking lab with you anywhere. Whether you’re practicing ethical hacking, doing security audits, or just exploring the world of cybersecurity, a Kali USB drive gives you power, portability, and flexibility all at once.
Once you’re set up, the possibilities are endless — happy hacking! 🔥
2 notes
·
View notes
Video
youtube
Discover the EASY Way to Install LINUX Without the Hassle!
*Linux For DevOps:* https://www.youtube.com/playlist?list=PLGj4aMqxhpL6qwlxRuVljjIxvNoMy-W91 *Linux For DevOps: Beginner Level:* https://www.youtube.com/playlist?list=PLGj4aMqxhpL5bLDvXBIpOmS_Vh6U8tjM0 *Linux For DevOps: Intermediate Level:* https://www.youtube.com/playlist?list=PLGj4aMqxhpL79czyihLsCRXHePzY0zQuv ***************************** * Discover the EASY Way to Install LINUX Without the Hassle! * 🎥: https://youtu.be/V7ZOuK6o5KQ *****************************
Linux is a powerful, versatile operating system widely used for servers, development environments, and personal computing. If you're new to Linux, this guide will walk you through the installation process and initial setup to get you started.
Why Choose Linux? - Free and Open Source: Most Linux distributions are completely free to use. - Customizable: Tailor your operating system to your needs. - Secure and Reliable: Preferred for servers and development due to robust security. - Community Support: A vast, active community to help with troubleshooting and learning.
Step 1: Choose a Linux Distribution Popular Linux distributions include: - Ubuntu: Beginner-friendly and widely supported. - Fedora: Cutting-edge features for developers. - Debian: Stable and ideal for servers. - Linux Mint: Great for transitioning from Windows. - CentOS Stream: Suitable for enterprise environments.
Step 2: Download the ISO File 1. Visit the official website of your chosen Linux distribution. 2. Download the appropriate ISO file for your system (32-bit or 64-bit).
Step 3: Create a Bootable USB Drive To install Linux, you'll need a bootable USB drive: 1. Use tools like Rufus (Windows), Etcher, or UNetbootin to create a bootable USB. 2. Select the downloaded ISO file and the USB drive, then start the process.
Step 4: Install Linux 1. Insert the bootable USB into your computer and restart. 2. Access the BIOS/UEFI menu (usually by pressing `F2`, `F12`, `Esc`, or `Del` during startup). 3. Set the USB drive as the first boot device. 4. Follow the installation wizard to: - Select your language. - Partition your disk (use “Automatic” if unsure). - Create a user account and set a password.
Step 5: Perform Initial Setup After installation: 1. Update the System: ```bash sudo apt update && sudo apt upgrade -y # For Debian-based systems sudo dnf update # For Fedora-based systems ``` 2. Install Essential Software: - Text editors: `nano`, `vim`. - Browsers: `Firefox`, `Chromium`. - Development tools: `git`, `gcc`.
3. Enable Firewall: ```bash sudo ufw enable # Uncomplicated Firewall ```
4. Learn Basic Commands: - File navigation: `ls`, `cd`. - File management: `cp`, `mv`, `rm`. - Viewing files: `cat`, `less`.
Tips for Beginners - Experiment with a Live Environment before installing. - Use VirtualBox or VMware to practice Linux in a virtual machine. - Join forums like Ubuntu Forums, Reddit’s r/linux, or Linux Questions for support.
Linux installation, Linux beginner guide, Linux setup, how to install Linux, Linux for beginners, Linux distributions, Ubuntu installation, Linux Mint setup, Fedora installation guide, Linux tips
#Linux #LinuxForBeginners #Ubuntu #LinuxMint #Fedora #LinuxTips #OpenSource #LinuxInstallation #TechGuide #LinuxSetup #ClouDolus #ClouDolusPro
ubuntu,Getting Started with Linux Installation and Basic Setup,linux tutorial for beginners,open source,linux terminal,distrotube,ubuntu is bad,linux tutorial,linux for beginners,linux commands,Linux installation,Linux beginner guide,Linux setup,how to install Linux,Linux for beginners,Linux distributions,Ubuntu installation,Fedora installation guide,Linux tips,cloudolus,cloudoluspro,free,Linux,Linux for DevOps,Linux basics,DevOps basics,cloud computing,DevOps skills,Linux tutorial,Linux scripting,Linux automation,Linux shell scripting,Linux in DevOps,Ubuntu,CentOS,Red Hat Linux,DevOps tools,ClouDolus,DevOps career,Linux commands for beginners,Introduction to Linux for DevOps: Why It’s Essential,devops tutorial for beginners,learn devops,devops tutorial,Who Should Learn Linux for DevOps?,Why You Should Learn Linux for DevOps,Why Linux is Critical in DevOps,Why Linux Essential?,What Is Linux Overview?,What Linux Key Features?,What Linux Key Benefits?,What Is Linux Overview? Linux for DevOps,Linux for cloud,Linux training,devops tutorial Linux,Linux commands for beginners ubuntu,cloud computing Linux for DevOps
***************************** *Follow Me* https://www.facebook.com/cloudolus/ | https://www.facebook.com/groups/cloudolus | https://www.linkedin.com/groups/14347089/ | https://www.instagram.com/cloudolus/ | https://twitter.com/cloudolus | https://www.pinterest.com/cloudolus/ | https://www.youtube.com/@cloudolus | https://www.youtube.com/@ClouDolusPro | https://discord.gg/GBMt4PDK | https://www.tumblr.com/cloudolus | https://cloudolus.blogspot.com/ | https://t.me/cloudolus | https://www.whatsapp.com/channel/0029VadSJdv9hXFAu3acAu0r | https://chat.whatsapp.com/D6I4JafCUVhGihV7wpryP2 *****************************
*🔔Subscribe & Stay Updated:* Don't forget to subscribe and hit the bell icon to receive notifications and stay updated on our latest videos, tutorials & playlists! *ClouDolus:* https://www.youtube.com/@cloudolus *ClouDolus AWS DevOps:* https://www.youtube.com/@ClouDolusPro *THANKS FOR BEING A PART OF ClouDolus! 🙌✨*
#youtube#ubuntuGetting Started with Linux Installation and Basic Setuplinux tutorial for beginnersopen sourcelinux terminaldistrotubeubuntu is badlin
0 notes
Text
Forgot Windows 8.1 Local Admin Password No Reset Disk How to Resolve
How to get back into your Windows 8.1 computer if you have forgotten local administrator password no reset disk, how can you reset administrator password in Windows 8.1 without reset disk?

To resolve this problem, you can firstly try Offline NT Password Editor to help reset the forgotten Windows 8.1 administrator password without reset disk. Offline NT password Editor can help clear or reset Windows local account password via CD/DVD. The following procedure will show you the detailed walkthrough.
Trick 1: Use Offline NT Password Editor to Reset Windows 8.1 Local Admin Password (Work with CD/DVD).
When you forgot Windows 8.1 administrator password and a password reset disk was not created, “Offline NT Password Editor”, a free Windows password reset disk, can help you reset forgotten Windows 8.1 local account’s password without knowing it. Free download the ISO file from the official site. Extract the downloaded file and then burn the ISO file on to a writable CD/DVD. Once burning completed, you can use the CD/DVD which is bootable to crack Windows 8.1 Local Admin password.
Step 1: Power on your locked computer and then insert the bootable CD to the CD-ROM.
Step 2: Restart the computer to boot from CD/DVD. If it still boot into Windows, you may need to change device boot order in BIOS. Learn how to boot computer from CD/DVD.
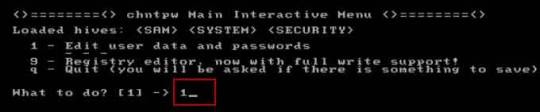
Step 3: When the computer boots from CD and loads Offline NT screen, press Enter until the “step one” appears. Type “1” and hit Enter.
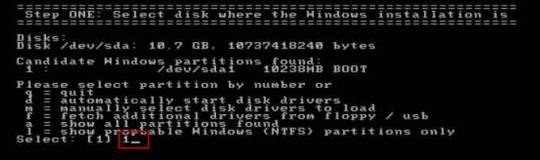
Step 4: Select “Password reset”, type “1” and hit Enter.
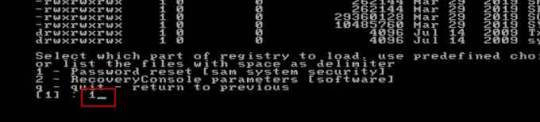
Step 5: Select “Edit user data and passwords, type “1” and hit Enter.
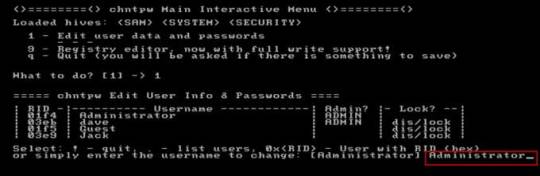
Step 6: Select a user account, type “administrator” and hit Enter.
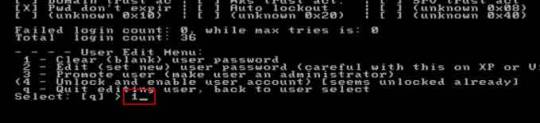
Step 7: Select “Clear user password”, type “1” and hit Enter.
Step 8: Administrator’s password is cleared. Select “Quit editing user and back to user select”, type “!” and hit Enter.

Step 9: Select “Quit”, type “q” and hit Enter.
Step 10: Write back changes, type “y” and hit Enter.
Step 11: When it asks you if try again, type “n” and hit Enter.
Step 12: Now eject your CD and then press CTRL-ALT-DEL to restart the computer.
Step 13: When Windows 8.1 welcome screen appears, click the screen to automatically sign in administrator without password.
Another simple method to reset forgotten Windows 8/8.1 local admin password is using a password recovery program, Windows Password Rescuer, which is working fine for all Windows systems including Windows 11. Here is how to use the utility to reset a local admin password on Windows 8.1/8 PC without logging in.
Trick 2: Reset Windows 8.1 Administrator Password with Windows Password Rescuer Run from USB.
If you have forgotten Windows 8.1 administrator password and need to get back into the account, you can use Windows Password Rescuer to create a bootable USB disk and then use the disk to reset Windows 8.1 local administrator password easily without losing data. It also works perfectly for Windows 11, 10, 8.1, 8, 7, Vista, XP and Windows server 2022, 2019, 2016, 2012, 2008, 2003 etc.
Equipment required: Another Windows computer, USB flash drive.
Read more detailed steps: How to reset Windows 8.1 Admin Password with USB.
Step 1: Use another computer to download Windows Password Rescuer and then install the software.
Step 2: Plug in a blank USB flash drive to the computer and launch the software. Select “USB device” on the software screen.
Step 3: Pull down the drive list and select your plugged USB flash drive. Then click “Begin Burning” to create a bootable USB under a minute.
Step 4: Once the burning process is completed, unplug the USB flash drive and then connect it to your locked computer that you want to reset Windows 8.1 password.
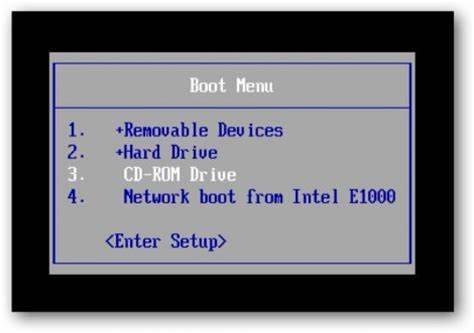
Step 5: Power on the locked computer and press F12 as soon as possible to open “Boot Menu”. Press arrow key to highlight USB option and press Enter to boot from USB.
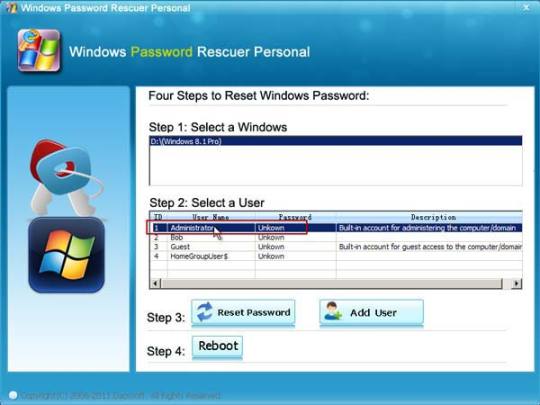
Step 6: Once the locked computer boots from USB and locates Windows Password Rescuer, you can reset administrator or other local user account passwords with several clicks. Now click “Administrator” from user list.
Step 7: Click “Reset Password”, when it asks you if reset administrator password to blank, click “Yes” to confirm it.
Step 8: Administrator password will be removed and shown blank in password list. It means that you will be able to sign in the account without password.
Step 9: Click “Reboot”. When it asks you to remove your USB, remove the USB from your computer and then click “Yes” to restart the computer.
Step 10: After restarting, you can log on administrator without password.

Methods in this article apply to any laptop and desktop computers such as Dell, HP, Toshiba, Acer, Lenovo, Asus etc.
0 notes
Text
Tech - FAQ 2
I'm scared of PCs; I'm just an end-user! I want to learn, though!
If you're curious and want a safe and zero-consequence environment to poke around with, consider turning to tools like VirtualBox. This is what we call a VM Manager or a Virtual Machine manager that enables you to emulate computer hardware on, well, actual hardware. It's a great way to create a Windows install you can poke around without damaging your own system, or of trying out other operating systems to familiarize yourself with them.
In fact, I'll always recommend that anyone who's sitting on the fence in regards to Linux try out a distro in a VM, first. There's no pressure involved, you get the same feel as a bare-metal install, and can rest easy in knowing that if none of this works out for you, you can just mash Delete on your VM folder, delete VirtualBox and forget this ever happened.
What tools do you recommend?
I can point you to several. First comes not so much a software tool as a piece of hardware most of us have, which is a USB drive. If you want to store diagnostics tools on it as well as a few OS image files, I'd advise investing in a nice and chonky one, going above 16 GBs in size. See Amazon for help, or any computer or hardware store you can think of. If you go Amazon's route, avoid no-name vendors and buy directly from reputed hardware manufacturers, like Lexar, Seagate or others. They'll be more expensive, yes, but you won't get scammed.
Then comes Balena Etcher and Rufus. Both do the same thing, which is burn an ISO image file to a USB stick, so said stick becomes a bootable drive containing everything you need to install an OS to your main drive. Etcher is more straightforward, while Rufus offers a few customization options, especially if you're trying to burn or flash a Windows image file.
What about Ventoy?
Ventoy is the Big Kahuna in bootable ISO file management, but it's a bit too involved for first-timers. Effectively, it turns your USB thumb drive into its own multiboot system, complete with a GRUB file that allows your PC to boot off it, while letting you choose which operating system you actually want to start. So instead of having one stick for your tools, one for a Windows install and one for a Linux distro, you'd have everything in one place. I'd recommend familiarizing yourself with simpler tools, first.
I don't want to switch to Linux, but I want more ownership of my Windows install. What can I do?
You can refer to tools like NTLite but again, that one is a lot for first-timers. In the interim, I'd recommend starting with a vanilla Windows 11 install and then referring to Chris Titus' Ultimate Windows Tool, to tweak and debloat your OS to your heart's content. Of particular note is the included MicroWin tool, which can strip down a normal Windows 11 ISO and create an unattended, offline install that boots directly into your User account. No giving Microsoft further credentials, no connection required - nothing. Several of the tweaks involved result in a Windows install that phones home a lot less often and that only concerns itself with proved, tested and necessary Windows Update cycles.
What's an Unattended install?
That refers to a software install that requires no input from the user. You start it, off it goes - and the reins of the PC are handed over to you only once the whole process is completed. No more screwing-about with Microsoft Game Pass offers or trying to say no to Microsoft's thirty thousand instances of telemetry. One click, and you're off to the races.
I tried it, and noticed it didn't remove everything from the base install. I still want to remove more stuff.
Then check out Bulk Crap Uninstaller, which allows you to force the removal of components Windows considers as vital, but that aren't, necessarily. If BCI's interface underlines something in green, it's safe to remove. If it's listed in red, you can still remove it. At your own risk. Some things are provably safe to remove, like the Xbox Game Bar if you've never used the Windows Store to buy a game before. Others shouldn't be touched if you know what's good for you, like Windows Explorer...
I've heard bad things about VirtualBox. What else can you recommend?
Microsoft supplies its own Hyper-V virtualization platform as part of Windows' basic tools, although it's not installed by default and is typically a bit more finicky to handle. Please note, Hyper-V isn't included in Windows Home Edition. You may have to upgrade, or go with a software-based solution like VirtualBox. Check your BIOS; your motherboard needs to support virtualization tech, too.
To get it, search for Turn Windows features on or off in the Start Menu's Search bar and tick the box next to Hyper-V. It'll tell you to prep for a reboot, let it do its thing. Once you've rebooted, you'll be able to search for Hyper-V in the Start menu. Follow the first-time tutorial that pops up to get a sense of the process - which requires you to have an ISO on hand.
What's a BIOS?
The Basic Input-Output System, or BIOS, is what initially controls your PC, before handing off most important aspects of it to your actual operating system. The BIOS performs hardware checks, allows you to define boot priority and can allow you to enable more advanced aspects of your motherboard of choice.
So, I figured out this Virtualization thing. What OS do I try out now?
The obvious first answer is Windows. Running Windows within another instance of Windows has the merit of giving you the most compact and secure home lab you could possibly want. You can try out the stupid shit I mentioned in the previous post - such as deleting System32 - in full confidence that you won't torch your actual rig. You can also test out debloaters, aesthetic patches, anything you'd want - with no fear of leaving scars on your actual system.
What about Linux?
Start with Linux Mint. It'll get you everything you need - just don't forget to install its hardware codecs, when it asks you. Get used to the Terminal - and do that in the knowledge that you're just barely touching the surface of the tech that runs most of the Web. Even Microsoft itself runs its business partly on Mint's parent distro, Ubuntu.
When you're ready, check out Arco Linux as a transition point between Mint and Arch Linux. Get used to its own package manager and syntax, while keeping the benefits of an out-of-box GUI experience.
At the end of your journey, hopefully a few years down the line, try out Arch Linux proper. Stick to VM installs, and get used to the command line-based install process. It isn't that complicated, but the absence of anything graphical and the need to grasp certain commands from the get-go can be daunting for some. Be aware that even if your Arch install boots and reaches a desktop, you'll have to provide literally everything else - or at least point it to the right resources. Expect some Terminal editing, a good long while spent poring through config files - and the fact that Arch pays for its modularity with stability. One errant package update can break anything and everything - and that's a small price to pay in the face of total user control - at least, according to some diehards.
So, when do I get to Mister Robot shit?
That's after years of work and several certifications. You can check your local Community College for courses, or just learn as you go online, provided you do sit down to take the CompTIA certifications, eventually. Fair warning - they're gruelling. Comparatively, Microsoft's own database of certs is easier to work through, but are more specific to Windows itself, as you'd expect. Outright hackers, however, tend not to make gains strictly using legitimate training platforms. Hacker or not, your best tool for learning is going to be a home lab.
What's a home lab?
Just your eternally willing victim, to be simplistic. It's a PC you set up as an attack target, or a PC you use as a test bench for new hardware, new tools or distros. Before any stress test I submit to the business' infrastructure, I always test my scripts and practice myself on hardware set aside specifically for that. You don't need anything expensive; mine is still just a refurbished Dell OptiPlex mid-tower PC bought used on eBay. It's currently connected to the office's netwok via VPN so I can attack it realistically. It's packed with dummy files and is designed to sort of feel like the workstation of a modestly-careful member of our Accounting team, and my colleagues in the IT department are instructed to treat any non-standard access to it as seriously as any other potential breach.
It's actually fairly simple: if I can hack into it and copy or steal something, then someone else can. If someone else can, then our entire infrastructure is at risk. This is why even though I work from home, there's days where audits need to happen, and I need to ensure that everyone who's onboard with us has decent security practices. That means going to our small office, going over logs manually and making sure nobody's been using workarounds or unsecure software.
Which tools can I expect to use?
Mostly Kali Linux' set of tools, just packaged into something a little less meme-worthy - like Parrot Security. Metasploit is eventually going to be your bread-and-butter, as once properly configured, it's a one-stop shop for pen-testing everything from computers to smartphones of both the Apple and Android persuasions.
I've done research and people keep telling me not to do bare-metal installs of Kali or Parrot. Why is that?
Because a hacker, ethical or otherwise, leaves no trace. You haven't finished pen-testing something until you've managed to exfil without being fingered as an unexpected connection. You're not there to leave calling cards; that's distinctly unprofessional. If you do choose to leave one, then it means you're after something - usually money, or the approval of some sponsor body or State. And that, well, defeats the purpose of being a hacker. Curiosity should be its own reward. Considering, working off of a dedicated "hacking rig" is the stupidest and easiest way for your pen-testing efforts to lose all relevancy - or for your sponsored hacks to be easily traceable.
Keep a mainline OS that handles Normie stuff - word-processing, normal Sysadmin tasks, writing emails, gaming after hours - and then use a USB stick to create a bootable drive image that contains everything you need for the rest.
Have you hacked anything before?
Only approved company resources - including keypads, IR receivers on TVs mounted in the Old Place's conference room - everything I could conceivably reach within the limits of my mandate. Now, with Walt and Sarah, I maintain the same ethical constraints. If I'm not asked to test something, I don't touch it.
But have you ever... hacked anything?
Illegally? No. I'm a staunch White Hat - with a few tinges of gray here and there. I've trolled particularly noxious Sales Reps using script-based UI barks in Windows, but I wouldn't go further.
1 note
·
View note
Text
All About your Ultimate Solution for Writing Windows ISO Images to USB Drives
In the realm of technology, where versatility and efficiency are paramount, Win32 Disk Imager stands tall as a beacon of reliability and convenience. For those seeking to harness the potential of their Windows operating systems through ISO images, this tool emerges as an indispensable asset. With its seamless capability to write Windows 10 or Windows 11 ISO images onto removable drives like USB pendrives, win32diskimager epitomizes speed, security, and dependability.
At its core, Win32 Disk Imager represents a fusion of simplicity and power. Its intuitive interface belies its robust functionality, catering to both novice users and seasoned tech enthusiasts alike. With just a few clicks, users can initiate the process of writing boot images onto SD cards or USB flash drives, paving the way for effortless system installations or recoveries.
In the fast-paced digital landscape, time is of the essence. win32diskimager portable recognizes this urgency, boasting exceptional speed in writing ISO images. Whether you’re embarking on a fresh Windows installation or creating backup drives for emergencies, Win32 Disk Imager ensures prompt execution, sparing you the agonizing wait times associated with conventional methods.
Security is non-negotiable when dealing with critical system files. win32 disk imager download upholds this principle with unwavering dedication, employing robust encryption protocols to safeguard your data throughout the writing process. Bid farewell to concerns about data breaches or corruption—win disk 32 imager prioritizes the confidentiality and integrity of your ISO images, allowing you to proceed with peace of mind.
In the realm of software, reliability reigns supreme. Win32 Disk Imager earns its stripes as a stalwart ally, consistently delivering flawless performance when entrusted with the task of writing ISO images. Say goodbye to frustrating glitches or unpredictable errors—Win32 Disk Imager stands as a beacon of dependability, ensuring that your system installations proceed without a hitch.
The hallmark of Win32 Disk Imager lies in its seamless integration into your workflow. Whether you’re a seasoned IT professional or a casual user, Win32 Disk Imager accommodates your needs with unparalleled ease. Its user-friendly interface eliminates the complexities typically associated with disk imaging tools, empowering you to accomplish your objectives with effortless efficiency.
Versatility is the cornerstone of Win32 Disk Imager’s appeal. Beyond its primary function of writing Windows ISO images, this tool serves as a Swiss army knife for tech enthusiasts. From creating bootable Linux distributions to cloning entire drives, Win32 Disk Imager adapts to a myriad of scenarios, emerging as a versatile companion in your digital endeavors.
As technology evolves, so does Win32 Disk Imager. With each new iteration, this tool evolves to address the ever-changing needs of its user base. Whether it’s enhancing compatibility with the latest Windows versions or introducing innovative features, Win32 Disk Imager remains at the forefront of innovation, ensuring that you always have access to the most advanced disk imaging capabilities.
Ready to embark on your journey with Win32 Disk Imager? Downloading the latest version is a breeze, thanks to its user-friendly website and streamlined installation process. With just a few clicks, you can harness the full potential of this powerful tool, unlocking a world of possibilities for writing Windows ISO images to USB drives with unparalleled speed and reliability.
In a digital landscape fraught with challenges, Win32 Disk Imager stands as a beacon of reliability, security, and efficiency. Whether you’re a seasoned IT professional or a casual user, this tool empowers you to unleash the full potential of your Windows operating system with unparalleled ease. Say goodbye to tedious installation processes and hello to seamless system deployments—Win32 Disk Imager is your ultimate solution for writing Windows ISO images to USB drives. Download the latest version today and experience the difference for yourself.
[Related site1] [Related site2]
0 notes
Text
Create a Bootable USB Drive for Windows with DiskPeak
Need to install or repair your Windows OS? A bootable USB drive is the perfect solution! Here’s a quick guide:
Download Windows ISO Files:
Windows 11: Install Windows 11 from USB
Windows 10: Buy Windows 10 USB
Windows 7: Bootable USB Drive Windows 7
Use Rufus: Download Rufus, select your USB drive and the ISO file, then click "Start."
For a smooth and reliable experience, choose DiskPeak bootable USB drives. They ensure seamless installations and are compatible with various Windows versions.
👉 Get yours now: Buy Windows 10 USB
#DiskPeak #BootableUSB #Windows10 #Windows11 #Windows7 #TechSolutions #PCUpgrade
0 notes
Text
HOW TO CREAT BOOTABLE PENDRIVE
Rufus is a popular utility software used for creating bootable USB drives. It is widely used for various purposes, including installing operating systems, running live Linux distributions, updating firmware, and more. Here are some key features and functionalities of Rufus:
Bootable USB Creation: Rufus allows you to create bootable USB drives from ISO image files for operating systems such as Windows, Linux, and others.
UEFI and BIOS Support: Rufus supports both UEFI and BIOS boot modes, making it compatible with a wide range of systems and devices.
Partition Schemes and File Systems: You can choose from various partition schemes (MBR, GPT) and file systems (FAT32, NTFS, exFAT) when creating bootable USB drives, depending on your requirements.
Bad Block Detection: Rufus includes a feature to check for bad blocks on the target USB drive before creating the bootable drive, helping to ensure data integrity.
Fast and Lightweight: Rufus is known for its speed and efficiency. It is a lightweight application that launches quickly and performs USB drive operations rapidly.
User-Friendly Interface: The interface of Rufus is simple and easy to use, making it accessible to users of all skill levels.
Open Source: Rufus is open-source software, which means its source code is freely available for inspection, modification, and distribution by anyone.
Overall, Rufus is a versatile and reliable tool for creating bootable USB drives, and it's a popular choice among users who need to install or run operating systems from USB media. However, as with any software, it's essential to download Rufus from a trusted source to avoid potential security risks from downloading malware-infected versions.
0 notes
Photo
تحميل وندوز 11 Windows 11 23H2 (22631.2361) | Genuine Microsoft Multi Edition ISO مفعل - https://www.animeiatlight.com/%d8%aa%d8%ad%d9%85%d9%8a%d9%84-%d9%88%d9%86%d8%af%d9%88%d8%b2-11-windows-11-23h2-22631-2361-genuine-microsoft-multi-edition-iso-%d9%85%d9%81%d8%b9%d9%84/ - #AnimeiatLight #Windows #Windows11 #Windows1123H2(22631.2361)|GenuineMicrosoftMultiEditionISO #Windows11GenuineMicrosoftMultiEdition #Windows11GenuineMicrosoftMultiEditionISO #انظمةتشغيل #انظمةوندوز #برامج #برامجوندوز #تحميلوندوز11 #تحميلوندوز11Windows1123H2(22631.2361)|GenuineMicrosoftMultiEditionISOمفعل #عالمالتقنية #عالمالتقنيةوالالعاب #مجلةنورالأنيميات #منتدياتنورالأنيميات #نورالأنيميات #نورالأنيمياتAnimeiatLight #وندوز #وندوز11 - #عالمالتقنيةوالالعاب - مجلة نورالأنيميات - تحميل وندوز 11 Windows 11 23H2 (22631.2361) | Genuine Microsoft Multi Edition ISO مفعل Windows 11 23H2 (22631.2361) Genuine Microsoft ISO (Multi Edition) ➡️ 100% Original, Untouched, Genuine Windows 11 23H2 ISO. ➡️ Downloaded Directly from Microsoft’s Servers. ➡️ ISO Notes: There are no changes to this ISO. It is original and genuine, the way Microsoft Intended. Default language is En-US. All additional languages are supported after installation. This Genuine ISO includes 11 editions – Home, Home N, Home Single Language, Education, Education N, Pro, Pro N, Pro Education, Pro Education N, Pro for Workstations, and Pro N for Workstations. ➡️ Installation Instructions: Unzip downloaded files to extract ISO from archive. Use your preferred method to write the ISO to a USB Drive. Boot from the USB Drive, and Install Windows 11 23H2 to your desired partition. Also supports in place upgrade on PC’s that meet Microsoft’s minimum requirements. Requires 2GB RAM and 12 GB Storage Space (if using bypass method given below). Alternately, when using the latest versions of Rufus to write the ISO to a bootable USB, you can select options to bypass Microsoft’s minimum requirements. Spoiler: How to install this Genuine 23H2 ISO on ANY PC! If your PC doesn’t meet the minimum requirements Microsoft has in place for you to install Windows 11, follow the steps below to bypass those requirements, and also learn how to bypass having to be connected to the internet, or having to create an online account to finish Setup. When you get to this screen, before clicking on ‘I don’t have a product key’ to proceed, hit SHIFT+F10 to open cmd prompt. then type ‘regedit’ in cmd prompt, and hit enter. In regedit, go to ‘HKEY_LOCAL_MACHINESYSTEMSetup’ and right click ‘Setup’ followed by ‘New’ then ‘Key’ then input ‘LabConfig’ and hit enter. In the LabConfig Key, right click the right hand pane, and select ‘New’ ‘DWORD (32-bit Value)’ and create the following 6 New DWORD Values: BypassCPUCheck BypassDiskCheck BypassRAMCheck BypassSecureBootCheck BypassStorageCheck BypassTPMCheck Followed by changing the value for each entry to ‘1’ You can now close regedit, and click on ‘I don’t have a product key’ to proceed with installation. When you get to this screen, if you don’t have an internet connection, or just want to bypass being forced to create or sign in to an Microsoft Account to finish setting up Windows, hit SHIFT+F10 to open cmd and then in the cmd window, type ‘oobebypassnro’ and hit enter. Your PC will restart, and go through the setup steps again. But this time allowing you to select ‘I don’t have internet’ and proceeding to finish Setting up by creating an offline local account. Spoiler: Or do it the easy way! (With Rufus) Another method you can use to bypass the minimum requirements required for Windows 11 Installation, and also bypass forced MS account creation during Setup, is by using Rufus to write the ISO to USB, and checking the boxes for whatever bypasses / modifications you would like in place when writing the ISO to USB ➡️RUFUS 4.2p DOWNLOAD LINK Spoiler: MD5 Checksum Hashes PART 1: 6386f27873b2a906bb4a45c9257c2250 PART 2: 08fc91c1c756302f01db767c20bcc136 PART 3: a86264d9086bf72f0f07ba62467aa813 PART 4: 04ef6e85a68ea0c497ce6d552fd18ced ISO: 15452e1dcde9ccf285aa1fe68d13fe39 Spoiler: Screenshots DOWNLOAD LINKS: ➡️PART 1 (USERSDRIVE) ➡️PART 2 (USERSDRIVE) ➡️PART 3 (USERSDRIVE) ➡️PART 4 (USERSDRIVE) ALTERNATE INTERCHANGEABLE DOWNLOAD LINKS: ➡️PART 1 (UPLOADRAR) ➡️PART 2 (UPLOADRAR) ➡️PART 3 (UPLOADRAR) ➡️PART 4 (UPLOADRAR)
0 notes
Text
In this guide, you will learn how to use Ventoy, a programme that makes it incredibly easy to create a multi bootable USB flash drive of Windows 11 (and 10) without the need to reformat the removable storage. Typically, you use the Media Creation Tool to create a bootable USB media when you need to perform a clean install of Windows 11 (or 10). As an alternative, you can complete the same task with more customization options by using the Rufus tool. The issue is that you have to repeatedly reformat the drive to update the installation files or switch the operating system, even though these tools perform as promised. A flash drive can be made bootable by installing Ventoy as software. Once the flash drive is able to boot, all you have to do is upload the desired ISO (or WIM, IMG, VHDX, or EFI) files without extracting them first. The system will boot into the Ventoy software when you insert the USB flash drive. You can select the image with which you want the computer to start while you are experiencing this. You can keep both versions of the image on the same bootable flash drive if a new version of the ISO becomes available. The instructions in this manual will show you how to use Ventoy to make a bootable USB that you can use to install Windows 10, Windows 11, Linux, or another operating system from the same flash drive. Create multiboot USB flash drive with Ventoy To create a Windows 11 bootable USB with Ventoy, connect a flash drive with enough space, and use these steps: Open Ventoy GitHub page. Under the “Assets” section, click the ventoy-x.x.xx-windows.zip file and download it to your computer. Quick note: You may need to force and keep the file as the browser may detect it as malicious. Open the Zip folder location. Double-click the open the ventoy-x.x.xx-windows.zip file. Click the Extract all button from the command bar. Click the Browse button. Select a location to extract the files. Click the Select Folder button. Click the Extract button. Open the ventoy-x.x.xx folder. Double-click the Ventoy2Disk.exe file to launch the installer. Choose the USB flash drive from the “Device” setting. Click the Install button. Click the OK button. Click on This PC from the left pane of File Explorer. Open the Ventoy drive. Copy and paste the ISO files to make them bootable. You can include the latest image of Windows 11, 10, Linux, etc. Once you complete the steps, you can use the USB flash drive to boot a device with the Ventoy software, where you can then choose to start the device with one of the ISOs you uploaded to the drive.
0 notes
Video
youtube
How to make USB flash drive Bootable for Linux on window 10 32 bit
#how boot linux iso on USB drive#how linux iso file convert into bootable pendrive#how learn bootable pendrive create on window 10#easily hack window#how install window 10#how partition create on window 10 32 bit#reinstall#how crack install window 10 license key#how hack Ubuntu 10.11#how hack password#using ubuntu#makeuseof#Ubuntu crack from wifi#how install Ubuntu using Pendrive#how to make money#How Ubuntu free use and download#open source#Facebook account hack
1 note
·
View note
Text
How do I download Windows 10 on my Mac for free without Boot Camp?
Macs don't come with a Windows 10 installation disc, so if you want to install it on your Mac, you'll need to use Boot Camp. But there's a way to install Windows 10 without using Boot Camp: by downloading and installing it through the Windows 10 Creators Update. This is free, and it doesn't require any extra hardware or software.
How to install Windows 10 on a Mac using Boot Camp?
If you have a Mac and you want to install Windows 10 on it using Boot Camp, here's how to do it. First, make sure your Mac is running macOS High Sierra or later. If it isn't, you can update your Mac software by going to the App Store and clicking Updates in the toolbar.

Then, download and install the Windows 10 ISO file. Next, open Boot Camp Assistant, which is in the utility folder of your Applications folder. In Boot Camp Assistant, click Continue and then select "Create a Windows 10 installer disk." When the process is finished, insert the disk into your Mac. Restart your computer while holding down the Option key. In the Startup Manager window that appears, select the disk with the Windows logo on it and click Start-Up. After your computer has restarted, follow the instructions on-screen to complete the installation of Windows 10 and you know more details https://today4pc.com/ from this blog website.
Download the Windows 10 ISO file
Microsoft Windows 10 is the latest release of the Microsoft Windows operating system. Windows 10 ISO file is the official disc image of Windows 10 and can be used to install or reinstall Windows 10 on a PC. The ISO file can also be used to create a bootable USB drive or DVD.
Install Boot Camp drivers
If you're running a Mac and don't have Boot Camp installed, you can still download and install Windows 10 using a free tool called Parallels Desktop. This software will allow you to use your Mac's resources to run Windows 10, instead of having to use up all the RAM in your computer. After downloading and installing Parallels Desktop, open it up and click on the "Install Windows 10" button. You'll then be asked to create a new account or sign into an existing one.
Partition of your Mac's hard drive
Windows 10 is one of the most popular operating systems on the market. It is available both as a free download for individual users, and as part of a subscription package for businesses. If you want to install Windows 10 on your Mac without using Boot Camp, there are several methods you can use.
Start the Windows 10 installation process
Windows 10 is a personal computer operating system developed and released by Microsoft as part of the Windows NT family of operating systems.

It was announced in September 2014 and released in July 2015. Windows 10 introduces what Microsoft describes as "a new generation of Windows", with a focus on "enabling more personal computing experiences" across different devices.
Conclusion
In the conclusion of an article, the author typically summarizes the main points that were made and provide a final thought on the topic. In some cases, the conclusion may also provide readers with information on what they can do to learn more about the subject matter or how they can get involved in the discussion.
2 notes
·
View notes
Link
#Doyouknow#doyouk9.tk#doyouk9#Create Windows Bootable USB Drive From ISO File & Installation#Bootable pen drive to install Windows#Bootable#bootable pendrive for linux#bootable pendrive for
0 notes
Text
Download Installer Mac Os X El Capitan
Open virtualbox and click ‘New’ to create a new virtual machine with the following details: Name: El Capitan Type: Mac OS X Version: Mac OS X 10.11 El Capitan (64 bit) Click next, select 4GB of RAM, and next again. Select the El Capitan image that you have downloaded and unzipped as the disk image, and create the machine.
Download For Mac Os X El Capitan
Mac Os 10.11 Download
Install El Capitan. OK, now you can click that Continue button in the installer window. (If the installer isn’t running, go to your Applications folder and double click the Install OS X El. Working framework X El Capitan is as of now open for straightforward download and at present, this new change is known to all. This advantageous downloading opportunity is at present by and large grabbed excitedly by the submitted Mac owners as they can acknowledge benefits with the latest type of OS X presented.
Download El Capitan from the Mac App Store. Head over to your existing OS X environment running 10.9 or later and open the Mac App Store. Search for 'El Capitan' and click Download. The download is completely free if you're running OS X 10.9+. Wait for the download to finish (this could take some time). Format the USB Drive.
OS X El Capitan Installer. Official OS X El Capitan Installer from the Mac App Store. Un-archive the zip archive and you will get the app Installer. A bootable ISO or bootable USB can be made from this installer. Instructions on how to do that are on the Internet/Youtube.
Download El Capitan Mac OS X from scratch while upgrading the current Mac OS version The new Apple El Capitan supports two installation methods. As in the case of many other operating system installations, Apple El Capitan also provides an option to upgrade from your current OS version or the option to install the new download El Capitan Mac OS.
How ToHow to install Mac OS X El Capitan on PC using VirtualBox

Touted as #1 VPN in the world, ExpressVPN is now offering 49% off & an additional 3-months of service on its annual plans.
ExpressVPN is widely known as the fastest and most secure VPN in the industry. With over 3,000 servers in 90+ countries, it is capable to unblock all geo-blocked services including Netflix, Amazon Prime Video, HBO+, and BBC iPlayer.
ExpressVPN app is available for nearly all the devices including Windows, macOS, Android, iOS, browsers, Firestick, and gaming consoles.
Mac OS X El Capitan was released last year. The operating system boasts of great features and a streamlined user experience. Fortunately, this incredible operating system by Apple is available for download. But you are wondering why this information is relevant to you since you have a PC, not a Mac. Well, read on to learn how you can install Mac OS X El Capitan on PC without a Mac, using VirtualBox.
Virtual Box
VirtualBox is a virtualization software that enables an operating system to run as a program or application. VirtualBox allows operating systems to be installed on it, by creating a virtual machine.
Requirements to install Mac OS X El Capitan on PC
Download For Mac Os X El Capitan
The process of installing this operating system on PC requires VirtualBox. VirtualBox is free for download. You will also need the downloaded image file of the OS (Google drive file courtesy tactig.com). You will need an extraction software such as Winrar to extract the OS.
There are system requirements for this process. You need Windows 7 or a newer version of Windows. The BIOS of your PC ought to be virtualization enabled. There needs to be free disk space of at least 3GB.
Step-by-step Guide to install Mac OS X on PC using VirtualBox
Step 1: Install VirtualBox
If you do not have VirtualBox, download and install it from this link. The installation process should be easy. After downloading, click on the setup and follow the prompts as required.
Step 2: Extract Mac OS X El Capitan
The image file you downloaded from Google drive (downloaded image file of the OS) needs to be extracted using WinRAR. You will simply have to right click on the image file and select the option ‘Extract Here’.
Step 3: Open VirtualBox and create a Virtual Machine
This whole process is dependent on VirtualBox. Open the application and select ‘New‘. In this case, we will name the new machine ‘OS X El Capitan’. After naming the machine click ‘Next‘.
On the next window choose the amount of RAM you want for your virtual machine. The virtual machine will need at least 2GB RAM. After choosing the desired RAM click ‘Next’.
You will now be required to select the hard drive. You should check the option that states ‘Use existing virtual hard drive file’. The file you are referring to in this case is the OS X El Capitan image file, you extracted from the step 2, above.
Step 4: Edit the new virtual machine
Mac Os X Iso Download For Virtualbox

There are three main properties of your virtual machine that you will need to edit. When you open the virtual machine you created, head to ‘Settings‘.
Open the ‘General‘ tab. Here, set everything to default.
Open the next tab, which is ‘System’. Here, there are three tabs which are horizontally arranged. The first is ‘Motherboard’ Disable Floppy, Enable EFI and select the Chipset PIIX3 or IHC9.
Step 5:Add Code to VirtualBox with Command Prompt
Run command prompt on your PC as the administrator.
You will have to add code to VirtualBox using Command Prompt. Copy the code given below and paste it in Command Prompt.
Note: In the code given below replace the words ‘Your VM Name’ with the name you gave your virtual machine.
For VirtualBox 5.0;
cd 'C:Program FilesOracleVirtualBox' VBoxManage.exe modifyvm 'Your VM Name' --cpuidset 00000001 000106e5 00100800 0098e3fd bfebfbff VBoxManage setextradata 'Your VM Name' 'VBoxInternal/Devices/efi/0/Config/DmiSystemProduct' 'iMac11,3' VBoxManage setextradata 'Your VM Name' 'VBoxInternal/Devices/efi/0/Config/DmiSystemVersion' '1.0' VBoxManage setextradata 'Your VM Name' 'VBoxInternal/Devices/efi/0/Config/DmiBoardProduct' 'Iloveapple' VBoxManage setextradata 'Your VM Name' 'VBoxInternal/Devices/smc/0/Config/DeviceKey' 'ourhardworkbythesewordsguardedpleasedontsteal(c)AppleComputerInc' VBoxManage setextradata 'Your VM Name' 'VBoxInternal/Devices/smc/0/Config/GetKeyFromRealSMC' 1
Mac Os 10.11 Download
For VirtualBox 4.0;
cd 'C:Program FilesOracleVirtualBox' VBoxManage.exe modifyvm 'Your VM Name' --cpuidset 00000001 000306a9 04100800 7fbae3ff bfebfbff VBoxManage setextradata 'Your VM Name' 'VBoxInternal/Devices/efi/0/Config/DmiSystemProduct' 'MacBookPro11,3' VBoxManage setextradata 'Your VM Name' 'VBoxInternal/Devices/efi/0/Config/DmiSystemVersion' '1.0' VBoxManage setextradata 'Your VM Name' 'VBoxInternal/Devices/efi/0/Config/DmiBoardProduct' 'Iloveapple' VBoxManage setextradata 'Your VM Name' 'VBoxInternal/Devices/smc/0/Config/DeviceKey' 'ourhardworkbythesewordsguardedpleasedontsteal(c)AppleComputerInc' VBoxManage setextradata 'Your VM Name' 'VBoxInternal/Devices/smc/0/Config/GetKeyFromRealSMC' 1
Step 6: Install OS X El Capitan in your virtual machine
Your virtual machine is now ready for the new OS. Open VirtualBox and click ‘Start’. A code will run on the screen.
After the code, you are ready to install the Mac OS X El Capitan. The installation process is very simple. It involves creating a new user account, selecting region, time and language preferences.
After the installation, you can now run the OS X El Capitan on virtualBox on a PC.
Mac Os X El Capitan Virtualbox Image Download Virtualbox
Installing Mac OS X El Capitan on PC using VirtualBox will break some sweat. But considering the usability of the OS, it is worth the time. In case you encounter problems following this guide, feel free to use the comment sections.
Download El Capitan
Download El Capitan OS X is also significant since it’s the last version of Apple Mac OS X released as its successor Sierra was released in the year 2016 under the brand macOS.
El Capitan latest version
El Capitan 10.11.6 is now released as the latest version of Download El Capitan . For OS X El Capitan users this update is recommended. The upgrade to OS X El Capitan v10.11.6 enhances your Mac's reliability, performance and protection and is advised for all users. Solves a problem that can prevent parental control accounts from saving settings. El Capitan Download latest version solves an issue, which prevents access to SMB sharing points by some network devices, such as speakers and multifunction printers. It improves startup time for the NetBoot server connection. Solves a problem that can make authentication of Active Directory longer than anticipated.
At the time of release, El Capitan was promoted as a significant release by Apple similar to how they promoted Mavericks and Yosemite upgrades which were the predecessors of El Capitan.
OS X 10.11 El Capitán
This update is recommended for all OS X El Capitan users.
The OS X El Capitan v10.11.6 update improves the stability, compatibility and security of your Mac and is recommended for all users.
This update:
Fixes an issue that prevents parental controls from saving settings in enabled accounts.
Fixes an issue that prevents some network devices, such as speakers and multifunction printers, from accessing SMB partitions.
Enterprise Content:
Improves boot time when connected to a NetBoot server.
Fixes an issue with a netboot image created with OS X v10.11.4 or OS X v10.11.5 installer preventing it from booting.
Active directory authentication fixes an issue that may take longer than expected.
System and Hardware Requirements for Download El Capitan
System requirements : You should have OS X v10.6.8 or below version and 2GB memory. And should have 8.8 GB of capacity. Apple ID is required for certain features; terms are applicable. Certain features include an Internet service provider that is compatible; fees can apply.
Hardware requirements : MacBook (early 2015)/ MacBook (late 2008 Aluminum or early 2009 or newer)/ MacBook Pro (Mid or late 2007 or newer)/ MacBook Air (late 2008 or newer)/ Mac mini (early 2009 or newer)/ iMac (mid 2007 or newer)/ Mac Pro (early 2008 or newer)/ Xserve (early 2009).
Features of OS X 10.11 Download
Safari has new features in the El Capitan update. It allows you to easily pin the tabs in the browser to the tab bar so that you can easily access them in the next time
It has multi-touch gestures to applications like Mail and Messages. And it uses the gathered information of the individual emails on the apps like Calendar
The Maps feature in the OS X 10.11 offers you the information about public transportation
Notes feature has added more powerful text processing capabilities. Under this improvement, you can add to-do-lists just like the Reminders application, map locations, photos and videos, inline webpage previews, digital sketches, and other media types
The Spotlight feature is more improved with more contextual information
The Photos feature in the El Capitan can now use editing tools from other apps
The System Integrity Protection gives you more protection to the OS X El Capitan running Mac computers and laptops
1 note
·
View note
Text
Download Macos El Capitan Usb
Nov 07, 2015 Boot from the USB Drive. Restart your computer and boot from the USB drive (Press Esc/F8/Del to access the boot selection menu). Use the arrow keys to select Boot OS X Install from Install OS X El Capitan (It should be selected by default). Press the spacebar and select Boot Mac OS X in verbose mode.
Mac Os 10.11 Download
Mac Os El Capitan 10.11 Download
El Capitan Installer
Download Mac Os El Capitan Iso
Download Os X El Capitan Usb Stick
Are you trying to make a bootable installer? Do you have the El Capitan installer downloaded from the App Store? You cannot make a bootable DVD but you can make a bootable flash drive.
To create bootable USB installer for Mac to Install Mac OS X El Capitan on Windows, on Mac or VirtualBox, you have to create bootable USB flash drive. Let’s get started on how to do it. First, you have to download TransMac software for Windows and install it on your computer. Here are the instructions. Go to Section 4 and click on Download OS X El Capitan. This downloads InstallMacOSX.dmg to your Downloads folder. The next section can only be done on a mac that is capable of running El Capitan, a mac that came preinstalled with an OS later than El Capitan will refuse to do the next bit. Mac OS X El Capitan ISO – Download Mac OS El Capitan ISO Setup Files Free: The MacBook and the Apple’s Mac are the second most widely used and famous portable Computers. The first place is occupied by the Family of Windows Computers, this is due to their cheaper prices, and ease of access.
Bootable USB Installers for OS X Mavericks, Yosemite, El Capitan, and Sierra
First, review this introductory article: Create a bootable installer for macOS. Second, see this How To outline for creating a bootable El Capitan installer. Simply replace the Terminal command with the one from the preceding article by copying it into the Terminal window. You will need an 8GB or larger USB flash drive that has been partitioned and formatted for use with OS X.
Drive Partition and Format
Open Disk Utility in the Utilities' folder.
After Disk Utility loads select the drive (out-dented entry with the mfg.'s ID and size) from the side list.
Click on the Erase tab in the Disk Utility toolbar. Name the drive, 'MyVolume'. <---- IMPORTANT!
In the drop down panel set the partition scheme to GUID. Set the Format type to Mac OS Extended (Journaled.)
Click on the Apply button and wait for the Done button to activate. When it does click on it.
Quit Disk Utility.
Create Installer
Open the Terminal in the Utilities' folder. Choose the appropriate command line (in red) depending upon what OS X installer you want. Paste that entire command line from below at the Terminal's prompt:
Command for macOS High Sierra:
Mac Os 10.11 Download
sudo /Applications/Install macOS High Sierra.app/Contents/Resources/createinstallmedia --volume /Volumes/MyVolume --applicationpath /Applications/Install macOS High Sierra.app
Command for macOS Sierra:
sudo /Applications/Install macOS Sierra.app/Contents/Resources/createinstallmedia --volume /Volumes/MyVolume --applicationpath /Applications/Install macOS Sierra.app
Command for El Capitan:
sudo /Applications/Install OS X El Capitan.app/Contents/Resources/createinstallmedia --volume /Volumes/MyVolume --applicationpath /Applications/Install OS X El Capitan.app
Command for Yosemite:
sudo /Applications/Install OS X Yosemite.app/Contents/Resources/createinstallmedia --volume /Volumes/MyVolume --applicationpath /Applications/Install OS X Yosemite.app
Command for Mavericks:
sudo /Applications/Install OS X Mavericks.app/Contents/Resources/createinstallmedia --volume /Volumes/MyVolume --applicationpath /Applications/Install OS X Mavericks.app
Mac Os El Capitan 10.11 Download
Press RETURN. You will be asked for your admin password. It will not echo to the Terminal window. Then press RETURN again. Wait for the return of the Terminal prompt signifying the process has completed. It takes quite some time to finish. Be patient.

Mar 3, 2018 7:47 PM
Download DiskMaker 2.0.2 ( ZIP file, about 3 MB). NB: this version of DiskMaker X is not able to build a Mavericks installer from Mac OS X 10.6.8. More information here. To create a bootable El Capitan installer drive, you need the El Capitan installer from the Mac App Store and a Mac-formatted drive that’s big enough to hold the installer and all its data. This can be a hard drive, a solid-state drive (SSD), a thumb drive, or a USB stick—an 8GB thumb drive is perfect. Windows users can also Download Hackintosh OS X 10.11.5 El Capitan ISO Image File for Bootable USB and DVD. OS X El Capitan Hackintosh System Requirements: Mac OS X El Capitan 10.11.5 (15F34) is officially compatible and supported with computer hardware's mentioned below.
Bootable USB Installers for OS X Mavericks, Yosemite, El Capitan, and Sierra
First, review this introductory article: Create a bootable installer for macOS. Second, see this How To outline for creating a bootable El Capitan installer. Simply replace the Terminal command with the one from the preceding article by copying it into the Terminal window. You will need an 8GB or larger USB flash drive that has been partitioned and formatted for use with OS X.
Drive Partition and Format

Open Disk Utility in the Utilities' folder.
After Disk Utility loads select the drive (out-dented entry with the mfg.'s ID and size) from the side list.
Click on the Erase tab in the Disk Utility toolbar. Name the drive, 'MyVolume'. <---- IMPORTANT!
In the drop down panel set the partition scheme to GUID. Set the Format type to Mac OS Extended (Journaled.)
Click on the Apply button and wait for the Done button to activate. When it does click on it.
Quit Disk Utility.

Create Installer

Open the Terminal in the Utilities' folder. Choose the appropriate command line (in red) depending upon what OS X installer you want. Paste that entire command line from below at the Terminal's prompt:
Command for macOS High Sierra:
sudo /Applications/Install macOS High Sierra.app/Contents/Resources/createinstallmedia --volume /Volumes/MyVolume --applicationpath /Applications/Install macOS High Sierra.app
Command for macOS Sierra:
sudo /Applications/Install macOS Sierra.app/Contents/Resources/createinstallmedia --volume /Volumes/MyVolume --applicationpath /Applications/Install macOS Sierra.app
El Capitan Installer
Command for El Capitan:
sudo /Applications/Install OS X El Capitan.app/Contents/Resources/createinstallmedia --volume /Volumes/MyVolume --applicationpath /Applications/Install OS X El Capitan.app
Mac Os El Capitan Download Usb Stick To Computer
Command for Yosemite:
sudo /Applications/Install OS X Yosemite.app/Contents/Resources/createinstallmedia --volume /Volumes/MyVolume --applicationpath /Applications/Install OS X Yosemite.app
Command for Mavericks:
sudo /Applications/Install OS X Mavericks.app/Contents/Resources/createinstallmedia --volume /Volumes/MyVolume --applicationpath /Applications/Install OS X Mavericks.app
Download Mac Os El Capitan Iso
Press RETURN. You will be asked for your admin password. It will not echo to the Terminal window. Then press RETURN again. Wait for the return of the Terminal prompt signifying the process has completed. It takes quite some time to finish. Be patient.
Download Os X El Capitan Usb Stick
Sep 13, 2018 1:16 PM
1 note
·
View note
Text
Os X El Capitan Usb
Os X El Capitan Usb Install
El Capitan Direct Download
El Capitan Os X Download
Sep 30, 2015 As has been the case for the last few releases of OS X, the easiest method to make a USB install drive is with the free program, Diskmaker X. It’s been updated today to support El Capitan. Making An El Capitan Dmg From El Capitan Mac Os X El Capitan 10.11 6 Download Dmg Descargar Mountain Lion 10.8 Dmg Original Os X Base System.dmg To Usb Download Sierra Dmg Direct Link How Much Dmg Does 10 Armor Block In Dota 2. Sep 30, 2015 OS X El Capitan Installer. Official OS X El Capitan Installer from the Mac App Store. Un-archive the zip archive and you will get the app Installer. A bootable ISO or bootable USB can be made from this installer. Instructions on how to do that are on the Internet/Youtube. Mac OS X El Capitan ISO – Download Mac OS El Capitan ISO Setup Files Free: The MacBook and the Apple’s Mac are the second most widely used and famous portable Computers. The first place is occupied by the Family of Windows Computers, this is due to their cheaper prices, and ease of access. To install macOS or OS X from USB, you need to create a bootable install USB drive for Mac operating system. This tutorial will introduce you three ways to create bootable USB drive for macOS High Sierra, macOS Sierra, Mac OS X El Capitan, Yosemite, Mavericks and more.
Download El Capitan
Download El Capitan OS X is also significant since it’s the last version of Apple Mac OS X released as its successor Sierra was released in the year 2016 under the brand macOS.
El Capitan latest version
El Capitan 10.11.6 is now released as the latest version of Download El Capitan . For OS X El Capitan users this update is recommended. The upgrade to OS X El Capitan v10.11.6 enhances your Mac's reliability, performance and protection and is advised for all users. Solves a problem that can prevent parental control accounts from saving settings. El Capitan Download latest version solves an issue, which prevents access to SMB sharing points by some network devices, such as speakers and multifunction printers. It improves startup time for the NetBoot server connection. Solves a problem that can make authentication of Active Directory longer than anticipated.
At the time of release, El Capitan was promoted as a significant release by Apple similar to how they promoted Mavericks and Yosemite upgrades which were the predecessors of El Capitan.

OS X 10.11 El Capitán
This update is recommended for all OS X El Capitan users.
The OS X El Capitan v10.11.6 update improves the stability, compatibility and security of your Mac and is recommended for all users.
This update:
Os X El Capitan Usb Install
Fixes an issue that prevents parental controls from saving settings in enabled accounts.
Fixes an issue that prevents some network devices, such as speakers and multifunction printers, from accessing SMB partitions.
El Capitan Direct Download

Enterprise Content:
Improves boot time when connected to a NetBoot server.
Fixes an issue with a netboot image created with OS X v10.11.4 or OS X v10.11.5 installer preventing it from booting.
Active directory authentication fixes an issue that may take longer than expected.
System and Hardware Requirements for Download El Capitan
System requirements : You should have OS X v10.6.8 or below version and 2GB memory. And should have 8.8 GB of capacity. Apple ID is required for certain features; terms are applicable. Certain features include an Internet service provider that is compatible; fees can apply.
Hardware requirements : MacBook (early 2015)/ MacBook (late 2008 Aluminum or early 2009 or newer)/ MacBook Pro (Mid or late 2007 or newer)/ MacBook Air (late 2008 or newer)/ Mac mini (early 2009 or newer)/ iMac (mid 2007 or newer)/ Mac Pro (early 2008 or newer)/ Xserve (early 2009).
Features of OS X 10.11 Download
El Capitan Os X Download
Safari has new features in the El Capitan update. It allows you to easily pin the tabs in the browser to the tab bar so that you can easily access them in the next time
It has multi-touch gestures to applications like Mail and Messages. And it uses the gathered information of the individual emails on the apps like Calendar
The Maps feature in the OS X 10.11 offers you the information about public transportation
Notes feature has added more powerful text processing capabilities. Under this improvement, you can add to-do-lists just like the Reminders application, map locations, photos and videos, inline webpage previews, digital sketches, and other media types
The Spotlight feature is more improved with more contextual information
The Photos feature in the El Capitan can now use editing tools from other apps
The System Integrity Protection gives you more protection to the OS X El Capitan running Mac computers and laptops
1 note
·
View note