#Bootable
Explore tagged Tumblr posts
Visit Tumblr Blog
Explore Tumblr blogs with no restrictions, modern design and the best experience.
Last Seen Tumblr Blogs


Fun Fact
Tumblr has 4 main sources of revenue.
Text
i’m at 77 someone just go crazy on me please

7 notes
·
View notes
Text
Create a bootable USB on Mac: Proxmox VE Setup
#bootable#Bootable USB drive#Burn ISO#Create a Bootable WinPE Media#Create Bootable USB#Create Proxmox VE Cluster#FLASH#Flash ISO to USB#Install Proxmox#proxmox#Proxmox Server#Proxmox VE#Proxmox VE kernel#Proxmox Virtual Environment
1 note
·
View note
Text
完成、Gentoo Linuxマニュアル
-----------
↑↑↑結構、凄い時間かけて、boot出来るGentoo Linux マニュアルを、完成させました🙂✨🎉
めっちゃ疲れたが、かなり的を得てると自負しますし、これ書いた事で、次々インストール可能になるような気がするw
私なんか、20年もかかったわけだが、その失敗とか、知識不足、勘違いが、次のステップ、理解を生んでくれた。
だから、教える事に惜しみはないw
俺が作ったわけではなく、プログラマーの絶えまぬ努力の成果なわけ。
それを上の人間がトラップかけ、インストール出来ない罠をしかけるのは、同じクリエイターとして、黙って見てられねえのさw🤣✨
なわけで、1人でも多く、自由なLinuxを、掴んで下さい。
1 note
·
View note
Video
youtube
Créer une clé USB bootable en 3 minutes (sans logiciel)
0 notes
Text
Ventoy - A new Bootable USB Solution
Ventoy is an open-source tool to create a bootable USB drive for ISO/WIM/IMG/VHD(x)/EFI files.With ventoy, you don’t need to format the disk over and over, you just need to copy the ISO/WIM/IMG/VHD(x)/EFI files to the USB drive and boot them directly.You can copy many files at a time and ventoy will give you a boot menu to select them (screenshot).You can also browse ISO/WIM/IMG/VHD(x)/EFI files…

View On WordPress
0 notes
Link
Mastering the Art of Creating a Bootable USB for Windows 10 Creating a bootable USB for Windows 10 is a crucial skill that every computer user should master. Whether you need to install a fresh copy of Windows 10, troubleshoot your system, or recover data from a non-booting computer, having a bootable USB can be a lifesaver. In this article, we will guide you through the process of creating a bootable USB for Windows 10, using different methods, and provide essential tips for success. [caption id="attachment_63124" align="aligncenter" width="1280"] windows 10 creates bootable USB[/caption] Understanding Bootable USBs A bootable USB is a USB drive that contains the necessary files and software to start up a computer. Unlike regular USB drives used for data storage, a bootable USB is specifically designed to help you install or repair an operating system. It acts as a portable installation medium, allowing you to boot your computer from the USB drive and initiate the installation process. When it comes to Windows 10, having a bootable USB offers several advantages. Firstly, it allows you to perform a clean installation of Windows 10 without the need for a DVD drive. Additionally, it enables you to quickly recover your system if it becomes unbootable or encounters critical errors. Moreover, a bootable USB provides a convenient way to install Windows 10 on multiple devices, saving time and effort. Preparing for the Process Before you dive into creating a bootable USB for Windows 10, there are a few essential steps to take. Firstly, ensure that your computer meets the system requirements for Windows 10 installation. Check the minimum hardware specifications, such as processor speed, RAM, and disk space, to ensure compatibility. Next, gather the necessary tools and resources. You will need a USB drive with sufficient storage capacity (at least 8GB) and a working Windows 10 ISO file. The ISO file contains all the files required for the installation. You can download the Windows 10 ISO file directly from the Microsoft website or obtain it through other legitimate sources. Once you have the required tools, familiarize yourself with the different methods available to create a bootable USB for Windows 10. The two most popular methods are using the Windows Media Creation Tool and using Rufus, a third-party software. Additionally, advanced users can also create a bootable USB using PowerShell. Understanding these methods will help you choose the most suitable one for your needs and expertise. Using the Windows Media Creation Tool If you prefer a user-friendly and straightforward approach, the Windows Media Creation Tool is an excellent option for creating a bootable USB for Windows 10. Follow these step-by-step instructions: Download and install the Windows Media Creation Tool from the official Microsoft website. Launch the tool and accept the license terms. Select the "Create installation media (USB flash drive, DVD, or ISO file) for another PC" option and click "Next". Choose the desired language, edition, and architecture (32-bit or 64-bit) for Windows 10. Select the "USB flash drive" option and click "Next". Connect the USB drive to your computer and select it from the list. Make sure it has enough space for the Windows 10 files. Click "Next" and wait for the tool to download the necessary files and create the bootable USB. Once the process is complete, safely eject the USB drive from your computer. It is important to note that the Windows Media Creation Tool requires a stable internet connection to download the Windows 10 files. Additionally, make sure you have selected the correct language, edition, and architecture to match your requirements. If you encounter any issues during the process, refer to the troubleshooting section in the official Microsoft documentation or seek assistance from online forums and communities. Using Rufus If you prefer more control and flexibility, Rufus is a popular third-party tool for creating bootable USB drives. Follow these steps to create a bootable USB using Rufus: Download and install Rufus from the official website (available for Windows). Launch Rufus and insert the USB drive you want to use. In the Rufus interface, select the USB drive from the "Device" dropdown menu. Under the "Boot selection" section, click the "Select" button and browse to the location where you have the Windows 10 ISO file. Ensure that the "Partition scheme" is set to "MBR" (for BIOS or UEFI-CSM) or "GPT" (for UEFI only). Choose the "File system" as "NTFS" and leave the "Cluster size" as default. Enter a name for the USB drive in the "Volume label" field. Check the "Quick format" and "Create a bootable disk using" options. From the dropdown menu next to it, select "ISO image" and click the small disk icon to browse and select the Windows 10 ISO file. Finally, click the "Start" button to begin the process. Rufus will format the USB drive and copy the Windows 10 files onto it. Rufus offers more customization options, such as the ability to create a bootable USB for different operating systems and file systems. However, be cautious when using Rufus, as improper settings or selecting the wrong options can lead to data loss or other issues. Always double-check your selections before proceeding. Using PowerShell For advanced users who prefer a command-line approach, PowerShell provides a powerful method to create a bootable USB for Windows 10. Follow these steps: Open PowerShell as an administrator. You can do this by right-clicking on the Start button and selecting "Windows PowerShell (Admin)". Connect the USB drive to your computer. Type the following command: diskpart and press Enter. This will open the DiskPart utility. Type list disk and press Enter. This will display a list of available disks on your computer. Identify the disk number associated with your USB drive. Be careful to choose the correct disk, as selecting the wrong one can result in data loss. Type select disk X (replace X with the disk number of your USB drive) and press Enter. Type clean and press Enter. This will remove all existing partitions and data on the USB drive. Type
0 notes
Text

Bad mood. Kinda smad
#azurarts#typhlosion#doodle#I was trying to replace windows with linux - which I did finally accomplish! - but I had to redo the bootable USB thing#and I KNEW that would probably delete the other stuff I'd backed up on that USB so I copied it back onto the pc#and then I forgot to check and re-backup those files until well after I'd wiped the disk#goodby 12 out of 16 badges heartgold save file#I swear I'm never gonna encounter that fucking snorlax#so. I made a doodle my favorite mon with my bad mood to make me feel a little better
55 notes
·
View notes
Text
My dinosaur of a laptop is so old that not only can't it support anything past Windows 10 (and it struggled like hell to update to it), but it also apparently can't support Ubuntu and I'm having trouble trying to install Linux. I think but I really have no idea what I'm doing that I can get Linux to work but it's going to require some tinkering and yeah I'm not an IT. Welp. Backing up all my files on my external drive first and then we'll try and see.
#rapha talks#love tinkering with my dinosaur laptop my baby is sooo old it's a miracle it's still going on#anyway if anyone know how to explain to me how to install linux as if i was a 5yo child that'd be neat#because all that thing about iso and verify the iso and the bootable usb stick and all that is a completely foreign language to me#and as much as i like to learn new languages this one might be too complex
5 notes
·
View notes
Text
Up next: windows 10
#i got it with windows 8.1 and if i destroy it now i know how to do it again#so the steps are: downgrade from yosemite to mountain lion#go into info.plist and delete the word Pre from preusbbootable or whatever#add 12.1 as the model in that list#run bootcamp#if the windows says no bootable disk just press alt until its in that booting mode and then click the usb#start installing windows and custom set it to whichever partition you want#if it says the parition is in the wrong format-- theres an indian guy online who said click out and go to repair settings#and then advanced. open terminal#and then do some funny little disk list commands (forgot. FIND THE VIDEO!!!!!!!)#then try again to install windows and then chilling. and then go into usb open bootcamp and run the exe for drivers#and then youre back at windows 8.1 again on the imac12.1#indian guy is an uncle and the video is 4-5 minutes long with only a few hundred likes#my ass is never finding that video again#my work account keeps browser history on autodelete
2 notes
·
View notes
Text
my laptop won't start. well i won't panic yet ill just trust that it's simply a sensitive soul and is affected by the sudden drop in temperature this week and is maybe feeling a bit melancholic and that if i try again tomorrow after its had a good nights sleep it'll be just fine again.
#WHAT DO YOU MEAN NO BOOTABLE MEDIA FOUND?!#i blame this on windows update to be honest. i accidentally let it update the other day. fatal mistake#anything can happen when you let windows 10 do an update#of course it could also have burnt itself out from me forcing it to emulate games whilst resting on my duvet. this is possible.#might also just need to hit it quite hard. who knows. many possibilities. but i will not worry about it tonight
6 notes
·
View notes
Text
I need to grow breasts so i could store usb sticks inbetween my tits
#id use them one for login as a physical key#one to store passcodes on#and one to be bootable with a portable linux distro#green bear spam
13 notes
·
View notes
Text
reinstalling bg3 😤
#fray.txt#just got finished doing a proper reinstall from bootable drive#praying this has fixed my issues#i just wanna play again 🥺
6 notes
·
View notes
Text
cara menginstall windows di komputer anda.
halo semua perkenalkan nama saya bintang,kali ini saya akan meng share cara menginstall windows di komputer anda,okey sebelumnya apakah kalian sudah pernah menginstall windows?jika kalian belum pernah menginstall windows sebelumnya anda bisa mencoba nya di virtual box/mesin virtual.Tapi kali ini topik saya bukan tentang menginstall windows di mesin virtual,kali ini saya akan membahas tentang penginstall an windows langsung di komputer kalian.
Pertama kalian dapat menyiapkan flashdisk,apakah kalian tau guna flashdisk dalam penginstallan windows kali ini?ya,flashdisk ini berperan sebagai tempat kita menyimpan file windows,tapi apakah kita hanya perlu menginstall file windows lalu menyimpan nya di flash disk dan berharap si komputer kita langsung bisa mendetect file tersebut?oh tentu tidak semudah itu ferguso. Sebelum kita siap menginstall,kita harus membuat flash disk kita menjadi bootable,bagaimana caranya? kalian bisa menggunakan software atau aplikasi bernama rufus,mungkin ada aplikasi atau softwrae lain tapi saya hanya berpengalaman menggunakan rufus,saya tidak tahu apakah mekanisme nya akan sama jika kalian menggunakan aplikasi yang berbeda. Jika memang kalian ingin menggunakan aplikasi lain kalian bisa mencari referensi mengenai hal ini selain di blog saya, dan maaf juga jika penjelasan saya sedikit sulit atau saya tidak pandai merangkai kata kata yang pas agar mudah di mengerti. Sudah sudah ayo kita lanjut ke menu hidangan utama, setelah kalian sudah menginstal rufus,pasang flashdisk kalian dan buka aplikasi rufusnya,*warning : sebelum kalian membuat bootable flash disk kalian,kalian harus memastikan bahwa flashdisk kalian tidak terdapat file penting,karna saat melakukan bootable,flashdisk akan terformat dan semua file di dalamnya akan hilang,ingat itu. ohiya kalian bisa menyiapkan file iso windows dengan mengunduhnya di website,kalian ketik saja di search bar "media creation tool".websitenya ada di paling atas daftar pencarian,setelah itu kalian cari sendiri saja ya caranya,panjang banget soalnya klo dijelasin,durasi bos durasi,cara menginstal rufusnya juga kalian cari sendiri saja ya,kita akan langsung ke cara mengbootable dan penginstallan saja,gasss.
ayo kita buka file rufus nya
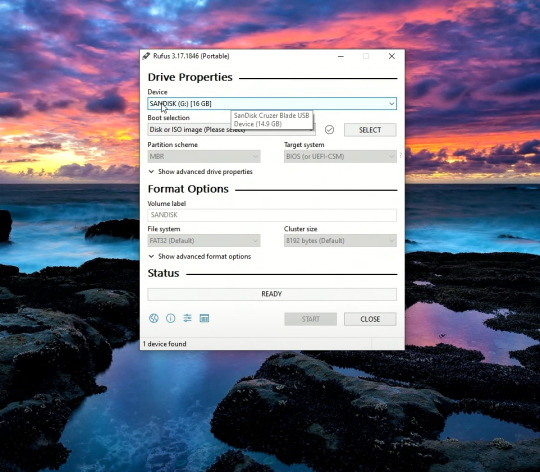
kira kira seperti itulah tampilan awal rufusnya,dan kalian lihat flash disk saya sudah ter detect oleh rufus,kita lanjut.

yang saya lingkari silahkan kalian klik dan pilih file iso windows yang tadi kalian unduh,lalu untuk partition scheme nya gpt/mbr kalian pilih sesuai tipe dari pc/laptop kalian,banyak tutorial cara ngecek nya kalian bisa cari ga ush manja.
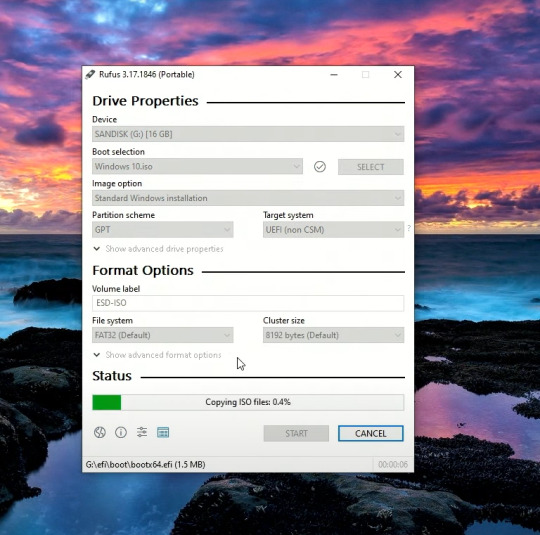
kalian bisa klik start untuk memulai proses bootablenya,tunggu sampai loadingnya menjadi ready,seperti pict dibawah.
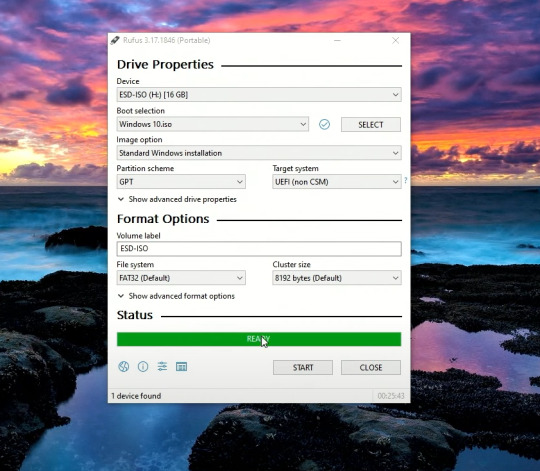
flash disk sudah menjadi bootable,langsung kita gas ke pc yang akan di install.
masuk ke bios komputer kalian,cara masuknya?saat prooseng booting kalian bisa klik f2,f3,f12,atau delete tergantung seri pc kalian,setiap pc bisa berbeda beda ya man teman.

kurang lebih beginilah tampilan bios komputer saya,bisa saja berbeda dengan kalian,menyesuaikan saja yaa.

setelah kalian masuk ke bios kalian bisa masuk ke menu boot,lalu pilih boot option #1,klik dan pilih uefi:sanDisk,jika tadi kalian memilih mbr makan pilih yang ada tulisan sanDisk saja,karna saya pakai gpt,jadina seperti itu.klik enter dan kita lanjut.

setelah kalian klik enter,kalian bisa save dan exit disini saya menggunakan f10 untuk save & exitnya,untuk kalian menyesuaikan saja ya. setelah ini kita akan me restart pc kita.

dan kita sudah masuk ke menu penginstallan windows,huhhh cape juga guys ngetik panjang lebar seperti ini,karna sudah panjang kali lebar saya menjelaskan, kita lanjut part 2 saja yaa,dan jika kalian tidak sabar,kalian bisa mencari tutorial dalam tahap ini,mudah kok guys. see uu>>>
4 notes
·
View notes
Text
Anyway the post I wanted to reblog was about making a bootable usb with persistence! It's essentially a little computer hosted on the usb, and can be run on almost any laptop/computer with a USB port. Download Windows on that USB, Linux Mint, Ubuntu, anything you want! You could even download multiple OSes if you use a multi boot creator (and you have enough space)!
You can go to pendrivelinux and use the Yumi creator (Your USB Multiboot Installer). There are even guides on there for how to download various OSes, though the basic rules should be the same. Plus, you can always use guides from other sites and other installers!
Personally, I plan to use Mint once I get a new USB (I need a new one for various reasons). I'm going to put Mint Cinnamon version on there (it's the most popular) and try to download it onto my laptop as well. My laptop is slow though so if that doesn't pan out I'll use the XFCE version since it's very light weight and uses little resources!
Here is a guide for installing Mint via Yumi and Here is Mint's guide to verifying the integrity and authenticity of the iso you download.
#I heard Linux lite is also a good one for slow devices#MAN I really want to make a bootable USB RIGHT NOW but I want to get a new USB first.#Firstly cus while yumi says you can use the USB as a normal USB after#I'm not sure if it means *only* after or not. Like will it delete all my files but then afterwards I can put new files on it just fine? Cus#I want to keep my old stuff. More pressingly though I bent my USB a little and then bent it back. But now I don't think it goes into ports#Smoothly. I don't want to damage a random laptop so I try not to use it much. But if I made a bootable USB I'd want to use it all the time.#On the plus side if I get a new USB I can get one with a lot more GBs. So I can download multiple OSes! I think I'd be able to do that with#Current USB but I'm planning on going from 32GB to 128GBs so it's a significant improvement! Plus it'd come with a thing to loop a keychain#Through. So that'd be nice.
2 notes
·
View notes
Text
I really need to get around to finalizing the upgrade to my PC, but after that last attempt I've lost the motivation to try again. I think I know how I'll find it again, and sadly it's not completely up to me: I need someone else here to supervise the process. So as I near the end of Burning Shores and start to wonder what I should stream next, I have to admit that it will not be BG3 for some time yet, not until the stars align and my upgrade is complete. I'll have to find a much smaller-scale game to play first!
#Specifically I want to try again when my partner visits next#Which will be sometime next month#So it's gonna be a few weeks until I finally complete this fucking upgrade#For those curious I wanted to upgrade my CPU since I figured it was the bottleneck giving my GPU issues#In order to do that I also needed a new motherboard#And the new mobo I got doesn't fit my current RAM#So the only things staying are my GPU and hard drives#But the new stuff had an issue with my decade-old hard drives and wouldn't recognize them as bootable devices#Which means I'll have to format one of them to work#I didn't have an external backup at the time#I do now of course#But that failed upgrade took an entire day where I just ended up back where I started#The mother of all spoon-killers#Pretty sure it's been a few months now and I still haven't gotten around to it
1 note
·
View note