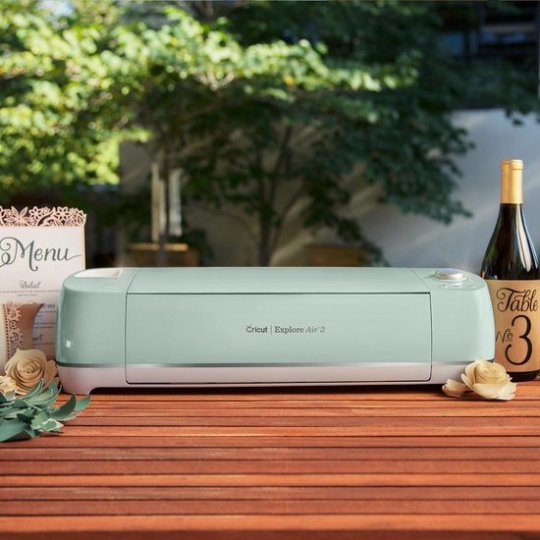
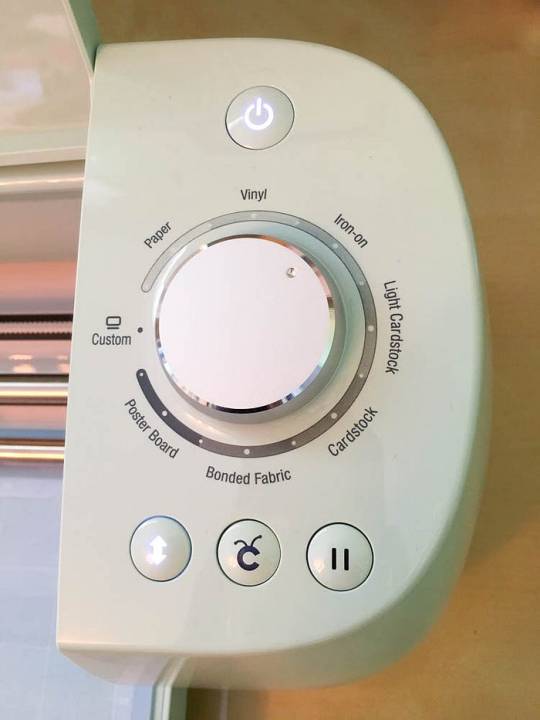
#Cricut Explore Air 2 Setup Tutorial
Explore tagged Tumblr posts
Visit Tumblr Blog
Explore Tumblr blogs with no restrictions, modern design and the best experience.
Last Seen Tumblr Blogs


Fun Fact
Celebrities use Tumblr as well.
Text
Cricut Setup Explore Air 2: A Complete Tutorial in 4 Steps
Looking for a way to Cricut setup Explore Air 2? You are in the right place. Ever since I bought a Cricut machine, the setup has been a crucial part. I have not only setup Cricut Explore Air 2 but also setup other models such as Cricut Maker, Joy, and Venture. Although every machine setup is the same, you will need to know the proper steps to connect your Cricut to your device.
Without any further ado, let’s delve into this Cricut Explore Air 2 setup tutorial and learn things like checking the PC’s requirements, downloading Cricut Design Space, creating a Cricut account, and finally finishing the setup process, which includes further sub steps. Remember, the following steps for Cricut machine setup are only on a Windows computer. Let’s get started now.
Step 1: Check System Requirements for Your Desktop
In the first step, you must ensure that the PC you will use is compatible with your Cricut Explore Air 2 machine. This is a must for the Cricut setup Explore Air 2 because if your PC doesn’t meet the basic requirements, you won’t be able to download the Cricut Design Space, which I will discuss in the next step.
Here, I have mentioned the system requirements for Windows 10 PC to run the Cricut software:
Operating System - Windows 10 or later (64-bit)
CPU - Intel Dual Core or equivalent to AMD processor
A PC/laptop with a USB port or built-in Bluetooth
Display - Minimum 1024px x 768px screen resolution
RAM - Minimum 4 GB
Disk - 2 GB free
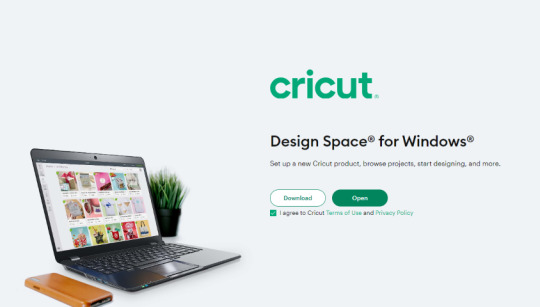
Step 2: Download Cricut Design Space
Above, I covered the basic system requirements to download the Cricut Design Space app on Windows 10. Now, I will show you how to download the software stepwise. Since the Cricut setup Explore Air 2 is not possible, you have to download this software on your PC.
Here’s how to download Cricut Design Space on a Windows PC:
First of all, you have to navigate to your compatible PC device.
You will see a small Windows icon on your PC desktop’s screen on a taskbar. You have to click on it.

Just start typing Chrome and hit the Enter key on your keyboard; it will open your Google Chrome browser.
Once you have opened your browser, you have to go to its search bar.
After that, you have to visit design.cricut.com, paste it into the browser’s search bar, and hit the Enter key.
Now, you will move to Cricut’s official website, from where you can download the Cricut software.
Here, you will notice a small squared checkbox. Click on it to check.
After ticking the checkbox, your Download button will be enabled. Click on it to start downloading Cricut Design Space.
Before downloading, it will open your File Explorer and will confirm where you want to save this file. By default, it will be saved to your Downloads folder.
When the download is finished, you have to go to your File Explorer > Downloads folder or wherever you have saved your downloaded file.
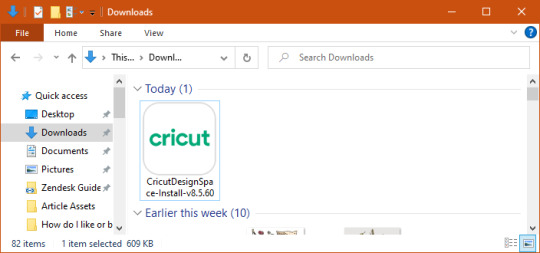
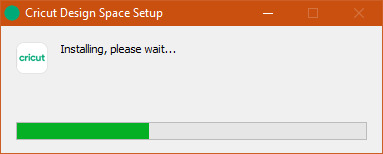
Double-click on this downloaded file to begin installation.
For installation, you can simply follow the instructions on your screen.
Step 3: Creating a Cricut Account ID
The second last step is to create a Cricut account. It is a must; without an account, you won’t be able to do Cricut setup Explore Air 2. In this method, you will learn to create an account from scratch and then log in to your Cricut ID. Let’s get started.
In the beginning, visit cricut.com/setup.
After that, hit the green Get Started button.
Enter your first and last name, including your email address.
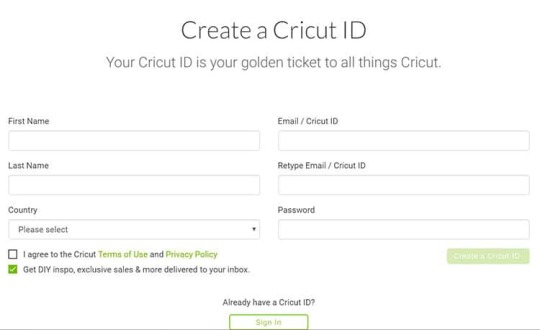
Then, you have to choose your country. (For example, the United States, Canada, or the United Kingdom.
Now, you will need to read the Cricut terms of use.
On the following screen, tick the checkbox.
Next, click on Create User ID.
You will now receive an Updated Policies pop-up window. To proceed, click the Accept button.
Step 4: Cricut Setup Explore Air 2 on Your Computer
Once you have created your Cricut ID, you will move to a Prepare Workspace screen, where Cricut displays it’s on-screen instructions. You can set up your device by following these instructions. While displaying on-screen instructions, it will ask you to connect your Cricut to your PC. To connect, follow the steps below:
Step 1: Connect Your Cricut Machine to Windows
Users can connect to a Cricut cutting machine using two methods: Bluetooth and a USB cord.
Method 1: Via Bluetooth
Switch on your Cricut Explore Air 2 cutting machine.
After that, position your Cricut machine 10 to 15 feet from your PC.
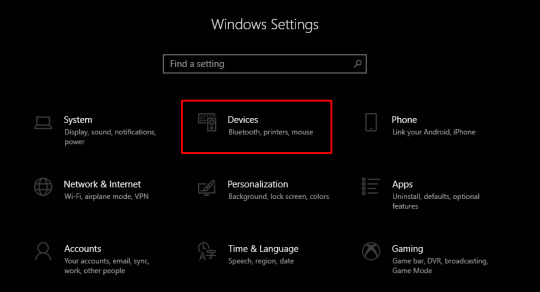
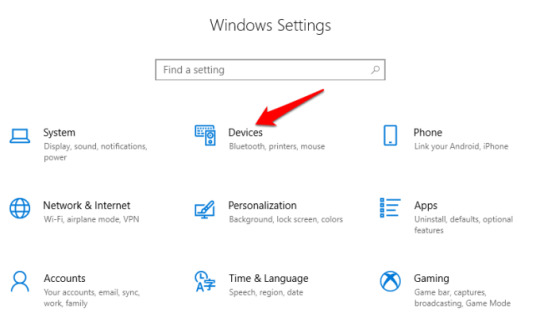
Then, open Settings on yourWindows computer.
When your Settings window is open, you have to select the Devices option.
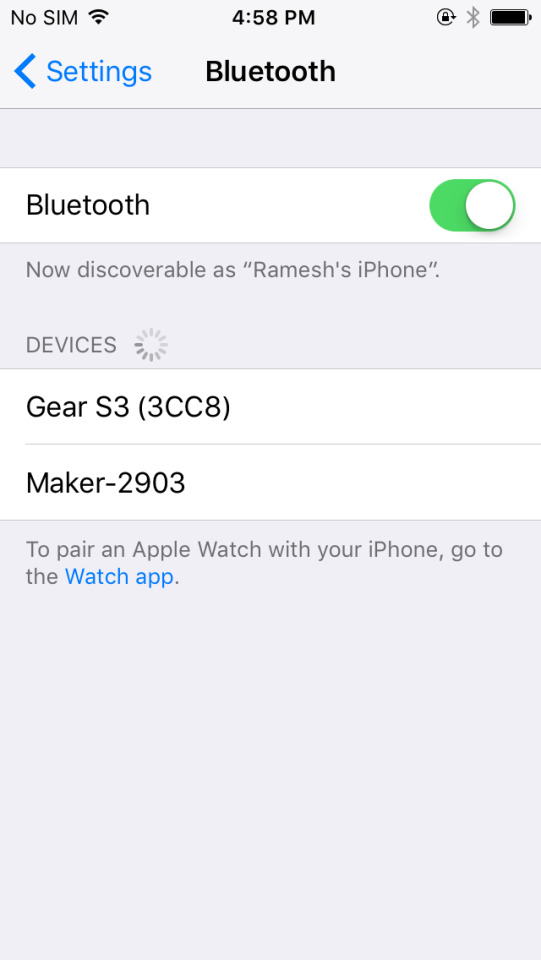
Now, confirm whether your Bluetooth is turned on. If not, then you have to turn it on.
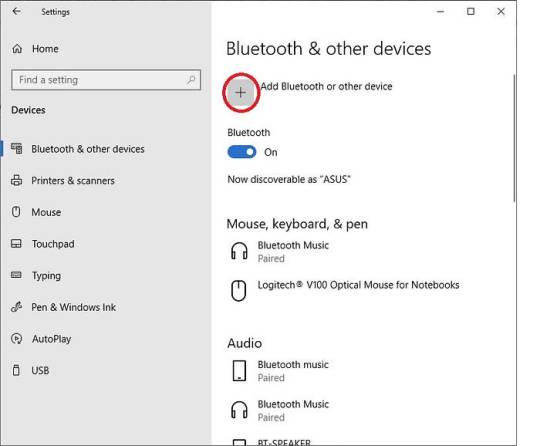
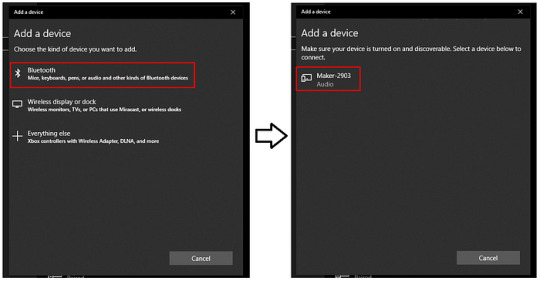
Afterward, you will need to click on Add Bluetooth or other device.
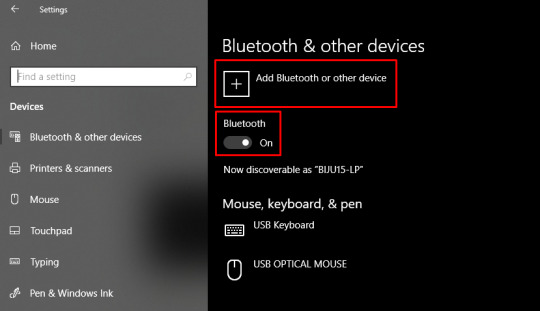
Next, you will see a pop-up to add a device; select Bluetooth.
Subsequently, you have to wait for your nearby Cricut model.

Once the PC finds your Cricut machine, select it and finish the pairing.
Method 2: Using a USB Cord
If you do not want to connect your Cricut wirelessly, you can easily do so with a USB cord. Connecting via a USB cable is a breeze. Follow the steps to connect with a USB cable:
Turn on your PC and Cricut Explore Air 2 machine.
After that, you will need to take your USB’s one end and connect it to your PC’s USB port.
Then, you have to take the other side of the USB cable and insert it into the Cricut’s USB port.
Once done, you’ve successfully connected your Cricut.
Once you have established the connection, you need to click Continue on your PC.
Step 2: Cricut Machine Updates
As you click the Continue button, it will start updating your Cricut cutting machine. Click on the Update button to start updating your machine. Once the machine has been updated, click next to proceed.
Step 3: Register Your Cricut Model
After updating the machine, the next step is to register it. To register your Cricut, click the checkbox and then click the Register button. After registration, click next.
You will see a screen for the Cricut Access Trial. If you’ve selected to try out Cricut Access, go ahead and fill out the required information. Once done, you’ll be prompted to do a test cut. Move further and follow the on-screen instructions to perform a test cut.
FAQs
Question 1: Are the setup steps similar for Mac, iOS, and Android?
Answer: Not really! Overall, the steps will be the same, but as you delve deeper into the details, they may vary. For example, connecting Cricut to a PC differs greatly from connecting it to your Mac or any other mobile device. The same goes for downloading Cricut Design Space.
Question 2: Is a Cricut account a must for machine setup?
Answer: Yes, absolutely! Without a Cricut account, you can’t use your Cricut Design Space and half of the setup uses Cricut software. So, it is a must to download the Cricut app on your compatible device. Cricut is compatible with Windows, Mac, Android, and iOS. So, make sure you download this app before setting up your Cricut.
Question 3: What is a test cut in Cricut setup?
Answer: A test cut is generally performed in the last stage of your Cricut setup. When you have almost completed your machine setup, Cricut will ask you to perform a test cut. It ensures whether everything has been done correctly or not. If any problem will be there, it will be detected right away while performing the test cut.
0 notes
Text
Cricut Explore Air 2 Setup: Easy Tutorial for Beginners
I can feel your excitement if it is your first time using the Cricut machine for crafting. The process of the Cricut Explore Air 2 setup is straightforward, but it is wise to have the proper knowledge first. Plus, as a new crafter, you can face some problems during the procedure, and that is given. But don’t worry, as I am going to cover all the vital steps to complete the machine setup. With the help of this guide, you will be able to setup your Cricut machine on a Mac and iOS device. Without causing any further delay, let’s jump right into the process!
Cricut Explore Air 2 Setup on Your Mac Computer
Here are the comprehensive steps that will allow you to setup your Explore machine on a Mac operating system.
Step 1: Establishing the Bluetooth Connection
First and foremost, keep your machine within the 15 feet range of your Mac device.
After that, turn on the printer if it is not on.
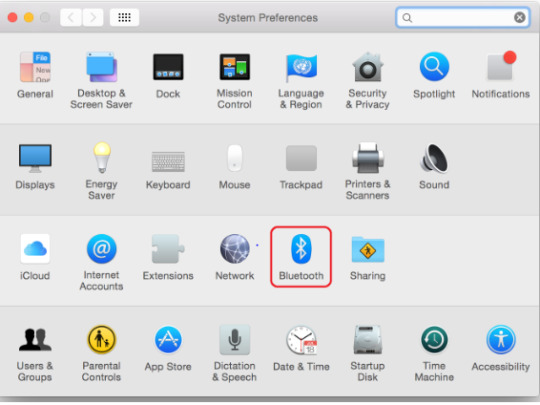
Now, move to your Mac desktop and click on the Apple icon to select the System Preferences option.
In the System Preferences window, choose the Bluetooth icon.
After that, click on the Bluetooth toggle to turn it on; it will start searching for all the available Bluetooth devices under its range.
Look for your machine model number in the list and click on the Pair option in front of it.
When you see a prompt to enter the password, click on the 0000, then click on Pair.
Then, the Bluetooth connection process will be complete.
Moreover, you can use the provided USB cable for the connection if you want to establish a wired connection.
Step 2: Downloading Cricut Design Space on Mac
Initially, browse the official Cricut web page on your macOS device.
Move to the Apps page and click on the Download option under Design Space for Mac option. (If the Download option is not enabled, then click on the checkbox for the Cricut Terms of Use and Privacy Policy first.)
After that, a new screen will appear on the screen, where you can specify how to save the Cricut file after the download.
Once you have selected a folder path, click on the Save option; afterward, the download process will begin.
Wait for the download to complete, and then open the software file from the browser.
In addition, you can also access the selected folder to open the Cricut .dmg file.
Then, drag your Cricut icon to the Applications folder in order to initiate the installation folder
Now, you can launch the app by double-clicking on the “cricut design space” option in the Applications folder.
While opening the app, a Mac notice may show up on the screen asking if you want to open this app; click on the Open button to move forward.
On the app home page, complete the account login process or create a new account if you are a new user.
Next, select the right option to complete the Explore machine setup.
From the list of options, choose your machine model number.
Here you go! Your machine setup process is complete.
Cricut Explore Air 2 Setup on Your iOS Device
The following procedures will guide you through the complete process of Explore machine setup on iPhones and iPads.
Step 1: Connecting a Cricut Machine via Bluetooth
Before you move to the connection process, ensure the printer is switched on.
If you want to connect the machine to an iPhone/iPad using Bluetooth connectivity, bring both devices within the 10–15 feet range.
Next, tap on the Settings tab from the home screen of your iPhone/iPad.
On the next page, tap on the Bluetooth option and then tap on the toggle to turn on the Bluetooth connection.
Now, the device will start scanning for the Bluetooth devices within its connection range.
Henceforth, look for your machine name from the devices list and then tap on it.
If you see a prompt to enter the password to establish the Bluetooth connection, enter 0000 and then tap on Pair.
The device Bluetooth pairing will now be complete.
Once the Bluetooth connection process is done, you can move to the next setup of the Cricut Explore Air 2 setup.
Step 2: Installing Cricut Design Space App
Then, go to your iOS device and open the App Store from your home screen.
After that, tap on the search section and type “cricut design space.”
From the results, tap on the correct app and then tap on Get to download it. (you might need to enter your iTunes password to verify the download.)
Next, the download process will begin.
After downloading, the app will automatically be added to your home screen.
You can open the app from the App Store or from the home screen.
On the app, access your Cricut account by entering your registered ID and password. (You need to create a new ID if you are a new user.)
To setup your machine, tap on the Machine Setup option.
Follow the instructions, and the Cricut Explore Air 2 setup process will be complete.
Final Words
I have covered all the information you should know to setup your Cricut Explore Air 2 machine. With the help of this complete guide, you can easily setup the device on a Mac or iOS device without anyone’s help. However, to avoid any problems during the setup, make sure to check the device compatibility first. Besides that, feel free to ask for additional help if you want more help, or if any problem appears in the setup.
Frequently Asked Questions
Can I Connect My Cricut Explore Air 2 to My Phone?
Yes, you can connect your Explore Air 2 machine to a phone. The machine works with both Android and iOS smartphones and tablets. You can download the Cricut app on your device and then start using it after connecting both devices through the app. However, before downloading the app to your device, make sure to check if the phone model you have is compatible with the machine.
Why Is My Cricut Explore Air 2 Not Connecting?
If your Cricut machine is not connecting to a device then it could be the result of some technical glitches. You need to check the system compatibility criteria and check the network connection. Also, ensure that your device OS is updated and both devices are within the connection range. If the problem seems complex, then connect to the brand customer support team to get the solution of this problem.
Do I Need to Download Software to Setup Cricut Explore Air 2?
Design Space is essential software to setup and use, no matter which cutting machine you are using. Also, without the Cricut app, it is impossible to setup the machine, let alone use it. Therefore, as a Cricut crafter, you need to download the app on a computer or smartphone device.
Source: cricut explore air 2 setup
Visit here to know more: Cricut.com/setup
Pinterest
0 notes
Text
How to Set Up Cricut Explore Air 2: A Complete Tutorial
Are you wondering how to Set up Cricut Explore Air 2? If yes, then you are in the right place! With years of experience using the Cricut machine, I am here to guide you through every step of the setup process. The Cricut Explore Air 2 is a versatile tool that allows you to cut and craft with over 100+ materials, like cardboard, paper, cardstock, vinyl, fabric, and leather. To get started, unbox the machine, connect it, and download the Cricut Design Space app. Let’s start the entire procedure in a step-by-step manner.
Unboxing Cricut Explore Air 2
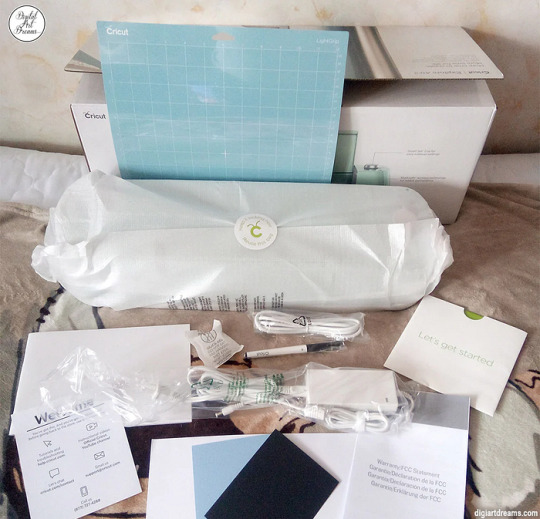
Once you go to set up Cricut Explore Air 2, the first thing you need to do is unbox the machine. Then, remove all the items inside the machine and check whether they are present. Once you have checked all the materials, you can move toward setting up the machine.
Here are the tools and supplies you get inside the box:
Cricut Explore Air 2
USB cable
Power adapter
Guidebook
Accessory adapter
Fine-point blade
Materials for a test cut
LightGrip cutting mat
Cricut Access trial for a month
These are the items you will get inside the box with your machine. To work on DIY projects, you will need other tools and accessories that you will have to buy personally. These tools will be a mat, a scraper, a weeding tool, a lint roller, and the materials required for your crafts.
Set up Cricut Explore Air 2
Once you have unboxed the machine and checked all the items, you can proceed to set up the Cricut cutting machine. For the setup process, you have to follow these steps:
First, you have to take the machine and place it on a flat surface. Try to put it in a place where it is safe, and you can keep it for a long time so you don’t have to move it more often.
Then, plug in the machine using the power adapter. It will give the machine a power supply.
Next, press the power button on the machine and turn it on.
Now, connect the machine to your device using Bluetooth or USB.
Afterward, visit cricut.com/setup and download Cricut Design Space.
Also, open the Design Space and log in with your username and password.
First-time Cricut users need to create an account, as Cricut requires an ID to work on it.
Connect Cricut Explore Air 2 to a Computer
Now that you know the process of setting up Cricut Explore Air 2, you can connect your machine to your computer. Here, we will see how to connect the machine to a Windows computer:
To start the connection, you should first turn on the machine. This will allow the machine to be connected to your computer.
The next thing you need to remember is that you should keep the machine within 10–15 feet of range.
After that, you should click on the Start menu and go to Settings.
Also, select the machine from the list. If the device asks you to enter a code, type 0000 and then connect.
Your Cricut machine is now connected to your computer device.
Downloading Cricut Design Space on Your Computer
Downloading the Design Space app is important for setting up the Cricut cutting machine. The software helps you control and use the machine on your device. On the app, you have the option to select, create, and upload a design that you will later cut on your machine. The steps to download the software are written below:
Initially, you have to turn on the computer and open a web browser.
Next, visit cricut.com/setup and click Download on the Design Space app. Before that, you will have to tick the box to agree to the Cricut Terms of Use & Privacy Policy.
Then, you should go to the Downloads folder and click on the downloaded file twice.
A new window will pop up on the computer’s screen, which means the computer has started installing the app.
By the way, before the installation starts, your computer may ask you to agree that you trust the app on your computer. If you see it, you have to agree that you trust the app.
Once the app is installed, you have to log in with your Cricut ID.
Conclusion
In short, it is important to learn how to set up Cricut Explore Air 2 if you want to use it for your projects. It is an amazing crafting machine, especially great for beginners. It is simple to use and gives you a lot of options to make your projects. To use a Cricut machine, you need Cricut Design Space on your device. With the app, you can use designs to cut on the machine and create unique designs and projects.
FAQs
What Can I Do Using Cricut Explore Air 2?
This Cricut Explore machine allows you to make multiple projects. It is powerful enough to cut from the thinnest to tough materials. You can cut materials like adhesive vinyl, heat transfer vinyl, sticker paper, cork, cardstock, fabric, and heat transfer vinyl. With all these materials, you can create stickers, mug designs, designs on fabrics, greeting cards, and many more things.
Is It Easy to Set Up Cricut Explore Air 2?
Yes, it is! You will have to follow the steps to set up your Cricut cutting machine. The first thing you have to do after buying a machine is unboxing it and checking for the accessories. Then, you must prepare the machine for the setup process. Once the machine is prepared, you should connect it to your device and then download the Cricut Design app. Once you log in with the app, your setup is complete.
Do I Need Software to Work With Cricut Explore Air 2?
Yes, you will need Cricut software to use the Cricut Explore Air 2 machine. Cricut has two different software programs that you can use. The first one is Cricut Design Space, which is a free app that you can download and use on your device. The other app is Cricut Access. You can also download it from the internet, but it is a premium app, and you will have to subscribe to use it.
Source: Set up Cricut Explore Air 2
Visit here to know More: Cricut Joy Xtra
Pinterest
0 notes
Text
How to Connect Bluetooth to Cricut Explore Air 2: Full Guide
How to connect Bluetooth to Cricut Explore Air 2? – Is that what you were looking for? Kudos to you! You have landed on the right page. This write-up focuses on establishing a connection between Cricut and computer/mobile devices using Bluetooth.
When I started crafting with Cricut, I was a little overwhelmed as I didn’t know where to start. Thanks to Cricut’s easy manual, it saved me a lot of time. Yet, I had to rely on various tutorials on the internet. Anyway, companies try their best to make their manual easier, but still sometimes it’s not easy for users to get everything on their own. Hence, that’s when this blog comes into a play.
How to Connect Bluetooth to Cricut Explore Air 2 (Desktop)?
Whether it is a Mac or Windows computer, you need to make sure you have built-in Bluetooth. Having a system with Bluetooth is a must to establish a connection via Bluetooth. To connect, follow the steps described below:
For Windows
You have to begin by turning on the Cricut machine.
Then, ensure you have placed your Cricut Explore 10 to 15 feet from your PC.
Now, you should hit the Windows logo + I keys on the keyboard, and it will open your PC’s Settings.
After that, click on Devices.
Next, you need to check if your Bluetooth is turned on. If not, you have to turn it on.
As you have turned on Bluetooth, hit Add Bluetooth or other device.
Also, you will receive a pop-up to add a device.
There, you need to select Bluetooth.
After that, wait and let your PC’s Bluetooth detect your Cricut model.
Now, you have to pair it with your Windows PC.
For macOS
The first and second steps will be the same as Windows (See above steps for Windows computer).
After that, press the power button on your Mac and turn it on.
Then, you have to head to your Apple menu.
Now, you should choose System Preferences.
Next, you will need to search for the Bluetooth choice.
Also, you should ensure that your Mac’s Bluetooth is turned on.
If it is on, choose the Cricut machine from the list.
How to Connect Bluetooth to Cricut Explore Air 2 (Mobile)?
Mobile phones are also compatible with Cricut machines. Hence, you can easily connect your Cricut to your mobile device. Whether Android or iOS, both devices are easily connected; let’s follow the steps I have explained below.
For Android
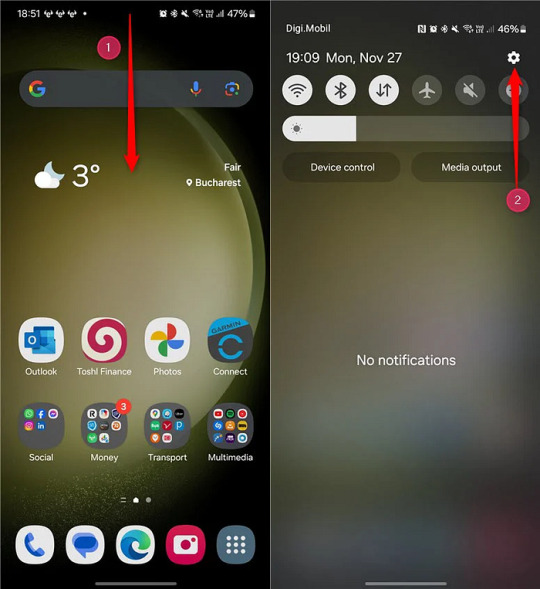
On Android, look for phone Settings.
On settings, head to the Bluetooth option.
Now, you will need to turn on your Bluetooth.
Once it is turned on, you have to wait.
Wait until your phone’s Bluetooth discovers nearby Cricut Explore Air 2.
Once the Cricut Explore Air 2 name is visible in the list, select it to pair it.
For iPhone/iPad
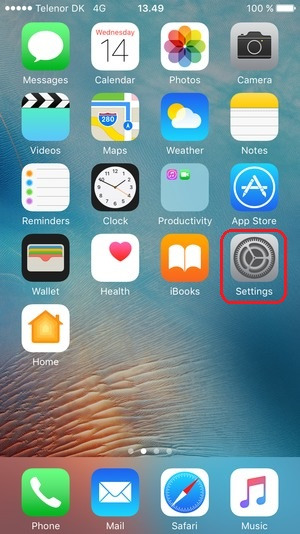
On an iPhone or iPad, look for the Settings.
Once you’ve found the Settings app, you have to launch it.
Then, you need to search for the Bluetooth option.
Now, enable your Bluetooth by clicking on the toggle button.
After that, you will need to wait.
Next, let your iPhone or iPad search for your Cricut Explore Air 2.
Once it is detected, you will need to click on it to pair.
By now, you must have understood how to connect Bluetooth to Cricut Explore Air 2. You can connect to any device you want, from a computer to a mobile phone.
FAQs
Question 1: Which software do I need to connect my Cricut to device?
Answer: There is nothing to do with Cricut software if you want to connect your Cricut to your computer or mobile device. However, you will need to download the Cricut Design Space later to setup your Cricut cutting machine. Besides design creation or setup, you will not need Cricut software for any reason.
Question 2: Can I only connect my Cricut via Bluetooth?
Answer: No! You can insert your USB cable into the Cricut machine’s USB port to connect it to your desktop. However, you can’t use USB when you want to connect your Cricut to your smartphone. For this, Bluetooth is compulsory, as the smartphone does not have bigger USB ports like the one your desktop has.
Question 3: Why do I need to connect Cricut to any device?
Answer: In order to setup your Cricut machine, you will need to connect it to your computer or smartphone using USB or Bluetooth. Without connecting, your computer can’t communicate with your Cricut, making it impossible for you to send your design to the machine for cutting. In short, you have to connect Cricut to your devices because you want your design to be sent from your device to your Cricut for further operations.
Final Words
Throughout this blog, I have highlighted how to connect Bluetooth to Cricut Explore Air 2 on a Windows, MacBook, or smartphone (Android or iOS). Connection is important if you want to setup your Cricut machine. Without Cricut setup, you can’t perform any other operations easily on your cutting machine, meaning a single cut is impossible without it. Get ready with your Cricut and connect it to your device via Bluetooth in no time.
cricut design space app
cricut design space setup
cricut design space download
cricut design space login
Source :- https://cricutie.wordpress.com/2024/05/30/how-to-connect-bluetooth-to-cricut-explore-air-2-full-guide/
0 notes
Text
How to Connect Bluetooth to Cricut Explore Air 2: Full Guide
How to connect Bluetooth to Cricut Explore Air 2? — Is that what you were looking for? Kudos to you! You have landed on the right page. This write-up focuses on establishing a connection between Cricut and computer/mobile devices using Bluetooth.
When I started crafting with Cricut, I was a little overwhelmed as I didn’t know where to start. Thanks to Cricut’s easy manual, it saved me a lot of time. Yet, I had to rely on various tutorials on the internet. Anyway, companies try their best to make their manual easier, but still sometimes it’s not easy for users to get everything on their own. Hence, that’s when this blog comes into a play.
However, crafting experts like me can’t sit alone doing their own crafting. It really doesn’t interest me🥴. I believe “The secret to growth is helping others grow.” Hence, I want to teach the best to all my novice crafters. So, let’s connect the Cricut machine to a device without any further ado!
How to Connect Bluetooth to Cricut Explore Air 2 (Desktop)?
Whether it is a Mac or Windows computer, you need to make sure you have built-in Bluetooth. Having a system with Bluetooth is a must to establish a connection via Bluetooth. To connect, follow the steps described below:
For Windows
You have to begin by turning on the Cricut machine.
Then, ensure you have placed your Cricut Explore 10 to 15 feet from your PC.
Now, you should hit the Windows logo + I keys on the keyboard, and it will open your PC’s Settings.
After that, click on Devices.

Next, you need to check if your Bluetooth is turned on. If not, you have to turn it on.
As you have turned on Bluetooth, hit Add Bluetooth or other device.

Also, you will receive a pop-up to add a device.
There, you need to select Bluetooth.
After that, wait and let your PC’s Bluetooth detect your Cricut model.
Now, you have to pair it with your Windows PC.
For macOS
The first and second steps will be the same as Windows (See above steps for Windows computer).
After that, press the power button on your Mac and turn it on.
Then, you have to head to your Apple menu.
Now, you should choose System Preferences.
Next, you will need to search for the Bluetooth choice.
Also, you should ensure that your Mac’s Bluetooth is turned on.
If it is on, choose the Cricut machine from the list.
How to Connect Bluetooth to Cricut Explore Air 2 (Mobile)?
Mobile phones are also compatible with Cricut machines. Hence, you can easily connect your Cricut to your mobile device. Whether Android or iOS, both devices are easily connected; let’s follow the steps I have explained below.
For Android
On Android, look for phone Settings.
On settings, head to the Bluetooth option.
Now, you will need to turn on your Bluetooth.
Once it is turned on, you have to wait.
Wait until your phone’s Bluetooth discovers nearby Cricut Explore Air 2.
Once the Cricut Explore Air 2 name is visible in the list, select it to pair it.
For iPhone/iPad
On an iPhone or iPad, look for the Settings.
Once you’ve found the Settings app, you have to launch it.
Then, you need to search for the Bluetooth option.
Now, enable your Bluetooth by clicking on the toggle button.
After that, you will need to wait.
Next, let your iPhone or iPad search for your Cricut Explore Air 2.
Once it is detected, you will need to click on it to pair.
By now, you must have understood how to connect Bluetooth to Cricut Explore Air 2. You can connect to any device you want, from a computer to a mobile phone.
FAQs
Question 1: Which software do I need to connect my Cricut to device?
Answer: There is nothing to do with Cricut software if you want to connect your Cricut to your computer or mobile device. However, you will need to download the Cricut Design Space later to setup your Cricut cutting machine. Besides design creation or setup, you will not need Cricut software for any reason.
Question 2: Can I only connect my Cricut via Bluetooth?
Answer: No! You can insert your USB cable into the Cricut machine’s USB port to connect it to your desktop. However, you can’t use USB when you want to connect your Cricut to your smartphone. For this, Bluetooth is compulsory, as the smartphone does not have bigger USB ports like the one your desktop has.
Question 3: Why do I need to connect Cricut to any device?
Answer: In order to setup your Cricut machine, you will need to connect it to your computer or smartphone using USB or Bluetooth. Without connecting, your computer can’t communicate with your Cricut, making it impossible for you to send your design to the machine for cutting. In short, you have to connect Cricut to your devices because you want your design to be sent from your device to your Cricut for further operations.
Final Words
Throughout this blog, I have highlighted how to connect Bluetooth to Cricut Explore Air 2 on a Windows, MacBook, or smartphone (Android or iOS). Connection is important if you want to setup your Cricut machine. Without Cricut setup, you can’t perform any other operations easily on your cutting machine, meaning a single cut is impossible without it. Get ready with your Cricut and connect it to your device via Bluetooth in no time.
Read more: cricut setup for pc
install cricut design space app
Cricut New Machine Setup
Source: How to Connect Bluetooth to Cricut Explore Air 2
#How to Connect Bluetooth to Cricut Explore Air 2#Cricut New Machine Setup#install cricut design space app#cricut.com/setup#cricut setup for pc
0 notes
Text
Cricut Explore Air 2 Machine Set Up: A Guide for Beginners
My grandchildren gifted me a Cricut machine on my 50th birthday a few days ago, and I was overjoyed. My favorite of the Cricut series is the latest version of the Explore series, the Cricut Explore Air 2. This versatile machine is designed with simplicity and value in mind. I need to execute the Cricut Explore Air 2 machine set up on my Windows and Mac computers to create unique designs on fabric.
Once I am done setting up this Cricut Explore model on a desktop, connecting devices via wireless and wired methods will be easy. Putting everything aside, I must download the Cricut software onto my separate computer. I will also be able to make DIY projects on a regular basis. This post covers everything from setting up Cricut Explore Air 2 to connecting it to a computer.
Cricut Explore Air 2 Machine Set up on Desktop Using a USB Cable
If you want to draw your ideal do-it-yourself craft out of Explore Air 2, you must set up this Cricut machine on my Windows/Mac systems. To perform this method laudably, keep an eagle eye given to you underneath:
With the finalization to set up Cricut Explore Air 2 on desktop, go forward by getting to know about connecting the Explore Air 2 machine to Windows and Mac computers.
Connect Cricut Explore Air 2 to Desktop via Bluetooth
As said in the above paragraphs of this tutorial, there are two ways to connect this Cricut machine to your desktop. One of the easiest and most popular methods is connecting them wirelessly (Bluetooth). Below are the tips that will make your process straightforward:
For Windows
Once you are done with the Cricut Explore Air 2 machine set up, let's discuss the process using which you wirelessly execute the process:
With the assistance of these steps, it will become child's play for you to connect the Explore Air 2 machine to a Windows PC wirelessly.
For Mac
After concluding the Cricut Explore Air 2 machine set up on Mac, let's take a step forward by examining the steps for connecting your computer to this machine.
Studying this blog on setting up Cricut Explore Air 2 to Windows will become a piece of cake for you to create personalized crafts. Some of the prominent crafts include greeting cards, banners, home decor items, paper wreaths, doormats, wood signs, and so much more.
Frequently Asked Questions
Question: How Do I Set up My Cricut Explore Air 2 on Mobile Devices?
Answer: Follow the below steps and set up your Explore Air 2 machine on mobile devices:
Question: Do I Need a Cricut App to Work With My Cricut Explore Air 2?
Answer: To draw your best designs from this Cricut machine, you need to have the Cricut software on your PCs and smartphones. Without this app, you won't be able to give perfect formation to your imaginary designs into the perfect shape or size. Also, this app allows you to transfer the designs to the Cricut machine and cut the material as per the command.
Question: How Can I Use My Cricut Explore Air 2?
Answer: To use the latest model of the Cricut Explore series, you need to download the Cricut Design app, set up, connect & pair the machine to your devices. After completing all these processes, you will be able to use it for creating various crafts such as:
Visit: Cricut.com/setup cricut.com setup mac cricut design space setup
Source: https://cricricutdesigncut.wordpress.com/2024/04/24/cricut-explore-air-2-machine-set-up-a-guide-for-beginners/
#design space setup#digital design#cricut.com/setup#www.cricut.com/setup\cricut explore air 2 setup#www.cricut.com/setup login#www.cricut.com/seup#install cricut design space app#design.cricut.com/setup#design space cricut#cricut explore air 2#cricut#cutfiles#cricut design space login#cricut new machine setup#cricut.com setup windows#cricut setup explore air 2 setup#cricut.com setup#cricut design space setup#cricut design space download#cricut design space app#cricut design space for mac
0 notes
Text

Explore endless possibilities with Cricut Design Nexus, your go-to resource for crafting inspiration and design ideas. Unleash your creativity with step-by-step guides, project tutorials, and a vast library of Cricut designs Space login. Elevate your crafting experience with our expert tips and custom solutions.
Visit — cricut machine setup
cricut explore air 2
#Cricut Design Nexus#cricut.com#cricut.com/setup mac#cricut.com sign in#cricut.com design space#cricut.com/create#cricut.com/setup#cricut design space app#cricut explore air 2#cricut new machine setup#cricut design space login#cricut crafts
0 notes
Text
How does a Cricut machine work?
The machine connects to your computer or smart phone via bluetooth or with a cable if needed. You can then create your own designs or download designs. Cricut has software called 'Design Space' where you can edit and adapt designs before asking Cricut to cut them out.
You can upload your own designs too! Find out how to upload images to Cricut. in this handy video tutorial.
When your design is ready you simply load your materials, press a button and the cricut.com setup has a small blade which moves around the material you are cutting following the lines of the design you have created or downloaded.
The material is secured via a 'sticky' mat so it doesn't move as the blade moves around allowing a perfectly clean cut.
Can I upload my own images with Cricut?
Yes, absolutely! The beauty of a Cricut is that you can create your own unique designs! However, there are also 1000's of files you can either buy as a digital download or even download for free.
The best file format for cricut design space images is an SVG because this image format is made up of lines, which will simply and easily guide your cutting blade around your material.
We've even got our own range of downloadable SVGs here on CraftWorld!
• Cricut Maker
• Cricut Explore Air
• Cricut Joy
There are currently 3 different types of cricut.com setup Machines and accessories available to buy and they each offer different features with the more expensive Cricut Maker being able to cut more materials than the cricut design space Explore Air 2 and offer more flexibility (hence the higher price). The Cricut Joy is a great option for smaller projects, especially if you have limited space. Don't underestimate the little Cricut Joy, it does still offer some fantastic features! Watch a full video tutorial on the Cricut Joy here - Cricut Joy Tutorial. See the comparison chart below.
Create Cricut Account
• Go to cricut.Com for setup.
• Click on the signal in the upper bar.
• Click "Create a Cricut identity".
• Enter the required credentials comprised of password, email address call etc.
• Select the United States of America.
• terms of assessment.
• test for the I
• Agreed container.
• Hit on the "Create
• "Identity" tab" tab.
• Verify account credentials to establish an account cricut log-in.
• You can download Cricut program for the laptop you are using.
• Cricut machines use
• Cricut's layout software , to start any task. Download it by following the steps:
• To begin, visit the cricut.Com/setup website.
• pick out your device type, i.E., cutting device.
• Select the product you want to purchase on the next web page.
• evaluate the privacy policy and terms of use.
• Mark on the I
• Agreed field.
• Click the download Now button.
• The next step is to set up.
Are you aware of how to setup Cricut setup using the printer?
Most of the time, cricut is enough to cut and score, cut or score, print and personalize everything you want to do and complete the task. There are times where you may require the use of a printer at home for labels, and other kinds of label. In this scenario you must follow these steps for installing the printer.
• To begin begin with installing Cricut Design Space through cricut.com/setup.
• After that, you'll need to log in to Cricut. Cricut account.
• If you've bought you Cricut equipment for the first time the next step would be required to sign-up with your brand new account. Log in to your account.
• Select the Cricut machine you're using and click download.
• You'll need be patient until your installation has been loaded on your system.
• Then double-click the install.exe file to complete the installation process for software.
After the setup is completed After the setup is completed, the machine will be in the process of making artwork.
Connect your Cricut.com/setup machine to connect to the printer.
Connect your device to the internet, and connect it to your computer using an USB cable.
0 notes
Text
Create fun and easy Cricut Joy projects in 15 minutes or less for the grad in your life! Complete step by step tutorials for making a graduation card, coffee mug, and custom face mask below!
What’s compact, portable, crafty, and super cute? The Cricut Joy of course! Join me as I show you how to make 3 easy Cricut Joy projects perfect for the grad in your life.
This is a sponsored post written by me on behalf of Cricut. All opinions are 100% mine.
*post includes affiliate links
3 Easy Cricut Joy Projects
I’m so excited to be sharing this brand new product from Cricut with you! Today we’ll be making a graduation card, coffee mug, and custom face mask using the products shown below.
#gallery-0-19 { margin: auto; } #gallery-0-19 .gallery-item { float: left; margin-top: 10px; text-align: center; width: 50%; } #gallery-0-19 img { border: 2px solid #cfcfcf; } #gallery-0-19 .gallery-caption { margin-left: 0; } /* see gallery_shortcode() in wp-includes/media.php */
What is a Cricut Joy?
Cricut Joy is a powerful new cutting machine that can help you create a birthday card, custom mug, or a gift in minutes. It is about half the size of the Cricut Explore Air 2 and is cute as a button. It’s fun, functional, and really easy to use.
My mom stopped by earlier this week and I made a card in minutes while we were talking. It’s so easy to make quick projects with this machine! I could see this easily becoming my DIY best friend.
You can even create your own custom insert using a Cricut Joy pen.
Compact and Portable
Aside from being ridiculously cute, it’s also compact and portable. It comes Bluetooth ready so you can take it from one room to the next, on the coffee table or kitchen counter, by the pool, in an RV, at a campground, or on your deck overlooking the ocean. All you need is a power outlet and an internet connection.
In addition to using a desktop or laptop, as long as you have the Cricut App, you can design on your phone or iPad.
Use the carrying case to store it and to take it on the road with you. If you are a member of a craft group, mommy group, wine club, etc…you can easily pack it up and take it with you. Impress your friends with custom wine glasses made on the spot!
Mats are Optional
One of the best things about this little machine is that you don’t need a mat. Yes, you read that correctly…you don’t have to use a mat! The Cricut Joy uses something called Smart Vinyl which allows you to create a vinyl decal up to four feet long! It’s pretty amazing.
I created a graduation garland to put on our front door for my son and was able to cut 4.25″ letters spelling out “CONGRATS GLENN” using one roll of Smart Vinyl. The graduation cap was made with black cardstock and my Cricut Explore Air 2. You could also use a Cricut Maker.
Cricut Joy Setup
Set up for your new Cricut Joy is so easy. Plug the machine in, choose “Cricut Joy” under machine selection, follow the prompts, and start creating.
Next, you will be prompted to create your first project. I chose the crown because it goes pretty well with my brand. Your brand new Cricut Joy comes with some materials to play around with so you really can plug in your machine and create something in about 5 minutes.
#gallery-0-20 { margin: auto; } #gallery-0-20 .gallery-item { float: left; margin-top: 10px; text-align: center; width: 50%; } #gallery-0-20 img { border: 2px solid #cfcfcf; } #gallery-0-20 .gallery-caption { margin-left: 0; } /* see gallery_shortcode() in wp-includes/media.php */
You can design on a desktop or laptop as long as it is Bluetooth capable. My computer does not have a Bluetooth option so I had to purchase a Bluetooth Dongle. Plug it into a USB port and you’re all set.
What All Can the Cricut Joy Do?
The Cricut Joy can do so many things! After I made my tiara test cut I immediately started making labels using the Smart Label Writable Vinyl. I updated my home office a bit last week with cube storage from Target and the pegboard system from IKEA. I made labels for the pegboard cups, the paper organizer, and my glitter cabinet. (Yes, I have a glitter cabinet because I’m obsessed with glitter!)
#gallery-0-21 { margin: auto; } #gallery-0-21 .gallery-item { float: left; margin-top: 10px; text-align: center; width: 50%; } #gallery-0-21 img { border: 2px solid #cfcfcf; } #gallery-0-21 .gallery-caption { margin-left: 0; } /* see gallery_shortcode() in wp-includes/media.php */
Some of the other things you can make with the Cricut Joy are:
Custom T-shirts (perfect for family trips to Disneyland!)
Cards (including addressing envelopes)
Planner Stickers
Labels for Organizing
Jewelry
Banners
Farmhouse Signs
Photo Props
Gifts
Party Decorations
Coasters
The possibilities are endless! I’m going to share three little Cricut Joy projects I made for my son. He is graduating from high school so I made a graduation card, custom mug (filled with candy and money), and a custom mask to wear in the drive through graduation ceremony.
How to Make a Greeting Card for Graduation
Can’t get to the store to buy a graduation card? You can make your own in less than 15 minutes! To make a card you will need the following supplies:
Cricut Joy Card Mat
Insert Card (choose from a wide range of card packs)
Cricut Joy Starter Tool Set
Cricut Joy Pen (if your design choice calls for it)
Open Cricut Design Space and search for a graduation card.
Once you find the design you like, slide one of the pre-folded cards between the layers of the Card Mat. Remove the mat protector (don’t throw it away!) and press the top of the card onto the sticky side of the mat.
Back in Design Space, click “Make It” in the lower right corner of your project.
It will ask you how you will load your materials, choose, “On Card Mat” then click the “Insert Card – Cardstock” option under Material Set, load Card Mat into the machine, and then click “Go”.
#gallery-0-22 { margin: auto; } #gallery-0-22 .gallery-item { float: left; margin-top: 10px; text-align: center; width: 50%; } #gallery-0-22 img { border: 2px solid #cfcfcf; } #gallery-0-22 .gallery-caption { margin-left: 0; } /* see gallery_shortcode() in wp-includes/media.php */
There are no buttons on the Cricut Joy so once you insert your card the machine will automatically grab the mat. When it’s done cutting, click, unload the mat, and using the spatula, gently pull off the mat.
Now, slide your insert card through the corner slots…you’re done! If you like you can use a glue pen to make sure the insert doesn’t come out.
How to Make a Cricut Mug Using Smart Vinyl
Making a coffee mug with vinyl is really easy and makes a great gift. I designed a mug for my son using his school colors and school mascot. This whole Coronavirus quarantine thing has really changed how we celebrate our grads this year but I wanted him to have something to remember this moment in history so instead of “0”s I used a toilet paper image.
Here’s what you need to make this Cricut Joy Project:
Clean White Mug
Cricut Joy Smart Vinyl
Cricut Joy Transfer Tape
Starter Tool Set
You can choose from many different designs in Cricut Design Space or you can create your own. One of the first things you need to determine is how big your image needs to be because you don’t want it too big or too small.
Once you have your design ready, click “Make It”, choose “Without Mat”, then “Smart Vinyl – Permanent”. You will be prompted to load your material and once you do click, “Go”. The Cricut Joy rollers will grab the vinyl and start cutting.
#gallery-0-23 { margin: auto; } #gallery-0-23 .gallery-item { float: left; margin-top: 10px; text-align: center; width: 50%; } #gallery-0-23 img { border: 2px solid #cfcfcf; } #gallery-0-23 .gallery-caption { margin-left: 0; } /* see gallery_shortcode() in wp-includes/media.php */
When your decals are done, weed the image and get your transfer tape ready. Cut a piece of transfer tape slightly bigger than your image, remove the backing, and place it over your decal. Use your Cricut Joy Scraper to remove bubbles and to ensure the vinyl has adhered to the tape.
Now transfer your image to the mug. Use the Scraper Tool to smooth the vinyl and slowly remove the transfer tape. If you are layering, make sure to put the bottom layer down first.
How to Make a Custom Face Mask Using Vinyl
Unfortunately, all traditional graduation ceremonies have been canceled due to COVID19 but that doesn’t mean we can’t still honor our grads. Thankfully, my son’s school did a drive through graduation. One of the rules was that everyone in the car had to wear face masks so I decided to make one for my son that matches his school colors and cap and gown. If you are into sewing you can make your own contoured mask as well using the same pattern I used from SewOside.
For this Cricut Joy Project you will need the following:
Cotton Face Mask
Cricut Joy Smart Iron On
Cricut Easy Press Mini
I used basically the same design for the face mask as I did for the mug but I did adjust the size. When creating a custom face mask image it is imperative your design does not impede your breathing. Your design should be limited to the outer edges of the face mask.
While Cricut has a whole collection of products made specifically for the Cricut Joy, you are not limited to using those materials. You can use Cricut Everyday Iron On vinyl with the Cricut Joy as long as you use the Cricut Joy Mat. I did not have Smart Iron On in white so I used a bit of Everyday Iron On and it worked perfectly.
Make sure to choose the “On Mat” option along with “Everyday Iron On” before loading your materials in the machine.
#gallery-0-24 { margin: auto; } #gallery-0-24 .gallery-item { float: left; margin-top: 10px; text-align: center; width: 50%; } #gallery-0-24 img { border: 2px solid #cfcfcf; } #gallery-0-24 .gallery-caption { margin-left: 0; } /* see gallery_shortcode() in wp-includes/media.php */
Once your vinyl is ready, carefully weed the image, and turn your Easy Press Mini to the medium setting and lightly press for 25 seconds. Check the Cricut Heat Guide for more setting options.
Let cool and carefully peel off the transfer tape. RBV class of 2020 graduation…you did it!
Do I Need a Cricut Joy?
Yes, you absolutely need the Cricut Joy! I think you will find that the Cricut Joy is the perfect craft companion. It’s small, compact, portable, super easy to use, and has a wide range of tools and materials available to suit all of your crafting, decorating, organizing, or gift giving needs.
How Much Does the Cricut Joy Cost?
The Cricut Joy is under $200. You can purchase the machine on Cricut.com, at Joann Fabric, Michaels, and Hobby Lobby.
Which Cricut is Best for Beginners?
You really can’t go wrong with any Cricut products. My mom has gotten into card making lately and I told her she should check out this machine. She doesn’t have any experience using something like this but I’m confident she would be able to get this setup all on her own. The Cricut Joy is perfect for beginners and seasoned crafters alike.
[mv_create title=”Essential Cricut Joy Tools” key=”127″ type=”list” layout=”grid” thumbnail=”https://www.madebyaprincessparties.com/wp-content/uploads/2020/06/cupid__0004_cupid_front_closed.jpg”%5DI hope you enjoyed these three easy Cricut Joy projects! What do you think of this powerhouse of a machine?!
More Cricut Crafts, Tutorials, & Ideas
5 Things I Love About My Cricut Explore Air 2
How to Use Cricut Easy Press 2
How to Use Cricut Explore Air 2 for Beginners
Cricut Pop Event at The Grove, Los Angeles
3 Easy Cricut Joy Projects DIY Graduation Gifts Create fun and easy Cricut Joy projects in 15 minutes or less for the grad in your life!
0 notes
Text
Silhouette vs Cricut – Which One Should You Choose?
Anyone who has worked with a die cut machine has probably made a choice between Silhouette or Cricut. The two are at the top of the food chain for cutting machines. Amateurs and experts alike can find something to love about each brand.
Which one should you go with? It depends on what you’re looking for. Each machine has features and measurements that are tailored for different skill levels and needs of crafters. Ultimately, one of these two machines should be in your home if you’re serious about using a cutting machine.
Quick Navigation
Silhouette vs Cricut: An Overview
Silhouette Cameo 3
Cricut Explore Air
What Are the Differences in Silhouette vs. Cricut?
Blade Strength
Software
Silhouette vs. Cricut: Which One to Choose?
Where Can I Purchase Each Device?
Final Thoughts on Silhouette vs. Cricut
Silhouette vs Cricut: An Overview
Before getting into a deep analysis of the differences in Silhouette vs Cricut, you should know the basics of each die cutting machine.
Silhouette Cameo 3
Sale
400 Reviews
Silhouette SILHOUETTE-CAMEO-3-4T Cameo 3 Wireless Cutting...
Cuts a variety of material including vinyl, paper, cardstock, fabric, and other materials up to 12...
Use the powerful Silhouette Studio design software to create your projects. Features Bluetooth...
Features a dual-carriage for multi-tool use and a higher 2 mm clearance to cut thicker materials. Is...
Check Price on Amazon
The Silhouette Cameo 3 remains the newest model on the market from Silhouette, introduced in 2016. You’ll be able to cut through most materials you would choose for crafting, including standard fabrics and vinyl. Although the biggest size mat you can use for the Cameo is 12” X 24”, you can cut into anything as long as 10 feet without using a mat.
You can use dual cartridges with the Cameo 3, which allows you to print and cut anything without completely stopping the machine. You’ll love the fact that you don’t have to change the blades or the pen to adjust your settings. On top of everything else, you can use Bluetooth to begin your cutting without any wired connection.
The cameo 3 comes with Silhouette’s PixScan technology. With this, you can use pictures taken directly with your smartphone or digital camera. You can then send them directly to the Cameo 3 when you are ready to begin cutting.
You can also take advantage of Scan and Cut, a feature that lets you transmit directly to a printer. Once the images are ready, you can send them directly to the Cameo 3 and get them cut to your preferred settings.
youtube
If you want to upgrade, you can purchase the Autoblade accessory for the Cameo 3. This will eliminate many of the setting adjustments you will have to make using the regular blades on the cutter.
Thanks to the Studio Designer software included with all Silhouette cutters, you can make your own designs from scratch, or import existing patterns. The software is incredibly detailed and may take some getting used to if you haven’t worked with Silhouette before. You’ll find plenty of online tutorials and videos to help you out along the way.
Cricut Explore Air
Sale
1,215 Reviews
Cricut Explore Air Wireless Cutting Machine
Embedded Bluetooth for wireless cutting
Dual carriage for cutting and writing or cutting and scoring in one step
Upload your own images for free (.svg, .jpg, .png, .bmp, .gif, .dxf) Cut over 60 materials from...
Check Price on Amazon
A direct competitor to the Cameo 3, Cricut brought the Cricut Explore Air cutter to the market in 2015. It has the same size of a cutting mat as the Silhouette model, and you will also find a dual-blade setup in this machine as well.
Along with Bluetooth compatibility, you can sync this device directly to an iPad for wireless cutting. The same Print and Cut feature found in the Cameo 3 is also used by the Explore Air.
One of the biggest advantages for the Explore Air is a dial located on the right of the device. With this knob, you can easily select how deeply you want to cut, and how much pressure you want to apply to the cut. If you’re using a special material, you can also lock in custom settings to one specific portion of the dial.
youtube
The Cricut Explore Air uses Design Space for its software. It’s very beginner-friendly and you’ll find it much more approachable than the complicated program with the Cameo 3. Design Space uses DRM, so you’ll need to have an active internet connection if you’re going to use it. While you can import files to the device, there’s no way to draft anything from a blank slate.
What Are the Differences in Silhouette vs. Cricut?
Now that you know the basics of each machine, you can get an idea of the specific ways the Silhoutte Cameo 3 and Cricut Explore Air differ from each other.
VS
Blade Strength
There’s no comparison here – the Cricut is much more powerful than the Silhouette. You wouldn’t mistake the Explore Air for a dedicated heavy-duty machine like the KNK Zing. Of course, it will give you less trouble than trying to cut tougher materials with the Cameo 3.
You’ll find a German carbide blade as part of the Cricut, which means they will last longer than the stock blades on the Cameo 3. You can equip deeper-cutting blades for both machines, but the ones included for the Explore Air win easily. If you plan to work with aluminum, hard leather, or cork, you won’t get anywhere using the Cameo 3.
Software
This comes down to user-friendliness vs. features. Silhouette Design Studio is far more diverse and robust in its features. It also allows anyone the complete freedom to work on an image from a blank sheet. If you prefer, you can purchase images from the Cricut store. These will look incredibly professional compared to basic clip art you would find online.
You can expect to spend more time learning the Silhouette software than you will with Cricut, but it might be worth it. The basic version of Design Studio is free, and you can use .jpg, .png, and .bmp files with it. For a $50 upgrade, the professional edition of the software allows the use of .svg files.
On the other hand, Design Space by Cricut can be picked up by almost anyone. If you don’t need to make anything from scratch and are focusing on simpler designs, you should consider going with Cricut. Keep in mind, though, that your options with Cricut are still limited. You also won’t be able to use it offline, so make sure you always have an active connection to the internet.
Cricut Design Space software is compatible with .gif and .dxf files, as well as everything that can be used with the professional version of Silhouette Design Studio.
Silhouette vs. Cricut: Which One to Choose?
Ultimately, you need to determine which of the two machines will suit you better. If you are a beginner in the world of die-cutters, you should consider the Cricut Explore Air. It’s very simple to set up, and you won’t feel overwhelmed with any unnecessary features.
Thanks to the deeper penetration, there is more potential material you can use with the Cricut. This complicates things, because professionals are more likely to work with a device that can use other materials. Unfortunately, the Explore Air does not lend itself well to experts. The lack of any software that functions without an internet connection is also a problem.
Anyone who is looking for freedom in material that doesn’t need too deep of a blade should go for the Silhouette Cameo 3. You have much more versatility in the included software, even if you don’t go with the professional edition. If you plan to work with anything that proves difficult for the blades, you’ll need to consider the Cricut instead.
The other downside to the Cameo 3 is in the software. Although it offers an amazing amount of options, you’ll need to pay extra to unlock certain file extensions, including .svg.
Where Can I Purchase Each Device?
The best place to purchase either the Silhouette Cameo 3 or the Cricut Explore Air is online. You’ll find the most affordable prices on sites like Amazon, where they offer free shipping for Prime members. If you don’t have a Prime membership, be sure to calculate the amount of shipping into the cost.
You can also try your luck at brick-and-mortar stores. Crafting stores such as Michael’s might keep them in stock, and you can check their website to see if your local store has any in stock. If you find one of the devices online, you might have the option to deliver it right to a store, saving money on shipping costs.
If all else fails, there is also Staples, but they tend to mark up the price of everything by quite a bit. Check other local stores before you resort to them.
Final Thoughts on Silhouette vs. Cricut
As you make a decision in the battle of Silhouette vs. Cricut, consider how much you want to do with your die cutter. Are you planning to use this as a hobby, and make things just for yourself? Are you considering setting up an Etsy store and selling your wares to anyone? What about the idea of opening up an entire business?
All of these questions should factor into your choice of an Explore Air or a Cameo 3. Your ability to learn software, work with different materials, and understand the mechanics of cutting will sway your opinion.
Along with your own research, find out which of your crafting friends have worked with either machine before. Their trusted opinion should help you decide. There might be exceptions to those who have consistently given the same opinions about one brand or model, so carefully review everyone’s take.
The post Silhouette vs Cricut – Which One Should You Choose? appeared first on Heat Press Machine Reviews.
from Heat Press Machine Reviews https://heatpressmachineguide.com/silhouette-vs-cricut/
0 notes
Text
cricut setup for windows and mac
Crafting is one of those hobbies that people of every age follow. To provide flawless results and an enjoyable experience in crafting, Cricut offers various impressive heat pres and cutting devices. Some of the popular cutting machines it offers are the Cricut Maker 3, Cricut Explore 3, Cricut EasyPress 3, Cricut Autopress, and more. With the help of these machines, anyone can create stunning DIY projects without any professional help. Also, for new users, the app offers various written content and video tutorials. Visit the cricut.com/setup website now to get more information.
cricut com setup explore air 2
design.cricut.com/setup
cricut setup for windows and mac
0 notes
Text
How to Setup Cricut Explore Air 2 on Computer and Mobile?
A few days ago, I received a new comment on my previous blog that was on how to setup Cricut Explore Air 2. Then, I decided to write a blog on it. This is an important procedure in the beginning when you have bought a new Cricut cutting machine.
Setting up a Cricut machine can be exciting, but it can also become complex at some point. Even my friend Jacob was excited during the setup of his Cricut Explore. But then he needed my help as he felt he might make some mistakes. Similarly, many of us are afraid of making a mistake when buying a new tool. Therefore, it would be better if we try to get help from someone.
But not everyone is as lucky as my friend, so that is where this blog comes in handy. With this blog tutorial, you will be able to setup your Cricut machine on your computer and mobile.
What Do You Need to Setup Cricut Explore Air 2?
There are sorts of accessories you need before the Cricut Explore Air 2 setup. Ensure you have the following items:
Now we have all the required items, let’s move to the next section.
How to Setup Cricut Explore Air 2 on Windows/Mac?
The setup process for Cricut is really easy on computers. Be it Windows or Mac, the steps below to set up your Explore Air 2 will be really helpful. Ensure you follow the steps correctly to avoid any errors:
Here are the simplified steps to setup your Explore Air 2:
How to Setup Cricut Explore Air 2 on Android/iOS?
Now, let’s jump on board into another step where we will setup our cutting machine on a mobile device. Here are simplified steps to setup Explore Air 2:
Final Words
Through this blog, I have taught you how to setup the Explore Air 2 model in a few simple steps. Firstly, I discussed the item you will need for this machine setup. The items include Cricut machines and other essential accessories. In the next step, I explained how to setup the model. However, this procedure can also be used to setup other models of Cricut, including Maker, Joy, and Venture.
FAQs
Question 1: Can I connect my Cricut Explore Air 2 to a Mac via Bluetooth?
Answer: Yes, you can. Connecting Cricut with a computer via Bluetooth is an essential step if you want to setup Cricut Explore Air 2. To setup, follow the steps below:
Question 2: Which connection method is best for connecting my Cricut to my computer?
Answer: Well, there are two methods that you can use to form a connection between your computer and Explore Air 2 machine. First is a USB wired connection, and second is a Bluetooth wireless connection. Both methods have their own advantage, such as:
Question 3: What could be the problem if my Cricut Explore Air 2 is not connecting to my computer?
Answer: If you are facing this problem again and again, then you should try unpairing and then repairing your Cricut cutting machine. In order to repair it, you have to follow the same method to connect your Cricut via Bluetooth. Just get to the device’s Bluetooth and connect it properly to connect your machine.
Visit: cricut.com/setup
Source: https://cricutdesignapp.wordpress.com/2024/02/28/how-to-setup-cricut-explore-air-2-on-computer-and-mobile/
#digital design#design space setup#cricut.com/setup#cricut.com/register#cricut.com/create#cricut.com design space#cricut.com sign in#cricut.com setup#install cricut explore air 2 '#install cricut design space app#install cricut explore air 2#cricut explore air 2 setup#cricut explore air 2#cricut design space#design.cricut.com/setup#cricut create connect to computer#cricut new machine setup#cricut new product setup#cricut new product device#cricut explore#cricut design space login#cricut design space download#cricut software app#cricut install setup#cricut setup download
0 notes
Text
How to Use Cricut Explore Air 2: Crafting Tips and Tricks
Hey guys, today I have come up with an easy guide on the topic named how to use Cricut Explore Air 2. In this guide, I will explain everything every beginner needs to know about Cricut machines. I remember the day when one of my uncles gifted me this machine. At first, I was very nervous and didn’t know how to set up and use it. Thanks to Cricut for the user guide, which helped me quickly set up my machine within a few minutes.
Despite this, I learned to use the machine with the help of tutorials, and fortunately, I am now able to help people who still need to know about the usage and setup process. In addition, I will show you how to perform a test cut on your new machine. Hence, it will help you understand the usage of the machine. Let’s get started!
How to Setup Cricut Explore Air 2?
After unboxing, the first thing I did was set up my cutting device. At the same time, I used a compatible computer device that supports the Cricut software. Here are the complete instructions on machine setup:
First, turn on the device and insert the power cable into the round hole on the back of the machine.
Then, establish the bluetooth connection between your device and machine.
While connecting to bluetooth, enter the code 0000 if prompted.
Head to your device (computer/mobile) and navigate to Cricut’s official website.
From the website, download and install the Design Space app.
After installation, set up the account using the Cricut ID and Password.
Afterward, you need to follow the screen’s prompts on the app.
At last, you will find that the setup is done, and it will ask you to perform a test cut.
How to Use Cricut Explore Air 2 for Creating a Project?
Now you have finished your setup, let’s see how to use this machine. Here, I will show you how to cut using Cricut Explore Air 2. To learn, follow the steps provided below:
Launch the Design Space and click on the Canvas tab located in the upper left corner.
Then, write or design anything that you want. Here, I have written the word TEST and added two shapes on my canvas.
Now, load the metallic adhesive-backed paper to cut your created shapes and block letters.
After cutting, separate the cut-outs from the spare materials.
Finally, you have learned how to cut anything using the Cricut Explore Air 2.
What Can I Make on Cricut Explore Air 2?
The moment I learned how to use Cricut Explore Air 2, I couldn’t stop myself from trying the various new projects every week. In a sense, this cutting machine is worth buying, and I should have bought it earlier. Anyway, it is never too late to learn. However, I am really thankful to my uncle; his one gift not only transformed me but also helped me bring the imaginary idea to reality.
Since I have created a lot of projects using this cutting machine, I am thrilled to share them with you. Let’s have a look at the 5 amazing projects I have made myself:
Paper Flower
Leather Jewelry
Custom Mug
Flower Pot
Pillows
Stickers
Wall Decals
Coasters and many more.
All these projects are my favorite, and they are beginner-friendly. So, after learning how to use Cricut Explore Air 2, you can try these projects. Now, let’s proceed with the setup procedure of the cutting machine.
FAQs
Question 1: How to cut using Cricut Explore Air 2?
Answer: This machine is basically made for cutting, be it Maker or Explore series; all of them are cutting machines. So, if you want to cut anything on Explore Air 2, then follow the steps below:
Go to Design Space and create a design.
Then, choose the Cardstock material under the Material Settings.
Now, you need to place the cardstock on the Blue LightGrip mat.
After that, load the mat and press the Go button.
Next, your machine will start cutting your material.
Question 2: Can I connect my Cricut Explore Air 2 via Bluetooth?
Answer: Yes, you can use the Explore Air 2 via Bluetooth. To connect, you need to follow the steps below:
First, ensure a minimum distance of 10 to 15 feet between your devices.
Next, you need to turn on the Bluetooth.
On the next screen, you have to click on Add Bluetooth or other device.
Here, let your computer find the available devices.
Once it detects the device, click on it to pair.
This way, connect your cutting machine via Bluetooth.
Question 3: Can I use my Cricut Explore Air 2 with my phone?
Answer: Design Space is compatible with all devices, including mobile and computer. So, whether you want to connect your machine with an Android or iOS phone, it is easy to connect. However, you can also use the machine without using the internet on an iOS or Android device.
Final Thoughts
Eventually, you have learned how to use Cricut Explore Air 2, including the machine setup. While setting up your machine, you have two options. Either connect your device via Bluetooth or USB cable; both methods are available for this machine. Once you are done with your setup, you are ready to perform a test cut, which I have explained in the detailed step-by-step instructions. Now, you can easily bring your project ideas to reality; all you need is an Explore Air 2 cutting machine.
Source :- https://crricut.wordpress.com/2024/01/04/how-to-use-cricut-explore-air-2-crafting-tips-and-tricks/
0 notes
Text
How to Make Business Cards with Cricut?
Business cards play an important role in branding and marketing for any business. A typical business card contains key details of the company, such as email address, phone number, website address, and others. Even though it might seem a bit irrelevant, marketers have turned these cards into an effective tool that can drive in new customers. Using a Cricut machine, you can create personalized business cards for your own brand or design them for other entrepreneurs and marketing professionals. Let’s explore how to make business cards with Cricut.
Step 1: Designing Your Business Card
The first stage is to design the business card. Designing a business card is very easy. You can also find premade designs from the Design Space Library, edit them, and customize them according to your needs. The basic steps involved in this are:
Step 2: Printing the Business Cards
Once you complete designing the card on Design Space, it is time to print the cards from a printer. Printing the cards from a printer first is important, as the Cricut machine can only be used later to cut.
Step 3: Preparing the Mat for Cutting
The final step in how to make business cards with Cricut is cutting the printout. This step will cut the paper into individual business cards.
Conclusion
So, you have finally understood how easy it is to make any projects from a Cricut machine. With a device like Cricut, you can design and print your business cards or take it on commission for others. It can also be your strategy that can get you more clients. In this blog, you will get a detailed tutorial on how to make business cards with Cricut.
FAQs
Can I make Business Cards with Cricut Joy?
Yes, you can make Business Cards with any Cricut machine. It is because of the limited steps involved in doing this project which requires the machine to cut the material. If you are a beginner or have recently started using a Cricut machine, then Joy will be the best for creating your crafting business.
Can I print my Business logo with a Cricut machine?
Yes, you can print any logo with a Cricut machine. The Cricut machine has many features that enable users to cut any design they wish. Also, the Print Then Cut function of the Cricut makes it even easier to cut your business logo. All you have to do is print the logo on paper, then load it onto the machine. Now, Cricut will cut the logo with high precision.
Why is it important to have Business Card?
Business cards are a personal marketing tool containing the main contact details regarding the person and business. Also, it will contain the address, contact information, and a little bit about the business, such as the company’s logo or tagline. Business cards also enhance the professional image of a business person and leave a lasting impression.
Visit: cricut.com/setup cricut design space cricut explore air 2 Cricut Design Space app
Source: https://designspace.space/how-to-make-business-cards-with-cricut/
0 notes
Text
How to Slice in Cricut Design Space? [A Detailed Guide]
The Design Space is an official software by Cricut that you use to instruct the machine. You can design, upload, or choose the design you want to make with your Cricut machine. It has a lot of features, and one such is Slice. The concept of the Slice is simple. It cuts a shape or text from another shape. You can use the feature to create unique projects with your Cricut machine. Although it is easy, it can be a bit confusing for new users. This blog will teach you how to Slice in Cricut Design Space.
How to Use the Slice Tool in Design Space?
The Slice feature of the Design Space helps split two overlapping images or texts into different parts. It creates new cut paths from two images, resulting in more than three shapes. Let us see the basic steps involved in using the Slice tool.
How to Slice Text or Image in Design Space?
You can cut shapes and texts from a background. So, let us see how you can cut shapes and texts.
How to Create a New Shape From Two Standard Shapes?
Suppose you want to create two more shapes with important standard shapes like rectangles, circles, etc. Then follow this tutorial.
Conclusion
To summarize, the Slice cuts one image out of another. It splits two overlapping images or texts into different and separate parts. Allowing you to design new cut paths from two images and get in three or more new shapes. And Slicing images is not difficult at all. So, this blog is about how to Slice in Cricut Design Space and create shapes. Further, you will see how Slice texts and standard shapes form each other.
FAQs
How to Slice on Android or iOS?
You can use the Slice feature from Android or iOS, not just from the computer. To use it on mobile/tablet, you must install the Design Space and add the images to the Canvas. Later, by tapping on the screen and dragging a selection box around both shapes. And then, tap on the Actions button at the bottom of the screen. Find and select the Slice option, and then the shapes will be separated.
Can I Slice more than two layers at a time?
No, you cannot Slice two or more layers at a time. The Slice feature can only work with two layers at once. So, if you have a project that has more than two layers, you will need to work with them separately till you reach the desired shapes by Slice.
Why is the Slice button grey?
The Slice option is unavailable if the Slice button on the Design Space is in grey. It cannot identify the selected shapes, or you have selected more than two layers. Remember, it only works with two layers at once. So, to fix it from benign gray, select only two layers, and the layers should be ungrouped and visible.
Visit: cricut.com/setup cricut setup explore air 2 setup cricut.com setup mac design.cricut.com/setup cricut design space setup
Source: https://cricutdesignapp.wordpress.com/2023/07/31/how-to-slice-in-cricut-design-space-a-detailed-guide/
0 notes