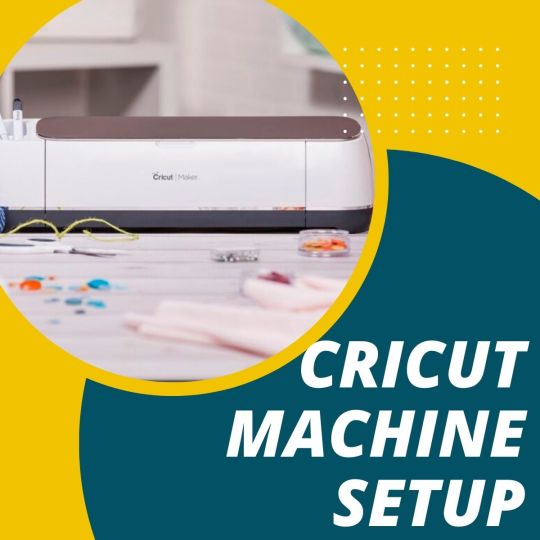
#Cricut Machine Setup
Explore tagged Tumblr posts
Visit Tumblr Blog
Explore Tumblr blogs with no restrictions, modern design and the best experience.
Last Seen Tumblr Blogs


Fun Fact
The KCSC sent more than 20K requests to delete posts related to prostitution and porn to Tumblr from January to June 2017.
Text
How to Calibrate Cricut Explore Air 2? (Full Guide!)
Cricut Explore Air 2 is a worthwhile machine for crafters who want to make pro-level crafting projects. The machine offers precise cuts for more than 100 different types of materials, including Cricut Smart Material, leather, wood, glass, metal, etc. With its easy-to-use interface, the machine allows users to work on DIY projects even if they are novices. Moreover, sometimes crafters may need to perform Cricut Explore Air 2 calibration before a cut.
Calibration is a process that helps set the machine’s blade to cut the design accurately without any flaws. Many users don’t know the procedure and struggle to get the perfect cut. If you have the same problem, then the follow-up blog will provide you with all the information about calibrating your machine.
Cricut Explore Air 2 Calibration on Windows/Mac
If you are using your Cricut Explore Air 2 machine on a computer, then the following is the extensive guide that will help you perform the calibration process.
Step 1: Selecting the Printer
Open the ‘Cricut Design Space app‘, sign in to your account, and then click on the Settings option.
Then, follow the path Machines > Machine Calibration, and select Cricut Explore Air 2.
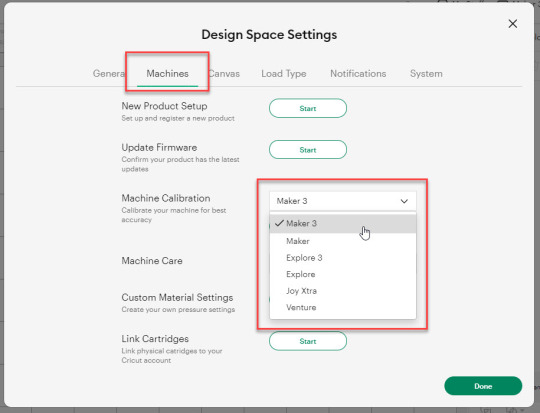
After selecting your crafting machine, click on the Start option.
Depending on the machine you choose, you will be asked to complete the calibration; select the Print Then Cut option.
In the next step, choose what you like to use with your printer machine for the process.
After that, click on the Continue option.
Step 2: Starting the Calibration Cut
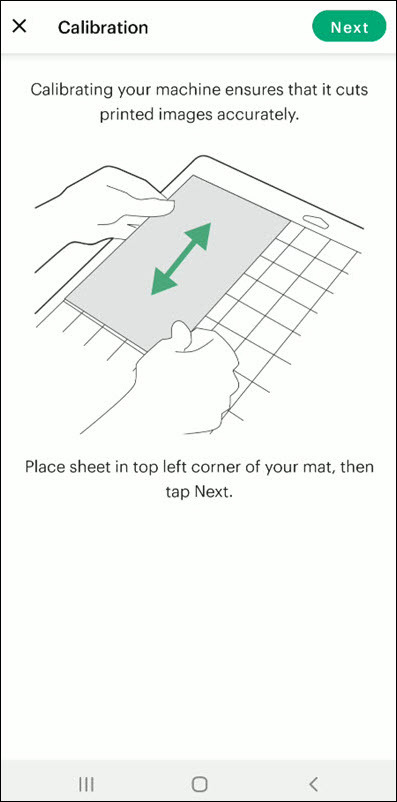
Now, you should place the printed calibration sheet on the mat, position it perfectly, and select the Continue option.
For the next step, ensure that your machine is ON and connected to your computer using USB or Bluetooth. Select the machine from the drop-down menu, insert the cutting mat into your crafting machine, and click Go.
Furthermore, the device will start scanning the markings for the calibration.
After the cutting is complete, check if the cut-makings are touched without unloading the mat from the machine. (If the markings are touched, then choose the Yes option in the app and select Continue to move to the next step.)
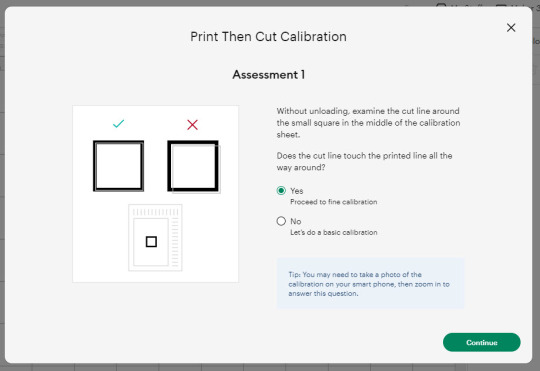
Note: If you choose the No option, then the machine will perform a cut for the next time for the accurate cut.
Also, the machine will start the calibration cut at the top and side of the page.
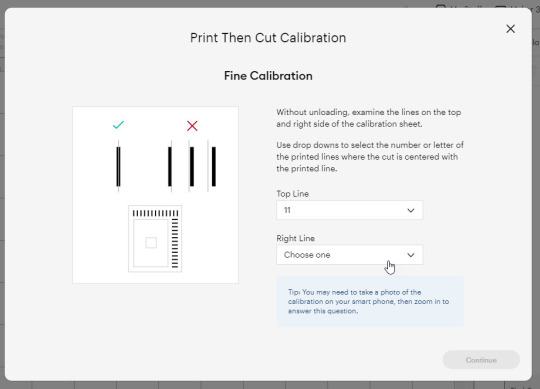
Now, check if the markings are correct without unloading the mat from the device. (The cut should be on or before line 1 and on or before line 21.)
If your cut meets all the conditions, choose the line closest to the center of the printed lines, the same as the following image; when you are done, select the Continue option.
In the next step, the Cricut Explore Air 2 machine will perform a confirmation cut around the large sheet. When this step is complete, unload the mat from the machine and remove the calibration sheet; now, you need to answer the final question on the app.
You need to choose Yes, cut is close enough to the center if you are happy with the cut. (Select no and follow the further process if you are not happy with the cut.)
Cricut Explore Air 2 Calibration On iOS/Android
The follow-up method will allow you to Calibrate your Explore Air 2 machine without any hassle. So, let’s begin the process.
Step 1: Connecting the Printer to Your Machine
Start by signing into your Cricut account on the app and selecting the menu option from the upper right corner.
After that, tap on Settings and then select Print Then Cut Settings.
Also, tap on the Calibration.
Next, you have to choose the Send to Printer, or I have a calibration sheet option.
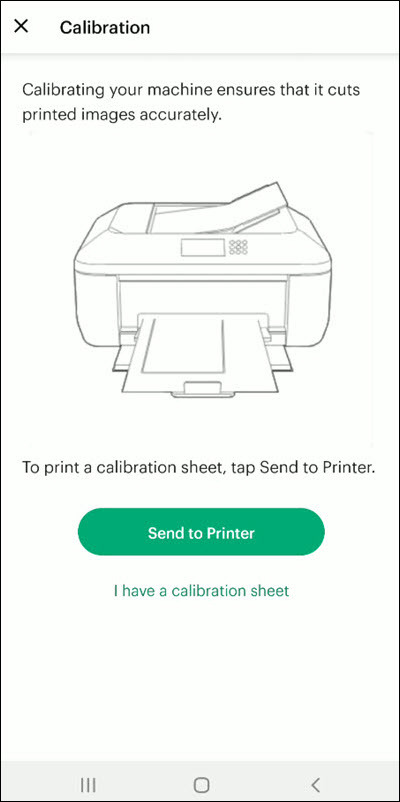
Now, the preview of the calibration sheet will appear on the screen (it can be a little different depending on the device you are using.)
Afterward, tap “Select a printer” and select the printer device you are using. Then, choose Next.
Step 2: Perform Sheet Calibration Process
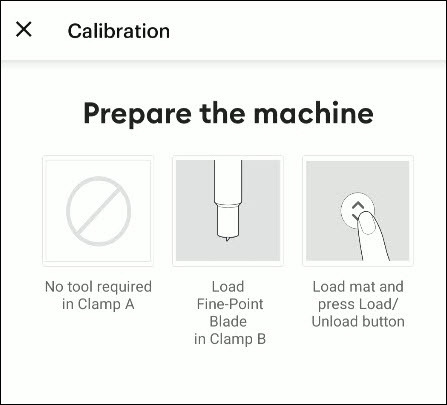
After that, take the printed calibration sheet, place it onto the machine mat perfectly, and select Next.
Specify the appropriate material setting for your machine.
Then, after loading the mat into the machine, press the Go button on it.
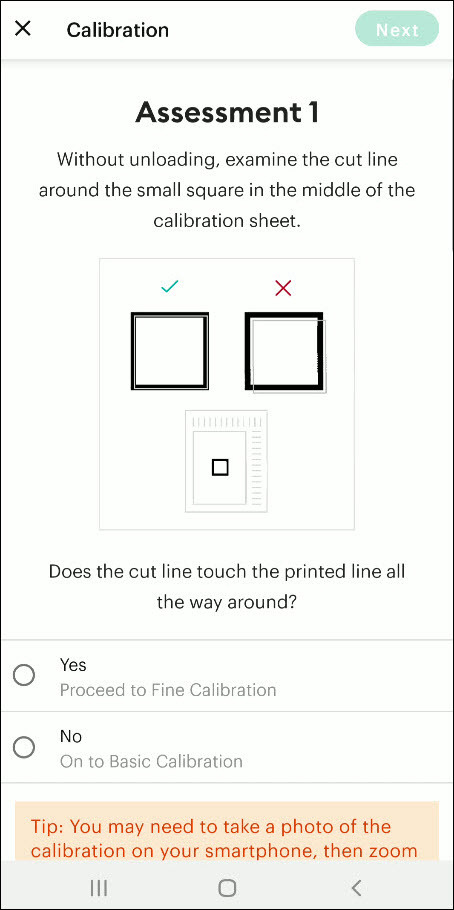
Also, the machine will look for the marking for the calibration and then start the cutting process near the small square.
Afterward, without unloading the mat from the machine, check for the cut to ensure the cut touches the marked lines all the way around. (If the lines touch the cut, then tap Yes in the app, then select Next to proceed with the next step.)
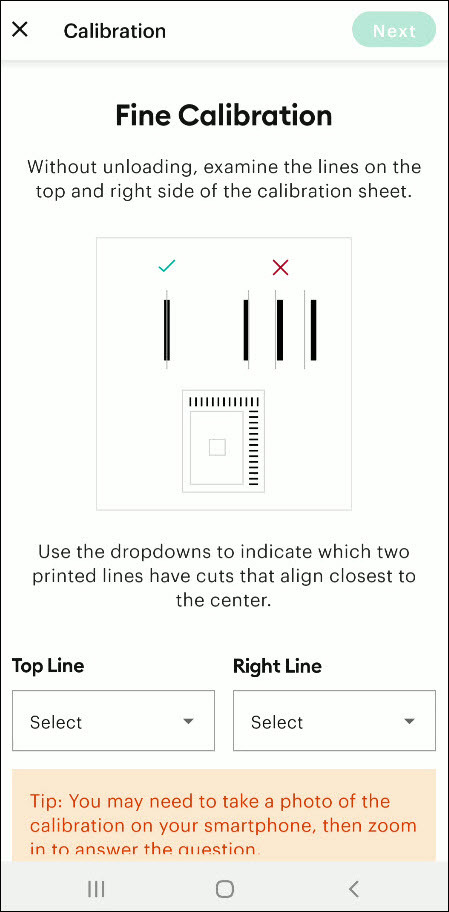
However, if you select the No option, then the machine will try to cut close to the top and sides of the page. (Once done, look closely without unloading the mat; there should be a cut before line 1 and on or after line 21.)
If the cut meets these lines, you need to specify which cut is closest to the center of the printed lines and the right side of the calibration sheet.
Once you are done, select Next to move forward.
After that, keep following the instructions on the screen to complete the procedure.
Once the process is complete, you can start cutting materials on your machine.
Final Words
Cricut Explore Air 2 calibration is the best way to get the pin-point cuts. These methods will help you to perform the calibration process on computer and smartphone devices. With these methods, you cannot only calibrate your Explore Air 2 but also any other cutting machine of the brand. Furthermore, if you have any doubts regarding the procedure or have any issues, then it would be good to ask for more assistance and guidance.
Frequently Asked Questions
Why Is My Cricut Explore 2 Not Cutting Properly?
Cricut Explore machines are known for their flawless and fast-cutting results. Sometimes, it is due to the material you are trying to cut on your device. Also, in some cases, the machine faces technical issues. To get your machine out of this problem and start cutting properly, you can use the calibration procedure. The process to calibrate your machine is simple.
Why Should I Calibrate My Cricut Machine?
However, the cuts can sometimes be misaligned due to various reasons. Crafters can calibrate their devices to get the blades and cuts aligned to their initial position. After the calibration, the machine starts to provide flawless cuts once again. However, the calibration process is a little complex and differs from device to device. So, you must know the whole process before performing it.
What Is the Thickest Setting on Cricut Explore Air 2?
We all know that Cricut cutting machines are known for their fast and flawless cuts, even for intricate designs. Thus, the Cricut Explore machine can cut a wide range of materials of a certain thickness. If you want to cut the wood, metal, leather, etc., then your machine can cut up to 2mm. However, different materials need to use specific blades to get the desired results.
Source: How to Calibrate Cricut Explore Air 2
#how to calibrate cricut explore air 2#cricut design space app#cricut design space download#cricut design space software#cricut machine setup#cricut explore air 2 setup
2 notes
·
View notes
Text
How to Pair Cricut Machine via Bluetooth or USB? (Easy Tips)
Cricut machines are a must-have for DIY crafters, designers, and small business owners. Whether you’re working on vinyl decals, paper crafts, or fabric designs, pairing your Cricut machine correctly is the first step to getting started.
I still remember the day my Cricut machine arrived as if it were yesterday. But within minutes, my excitement faded as I struggled to connect the machine to my laptop. I couldn’t figure out how to connect it to my laptop. But you don’t have to worry about that. Pairing your Cricut isn’t as complicated as it seems once you know what to do.
In this blog, I’ll explain exactly how to pair Cricut machine with your Windows or Mac, whether you use Bluetooth or a USB cable. It’s a beginner-friendly guide designed to help you avoid the roadblocks I encountered.
Let’s get your machine up and running so you can start creating!
Step 1: Turn On Your Cricut Machine
Before you start pairing, make sure your machine is powered on. Follow these steps:
Plug in your machine: Make sure the power cable is connected to the machine and plugged into a power source.
Turn on the machine: Press the power button (usually located on the side or top) to turn it on. A blinking light indicates readiness.
Step 2: Connect via Bluetooth (Wireless Connection)
You can connect your machine wirelessly via Bluetooth. Here’s how to do it:
For Windows Users
Follow the steps given below to learn how to pair Cricut machine via Bluetooth on Windows:
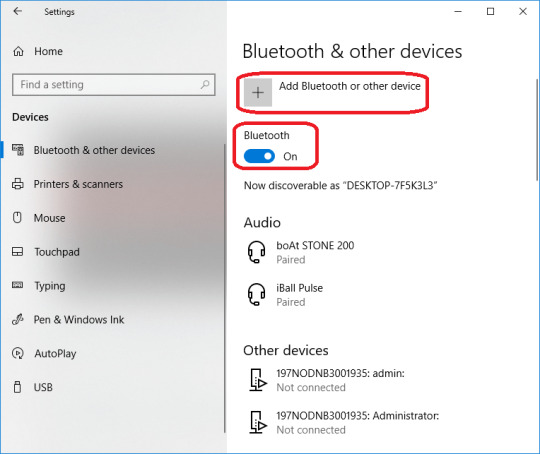
Open Bluetooth settings: Click onthe Start menu, then select Settings, then Devices. After that, go to Bluetooth & other devices.
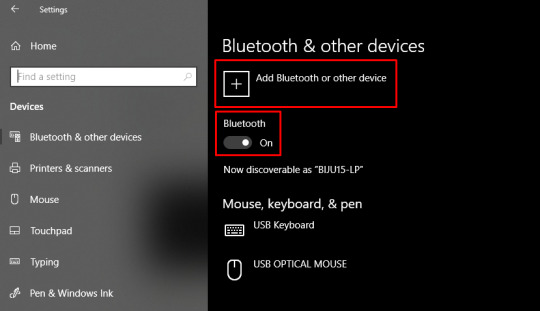
Turn on Bluetooth: Ensure Bluetooth is turned on in your computer’s settings.
Put your machine in pairing mode: Press and hold the Bluetooth button on the machine. The machine’s Bluetooth light will begin blinking, indicating that it’s ready to pair.
Select your machine in Bluetooth settings: On your computer, under the “Bluetooth & other devices” settings, click on Add Bluetooth or another device. Choose Bluetooth, then select your machine from the list of available devices.
Confirm the connection: Once paired, the Bluetooth light on your machine will stop blinking and become solid, indicating that it is connected to your computer.
TIP: Cricut Explore and Maker models include Bluetooth functionality by default. Older models may require a separate Bluetooth adapter.
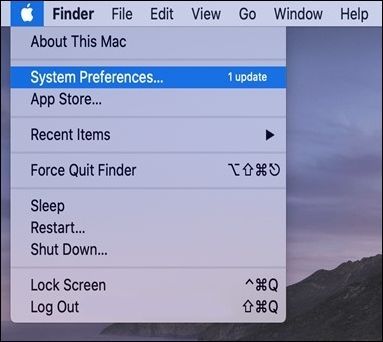
For Mac Users
Follow the stepwise guide listed below to learn how to pair Cricut machine via Bluetooth on a Mac:
Open Bluetooth settings: Tap on the Apple menu > System Preferences > Bluetooth.
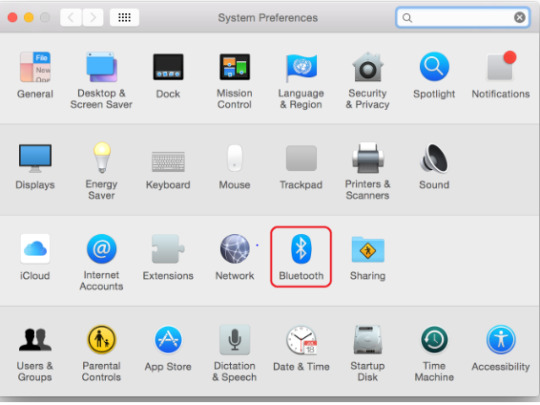
Enable Bluetooth: Make sure Bluetooth is turned on in your Mac’s settings.
Put your machine in pairing mode: Press and hold the Bluetooth button on your machine until the Bluetooth light blinks.
Select your machine name: On your Mac, you should see your machine model in the list of available Bluetooth devices. Click on Pair to connect.
Confirm the pairing: After pairing, the Bluetooth light on your machine will remain solid, confirming the connection.
Step 3: Connect Using a USB Cable (Wired Connection)
If you prefer a wired connection or your device doesn’t support Bluetooth, you can connect your crafting machine using a USB cable.
Locate the USB port on your machine: The USB port is on the left side of the machine, where you can connect the USB cable.
Plug in the USB cable: Now, connect one end of the USB cable to the machine and the other end to a USB port on your computer.
Open Design Space: Launch the software on your computer, and the machine should be automatically recognized.
If prompted, follow the on-screen prompt to complete the setup.
Step 4: Setup Cricut Design Space on Your Device
Now that your Cricut machine is paired with your device, you need to set up Design Space to start creating designs.
Download Design Space: If you haven’t already, download and install Design Space on your computer or mobile device.
Create or sign in to your account: Open the software and either sign in with your existing account or create a new account.
Select your machine name: Once logged in, the software will automatically detect your machine. If not, go to Settings and select your machine from the list.
Start designing: Once everything is set up, you can start creating your projects in Design Space and send them to the cutting machine for cutting.
Troubleshooting Cricut Pairing Issues
Sometimes, your machine may not pair correctly due to device settings or software glitches. Here are quick fixes.
Turn off both the machine and your computer or phone. Turn them back on and retry the pairing steps.
Remove any old Bluetooth devices that could be conflicting.
Ensure both your device’s operating system and the Design Space software are updated to their latest versions.
Clear the cache in the Cricut Design Space software.
Reopen the software and attempt to pair again.
Final Words
Pairing your machine doesn’t have to be difficult. Whether you use Bluetooth or a USB cable, the steps above will help you connect quickly and efficiently. Just keep your software up to date, follow the correct steps, and stay patient!
Once your Cricut machine is paired, the world of crafting will be at your fingertips!
Frequently Asked Questions (FAQs)
What to do if Design Space doesn’t recognize my Cricut machine?
If Design Space isn’t recognizing your machine, make sure of the following key points:
Ensure that the Bluetooth or USB connection is enabled and that the machine is discoverable.
Restart both your computer and machine.
Ensure your machine is within the recommended range of 15 feet from your device.
Make sure Cricut Design Space and your machine’s firmware are up to date.
If updates don’t resolve the issue, consider uninstalling and reinstalling Cricut Design Space.
Do all Cricut Machines have Bluetooth?
No, not all Cricut machines have Bluetooth connectivity out of the box. While newer models like the Cricut Joy, Joy Xtra, Maker, Maker 3, Explore Air 2, Explore 3, and Venture utilize Bluetooth, older models like the Explore One require a separate Bluetooth adapter to connect to devices.
Note: Cricut Explore and Explore One require a Bluetooth adapter.
Can I pair the same Cricut Machine with multiple devices?
Yes, you can connect extra devices to one Cricut machine, but only one device can actively control the machine at a time. This prevents conflicts and ensures that the machine receives clear instructions. You can install Cricut Design Space on multiple devices and access the same account and projects. You can connect to the machine via USB or Bluetooth, and the software will guide you through selecting the desired machine for your project.
SOURCE: How to Pair Cricut Machine via Bluetooth or USB
#how to pair Cricut machine#Cricut Setup#Cricut software app#cricut machine setup#cricut design space app#cricut design space software
0 notes
Text
How to Use Cricut Without a Subscription for DIY Projects
Cricut machines are popular among hobbyists and professional crafters, offering a perfect blend of reliability and versatility. These qualities make them indispensable companions for a variety of DIY projects. To unlock their full potential, Cricut machines rely on an application called Design Space, which serves as a platform for making craft projects. This free software provides access to various fonts, images, and project templates, enabling users to bring their ideas to life. Also, with a Cricut Access plan, users can explore premium features, expanding their creative possibilities even further.
In this blog, we’ll show you how to make the most of your Cricut machine without needing a subscription. So, let’s dive in and explore the possibilities!
Do You Need a Subscription to Use a Cricut?
Not necessarily. Whether you need a subscription depends on your usage and crafting needs. If you are a professional who is great at designing and requires various features at hand to create cutting designs, then a Cricut subscription will work for you. However, if you’re a beginner, you don’t need a Cricut Access plan.
Cricut Access Subscription Features
In this section, we mentioned the main features you’ll receive with the Cricut Access plan. Exploring these will help you understand whether you’ll need a Cricut subscription or not.
Subscription Design Perks:
Unlimited access to over 1,000,000 images
Unlimited access to over 1,000 fonts
10% discount on licensed images
Over 100,000 ready-to-use projects
Unlimited collections
Savings Benefits:
Cricut.com every three months (includes free shipping).
Get 10% off on purchases from cricut.com, with savings of up to $100 per machine.
20% off all Cricut materials
FREE shipping on $50+ orders
Plus:
Priority Member Care
How to Use Cricut Without a Subscription
In this section, we’ll explore how you can use Cricut without a subscription by accessing exclusive features for images and fonts.
Create Your Own Images

If you’re wondering whether you can create your own image with Cricut, the answer is yes! Users can upload original art to Cricut Design Space. It doesn’t matter whether it’s hand-drawn or digitally created. Just save the file in any format: JPG, PNG, or SVG. Upload it to Design Space, and the rest is easy; use your creative mind to start customizing the design. Design Space allows you complete flexibility to create or edit your image as needed.
Upload Images to Design Space

Once you’ve done selecting the image for designing, the next step will be uploading the image to the Design Space software.
Start by launching the Cricut Design Space app on your computer, tablet, or mobile device.
Next, click on the “New Project” button to start creating a new design on the canvas.
Select the “Upload” button in the bottom left corner of the screen.
After that, select the “Upload Image” button on the screen.
Then, select the image file that you want to upload (File format: JPG, PNG, or SVG).
Next, click on Continue and remove the background from the image. To do so in Manual, select Apply & Continue.
Now, convert the image into multiple layers, then select Continue.
Next, choose “Cut Image” if you want to cut the design or “Print Then Cut Image” for printed designs before cutting.
Lastly, click on the “Upload” button, and then your image will appear in the “Recent Uploads” folder.
Note: To insert the uploaded image into your new canvas, select the image and then click on “Add to Canvas” in the bottom right corner of the screen.
Upload Fonts to Design Space

Once you have learned “how to upload and insert an image into the Cricut Design Space app“, the next step is to work with fonts. In this section, we’ll be covering this:
First, download the font you desire to your system.
Next, install the font on your system.
Now, open the Cricut Design Space application and click on the “New Project” button on the top right of the display.
After that, click on the text tool on the left-hand side of the screen.
At this point, start writing the text or phrase that you wanted on your design.
Later, click on the “Font” menu at the upper-left side of the screen.
Click on “System” fonts. A menu will open on your screen, displaying all the fonts on your system (device). Lastly, click on the desired font for your design. That’s how you can use any font you like on Cricut Design Space.
Conclusion
Cricut is a leading brand that is famous for providing excellent crafting tools that are suitable for hobbyists and pro crafters. These machines offer cutting-edge features and extensive customization options, which empower you to elevate your designs to the next level. To enhance the crafting experience further, Cricut offers a subscription plan (Cricut Access), which unlocks exclusive features and provides unlimited access to various text fonts, pictures, and ready-to-make projects. However, if you are not ready to invest in a plan, you can still take advantage of the free features available on the Cricut Design Space app to create unique and beautiful designs. By following the steps mentioned above, you can explore your creativity without limitations. If you have any questions or need help, our team of experts is always here to help you get the crafting experience.
Frequently Asked Questions (FAQs)
How to Crop an Image in Cricut App?
To crop an image in Cricut Design Space, follow these steps:
Insert the image into the canvas.
Add a shape over the area you want to keep.
Select both and click Slice.
Delete the extras and use only the cropped piece.
Note: If your file isn’t an SVG, flatten it before slicing to ensure the system doesn’t treat it as a single object.
How to Downloaded fonts to Cricut on iPhone?
First, download the third-party font app like iFont, then follow the instructions listed below:
Download the font file to your iPhone’s Files app.
Select and install the downloaded font file (usually a zip file).
Open the Cricut Design Space App and click on the Text tool.
Go to the “Font” tab in the Edit panel.
Your newly installed font should be listed under “System Font.” Enjoy it!
How to offload Cricut Design Space?
Uninstalling the iOS app may be mandatory to resolve some issues. However, if you haven’t saved your projects to the Cricut Cloud, do that right away, as uninstalling the app will also delete those projects and any images or fonts you have downloaded to the device.
To offload Cricut Design Space:
Go to the Settings app and select General.
Scroll down and find iPhone/iPad storage.
Find the Cricut Design Space app and click on it.
Select the Offload App and confirm the selection.
After that, click on Reinstall App.
Open the app and attempt your project again.
Source: How to Use Cricut Without a Subscription for DIY Projects
#cricut design space app#cricut design space setup#Cricut.com/setup#Cricut Setup#cricut machine setup#design.cricut.com
0 notes
Text
Cricut Machines | Cricut Printer & Vinyl Cutting Machines
Design and create custom vinyl decals, iron-ons, cards, and more with Cricut cutting machines and printers. Explore the latest Cricut Maker, Explore, and Joy models now available in India.
0 notes
Text
design.cricut.com/setup
Cricut provides you with a safe space to express your creativity, along with its unique, easy-to-use design software and a range of DIY essentials. Thus far, Cricut has released many creative machines with extravagant features and designs. It provides several features, from cutting, drawing, and writing to embossing, etching, debossing, and many more. Utilize this amazing lineup of DIY machines and setup your machine via cricut.com/setup.
#cricut design space app#cricut machine setup#Cricut design space download#Cricut.com/setup#Cricut.com/create
1 note
·
View note
Text
Cricut Machine Setup: A Full Guide for Beginners
Are you wondering how to setup your brand-new Cricut machine? Worry not! You have come to the right place. All you need to setup this amazing machine are the items that come in the box: a power cord, blade, cutting mat, USB cable, etc.
Some find the Cricut machine setup process tricky and troublesome, especially to beginners. Although it may feel difficult in the beginning, you don’t have to panic. In this blog, I will guide you through every step in a detailed manner to help you setup your crafting machine. Without any further delay, let’s start the machine setup procedure right away.
Cricut Machine Setup on Computer Using a USB Cable
You can setup your machine on both a computer and a phone. In this section, we will look at the computer setup instructions for your machine. To start setting up your machine, follow the steps in the section below:
To Cricut setup your machine, you must have the exclusive Design Space app installed on your computer. Also, you must have your Cricut ID. If you do not have either, you should create one.
First of all, ensure your crafting machine is plugged in properly, and then turn it on.
Now, connect your Mac to the back of your machine with the help of a USB cable. Insert one end into the USB port of your Mac and another cable end into the back of your machine.
After that, head to the cricut.com/setup website on your computer.
Next, you will need to download the Design Space software.
On the following screen, complete the steps on your screen and then log in to your account.
Also, setup your machine, and you will be all set to start crafting your projects.
If the app redirects you to do a test cut, know that your setup is complete. If not, rest assured that you have either not followed the above instructions carefully or your Cricut details are wrong. Another reason for this failure could be that your machine is not compatible with the version of your Mac.
Following the above steps carefully, you can easily setup your machine and enjoy designing DIY projects and giving them life on various materials.
NOTE: When setting up your machine for the first time and activating it at the same time, you should set it up very carefully. If you do not meet this requirement, you will have to reconnect the machine by navigating to design.cricut.com/setup again. You can also do this by selecting New Machine Setup, which is accessible through the Design Space menu.
Cricut Machine Setup on Your Mobile with Bluetooth
You can setup your brand-new crafting machine in the same way as in the above section. Ensure you have the Design Space app installed on your mobile phone and your Bluetooth is on. Also, you must know your Cricut details beforehand; if you do not have one, you must create a new one. To do the setup for your machine, follow these steps:
To start, ensure your machine is on and connected to a power source.
The next thing to do is to pair your mobile device to your machine via Bluetooth. To do this, go to the Settings tab and turn the Bluetooth on.
After that, open the app and then sign in with your Cricut credentials.
From the menu on the home screen of the app, move to the Machine Setup option and choose the correct machine model.
Lastly, follow the on-screen instructions to complete the full setup.
If the app takes you to the page to do a test cut, know that your Cricut machine setup is finally complete, and you can start making your designs and projects.
How to Setup Cricut Machine on Computer via Bluetooth?
You can also use your machine on your windows computer with the help of Bluetooth. These days, almost all computers and mobile devices have Bluetooth features built into them. If not, you can use a Bluetooth adapter as an external tool. Now, let’s start the process:
For Windows
To connect your machine, be it Explore, Maker, or Joy, you must perform these steps:
In the beginning,click the Start button from the search bar on the dock.
Now, open the Settings panel and then to Bluetooth and other devices.
After that, click on Add Bluetooth or another device and tap on Bluetooth toggle to turn it on.
Next, you will have to wait for a few seconds to let your machine be discoverable.
Once you find the name of your machine in the list, click on it. The password for any machine is 0000. If it still does not work, look at the bottom of your machine; you will find the password close to the serial number.
For Mac
Follow the below steps to connect your machine to your Mac via Bluetooth. Also, remember that your Mac must be supported by Bluetooth.
In order to connect and setup your machine (Joy, Maker, or Explore), you must tap on the Apple icon, which is visible on the dock page.
Now, tap on the System Preferences option.
Next, look for the Bluetooth and turn it on.
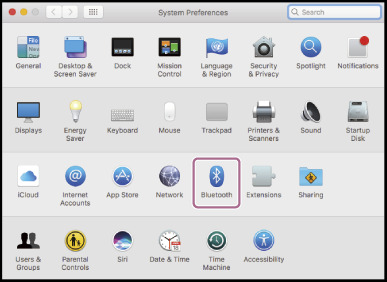
Lastly, look for the name of your machine from the list of devices. And click on your machine’s Bluetooth name. If a password is asked, type in 0000. Otherwise, you can find it at the bottom of your machine, next to the serial number.
Your setup is finally complete. Open the Design Space app, log in, and start your crafting journey. It was simple. Wasn’t it?
NOTE: Also, you must know that Cricut Joy cannot be setup with a USB cable because it is not equipped with a USB port.
Wrapping Up
Congratulations! Count yourself lucky now that you know how to do a Cricut machine setup. I hope that any confusion regarding your setup has already been removed, reading this blog. You also know how to connect your machine through USB and Bluetooth. Enjoy giving your crafts a new life. Happy designing!
0 notes
Text
Cricut Explore Air 2 Machine Setup: Ultimate Guide
When it comes to the Cricut Explore Air 2 machine setup, I find the process quite interesting. However, the setup procedures for this model are similar to those of other Cricut machines. Even a few days back, when my cousin visited me, she wanted to know everything about Cricut. From setup to creating a project, she was curious to learn everything. She even told me that she wanted to buy a machine for myself. Hence, I taught her a complete setup process for Cricut.
If you recently got a new Cricut Explore Air 2, you must follow me throughout this write-up. This guide will show you how to set it upon a computer or mobile device. Let’s get into this blog to learn more.
Cricut Explore Air 2 Machine Setup on a Computer
Let me show you how to setup Cricut Explore Air 2 on a computer. When I say computer, I mean both Mac and Windows. Many crafters might be using either Mac or Windows. However, I am not going to explain the Cricut machine setup separately for both devices.
It is because the process is exactly the same. So, what’s the point of talking about them individually? Let’s delve into it and setup your machine on a computer (Mac or Windows). Below, there are two steps given to setup your Cricut cutting machine:
Step 1: Unbox Your Cricut Machine and Download the Design Space App
If you have a new machine, unbox it and take all the items out of the box.
Carefully take your Cricut machine out of the box and place it on the flat surface.
Then, you need to use your power cord (Which comes with your Cricut machine).
After that, plug it into your power source.
Open any browser you are using, such as Chrome, Firefox, or others. I am using Chrome in this example.
On the browser, you have to visit a site called cricut.com/setup.
As you enter the website, you will need to choose either from Cutting Machine or Heat Press.
Here, you have to choose Cutting Machine.
On the next screen, you will have to click on a checkbox to enable the Download now tab.
Your Download now tab is activated. Click on it to download the Cricut Design Space app.
After downloading, you need to install it on your computer. Installation may vary for Mac or Windows computers.
Step 2: Perform the Cricut Explore Air 2 Machine Setup
Now, press the power button on the Cricut machine. You will hear a sound.

Then, go back to your computer and open the Cricut Design app.
On the application, you will have two options: Product Setup or Sign In.

Here, I recommend you select the Product Setup option.
Further, create your Cricut account or sign in to your account if you already have one.
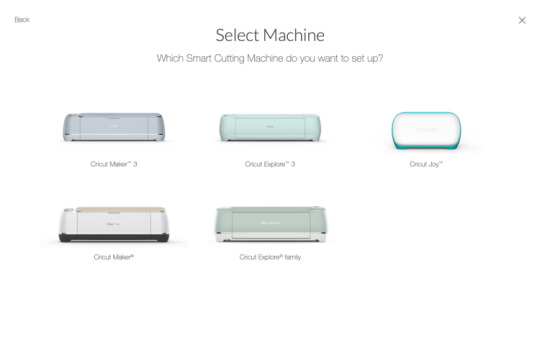
After that, you might be asked to select a Smart Cutting Machine or Heat Press.
Select Smart Cutting Machine, then select Cricut Explore Family.
Follow the presented prompts on the screen to finish the Cricut Explore Air 2 setup.
Cricut Explore Air 2 Machine Setup on Your Mobile Device
If you do not have a computer, then CHILLAX! You can also set it up on your mobile device. The setup process for both devices is the same, whether you are an Android or iOS user. Let’s get into it without any further delay.
Here are the steps to setup the Cricut machine on a mobile device:
Switch on your Cricut Explore machine by plugging its power cord into a power source.
After that, go to your mobile device and find the Bluetooth option.
If your Bluetooth is not enabled, you have to enable it.
And then, let your device search your Cricut machine.
Once you see that your machine has detected your Cricut machine, you have to click on it from the given list.
Pair your device with Cricut, and then navigate to your App Store or Play Store.
On this app, you have to search for Cricut Design Space on the search bar.
In the search result, the Cricut software will appear. You need to install it.
After that, you have to click on the Menu and select Machine Setup.
Next, choose your model and proceed as per the screen prompts.
That’s all in this Cricut Explore Air 2 machine setup. Start setting up your Explore family and create amazing crafts in no time.
FAQs
Question 1: Is a computer compulsory to setup my Cricut Explore Air 2?
Answer: No, the computer does not need to setup your Explore Air 2 machine or any other model. All you need is a compatible mobile device, such as Android or iOS, that meets the minimum system requirements. That’s what you will need only while setting up your Cricut.
Question 2: Which software do I need to setup my Cricut Explore Air 2?
Answer: Well, you will need the Cricut Design Space software to setup your Cricut machines. This is common to all types of Cricut models. Be it Cricut Maker or Joy series, you will first have to download the Design Space from Cricut’s official website, and then you can setup your setup.
Question 3: How to connect Cricut machine to Windows?
Answer: Below are the steps to connect your Cricut to Windows:
First, select the Start button from the taskbar and select the Settings icon.
Move to the Devices tab and then turn on your Bluetooth.
After that, let your Windows computer find your Cricut machine.
Once it finds your Cricut machine, you have to select it to form a connection.
You might be asked to enter four digits of PIN: 0000 and then select the Connect tab.
Read more: cricut setup for pc
install cricut design space app
Cricut New Machine Setup
Source: Cricut Explore Air 2 machine setup
#Cricut Explore Air 2 machine setup#Cricut New Machine Setup#cricut machine setup#install cricut design space app#design.cricut.com/setup#cricut design space#cricut explore 3#cricut.com/setup#cricut setup for pc
0 notes
Text
7 Must-Have Cricut Machine Accessories to Elevate Your Crafting
Cricut machines are undoubtedly incredible, but what makes them interesting are their amazing accessories. Without tools and supplies, anyone cannot fully use the Cricut machine. Since Cricut offers so many accessories, it’s always tricky to know what you need. Many of you may not know the importance of Cricut machine accessories, and here I am going to tell you. So, I will share the list of Cricut tools with you in this blog.
The best thing about these accessories is that they are available in affordable ranges and on almost every e-commerce platform. Hence, finding it will not be a troublesome task for you. Once you know a little about them, let’s get started with my blog to learn must-have Cricut accessories for beginners.
1. Cricut Basic Tool Set
Cricut’s basic tool set is first on my Cricut machine accessories list. This is because, to make a perfect project, you’ll start from the basics. This tool set has things for peeling, trimming, and peeling. The weeding tool is the one that helps you pick up the things you have cut.
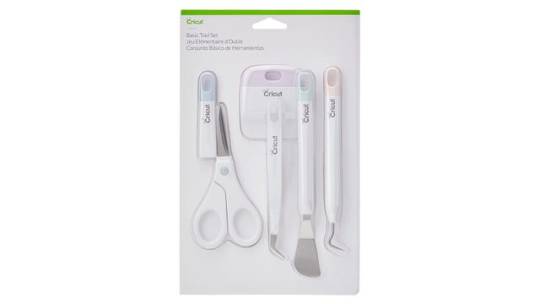
You’ll get a spatula that is used for large projects to take off the cuts from the mat without spoiling them. Then come the tweezers that are used for cleanups, and scissors are also there to cut things precisely.
More advanced tools are available, but this basic Cricut tool kit is just amazing, and I always use these tools while working on small or bigger projects.
2. Cricut Cutting Mats
If you are a Cricut user, you already know about Cricut cutting mats. But do you know about all four mat types? I’ll tell you here. All these four mats are used for different purposes. So, let’s start with the first type, the StandardGrip mat, which is the common mat that everyone has. But it’s not ideal for all types of projects.

The second type is the Light Grip mat; it is used for paper and light materials that need more care. On the other hand, a Strong Grip mat is used for thicker materials such as vinyl. Then comes the fourth one- Fabric Grip mat to cut fabrics. So, that’s all about Cricut mats.
3. Cricut Bright Pad Go
It’s one of the most useful time savior Cricut machine accessories for serious crafters. They make bigger projects at once, and then they spend hours to weed off the things they don’t want. This hustle gets more troublesome when they can’t spot all particles at once and spend even more time in it.
That’s why Cricut has a Bright Pad Go that provides more light to make the weeding easier. Moreover, this tool is rechargeable, and you can have full control over its brightness by adjusting it according to your needs. So, take it anywhere where you want to make your favorite stuff. So, a Bright Pad Go will never let you miss a chance to be creative.
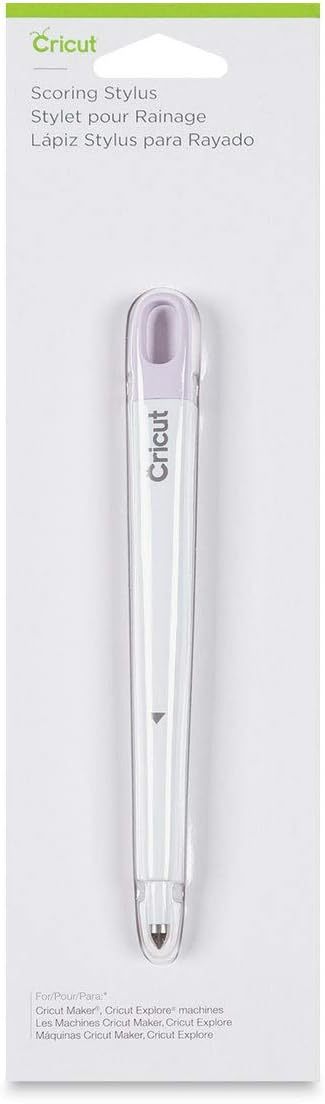
4. Cricut Scoring Stylus
A scoring stylus is one of the perfect Cricut machine accessories for working on paper and cardstock. This accessory will help you get a good crease for cards, envelopes, paper flowers, boxes, and many other things. This tool is perfect for people working on a 3-D project to create a straight line and will save you time.
5. Infusible Ink Pens and Markers
If you want to make a design with your handwriting, you must use Cricut’s infusible ink pens and markers. So, no matter if you are making a custom shirt, mug, or bag, you can easily put your quote onto it using them.
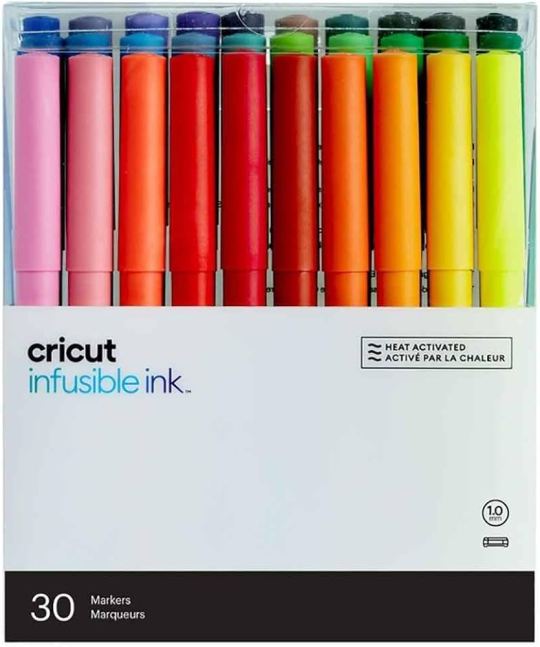
These tools are high quality and work best to transfer your designs effortlessly. However, you can’t use them without a Mug Press or Easy Press. These accessories are excellent and work best for your creative projects where you can actually use your own handwriting.
6. Cricut Ultimate Gel Pen Set
Cricut never misses the point of impressing its users. And its ultimate gel pen set is one of the best Cricut machine accessories you can work with. The ideal use for them is on greeting and invitation cards. Moreover, these gel pens are the best tool for writing slogans. And anything you want to put on a paper.

The set includes all the vibrant colors that you will surely like. With the bold collection of colors, Cricut made these pens extremely desirable.
7. XL Scraper
This is the best tool for cleaning your Cricut mats and scraping off the materials to avoid wrinkles and bubbles. This tool is amazing as it maintains your mat and shapes your designs. As it’s available in an extra-large size, it would be an ideal option to make your projects look the best and save big money in the long run.
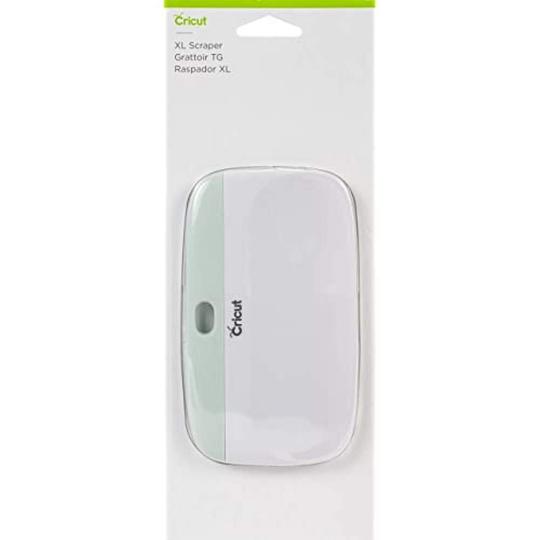
Also, it will save you time by quickly cleaning off the mat. You can even go for a smaller scraper tool if it is too big for you. So, I hope you find this tool interesting and useful.
Conclusion
Finally, we have discussed almost all the amazing Cricut machine accessories you should try in 2024. And I’m sure you must have tried many of them before. So, for all who haven’t tried them yet, please go for them and make your projects even more interesting and unique. These Cricut tools work best for small to larger projects and also are inexpensive. So, it’s worth it to get them.
#must-have Cricut accessories for beginners#Cricut Design Space Login#Cricut New Machine Setup#Cricut Machine Accessories#cricut machine setup
0 notes
Text

Designing with Ease: Cricut Design Space Hacks
Whether you’re making custom home decor apparel or party favors, this robust cutting machine will get you to cut, score, emboss, and write on over 300 materials without any trouble. Just get your machine set up by visiting Cricut Accessories. Visit the site download the Design Space app, and finally register using your Cricut ID. Expand your horizons to make crafts that stand out!
Visit here for more Information :- https://mycricutspace.com/
#cricut.com/setup#design.cricut.com/setup#cricut.com#cricut design space#cricut design space download#cricut design space login#design.cricut.com/setup explore air 2#cricut.com/setup app#cricut.com/create#cricut.com/register#cricut machine setup
0 notes
Text
Cricut Setup for PC on Windows 10 [A Beginner’s Guide]
Cricut machines are revolutionary in the crafting business. These machines are creative, economical and help users to create thousands of creative things. You can choose from a wide range of Cricut machines like Cricut Explore 3, Explore Air 2, Maker, and Maker 3, as well as heat presses. The setup is common for all the machines. But, there can be a slight difference in the setup according to the Cricut model and the Windows version. We will see the Cricut Setup for PC on Windows 10
Cricut Design Space has a big role in the Cricut machine setup. It’s software in-built with Cricut machines. You need to download and install this software to access your machine. Let’s learn more about it.
What is Cricut Design Space?
Cricut Design Space is an app designed specifically for the Cricut Maker and Explore family of cutting machines. You can use this app on your desktop or mobile device to create various DIY projects.
This software has limited features but enough to get started with your Cricut machine. With the Cricut Access subscription, you can get unlimited features such as images, free fonts, and read-made projects. However, if you aren’t professional, you can skip taking that subscription.
You are also allowed to create your own designs by using the free fonts and images in the Design Space library. So, to get this software, you will need to install it on your device, and then you’re all set to make anything. Apart from Design Space, you can also use some alternatives like Adobe Illustrator and then send it to Design Space to format it.
How to Set Up Cricut on Windows 10?
Setting up the Cricut machine involves a few steps, from its unboxing to running a test cut. If you got a new Cricut machine recently, you should set it up properly. Here are the steps to set up your machine.
Step 1: Unbox Your Machine
When you get your machine, the first thing you do is unbox it and check all the important accessories inside the box. Check that it has USB, power cord, blades, cutting mat, and sample materials. So, when you are done with checking, install your Cricut machine in a safe, clean place near a power source.
Step 2: Connect the Machine to Your PC (Windows 10)
Use the USB cable you received in the package. Then, connect your machine and computer to it. Connect one end of the cable to the Cricut machine and another end to your computer. So, you have connected both devices to each other.
Step 3: Install Cricut Software
As we learned about the Design Space, it’s necessary to download and install it. After connecting your Cricut machine to the computer through a USB cable, go to Cricut’s official website to download and install the Design Space software.
Go with the described steps to get the software on your Windows 10 computer:
First, ensure that your computer is connected to a wireless network.
Then, open an internet browser and search cricut.com/setup.
Now sign in with your Cricut ID. If you don’t have an ID, create one by clicking the Create ID option.
Select your Cricut machine from the option and click the Download button.
Wait until the software gets downloaded completely.
Your file will be saved under the Downloads folder. Move there and double-click your file to open it.
Run the installation when an installation window pops up.
That’s how you can get Design Space software on your computer and use it for creating designs for your projects.
Step 4: Pair Your Machine to Design Space
Now, you need to connect your Cricut machine to the computer. This process may vary according to the Cricut model you have. So, select your machine’s model from the list of available devices and go with the on-screen instructions.
Step 5: Calibrate Your Cricut Machine
Once you pair your Cricut to the Design Space, the setup is complete. But what if the machine doesn’t work well? To avoid this, calibrate your machine. Calibration helps you get precise cuts. The machine itself will help you to be calibrated. You will require a calibration sheet to follow this step.
Once you complete calibration, you’re ready to do anything with your Cricut machine and create unlimited crafts and DIY projects.
Conclusion
Wrapping up Cricut Setup for PC on Windows 10, we can say that it’s easy and doesn’t require any additional skills. All you need is to connect your machine to the Windows 10 computer. Then, visit Cricut’s official website and then install the Design Space on your PC. Then, use your Cricut ID to log in or create a new account. After that, pair up your Cricut machine with the Design Space. Now, you are good to go. It would be better if you calibrated your machine before starting to use your machine.
Source: Cricut Setup for PC on Windows 10
0 notes
Text
Why Is My Cricut Not Connecting? (Quick Fixes)
Cricut machines are one of the most useful tools for crafters, which makes it easy for them to create complex designs and projects. However, users may become extremely frustrated as a result of connectivity problems. It is important to comprehend the causes of these issues. This will enable you to troubleshoot them more successfully. This blog will look into the query, “Why is my Cricut not connecting?” alongside the typical causes of connectivity problems for your machine.
Method 1: Check the Connection of Devices
Cricut machines can connect either via a USB cable or with the help of Bluetooth. Knowing how each connection type works is essential for troubleshooting connectivity issues.
USB Connection

The USB that you are using must be in good condition; otherwise, you will have trouble connecting it to your machine. Plus, you must ensure the wire is correctly plugged into your computer and the machine. A malfunctioning cable or port could be the cause of the connection loss. An alternative USB cable or port might help fix the problem.
Bluetooth Connection
With the Bluetooth option, you can have a wireless connection to your machine. Just ensure that you turn on Bluetooth on your device. If your machine’s name does not appear in the list of available devices, then you should try the following steps:
Restart your devices: Sometimes, a simple restart of your device can resolve the issue. So, start with that.
Forget the device: If that does not work, you can try forgetting the device. To do this on your computer or mobile device, go to Bluetooth settings, find your machine model, and select “Forget.” After that, try to reconnect again.
These steps often answer the question, Why is my Cricut not connecting?
Method 2: Update Design Space or Operating System
Another main factor in connectivity issues is software compatibility. You need to make sure that both the app and the device’s operating system are up to date. Older software often leads to connectivity problems.
Updating Design Space
To check whether the app is updated or not, follow the below steps:
On Windows
You need to open the app and then need to click on the three horizontal lines in the top left corner. Once there, go on to select “Check for updates” and click OK. Your app will be updated if you have some older versions.
On Mac
If you have a Mac, open the app and click on “Design Space” from the menu bar. Afterward, select the “Check for updates” option. If updates are available, go ahead and install them. Once installed, you must restart the application. This way, you can resolve the issue related to why is my Cricut not connecting.
Method 3: Diagnosing the Network Settings
Network settings can mainly impact wireless connectivity. You must ensure that your antivirus software does not block the firewall settings for the Cricut Design Space app. If found positive, you might need to adjust your firewall settings so that the app can communicate through the network.
Method 4: Check the Firewall Settings
Sometimes, you need to configure the firewall settings properly so that the machine can connect properly. In order to do that, follow the below steps for Windows and Mac.
Windows
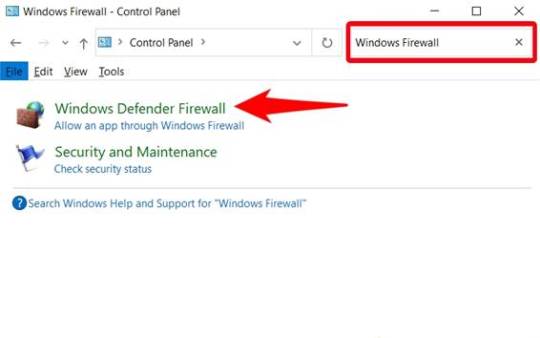
First, you need to go to the Control Panel, then to System and Security, and from there you must open Windows Defender Firewall. Once you reach there, check for the option “Allow an app through Windows Defender Firewall.” Click on it and ensure the app is allowed.
Mac
On Mac, go to System Preferences, then Security & Privacy, and then Firewall. Once there, select the Firewall option and ensure that the Design Space software is allowed. Adjusting these settings can help answer why is my Cricut not connecting.
Method 5: Ensure Your Device Is Compatible
You will have to make sure that your computer or mobile device meets these minimum system requirements for using Design Space. If your operating system has insufficient RAM or processing power, you might have difficulty connecting or might not connect altogether.
Method 6: Checking System Requirements
The minimum system specs for the application include:
Windows: Windows 10 or later, and at least 4 GB RAM or more.
Mac: macOS 10.12 or later, and at least 4 GB RAM or more.
Mobile: iOS 12 or later or Android 5.0 or later.
If your device does not fulfill these requirements, you should consider upgrading your hardware or changing the device that connects your machine.
Troubleshooting Steps
If you still face trouble with the connectivity, then follow these quick and simple steps:
Restart your machine: Turn off your machine and wait a few seconds. Then, turn it on again. This will surely solve the issue.
Reset Bluetooth settings: If you are using Bluetooth, reset your device’s Bluetooth settings and try to reconnect. It should fix the problem.
Reinstall Design Space: Uninstall the app and reinstall it. Reinstalling will ensure a fresh start, and hopefully, you will be able to reconnect again.
Conclusion
In short, connectivity issues with your Cricut machine can arise from various factors, including connection type, software compatibility, network settings, and device compatibility. Following the tips and suggestions mentioned above, one can address the question, “Why is my Cricut not connecting?”
Just remember to check your connections, and ensure that the software is updated, also make sure your device meets the necessary requirements. With these methods, one can enjoy a seamless crafting experience with their machine.
FAQs
1. What should I do if my Cricut machine doesn’t turn on?
Ensure that your power cord is securely connected to both the machine and the electric outlet. If using a power strip, try plugging directly into a wall outlet. You should also check the power cord for any visible damage.
2. How can I improve Bluetooth connectivity with my Cricut?
Make sure that your machine is within range of your device and that Bluetooth is enabled. Restart both devices and try forgetting the machine in the Bluetooth settings before reconnecting.
3. What are the minimum system requirements for Cricut Design Space?
For Windows, you need Windows 10 or later with at least 4 GB RAM. For Mac, macOS 10.12 or later with 4 GB RAM is required. Mobile devices should run iOS 12 or Android 5.0 or later.
4. How do I check for updates in Cricut Design Space?
On Windows, open the app and click the three horizontal lines in the top left corner to select “Check for Updates.” On Mac, click “Design Space” in the menu bar and select “Check for Updates.“
5. What should I do if my Cricut App is crashing?
Try reinstalling the app to ensure a fresh start. Also, check for software updates and clear your device’s cache to improve performance.
Source: Why Is My Cricut Not Connecting
#why is my cricut not connecting#cricut design space#cricut design space app#cricut design space software#cricut design space download#cricut machine setup
4 notes
·
View notes
Text
How to Make Stickers on Cricut (Full Guide)
Stickers are fun to create, right? There are so many fun things that you can create in the form of stickers. These products are decorative, and you can use them for your home decor, festivals, special occasions, or phone covers. Sticker making can never be boring with the ultimate Cricut machine. With the help of this blog, I’ll share ‘how to make stickers on Cricut‘.
I’ll tell you each step included in making a good sticker using your crafting machine. Moreover, you’ll also need a printer to print stickers through your machine. Use an inkjet printer to create stickers. Discover all the steps included in making a perfect sticker.
Step 1: Launch Cricut Design Space on Your Device
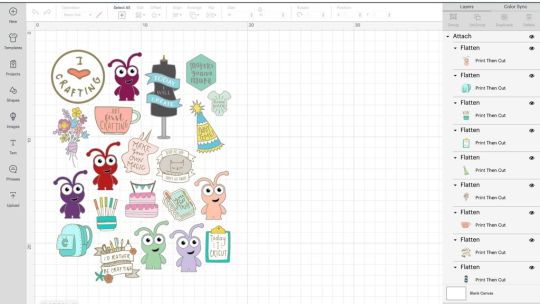
In this method, I usually use the Print Then Cut feature with a size of 6.75 x 9.25 inches. You can also resize your sticker by choosing a square shape from the library and resizing it according to you. Let’s move to learn how to make stickers on Cricut.
Step 2: Prepare Your Printer
Now that you’ve completed the design and adjusted the print size, you need to create a customized sticker. In the next step, choose your machine from the menu and hit the Make It button.
After that, you’ll see a black line around your design. Then, your crafting machine will scan your image and cut it into the exact size. Now, click on the Continue option to continue, and send the image to your inkjet printer.
Once you hit the Print option, choose the Add Bleed option. After selecting this option, the white margin will be removed from your image’s border. Next, you should hit the System Dialog option to confirm your printer’s settings and keep them adjusted to get premium-quality prints.
Step 3: Print Your Design, and Add an Image to Mat
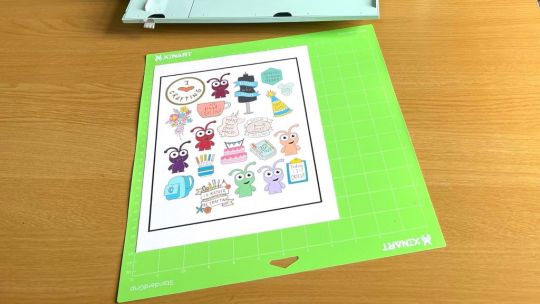
When everything is optimum, just add the material into your printer to the printer and click the Print button.
Once your sticker design is printed, you can add the print to the mat. Make sure that your sheet perfectly aligns with the mat and doesn’t cover the Cricut logo. Using a machine mat is necessary even if you’re using smart materials.
Step 4: Select Your Material and Start Scanning
Once you’ve followed all the steps carefully, you should select the material you’re using. For instance, if you’re using sticker paper or vinyl, select it. If you create stickers quite often, you can click the Start button next to your material, and your material will be added to the favorites.

After that, let your machine use its sensors to scan the black lines and cut the images. In the next step, your machine will cut the stickers, and now you can use them anywhere you want.
Tips and Tricks to Troubleshoot Sticker-Related Problems
No matter how well you create your design or follow the steps, you may end up with some issues. Sticker-making with Cricut can be a little complicated. Here are some tips and tricks you can use to fix the issues you create while creating your stickers.
Ensure that your machine is On and lit to scan the registration marks.
Then, confirm if the mat is perfectly aligned inside the machine.
You can also increase the white border around your sticker’s design to fix the issue. Sometimes, low margins may also cause issues in cutting.
Power cycle your machine. Turn it off, and disconnect its power cord.
Update the firmware and check it by performing the Print Then Cut feature.
Hence, these are some tricks you can follow to create a well-designed sticker with your crafting machine. That’s it for how to make stickers on Cricut.
FAQs
Is a Printer Necessary for Making Stickers With Cricut?
Not at all! You don’t necessarily need a printer; however, you can use it by choice. You can create a fun sticker with your Cricut and vinyl. There are more fun ways to create the best stickers with your machine without using a printer.
What Materials Do I Need to Create a Sticker With My Cricut?
If you want to create your own stickers with the machine, you need certain materials to get started; check the list here:
A brand new Cricut machine
A design software (Cricut Design Space)
Printable vinyl
LightGrip cutting mat
A scraper tool
Can I Use Something Else Instead of Cricut Design Space?
Yes, there are some alternatives to Design Space, like Canva. It’s one of the best tools for creating fun sticker designs. You can use this tool to print your stickers, and then you can cut them using your machine.
Source: how to make stickers on Cricut
#how to make stickers on Cricut#cricut design space download#cricut machine setup#Cricut.com/setup#cricut design space app#cricut design space software
0 notes
Text
How to Setup Cricut Machine? [Computer & Smartphone]
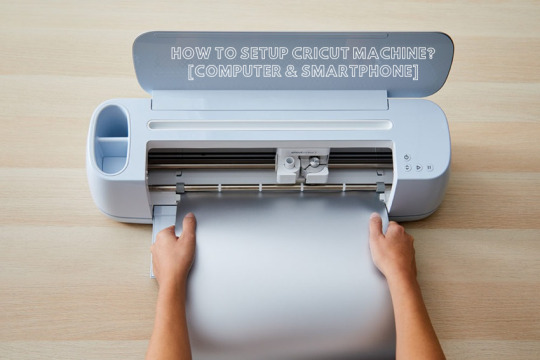
Do you want to learn how to set up a Cricut machine? Worry not—this blog covers all the necessary information you need to know.
Cricut machines are paving a new path for crafters around the world to make brand-like DIY projects at home. In addition, the Cricut machines are easy to use and come with advanced connectivity options to streamline the setup process. By following the instructions, crafters can complete the machine setup and start their crafting journey easily.
However, some users may find it difficult to complete the setup from scratch or face issues. As a result, it is necessary to have a proper understanding of the setup. So, let’s learn about the Cricut machine setup on PC and smartphone devices.
How to Set Up a Cricut Machine on a Computer?
Follow-up guides will help you complete your machine setup on a computer device using the Bluetooth connection and downloading the Design Space app. Follow the steps properly to establish a successful connection.
Step 1: Connect via Bluetooth
First, you need to unbox your machine, turn it on, and then place it within the 10-15 feet range of your computer.
On your PC, open the Settings window by going to the Start menu and then choose the Devices option.
On the next page, ensure that the Bluetooth toggle is on and then click on the “Add Bluetooth or other device” option.
Click on Bluetooth on the open page; it will start looking for your crafting machine.
You need to look for your machine name in the results and select it. (You can look for your machine’s Bluetooth device code, which is printed or engraved on your machine and is near the serial number.)
If asked to enter the password, then enter 0000 and then click on the Pair option.
Now, the Bluetooth pairing of your crafting machine will be complete with your PC.
After that, you can move to the next step of your Cricut machine set up.
Step 2: Download Cricut Design Space
At the start, browse the official Cricut support website Cricut.com/setup on your PC and type the name of your machine in the search section.
After that, you need to click on the checkbox next to the “I agree to Cricut Terms of Use and Privacy Policy” option, then select the Download button.
Now, the download process will start, and the screen will show a progress bar indicating the download status.
Wait for the download to complete; double-click on the Cricut Design Space setup file in your browser to begin the installation.
Open the downloaded file from the Downloads section on your device.
Once you launch the Cricut file, a prompt will ask if you trust this app. Select the right option to continue with the installation process.
Now, the installation process will appear in a pop-up box.
After the installation, you should complete the sign-in process using the Cricut account credentials. (If you are a new user, then click on “Cricut Cricut ID” to make a new account.)
Then, choose the option to set up your machine and then select it.
When the setup process is complete, you can continue with your first project.
How to Set Up a Cricut Machine on a Smartphone?
Carefully read the procedures below and use them if you want to set up your cutting machine on your smartphone.
Step 1: Establish the Bluetooth Connection
First, you need to turn on your machine and bring your smartphone near your machine.
From the homescreen, tap on Settings and then go to Bluetooth.
Now, you need to ensure that the Bluetooth toggle is on; if the toggle is off, then tap on it to turn it on.
Your device will search for all the available Bluetooth devices and show them on the screen.
From the list of devices, you need to tap on your machine. (If you see a prompt to type the PIN, then enter 0000 and then tap on Pair.)
Next, your device will be connected via Bluetooth.
Step 2: Download the Cricut App
Go to your smartphone device’s home screen and tap on the Google Play Store or Apple App Store icon.
Once the app opens, go to the search bar and enter ‘Cricut Design Space‘ to search for it.
From the list of results, tap on the Cricut green C icon and then choose the Install option to start the download.
Once the download is complete, open the app. (The app icon will also be added to your device’s home screen.)
Complete the sign process and tap on the Machine Setup option.
Click on your machine model number from the options, and then the setup will be complete.
Here you go! You can now create awesome crafts using the Cricut supplies and machines.
Final Words
With the help of the above-mentioned guides, you can complete your Cricut cutting machine setup on a PC or smartphone running various operating systems, such as Mac, iOS, Android, and Windows. Carefully use the specific method according to the device you are using, and start your crafting journey right away. However, if you are facing any problems or need more help with the setup, then it would be good to seek further help.
Frequently Asked Questions
How to set up my Cricut machine?
Below are the major steps you can follow to set up your machine with a device.
First, you should turn on the machine and keep it close to your PC or mobile phone.
After that, connect both devices using the USB cable or Bluetooth connectivity.
Next, you are required to download and install the Design Space app on your device.
Once the download is complete, complete the sign-in process. (Create a new account if needed.)
Then, choose the Machine Setup option to search for the machine.
Select the machine, and the setup will be successful; you can start using it.
Why can’t I connect my Cricut machine?
The process of setting up the machine is simple, but you can face many problems. Here are some major reasons you are unable to complete the setup.
The machine may not be compatible with your device if it does not meet the system requirements or lacks Bluetooth connectivity.
You are following the wrong method when setting up the machine.
You have downloaded a corrupt or outdated app.
The devices are not within the same network connection range.
Connection settings on computers or smartphones are not correct, and other issues.
Can I use Cricut machine without completing setup?
Cricut mainly offers heat press devices and cutting machines. If you want to use the heat press device, then there is no need to complete the setup. However, if you want to work with the cutting machine, then it is necessary to connect it to a desktop or smartphone device to use its functions. In addition, without completing the setup, you will not be able to use the machine. For the hassle-free setup of your machine, you need to have proper knowledge of the whole procedure.
Source: How to Setup Cricut Machine
#how to setup cricut machine#setup cricut machine#Cricut Setup#cricut machine setup#Cricut design space Software
1 note
·
View note
Text
Calibration is the process of ensuring your Cricut machine setup cutting or writing is precise. This may involve adjusting blade depth, ensuring proper mat alignment, or calibrating the machine’s settings.
Visit — Cricut.com/setup Cricut.com sign in cricut explore air 2 software
#Cricut machine setup#cricut setup#cricut explore air 2#cricut crafts#cricut software#cricut.com/setup mac#cricut.com/setup pc#cricut.com/setup windows#Cricut.com/setup#cricut new machine setup#design.cricut.com#cricut design space login#www.cricut.com/setup login
0 notes
Text

Are you planning to make some personalized gifts for Cyber Monday or Black Friday? Make the most of your Cricut machine with the most innovative DIY ideas. Begin with vinyl, iron-on, paper, cardstock, wood, and other materials to turn out excellent handmade projects. Moreover, Cricut Design Space will provide ease and save time while crafting. Download the software right away from cricut.com/setup. It can be used with all the devices, be it Windows, Mac, Android, and iOS devices. Crafting is about having fun, and thus, doing the project with family members or friends will add more pleasure.
Do you want to go with crafting in a time-saving manner? Download and install Cricut Design Space right from cricut.com/setup. This software will help you save time while giving access to free fonts and images.
0 notes