#Cricut Maker Setup
Text
How to Pair Cricut Maker to Phone and Computer: Full Guide
Every crafter will agree that the Cricut Maker Setup is one of the smartest and favorite models among cutting machines. This Cricut machine can cut 300+ materials such as vinyl, iron-on, cardstock, and more. It can also cut, write, foil, and score different materials. To start with this Cricut cutting machine, one must know how to pair Cricut Maker with a computer and smartphone.
Crafters have two options for pairing both devices: Bluetooth and USB cable. However, it is their call to decide in which mode to connect their Cricut machine to a computer and mobile devices. Also, to begin any projects, all users must download the Cricut software and connect it to their device.
If you cover the entire blog from top to bottom, you will quickly learn how to set up and pair this Cricut machine with devices.
How to Setup Cricut Maker on a Computer?
Before getting started with how to pair Cricut Maker, all the users need to set up their Cricut product on a computer. To properly end the setup process, they need to go through the below-shared steps:
Lay the first stone of the setup process by unpacking your Cricut machine & switching it on.
After doing that, connect both devices via USB cable or Bluetooth.
Next, visit cricut.com/setup and install the Design Space app on your computer.
Then, create your Cricut ID or sign in with the login details.
Now, follow the instructions appearing in your front on the screen.
Finally, you will be called for a test cut after completing the setup process.
How to Pair Cricut Maker to Windows and Mac?
Below are some tips and instructions for pairing this Cricut product with Windows and Mac systems.
Windows
In addition to this blog section, look at the steps below and learn about setting up both devices.
Go ahead with the process by checking that your Maker machine is within 10-15 feet of your computer.
Now, tick the Settings icon and land on the Windows Settings tab.
Following this, choose Devices and check that the Bluetooth is on.
After that, hit Add Bluetooth or other device that appears at the top of the screen.
Next, click the Bluetooth button under the Add a device tab.
A window will appear at this point. Click on your Cricut model.
Finally, your Maker and Windows pairing process will come to an end.
Mac
This section explains how to pair Cricut Maker with a Mac system.
Make the first move by ensuring that your Cricut cutting machine is on.
Afterward, check that it is under the range of 10-15 ft of your Mac system.
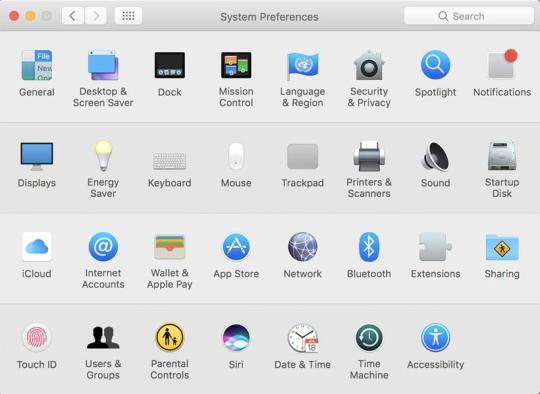
Next, open the Apple menu, choose System Preferences, and click the Bluetooth icon.
Check that your Bluetooth is on, and select your Cricut model from the list.
After a few minutes, your device’s pairing process will end.
How to Pair Cricut Maker to Phone (Android/iOS)?
Further referring to the blog, let’s discuss the process that will help the user pair smartphones with this Cricut product.
Android
Take the first step and ensure that your Cricut machine is on and positioned within 10-15 ft of your mobile device.
After that, scroll down your phone’s home screen and hold on to the Bluetooth icon for a few seconds.
Now, turn on your device’s Bluetooth and let it scan for the machine for a few minutes.
Next, choose your model name, and the pairing process between your Android and Maker will end.
iOS
To get things moving, check that your Cricut Maker is on and within 10-15 feet of your iOS device.
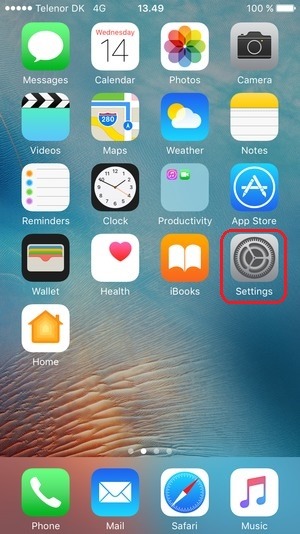
Go to the Settings tab and activate your device’s Bluetooth feature.
After activating the Bluetooth, a list of available devices will be shared in front of you.
Select your model name from the list at this point, and both of your devices will be paired successfully.
By paying special attention to these steps, the user can swiftly pair up their respective smartphones with the Cricut Maker machine. Moreover, they need to be very cautious so they don’t make any mistakes during the process.
Frequently Asked Questions
How to Setup My Cricut Maker on a Smartphone?
With the help of the below steps, you can effortlessly set up a Maker machine with smartphones:
Begin the process by plugging the machine and turning on its power.
After that, pair your smartphone with the Cricut machine via Bluetooth.
Install the Design Space app on your device and create your account.
Next, go to the Menu section and tick the Cricut Machine Setup option.
Following this, choose your machine name from the list and follow the steps to finish the setup.
Finally, when informed of the test cut, you will know about the setup completion.
How to Connect Cricut Maker to Devices via USB Cable?
To connect the Cricut cutting machine with devices via a USB cord, the user needs to follow these steps:
First, unpack your Cricut product and USB cable very carefully.
Following this, switch on your machine and put one cord into the machine port.
Afterward, insert another end of the cable into the device and let it connect with each other.
Now, the Cricut Maker will turn on and be ready for cutting purposes.
How Do I Pair My Cricut Maker With iOS via Bluetooth?
With the help of these steps, you can effortlessly connect the Cricut product with iOS devices:
Check that your Cricut machine is enabled and place it under your device’s 10-15 ft range.
Next, go to the Settings tab and turn on your device’s Bluetooth.
After a few seconds, a list of devices will be shared on your phone screen.
Tap the model name, and the pairing process will end after a few seconds.
For More Information Visit: www.cricut.com setup login
Cricut Design Space Download
Cricut setup on computer
Source: How to Pair Cricut Maker
#how to pair cricut maker#cricut maker setup#cricut design space app#cricut design space login#cricut design space download#Cricut setup on computer#cricut machine setup#how to setup cricut maker
3 notes
·
View notes
Text
How to Pair Cricut Maker: Easy Steps for Connection
Cricut Maker is one of the best crafting machines available for creating stunning projects. In order to use this machine, it is essential to know how to pair Cricut Maker with any device you prefer—whether Windows, iOS, Mac, or Android. In this blog, I will explain how to connect your Cricut machine to each of these devices easily.
You can pair the Cricut Maker with your device using Bluetooth or USB. USB offers a wired connection, which some professional crafters prefer for its reliability. However, Bluetooth is more popular among individual users due to its wireless flexibility. With Bluetooth, you can move around freely without being limited to one place while using the machine.
How to Connect Cricut Maker to Windows?
If you have a Windows computer and want to work with your Cricut cutting machine, you should pair it with your Cricut Maker machine. Here is how you can pair them using Bluetooth:
To start the process, first, plug the Cricut machine into a power source and turn it on.
After that, place your computer within 10-15 feet of the machine.
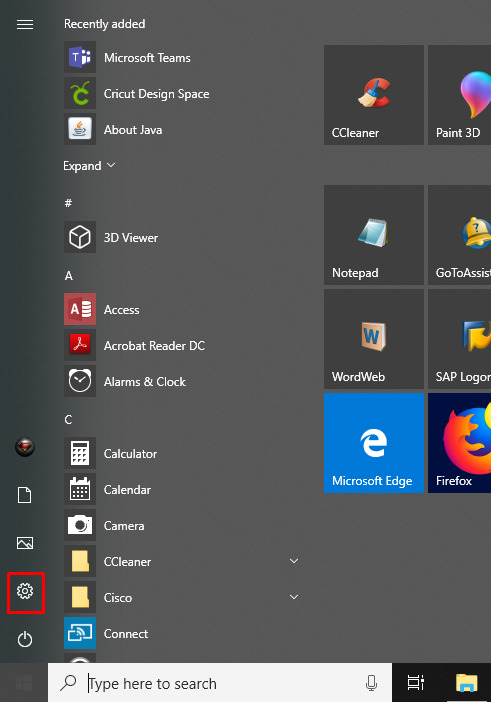
Then, go to the computer’s home screen and click on the Start menu.
From the Start menu, navigate to Settings and choose the Devices option.
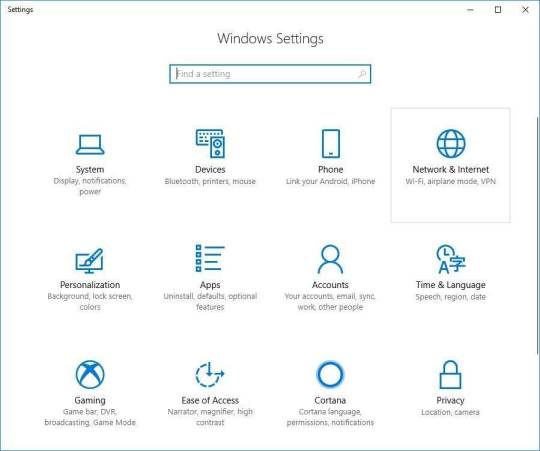
There, you will see Bluetooth; turn it on.
Now, click on Add Bluetooth or other device and select the Bluetooth option.

Your Windows computer will begin detecting available Bluetooth devices.
When you see the Cricut model listed, click on it to connect, and that’s it. Your pairing process is done.
How to Pair Cricut Maker With Mac?
In case you have a MacBook instead of a Windows PC, you can add it to your Cricut cutting machine using the same method. Here is how to pair your MacBook to your Cricut Maker via wireless Bluetooth.
Initially, connect the Cricut product to a power socket and press the power button.
Next, maintain a distance of 10-15 feet between the MacBook and the machine.
After that, you have to open the MacBook and go to the Apple menu.
In the Apple menu, open System Preferences and then go to Bluetooth settings.
Now, turn Bluetooth on and wait for the MacBook to detect the machine.
When you see the machine listed, click on it to connect.
You can ensure the connection by returning to the Cricut Design Space app.
If you go to New Product Setup, you will see the connection there.
How to Pair Cricut Maker With iOS?
In case you do not have a computer, you can use a Cricut machine with your smartphone. To connect your iPad or iPhone to Cricut using Bluetooth, follow this procedure.
To start, turn on the Cricut product by plugging it in and pressing the power button.
Then, keep the device within 10-15 feet of the machine.
Next, go to your phone’s Settings and navigate to Bluetooth.
Moreover, you also have to make sure Bluetooth is on.

After that, search for your Cricut model machine.
When it appears on the list, tap on it to connect.
The connection will be completed. You can verify the wireless Bluetooth connection by opening the Cricut Design Space app on your device.
How to Pair Cricut Maker With Android?
In case you have an Android device, you can pair it to your Cricut cutting machine as well. Here is how to connect your Cricut to your Android device using Bluetooth:
First of all, connect the Cricut machine to a power source using a power adapter and press the power button to turn it on.
In addition, ensure the machine and your device are within 10-15 feet of each other.
Next, open the Settings on your phone and navigate to Bluetooth.
After that, you will need to turn Bluetooth on and search for your Cricut model.
When it appears on the list, select it to connect.
You can confirm the Bluetooth connection by checking in the Cricut Design app.
Apart from Bluetooth, you can also use a USB cord to add a Cricut product to your mobile device. To do this, pair one end of the cable to your phone or computer and the other end to the machine. Then, make sure the cable is in good condition; it is better to use a new or less-used cable for a stable connection.
Conclusion
In the blog, you learned how to pair Cricut Maker to your device. Pairing your operating system with the Cricut machine is simple, and once you know how to do it with any of your devices. This connection is important because it allows you to use the Cricut cutting machine with the Cricut Design Space app. Cricut offers two connection options: Bluetooth and USB. Most users prefer Bluetooth for its wireless flexibility.
FAQs
What Should I Do if My Cricut Maker Bluetooth Is Not Connecting?
There are a few things you can do to prevent Bluetooth connection errors. First of all, check if your Cricut machine is on or not. Also, make sure Bluetooth on your device is turned on. Keep the distance between the machine and your device within 10-15 feet. If the issue is still not resolved, try resetting Bluetooth, and the problem should be fixed.
What Is My Cricut Bluetooth PIN?
When connecting your Cricut product, you may need to enter a Bluetooth PIN code. In case prompted, you can input 0000, the default PIN for wireless Bluetooth connection. This is usually required only during the initial setup. Later, the device will remember it, but you may need to re-enter the PIN code if you reset Bluetooth.
Can I Pair My Cricut Maker With a Wired Connection?
Yes, you can use wired and wireless connections with Cricut machines. A wireless Bluetooth connection is more common among Cricut users for its convenience. However, if you want, you can also use a wired USB connection. USB is often preferred by professional crafters who need a more stable connection.
#Cricut Maker Setup#Cricut Maker#cricut maker 3#Easy Steps#Connect Cricut Maker#How to Pair Cricut Maker
0 notes
Text

Cricut Maker Machine is a versatile tool for DIY enthusiasts and crafters, offering precision cutting of various materials including vinyl, fabric, paper, and more. It connects to computers and mobile devices via Bluetooth or USB, allowing users to upload custom designs or choose from a vast library of pre-designed projects through Cricut’s Design Space software. Its adaptive tool system accommodates a range of accessories like rotary blades for fabric cutting and scoring tools for precise folding. With its user-friendly interface and robust capabilities, the Cricut Maker empowers users to create intricate designs, personalized gifts, and professional-quality crafts with ease and precision.
0 notes
Text
Cricut Joy Setup: A Step-by-Step Guide for Beginners

Are you looking for an easy Cricut Joy setup tutorial? I’ve got you covered! Cricut Joy is a cutting tool that is great for beginners and anyone who wants to craft occasionally just for fun.
I also have it, and recently, I bought one of its new versions, the Cricut Joy Xtra, but I will only talk about the Cricut Joy machine. I understand some new users find it difficult to setup their Cricut machine. Therefore, I came up with this blog. Here, I will talk in a stepwise manner to make it easier for everyone to understand my points.
The Cricut setup includes various things, such as connecting Cricut to Bluetooth and downloading the Cricut app. However, I will only discuss the Cricut setup for Windows users. So, let’s get started now.
Minimum System Requirements for Cricut Joy Setup
Before you dive into the setup process of the Cricut machine, let’s understand whether your system meets the basic requirements for using Cricut Design Space software. In order to ensure the smooth functioning of the software, I advise you to check the system needs once and then proceed. Once you have checked it, you can move to the next steps, which I have answered: How do I setup my Cricut Joy?
Here is what you need to check on your Windows PC:
Operating System – Windows 10 or later (64-bit)
RAM – 4 GB
Disk – 2 GB free
CPU – Intel Dual Core or equivalent to AMD processor
Display – Minimum 1024px x 768px screen resolution
Connection Type: Bluetooth connection
Cricut Joy Setup Guide: 4 Quick and Easy Steps
Have you checked the above system requirements before proceeding with this step? If so, then GREAT!! Now, you are ready to setup your Cricut without any hassle. In it, we will connect the Cricut and download the software from scratch. If you have bought a new Cricut Joy and haven’t unboxed it yet, then don’t worry. You can join me on this journey. Let’s unbox it and finally set it up together.
Step 1: Unbox the Cricut Cutting Machine
In the first step of the Cricut Joy setup, you will need to unbox the machine.
Here’s the picture of my Cricut machine setup unboxing! Now, let me tell you what I got in the box of the Cricut machine. Let’s take a look below:
Cricut Joy machine
Fine Point Pen (0.4mm)
StandardGrip Mat, 4.5″ x 6.5″
Powder Adapter
Welcome Card
Blade + Housing
Free trial membership to Cricut Access
50 ready-to-make projects online
Materials for a practice cut
Step 2: Connect Cricut to Your Windows Computer
This second step is crucial in the Cricut Joy setup. In it, we are going to connect our Cricut to our PC using Bluetooth. Before that, make sure your Cricut machine is placed on a flat surface, and the distance should not be more than 10 – 15 between the PC and the machine.
Here’s what you need to do to connect your Cricut to your PC via Bluetooth:
Navigate to the Start menu and then tap the gear-like icon in your settings.
Then, you will need to choose Devices on the next screen.
Now, check whether you have turned on your Bluetooth. If not, please turn it on. Once done, click on the Add Bluetooth or other device.
On the next screen, you have to select the Bluetooth option.
After that, wait for a while for your PC to check your Cricut machine.
As you can see in the available list, you have to select your Cricut model.
Step 3: Download Cricut Design Space
Here’s how to download Cricut software on Windows 10:
Launch the Internet browser on your desktop.
Search design.cricut.com is on your browser search bar.
On the displayed screen, click the I agree checkbox and then hit the Download button.
Now, you have to hit the Download tab to start downloading the Cricut Design Space.
Once you have downloaded the Cricut app, double-click on your file from the Downloads folder.
Afterward, the installation will start.
Step 4: Complete Cricut Joy Setup Steps
Launch your Cricut software on your PC.
Then, you need to select Cricut New Product Setup.
After that, you will need to sign in to your Cricut IS using your username and password.
Next, select the Smart Cutting Machine.
Now, you will need to choose the Cricut model.
Finally, follow the on-screen instructions to complete the steps. Although you will find many steps that you have already taken, it is okay to follow them.
FAQs
Which software do I need for Cricut Joy setup?
You will need the Cricut Design Space app to setup your new Cricut Joy machine. Cricut Joy is smaller in size and made portable to carry anywhere. Just because it is different from the rest of the machine, it doesn’t mean it will use different Cricut software. The app is indeed the same, and you don’t need to worry about anything. Simply download the app and start making DIY projects like a pro.
Can I setup Cricut Joy without connecting to Bluetooth?
No, there is no other way to connect your Cricut machine to your computer, as Joy comes with built-in Bluetooth. Unlike Cricut Maker and Explore models, Cricut Joy doesn’t come with a USB port, and hence, you can’t connect it using a USB cord if your Bluetooth is not working due to some reasons. In short, Bluetooth is a must for connecting your Cricut to any device.
Is Cricut Joy worth the investment?
It depends on your needs and the type of materials that you want to cut on it. Since Cricut Joy can cut only up to 50 materials, you should know that you will not be able to do all kinds of projects on it. There will always be some materials that you can’t cut on it. Cricut Joy can be worth the investment only for those who are novice crafters and have less budget. In addition, it is the perfect choice for occasional crafters.
Source: Cricut Joy Setup
#cricut joy setup#how do I setup my cricut joy#cricut joy xtra#cricut joy app#Cricut design space download#cricut design space app#cricut design space software#cricut maker setup#cricut machine set up
1 note
·
View note
Text
How to Connect Cricut Maker 3 to Bluetooth: Beginner’s Guide
Want to connect Cricut Maker 3 to Bluetooth on your phone or computer? Then, you are welcome. In this blog, I will be guiding you through all the details that you require to know. After reading this post, you will have no tension about connecting any device, be it a computer or a mobile device. I will teach you about the basic steps, and then you will be ready to connect any device to your Cricut Maker 3 machine. So, without any further delay, let’s dive into it.
Connecting Cricut Maker 3 to a Windows PC via Bluetooth
Connecting the Cricut machine to your Windows laptop or computer is easy. You can connect it by using these simple steps:
The first thing you are supposed to do is plug the machine in and turn it on.
Then, keep the machine within 10 to 15 feet of range. So your machine will not have to face the connectivity issue.
Next, look for the Start menu on your computer and open it.
Once it opens, go to the Settings tab.
When the Settings open, click on the option Devices.

There, you will find Bluetooth. Then, go to Bluetooth and search for your machine.
Now, start the Cricut machine procedure.
When it is complete, it will show as connected.
That’s it for connecting the Cricut cutting machine to your Windows operating system. Now, you can start making unique designs and stunning projects with your machine.
How to Connect Cricut Maker 3 to Bluetooth on Mac
Like Windows computers, Macs have a similar approach to connecting with the Cricut cutting machine. You can follow these easy steps to connect the Cricut Maker machine.
To start, you have to power on the machine after plugging it in using the power adapter.
Next, keep your Mac computer and the machine within 10-15 feet range.
Open the Apple menu on your Mac computer and go to System Preferences.
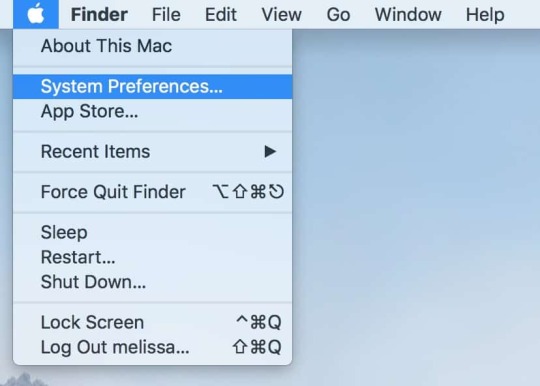
You will find Bluetooth over there. Open it.
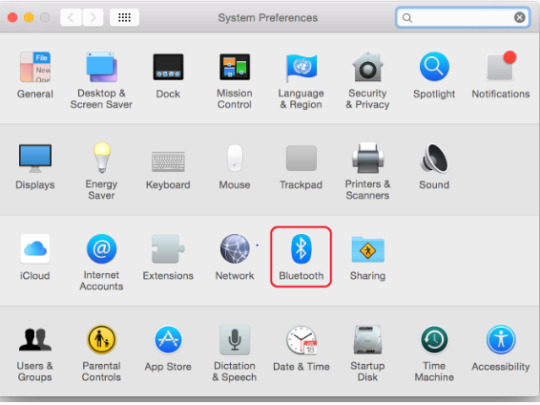
Look for the machine on the list of Bluetooth devices.
After that, select the machine you want to connect to.
Then, go to the Cricut app and select New Product Setup.
Now, the Cricut cutting machine will be connected.
Isn’t it an easy setup guide? Yes, right. You have successfully connected the Cricut machine to your Mac. Now, download and install the Cricut software and start your crafting journey!
How to Connect Cricut Maker 3 to Bluetooth on Android?
Smartphones have a slightly different approach to connecting to the machine. The phone’s settings and applications are placed in a different way. But these are easy to find, and you can do it as follows:
First of all, switch on your Cricut cutting machine.
Maintain the distance between the machine and your phone, which should not be more than 10-15 feet.
Search for the Settings tab on your phone and open it.
On the following screen, you need to open Bluetooth.
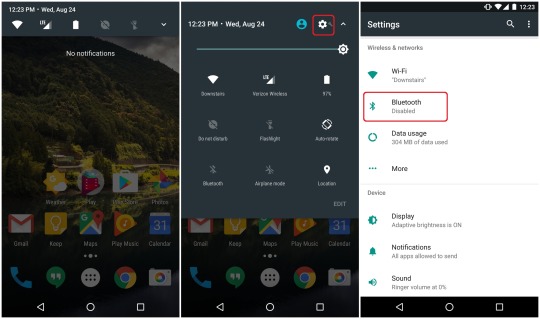
Look for the machine in the list that is displayed on your phone and select it.
Next, the machine is connected. Now, open the Cricut app and select Setup.
In the last step, your machine will appear to be connected.
Connecting Cricut Maker 3 to iOS Devices Using Bluetooth
Like Android phones, iOS phones can also connect to your phone. All you need to do is:
Initially, the Cricut Maker 3 machine should be on and should have a range of 10-15 ft.
Bluetooth will be found in the Settings and should be opened.
Next, open Bluetooth and see the list of devices. You will find your Cricut model in the list.
After that, select the Cricut model machine.
Now, open the Cricut app and then sign in with your username and password.
After you complete the process, the Cricut cutting machine will show up as connected.
Conclusion
Cricut Maker 3 is an amazing cutting machine to get started with your DIY projects. After reading this blog, I am sure you have learned how to connect Cricut Maker 3 to Bluetooth. Wireless Bluetooth connectivity gives you flexibility about keeping your machine anywhere according to your preference. You can now connect your Cricut machine to any operating system, such as Android, Mac, Windows, or iOS that you are using and start your journey in the world of crafting.
FAQs
Why Is Cricut Maker 3 Bluetooth Facing Connection Issues?
A couple of reasons may affect the connection of your Cricut cutting machine to your device. One of them could be that you kept the distance between your operating device and the machine more than 15 feet. It is a very common problem. In this case, you have to bring the device in the reach of your Bluetooth connectivity, and the error will be solved.
What Should I Do if My Cricut Maker 3 Is Not Working?
If your Cricut Maker 3 machine is not working even after connecting it to your mobile/computer, then you can do two things. First, turn off the machine for 10 seconds and turn it on again. The problem should be fixed. If it persists, you can go to the Bluetooth settings, unpair the device, and pair it again. The problem will be solved.
Do I Always Need to Connect Cricut Design Space to the Internet?
Not really! You don’t always need an internet connection in order to use the Cricut app. You can use it without the Internet as well, although there is a limit to the number of features you can use without the Internet. If you want full access to all the features, you will need to connect to the Internet.
#connect cricut maker 3 to bluetooth#Cricut Design Space#cricut design space login#cricut design space app#cricut maker setup#cricut maker bluetooth not working
0 notes
Text
You can unleash your creativity right from the comfort of your home. Wonder how? It's very simple: just use any Cricut machine. Known as the best cutting companion, the Cricut machine produces the power to cut, score, and deboss a variety of materials like paper, vinyl, wood, and engraved metal. Plus, you can create popular DIY projects ranging from greeting cards to everyday items and T-shirts. To use the capabilities of the Cricut new machine setup, make sure you have Cricut Design Space installed on your computer from cricut.com/setup.
#cricut maker setup#cricut maker 3#cricut.com/create#cricut.com/setup#cricut setup#cricut design space app#cricut explore air 2
0 notes
Text
Try your hands on paper, vinyl, HTV, fabric, and other materials this time. Working with different types of materials has become efficient and effortless in the presence of a Cricut machine setup. You can start making personalized keychains, stunning home decor, custom doormats, eye-catching labels and stickers, and more. The best part about making the Cricut project is that you can use the Cricut Design Space app. Visit cricut.com/setup and download and install the application on your systems to browse through fonts and images present in the library. There are many possibilities with a Cricut explore air 2 software and its compatible application.
#cricut maker setup#cricut machine set up#cricut maker 3#cricut explore air 2#cricut machine#cricut new machine setup#cricut design space login#cricut mug press#cricut crafts#cricut design space download#cricut software app#Cricut
1 note
·
View note
Text
#youtube#youtube channel#youtube shorts#shorts#subscribe#hilarious#funny#cricut#cricut machine set up#cricut maker setup#cricut maker#crafts#projects#birthday present
0 notes
Text
How to Make Earrings With Cricut? [Complete Tutorial]
Do you love collecting different jewelry types, but tight pockets always stop you? From now onwards, it won’t happen to you. It’s always fun to learn how to make earrings with Cricut. The DIYer can make this ornament from various materials such as leather, faux leather, and more. Other than that, you can also make them for yourself, friends and family members.
With the craft plotter model and Design Space app, the crafter easily cuts down and creates the design on the loaded material. In addition, you can also start your own business by designing and selling them into the market. This tutorial will share all the primary steps needed to create personalized earrings.
Step 1: Open Design Space
Step 2: Prepare Cutting Mat
Step 3: Cut & Weed Material Design
Step 4: Assemble Earrings
At last, you can add these earrings to your personal collection or give them to friends or friends as a present. It can be considered the sweetest present for a birthday party, anniversary or Christmas celebration. With this DIY project, the pressure of giving something unique will decrease.
Conclusion
This blog on how to make earrings with Cricut has justified that it is one of the simplest jobs. The customized ornament will not only highlight the personality but also share the creative skills of an individual. Besides that, the crafter should keep all the supplies beside them safe and secured before starting the design process. Moreover, you can also make the earrings in different materials such as wood, paper & magnetic. Moreover, if you have any kind of queries about the design process, then stay connected with us.
Frequently Asked Questions
Question: What Supplies are Required to Create Custom Earrings?
Answer: In order to create some of the best custom earrings, it’s essential for all crafters to have some of the supplies by their side. Every item has its own contribution during the designing process:
Question: Which Paper is Used to Make Cricut Earrings?
Answer: Apart from the thick material, the crafter can also make earrings from Cardstock. It is considered one of the affordable and easily available materials used for various crafting purposes. It easily gets cut down and is compatible with all the cutting machine versions for designing various projects. However, the crafter needs to take lots of precautions while creating something new on this material.
Question: How Can I Make Earrings With Cricut?
Answer: It’s very simple to make personalized earrings with a Cricut machine by taking the steps given below:
Visit: Cricut.com/setup
cricut setup
www.cricut.com/setup
cricut.com sign in
Source: https://cricut.designspace.space/how-to-make-earrings-with-cricut-complete-tutorial/
#digital design#design cricut.com download#design space setup#cricut.com sign in#cricut.com/setup#cricut.com/create#cricut.com design space#cricut setup explore air 2 setup#cricut setup#cricut design space#cricut maker setup#cricut explore air 2#cutfiles#cricut machine set up
0 notes
Text
Cricut.com setup | cricut login design space
Crafting is even more fun with a Cricut craft machine that you can use for almost all projects. The Design Space software from cricut.com/setup is important software that connects your machine and computer. And you need the machine to start crafting with Cricut machines like the Maker series, Explore series, and Joy. You can customize tumblers, coffee mugs, t-shirts, wall decals, coasters, and more by using the versatile tools of the machine. Further, You can set the cutting force depending on the material you use for the project.
#cricut login design space#cricut login design#cricut login#cricut#cricut setup#cricut design space#cricut explore air 2#cricut maker setup#cricut machine set up#cricutprojects#cutfilesforcricut
0 notes
Text
What Are Basic Cricut Maker Tips And Shortcuts for Beginners?
It's very important for all beginners to learn about the basic Cricut maker tips before becoming a master at handling the machine. With the help of those tricks & shortcuts, they'll be able to complete their project a lot easier.
Visit:- cricut.com/setup
design.cricut.com
cricut explore air 2
cricut setup download
cricut.com setup Mac
Other than that, they'll also get to know how to handle their mistakes and utilize their crafting skills. This post will assist you in gathering some of the essential Maker tricks required while accessing the cutting machine.
1. Use Ready-to-Use Make Projects
Preferring ready-to-make projects is one of the best Cricut Maker tips that save the crafters time by directly choosing the projects from the Design Space. The project included in the app helps the users without any pressure of messing up during the cutting process. Through these projects, it will be fun to learn more about the different kinds of projects.
2. Download Design Space
In order to get the customized project from the smart cutting machine, it's important for every user to install Design Space software/app. Moreover, it also assists the DIYers in creating a wide range of projects. In addition, it is an easy-to-learn app available for free to users.
3. Get Basic Tool Set
Furthermore, you aren't supposed to have all kinds of supplies while creating new projects on Cricut. The crafters need to choose some of the basic tools as per the type of project. Apart from that, it's important for them to carry the correct tools during cutting; otherwise, they'll end up spoiling the project.
4. Don't Waste Testing Materials
While unboxing the provided box, the users will be provided with testing materials for the trial. Moreover, the users shouldn't waste the materials during the testing process; otherwise, they'll face the issue of a lack of supplies while designing the project in the future. Apart from that, you can also save money by saving the supplies from getting wasted to purchase new materials.
5. Use Cricut Maker Aluminium Foil
One of the common Cricut Maker tips to increase the longevity of the deep-point blades & fine-point blades is by using Aluminum foil. From the sheet, tear off a 12" sheet of aluminum sheet and make a tight ball out of it. Following this, push down the blade's plunger to expose the blade. Once the blade gets exposed, poke down the pointed part of the blade at least 40-50 times.
Flipping Mat for Removing Material
Intending to remove the material from the filled mat, you've to flip it over so that it faces down on the work surface. Following this, with soft hands, bend over the mat upwards, away from the material. It'll be putting a bending force over the mat, not on the material. With the help of this process, the material will start popping out from the mat.
6. Using Cricut Maker Scraper Tool
Other Cricut Maker tips that are commonly used by DIYers to clean up the mat include the Scraper tool. This tool is available in two different sizes: regular size & extra large scraper. One can easily remove the little bits of dust and debris from the mat.
7. Use Baby Wipes
Other than the above-said shortcuts, you can also prefer using baby wipes to get the mat into its exact texture. Ensure that the wipes are alcohol-free before wiping them down on the mat. Moreover, smoothly cover the whole mat in a circular pattern and let it dry for at least 10-15 minutes. The process will regenerate some percentage of its stickiness.
8. Use Correct Tools During Weeding
One of the toughest jobs while weeding Vinyl is not preferring the correct tools. The majority of the people use only Cricut weeder during the process, not realizing that there are other tools also. Intending to get the desirable project, it's essential to have a collection of correct tools such as dental tools, weeders & crafting knives.
9. Use Baby Powder For Cut Lines
Another method that can be included as the Cricut Maker tips involves baby powder on the Vinyl and spreading it with a makeup brush. After spreading the powder, the DIYers will be able to see the cut lines more closely, making it easier to weed better and quicker. Moreover, it is a good option for those who have weaker eyesight.
Intending to make the project look much more attractive, every crafter can refer to these tips or shortcuts depending upon their needs or the project they are working on. Moreover, it can be anticipated that they'll be using the correct tip before proceeding toward the next design.
Frequently Asked Questions
Question: How to Position Design While Engraving on Cricut Maker?
Answer: Follow the steps about positioning design for the Cricut Maker engraving process:
Press Make It after completing the design on the Design Space software.
Select & drag the design to the location of the mat where you want to engrave.
After that, place the material on the mat in a parallel location.
You can use the SnapMat feature to accurately position the design if you are using the app.
Question: What Are the Pros of the Cricut Maker Machine?
Answer: The pros & cons of Cricut Maker machine are available below:
● It is fantastic for cutting fabric as well as thick materials.
● It also uses tools such as the Rotary and Knife blades to cut down various materials.
● Specially designed to use the Sewing Pattern library with 2 times faster mode for cutting Vinyl & paper.
● The embedded Bluetooth permits wireless connection.
● Warranty is no longer voided by commercial use.
Question: What Are the Cricut Maker Machine Shortcuts for Projects?
Answer: Some of the other Maker shortcuts that can assist the users in making their designing process for new projects much easier are as follows:
● Keep the mats within easy reach.
● Shift with less sticky tape by saving sanity.
● Prefer double presses for better results.
● Keep FabricGrip Mats cleaner with you all the time.
● Choose lint rollers for removing debris before starting new projects.
● Remove tacks from new mats.
Source url- https://cricutdesignmachine.wordpress.com/2023/06/19/what-are-basic-cricut-maker-tips-and-shortcuts-for-beginners/
#cricut maker tips#Cricut.com/setup#design.cricut.com#Cricut explore air 2#cricut setup download#cricut.com setup mac#Cricut design space#Cricut maker setup#cricut maker machine#cricut setup
0 notes
Text
7 Cricut Maker 3 Leather Projects to Enhance Your Style

Hey, are you looking for some unique Cricut Maker 3 leather projects? Look no further than this guide! In this post, I am going to tell you the best DIY projects that you can create with leather. About 3 weeks ago, I finished my Cricut leather projects. I have aimed to make a few projects so that I could write this blog diligently. But do you know what was the most difficult part of this project? Cutting intricate designs on leather. Yes, it might not be easy to cut, but they require patience during both cutting and weeding such designs.
Without any further delay, let’s get straight into this blog to find out the most amazing ideas for creating leather Cricut projects.
1. Bracelets
Do you love bracelets? If so, you must give it a shot! When I was looking for ideas for Cricut Maker 3 leather projects, it had been on my mind for a long time. Finally, I gave it a try and saw how beautiful it looked. If you have any friends you want to give this bracelet to, it would be great!
2. Hair Accessories
Do you want something for your hair? You might wonder what I can make for my hair or other beauty stuff. Well, this leather accessory is also made with leather. As you can see, it might look a little tedious, but it is a piece of cake. Start diving into your Crafting journey and create what you need the most.
I gave it a flower shape, and if you are a little bit familiar with Cricut Maker 3 Setup, then it is a breeze for Maker 3 to cut such designs.
3. Earrings
I love leather earrings, as they enhance my beauty and are easy to create. Beginners who are looking for the best Cricut Maker 3 leather projects should try them out! Why? Because they are really easy to make. I also wanted to make them a little unique, so I added some glittery effects. This is what I needed, and hence, I made them.
4. Keychains
If you want personalized keychains, then here I have something for you! Whether you are a novice crafter or a pro, this keychain is easy to make. All I did was add some texts with different font styles to my Design Space.
Finally, after finishing my design, I started my Cricut Maker 3 and cut all the words Daddy and Daniel to make keychains. I handed it to my dad, my brother, and my dinner.
5. Crossbody Bag
Today, everyone wants to use a body bag, and what if you have a personalized one? Sounds like a great idea, no? I created this simple bag for myself as I am not much into personalized stuff. But you can have one if you want. The process of making this bag is easier, and you will need iron-on vinyl to make such a beautiful crossbody bag.
6. Monogram Keyring
Looking for super easy-to-make Cricut Maker 3 leather projects? Here is the monogram keyring that is most widely useful, and it would be great if you could give it a shot! This is a great beginner project, and any beginner should try to make something unique. I also used paint to color it to make it look stunning! Lastly, you can see the result in the picture, like how elegant it looks.
7. Cord Organizers
Every one of us uses earphones or a charger, but sometimes managing those clumsy wires is boring and tedious. So, I decided to create something that could organize my cords or wires. Here, you go with leather cord organizers, which I created using my Cricut. There are many cuts that I had to make, and I preferred my Cricut Maker to cut them as they are faster and provide precise cuts, making them look professional rather than handmade.
FAQs
Can I cut leather with Cricut Maker 3?
Yes, leather can be easily cut with Cricut Maker 3. It can also cut other materials such as fabric, paper, and balsa wood without any problem. In order to cut the leather, you have to use a knife blade, and the thickness of the leather should be up to 2.4 mm or 3/32 mm thick. However, you have to use a clean cutting mat with a sharp blue edge for better results.
What are the essential Cricut tools for cutting leather?
There are some common tools that you can use to cut leather. They are as follows:
Utility knife: This sharp knife is considered a versatile tool for cutting your leather.
Rotary cutter: This is a tool that comes with a wheel-shaped blade. Ideal for long and straight cuts.
Leather shears: A kind of specialized scissors idea for cutting thick and tough leather.
Round knife: It is a popular tool that is most widely used for cutting leather.
How thick can I cut leather with Cricut Maker 3?
If you want to cut the leather on Cricut Maker 3, you can cut up to 7 oz thick. The best thing about the Maker 3 machine is that it cuts anything precisely. In addition, cutting the leather is a breeze. You will also have to use a knife blade for all these leather Cricut projects.
Wrapping Up
As you went through the 7 Cricut Maker 3 leather projects, you might have found them easy to make. The best thing about these leather projects is that they are beginner-friendly. So, you will not need to worry about the complexity of the projects; just turn on the Cricut Maker 3 and prepare the leather that you want to cut. After cutting, the result will be fantastic and will stand out!
For more information and visit: www.cricut.com/setup login
cricut.com/create
Cricut Design Space App
Source: Cricut Maker 3 Leather Projects
#Cricut Maker 3 leather projects#leather Cricut projects#cricut design space download#Cricut maker setup#cricut maker 3 setup#Cricut Design Space Login#Cricut Design Space App#Cricut New Machine Setup
2 notes
·
View notes
Text
8 Best Cricut Kits for Your Crafting Needs: Ultimate Guide
Getting a proper Cricut kit somewhere helps the crafter come out of their comfort zone. A cut-die machine can create any project, whether greeting or home decor items. However, each item available inside the kit has its duty to give the finest form to the craft.
It is a small deal whether you are a fresher or experienced DIYer; what's important is your knowledge of the importance of the kit during the crafting process. If you need clarification about which pack of tools will be best for you, go on by studying the post divided into various paragraphs.
1. Cricut Kit: Paper
Learn to do all kinds of paper crafts with this Cricut paper kit. Get step-by-step lessons on the Cricut Design Space app. Inside this kit, all the essential tools and materials are provided to users before crafting. You can revise lessons, make mistakes and enjoy the fun while creating a project with all the materials.

2. Cricut Learning Kit: Iron-On
However, learn how to create different kinds of crafts using the Iron-on Cricut kit. Composed within a wide zone of materials, it helps sharpen your skills. Apart from that, all the step–by–steps instructions are available on the Cricut app. The kit allows the buyers to make errors, repeat the lessons and enjoy while creating the project.

3. Sewing Kit Set
Further, with the Sewing Tools Cricut kit set, you can get professional sewing and quilting projects by getting crisp, clean cuts through different materials. This 7-piece sewing tool set includes every item necessary for sewing and quilting projects. With the Thread Snips, one can pick off the threads and swiftly stop the small stitches with Seam Ripper.

4. Cricut Tools Craft Kit
On the contrary, this Cricut kit contains different items that will play an important role during the process. Further, it can be expected from all the users to use all the items available inside the kit equally and properly while creating a DIY project. Apart from that, the user needs to install the Cricut software to create the project on it.

5. Cricut Truecontrol Knife Kit, Mint
With the Truecontrol Knife kit, users can experience unforgettable precise and accurate cutting on various materials. Due to its free-blade changing system, one needs to get the chance to replace the blade manually. A huge round of applause for the anti-roll design ensures that the knife stays in its place when not in use.

6. Cricut Foil, Transfer Kit
Equally important, this 3-in-1 tool Cricut kit is preferred for adding eye-catchy foil effects on different ranges of ongoing projects. One of the special features of this foil is that the foil easily gets embellished. Apart from that, it also gives long-lasting results and polished results to the users.

7. Cricut Basic Weeding Tool Kit
Learning about the basic Weeding Tool Set is much more fun than other electric cutting machine kits. This weeding tool kit contains five different tools specially designed to craft projects with speed, precision & accuracy. The tips of each tool help the user comfortably complete the project without damaging it.

8. Cricut Pens & Variety Pack Mats Kit
Lastly, this basic Cricut kit assists the DIYer in giving beautiful results by creating greeting cards, banners, and many more for various occasions. The pens are water-proof, acid-free, and permanent once dried. Additionally, the pack of Adhesive cutting mats 12 x12in-3/Pkg contain LightGrip, Standard & Strong Grip Mat. Other than that, all these materials must be used by an adult.

Summing up this blog post, the user should choose the correct Cricut kit before commencing the cutting process. Moreover, they must also know how to utilize the provided supplies to receive the desired result.
Frequently Asked Questions
Question: Is It a Good Decision to Buy Cricut Supplies?
Answer: To get the standard project, purchasing Cricut supplies will be a good decision. The best quality of items will help the user give proper form to the project by sticking the material and design on the loaded mat. Apart from that, the material cutting will also get completed within a few minutes.
Question: What Are the Common Equipment that Comes Inside the Cricut Box?
Answer: While unboxing any module of the cutting machine, there will be some types of equipment that come inside every box, which include:
● Cricut machine.
● Blades+ Housings.
● Quick Start Guide.
● Welcome Book.
● USB cable.
● Power adapter/Power cord.
● Materials for a test cut.
● Bonus materials.
Question: Do I’ve to Purchase Cricut Kit Separately for DIY Projects?
Answer: Some of the Cricut supplies and the electric cutting machine will be provided to the users. Apart from that, the Cricut Access subscribers will get some sort of discount while buying from the Cricut official portal. Moreover, some of the separate supplies are available on different shopping portals.
#Cricut Kit#Cricut#cricut explore air 2#cricut download#cricut setup#cricut software#cricut design space#cricut crafts#cricut maker setup#trending#cricut projects#cricut.com/setup#design cricut.com download#cricut design space login#cricut machine set up
0 notes
Text
www.cricut.com setup login
Cricut is an innovative creation in the DIY industry. With a collection of powerful cutting machines and heat presses, Cricut has become prominent in the market. These machines provide precise cutting and versatile features for your crafting regimen. It’s an absolute must-have tool to level up your DIY projects and showcase your creativity on the material of your choice. If you enjoy creating personalized items for home decor, regular use, or selling, try Cricut software from www.cricut.com setup login and elevate your DIY journey.
install cricut design space app
cricut.com setup mac
#cricut crafts#cricut.com/setup#cricut#install cricut design space app#install cricut design space#cricutprojects#www.cricut.com setup login#www.cricut.com/setup login#www.cricut.com/setup#install cricut explore air 2#cricut install setup#cricut.com setup mac#setting up your cricut maker#cricut design space setup#cricut setup
0 notes
Text
Cricut Easy Press Set up Guide for Optimal Results

In addition to producing crafting machines, Cricut.com/setup Inc. also develops a variety of Heat Presses for DIYers worldwide. It’s pretty evident that before creating custom-made projects, all users need to be aware of the proper Cricut Easy Press set up process. As a professional crafter, I prefer Cricut EasyPress 3 when making any iron-on projects.
Cricut EasyPress 3 perfectly combines heat press speed and iron convenience. It is three times faster than other models and operates with the Cricut Heat app. This EasyPress model is ideal for DIY projects like bandanas, coasters, cosmetic bags, and T-shirts. All users must set up their Cricut machines on a device and then create projects. This blog provides details on how to set up, activate, and craft with this Cricut Heat Press model.
Cricut Easy Press Set up on Your Mobile Device
Finishing the Cricut Easy Press 3 setup with mobile devices is a challenging task. But it can be done by referring to the steps shared in the below pointers:
Start the process by going to your device’s Settings app and enabling its Bluetooth feature.
After enabling Bluetooth, connect your Heat Press’s power cord to the nearby wall socket and turn it on.
Next, open your Cricut Heat app and sign in by entering your login details inside the specific section.
Following this, tick the Set up New Heat Press and follow the on-screen instructions appearing on the screen.
If your Cricut EasyPress 3 is enabled, it will appear under the My Presses section.
Now, the app will notify you about the successful connection, and you will see the press name on your Bluetooth list.
Finally, you can start making new iron-on projects by wirelessly giving commands to the heat press.
How Do I Activate My Cricut EasyPress 3?
After successfully finishing up the Cricut Easy Press set up with smartphones, it’s time to step forward and activate the press. Carefully consider the below steps to activate the Cricut EasyPress 3:
First, download and install the Cricut Heat app on your Android/iOS devices and create your account.
After that, sign in with your Design Space account and start unboxing the press from its packages.
Now, plug your Cricut EasyPress 3 into the compatible wall socket and press the power button to switch it on.
Following this, you will notice the word APP flashing on the screen, meaning your press needs to be connected to the device.
Next, go to your Cricut Heat app and choose the Set Up option to start the activation process.
After that, choose Cricut EasyPress 3 from the list and hit the Connect button.
At this point, the Cricut Heat app will display connecting to Cricut EasyPress 3 with the Bluetooth logo.
Now, the app will confirm the details, select the Terms & Conditions box, and tick the Activate option.
At last, when the process ends, you will get the success message that the devices are ready to be used.
How to Use Cricut EasyPress 3?
With the completion of the Cricut Easy Press set up and activation process, let’s discuss how you can make crafts from this Heat Press:
Begin the process by pressing the Temperature button and adjusting the value with the plus (+) or minus (-) buttons.
To change the temperature from Fahrenheit to Celcius, press the Temperature button until you see the change from *F to *C.
Following this, tick the time button and then adjust the timing with (+) or (-) buttons.
Now, you will notice an orange light, which means that your Cricut Heat Press is heating up, and a green light, which means that the temperature has been reached.
Lastly, select the Go button to start the countdown. If you are using Cricut EasyPress 3, the app will show the countdown.
Conclusion
In conclusion, regarding the Cricut Easy Press set up blog, you must’ve understood that Cricut EasyPress 3 is the smartest heat press with the ability to do various do-it-yourself iron-on projects. No doubt, it’s compulsory for all the users to finish the connection and activation process before starting any project. They can buy this Cricut Heat Press from Cricut’s official website (design.cricut.com), Amazon, or Walmart at a discounted price range.
Frequently Asked Questions
How to Use Cricut EasyPress 3 With the Cricut Heat App?
Have a look at the below steps and get to learn a project that you can make out of Cricut EasyPress 3 with the Heat app:
First, plug in the heat press power cord into the wall outlet and open the Cricut Heat app.
Now, choose Cricut EasyPress 3 under My Presses and tick Start New Project.
Next, you need to select the material & base material and tick the Next option.
Finally, tap the Send Settings to EasyPress and follow the instructions to finish the process.
How Do I Update My Cricut EasyPress 3 Firmware?
The Cricut EasyPress 3 firmware will be updated through the Heat app by referring to the steps given below:
First, you need to plug in the power cable inside the wall socket and press the power button.
After doing that, you need to check whether your Heat Press is paired with the Heat app or not.
Finally, select Cricut EasyPress 3 under the My Presses section, and it will update the firmware directly.
How to Adjust Cricut EasyPress 3 Temperature With Heat App?
Have a look at the below steps and get to know about the steps needed to be taken while adjusting the temperature with the Cricut Heat app:
Begin the process by turning on your Cricut EasyPress 3 and choosing your Heat Press model.
After doing that, select your transfer material & base material and tick the Next option.
Now, press the Send Settings to EasyPress, and the app will display the temperature settings.
For more information visit: Cricut.com/create
Cricut Design Space Download
Cricut New Machine Setup
Source: Cricut Easy Press Set up
#cricut easy press set up#cricut design space download#cricut design space login#design.cricut.com#Cricut New Machine Setup#cricut.com/create#Cricut maker setup
1 note
·
View note
Text

Cricut makes a digital cutting machine that works with easy-to-use software, and crafters can get it for free at Cricut .com/setup. With the help of this software, you can make any cricut explore air 2 software and cut it with the help of the machine. Apart from this, you can upload your project and access it from anywhere and can also access pre-made projects and designs. It helps craft projects within a minute. cricut setup for pc
0 notes
Last Seen Blogs