#cricut maker machine
Text
How to Connect to Cricut: Easy Steps for Phone and Computer
Do you want to learn how to connect to Cricut on your device? If that is the case, then you have reached the right place. As a long-time Cricut user, I am familiar with all the techniques to connect a Cricut machine to your compatible device. I am going to write down the methods you can use to connect your machine to your smartphone and computer.
Cricut offers two methods for connecting your machine: a wireless Bluetooth and a wired USB connection. Both methods are available for nearly all Cricut machines. To learn more about these connection options for your device, let’s get started!
How to Connect to Cricut via Bluetooth on Windows?
Windows computers are a great device to use with a crafting machine. So, if you are using a Windows PC to connect it to your machine, you have both options for the connection. For the compatibility of your computer, you just have to make sure that you are using a Windows 10 or a newer version of a computer. The process for the connection is as follows:
In the beginning, you must turn on the machine after connecting it to a power source.
The other thing you have to remember is that you should keep the machine within 10-15 feet of the computer.
Go to the computer, open the Start menu, and open Settings.
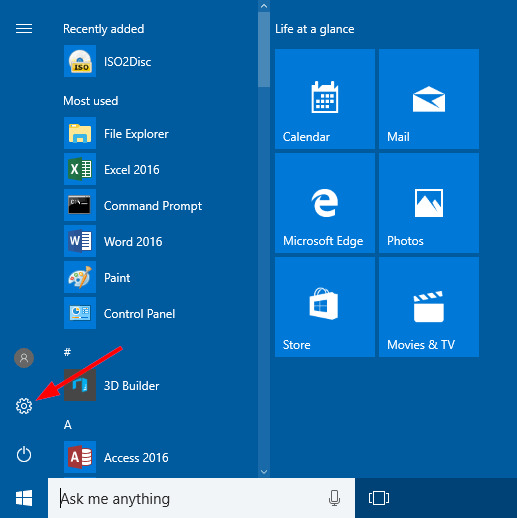
In the following screen, move to the Devices option. There, you will see Bluetooth; you have to turn it on.
After turning on the Bluetooth, click on the option Add Bluetooth or another device.

Now, the computer will start searching for the available Bluetooth devices.
When you see your machine along with other available devices, you have to tap to select it, and it will be connected to your computer.
You can ensure the connection by going to the Design Space app and checking in the New Product Setup. The machine appears to be connected to your PC.
How to Connect to Cricut via Bluetooth on Mac?
A Mac computer is equally good for connecting to a Cricut machine. You can again use both methods to connect your computer to a machine. The computer is compatible with the Design Space app, but for that, you will have to use macOS 11 or newer versions. Here is how you can connect a MacBook to your machine with Bluetooth:
Similarly, plug the machine into an electric source and press the power button.
It will be available for the connection, but you have to keep it in the range. The range for the wireless connection is 10-15 ft.
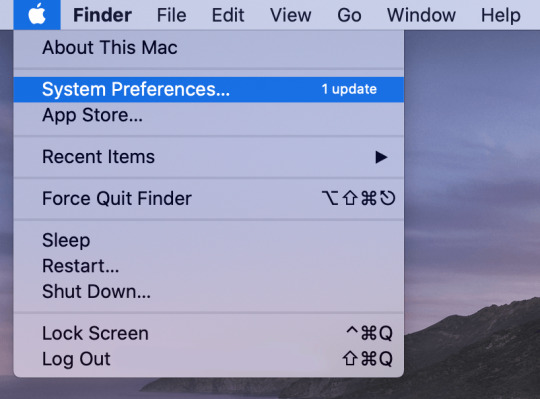
Then, click on the Apple icon and go to the System Preferences on your computer.
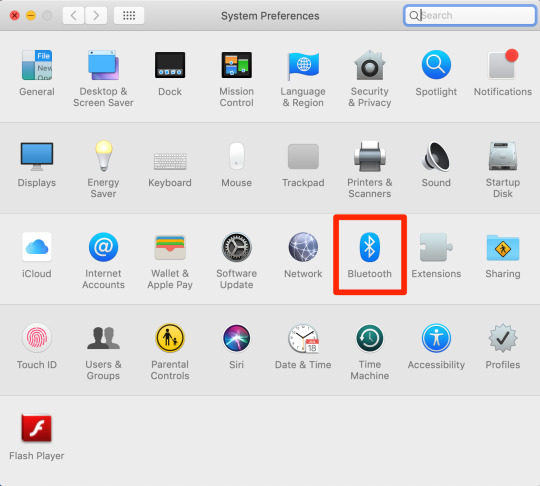
After that, go to the Bluetooth section and turn it on.
When you turn on your computer’s Bluetooth, it will start searching for available devices.
When you see your machine on the available devices, you have to tap on it.
Next, the machine is connected to your computer.
To ensure the connection between the machine and your Mac, go back to Design Space and then to the New Product Setup.
You can see that the machine appears to be connected to the computer there.
How to Connect to Cricut via USB on Android/iOS Devices?
Apart from Bluetooth, you can also use a USB cable for the connection between the machine and your computer. Since it is a wired connection, you do not have the luxury of roaming around while working on projects as you can do with Bluetooth. USB can be used to connect your machine to any of the devices. Here, you will see the process of connecting your Android or iOS phone to your machine via Bluetooth. To add your machine to your desktop with USB, you will have to follow the same procedure:
You have to add a machine to a power source and then press the power button to turn it on. When the machine is on, a light will light up.
Then, you have to use a USB cable to connect it to your phone and the machine. The cable has to be connected to both devices at both ends.
You must use a healthy cable so that you do not lose the connection while working with it.
You can go back to the Cricut app again to ensure connectivity.
Conclusion
To sum up, you learned how to connect to Cricut with Bluetooth or a USB cable. With both methods, you can connect any computer or mobile device that is compatible with Cricut. You learned how to connect Windows and Mac computers to Cricut with the help of Bluetooth. You also saw how you could connect a phone to your machine with the help of a USB cable. Now, you can use this guide to connect your Cricut to your device, and then you will be able to work on your DIY projects.
FAQs
Can I Connect My Cricut via Bluetooth to My iPhone?
Yes, you can! Cricut gives you two options to connect it to your device. You can use not only an iPhone but any device, and you can use either of the options to make your projects. So, you can definitely use Bluetooth to connect your machine to your iPhone. To connect Cricut to your iPhone via Bluetooth, you have to turn the machine and search for it on the device. When you see it, select it, and it will connect.
How Can I Reset Bluetooth on My Computer?
Resetting a Bluetooth connection on your Cricut machine is easy. You need to open the Bluetooth settings and click on the pairing. You will have the option to unpair it; click on it. Then, you must turn the Bluetooth off and wait for some time. Now, turn on the Bluetooth again on your computer and start searching for your machine. Upon seeing the machine, click on it, and it will be connected.
Why My Cricut Is Not Showing on My Computer?
If your machine is not being shown on your computer, then you should check a couple of things. The first thing you have to do is check and make sure that you have turned on the machine. Only after that will it be available to be connected to any device. Next, you need to ensure that you have turned on the Bluetooth on your device. The final thing you must check is that you have kept the device and your machine within the range of 10-15 feet.
0 notes
Text

Cricut Maker Machine is a versatile tool for DIY enthusiasts and crafters, offering precision cutting of various materials including vinyl, fabric, paper, and more. It connects to computers and mobile devices via Bluetooth or USB, allowing users to upload custom designs or choose from a vast library of pre-designed projects through Cricut’s Design Space software. Its adaptive tool system accommodates a range of accessories like rotary blades for fabric cutting and scoring tools for precise folding. With its user-friendly interface and robust capabilities, the Cricut Maker empowers users to create intricate designs, personalized gifts, and professional-quality crafts with ease and precision.
0 notes
Text

Being a crafter is not easy. Since there are multiple things you have to take care of, it’s tricky always to be productive. But not anymore with a Cricut machine setup. These machines are multifunctional smart DIY cutting machines that are built for all aspiring crafters who are keen to produce quality stuff with their creative ideas. Cricut offers plenty of accessories and features, and it works with the utmost precision and adaptability. To get started with this excellent machine, navigate to cricut.com/setup and set it up.
0 notes
Text

Cricut machines include the most versatile DIY Cutting machines that offer versatile features and capabilities to make a desired craft project. These machines have a plentiful supply of accessories to make your crafting experience hassle-free. Cricut removes all the hurdles you face while making something unique by providing advanced cutting and heating machines. Moreover, its built-in software, Design Space, works excellently and allows you to design something you want to cut. To start your crafting journey with Cricut, visit cricut.com/setup and install Cricut Design Space software.
#cricut maker machine#cricut.com/setup mac#cricut.com/setup windows#Cricut.com/setup#cricut new machine setup#cricut explore air 2#cricut design space login#cricut software app#www.cricut.com/setup login
0 notes
Text
What Are Basic Cricut Maker Tips And Shortcuts for Beginners?
It's very important for all beginners to learn about the basic Cricut maker tips before becoming a master at handling the machine. With the help of those tricks & shortcuts, they'll be able to complete their project a lot easier.
Visit:- cricut.com/setup
design.cricut.com
cricut explore air 2
cricut setup download
cricut.com setup Mac
Other than that, they'll also get to know how to handle their mistakes and utilize their crafting skills. This post will assist you in gathering some of the essential Maker tricks required while accessing the cutting machine.
1. Use Ready-to-Use Make Projects
Preferring ready-to-make projects is one of the best Cricut Maker tips that save the crafters time by directly choosing the projects from the Design Space. The project included in the app helps the users without any pressure of messing up during the cutting process. Through these projects, it will be fun to learn more about the different kinds of projects.
2. Download Design Space
In order to get the customized project from the smart cutting machine, it's important for every user to install Design Space software/app. Moreover, it also assists the DIYers in creating a wide range of projects. In addition, it is an easy-to-learn app available for free to users.
3. Get Basic Tool Set
Furthermore, you aren't supposed to have all kinds of supplies while creating new projects on Cricut. The crafters need to choose some of the basic tools as per the type of project. Apart from that, it's important for them to carry the correct tools during cutting; otherwise, they'll end up spoiling the project.
4. Don't Waste Testing Materials
While unboxing the provided box, the users will be provided with testing materials for the trial. Moreover, the users shouldn't waste the materials during the testing process; otherwise, they'll face the issue of a lack of supplies while designing the project in the future. Apart from that, you can also save money by saving the supplies from getting wasted to purchase new materials.
5. Use Cricut Maker Aluminium Foil
One of the common Cricut Maker tips to increase the longevity of the deep-point blades & fine-point blades is by using Aluminum foil. From the sheet, tear off a 12" sheet of aluminum sheet and make a tight ball out of it. Following this, push down the blade's plunger to expose the blade. Once the blade gets exposed, poke down the pointed part of the blade at least 40-50 times.
Flipping Mat for Removing Material
Intending to remove the material from the filled mat, you've to flip it over so that it faces down on the work surface. Following this, with soft hands, bend over the mat upwards, away from the material. It'll be putting a bending force over the mat, not on the material. With the help of this process, the material will start popping out from the mat.
6. Using Cricut Maker Scraper Tool
Other Cricut Maker tips that are commonly used by DIYers to clean up the mat include the Scraper tool. This tool is available in two different sizes: regular size & extra large scraper. One can easily remove the little bits of dust and debris from the mat.
7. Use Baby Wipes
Other than the above-said shortcuts, you can also prefer using baby wipes to get the mat into its exact texture. Ensure that the wipes are alcohol-free before wiping them down on the mat. Moreover, smoothly cover the whole mat in a circular pattern and let it dry for at least 10-15 minutes. The process will regenerate some percentage of its stickiness.
8. Use Correct Tools During Weeding
One of the toughest jobs while weeding Vinyl is not preferring the correct tools. The majority of the people use only Cricut weeder during the process, not realizing that there are other tools also. Intending to get the desirable project, it's essential to have a collection of correct tools such as dental tools, weeders & crafting knives.
9. Use Baby Powder For Cut Lines
Another method that can be included as the Cricut Maker tips involves baby powder on the Vinyl and spreading it with a makeup brush. After spreading the powder, the DIYers will be able to see the cut lines more closely, making it easier to weed better and quicker. Moreover, it is a good option for those who have weaker eyesight.
Intending to make the project look much more attractive, every crafter can refer to these tips or shortcuts depending upon their needs or the project they are working on. Moreover, it can be anticipated that they'll be using the correct tip before proceeding toward the next design.
Frequently Asked Questions
Question: How to Position Design While Engraving on Cricut Maker?
Answer: Follow the steps about positioning design for the Cricut Maker engraving process:
Press Make It after completing the design on the Design Space software.
Select & drag the design to the location of the mat where you want to engrave.
After that, place the material on the mat in a parallel location.
You can use the SnapMat feature to accurately position the design if you are using the app.
Question: What Are the Pros of the Cricut Maker Machine?
Answer: The pros & cons of Cricut Maker machine are available below:
● It is fantastic for cutting fabric as well as thick materials.
● It also uses tools such as the Rotary and Knife blades to cut down various materials.
● Specially designed to use the Sewing Pattern library with 2 times faster mode for cutting Vinyl & paper.
● The embedded Bluetooth permits wireless connection.
● Warranty is no longer voided by commercial use.
Question: What Are the Cricut Maker Machine Shortcuts for Projects?
Answer: Some of the other Maker shortcuts that can assist the users in making their designing process for new projects much easier are as follows:
● Keep the mats within easy reach.
● Shift with less sticky tape by saving sanity.
● Prefer double presses for better results.
● Keep FabricGrip Mats cleaner with you all the time.
● Choose lint rollers for removing debris before starting new projects.
● Remove tacks from new mats.
Source url- https://cricutdesignmachine.wordpress.com/2023/06/19/what-are-basic-cricut-maker-tips-and-shortcuts-for-beginners/
#cricut maker tips#Cricut.com/setup#design.cricut.com#Cricut explore air 2#cricut setup download#cricut.com setup mac#Cricut design space#Cricut maker setup#cricut maker machine#cricut setup
0 notes
Note
do you have any advice for making stickers? your designs are all so pretty!!
ahh thank u sm!! yessir here's some tips i keep in mind when i design/make stickers (mostly from the perspective of someone selling stickers but these can be for personal sticker making too):
design:
try to use the same brush size/type if youd like all of your stickers to look similar. i personally have two i like to alternate between whether I'd like a smooth vs sketch look
also try to use the same size canvas if youre gonna make a lot of 3 inch stickers or 4x6 in sticker sheets (for example) to keep everything looking consistent
find artists you're inspired by and that'll be very helpful to avoid art block. for me, i adore artists who have similar taste and it helps me feel so happy and inspired to make my own art.
people like stickers that are all kinda the same vibe! i like to design stickers that are cute and vibrant and either feature characters i like or aesthetics i like. you gotta like what you make! (they dont all have to have the exact same vibe of course. but ive found that people will like getting all my cute fandom stickers bc they look like they all go together for example)
printing:
if youre cutting these out yourself, rotate the paper, not the scissors for better control. take breaks too! you don't wanna strain your hand! also its worth it to have big girl scissors (i am a big girl with big girl scissors btw ahahaha)
if youre using a cricut or silhouette machine to cut, please consider making all of your stickers easy peel (basically making the sticker its own mini sticker sheet so you remove the outer border so it's easier to peel) because this helps make sure that people from many backgrounds and lives can enjoy your work! It would break my heart to find that someone who has joint pain, for example, can't use the stickers they bought from me because they're too difficult to peel. (If you're hand cutting your stickers, I have no idea how you'd do this so don't worry! Maybe in the future if you decide to invest in a machine, this is something to think about)
if you're using a cutting machine, yes it will take up a lot of time and supplies running tests to see what works with your stickers! and yes you will have to readjust how you do things with the life cycle of the machine's blades. augh........ such a hassle sdjfhksd
when printing for the first time, you may need to spend time running tests and adjusting the colors. some printers need help with the vibrancy and stuff!
when printing your stickers, please only have a few pages loaded in your printer if you're still testing (or in general! i have my paper loaded in one at a time JUST in case I forgot a setting)
if you're printing at a print shop, make sure your file is PDF and that they're printing "actual size" bc otherwise it may change. this would be bad especially if you're planning on using your machine to cut later.
i personally would not recommend ordering your first several stickers outsourced bc you may end up with stock that never sells.
i hope these helped! some may not apply bc theyre for like,,, a sticker biz but maybe someone out there wants this info too :3 ill leave my current supply list in the tags so i can change it if i find that something changes and i dont wanna recommend it anymore
basically read op tags for recommendations :3
#sticker paper (not waterproof) : online labels OL177WX#vinyl sticker paper: koala matte sticker paper#lamination (glossy) : Avery 73601 Self-Adhesive Laminating Sheets#lamination (sparkly): idk theyre like... star style sparkly lamination sheets?? i got em on amazon!#cutting machine: cricut maker (i get so frustrated with this machine tbh once you wrangle your beast its fine tho)#printer: canon pixma g7020 (i LOVE THIS THING...... i understand you lady redundant woman.......)#drawing software: procreate on my ipad 7th gen & 1st gen apple pencil (you could use anything tbh i just like having a stabilizer)#editing software: photoshop (for color editing and placement editing and adding text mostly... this comes in handy with my sticker sheets!)#and if you wanna buy any of this stuff and help support me lemme give you an amazon affiliate link!!! it doesnt cost anything extra and-#amazon has to give me some sweet sweet cash for it#i promise ill be responsible with that money like going to whataburger everyday for a week >:3c#jk jk it would go toward po box costs! its so expensive waaahhhh#djsadbean answers#stickers resource#artist resource#faq
28 notes
·
View notes
Text
How to Pair Cricut Maker to Phone and Computer: Full Guide
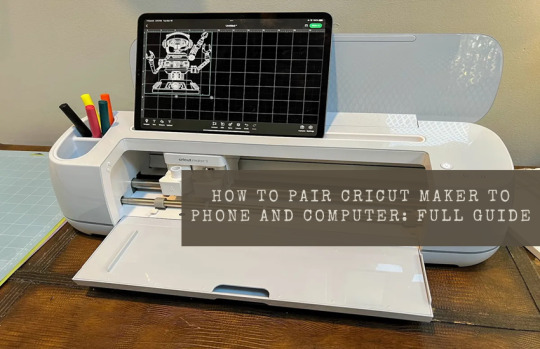
Every crafter will agree that the Cricut Maker Setup is one of the smartest and favorite models among cutting machines. This Cricut machine can cut 300+ materials such as vinyl, iron-on, cardstock, and more. It can also cut, write, foil, and score different materials. To start with this Cricut cutting machine, one must know how to pair Cricut Maker with a computer and smartphone.
Crafters have two options for pairing both devices: Bluetooth and USB cable. However, it is their call to decide in which mode to connect their Cricut machine to a computer and mobile devices. Also, to begin any projects, all users must download the Cricut software and connect it to their device.
If you cover the entire blog from top to bottom, you will quickly learn how to set up and pair this Cricut machine with devices.
How to Setup Cricut Maker on a Computer?
Before getting started with how to pair Cricut Maker, all the users need to set up their Cricut product on a computer. To properly end the setup process, they need to go through the below-shared steps:
Lay the first stone of the setup process by unpacking your Cricut machine & switching it on.
After doing that, connect both devices via USB cable or Bluetooth.
Next, visit cricut.com/setup and install the Design Space app on your computer.
Then, create your Cricut ID or sign in with the login details.
Now, follow the instructions appearing in your front on the screen.
Finally, you will be called for a test cut after completing the setup process.
How to Pair Cricut Maker to Windows and Mac?
Below are some tips and instructions for pairing this Cricut product with Windows and Mac systems.
Windows
In addition to this blog section, look at the steps below and learn about setting up both devices.
Go ahead with the process by checking that your Maker machine is within 10-15 feet of your computer.
Now, tick the Settings icon and land on the Windows Settings tab.
Following this, choose Devices and check that the Bluetooth is on.
After that, hit Add Bluetooth or other device that appears at the top of the screen.
Next, click the Bluetooth button under the Add a device tab.
A window will appear at this point. Click on your Cricut model.
Finally, your Maker and Windows pairing process will come to an end.
Mac
This section explains how to pair Cricut Maker with a Mac system.
Make the first move by ensuring that your Cricut cutting machine is on.
Afterward, check that it is under the range of 10-15 ft of your Mac system.
Next, open the Apple menu, choose System Preferences, and click the Bluetooth icon.
Check that your Bluetooth is on, and select your Cricut model from the list.
After a few minutes, your device’s pairing process will end.
How to Pair Cricut Maker to Phone (Android/iOS)?
Further referring to the blog, let’s discuss the process that will help the user pair smartphones with this Cricut product.
Android
Take the first step and ensure that your Cricut machine is on and positioned within 10-15 ft of your mobile device.
After that, scroll down your phone’s home screen and hold on to the Bluetooth icon for a few seconds.
Now, turn on your device’s Bluetooth and let it scan for the machine for a few minutes.
Next, choose your model name, and the pairing process between your Android and Maker will end.
iOS
To get things moving, check that your Cricut Maker is on and within 10-15 feet of your iOS device.
Go to the Settings tab and activate your device’s Bluetooth feature.
After activating the Bluetooth, a list of available devices will be shared in front of you.
Select your model name from the list at this point, and both of your devices will be paired successfully.
By paying special attention to these steps, the user can swiftly pair up their respective smartphones with the Cricut Maker machine. Moreover, they need to be very cautious so they don’t make any mistakes during the process.
Frequently Asked Questions
How to Setup My Cricut Maker on a Smartphone?
With the help of the below steps, you can effortlessly set up a Maker machine with smartphones:
Begin the process by plugging the machine and turning on its power.
After that, pair your smartphone with the Cricut machine via Bluetooth.
Install the Design Space app on your device and create your account.
Next, go to the Menu section and tick the Cricut Machine Setup option.
Following this, choose your machine name from the list and follow the steps to finish the setup.
Finally, when informed of the test cut, you will know about the setup completion.
How to Connect Cricut Maker to Devices via USB Cable?
To connect the Cricut cutting machine with devices via a USB cord, the user needs to follow these steps:
First, unpack your Cricut product and USB cable very carefully.
Following this, switch on your machine and put one cord into the machine port.
Afterward, insert another end of the cable into the device and let it connect with each other.
Now, the Cricut Maker will turn on and be ready for cutting purposes.
How Do I Pair My Cricut Maker With iOS via Bluetooth?
With the help of these steps, you can effortlessly connect the Cricut product with iOS devices:
Check that your Cricut machine is enabled and place it under your device’s 10-15 ft range.
Next, go to the Settings tab and turn on your device’s Bluetooth.
After a few seconds, a list of devices will be shared on your phone screen.
Tap the model name, and the pairing process will end after a few seconds.
For More Information Visit: www.cricut.com setup login
Cricut Design Space Download
Cricut setup on computer
Source: How to Pair Cricut Maker
#how to pair cricut maker#cricut maker setup#cricut design space app#cricut design space login#cricut design space download#Cricut setup on computer#cricut machine setup#how to setup cricut maker
3 notes
·
View notes
Text
How to Set up Cricut Machine with Steps
Setting up your Cricut machine is a straightforward process that opens the door to endless crafting possibilities. Begin by unpacking your Cricut and placing it on a flat surface. Connect the power, turn it on, and link it to your computer or mobile device. Download and install Cricut Design Space, the hub for your creative projects. Create or sign in with your Cricut ID to access a world of designs.
If required, calibrate your machine for precise cuts. Load your chosen material onto the cutting mat and let the Cricut work its magic by following the simple on-screen instructions. Within minutes, you’ll witness your designs come to life. The setup is intuitive, allowing you to focus on what you do best – crafting with precision and creativity. Welcome to the world of Cricut, where your imagination knows no bounds!
Setting up your Cricut machine is a breeze, and soon you’ll be crafting to your heart’s content. Follow these simple steps to get started:
Unboxing: Begin by carefully unpacking your Cricut machine set up and accessories. Take a moment to marvel at the sleek design and the possibilities it holds.
Place Your Machine: Find a clean, flat surface to set up your Cricut machine. Ensure there’s ample space for the materials and projects you’ll be working on.
Connect Power: Plug in the power cord and turn on your machine. The power button is usually located on the side. Watch as it comes to life, ready to bring your creative visions to reality.
Connect to Computer or Mobile Device: Depending on your Cricut model, connect it to your computer or mobile device using a USB cable or Bluetooth. Make sure your device’s software is up-to-date for seamless communication.
Install Design Space: Download and install Cricut Design Space from official website Cricut.com setup on your computer or mobile device. This is the platform where you’ll create and customize your projects.
Create a Cricut ID: If you don’t already have one, create a Cricut ID. This will be your gateway to a world of designs and inspiration.
Calibrate Your Machine (if required): Follow the on-screen instructions to calibrate your Cricut machine. This step ensures precision in your cuts.
Load Materials: Place your chosen material (vinyl, paper, fabric, etc.) on the cutting mat and load it into the machine. Adjust the settings in Design Space accordingly.
Design and Cut: Open Design Space, create or choose a design, and click “Make It.” Follow the prompts to load the cutting mat into the Cricut machine, and let the Cricut work its magic.
Admire Your Creation: Once the cutting is complete, carefully remove your project from the mat. Admire the clean cuts and intricate details, knowing that the world of limitless crafting possibilities is now at your fingertips.
With these simple steps, you’ve successfully set up your Cricut machine and are ready to embark on a creative journey like never before. Happy crafting!
Source:How to Set up Cricut Machine
#cricut machine setup#set up cricut machine#Cricut design space download#design.cricut.com#cricut explore air 2 setup#www.cricut.com/setup login#how to set up cricut maker#how to set up cricut machine
3 notes
·
View notes
Text
the library downtown just keeps getting cooler and cooler, i swear to god. they just got a sublimation printer, an embroidery machine, and a heat press to add to their lineup of free to use stuff in the tech lab
#they already had a glowforge and a cricut maker and a pin press#alongside free access to the entire adobe creative suite AND a small video/photography studio with a professional camera#they used to have a sewing machine but it's not listed on their site anymore so i think they got rid of it :(#maybe it just broke or something. hopefully there will be another in the future#i gotta make use of some of this
3 notes
·
View notes
Text
How to Use the Cricut Maker: Need-To-Know Details for Novices
Ready to get started with your crafting journey but don’t know how to use the Cricut Maker machine? Well, this blog is designed to impart all the fundamental understanding to help you learn all the essential info to start your creative journey. The Cricut Maker is an easy-to-use device that comes with fantastic features to give fun and outstanding crafting results. Plus, the machine works perfectly with various devices.
Here, I am going to share all the crucial knowledge, such as machine setup, essential tools & supplies, and steps to cut on the machine. Continue reading to learn everything thoroughly!
Steps to Set up a Cricut Maker Machine
Before learning about how to use the Cricut Maker it is important to learn about its setup process. The following guide will help you connect your cutting device to a computer device.
Step 1: Perform the Bluetooth/USB Connection of Both Devices
Note: You can also use the USB cable to establish the connection between your computer and the crafting machine.
Step 2: Download the Cricut Design Space App
The next crucial step to completing the machine setup process is to download the Design Space App. Here are the simple steps to complete the process easily with the app.
Note: You can complete your machine setup on all compatible computers and mobile phones. You need to learn about the eligibility criteria of your device before you jump to the setup process.
Essentials to Use With the Cricut Maker Machine
If you are going to use the machine for your crafting, you need to know what other supplies and essentials you require. Follow-up is the basic supplies you must have as a crafter.
The need for the supplies changes from the project to the project you make on your machine. As a result, when you plan to work on a project, first ensure that you have all the essential supplies.
Cutting the First Project in Cricut Maker Machine
The most crucial part of learning how to use the Cricut Maker is to perform a cut on your device. Let’s see how it’s done!
Final Words
Cricut Maker is an awesome crafting tool that is suitable for both beginners and professionals. I have tried to cover all the important topics you need to learn about how to use the Cricut Maker and get started. With the help of this guide, you can start your journey and make your first craft. However, there is a lot more you can learn about crafting and the machine’s use. If you have any other questions or any steps that seem dubious, it would be wise to use additional resources and get more help.
Frequently Asked Questions
How to Use My Cricut Maker for the First Time on iPhone?
These are the steps that will guide you if you want to use the machine for the first time.
Why Am I Facing an Issue in Using My Cricut Maker?
The following are some prominent reasons that can cause problems with your machine.
Do You Need a Computer to Use a Cricut Maker?
Though you can use your machine on a computer, it is not mandatory to use only that. If you have an iOS or Android smartphone, then you are good to go. You can easily connect the Maker machine to your smartphone and enjoy the seamless crafting right away. However, you must know that there are some features that might not work on the Android phone. So, make sure to learn about it first.
Visit: cricut.com/setup
www.cricut.com/setup login
cricut setup
Source: https://cricricutdesigncut.wordpress.com/2024/09/13/how-to-use-the-cricut-maker-need-to-know-details-for-novices/
#www.cricut.com setup#www.cricut.com setup login#www.cricut.com/setup login#www.cricut.com/setup#www#cricut.com/setup#design space setup#install cricut explore air 2#cricut.com/setup windows#digital design#cricut setup#cricut.com setup mac#cricut.com/setup mac#cricut design space setup#cricut setup for pc#business setup in dubai#cricut com setup#cricut maker machine setup#setup
0 notes
Text
Why Won’t My Cricut Design Space Open (Easy Steps)
Why won’t my Cricut Design Space open? This is a question that I frequently receive from many readers. Finally, I got a chance to write something about it. Recently, I experienced the same issue, and it was not opening on my PC at all. At that time, I had to use the Cricut software on my mobile device; thanks to Cricut, it is compatible with smartphones, too.
Now, you might wonder why this happens and what the reasons behind it are. So, I tried to research it, and after extensive research, I figured out that it happens because of third-party virus interference, incorrect network settings, and corrupt cache files. For these reasons, our Cricut app doesn’t open the way we want it to.
But chillax! It’s not a big deal and can be fixed easily with some methods I’ll explain in this blog. Without any further ado, let’s jump into the solutions!
Solution 1: Check System Compatibility
Did you know that system compatibility plays one of the biggest roles in the smooth functioning of any software? Therefore, we check our system requirements to see whether our computer or any devices we want to use the software meet all its needs. To fix the “why won’t my Cricut Design Space opening“ issue, I will walk you through the following system requirements for PC and Mac:
For example, if you are a Windows user, verify the following points:
Now, if you are a Mac user, you have to check the following points:
Once you have ensured the above points, you will be able to fix the “why won’t my Cricut Design Space not Working“ issue quickly. If the above solution doesn’t work for you, you can try the next one.
Solution 2: Check the Internet Connection
Sometimes, the Cricut software will not open properly just because of your unstable internet connectivity. This software requires a constant internet connection to work properly. An unstable connection can cause many issues, hindering you from creating and opening your projects. Although you can create projects offline, sometimes it is better to cross-check.
For both Windows and Mac users, the internet requirements are as follows:
Solution 3: Force Cricut Design Space Reloading
Sometimes, I have seen that a slow speed can cause the “why won’t my Cricut Design Space open” issue on your desktop. However, the software can be sluggish due to several reasons. Therefore, you need to do the force reload.
Here’s how to perform a force reload of the Cricut Design app:
Once you have performed the above steps, you need to make sure whether the errors are resolved or not. If the issues still persist, go and check for the next solution.
Solution 4: Relaunch Cricut Design Space on Mac/PC
Here, we will try one last solution, which is the easiest one. All you need to do is relaunch the Cricut software on a compatible computer, such as a Mac or Windows PC.
For Windows
For Mac
By following the above steps, I assure you that you can fix the “why won’t my Cricut Design Space open” in no time. There are four solutions mentioned above; you can try any of them. One of them must work for you.
Final Words
Finally, I have given all the solutions on Cricut Design Space that won’t open issues. These solutions are really effective and will work for sure, as I have tried them myself. Besides, the Cricut software hardly shows any errors, so if you try to solve the issues by following the above methods, they will be resolved as soon as possible.
FAQs
Question 1: Why Cricut Design Space won’t open?
Answer: Sometimes, Cricut Design Space fails to open due to several reasons. It can also happen due to an unstable internet connection or the presence of viruses. There are other additional causes, which I have mentioned below:
Question 2: What do I need to know before downloading Cricut app?
Answer: Before you download and install the Cricut Design Space app on a desktop or phone, make sure your device meets all the system requirements. The RAM size is the same for Windows, Mac, Android, and iOS, including the 2 GB free disk. However, in terms of operating system, ensure that you are using the latest one.
Question 3: Why is my Cricut stuck on loading?
Answer: If you find your Cricut machine stuck while loading, you should try the following steps:
Visit: install cricut design space app
www.cricut.com setup login
Source: https://connectcricut.com/why-wont-my-cricut-design-space-open-easy-steps/
#install cricut explore air 2#install cricut design space app#cricut.com/setup#www.cricut.com setup login#www.cricut.com#www.cricut.com/setup login#cricut.com setup mac#cricut setup#cricut setup create account#cricut setup for pc#cricut setup explore air 2 setup#cricut setup maker#cricut setup log in#cricut design space#cricut setup on computer#cricut new machine setup#cricut explore air 2#cricutprojects#cricut venture#cricut#setting up my cricut maker#connecting cricut maker to computer#setting up new cricut maker#cricut printer setup
0 notes
Text
How to Use a Cricut Mug Press? [A Comprehensive Guide]
Are you curious to learn how to use a Cricut Mug Press? Well, this guide explores everything you need to know about the use of this machine. With this ultimate guide, you will be ready to use the Cricut Mug Press easily without anyone’s help. However, the Cricut Mug Press is a perfect choice for people who want to create a customized mug with pro quality.
This fantastic tool is compatible with markers, pens, and Infusible Ink transfer sheets. You also need a Cricut Design Space to create a design that can be further cut on the Cricut cutting machine. Moreover, you will need different materials, such as HTV and Infusible ink, to get desirable designs on mugs. After that, we will learn the process of using the Mug Press with step-by-step instructions. Let’s dive into it.
Step 1: Supplies You Need to Use Cricut Mug Press
Before learning how to use a Cricut Mug Press, you first need to know the requirements of supplies. These supplies are essential for using the Cricut Mug Press.
A desktop or laptop for setting up your Mug Press.
You can use any Cricut machine (Maker series, Explore series, and Joy).
Cricut Blank Ceramic Mug
Lint Roller
Butcher Paper
EasyPress mat or heat-resistant surface.
Infusible Ink Transfer Sheets and Infusible Ink Markers/Pens.
Oven Glove
Heat Resistant Tape
Laser copy paper
Step 2: Set Up Your Cricut Mug Press
In order to learn how to use a Cricut Mug Press, you must know about the Cricut Mug Press setup.
Follow the steps carefully to set up the Cricut Mug Press:
Insert the power cable into the back of your Cricut Mug Press, followed by a USB cable. Insert one end into your machine and another end into the computer.
Open the Cricut Design Space on your computer or laptop.
Then, select New Product Setup from the right-side menu.
Afterward, select Heat Press, followed by Mug Press.
You can follow the displayed instructions on the screen to download any updates you need.
While following the instructions, you will need to continue the Activate button to activate your Mug Press.
After this, the update will be completed.
Then, you can unplug the USB cable.
Now, your Mug Press is ready to use. Let’s learn how to use a Cricut Mug Press.
Step 3: Use the Cricut Mug Press
The Mug Press is relatively easy to use. After setting up, you can easily create a pro-customized mug. You can choose the design from Cricut Design Space. Always ensure that you choose the design with the exact size that fits your mug.
Once you have selected the designs, start cutting them using your cutting machine. Make sure your design is mirrored before the cut. You can follow the design given below.
After cutting the material, weed the unwanted materials.
Ensure your mug is clean and there is no dust present on it.
Then, place the design around the mug.
Afterward, you have to place the Cricut Mug Press on an easy press mat or any other heat-resistant surface you have.
Press the power button in your Mug Press, and the button will light the green color.
After that, you will hear the beep sound, meaning it is ready to use. However, you don’t need to set any temperature as it is already smart enough to set the temperature automatically.
Then, put the mug into the press.
It will take 6 minutes to sublimate the design onto the mug.
Finally, it will beep when it is done.
Turn off the device and take out the mug using gloves.
Final Words
In short, you should understand that a Mug Press alone can’t help you customize your mug. For this, you need various types of supplies that we have already mentioned in this post. Once you have all these items, you can proceed with the setup process. For this setup, you need a laptop or computer with a Cricut Design Space. When you are done with your setup, your Mug Press will be ready to use. Finally, you can design your mug like a pro!
FAQs
Question 1: How much time does a Cricut Mug Press take to heat up?
Answer: The only time your Mug Press will take to heat up is 5 minutes. After placing your mug into the press, it will take approx 6 minutes to finish it. However, the Mug Press produces a beep sound when it has finished its task. When you finally take out the mug from the press, it takes 15 to 30 minutes to cool down. Therefore, you must be cautious while taking it outside.
Question 2: Do I need a computer to use the Cricut Mug Press?
Answer: Well, you don’t have to rely entirely on a computer to use the Mug Press. Still, a computer is needed when you want to set up or activate your Cricut Mug Press. Also, you can update your firmware using your computer or laptop. All this is done when you connect your computer to your Mug Press via a USB cable.
Question 3: Is a regular mug compatible with the Cricut Mug Press?
Answer: There is no issue using your regular mug until it is made up of ceramic. Other than this, no materials should be used, such as stainless steel, plastic, etc.). Plus, the mug must be coated with sublimation material, which is suitable for your printer’s sublimation ink and Infusible ink. In short, the regular you buy from a local store is not going to work with the Cricut Mug Press.
Visit - Cricut.com/setup
Cricut Design Space Login
Cricut maker setup
Cricut Mug Press
Cricut Maker Machine
#Cricut Maker Machine#Set Up Cricut Machine#Cricut Mug Press#How to Use a Cricut Mug Press?#How to Use a Cricut#How to Set Up Cricut Maker Machine
0 notes
Text
How to Use a Cricut Explore 3: Easy Tutorial for Beginners
Learning how to use a Cricut Explore 3 is important in order to complete any project with this machine. The Cricut Explore 3 is a versatile cutting and crafting tool that can cut more than 100 materials, like paper, cardstock, vinyl, iron-on, fabric, leather, wood, and many more. With the help of these materials, you can work on a variety of craft projects. If you do not know how to use this machine, read this blog to learn everything you need to know.
To use this Cricut machine, you need to do certain things. You will have to connect your machine to a computer and download the Cricut Design Space app. This app will help you manage your projects and make the most of your machine. So, let’s start with the tools and supplies you will need for your project.
Tools and Materials for Using Your Cricut Explore 3
Before learning how to use a Cricut Explore 3, you should know about the supplies you will need for your DIY project. What supplies you will need depends on the project you are working on. Here, we are going to talk about using a Cricut machine to cut material to make a beautiful butterfly. You will need the following supplies on your machine:
How to Use a Cricut Explore 3 for Making a Project?
Once you know about all the supplies you will need for your project, you can move towards working on it. So, these are the steps you have to follow:
Step 1: Create a Design in Cricut Software
The first step is to create a design on the Cricut Design Space app. It offers many features that you can use to make your design. The first option you have is you can pick any design from the thousands of options you have. The other option is to create your own design by clicking on the New Project section on Canvas. You have one more option: you can choose any design from your computer and upload it to the software. After that, you can use that image for your project. Once your design is ready, you can move on to the next step.
Step 2: Load Your Material
When you have selected a design, and then load the material on your machine. To do this, you must take the material and put it on the cutting mat. Next, place the mat inside your machine and press the Load button on the machine.
Step 3: Select the Material
When learning how to use a Cricut Explore 3, the next step is to select your material on the Design Space app. Afterward, go to the app and select the material you will use to cut on your machine.
Step 4: Cut Your Design on Your Cricut Machine
Once you have selected the material on the app, you can cut the design. To do so, you will need to click on Make It. The machine will cut the design in the exact shape that you have selected on the Cricut software.
Step 5: Unload Your Material and Reveal Butterflies
Once the material is cut, you have to unload it and remove it from the Explore machine. Then, you have to weed the design from the material. You can use a weeding tool for that. When the design is out, you have to glue it to the canvas, and your beautiful butterfly is ready to beautify your room.
Conclusion
In short, I am sure you have learned how to use a Cricut Explore 3. With this machine, you can create many DIY projects like cards, flowers, coasters, keychains, etc. In this blog, you learned how to make a beautiful butterfly by using your cutting machine. To complete your project, you must know about the essential supplies you will need and the basic process. Reading this blog, you understand how the Cricut machine works, and now you can create any project you want.
FAQs
Can I Use Cricut Explore 3 as a Beginner?
For sure! Cricut Explore 3 is an easy-to-use machine, and it is great for beginners to learn how to use it. This machine allows you to cut more than 100 materials, like paper, cards, and many other projects. If you want to use the machine, you will have to do a few things, like connecting it to your device and downloading the Design Space software.
How Do I Set Up Cricut Explore 3?
To work with this machine, you will have to complete the setup. For the setup, you will have to do the following things:
How Can I Connect Cricut to My Computer via Bluetooth?
To connect your computer to the machine via Bluetooth, you will have to do the following things:
Visit: install cricut design space app
www.cricut.com setup login
Source: https://cricutmakermachines.com/how-to-use-a-cricut-explore-3-easy-tutorial-for-beginners/
#How to Use a Cricut Explore 3#cricut.com/setup#install cricut design space app#cricut.com setup mac#install cricut design space#cricut create connect to computer#setting up my cricut maker#cricut setup create account#setting up new cricut maker#cricut setup on computer#cricut cutting machine setup#cricut setup#cricut design space setup
0 notes
Text
Cricut Design Setup: A Complete Guide for Beginners
The Cricut Design setup is a cakewalk. Don’t you think so? It’s okay; I know you might be a beginner crafter who wants to get started with a new Cricut machine. But you need to know that setting up is really not as daunting as it seems to be. First of all, clear these things from your mind that you are a beginner and don’t know how to setup Cricut.
Cricut Design Space is software that is used to setup your Cricut machine. However, the main purpose of the Cricut app is to design and edit them on your device and then cut those designs with your Cricut machine. So what are you waiting for? Let’s delve into this blog and start your Cricut setup hassle-free.
What Do You Need for Cricut Design Setup?
When it comes to setting up a Cricut machine, you will need many things, such as a compatible device, Cricut software, and Cricut ID. The software plays an important role in setting up the machine. Besides, Cricut only supports four types of operating systems, like Windows 10 or 11, macOS 11 or later, Android 10.0 later, and iOS 15 or later. Below, I have mentioned the prerequisites you need to ensure before the setup.
1. A Compatible Device
Here are the system needs you will want on your MacBook for Cricut setup:
Now that you know what you will need to look for when you decide on your system for Cricut Design setup.
2. Cricut Design Space
Here’s how to download the Cricut software on your Mac:
3. Cricut Account ID
Before you learn about the Cricut Design setup, you must create a Cricut account. Here’s how to create an account using the Cricut app:
After completing these prerequisites, you can move further to the next section, where I will explain how to perform the Cricut Design setup.
How to Setup Cricut Machine?
Now that you have everything you need to setup your Cricut product, you need to start with your Mac and set it up. Follow the steps given below to setup your Cricut.
After that, you need to connect your Cricut to your Mac. Follow the steps in the next section, which explains how to connect Cricut to Mac.
How to Connect Cricut Machine to Mac?
Let’s now connect our Cricut machine to a Mac device. The steps will be simple enough for beginners to follow and connect themselves. Here’s how to connect:
Finally, you have done the Cricut Design setup; now, you are all set to start your crafting journey hassle-free.
FAQs
Question 1: Can I connect my Cricut via a USB cable?
Answer: Yes, you can connect your Cricut using your USB cable. However, you can not connect your Cricut Joy via USB cable because the Joy model doesn’t come with a USB port built-in. So, you will need to connect it wirelessly. Besides, all the models are easily connectable via a USB cord.
Question 2: Is Cricut software enough for Cricut Design setup?
Answer: Yes, Cricut Design Space is enough. But still, you will need to ensure other factors, such as your system’s requirements. Systems with the latest operating system are more likely to support the Cricut software, making your machine setup easy and seamless. Although Cricut software will be enough, you must check the other factors as well.
Question 3: How can I setup Cricut product?
Answer: Here are some tips for setting up a Cricut more quickly:
Visit: install cricut design space app
Source: https://connectcricut.com/cricut-design-setup-a-complete-guide-for-beginners/
#install cricut design space app#install cricut explore air 2#cricut.com/setup#cricut heat press#cricut design space#cricut new machine setup#cricut.com/setup mac#cricut venture#cricut.com setup mac#cricut explore air 2#cricut crafts#cricut#cricut setup create account#cricut setup explore air 2 setup#cricut setup maker#cricut setup log in#cricut setup#cricut setup on computer#cricut setup for pc#www.cricut.com setup login#cricut create connect to computer#setting up your cricut maker
0 notes
Text

Circut Explore Air 2 Cut Smart 2 w/ Accessories Teal Blue Aqua Color Cuts Vinyl Cardstock Bonded fabric Poster Board Paper Iron-on's
0 notes
Text

Cricut is a well-known brand that offers a variety of cutting and heat press machines, such as Cricut Explore, Maker, Joy, Cricut EasyPress 2, Hat Press, Mug Press, etc. If you are a beginner, you should choose Cricut Joy, or if you want to level up your crafting experience, then select Cricut Explore Air 2 or Cricut Maker. To start using your Cricut machine, you must download and install the Cricut Design Space app on your computer or smartphone from cricut.com/setup
0 notes
Last Seen Blogs

zelos-official-armrest
Welcome, you wandering soul :D !


trivalleyhc
Tri-Valley Hospice Care

scottymac92
Mac

louisemagdalenacarlsson
En blondin på vift