#Custom File Uploader using Lightning Web Component
Explore tagged Tumblr posts
Visit Tumblr Blog
Explore Tumblr blogs with no restrictions, modern design and the best experience.
Last Seen Tumblr Blogs


Fun Fact
Tumblr’s website traffic is steadily declining.
Text
Enabling CSV data uploads via a Salesforce Screen Flow
This is a tutorial for how to build a Salesforce Screen Flow that leverages this CSV to records lightning web component to facilitate importing data from another system via an export-import process.
My colleague Molly Mangan developed the plan for deploying this to handle nonprofit organization CRM import operations, and she delegated a client buildout to me. I’ve built a few iterations since.
I prefer utilizing a custom object as the import target for this Flow. You can choose to upload data to any standard or custom object, but an important caveat with the upload LWC component is that the column headers in the uploaded CSV file have to match the API names of corresponding fields on the object. Using a custom object enables creating field names that exactly match what comes out of the upstream system. My goal is to enable a user process that requires zero edits, just simply download a file from one system and upload it to another.
The logic can be as sophisticated as you need. The following is a relatively simple example built to transfer data from Memberpress to Salesforce. It enables users to upload a list that the Flow then parses to find or create matching contacts.
Flow walkthrough
To build this Flow, you have to first install the UnofficialSF package and build your custom object.
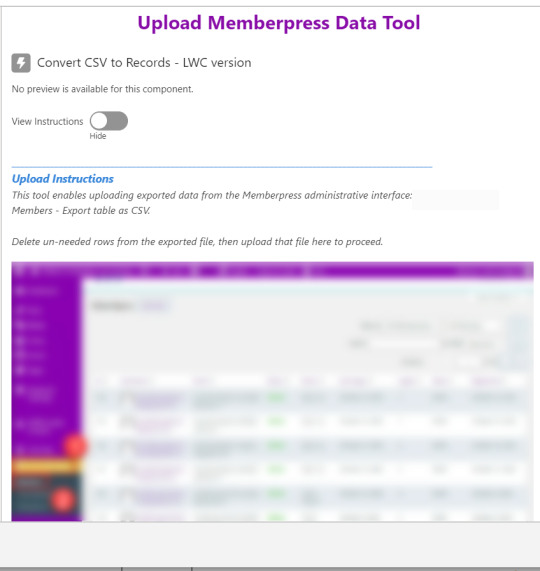
The Welcome screen greets users with a simple interface inviting them to upload a file or view instructions.

Toggling on the instructions exposes a text block with a screenshot that illustrates where to click in Memberpress to download the member file.
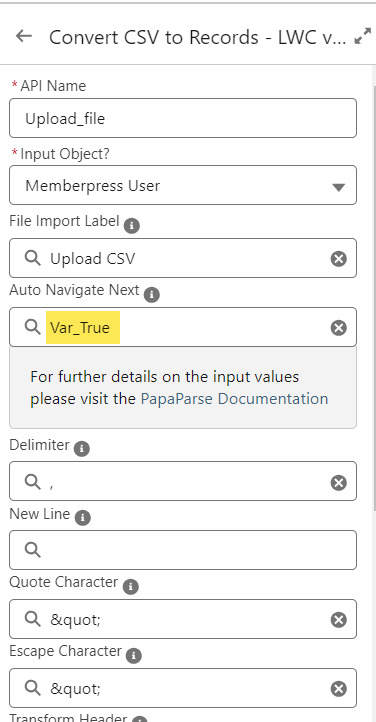
Note that the LWC component’s Auto Navigate Next option utilizes a Constant called Var_True, which is set to the Boolean value True. It’s a known issue that just typing in “True” doesn’t work here. With this setting enabled, a user is automatically advanced to the next screen upon uploading their file.
On the screen following the file upload, a Data Table component shows a preview of up to 1,500 records from the uploaded CSV file. After the user confirms that the data looks right, they click Next to continue.

Before entering the first loop, there’s an Assignment step to set the CountRows variable.

Here’s how the Flow looks so far..

With the CSV data now uploaded and confirmed, it’s time to start looping through the rows.
Because I’ve learned that a CSV file can sometimes unintentionally include some problematic blank rows, the first step after starting the loop is to check for a blank value in a required field. If username is null then the row is blank and it skips to the next row.

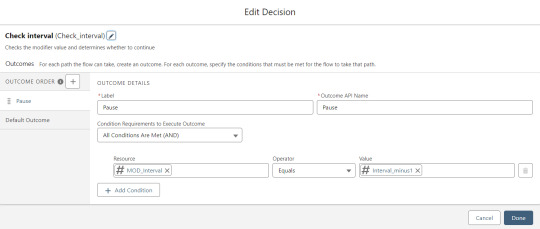
The next step is another decision which implements a neat trick that Molly devised. Each of our CSV rows will need to query the database and might need to write to the database, but the SOQL 100 governor limit seriously constrains how many can be processed at one time. Adding a pause to the Flow by displaying another screen to the user causes the transaction in progress to get committed and governor limits are reset. There’s a downside that your user will need to click Next to continue every 20 or 50 or so rows. It’s better than needing to instruct them to limit their upload size to no more than that number.

With those first two checks done, the Flow queries the Memberpress object looking for a matching User ID. If a match is found, the record has been uploaded before. The only possible change we’re worried about for existing records is the Memberships field, so that field gets updated on the record in the database. The Count_UsersFound variable is also incremented.

On the other side of the decision, if no Memberpress User record match is found then we go down the path of creating a new record, which starts with determining if there’s an existing Contact. A simple match on email address is queried, and Contact duplicate detection rules have been set to only Report (not Alert). If Alert is enabled and a duplicate matching rule gets triggered, then the Screen Flow will hit an error and stop.

If an existing Contact is found, then that Contact ID is written to the Related Contact field on the Memberpress User record and the Count_ContactsFound variable is incremented. If no Contact is found, then the Contact_Individual record variable is used to stage a new Contact record and the Count_ContactsNotFound variable is incremented.

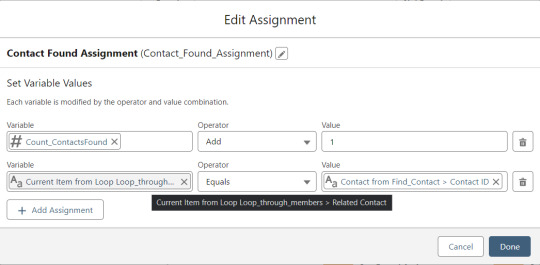

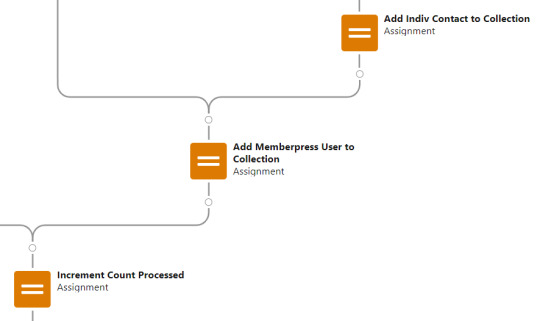
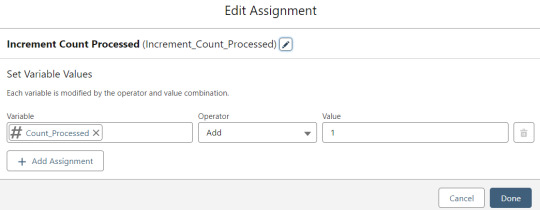
Contact_Individual is then added to the Contact_Collection record collection variable, the current Memberpress User record in the loop is added to the User_Collection record collection variable, and the Count_Processed variable is incremented.


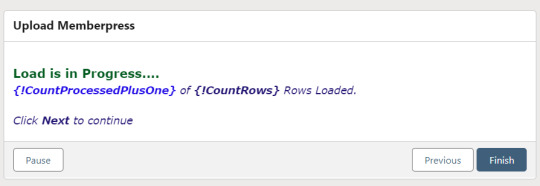
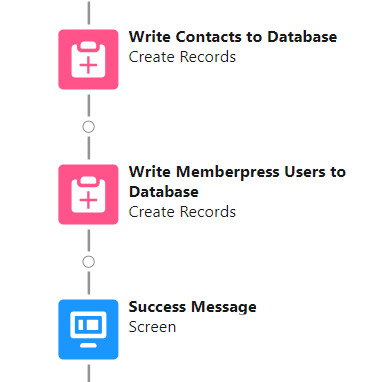
After the last uploaded row in the loop finishes, then the Flow is closed out by writing Contact_Collection and User_Collection to the database. Queueing up individuals into collections in this manner causes Salesforce to bulkify the write operations which helps avoid hitting governor limits. When the Flow is done, a success screen with some statistics is displayed.

The entire Flow looks like this:
Flow variables
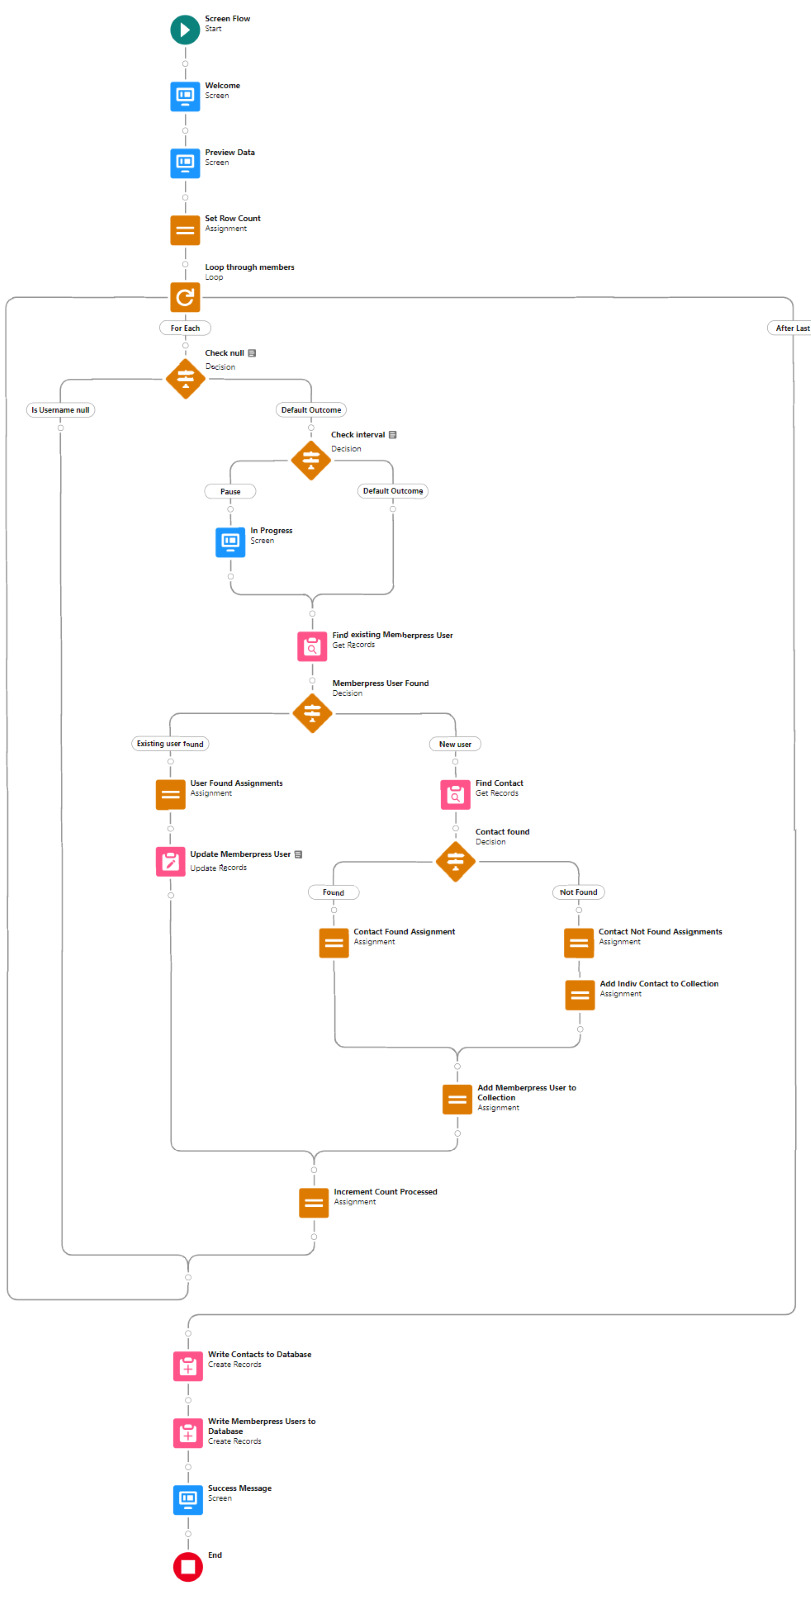
Interval_value determines the number of rows to process before pausing and prompting the user to click next to continue.
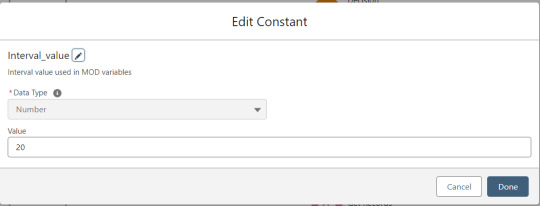
Interval_minus1 is Interval_value minus one.
MOD_Interval is the MOD function applied to Count_Processed and Interval_value.

The Count_Processed variable is set to start at -1.

Supporting Flows
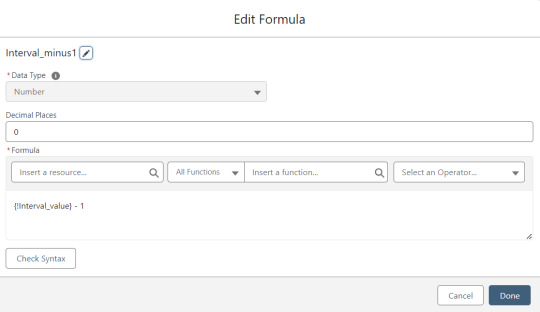
Sometimes one Flow just isn’t enough. In this case there are three additional record triggered Flows configured on the Memberpress User object to supplement Screen Flow data import operations.
One triggers on new Memberpress User records only when the Related Contact field is blank. A limitation of the way the Screen Flow batches new records into collections before writing them to the database is that there’s no way to link a new contact to a new Memberpress User. So instead when a new Memberpress User record is created with no Related Contact set, this Flow kicks in to find the Contact by matching email address. This Flow’s trigger order is set to 10 so that it runs first.
The next one triggers on any new Memberpress User record, reaching out to update the registration date and membership level fields on the Related Contact record

The last one triggers on updated Memberpress User records only when the memberships field has changed, reaching out to update the membership level field on the Related Contact record


0 notes
Text
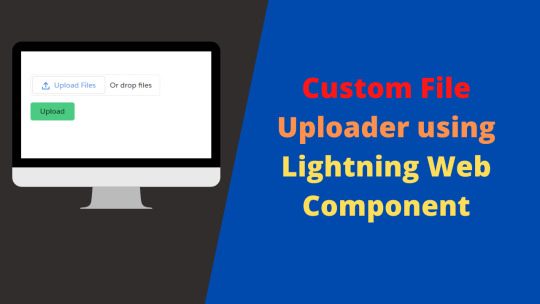
Custom File Uploader using Lightning Web Component
[Blogged] - Custom File Uploader using Lightning Web Component via @sfdc_panther Link - @Salesforce @SalesforceDevs @Trailhead @ApexHours #Salesforce #LightningComponent #Trailhead
Hi #Ohana, In this blog post, we will talk about how to develop a custom file Upload using Lightning Web Component. We will create a Component that will upload the file under the file object instead of Attachment. The reason we are doing, Salesforce is deprecating the attachments. We will use FileReader class of JavaScript to read the File and then send that to Salesforce. We have designed…
View On WordPress
#custom file upload in lwc#custom file upload using lwc#Custom File Uploader using Lightning Web Component#file uploader using lwc#files in lwc#upload files using lightning web component
0 notes
Link
File Upload in Lightning Web Component(lwc) File Upload in Lightning Web Component(lwc) lightning-file-upload component provides an easy and integrated way for users to upload multiple files. The file uploader includes drag-and-drop functionality and filtering by file types. File uploads are always associated to a record, so the record-id attribute is required. Uploaded files are available in Files Home under the Owned by Me filter and on the record’s Attachments related list that’s on the record detail page. Although all file formats that are supported by Salesforce are allowed, you can restrict the file formats using the accept attribute. lightning-file-upload component inherits styling from file selector in the Lightning Design System. LWC file upload Example fileUploadLWC.html fileUploadLWC.js import { LightningElement, api } from 'lwc'; import {ShowToastEvent} from 'lightning/platformShowToastEvent'; export default class FileUploadLWC extends LightningElement { @api recordId; get acceptedFormats() { return ['.pdf', '.png','.jpg','.jpeg']; } handleUploadFinished(event) { // Get the list of uploaded files const uploadedFiles = event.detail.files; let uploadedFileNames = ''; for(let i = 0; i < uploadedFiles.length; i++) { uploadedFileNames += uploadedFiles[i].name + ', '; } this.dispatchEvent( new ShowToastEvent({ title: 'Success', message: uploadedFiles.length + ' Files uploaded Successfully: ' + uploadedFileNames, variant: 'success', }), ); } } fileUploadLWC.js-meta.xml Now we can add this lwc component on the account detail page. Go to one of account detail record Click Setup (Gear Icon) and select Edit Page. Under Custom Components, find your fileUploadLWC component and drag it on Account page. Click Save and activate. We will get the following output where the user will be able to upload multiple files on the account record. Once the user will click on Done, user will see a success message. File Upload Limits By default, you can upload up to 10 files simultaneously unless your Salesforce admin has changed that limit. The org limit for the number of files simultaneously uploaded is a maximum of 25 files and a minimum of 1 file. The maximum file size you can upload is 2 GB. In Communities, the file size limits and types allowed follow the settings determined by community file moderation. By default, guest users can’t upload files. You can enable the org preference. Allow site guest users to upload files. Usage Considerations This component is not supported in Lightning Out or standalone apps, and displays as a disabled input. Additionally, if the Don’t allow HTML uploads as attachments or document records security setting is enabled for your organization, the file uploader cannot be used to upload files with the following file extensions: .htm, .html, .htt, .htx, .mhtm, .mhtml, .shtm, .shtml, .acgi, .svg. For more details please refer to official link. This example is copied from this official link with small tweaks. The post File Upload in Lightning Web Component(lwc) appeared first on Salesforce Blog.
0 notes
Photo

WordPress Image Optimization Made Easy With WP Compress
Agencies that build and host dynamic, high-volume, high-traffic WordPress websites are tasked with delivering fast loading speeds for their clients.
Their clients might be eCommerce websites, community websites, or membership websites with:
massive amounts of images that keep changing
many concurrent visitors
many simultaneous transactions
All these images can be hard to maintain and can significantly slow down the loading of the website. For clients, though, faster loading speeds mean credibility.
Fast-loading sites keep customers satisfied, supporting conversions and sales. A fast, responsive site will reduce the number of abandoned shopping carts and, perhaps most importantly, lead to higher search engine rankings.
But images use a lot of bandwidth, which in turn slows down webpage loading speeds. Research has shown that:
65% of a webpage weight is composed of images.
47% of users move on if a website takes more than 3 seconds to load.
Here is the hard truth: images are an indispensable part of your content, but they can hurt website performance if you're not careful.
The Solution: Image Optimization Plugins
Image optimization used to take a long time, but not anymore. WordPress image optimization plugins optimize your images by automatically compressing your images and using smaller versions for your website. They maintain the original quality of the image and deliver the image in the right format, resolution, dimensions, and size.
What to Look for When Choosing Image Optimization Plugins
Here are some questions and prompts to keep in mind while selecting an image optimization plugin.
Image Compression
A good image optimization plugin will compress your images to reduce the file size. A superior image optimizer does it live, on the fly, when visitors are on the page.
Does it offer compression while preserving the quality of the images?
Can you determine your own optimization settings?
Can you set your own compression levels?
How does it prevent over-compression?
Does it save original image files?
Can it do compression on autopilot?
Does it offer WebP files?
Performance and Back-End
An optimization plugin is only as good as the performance gains it delivers!
Does it offer cloud storage services?
Does it work with a reputable CDN?
How much website space does it save you?
Does it vastly improve image loading speed and website loading times?
Quality
You want to be sure that compression and optimization won't ruin the quality of your images.
Does it compress a high percentage of the image size?
What kind of file size is left afterwards?
Does it save original files in the cloud?
Management
Consider the admin interface of your optimization plugin—an easy-to-use plugin will be used more and so will work better.
Does it offer features like a centralized dashboard to manage the client’s websites?
Does it offer personalized monthly reports?
WP Compress Image Optimization
WP Compress fulfills all these requirements for an excellent image optimization plugin.
What Is WP Compress?
WP Compress is an image optimization plugin for WordPress. There are two versions of WP Compress:
Local Version: Performs compression locally, optimizes images locally, and saves on website storage space on the local server.
Live Version (the main version): Compression is done live, with up to 333x faster image load speeds of up to 7 milliseconds!
Once a visitor is on the page, it is automatically optimized on the fly, loading fast for existing visitors and new visitors. This means higher conversion rates and lower bounce rates, with fast speeds helping keep users on the page.
Using a top-rated CDN in the background, WP Compress makes websites available to users at lightning-fast speeds.
WP Compress is focused on the needs of agencies that build and host websites. A single WP Compress account can be used on unlimited websites.
Live compression means every time a new visitor comes to the website, it is instantly optimized and made available to them in up to 7 milliseconds, even when there are already other visitors on the website.
Under the Hood of WP Compress
WP Compress consists of the following components:
plugin component that can be downloaded on all the websites your agency manages
cloud storage service for original images
centralized management portal where you can configure the optimization of all websites your agency manages
WP Compress Features
Incredible image optimizations paired with the following advanced features will give you 333x faster image loading speeds.
Cloud Processing
All your images are securely compressed, resized, and saved in the cloud so as not to use up your local server resources, while saving on storage space and ensuring faster loading speeds. Only optimized images are loaded on your server.
Adaptive Images
Adaptive images are responsive images that are properly sized to be viewed on different kinds of devices. WP Compress generates and loads these images based on the actual devices they will be viewed on. This, combined with adaptive images and automated WebP delivery, is a combination that results in up to 333x faster image loading speeds of 7 milliseconds, with especially noticeable effects on mobile devices.
WebP
You can generate WebP images for each of your optimized images. Just toggle Generate WebP image, and it will be created and served to web browsers that support the WebP format.
Lazy Loading
Lazy loading ensures that only pictures that are currently visible on the user device are loaded. This saves bandwidth for users and is one of the many methods that WP Compress uses to bring websites to users at lightning-fast speeds.
Automatic Resizing
Once images have been compressed, they are automatically resized.
Intelligent Compression
The WP Compress algorithm is designed to prevent over-compression in order to maintain the original quality of the image.
Unlimited Cloud Backups
Backups of original images are always safe (and offloaded to the cloud to save server space).
Top-Rated CDN
Customers will be able to access client websites anywhere in the world in seconds. Whether they're in Brazil, Oslo, Madrid, or Johannesburg, they will all have the same loading speeds.
Say your client is based in New York, and their customer is based in Rio de Janeiro. Their customer will access the website content not from a server in New York but from a cloud server in their own city.
To make this happen, WP Compress uses a highly reputable global content delivery network, meaning that the pages and images are accessed from the cloud server closest to the location of the customer.
Agency Features
A lot of thought has gone into how hosting management works. And since WP Compress is made with agencies in mind, it comes equipped with tools that enable you to easily manage multiple websites.
Centralized Management
You can remotely manage all websites from a central portal to configure settings, bulk compress, and view reports.
Monthly Quotas
The agency can assign monthly quotas to each client’s website based on hosting plans they already have.
Custom Branded Reporting
You can generate and send detailed reports for each website account, such as a web report, email report, or PDF report. Also, you can put your own logo on the report.
Hide From WordPress
You can fully hide WP Compress from your clients’ websites and take credit for lightning-fast load times.
How to Get Started With WP Compress
Using WP Compress is completely effortless once it's set up. Just paste in your API keys to activate, hit start, and optimization is always done automatically. You don't need to lift a finger.
Now I will show you how to set up and use WP Compress.
1. Register for a WP Compress Account
Go to the portal, sign up, and you will be sent a confirmation email. After you've confirmed your email, you will be asked to log in, and you’ll be taken to your dashboard.
2. Add a New Website
Click Add a Website and you will be taken to this screen. You need to have a WordPress website for you to link to WP Compress. You also need to select a maintenance plan.
(Note that a free WordPress.com account will not work with WP Compress because it doesn't allow plugin downloads.)
3. Install the Plugin
Click Download Plugin to download the WP Compress plugin. Go to your WordPress site and upload and install the plugin. (See our complete guide to installing plugins for help with this step.) Alternatively, you can find and install the WP Compress plugin from the built-in plugin search engine in your WordPress admin pages.
4. Get Your API Keys
When you click Next Step, you will be assigned API keys. Copy this key to the clipboard—you'll need to paste it into the WP Compress admin page on your WordPress site.
5. Connect Your WordPress Site to WP Compress
Now you can link the WP Compress plugin on your WordPress site to the WP Compress management portal. Simply select WP Compress from the admin menu and paste your API keys to connect, and then press Start.
6. That's It!
From now on, your images will be automatically optimized when viewed by visitors coming into your website and will be delivered at lightning speed from a global CDN.
Using the Local Version of WP Compress
If you prefer to use the local version, which optimizes on your local server, here's a screenshot of the image optimization settings you can choose from:
I'll explain some of these settings below.
Optimization Level
When compressing images, you can choose from three optimization settings:
Lossless: There will be no loss of image quality, but only limited compression.
Intelligent: This is the recommended setting—a balance between quality and compression.
Ultra: Choose this setting if you want images to be compressed into tiny sizes and don't mind a significant reduction in quality.
Resize Image
Assign a maximum size for images. Any images larger than this will be shrunk to fit.
Autopilot Mode
If you don’t want to manually compress every time new images are loaded, turn on autopilot mode and let WP Compress look after detecting and compressing new images. However, if you want to compress images manually, you can turn off autopilot mode and handle compression of each image individually from the Media Library.
Here's what you'll see in the Media Library for images that have been successfully compressed:
Compression Reports
WP Compress offers some reports to make it easy to see the benefit that your clients are getting from image optimization and compression. Let’s take a look at the report below.
This shows that WP Compress is achieving a high compression rate—reducing images to about 10% of their original size.
Note: You do have the option to choose delivery of your website content from a CDN.
Reports for Clients
As an agency, you can generate and send detailed reports for each website account. This can be a web report, email report, or PDF report. Also, you can put your own logo on the report.
Conclusion and Next Steps
After testing WP Compress, I can conclude that it delivers on its promises. It is very easy to install and simple to use. Once I installed it, everything was done automatically and effortlessly.
For the live version, I created a website and loaded it with images. It significantly reduced my image files down to 10% of their original sizes. Talk about website weight loss! The images also maintained their original quality.
The same applied for the local version. You still save upwards of 75% disk space on your local server, and your newly light pages will load up to 4x faster.
I highly recommend the agency features like monthly quotas because they fit with clients' website care plans. You don't need to revamp how your services are structured.
Finally, you should consider adding WP Compress to the package of services you offer to clients.
You can learn more about WP Compress on the plugin's website
by Franc Lucas via Envato Tuts+ Code https://ift.tt/2Pn1x3S
0 notes
Text
what's the best green screen software
H.B. Video Photo Magix title>
You sent too many requests so Linguee locked out your computer.
Those who already have all the basics and want to add one to the top are well served with the following specials. Gradually, you can make your home streaming studio complete. Anyone who wants to buy a green screen set is well served with models such as Fancierstudio Lightning. However, you can also make simple green screens yourself from green cotton towels. You don't have to dig too deep to get good lighting. Your customers, employees and partners expect modern digital and mobile applications. But replacing proven systems with Windows or Linux systems can be expensive, time-consuming and risky, and can result in high running costs. Import the green screen video, as well as the image or video that should replace the green background. Drag the media files into the first two tracks on the timeline. Click "Add Media Files" to add both the green screen video and the background video or image. Drag both videos onto the timeline. The selection ranges from free software to expensive professional video editing programs. However, you should know that when it comes to VSDC, green color is the only option as the multi-color chroma key tool is an advanced feature for premium users. Back to video editing magic. Click anywhere on your video background to select the color you want to remove.

Free green screen software for Mac - iMovie
It is not uncommon for you to end up with errors and an unacceptable risk.
Click on the green screen video and select the "Sony Chroma Keyer".
You can also easily use the green screen effects "at home" if you follow these simple instructions.
That means if your background color is not dominant (e.g. the scene object needs more space), you have to remove it manually.
Here are a few tips on how to brighten it up properly. In the properties, adjust the Chormakey settings until you are satisfied with the result. Click "Add Video" to add both your main video and the background video to the timeline. If your computer is only on a large network in which many users access Linguee at the same time, please contact us. For next level streaming, we have compiled a list of recommended partners who offer advanced solutions. Use features like green screen / chroma key, filter application, adjusting transition effects and changing the size and color of borders. In the camera viewfinder, you select a color that you want to replace and then the video that you want to display instead of the color. When you have finished creating the video, you can upload it directly to the app on Facebook, Dropbox, Twitter or by email, or today there is hardly a movie without green screen effects. Some blockbusters are even almost completely rotated in front of the green wall in order to be able to insert computer-generated effects later. But is the green screen only for large productions with a budget of millions? LegaSuite Web makes web development quick and easy. With drag-and-drop tools and runtime components that extend any IBM i application into a user-friendly HTML5 web application. In contrast to other solutions, LegaSuite allows you to use existing developments without having to install or change code. In addition, it automatically extracts and synchronizes all screens of a legacy application with every modernized user interface. Some community members have badges that show who they are or how active they are in a community. Select one of the following categories to discover the latest GTA 5 PC Mods. Logitech Capture makes creating content with your webcam easy, fast and intuitive. By using remove.bg you agree to the use of cookies. You can find details on this in our Privacy Policy. Third, you need to spend some time finding the best place for yourself (or the scene object if you are not). Your shadow is almost inevitable, but your goal is to either have it outside the camera frame or even inside. To do this, make sure there is a solid space between you and the green screen.
0 notes
Text
Vidnami Review Discount And Huge Bonus
Vidnami Testimonial - Are you searching for even more knowleadge about Vidnami? Please go through my honest review regarding it prior to selecting to evaluate the weaknesses and also toughness of it. If you purchase Vidnami via my web link, you will certainly obtain unique and also attractive bonus offer plans. I constantly upgrade my bonus offers daily.
Presenting Vidnami
8 Aesthetic Web Content Applications to Create Spectacular Pictures and Video Clips (Component 1)
Do you wish to present aesthetic messages in brand-new methods?
Are you seeking brand-new design devices to assist you create visual content?
Social media site is nothing without images. From easy blog graphics to memes and video clips, visuals aid us communicate with and also engage our target markets.
In this short article I'll reveal you eight design resources and devices that can help you produce aesthetic web content quickly and also easily.
Discover 8 apps to produce spectacular social media sites pictures.
# 1: Locate Images Without Copyright
If you're seeking images to utilize in your pictures, I have 2 resources for you: Unsplash and New Old Stock.
Unsplash is a complimentary photo archive that prides itself available "do-whatever-you-want, hi-res images." According to their licensing details, the photos on the site are not copyrighted, which indicates you have free rein over how you utilize them.
Usage copyright-free pictures as a background for your key message.
Unsplash's subscription service offers you 10 brand-new photos delivered straight to your inbox every 10 days.
It's not constantly easy to find what you're searching for on Unsplash. You can watch pictures by month of submission, but there is no chance to search by topic or any kind of various other category.
New Old Stock supplies "vintage pictures from the public archives" and assures that no known copyright restrictions exist on them.
You can discover images from times past at New Old Supply.
Like Unsplash, you can't search images by theme, topic or any various other groups. However, New Old Supply includes some incredible vintage digital photography. If that's what you're looking for, this is the place.
Exactly how to Obtain Much More Wins for Your Firm or Customers-- Specialist Training! Do not miss this occasion! SALE FINISHES
# 2: Attract Attention With Animated Video Clip
Video has taken content marketing by storm-- target markets enjoy it. If you've avoided video since it's too taxing or costly, you need to most likely take a look at PowToon.
PowToon is a super-simple Vidnami app that assists you create computer animated videos that will really engage your target market.
Usage PowToon to develop video clips as well as presentations with a large "Wow!" factor.
PowToon features several design templates as well as a well-stocked collection of forms, things and also effects you can make use of in your computer animation.
If you've ever before thought of producing item overviews, presentations or perhaps educational video clips, you can utilize PowToon for those as well as much more. Whatever your message, an eye-catching video clip can possibly enhance it.
# 3: Pick a Color Combination
Adobe Kuler is a solution that allows you create your very own shade palette or select from thousands of existing ones. Why is that important? Colors affect our perception, our emotions and also our actions. We associate shades with different principles as well as respond to them in various means.
Use Kuler to discover just the appropriate color for your message. With Kuler, you can find the right color equilibrium for your aesthetic content. As soon as you find your perfect scheme, order the code for every color (RGB, HEX, LAB, CMYK, HSB). You can kind the code right into nearly any type of design tool to see to it your shade is always exactly ideal.
Obtain Specialist Social Network Advertising Training!
Intend to keep ahead of your competitors? Need to understand a Vidnami social platform? Discover how to improve your social media sites advertising and marketing at Social media site Advertising World 2020, given you by your close friends at Social Media Supervisor. You'll massage shoulders with the biggest names and also brand names in social media, take in numerous ideas as well as new techniques, and appreciate comprehensive networking opportunities. Do not miss the sector's largest meeting. Get in early for large discounts.
Vidnami Review & Review
Supplier: Jonathan Oshevire
Product: Vidnami
Release Date: 2019-Nov-04
Launch Time: 11:00 EST
Front-End Cost: $37/mo
Sales Web Page: https://www.socialleadfreak.com/vidnami-review/
Particular niche: General
What Is Vidnami?
Vidnami is a new software program tool that leverages the power of AI to make it much easier than ever to create stunning videos with just a couple of clicks of your computer mouse. What accustomed to take hrs, currently takes a number of minutes!
Exactly How Does Vidnami Work?
Step 1: Click The Develop A New Video Switch.
Action 2: Upload Your Text Web Content.
Action 3: Vidnami's SMART Modern technology After that Produces A Stunning Video Clip Using Your Web Content In A Matter Of A Couple Of Seconds By Selecting From An Included Data Source Of COUNTLESS Sensational Images And Video Templates.
Vidnami Comes Crammed With Spectacular Video Templates.
Vidnami Evaluation - Quality & Advantages
Vidnami is Packed With Attributes That Make It The Smartest, Fastest, And Simplest Video Software Program Released.
Cloud-Based Software program
Because Vidnami is firmly hosted in the cloud, there's never anything to install or update. Simply login to Vidnami from any type of tool with an internet connection and also start making videos with a couple of computer mouse clicks.
No Video Clip Development Skill Or Design Experience Required
You do not require to bring anything to the table when you get Vidnami. No prior abilities or experience with video is needed to create specialist high quality video with a couple of clicks of your computer mouse.
Includes Thousands Of Stunning Templates
Vidnami includes countless spectacular themes that are verified to get involvement, get traffic, and drive sales.
' Smart' Modern technology Does All The Heavy Lifting
Allow's face it ... Most of us aren't developers and also it's very easy to obtain STUCK trying to determine which template or video style would be the most effective. This is where Vidnami truly radiates ...
Instead of attempting to choose a template or identify which design of video clip you should make use of, Vidnami utilizes SMART modern technology that leverages Expert system to choose from the thousands of consisted of design templates to locate the one that matches perfectly. Creating videos with Vidnami essentially is as very easy as pushing a button.
Never Program Your Face On Electronic camera
You know that you need to be making video clips if you intend to obtain the results you're trying to find online, however one of the large points holding you back is you don't want to reveal you face on camera. Do not fret ... with Vidnami, you can create incredibly engaging video clips that obtain your traffic, leads, and also sales without ever revealing your face on cam.
Newbie-Friendly Video Editor
The Vidnami dashboard is instinctive, straightforward, and also very easy to utilize. We're consisting of 'Flying start' guide videos yet the majority of people find that Vidnami is so straightforward, you don't truly need a tutorial. Where most video software program devices have a finding out contour that last for weeks, within minutes you'll be a Vidnami 'Pro' user.
Add Captions and also Text Overlaps To Your Videos
Make your video clips look uber expert and stand apart with text overlays and also captions. Similar to every little thing else, adding these to your videos is simple as well as makes use of a drag and also decline editor so there's no discovering contour as well as no technical skills required.
Audio Is Added Instantly
Wish to include history songs or voiceover audio to your video. Vidnami makes it simple. Simply publish the audio file and Web content Samurai will immediately make it 'fit' your video clip. Speak about SMART!
Export And Share Video With The Click Of Your Computer mouse
Once your video clip prepares you can export it in several formats or share via social networks with a click of your computer mouse.
No Demand For A Computer Upgrade Or Costly Devices
Due to the fact that Vidnami is held in the cloud, you don't have to stress over updating your computer or acquiring additional tools. With Vidnami all you have to do is upload a text documents, struck 'Produce A New Video,' and Material Samurai does the rest for ... with lightning speed as well as incredible precision.
Final thought
" It's A Good deal. Should I Invest Today?"
Not just are you obtaining accessibility to Vidnami for the very best price ever before supplied, but also You're spending entirely without danger. Vidnami includes a 30-day Cash Back Warranty Policy. When you choose Vidnami, your contentment is ensured. If you are not completely satisfied with it for any factor within the first 1 month, you're entitled to a full reimbursement-- no question asked. You've obtained absolutely nothing to shed! What Are You Awaiting? Try It today and also obtain The Following Bonus offer Now!
Ps: If you have any questions you intend to ask me concerning Vidnami or you merely wish to present your sensations and thoughts regarding it. Please do not hesitate to relay your comments, suggestions or corrections., I will certainly address you totally and also thoughtfully. Many thanks!
0 notes
Text
Slider Revolution Responsive Joomla Plugin (Sliders)
Slider Revolution Joomla Plugin
Slider Revolution is an innovative, responsive Joomla Slider Plugin that displays your content the beautiful way. Whether it’s a Slider, Carousel, Hero Scene or even a whole Front Page, the visual, drag & drop editor will let you tell your own stories in no time!
Slider Revolution Highlights
Front Page Designer
Slider Revolution is not only for “Sliders”. You can now build a beautiful one-page web presence with absolutely no coding knowledge required. To get you started fast, we included a ton of premade examples that come with all assets included!
Create Beautiful One-Page Websites
Lots of Examples included
Works Great on any Device (Desktop, Tablet, Mobile)
No Coding Knowledge necessary!
Drag & Drop Visual Slider Building
Building sliders has never been easier! Even though Slider Revolution is sporting an impressive number of options, even beginners will manage to create beautiful presentations with our new, more intuitive workflow.
Text, Image, Video, Shortcode, HTML Content Layers
Complete Graphical User Interface
Custom Slide Content for different Devices
Full Control over Styles, Animations, Transitions
Fully Responsive Solution
We made sure that Slider Revolution looks great and is intuitive to use on every device, be it desktop computers, tablets or smartphones.
Works on Desktops, Notebooks, Tablets & Smartphones
Optimised for Android & Apple Devices
Custom Slide Content for different Devices
Fallback Options for Mobile Devices
True Multi-Media Content
We want Slider Revolution to integrate into your website as seamlessly as possible. Why not show any content with it?
Regular Image Display with Bulk Upload
HTML5, YouTube & Vimeo Video Support
Popular Social Media Content Stream
Navigation Designer
You get tons of navigation styles for bullets, arrows, tabs & thumbnails with Revolution Slider. The kicker is that you can now easily modify or create your own sets of navigation elements!
Arrows, Bullet, Tab, Thumbnail Navigation
Lots of “Ready to Use” Styles included
Markup and Style Builder with Preview
Export your own Navigation Sets!
We take Security Seriously
Our Slider Revolution Joomla Plugin is regularly audited by professional researchers at Dewhurst Security to make sure that it’s no threat to the security of your Joomla website.
Checked Joomla Plugin Security
Constantly Maintained ThemePunch Quality
Optimized Performance
Good looks aren’t everything, so we made sure that Slider Revolution also loads lightning fast!
Loaded core file size automatically scales with used features
Intelligent Lazy Loading options
SEO Optimization
Monitor and optimize all aspects of your sliders
Advanced Debugging Options
Visit our detailled FAQ Site
Alternatives to this Product
jQuery-only Version: Slider Revolution Responsive WordPress Plugin
jQuery-only Version: Slider Revolution Responsive jQuery Plugin
PrestaShop Version: Slider Revolution Responsive Prestashop Module
Magento Version: Slider Revolution Responsive Magento Extension
Opencart Version: Slider Revolution Responsive Opencart Extension
Plugin Features
The Technology
Our premise is “less is more” and that is reflected in the structure of our components. In order to incorporate so much functionality into our plugins, we make sure everything is build as modular as possible.
Fully Responsive & Mobile Specific Features
jQuery 1.7 – jQuery 2.x Supported
Lightning Fast Greensock Animation Engine
Powerful API functions
Smart Font Loading
General Options
We want Revolution Slider to be able to fulfill all slide based roles along with special functionality like carousels and hero blocks. If you can’t find a specific feature, feel free to ask us!
Hero, Carousel and Classic Slider Features
All Sizes Possible (Full Responsive + Revolutionary 4 Level Advanced Sizes)
Fullwidth, Fullscreen, Auto Responsive Slider sizes
Unlimited Sliders per page
Image BG Cover, Contain, Tiled, Alignment, etc.
WYSIWYG Drag & Drop Editor
Published / Unpublished Slides
Publish slides based on predefined Dates
Simple and Advanced Lazy Loading for Faster and SEO Optimized Slider Start
Link and Actions on Slides
Parallax Effects, full customizeable, combine with Ken Burns and other effects (Mouse / Scroll controlled)
Improved Light weight Ken Burns Effects (easier & faster)
World Premiere for advanced Action Building
Build Social Stream based Sliders
Quick and Easy building based on Slider, Slide and Layer Templates
Performance Monitor and better Performance Suggestions
Viewport based Slide Loading and Progress
Create Slider Defaults, Reset, overwrite single Settings due all slides
Save Slide, Slider, Layer, Animation as Template
Layer Capabilities
Layers have evolved from simple layers to become powerful scene building tools! Drag and Drop, Customize & Animate your way to your perfect slider.
Animation Builder
Huge Number of Possible Transitions
Create your custom animations
Set Start / End Time, Speed, Ease and Effects of any Layers
Show/hide layers on Slider Effects, Events, Actions
Add Unlimited Number of Layers
YouTube, Vimeo, Self-Hosted HTML5 Videos, Shapes, Buttons, Predefined Buttons as Layer
Set actions and links per Layers
Combine Actions over different Layers and slides
Option to Link to a Specific Slide via Layer
Toggle Animation, Classes, video functions via Layers
Variable Layer Image Sizes, full responsive and/or Device Size based
Design your Layers for different Device sizes after your needs
Option to Hide Layers on Any Devices
Slider Navigation
We have implemented almost all navigation types you can think of, which can be aligned anywhere on the stage. Be in full control with Slider Revolution Navigation!
Bullet, Button, Tabs and Thumbnail Navigation, single or mixed mode. Any position like outter,inner, aligned etc.
Left/Right, Top/Bottom Mouse Scroll events.
Vertical/Horizontal Keyboard actions
Mobile Touch Enabled (Optional)
Drag and Pull Carousel Feature
“Stop Slide Timer on Hover” Function
Auto-Hiding of Navigation with Delay Option
Optional Countdown Timer Line
Set position, color, size of Time Line
Set size, visibility, amount and behaviour of Thumbs, Tabs, Bullets, Arrows
Hide / Enable Navigation on Mobile Devices
Keyboard Navigation
Fancy Navigation Skins with Slider Preview
Video Features
AutoPlay – Always, only first time, skip first time, wait for action
Stop video on Blur, Play Video only in ViewPort
Rewind, or keep current progress time
Set Start and End time
Loop, “Loop and Progress” Slide
Fullscreen, fullwidth, boxed
Navigation features
Action based control (through other layers)
New Video API, Events and Methods to controll media outside of the Slider
Content Sources
Slider Revolution is not just your ordinary image & video slider any longer. Now you can also pull the sliders content from popular social media steams.
Custom-Build Content
Posts
Facebook
Twitter
YouTube
Vimeo
Flickr
Instagram
Get Involved!
Is there a feature you would like to see? We will go through all your feedback weekly and pick the most requested features to be included in a future update! Contact us via our Profile Form
Press Commentary for the WordPress Version
“Revolution Slider is an all around awesome plugin, and would be a solid addition to any site.” (WPExplorer) ”...all I can say is WOW. I can honestly say that I haven’t had as much fun with, or been blown away by the quality and experience of any plugin/slider/website building tool in…ever??” (Webdsignandsuch.com – “A look at the Revolution Slider – Steve Jobs would be proud”) “This is my favourite Slider plugin right now – props to Theme Punch for bringing us this one.” (Blogging Wizard) “I thoroughly enjoyed testing and using this plugin, and highly recommend it to all those of you who are looking for a slider plugin, especially if you plan to include some layer-based animation features to your slides.” (WP Mayor)
Recommendation #1
Best WordPress Plugins – Digital Trends
30+ Useful WordPress Slider Plugins – Creative Can
35+ Premium WordPress Plugins – To Put You A Step Ahead – Tripwire Magazin
80 Amazing jQuery Slider and Carousel Plugins – Creative Can
30+ jQuery Image Slider Plugins and Tutorials – Tripwire Magazin
25+ Cool WordPress Slider Plugins – Creative Can
Usage in Themeforest Themes
If you want to use Slider Revolution in your Theme here on ThemeForest purchase ONE extended license for EACH theme (as long as there is no Developer License available) you put on the marketplace! If you have questions about this agreement please Contact us Here
Ressources / Credits
iPhone 6 Plus Psd Vector Mockup
Psd iPad Air 2 Vector Mockup
The New MacBook Psd Mockup
Stroke 7 Icon Font Set
33 Trendy Retro Vintage Insignias Bundle Volume 3
from CodeCanyon new items http://ift.tt/2xqOTK4 via IFTTT https://goo.gl/zxKHwc
0 notes
Link
Content Management Systems are arguably the internet’s most powerful web development tool. In a rapidly growing market where every business under the sun requires a website that is not only fully functioning, but optimised, easy to update regularly, and implement the latest features, the right CMS is important.
As a web developer it can be easy to stick to the CMS you know – even if there are potentially better ones out there. With such a busy schedule, websites to be made, and money to be earned, the desire to find something new is quite frankly near the bottom of the pile.
That’s is why we have worked to put together a list of some the most new and notable (or older but still just as worthy) CMS systems for 2020. After all, with a new year, why not learn a new CMS too?
1. Craft
Craft is a content-first CMS system that is both flexible and user-friendly. Ideal for web designers it is totally customisable and gives control over everything including all your own HTML.
You only need one Craft installation to manage multiple sites’ content, making it ideal if you have multiple projects on the go. Alternatively, you can use it as a content API for any sites you may look after. There are multiple tools and features built to optimise performance alongside regular releases and bug fixes.

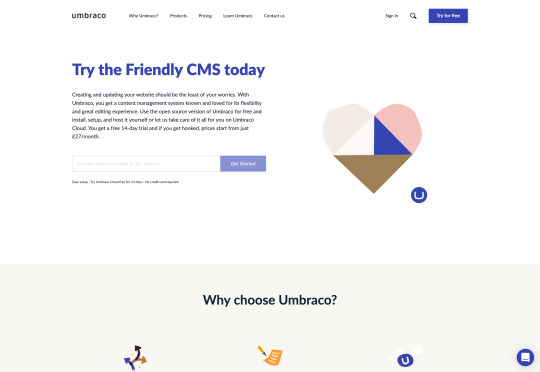
2. Umbraco
Umbraco is a great open source Content Management System that is built on .NET technology and used to run enterprise-level websites for a range of large, multinational organisations. Some examples include Microsoft, McDonalds and Mercedes Benz — giving you a clue at just how trusted this CMS system is. One of the benefits of Umbraco is that you can build an integrated site that can feed content from other digital platforms. It uses Microsoft stack and Microsoft Windows servers meaning it integrates well with third party systems and also benefits from the core security protection built into this.
It is a CMS that doesn’t require you to add lots of your own custom HTML — a plus if you’re not a fan of custom coding. You can manage multiple sites from the same CMS, upload and manage media files, build forms and use a drag and drop visual page editor to craft content quickly and simply.
3. Joomla
Ranked as the second top CMS system in the world by CMS Crawler, Joomla is proven to be one of the most popular Content Management Systems out there. Joomla can be seen as more complex as it requires a certain amount of coding knowledge, for example to develop or customize components, modules and plugins.
A point to note when using Joomla is that you don’t get limitations with themes and templates – you can use multiple templates on one site. This means if the client wants a totally different layout for a blog than for their primary pages it is easy to do.
You can have different types of content displayed on one page and the backend is often praised for being well organised. You can easily add new menus and articles, as well as restrict access to certain content on specific pages if you so desire. Joomla also has the function to make a website multilingual from the off — something that is useful for websites that are read and used worldwide.

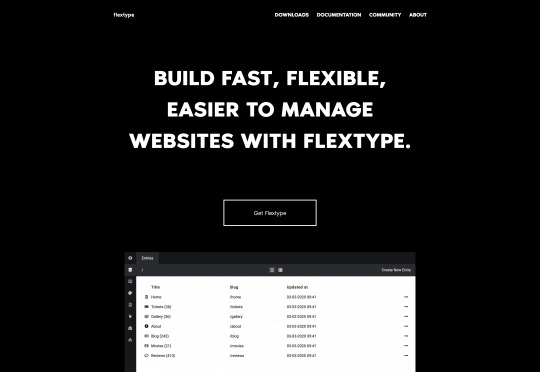
4. Flextype
Flextype is still relatively new to the game having launched in 2018, however this doesn’t mean it should be underestimated. An open source solution, its purpose is to provide a free web design programme without the unnecessary complexities often found in other CMS systems.
One of the great advantages is that it’s a flat file CMS so if you need to change hosting providers you can simply zip up your website content and extract it somewhere else, without the messy database exports. It also means you can define custom fields for any of your entries and it is easy to edit going forward. Other key technologies it uses is Slim PHP to help you quickly write simple yet key web applications, Twig templating to aid with coding, and the Doctrine Project for optimum database storage and object mapping.
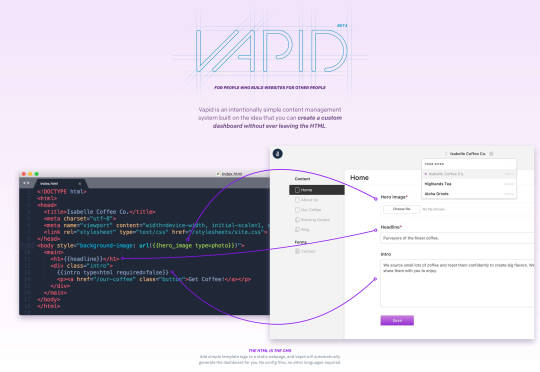
5. Vapid
Vapid is an intentionally simple Content Management System that describe itself as “for people who build websites for other people.” It is a system which is built on the idea that you can create a custom dashboard without ever leaving the HTML, as the HTML is the CMS, and Vapid automatically generate the dashboard for you.
It’s essentially a combination of static site builders with an additional dashboard to make it easy for users to edit content. It’s a great CMS for those who want to build a lot of customisable, relatively simple websites, but it doesn’t have the flexibility of more complex CMS systems.
6. Magnolia
Magnolia is one of the longer standing players in the field, having first been established over 15 years ago. It is a fast and easy system to use with powerful capabilities for creation, management and delivery of personalised experiences across channels.
It has an omnichannel content hub allowing you to integrate all your channels in one. It integrates access to all content without needing to migrate and works with AI to automatically tag assets — ideal for metadata and improving your SEO. It has a DX architecture which is secure, scalable and cloud ready, and a Headless CMS — ideal for easy yet powerful development of your sites.
Inspired by frontend development practices it uses slim YAML configuration to accomplish the most common CMS tasks meaning there is low code. Everything is configured in text files, so you don’t need to worry about GUI or exporting configuration. This is an easy to use system that has been designed with simplicity yet top functionality in mind.

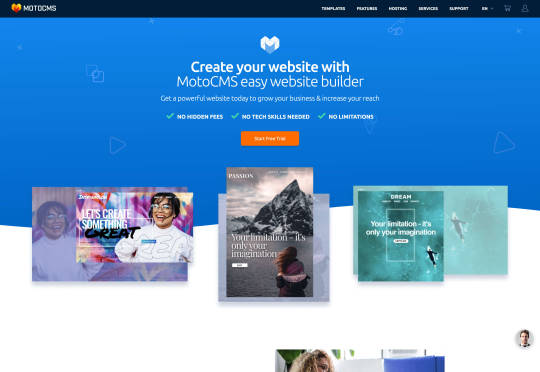
7. MotoCMS
MotoCMS is another easy CMS system to pick up and use. No coding skills are required, it works via a simple visual drag and drop editing, eCommerce plugin and responsive design.
There are four simple steps to follow: you choose a template, customise it and add content, add custom SEO and analytics, then publish and promote it online.
There are ready made templates for a number of professions as well as additional integrations and plug-ins. It is also easy for optimising for search, with advanced SEO settings and optimised tools designed to give sites the best chance of ranking right from the off. Sites will load lightning-fast and it is easy to manage, meaning if you have multiple clients it’s still a smooth process.
8. Concrete5
Concrete5 is a mobile-ready open source CMS designed to allow you to build a website without coding. It is best known for its well-implemented in-content editing and is often the choice for web projects where end user buy-in is particularly difficult.
It was first released in 2008 and has rapidly grown in popularity. It’s easy to add additional functionality with their marketplace add-ons so customising isn’t too difficult. Certain features such as the sitemap are native and not via plugins (which can sometimes slow sites down) — a further plus point for this CMS.

0 notes
Text
Photo editor to edit pictures for Computer
It's difficult to get a wonderful smart device photo that was shoot with a zoom. Many times, people make a photo appearance overexposed, negatively altering colors and making things turn out rinsed. Also the cellular phone light up is reported to get a few defects. Make use of the sources of artificial lightning you can locate, also when it is dark. That gives you a chance to have fun with shadows, like in the picture below, or create a silhouette with various other environs origin of light, such as sunshine and outlying structures. When you have actually taken the picture, attempt the direct exposure tool in your favored image modifying program to made the photo slightly brighter.
Photo editor carries out have a few of the features is popular for, which happens rather valuable when you've selected you've like to effort your hand on something extra high-end than photos grayscale and edit images. Discover more about the great Windows 10 photo editor for professionals to comfortable edit images.
Photo editor can easily also import freeze frames coming from video recordings, besides different files. As well as when you're experiencing a little lazy or even it is actually only ordinary uninformed about how to usage a few of the functions, an occultist may aid you adjust the basics just like lighting fixtures, focus, different colors, and cutting of photos. For them that like their images in wide scale editions, the photo editor supports you faultlessly assembled images to generate a breathtaking image.
As well as when it is actually time to program as well as print off your photography capabilities, you can choice with the picture strategy templates to promptly imprint them in a particular dimension.
New photo editor for Windows to practical edit an image
Photo editor does possess some of the functions is actually prominent for, which happens fairly beneficial when you have actually determined you have actually like to try your hand on something more trendy than edit pics and flip images.
This program is actually well for delighted students with a fantastic bargain of attend their palms to identify the too technical features that would shock away very first time picture customizing users. It also happens geared up with a nice panorama plan. Probably the most shining treasure in the bunch will be actually the gorgeous skin outcome, which does away with reddish patches and balance out your complexion.
While there's no motor vehicle different colors repair service selection rather necessary to remedy the lousy illuminating very most digital online video electronic cameras catch, there are still the basic utilities of mowing, changing illumination and colors, and also taking out reddish eye.
This plan is going to function completely if you dream problem-free, vital photo tweaking. Most likely the most shining jewel in the package deal would be the attractive skin layer outcome, which evens and also eliminates red areas out your complexion. While there is actually no car different colors repair service choice, what is fairly required to repair service the lousy lighting up most electronic video clip cameras drawback, there are still the standard utilities of shearing, adjusting lighting as well as colors, as well as obtaining rid of red eye.
Within a few minutes of using this photo editor, it is feasible to produce brand-new pictures from your supply of photographs that look better as well as are extra suited to their preferred function. Not just is the photo editor matched to specialist photo editors, but this photo editor is ideal for periodic or home individuals that just want to develop better pictures from their family images or vacation breaks.
In case people are actually making photographs for a web blog or even a personal usage, photo editor are able to let you boost their visual appeal. The moment people you want to make a web blog, editing and enhancing is an important component of the technique. It is easy in order to locate a photo editor in order to modify photos. A lot of them let someone to correct, arrange, and upload your images. Look at the adhering to standards to search for the best correct photo editor.
Get a very easy photo editor what gives you accessibility to a lot of modifying tools. The photo editor ought to be suitable for anybody that is attempting to boost the high quality of their images. Discover an easy photo editor that has attributes such as color modification and the option to edit photos.
Edit pics is useful with the photo editor
You recognize you need to be blogging every week and you understand you require to be posting on a website multiple times every week. However I am guessing one of the important things slowing you down and also keeping you from posting consistently is your pictures. Specifically taking very own images that rather specialist and on-brand.
The very great at is, you do not require to take digital photography courses as well as you do not even require to invest in a fancy digital camera. You just take wonderful pictures, on a spending plan, which everybody currently had, your cell phone!
No one gets a best image whenever. And yet, it is simply feasible to correct images to ensure that you ultimately get the feel and look you are hoping for. Find out exactly how to correct photos fast as well as simply along with these blogs. They are going to assist identify what happens next after you get nice pictures to correct.
This very great thing is, you do not require to take digital photography classes and you don't also need to invest in an expensive camera. You can take excellent images, on a spending plan, with what you currently owns, your cell phone!
Edit pictures or photo solarization is user friendly with the photo editor and edit photo software for Computer
Brand new Windows photo editor for professionals to powerful edit photos
One of the most misconstrued parts of digital photography is what happens once you made the shot actually modifying your picture. This is where you modify the images you have actually taken, to produce the final product. Modifying your images is the equivalent of the dark room from the time long period of time back. We are going to be covering some concepts for editing and enhancing your images, from the essentials like blur a picture and also edit pics, via more complicated activities.
The picture montage tool also brings info concerning the photo editor. Create a photograph mosaic tool was actually created when it comes to most of the newbie shooters to utilize the photo editor to create an expert photo. For trainees, the photo editor is actually the optimal answer as a result of its many different features as create a photo album. Essential requirements for picture processing are exposure or edit a picture. The photo editor is maximized for array pictures and also is suitable for photos and image mosaic. Right here it ought to be said that photo control photo montage producing a photo editor is mainly utilized for edit images.
Along with the digital age ushering in a higher demand for visible content, digital photography business has already transformed into a challenging as well as thriving sector. If someone are definitely a hopeful photographer just starting out or a skilled digital photographer looking to construct your company, people are in need of to equal the swiftly altering trends as well as latest modern technologies coming over out each month.
0 notes
Text
Webflow: A New Web Development Platform for Developers in the Future
In today's ever-changing and competitive market many DIY website building platforms try to convince users as the universal solution for any type of design challenge and ease of building a website without any sort of code challenges. But many of them fail to live up to the promises made by them and only a few fits into the scenario. In this article, we will try to explore a future-ready tool named Webflow, which facilitates users to design-build and launch their websites with ease without seeking the help of any website development services from agencies.
Before exploring Webflow, let us try and understand the challenges which web development companies in Kenya normally face while creating websites.
Visual designers handover the blueprint of design to developers to work upon which is done through coding and becomes a back-and-forth process as developers are supposed to go through extra iteration of coding.
Graphic designers can produce splendid effects through high-level prototypes but it becomes difficult for developers to reproduce the same through coding.
Responsiveness of the design is another mandate which needs to be followed which becomes difficult at times due to coding snags etc.
Webflow is a simple drag and drop tool used to create responsive websites without the knowledge of coding and designing. It is a real competitor to DIY software like Wix, Shopify, and Squarespace along with traditional Content Management Systems like WordPress and Joomla.
The Webflow designer interface is moreover similar to Photoshop one. The interface allows drag and drops HTML elements on to the canvas and styling CSS properties. The versatility and features of Webflow are such that you cannot resist using it. To highlight a few of them are:
Whatever we create in the visual editor of Webflow, they are enriched with HTML, CSS, and JavaScript.
There is an option to reuse the CSS classes once defined anywhere in the code where the styling remains the same.
Webflow is bundled with hosting plans also other than the DIY platform.
Webflow Content Management System
Launching a blog using Webflow is a bit complex when compared to the other blogging platform like WordPress but it is worth an effort as WordPress has failed in ease of customization and user-friendliness. In WordPress users are tied with the default template theme and denied making any changes to the elements without the help of any third-party plugins. The other option is to rewrite cumbersome theme template files as per the requirement of your customization. These challenges in WordPress have been addressed in Webflow. Webflow has become one of the first Visual Content Management systems as the same allows designers to define the structure and style of their responsive and dynamic website without fiddling with databases and PHP modules etc. The best part is that these can be imported from CSV files or uploaded through the Webflow Content Management System Application Programming Interface.
Creating Animations in Webflow
Interactions 2.0 is another valuable feature that has made making animations easier without writing JavaScript animations scripts. But the only pain which the user needs to face while using this tool is that he should know JavaScript coding. But the pain is worth taking as you can create wonderful animations using this tool.
Deployment and Hosting of Website
As already mentioned earlier in this article this in-browser tool named Webflow comes with hosting facility too which is provided by Amazon Web Services. The benefit of availing the hosting service from Webflow is the lightning-fast loading of pages and hassle-free maintenance without worrying about frequent PHP updates. All the hosting plans from Webflow comes with free SSL certificates and all the security compliances. The only drawback is the charges levied for hosting by Webflow.
Webflow Ecommerce
The Webflow Ecommerce is currently in the beta version mode. This targets to customize overall visual components of a typical online store by keeping it different from competitive platforms like Shopify and WooCommerce. It also offers a way for managing complex administrative functions like defining shipping regions, managing inventory, tax calculation, and fulfillment, etc.
Conclusion
Webflow no doubt is a useful and innovative tool in comparison to the prevailing DIY software. There might be some hiccups in the animation interface area but Webflow provides an influential outcome that is suitable to most professional web designers and their development needs.
0 notes
Link
Have you ever wanted to play YouTube videos in Salesforce? I have, and created a YouTube player using Lightning Web Components. As a budding pianist, I built the player to help me learn classical music within a Salesforce app. The app centralizes sheet music, ideal music performances, and practice sessions. Since many great musical performances are readily available on YouTube, I needed a YouTube video player. Furthermore I’ve configured the video player to appear beside the sheet music on a Record page, so I can read the music and play the recording, to memorize best practices. Since these are Lightning web components, you can also embed them in Communities. For example we can have an entire community of like-minded musicians, where members share what they have been practicing and/or performing. This video player use YouTube’s IFrame API, which defines the iframe player with event listeners. If the YouTube ID is invalid, the error listener is especially useful for providing the reason why. In the onPlayerError listener, we show the message in an error toast. You can follow along this blog post to create these components, or head over to the Github repo to install the components. Plus, here’s a video on how to configure the finished components. Enjoy Mozart’s “Eine Kleine Nachtmusik” in the background! In this post, we will create two components to play YouTube videos. Why two, you ask? One is a component designed for Home or App pages. The other is a more advanced wrapper component, for use with Record pages. Let’s get started! Pre-requisites This post assumes you have a Salesforce org and Lightning Web Component developer flow set up. If not, follow the steps in the Quick Start: Lightning Web Components Trailhead project. To test these components you also need a YouTube video ID — it is super easy to find. We also need two scripts in Static Resource to use YouTube’s IFrame API. We use the API to create an iframe player with event listeners. They are at https://github.com/annyhe/youTubePlayer/tree/master/force-app/main/default/staticresources/YouTubeJS. Make sure they’re uploaded and show up as public in your org’s Static Resources tab. All set? Let’s start with the simple component for App and Home pages. This component is also a pre-requisite for the wrapper component. Code walkthrough: basicYouTubePlayer component Let’s start with the metadata file for the simpler basicYouTubePlayer component. This component takes a YouTube video’s ID through the Lightning App Builder, so we set isExposed to true and add a youTubeId property to take user input. We specify the interface for Home and App pages. The finished basicYouTubePlayer.js-meta.xml looks like this. In the basicYouTubePlayer.js file, we declare the youTubeId property as a public property via the @api annotation, the same property defined in the basicYouTubePlayer.js-meta.xml file. We also have a private property called player, which will reference the YouTube iframe player component we create. Where do we create the YouTube iframe player? In the renderedCallback, which is called after the template has been rendered with DOM elements. We load the YouTube scripts from static resource and after they’re loaded, we call the onYouTubeIframeAPIReady method. Notice the onYouTubeIframeAPIReady method manipulates the DOM directly. This is because the YT.player constructor takes in a DOM element, and replaces that element with an iframe element. Within the manipulatable wrapper component, we create a child element for replacement by the iframe. Inside YT.player we attach the error listener named onPlayerError, which gets automatically invoked when the player errs. For onPlayerError, we bind it to this so it can access this component instance, to call the showErrorToast instance method. { this.showErrorToast(error); }); } } onPlayerError(e) { let explanation = ''; if (e.data === 2) { explanation = 'Invalid YouTube ID'; } else if (e.data === 5) { explanation = 'The requested content cannot be played in an HTML5 player or another error related to the HTML5 player has occurred.'; } else if (e.data === 100) { explanation = 'The video requested was not found. This error occurs when a video has been removed (for any reason) or has been marked as private.'; } else if (e.data === 101 || e.data === 150) { explanation = 'The owner of the requested video does not allow it to be played in embedded players.'; } this.showErrorToast(explanation); } showErrorToast(explanation) { const evt = new ShowToastEvent({ title: 'Error loading YouTube player', message: explanation, variant: 'error' }); this.dispatchEvent(evt); } onYouTubeIframeAPIReady() { const containerElem = this.template.querySelector('.wrapper'); const playerElem = document.createElement('DIV'); playerElem.className = 'player'; containerElem.appendChild(playerElem); this.player = new window.YT.Player(playerElem, { height: '390', width: '100%', videoId: this.youTubeId, events: { onError: this.onPlayerError.bind(this) } }); } } Onto the markup. basicYouTubePlayer.html displays the iframe HTML element only if the youTubeId property is set. Another conditional markup renders an error if youTubeId is not found, since the youTubeId property can be passed in from another component. If the youTubeId property exists, we add an empty div with a class to make it selectable, and lwc:dom="manual" to make it manipulatable with JavaScript. The lwc:dom="manual" ensures when we call appendChild() in the basicYouTubePlayer.js file, the element is manually inserted into the DOM. This is what basicYouTubePlayer looks like on an App page. It looks good and sounds even better! The component you see plays Mozart, referencing this YouTube video. That was fun! Next up, let’s walk through the wrapper component which reuses the basicYouTubePlayer component, for Record page. Code walkthrough: youTubePlayerRecordWrapper component Let’s start with the youTubePlayerRecordWrapper.js-meta.xml file. The admin can set which field in the record holds the YouTube video ID, so we have a fieldName property for that. We also add a target tag since the component is for a Record page. The finished youTubePlayerRecordWrapper.js-meta.xml should look like this. The youTubePlayerRecordWrapper.js file retrieves the field value, given the public properties, which are annotated with @api. Since the component is on a record page we use @objectApiName to get its object API Name. The wire service then uses Lightning Data Service to get the youTubeId and saves the result to the record property. To construct the fields the wire service needs, we use a getter to concatenate the public properties. Finally, we use another getter to parse youTubeId from the wire result. import { LightningElement, api, wire } from 'lwc'; import { getRecord } from 'lightning/uiRecordApi'; export default class YouTubePlayerRecordWrapper extends LightningElement { @api fieldName; @api objectApiName; @api recordId; @wire(getRecord, { recordId: '$recordId', fields: '$fields' }) record; get youTubeId() { return this.record.data ? this.record.data.fields[this.fieldName].value : ''; } get fields() { return [this.objectApiName + '.' + this.fieldName]; } } Onto the markup youTubePlayerRecordWrapper.html. The component displays the child component basicYouTubePlayer if the youTubeId field exists, and passes the youTubeId property to the child component. If the youTubeId field is non-existent or empty, the markup shows an error message. What does the youTubePlayerRecordWrapper component look like on a Record page? Like this. Looking good, Mozart — and the music sounds great! Lessons learned Share, get feedback, improve the component I built the basicYouTubePlayer first, then shared it with Peter Chittum. He mentioned it would be lovely to extend the YouTube component to load videos from record values. Why not? That’s when I learned the next two lessons. Use composition instead of overloading a component I re-doctored the Lightning component to work for all three page types: App, Home, and Record. However the code was confusing to read. Finally at the suggestion of Christophe Coenraets, composition, where a component wraps another one, made more sense: let the wrapper component extract the YouTube video ID from the record and let the child component render the video. The end result is two clean, reusable components. Use Lightning Data Service to fetch data on a Record page There are multiple ways to retrieve a field value, given the record ID. One way is to use Apex with record ID and fieldName. However since the public property objectApiName and getRecord method are readily available, we get the field value using Lightning Data Service. This means less code to maintain, and we save API calls for when it is needed. Takeaways These two Lightning web components are now ready to play YouTube videos in Salesforce orgs! I’ve configured them to play classical music. You can use them for product marketing, training/enablement, corporate messaging…the sky is the limit! For example, you can add marketing videos from customers to the Account page to reference the customer’s latest campaign during sales calls. Since these are Lightning web components, they also work in Salesforce Communities and provide an easy and effective way to share content with customers and partners. For example, you can include how-to videos to drive feature adoption and users can put the video beside the new feature in their org. Try out the components today! Here is the code and installation instructions. Resources YouTube iFrame API Working with Third-Party Libraries in Lightning Web Components Documentation for developing Lightning Web Components on Salesforce Platform Documentation for developing LWC off of the Salesforce platform Trailmix on Trailhead for Lightning Web Components LWC Video Gallery
0 notes
Text
All about PHP Frameworks! Which is better to use & learn for Custom Web Applications & Why?

PHP is essentially the most loved programming language when it comes to Website Development as well as complex Web Applications. However, Web Development can become trickier with increasing complexity. In such cases, PHP frameworks such as Codigniter, Laravel, Symphony and others come to the rescue. Here is everything you need to know about them and learn how to make most of Codeigniter Development, Laravel Development, Symphony Development, Zend Development etc…
CodeIgniter: Codeigniter is among the oldest PHP frameworks, having been around since 2006. Some of the features worth mentioning here are:
Model-View-Controller Based System: ensures scalable and well segregated development.
Light Weight: Web applications built on CodeIgniter are blazingly fast.
Database support
Support for email, image manipulation, FTP upload and much more.
Codeigniter Development is fun when you work with some of the brightest minds in the industry. Check with your service provider how well versed is their employees in CodeIgniter.
Laravel Development
Though Laravel is a late entrant to the field, it is essentially the hottest property in the town. As per a survey by popular site Sitepoint, it is the most preferred choice among developers. What is the reason behind the popularity of Laravel development? Here are some of the reasons behind its stupendous popularity:
Support for multiple file systems
Authentication feature that saves developers from writing tons of authentication related code
Route caching to speed up the application route registration
Highly improved method injection feature
Events object that helps speeding up Laravel development
Inbuilt templates that help in creating awesome content with lightning quick speed
Eloquent ORM to write database queries
MVC architecture support
Symphony Development
Symphony is yet another popular PHP framework that is immensely rich in incredible features. This is precisely the reason why it has enjoyed continuous love from developers all over the globe. Here are some of such features that deserve a mention:
Rich in features that make it flexible: Bundles are collection of files that make installation of new features tremendously easy. For instance, adding a new blog or a shopping cart can be done pretty easily by doing simple configuration. A number of similar such features essentially make Symphony a darling to web developers.
Commercial support: Commercial support from its parent company, SensioLabs has ensured that it has professionally curated tutorials and a lot of support as well.
-Ease of testing: PHPUnit Testing Library makes unit testing considerably easy.
Large community: Over the years, Symphony developers have ushered in a large community and by seeking support from the same one can tide over even the most complex problems.
Zend Development
Reasons to go for Zend development:
Extensible: Based on object oriented programming, Zend framework is immensely extendable. Zend developers can write awesome applications using its features like interfaces and inheritance without having to disturb the Zend framework codebase.
Decoupling lets you to use the features you need and skip everything else: Zend MVC architecture is so flexible that it lets you use only the features that are required for your application and skip those that you don’t need. This is essentially made possible with the help of classes based approach.
A variety of components that let you perform awesome tasks: You can do a lot with the vast variety of components like authentication, access control, create forms, RSS feed and so on with easily reusable components. So, step forward and implement that cracking functionality that you always wanted to add.
CakePHP: Here are some features of CakePHP, another immensely popular PHP framework that enjoys favor from many PHP developers:
MVC architecture: You can build scalable and inherently complex web applications using this framework
Object Relation Mapping: With the help of this feature you can write database queries with immense ease
Class inheritance: Class inheritence helps you to scale applications without unnecessary code and complications
Built-in validation: The validation related tasks can be completed without having to write enormous pieces of code thanks to the built-in validation featue
Yii: Some noteworthy features of Yii PHP framework:
Tremendous speed: Yii PHP framework is immensely fast and web applications written on it run like a charm
Form validation made easy
Enhanced security
CRUD validation
Authentication and Authorization features are in-built
The most popular PHP framework
Among all the PHP frameworks available today, the most popular one among these seems to be Laravel, given that it is used by over 50% of all PHP developers. Codeigniter and Symphony are up next due to their stupendous features, but even then they are far behind Laravel in terms of overall popularity.
Author Bio: Pushpendra Singh is a Freelance Codeigniter Developer working with F5 Buddy, who loves to develop Website, mobile and web applications. F5 Buddy is one of the amongst leading Development Outsourcing Company, which provides totally different array of real software package solutions like Custom software Development, IT Outsourcing Services, Web Application Development services to its clients globally.
0 notes
Text
Which PHP Framework is better to use and learn for Custom Web Applications & Why?

PHP is essentially the most loved programming language when it comes to Website Development as well as complex Web Applications. However, Web Development can become trickier with increasing complexity. In such cases, PHP frameworks such as Codigniter, Laravel, Symphony and others come to the rescue. Here is everything you need to know about them and learn how to make most of Codeigniter Development, Laravel Development, Symphony Development, Zend Development etc…
CodeIgniter: Codeigniter is among the oldest PHP frameworks, having been around since 2006. Some of the features worth mentioning here are:
Model-View-Controller Based System: ensures scalable and well segregated development.
Light Weight: Web applications built on CodeIgniter are blazingly fast.
Database support
Support for email, image manipulation, FTP upload and much more.
Codeigniter Development is fun when you work with some of the brightest minds in the industry. Check with your service provider how well versed is their employees in CodeIgniter.
Laravel Development
Though Laravel is a late entrant to the field, it is essentially the hottest property in the town. As per a survey by popular site Sitepoint, it is the most preferred choice among developers. What is the reason behind the popularity of Laravel development? Here are some of the reasons behind its stupendous popularity:
Support for multiple file systems
Authentication feature that saves developers from writing tons of authentication related code
Route caching to speed up the application route registration
Highly improved method injection feature
Events object that helps speeding up Laravel development
Inbuilt templates that help in creating awesome content with lightning quick speed
Eloquent ORM to write database queries
MVC architecture support
Symphony Development
Symphony is yet another popular PHP framework that is immensely rich in incredible features. This is precisely the reason why it has enjoyed continuous love from developers all over the globe. Here are some of such features that deserve a mention:
Rich in features that make it flexible: Bundles are collection of files that make installation of new features tremendously easy. For instance, adding a new blog or a shopping cart can be done pretty easily by doing simple configuration. A number of similar such features essentially make Symphony a darling to web developers.
Commercial support: Commercial support from its parent company, SensioLabs has ensured that it has professionally curated tutorials and a lot of support as well.
-Ease of testing: PHPUnit Testing Library makes unit testing considerably easy.
Large community: Over the years, Symphony developers have ushered in a large community and by seeking support from the same one can tide over even the most complex problems.
Zend Development
Reasons to go for Zend development:
Extensible: Based on object oriented programming, Zend framework is immensely extendable. Zend developers can write awesome applications using its features like interfaces and inheritance without having to disturb the Zend framework codebase.
Decoupling lets you to use the features you need and skip everything else: Zend MVC architecture is so flexible that it lets you use only the features that are required for your application and skip those that you don’t need. This is essentially made possible with the help of classes based approach.
A variety of components that let you perform awesome tasks: You can do a lot with the vast variety of components like authentication, access control, create forms, RSS feed and so on with easily reusable components. So, step forward and implement that cracking functionality that you always wanted to add.
CakePHP: Here are some features of CakePHP, another immensely popular PHP framework that enjoys favor from many PHP developers:
MVC architecture: You can build scalable and inherently complex web applications using this framework
Object Relation Mapping: With the help of this feature you can write database queries with immense ease
Class inheritance: Class inheritence helps you to scale applications without unnecessary code and complications
Built-in validation: The validation related tasks can be completed without having to write enormous pieces of code thanks to the built-in validation featue
Yii: Some noteworthy features of Yii PHP framework:
Tremendous speed: Yii PHP framework is immensely fast and web applications written on it run like a charm
Form validation made easy
Enhanced security
CRUD validation
Authentication and Authorization features are in-built
The most popular PHP framework
Among all the PHP frameworks available today, the most popular one among these seems to be Laravel, given that it is used by over 50% of all PHP developers. Codeigniter and Symphony are up next due to their stupendous features, but even then they are far behind Laravel in terms of overall popularity.
Author Bio: pushpendra singh is an Freelancer web developer working with F5 Buddy Professional web development company. You can contact her in order to hire a web developer to avail the highly functional web development and eCommerce solutions. He has several years of experience in the field of web development. He has successfully worked on various project and given on time delivery.
0 notes