#Digital image processing projects for final year students
Explore tagged Tumblr posts
Visit Tumblr Blog
Explore Tumblr blogs with no restrictions, modern design and the best experience.
Last Seen Tumblr Blogs


Fun Fact
When “GIF” was named word of the year in 2012, Oxford Dictionaries U.S.A. credited Tumblr for pushing the word.
Text
Trending Digital Image Processing Projects for Final Year Students
Are you looking for an extensive Digital Image Processing Projects Whether you are a student, a researcher, or an engineer then my recommendations, Takeoff Edu Groups - Provide innovative Digital Image Processing projects with proper guidance and support for your project need.
Digital Image processing projects reach a wide range of applications and provide opportunities for exploring advanced technologies.
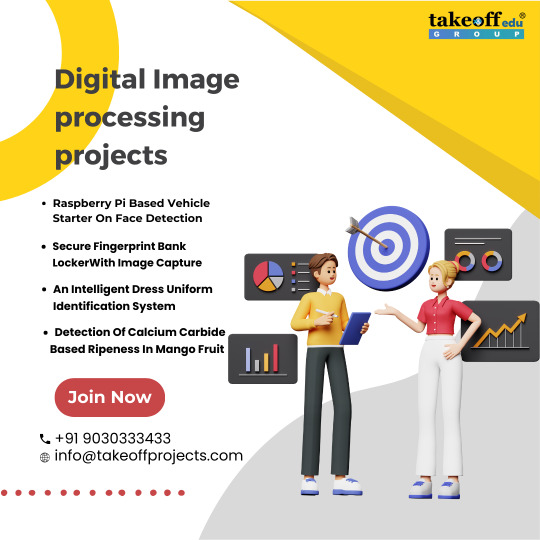
#Digital image processing projects#Academic Digital image processing projects#Digital image processing projects for final year students
0 notes
Note
But I already critique and research and love and explore art! Yet I'm still not getting any better at actually creating! Art is communication, and "improvement" is building upon that communication. How do I get better and put all the pieces together?
Disclaimer: I'm a second year art student having fun thinking about art. I like what I do, but I'm not an authority.
Hi anon,
For the purposes of this ask, keep in mind that i know basically nothing about you. I assume that you hope to proliferate your work to an audience. There are a few questions I'd run down, just to form a basis.
1) Who is your audience?
Art made to share on social media will be different than art made to submit to a magazine. Art made for a local gallery will be different than art for a national gallery, and so on. Who will access your work? Who do you want to focus on from within that group? Consider what people go to each platform for, and try to deliver what folks want from each one. You can get very specific here and talk directly to certain people, to great effect.
2) what is your medium?
Are you working digitally? Are you sketching or painting? Are you making risograph prints? Oil paintings? Small-scale sculptures? Multi-sensory installation work? Again, this is a question of working to the strengths of your medium. If you're working on social media, consider that your images will only be physically about two inches across, since most people use their iphones to scroll their timeline. That sort of thing.
3) What do you want to say?
If you intend to communicate something, it helps to pin down what it is you want to communicate. For me, my focus is currently on exploring different aspects of strength in femininity. That's just one message, but reading up on what you want to communicate is always a safe bet. Chance is, you'll get inspired, imagery will come to mind.
4) does technical skill matter to you?
Some of the most hard-hitting works of art i've seen have been made with very minimal technical skill. Some of the most ineffective art i've seen has been masterfully crafted. It's worth considering how much technical skill really matters to you, especially if you could be streamlining your process to put effort elsewhere. That said, it's always worth looking into different elements of design and working to your strengths.
5) who are you?
Whether we consider it or not, viewers are always looking at who is making the work. Consider your presence as the author. How much does your identity factor in to the work you're making? If you're on social media, what else is on your account? If you're submitting to a gallery, your name will be next to the work. What do you want people to know about you? Would it help to use a persona or pseudonym? This will help to distinguish your work from everyone else's.
That's all for the questions. I want to leave you with some final thoughts on the subject of 'effective communication' in visual art.
When i've achieved the most success with my message, the key was the streamlined concept. I drew the same thing over and over. I projected a certain image of who I was to my audience. I had one message, one theme, and I churned it out. If that sounds formulaic, that's because it is. But the formula doesn't cheapen the work, in my opinion. It takes a lot for an effective concept to 'click'. Lots of time, research, effort, and false starts. It was worth it. Effective art can make waves (and a living).
Here's a cute little closing thought: When in doubt, do what you really want to do. (Easier said than done.)
I hope this helps, anon. I'm not an authority by any means, this is just what comes to mind when the question of effective communication in art presents itself. Good luck, and I hope to receive your artistic message in its most effective form sometime soon.
11 notes
·
View notes
Text
heyyy, somehow gained many new followers recently. thank you very much for enjoying my work! in light of that, let's do a small introduction.
i'm Seosamh Dáire, or you can call me joe. he/him • sé/é only. transsexual butch man and leatherdyke ✦ fear tras/aiteach agus gearrán 🐗
i'm a painter, comic author-illustrator, web/html artist, petty designer, smalltime archivist, passionate marxist. i like anime and virtual pets both from ~1990. as someone working primarily with past decades, i'm interested in broadening our ideas of time/place and who was in it. pro-palestine, native rights and strong proponent/student of irish-native solidarity, blm, roma, the works (uninterested in debating these topics!)
i make trans gay art for perverts and i was recently an artist in residence in the Burren, focusing on traditional paintings and reflecting/writing on being Queer In The Land.
SUPERPOSE: the tremendous dark trans sci-fi comic i make with my life+work partner Anka @kingfisher-cove . take a look! this project is my whole LIFE, and almost every piece i make pertains to it, so if you're unsure of who or what my images are of, that's a safe bet. the comic is recommended for mature readers. here's a brief synopsis,
An ongoing queer sci-fi horror comic about physics.
On the Atlantic coast, in a town called PORT CITY— “a place out of time”
While a tourist destination boasting a popular beach and boardwalk, Port City is also home to ROMAN LABS, an aerospace-turned-tech company now floundering in the tech boom.
Rafael and Royal are each listless in their own lives as longtime locals with little mobility, whose orbits have only occasionally overlapped, until now. Turning a job at the lab into a last-ditch effort for a glimpse of a more equitable future brings Royal and Rafael together, and beaches Kas, a young physicist, on Port City’s shores.
Together they seize the opportunity to alter their future and carve out a place in time for themselves, finally shaking the town and their lives from standstill. Changing history begins with the machine.
(also a supplementary web art/ARG aspect, using flat digital spaces to create a sense of 3d depth and narrative.)
SUPERPOSEBLOG @superposeblog is the repository for all updates and news about the comic.
198X.LOVE our homepage & portfolio
PATREON is where i share most of my work first, early comic pages, WIP, process and thoughts and other resources. it's a direct way to support mine & my partner's work. we are an independent team of two and i'm sure you can appreciate the effort and dedication to managing our practise as well as life obligations. for one-time support, there's also ko-fi. thank you!
i've also begun a new, as of yet unnamed 18+ comic about trans disposability/sapped as a resource + weird blood + nuclear war. so look out for that next year 😘
#introduction#illustration#superpose#comic#webcomic#painting#queer#trans#butch#dyke#he/him#trans artists#artists on tumblr#q&a#please don't call me transmasc
131 notes
·
View notes
Text
Advanced Communication Technology Courses at MVJ College of Engineering
MVJ College of Engineering (MVJCE), located in Whitefield, Bengaluru, is one of the premier institutions offering specialized programs in Advanced Communication Technology (ACT) under the Department of Electronics and Communication Engineering. With a focus on both foundational knowledge and cutting-edge technological advancements, MVJCE prepares students to lead in the fast-evolving communications industry.
🎓 Programs Offered
1. M.Tech in Advanced Communication Technology
MVJCE offers a two-year postgraduate M.Tech program in Advanced Communication Technology, affiliated with Visvesvaraya Technological University (VTU) and approved by the All India Council for Technical Education (AICTE).
Eligibility Criteria:
Bachelor’s degree in ECE or equivalent with a minimum of 50% marks (45% for reserved categories).
Admission through valid GATE scores or Karnataka PGCET rankings.
📘 Curriculum Highlights
The curriculum is crafted to bridge academic concepts with industrial demands, covering both theoretical and hands-on learning:
Core Subjects:
Advanced Digital Signal Processing
Advanced Communication Systems
Microwave Engineering
Antenna Theory and Design
Digital Image Processing
Internet of Things (IoT)
RF MEMS
Wireless and Optical Communication
Electives Include:
5G Radio Access Technologies
Multimedia Over Communication
Array Signal Processing
Pattern Recognition and Machine Learning
Signal Processing for Microelectronics Devices
Research & Practical Training:
Laboratory-based experiments
Research-oriented projects in the final year
Industry internships
Seminars and technical paper presentations
The course emphasizes certifications through platforms like NPTEL, SWAYAM, and MOOCs to ensure students remain updated with global technological trends.
💼 Career Prospects
Graduates of the ACT program are equipped to handle complex roles in:
Telecommunications & Networking
Satellite and Wireless Communication
Embedded and IoT Systems
Defense and Aerospace Communication
R&D in Public and Private Sectors
MVJCE alumni are employed in reputed organizations and research institutions, taking on roles such as Communication Engineers, Network Analysts, RF Engineers, and System Designers.
💰 Fee Structure & Scholarships
Tuition Fee: ₹66,000/year
College Fee: ₹40,000/year
Total: ₹1,06,000/year
Merit Scholarship: ₹7,500/month stipend for students scoring above 70%, subject to eligibility and review.
📍 Why Choose MVJCE for ACT?
State-of-the-art labs and research facilities
Experienced faculty with industry exposure
Frequent technical workshops, guest lectures, and hackathons
Strong industry-academic collaboration
Located in the tech hub of Bengaluru, fostering better internships and placements
📝 Admission & Contact Information
Location: Near ITPB, Whitefield, Bengaluru – 560067
Phone: +91 80 4299 1000
Email: [email protected]
Website: www.mvjce.edu.in
MVJ College of Engineering continues to be a center of excellence in engineering education, especially in the domain of Advanced Communication Technology. For students aspiring to innovate in the field of digital and wireless communication, MVJCE offers the right blend of academic rigor and practical exposure.
0 notes
Text
Online vs Offline: What's the Best Way to Buy Furniture for Schools Today?
Introduction
Choosing the right school furniture is a vital decision that impacts student comfort, classroom engagement, and the overall learning environment. But in today’s fast-evolving digital world, school administrators and buyers face a crucial question: Should you buy school furniture online or offline? This article compares both options to help you make an informed decision — one that aligns with your school’s budget, quality expectations, and delivery timeline.

Understanding the Two Modes of Purchase
1. Buying School Furniture Online
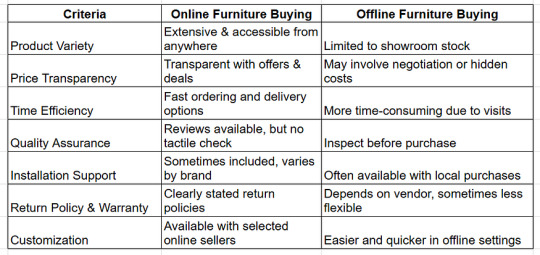
In recent years, digital platforms have transformed how schools and institutions purchase furniture. Online furniture stores in India now offer:
Wide Product Range: From ergonomic Classroom Chairs to modular lab desks, you can explore hundreds of options on one website.
Quick Comparisons: Instantly compare prices, specifications, and reviews across multiple sellers.
Ease of Purchase: Order with a few clicks, track shipments, and even get virtual support.
Bulk Discounts & Seasonal Offers: Online platforms often have better deals for bulk orders.
However, there are a few concerns such as:
Lack of Physical Inspection: You can’t touch or try the furniture before buying.
Quality Assurance: Product quality may vary from the website image.
Assembly Issues: You may need to self-install unless professional assembly is included.
2. Buying School Furniture Offline
The traditional route still holds strong value, especially for schools making high-investment, large-scale purchases.
Physical Experience: Inspect the build, size, and finish before finalizing.
Direct Consultation: Get in-person guidance from showroom staff or design consultants.
Customization Opportunities: Easy to discuss specific requirements like height, materials, or layout.
Instant Decision-Making: Finalize purchases and transport directly from warehouse/showroom (if available).
However, offline shopping may limit your choices to local vendors and often involves more time and logistical effort.
Online vs Offline: A Feature-by-Feature Comparison
When Should Schools Buy Furniture Online?
Buying online is ideal if:
Your institution has a defined list of items with clear specifications.
You want to compare multiple brands and products quickly.
You are targeting cost efficiency with bulk deals or seasonal discounts.
You need delivery in remote or tier-2 cities where local showrooms may be limited.
When is Offline Purchase the Better Choice?
Offline buying is suitable when:
You want to inspect the furniture physically before placing large orders.
You’re customizing furniture based on classroom size or layout.
Your institution needs immediate delivery and support.
You prefer dealing with local vendors or have existing vendor relationships.
Expert Tip: The Hybrid Approach
Many modern institutions are now adopting a hybrid model — they research online to shortlist options and finalize the purchase offline after verification. This approach ensures you get both variety and peace of mind.
Conclusion: Which is Better for Schools?
There’s no one-size-fits-all answer.
For budget-conscious, time-efficient, and research-driven institutions, online is the way forward. For customized, large-scale projects where touch-and-feel matters, offline is still relevant.
Ultimately, your decision should depend on your school’s budget, procurement process, and timeline.
At Bonton Furniture, we cater to both online and offline buyers — offering seamless digital support along with personalized offline consultations. Whether you’re exploring ready-made school furniture online or planning a customized bulk order, we’re here to help schools make smarter furniture decisions.
FAQs (Frequently Asked Questions)
Q1. Is it safe to buy school furniture online in India?
Ans- Yes, it is safe if you choose reputable websites that offer warranty, return policies, and verified customer reviews. Always check GST invoices and company credentials.
Q2. What should I check before buying school furniture online?
Ans- Check dimensions, materials used, warranty, customer reviews, shipping costs, and installation support before placing the order.
Q3. Can I customize furniture if I buy it online?
Ans- Many premium online furniture brands offer customization services, especially for bulk or institutional orders. You may need to contact them directly.
Q4. Are online furniture purchases more affordable than offline?
Ans- Generally, yes. Online platforms offer competitive prices due to lower operational costs and occasional discounts, especially for bulk orders.
Q5. What is the best way to ensure furniture quality online?
Ans- Look for brands with ISO certifications, images from actual buyers, and verified reviews. Also, prefer sites that offer sample orders or demo units.
Q6. Can I return school furniture bought online?
Ans- Most major platforms offer return windows, but read the return policy carefully — especially for bulk or customized orders.
#buy school furniture#shop furniture for schools#furniture for schools inn 2025#buy classroom chairs#buy furniture for schools
0 notes
Text
Monthly Summary - December
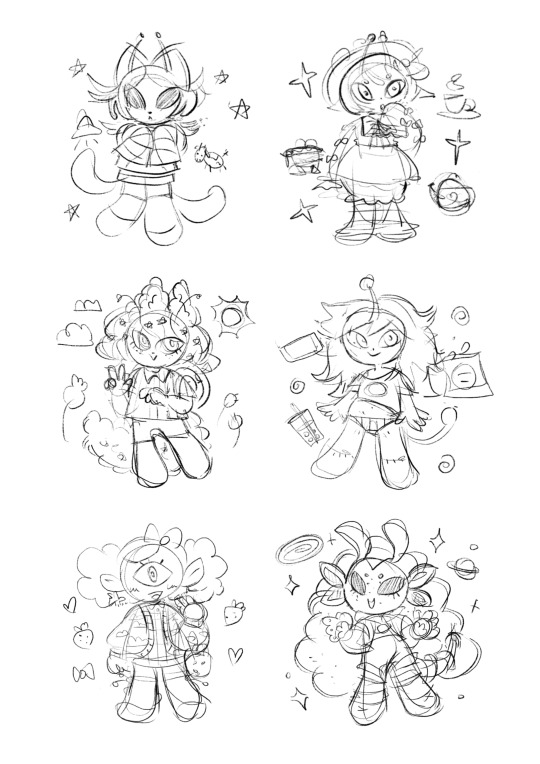
I started December working on my final piece. Initially, I planned to create character references using Gummy’s brushes, which I had previously practiced rendering my Jelly Cat with. However, my experience showed that rendering a more detailed character would take even longer than expected. I couldn’t afford to spend that much time on it, so I decided to scrap the idea and leave my character as a coloured sketch. I also experimented with creating more simplistic characters. My initial plan was to make a full illustration with a background, but I realized that the designs I had chosen might be too overwhelming in a backgrounded composition. I sketched several pages using various Sylvanian Family toys as references, but none of the results satisfied me, so I returned to my original idea.
At this point, I decided to start watching the course Exploring Landscapes: Travel-Inspired Gouache Paintings in Procreate by Yifat Fishman. The first few lessons focused on collecting references and making thumbnails for future illustrations. This helped me a lot in creating an interesting composition and selecting the best one to develop further. I refined two selected sketches, adding colour to them, and I was proud of the results.
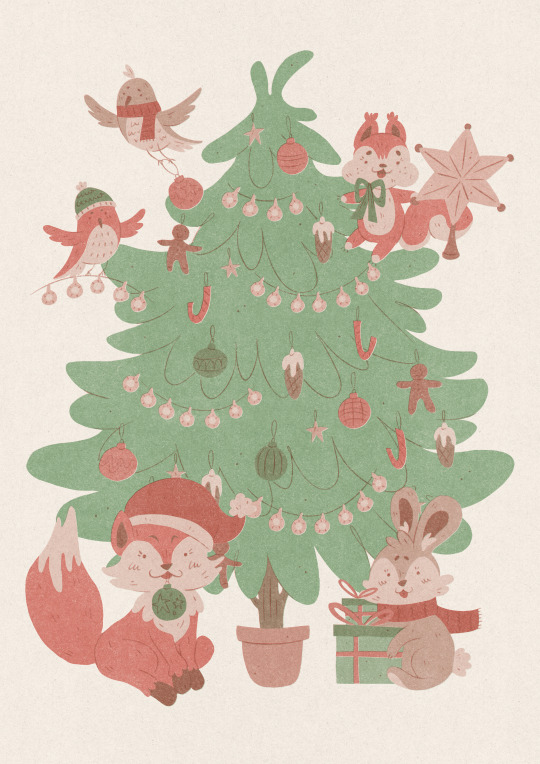
The following week, we had to create cards for the pop-up shop. Although it wasn’t required, I chose a holiday theme. I was simply in the holiday spirit and thought it would be both more fun and more marketable. I spent a lot of time brainstorming ideas, but in the end, I was inspired by a card design featuring a Christmas tree in the center with a different character in each corner. The card was divided into four sections, creating four different cards. I found this idea compelling and decided to create something similar. My design featured forest animals—two birds, a squirrel, a fox, and a rabbit. Each contributing in their own way to bringing the tree to life. Since this was intended as a risograph print, I limited the design to only two colours to reduce the number of layers per print and streamline the process. However, when I attempted to print it, I ran into issues. The scanner, which reads black-and-white images, failed to pick up any opacity below 40-50%, while anything over 60% became over-saturated. It wasn’t until I asked the tutors that I learned some students were allowed to use USBs for printing, which made the process much easier and resulted in better colour accuracy. I’ve been here for years and had never been told about this. It’s frustrating to think of all the stress I could have avoided. In the end, I simply created a digital version of the print, and I’m quite happy with it.

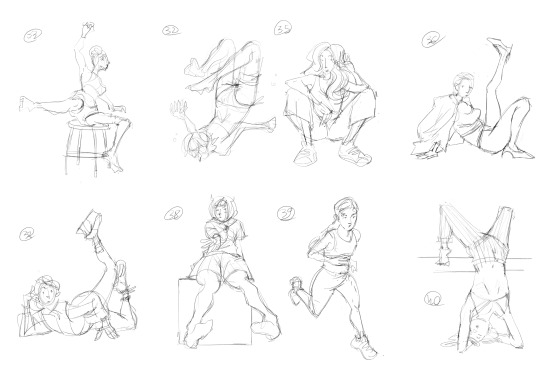
During the third week, I didn’t feel like continuing my final piece because I liked how my sketches looked and was a bit afraid of ruining them. Instead, I focused on creating 5-10 sketches of dynamic poses each day. By the end of the week, I could see my sketching ability improving. I also was watching tutorials on YouTube and experimented with background drawing using the selection/lasso tool, but I wasn’t entirely satisfied with the results.

Later that week, I sketched out some sticker ideas I was considering selling on Etsy. However, I lacked the motivation to finish them at the time, so I set them aside as a potential future project.
That’s how this month ended. With the holidays approaching, I didn’t want to work through the little time I had off. While this month may not have been as productive as others, I still laid the groundwork for my final pieces, which I will continue working on next month.
0 notes
Text
Bring Your Drawings to Life with Animation
Animation is a fascinating way to transform static drawings into dynamic and moving visuals. This art form combines creativity and technology, offering endless possibilities for storytelling and design. Whether you’re interested in creating animated movies, games, or visual effects, learning animation is an exciting journey.

Understanding Animation
Animation is the process of creating the illusion of movement by displaying a sequence of images. These images, called frames, are shown in rapid succession, tricking the eye into perceiving motion. Over the years, animation techniques have evolved from traditional hand-drawn methods to advanced digital tools, making it accessible to anyone passionate about bringing their ideas to life.
The Process of Animation
Creating an animation involves several steps, starting with an idea or concept. Storyboarding comes next, where rough sketches outline the scenes and flow of the animation. Afterward, animators create detailed drawings or 3D models, followed by adding movement and effects. Finally, sound and music are integrated to complete the project.
Many people who wish to explore these steps in detail opt for structured learning programs. Taking animation courses can help you master essential techniques and tools efficiently. For those based in Rajasthan, enrolling in animation courses in Udaipur provides a fantastic opportunity to learn under experienced professionals.
Benefits of Learning Animation
Animation is not just about creating entertaining visuals; it’s a valuable skill with numerous applications. From designing advertisements to producing educational content, animators are in high demand. Additionally, learning animation helps enhance creativity, problem-solving skills, and technical expertise.
For individuals looking to explore this field, attending animation classes in Udaipur can be a great choice. These classes provide hands-on training, covering everything from basic principles to advanced software, ensuring that learners are well-prepared for real-world projects.
Career Opportunities in Animation
Animation opens doors to diverse career paths. You can work as an animator in the film or gaming industries, create visual effects for advertisements, or even teach the craft to aspiring artists. As technology continues to evolve, the scope for animation professionals is only expected to grow.
Learning animation locally allows students to gain personalized guidance and build a strong foundation. By joining courses and classes in cities like Udaipur, you can connect with like-minded individuals and access resources tailored to your learning needs.
Start Your Animation Journey
If you’ve ever dreamed of bringing your drawings to life, there’s no better time to start than now. Animation combines artistic expression with technological innovation, making it a rewarding and versatile field. Explore the world of animation, develop your skills, and watch your creativity take flight!
0 notes
Text
Best VLSI Projects for Final Year Students
Here are some great VLSI project ideas for final-year students:
1. Image Processing System on FPGA: Algorithm, such as edge detection or image filtering should be performed through the usage of FPGAs for optimal performance.
2. Low-Power SRAM Design: Design and simulate a low-power Static Random Access Memory (SRAM) cell, targetting leakage and dynamic power dissipation.
3. Digital Signal Processor (DSP) Design: Design an example of a DSP that will allow a specific signal to be filtered or, for instance, undergo FFT.
4. Wireless Sensor Network (WSN) Protocol Implementation: Devise a VLSI based sensor node for wireless communication that will support protocols used in data transmission.
5. Reconfigurable Hardware Architecture: It is necessary to elaborate a box which is able to evolve in order to support several applications: in this context, it is possible to try to reconfigure parts of the hardware during the runtime according to the specific needs of the client application.
6. Cryptographic Hardware Accelerator: Propose and design a device for which you could use cryptographic algorithms or primitives including AES or RSA where optimization of both speed optimization and security is important.
7. System-on-Chip (SoC) Design: Selected h/w architects use Verilog or VHDL to design a including microcontroller, memory and other peripherals.
8. Artificial Neural Network (ANN) on FPGA: Devise a mini ANN for image recognition and other related work and optimally use the features of parallel processing provisioned by FPGAs.9. Automated VLSI Testing Tool: Design a testing and validation software system that has reduced time and eliminated errors in conducting tests of VLSI designs (Very Large Scale Integration).
10. Temperature Sensor with Data Logger: It will be a VLSI (Very Large Scale Integration) chip for measuring temperature and recording data, with the capability to display the data on a PC or a mobile connection.
All these project proposals present prospects to learn diverse aspects of VLSI design and implementation in addition to enhancing creativity. Choose one that you are interested in and which you can afford to do!
#vlsi#finalyear#verylargescaleintegration#VLSIDesign#engineeringstudents#studentsprojects#takeoffedugroup#takeoffprojects
0 notes
Text
image processing projects with source code for engineering students

The Takeoff Edu Group brings in creative image processing projects with source code for engineering students. Learn about computer vision, algorithms involved and sharpen your skills in this process. Apply your academic experience through our projects, that invite creative ideas and practical involvement in the field of image processing.
Latest image processing projects with a source code
Content-Based Image Retrieval Process for Speech Annotated Digital Images
Contrast Enhancement of Medical Images Using Statistical Methods with Image Processing Concepts
Colour Correction Based on CFA and Enhancement Based on Retinex with Dense Pixels for Underwater Images
Medical Video Watermarking Scheme for Telemedicine Applications
Combining highlight removal and low-light image enhancement technique for HDR-like image generation
Standard image processing projects with a source code
A Multi-Stage Framework with Context Information Fusion Structure for Skin Lesion Segmentation
Algorithm of Weed Detection in Crops by Computational Vision
Single Image Dehazing Using Dark Channel Fusion and Haze Density Weight
Denoising of Hyper Spectral Images Using Low Rank Matrix Factorization
Takeoff Edu Group can be your choice for all image processing projects with a source code, and you will find a world of opportunities in front of you. Our wide variety of activities enables students to obtain practical knowledge, acquire required skills, and stimulate their imagination. Ensure your academic journey is successful when you engage our expertise to boost your learning. Come along on the journey to victory with us. Visit more information: https://takeoffprojects.com/image-processing-projects-with-source-code Meta Tags: Image Processing Projects, Engineering projects, Final year projects, academic projects, MATLAB projects, CSE Projects, EEE Projects,
0 notes
Text
Unique DSP (Digital Signal Processing) core projects For Final year Student
DSP (Digital Signal Processing) core projects are about using clever technology to make signals better. Takeoff Edu Group Furnishes DSP core Projects with better knowledge. It's like magic for sounds, images, and other signals. In these projects, people use special chips or software to make music sound better, pictures clearer, and even help computers understand speech. It's like having a digital wizard that makes things clearer and sharper. These projects are cool because they can make our phones, cameras, and other devices work even better. They give us clearer calls, nicer pictures, and smarter features.
Digital signal processing (DSP) Cores Projects are based on computers algorithms to manipulate the digital signals such as audio or video to give a meaningful output with respect to their content. The new projects are like digital toolboxes that can help you with almost any imaginable tasks like filtering the noise from audio, or cleaning the image, and always minimizing the data size to save storage. Can you assume that the individual is speaking to you via a medium that is not so clear? A project of the DSP would be helpful due to the fact that the audio is degraded and noise removal is the only way to hear the person's voice. Perhaps you could talk about an instance of image processing.
Here are the example titles of DSP Core Projects- Takeoff Projects
Latest
Implementation of Delayed LMS algorithm based Adaptive filter using Verilog HDL
Trendy
Algorithm Level Error Detection in Low Voltage Systolic Array
VLSI Implementation of Turbo Coder for LTE using Verilog HDL
VLSI Implementation of Fully Parallel and CSD FIR Filter Architecture
A High-Speed Floating-Point Multiply-Accumulator Based on FPGAs
High performance IIR filter implementation on FPGA
Standard
An Efficient Parallel DA-Based Fixed-Width Design for Approximate Inner-Product Computation.
Calculator Interface Design in Verilog HDL using MIPS32 Microprocessor.
An Improved Distributed Multiplier-Less Approach for Radix-2 FFT
FPGA Implementation for the Multiplexed and Pipelined Building Blocks of Higher Radix-2k FFT
Low-complexity Continuous-flow Memory-Based FFT Architectures for Real-valued Signals
If there is a picture flattened out, its sharpness could be improved in the project of DSP (Digital signal processing) which would make the photo to look clearer and easier to see the details. These projects are mainly about programming and utilizing software or a specialized physical hardware for the operations of algorithm that process specific frequencies. DSP Core has the potential to be used to solve a wide variety of problems, such as in the fields of communications, medical imaging, and audio processing, and so on. They are instrumental for application of signal polishing and obtaining unique data from the signals, thus simplifying analysis process by rendering it easy to comprehend and work with.
In conclusion, DSP Core projects are essential for many modern technologies, making things like smartphones, music players, and even medical devices work efficiently. Takeoff Edu Group also providing all kind of projects to your Academic years. Through this technology, we can enjoy clearer audio, sharper images, and faster data processing. DSP Core projects play a crucial role in shaping our digital world, enhancing our everyday experiences, and driving innovation forward.
#DSP Memory#Processor core IP#DSP cores Projects#Configurable cores#Configurable processors#DSP core IP core#Digital signal processors
0 notes
Text
(ARTS246) Ch. 8: Typography on Screen & Project #2 Critique


I spent the past week and the previous two weeks finalizing my submission for the UCDA Poster Competition. As I have mentioned in my previous blog posts, the competition aims to encourage students to create artwork that inspires positive thinking. Participants can create an original poster for print or online use. This year's theme is "Immerse," and I used Artivive, an augmented reality software, to bring my designs to life.
Similar to how I began Project #1, I tried out different variations and layouts of my typography to see what worked best. After some experimentation, I narrowed down my options from six to three. From those final three, I selected one to submit for a critique and as my entry into the contest.
I needed to develop the text for my poster, so I searched the internet for inspiration. I wanted the text to sound poetic and invite the audience to interact with the poster. After careful consideration, I came up with the slogan, "Immerse as wave by wave the water deepens." It had an inviting, poetic ring and a mysterious undertone. The audience could interpret it as an invitation to explore deeper or a warning. Ultimately, it was up to them to decide.
Next, I experimented with ways to make my typography more interesting. My professor suggested using water to create unique textures. I printed my type on regular paper, trimmed it down, and tried different solutions such as water, Dawn dish soap, vinegar, baking soda, and body wash. Placing my type under a glass jar, I poured the liquids into the jar to see how they interacted with the ink and paper. I also crumpled up the paper and submerged it in the solutions for a more unique effect. Throughout the process, I took photos from different angles to use later. Using Adobe Illustrator's image tracing tool, I manipulated the photos to create an impression of the type being submerged in the ocean. I then used Adobe Photoshop to experiment with different color gradients until I found blue and turquoise gradients that worked well. Finally, I exported the files and sent them to be printed on glossy poster paper for the final critique.
Finally, I had to work on an augmented reality component for a project. Initially, I was nervous about it because I had to use a new software that I was not familiar with. To overcome my fear, I took some time during my Spring Break to watch videos and experiment with Artivive - a website that allows users to add their artwork files and another digital layer together to make the artwork interactive. The purpose of augmented reality was to combine a 3D technological component with artwork. Artivive helped me achieve that by allowing me to import three variations of posters and add my secondary components, which were videos of waves I had taken at Surface Beach during my vacation. I chose these videos as they captured interesting wave patterns that I believed would add an interactive component to my posters. I brought both files into Artivive and manipulated the videos to act as a transparent overlay over my artwork. The waves would come from various angles to bring my posters' textures to life and submerge the type beneath the surface. After I was happy with the overlaying effect, I saved my files and downloaded the Artivive app, which activates my artwork when you scan it with the app.
To help me decide which poster to submit for a competition and for critique, I asked graphic design students for their feedback. They gave me helpful and constructive feedback on which version conveyed the message better, which color palette was the strongest, and which variation appeared the most legible. Most students agreed that the second variation was the strongest among the three, and the augmented reality component was the most effective in bringing the design to life.
After receiving feedback during the critique, I found that most of the comments were positive. I was initially concerned that the augmented reality effect would not be advanced enough for the competition, but I was reassured that the technology did not need to be groundbreaking but rather a key element that enhanced the initial design. Many of us in the class had never interacted with this software before, and the project was meant to introduce us to augmented reality and encourage us to experiment with the software. I was commended for my dedication to playing around with typography in both the physical and digital spaces. Overall, this project was a great opportunity to explore typography and learn new design software that I can use in future projects. I am excited to add these new pieces to my portfolio as they will serve as an interesting conversation starter!
The readings for this week covered Chapter 8: Typography on Screen, which delves into the challenges of incorporating technology into digital design, specifically when it comes to typography on computer or phone screens. While I understand the concern of designing type to fit multiple screen sizes in today's ever-changing digital landscape, I never initially considered it an issue. Perhaps this was more of a concern for traditional graphic designers who began their careers outside computers and design software, as early computer screens had extremely pixelated and limiting resolutions. However, these initial limits did not stop designers from creating work. I would argue that it challenged designers to think outside the box and continue solving visual problems with creative solutions, which is still applicable in today's world. Nonetheless, we now have more advanced computers and design software which early designers did not have the luxury to start with. However, the basics still apply, such as ensuring that a file is in the correct dpi (300+), using the grid to organize type, and understanding visual hierarchy, which is all necessary. These basic principles will never change, even as technology continues to evolve and advance.
0 notes
Text
Week 1 - Project Launch
Monday 25th February -
Today was the launch of the global project. We were given the new brief which was:
"This module focuses on real-world challenge-based learning, through a globally located live brief, set by an external client, user, community, audience or institution. Building on skills developed in the previous modules throughout Level 5, the scope is now bigger again, with a global perspective, and an emphasis on understanding different cultures, knowledge and working practices. You will collaboratively question and explore a live brief, while iteratively moving through the Thought, Materials and Digital Labs as needed as your project grows and develops. Throughout the module, you will regularly bring your work together to share, display, discuss, and critique.
The inclusion of a reflective essay asking you to discuss a position for yourself globally, in relation to your work and interests, will act as a transition into level 6, in preparation for your final year of self-directed study and the future direction you wish to take. "
Later in the presentation there was a more direct version of the brief which provided some more clarity as to what was actively being asked:
"The Brief - A Portal Between Two Universities
Communicating across the Continent
This collaborative creative project aims to create a body of work and a possible real time event. This project takes inspiration from PORTAL, by Benedict’s Gylys, which acts as a reminder that:
‘We are all inseparably connected’ "
I gathered, we were to create some form of 'portal' connecting us and the students in Kiev, while being conscious of the socio-geographical challenges and solutions, audience and community, and the environment. We were given the example 'PORTAL' which was a good example of the kind of outcome that we could produce. Anything that connects us to the students in Kiev. This example showed a physically built portal in the streets of Lithuania, and Poland and it shows a live view image of the street at the time, only the Lithuanian street is streamed on the Polish portal and vice versa.
We were then spoken through the learning objectives and how we will be assessed:
Learning Objective 1: 25% Individually assessed
research and development evidenced in a process log
relating to the needs of the client, audience, community and planet.
Learning Objective 2: 25% Individually assessed
research and development evidenced in a process log
regarding socio-geographical challenges/solutions for sustainable development.
Learning Objective 3: 25% Group assessed
Research and development and final output evidenced in process log
Learning Objective 4: Individually assessed
Individual 2000 word essay
develop a position for ourselves globally in relation to the inquiry
We went on to discuss the reading texts that we will venture into throughout the project. After this we were told that it was Kyiv National University of Technologies and Design, that we were going to be collaborating with. We started to consider themes that we could focus on to later develop our projects. The ones that we were given were:
communication/language
population
weather
maps/geography
time zone
studios
creative work
food
These were just a few ideas that we were told about and discussed. We can work with different themes if we chose but these were a few that we ventured into early on to begin to spark our ideas. We looked into examples of each that had already been done. Like carrier pigeons as a form of communication and morse code as a language/communication example. My favourite example that we looked at, however, was the "Tomorrow is another day, weather experience" by Mathieu Lehanneur. It was an installation made for a Palliative care unit. It offered patients an opportunity to see tomorrow's sky as it streamed live weather updates for the next day and displayed them through this window like feature for the patients. I liked most the meaning behind this installation. I think it was especially heartwarming and I like the idea of designing with such a nice sentiment. I think that this project is a perfect example of where the audience, community and the socio-geographic issues/questions have been dealt with in such a professional and compassionate way. He claims to have used the weather as it is such a frequent conversation between people, and rather than steer away from the fact that the patients aren't in control or aware of their time, he gives them this awareness of the future. Patients in such an environment you wouldn't expect to have but he allows this conversation and this knowledge.
‘I also liked being a step ahead of death itself: perhaps I will not be there tomorrow, but I know what tomorrow will look like!‘
This sentiment resonated with me particularly as I think it was such a positive effect of the installation. He deals with the environment in such an admirable and positive way. It is this kind of designing that I think shows a higher level of professionalism. There is such an understanding and awareness of his audience, setting and community and it is evident in the outcome and the effect that it has.
We discussed the next steps for the project which were to join the Figma page. This is a communal workspace that we shared with the students in Kiev, so that we could all upload our work to a space that was accessible for all. It was a very very similar programme to Miro and so was easy to get the hand of and begin uploading to. After joining the Figma we began research for the rest of the morning until we had a teams call with students and tutors in Kiev. We were to select a theme and start researching and configuring research to influence and aid our design ideas. This was so that we could all come up with individual pitches for the following Monday morning. We were to pitch to the class our idea so that we could find similarities in ideas and then begin to split off into groups and develop these ideas further, alongside the students in Kyiv.
In the evening of the session we had our first Teams call with the Students in Kyiv. This call was mostly just an introductory meeting to each other and to see the other students. We spoke about the project and heard a little from a teacher in Kyiv who seemed very excited to begin the project. We informed them of our course and then individually the students from Kyiv introduced themselves which was really nice to hear. I was really impressed with their English and they even said it was a good opportunity for them to practice which was nice! After the introductions we spoke about the next steps of the project, which were of course to come up with individual pitches which will then navigate us into groups based on the similarities between the ideas. We mentioned that the communal Figma page will be used throughout the project so that we can all see each other's ideas and comment throughout the entire process.
We created spaces on the Figma to introduce us, with images of ourselves and a small bio to tell them a little about each of us. The Ukrainian students did the same and it was nice to see this social page form, for me it helped to realise that we were really in contact and collaborating with this students, despite them being in another country. It also helped as anything then posted by a student was labelled and we could physically see the person that was uploading the content.
Wednesday 28th February -
Today I felt was the time to really consider what I wanted to achieve via my 'portal'. I tried to break down various similarities and differences between the students in Kyiv and ourselves. The biggest ones I came up with ranged from,
similar educative backgrounds
different cultures
different architecture/environments
similar interests
universities/courses.
I began my research into Kyiv and its culture. I was considering the differences and the similarities between Kyiv and Birmingham as I thought this may be an easy was to compare the two and see any significant themes. One area I did begin to look into was the architecture. This was slightly difficult as I wanted to ensure the architecture I looked at in Kyiv had little to no soviet relations. It was imperative that even in my research I stayed sensitive of the current affairs. I discovered the 'monumental' statue, 'Mother Kyiv'. This statue was built to commemorate the victory of World War Two. Its vast scale was made to resemble a sense of power as it stands at a large 102 meters (including the podium on which it stands). The parliament of Ukraine began a decommunisation of Ukraine in April 2015 and ultimately outlawed Soviet and communist symbols, street names, and monuments. World War Two monuments were, however, protected from this law until February 2018 where the debate began to replace the Soviet State emblem on the statue with the Ukrainian Trident Coat of Arms. According to 'DIAM' on the 13th of July 2023 the work to remove the Soviet emblem began. I was particularly drawn to this monument not just because it is located in Kyiv but because of this history and what it now represents. It seems something that the people of Ukraine can be proud of as it has been, in a way, reclaimed.
Birmingham is also known for a lot of its architecture. From the traditional, listed buildings to the much more modern buildings like the library and the bullring. This was an interesting area as it allowed me to really consider the buildings that I am surrounded by and often overlook. Even to look at our building, first opened as an art school in September 1885. It is the oldest School of Art in the UK. This was an interesting comparison point and allowed for a lot of useful research. It is interesting to learn about the different features of each city and how they are influenced. From the reclaiming of once soviet statues to the gothic revival architecture of Birmingham, the cultural differences shine through.
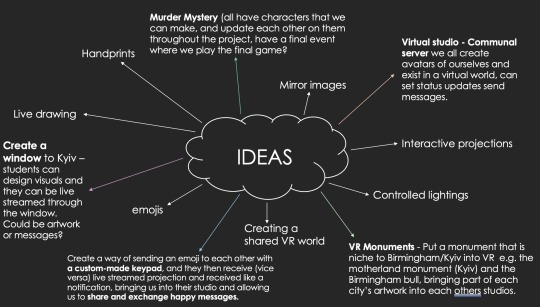
After a fair amount of reading and research in the morning I tried to focus on possible physical outcomes. I considered different ways of interacting, and just made a note of anything that inspired me after hearing the brief. I created a mindmap of these ideas as it was a rough draft on possible ideas that I can later branch off of and develop.
These ideas consisted of:
handprints
drawing
creating a VR world
emojis
mirror images
interactive projections
lighting changes
These were all just very initial thoughts that I made a note of. My design process begins with rough ideas and then development to create more thought out and evolved ideas. This is what I spent the rest of the afternoon doing. I started to flesh out some of these thoughts. Some of the more developed ideas were:
A window between Kyiv and Birmingham - we can each design and project visuals through the window and stream them in each others studio, maybe uploading them through a shared website.
An interactive game between the two groups, potentially a murder mystery.
A live streamed chat via our own website.
Create a monument combining aspects of both Ukrainian and British culture, specific to Birmingham and Kyiv. We can then project it or use AR to display it in each other's studios.
A communal server of some sort that we can all access and enter together.
I began to create a mind-map of these ideas to visualise and see them alongside each other. This usually helps see any possible crossovers of ideas that could be combined into one or developed together. I also thought this may be a useful visual to display in my pitch presentation to see if there's anything that may inspire/coincide with others.
0 notes
Text
Week 12 Compulsory Question 3
In terms of collaborative projects, I think I would like to have a collaboration with the Fashion Design major in our school. First, we can communicate to define the theme and style of the design, ensuring mutual understanding and agreement. After that, I can take charge of creating clothing patterns, colour coordination and so on, providing visual elements to support the fashion design. Meanwhile, the fashion design student can focus on tailoring, fabric selection, and the actual manufacturing process. It will be an excellent collaboration.
Speaking of final projects, I would like to make a portfolio about graphic design in the final semester. That includes poster design, logo design,product design, web design and packaging design. I would take the portfolio to apply to an American art college. That has been my dream since I was in high school.
I would like to showcase and demonstrate all the design skills and knowledge that I have learnt over the past 3 years in this school, and display it in my portfolio.
If I meet some community engagement in the future, I will help them by the knowledge I have learnt. For example, create posters, flyers, event brochures, or signage to make the activity information more attractive and easily communicable. Secondly,Design social media images, website interfaces, or other digital media to enhance the online exposure and engagement of the event. Last but not least,Share my design skills by conducting workshops or training sessions, helping other community members learn and apply design techniques.
After learning CTS, l learnt a lot of things which can help me professionally, including mindfulness, collaboration, emotional intelligence, growth mindset and so on. These will help my work, such as having a clean mind when working, reassessing my weaknesses and strengths, and adjusting my mindset if I don't reach my goal or ideal.
(303 words)

Reference:
Writer, Teen. “9 Simple Strategies to Clear Mind Before Working - Teen Writer - Medium.” Medium, 6 Jan. 2022, teenwriter088.medium.com/9-simple-strategies-to-clear-mind-before-working-1603a953cb4f.
0 notes
Text
BTech Live CSE Major Image Processing Engineering Projects in Hyderabad Btech Projects in Hyderabad
Truprojects emerges as a paramount source of exhilarating btech cse major image processing projects in hyderabad, tailor-made to cater to final-year engineering students. Our proficiency lies in delivering captivating projects that dive into the captivating realm of Image Processing technology. For BTech CSE students, these btech cse major image processing projects provide an exceptional pathway to explore this transformative field. Truprojects stands as a hub for innovative project concepts and comprehensive solutions.
When it comes to substantial Btech CSE projects centered around Image Processing technology, Truprojects stands out as the ideal destination in Hyderabad. As the demand for Image Processing applications surges, we provide students with an array of intriguing projects to select from. Our role extends beyond the academic sphere – we guide students in bridging the gap between theoretical comprehension and real-world application.
The btech ieee cse major image processing projects in hyderabad we offer are meticulously designed not only to challenge students but also to equip them with vital skills essential for success in the industry. Through hands-on projects, students garner invaluable experience in developing Image Processing applications that hold real-world significance. These btech academic cse major image processing projects in hyderabad transcend traditional coursework, providing a platform where innovation harmonizes with practical execution.
Truprojects also specializes in major final-year projects centered around Image Processing, seamlessly aligning with the core requirements of btech cse major image processing final year projects in hyderabad. These btech live cse major image processing projects carry academic significance while affording a glimpse into the future of technology. At the heart of Image Processing lies its power to analyze and manipulate visual data, and through these projects, students explore its potential to redefine various industries.
With an unwavering commitment to upholding IEEE standards, Tru Projects ensures its offerings consistently meet the highest benchmarks of quality and innovation. Our collaboration with IEEE adds an extra layer of credibility to the major Image Processing projects, setting them apart in the competitive landscape of engineering endeavors.
For BTech CSE students, these btech cse major image processing live projects in hyderabad
offer an immersive experience in the realm of advanced technology. Tru Projects transforms abstract ideas into tangible projects, providing an btech ieee cse major image processing projects in hyderabad for students to showcase their prowess and knowledge. As Image Processing continues to revolutionize industries, these projects empower students with expertise to excel in a digitally connected world.
In conclusion, for BTech CSE students seeking significant btech cse major image processing live projects in hyderabad centered around Image Processing technology, Truprojects in Hyderabad is the ultimate destination. Our unwavering dedication to excellence, commitment to IEEE standards, and strong emphasis on practical implementation position us as leaders in the field. As students delve into the limitless possibilities of Image Processing, Truprojects paves the way for a future where innovation knows no bounds.
0 notes
Text
Finalized animation styles for each hat | Research for each
White hat: Paper cut out
Cutout animation is a form of stop-motion animation using flat characters, props and backgrounds cut from materials such as paper, card, stiff fabric or photographs. The props would be cut out and used as puppets for stop motion.
The cut-out animation is the method of creating a cartoon or video in which the artist moves by replacing the character's body parts (a head, a hand, a neck, a mouth, and so on). It recreates an illusion of the motions of the character.

Blue hat: Collage animation + digital scribbles
What is a collage animation? It is a type of animation which consists of a mixture of real photographs and illustrations. It may involve the usage of more photos than illustrations or vice versa.
an artistic composition made of various materials (such as paper, cloth, or wood) glued on a surface. cut pictures from magazines to make a collage. b. : a creative work that resembles such a composition in incorporating various materials or elements. the album is a collage of several musical styles.
Red hat: 3D mixed media with live footage
Assemblage: A 3D mixed media collage is called an assemblage, with various materials protruding in different directions.
Three-dimensional media occupies space defined through the dimensions of height, width and depth. It includes sculpture, installation and performance art, decorative art, and product design.
Definition. Three-dimensional media occupies space defined through the dimensions of height, width and depth. It includes sculpture, installation and performance art, decorative art, and product design.

Yellow hat: Sand animation + Light painting
Storytelling: Sand animation allows artists to visually tell stories and convey emotions in a unique and captivating way. Versatility: Sand animation can be adapted to different styles, themes, and audiences, making it a versatile form of expression.
Caroline Leaf
Sand animation techniques were first pioneered by Caroline Leaf at Harvard University in 1968 when she was an undergraduate art student. She created her first film, Sand, or Peter and the Wolf, by dumping beach sand on a light box and manipulating the grains to build figures, textures and movement, frame by frame.
Sand animation was invented in 1968, by Caroline Leaf, for her project at Harvard University. Her first stop motion animated film was "Sand, or Peter and the Wolf", which she created by moving sand with her hands on an illuminated glass surface.


To do light painting, you need to use a long exposure to capture the path of a moving light source. Set your camera to manual mode and try starting with a shutter speed of around 30 seconds. Keep ISO as low as possible and set your aperture according to the style of shot you want (if in doubt, start at about f/5.6).
The first known light painting photographs were not even meant to be interpreted as art. They were taken in the year 1914 by Frank and Lillian Moller Gilbreth, a husband-and-wife duo. Using small lights and a camera's open shutter, they captured the motions of workers, including handkerchief folders and bricklayers.
The main benefit of having lighting – whether noticeable or subtle – is that it gives an image an added depth. As paintings are usually created on canvas, it can be very easy for a piece to look flat and uninteresting if there isn't some form of light involved in the composition.


Black hat: 2D rotoscope animation
Rotoscope animation describes the process of creating animated sequences by tracing over live-action footage frame by frame. Though it can be time consuming, rotoscoping allows animators to create lifelike characters who move just like people in the real world.
2D and 3D rotoscoping share a lot of likenesses. Following a picture to create a movement path for an energized object is one of the two methods. The most important difference is that 2D rotoscoping is done manually, while 3D rotoscoping is done with software.
Ralph Bakshi used rotoscoping extensively for his animated features Wizards (1977), The Lord of the Rings (1978), American Pop (1981), Fire and Ice (1983), and Cool World (1992).
What is 2D animation? Animation means making visual objects move. 2D animation is the process of creating that illusion of movement for characters and objects within a two-dimensional space. Traditional 2D animation was hand-drawn, but it can now also be computer generated.
Green hat: 2D digital animation
2D animation is motion that takes place within a flat, two-dimensional space. 3D animation adds the concept of depth. This means that 2D animation can often be created more easily than 3D, using less technical and specialized tools.
Emile Cohl
The very first 2D animation was called Fantasmagorie, a short cartoon made by Emile Cohl in 1908.
2D animation is the art of creating movement in a two-dimensional space. This includes characters, creatures, FX, and backgrounds. The illusion of movement is created when individual drawings are sequenced together over time.
The first type of 2D animation might be called traditional animation or cel animation.


0 notes
Text
Film Inspection in the Media Preservation Unit by Lindsay Miller
Hello there - my name is Lindsay Miller and I am a second-year graduate student in NYU’s Moving Image Archiving and Preservation (MIAP) program. This semester I have the privilege of working in the Media Preservation Unit at the Barbara Goldsmith Preservation & Conservation Department, and today I will be telling you more about the work I have been doing inspecting films from collections held by Fales Library.
My first year of the MIAP program was spent entirely online, so I missed out on a lot of hands-on training. I was born in the latter part of the 1990s and do not have much recollection of older audiovisual formats except audiocassette tapes and VHS. All of my previous film production experiences were also entirely done digitally, so analog film always felt just outside of my comfort zone. I had never even been inside a projection booth until last summer when I took a tour of Cornell Cinema. Needless to say, I jumped at the chance to work in the Preservation Department at Bobst Library, as I would finally have this opportunity.

The author trying to act candid in Cornell Cinema
Let me walk you through a typical film inspection: I’ve worked with a variety of gauges throughout the semester, but my absolute favorite to work with is 35mm. Besides the fact that rewinding gives me a great arm workout, 35mm’s size allowed me to get comfortable with some basic tasks like measuring shrinkage before moving on to smaller formats, almost like training wheels.
I begin each new reel with a brief visual inspection. I’m looking for anything that seems out of the ordinary: mold, dust, debris. I will also take a look at the reel’s housing and make any notes or annotations that may be on the container. These notes can sometimes provide clues as to what is on the film and are other times just chicken scratch. A valuable skill they don’t teach you in film preservation school is how to decipher cursive handwriting!
If the reel is looking okay, I will then put it on a rewind crank to begin a more in-depth inspection. This process starts with splicing the leader onto the head of the reel, which is then labeled with its associated metadata. Then I begin to slowly wind through the film. There are some rudimentary things to look for with every inspection. Is this a black and white film or is it color? Is this a positive image or a negative? Is there a soundtrack? Most of the film I have inspected so far has not had a soundtrack, so it’s always fun when an optical soundtrack makes an appearance.

Example of a negative film print Shu Lea Cheang Papers (MSS.381)

A wild optical soundtrack appears! Alan Sondheim Papers (MSS.267)
Another thing to look for on film is an edge code. This is a special code printed on the edge of a film that can be used to figure out when the film was manufactured and by whom. Sometimes the answer to this will be obvious; Kodak is pretty in-your-face with its film stock and has a well-documented key that is used to decipher each symbol. Other times there is no edge code and it is up to other clues, such as a film’s housing, to determine these factors.

Kodak film manufactured in 1971 Alan Sondheim Papers (MSS.267)
During this process, I am also keeping track of any splices I may notice and will also repair them as needed. Splicing film is something that I have grown to love, even when I am working with Super8, which can be tricky to work with. It takes a steady hand and some patience to get it right but there is nothing more satisfying than repairing a bad tape splice.
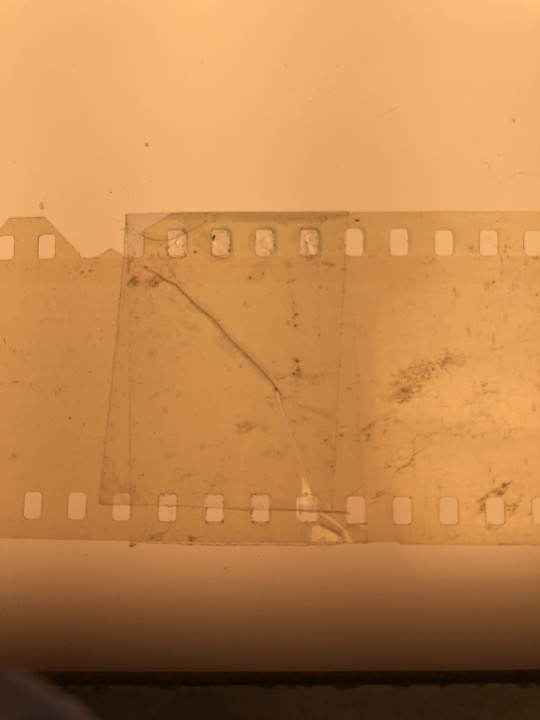
Now that’s a bad splice! 35mm film
Once I finish winding through a film, I attach a leader to the tail end and wind it onto a new core. Winding film is another skill that takes practice, even though it may seem simple. It is important to keep a constant speed so that tension is evenly distributed throughout and the pack remains smooth. If a film has not been properly wound and strands stick out, it is more likely to warp or become damaged down the road. And like I said, winding 35mm is a workout! I’m always sweating by the end.

35mm rewind I was particularly proud of…so smooth!
My favorite part of working in the Media Preservation Unit has been discovering what’s contained within each collection. Every day brings about new discoveries and I love learning more about the folks behind the work. Inspecting films has also been a welcome escape from the stresses of everyday life. I love being able to sit and focus on a reel for an hour or two. Each presents its own unique challenges and it’s been a gratifying experience working with my supervisors to tackle each.
14 notes
·
View notes