#DirectionalLighting
Explore tagged Tumblr posts
Visit Tumblr Blog
Explore Tumblr blogs with no restrictions, modern design and the best experience.
Last Seen Tumblr Blogs


Fun Fact
Premium Tumblr themes are available from anywhere between $9 to $49.
Text

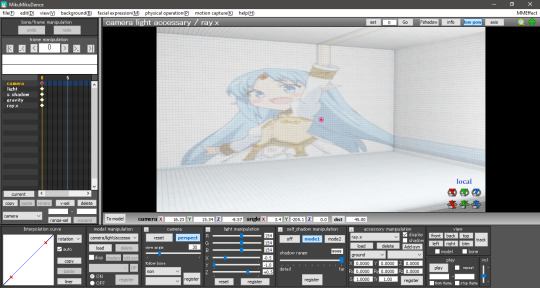
MME making
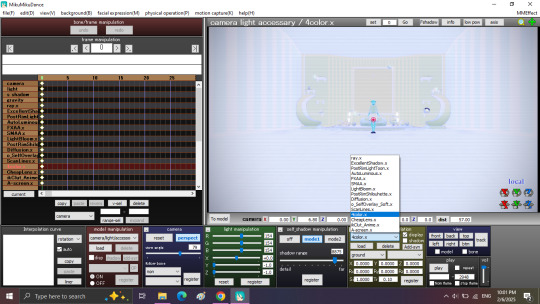
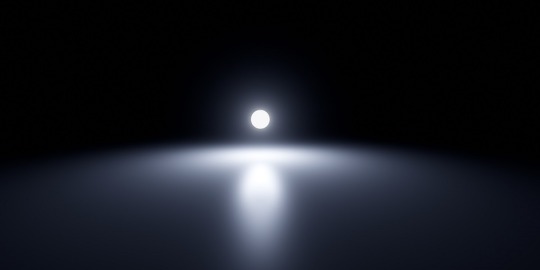
Light:
-X: +0.0
-Y: -1.0
-Z: -1.0
ray-mmd-master:
-Sky Hemisphere:
+TopV-: 0.2
+BottomH+: 0.6
+BottomS+: 0.2
+EnvDiffLight-: 0.2
-ray_controller:
+SunLight-: 0.3
+SunShadowV-: 0.2
+SSAO-: 0.94
+Fstop-: 1.0
+FocalLength+: 1.0
+BloomThreshold: 0.51
+BloomColor AllH+: 0.6
+BloomColor AllS+: 0.8
+BloomStarFade: 1.0
+Exposure-: 0.2
+Saturation: 0.31
+Gamma-: 0.14
-DirectionalLight:
+R+: 0.47
+Range+&-: 0.85
+Hardness: 1.0
-AtmosphericFog:
+MieH+: 0.6
+MieS+: 0.8
+MieV+: 0.4
+MieV-: 0.2
+RayleightH+: 0.6
+RayleightS+: 0.4
+RayleightV-: 0.2
+Density-: 0.1
-GroundFog:
+R+: 0.24
+G+: 0.2
+B+: 0.2
+Heght+: 1.0
+Density+: 1.0
+Range+: 0.15
-VolumetricCube:
+Density-: 0.79
LightBloom:
-BloomThreshold: 0.55
-BloomColorAllH+: 0.28
PostRimShilouhette:
-Null_8: 1.0
-Null_5: 0.7
FXAA - SMAA
AutoLuminous4
Diffusion7:
-Tr:0.5
AnimeScreenTex_v1.0:
-Tr: 0.05
o_SelfOverlay_v0_6
-Tr: 0.4
msColorCorrection_ver.1.0: But with "Default.vmd"
CheapLens:
-Tr: 0.50
ikClut_ET5:
-Tr: 0.10
CameraScreen: With ScanLines.x
Video: https://www.youtube.com/watch?v=VJAj9SSPdDU
2 notes
·
View notes
Text
Filming my Cutscene Part 12
I make him raise his walking stick at 1800 frames and then quickly tap the ground again 10 frames later (a third of a second) to highlight the energetic nature of him while "taking a stand".
Then I had an Idea on how to end the cutscene nicely rather than it just freezing.
So I clicked +Add, then Actor To Sequencer then I searched up "DirectionalLight"

Then I pinned it at Intensity of 3.0 at 0 frames.
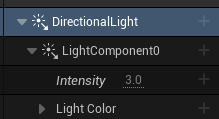
Then it steadily decreases to 1.0 intensity at 1785 frames. Then I added the final key frame for it which was to decrease the light intensity to 0.0 at 1820 frames.

Just 10 frames before the cutscene finishes. This gives it the cinematic finish.
0 notes
Text
Developing game
Making it night time in my game.
How to make night in Unreal Engine 5 - UE 5 Full guide - YouTube
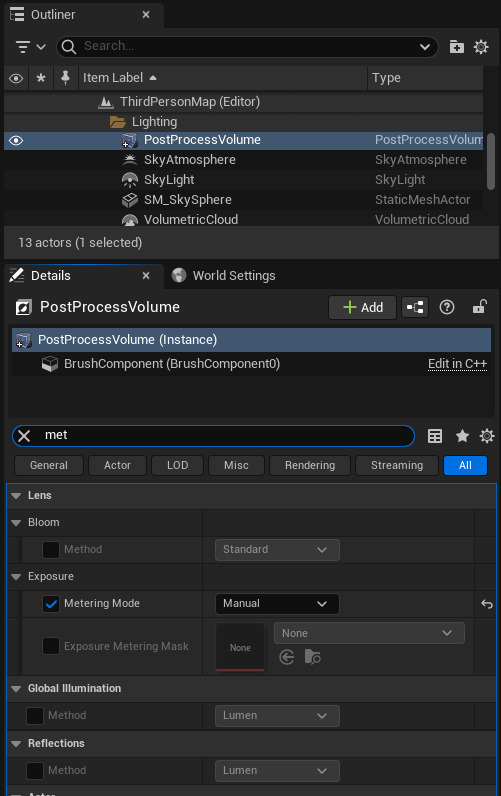
In Unreal Engine, click on the sky in the game and in Outliner, select PostProcessVolume and go to Details. In here, find Metering Mode and enable it, then set it to Manual.

Then, Enable Exposure Compensation and change this value as preferred.

Now, instead of PostProcessVolume, we need to get DirectionalLight. Once you open it, change Source Angle; this will change the size of the moon/sun. You can also change the Light Color if you want.
0 notes
Text
Fixing up the game:
I tested how the game now looks when dark. To do this, I rotated the 'DirectionalLight' 90 degrees. There was a problem. The planets don't show up. I think that the problem is that I had set the material for the sprites as the lit variant which is non-illuminate.
To fix this I changed each of the sprites materials to 'MaskedUnlitSpriteMaterial'. This had worked well.
I decided to make it day again by rotating the directional light back to where it was.
0 notes
Text
Unreal Engine: Block Breaker Prototyping
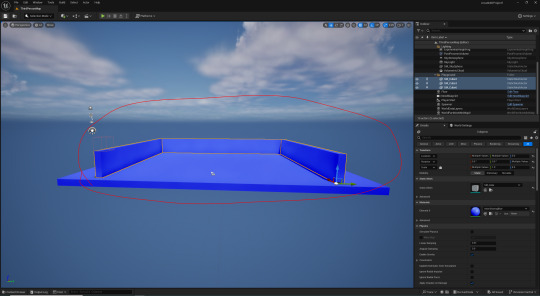
Moving on from endless runners, the next genre to prototype is block breakers. I'll be making a pong or breakout style one to begin with, and then if I have time I'll iterate and develop it further from there.
I started by creating a blank project- something I've not done previously. When doing this it's important to remember how to add the basic lighting so I have a space to work in. To quickly do this I went to window > Env. Light Mixer, then created everything it prompted:

I then changed the color and intensity of my DirectionalLight to give me my background for the prototype:
This gave me a base to work off of. I then created a material that I made Material Instances of to give to each object in game:


The advantages of using Material Instances is that - similarly to child actors - I can edit the parameters of the original M_EmissiveBase without affecting the original or having to make duplicate materials:
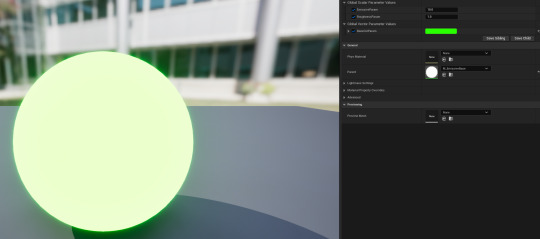
I'm really happy with the use of material instances here, I think this is a really useful tool to have under my belt, and now I can use these to create the objects in this prototype.
0 notes
Text
Tilemap in Unreal Engine!
Export as a PNG for the Assets.

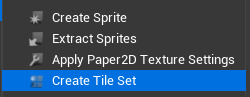
2. Import Tileset and apply paper2d setting


3. Create Tileset and collisions-check grid size!

4. Create Tilemap (H 10 W 20 to start)-organise layers.
I am also changing my tiles to look clearer since they weren't in Nearest Neighbor.


5. Create NewLevel and add Tilemap and playerstart(x and y axis)


6. Go to BP_ThirdPersonCharacter and change the Projection mode to Orthographic from the FollowCamera. Also start adding blocks in from your tile map into the world.


7. Add a PlayerStart to the NewLevel.

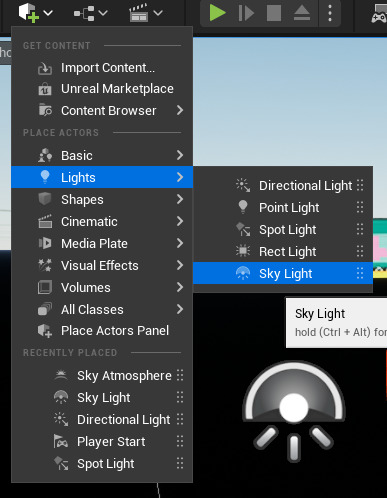
8. Add a SkyAtmosphere

9. Add a DirectionalLight and a SkyLight.

9. Change Tile size and add Collision(which I still need to add!)

10. play your level.

1 note
·
View note
Text
Fixing initial issues with my first level
After initializing everything for my first level, I ran into 3 big issues:
The scale of player:level was incorrect.
the lighting was having issues, causing my character to glow
the camera was incorrectly showing my tile map.
The fixes for these in order was to:
Rescale my level in the editor
Add a DirectionalLight, SkyLight, and SkyAtmosphere objects.

Change the player camera to orthographic and set the width to 2000.

After that, the level was a lot more playable.

0 notes
Text
Arco - Atemporalidade na Iluminação

A Luminária Arco é, sem dúvida, uma das peças mais icônicas do design moderno, representando uma verdadeira obra-prima da iluminação. Criada pelos renomados designers italianos Achille Castiglioni e Pier Giacomo Castiglioni em 1962, essa notável criação surgiu em uma época de grande inovação e experimentação no design de mobiliário e iluminação, deixando sua marca na história.
O objetivo primordial dos irmãos Castiglioni ao conceber a Arco era solucionar o desafio de iluminar espaços sem a necessidade de fixar uma luminária ao teto. Inspirados pelos arcos de iluminação pública das ruas de Paris, a cidade se tornou a musa para a concepção desta luminária visionária.
Com um design engenhoso, a Arco possui uma base de mármore maciço que não apenas garante estabilidade, mas também adiciona um toque de sofisticação à peça. A partir dessa base, uma longa haste telescópica de aço inoxidável se estende elegantemente, permitindo que a luminária alcance áreas distantes, como uma mesa de jantar, sem a necessidade de ser fixada ao teto. O topo da haste ostenta um elegante e amplo arco metálico, finalizado por uma cúpula que abriga a fonte de luz. Essa configuração permite que a luz seja projetada de forma direta e focalizada, criando uma iluminação adequada para atividades específicas, como a leitura ou um jantar aconchegante.
A notável versatilidade da Arco também merece destaque. Sua extensão pode ser ajustada conforme a necessidade do ambiente, e a abrangente área de alcance a torna uma escolha popular para iluminar espaços amplos e abertos, destacando-se pela sua funcionalidade e estilo.
Desde o seu lançamento, essa luminária tem recebido ampla aclamação e se estabeleceu como um ícone do design moderno. Sua combinação única de funcionalidade, elegância e inovação a transformou em uma peça atemporal, que mantém sua popularidade e relevância até os dias de hoje. A Arco é frequentemente encontrada em ambientes residenciais, espaços de escritórios, galerias de arte e outros ambientes contemporâneos, onde sua presença imponente e estilo atemporal continuam a impressionar e iluminar o ambiente com uma luz singular e cativante.
#Alalux #LuzÉArte #ReferênciasDoDesign #Arco #DesignAtemporal #TimelessDesign #DesignContemporâneo #ContemporaryDesign #DesignClássico #ClassicDesign #Tecnologia #Technology #AltaTecnologia #HighTech #Luminária #IluminaçãoDirecional #DirectionalLighting #Iluminação #Lighting #IluminaçãoUniforme #UniformLighting #IluminandoComEstilo #ÍconeDoDesign #LuzDireta #Flos


0 notes
Text
The Best Floor Lamps For Reading
Illuminate your reading nook with the best floor lamps for reading. Adjustable brightness, directional lighting, and stylish designs enhance your reading experience. Discover the perfect lamp to accompany your literary adventures.
#ReadingLamps#FloorLamp#IlluminateYourSpace#PerfectLighting#EnhanceReadingExperience#AdjustableBrightness#DirectionalLighting#StylishDesigns#CreateCozyAmbiance#PerfectForBookworms#bestuniquedecor
0 notes
Photo

Plug-n-play CANBUS error free LED turn signal lights bulbs upgrade from #AllaLighting with built-in resistors #turnsignal #turnlight #canbusleds #canbuserrorfree #errorfree #ledcanbus #directionallight #blinkerlight #flashinglights #cars #carlight #carlights #trucklights #trucklight #trucks #motorcycle #offroad #offroading #offroadtrucks #offroad4x4 https://www.instagram.com/p/CS28gDqN2SS/?utm_medium=tumblr
#allalighting#turnsignal#turnlight#canbusleds#canbuserrorfree#errorfree#ledcanbus#directionallight#blinkerlight#flashinglights#cars#carlight#carlights#trucklights#trucklight#trucks#motorcycle#offroad#offroading#offroadtrucks#offroad4x4
0 notes
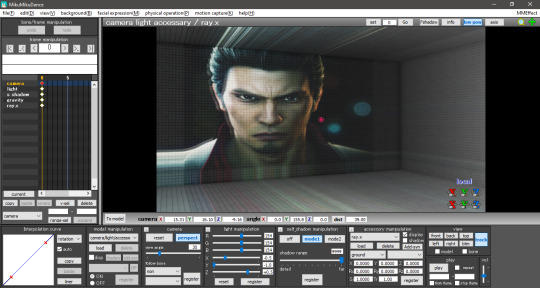
Text
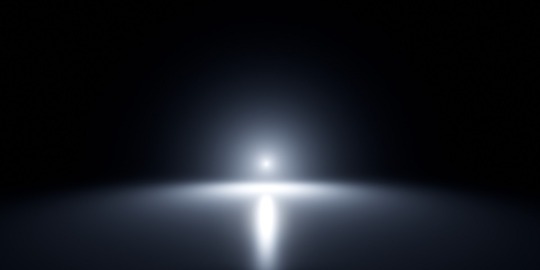
Light:
-X: +0.0
-Y: -1.0
-Z: -1.0
ray-mmd-master:
-Sky Hemisphere:
+TopV-: 0.2
+BottomH+: 0.6
+BottomS+: 0.2
+EnvDiffLight-: 0.2
-ray_controller:
+SunLight-: 0.3
+SunShadowV-: 0.2
+SSAO-: 0.94
+Fstop-: 1.0
+FocalLength+: 1.0
+BloomThreshold: 0.51
+BloomColor AllH+: 0.6
+BloomColor AllS+: 0.8
+BloomStarFade: 1.0
+Exposure-: 0.2
+Saturation: 0.31
+Gamma-: 0.14
-DirectionalLight:
+B+: 0.47
+Range+&-: 0.85
+Hardness: 1.0
-SpotLightIES:
+R+: 0.64
+G+: 0.56
+B+: 1.0
+Angle+: 1.0
+Intensity-: 0.75
+Hardness: 1.0
LightBloom:
-BloomThreshold: 0.55
-BloomColorAllH+: 0.28
PostRimShilouhette:
-Null_8: 1.0
-Null_5: 0.7
FXAA - SMAA
AutoLuminous4
Diffusion7:
-Tr:0.5
AnimeScreenTex_v1.0:
-Tr: 0.05
o_SelfOverlay_v0_6:
-Tr: 0.4
msColorCorrection_ver.1.0: But with "Default.vmd"
CheapLens:
-Tr: 0.50
ikClut_Anime:
-Tr: 0.10
CameraScreen: With ScanLines.x
PostRimLightToon_v08:
-Null_04: 1.0
-Null_09: 1.0
4color.fx:
-Tr: 0.10
ExcellentShadow2
Video: https://youtu.be/VbL5fwLzNig?si=6mqvgGqz_eAI9vqc
1 note
·
View note
Text
Lights & Sirens - Trying to find flashing Safety Beacons online?

Welcome to Lights & Sirens UK, UK’s leading supplier of public safety and warning equipment used by all emergency and public safety services. With our extensive range we supply everything you may require from emergency utility bars, flood lights, directional LEDs to camera systems and plenty more. Are you searching for flashing safety beacons online?
Then Lights & Sirens UK, is the right supplier for you as we have a wide variety of products available for you to choose from. We are confident that you will be able to find the perfect emergency or safety product to meet all of your specific safety requirements.
Lights & Sirens UK’s beacons, ranges from economy LED series, R65 rotator series, ROTOLED series, to the ECCO LP (low profile) series including a variety of other affordable emergency oand safety products that are suitable for various different applications. Lights & Sirens UK has an incredible item range of flashing safety beacons, that can be used for fire engines, ambulances, police cars, towing vehicles, construction vehicles and more. One of our more popular products is the Beacon 500 Series Static Flash Incandescent, 24 volts connectivity with a one year warranty and available in 4 different mounting options, 3 bolt, 1 bolt, flexi DIN pole and mag 70. It is recommended for airport use as per Civil Aviation Publication 168 (CAP168) that sets this out in detail, but to summarize: ‘The correct type of beacon or light bar must not dazzle flight crew in their elevated position to the ground servicing vehicles, as the beacon or light bar light must be a static flash.’

Lights & Sirens UK’s safety beacons have an extra tough housing design to maximise resilience to excessive vibration and increase the life of the product, so you can be confident in knowing that you are purchasing a long-lasting beacon that you may rely on. In addition to this, most are all available in four different mounting options including 3 bolt, 1 bolt, flexi DIN pole and mag 70, so you can be sure to find everything you need and more here with us at Lights & Sirens.
Not only do we offer some of the best flashing safety beacons around, but we also supply a wide variety of mini bars, work lamps as well as interior lighting, safety directors and various other products that will be sure to meet all of your specific needs.
When purchasing any product from Lights & Sirens UK , it comes with our 100% customer satisfaction guarantee.
Purchase online any of Lights & Sirens UK public safety and warning equipment today or for any of our product enquiries, kindly contact our product specialist, Tristan on 0800 0445882 or via the website’s whatsapp or contact form.
It could not be easier!
#SafetyBeacons#Beacons#EmergencyLights#LightBars#MiniLightBars#MagneticLightBars#Sirens#Amplifiers#Strobes#WorkLights#LEDDirectionalLights#DirectionalLights#UtilityBars#ReverseAlarms#CameraSytems#SafetyDirectors#InteriorCabLights#CAP168#Chapter8
0 notes
Text
RAY-MMD lighting tips: a translation by ryuu
The following tutorial is an English translation of the original one in Japanese by ngreeed. (WARNING: the website is NSFW)
Let’s get started? If you just landed on this tutorial for advanced MMDers and is wondering what the hell is going on, there are beginner Raycast tutorials in Learn MMD! Also, if you feel like reading more about rendering tips, I suggest taking a look at my other tutorial: advanced MMD rendering tutorial (and why you should care).
Content Index:
Introduction
Lighting: introduction
Lighting: basics
Fog
Other Tips
Final Notes
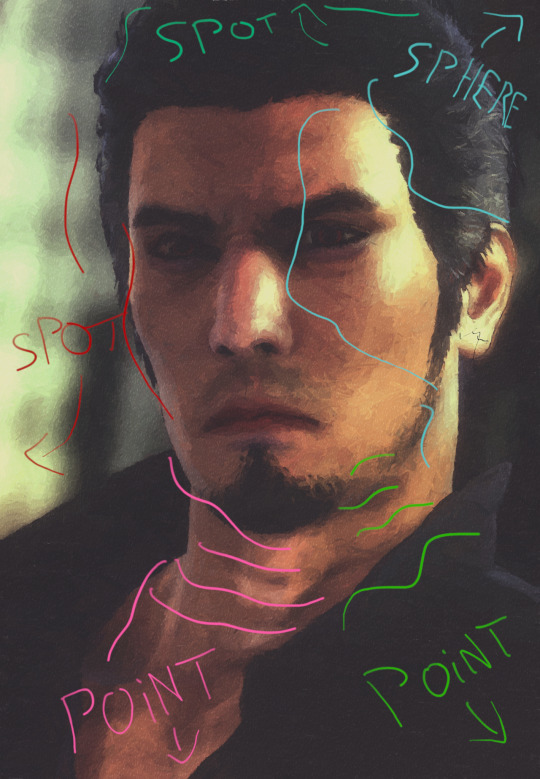
Introduction to Lighting Content Index:
Directional Light
Rectangle Light
Sphere Light
Point Light
Spot Light
Spot Light IES
Disk Light
Tube Light
Basics of Lighting Content Index:
Ambient
Shadow
Fog
IES
LED
IBL
GIF
Fog Content Index:
Atmospheric Fog
Ground Fog
Volumetric Cube And Sphere
1. INTRODUCTION
This compilation was brought together by the MMD community and contemplates ngreeed’s own experiences with fog and lighting usages. Every picture shown in this translation can be found in the original documentations on Iwara and GitHub.
It was translated from Japanese to English by ryuu with written permission from the author to share it on my blog and add information. The translation was done with the aid of the online translator DeepL and my friends’ help. This tutorial has no intention in replacing the original author’s.
2. LIGHTING: INTRODUCTION
By learning lighting, you’ll have more freedom in directing your videos, but it’s only for those who are confident that they understand how to use Ray-mmd, because it’s a pre-requisite and an additional part of understanding how to use skybox and materials. If you’re unsure about the other two items, start by reading this wiki.
Originally, surface lights in a 3DCG software are characterized by their ability to create soft shadows, but the surface lights used in Ray-MMD are very difficult to handle and don’t provide much benefit, so we recommend using point lights or directional lights.
Translator’s note: for those wondering what lights are available in Raycast, there’s a translation below of the wiki’s list.
2.1 Directional Light
Directional light simulates lighting hitting an object from an infinite distance. The angle of each ray reaching the object is negligible and the rays will always be parallel to each other, so it is also called sunlight.
Directional light doesn’t take into account the coordinates of the light source and won’t affect the lighting effect when placed in any position of the scene. Only the rotation will affect the lighting, because of the nature of directional light requires shading calculations for the whole scene.
Therefore its computational overhead is the largest among all multi-source shadows, and its shadow quality is only suitable for lighting characters at very high quality, which you may use when you want to attach a bone to the main light source.
2.2 Rectangle Light
The light source will shine from a plane towards a fixed range. It’s used to simulate monitors, screens, smartphones, etc.
Since the light source of the area light needs to consider the volume of the light source, the real calculation of its shadow in real time is very difficult to do. It’s recommended to use spot light shadow instead.

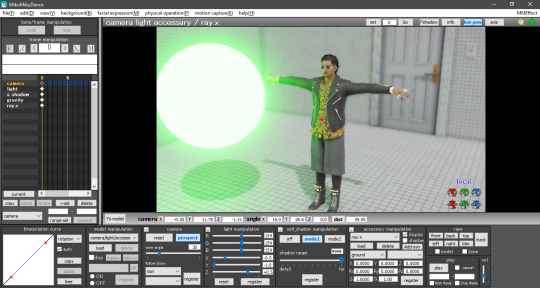
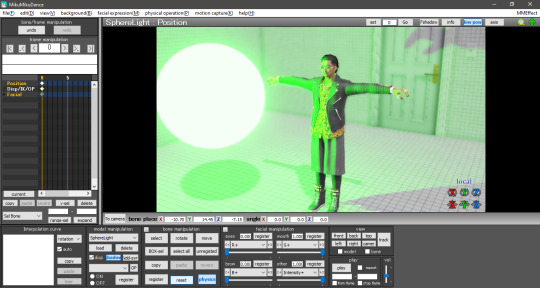
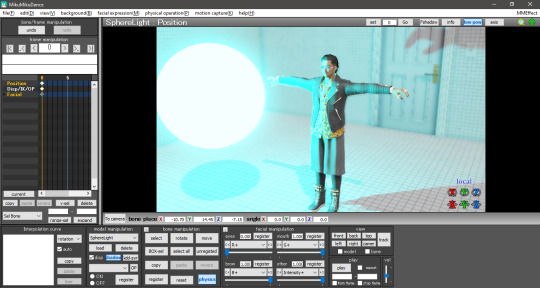
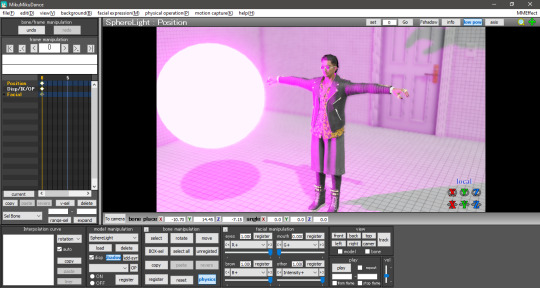
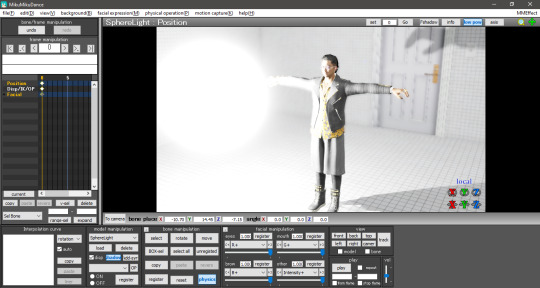
2.3 Sphere Light
The light is emitted from the location of the light source to the surrounding area and the volume of the light source is taken into account to illuminate all the objects within the range.
Since the light source of the area light needs to consider the volume of the light source, the real calculation of its shadow in real time is very difficult to do, so the point light source shadow is used instead.
2.4 Point Light
Light source from a point, uniformly emitting light to the surrounding area, all objects within the range of light.
The point light source needs to calculate the shadows of objects within the range and will lead to a large shadow calculation overhead, while its shadow quality isn’t suitable for character lighting.
2.5 Spot Light
Spotlight dosn’t take into account the volume of the light source from a point, in a fixed direction to a certain range of cone angle irradiation object. The brightness of the edges of the ball will gradually fade and the angle of the ball can be controlled by the (Angle +/-) morph.
It’s used to simulate lampshade, flashlight and a car high beam. The quality of shadows is the best of all light sources, so it’s very suitable for irradiating the character on the simulation of stage lighting.

2.6 Spot Light IES
Sampling IES textures simultaneously on the behavior of the spotlight.
IES defines the luminous flux of its light at different angles, so that certain areas will be brighter or darker, thus simulating light coming through certain places and shining around the scene.

2.7 Disk Light
The light source will be irradiated from a plane object towards a fixed range. It’s used to simulate light from afar, because the light source of the area light needs to consider the volume of the light source.
The calculation of its shadow in real time is very difficult to do, so use spotlight shadow instead.
2.8 Tube Light
Uniform illumination of the surrounding objects. It’s used to simulate the light source of a lamp, because the light source of the area light needs to consider its volume
The calculation of its shadow in real time is very difficult to do, so use a point light source shadow instead.

3. LIGHTING: BASICS
Before explaining the parameters, let's start with an explanation of how to use the Lighting folder.
In the Lighting folder of ray-mmd, there are 10 different .pmx's to load into the MMD and their respective folders. Basically, the MME of the light will assign the .pmx's in the Default (Ambient/LED/GIF/IBL) folder of the respective light folder to the light’s .fx. .....lightning.... .fx is assigned to the LightMap tab of MME, and ...fog... .fx is assigned to the FogMap tab of MME.
Translator’s note: a fog .fx can be assigned to LightMap, but it’ll produce only fog.
Once you know this, you can play around with the lights and learn what you can do with them.
This spreadsheet shows the parameters and .fx available for each light, along with a brief explanation. The explanation of the terms is pretty much a translation.
3.1 Ambient
Reference: twitter.com
Assign the .fx in the Default Ambient folder to the LightMap to create a light without reflections or highlights when a material with high parameters such as Specular is lit. It is good to use it when loading multiple lights.
DirectionalLight is located in the Default folder, not in the DefaultAmbient folder.
3.2 Shadow
There are four types of shadow: low, medium, high and very high. If you assign it, when light (or fog) hits the model, it won’t shine on the model beyond it. Rather than increasing the shadow, it’ll stop when the light hits the model. In other words, it isn’t attached to the initial light, the light will be brightened nonetheless.

Default spot light.
The same spot light with shadow (very high).
3.3 Fog
When fog is loaded, light streaks are created at the location of the light emitted by the light. There are also special parameters called MiePhase and MieDensity, but be aware that other parameters aren’t isolated. The godray may or may not be displayed depending on the angle and position of the camera. So be careful.
Godray representation using volumetric fog and disk light.
3.4 IES
Reference: unrealengine.com
Simply put, it’s a light which displays the distortion caused by the reflective surface of the lighting fixture, the shape of the bulb, and the lens effect.
It can express a light closer to the one you have at home than a straight spot light like the ones used on stage. You can think of it as basically spot light with just a little distortion in the shape of the light. A point light IES is also spot light.
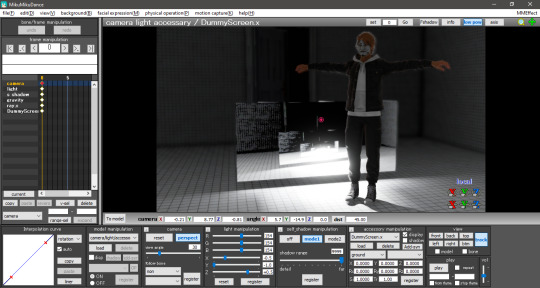
3.5 LED
Reference: twitter.com
The light source itself is the same as rectangle light, but it can display AVI images or screen images.
In order to display images on the LED light source, load DummyScreen.x in the Extension folder and set the Background (B) in the upper left corner of MMD to ON mode. You can also load the background AVI and change the mode to display any image.
If you just want to display the image, you can set the material of your favorite model to material_screen, but you can use the LED as a light source for the image.
Translator’s note: in practice, it looks like this. In a more straight forward way to explain this, load the LED light and add main.fx to it. Then, load the dummy and select any AVI file or just enable the capture mode. The LED will start capturing the screen and emit light. You can play with the RBG sliders and all. I added a volumetric cube for the dark room effect and Sugiura-san for you to see how the panel behaves. Whenever there’s a change in the captured screen, the light behaves accordingly i.e. a red screen emits red light; a mostly white screen with green details emits white-ish.
3.6 IBL
This and the GIF sections were writen by the translator, ryuu, as the original author requested information about it.
IBL stands for Image Based Lighting, which is what Raycast does! The image is projected into a sphere and it samples the data to light the objects. All of the skyboxes we use have images in the .dds format for easier rendering.
According to the spreadsheet, the only light capable of using IBL is sphere. To activate it, head to the Default IBL folder instead of the default one that opens when loading light properties. You’ll notice the sphere reacts with weaker lighting, you have to increase the intensity.
The following images are color tests with sphere IBL. The most visible differences are in how RG and RBG react: they produce shades of red and yellow, then white and pink respectively.


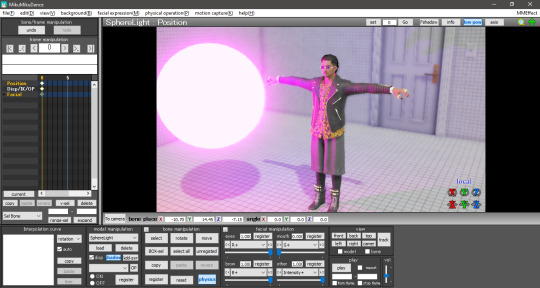

Now with disabled IBL, this making the sphere another common light. The default is very strong compared to IBL, Zhao-san hand’s shadow is even huge on the door behind him.

The .dds used was the default one in the Default IBL folder. I haven’t experimented with a different one yet, plus I believe it isn’t any .dds image that’ll work there. If we follow the logic of how custom skydomes are created, a HDR image is needed and you have to “craft” them.
3.7 GIF
A rectangle light can load .gif images and project them on their light, Just load the .fx inside the Default GIF folder to activate it. The default GIF is the following. However, when loaded as light, it doesn’t animate and has some distortions on the edges.

For now, the only advantage I see in using a GIF light is to mimic a projector effect at the cinema. You can use custom images by renaming the default one to rance1 and the new one to rance.
The projection’s size depends on the rectangle’s, so a small rectangle will show a small GIF. Also, keep in mind that the projection is a mirror of the original image.
4. FOG
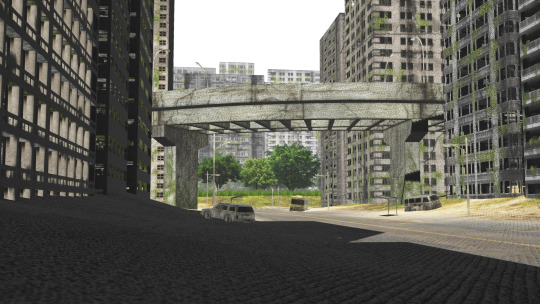
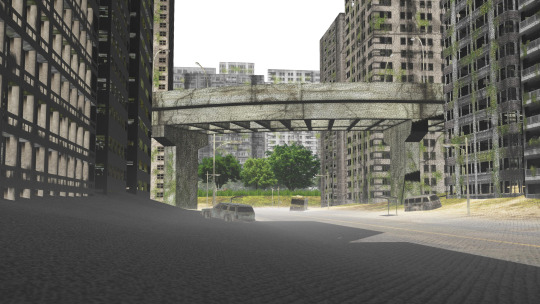
The fog can be used to create realistic perspective, smoke, and air, and it can also be used in conjunction with fog lights to change the atmosphere. It’s important to note that when the fog is loaded, it’s rarely displayed in Model Edit mode, so be sure to check it in Camera mode. In this case, you may need to tweak the model display order a little to get it to show up.
There are four types of fogs: atmospheric fog, ground fog, volumetric cube and volumetric sphere.
4.1 Atmospheric Fog
If you don't know what you're doing, but want to use a fog, just load this to get a sense of perspective (or rather, fading in the distance). So if you have a stage that extends far into the distance, you can use this to get a certain atmosphere.
Also, only the atmospheric fog has multiple fog maps, which can be found in the AtmosphericFog folder with a godray .fx file. You can apply godray to the lighting (sunlight) in MMD and, by assigning a fog map with ...without sky... .fx, you can disable the fog effect on the skybox.
You can also disable the fog effect for skyboxes by assigning a fog map with ...without sky.... .fx.
The number of parameters is overwhelming and difficult to adjust, but it may be easier if you think that the parameters with Mie are related to the lighting (sunlight) in MMD.

Without fog.

With atmospheric fog and changed density and range values. The farther away the image is, the lower the saturation and lightness become. The perspective is clearer. It’s rare to see much difference, but the atmosphere changes quite a bit with and without the atmospheric fog.
4.2 Ground Fog
When loaded, the fog is displayed based on the ground, and its color and height can be adjusted using morphs. The number of adjustable parameters is small, but if you adjust them, you can use it in the same way as the ground-based atmospheric fog.
Without ground fog.
With ground fog.
4.3 Volumetric Cube And Sphere
Unlike the other fogs, these two are only loaded and not applied to the entire room. At first, they only appear small at the foot of the screen and need to be resized to fit the room. By the way, they are basically the same, just round or square. The advantage is that it can be assigned to a limited space only.
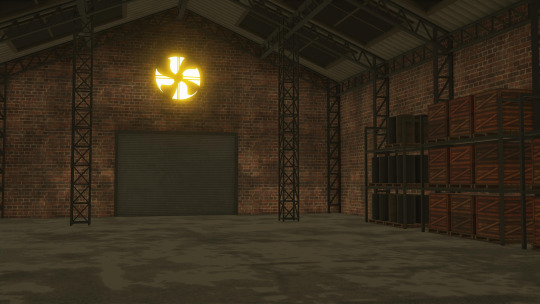
Without light.
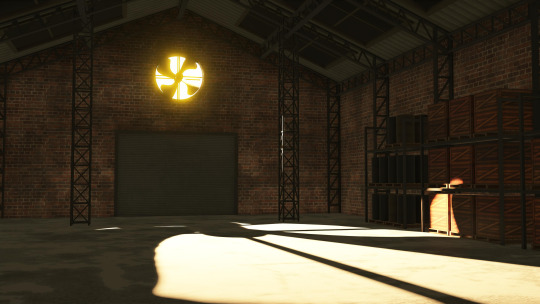
With light.

With light and volumetric fog. It might be good for a dusty atmosphere in a closed room.
5. OTHER TIPS
If you feel that your PC can't handle it, you can lower the shadow to low and get by.
The skybox time of day can be used as a second atmospheric fog which is easy to handle since it is built into the skybox. If you turn off EnvLightMap, Main and MaterialMap, it won't interfere with other skyboxes. It's pretty easy to use, but not for everyone.
Turn on Bokeh (DOF effect of Ray-MMD) and pull the MeasureMode morph of ray-controller to the right to bring the ray.x accessory into focus.
It's a good idea to set the SSAOMap of eyes and face to 0.
6. FINAL NOTES
Stages shown in this tutorial: P.T by G_Wuuuuu, warehouse by hiro K, skyscrapper by 化身バレッタ and abandoned city by NOB.
Models by SEGA.
I tried to keep the translation as faithful as possible to the original documentation. Thank you, ngreeed, for allowing me to share your tutorial with non-Japanese speakers.
Also, I absorbed many knowledge from this tutorial and rendered a new image using the improved technique. Only the sphere light had fog. The colors were applied after adjusting all the lights in their black and white counterpart. Retouched in GIMP.


38 notes
·
View notes
Text
Changing the map and game code:
Firstly, I deleted the walls of the map. I did this because they would take up too much space.
Next, I deleted the spawner. I didn't need a spawner for my game as the objective is to fire projectiles rather than picking items up.

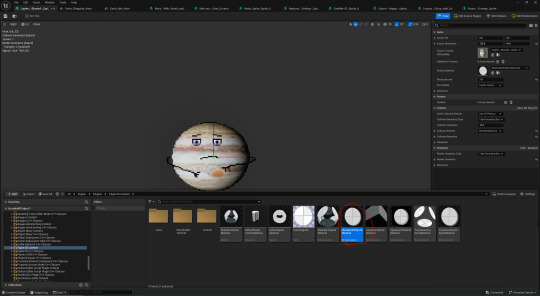
Here, I added a sphere and duplicated it twice. They are supposed to represent the Sun, Mercury, and Venus.
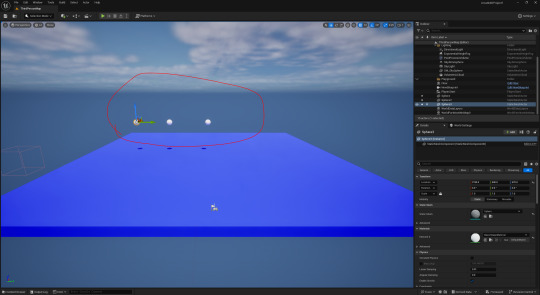
After that, I resized the first sphere in order to represent the Sun.

Here, I resized Venus and made it bigger.
Next, I moved and resized the base plate for the player to stand still on.


After that, I had to move the player spawner on top of the new location of the base.

Here, I had noticed that the flipbook used for the idle animation was too low as it clipped through the floor.

From here, I moved the flipbook upwards so it doesn't have much chance of clipping through the floor.

However, there was a problem. For some reason, I could freely move again.

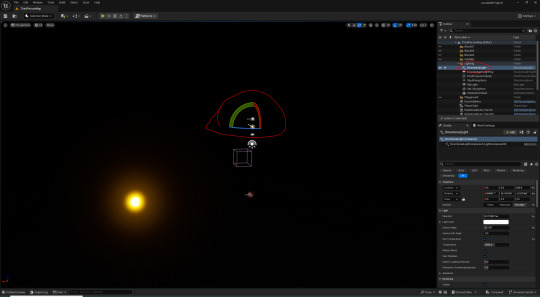
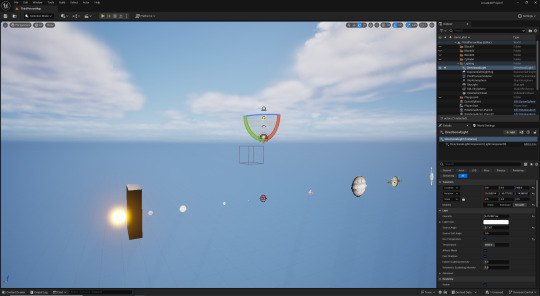
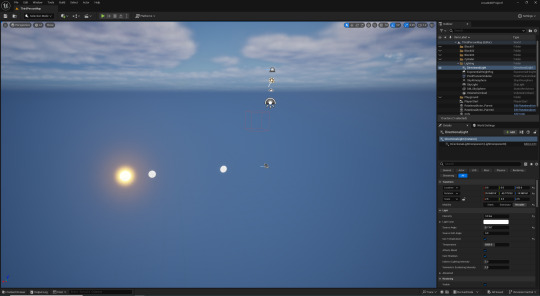
In the meantime, I tried to make the world dark by rotating the 'DirectionalLight'.

I then clicked on the eye icon beside where it says 'Volumetric clouds' to toggle its visibility. In this case I disabled its visibility.

However, I had to undo these past two steps so I could see.
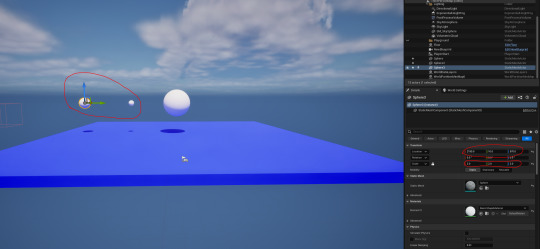
Here, I wanted to adjust Venus' orbit radius to -550.

Next, I changed Mercury's orbit speed to -0.225.

After that, I adjusted the speed of the Moon to -0.175.

At this point, I got help from Chris.
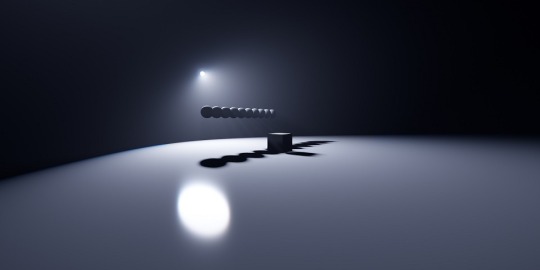
Here, we made an actor and named it 'DysonSphere'. We also made a goldish material to represent modern space solar panels that use gold to protect them from radiation.
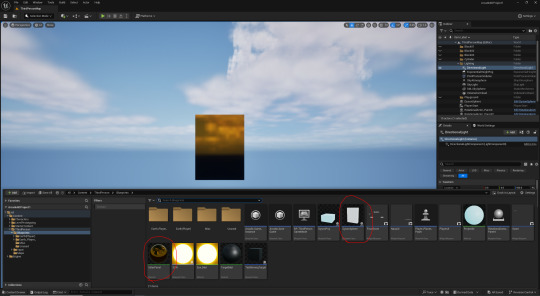
Example of these panels:

Once, I double clicked on the blueprint and I had built a basic shield with 12 cubes.

Next, I made an array using them by making each cube an integer variable. In order to control the order in which they are spawned, I changed the order in which they are connected into the array.

In the screenshot below, there are comments that give a rough idea on what it's doing. For example, in the custom event called 'ShowDysonSphere' piece of the code, it reveals a block from the dyson sphere in the order that its in the array whenever the Sun gets hit.

This code here asks whether all 12 parts of the dyson sphere have been assembled. If so, it will repeatedly print the string 'WIN'.

Next, I made a new material and called it 'SolarPanel'. After I had set the colour, I had set the 'Metallic' box to 1.0, and the 'Specular' box to 0.5.

Meanwhile, I felt that the projectile was too hard to see in the game. As a result, I made a new material and called it projectile. Next, I set the 'Emissive color' so that the projectile glows a visible colour.

Next, I applied this material to the projectile.

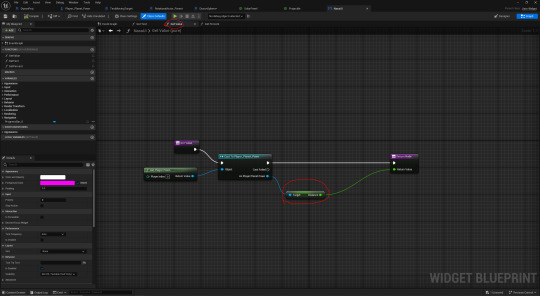
At this point, Chris and I decided that it would be a good idea to create a new widget that displays the projectile's distance from the sun to make the game more interesting. We named this widget 'NasaUI'.

Here, I binded the text that said 'Text Block' to a piece of code that gets the distance between the projectile and the Sun. This was done in the 'Get Percent' tab. In the circled box below, I had set the number to 1500.
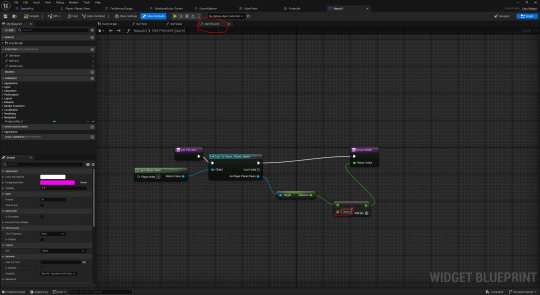
In the 'Get Text' tab, I made it so that the distance is displayed in the binded text box. I also wanted to make it a float to make it seem more precise.
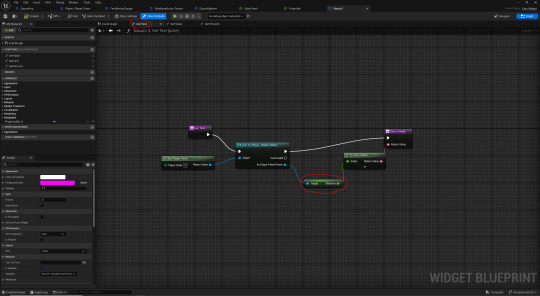
In the 'Get Value' tab, I casted to the 'Planet_Player_Pawn' to set it as the target. This is so that the progress bar that I will add goes down as the projectile gets closer to the Sun.
0 notes
Photo

There is beauty everywhere if you take the time to look. . . . #observe #outsidethevet #intheparkinglot #autumn #fall2017 #fallcolors #directionallighting #tao #mindfulness
#observe#intheparkinglot#directionallighting#mindfulness#autumn#fall2017#tao#fallcolors#outsidethevet
0 notes
Photo

Talk about 1 of the best #Christmasgifts ever!!!... A #splunking #Beanie... or #DirectionalLighting...by any other name!!!... #photography101...haha... A must have for the #nighttime #photographer!!!..;)...Seriously!!!... #NoJoke!!!... #carproblems #mechanics #SpotLight #thisshitisawesome
#mechanics#beanie#directionallighting#christmasgifts#photographer#nighttime#photography101#splunking#spotlight#thisshitisawesome#carproblems#nojoke
0 notes