#MMD Tutorial
Explore tagged Tumblr posts
Visit Tumblr Blog
Explore Tumblr blogs with no restrictions, modern design and the best experience.
Last Seen Tumblr Blogs


Fun Fact
12.7% of mobile users access Tumblr.
Text
Making a spinning morph (MMD/PMXe)
So earlier this month I posted a showcase of my newest stage (link) and one of its functions was that you could make the armillary sphere spin with just a morph. I'll try my best to explain here how to make a morph like this yourself! ( ˶ᵔ ᵕ ᵔ˶ )
Model by Etheluu
To start of, add one bone and rig the parts that you want to spin to the said bone.
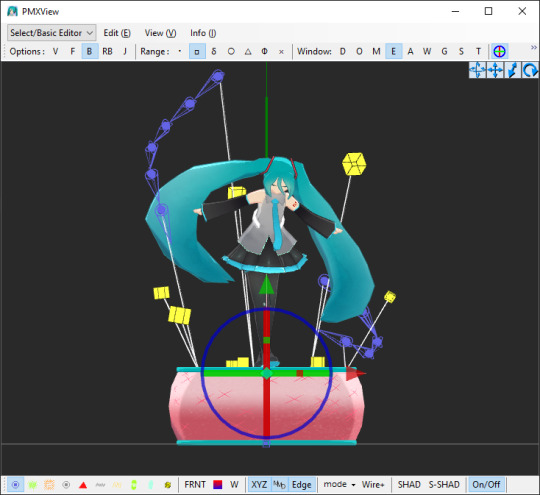
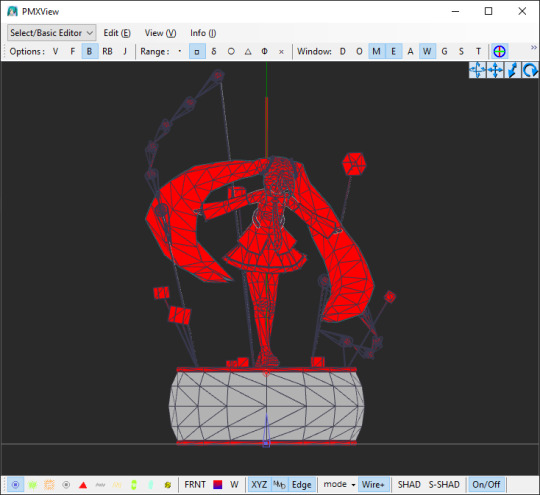
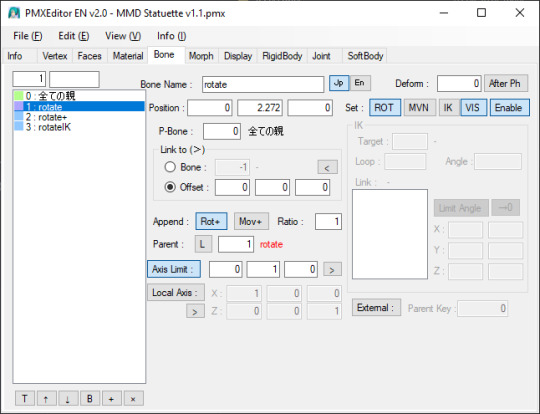
In the 'Bone' section, select the bone that you made (you can name it whatever you want, I named it 'rotate') and click CRTL+D twice to duplicate it twice.
Name those two bones as well, they shouldn't share all the same name! One bone will be the actual IK bone ('rotateIK') and one will be just a target bone for the IK bone ('rotate+').
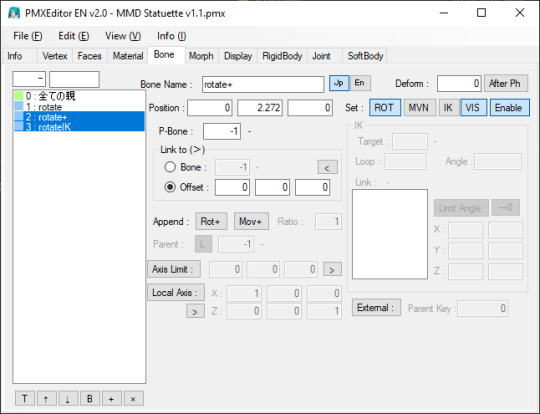
Now into the each of the bones' settings:
For 'rotate' bone:
assign the parent bone (P-Bone) to the main bone (or a bone that the rotating bone should be attached to)
set 'Append' to 'Rot+', where parent is the 'rotate' bone (yes, the bone must refer to itself! in PMX info it will show up as an error but it will work either way)
turn on 'Axis Limit' and type in '1' in a box that refers to the axis that the bone should be rotating on (X, Y or Z)
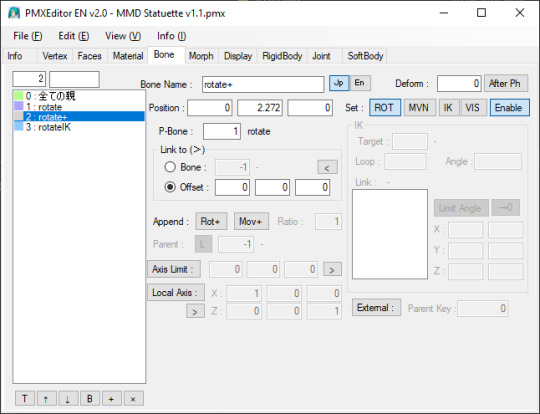
For 'rotate+' bone:
assign the parent bone (P-Bone) to the 'rotate' bone
turn off the visibility for this bone (not neccessary for it to work)
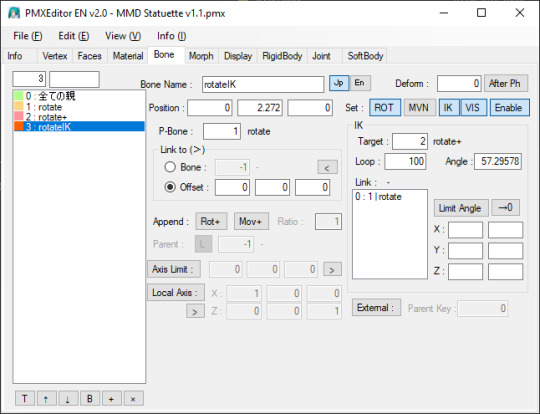
For 'rotateIK' bone:
assign the parent bone (P-Bone) to the 'rotate' bone
turn on the 'IK' setting
in IK section, in the 'Target' box, type in the number of the 'rotate+' bone
in IK section, in the 'Loop' box, type in '100'
ik IK section, in the 'Link' box, add the 'rotate' bone (you can do it by right-clicking on the 'rotate' bone on the left side and select 'Copy Index (X)' option from the menu and then right-clicking on the 'Link' box and selecting 'Copy From Index (V)' option)
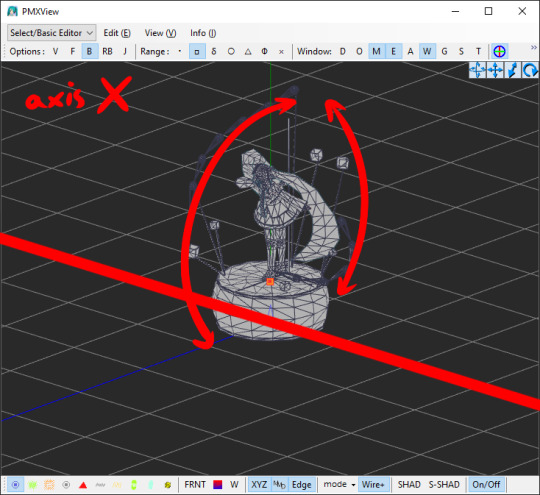
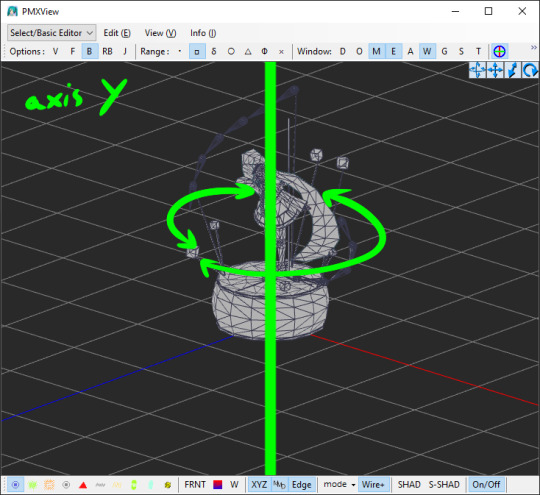
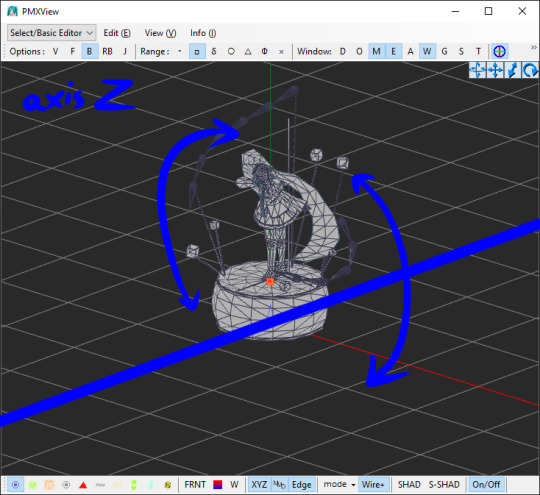
Now, you must move the IK bone ('rotateIK') along the same axis that the whole thing will be rotating along. Example: if you want the materials to rotate by the Y axis, move the IK bone ('rotateIK') by the Y axis.
An infographic(?) if you want to see the direction of the rotation of the axisses in PMXE:
Switching to the 'Morph' tab, add a new morph. Right-click on the area on the left -> New (N) -> Bone (B). Name it however you want.
Don't mind the other morphs on the screenshot, those are just pre-existing morphs I made and are irrevelant.
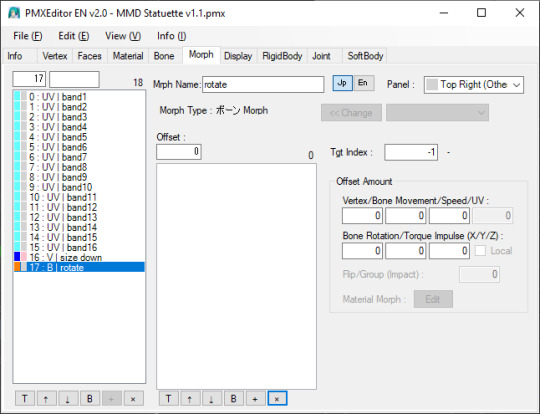
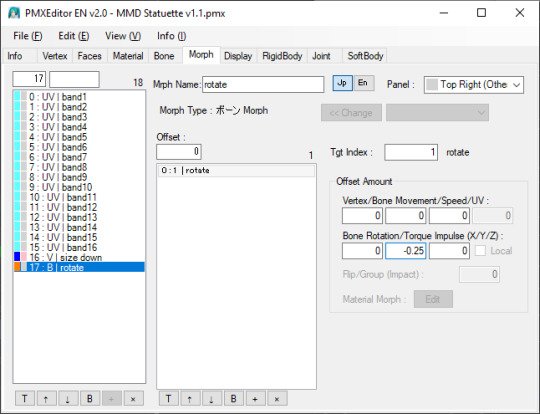
Add the bone that you rigged the materials to ('rotate'). You can do it with the same method as earlier with the IK settings ("Copy Index (X)" and "Paste From Index (X)").
In the 'Offset Amount' section and under 'Bone Rotation/Torque Impulse (X/Y/Z)' text, enter a number from 0 to 1/-1. This determines the speed at which the bone will rotate at:
0 = not moving at all
1 = moving quickly
-1 = moving quickly but in the opposite direction
Theoretically, you can enter higher number but it might result in the bone moving way too fast so I would just simply not recommend doing that.
And here you go! You've made a morph that makes a bone rotate on its own ദ്ദി(˵ •̀ ᴗ - ˵ ) ✧
Remember that this will work only in MMD itself and not in PMX Editor!! If you try to test it in PMXE, don't be alarmed! This does not work in the PMX Editor (for some unknown to me reason) but if you test it in MMD then everything will be alright!
9 notes
·
View notes
Text
I realize I have alot of metaseq/mmd knowledge floating around in my head that may not be common knowledge? and tbh I forget alot so. maybe I will post some randomly now and then.
Todays random MMD information is....
Have you ever wondered why some bones merge and some flip when you hit Mirror in PMD editor? Well, I can tell you why! It's important for any bone you want to flip instead of merge have the kanji for Left/Right in the bone name. Any bone with 左 (hidari/left) 右(migi/right) will automatically flip to the other direction when mirrored. if this kanji is not present, and the bone is not manually renamed before merging the sides, the bones will merge into one.

here's an example of my quadroped model that I made the bones for. Although he isn't compatible with mmd motions/is in english. I slapped on that kanji so I didn't have to manually rename anything while mirroring.
As you can see....I'm the kind of person who doesn't name my layers.
#mmd#mikumikudance#tutorial#i guess???#mmd tutorial#pmd editor#I want to help others also create new things instead of gatekeeping information.
2 notes
·
View notes
Text
MMD model making tip:
If you want your model to have pants or stockings, unless you want your model to have baggy pants or a specific pants shape (bell bottoms, cuffed jeans, etc), it's much easier to simply retexture the existing leg material rather than adding someone else's stocking or tight fitting pants model part to your model. You won't have to worry about the legs clipping through the pants when using motions, and you also don't have to manually fit the pants to the model's leg shape!
You can either edit the texture of the whole body using your preferred image editing software and retexture just the leg part of the texture, or you can separate the legs from the main body material and edit them separately.
I recommend the second method, as it'll make editing the textures simpler. You don't have to worry about the pants part of the texture spilling (for lack of better wording) onto the rest of the body, as the pants have their own texture. It's also better for when you're making renders of the model, you can give the pants a different shader from the main body, useful for when you want to apply a cloth/fabric shader to the pants but not the skin.
I see SO MANY models with stocking and pants related clipping issues which could easily be fixed by simply retexturing the legs rather than fitting pants or stockings to a model. I'm guilty of this, and after learning this life hack making models wearing pants or stockings is much simpler!
This method is also useful for things like gloves and some shirts, assuming you don't plan on having any 3D added details to the gloves.
If you want your model to have baggy pants or cuffs on the legs then this method won't help as much, but for tight fitting pants and socks such as stockings it'll make things much simpler!
Will update with images when I get my computer back from being repaired!
#mmd#mikumikudance#3d modeling#3d modeling tips#mmd tips#mmd tutorial#mikumikudance tutorial#3d modeling tutorial#pmx#pmx editor#pmxe#pmx editor tips#pmx editor tutorial
1 note
·
View note
Text
How to use shaders on Maruki's battle model to fix shading issues
DISCLAIMER: I am in no way, shape or form obligated to do this. However, I write this so that anybody who wants to use Maruki’s model has the knowledge to do so. I know that a lot of people with custom models of their OCs primarily use MMD and instead of keeping the wall of ‘experience’ up between MMD users and those familiar enough with Blender, I decided to write this of my own volition so everybody can enjoy him.
Please, please, please read part 1 before you jump in because I will not be providing screenshots for some of the steps I already covered in part 1.
I'm just gonna say this now: Maruki's metaverse battle outfit is a pain.
It's not difficult, but it just requires an extra step and once or twice you might run into a 'huh? What did I do wrong?'
Let me explain:
Completely untouched, Maruki looks likes this (I hid the cloak for visibility of his golden outfit):

For this part of his outfit, it's fine to use C_Default

But then you get to this


The metal parts of his outfit. Instead of using C_Default, we have to use C_Complex. It already looks shiny like metal, right? Well Maruki has a texture, that when applied, mimics the appearance of reflection. And C_Default only has three options: base color, highlights, and shadows. And this texture doesn't fall under any of those categories. It's a visual effect. But thankfully a Twitter user I shall not name in respect for their privacy has showed me how to properly apply it.
Right here I've only used the shader and proper textures for the cloth part of his outfit (the golden parts)

Untouched, his plating shading looks like this:

It has a box for reflection, which I assume means that yeah it has to reflect. Now this is what the C_Complex looks like

looks a whole more complicated, huh? Well, thankfully I know how to fix that, thanks to the aforementioned Twitter user. (Note: Just like the highlight texture with C_SkinFace, you can skip the texture called 'normal' in this. The only thing to do, in order to properly obtain the reflective effect, is to get rid of whatever texture it's trying to use and leave it with nothing. If you don't want the reflective look, keep the dummy texture there.)
First, zoom in and stop here

See the box that says 'a copy so that the original texture still has UV0'? Inside is another box that's called 'Texture Coordinate'. Click and hold down on the circle labeled 'Reflection'. Then drag it and connect it to the circle labeled 'Vector' on the 'Reflection Texture'. It should look like this:

After that, click and hold down on the circle labeled 'Color' on that same 'Reflection Texture' box. Drag it to this box and connect it to 'B'.


Doing this makes it so that when that reflection texture is applied that it will reflect how it's supposed to. These settings apply to both the metal parts on his body and the mask he wears.
Without the reflection texture added to the metal, he looks like this:

The texture in question that will make the metal reflect is this pic

when applied, Maruki will look like this:

You may wonder 'what the hell is up with the white? Did I do it wrong?'. Nope, you did not. That's just the light reflecting. When you turn him around in a circle, you'll notice that the appearance will change depending on the angle you're viewing him.
One thing to note, however:

See these on his chest?
Unlike the metal chest-belt disaster that's his outfit, you can't use the textures for his body suit on these button things. For these, I suggest using C_Default instead or else they won't be visible. Contrary to what may make sense, you instead use the texture for his mask for these chest buttons.
If you use his full body texture:

when you use his mask texture instead:

And that's it! My final post will just be on observations I've made regarding his model.
#takuto maruki#tutorial#mmd#tagged mmd because this is meant for people who primarily use mmd but want to work with maruki's model#and maruki's model just doesn't work in mmd#persona 5#persona 5 royal
5 notes
·
View notes
Text
So there's a free program on steam called Desktop Mate that let's an anime girl/Miku sit around your computer.
AND apparently there is a way to use any .vrm avatar and replace the default character.
👀
#kewmsisposting#i might just try this#but the question is with WHO#even found a tutorial on how to convert mmd to vrm oooooo
0 notes
Text

my name is rissa and all I know is pain and suffering send help
0 notes
Text
Yuhh get into it!!!
I made a BEN mmd model! Here's how to use it and or make your own model ヽ(´▽`)ノ
Here's the vroid file! Both of the files are the same, so pick whichever you prefer. I added two in case one file doesn't work. If there's an issue please let me know!
https://www.mediafire.com/file/g188jtmismsnf01/Behavioral+Event+Network.vroid/file
https://www.mediafire.com/file/vifmafoanscfw36/Behavioral+Event+Network+vroid+model.zip/file
You can do whatever you want with the model, have fun! For those interested in making their own models, Vroid is free! It's used for vtubing and stuff, so the uses are endless! You can also use blender (yes, it's free) to make MMD models as well.
I compiled a list of both the written and video tutorials I used for MMD. This also includes motion files and other things for animating.
How to download mmd:
https://learnmmd.com/downloads/
https://www.youtube.com/watch?v=boFDkuqMLDI
How to convert a Vroid file (vrm) to pmx:
https://learnmmd.com/http:/learnmmd.com/convert-vroid-studio-to-mmd-with-one-click/
https://bowlroll.net/file/267190
https://www.youtube.com/watch?v=VnQXq3EAmYI (don't worry about the pmx editor unless you want to do more specific edits to the model. If you're interested here is the link: https://www.deviantart.com/inochi-pm/art/PmxEditor-vr-0254f-English-Version-v2-0-766313588)
The Happy Hands:
https://www.youtube.com/watch?v=Yf-wZ21zmOo
Extra - MMD sample animation:
https://www.youtube.com/watch?v=CKccnq2aD3A
The Disappearance of Hatsune Miku:
https://www.youtube.com/watch?v=93bnn3aZwxc
https://www.youtube.com/watch?v=8b_J0WfX_2U
https://www.youtube.com/watch?v=93bnn3aZwxc
https://www.deviantart.com/merodythann/art/World-Snow-download-488177446
Get down/geddan meme:
https://www.youtube.com/watch?v=r48-cyVII_k
https://www.youtube.com/watch?v=lKHAQPVeIsE
How to export mmd videos:
https://www.youtube.com/watch?v=vBVL2sLWxIE
I used this site to convert the avi files to mp4. You can also use windows movie maker 7 and I'm sure there are apps for this too.
https://cloudconvert.com/avi-to-mp4
When it comes to learning MMD the most important thing is to be patient and read the instructions throughly!
#DO THE RP10 DANCE😝😝#the way all the video files i wanted to attach are too big💀💀ill just post em separately#behavioral event network#ben drowned#ben drowned arg#mmd
38 notes
·
View notes
Note
Hi! Just stumbled upon your blog, and your work looks superb. I was wondering if you had any tutorials? I'm planning to do a hologram using 3d software (like Blender/Blockbench/MMD etc) for my final year project in my fine arts degree. Let me know if you have any advice, because I'd totally appreciate any that I can get ( ≧∀≦)ノ
I myself don't have any videos out, but as I said in a previous post, there is this guy called ArtDanPol3d, he has his all of his progress on his videos and has done some tutorials that have guided me for modelling and even texturing.
I haven't tried MMD nor Blender, but I'd say Blockbench is like a simplified version of Blender, so if you want to do more complex stuff, I'd say blender is a better pic.
If you have any doubts, start with more simple stuff that you can experiment with and look at the tools, for example, my first model were some masks from majora's mask!

There are also some plugins I'd reccomend for blockbench, like MTools that adds helpful tools in general and Outline creator which helps to do like a cartoony outline •ㅅ•
23 notes
·
View notes
Note
your Mouthwashing Blender edits are so cool!
I'm learning Blender but it's a bit complicated, do you have any advice for someone getting started?
Hi there, Captain! Thank you for your words! I must say my edits are not done in Blender, they are done in MikuMikuDance

I exported the models created by Aarontaron (.fbx format), to MikuMikuDance using the plug-in "MMD Tools" in Blender, then retouched them a bit in PMX Editor to later use in the mentioned program. (I talk quite a lot about that here (Part 1) and here (Part 2)
Most of my renders are actually pretty raw as I don't have MME (MikuMikuEffects) and my character's model has wonky shadows for being a Daisuke edited model (And also imcomplete, that's why I didn't make any animations yet), so I use them with flat colors.


On your left is the raw version, the second has expressions photoshopped and corrected my character's textures.
But that's just step one. Step two, I add shadows and blurr effects and Step three is copying a merged version of what I got so far, blurr it and set it to "Soft Light" layer mode

Step four, I merge layers then copy it again. And set it to Semi-Tone. Then I reduce frequency to 12. Then rasterize the image

Now, for step 5 we turn the lights into transparency so we only get the dots. We multiply said layer twice then set the three of them a color (Red, Blue, Green). Finally, we Overlay + reduce opacity to 5-10% and separate the dots to give a chromatic abberation
In some cases I apply extra layers of light, shadows and effects. As well Correction layers. End result being this!

I hope this helped! My suggestion for Blender would be to: 1. Get someone that could teach you, or watch a billion tutorials 2. If you aim for animation, then with even more reason! I just learned Blender for two weeks just to get my model and export the crew to MMD.
8 notes
·
View notes
Note
I just want to say, having now messed around in MMD trying to pose stuff, what you do is amazing and you deserve more praise for how good your art is.

Getting into 3D rendering is such a pain in the butt!! The learning curve is really daunting but I hope you're enjoying it!! The benefit of using MMD is the amount of tutorials that are out there but no amount of them can prepare you for the frustration of posing finger bones >:v - Mod Velvet
24 notes
·
View notes
Text

How I’m making my comic / REWRITTEN /
Hello! Today I have something that I'm really proud of - a page that is all about how I'm making my comic in MMD. Some of you might already know about this since it was first published as a DeviantArt post. Although now it has a new version - ✨ the rewritten one ✨and it was published on my notion page (link below).
-> Link to the page here <-
All comments and suggestions regarding this page are greatly appreciated! ( ´ ▿ ` ) We don't talk about how it was published back in September and I'm writing about this in the middle of November, I just forgot.
More info under the cut ↷
What does this page consists of?
Main topic is the process of making an episode I describe each step of this process in details to show to the reader how does all of this looks like and how it works.
My ways of crediting Crediting is a very important thing in MMD community and so I showcase my system of crediting on almost a mass scale.
Tips regarding stuff related to MMD and a comic It's a short section where I share my tips regarding e.g.: making good poses or 2D-ish effect style.
Disclamers
My native language is not English therefore there may be some spelling mistakes I haven’t noticed. I’m using translators too. I’m sorry for that in advance.
I’m not trying to force anyone to do everything exactly like I described in this document. It’s for you to read if you’re curious about how I’m making episodes for Webtoon and it’s for you to decide whether you’ll try to do something from it or not.
This document is based only on my experience. I’m not an expert in making comics or 3D art, it’s just a hobby for me. There won’t be any professional advice, only my personal ones.
Do not repost this anywhere. You’re allowed to share the link to this page with it but not copying the entire content of the page itself. Quoting with sourcing the original post is of course allowed.
I do not take responsibility for any damages caused by any advice included in this document.
If you have any questions or suggestions regarding anything related to me making episodes for a comic or the comic itself, you may send them through one of my social medias. Frequently asked questions might be anonymously added into the page for others.
#ethu stuff#mmd#mikumikudance#mmd tutorial#runaway comic#indie comic#original comic#notion page#watch me ramble about some niche topic in this community
6 notes
·
View notes
Text

I'm thinking of experimenting with MMD models in Blender.
Any MMD wizards out there, you guys have any guides or tutorials I might use?
20 notes
·
View notes
Text
Caramelldansen with Heart Effects ✨
This week, I started with a big idea—continuing my exploration of day/night cycles—but ultimately shifted gears to focus on something simpler. 🌅 My initial vision involved Miku dancing on a tall platform up in the clouds, but no matter how I tweaked the skyboxes, I couldn’t get them to look right. ☁️😓 After a few nights of trial and error, I decided to pivot. Instead of pushing through frustration, I embraced something more manageable: experimenting with motion effects. 🎥
Highlights
Experimenting with Effects: After watching a tutorial, I decided to combine the iconic Caramelldansen motion with heart particle effects. 💖✨
Used the "colorful pastel" preset from Active PV Heart to Miku's hands and scaled the hearts up to three times their size for more impact. 💕 You can use the Scale (S) value in the Accessory Manipulation panel to do this.
The effect was pretty limited to the top half of the model, since that is how Caramelldansen goes, so I added the "Blue Green Miku" variant of the effect to Miku's body to spread the hearts across the model. 💙
Atmosphere Tweaks:
Adjusted gamma, saturation, and temperature in Ray Controller to achieve rich, deep blues. 🌌
Selected a rooftop stage, which captured the elevated vibe I wanted after scrapping the cloud concept. ☁️➡️🏙️
Challenges & Lessons Learned
Camera Movement: Tried a wrap-around panning movement but found it too advanced for my current skills. 📹 Opted for six dramatic hard cuts instead, leading to a satisfying final shot of Miku’s peace sign pose. ✌️
Music Misstep: While cutting down the length of the dance, I scrapped the music for the video, which made it feel less cohesive. 🎶 I’ll prioritize keeping music intact in future projects.
Export Tip: Always double-check export settings! I almost rendered the wrong version because I had it set to "Model" mode instead of "Camera." 😅💾
Looking Ahead
I’m not entirely sure what I’ll take on next, but a few inspirations from other MMD videos have me excited to explore new ideas. 🌟 I’m considering designing a stage using some props, experimenting with a stylized color palette, or creating something that really glows. ✨ Whatever I choose, I’m looking forward to diving into something fresh and seeing where it takes me!
Reflection
This project reminded me that letting go of overly ambitious ideas can lead to enjoyable results. 🌈 The final video might not match my initial vision, but the process was so rewarding—and that’s what counts! 💡💖
Resources Used
Model: DT Extend Stroll Style Miku (Yuaruma)
Background: HiHighRooftop (Baberyu)
Effects: ActivePVHeart Ver. 1.0 (hosino), Ray-MMD 1.5.2 (rui)
Motion: Caramelldansen (unknown)
5 notes
·
View notes
Text
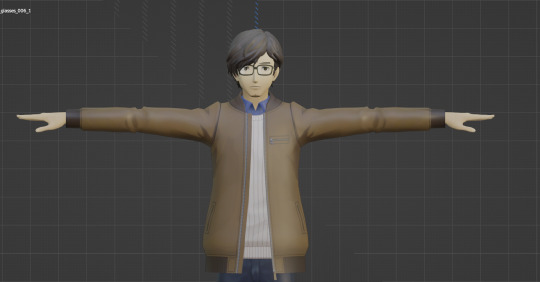
How to use shaders on his model to fix shading issues (2)
DISCLAIMER: I am in no way, shape or form obligated to do this. However, I write this so that anybody who wants to use Maruki’s model has the knowledge to do so. I know that a lot of people with custom models of their OCs primarily use MMD and instead of keeping the wall of ‘experience’ up between MMD users and those familiar enough with Blender, I decided to write this of my own volition so everybody can enjoy him.
Please, please, please read part 1 before you jump in because I will not be providing screenshots for some of the steps I already covered in part 1.
We meet again...
Maruki's glasses were just the beginning. Now is the main meat.
Let's start with Maruki's coat! geo_chack_006, geo_coat_006, geo_coat_006_0 are all parts of his coat. I'll be doing geo_coat_006 for this example. Like the glasses in part 1, we want to add a new, blank spot. However, this time in the asset library we want to drag and drop the C_Default orb to the new slot.
And, again, like his glasses we're going to copy-paste the the contents of the shader slot to the first slot. And after copy-pasting we'll delete C_Default just like the lenses.
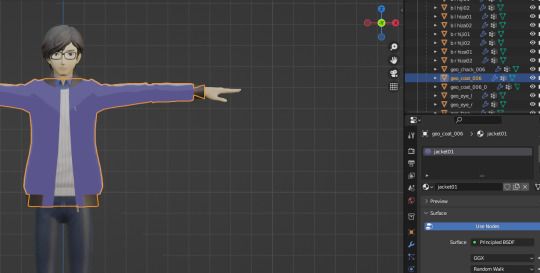
First thing you'll notice is that his coat is suddenly blue. Why? Because the material slot we copy-pasted doesn't have any of Maruki's textures. In their place are dummy placeholder images.
Go down to the toolbar where the asset library is at and click on this
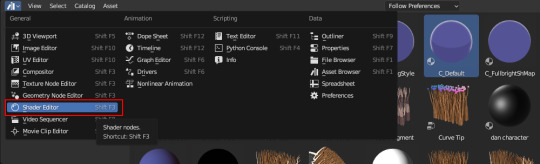
This is where we edit that material we copy pasted.
Before we copy-pasted C_Default, his jacket looked something like this

Overwhelming, yes?
This is what it looks like with C_Default copy-pasted
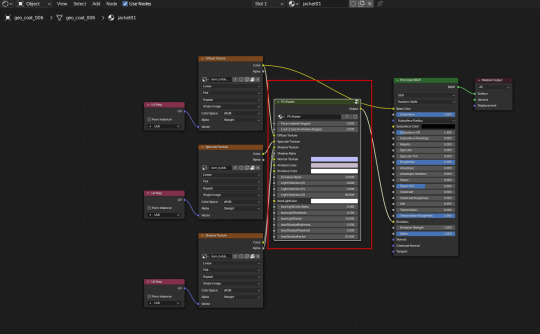
Looks slightly different, yeah? A box was added called 'P5 Shader'. That box is what helps with the mimicking of the cell shade style in P5.
Now all these boxes must be confusing and you're probably unsure of what to do with them, right?

I got your back

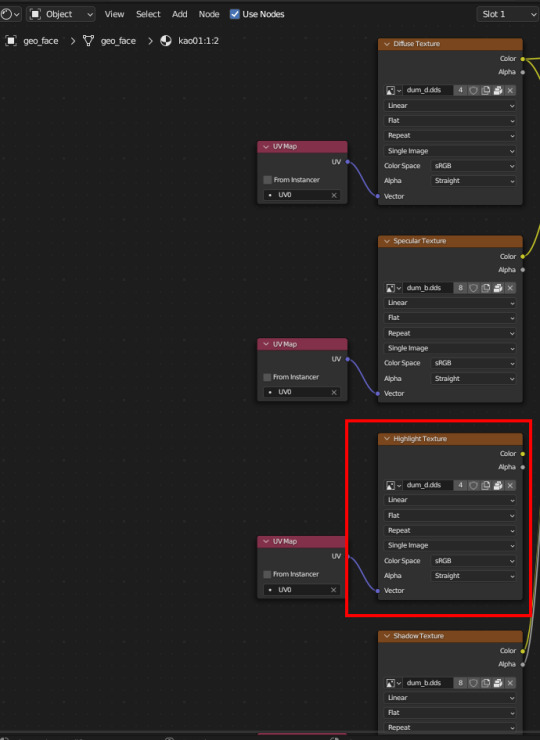
Let's zoom in on these boxes and I'll explain.
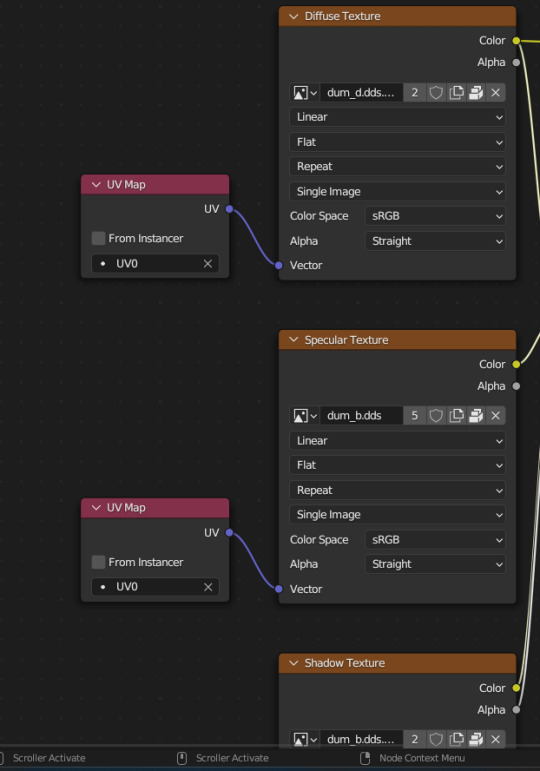
These 3 boxes are all you need to focus on. Right now they're all set to a default dummy texture.
Using 2d art as a comparison, the three boxes are basically this:
Diffusion: Your main color
Specular: Your highlights
Shadows: You shadows
Typically in the textures the model will have images that are named clearly enough so you can easily understand what image goes to what. They usually shorten them though.
If it has 'c' it's the diffusion texture
If it has 'sp' it's the specular texture
If it has 'shadow' it's the shadow texture
(EDIT: my acquaintance tipped me off to something. if you see something with 'sh_' in the title, that's still a shadow. HOWEVER, these are textures called Shadow Maps and are specific to the character model. Otherwise other models like rooms and stuff simply use the word 'shadow' in the file name.)
click on the little X by the file name (dum_b.dds) so it now looks like this

Now click open and navigate to where his model textures (a folder named 'tex' or 'tex png' depending on your preference) are. For his diffusion texture we're using this

For his specular, we use this

And finally, for the shadows, we use this

Before:
After:

This applies to the rest of his clothes as well, as all the color, highlights, and shadows for his entire outfit are in the three texture images.
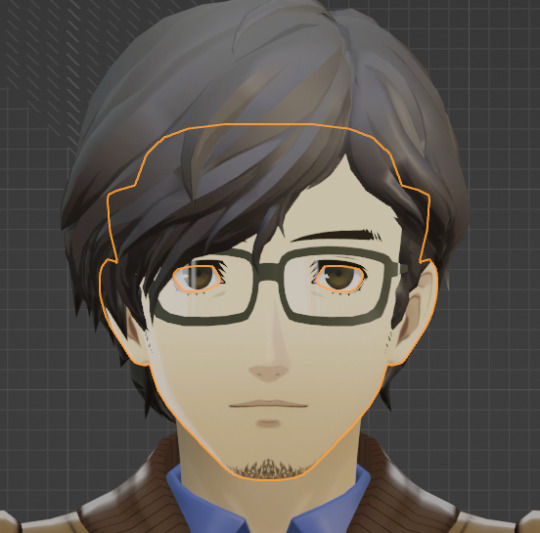
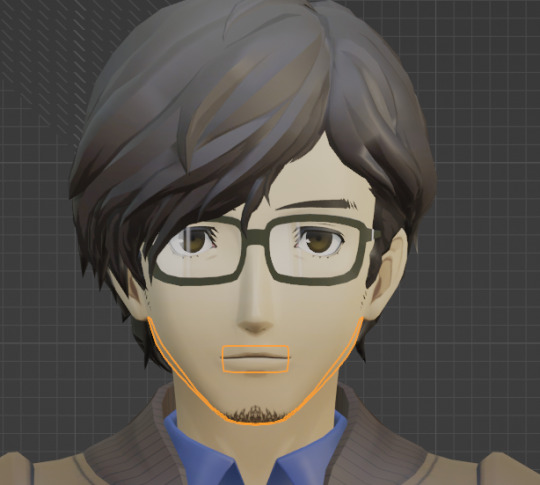
Now to cover skin. For his face (all of his head excluding hair ofc), you want to copy-past C_SkinFace. But uh-oh, you see this!
Ignore it. I've noticed that Persona 5 models have a diffusion texture, a specular texture, and a shadow texture. I often don't see textures beyond that unless they serve a specific purpose (ex Maruki has a special texture for his battle metaverse outfit that's supposed to make the metal on his outfit reflect)
When C_SkinFace is applied:
There will be times where something is made of multiple parts, like Maruki's head:
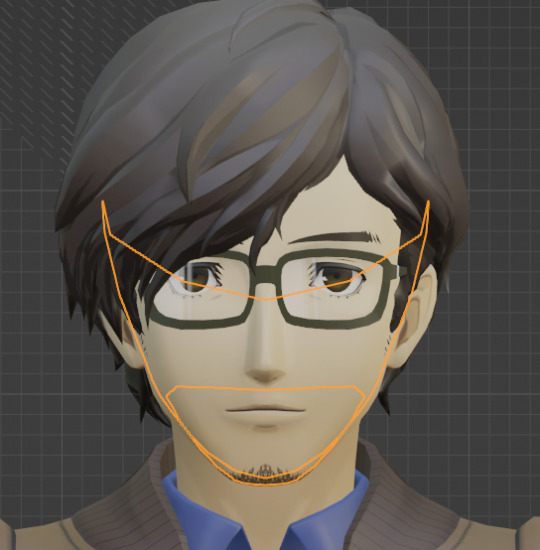

In the end, they're all part of his head, so it's fine to use the same three textures I used on his face. You'll often be reusing textures in cases like this. Note: you'll see geo_siwa and geo_tan but don't worry about them. Just use C_SkinFace. From what I can tell, those two are some of the shadows on his face
As for the skin on the body (C_SkinBody)...well, it's really simple. It works like C_Default and C_SkinFace in how you apply it. The only difference (That I've noticed) is that the specular texture option is missing. But that isn't surprising, considering that most of the body's skin is covered.

After applying everything you should go from this:
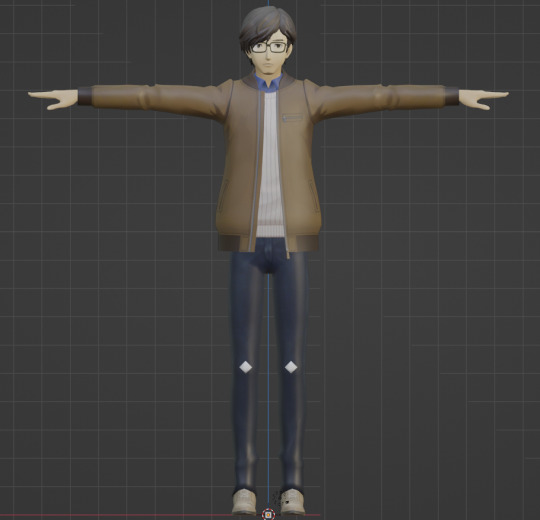
to this:
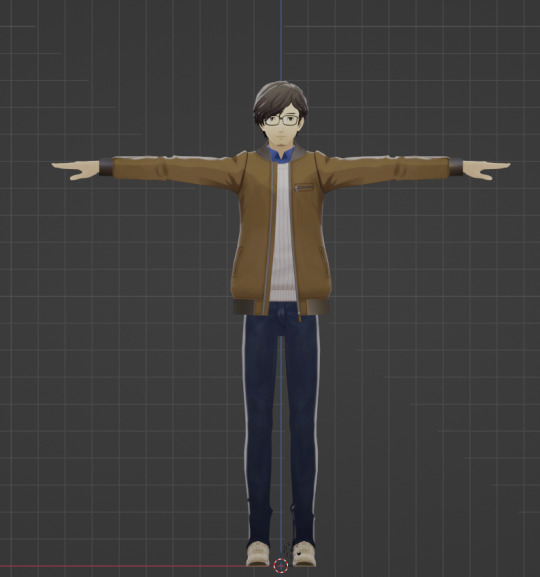
Much more vibrant!! 😊
For the last part, I will teach you all how to work with Maruki's metaverse battle outfit
#takuto maruki#tutorial#mmd#tagged mmd because this is meant for people who primarily use mmd but want to work with maruki's model#and maruki's model just doesn't work in mmd#persona 5#persona 5 royal
4 notes
·
View notes
Note
Hi! It's a pleasure to contact you. 😊 I have to say that I love the content you post on Tumblr and how underrated and undervalued it is. You deserve much more recognition! Your work with 3D models is amazing. I've always wondered how you make them, what program you use to work with the bodies and avatars from the Attack on Titan Final Battle game. I love the Rivetra ship because I resemble Petra a little, especially a few years ago when I used to dye my hair red. Now it's brown, but I still like to think that Levi would fall in love with Petra, and I feel like that opens up the possibility that he could fall in love with me too. ❤️ I've been in love with Levi since 2021, and he is a fundamental pillar in my life, my emotional and physical integrity. He means a lot to me. 😍
Thank you so much for giving us these beautiful works. I've activated notifications so I won't miss any of your new posts. I don't want to miss a single story!

Oh my gosh thank you so much!!!!!!
I can relate tbh. As odd as it sounds, I used to feel the same way about Gaara from Naruto when I was growing up. One day, you're going to find your Levi. I promise <3.
My boyfriend (my irl Gaara) pointed out that rivetra is my "security blanket" as he calls it (a.k.a my emotional support pairing). Levi has also become quite the pillar in my life as well. He (and AOT in general) has helped me through some of the most difficult times in my adult life. But the Selkie Tragic Backstory ™ is for another day.
The Software I use is called Miku Miku Dance (or MMD) and there are a ton of tutorials on how to use it at www.learnmmd.com . It's really easy to learn and you can get the models from deviantart.com. Be warned though, it's a live-render 3D animation software so your CPU will NOT like it.
It means so much to me that you guys love the skits and my old youtube videos, though. It feels good knowing I'm not just throwing stuff out into the void of the internet like I used to.
#rivetra#levi x petra#attack on titan#petra ral#levi ackerman#rivapeto#rivaille x petra#shingeki no kyojin#ackerfam#petora raru
7 notes
·
View notes
Text

i forgot that i long meant to explain the PROPER way of using the fx PostAlphaEye so i hastily put together this mini tutorial!
click [Keep Reading] for the explanation!
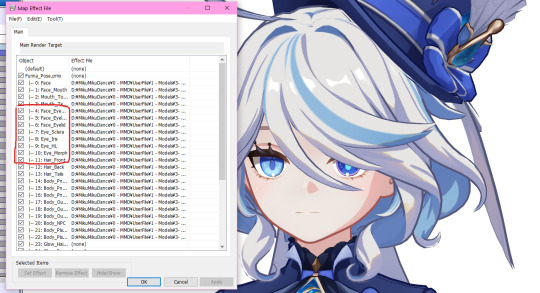
load your model, open the MME tab and identify the material numbers for the eye parts as well as the bangs (or front hair).
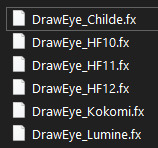
now go to your folder of PostAlphaEye, make a copy of the DrawEye.fx file and rename it to whatever (simplest is name it the same as the character), then open the fx file in any text editing software.
below is example on how i made for my edit of PostAlphaEye mainly used for my Genshin ports. i named a few as HF(*) as some of my ports share the same material organisation for numbering.
after opening DrawEye.fx, go to these two command lines and input the material numbers according to your model, and save it.
NOTE: DO NOT ADD SPACING AFTER THE COMMAS

now, open up PostAlphaEye.fx and locate this line:
// ここに「"(モデル名).pmd = DrawEye○○.fx;"」のように追加していく ///////////
UNDER the above line, input your command line using this format:
"(Model name).pmx = DrawEye(Name).fx;"
then save your changes.
here's how i did mine:

if done correctly, you'll now only need to load in PostAlphaEye.x for the effect to work WITHOUT having to manually remove/disable through the EyeRT tab!! (this manual method does work but it's too hassling now imo)
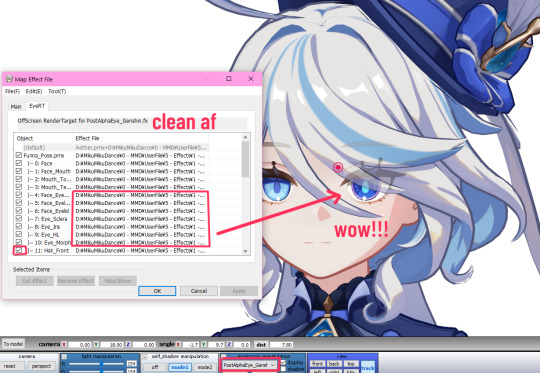
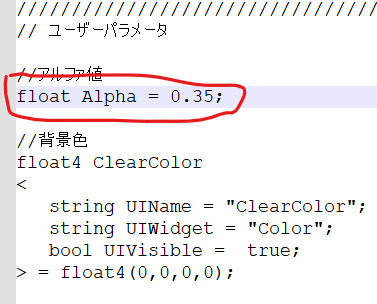
extra tip: in PostAlphaEye.fx, you can change the visibility on this setting if you don't want to bother using the Tr tab in MMD!
19 notes
·
View notes