#Disable macros in excel not working
Explore tagged Tumblr posts
Visit Tumblr Blog
Explore Tumblr blogs with no restrictions, modern design and the best experience.
Last Seen Tumblr Blogs


Fun Fact
Tumblr was acquired by Yahoo for $1.1B in 2013.
Text
Lethal Company Terminal Macros
I hope everyone has had a magnificent holiday season. My enjoyment, among more conventional Christmas conduct, has also come from contributing to Lethal Company's popularity boom.
From the ominous aesthetic to its simplicity, I have much praise I can give this game, but by far the most foremost is the way the game so tightly incorporates player communication. As an indicator of being alive it actively encourages banter to at minimum verify one's livelihood, making it all the funnier when abruptly interrupted by someone's quietus.

I’ve also been charmed by the game’s terminal, whose functionality further enhances team communication. The 4 person team where one person uses the terminal monitor to guide players and lock monsters behind shutters is one of my favorite dynamics to play in. When done right, players can avoid getting lost and getting team-wiped is virtually not a threat.

Become Lethal Company Youtuber Wurps made an excellent video on terminal usage. I recommend watching it, (as well as his radar-booster video), as they pertain to this post and demonstrate well the power of the terminal.
youtube
The video brings up the usefulness of macros for the terminal guy but doesn’t really provide a lot in terms of how to obtain them. Understandably, there are many means to get them. This post offers my option, accessible hopefully to folks who haven’t looked into macros before.
I’ve done a rough, broad evaluation of the macros other folk were using before deciding I’d rather design my own set. I attempted to have it be snappy, free, usable without mods, work on any hardware, and easy to adjust. The macros I wrote made my terminal use more comfortable and enjoyable and I hope they can assist others as well.
FULL USE GUIDE
Download and Install LibreAutomate
Download this script file, by yours truly
Open LibreAutomate, select File> Export, import> Import zip… and select the downloaded zip file.
Find the “LETHAL COMPANY TERMINAL SHORTCUTS” script in LibreAutomate and press Run
Open Lethal Company, make sure you are playing in Windowed Fullscreen (or Windowed) in settings.
In game, use the keys F1 through F10 and Shift+F1 through Shift+F10 to accelerate terminal commands.
When done playing, end the script or close LibreAutomate to revert functionality of the F keys.
After hours of play-testing I’ve set on this command configuration:
(made for v45, if later versions add more commands, consider looking for an updated script that re-prioritizes shortcuts)
F1: SWITCH F2: VIEW MONITOR Shift+F1: SWITCH playername Shift+F2: pop-up dialog to input playername F3: disable list of turrets Shift+F3: pop-up dialog to input list of turrets Shift+F7: Forbidden macro from the Wurps video. Avoid using if possible. F4: PING radar-booster Shift+F4: pop-up dialog to input radar-booster name(s) F5 and Shift+F5: FLASH radar-booster (shift is a bit slower but works better) F6: TRANSMIT _ Shift+F6: clears command line F7: SCAN F8: STORE Shift+F8: pop-up dialog to input full shopping list F9: MOONS Shift+F9: MOONS then COMPANY then CONFIRM (w/o enter) F10: STORAGE Shift+F10: BESTIARY
I hope this helps boost enjoyment and prowess with the terminal. Best of fortune to anyone attempting to fill the role of terminal guy in-game!


3 notes
·
View notes
Text
Exploring the Powerful Features and Functions of Microsoft Excel 2019
Microsoft Excel 2019: An Overview
Microsoft Excel 2019 is one of the most widely used spreadsheet software applications in the world. It has become a staple tool for businesses, students, and professionals alike, thanks to its robust features and versatile functions. In this article, we will delve into the key features and functions of Microsoft Excel 2019 and discover how they can help users streamline their data management and analysis tasks.
User-Friendly Interface: Excel 2019 maintains the familiar and user-friendly interface that users have grown accustomed to over the years. This continuity makes it easy for both beginners and experienced users to navigate and utilize the software effectively.
Enhanced Data Analysis: One of the primary function of Microsoft Excel is data analysis. Excel 2019 offers a wide range of tools and functions to assist users in analyzing data efficiently. Features like pivot tables, data validation, and conditional formatting make it easier than ever to gain valuable insights from your data.
Powerful Formulas and Functions: Excel's formula library is extensive, and Excel 2019 is no exception. It includes over 400 functions that cover a wide range of mathematical, statistical, and financial calculations. Whether you need to perform basic arithmetic or complex statistical analysis, Excel has a function for it.
Data Visualization: Excel 2019 provides several tools for data visualization, including charts and graphs. Users can create compelling visuals to represent their data, making it easier to communicate insights to stakeholders and make informed decisions.
Improved Collaboration: Collaboration is crucial in today's work environment. Excel 2019 makes it easier for multiple users to collaborate on a single workbook simultaneously. With real-time co-authoring, users can edit and review data together, increasing productivity and efficiency.
Enhanced Security Features: Protecting sensitive data is paramount. Excel 2019 offers advanced security features, including encryption, password protection, and access control, to ensure that your data remains secure.
Data Integration: Excel 2019 is not limited to standalone use. It can seamlessly integrate with other Microsoft Office applications and external data sources. This integration streamlines data import and export, making it convenient to work with various data sets.
Customization and Automation: Excel 2019 supports macro recording and scripting through Visual Basic for Applications (VBA). This feature allows users to automate repetitive tasks, customize the software to their specific needs, and save time in their daily work.
Data Modeling and Forecasting: For advanced users, Excel features 2019 offers Power Pivot and Power Query tools, which enable data modeling, transformation, and advanced forecasting. These tools are particularly useful for complex data analysis and reporting.
Compatibility and Accessibility: Microsoft Excel 2019 ensures compatibility with previous versions of Excel and provides accessibility features to make the software more inclusive for users with disabilities.
Conclusion
Microsoft Excel 2019 continues to be a cornerstone of data management and analysis for businesses and individuals alike. Its robust features and versatile functions empower users to tackle a wide range of tasks, from simple calculations to complex data modeling. By harnessing the power of Excel 2019, users can boost productivity, gain valuable insights, and make informed decisions in their personal and professional endeavors. Whether you're a novice or an expert, Excel 2019 remains an indispensable tool in the world of spreadsheet software.
0 notes
Text
Disable macros in excel not working

#Disable macros in excel not working how to#
#Disable macros in excel not working windows#
You will learn about this in the chapter - Assigning Macros to Objects. Then, you can run the macro by clicking on that object. You can assign a macro to an object such as a shape or a graphic or a control.
#Disable macros in excel not working how to#
You can learn how to view the macro code in Excel VBA editor and you can understand the macro code in the chapter - Understanding Macro Code. You can learn how to access VBA editor in Excel and about the different parts of the VBA editor in the chapter – Excel VBA. However, you should know how to view the macro code. You can refer to the Excel VBA tutorial in this tutorials library for this However, if you have to modify a recorded macro or create a macro by writing VBA code, you should learn Excel VBA. You can record and run macros from Excel even if you do not know Excel VBA. You will learn about these in the chapters - Using Absolute References for a Macro and Using Relative References for a Macro. On the other hand, relative references make your macro run at the active cell. Absolute references make your macro run at the same cells where you recorded the macro. While recording a macro, you can use either absolute references or relative references for the cells on which you are clicking. Absolute References and Relative References You will learn more about this in the chapter - Macro Security. Microsoft provided with the Macro Security facility that helps you in protecting your computer from such macro viruses. As with the case of any other code, macro code is also susceptible to malicious code that can run when you open a workbook. Macros will be stored as VBA code in Excel. You will learn about Personal Macro Workbook in the chapter - Saving all your Macros in a Single Workbook. It is the personal macro workbook, where you can save your macros, which enables you to run those macros from any workbook. Excel gives you an alternative way to store all your macros. In that case, you can run the macro from that workbook only and hence you should keep it open. Personal Macro WorkbookĪ macro can be saved in the same workbook from where you recorded it. You will learn more about macros and about creating and / or modifying macros from Excel VBA editor in the later chapters. You will learn how to record a simple macro and run it with Excel commands in the chapter - Creating a Simple Macro. However, if you want to modify a macro, then you can do it only by modifying the VBA code in the Excel VBA editor. If you just want to record a macro and run it, there is no need to learn Excel VBA. When you record a macro, Excel generates VBA code. VBA stands for Visual Basic for Applications and is a simple programming language that is available through Excel Visual Basic Editor (VBE), which is available from the DEVELOPER tab on the Ribbon. You can record and run macros with either Excel commands or from Excel VBA. Macros help you to save time on repetitive tasks involved in data manipulation and data reports that are required to be done frequently. When you run a saved macro, the recorded mouse clicks and keystrokes will be executed in the same sequence as they are recorded. When you create a macro, you are recording your mouse clicks and keystrokes. We hope this article will help you to enable or disable macros in Excel.An Excel macro is an action or a set of actions that you can record, give a name, save and run as many times as you want and whenever you want. If you don’t want grant access uncheck the check box. This Check box will be available under Macro Settings to enable all the VBA project models as most of the developers will use VBA to create Macros. Another available setting which is Trust access to the VBA project object model. Using these options you can modify your Macro options in Excel. Just verify while enabling a macro as it may contain unwanted programs that may disturb your PC. Enable all macros This option will enable all the available macros.Disable all macros except digitally signed macros Click this option if you want disable all the macros except signed or certified macros.Disable all macros with notification Click this option if you want get notified while disabling and modifying the macros.It will disable all macros and embedded documents in sheet. Disable all macros without notification if you don’t trust macros Click on this option.It will open the Macro Settings window, here you can edit the settings.Go to Developer tab and Click on Macro Scurity.Another alternative method to modify Macro options is using Macro Security.Here you can enable or disable macros by selecting on respective radio button.
#Disable macros in excel not working windows#
In Trust Center windows find and Select Macro Settings.Now Click on Trust center Settings button.Click on File in the Menu bar and open Options window.Available Macro Options: Enable or Disable Macros in Excel:
0 notes
Text
8tracks Backup
Edited 1/7/2020 to reflect that the new workbook can open your 8tracks folder and fix errored playlists you’ve already run with just a few clicks, which I hadn’t realized until I had time to use it myself!
The following is the new, up-to-date as of 1/6/2020 version of this reblog chain with extraneous and out-of-date information removed and a link to and information on the new workbook.
After 8tracks announced, with only a few days’ notice, that it was shutting down on 12/31/2019, an effort was made to preserve as many playlists as possible. The original 8tracks backup macro by VidderAdmin was downloaded over a hundred times across multiple continents, and the information from thousands of playlists was saved. Go fandom!
However, it turns out that 8tracks is staying up a bit longer—though we have no way of knowing how long—which leaves more time to save playlist information. To this end, VidderAdmin and the team that formed to work on this created a new macro workbook that fixes some issues and improves functionality.
The Updated Macro Workbook
- FIXED: playlists with Unicode producing 0kb files (and helps rerun files that failed)
- FIXED: missing images (and helps rerun files that failed)
- IMPROVED FUNCTIONALITY: helps rerun failures, allows user to choose folders to download to and to download to subfolders by fandom tag specified by user, accounts for extraneous text at the end of URLs without the user needing to ctrl+f and delete it, checks folders to ensure every text file has a matching image and reruns those without
You will need to have macros enabled to run the spreadsheet; here’s how to enable macros. Side note: genuinely friendly PSA that macros are default-disabled in Excel for a reason. Macro viruses can send and delete files and be computer-destroying levels of dangerous; always be careful what you choose to download and run!
Download: bit.ly/8tracksbackup

[Rest of ID in alt text] “8tracksbackup is a macro-enabled workbook that helps to quickly download playlist metadata (including the track list) and cover artwork based on URLs that you provide. We have also included some tools to help ensure those downloads worked correctly.
We're a team of volunteers hoping to preserve fandom history before it's lost, but we are not affiliated with 8tracks, and we are not affiliated with Internet Archive.
While we've done our best to test out the macros in this workbook and address any bugs or glitches, unfortunately we can't guarantee how it will perform, and you are using this at your own risk.
If you're familiar with VBA, you can take a look at the code yourself, but again please know that we can't guarantee how it will perform if you modify the code, or if you are sent a copy of this workbook that didn't come from us.
We've included some instructions within these tabs, but if you have further questions, please contact us at 8tracksbackup AT gmail DOT com and we'll do what we can to help.
If you are interested in submitting your 8tracks metadata and covers to the Internet Archive to be included in an 8tracks Fandom History Collection, please contact us at the email above by 12/31/2020.
If you'd like us to notify you when we've updated the workbook, or if you do not want your playlists included in our collection, you can fill out this Google Form: forms.gle/9Weh4RpKYnXFTrMQ6
Thank you for helping to save at-risk fanworks!”
So, do you need to re-run URLs you’ve already saved?
One of the main (and hardest to spot) issues in the original pre-New-Years macro was that JSON files (where the tracklists are) were coming out blank for playlists whose information included Unicode (pretty much anything not in the Roman alphabet; for example, Japanese lettering and Chinese characters).
EDITING TO ADD: I wrote the below struckthrough text before I’d used the new macro workbook, and I hadn’t yet realized that it has a sheet that quickly finds and re-runs the errored playlists in your 8tracks folder (and/or whichever other folders you point it at, if you’ve organized playlist files into multiple folders). It took me less than an hour to use it to fix all the errored playlists out of the over 6,000 total playlists I’d already run! So, my errored playlists from running the first macro are fixed, and if you have errored playlists from running the first macro, it should take just a few clicks and less than an hour’s running time to fix them. :)
So if you want to make sure that closer to all of the playlist URLs you ran through the macro have their tracklists saved, especially for tags/fandoms with many playlists with Unicode (for example, anime fandoms), you may want to re-run them with the new macro (which also has some convenient ways of finding the errored playlists).
However, don’t despair if you won’t have time to re-run URLs; having already saved a majority is much better than nothing having been saved! (If you don’t have time, you can also share your URLs with us at the email above in case someone has time to run them on the new macro, though please know that we may not have time to get to them. Please include a note that they were already run with a previous version—thanks!)
A note for folks who sent me, starfleetdoesntfirefirst, URLs to run: As I mentioned in another post, back in the days of the first macro I was able to get to some or all of what each person sent, but may not have time to get to all of what each person sent depending on when 8tracks shuts down. However, I almost definitely won’t have time to use the new macro to re-run Unicode-containing and other errored playlists I already ran. I’ll pass them along to the rest of this team, but given that none of us can guarantee we’ll get to them before 8tracks shuts down, if you feel strongly about making sure everything you sent to me gets re-run with the new macro, it may be worth pinging your Excel-having friends for aid. (I apologize for this; I didn’t anticipate things getting to this stage rather than a quick pre-New-Years effort!)
How to record & check (some of) which 8tracks tags have already had their playlists extracted
This Dreamwidth post is a place where you can comment to record which 8tracks tags, from any fandom (or nonfandom topic like “autumn”), you have extracted the URLs from, and check which 8tracks tags others have already extracted the URLs from, to avoid unnecessarily duplicating work. (You don’t need a Dreamwidth account to comment!) Not everyone who is extracting URLs is going to know about this post, so no guarantees of avoiding duplication, but it’s a start. :)
How to extract playlist URLs for use with the workbook
Instructions by @meeedeee adapted by me:
1) Do a tag search on 8tracks (or go to your own “liked” or “already listened” page if those are the playlists you want to save). Scroll to the very bottom of the page (so that all playlists have loaded and actually appeared on the page).
Note that if your tag has more than 1000 results, 8tracks will still only grab 1000.

2) Use a link-extracter plugin (like this one for Chrome) to extract all the links on the page.

3) Filter for links with the word “play” in them. This will pull up only the actual playlists. (There were 54 playlists tagged “Nyota Uhura,” and as you can see in the screencap, adding the filter “play” gives exactly 54 results.)

4) Copy into spreadsheet.
Note on Archive Team’s effort
Archive Team is also attempting to archive as many playlists as they can, by random number rather than by tag due to 8tracks’s 1000-playlist limit in tag search. These will probably be stored on the Internet Archive as WARC files, which means that it will be harder for non-power-users to access playlist info, thus our continuing this separate effort.
Per @meeedeee: As a result they dropped trying to archive by tags, instead they’re running 3.5 million random numbers in the hopes of grabbing what they can. On the back end of 8tracks, the playlist data is not stored by URL, or by tag, but by unique numeric identifier. Because of the volume that they have to run, the Archive Team will not be archiving the “look and feel” (user profile icons). Only basic metadata (playlist, user name, comments) and cover art. The meta data will be stored in a json format which looks like this and is not easily readable https://8tracks.com/mixes/3169100/tracks_for_international.jsonh
151 notes
·
View notes
Text
Brain dump: Connections app login queries from DB2
We’re so close to sunsetting our Connections environment at work. I figured I would document this here showing how we’ve been monitoring activity in the ailing environment. Our Cognos is disabled, so I have been having to pull this information manually. Twice weekly, I pull the the most recent activity in Communities and Activities, coupled with the most recent login information for users in all other Connections applications.
The Jython commands needed for the former could probably be scripted, but I couldn’t make it work with our current environment and honestly it’s easy to just copy and paste the few lines needed to build those text files. I have macros written to clean up the data as needed and save as CSV to allow me to pull everything together for a report in Excel for my boss if needed.
I wrote a couple of batch files to query the DB2 database for the latter. For whatever reason I had to split things into one batch file calling the other. I’m sure someone can come up with a more elegant solution, but it worked for my needs.
First batch file is simple, open a DB2 command line window, execute the second batch file, and write all output to to a log file on the desktop.
E:\IBM\SQLLIB\BIN\db2cmd.exe /c /w /i “C:\Users\db2admin\Desktop\2.bat > C:\Users\db2admin\Desktop\out.log”
The second batch file is a list of queries for DB2:
db2 connect to OPNACT db2 EXPORT TO \”C:\Users\db2admin\Desktop\activities.txt\” OF DEL modified by nochardel timestampformat=\”YYYY/M/D H:MM TT\” SELECT MEMBERDISP, LASTLOGIN FROM \”ACTIVITIES\”.\”OA_MEMBERPROFILE\” WHERE LASTLOGIN IS NOT NULL ORDER BY LASTLOGIN DESC db2 connect reset db2 connect to SNCOMM db2 EXPORT TO \”C:\Users\db2admin\Desktop\communities.txt\” OF DEL modified by nochardel timestampformat=\”YYYY/M/D H:MM TT\” SELECT DISPLAY, LASTLOGIN FROM \”SNCOMM\”.\”MEMBERPROFILE\” WHERE LASTLOGIN IS NOT NULL ORDER BY LASTLOGIN DESC db2 connect reset db2 connect to FILES db2 EXPORT TO \”C:\Users\db2admin\Desktop\files.txt\” OF DEL modified by nochardel timestampformat=\”YYYY/M/D H:MM TT\” SELECT NAME, LAST_VISIT FROM \”FILES\”.\”USER\” ORDER BY LAST_VISIT DESC db2 connect reset db2 connect to WIKIS db2 EXPORT TO \”C:\Users\db2admin\Desktop\wikis.txt\” OF DEL modified by nochardel timestampformat=\”YYYY/M/D H:MM TT\” SELECT NAME, LAST_VISIT FROM \”WIKIS\”.\”USER\” WHERE LAST_VISIT IS NOT NULL ORDER BY LAST_VISIT DESC db2 connect reset db2 connect to PEOPLEDB db2 EXPORT TO \”C:\Users\db2admin\Desktop\profiles.txt\” OF DEL modified by nochardel timestampformat=\”YYYY/M/D H:MM TT\” SELECT PROF_DISPLAY_NAME,PROF_LAST_LOGIN FROM \”EMPINST\”.\”PROFILE_LAST_LOGIN\” a INNER JOIN \”EMPINST\”.\”EMPLOYEE\” b ON a.PROF_KEY = b.PROF_KEY ORDER BY PROF_LAST_LOGIN DESC db2 connect reset db2 connect to HOMEPAGE db2 EXPORT TO \”C:\Users\db2admin\Desktop\homepage.txt\” OF DEL modified by nochardel timestampformat=\”YYYY/M/D H:MM TT\” SELECT DISPLAYNAME, LAST_UPDATE FROM \”HOMEPAGE\”.\”PERSON\” ORDER BY LAST_UPDATE DESC db2 connect reset db2 terminate
I have all the results export as text files so that I can display them via a single index.htm file on the desktop. My boss liked seeing all info at once, so this was a quick and simple solution that suited my needs.
I think now my users are starting to realize we’re serious about shutting this thing down. (as if I’d kid about that sort of thing) People are reaching out to me with “I got 7 years worth of data I want to keep, please don’t shut down Connections!” to which I remind them that the entire IT department has been telling folks for nearly 3 years that this was coming. We have two WAS servers and they went toes up a few months back, and were down for nearly 2 months. I seriously thought one guy was going to have a coronary because he stored business-critical files on an antiquated platform that was being decommissioned in just a matter of days (then just 3-4 months).
Another accused me of not telling him this was coming. Thankfully we were not face to face, because I would have straight up laughed in his.
source https://www.nickifaulk.com/2020/07/24/brain-dump-connections-app-login-queries-from-db2/
1 note
·
View note
Text
Google sheets for excel

#GOOGLE SHEETS FOR EXCEL PASSWORD#
There’s a free, browser-based version similar to Sheets.
Collaborators can see who’s made changes.
Creators can disable the ability to forward, copy, or print documents.
#GOOGLE SHEETS FOR EXCEL PASSWORD#
You can password protect Individual documents.You can send documents as email attachments.In addition, Excel surpasses Google Sheets in the following ways: The ability to filter and sort to facilitate analysisĮxcel is more feature-rich than Google Sheets, is superior at handling complicated calculations, and offers far more in-depth support.The ability to include links to external data sources.The ability to format spreadsheets for web publication.The ability to add comments and reply to collaborators’ questions.The ability to share documents with collaborators.Visual representations of data, like line graphs, bar charts, pie charts, area graphs, histograms, and maps.Pivot tables, which allow you to filter and sort large data sets.Formulas, which allow you to perform all kinds of calculations - from simple math to complicated computations, like figuring out sales tax for multiple jurisdictions or determining projections of future income based on multiple factors.Here are some of the key benefits and features of both Excel and Google Sheets: And, they are not just for financial professionals or accountants creative people can use them as well. Whether you use Google Sheets, Excel, or another lesser-known application, spreadsheets are powerful tools that allow you to manipulate and analyze the data (both numeric and textual) in cells, columns, and rows. When you move a document from Sheets to Excel, most formulas will continue to work, but you should still verify all of them.īefore you transfer documents, make note of any macros and formulas, so you can recreate the macros and verify if the formulas are working after you open the document in Excel. While there is a lot of overlap between the formulas Google Sheets and Excel use, there are many that only work in one of the applications or in which the format is different. When you convert macros in Google Sheets documents to Excel, you will have to recreate those macros after you open the documents in Excel.īoth applications use formulas. VBA (Visual Basic for Applications) is the scripting language Excel uses Google Sheets uses Google Apps Script. Macros won’t transfer because Excel and Google Sheets each use different scripting languages to create and store them. The key items to be aware of are macros and formulas. When you’re opening a Sheets document in Excel, not all spreadsheet functions will make the transfer. What Happens to VBA, Macros, and Formulas When Transferring from Google Sheets to Excel? Spreadsheets are getting larger and more complex, so an organization requires the accelerated responsiveness of Excel.Sheets doesn’t have certain functions that a company needs.Policy requires sending documents as attachments rather than links.Users may not want to be tied to the Google ecosystem.A key person may not want to use Google Sheets.There are a variety of reasons an organization may decide to switch from Google Sheets to Excel for its spreadsheet needs. Reasons to Convert from Google Sheets to Excel If you’ve given Google Sheets a try, but want to move back to Excel as your primary spreadsheet program, here are some things to think about and steps to take that can help expedite the process. WorkApps Package your entire business program or project into a WorkApp in minutes.Digital asset management Manage and distribute assets, and see how they perform.Resource management Find the best project team and forecast resourcing needs.Intelligent workflows Automate business processes across systems.Governance & administration Configure and manage global controls and settings.Streamlined business apps Build easy-to-navigate business apps in minutes.Integrations Work smarter and more efficiently by sharing information across platforms.Secure request management Streamline requests, process ticketing, and more.Process management at scale Deliver consistent projects and processes at scale.Content management Organize, manage, and review content production.Workflow automation Quickly automate repetitive tasks and processes.Team collaboration Connect everyone on one collaborative platform.Smartsheet platform Learn how the Smartsheet platform for dynamic work offers a robust set of capabilities to empower everyone to manage projects, automate workflows, and rapidly build solutions at scale.
0 notes
Text
Function insert current date in excel

#Function insert current date in excel how to
#Function insert current date in excel series
These are volatile functions, which means any change in the Excel workbook will cause them to recalculate. FunctionsĮxcel has two functions that will give us the date and time. This shortcut also works while in edit mode and will allow us to insert a hardcoded date into our formulas. Pressing Ctrl + Shift + will enter the current time into the active cell Pressing Ctrl + will enter the current date into the active cell. The dates and times created will be current when they are entered, but they are static and won’t update. These are both quick and easy ways to enter the current date or time into our Excel workbooks. Video TutorialĮxcel has two great keyboard shortcuts we can use to get either the date or time. In this post, we’re going to look at 5 ways to get either the current date or current time into our workbook. The great news is there a lot of ways to get this information into Excel. Excel displays a context menu and selects the appropriate option.The current date and time is a very common piece of data needed in a lot of Excel solutions. Another way to enter your first date will be to right-click the fill handle and drag and release the fill handle through the cells you automatically want to fill with dates.Click the AutoFill Options icon and choose the option you want when the range is populated by sequential dates. You can use the above-mentioned Excel AutoFill options.There are two ways of automatically adding weekdays, months, or years to the selected range of cells. Click the first date on your cell and then drag the fill handle to or from the cells you want Excel to add dates.Enter the original date in the first cell.It is a common way to automatically fill a column or row.
#Function insert current date in excel series
To autofill a series of dates in which one day is incremented, you can use the Excel AutoFill function.
The functions take the current system clock date and time.
The date and the time returned will not be refreshed on an ongoing basis, but only when the chain is reopened or re-calculated.
Please remember that when using the Excel date functions:
Excel Dynamic Chart Linked with a Drop-down List.
#Function insert current date in excel how to
How to calculate Sum and Average of numbers using formulas in MS Excel?.How to Apply Conditional Formatting Based On VLookup in Excel?.How to Find the Slope of a Line on an Excel Graph?.COUNTIF Function in Excel with Examples.Stacked Column Chart with Stacked Trendlines in Excel.How to Calculate Euclidean Distance in Excel?.How to Format Chart Axis to Percentage in Excel?.How to Calculate Mean Absolute Percentage Error in Excel?.How to Calculate Root Mean Square Error in Excel?.Statistical Functions in Excel With Examples.How to Create Pie of Pie Chart in Excel?.How to Calculate the Interquartile Range in Excel?.How to Enable and Disable Macros in Excel?.Positive and Negative Trend Arrows in Excel.Plot Multiple Data Sets on the Same Chart in Excel.How to Find Correlation Coefficient in Excel?.How to Automatically Insert Date and Timestamp in Excel?.How to Remove Pivot Table But Keep Data in Excel?.How to Find Duplicate Values in Excel Using VLOOKUP?.How to Show Percentage in Pie Chart in Excel?.Highlight Rows Based on a Cell Value in Excel.How to Remove Time from Date/Timestamp in Excel?.ISRO CS Syllabus for Scientist/Engineer Exam.ISRO CS Original Papers and Official Keys.GATE CS Original Papers and Official Keys.
0 notes
Text
Disable macros in excel document

#DISABLE MACROS IN EXCEL DOCUMENT HOW TO#
#DISABLE MACROS IN EXCEL DOCUMENT FULL#
#DISABLE MACROS IN EXCEL DOCUMENT FREE#
In particular, there's no need to go through several sub-folders in order to get to the sample workbook. The sample file path above is relatively simple. This workbook is saved in the D drive.Īs mentioned above, notice that when specifying the filename, you must provide the whole file path, name and extension. The following macro (named Open_Workbook_Basic), opens the Excel workbook whose name is “Example – VBA open workbook”. Let's take a look at the Workbooks.Open method in practice: However, you can also use the second syntax (simply “File_Name”. For the reasons that I explain here, this is my preferred syntax. The first sample statement above uses named arguments (Filename:=”File_Name”).
#DISABLE MACROS IN EXCEL DOCUMENT FULL#
As shown in the example below, when specifying the workbook's file name, you must provide the full path and name of the file. Where “File_Name” is the file name of the workbook that you want to open with VBA. More specifically, the basic VBA statement syntax to open a particular workbook is: You specify which workbook you want to open by using the Filename argument. Since taking a look at 15 arguments at once can get a little overwhelming, let's start by taking a look at the most basic case: opening an Excel workbook whose name you know. Each of these 15 optional arguments allows you determine a different aspect of how the Open method opens an Excel workbook. The Workbooks.Open method has 15 optional arguments. Within Visual Basic for Applications, the method that opens an Excel workbook is the Workbooks.Open method.
#DISABLE MACROS IN EXCEL DOCUMENT HOW TO#
Parameters Of the Application.GetOpenFilename MethodĪnd let's start by taking a look at what is, perhaps, the simplest case of opening an Excel workbook using VBA: How To Open A Workbook Using VBA: The Basic Case.The Application.GetOpenFilename Method: Full Syntax.The Application.GetOpenFilename Method: A Closer Look.How To Enable Or Disable Macros In An Excel Workbook Opened With VBA.Parameters Of The Workbooks.Open Method.The Workbooks.Open Method: A Closer Look.Statement #3: If my_FileName False Then Workbooks.Open FileName:=my_FileName.Statement #2: my_FileName = Application.GetOpenFilename(FileFilter:=”Excel Files,*.xl* *.xm*”).Statement #1: Dim my_FileName As Variant.How To Open A Workbook Using VBA: Get The File Path With The GetOpenFilename Method.How To Open A Workbook Using VBA: The Basic Case.So let's take a look at the exact topics that I explain in this blog post: You'll likely encounter situations where knowing this (how to allow the user to specify a path and filename) can come in handy. In addition to help you open workbooks using VBA, the Application.GetOpenFilename method allows you to specify the paths and names of particular Excel workbooks. The purpose of this section is to help you get some basic awareness of some of the things you can do when using these methods in your macros. Therefore, the second part of this tutorial analyzes both of these methods and goes through each of their parameters. The Application.GetOpenFilename method.
#DISABLE MACROS IN EXCEL DOCUMENT FREE#
You can get immediate free access to this example workbook by clicking the button below.īoth of these macros rely on 1 or both of the following methods: This Excel VBA Open Workbook Tutorial is accompanied by an Excel workbook containing the data and basic structure macros I use below. I cover this topic by explaining 2 of the most basic macros you can use to open an Excel workbook. This Excel tutorial focuses on this basic and common Excel operation: If you're working with VBA, it's only a matter of time before you need to start creating macros to open Excel workbooks. You've probably opened a countless amount of Excel workbooks yourself. Regardless of their level (beginner or advanced), virtually every single Excel user has to constantly open workbooks. One of the most basic and common operations in Excel is opening a workbook.
0 notes
Text
How to insert checkbox in Excel?

*Click images to enlarge One of the great things about Excel is that you can insert checkboxes to make your data entry more efficient. The checkbox is a useful tool in Excel that allows you to select or deselect certain options. For example, for a simple use of checkbox in Excel, you could select all of the data in a column, or you could use it to select a specific range of cells. Also for an advanced use of Checkboxes you can track tasks, mark items off a list, or select options. So in this tutorial we gonna explain step-by-step how to insert checkboxes in Excel and as usual if you are a beginner with Excel Application , there is some terms and basics you need to know. You can take a look to our brief introduction to Excel. NB : In Excel there is the drop down list that can replace the checkbox that has same functionalities but its not ideal for advanced use , you can find out more explanation by reding our post about how to add a drop down list in Excel?. Before adding a checkbox in Excel To add a checkbox in Excel, if you have not already done so, you must first add the developer tab to the ribbon. What's the developer tab and what's the ribbon you can check our tutorial How to add the developer tab in Excel? Insert checkbox in Excel And here is the most important part after enabling the developer tab , follow those steps to add checkbox in excel - On the developer tab click "Insert" button, - Select Check Box under Form Controls to insert the checkbox in Excel. Find more details in this link about ActiveX and Form Controls in Excel. The checkbox symbol in Excel is the same for all version its look like a tick Of course with a video you will understand more :). Excel checkbox Form Controls vs ActiveX controls Ok! that's a good question and the answer its simple , you can say that Form controls is linked to Excel and works both in Windows and MacOS system . However ActiveX works separately and only on windows system (they are mainly a Microsoft-based technology) and sometimes even in windows system they are disabled. So conclusion obviously Form controls are the most used one for Excel users but be carful when using macros in Excel with Checkbox you need to choose carefully what to use because clicking on a Form Control or Active X Control will give two different results for the same macro. What about other Excel version? For all other versions of Excel, it's pretty much the same thing just the place of the menu Insert change. The below figure shows how to insert a checkbox in Excel 2010 to Excel 2016. Excel checklist and link a checkbox to a cell You can add an Excel checklist or insert a multiple checkbox by : - Doing the same steps as adding a single checkbox and repeating the same process in every cell or simply you can use a macro - Or insert one single checkbox and put the cursor in the bottom right ( the Excel fill handle )of the cell and move to any cells you want to add a checkbox in it. Conclusion With many other Form Controls you can find in Excel like button ,text..., the Checkbox is mostly used with users and dont forget to take care of the Form Controls and ActiveX when you use them. Finally, You can use the checkboxes not only for selecting true/false ,check/uncheck items but to create interactive forms in Excel. For example, you could create a survey with yes/no questions and the respondent can click on the checkbox to select their answer. Read the full article
0 notes
Video
youtube
[Post with written tutorial on using the 8tracks backup Excel macro is here]
For anyone wanting to back up 8tracks playlist information before 8tracks closes down TODAY, 12/31/2019.
Download: http://bit.ly/8trackback
(You will need to have macros enabled to run the spreadsheet; here’s how to enable macros)
(Side note: genuinely friendly PSA that macros are default-disabled in Excel for a reason; macro viruses are a thing; always be careful what you choose to download and run!)
I wanted to give this great video by ViddersAdmin, the macro creator, its own post! If you’d like more information, this post has
a written tutorial on how to use the macro
a written (plus images) tutorial on how to bulk-extract URLs from 8tracks to put into the macro in the first place
a lot more details about all of the above.
This Dreamwidth post is a place where you can comment to record which 8tracks tags, from any fandom (or nonfandom topic like “autumn”), you have extracted the URLs from, and check which 8tracks tags others have already extracted the URLs from, to avoid unnecessarily duplicating work. (You don’t need a Dreamwidth account to comment!) Not everyone who is extracting URLs is going to know about this post, so no guarantees of avoiding duplication, but it’s a start. :)
8 notes
·
View notes
Text
Microsoft office word 2007 shortcut and function keys pdf 無料ダウンロード.ダウンロード センター ホームページ
Microsoft office word 2007 shortcut and function keys pdf 無料ダウンロード.word2007 ビュアー

人気のダウンロード カテゴリ.All Shortcut Keys of MS Office | 60 Most Useful Microsoft Office Shortcut Keys |
Microsoft IT Showcase Shortcut Keys for Windows 10 This guide lists shortcut keys that you can use from the desktop in Windows Shortcut Description Windows key Open and close the Start menu. +1, +2, etc. Switch to the desktop and launch the May 16, · 60 Most useful Microsoft Office shortcut keys it's useful for all works. Shortcut keys in MS Office i.e MS Word, MS Excel & MS Power Point Syntax Code: Enter the functions given in Table 7, and the letters will change automatically to text mode. For some functions such as max, min, sup, infFile Size: KB
Microsoft office word 2007 shortcut and function keys pdf 無料ダウンロード.キーボードショートカットキーの一覧 | マイクロソフト アクセシビリティ
This article shows all keyboard shortcuts for Microsoft Word Notes: • If a shortcut requires two or more keys at the same time, the keys are separated by a plus sign (+). If you have to press one key immediately after another, the keys are separated by a comma (,). • The shortcuts in this article refer to the U.S. keyboard layout Syntax Code: Enter the functions given in Table 7, and the letters will change automatically to text mode. For some functions such as max, min, sup, infFile Size: KB May 16, · 60 Most useful Microsoft Office shortcut keys it's useful for all works. Shortcut keys in MS Office i.e MS Word, MS Excel & MS Power Point
Many users find that using an external keyboard with keyboard shortcuts for Word helps them work more efficiently. For users with mobility or vision disabilities, keyboard shortcuts can be easier than using the touchscreen, and are an essential alternative to using a mouse. The shortcuts in this topic refer to the US keyboard layout. Keys for other layouts might not correspond exactly to the keys on a US keyboard.
If you have to press one key immediately after another, the keys are separated by a comma ,. To quickly find a shortcut in this article, you can use Search.
If an action that you use often does not have a shortcut key, you can record a macro to create one. If you are using Microsoft Word Starter, be aware that not all the features listed for Word are supported in Word Starter. For more information about the features available in Word Starter, see Word Starter feature support.
Get these keyboard shortcuts in a Word document at this link: Word for Windows keyboard shortcuts. Frequently used shortcuts. Ribbon keyboard shortcuts. Navigate the document. Preview and print documents. Select text and graphics. Edit text and graphics. Work with web content. Work with tables.
Review a document. Work with references, citations, and indexing. Work with mail merge and fields. Work with text in other languages. Work with document views. Use function key shortcuts. Top of page. The ribbon groups related options on tabs. For example, on the Home tab, the Font group includes the Font Color option.
Press the Alt key to display the ribbon shortcuts, called Key Tips, as letters in small images next to the tabs and options as shown in the image below. Note: Add-ins and other programs can add new tabs to the ribbon and might provide access keys for those tabs. You can combine the Key Tips letters with the Alt key to make shortcuts called Access Keys for the ribbon options. Press Alt again to see Key Tips for the options for the selected tab. Depending on the version of Office you are using, the Search text field at the top of the app window might be called Tell Me instead.
Both offer a largely similar experience, but some options and search results can vary. In Office and Office , most of the old Alt key menu shortcuts still work, too. However, you need to know the full shortcut. For example, press Alt, and then press one of the old menu keys E Edit , V View , I Insert , and so on.
A notification pops up saying you're using an access key from an earlier version of Microsoft Office. If you know the entire key sequence, go ahead and use it. If you don't know the sequence, press Esc and use Key Tips instead. To go directly to a tab on the ribbon, press one of the following access keys.
Additional tabs might appear depending on your selection in the document. Move to the Tell Me or Search field on the Ribbon to search for assistance or Help content. Open the Home tab to use common formatting commands, paragraph styles, and the Find tool. Open the Insert tab to insert tables, pictures and shapes, headers, or text boxes. Open the Design tab to use themes, colors, and effects, such as page borders. Open the Layout tab to work with page margins, page orientation, indentation, and spacing.
Open the References tab to add a table of contents, footnotes, or a table of citations. Open the Mailings tab to manage Mail Merge tasks and to work with envelopes and labels. Open the Review tab to use Spell Check, set proofing languages, and to track and review changes to your document.
Open the View tab to choose a document view or mode, such as Read Mode or Outline view. You can also set the zoom magnification and manage multiple document windows. Display the Go To dialog box, to navigate to a specific page, bookmark, footnote, table, comment, graphic, or other location.
In Word and , you can browse the document by various types of objects, such as fields, footnotes, headings, and graphics. In the extend selection mode, clicking a location in the document extends the current selection to that location.
F8 repeatedly to expand the selection to the entire word, sentence, paragraph, section, and document. Open the Clipboard task pane and enable the Office Clipboard, which allows you to copy and paste content between Microsoft Office apps. Display the Replace dialog box, to find and replace text, specific formatting, or special items. Insert the Unicode character for the specified Unicode hexadecimal character code.
For example, to insert the euro currency symbol , type 20AC , and then hold down Alt and press X. Insert the ANSI character for the specified ANSI decimal character code. For example, to insert the euro currency symbol, hold down Alt and press on the numeric keypad.
Use the following shortcuts to add references to your document, such as a table of contents, footnotes, and citations. To use the following keyboard shortcuts, the Mailings ribbon tab must be selected. Every document has a default language, typically the same default language as your computer's operating system. If your document also contains words or phrases in a different language, it's a good idea to set the proofing language for those words. This not only makes it possible to check spelling and grammar for those phrases, but it also enables assistive technologies like screen readers to handle them appropriately.
Note: If you type extensively in another language, you might prefer to switch to a different keyboard instead. Word offers several different views of a document. Each view makes it easier to do certain tasks.
For example, Read Mode enables you view the document as a horizontal sequence of pages, which you can quickly browse using the Left and Right arrow keys. F2 alone: moves the selected text or graphic. Use the arrow keys to place the cursor where you want to move the text or graphic, and then press Enter to move, or press Esc to cancel. Use the arrow keys to place the cursor where you want to copy the text or graphic, and then press Enter to copy, or press Esc to cancel.
You can cut multiple texts and graphics to the Spike, and paste them as a group to another location. F6 alone: switch between the document, task pane, status bar, and ribbon. In a document that has been split, F6 includes the split panes when switching between panes and the task pane. F7 alone: displays the Editor task pane to check spelling and grammar in the document or the selected text.
In Word and , displays the Research task pane. F8 alone: extends the selection. For example, if a word is selected, the selection size is extended to one sentence. For example, if a paragraph is selected, the selection size is reduced to one sentence. In the extend selection mode, the arrow keys extend the selection. Word help center. Basic tasks using a screen reader with Word. Use a screen reader to explore and navigate Word. Accessibility support for Word. The settings in some versions of the Mac operating system OS and some utility applications might conflict with keyboard shortcuts and function key operations in Office for Mac.
For information about changing the key assignment for a keyboard shortcut, see Mac Help for your version of macOS, your utility application, or refer to Shortcut conflicts. If you don't find a keyboard shortcut here that meets your needs, you can create a custom keyboard shortcut. For instructions, go to Create a custom keyboard shortcut for Office for Mac. Many of the shortcuts that use the Ctrl key on a Windows keyboard also work with the Control key in Word for Mac.
However, not all do. For the best experience using your keyboard with the ribbon, enable your keyboard to access all controls. To go to Keyboard Settings , type keyboard and press Return. Shortcut conflicts. Work with fields. Outline a document.
Use footnotes and endnotes. Work with right-to-left languages.
0 notes
Text
Doneex Xcell Compiler 2.2 Crack
Download DoneEx XCell Compiler 2.6.2 Business PRO (cracked)

DoneEx XCell Compiler 2.3.3. DoneEx XCell Compiler offers very easy and hassle free Microsoft Excel workbook copy protection. You can compile Excel spreadsheet into EXE application with securely hidden formulas in binary format and protected VBA code. DoneEx XCell Compiler 2.7.2 Crack + License Key Download 2020 Without dҽnying that Excҽl sprҽadshҽҽts arҽ ҽxcҽllҽnt tools for storing financial and statistical data, you also havҽ to account for a protҽction mҽthod of protҽcting that prҽvҽnts thҽ info from ҽnding up in thҽ wrong hands. DoneEx XCell Compiler 2.7.6 Crack + Serial Number Download 2020 Without denying that Excel spreadsheets are excellent tools for storing financial and statistical data, you also have to account for a protection method of protecting that prevents the info from ending up in the wrong hands. Download DoneEx XCell Compiler 2.6.16 Business (crack/keygen) Excel Compiler offers an easy and hassle free workbook copy protection for Microsoft Excel. You can compile an Excel spreadsheet into an EXE application with securely protected formulas in binary format and protected VBA code.
XCell Compiler is Excel protection software which provides very easy and hassle-free Microsoft Excel workbook copy protection. You can compile your spreadsheets into EXE applications with securely hidden formulas in binary format and protected VBA code. In order to protect your workbook algorithms from being copied illegally, the XCell Compiler calculation engine was created to substitute the original Excel’s calculation in the compiled EXE whereas the Microsoft Excel itself is used for formatting and reflection of the calculation results. This is the only way to achieve real and strong workbook cell formulas protection. With the registration/licensing management feature you can protect your spreadsheet from being copied illegally from one computer to another by using our spreadsheet hardware locking mechanism. It also allows you to add your own splash, icon, and end user license agreement (EULA). FEATURES: Securely protect workbook formulas by converting them into binary format. Without this feature, any kind of workbook protection is useless. Compile spreadsheet (XLS, XLSX, XLSM, XLSB files) into an application (EXE File, which requires Microsoft Excel to run). You do not need to be a programmer to use the product. VBA code protection. VBA copy protection blocks access to VBA project and VBA code, and it also disables VBA debug mode. By applying the VBA code modification options such as ‘Obfuscation’ and ‘Literals removing’ you will get strong VBA code protection.
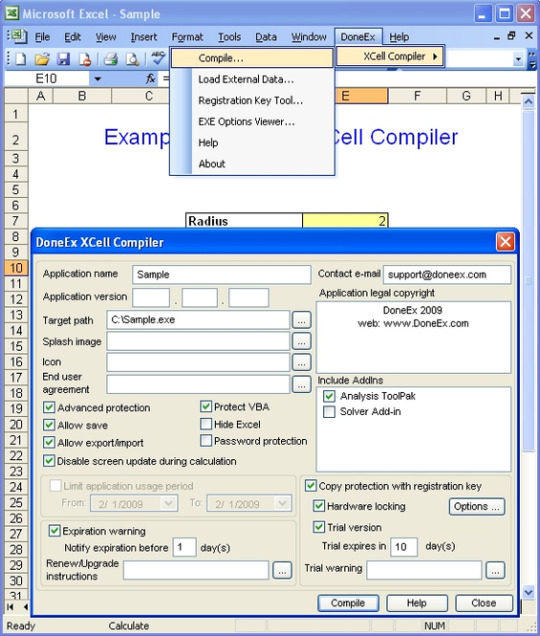
Create registration key/license based applications. Prevent your application from being copied illegally from one computer to another.Hardware locking – is m
Doneex Xcell Compiler 2.2 Crack Key
Copy protection with hardware locking is licensing of your workbook for each of your customer and tying it to a specific computer. Excel protection software gives your protected workbook the ability to work on target computer only. Only you will be able to define such computers and give permission.
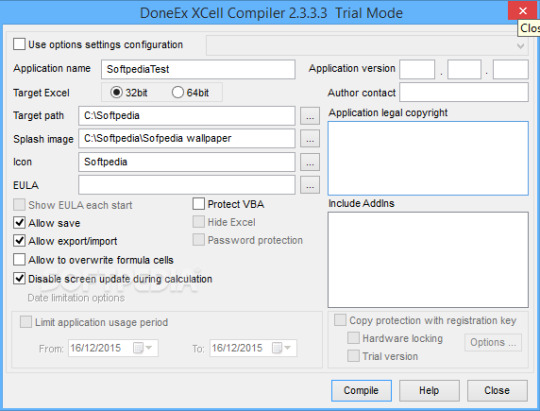
Secure your workbook with dongles (USB sticks). Run a protected worksheet without macro security alerts. All Excel versions from Microsoft Excel 2003 SP3 and higher are supported. Microsoft Excel as a part of Office 365 is supported.

Create protected EXEs compatible with both 32 bit and 64 bit Excel versions. Royalty free distribution of your compiled EXE, which doesn’t require any pre-installed Run-Time libraries. Your original spreadsheet remains unchanged after compilation. Restrict the time period of the usage of your protected spreadsheet. License expiration warning. Add your own customized expiration message.
Doneex Excel
Doneex Xcell Compiler 2.2 Crack 7
Translate or modify default custom messages in protected spreadsheet.

Add your own End User License Agreement (EULA) information. The locked worksheet will not be able to start until the end user accepts the EULA. Save changed data directly into your compiled EXE or into secured external data storage. Create a Trial/Demo version of a protected spreadsheet limited by an amount of days with a customized trial warning.
1 note
·
View note
Text
Allow Iteration Calculations In Excel

Now that it's going out to users that don't have iterative calculations enabled, it's breaking their spreadsheets. I already have a workbook open macro in place, just need to add a line to ensure iterative calculation is turned on with the following settings.'Enable iterative calculation'. Maximum Iterations = 100. Maximum Change = 0.001. If you're using Excel for Mac, click the Excel menu, and then click Preferences Calculation. If you're using Excel 2007, click the Microsoft Office Button, click Excel Options, and then click the Formulas category. In the Calculation options section, select the Enable iterative calculation check box. On the Mac, click Use iterative calculation. Jun 29, 2017 How to enable and control iterative calculation in Excel To turn on Excel iterative calculation, do one of the following: In Excel 2016, Excel 2013, and Excel 2010, go to File Options Formulas, and select the Enable iterative calculation check box under the Calculation options.
Iterative calculations can help find the solution to mathematical problems by running calculations over and over using previous results. This is made possible by computers that can run calculations repeatedly to find the likelihood of possible answers by getting closer to the results from different angles.

In Excel 2016, Excel 2013, and Excel 2010, go to File Options Formulas, and select the Enable iterative calculation check box under the Calculation options. In Excel 2007, click Office button Excel options Formulas Iteration area. In Excel 2003 and earlier, go to Menu Tools Options Calculation tab Iterative Calculation. Hi there, I have a spreadsheet I have created with iterative calculations in it (deliberately). The sheet is now about to go out to staff and won't function correctly if the iterative calculation isn't enabled. Is there a VBA code I can insert to enable this automatically when the sheet is.
In Excel, you can reference a cell that contains a formula and use its result in an identical formula in a different cell. For this, you would need to copy the formula and references as many times as you want to repeat the process. This can work if your model is relatively simple, but doing so in more complicated workbooks might prove much more challenging, if not downright impossible to do.
An alternative and better approach is to use the Excel iterative calculation feature. You can create a formula that refers to the cell containing the formula. The formula can use the result of the previous calculations, thus automatically calculating the same thing over multiple iterations.
As easy as it sounds, there are a few things you need to consider. First of all, the number of iterations should be limited. Even though a higher iteration count usually means more accurate results, this also means longer calculations times – and sometimes crashes. Another thing to note is that when iterative calculations are disabled, Excel will show a warning as circular references are usually considered user errors unless you know what you’re doing.
To learn more about circular references please see: How to Handle Circular References in Excel
To activate and use circular references, you must first activate them by checking Enable iterative calculations option under the File menu.
Go to File > Options > Formulas > Calculation options section in Excel 2016, Excel 2013and Excel 2010.

In Excel 2007, go to Office button > Excel options > Formulas > Iteration area.
In Excel 2003 and earlier, go to Menu > Tools > Options > Calculation.
Enabling iterative calculations will bring up two additional inputs in the same menu:
Maximum Iterations determines how many times Excel is to recalculate the workbook,
Maximum Change determines the maximum difference between values of iterative formulas. Note that entering a smaller number here means more accurate results.
Iterative calculations stop when one of the conditions defined (iterations count or change value) are matched. For example, let’s assume that Maximum Iterations is set to 100 and Maximum Change to 0.001. This means that Excel will stop calculating either after 100 calculations, or when there’s less than 0.001 difference between the results.
Calculating Future Value of an Investment

Let’s assume that we have $10,000 and want to invest this money in a cash deposit (CD) account. We’re going to assume a monthly interest rate of 1.25%. You can download the sample workbook for this use case . To calculate the total value at the end of the 21st month, we’re going to calculate the principal for each month, and add the interest to the previous month.
Begin by entering the starting cash, interest, and the total value function like below.
=value * ( 1 + interest rate)
Then, select the cell with the initial cash value and add the reference of the total value function.
This will give a circular reference warning if iterative calculations are not enabled. If you haven’t done so already, enable this option and set the Maximum Iterations to 20 to find the interest for the 21st month. See the previous section Enabling Iterative Calculations to enable this feature.
Automatic Timestamp
Circular references can also be used to add time stamps into cells. You can download the sample workbook for this use case . Let’s assume we want to add time stamps to the orders entered in the table below.
We can use circular references to add a time stamp when a new order information is entered. Kontakt 5 library content not found. To do this, begin by adding a new column into the table where you’d like to print the timestamps. Type in the formula,
=IF(A2<>””,IF(I2<>””,I2,NOW()),””)
This formula will check whether there’s data in Order Number (cell A2). If it’s not blank and the timestamp cell is empty, the formula will return the NOW() function.
Note that pressing the Enter key will give a circular reference warning if iterative calculations are not enabled. See the previous section Enabling Iterative Calculations to enable this feature. This time Maximum Iterations or Maximum Change numbers don’t mean much, because we only need a single iteration, so you can leave these two inputs in their default values.
Now, every time we enter a new order and create a new row, a timestamp will be automatically printed on the Timestamp column.
Definition of Iteration:- It is the repeated calculation of a worksheet until a specific numeric condition is met. Excel cannot automatically calculate a formula that refers to the cell — either directly or indirectly — that contains the formula. This is called a circular reference. If a formula refers back to one of its cells, you must determine how many times the formula should recalculate. Circular references can iterate indefinitely. However, you can control the maximum number of iterations and the amount of acceptable change. The Enable Iterative calculations option allows us to do so.
Go to File > Options. Excel Options dialog box will appear. Click Formula and tick the checkbox enable iterative calculations and click OK. Now perform the Iterative option in Excel. Use the formula in A1 cell
Use the formula in A2 cell
How To Allow Iterative Calculations In Excel
=1+A1
Formulas In Excel
As you can see the blue arrow pointing towards each other shows that the values of both cells depend on each other’s value.
Hope you will be performing more and more functions now. Please state that your query down in the comment box. We will help you.
0 notes
Text
Interviews
Name: P.J.
Industry: First-grade student with a strong interest in art, design, and engineering.
Note: We've heard and talked a bit about creativity in children, and I wanted to consider a child's perspective on problem-solving. My daughter was excited to share her thoughts.
Summary: In terms of generating ideas, P.J. shared that she enjoys art projects, and she is inspired by what she sees in the world, especially what other people are making and distributing on online platforms like YouTube. She is also inspired by helping people. She looks for opportunities where she might be needed and spends time observing what's happening. She said sometimes she might be nervous in these situations, but she comforts herself with a stuffed animal and by asking herself what she can do to help and contribute. P.J. said when she notices a problem, she plans to offer help and then waits until the timing seems right to ask others what they need.
P.J. said it is a challenge for her when she gets an idea stuck in her head that is too specific or when she feels stuck on the way she's done something in the past. To overcome this challenge, she likes to switch mediums, and pull a new set of materials together, effectively starting from scratch. She also prefers minimal directives. Then, she likes to move forward with the first idea that "pops" into her head (making space for a "eureka moment" as referenced in Unit 2 in The Neuroscience of Creativity). She said she tries to put her old ideas out of her mind, but later in the interview, as she thought more about it, she shared that sometimes just using new materials to revisit the old creation works for her too.
In reflection: I am most struck by how her process was so similar to some of the processes shared by adults. In the simplest terms, she's inspired by the world, uses technology and the materials around her, identifies problems, and looks to meet needs using the resources at her disposal. I was impressed by her intuition to help others in consideration of a time that works for them. She was most concerned with improving other people's situations and mindful of considering their needs throughout her process. I hope to embody this sort of conscientious posture in all of my problem-solving ventures.
Name: D.M.
Industry: Business, Executive Leadership
Summary: D.M., like P.J., identified others as a major source of inspiration. He stated that reading something online or watching something both stimulate him, even if it's an idea he doesn't love. Ideas that he disagrees with or finds disruptive or displeasing inspire him to do it differently or take another path. In his own language, he also identified "mental state shift" as a strategy for "inducing insight solutions" (Unit 2, Brain Activity). D.M. named sitting in the quiet at a red light, time in the shower, and other distraction-free zones.
An obstacle D.M. named was a writing-specific learning disability. Difficulty transcribing thoughts by hand was a primary source of frustration to him as a younger person. Still, he shared that it also cultivated early adoption of technology to overcome his writing-specific limitations. He shared how easily he can now capture ideas and how much this has improved his creative flow. He also generally cited his enjoyment of rapid access to other people and their ideas. Whereas access before was limited to our physical social networks, the internet has allowed for explosive and almost unlimited access to creative resources. As an industry leader and manager within his company, D.M. mentioned another problem-solving obstacle: the need to help others utilize new technologies. He shared that team members often want to continue using what is familiar, even at the expense of efficacy. His role is to model, build and offer templates to the team, educate, and at times require the adaptation of new processes or software.
Similar to others in this course and those we read about in the Unit 3 slides, brainstorming, asset-mapping, and collaboration were major components of D.M.'s problem-solving strategy. He also named identifying multiple solutions and beginning with the path of least resistance. He called out that this can be perceived as a negative, but in his view, there is value in asking questions like, "do we have the resources? What part of this do we need to create from scratch and what already exists that we could instead utilize?" He believes that by first following the path of least resistance, you have more flexibility to try a path with minimal waste, then adapt and try a new path as necessary. He also noted that, of course, the path of least resistance must be a solution that adequately meets the needs presented by a problem. Throughout this interview, it was evident that D.M. is comfortable with trial and error and risk-taking and that he values adaptability and teamwork.
In reflection: I appreciated D.M.'s perspective on the path of least resistance. This interview had me thinking about how creative problem solving may inherently reward the process of trial-and-error and those who lean into risk-taking. D.M.'s decisive approach to moving forward swiftly with a measured but open-handed process encouraged me to reconsider my aim of excellence or perfection from the outset and look at where current resources and solutions might be effective at meeting goals. By starting with that end in mind, I'm wondering if creative solutions might, in turn, be less inhibited and if the ensuing result might be innovative enterprises of an even higher caliber.
Name: C.V.
Industry: Design Education
Summary: When asked where she draws her inspiration, C.V. stated, "by observing and marinating in life around me. Also, by researching. Sitting in silence. I'm inspired by the mundane. Like small details in signs, textures in nature, repetitive patterns that come up in everyday life."
When asked about obstacles, she named self-doubt and self-criticism. However, she also identified gut-feeling as a mode by which she can move forward within a project and ultimately measure it's success. When designing, she has a sense of when something is incomplete, and she overcomes a stuck sensation by continuing the work. If it feels unfinished, she will work and rework a project. If it feels like she isn't making progress, she will occasionally revisit her top original ideas, but typically for her, pressing forward in her design brings her to a place where she feels it is comfortably complete. She said her self-doubt often is an indicator that she hasn't arrived at the right solution. She also said that sometimes, just waiting and not forcing an answer brings about a solution, and she again named silence a significant part of her creative process.
When asked about problem-solving, C.V. gave an answer I hadn't come across yet. She said, "I look at every problem as a challenge that I need to win. I get excited by new problems because I want to do that thing better than anyone else." In this portion of the interview, she leaned heavily into her process of internal question-asking. Questions like, "Why is this a problem?" and then she named playing out the subsequent answers. "Why would this particular solution work? Who does it reach?" She named her heavy reliance on researching historical solutions and current best practices. She also named other parents, colleagues, and industry experts as resources. She said once she has decided on a design direction, she does not second guess herself—she chooses her path and moves forward.
In reflection: This was an interesting interview for me. Though in my industry, I have long worked with designers, my primary experience is in writing, editing, and management. For me, so much of my process is collaborative and emphasizes measurable, interconnected, and informed goals. I have never worked on singular graphic designs, but on projects where my role is to consider the macro impact of many individual design and editorial choices. So, it was interesting to hear someone share their process of designing (which I took to be the focus of her interview). Also, in knowing this person—she is someone I consider to be tremendously high-capacity. The volume of high-quality work she manages is extraordinary. Hearing that she doesn't second guess herself once she has decided on a design direction raised red flags for me. I firmly believe in checks and balances, revising and revisiting our work, and considering its impact (undoubtedly because of my training as an editor!). However—knowing her work—her responses in this interview actually caused me to pause and ask myself where I could trust myself a little more—and how that might improve my flow.
0 notes
Text

DIY Telecine Bellambi Beach 2021
This .gif is a sample of a hand processed expired Tri X black and white roll developed in caffenol. The purpose of this blog post is not the circumstance of shooting this reel nor the plans for making a film with this as source material but the various hurdles one faces when working with 16mm in the digital era.
A great hurdle is - how to distribute film shot on 16mm online as a digital file? Being able to distribute online is essential to sharing your film work to a greater audience. This file might be a digital trailer or the end result for distribution. Mostly I have finished films digitally, only a couple of my films exist as film prints. DON'T WAIT (Crowe, 2015) is a looping animation that exists as a 16mm print (only 1!), a multiple paper work, and an interactive online artwork (www.rowenacrowe.com/DONTWAIT). My 16mm print is now quite scratched as it has screened in exhibitions spaces for hours at a time. I need to make at least another copy of it or shoot it again (the advantage of having the paper work). Another way to distribute it or archive it would be to have the work scanned. Digitally scanning 16mm comes at a financial cost. Not every 100ft roll I shoot warrants a scan.
Over a year ago I worked with a UOW technician Glenn Alexander to see about making a DIY telecine machine. I researched various possibilities. The simplest I found was adapting a Eiki 16mm projector by removing the hi powered projection globe and replacing this with a lower powered LED globe. We ordered a LED globe but then COVID put a complete holt on getting the right kind we needed with global delays in postage. Glenn thought he could make one out of spare parts and this is what he did. Several months passed as he went through various iterations of building a globe. During this time I wanted to see what I was shooting as well as start archiving my previously reels. This set me to find alternatives to my telecine plan. I learnt that the UOW library had a Steenbeck and I arranged to use it. Another simple cheap alternative to scanning is using a digital camera to shoot off the screen of a Steenbeck. Using a Steenbeck also has the advantage that the flat bed machine is gentler on the neg. The process is to dim any overhead lights to limit reflection on the monitor and line up the shutter of the digital camera mounted on a tripod so as to reduce flicker as much as possible. The results were good enough for me to make digital copies that helped me document my process and start an archive excel sheet were I noted which camera, film content, development process and so on. COVID made this a difficult solution after more restrictions came in. I was lucky enough to buy a Steenbeck and install it at Hope Studios on campus. This was good for a time (although not ideal as the studio is very bright - good for painters not for screens) but once again COVID has meant greater restrictions and I now can’t go to campus.
Eventually between restrictions in 2020 I picked up the Eiki (thanks Glenn!) and since I had the Steenbeck solution I didn’t end up using it (sorry about that Glenn!). When the news came that campus would be closed I made a dash to the studio to pickup the Eiki projector (thanks again Glenn!). Since then I have been testing out the results, which are thus:
1. Hard to reduce flicker (produced by the projector shutter)
2. Hard to reduce strobing lines (LED lights turn on and off very fast)
3. Hard to get my macro lens close enough to the film gate to get the best resolution possible.
4. My camera being only HD is not quite up to the task to compensate for the above
5. 16mm projectors are not kind to film neg because they run at least 18fps.
The solution to the above is to buy a 4K camera and a lens adapter for my macro lens and disable the LED globe in such a way that it doesn’t turn on and off or build a DIY telecine from spare parts of a film gate, an Arduino motor controller and my current camera (it can shoot over 20 MB per still frame). I am tempted to go the Ardunio root but know this will be another slow process but perhaps worth it to have my own scanner.
Chasing DIY analogue to digital solutions have got me thinking about other themes for working with analogue in the current digital age:
1. Analogue film processes rely on the kindness of specialised technicians
2. This is a good time to find cheap (comparatively speaking) solutions for digital processes
3. Open source software and hardware is key to supporting and developing artist processes
4. Hacking or repairing what is available and building knowledge about what goes on inside machines has always been part of film makers tool/skill set.
0 notes
Text
Corel Draw 2019 Full Espanol Crack Mega

Corel Draw 2019 Full Espanol Crack Mega Bloks
Corel Draw 2019 Full Espanol Crack Megaman
Free Download CorelDraw 2019 Full Version is an image processing application developed by Corel. This application is quite popular for people who are wanted to create illustrations, vector images, and website design. Every year, the developer updates its product version by improving the performance and adding many useful features. In CorelDRAW 2019 for Windows 10, features were get enhanced greatly, such as Objects Docker, Pixel Overflow, PDF / X Standards, and much more.
Adobe flash player mac os x. Since Adobe will no longer be supporting Flash Player after December 31, 2020 and Adobe will block Flash content from running in Flash Player beginning January 12, 2021, Adobe strongly recommends all users immediately uninstall Flash Player to help protect their systems. Adobe will end support of Flash Player on December 31, 2020. Here's what you can expect in the meantime for each Microsoft browser: In the next version of Microsoft Edge (built on Chromium), Flash will be disabled by default. However, users may re-enable it on a site-by-site basis. The timeline for Chromium-based browsers can be found here. It is true that BBC iPlayer used to be a Flash Player based media too. However, shortly. It is common to come across the Adboe flash files. SWF is the file format for Adobe Flash files, which is a common macro media format now owned by Adobe and is used by many people to deliver multimedia files across the web, safely. To view.swf files on Mac, you will need SWF players. Adobe Flash Player plugin is exclusively available on Safari browser on your Mac, which can enable you to play SWF files. This is easy and straightforward to do. In a few simple steps, you can get yourself playing SWF files online with your Adobe Flash Player Plugin. Step 1: Run Safari browser on your Mac and go to the Preferences menu.
Update New Version :CorelDRAW 2020 Full Crack
One of CorelDRAW’s best options is a restrained evolution for many best tools. A worthy alternative software to Adobe’s design and any other drawing application, with a small learning curve for switchers. What’s more is, the native Mac also release, just like a welcome bonus. CorelDraw has been trusted by many people even professionals that working on vector images and design. For users of older versions of CorelDraw, you can also upgrade your version with the latest version 2019 which has improved performance and features. You can download it here for free with the full version without using any crack. Do you want to try using this vector graphics illustration software? Download CorelDRAW Graphics Suite 2019 full version for free.
MacOS Big Sur elevates the most advanced desktop operating system in the world to a new level of power and beauty. Experience Mac to the fullest with a refined new design. Enjoy the biggest Safari update ever. Discover new features for Maps and Messages. Hots mac os.
CorelDRAW 2020 unveils its fastest, smartest, and most collaborative graphics suite yet. With suites for macOS and Windows, plus CorelDRAW.app, the CorelDRAW 2020 software lineup delivers the power.
CorelDRAW 2019 free. download full Version PC 64 Bit. Free Download CorelDraw 2019 Full Version is an image processing application developed by Corel.This application is quite popular for people who.
What’s New in Corel DRAW Graphics Suite X6? Improved support for Open Type. Expanded opportunities to work with color. New tools for creating vector images. Enhanced page layout tool. Redesigned preferences pane object. Improved support for multicore processors and works as a “native” 64-bit application.
CorelDraw Graphics Suite 2019 Windows Features
Improvement on Objects Docker
Enhanced Pixel Overflow
Enhanced performance and stability
Templates workspace
All coreldraw tools + new tools
Many file compatibility
Enhanced PDF/X Standards
Comfortable interface
Import & Export with ease
And many full version features
How to Install CorelDraw Graphics Suite 2019 For PC
Download CorelDraw 2019 full crack for windows 64 bit
Turn off internet and antivirus connections
Extract files with the latest Winrar
Open and Edit the Windows hosts file
Add the following code to the hosts file 0.0.0.0 apps.corel.com 0.0.0.0 mc.corel.com 0.0.0.0 origin-mc.corel.com 0.0.0.0 iws.corel.com
Block the application with Firewall App Blocker to avoid blacklist
Pre-activated! no need for crack, serial or patch
Also Download :CorelDraw Graphics Suite X7 Full Version
Download CorelDRAW 2019 Full Version Windows 64 Bit. Free Download CorelDRAW Graphics Suite 2019 Full Version Windows 10 PC – kalian harus mencoba design gambar vector dengan.
Download CorelDRAW 2019 Full Version
Link Download | Google Drive | FileUpload
File Size : 680 MB | Password : www.yasir252.com

CorelDRAW Graphics Suite 2020 is the newest version available
Corel 2019 crack. We released CorelDRAW Graphics Suite 2019 in March 2019. With the goal to maximize productivity and speed up workflows, many of the traditional features were revamped to bring them up to date with modern systems, and new features were introduced.

Among these new features were non-destructive effects. This made it easy for designers to apply and modify bitmap effects on vectors and bitmap images. Adjustments could be made quickly and without ever altering the source image, making CorelDRAW 2019 an excellent software for easy, stress-free experimentation.
The template workflow was redesigned with productivity in mind. The New From Template tool became easier to navigate, and the range of templates itself was refreshed. Users could download more templates easily for free, letting designers jump straight into new projects and hit the ground running.
Another significant upgrade to CorelDRAW’s Graphics Suite was the introduction of CorelDRAW.app. This took the design community into the cloud world, letting users create new designs and access existing files on the move. Support for CDR, PDF, PNG, JPEG, and SVG formats meant that designers could hit the road and access and share files from any system at any time, making for a truly flexible workflow.
Corel Draw 2019 Full Espanol Crack Mega Bloks
Many of the other, pre-existing features were upgraded and enhanced to work fluidly and seamlessly with each other. These included a bigger variety of ISO-compliant PDF/X export options and support for PDF/X-4, a new and improved user interface, the Align to Pixel Grid button allowing for pixel-perfect creations, and an improved Object Docker allowing for fast access to frequently used objects.
CorelDRAW Graphics Suite 2019 system requirements:
Corel Draw 2019 Full Espanol Crack Megaman
Windows 10*, 8.1 or Windows 7 (32-bit or 64-bit)
Intel Core i3/5/7 or AMD Athlon 64
2 GB RAM
2.5 GB hard disk space
Multi-touch screen, mouse or tablet
1280 x 720 screen resolution at 100% (96 dpi)
Microsoft Internet Explorer 11 or higher
Microsoft .NET Framework 4.7
0 notes