#DistinguishedName
Explore tagged Tumblr posts
Visit Tumblr Blog
Explore Tumblr blogs with no restrictions, modern design and the best experience.
Last Seen Tumblr Blogs


Fun Fact
Average visit duration of Tumblr.com is 10 mins and 25 secs.
Link
#linux#ldap#dn#DistinguishedName#server#authentication#openldap#informationtechnology#itupdates#ad#active directory
0 notes
Text
POWERSHELL: Lister les groupes d'un utilisateur Office365
BonjourCe script permet d’afficher tout les $User = read-host “Quel est le nom de l’utilisateur que vous souhaitez, fournissez le distinguishedName active directory” ? Import-module ActiveDirectory function getAdGroupMembership ($user) {$groups = @(Get-ADPrincipalGroupMembership -Identity $user | select -ExpandProperty distinguishedname)$groupsif ($groups.count -gt 0) {foreach ($group in…
View On WordPress
1 note
·
View note
Text
Cách đổi tên user trong Active Directory
Bạn có thể đổi tên tài khoản người dùng trong Active Directory theo một số cách khác nhau. Ví dụ như sử dụng giao diện đồ họa của AD hoặc lệnh PowerShell.
Cách đổi tên Domain User sử dụng Active Directory
Cách đơn giản nhất để đổi tên người dùng AD là sử dụng Active Directory Users and Computers (ADUC). - Mở bảng ADUC bằng cách chạy lệnh dsa.msc trong CMD; - Tích chọn tùy chọn sau trong menu: View > Advanced Features; - Dùng Active Directory tìm user bạn muốn đổi tên; - Mở bảng user properties rồi nhấn vào tab Object. Tên đầy đủ của người dùng được hiển thị trong trường Canonical name of object. Đây là tên được hiển thị trong bảng điều khiển ADUC và các công cụ Windows và AD khác;

- Để đổi tên user, bạn nhấn phải chuột vào tên người dùng rồi chọn Rename;

- Trong cửa sổ mở ra, bạn có thể thay đổi Full Name (Tên chính tắc của đối tượng), First name, Last name, Display Name, cũng như các thuộc tính userPrincipalName và userlogonname (samAccountName / pre-Windows 2000); - Nhập tên người dùng bạn muốn đổi và nhấn Ok để áp dụng.

Bạn cũng có thể đổi tên người dùng bằng cách chỉnh sửa thủ công các thuộc tính thích hợp trong tab Attribute Editor trong cửa sổ properties của người dùng.

Cách đổi tên User bằng PowerShell?
Bạn có thể sử dụng lệnh trong PowerShell để đổi tên người dùng trong AD. Các lệnh cơ bản là Rename-ADObject và Set-ADUser. - Rename-ADObject — cho phép bạn thay đổi giá trị của các thuộc tính: cn, DifferentName, name; - Set-ADUser — cho phép bạn thay đổi samAccountName, UPN, given name, surname và other names của người dùng. Nếu bạn muốn đổi tên người dùng sử dụng Rename-ADObject, bạn phải chỉ định DistinguishedName của nó. Ví dụ: Rename-ADObject –identity “CN=Nguyen Van A,OU=Office,OU=User,OU=Sales,DC=blogcntt,DC=com” -NewName "Nguyen Van A" Mẹo: Bạn có thể thêm tham số whatIf vào một lệnh để lấy thông tin về hoạt động mà lệnh đó sẽ thực hiện. Để làm cho lệnh dễ dàng hơn, bạn có thể lấy thông tin của người dùng theo tên hoặc samAccountName bằng lệnh Get-ADUser: Get-Aduser a.nv | Rename-ADObject -NewName "b.nv" Liệt kê các thuộc tính có sẵn và giá trị của chúng: Get-ADUser "Nguyen Van A" | fl *name*

Bạn có thể thay đổi những cài đặt người dùng khác bằng lệnh Set-ADUser. Ví dụ: Get-ADUser b.nv | Set-ADUser –displayname “Nguyen Van B” –SamAccountName b.nv –Surname “B”

Bạn có thể sử dụng lệnh dsmove.exe để đổi tên người dùng. Cú pháp này được sử dụng: dsmove "" -newname "" Ví dụ, Đổi tên của "Nguyễn Van A" thành "Nguyen Van B": dsmove.exe "CN=Nguyen Van A,CN=Office,DC=Users,DC=Sales" -NewName "Nguyen Van B" Read the full article
0 notes
Text
Disable-Inactive-ADAccounts - Active Directory users PS script

In this post we'll talk about Disable-Inactive-ADAccounts, a small yet useful Powershell script that can be used by System Administrators to perform the following tasks: Disable all the Active Directory user accounts inactive for more than X days Delete all the Active Directory user accounts prevously disabled more than Y days ago. The two above tasks can be run independently using the provided command-line switches.
Why should we do that?
As a matter of fact, being able to automatically disable AD accounts after X days of inactivity is a good security practice. If you don't have such process up, your Active Directory could grant "permanent" access to many user accounts that should no longer be active, such as those of ex-employees or collaborators who are no longer active at your company. Unfortunately, such feature is not (yet) supported by any version of Windows or Windows Server, at least up to Windows 10 and Windows Server 2019. That's why we ended up to develop this Powershell script.
Usage
To disable all AD users that has been inactive for 180 days or more (without deleting them): > powershell .\Disable-Invalid-ADAccounts.ps1 -days 180 Same thing as before, plus creating a logFile.csv file containing a list of all disabled users: > powershell .\Disable-Invalid-ADAccounts.ps1 -days 180 To disable all AD users that has been inactive for 180 days or more and also delete those that have been previously disabled more than 180 days ago. > powershell .\Disable-Invalid-ADAccounts.ps1 -days 180 -deleteDays 180 Same thing as before, plus creating a logFile.csv file containing a list of all disabled users and a deleteLogFile.csv file containing a list of all deleted users: > powershell .\Disable-Invalid-ADAccounts.ps1 -days 180
The Code
Here's the full script source code: param( $days = 180, # -deleteDays : delete all previously disabled users since X days or more. # If set to -1, it won't delete anything. Default is -1. $deleteDays = -1, # -logFile : if set to a valid PATH, it will output a CSV files containing the disabled users. # If set to null (default) it won't create a logFile. $logFile = $null, # -deleteLogFile : if set to a valid PATH, it will output a CSV files containing the deleted users. # If set to null (default) it won't create a logFile. $deleteLogFile = $null ) #Search all inactive accounts $ts = (Get-Date).AddDays(-$days) # (Search-ADAccount -UsersOnly -AccountInactive -TimeSpan $ts.Day | Select-Object DistinguishedName).count # Search-ADAccount -UsersOnly -AccountInactive -TimeSpan $ts.Day | Select-Object DistinguishedName,sAMAccountName # $users = {(Search-ADAccount -UsersOnly -AccountInactive | ? { $_.LastLogonDate -lt (get-date).AddDays(-$days)}) | Select-Object DistinguishedName,sAMAccountName,Enabled } $users = Search-ADAccount -UsersOnly -AccountInactive -TimeSpan $ts.Day | Select-Object DistinguishedName,sAMAccountName, Enabled Write-Host "$($users.Count)" # Adding the time of account disabled in the extentionAttribute10 for all accounts. # This will help while deleting the accounts if parameter is set. $t = ((Get-Date).Datetime) $disabled = 0; $alreadyDisabled = 0; $deleted = 0; # Disable the inactive accounts found if ($days -gt -1) { Foreach ($user in $users) { If ($user.Enabled) { $disabled++ Set-ADUser $user.DistinguishedName -add @{extensionAttribute10="$t"} Disable-ADAccount -Identity $user.DistinguishedName } Else { $alreadyDisabled++ } } # Export the disabled accounts If ($logFile) { $users | Export-Csv "$logFile" } } # if $deleteDays is set, delete the already-disabled accounts found If ($deleteDays -gt -1) { $tsD = (Get-Date).AddDays(-$deleteDays) $usersD = Get-ADUser -Filter {enabled -eq $false} -Properties * | Where-Object{"extensionAttribute10" -in $_.PSobject.Properties.Name} | Where-Object{$tsD -ge $_.extensionAttribute10} Foreach($user in $usersD) { $deleted++ Remove-ADUser $user } # Export the deleted accounts If ($deletedLogFile) { $usersD | Export-Csv "$deletedLogFile" } } Write-Host "" Write-Host "Operation complete:" If ($days -gt -1) { Write-Host " - $($disabled) accounts has been disabled ($($alreadyDisabled) already disabled)." If ($logFile) { Write-Host " Disabled accounts logged to $($logFile) file." } } If ($deleteDays -gt -1) { Write-Host " - $($deleted) accounts has been deleted." If ($deleteLogFile) { Write-Host " Deleted accounts logged to $($deleteLogFile) file." } } As you can see there are a lot of in-line comments, thus making the above code quite self-explanatory: however, if you got questions, feel free to ask anything using the comments section below this post.
Conclusion
That's about it: if you like this script, don't forget to give us a virtual hug by putting a like on our Facebok or Twitter pages! Read the full article
0 notes
Text
PowerShell Enable Active Directory Recycle Bin

PowerShell Enable Active Directory Recycle Bin, work in Windows Server 2012/2012R2/2016/2019. 1. Enabling Recycle Bin (Windows Server 2008 R2): To enable recycle bin: Open Powershell on the PDC (Primary Domain Controller). NOTE: To confirm which server is the primary DC, run the below command: Get-ADForest | fl Make sure that the server you are using is the SchemaMaster or else the command will not work. Check that the ForestMode shows up as Windows2008R2Forest. If not, run Import-Module ActiveDirectory, then run following command: Set-ADForestMode –Identity -ForestMode Windows2008R2Forest enable it using Active Directory Domains and Trusts by right-clicking on the top level item and selecting Raise forest functional level. Please note that this option needs replication if one or more DCs exist, therefore running the PowerShell command yields faster results.Once enabled run the following command in PowerShell: Enable-ADOptionalFeature –Identity ‘CN=Recycle Bin Feature,CN=Optional Features,CN=Directory Service,CN=Windows NT,CN=Services,CN=Configuration,DC=domain’ –Scope ForestOrConfigurationSet –Target ‘ ’ By default, the deleted object lifetime and tombstone lifetime in AD are set to 60 days. If this is not enough, you can modify the value by running the below commands (below example sets them to 1 year): Set-ADObject -Identity “CN=Directory Service,CN=Windows NT,CN=Services,CN=Configuration,DC=domain” –Partition “CN=Configuration,DC=contoso,DC=com” –Replace:@{“tombstoneLifetime” = 365} Set-ADObject -Identity “CN=Directory Service,CN=Windows NT,CN=Services,CN=Configuration,DC=domain” –Partition “CN=Configuration,DC=domain” –Replace:@{“msDS-DeletedObjectLifetime” = 365} 2. How to restore an object (Windows Server 2008/2008R2): First, search for the object using one of the following commands using PowerShell. Don't forget to run the command: Import-Module ActiveDirectory Search for all objects: get-adobject -filter ‘IsDeleted -eq $True’ -IncludeDeletedObjects -properties IsDeleted,LastKnownParent | Format-List Name,IsDeleted,LastKnownParent,DistinguishedName Search for a particular user: Get-ADObject -Filter {displayName -eq "Name"} -IncludeDeletedObjects (where Name is the display name of the user) Once the user or object is found, restore it using the following command: Get-ADObject -Filter {displayName -eq "Name"} -IncludeDeletedObjects | Restore-ADObject This will restore it to its last OU location 3. Enabling Recycle Bin (Windows Server 2012/2012R2/2016/2019) In this versions enabled by default. Confirm that the forest functional level is at least Windows2008R2. Once completed: Open Active Directory Administrative Center Right-click on the domain name and select Enable Active Directory Recycle Bin Being that this option changes the collection structure for AD, a prompt will show that this action is irreversible. Press Ok Wait for the change to apply Done 4. How to restore an object (Windows Server 2012/2012R2/2016/2019): To restore an object: Open Active Directory Administrative Center;Click on the domain name folder and open the Deleted Objects folder from the list;Find the object and select Restore. This will automatically restore it to the location from where the object was deleted;To restore the object in another folder or OU, select Restore To;Done Read the full article
0 notes
Text
Audio Technica M50x Testimonial Techgearph
ASSOCIATE DISCLAIMER: TechGearPH is a Lazada Philippines affiliate. It indicates that we might make commission by any of the following:
If you get thru any one of our product web links inside our articles.If you use the
Lazada http://www.thefreedictionary.com/new tech gear seach button on this web site to seach and get any type of products.If you use this LINK http:/
/ ho. lazada. com. ph / SHZi2V to lookand alsobuy any products.Audio Technica has actually been a distinguishedname https://en.search.wordpress.com/?src=organic&q=new tech gear in the music industry for a long time. They have beencreating top-notch audioperipherals which cater various requirements ranging from turntables, earphones, earbuds, in-ear display earphones
, the checklist goes http://www.computerworld-digital.com/7-of-the-best-binoculars-for-hunting-for-2019/ on. They also offer affordable items and also actually high-end ones. That product that might have put them in the international radar is the M50X.Upon purchasing myself one, I was actually surprised on how big the box is. I can not blame them, there are a lot of stuff inside. It includes the headphone itself, one coiled 1.2 m cable, one coiled long cable, one uncoiled lengthy cable, one adapter, a natural leather lugging bag, and
the manual.I checked it on various tracks and also right here are my observations: (Resource: Samsung J7 2016, Spotify Premium Extreme Top Quality)EXID-- Every Night( Slow Kpop, Oriental Ballad)It highlights as well as showcases the different vocalists'voices and also ranges. Harmonization is really great between the tools
and also various vocals. The bass is detailed. Appears crisp and clear with some clearness and also emphasis on greater notes as well as registers.Mamamoo-- I Miss You(Sluggish
KPop, Oriental Ballad)Same as over since they are both
women girl teams. Well-handled bass. It appears detailed and balanced, rich and also all-natural. It does not have soundstage really slightly.Chicosci-- Taking Kisses (OPM, Hard Rock )It is still thorough in spite of with hefty tools. It is not messy.
You can differentiate every instrument to the pedals. Can plainly listen to the slight laughing after the very first chorus.Snakeships, Tinashe, Possibility the Rapper -All My Pals Sub-bass is not http://www.computerworld-digital.com/7-of-the-best-biometric-door-locks-in-2019/ boomy which is a plus since it is a sluggish track.
Women vocals is robust. On the whole

, the audio quality is outstanding. It appears neutral as well as in-depth and also it is enjoyable to use to whatever category. The focus as well as boosting on the various aspects never ever made it appear artificial. The bass is punchy when required. When I use it outdoors, I observed that the bass have actually reduced. The treble is all-natural and not metal. The highs are not puncturing so it would be appreciated http://www.computerworld-digital.com/7-of-the-best-bluetooth-headphones-in-2019/ hightly, it is
crisp as well as clear. Mids are not recessed. I could yearn for even more thorough soundstage but it is not that poor. It may appear flat but it is enjoyable appearing at the exact same. I could confidently state that it gets on the same level with some pricier earphones in the market.It is also flexible since you don't need an amplifier to enhance the audio, contrasted to various other earphones with higher insusceptibility. A smartphone is simply enough to highlight its ideal. It can likewise be utilized in enjoying flicks for border noise and also in pc gaming in tracking of footsteps or whatsoever.Personally, I would certainly alter the paddings yet 7 of The Best Bluetooth Stereo Earbuds in 2019 I think its just me. It looks very hefty and also fatiguing to use in the beginning look, however after using it in extensive amount of times you will not see it in any way.
youtube
The securing is awkward to some but for me it is simply fine.Why pick this up over its older brother, the M50? There is very little of a difference truly yet I enjoy the detachable cord and the adaptability to use a bluetooth receiver. It likewise is extra recent. I myself remain in shock to uncover that the M50x is first of all presented years ago. It ought to be unnecessary currently, yet hey, it is still used as a referral factor and day-to-day drivers of a lot of music lovers so great work Sound Technica for making such a fantastic product that has actually not been eclipsed by current releases for a long period of time.
You would certainly acquire this one as well as not recall for a very long https://www.washingtonpost.com/newssearch/?query=new tech gear time.I rate this work of art a 9.5/ 10.
0 notes
Text
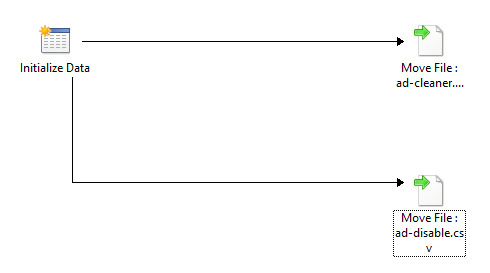
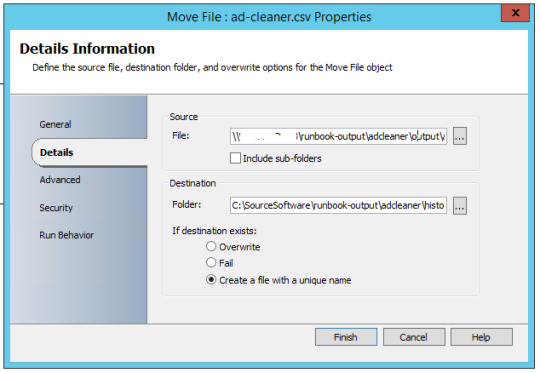
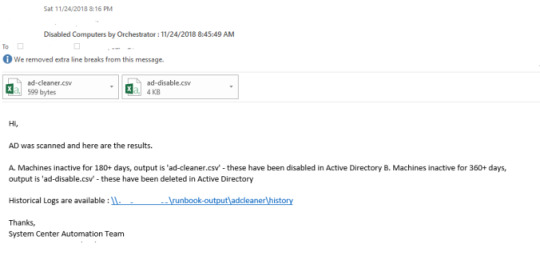
SCORCH : Active Directory Cleanup with Orchestrator
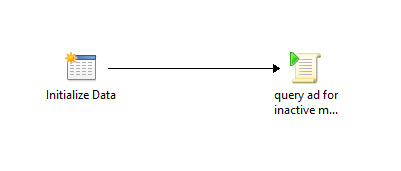
Active Directory Cleanup Runbook Automation

6 runbooks – 5 are functional workbooks and 1st runbook calls the rest in sequence.
Download the Powershell Scripts – ad cleanup runbook ps
Runbook 1 – AD Cleanup
The Master Runbook – which triggers every 7 days 16 hours – call the 5 runbooks and they a ‘wait for completion’ before starting the next runbook.


Runbook 2 – Scan and Dump List
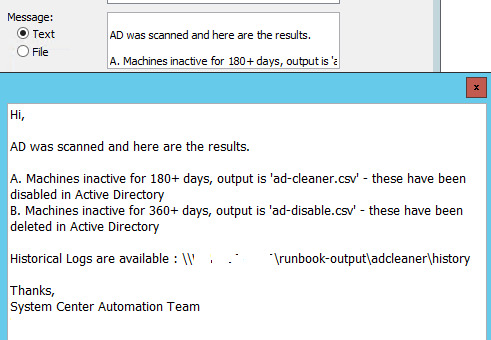
Powershell script which scans Active Directory [admin rights not required], check machines which are inactive for 180 days and machine should not be disabled – Operating System = WinXP, Win7 or Win10.

C:\windows\System32\WindowsPowerShell\v1.0\powershell.exe {import-module activedirectory
$DaysInactive = 180
$time = (Get-Date).Adddays(-($DaysInactive))
$result=@()
$result2=@()
#————————————————————————————————————————–
Get-ADComputer -Filter {(Modified -lt $time) -and (useraccountcontrol -ne “4098”)} -Properties * |
select Name,OperatingSystem | foreach {if (($_.OperatingSystem -like “Windows 7*”) -or($_.OperatingSystem -like “Windows 10*”) -or ($_.OperatingSystem -like “Windows 8*”) -or ($_.OperatingSystem -like “Windows xp*”)) {$result+=$_.Name}}
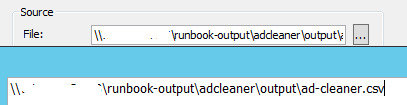
$result | set-content C:\SourceSoftware\runbook-output\adcleaner\output\ad-cleaner.csv}
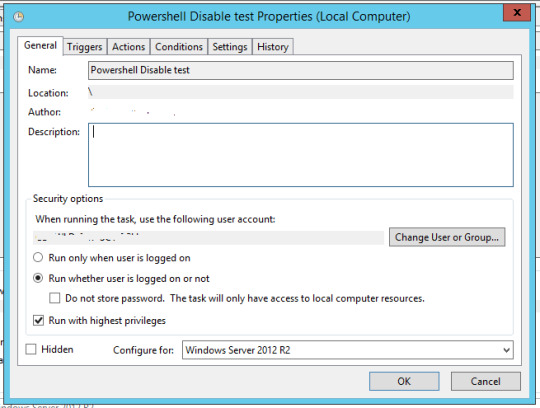
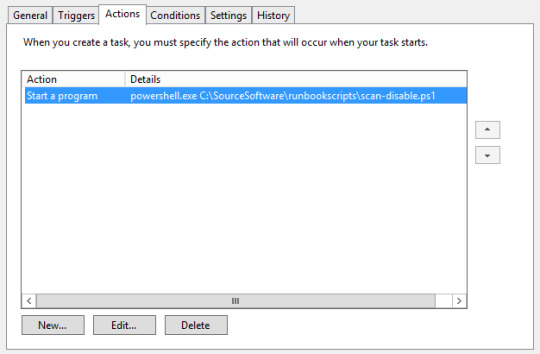
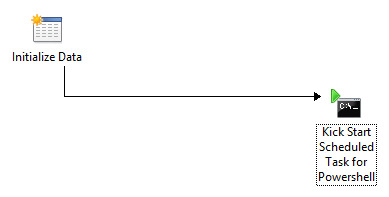
Runbook 3 – Scan and Disable Scheduled Task
Powershell script to Disable machines in AD [requires Admin rights] found in earlier Runbook


#Setting search parameters and creating array
import-module activedirectory
$DaysInactive = 180
$time = (Get-Date).Adddays(-($DaysInactive))
$result=@()
#————————————————————————————————————————–
#Searching for computers that fit the parameters
Get-ADComputer -Filter {(LastLogonDate -lt $time) -and (Enabled -eq “True”)} -Properties * -ErrorAction SilentlyContinue |
select Name,OperatingSystem,comment,CN,LastLogonDate,DistinguishedName | foreach {if (($_.OperatingSystem -like “Windows 7*”) -or($_.OperatingSystem -like “Windows 10*”) -or ($_.OperatingSystem -like “Windows 8*”) -or ($_.OperatingSystem -like “Windows xp*”)) {$result+=$_}}
#Disabling computers
#$result|Foreach-Object {Disable-ADAccount -Identity $_.DistinguishedName -recursive -ErrorAction SilentlyContinue}
foreach ($_ in $result)
{If ($_ -ne $Null)
{Disable-AdAccount -Identity $_.DistinguishedName}}
#————————————————————————————————-
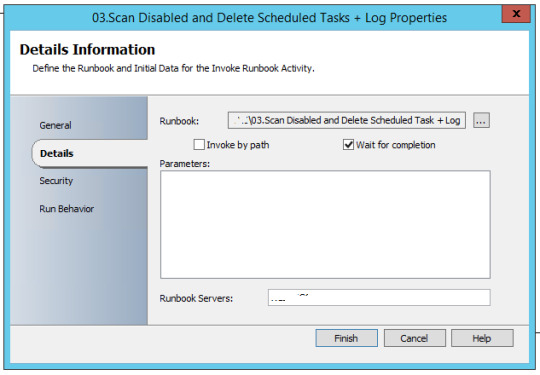
Runbook 4 – Scan Disabled and Delete Scheduled Task + Log
Powershell Script to scan for machines inactive for 360 days and disabled, then delete them [required AD Admin rights]


#Setting search parameters and creating array
import-module activedirectory
$DaysInactive = 360
$time = (Get-Date).Adddays(-($DaysInactive))
$result=@()
#Searching for computers that fit the parameters
#————————————————————————————————————————–
Get-ADComputer -Filter {(LastLogonDate -lt $time) -and (Enabled -eq “False”)} -Properties * -ErrorAction SilentlyContinue |
select Name,OperatingSystem,comment,DistinguishedName | foreach {if (($_.OperatingSystem -like “Windows 7*”) -or($_.OperatingSystem -like “Windows 10*”) -or ($_.OperatingSystem -like “Windows 8*”) -or ($_.OperatingSystem -like “Windows xp*”)) {$result+=$_}}
#Write Output to Log
#————————————————————————————————————————–
$result | set-content \\SERVER01\runbook-output\adcleaner\output\ad-disable.csv
#————————————————————————————————————————–
#Delete Function
#————————————————————————————————————————–
foreach ($_ in $result)
{If ($_ -ne $Null)
{Remove-ADObject -Identity $_.DistinguishedName -recursive -Confirm:$false}}
#————————————————————————————————————————–
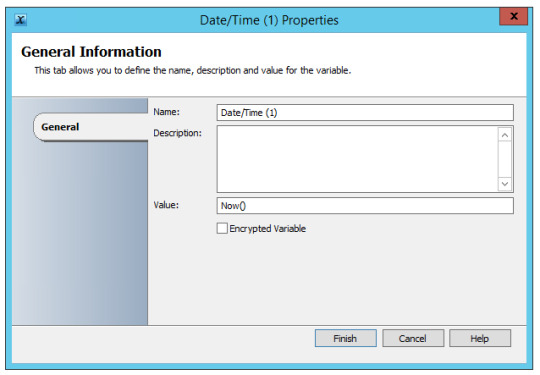
Runbook 5 – Mail Routine
Send mail with output files to recipients, with subject of today’s date
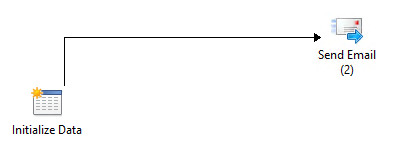


The Subject of the mail would be appended with current date and time


Runbook 6 – Logging Routine
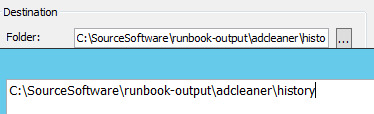
Moving current logs to history folders and appending with date of file transfer in name.


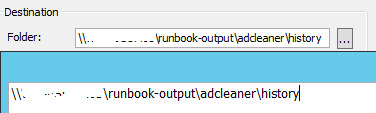

sample automated email
from WordPress http://bit.ly/2Hpa6tj via IFTTT
0 notes
Text
Retrieve Active Directory subnets with PowerShell
To create a list of all subnets belonging to an AD site requires a lot of manual work, especially as the environment gets larger. However, there is of course another way to retrieve Active Directory subnets with PowerShell. Contents1 Customer scenario2 Retrieving subnets with PowerShell2.1 Find...
Read the full Article http://activedirectoryfaq.com/2017/06/active-directory-subnets-powershell/
#ActiveDirectorySite, #DistinguishedName, #Powershell, #Subnets
1 note
·
View note
Text
Tech Toolbox #2: Default Permissions
Recently I created this PowerShell script to go through all domain accounts in a given group and edit the calendar permissions.
It’s a simple script and can be found on my GitHub account.
Script
# Add's Exchange Management Module
Add-PSSnapin Microsoft.Exchange.Management.PowerShell.SnapIn
# Gets all AD Accounts in the group SG-ALL-USERS
Get-ADGroupMember -Identity "SG-ALL-USERS" | ForEach-Object {
# Takes one and stores it in the variable $mb
$mb = Get-Mailbox -Identity $_.distinguishedName
# Sets the permission for Calendar on the account Default (Everyone) as Reviewer rights
set-MailboxFolderPermission -Identity "${mb}:\Calendar" -User Default -AccessRights Reviewer
# Repeats for all users in group
}
0 notes
Text
драйвер для электронной книги digma t700
драйвер для электронной книги digma t700
———————————————————
>>> Получить файл <<<
——————————————————— Все ок! Администрация рекомендует ———————————————————
Здесь два варианта, либо отображаемые данные не удалены с диска, либо телевизор запомнил содержимое дисков и, по какой-то причине, не может очистить свой 676 кеш 687 <> Попробуйте сбросить настройки телевизора на заводские. ## Толковый Словарь Компьютерных Терминов (ТСКТ) / Весь словарь Совет: если вы решили купить накопитель для телевизора, убедитесь, что у него есть необходимый Y-кабель, а телевизор имеет 7 USB разъема. ### Іиблиотека РЎР‚Р В°Р Т‘Р С Заработает или нет, выяснить можно только после подключения. Народ жалуется на диски больше 6ТБ, но все зависит от телевизора. #### Автоматизация учета, системы автоматизации учета, кассовые В случае возникновения проблем с установкой Windows обращайтесь за помощью в одну из тем форума: Решение проблем с установкой Windows XP на ноутбук , Решение проблем с установкой Windows Vista , Решение проблем с установкой Windows 7 , Установка и настройка Windows 8 или Windows - Установка и настройка. Здравствуйте, у меня Телевизор LG 97LM766T, когда я воспроизвожу фильм с внешнего жесткого диска, он начинает зависать, останавливается на каком-нибудь момент�� и все.. Пульт перестает слушаться пока не вытащишь жесткий диск. С чем это может быть связанно? Переполнен жесткий диск или вирусы на нем??? Подскажите пожалуйста, как решить проблему? Заранее спасибо. Добрый день.<> Имеется тв-приставка Ориел 798 и внешний HDD WD Elements Portable WDBUZG5555ABK-EESN 555Гб. HDD по характеристикам поддерживает USB и USB . В комплекте с HDD кабель без . При подключению к ПК HDD работает корректно. При подключении HDD к приставке индикация работы и вращение шпинделя есть. Однако, приставка не видит диск. USB приставки по паспорту выдает 555 мА. Жесткому диску недостаточно питания для корректной работы с приставкой? Добрый день, скажите пожалуйста, не опасно ли для телевизора подключение жесткого диска через USB без всяких дополнительных устройств, а просто по соединительному кабелю? Телевизор SONY новый, ЖД на 555 Гб. Нашла в интернете предупреждение о возможной поломке телевизора. Имя сервера = адрес DC.<> База поиска копируем в AD из свойств OU, где хранятся учетки пользователей, параметр distinguishedName.<> Аутентификация незашифрованный текст (Cleartext Authentication).<> Логин обычный пользователь. Всем добрый вечер.<> Столкнулся с проблемой на Transcend 555gb. После очередного извлечения из тв девайс перестал запускаться на пк. В диспетчере устройств он виден как StoreJet Transcend USB Device, но как диск не определяется в 676 моем компьютере 687 . Безопасное извлечение только можно сделать, там он тоже называется как StoreJet Transcend. Диску лет 5, первый раз проблема и такая вот буду рад помощи. Удалил скопированный ранее(с диска D) файл c жд и вроде все зароботало. Тем более этот файл создавался три года назад и был битый, думал пригодится для восстановления
0 notes
Text
драйвер для сетевого подключения windows 7
драйвер для сетевого подключения windows 7
———————————————————
>>> Получить файл <<<
——————————————————— Все ок! Администрация рекомендует ———————————————————
Я хочу (для сохранения скорости интернета от провайдера {для он-лайн игр}) подключить интернет к стац. ПК, а роутер D-Link-665 подключить к ПК (есть второй разъем) для обеспечения wi-fi. Как это сделать и не срежется скорость у роутера, по wifi? ## Обзор и тестирование беспроводного роутера Asus RT-AC55U с Решение этой проблемы весьма объемно. Посмотрите оригинал на сайте Microsoft ищите главу 676 Драйверы, которые не поддерживают службу настройки беспроводной связи 687 <> http:///kb/875757#5 ### Обжим витой пары и сетевого кабеля - как обжать витую пару Да все верно. Для вашей схемы все провода по схеме 676 Б 687 <> Схема 676 А 687 для соединения 7х ПК напрямую и вам не подходит. #### Windows 7 и HP LJ 1100 - [1] :: В помощь системному Здравствуйте. Имеется роутер для интернета по телефонной линии. А интернет кабельный. Существует ли переходник, как называется? Или роутер придётся выкинуть? Спасибо большое. Клавиша FN не показывает функцию wifi. ранее он имел сочетания FN+F7. на данный момент индикатор на корпусе горит, говоря о том, что wifi активен. в параметрах адаптеров показывает, что беспроводные сети отключены. вернемся к первому моему сообщению все выполнялось неоднократно. на моем ноутбуке переключателя wifi на корпусе отсутствует. Помогите!!! На ноуте win7 max на компе xp sp8. группа одна, адреса разные, маска есть. на 7 создана домашняя группа но сеть так и остается неопознанной, к тому же пишет чтоприсоединен но без доступа к сети. общие папки (открыл аж по диску) есть и все После переустановки ОС (Windows7 Profesional 69р) значительно уменьшился радиус приема сигнала wifi на ноутбуке (Packard Bell EN LS 66 HR). рядом с роутером (TP-Link)сигнал 655%, через метров 5 уже одна-две палочки сети. Драйвера установлены последние с офсайта. Сетевой адаптер Qualcomm Atheros AR5B97 Wireless Network Adapter. Остальные устройства работают норм с данным роутером. В чем может быть проблема? Как ее устранить? Имя сервера = адрес DC.<> База поиска копируем в AD из свойств OU, где хранятся учетки пользователей, параметр distinguishedName.<> Аутентификация незашифрованный текст (Cleartext Authentication).<> Логин обычный пользователь. Здравствуйте.<> в квартиру проведен кабель от провайдера, можете купить WiFi роутер (потребуется его настройка) лучший вариант.<> нет возможности в квартиру провести кабель провайдера, покупаете USB 8G или 9G модем и симку с тарифом Интернет, но оплата за услуги выхода в Интернет будет значительно выше.<> у соседей есть WiFi, договариваетесь с ними и за скромную плату, пользуетесь ихней сетью. Подскажите пожалуйста. Интернет подключен по 7 жильному телефонному кабелю, можно ли его как то приконектить к роутору у которого разьем только под 8 жильный кабель? До этого был роутор с разьемом под двухжильный. У старого разьем назывался DSL а у нового<> WAN. Заранее спасибо!!
0 notes
Text
Powershell Script to Disable AD User Account
Powershell Script to Disable AD User Account
Today I got a query on My Youtube Channel on How to create a Powershell script to Disable AD User Account. There are multiple ways to do it lets see How we can Disable AD User Account with Powershell. To disable Active Directory user account by user’s samAccountName and DistinguishedName, disable AD Users from specific OU, and disable Bulk AD users from CSV file using PowerShell script. You can…
View On WordPress
0 notes
Text
New Post has been published on o365info.com
New Post has been published on http://o365info.com/using-powershell-for-view-and-export-information-about-mailbox-migration-to-office-365-part-3-5/
Using PowerShell for view and export information about mailbox migration to Office 365 | Part 3#5
In the current article and the next article, we review the various PowerShell cmdlets that we can use for viewing and export information about the process of Exchange mailbox migration process.
The “mailbox migration” PowerShell commands that we review in this article are:
Get-MigrationBatch
Get-MoveRequest
Get-MoveRequestStatistics
Article Series table of content | Click to expand
Using PowerShell for view and export information about mailbox migration to Office 365 | Article Series
Mailbox migration to Office 365 the PowerShell migration entities | Part 1#5
Using PowerShell for view and export information about mailbox migration to Office 365 | Part 2#5
Using PowerShell for view and export information about mailbox migration to Office 365 | Part 3#5
Using PowerShell for view and export information about mailbox migration to Office 365 | Part 4#5
How to use the export mailbox migration information and troubleshooting PowerShell script | Part 5#5
1. Migration batches | Get-MigrationBatch
The term – “Migration Batch”, define an entity that serve as a “logical container”, that contain the mailboxes (and their associated users), that we migrate from the source Exchange server to the destination Exchange server (Exchange Online in our scenario).
Get information about specific migration batch
PowerShell command syntax
Get-MigrationBatch -Identity <Migration BATCH name>
PowerShell console output example
PS C:\> Get-MigrationBatch "Eyal Migration batch -001" |fl RunspaceId : 2771b392-d73b-4639-b63d-f4646c49c0af Identity : Eyal Migration batch -001 Status : Completed State : Completed Flags : None WorkflowStage : Processing TriggeredAction : None BatchGuid : fb2529fe-b9bf-446a-accd-3819e6bef03c TotalCount : 2 ActiveCount : 0 StoppedCount : 0 SyncedCount : 0 FinalizedCount : 2 FailedCount : 0 FailedInitialSyncCount : 0 FailedIncrementalSyncCount : 0 CompletedWithWarningCount : 0 PendingCount : 0 ProvisionedCount : 0 ValidationWarningCount : 0 ValidationWarnings : Message : CreationDateTime : 2/23/2017 10:41:09 AM CreationDateTimeUTC : 2/23/2017 8:41:09 AM StartDateTime : 2/23/2017 10:41:09 AM StartDateTimeUTC : 2/23/2017 8:41:09 AM InitialSyncDateTime : InitialSyncDateTimeUTC : InitialSyncDuration : LastSyncedDateTime : 2/23/2017 10:47:28 AM LastSyncedDateTimeUTC : 2/23/2017 8:47:28 AM FinalizedDateTime : FinalizedDateTimeUTC : SubmittedByUser : [email protected] OwnerId : EURPR05A001.prod.outlook.com/Microsoft Exchange Hosted Organizations/o365info2.onmicrosoft.com/Eyal OwnerExchangeObjectId : 7646f17d-bf1f-4e07-8698-4e71ab4dad80 NotificationEmails : [email protected] ExcludedFolders : MigrationType : ExchangeRemoteMove BatchDirection : Onboarding Locale : en-US Reports : When migration report was created:2/23/2017 9:19:17 AM; Migration report URL:https://outlook.office365.com/ecp/Migration/DownloadReport.aspx?HandlerClass= MigrationReportHandler&Name=MigrationReport.csv&DelegatedOrg=o365info2.onmicrosoft.com&realm=o365info2.onmicrosoft.com&exsvurl=1&Identity=RgAAAAAKqOiME1CMQ LkjirbMEluxBwCuLv0wEUQXTp3grhMeQsz8AAAh0Mi_AACuLv0wEUQXTp3grhMeQsz8AAN-JngxAAAJ; Error report URL: IsProvisioning : False BatchFlags : ReportInitial WorkflowControlFlags : None AutoRetryCount : 0 CurrentRetryCount : 0 AllowUnknownColumnsInCsv : False DiagnosticInfo : SupportedActions : Remove SourceEndpoint : mail.o365info.com TargetEndpoint : SourcePublicFolderDatabase : TargetDatabases : TargetArchiveDatabases : TargetDAGs : BadItemLimit : 10 LargeItemLimit : 0 MoveOptions : SkipMoving : SkipMerging : InternalFlags : PrimaryOnly : False ArchiveOnly : False TargetDeliveryDomain : o365info2.mail.onmicrosoft.com SkipSteps : None Workflow : Steps: [(Injection), (Processing)] WorkflowTemplate : Report : StartAfter : StartAfterUTC : CompleteAfter : CompleteAfterUTC : IsValid : True ObjectState : Unchanged
Export detailed information about specific migration batch | TXT file
Get-MigrationBatch -Identity migration-003 -IncludeReport -Diagnostic | Format-List | Out-File c:\temp\"Get-MigrationBatch-IncludeReport-Diagnostic.txt" -Encoding UTF8
Export detailed information about ALL migration batches
Export information to TXT file
Get-MigrationBatch -IncludeReport -Diagnostic | Format-List | Out-File c:\temp\"ALL Migration -Get-MigrationBatch-IncludeReport-Diagnostic.txt" -Encoding UTF8
Export information to XML file
Get-MigrationBatch -IncludeReport -Diagnostic | Export-Clixml c:\temp\"ALL Migration Get-MigrationBatch-IncludeReport-Diagnostic.xml" -Encoding UTF8
Migration batch status
Using the “Status” parameter, we can get information about existing migration batch that has a specific “Status”.
The migration batch type of “Statuses” value could be as follow:
Completed
CompletedWithErrors
Completing
Corrupted
Created
Failed
IncrementalSyncing
Removing
Starting
Stopped
Syncing
Stopping
Synced
SyncedwithErrors
Waiting
To view a migration batch with a specific status, we can use the following PowerShell syntax
Display all migration batch with status such as “Completed”
PowerShell command example
Get-MigrationBatch -Status Completed
PowerShell console output example
PS C:\> Get-MigrationBatch -Status Completed Identity Status Type TotalCount -------- ------ ---- ---------- Eyal Migration batch -001 Completed ExchangeRemoteMove 2 Eyal Migration batch -002 Completed ExchangeRemoteMove 2
Export information about all migration batch with the status “Not Completed” | TXT file
PowerShell command example
Get-MigrationBatch | Where $_.status -ne ”Completed” | Get-MoveRequestStatistics | Format-List | Out-File c:\temp\"Get-MigrationBatch Not Completed.txt" -Encoding UTF8
3. Move requests
The term – “Move request”, define the Exchange mailbox that we migrate from the “source Exchange server” to the “destination Exchange server”.
The two PowerShell cmdlets that we use for getting information about the move requests of the “mailbox entity” are:
Get-MoveRequest
Get-MoveRequestStatistics
2. Using the Get-MoveRequest command
The PowerShell command Get-MoveRequest, get a basic information about a property of a specific mailbox that we migrate.
Get information about specific Move Request
PowerShell command syntax
Get-MoveRequest < Move Request name>
PowerShell console output example
PS C:\> Get-MoveRequest [email protected] | Format-List RunspaceId : 2771b392-d73b-4639-b63d-f4646c49c0af ExchangeGuid : e3254cfe-81c0-496e-84db-80e9190342e5 SourceDatabase : TargetDatabase : EURPR05DG136-db018 SourceArchiveDatabase : TargetArchiveDatabase : Flags : CrossOrg, Pull RemoteHostName : mail.o365info.com BatchName : MigrationService:Eyal Migration batch -001 Status : Completed RequestStyle : CrossOrg Direction : Pull IsOffline : False Protect : False Suspend : False SuspendWhenReadyToComplete : False AdministrativeUnits : Alias : onpremmbx-01 ExtensionCustomAttribute1 : ExtensionCustomAttribute2 : ExtensionCustomAttribute3 : ExtensionCustomAttribute4 : ExtensionCustomAttribute5 : DisplayName : onpremmbx-01 ExternalDirectoryObjectId : c4d8af0e-69f2-4534-b79c-04ddaea7d074 LastExchangeChangedTime : RecipientType : UserMailbox RecipientTypeDetails : UserMailbox Identity : onpremmbx-01 IsValid : True ExchangeVersion : 0.20 (15.0.0.0) Name : onpremmbx-01 DistinguishedName : CN=onpremmbx-01,OU=o365info2.onmicrosoft.com,OU=Microsoft Exchange Hosted Organizations,DC=EURPR05A001,DC=prod,DC=outlook,DC=com Guid : 1e697c91-3a05-490d-a1d2-4434471cd1d9 OrganizationId : EURPR05A001.prod.outlook.com/Microsoft Exchange Hosted Organizations/o365info2.onmicrosoft.com - EURPR05A001.prod.outlook.com/ConfigurationUnits/o365info2.onmicrosoft.com/Configuration Id : onpremmbx-01 OriginatingServer : DB3PR05A001DC03.EURPR05A001.prod.outlook.com ObjectState : Changed
Export information about specific Move Request | TXT file
Get-MoveRequest [email protected] | Format-List | Out-File c:\temp\"Get-MoveRequest.txt" -Encoding UTF8
Get information about ALL existing Move mailbox requests
When we use the PowerShell, command Get-MoveRequest without relating to a specific move request, meaning, without specifying the identity of a specific move request, the PowerShell command will display information about ALL existing “Move Requests”.
General note – in case that you are performing mailbox migration that include tens or hundreds of mailboxes, the process of exporting information about each of these migrated mailboxes, could take a long time.
Export information about ALL Move Requests | TXT file
PowerShell command example
Get-MoveRequest | Format-List | Out-File c:\temp\"Get-MoveRequest.txt" -Encoding UTF8
Export information about MoveRequest with specific status
Each of the “move requests” could have a specific “status” such as – Completed ,Failed and so on.
The available status codes values are as follow:
AutoSuspended
Completed
CompletedWithWarning
CompletionInProgress
Failed
InProgress
None
Queued
In case that you want to get information only about specific status of “Move requests”, you can use the following PowerShell syntax:
Export information about ALL Move Requests which their status is not “completed” | TXT file
Get-MoveRequest | Where $_.status -ne ”Completed” | Get-MoveRequestStatistics | Format-List | Out-File c:\temp\"Get-MoveRequest- status is not completed.txt" -Encoding UTF8
Export information about ALL Move Requests which their status is – “Failed” | TXT file
PowerShell command example
Get-MoveRequest | Where $_.status -eq ”Failed” | Get-MoveRequestStatistics | Format-List | Out-File c:\temp\"Get-MoveRequest- status is Failed.txt" -Encoding UTF8
3. Using the MoveRequestStatistics command
The purpose of the PowerShell command Get-MoveRequestStatistics, is to get detailed information about the “migrated mailbox content”.
For example,
ItemsTransferred – information about the number of mail items, that was already transferred.
PercentComplete – as the name implies, information about the “Complete percentage” of the mailbox migration process.
Get move requests Statistics information for specific Move Request
PowerShell command syntax
Get-MoveRequestStatistics <Migrated mailbox>
PowerShell console output example
PS C:\> Get-MoveRequestStatistics [email protected] DisplayName StatusDetail TotalMailboxSize TotalArchiveSize PercentComplete ----------- ------------ ---------------- ---------------- --------------- onpremmbx-01 Completed 7.148 MB (7,495,583 bytes) 100
Export information about specific move requests Statistics | TXT file
Get-MoveRequestStatistics [email protected] | Format-List | Out-File c:\temp\"Get-MoveRequestStatistics.txt" -Encoding UTF8
If we want to eliminate unmercenary data and get a “clear view” of the mailbox migration Statistics, we can ask from PowerShell to display only specific data fields.
PowerShell command example
Get-MoveRequestStatistics [email protected] | Select MailboxIdentity,Status,WorkloadType,RecipientTypeDetails,SourceServer ,BatchName,TotalMailboxSize,TotalMailboxItemCount,TotalArchiveSize,BytesTransferred,BytesTransferredPerMinute,ItemsTransferred,PercentComplete | Format-List | Out-File c:\temp\"Get-MoveRequestStatistics.txt" -Encoding UTF8
Combine the Get-MoveRequest + Get-Moverequeststatistics commands
A nice option that we can use when using PowerShell is a “combination” of two or more PowerShell command. The formal term for this method is “pipeline”.
In the following scenario, we a combination of two PowerShell commands:
Get-MoveRequest
Get-MoveRequestStatistics
The first command Get-MoveRequest will “fetch” all the existing “Move Requests”.
The second command Get-MoveRequestStatistics, will use the “move requests list” form the first command, and add the “statistics information” for each mailbox move requests.
Combine the Get-MoveRequest + Get-Moverequeststatistics commands
PowerShell command syntax
Get-MoveRequest| Get-Moverequeststatistics
PowerShell console output example
PS C:\> Get-MoveRequest| Get-Moverequeststatistics DisplayName StatusDetail TotalMailboxSize TotalArchiveSize PercentComplete ----------- ------------ ---------------- ---------------- --------------- onpremmbx-02 Completed 7.148 MB (7,495,429 bytes) 100 onpremmbx-03 Completed 7.148 MB (7,495,563 bytes) 100 onpremmbx-04 Completed 7.148 MB (7,495,449 bytes) 100 onpremmbx-01 Completed 7.148 MB (7,495,583 bytes) 100
Get + Export information about ALL concurrent move requests Statistics + troubleshooting information
In this scenario, we add the additional parameters- “IncludeReport” and “Diagnostic” for getting more details about the Move Request Statistics. Most of the times, we will use this additional parameter is a troubleshooting scenario.
In addition, I add an example of- exporting information to XML file because in case that we need to deliver the exported information to Microsoft support for further analysis, this is the “preferred” file format.
Combine the Get-MoveRequest + Get-Moverequeststatistics commands
Export information to TXT file
Get-MoveRequest| Get-Moverequeststatistics -IncludeReport -Diagnostic | Format-List | Out-File c:\temp\"Get-Move-Request-Get-Moverequeststatistics.txt" -Encoding UTF8
Export information to CSV file
Get-MoveRequest| Get-Moverequeststatistics -IncludeReport -Diagnostic | Export-CSV c:\temp\"Get-Move-Request-Get-Moverequeststatistics.CSV" –NoTypeInformation -Encoding utf8
Export information to XML file
Get-MoveRequest| Get-Moverequeststatistics -IncludeReport -Diagnostic | Export-Clixml c:\temp\"Get-MoveRequestStatistics-IncludeReport-Diagnostic.xml" -Encoding UTF8
Other variation of the PowerShell command syntax that we can use for getting information about move requests with a specific status such as Failed move requests + statistics information about each move requests could be:
PowerShell command example
Get-MoveRequest -movestatus Failed| Get-moverequeststatistics |select DisplayName,SyncStage,Failure*,Message,PercentComplete,largeitemsencountered,baditemsencountered| ft -autosize
For your convenience, I have “Wrapped” all the PowerShell commands that were reviewed in the article, in a “Menu Based” PowerShell Script. You are welcome to download the PowerShell script and use it.
Using PowerShell for view and export information about mailbox migration to Office 365
Download Now!2 Downloads
In case you want to get more detailed information about how to use the o365info menu PowerShell script, you can read the following article
Additional reading
Get-MoveRequest
Get-MoveRequestStatistics
Monitoring Mailbox Moves
The next article in the current article series
Using PowerShell for view and export information about mailbox migration to Office 365 | Part 4#5
Now it’s Your Turn! It is important for us to know your opinion on this article
Restore Exchange Online mailbox | Article series index
Related Post
Restore Exchange Online Shared mailbox | Cloud onl...
Manage Litigation Hold by using PowerShell | Offic...
Full Access Mailbox permission – Everything You Al...
Exchange CAS server | Providing Exchange clients a...
Exchange 2013 coexistence | Autodiscover infrastru...
.yuzo_related_post imgwidth:120px !important; height:110px !important; .yuzo_related_post .relatedthumbline-height:15px;background: !important;color:!important; .yuzo_related_post .relatedthumb:hoverbackground:#fcfcf4 !important; -webkit-transition: background 0.2s linear; -moz-transition: background 0.2s linear; -o-transition: background 0.2s linear; transition: background 0.2s linear;;color:!important; .yuzo_related_post .relatedthumb acolor:!important; .yuzo_related_post .relatedthumb a:hover color:!important;} .yuzo_related_post .relatedthumb:hover a color:!important; .yuzo_related_post .yuzo_text color:!important; .yuzo_related_post .relatedthumb:hover .yuzo_text color:!important; .yuzo_related_post .relatedthumb margin: 0px 0px 0px 0px; padding: 5px 5px 5px 5px; jQuery(document).ready(function( $ ) //jQuery('.yuzo_related_post').equalizer( overflow : 'relatedthumb' ); jQuery('.yuzo_related_post .yuzo_wraps').equalizer( columns : '> div' ); )
0 notes
Text
Orphaned GPO
How dare you speak of cleaning up Group Policies - ofcourse they are all required and are all important ;)
use the below as a powershell script that will give you a list of GPO’s defined but that do not exist in the share and vice versa. very handy to clean up a messy environment before well any kind of activity on the infrastructure. You are welcome.
Code:
<# This script will find and print all orphaned Group Policy Objects (GPOs).Group Policy Objects (GPOs) are stored in two parts:1) GPC (Group Policy Container). The GPC is where the GPO stores all the AD-related configuration under the CN=Policies,CN=System,DC=... container, which is replicated via AD replication. 2) GPT (Group Policy Templates). The GPT is where the GPO stores the actual settings located within SYSVOL area under the Policies folder, which is replicated by either File Replication Services (FRS) or Distributed File System (DFS).This script will help find GPOs that are missing one of the parts, which therefore makes it an orphaned GPO.A GPO typically becomes orphaned in one of two different ways:1) If the GPO is deleted directly through Active Directory Users and Computers or ADSI edit. 2) If the GPO was deleted by someone that had permissions to do so in AD, but not in SYSVOL. In this case, the AD portion of the GPO would be deleted but the SYSVOL portion of the GPO would be left behind.Although orphaned GPT folders do no harm they do take up disk space and should be removed as a cleanup task.Lack of permissions to the corresponding objects in AD could cause a false positive. Therefore, verify GPT folders are truly orphaned before moving or deleting them.Original script written by Sean Metcalfhttp://blogs.metcorpconsulting.com/tech/?p=1076Release 1.1 Modified by [email protected] 29th August 2012#>$Domain = [System.DirectoryServices.ActiveDirectory.Domain]::GetCurrentDomain() # Get AD Domain Name $DomainDNS = $Domain.Name # Get AD Distinguished Name $DomainDistinguishedName = $Domain.GetDirectoryEntry() | select -ExpandProperty DistinguishedName$GPOPoliciesDN = "CN=Policies,CN=System,$DomainDistinguishedName" $GPOPoliciesSYSVOLUNC = "\\$DomainDNS\SYSVOL\$DomainDNS\Policies"Write-Host -ForegroundColor Green "Finding all orphaned Group Policy Objects (GPOs)...`n"Write-Host -ForegroundColor Green "Reading GPO information from Active Directory ($GPOPoliciesDN)..." $GPOPoliciesADSI = [ADSI]"LDAP://$GPOPoliciesDN" [array]$GPOPolicies = $GPOPoliciesADSI.psbase.children ForEach ($GPO in $GPOPolicies) { [array]$DomainGPOList += $GPO.Name } #$DomainGPOList = $DomainGPOList -replace("{","") ; $DomainGPOList = $DomainGPOList -replace("}","") $DomainGPOList = $DomainGPOList | sort-object [int]$DomainGPOListCount = $DomainGPOList.Count Write-Host -ForegroundColor Green "Discovered $DomainGPOListCount GPCs (Group Policy Containers) in Active Directory ($GPOPoliciesDN)`n"Write-Host -ForegroundColor Green "Reading GPO information from SYSVOL ($GPOPoliciesSYSVOLUNC)..." [array]$GPOPoliciesSYSVOL = Get-ChildItem $GPOPoliciesSYSVOLUNC ForEach ($GPO in $GPOPoliciesSYSVOL) {If ($GPO.Name -ne "PolicyDefinitions") {[array]$SYSVOLGPOList += $GPO.Name }} #$SYSVOLGPOList = $SYSVOLGPOList -replace("{","") ; $SYSVOLGPOList = $SYSVOLGPOList -replace("}","") $SYSVOLGPOList = $SYSVOLGPOList | sort-object [int]$SYSVOLGPOListCount = $SYSVOLGPOList.Count Write-Host -ForegroundColor Green "Discovered $SYSVOLGPOListCount GPTs (Group Policy Templates) in SYSVOL ($GPOPoliciesSYSVOLUNC)`n"## COMPARE-OBJECT cmdlet note: ## The => sign indicates that the item in question was found in the property set of the second object but not found in the property set for the first object. ## The <= sign indicates that the item in question was found in the property set of the first object but not found in the property set for the second object.# Check for GPTs in SYSVOL that don't exist in AD [array]$MissingADGPOs = Compare-Object $SYSVOLGPOList $DomainGPOList -passThru | Where-Object { $_.SideIndicator -eq '<=' } [int]$MissingADGPOsCount = $MissingADGPOs.Count $MissingADGPOsPCTofTotal = $MissingADGPOsCount / $DomainGPOListCount $MissingADGPOsPCTofTotal = "{0:p2}" -f $MissingADGPOsPCTofTotal Write-Host -ForegroundColor Yellow "There are $MissingADGPOsCount GPTs in SYSVOL that don't exist in Active Directory ($MissingADGPOsPCTofTotal of the total)" If ($MissingADGPOsCount -gt 0 ) { Write-Host "These are:" $MissingADGPOs } Write-Host "`n"# Check for GPCs in AD that don't exist in SYSVOL [array]$MissingSYSVOLGPOs = Compare-Object $DomainGPOList $SYSVOLGPOList -passThru | Where-Object { $_.SideIndicator -eq '<=' } [int]$MissingSYSVOLGPOsCount = $MissingSYSVOLGPOs.Count $MissingSYSVOLGPOsPCTofTotal = $MissingSYSVOLGPOsCount / $DomainGPOListCount $MissingSYSVOLGPOsPCTofTotal = "{0:p2}" -f $MissingSYSVOLGPOsPCTofTotal Write-Host -ForegroundColor Yellow "There are $MissingSYSVOLGPOsCount GPCs in Active Directory that don't exist in SYSVOL ($MissingSYSVOLGPOsPCTofTotal of the total)" If ($MissingSYSVOLGPOsCount -gt 0 ) { Write-Host "These are:" $MissingSYSVOLGPOs } Write-Host "`n" pause
0 notes
Text
How to Find Inactive Computers in Active Directory Using PowerShell

How to Find Inactive Computers in Active Directory Using PowerShell. To identify inactive computer accounts, you will always target those that have not logged on to Active Directory in the last last 90 days. To accomplish this goal, you need to target the LastLogonTimeStamp property and then specify a condition with the time as shown in the following PowerShell commands: $DaysInactive = 90 $time = (Get-Date).Adddays(-($DaysInactive)) Get-ADComputer -Filter {LastLogonTimeStamp -lt $time} -ResultPageSize 2000 -resultSetSize $null -Properties Name, OperatingSystem, SamAccountName, DistinguishedName If you wish to search computer accounts that have been inactive for more than 90 days, all you need to do is modify the $DaysInActive variable value. The current value is set at 90 days; however, you can specify your own value. To export output to a CSV file, add the Export-CSV PowerShell cmdlet as shown in the following command: Get-ADComputer -Filter {LastLogonTimeStamp -lt $time} -ResultPageSize 2000 -resultSetSize $null -Properties Name, OperatingSystem, SamAccountName, DistinguishedName | Export-CSV “C:\Temp\StaleComps.CSV” –NoTypeInformation Read the full article
0 notes
Text
New Post has been published on o365info.com
New Post has been published on http://o365info.com/using-powershell-for-view-and-export-information-about-mailbox-migration-to-office-365-part-3-5/
Using PowerShell for view and export information about mailbox migration to Office 365 | Part 3#5
In the current article and the next article, we review the various PowerShell cmdlets that we can use for viewing and export information about the process of Exchange mailbox migration process.
The “mailbox migration” PowerShell commands that we review in this article are:
Get-MigrationBatch
Get-MoveRequest
Get-MoveRequestStatistics
Article Series table of content | Click to expand
Using PowerShell for view and export information about mailbox migration to Office 365 | Article Series
Mailbox migration to Office 365 the PowerShell migration entities | Part 1#5
Using PowerShell for view and export information about mailbox migration to Office 365 | Part 2#5
Using PowerShell for view and export information about mailbox migration to Office 365 | Part 3#5
Using PowerShell for view and export information about mailbox migration to Office 365 | Part 4#5
How to use the export mailbox migration information and troubleshooting PowerShell script | Part 5#5
1. Migration batches | Get-MigrationBatch
The term – “Migration Batch”, define an entity that serve as a “logical container”, that contain the mailboxes (and their associated users), that we migrate from the source Exchange server to the destination Exchange server (Exchange Online in our scenario).
Get information about specific migration batch
PowerShell command syntax
Get-MigrationBatch -Identity <Migration BATCH name>
PowerShell console output example
PS C:\> Get-MigrationBatch "Eyal Migration batch -001" |fl RunspaceId : 2771b392-d73b-4639-b63d-f4646c49c0af Identity : Eyal Migration batch -001 Status : Completed State : Completed Flags : None WorkflowStage : Processing TriggeredAction : None BatchGuid : fb2529fe-b9bf-446a-accd-3819e6bef03c TotalCount : 2 ActiveCount : 0 StoppedCount : 0 SyncedCount : 0 FinalizedCount : 2 FailedCount : 0 FailedInitialSyncCount : 0 FailedIncrementalSyncCount : 0 CompletedWithWarningCount : 0 PendingCount : 0 ProvisionedCount : 0 ValidationWarningCount : 0 ValidationWarnings : Message : CreationDateTime : 2/23/2017 10:41:09 AM CreationDateTimeUTC : 2/23/2017 8:41:09 AM StartDateTime : 2/23/2017 10:41:09 AM StartDateTimeUTC : 2/23/2017 8:41:09 AM InitialSyncDateTime : InitialSyncDateTimeUTC : InitialSyncDuration : LastSyncedDateTime : 2/23/2017 10:47:28 AM LastSyncedDateTimeUTC : 2/23/2017 8:47:28 AM FinalizedDateTime : FinalizedDateTimeUTC : SubmittedByUser : [email protected] OwnerId : EURPR05A001.prod.outlook.com/Microsoft Exchange Hosted Organizations/o365info2.onmicrosoft.com/Eyal OwnerExchangeObjectId : 7646f17d-bf1f-4e07-8698-4e71ab4dad80 NotificationEmails : [email protected] ExcludedFolders : MigrationType : ExchangeRemoteMove BatchDirection : Onboarding Locale : en-US Reports : When migration report was created:2/23/2017 9:19:17 AM; Migration report URL:https://outlook.office365.com/ecp/Migration/DownloadReport.aspx?HandlerClass= MigrationReportHandler&Name=MigrationReport.csv&DelegatedOrg=o365info2.onmicrosoft.com&realm=o365info2.onmicrosoft.com&exsvurl=1&Identity=RgAAAAAKqOiME1CMQ LkjirbMEluxBwCuLv0wEUQXTp3grhMeQsz8AAAh0Mi_AACuLv0wEUQXTp3grhMeQsz8AAN-JngxAAAJ; Error report URL: IsProvisioning : False BatchFlags : ReportInitial WorkflowControlFlags : None AutoRetryCount : 0 CurrentRetryCount : 0 AllowUnknownColumnsInCsv : False DiagnosticInfo : SupportedActions : Remove SourceEndpoint : mail.o365info.com TargetEndpoint : SourcePublicFolderDatabase : TargetDatabases : TargetArchiveDatabases : TargetDAGs : BadItemLimit : 10 LargeItemLimit : 0 MoveOptions : SkipMoving : SkipMerging : InternalFlags : PrimaryOnly : False ArchiveOnly : False TargetDeliveryDomain : o365info2.mail.onmicrosoft.com SkipSteps : None Workflow : Steps: [(Injection), (Processing)] WorkflowTemplate : Report : StartAfter : StartAfterUTC : CompleteAfter : CompleteAfterUTC : IsValid : True ObjectState : Unchanged
Export detailed information about specific migration batch | TXT file
Get-MigrationBatch -Identity migration-003 -IncludeReport -Diagnostic | Format-List | Out-File c:\temp\"Get-MigrationBatch-IncludeReport-Diagnostic.txt" -Encoding UTF8
Export detailed information about ALL migration batches
Export information to TXT file
Get-MigrationBatch -IncludeReport -Diagnostic | Format-List | Out-File c:\temp\"ALL Migration -Get-MigrationBatch-IncludeReport-Diagnostic.txt" -Encoding UTF8
Export information to XML file
Get-MigrationBatch -IncludeReport -Diagnostic | Export-Clixml c:\temp\"ALL Migration Get-MigrationBatch-IncludeReport-Diagnostic.xml" -Encoding UTF8
Migration batch status
Using the “Status” parameter, we can get information about existing migration batch that has a specific “Status”.
The migration batch type of “Statuses” value could be as follow:
Completed
CompletedWithErrors
Completing
Corrupted
Created
Failed
IncrementalSyncing
Removing
Starting
Stopped
Syncing
Stopping
Synced
SyncedwithErrors
Waiting
To view a migration batch with a specific status, we can use the following PowerShell syntax
Display all migration batch with status such as “Completed”
PowerShell command example
Get-MigrationBatch -Status Completed
PowerShell console output example
PS C:\> Get-MigrationBatch -Status Completed Identity Status Type TotalCount -------- ------ ---- ---------- Eyal Migration batch -001 Completed ExchangeRemoteMove 2 Eyal Migration batch -002 Completed ExchangeRemoteMove 2
Export information about all migration batch with the status “Not Completed” | TXT file
PowerShell command example
Get-MigrationBatch | Where $_.status -ne ”Completed” | Get-MoveRequestStatistics | Format-List | Out-File c:\temp\"Get-MigrationBatch Not Completed.txt" -Encoding UTF8
3. Move requests
The term – “Move request”, define the Exchange mailbox that we migrate from the “source Exchange server” to the “destination Exchange server”.
The two PowerShell cmdlets that we use for getting information about the move requests of the “mailbox entity” are:
Get-MoveRequest
Get-MoveRequestStatistics
2. Using the Get-MoveRequest command
The PowerShell command Get-MoveRequest, get a basic information about a property of a specific mailbox that we migrate.
Get information about specific Move Request
PowerShell command syntax
Get-MoveRequest < Move Request name>
PowerShell console output example
PS C:\> Get-MoveRequest [email protected] | Format-List RunspaceId : 2771b392-d73b-4639-b63d-f4646c49c0af ExchangeGuid : e3254cfe-81c0-496e-84db-80e9190342e5 SourceDatabase : TargetDatabase : EURPR05DG136-db018 SourceArchiveDatabase : TargetArchiveDatabase : Flags : CrossOrg, Pull RemoteHostName : mail.o365info.com BatchName : MigrationService:Eyal Migration batch -001 Status : Completed RequestStyle : CrossOrg Direction : Pull IsOffline : False Protect : False Suspend : False SuspendWhenReadyToComplete : False AdministrativeUnits : Alias : onpremmbx-01 ExtensionCustomAttribute1 : ExtensionCustomAttribute2 : ExtensionCustomAttribute3 : ExtensionCustomAttribute4 : ExtensionCustomAttribute5 : DisplayName : onpremmbx-01 ExternalDirectoryObjectId : c4d8af0e-69f2-4534-b79c-04ddaea7d074 LastExchangeChangedTime : RecipientType : UserMailbox RecipientTypeDetails : UserMailbox Identity : onpremmbx-01 IsValid : True ExchangeVersion : 0.20 (15.0.0.0) Name : onpremmbx-01 DistinguishedName : CN=onpremmbx-01,OU=o365info2.onmicrosoft.com,OU=Microsoft Exchange Hosted Organizations,DC=EURPR05A001,DC=prod,DC=outlook,DC=com Guid : 1e697c91-3a05-490d-a1d2-4434471cd1d9 OrganizationId : EURPR05A001.prod.outlook.com/Microsoft Exchange Hosted Organizations/o365info2.onmicrosoft.com - EURPR05A001.prod.outlook.com/ConfigurationUnits/o365info2.onmicrosoft.com/Configuration Id : onpremmbx-01 OriginatingServer : DB3PR05A001DC03.EURPR05A001.prod.outlook.com ObjectState : Changed
Export information about specific Move Request | TXT file
Get-MoveRequest [email protected] | Format-List | Out-File c:\temp\"Get-MoveRequest.txt" -Encoding UTF8
Get information about ALL existing Move mailbox requests
When we use the PowerShell, command Get-MoveRequest without relating to a specific move request, meaning, without specifying the identity of a specific move request, the PowerShell command will display information about ALL existing “Move Requests”.
General note – in case that you are performing mailbox migration that include tens or hundreds of mailboxes, the process of exporting information about each of these migrated mailboxes, could take a long time.
Export information about ALL Move Requests | TXT file
PowerShell command example
Get-MoveRequest | Format-List | Out-File c:\temp\"Get-MoveRequest.txt" -Encoding UTF8
Export information about MoveRequest with specific status
Each of the “move requests” could have a specific “status” such as – Completed ,Failed and so on.
The available status codes values are as follow:
AutoSuspended
Completed
CompletedWithWarning
CompletionInProgress
Failed
InProgress
None
Queued
In case that you want to get information only about specific status of “Move requests”, you can use the following PowerShell syntax:
Export information about ALL Move Requests which their status is not “completed” | TXT file
Get-MoveRequest | Where $_.status -ne ”Completed” | Get-MoveRequestStatistics | Format-List | Out-File c:\temp\"Get-MoveRequest- status is not completed.txt" -Encoding UTF8
Export information about ALL Move Requests which their status is – “Failed” | TXT file
PowerShell command example
Get-MoveRequest | Where $_.status -eq ”Failed” | Get-MoveRequestStatistics | Format-List | Out-File c:\temp\"Get-MoveRequest- status is Failed.txt" -Encoding UTF8
3. Using the MoveRequestStatistics command
The purpose of the PowerShell command Get-MoveRequestStatistics, is to get detailed information about the “migrated mailbox content”.
For example,
ItemsTransferred – information about the number of mail items, that was already transferred.
PercentComplete – as the name implies, information about the “Complete percentage” of the mailbox migration process.
Get move requests Statistics information for specific Move Request
PowerShell command syntax
Get-MoveRequestStatistics <Migrated mailbox>
PowerShell console output example
PS C:\> Get-MoveRequestStatistics [email protected] DisplayName StatusDetail TotalMailboxSize TotalArchiveSize PercentComplete ----------- ------------ ---------------- ---------------- --------------- onpremmbx-01 Completed 7.148 MB (7,495,583 bytes) 100
Export information about specific move requests Statistics | TXT file
Get-MoveRequestStatistics [email protected] | Format-List | Out-File c:\temp\"Get-MoveRequestStatistics.txt" -Encoding UTF8
If we want to eliminate unmercenary data and get a “clear view” of the mailbox migration Statistics, we can ask from PowerShell to display only specific data fields.
PowerShell command example
Get-MoveRequestStatistics [email protected] | Select MailboxIdentity,Status,WorkloadType,RecipientTypeDetails,SourceServer ,BatchName,TotalMailboxSize,TotalMailboxItemCount,TotalArchiveSize,BytesTransferred,BytesTransferredPerMinute,ItemsTransferred,PercentComplete | Format-List | Out-File c:\temp\"Get-MoveRequestStatistics.txt" -Encoding UTF8
Combine the Get-MoveRequest + Get-Moverequeststatistics commands
A nice option that we can use when using PowerShell is a “combination” of two or more PowerShell command. The formal term for this method is “pipeline”.
In the following scenario, we a combination of two PowerShell commands:
Get-MoveRequest
Get-MoveRequestStatistics
The first command Get-MoveRequest will “fetch” all the existing “Move Requests”.
The second command Get-MoveRequestStatistics, will use the “move requests list” form the first command, and add the “statistics information” for each mailbox move requests.
Combine the Get-MoveRequest + Get-Moverequeststatistics commands
PowerShell command syntax
Get-MoveRequest| Get-Moverequeststatistics
PowerShell console output example
PS C:\> Get-MoveRequest| Get-Moverequeststatistics DisplayName StatusDetail TotalMailboxSize TotalArchiveSize PercentComplete ----------- ------------ ---------------- ---------------- --------------- onpremmbx-02 Completed 7.148 MB (7,495,429 bytes) 100 onpremmbx-03 Completed 7.148 MB (7,495,563 bytes) 100 onpremmbx-04 Completed 7.148 MB (7,495,449 bytes) 100 onpremmbx-01 Completed 7.148 MB (7,495,583 bytes) 100
Get + Export information about ALL concurrent move requests Statistics + troubleshooting information
In this scenario, we add the additional parameters- “IncludeReport” and “Diagnostic” for getting more details about the Move Request Statistics. Most of the times, we will use this additional parameter is a troubleshooting scenario.
In addition, I add an example of- exporting information to XML file because in case that we need to deliver the exported information to Microsoft support for further analysis, this is the “preferred” file format.
Combine the Get-MoveRequest + Get-Moverequeststatistics commands
Export information to TXT file
Get-MoveRequest| Get-Moverequeststatistics -IncludeReport -Diagnostic | Format-List | Out-File c:\temp\"Get-Move-Request-Get-Moverequeststatistics.txt" -Encoding UTF8
Export information to CSV file
Get-MoveRequest| Get-Moverequeststatistics -IncludeReport -Diagnostic | Export-CSV c:\temp\"Get-Move-Request-Get-Moverequeststatistics.CSV" –NoTypeInformation -Encoding utf8
Export information to XML file
Get-MoveRequest| Get-Moverequeststatistics -IncludeReport -Diagnostic | Export-Clixml c:\temp\"Get-MoveRequestStatistics-IncludeReport-Diagnostic.xml" -Encoding UTF8
Other variation of the PowerShell command syntax that we can use for getting information about move requests with a specific status such as Failed move requests + statistics information about each move requests could be:
PowerShell command example
Get-MoveRequest -movestatus Failed| Get-moverequeststatistics |select DisplayName,SyncStage,Failure*,Message,PercentComplete,largeitemsencountered,baditemsencountered| ft -autosize
For your convenience, I have “Wrapped” all the PowerShell commands that were reviewed in the article, in a “Menu Based” PowerShell Script. You are welcome to download the PowerShell script and use it.
Using PowerShell for view and export information about mailbox migration to Office 365
Download Now!2 Downloads
In case you want to get more detailed information about how to use the o365info menu PowerShell script, you can read the following article
Additional reading
Get-MoveRequest
Get-MoveRequestStatistics
Monitoring Mailbox Moves
The next article in the current article series
Using PowerShell for view and export information about mailbox migration to Office 365 | Part 4#5
Now it’s Your Turn! It is important for us to know your opinion on this article
Restore Exchange Online mailbox | Article series index
Related Post
Calculating manually the value of the Office 365 D...
How to restore Active Directory deleted user accou...
Exchange clients and their Public facing Exchange ...
Using Remote PowerShell to manage Office 365 | Par...
Exchange architecture and default opportunistic TL...
.yuzo_related_post imgwidth:120px !important; height:110px !important; .yuzo_related_post .relatedthumbline-height:15px;background: !important;color:!important; .yuzo_related_post .relatedthumb:hoverbackground:#fcfcf4 !important; -webkit-transition: background 0.2s linear; -moz-transition: background 0.2s linear; -o-transition: background 0.2s linear; transition: background 0.2s linear;;color:!important; .yuzo_related_post .relatedthumb acolor:!important; .yuzo_related_post .relatedthumb a:hover color:!important;} .yuzo_related_post .relatedthumb:hover a color:!important; .yuzo_related_post .yuzo_text color:!important; .yuzo_related_post .relatedthumb:hover .yuzo_text color:!important; .yuzo_related_post .relatedthumb margin: 0px 0px 0px 0px; padding: 5px 5px 5px 5px; jQuery(document).ready(function( $ ) //jQuery('.yuzo_related_post').equalizer( overflow : 'relatedthumb' ); jQuery('.yuzo_related_post .yuzo_wraps').equalizer( columns : '> div' ); )
0 notes