#EMA confluence with candlestick patterns
Explore tagged Tumblr posts
Visit Tumblr Blog
Explore Tumblr blogs with no restrictions, modern design and the best experience.
Last Seen Tumblr Blogs


Fun Fact
Tumblr.com is the 103rd most visited website in the world.
Text
How to Trade the Bearish Engulfing Pattern: Complete Guide with Strategies and Examples
Candlestick patterns are powerful tools in the arsenal of a technical trader. Among the most reliable reversal patterns is the Bearish Engulfing Pattern—a strong signal that can hint at the start of a downward trend. In this guide, we’ll explain how to identify this pattern, why it works, and most importantly, how to trade it effectively with multiple strategies and examples. 📌 What is a Bearish…
#Bearish candle formation#Bearish engulfing candlestick pattern explained#Bearish Engulfing Pattern#Bearish engulfing pattern trading strategy#Bearish reversal pattern#Bearish trend confirmation#Can you trade bearish engulfing in forex?#Candlestick pattern for bearish reversal#candlestick patterns#Confirmation signals for bearish engulfing#EMA confluence with candlestick patterns#Engulfing candle trading rules#Entry and exit with candlestick patterns#Forex bearish engulfing strategy#How to confirm a bearish engulfing signal?#How to trade the bearish engulfing pattern#Is the bearish engulfing pattern reliable?#learn technical analysis#Multi-timeframe candlestick pattern strategy#Price action trading setup#Reversal Candlestick Patterns#Risk management for pattern trading#stock markets#Stock trading with bearish engulfing pattern#support and resistance levels#Swing trading with bearish engulfing#technical analysis#Trading bearish engulfing with moving averages#Trading Strategies#Using bearish engulfing with RSI
0 notes
Text
XRP price can fall 40% by September — Fractal analysis
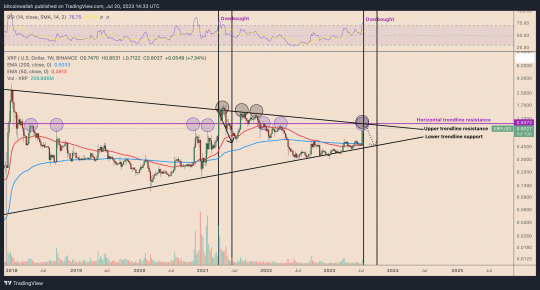
The double-digit percentage gains for XRP (XRP) this month may have reached an exhaustion point, reflecting the trends elsewhere in the cryptocurrency market. This follows the euphoria surrounding Ripple’s partial win against the United States Securities and Exchange Commission, resulting in bullish calls for as high as $15 in the coming months. $15 is reasonable I believe over 18 months or so. If they IPO and time it correctly, could be up to $35 imo. Make no mistake… it may not go that high… but $XRP IS breaking an all time high this cycle save some sort of pointless, vindictive SEC appeal. (Low chance) https://t.co/rrMCuOacrE — Ben Armstrong (@Bitboy_Crypto) July 19, 2023 Nonetheless, fractal analysis of XRP’s recent candlestick and price momentum patterns hints that a sharp market correction is not off the table, particularly if history repeats. XRP price fractal preceded 65% decline Notably, certain XRP market signals preceded a 65% price decline in Q2 2021. These are now flashing again, namely the multiyear descending trendline resistance and an “overbought” relative strength index (RSI), as illustrated below. XRP/USD weekly price chart. Source: TradingView The descending trendline resistance (marked as “upper trendline resistance” in the chart above) has limited XRP’s upside since January 2018. This price ceiling is helped by another horizontal trendline resistance (purple) near $0.93. Overall, the resistance confluence, coupled with an overbought RSI, now raises XRP’s risks of a market correction. In this case, XRP price will likely fall toward the lower trendline support near $0.52 by September, down almost 40% from current price levels. Related: Chair Gensler says SEC reaction to Ripple decision is mixed, still under consideration Interestingly, the downside target appears closer to XRP’s 50-week exponential moving average (50-week EMA; the red wave), which raises the possibility of a bounce around this level. Moreover, the wave support was the local bottom level during the price decline in Q2 2021. As of July 20, Ripple price is up 70% month-to-date, outperforming the broader crypto market, which rose only 5% in the same period. This article does not contain investment advice or recommendations. Every investment and trading move involves risk, and readers should conduct their own research when making a decision. Source link Read the full article
0 notes
Link
#Analysis #Price #NFL USD/JPY Worth Evaluation: Bounces off weekly lows, additional upside above 140.00 https://news247planet.com/?p=275697
0 notes
Text
The 13 Best Candlestick Signals
Candlesticks are the foundation of any price action chart. And although I do not recommend to trade candlesticks blindly – because their predictive power is not strong enough – when combining candlesticks with other confluence factors of technical analysis, a trader may improve the odds for determining the right price direction.
How to use candlesticks?
There are dozens of use cases for candlesticks but the one that we found to be most reliant is to use a strong candlestick signal to determine your higher timeframe bias.
For example, if you find a strong candlestick signal on the Daily timeframe, you can establish a directional bias for the lower timeframes and use the candlestick information as a trading filter.
This works extremely well and helps traders pick the direction for their trading. In the following, we will show you how to determine the higher timeframe bias with the 13 case studies we prepared.
During our masterclass courses and webinars, we also pay close attention to candlestick analysis and we dive even deeper into price action trading. If you are interested, make sure to have a look:
Tradeciety’s Masterclass Program
youtube
#1 Candle Deceleration
I have been talking about the deceleration concept for a while and we teach one multi-timeframe trading strategy that uses this approach in our masterclass as well. It’s a super-powerful candlestick formation that helps to understand the change of momentum during a long trend.
During the long uptrend, you suddenly see a small Doji candle and then a strong bearish candle. This sequence indicates that the buyers are not as strong and that the price is high enough for the sellers to come in.
Most importantly, the deceleration pattern is best traded during a strong and overextended trend. The longer a trend goes on, the higher the chance of seeing a reversal back to the mean – especially in the Forex market which is considered a mean-reverting market.
Once a deceleration pattern has been identified on the higher timeframe, the trader may drop to the lower timeframe to look for trades in the direction of the deceleration pattern.
#2 Deceleration-Continuation
The deceleration can also be found as a continuation pattern.
In the example below, the price was in an uptrend and during the correction phase, the corrective wave gave a deceleration pattern: Bearish candle – Doji – Strong bullish candle.
This pattern indicated that the bulls are reclaiming the trend and that a continuation is likely.
Continuation patterns are best trades early on during a trend because the likelihood of a successful continuation is higher.
#3 Engulfing Reversal
The engulfing candle is very versatile and we will observe multiple engulfing candle scenarios during this article.
In the example below, the engulfing pattern happened as a reversal pattern. The bullish trend had been going on for a while and the engulfing pattern indicated a shift in momentum.
The large, red engulfing candle is significantly larger than the previous bullish candle. The bearish candle is also the largest bearish candle that was observable during the whole uptrend.
Such a significant change in candle size should always get the attention of traders because it indicates a major shift in the buyer-seller dynamic.
#4 Engulfing Continuation
Engulfing candlesticks can also be used as a continuation signal.
The price had just broken out of the range to start a new downtrend when the price gave a short corrective wave. The price always moves in ways and during corrective phases, it can pay off to look for continuation signals.
The two bullish candles were small in size, indicating that the bulls were extremely weak and could not get the price higher. Suddenly, the trend continued with a bearish engulfing candle. The break-away with the engulfing candle signaled that the bulls have withdrawn and that the bears are now continuing the downtrend.
As indicated above, paying attention to candle size during a trend and corrective waves is a great way to improve your chart reading skills.
#5 Engulfing Pullback
Did I say that the engulfing pattern is extremely versatile?
In this example, I used a 50 EMA as a trend-following tool. The price was always above the EMA, indicating a bullish trend. During a bullish trend, traders should look for buying opportunities.
The best pullback opportunities usually exist when the price moves back into the moving average and then provides a strong signal. Keep in mind that trading the touch of a moving average is not enough but by adding multiple confluence factors to your decision-making, the chances for picking the right direction may increase.
When the price hit the EMA in the example below, the price also formed a strong engulfing candlestick pattern. The correct wave, at this point, had been going on for a while and the pullback then offered a much better price for the buyers to get into new trades.
#6 Double Top Fakeout
The fakeout pattern is also often referred to as a trap candlestick pattern but the idea is the same.
In the example below, the uptrend made a local high initially and during the next attempt to continue the trend, the price failed to reach a higher high. The price was immediately rejected as soon as it reached the previous high.
This pattern is a clear indication that the prevailing trend is likely to be over because the buyers lack the power to continue making higher highs.
#7 Triple Tap Exhaustion
The triple tap is a powerful reversal pattern as it indicates a loss in trend momentum.
The price in the screenshot below made three weak higher highs after an extended uptrend. Each push at the top become less strong, the size of the wicks had increased and the candle size decreased. All those confluence factors indicate that the trend may be losing momentum.
The triple tap, like all other reversal patterns, is best traded during/after extended trends. The longer a trend goes on, the higher the likelihood of seeing a reversal.
#8 Engulfing Double Bottom
Did I say that the engulfing pattern is extremely versatile?
Whenever you see a double bottom after/during an extended trend, it indicates a loss of trend momentum. The sellers, in the scenario below, were not strong enough to continue the downtrend. The price was so low that it became increasingly interesting for the buyers.
The double bottom was finalized buy the large bullish engulfing candle. The significant size of the engulfing candle made this scenario even more powerful. Such huge momentum shifts indicate a significant change in the seller-buyer balance on your price action charts.
#9 Engulfing meets Fakeout
Did I say that the engulfing pattern is extremely versatile?
In the chart study below, the engulfing candle also showed the characteristics of a fakeout. The price was in a sideways consolidation and the breakout occurred with a large engulfing candlestick which also has a long wick to the upside. The wick indicates a failed attempt to move higher and the large bearish candlestick body shows that the buyers have withdrawn completely.
The engulfing candlestick is the largest bearish candlestick that was observable up until this point.
#10 Tweezer
A tweezer candlestick pattern is made up of two candlesticks with equally long wicks. The tweezer indicates a move in the opposite direction of the candlestick wicks.
In the example below, the tweezer occurred at a key price level too. When you look to the left, you can see that the last bullish trend was initiated right at the tweezer price level too. Such trend origin levels often provide great trend-trading opportunities if enough confluence factors are present.
The tweezer also occurred after an extended downtrend – making the bullish reversal even more likely. Thus, you can see how we can stack multiple confluence factors in our favor.
#11 Egulging + Pinbar + Triple Tap
Did I say that the engulfing pattern is extremely versatile?
I mentioned a few times that the more confluence factors you can stack in your favor, the better your price prediction usually becomes. In this chart study, we have multiple confluence factors that indicated the potential end of the bullish trend and a bearish reversal.
The bullish trend had multiple trend waves and was extremely over-extended
The triple tap pattern shows weakening bullish continuation trend waves
The engulfing candlestick shows a strong bearish push at the third triple tap
The wicks show signs of a tweezer pattern – further indicating a rejection at the highs
All signs were pointing towards the end of the uptrend. Once you identify the confluence factors, you may go to a lower timeframe to time your entry in the direction of the potentially upcoming downtrend.
#12 Pinbar Deceleration
Once again, we can stack the confluence factors in our favor to end up with a powerful price analysis.
The chart was in a strong uptrend on the left. But the second trend wave was much shorter than the first one. Any momentum indicator will signal a divergence.
The bullish candles decrease in size before the price printed a pinbar with a long wick. The long wick is a strong reversal signal. Following the pinbar, a large bearish candle occurred. This pattern indicates the deceleration of the uptrend and then the acceleration of the new downtrend.
#13 Inside-Outside Reversal
Let’s end with an engulfing candlestick pattern, shall we?
Just as in the example above, the price was in a weakening uptrend. The trend wave leading into the final top was significantly shorter than the prior trend waves.
At the top, the price first made an extremely large bullish candlestick. However, the next candlestick was only a short inside candle which indicates stopping momentum. This is not enough to say that the trend may end but it’s another confluence factor.
After the inside candle, the next candle was an engulfing candlestick, showing newfound interest from the sellers in the market.
Candlesticks are great! But only with confluence
Candlesticks can provide a lot of important information about what is going on on your charts. But trading candlesticks alone is not recommended because the predictive power may not be high enough.
Stacking multiple confluence factors on top of each other to come up with a strong price analysis may improve the odds of finding the right trend direction significantly.
When it comes to confluence factors, let me summarize the most important ones once again:
Trend wave analysis. Reversal candlesticks are best found after extended trends. Continuation candlesticks are best traded early on in a new trend.
When a trend is showing signs of fading momentum, reversal candlesticks may succeed more often.
Location matters! When a candlestick signal occurs at a key resistance level, your odds may increase even further.
Candle size matters! Extremely large candlesticks show stronger momentum-shifts.
When multiple candlestick signals can be combined, signal quality may increase too.
The post The 13 Best Candlestick Signals appeared first on Tradeciety Online Trading.
The 13 Best Candlestick Signals published first on your-t1-blog-url
0 notes
Text
Bitcoin Price Faces Minor Pullback as Indecision Creeps into Market
With the bitcoin (BTC) market showing signs of indecision, prices could soon retreat back below $4,000.
The world’s largest cryptocurrency by market capitalization witnessed two-way business yesterday before ending largely unchanged on the day (as per UTC) at $3,995 on Bitstamp.
Worryingly for the bulls, BTC created a doji candle on Tuesday – widely considered a sign of indecision in the market – even though a bull flag breakout, witnessed yesterday, had seemingly set the stage for a move above $4,300.
Notably, the candlestick pattern appeared at the top of the recent recovery rally and near crucial resistance above $4,100, representing bullish exhaustion.
The bears, therefore, have an opportunity to make a slight comeback, especially if buyers fail to keep prices above the previous day’s low of $3,934.
As of writing, bitcoin is changing hands at $4,010 on Bitstamp, representing a 0.80 percent gain on a 24-hour basis.
Daily chart
As seen above, BTC has carved out a doji candle at the confluence of the 50-day exponential moving average (EMA) and the inverse head-and-shoulders neckline resistance.
The prospects of a bull breakout above $4,130 (neckline + 50-day EMA) would drop sharply if BTC confirms a bearish doji reversal with a UTC close below $3,934. That will likely put the focus back on the long-term bearish technical setup and allow a drop to $3,566 (Dec. 27 low).
It is worth noting that a drop towards $3,566 would imply inverse head-and-shoulders failure, which is widely considered a strong bearish signal.
Put simply, the bulls need progress soon. A UTC close above $4,130 would confirm an inverse head-and-shoulders breakout and open the doors for a stronger rally.
4-hour chart
BTC witnessed a bull flag breakout on the 4-hour chart yesterday, signaling a resumption of the rally from the Jan. 6 low of $3,753.
So far, however, a break above the inverse head-and-shoulders neckline resistance of $4,130 has remained elusive. That said, the bull flag pattern is still valid and would lose credibility only below the previous day’s low of $3,934.
View
Bullish exhaustion seen at the key hurdle above $4,100 could embolden the bears.
A UTC close below $3,934 could yield a drop to $3,566 (Dec. 27 low). A break below that level would violate the bullish-higher low pattern and expose the December low of $3,122.
On the higher side, $4,130 is the level to beat for the bulls. An inverse head-and-shoulders breakout, if confirmed, would invalidate yesterday’s doji and open up upside towards the psychological hurdle of $5,000.
Disclosure: The author holds no cryptocurrency assets at the time of writing.
Bitcoin chart image via Shutterstock; Charts by Trading View
!function(f,b,e,v,n,t,s){if(f.fbq)return;n=f.fbq=function(){n.callMethod? n.callMethod.apply(n,arguments):n.queue.push(arguments)};if(!f._fbq)f._fbq=n; n.push=n;n.loaded=!0;n.version='2.0';n.queue=[];t=b.createElement(e);t.async=!0; t.src=v;s=b.getElementsByTagName(e)[0];s.parentNode.insertBefore(t,s)}(window, document,'script','//connect.facebook.net/en_US/fbevents.js'); fbq('init', '239547076708948'); fbq('track', "PageView"); This news post is collected from CoinDesk
Recommended Read
Editor choice
BinBot Pro – Safest & Highly Recommended Binary Options Auto Trading Robot
Do you live in a country like USA or Canada where using automated trading systems is a problem? If you do then now we ...
9.5
Demo & Pro Version Try It Now
Read full review
The post Bitcoin Price Faces Minor Pullback as Indecision Creeps into Market appeared first on Click 2 Watch.
More Details Here → https://click2.watch/bitcoin-price-faces-minor-pullback-as-indecision-creeps-into-market-3
0 notes
Text
BTCUSD 1D Renko Chart with CM_Trendbars, EMAs and a custom DMI
New Post has been published on http://bitcoingape.com/btcusd-1d-renko-chart-with-cm_trendbars-emas-and-a-custom-dmi/
BTCUSD 1D Renko Chart with CM_Trendbars, EMAs and a custom DMI
BTCUSD 1D Renko Chart with CM_Trendbars, EMAs and a custom DMI
Bitcoin / Dollar BITFINEX:BTCUSD
CryptoTechs
This 1D BTCUSD chart is based on Renko Candlesticks , the CM_Trendbars, 4 EMA (9,15,21,55) and a custom DMI.
Renko Chart patterns come from Japan, and they apparently mean ‘brick’. They are a cousin of the Heikin Ashi candlestick patterns, using weighted calculations of the OHLC (open, high, low, close) but without the time. Renko candlesticks are now well know but there are sections of the trading community that strongly believe in them. The candlesticks are built using price only, rather than time and volume . This design helps filter out minor price movements to make it easier for traders to focuso on the important trends. Renko charts are not for the day trader, they are really suitable for longer term trend traders that have patience and are waiting for the right types of setups. Each bar represents a set change in price, for example I have set BTC at $50 USD. Renko can be used to add confluence to other indicators and enter into less risky trend trades.
The Renko chart has clearly bearish since the 9th of November, with BTC breaking below the long held resistance line at 6484 and rapidly dropping to 3900 before finally bouncing off 3300’s. This has clearly been rejected on the 17th of December when we moved from 3382 to 3938 in two days with a forecasted target of 4416 representing the next area of resistance. I conservative trader would wait for a line of resistance to be broken, and then enter the trade with more confidence, so if 4100 area
Moving Averages, are widely used and one of the most important technical indicators. There are two commonly used MAs, SMA and EMA . SMA (Simple MA) simply takes adds up the closing price over a given period say, 5 days, and divides that number by the number of periods. Eg, 10,12,14,16,18 = 70/5 = 14. The EMA (Exponential) then weights those numbers to place greater significance on the more recent price data points. I use the EMA as it tends to provide a more relevant indicator of recent/current and therefore possible future price actions. I use 5 EMA’s on this chart, based on Fibonacci numbers (9,15,21,55,200).
The EMA’s have been clearly bullish since the 9th of November, with a good spread between the difference EMA , until the 9,15 and touch the candlestick bodies early in December. They then continued down, although more weakly then the previous move until we hit the 3300 level of resistance. With little price movement and contracting price bands the EMA were gradually leveling off. Then on the 17-19th we have seen the price clearly cross the 9,15 and 21 day EMA with the 55EMA in ear shot. The 200 EMA is at 5200, so we are still 1000+ clear of that target.
THE DMI ( Directional Movement Index/Indicator) measures the MA of a price change over a given period of time, 15 days in my case. The DMI is popular with trend traders because it provides clarity on the strength and direction of a trend. There are three lines, the +DMI or +DI in green, the -DMI or -DI which is in the red, and the ADX which is an weighted average of the two that tells up are we trending down/up. Basically when the green crosses over the red, and also the yellow, with conviction we have a strong bullish trend in play. Vice versa. The line on the top, is referred to as the ‘dominate DMI’. The long the the MA has remained in a tight price band, the more likely an outbreak will be substantial.
The DMI presented a very clear signal from since the crossover on the 7th of November to it’s peak in divergence on the 24th of November. The -DMI and the ADX were clearly trending bearish . What could be interpreted a false bounce/price reversal occurred from the crossover bullish on the 25th of November to the bearish cross over on the 3rd of December. The bearish trend continued until the 7th of November then we started to see some divergence between price (that continued to drop) and the -DMI that weakened in strength. This was a signal that the strength of the bull trend was weakening. Since the 17th of December we have seen both the -DMI and the ADX weaken rapidly, finally crossing the +DMI on the 19th of December. This is set up represents a low risk entry, as the -DMI has managed to go from below the 25 level, confidently cross the -DMI/ADX and also the price has broken a major S&R level. Source link
0 notes
Text
These 3 stocks may offer 17-19% returns in 6 months
We expect the Nifty to form a higher base by consolidating in a broader range of 10,400–10,850 that would pave the way for the next leg of the upmove.
The Nifty on the weekly chart formed a ‘Hammer’ candlestick pattern with a long lower shadow indicating buying demand emerging near the 50 percent retracement (around 10,440 levels) of the last leg of the upmove (9,952–10,929).
The index witnessed a sharp rebound from the support level and is currently consolidating near 10,600 levels. We expect the index to maintain a positive bias, amid high volatility, and extend the upmove towards 10,850 levels, which is the confluence of the 80% retracement (10,827) of the last leg of decline (10,929-10,418) and placement of the falling trend line (around 10,850 levels) drawn adjoining the January-May high.
Over the past two weeks, the index underwent a secondary phase of healthy consolidation as it cooled off from the overbought situation that developed after the 10 percent rally (9,952-10,929) seen over the last two months.
Going forward, we expect the Nifty to form a higher base by consolidating in a broader range of 10,400–10,850 that would pave the way for the next leg of the upmove.
Thus, any breather from here on should be capitalised to accumulate quality stocks in a staggered manner. The improving price structure makes us comfortable to shift the support base upward to 10,400, being the:
a) 50% retracement of the move (9,952-10,929), placed at 10,440 b) Last week’s low placed at 10,418
Structurally, the Nifty Midcap and Smallcap have held on to their March lows and formed a potential double-bottom by forming a hammer candlestick pattern on the weekly chart. The placement of the hammer candle at the bottom indicates a bullish reversal. This structural improvement augurs well for the broader market. We expect the broader markets to outperform in the coming session.
Here is a list of top three stocks that could deliver 17-19% return in the next six months:
Pfizer: Buy| Target: Rs 2,960| Stop Loss: Rs 2,240| Return 19%| Time Frame 6 months
The share price of Pfizer India is in a strong uptrend forming rising peak and rising trough and has recently registered a Flag breakout in the monthly chart highlighting the strength in the uptrend which offers a fresh entry opportunity from a medium-term perspective.
The stock entered a sideways consolidation mode after hitting a 52-week high of Rs 2,369 in mid-February 2018 and, thereafter, oscillated in a price band of Rs 2,350 to Rs 2,050 in the last three months.
Pictorially, this sideways consolidation has taken the shape of a bullish Flag pattern as highlighted in the adjoining chart.
The resolute breakout from the bullish Flag pattern in current months trade signals conclusion of the secondary corrective phase and resumption of the primary uptrend thus provides fresh entry opportunity.
The stock has major support in the range of Rs 2,150-2,200 being the confluence of 80% retracement of the previous up move from Rs 2,050 to Rs 2,549 and 12-months EMA.
Time-wise, the stock has seen a faster retracement of the last falling segment as nine weeks decline from Rs 2,369 to Rs 2,080 was completely retraced in just four weeks signalling a robust price structure.
Based on the above technical observation the stock is likely to continue with positive bias and head towards Rs 2,978 levels being the measuring implication of the flag breakout.
The height of the pole of the flag 688 points (2369-1681=688) added to the breakout area of Rs 2,300 projects upside towards Rs 2,978 (2300+ 688=2978).
AIA Engineering: Buy| Target: Rs 1,850| Stop Loss: Rs 1,440| Return 17%| Time Frame 6 months
The share price of AIA Engineering is in a strong uptrend forming a rising peak and rising trough and has recently registered a breakout above the three months consolidation (Rs 1,350-1,494). Thus, it offers a fresh entry opportunity from a medium-term perspective.
The base of the last three months consolidation is placed at the major support area around Rs 1,340-1,390 as it is the confluence of the following technical parameters:
a) A rising trend line support joining the major lows since September 2016 currently placed at | 1390 b) the long-term rising 52 weeks EMA, which has acted as strong support for the stock since April 2016 c) 80% retracement of the previous major up move (| 1273-1709) is placed around | 1360 levels
Time-wise, the stock has already taken 22 weeks to retrace just 80% of the previous 15 weeks up move from Rs 1,273 to Rs 1,709.
The slower pace of retracement of the rally is a cornerstone of a bullish price structure and indicates the corrective nature of price decline.
Among the oscillators, the weekly MACD has generated a bullish crossover above its signal line thus supports the positive bias in the stock.
Based on the above technical parameter we expect the stock to continue with its current uptrend and head towards Rs 1,850 as it is the 138.2% external retracement of the entire previous decline (| 1709-1320).
Taj GVK Hotels & Resorts: Buy| Target: Rs 265| Stop Loss: Rs 205| Return 17%| Time Frame 1 month
The stock has registered a resolute breakout above the bullish flag pattern highlighting the strength in the uptrend and offers a fresh entry opportunity from a medium-term perspective.
The base of the flag pattern is placed at the crucial support area of Rs 205-210 as it is the confluence of the 50% retracement of the previous up move (Rs 152 to 263) and the trendline support joining previous high placed around Rs 210 levels signalling robust price structure.
Time-wise, the stock has already taken 24 sessions to retrace just 50% of the previous 20 sessions up move from Rs 152 to 263. A shallow price wise correction indicates robust price structure that augurs well for next leg of up move.
Among the oscillator, the weekly 14 period’s RSI remains in an uptrend and is seen taking support at its nine period’s average thus validates the positive bias in the stock.
We expect the stock to maintain positive bias and head towards Rs 268 being the 161.8% extension of the previous up move (208-243) as projected from the recent trough of Rs 210. This signals an upside towards Rs 268 in the short-term.
Capital Ways Investment Adviser 605, Industry House , AB road Indore (MP) 452001 [email protected] Contact Us: 08517810864 https://www.capitalways.com/
0 notes
Text
MACD Half Trend Forex Trading Strategy
How do you get a high probability trading setup? High probability trade setups typically occur when there are multiple indications that price is going a certain direction. This is called confluence.
In trading confluence is when there are several indicators or technical charting analyses that point towards the same direction. It may be a candlestick pattern coinciding with an indicator. It could also be a support or resistance bounce coinciding with an oversold or overbought market condition. It could also be two or more indicators pointing the same direction quite at the same time. Whatever way you approach confluences in technical analysis, as long as the indications are complimentary, it usually results in an increased probability. However, using technical indicators present an advantage due to its objectivity. It allows traders to simply follow rules and filters based on the strategy and decide accordingly.
The MACD Half Trend Forex Trading Strategy is one which makes use of two very popular technical indicators. These indicators are complimentary and when both indicators provide signals at the same time, it usually results in a high probability trade setup.
Moving Average Convergence and Divergence
The MACD or Moving Average Convergence and Divergence is pretty much a standard oscillating indicator, which is widely used by technical analysts. You would even hear about it being used in market analysis news on TV.
The MACD is simply an oscillating indicator based on the crossing over of moving averages. It is composed of three moving averages. The first two are usually Exponential Moving Averages (EMA). One is fast while the other is slow. The slower moving average is then subtracted to the faster moving average. The difference is then usually plotted as a histogram bar. Positive bars indicate a bullish market condition while negative bars indicate a bearish market condition. The crossing over from positive to negative is in itself a trend reversal signal. This is because if you would consider it closely, it is actually a crossing over of two moving averages.
Then, we have a signal line. The signal line is usually a Simple Moving Average. The crossing over of the histogram bars and the signal line could then be another entry signal. Signals using this method is usually filtered by whether the signal line and histogram is positive or negative. This is because of the assumption that these two would always be drawn to the midline, which is zero. This method is popular among mean reversal traders.
Half Trend Indicator
The Half Trend Indicator is another custom indicator that has been gaining popularity lately and probably with good reason.
The Half Trend Indicator is a trend following indicator which is printed on the price chart itself. It is composed of lines and bars attached to the line. Whenever it is bullish, the bars are drawn below the line. Whenever the market is bearish, the bars are then drawn above the line. The indicator also changes colors whenever it detects a change in trend.
If you would closely examine the Half Trend Indicator, you would notice how high the probability it has of having a correct reading of the trend. Many of the signals it produces even usually would result in high returns.
Trading Strategy
This strategy is based on the confluence of the MACD and the Half Trend indicator. The entry signal from the MACD will be based on the crossing over of the histogram over the midline. This is a basic entry strategy used by traders who use the MACD. However, when this entry signal is combined with the trend reversal signal of the Half Trend Indicator, the probability of having a profitable trade becomes even better. These two complimentary indicators seem to do very well together.
Indicators
HalfTrend-1.02
Amplitude: 4
MACD
Timeframe: 1-hour, 4-hour and daily timeframes
Currency Pair: major and minor pairs
Trading Session: Tokyo, London and New York
Buy Trade Setup
Entry
The MACD histogram should cross from negative to positive indicating a possible bullish trend reversal
The Half Trend Indicator should change to blue with the bars shifting below the line indicating a possible bullish trend reversal
These two bullish entry signals should be somewhat aligned
Enter a buy order on the confluence of the above conditions
Stop Loss
Set the stop loss below the Half Trend Indicator
Exit
Close the trade if the MACD histogram crosses back to negative
Close the trade if the Half Trend Indicator changes to red
Sell Trade Setup
Entry
The MACD histogram should cross from positive to negative indicating a possible bearish trend reversal
The Half Trend Indicator should change to red with the bars shifting above the line indicating a possible bearish trend reversal
These two bearish entry signals should be somewhat aligned
Enter a sell order on the confluence of the above conditions
Stop Loss
Set the stop loss above the Half Trend Indicator
Exit
Close the trade if the MACD histogram crosses back to positive
Close the trade if the Half Trend Indicator changes to blue
Conclusion
This simple trading strategy based on confluence of two popular and widely used indicators is a high probability trend following strategy, which also allows traders to catch big trending moves.
This strategy allows traders to catch trades that could result in a reward-risk ratio of 3:1 or even more. This allows traders to be in profit even if some losses would occur. Add to it the fact that trades usually end up being high probability trade setups.
Trade management is also a good thing to master when using this strategy. There are some cases when the trend would reverse in spite of the confluence, right after a short thrust towards the direction of the trade. Moving the stop loss to breakeven would allow traders to earn a profit even if price does reverse a bit too early.
Forex Trading Strategies Installation Instructions
MACD Half Trend Forex Trading Strategy is a combination of Metatrader 4 (MT4) indicator(s) and template.
The essence of this forex strategy is to transform the accumulated history data and trading signals.
MACD Half Trend Forex Trading Strategy provides an opportunity to detect various peculiarities and patterns in price dynamics which are invisible to the naked eye.
Based on this information, traders can assume further price movement and adjust this strategy accordingly.
youtube
Recommended Forex Metatrader 4 Trading Platform
Free $30 To Start Trading Instantly
Deposit Bonus up to $5,000
Unlimited Loyalty Program
Awards-Winning Forex Broker
Click Here for Step By Step XM Trading Account Opening Guide
How to install MACD Half Trend Forex Trading Strategy?
Download MACD Half Trend Forex Trading Strategy.zip
*Copy mq4 and ex4 files to your Metatrader Directory / experts / indicators /
Copy tpl file (Template) to your Metatrader Directory / templates /
Start or restart your Metatrader Client
Select Chart and Timeframe where you want to test your forex strategy
Right click on your trading chart and hover on “Template”
Move right to select MACD Half Trend Forex Trading Strategy
You will see MACD Half Trend Forex Trading Strategy is available on your Chart
*Note: Not all forex strategies come with mq4/ex4 files. Some templates are already integrated with the MT4 Indicators from the MetaTrader Platform.
Click here below to download:
Save
Save
Get Download Access
La entrada MACD Half Trend Forex Trading Strategy se publicó primero en Forex MT4 Indicators.
MACD Half Trend Forex Trading Strategy published first on https://alphaex-capital.blogspot.com/
0 notes