#Electrical Box Quality Guide
Explore tagged Tumblr posts
Visit Tumblr Blog
Explore Tumblr blogs with no restrictions, modern design and the best experience.
Last Seen Tumblr Blogs


Fun Fact
Tumblr Inc. has $15.1M in annual revenue.
Text
How to Check the Quality of a Modular Surface Gang Box

When buying Modular Surface Gang Boxes, quality should be your top priority. High-quality gang boxes ensure durability, fire resistance, and secure fitting of switches and sockets. Start by checking the material—prefer heavy-duty polycarbonate or high-grade plastic. The box should have a strong frame, smooth surface, and accurate cut-outs. Inspect the fitting mechanism—loose or misaligned slots are a sign of poor build. Also, make sure the gang box complies with BIS or ISI standards. Trusted brands usually provide warranties and proper labelling, helping you make the right purchase. Investing in premium Modular Surface Gang Boxes guarantees safety and long-term performance for both residential and commercial setups.
#Modular Surface Gang Boxes#Quality Gang Box Check#Electrical Box Quality Guide#How to Choose Modular Gang Box#Safe Modular Gang Boxes
0 notes
Text
Lilith through the Degrees😫😫
0° – The Raw Rebel
Lilith’s energy is undiluted and intense here. This person is unapologetically rebellious and often triggers strong reactions from others without trying. They exude raw, untamed power.
1° – The Independent One
Lilith at this degree craves absolute independence. There’s a fearless, pioneering quality, but also a tendency to push others away due to a “me against the world” mindset.
2° – The Sensual Siren
A deeply magnetic energy—whether consciously or not, these people attract strong desires and obsessions from others. There’s a connection to pleasure, beauty, and indulgence.
3° – The Trickster
Lilith at this degree has a playful but chaotic nature. There’s an ability to manipulate situations, often without even realizing it. Words and wit are weapons here.
4° – The Silent Power
A deeply reserved yet unshakable presence. They don’t need to scream to be intimidating—just their energy alone makes people respect (or fear) them.
5° – The Free Spirit
Lilith here refuses to be boxed in by tradition or rules. There’s a strong urge to break societal norms, especially regarding gender roles, relationships, or creative expression.
6° – The Forbidden Healer
Lilith at this degree has a deep connection to pain, healing, and transformation. They may attract wounded souls or play the role of a guide, but their wisdom often comes from personal suffering.
7° – The Seductive Mind
A mix of mystery and intelligence—people with this placement can be dangerously charming. They know exactly what to say to pull others in (or push them away).
8° – The Power Player
Lilith at 8° is all about control, dominance, and influence. These individuals either own their power or find themselves caught in power struggles with others.
9° – The Untamed Dreamer
A deeply idealistic yet rebellious energy. This person may struggle with feeling trapped in reality, constantly seeking a life that is wilder, freer, and more meaningful.
10° – The Social Rule-Breaker
Lilith here challenges societal structures. They may be known for rejecting authority, questioning norms, or reshaping institutions in a way that benefits the “outsiders.”
11° – The Unpredictable One
This degree gives Lilith an erratic, electric energy. Others can’t predict them, and that makes them both intriguing and intimidating. There’s a genius-madness balance here.
12° – The Illusionist
Lilith at 12° is skilled at blending in while secretly staying untamed. They can play the role society expects, only to break free when least expected. A master of deception.
13° – The Boundary Destroyer
This placement rejects restrictions—whether it’s in relationships, spirituality, or lifestyle choices. They may also struggle with blurred personal boundaries, either craving total control or none at all.
14° – The Enigmatic Siren
A powerful mix of intellect and seduction. These people often have a quiet magnetism that makes others curious about them. They attract attention without even trying.
15° – The Shadow Walker
Lilith at 15° moves between light and darkness with ease. They may feel drawn to taboo topics, the occult, or hidden power structures. Their presence alone can feel haunting.
16° – The Unchained Heart
They crave absolute emotional and physical freedom. Relationships must be equal and liberating, or they’ll run. This degree can also make them immune to emotional manipulation.
17° – The Disruptor
Lilith here embodies chaos as a catalyst for change. They may struggle with constantly being “too much” for others, but their rebellious energy forces necessary growth.
18° – The Dark Visionary
A deep connection to hidden truths, psychic insights, and underground power. Lilith at this degree often challenges people’s comfort zones with their ideas, art, or energy.
19° – The Siren’s Curse
Magnetic but dangerous—Lilith at 19° attracts obsessive energy from others. They have an intense, hypnotic aura but must learn to protect their own energy from toxicity.
20° – The Unforgiving One
Lilith here holds grudges forever. If betrayed, they will burn bridges without hesitation. Others may see them as cold or detached, but they simply refuse to tolerate disrespect.
21° – The Wild Wanderer
They reject routine, comfort zones, and anything that feels too safe. Lilith at 21° is a cosmic drifter, always searching for a new thrill, experience, or untamed passion.
22° – The Ruthless Strategist
Lilith at this degree is calculating, patient, and in full control of their power. They don’t act impulsively—they move like a chess player, always ten steps ahead.
23° – The Hypnotic Rebel
A rebellious nature that draws people in rather than pushing them away. They challenge norms so effortlessly that others feel naturally compelled to follow them.
24° – The Forbidden Lover
A highly seductive yet elusive energy. This placement often involves themes of taboo love, forbidden attraction, or power struggles in relationships.
25° – The Untouchable One
They have an air of mystique and danger that makes others obsessed—but they remain emotionally distant. People want to figure them out, but they rarely let anyone in.
26° – The Unbreakable Force
Lilith at 26° is resilient and relentless. No matter how many times they’re knocked down, they come back stronger. Others may fear their ability to rise from the ashes.
27° – The Subtle Destroyer
They don’t look like a troublemaker, but their mere presence challenges the status quo. Their power lies in their quiet defiance—they dismantle systems from the inside.
28° – The Cosmic Witch
Lilith here is deeply spiritual, intuitive, and connected to the unseen. They often feel like an outsider in this world, drawn to magic, astrology, or esoteric knowledge.
29° – The Fated Femme Fatale
A karmic placement—Lilith at 29° feels destined for intense, transformative experiences. They may struggle with being either feared or desired, but never ignored.
#astro notes#astrology#birth chart#astro observations#astro community#astrology observations#astrology community#astro#astroblr#astrologyposts#astrology content#astrology degrees#lilith
2K notes
·
View notes
Text

I don't want to put anyone in the notes on the print/steal a replacement knob for an oven post on blast but nope. wrong. printer beam attack.

also wrong, but with more qualifiers. Taking a peek at the local hardware store, a low end stove is in the $800s on sale. A good medium-high quality 3D printer is also in the $800s. A cheapshit 3D printer can be had for $200. So you can do the math on that one.
But to discuss a 3D printer paying for itself in home repairs, that's actually pretty easy.
I got a 3D printer for about $800 in 2018. In the last two years, for home repairs, improvements, and quality of life, I've printed about:
30 custom color matched brackets for a lighting system, none of which could be purchased. To approximate it, you'd need to buy all of the pieces and then modify them using sandpaper, primer, and paint and just the materials to modify the pieces would run you about $30 and 2-3 days of work.
Nail guides for installing a pocket door, not a purchasable item
12 fancy shelf brackets for the bathroom closet, $10+ per piece
36 basic shelf brackets for the basement storage racks, $5+ per piece
various glue and cut guides
cover for drier exhaust tube hole
4 brackets for curtain to cover unwanted mirror, can't be bought
6 custom brackets for curtains over main windows, can't be bought
2 windowsill cleats to tie off the curtain pulls, $5+ each
3 bends for the hand rail replacement project, $60+ each
blast gates for dust collection system for power tools in the basement, $30 per gate
30 clips for the gallery hanging system to work with my cheapass frames, the clips that don't work are $2+ a piece
plumbing pieces for the wet/dry vacuum, can't be bought
plumbing pieces for the rain collection system, can't be bought, similar parts $15/piece
various small boxes and organizers, $5-30 piece
tabs to secure forces air register covers to the wall, $0.50/piece but they'd look like shit
and some stuff I'm forgetting
Not counting the things that couldn't be bought, gas to run to the store, shipping costs, or the money my time is worth and using the minimum estimates, that list totals $1017. Estimating the uncountables, I guess that I've gotten upwards of $2000 of value from the printer.
Materials cost, not counting the printer:
about two hours per model (average, some take like 10 minutes) to create the model, total 32 hours. At $20/hr for my time, that's $640.
about two hours per print run (average, some take a few minutes, others take 6 hours).
electricity for the computer to model and the printer to run. Given that heating and cooling and cooking in this house is all electric, I consider this round off to the total costs of operating the house.
filament to feed the printer: three reels at $30/reel (estimated) = $90
That totals about $730 of costs to operate the printer.
Subtracting operating costs from obtained value, I get $1270. So in two years, the printer has well and thoroughly paid for itself and left $400+ in my pocket.
And the convenience of having parts made exactly the way I want them, the first time, with limited modifications, almost zero waste, and almost instantly is truly a lifesaver. I cannot overstate how much better that has made my life. I can start work on something, realize I need a part, and have the part ready to go by the time the work gets to where the part is needed. And I live super close to the store; it would be even more valuable to me if I lived further from the store.
and for funsies I've also printed:
hand wheel for antique sewing machine. If you can buy the parts, it'll run you over $1000.
Spinning wheel. IDK $300-$3000.
cute watering can for my plants. Can't buy it but equivalent would be $30-50.
and more!
I joke about the 3D printer being my most valuable tool but it really is. Many, most even, of my most annoying problems can be solved with it.
#While I'm having unwanted opinions on the internet#3D printing#Ill advised posts#$400 ain't much but it ain't nothing that's for sure#And it's been fun to run the numbers#So much stuff I couldn't have or do without the printer#And I really don't make novelties and toys#This is a utility printer for solving problems
13 notes
·
View notes
Text
Magura (Monster)

(Realistic Magmar by Namh on Deviantart)
(I mentioned these earlier in @thecreaturecodex's ask box before we started actually talking, and here they are, published to tumblr! Magura started as a servitor race for the Great Old One Cthugha, who is relevant to a character from my Strange Aeons game, and was inspired by the pokemon Magmar, even if it quickly spiraled in its own direction.)
CR9 NE Medium Aberration (Fire)
Magura are a race of intelligent, omnicidal beings who seek to cleanse the universe of life through the detonation of stars. They travel through space on massive fiery skiffs powered by solar sails on a search for stellar systems to annihilate. An average magura citizen is a scholar of these astral detonations and of alien technology, being well-versed in arcane secrets and occult philosophies about destruction, the planes, and fire. Despite this, many magura are spiritual, and the worship of fiends and outer gods (particularly daemons) is a common part of magura societies.
Magura philosophy understands the material plane, if not creation itself, as a mistake on the part of the gods- a material existence can only lead to suffering, as interpersonal connections and material goods are lost, destroyed, or simply fade to the sands of time. Their answer to this philosophical quandary is to destroy the material plane by snuffing out stars one by one. True to their beliefs, magura do not collect material possessions for any purpose other than practical use, and even then, many destroy or dispose of tools even if there’s a potential future use, much like other mortals have the opposite affinity.
Magura bodies subsist on solar energy in a process not unlike photosynthesis, though with different chemical pathways. Magura appreciate the irony that they rely on the stars they destroy to move and survive, and acknowledge that the completion of their goal will cause the extinction of their race- this is a sacrifice they are comfortable making, especially as it’s rather far into the future.
Magura leaders are called Magura Guides. Magura Guides can cast spells as an 8th level wizard, and often advance their levels in Wizard or Rogue.
This man-sized creature resembles an upright reptile, but its head has a pointed beak and is covered in large, bulbous growths. Misc- CR9 NE Medium Aberration (Fire) HD14 Init:+7 Senses: Perception:+15 Aura: Flamestoke 60ft Stats- Str:21(+5) Dex:17(+3) Con:17(+4) Int:22(+6) Wis:16(+3) Cha:18(+4) BAB:+10/+5 Space:5ft Reach:5ft Defense- HP:119(14d8+28) AC:22(+3 Dexterity, +13 Natural, +6 Deflection) Fort:+10 Ref:+7 Will:+12 CMD:28 Resist: Acid 5, Electricity 5 Immunity: Fire, Disease Weakness: Vulnerable to Cold Special Defenses: Heat Shimmer Offense- 2 Claw +16(1d6+5 plus Burn) CMB:+15 Speed:30ft Special Attacks: Burn (2d6, DC19) Feats- Great Fortitude, Improved Initiative, Power Attack (-3/+6), Combat Expertise (-3/+6), Improved Dirty Trick, Greater Dirty Trick, Improved Feint, Weapon Focus (Claw) Skills- Acrobatics +15, Bluff +12, Escape Artist +9. Fly +15, Heal +6. Knowledge (Arcana) +10, Knowledge (Planes) +14, Linguistics +10, Perception +15, Sense Motive +12, Spellcraft +18, Stealth +15, Use Magic Device +13 Spell-like Abilities- (Caster Level 10, Concentration +14) Burning Gaze (DC15) /constant Fireball (DC17), Major Image 3/day Special Qualities- No breath Ecology- Environment- Space (Hot) Languages- Ignan Organization- Solitary, Wave (4-6 Magura, 1 Magura Guide) Treasure- None Special Abilities- Convection Flight (Ex)- In areas of intense heat, magura are particularly buoyant; they gain a fly speed of 40ft and a maneuverability of average. Flamestoke Aura (Su)- Mundane fires around a magura are empowered by a magura’s internal heat. The Reflex DC to avoid or put out a mundane fire within a flamestoke aura increases to 18, and the damage dealt increases to 2d6. Heat Shimmer (Su)- A magura’s internal heat warps the air around it, causing a visual distortion. Magura have concealment (50% miss chance) against ranged attacks and a deflection bonus to AC equal to its intelligence modifier. Creatures with the fire subtype can see through this effect.
69 notes
·
View notes
Text
Unique and Practical Gifts for Him

Finding the perfect gifts for him the men in your life doesn’t have to be a struggle. Whether you’re shopping for your partner, father, brother, or friend, here are some unique and practical gift ideas.
1. Subscription Services: Monthly subscription boxes make excellent gifts. Consider options like grooming kits, coffee deliveries, or book clubs. For whiskey or beer lovers, a craft subscription service could be a hit.
2. Tools and Equipment: Practical gifts are always appreciated. A high-quality multi-tool, a durable toolbox, or a set of precision screwdrivers are great for DIY enthusiasts. If he enjoys grilling, a personalized BBQ set or a smoker can make his weekends even better.
3. Wellness and Self-Care: Encourage him to relax and recharge with wellness gifts. A massage gun, an aromatherapy diffuser, or a weighted blanket can enhance his downtime. For skincare, invest in a luxurious grooming kit or a high-end electric razor.
4. Tech Essentials: Upgrade his tech setup with practical devices like a laptop stand, wireless keyboard, or noise-canceling headphones. If he works from home, an ergonomic chair or desk lamp can transform his workspace.
5. Sports and Fitness Gear: For the fitness enthusiast, new workout gear, a water bottle with time markers, or a yoga mat can motivate his routine. Golfers might love personalized golf balls, while cyclists could use a bike repair kit or a compact toolset.
6. Unique Experiences: Instead of a physical gift, surprise him with an experience. A guided fishing trip, a sports game ticket, or a day at a luxury spa can provide unforgettable memories.
The key to choosing the perfect gift lies in understanding his interests and daily needs. Whether it’s something practical, luxurious, or purely fun, your effort in picking the right gift will undoubtedly make him feel appreciated.
2 notes
·
View notes
Video
youtube
The Ultimate Guide to Selecting the Perfect Bedding
Selecting the right bedding is crucial for a good night's sleep. Bedding not only serves the practical purposes of hygiene and mattress protection but also adds a decorative click here to learn more touch to your bedroom. A complete bedding set typically includes a flat top sheet, pillow covers, a blanket, quilt, or duvet cover, and bed cushion covers, all of which are designed to be removable and washable for easy care.
Understanding Mattress Selection
Choosing the right mattress is a decision that impacts your sleep quality and spinal health. On average, humans spend a third of their lives sleeping, making the mattress an essential investment for well-being. A comfortable mattress supports your spine and can alleviate the fatigue of daily life, ensuring restful sleep. When your mattress shows signs of wear, such as stiffness, back pain, or visible sagging, it's time to consider a replacement, typically every 7-10 years according to the National Sleep Foundation.
Mattress Technologies
There are three primary types of mattress cores:
Latex Foam Springs Each technology caters to different preferences, needs, and body types.
Latex Mattresses
Latex mattresses are known for their comfort and durability. Made from rubber, they offer excellent elasticity and support, making them a long-lasting choice. Both natural and synthetic latex have hypoallergenic properties, beneficial for allergy sufferers. They are often recommended for individuals with back issues due to their supportive nature and good moisture management.
Foam Mattresses
Foam mattresses come in various types, including polyurethane, high resilience, and memory foam. A key factor is density; for optimal support, choose foams with a density above 35 kg/m³. High resilience foams provide better comfort and longevity, while lower densities are suitable for children or lighter adults. Foam mattresses are also lighter and easier to handle compared to other types.
Spring Mattresses
Spring mattresses are popular for their natural ventilation and ability to absorb body movements, making them ideal for those who tend to sweat at night. Technologies within this category include biconical springs, pocket springs, and continuous wire springs, each offering different levels of support and comfort.
Additional Considerations
Mattress Reception: The top layer of the mattress determines your initial comfort. Materials like wool, cashmere, and cotton can vary in softness and firmness.
Thickness: A minimum of 14 cm is recommended for a mattress, with 14-20 cm being the ideal range for ease of handling and fitting sheets.
Box Spring: The box spring acts as a shock absorber, extending the life of the mattress and aiding in ventilation. It should be firm, flat, and compatible with the mattress.
Ventilation: Good ventilation is essential for a mattress to expel moisture and maintain hygiene.
Relaxation Sets: TPR (Head and Foot Lift) sets offer individual positioning and can include electric options for added comfort and support.
Sleeping Independence and Mattress Firmness
Sleeping Independence: High-density mattresses or two separate mattresses can provide independent support for partners with different sleeping habits. Mattress Firmness: The firmness should match your body type, with balanced options for slender individuals and firmer choices for those with a larger build.
Mattress Sizes and Special Considerations
Sizes: Mattresses come in various sizes, from single (90 × 190 cm) to larger double options (up to 180 × 200 cm).
Allergies and Back Pain: Look for hypoallergenic materials like latex and consider mattresses with differentiated support zones for back issues.
Specialized Mattress Features
Pocket Springs: Offer targeted support and are ideal for couples.
Memory Foam: Originally developed by NASA, memory foam adapts to body shape and reduces pressure points, improving sleep quality.
Mattress Toppers and Maintenance
Mattress Toppers: These add an extra layer of comfort and can adjust the firmness of your mattress while also protecting it.
Maintenance: Regularly turning and flipping your mattress, as well as using mattress protectors, can extend its lifespan and maintain hygiene.
2 notes
·
View notes
Text
How do you plan an out of state move in 2024?
Planning an out-of-state move can be a complex and stressful process, but with careful planning and organization, you can ensure a smooth transition. Here’s a comprehensive guide to help you begin:
Research Your New Location:
Cost of Living: Begin by comparing the cost of living between your current state and the new one. This includes housing, groceries, utilities, and taxes. Websites like Numbeo can provide detailed comparisons.
Housing: Look into neighborhoods, housing prices, and rental options. Consider factors such as proximity to work, safety, amenities, and school quality if you have children. Online platforms like Zillow and Realtor.com are excellent resources.
Job Market: Investigate job opportunities and the local economy. Sites like Indeed and LinkedIn can help you understand the job market and connect with potential employers.
Lifestyle: Consider the climate, local amenities, schools, and community culture. Explore forums, social media groups, and local news sites to get a feel for the area.

Budgeting:
Moving Costs: Get estimates from moving companies or calculate costs if you plan to move yourself. Include packing materials, transportation, and potential storage fees. Companies like U-Haul provide cost calculators for DIY moves.
Travel Expenses: Budget for gas, flights, hotels, and meals if you’re driving. Websites like GasBuddy can help estimate fuel costs, and travel sites can assist with finding affordable accommodation.
Initial Setup: Plan for deposits, initial rent, utility setup, and any immediate purchases needed upon arrival.
Create a Moving Timeline:
Plan Ahead: Start planning 2–3 months in advance to avoid last-minute stress.
Checklist: Develop a detailed checklist of tasks to be completed each week leading up to the move. This should include everything from hiring movers to packing specific rooms.
Hiring Movers vs. DIY
Consider hiring professional movers by researching and selecting a reputable moving company. Check reviews on sites like Yelp and get multiple quotes to compare prices and services.
DIY Move:
If you decide to move yourself, rent a truck, recruit friends and family, and plan the logistics of driving and unloading. Ensure you have the necessary equipment like dollies and moving blankets.
Declutter and Organize:
Inventory: Take an inventory of your belongings. This helps in estimating moving costs and ensuring nothing gets lost.
Declutter: Sell, donate, or discard items you don’t need. This reduces the volume of items to move and can save money.
Organize: Label boxes clearly by room and content. Use a color-coded system or numbered labels to simplify unpacking.
Update Your Information:
Address Change: Update your address with the postal service, banks, subscription services, and any other relevant parties.
Utilities and Services: Arrange for the disconnection of utilities at your current home and setup at your new home. Ensure you transfer internet, cable, water, and electricity services in time.
Licenses and Registrations: Update your driver’s license, vehicle registration, and voter registration as soon as possible after your move.
Pack Strategically:
Essentials Box: Pack a box of essentials for the first few days, including clothes, toiletries, important documents, and basic kitchen items.
Fragile Items: Pack fragile items with care, using plenty of padding. Clearly label these boxes to ensure they are handled with care.
Room-by-Room: Pack one room at a time and label boxes accordingly. This method makes unpacking more manageable.
Travel Arrangements:
Transport Vehicles: Decide whether to drive your car(s) or have them shipped. Companies like Montway Auto Transport can assist with vehicle shipping.
Pets: Make arrangements for moving pets safely, including carriers, food, and necessary medications.
Accommodation: Book any necessary accommodation if the journey takes more than a day. Plan your route and make reservations in advance.
Settling In:
Unpacking: Start with essential areas like the kitchen and bedrooms to make your new home livable quickly.
Explore: Take time to explore your new neighborhood and meet your neighbors. Familiarize yourself with local grocery stores, pharmacies, and parks.
Emergency Contacts: Find and note down local emergency contacts, such as doctors, vets, and hospitals. Register with local healthcare providers as soon as possible.
Stay Organized:
Keep Records: Maintain a file with all moving-related documents, including contracts, receipts, and inventory lists. This helps in case of disputes or for future reference.
Backup Plans: Have contingency plans in case of delays or unexpected issues. This could include having extra funds for unforeseen expenses or knowing alternative routes.
By following these steps, you can ensure a more organized and less stressful out-of-state move. For personalized assistance with moving in the central Kentucky area, consider reaching out to My 3 Sons Moving and Storage Company.
#moving and storage#out of state moving#moving tips#moving and storage company#state to state moving#out of state relocation#Central Kentucky#United States
5 notes
·
View notes
Text

Hiding an electric box and a storage cabinet can be achieved in various creative ways, depending on your specific situation and preferences.
Here are some ideas: Electric Box:
1; Wall Art;
Use decorative wall art or decals to cover the electric box. Ensure that they can be easily removed for maintenance.
2; Furniture Placement:
Strategically place furniture like a tall bookshelf, a decorative screen, or a console table in front of the electric box to conceal it.
3; Hinged Artwork or Mirror:
Install a hinged artwork or mirror that can be swung open to access the electric box when needed.
4; Cabinet or Shutter Cover:
Install a small cabinet or shutter with hinges that can be opened when access to the electric box is required.
5; Floating Shelves:
Install floating shelves that can be arranged around the electric box, incorporating it into a display of books, plants, or decorative items. Covering an electric panel with a cabinet can be done, but it's important to ensure that you maintain safe and easy access to the panel for maintenance and emergencies.
Here's a step-by-step guide on how you might accomplish this:
1; Materials and Tools Needed:
Cabinet:
Choose a cabinet that fits the dimensions of the electric panel and complements your room's decor.
2; Safety Considerations:
Ensure the cabinet doesn't obstruct the electric panel's visibility and accessibility.The cabinet doors should open easily to allow quick access to the panel.
Do not permanently attach the cabinet to the wall or panel; it should be easily removable.
One Stop Solution for customized dressing room, wardrobes, dressing room, Walk-In Closets, all types of Furniture, Sofa seating and wooden products in UAE. Fully Customized work as per your demand and needs. Storage Management & Organisation. Unlimited Wardrobe Designs.
We Design, We Build.
☑ 💯High Quality Services ✔️
☑.⏲️Delivery of project on committed time✔️
☑🔎Unlimited designs✔️
--------------------------------------
For more update on the projects, at :-
Pinterest; https://www.pinterest.com/malekcarpentry/_created/ Facebook: https://www.facebook.com/almalekcarpentry
YouTube; https://www.youtube.com/channel/UCyMUvEg7ReuI11mwqMl6YNA Instagram; https://www.instagram.com/malekcarpentry/
Website; http://www.malek.ae/
For more details Call us at Tel:
+971 7 2235362
ADMIN: Usman Azhar
Contact: (00971)50 766 8139.
#almalekcarpentry #almalekdesign #interiordesign #WallDecor #homeinterior #InteriorTrend2023 #HomeDesign #MainGateDesign #decoratingideas #rotatingtvstand #arabicmajlis #arabianmajlisdesign #hideelectricbox #mediawalldesign #electricboxcabinetdesign
#almalekcarpentry#arabianmajlisdesign#almalekdesign#interior design#homeinteriors#mediawalldesign#arabicmajlis#home decor#kitchen design#arabicmajlisfurniture#electricboxcabinetdesign#hideelectricbox#InteriorTrend2023#HomeDesign#WallDecor#homeinterior
2 notes
·
View notes
Text
[image id]
Long-form multi-image Screenshot of a Reddit Thread. Transcribed below.
/r/EatCheapAndHealthy
/u/doxiepowder
There is a whole wide world of different beans and legumes, from the humble navy bean stewed down to maximum heartiness to the elegant black lentil tossed in a lemon and dill vinaigrette topped with poached salmon. Unfortunately I see a ton of people just dumping some beans out of a can onto a plate and wondering why their McDonald’s cued palates can’t stand them. My dudes, beans are a staple in nearly every culture and they didn’t get that way by unseasoned tinny chalk balls. Here’s how to bean.
Selecting Beans
Beyond skipping over the canned when you can, not all dried beans are created equal. While they have a super long shelf life in regards to safety and not inculcating anything that would give us a food born illness they have a shelf life of about one year max in terms of quality. This means that the dusty bag on the bottom of the shelf in a suburban grocery store full of non bean eaters might do you wrong unexpectedly. Cooking will take longer, they may never actually get creamy, you may have a lot of withered “floaters” that never soften. Your best bet (in the USA) is to hit up stores that cater to Hispanic populations or vegetarians. Bulk bins are a great sign but not 100% necessary. A Mexican grocery store near me has bulk bins of pinto, black beans, and occasionally mayocoba as well as fresh(!) chickpeas on occasion. A trip to whole foods or a natural food store will net me cannelini beans or great northern beans and a whole rainbow of lentils that even when buying fancy pants organic are still cheaper than almost any other food staple. Have an Indian or Ethiopian grocery store near you? Stock the heck up, and grab spices while you are there. More on that later. The only beans I really buy at big box supermarkets are ones that have them stocked near the middle height of the shelf (spots reserved for higher turnover items) and bags of 15 Bean Soup.
Bean Prep
Once you have your beans look them over a bit before you cook them. A quick rinse in a large bowl of water to get any dust or dirt off, make sure there are no small stones mixed in, and toss any withered up floaters you see.
I have taken a lot of J. Kenji Lopez-Alt's great research and food science to heart and he and Daniel Gritzer have a pretty exhaustive bean guide up on Serious Eats if you want the chemistry but the short take away is you only need to soak thicker skinned beans, soaking can take away some of the quality variability if you don’t know if the beans are fresh, soaking can leach away flavor and nutrients of thin skinned beans like black beans, and you should cook your beans with salt.
If you are soaking you want to put your beans in a large container like a bowl or a Cambro, and cover them with cold water that is about twice their height. If you have an inch-thick layer of beans you want two inches of water above them. Let them sit 8 to 24 hours then cook them up.
Don't add acid until after cooking, and if your tap water has a low pH to where you find beans don't seem to get tender you should cook them with a smidge of baking soda. Start off with half a teaspoon per pound of beans in order to not effect the flavor too much, and adjust as needed to figure out hour much you need depending on how hard or soft your water is. (Most people will not have to adjust their water pH though, this is just outlier troubleshooting.)
Bean Cooking Methods
My Granny knew what was up with pressure cookers. And now that they are improved so much with new model stove top ones and electric ones like the Instant Pot where the risk of blowing beans into your ceiling is negligible it’s one of the best investments for any home cook, even outside of the bean diet. If you don’t want to get one though you will need a large pot with a lid on the stove or a dutch oven in a 250F oven with the lid slightly offset.
Pressure cooking lets you skip soaking without consequence more than any other method, even with older beans. You don’t have to worry about evaporation while cooking. It gives you the maillard reaction throughout the liquid unlike a dutch oven which only accomplishes it on the perimeter (and not at all with the slow cooker), and it’s fast. With an electric one you automate the entire process as well.
Pressure cookers allow less evaporation so you will want your bean to water ratio to be less than other methods but soaking comes into play. I’m about 900 feet above sea level. For soaked beans I cover them with one inch of water above the level of the beans, for unsoaked I cover with two inches of water. If you are at a higher altitude unsoaked beans might require more water. For pots and dutch ovens two inches over soaked beans and three inches over unsoaked will be adequate.
Timing will depend on the bean and the method. Smaller beans cook faster, soaked beans cook faster. They’re done when they are creamy inside and firm outside with few exceptions such as red lentils. THe best way is to just check the package or google what type of bean for which method you are using.
Bean Seasoning
Here’s the real rub for me and my real inspiration for writing this. Y’all under season your beans. Entire wars weren’t fought for spice trade routes just so people could forget what a bay leaf was. Your basic template for flavors is going to be Aromatic + Cooking Liquid + Acid. I know it sounds like a lot going on, but frequently one ingredient can cover multiple elements and just two our of three elements will take you far.
Aromatics
Charred onions or caramelized onions
Mirepoix or trinity
Minced garlic and/or ginger
Fennel
Herbs such as bay leaves, rosemary sprigs, thyme sprigs, sage, cilantro, parsley, oregano, epazote, tarragon
Spices such as cumin, cloves, cardamom, turmeric
Spice blends such as garam masala, Cajun seasoning, Indian curry powder blends, BBQ rubs, Berebere
Chilis. Jalapeno, serrano, dried guajillo, canned chipotles in adobo, hatch chilies, canned diced green chilies. Just chilies.
Cooking Liquid
Stock or broth is bare minimum. Get Better than Bouillon or a similar concentrated stock paste if you don’t want to make your own but if you ever buy a rotisserie chicken you should really try making your own. I’ve used miso paste before when I had nothing else on hand.
A few shakes of Liquid Smoke.
Canned diced tomatoes (with or without chilies)
Some shakes of Fish Sauce AKA Nam Pla
A bit of Worcestershire
A glug of wine
Some beer (maintenance mode)
Acid
Once it’s finished cooking a little acid can go a long way. A splash of vinegar, a squeeze of lime or lemon, hot sauce, buffalo sauce, and suddenly the dish has new heights and depths.
Bonus
A bit of chorizo. Nduja. Some thick smoked ham, or even a bone from a smoked ham. A few sausages. A smoked turkey leg. Tasso. Andouille. A few slices of diced bacon. If it’s meaty and salty and you don’t have enough to make a meal of it use it as a flavoring agent in beans.
Storing Cooked Beans
Fridge ‘em for 5 or 6 days without issue in a covered container or freeze them. Beans freeze wonderfully and you can bulk cook these, put some in a quart ziplock bags and freeze them up to 6 months. This is a great way to cycle through different flavors or types if you are getting burnt out.
Bean Flavor Combos
Black beans + bell peppers, onions, garlic + bay leaves
Black beans + onions + orange peel + all spice
Black Beans + cumin and onion + cilantro + lime
Pinto beans + onion and jalapeno + cumin and epazote
Pinto beans + bacon + canned green chilies
Pinto beans + chorizo + cilantro
Pinto beans + dried chilies + tomatoes + unsweetened cocoa powder + cumin + smoked meat
Pinto beans + dried guajillio peppers + leftover smoked meat + apple cider vinegar
Pinto beans + bacon, onion, serrano + can of diced tomatoes + bay leaf, cilantro
French lentils + garlic, onion, celery + herbes de provence
French lentils + caramelized onions and bay leaves + white wine vinegar
French Lentils + dill and tarragon + lemon juice
Red beans + Cajun seasoning + fish sauce
Red beans + trinity + bay leaves + tabasco
Red beans + Cajun sausage + collard greens + vinegar
Great Northern beans + diced tomatoes + oregano and basil
Great Northern beans + Italian sausage + apple cider vinegar
Great Northern beans + mirepoix and garlic + chicken thighs + parsley, bay leaf, cloves + bacon
Great Northern beans cooked with oregano and fish sauce, drained and mixed with olives, artichoke hearts, lemon juice
Great Northern beans + diced tomatoes + dill, parsley, oregano, hint of cinnamon
Chickpeas + diced tomatoes + fish sauce + liquid smoke
Chickpeas + diced tomatoes + curry powder + ginger and garlic
Chickpeas + bacon + dried chilies + lime juice
Chickpeas + garlic and cumin + tahini + lemon juice
15 bean soup + Old Bay + sausages + spinach + lemon juice
Red lentils + cumin, ginger, and garlic
Red lentils + diced tomatoes + cumin, garlic, and cilantro
Red lentils + onion, cumin, turmeric + serrano pepper
Red lentils + onion + curry powder
Green or brown lentils + jalapeno + turmeric, garlic, ginger + diced tomatoes
Green or brown lentils + mirepoix + berbere + lemon juice
Green or brown lentils + berbere + ginger and garlic + fish sauce
Green or brown lentils + mustard powder + diced tomatoes with chilies + lemon juice
Mung beans + mirepoix + ginger, cumin, jalapeno + lime
Mung beans + diced tomatoes + trinity + kale
Navy beans + ham bone + bay leaf and onion
Go forth and bean.
[/id]


#beans#the more you know#foodways#found on reddit#at least originally#cheap food#eat cheap#recipes#food hacks#cooking hacks#life hacks#trump recession#beans beans beans#trump depression#trump tariffs#the price of eggs#trump tax#trump slump
21K notes
·
View notes
Text
Selection Guide for Mainstream Bluetooth Module Chips for Lithium Battery BMS Protection Boards — Focusing on the KT6368A Dual-Mode Chip

1. Types of BMS Protection Board Products
Currently, many manufacturers produce BMS (Battery Management System) protection boards for lithium batteries, but only a few excel in quality. Insights from repair engineers on platforms like Bilibili provide authentic perspectives. Based on my observations, BMS protection boards generally fall into two categories:
Type 1: Integrated Battery & BMS Systems
Manufacturers combine lithium battery packs and BMS into a single product (e.g., for two-wheel or three-wheel electric vehicles).
Mass-produced and sold as finished battery products or battery boxes.
Type 2: Modular Battery Packs with External BMS
Sellers provide battery packs without built-in BMS (often lacking R&D capabilities or targeting repair shops/hobbyists).
Buyers pair these with external BMS boards and sell assembled battery systems to niche markets.
Key Takeaways:
Standard, high-volume applications typically develop proprietary BMS boards (rarely include Bluetooth).
Low-volume, fragmented markets often use externally sourced BMS boards (Bluetooth is a common feature).
Why Bluetooth Integration Matters:
Enables mobile app interaction for parameter monitoring/configuration.
Enhances user experience, reduces after-sales costs, and increases customer satisfaction.
This analysis aligns product development with customer needs and supports a SWOT evaluation of the KT6368A dual-mode Bluetooth chip. Understanding demand can reveal untapped product potential.
Typical BMS Protection Board Requirements:
Market prefers dual-mode chips for backward compatibility.
Consumers favor WeChat Mini Programs for ease of use.
Supported battery types: Ternary Lithium, LiFePO4 (LFP).
Balancing method: Active balancing.
2. Sample Bluetooth-Enabled BMS Boards Collected Online

1.JDY-33-V1.6 – Bluetooth SPP transparent transmission module (datasheet available).

2. D32 Dual-Mode Bluetooth Module – Supports UART transparent transmission, SPP 3.0 + BLE 4.2, HC-05/06 compatibility.

Feiyitong-based Module (likely high-cost, from an official site).

DX-BT24 Module – Another variant in use.
3. Conclusion
The KT6368A dual-mode Bluetooth chip offers distinct advantages for BMS lithium battery applications:
Compact size & cost-effectiveness make it a top contender.
SOP8 package simplifies integration.
Enables flexible module designs, reducing costs for manufacturers.
By adopting the KT6368A, companies can optimize BMS board designs while maintaining compatibility and affordability.
0 notes
Text
Day 2: Temple, Toro and Trachea, A Most Excellent Day
Our day started walking between two massive tori gates, down a lane of merchants in Asakusa to the Sensoji Temple. The temple is significant because:
1. Historical Significance: Sensoji Temple, also known as Asakusa Kannon Temple, is Tokyo’s oldest Buddhist temple, founded in 645 CE. It is dedicated to Kannon, the Buddhist goddess of mercy, and was established after two fishermen brothers discovered a statue of Kannon in the Sumida River.
2. Iconic Landmarks: The temple complex features the striking Kaminarimon (Thunder Gate) with its large red lantern, a symbol of Asakusa, and the vibrant Nakamise-dori, a shopping street leading to the main hall, lined with traditional shops selling crafts, snacks, and souvenirs.
3. Cultural Hub: Sensoji is a major cultural and religious site, hosting events like the Sanja Matsuri festival in May, attracting millions of visitors annually. Its main hall and five-story pagoda are designated as Important Cultural Properties of Japan.
We reveled in the architecture across the centuries, wrote fortunes and took in people watching before heading out to the Sumida River Promenade.
The river walk quickly took us across the river to Sushiro for a sushi train experience. Virtually contactless, you make your selections on an iPad and they are delivered by conveyor belt to your table. The quality was excellent, variety was good and everybody was able to have a huge lunch for under $17.
The there was nap time back at The Knot before the games began.
Our AirBnB experience this night met up at Ueno station. Eat and Drink Like a Local: Taverns and Ramen. Our guide Akira took us through the back alleys and side streets of Ueno in search of authentic Tokyo food and drink.
Stop 1: Not quite a dive but not exactly fine dining. The atmosphere was electric with a party of business men in the adjoining room whooping it up and blowing off steam. The food was an array of sushi on a sushi boat ranging from salmon to toro to shrimp, and you better suck out the head… We also had soups and a refreshing drink of mixed molassesey liquor and a beer called Hoppy. Oh and the pickled mackerel was not pickled to our liking.
Stop 2: Met by the Tokyo guidos dressed in white linen jackets we were warmly welcomed into a dive that you might find in the backwaters of Luang Prabang. And this is where the trachea comes in to play… We “experienced” pork and not served many ways but rather many “cuts” if pork ranging from tongue, diaphragm to chitlins and, yes, trachea. Luckily there was sake to burn away the flavors that lingered. And the sake was presented in an interesting way by placing the glass inside a lacquer box and then filled beyond overflowing so that the lacquer box was full… Why not just get a bigger glass?
Stop 3: Cocktails on the third story of a narrow row house. We were here to chat about local drinking customs and etiquette and have what’s best described as a whiskey soda. We learned that the Japanese understand what is means to be over-served and so if you see someone sleeping on the street who is fairly well dressed, they are left alone out of sympathy. We also learned it’s polite to pee sitting down, but I’m not sure any of us agree.
Stop 4: The ramen. Amazing chicken ramen. Thick broth. Large slices of chicken. Hearty and delicious. And all in the narrow basement of a small house. Possibly the best ramen…
So with good memories and extremely full bellies we metro’d it back to The Knot for some rest before the next day began.
0 notes
Text
Ambica Cable: A Trusted Name Among PVC Wires and Cables Manufacturers in India
Ambica Cable: Your Reliable Partner for High-Quality PVC Wires and Cables
In the world of electrical wiring, quality, safety, and durability are key. With increasing demand for efficient and long-lasting wiring solutions, PVC (Polyvinyl Chloride) wires and cables have emerged as a popular choice across residential, commercial, and industrial sectors. Among the leading PVC wires and cables manufacturers in India, Ambica Cable has carved a niche for itself through its commitment to excellence and innovation.
Why PVC Wires and Cables?
PVC is a preferred material for electrical insulation due to its:
High thermal and chemical resistance
Flexibility and durability
Fire-retardant properties
Cost-effectiveness
PVC wires are widely used in homes, factories, power plants, and infrastructure projects due to their performance under challenging conditions.
Ambica Cable: Excellence in Every Strand
Established with a strong vision and guided by technical expertise, Ambica Cable has become a leading manufacturer of high-quality PVC insulated wires and cables. Here’s what makes them a standout name in the industry:
Uncompromised Quality
Ambica Cable manufactures all products in compliance with ISI, ISO, and other industry standards, ensuring safety and performance. Every batch goes through rigorous quality checks for conductivity, insulation, and durability.
Wide Range of Products
From single-core PVC wires for domestic use to heavy-duty industrial cables, Ambica Cable offers a comprehensive product portfolio to meet diverse needs.
State-of-the-Art Manufacturing
Using advanced machinery and modern technology, the company ensures precision engineering and consistent product quality in every roll.
Environment-Friendly Solutions
Ambica’s PVC cables are RoHS compliant and built with eco-conscious materials that reduce environmental impact.
Applications of Ambica PVC Wires and Cables
Residential Wiring – Reliable, safe, and long-lasting power solutions for homes.
Commercial Buildings – Ensuring smooth electrical operations in offices, malls, and institutions.
Industrial Installations – Heavy-duty cables designed for high-performance in factories and plants.
Control Panels and Machinery – Efficient wiring for control circuits and industrial automation.
Why Choose Ambica Cable?
Decades of industry experience
Certified and tested products
Competitive pricing
Nationwide distribution network
Customization options based on project requirements
Conclusion
When it comes to choosing reliable PVC wires and cables manufacturers, it’s essential to partner with a manufacturer that values safety, innovation, and customer satisfaction. Ambica Cable checks all the boxes, making it a trusted choice for electrical contractors, builders, and engineers across India.
If you're planning your next electrical project, consider Ambica Cable — where quality meets performance.
Visit:- https://www.ambicacables.com/pvc-wires-and-cables.html
0 notes
Text
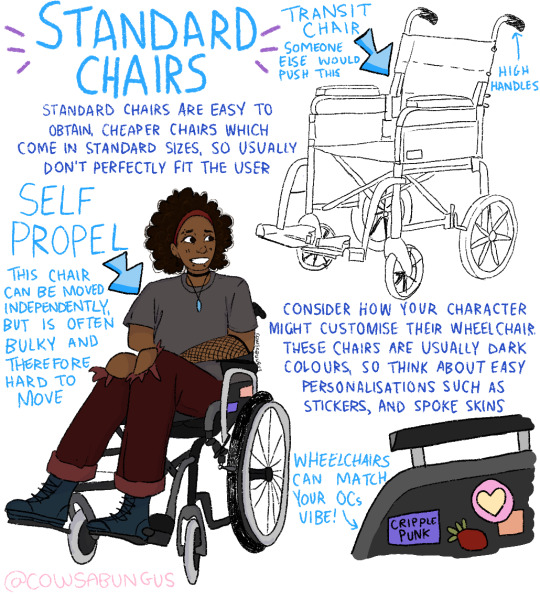
[Art description: Several panels titled, ‘A Guide to Visually Designing Wheelchair Using Characters / (From a Wheelchair User)’ The title panel shows five boxes with red X marks drawn over them and one with a green checkmark. The five X boxes show a person in various inaccurate wheelchair positions, including lying on the floor, sitting with their head sticking out horizontally, and floating upside down above the chair. The subsequent panels have the watermark CowsABunges and are as follows:
1. Standard Chairs: Standard chairs are easy to obtain, cheaper chairs which come in standard sizes, so usually don’t perfectly fit the user. Consider how your character might customise their wheelchair. These chairs are usually dark colours, so think about easy personalisations such as stickers, and spoke skins. [Line drawing of a standard chair with blue text labelling it as a ‘transit chair’ and saying, ‘someone else would push this.’ Separate text emphasises the high handles of the chair.] [Coloured drawing showing a dark-skinned person sitting in the chair, with text that says, ‘Self Propel: This chair can be moved independently, but is often bulky and therefore hard to move.’] [Coloured drawing of one edge of the chair, which has a sticker that says, ‘Cripple punk’ as well as a strawberry sticker and a heart sticker, with descriptive text that says, ‘Wheelchairs can match your OC’s vibe!’]
2. Some people need more support in a standard chair. Some users need extras on their chairs to support them, such as head rests, and belts. Some users may use ‘tilt in space’ chairs. This is all dependent on factors such as core strength, and seating needs, so consider how your character is effected by their condition when deciding the right chair for them. [Drawing of a light-skinned person in a standard chair with a thick cushion and a head rest, which has been labelled in purple.] Foot propelling: Some users use their feet or toes to help propel themselves, and accomadate this by removing the footplate on their chairs. [Line drawing showing a person from the waist down in their chair. Text has been drawn to label the belt tightened across their thighs and to show that the foot plates have been removed.]
3. Active chairs: Active lightweight wheelchairs are bespoke chairs made to allow the user to propel themselves with as much independence as possible. Due to being totally customised to the user, they are expensive and less accessible than standard chairs. [Coloured drawing of a light-skinned person making a peace sign while sitting in a purple active chair. The chair has a noticeably lower back, sides, and handles than the standard chair.] Gloves: Wheelchair gloves are like marmite: some people love them, some hate them. [Three drawings of hands showing different types of gloves. One covers the thumb and leaves the other four fingers exposed, one covers the entire hand, and the last leaves all the fingertips exposed.] Wheels: There are also different types of wheels for chairs, with different price points and different qualities that people may need or want. [Drawing of two different types of wheels. One has a white rim and three wavy spokes, and the other has a black rim and many straight spokes.]
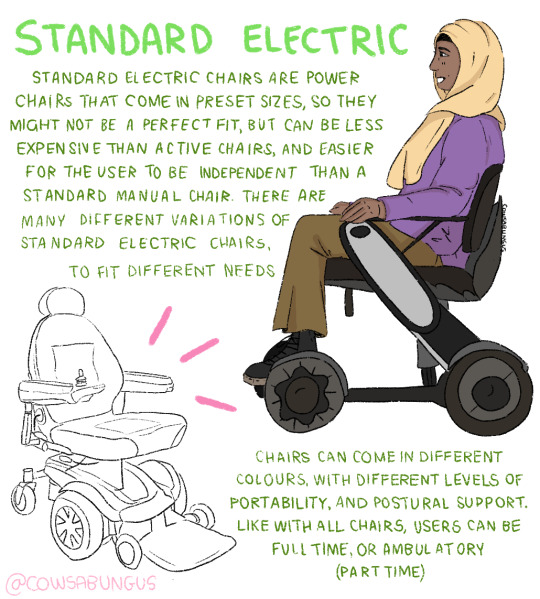
4. Standard Electric: Standard electric chairs are power chairs that come in preset sizes, so they might not be a perfect fit, but can be less expensive than active chairs, and easier for the user to be independent than a standard manual chair. There are many different variations of standard electric chairs, to fit different needs. [Coloured drawing showing a medium-skinned person in a pale orange headscarf in profile as they sit in a standard electric chair.] Chairs can come in different colours, with different levels of portability, and postural support. Like with all chairs, users can be fulltime, or ambulatory (part time). [Line drawing of a standard electric chair, which has a cushioned seat and back mounted on a base with three sets of wheels and a large flat foot plate.]
5. Bespoke Powerchairs: Similar to self propel wheelchairs, electric/power chairs can be made to the exact measurements to the user, with elements added to aid posture and stability of needed. These chairs tend to be expensive. [Line drawing of a bespoke powerchair. The back and seat have been customised, and the base is slightly smaller with a different foot plate.] Joysticks: Joysticks used to control the chair, can be customised to the style and needs of the user. [Two drawings showing a wide joystick with ‘wings’ on the edges and another that is a round knob on a stick.] [Coloured drawing of a light-skinned person sitting in a bespoke powerchair, shown from the front. Text highlights the arm rests and custom colour, a dark blue.]
6. Ambulatory users: Out of the 1.2 million wheelchair users in the UK, a third are ambulatory users, meaning they are able to walk to some degree/under certain circumstances. It’s totally possible for your character to be a part time wheelchair user, and vary which mobility aids are used. [Three coloured drawings of a medium-skinned person whose right leg is amputated above the knee. They use a red active chair, a pair of crutches, and a prosthetic.]
7. Summary: This isn’t a totally comprehensive guide and there are definitely facts I’ve forgotten. This can be a start for those totally clueless on designing wheelchair users. Research is the best way forward if you have bits you have no idea about. Wheelchair users ‘experiences are the best research! [Line art of an active chair.] However: don’t just go asking wheelchair users and disabled people about your characters or invasive questions for your research. They aren’t here just to give you information. There are loads of already existing information from wheelchair users online. [Line art of a person in sunglasses finger-gunning at the camera.] \End descriptions]
[Plain text: A guide to designing wheelchair using characters! \End PT]


A guide to designing wheelchair using characters!
I hope this helps anyone who's trying to design their oc using a wheelchair, it's not a complete guide but I tried my best! deffo do more research if you're writing them as a character
#requests#art#CowsABungus#wheelchairs#long description#op if you see this please add the description to the original post (not under a read more)#with any edits you like and no credit needed
114K notes
·
View notes
Text
Do It Yourself Kitchen Cabinets Tips and Tricks for a Professional Look

Renovating a kitchen can be expensive, but building your cabinets can save thousands while giving you complete control over design and materials. Though it may seem daunting, with the right tools and techniques, you can achieve a polished, high-end finish without hiring a professional.
The key to success lies in careful planning, precise execution, and attention to detail. From choosing the right materials to assembling cabinets with sturdy joinery, every step matters. Whether you're upgrading old cabinets or starting from scratch, knowing the right tips and tricks will help you avoid costly mistakes.
This guide covers everything from accurate measurements to painting techniques, ensuring that your do it yourself kitchen cabinets look professionally crafted. Ready to build the kitchen of your dreams? Let’s get started!
Why DIY Kitchen Cabinets?
Kitchen cabinets are one of the most expensive parts of a kitchen remodel. Hiring a contractor or buying pre-assembled cabinets can cost thousands of pounds, making it a significant investment. However, opting for DIY cabinets can save 40-60% of the cost while giving you full control over design, materials, and customization.
Cost Savings
The biggest advantage of building your own cabinets is the reduced cost. High-quality custom cabinets can cost upwards of £5,000 to £10,000, but by sourcing materials yourself, you can build them for a fraction of that price.
Customization and Flexibility
DIY cabinets allow you to create storage solutions tailored to your needs. You can choose specific materials, adjust shelf heights, and incorporate custom features like pull-out drawers, spice racks, or hidden compartments.
Quality Control
When purchasing ready-made cabinets, you may compromise on material quality. Many store-bought options use particle board, which is less durable than plywood or hardwood. By building your own, you can ensure long-lasting strength and durability.
A Rewarding Project
If you enjoy hands-on projects, making kitchen cabinets can be highly satisfying. The sense of accomplishment from crafting something functional and beautiful for your home is unmatched.
With the right planning, DIY cabinets can look just as professional as store-bought ones—at a much lower cost!
Planning Your DIY Cabinets
Before you start, take time to measure and plan carefully. Skipping this step can result in misaligned cabinets, wasted materials, and costly mistakes.
1. Take Accurate Measurements
Measure your kitchen space precisely, noting wall irregularities.
Consider the height, width, and depth of your cabinets.
Account for appliances, electrical outlets, and plumbing.
Double-check measurements before cutting any materials.
2. Choose the Right Materials
The material you select will determine the longevity and look of your cabinets. Some popular choices include:
Plywood: A strong and cost-effective option for cabinet boxes.
MDF (Medium-Density Fibreboard): Smooth and easy to paint but less durable than plywood.
Hardwood: Best for cabinet doors and face frames for a premium finish.
Melamine or Laminated Boards: Budget-friendly options that resist moisture and scratches.
Cabinet Hardware Essentials
Quality hardware can make or break your cabinets. Invest in:
Soft-close hinges to prevent slamming.
Full-extension drawer slides for easy access.
Sturdy handles and pulls to enhance durability and aesthetics.
3. Design with Function in Mind
Think beyond appearance and focus on usability. Popular features include:
Pull-out shelves for pots and pans.
Lazy Susans for corner cabinets.
Built-in trash bins for a cleaner look.
Vertical dividers for baking trays and cutting boards.
Under-cabinet lighting for improved visibility.
Assembling Like a Pro
Once your materials are ready, it’s time to start the build!
4. Cutting Wood with Precision
Use a table saw or circular saw with a straight-edge guide to achieve clean cuts. Mark your measurements clearly before cutting, and always cut slightly larger—you can trim down if needed.
Pro Tip: If you're using plywood, consider using a fine-tooth blade to minimize splintering.
5. Using Pocket Hole Joinery
Pocket holes create strong, hidden joints without visible screws, making your cabinets look seamless. A pocket hole jig is an excellent investment for this step.
Alternatively, dowels and wood glue can be used for a more traditional joinery approach.
6. Sanding for a Smooth Finish
Sanding is crucial for professional results. Use 120- to 220-grit sandpaper to smooth out surfaces before assembly. Pay extra attention to edges to avoid rough spots that could affect paint or stain adhesion.
7. Assembling the Cabinet Structure
Follow these steps to build a sturdy base:
Attach the side panels to the bottom panel using wood glue and screws.
Secure the back panel for stability.
Add face frames using wood glue and pocket screws for a high-end look.
Install adjustable shelves with shelf pin holes for flexibility.
Achieving a Professional Finish
The difference between amateur and professional-looking cabinets often comes down to the finishing touches.
8. Choosing the Right Paint or Stain
Your choice depends on the style you want:
For a modern, sleek look: Use semi-gloss or satin paint.
For a natural, rustic feel: Stain highlights the wood grain beautifully.
For farmhouse-style cabinets: A distressed paint finish adds character.
Pro Tip: Always apply a primer before painting to prevent streaks and uneven coverage.
9. Installing Doors and Hardware with Precision
Use a level to align cabinet doors properly.
Soft-close hinges give your cabinets a high-end touch.
Install high-quality handles or knobs to enhance aesthetics.
10. Enhancing Your Cabinets with Extra Features
Crown molding: Adds sophistication to upper cabinets.
Toe kicks: Provides a finished look to base cabinets.
Beadboard panels: Gives cabinets a classic, textured appearance.
Common Mistakes to Avoid
Even experienced DIYers can run into challenges when building kitchen cabinets. Avoiding these common mistakes will save you time, money, and frustration.
1. Inaccurate Measurements
One of the biggest mistakes is miscalculating dimensions. Even a slight error can result in misaligned cabinets, uneven gaps, or drawers that don’t fit properly. Always measure twice, cut once, and double-check wall angles for irregularities.
2. Choosing Low-Quality Materials
Some DIYers opt for cheap particle board to cut costs, but this can lead to weak, flimsy cabinets that won’t last. Instead, invest in high-quality plywood or MDF for durability and a professional look.
3. Poor Assembly Techniques
Using the wrong joinery can weaken your cabinets. Avoid relying solely on nails or glue—use pocket holes, dowels, or dado joints for strong, lasting construction.
4. Rushing the Finishing Process
Skipping sanding, priming, or drying time between paint coats leads to a rough or uneven finish. Take the time to sand properly and apply primer before painting or staining for a flawless look.
5. Installing Doors and Hardware Incorrectly
Crooked cabinet doors and misaligned hardware can ruin the overall aesthetic. Use a level and templates to ensure precision when attaching hinges, knobs, and pulls.
By avoiding these mistakes, your DIY cabinets will look professional, durable, and polished!
Budgeting for Your DIY Cabinets
While making your cabinets is cheaper than buying pre-made ones, costs can still increase. Here’s a rough estimate of the budget breakdown:
Expense
Estimated Cost (£)
Plywood (4x8 ft)
£40 - £80 per sheet
MDF/Hardwood
£50 - £100 per sheet
Paint/Stain
£20 - £50
Hinges & Slides
£5 - £15 per set
Knobs/Pulls
£2 - £10 each
Tools (if needed)
£100 - £300 (one-time purchase)
Total Estimated Cost: £300 - £1,000 (varies based on materials and kitchen size)
Final Thoughts
Building your kitchen cabinets is a rewarding and cost-effective project. With careful planning, precise execution, and the right finishing touches, you can create a stunning kitchen that looks professionally crafted.
By following these expert tips, you’ll save money and be satisfied by transforming your kitchen with your own hands. Take your time, use quality materials, and enjoy the process of building something truly unique for your home! Now you're ready to tackle your DIY kitchen cabinet project with confidence. Happy building!
0 notes
Text
Shrink Tunnel Machine: The Ultimate Guide to Seamless Heat Shrink Packaging

What is a Shrink Tunnel Machine? A shrink tunnel machine, also known as a heat shrink tunnel, is a packaging system that applies controlled heat to shrink plastic film (typically PVC, POF, or PE) wrapped around a product. As the product passes through the tunnel on a conveyor belt, hot air circulates uniformly, causing the shrink film to tightly conform to the product’s shape, creating a secure, tamper-proof seal.
Working Principle of a Shrink Tunnel Machine Product Wrapping: The product is first wrapped in shrink film using a sleeve sealer, L-bar sealer, or manually.
Conveyor Entry: The wrapped product enters the shrink tunnel via a heat-resistant conveyor.
Uniform Heating: The tunnel's heating elements blow hot air through nozzles or fans, activating the film’s memory to shrink.
Cooling & Exit: The product exits the tunnel, where the film cools and tightly conforms to the shape.
Types of Shrink Tunnel Machines
Electric Shrink Tunnel Powered by electricity.
Ideal for small to medium-scale industries.
Energy-efficient and simple to maintain.
Steam Shrink Tunnel Uses steam as the heat source.
Preferred for PVC or PETG labels and beverage bottles.
Ensures gentle and uniform shrinking—great for delicate packaging.
Infrared Shrink Tunnel Uses infrared rays for rapid and uniform heating.
Suitable for thin, heat-sensitive shrink films.
Gas Shrink Tunnel Uses LPG or natural gas as heating medium.
Suitable for large operations needing faster heating at lower operational cost.
Key Features of Shrink Tunnel Machines Adjustable Temperature Control: Precise heat application to avoid film damage.
Variable Conveyor Speed: Matches line speed and product type.
Dual Insulation System: Reduces heat loss and energy consumption.
PID Temperature Controller: Maintains consistent heat for high-quality finish.
Heavy-Duty Conveyor Belts: Supports different product weights and sizes.
Built-in Cooling Fan (Optional): Ensures faster setting and better finish.
Stainless Steel Frame: Hygienic, rust-free, and ideal for food or pharma packaging.
Applications of Shrink Tunnel Machines Beverage Bottles: Neck banding and full-body sleeve labeling.
Pharmaceuticals: Tamper-evident shrink bands on caps and containers.
Food Packaging: Bundling of bottles, trays, and cans.
Cosmetics: Shrink wrapping tubes, boxes, and gift sets.
Stationery & Toys: Wrapping products in display-ready packs.
Consumer Electronics: Tight, dust-proof wrapping for gadgets.
Benefits of Using Shrink Tunnel Machines ✅ Enhanced Product Presentation: Clean, wrinkle-free finish that enhances brand appeal.
✅ Tamper Evidence: Secure packaging deters counterfeiting and tampering.
✅ Moisture and Dust Protection: Seals out contaminants and preserves freshness.
✅ Bundling Capability: Wrap multiple items together for easier handling.
✅ Extended Shelf Life: Preserves packaging integrity during transportation and storage.
✅ Compatibility with Various Films: Works with PVC, POF, PE, and PET shrink films.
✅ Integration-Ready: Easily connects with existing sealing and labeling lines.
Shrink Tunnel Machine Technical Specifications Parameter Specification Range Conveyor Speed 0–25 meters per minute (adjustable) Tunnel Dimensions Varies from 1000mm to 2000mm (length) Power Source Electric / Steam / Gas Power Consumption 3 – 20 kW (depending on tunnel size) Temperature Range 0°C to 300°C Conveyor Load Capacity Up to 50 kg Film Compatibility PVC, POF, LDPE, PETG Machine Material Mild Steel / SS304 or SS316 for hygiene
Top Manufacturers of Shrink Tunnel Machines in India Harikrushna Machines
Shree Bhagwati Packaging
Sevana Packaging Systems
SS Automation & Packaging
Labh Group of Companies
Multipack Machinery Co.
These manufacturers provide custom-built solutions for startups and large-scale industries, ensuring high efficiency, reliable output, and local service support.
Shrink Tunnel Machine Price in India (2025) Machine Type Price Range (INR) Manual Shrink Tunnel ₹25,000 – ₹60,000 Semi-Automatic Tunnel ₹80,000 – ₹1.5 lakh Fully Automatic Tunnel ₹2 lakh – ₹6 lakh Steam Shrink Tunnel ₹3 lakh – ₹8 lakh Customized Tunnel System ₹6 lakh – ₹15 lakh+
Prices depend on capacity, size, heating source, conveyor type, and automation level.
How to Choose the Right Shrink Tunnel Machine ✅ Know Your Film Type: Choose machine type based on film—PVC, POF, or PE. ✅ Assess Throughput Needs: Match conveyor speed and heat capacity to production volume. ✅ Consider Product Size: Ensure tunnel dimensions suit the largest product. ✅ Check Energy Consumption: Balance efficiency with operational costs. ✅ Select Material Build: Opt for stainless steel in food and pharma industries. ✅ Look for Safety Features: Emergency stop, overload protection, and insulation.
Maintenance Tips for Shrink Tunnel Machines Clean heater coils and fans weekly.
Lubricate conveyor chains regularly.
Calibrate temperature settings based on ambient conditions.
Check electrical connections and insulation monthly.
Replace worn-out shrink film rollers promptly.
Latest Innovations in Shrink Tunnel Packaging IoT Integration: Real-time monitoring of temperature, speed, and performance.
Servo Motor Control: Precise conveyor motion for delicate items.
Energy Recovery Systems: Minimizes power consumption and heat loss.
Modular Tunnel Design: Easy to expand or upgrade based on demand.
Environmentally Friendly Films: Compatible with biodegradable shrink wraps.
Conclusion The shrink tunnel machine is a powerful asset in modern packaging lines, offering not only professional and tamper-proof product finishes but also speeding up operations while ensuring product safety and branding excellence. Whether you’re a small business or a large manufacturer, investing in a shrink tunnel system will drastically improve your packaging process and brand image
0 notes
Text
How to Identify the Best Junction Box Manufacturers in UP?
Identifying the best Junction Box Manufacturers requires a thorough strategy, irrespective of any setting. All the vital components must be set together so that you can successfully find a manufacturer with genuine services. This might not look vital, but in the real world, it directly relates to human lives. Hence, it is important to know more about the electrical junction box to understand the safety standards. Furthermore, high durability and long-term performance of the electrical equipment are needed for genuine construction projects.

Research all the best Junction Box Manufacturers
Research is the first step in identifying the best junction box manufacturers in UP, as it provides complete information. This complete information includes stamps of approval, and your task is to ascertain the safety standards. This is the major step when you plan to hire a manufacturer for your construction project.
Compare all the Junction Box Manufacturers
The next step guides you to compare all the researched junction box manufacturers. This is because everyone claims to be the best; however, exceptions are always there. You, therefore, need to look for your project’s quality to make a smart decision. In this, quality, certifications, and brand reputation must be compared. For this, you can visit various local websites online, which can provide you with user reviews.
Go Equipment-Specific
When choosing junction box manufacturers, consider going equipment-specific. This is a careful step taken in the construction project, where the whole electrical system must work perfectly. The major equipment includes voltage, amperes, and connections, etc., to connect the boxes as and when required. If you do not consider going equipment-specific, then you might face health and wealth damage.
Visit both online and offline stores
Visiting means living the whole process to avoid making any kind of mistake. A professional and well-established junction box manufacturer will allow you to do this, as it has nothing to hide. Hence, junction box manufacturers in UP offer their customers to know their company profile in detail. This is proof of being a certified and ISI-marked junction box manufacturer with all the necessary things present. You can visit us through both our online and offline stores to initiate the best customer relationship process.
Evaluate all the key points and make sound decisions
The last step is to note down all the activities done above and then make sound and confident decisions. Then evaluate all the points and reach out to the best junction box manufacturer to get the work done. When you evaluate all the points, you get a comprehensive range of options like reliable manufacturers, a variety of electrical equipment, etc. This further helps in identifying both positive and negative points to get a clearer picture.
Secure your electrical installations with a reliable junction box manufacturer
In every electrical installation, there is a need for a trustworthy manufacturer, and Durga Electroplast is the answer. We are not just a choice, but the best investment you can make to secure your health and wealth. We understand that exceptional services are necessary in such crucial matters, and we are here to help. Hence, with a focus on ISI-marked products, we are your one-stop destination for all your construction needs. Whether you need electrical equipment or a reliable junction box manufacturer, we guarantee safety!
0 notes