#Embroidery Machine Software
Explore tagged Tumblr posts
Visit Tumblr Blog
Explore Tumblr blogs with no restrictions, modern design and the best experience.
Last Seen Tumblr Blogs


Fun Fact
25% of US internet users with an annual income of $80-100K use Tumblr.
Text
I'm makin' band sew-on patches with an embroidery digitizing software. And gettin' squirrely with the fabric i'm picking as the background. Also ran out of black thread so ended up with a summer-vibe patch using dark teal thread on an almost sun-print batik fabric.
Band is Indeyevid from NJ, if you're lookin for some punk garage band jams. They recently made a music video for their song Red Dye 40.


Lessons learned on embroidery n patches:
1) (and this is so silly fundamental it's almost not worth saying,) but when you hoop stabilizer or your fabric, dear gods make sure the piece is larger than your hoop by at least an inch on all sides. 🥲 i had to crossways my washable stabilizer and effectively use twice as much for the patches i did make because i got a tube that was too narrow for my hoop.
2) thiicccc boarders on your patch make it easier to hide the raw edge that gets covered by the satin stitch boarder. 0.18" for this size patch, up to 0.25" on really big patches.
3) duh to me, use the preview stitch feature of the program to make sure you dont accidentally hit outline on a design part you didnt want outlined. ...And then make a patch that looks so misaligned that it doesnt pass your personal preference.
4) basic quilt cotton, - quite a flimsy choice for patches, needs heavy tear away stabilizer for support to make it hearty. In future, look for twill, or canvas for patch base (save on needing to layer materials).
#patches#machine embroidery#embroidery digitizing services#embroidery digitizer software#asharpartmaille#quilt fabric#nj punk bands#punk rock#garage band#made it myself#sew on patch#lessons learned#indeyevid#indeyevid band#bruh i used soo much stabilizer for this. if i am asked to make more i gotta order a bolt or something jfc#Spotify
3 notes
·
View notes
Text
ffcc fumo plushies on the brain again
i was gonna sketch out a rough draft but all my pencils have mysteriously disappeared
#studio ramblings //#it's been MONTHS since i last visited this concept tbh#but this time i have an embroidery machine and software >:)#i have been itching to make hurdy/gurdy plushies for 2 1/2 YEARS
6 notes
·
View notes
Note
I follow you because I wanna grab digit like a squeaky toy
aw man if i was popular enough for one of those plushie makers to consider me i'd absolutely be making a digit plush. wouhg.
for now at least there is his sticker sheet where he's getting squimsht

#digit#well ok. genuinely i'd rather make plushies of him myself i know how to sewing machine#but the big thing stopping me is not having an embroidery machine to do the faces#and those (and the software for thoise) are PROHIBITIVELY expensive#so itd have to be a plushie makin company
24 notes
·
View notes
Text
my embroidery machine got to my mom's place i'm sooooo excited
but i'm dumb bcuz i didn't realize how expensive digitizing software was lol so i need to see if i can use an older version of the brother ones
but i'm so excited!!!!!!!!!!!!!!!!!!!!!!
#personal#hahaha i used up all my credit card points on it so in total it only cost me $200 and it's an embroidery/sewing combo#so i'm just gonna treat it like i got a cheapo sewing machine and allow myself to spend the $200+ on software possibly#unless like i can use 2-3 years' ago's brother software#i gotta look into it more.... maybe take a trek into long island to joanne fabric cuz the little old ladies there would know#i wanna learn how to make iron on patches of my art#especially cuz like (obviously it's what i do for a living) i know how to make production ready vector art files#the thing is i know what the 10 years ago machines + softwares worked together#cuz my first job EVER was selling sewing supplies LOL#(which is so odd cuz i work in apparel now like... hahaha thnx mom)#((ironically my great grandparents on my mom's side... both sides had apparel custom stores... one was a millinery and the other costume#jewelry... so i have all sorts of nice vintage stuff from the 20's-40s <3))#BUT now i don't have to go to my mom's whenever i need a machine now!!! whooohooo!!!!!!!!!!!!!!!!!!
3 notes
·
View notes
Text
learn to digitizing your embroidey designs
From Sketch to Stitch: A Comprehensive Guide to Digitizing Your Embroidery Designs
The world of embroidery has embraced the digital age, allowing you to transform your own unique designs into stunning stitched masterpieces. But how do you bridge the gap between a simple vector graphic and a complex stitching pattern? This comprehensive guide, crafted with 2500 words, will teach you the art of digitizing your embroidery designs, from software choices to stitch considerations and finishing touches. Before We Embark: Understanding SVGs and Embroidery Files Scalable Vector Graphics (SVGs): These text-based descriptions of images offer infinite scalability, making them perfect for digital design. Embroidery files: These contain specific instructions for your machine, including stitch types, colors, and placement (DST, EXP, JEF, PES formats are common). Step 1: Choosing the Right Software Consider these factors when selecting your digitizing software: Skill Level: Are you a beginner or an experienced digitizer? Some programs cater to novice users, while others offer advanced features. Budget: Free and paid options exist, each with varying capabilities and functionalities. Compatibility: Ensure the software outputs files compatible with your embroidery machine. Here are some popular choices: Free: Inkscape: A free vector graphics editor with the Ink/Stitch plugin for basic digitizing. Sewing & Embroidery Software (SERF): Free software with limited but beginner-friendly digitizing features. Paid: Wilcom Embroidery Studio: Offers powerful tools for advanced digitizing and editing. Embrilliance Enthusiast: User-friendly software with various features at a good price point. Brother PE Design: Ideal for beginners with Brother embroidery machines. Step 2: Preparing Your SVG Simplify the design: Remove unnecessary details or intricate lines that might not translate well to embroidery. Optimize colors: Limit your color palette to what your machine can handle (usually 6-12 colors). Convert to paths: Ensure all elements in your SVG are outlines (paths) for proper stitching. Step 3: Importing and Converting Import your cleaned-up SVG into your chosen software. Follow the software's specific instructions for converting to an embroidery file. This typically involves: Choosing stitch types: Select appropriate stitches for different parts of your design (satin stitch for filling, backstitch for outlines, etc.). Setting stitch parameters: Adjust stitch density, length, and direction for desired effects. Color mapping: Assign thread colors to different parts of your design. Step 4: Digitizing Tweaks and Adjustments Preview and test: Most software allows you to preview your design on a virtual embroidery machine. Check for stitching issues and adjust paths or settings if needed. Refine stitch types and parameters: Experiment with different stitch combinations to achieve the desired look and texture. Consider thread types and colors: Choose thread that complements your fabric and design aesthetic. Step 5: Export and Embroider! Once you're happy with your design, export it in a file format compatible with your embroidery machine. Transfer the file to your machine and prepare your fabric and thread. It's finally time to see your creation come to life! Embroider your design, following your machine's instructions. Bonus Tips for Success: Start simple: Begin with basic shapes and designs to get comfortable with the conversion process. Practice digitizing: The more you experiment, the better you'll understand how different stitches and settings affect your final outcome. Join online communities: Connect with other embroidery enthusiasts for tips, advice, and inspiration. Don't be afraid to ask for help: If you get stuck, consult software manuals, online tutorials, or seek assistance from experienced digitizers. Remember, with a little practice and this guide as your compass, you'll be well on your way to transforming your SVG dreams into beautiful embroidered realities! Further Resources: Websites: Needlework Tips and Techniques: https://www.needlework-tips-and-techniques.com/ Books: "The Complete Book of Digitizing" by Jeannette Douglas, "Digitizing Designs" by Laura Ashley YouTube Tutorials: CreativeBug Cutwork Embroidery Masterclass, Bluestone Creations Cutwork Basics Online Forums: Embroidery Forum With these additional resources and the knowledge you've gained, you Read the full article
3 notes
·
View notes
Text


Plush of Falin from Delicious In Dungeon / Dungeon Meshi ! I'm watching the anime and I'm enjoying that show a lot, I hope it encourage a lot of people to try cooking !
Also, I FINALLY have a embroidery machine !!! I had a lot of fun trying to add scales and feathers texture on the plush. What a pleasure to not have to stress for the face too ! The machine was expensive but worth it, I hope I'll be able to gather enough to get a better software for digitizing soon ( I'm using Inkstich with Inkscape right now ahah ).
Also the plush is around 20cm tall and 35-40 cm long
I hope you like it !
Falin is from Dungeon Meshi Plush, Pattern and Pictures by me, please do not use/repost without permission.
#french artist#art#plush#fantasy#craft#handmade#artiste francais#monster#dragon#chimera#beast#anime#manga#fanart#dungeon meshi#falin#falin touden#delicious in dungeon#chimera falin#sew#plushartist#plush artist#chibi#human plush#dragon plush#chimera plush#dungeon meshi fanart#delicious in dungeon fanart
1K notes
·
View notes
Text


Super Mario Embroidery World is officially licensed Mario sewing software for Brother brand sewing machines that allows Mario-related designs to be sewn into clothing.
Main Blog | Patreon | Twitter | Bluesky | Small Findings | Source
146 notes
·
View notes
Text
10 days ago, I decided I would get started on that linen summer dress with the swooshy skirt I've had all the materials for since last summer. So, naturally, 9 days ago, I did unspeakable things in a text editor software to reformat this free Apex Legends Nessie pattern by Jackalodreams on Deviantadt so most pieces fit on less pages. Then I printed it at 200%, taped the pieces together and... Things got a bit out of hand.
Long story short, I've got a new purse, and it made at least three separate adults who saw it smile squeal in public.
Construction notes after the break!
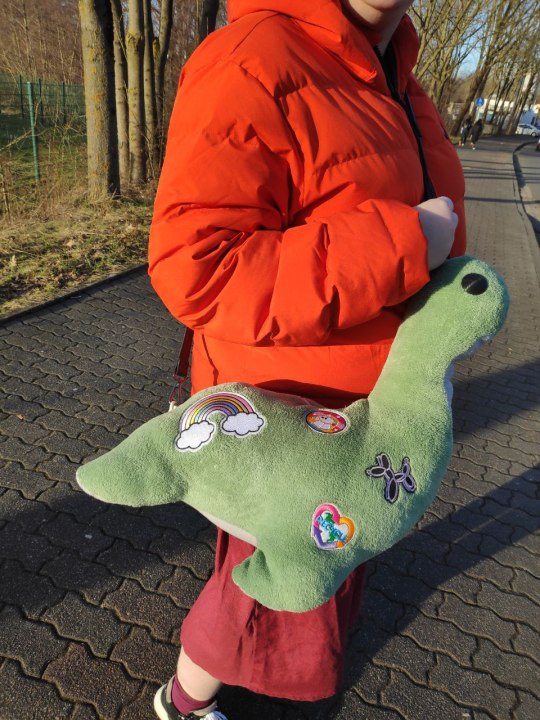


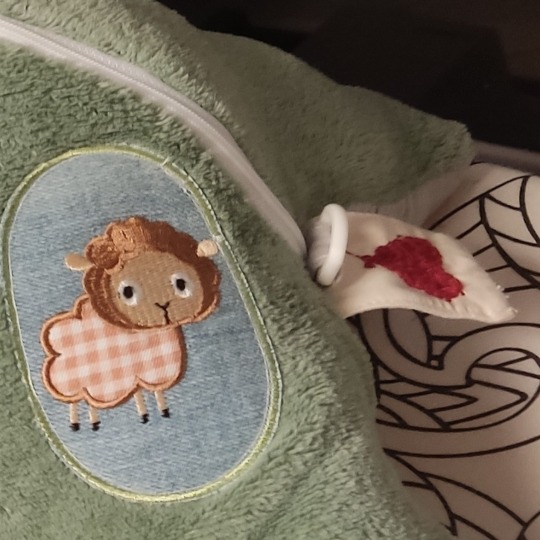
I think it only took me an evening or two to make, the main thing was getting all the materials. Zipper is from a duvet, all other hardware, eyes included, are 3D printed with PLA. (Pro tip: don't size up safety eye STL files unless you have a way to size up your fabric thickness accordingly.) Patches are mostly from stash, as is the lining (just some random jersey) and belly fabric (basic double gauze). Body is a fuzzy blanket I found on clearance. Tag is a piece of cotton calico with some quick and dirty hand embroidery on it.
Getting the tag, zipper and D-ring caught in the butt seam made me fear for my little Brother sewing machine, so maybe don't do what I did there. I didn't have the patience to figure out something else, and I didn't not want to put in a tag. Still, all the fabric edges are finished, every seam is locked, the patches are sewn on instead of ironed on, so this thing, when empty, should be machine washable at 30°C.
This deceptive little beastie took an entire 400g bag of polyfill to get structurally sound, even with the pouch pre-filled with way more things than I expected would fit. It's a pretty practical size inside for everyday errands. It came out extremely squishy, to the point that I could probably use it as a pillow on a long drive or train ride. The different textures of eyes, patches, tag, body and belly go together nicely.
The shoulder strap was borrowed for about an hour from my wife's purse (thank you, sweetie!) when Hermes smiled down upon us and had us catch one market stall selling fashion straps that was several hours late in packing up and closing. (Lesson learned: drinking a can of Monster before running small errands is a good thing.) Don't have pictures of the new one yet.
It's the size of a medium-large plush, so not ideal for tiny stores while wearing a thick winter coat, but otherwise it did quite well on its first outing.
Just gotta attach the zipper pull with a jump ring, as the sewed on McGyvering I've got right now isn't the most practical.
#nessie#sewing#plushie#handbag#bag#free pattern#working from stash#mostly from stash anyway#learning new things#3D printing#apex legends#patches#it's not dumb if it brightens someone's day#it's SO SQUISHY#no I have not started that dress yet
169 notes
·
View notes
Note
Omg someone just showed me your Batstarion plushies they are so cute 🥹 how do you do his little ice cream swirl hair lol
Thank you so much!! 💙🦇💙 I use BeeZeeArt's very cute bat pattern and then I just doodled a little swirl for his hair on some paper. It's a really small piece, just over an inch, so I put it into my embroidery machine to stitch the hair lines and the top and bottom layer for me, and sew the tiny side curl too. Then I cut it out and stuff it lightly, layer the pieces on his head and sew them on!
This is what it looks like in my embroidery software

Feel free to trace it if you want to make your own! :)

29 notes
·
View notes
Text
So I procured an embroidery machine several months ago (and then proceeded to not use it, because I absolutely could not lose momentum on another project I was working on).
Anyway, I finally got around to opening it up, figuring it out, and deciding on an embroidery digitization software. For my first project (beyond pre-made patterns to figure out my machine), I chose what I THOUGHT was a simple option.
(spoiler alert: it was not)
I'm a huge fan of Tolkien's heraldic devices, so I went for this one:

This one is Earendil's. While I'm usually on the 'these look like quilt blocks' train, I decided to try my hand at digitizing it. So I blocked it out in Krita (I am no digital artist, but I very much enjoy the multi-brush tool, and it was very effective at this:

(the colors aren't meant to be accurate, just distinct from each other)
Muddled around in Embrilliance for a while, got it on my machine (a Brother SE630 I have named Pityaháno), and this is what I came up with:

(I apologize for the photo quality, the light is not good at this time of day)
I'm actually pretty happy with how it came out, for a first draft. I did some refining while it was going, stitch direction and such. And I need to work on aligning the sections better, and perhaps reducing the satin stitch borders where they overlap.
This was done with brothred cotton embroidery thread and YLI 60wt cotton bobbin thread on linen fabric. Digitized with embrilliance stitchartist level 1. Source for the heraldry is Tolkien, of course, via the tolkien wiki.
I do have to get on my other projects (Halloween is COMING and as usual I am behind), but I'll probably be playing around with this a little more when I have time. I'm very excited to do more of this!
If anyone has advice about machine embroidery/digitizing, in general or with regards to this piece specifically, I'd absolutely love to hear it!
37 notes
·
View notes
Text
Spent the last few weeks learning how to do digital embroidery with some free software and an entry level machine. I made a video explaining some of what the process of making patches is like! this patch took about 90 minutes to print and about 14 hours to design
heres the finished result

69 notes
·
View notes
Text
as for how i get my patches; i made/make (havent made any in a while) all of them myself using a 6 needle embroidery machine. more needles = more concurrent colors the machine can easily swap through during the patch production. i bought special embroidery software that came with video guides after attending a workshop with the software developer and trying to use free open source embroidery software. the process is essentially the same as making vector art but with more attention paid to layering and then tooling around with things like fabric, thread, and types of stitches. i had experience with hand embroidery and also with hand sewing / using sewing machines and my partner at the time and i were very interested in the idea of making elaborate embroidery. it is in many ways similar in concept / process to screen printing which i have ample experience in, so it did not take me long to pick up and i had all the tools / access i needed to do lots of easy and fun designs. i was able to buy the machine by splitting the cost with someone else and using money i had gotten from my printing business/savings. i honestly recommend not buying a machine (even a small one) and instead out sourcing any embroidery you would want to local digitizers/embroidery companies if you want to do any machine embroidery slightly more complicated than one color directly onto a garment. it takes a long time, it’s very loud, the software required is expensive and nearly impossible to pirate (low demand), and the cost / time investment is very steep. however, i am a freak, and i also consider this my job (or part of it), so i have enjoyed it. there are a lot of people in your town or city, no matter where u are, who are already much more capable and set up to make patches for you than you would be. and they also would love to do it and it’s probably way cheaper than u think. (this also goes for screen printing). the one singular advantage to my set up is that i can make a lot of extremely singular one off patches at my own pace and at my own justified labor/time/monetary investment without having to communicate with anybody else. which is why i primarily think of myself as a artist and not necessarily a clothing embellisher/manufacturer; everything i do takes a lot of fucking time and research.
21 notes
·
View notes
Text
hmmmmmmmmm
i might wait and see how things look (financially) next month and hold off on getting my grubby mitts on that embroidery machine and digitising software...
#studio ramblings //#i forgor i had a dentist appointment today#and this week's paycheck was a bit... thin#a bit mad rn tho because i *was* gonna buy that fuckin digitising software today
3 notes
·
View notes
Text
Floriani Software Review

Floriani Software Review:
Unleashing Creativity in Embroidery Design
In the ever-evolving world of digital embroidery, Floriani Software has emerged as a powerful contender, offering a comprehensive suite of tools for both novice and experienced embroiderers. This review delves deep into the features, benefits, and potential drawbacks of Floriani Software, providing you with all the information you need to determine if it's the right choice for your embroidery journey.
Introduction to Floriani Software
Floriani Software, named after the renowned embroidery expert Walter Floriani, is a suite of embroidery design and digitizing programs developed to cater to a wide range of users in the embroidery community. From hobbyists to professional digitizers, Floriani offers various software packages to meet different needs and skill levels. Key Features of Floriani Software 1. User-Friendly Interface One of Floriani Software's standout features is its intuitive and user-friendly interface. The layout is clean and well-organized, making it easy for users to navigate through different tools and options. This accessibility is particularly beneficial for beginners who may feel overwhelmed by more complex software interfaces. 2. Comprehensive Design Tools Floriani Software provides a robust set of design tools that allow users to create, edit, and customize embroidery designs with precision. Some notable design features include: - Auto-digitizing capabilities - Manual digitizing tools for intricate designs - Extensive stitch types and effects - Advanced text and monogramming options - Color blending and shading tools 3. Built-in Design Library The software comes with a vast library of pre-made designs, giving users instant access to a wealth of embroidery patterns. This feature is particularly useful for those looking for quick inspiration or a starting point for their projects. 4. Thread Color Management Floriani Software excels in thread color management, offering a comprehensive database of thread colors from various manufacturers. Users can easily match thread colors to their designs and even create custom palettes for specific projects. 5. 3D Visualization The 3D visualization feature allows users to see how their designs will look when stitched out, providing a realistic preview of the final product. This tool is invaluable for identifying potential issues before the actual embroidery process begins. 6. Multi-Format Compatibility Floriani Software supports a wide range of embroidery machine formats, ensuring compatibility with most popular brands. This flexibility allows users to create designs that can be used across different machines without conversion issues. 7. Educational Resources One of Floriani's strengths is its commitment to user education. The software comes with built-in tutorials, video lessons, and a comprehensive help system, making it easier for users to learn and master the various features. Floriani Software Packages Floriani offers several software packages to cater to different user needs and skill levels: - Floriani Total Control U: The flagship product, offering a complete suite of digitizing and editing tools for professional-level work. - Floriani Fusion: A mid-range option that combines basic digitizing with powerful editing and customization features. - Floriani Embroidery Suite: An entry-level package that focuses on design editing and customization, ideal for hobbyists and beginners. - Floriani My Decorative Quilter: Specialized software for quilting enthusiasts, combining embroidery design with quilt layout planning. Pros of Floriani Software - Ease of Use: The intuitive interface makes it accessible for users of all skill levels. - Comprehensive Tools: From basic editing to advanced digitizing, Floriani covers a wide range of embroidery design needs. - Excellent Support: Floriani offers robust customer support and a wealth of educational resources. - Regular Updates: The software is frequently updated with new features and improvements. - Versatility: Suitable for both home users and small business owners. Cons of Floriani Software - Price Point: Floriani Software can be more expensive compared to some competitors, especially for the higher-tier packages. - Learning Curve for Advanced Features: While basic functions are easy to grasp, mastering the more advanced tools can take time. - System Requirements: The software may require a relatively powerful computer to run smoothly, especially when working with complex designs. User Experience and Performance Users generally report positive experiences with Floriani Software, praising its stability and performance. The software runs smoothly on most modern computers, though performance can vary depending on the complexity of designs and the user's hardware specifications. The auto-digitizing feature, while not perfect (as is the case with most embroidery software), produces good results for simple to moderately complex designs. For intricate designs, manual digitizing tools provide the precision needed for professional-quality output. Comparison with Competitors When compared to other popular embroidery software like Wilcom, Hatch, or Brother's PE-Design, Floriani holds its own in terms of features and usability. While it may not have some of the advanced capabilities found in high-end professional software, it offers a well-rounded package that suits the needs of most users. Floriani's strength lies in its balance between powerful features and user-friendliness, making it a strong contender in the mid to high-range embroidery software market. Is Floriani Software Right for You? Floriani Software is an excellent choice for: - Beginners looking for an accessible entry point into digital embroidery design - Intermediate users seeking to expand their capabilities without overwhelming complexity - Small business owners who need a versatile tool for custom embroidery work - Quilters who want to incorporate embroidery into their projects However, it may not be the best fit for: - Professional digitizers who require highly specialized tools - Users on a tight budget, as there are more affordable options available - Those who prefer open-source or subscription-based software models Future Developments and Updates Floriani continues to evolve its software offerings, with regular updates introducing new features and improvements. The company has shown a commitment to staying current with embroidery trends and technology, suggesting that users can expect ongoing enhancements to the software.
Conclusion
Floriani Software stands as a robust and user-friendly option in the world of embroidery design software. Its combination of powerful features, intuitive interface, and excellent support make it a worthy consideration for both hobbyists and small business owners. While it comes with a higher price tag than some alternatives, the value it provides in terms of capabilities and ease of use justifies the investment for many users. Whether you're just starting your embroidery journey or looking to upgrade your current software, Floriani offers a comprehensive solution that can grow with your skills and needs. By balancing advanced features with accessibility, Floriani Software has carved out a respected place in the embroidery software market.
Q&A Section
Q1: Is Floriani Software suitable for complete beginners? A1: Yes, Floriani Software is designed to be user-friendly and offers entry-level packages like the Floriani Embroidery Suite that are suitable for beginners. The software also includes tutorials and educational resources to help new users get started. Q2: Can I use Floriani Software with any embroidery machine? A2: Floriani Software supports a wide range of embroidery machine formats, making it compatible with most popular brands. However, it's always best to check the specific compatibility with your machine before purchasing. Q3: Does Floriani offer a trial version of their software? A3: Floriani occasionally offers trial versions or demos of their software. Check their official website or contact their sales team for the most up-to-date information on trial availability. Q4: How does Floriani's auto-digitizing feature compare to manual digitizing? A4: While Floriani's auto-digitizing feature is quite good for simple to moderately complex designs, manual digitizing still provides more control and better results for intricate designs. The software offers both options, allowing users to choose the best approach for each project. Q5: Is there a subscription option for Floriani Software? A5: As of my last update, Floriani primarily offers perpetual licenses rather than subscription-based models. However, software licensing models can change, so it's best to check their current offerings. Q6: How often is Floriani Software updated? A6: Floriani regularly releases updates for their software, typically including bug fixes, performance improvements, and new features. The frequency can vary, but users can generally expect several updates per year. Q7: Can I transfer my Floriani Software license to a new computer? A7: Yes, Floriani typically allows users to transfer their software license to a new computer. However, there may be limitations on the number of transfers or the process involved, so it's best to consult their customer support for specific details. Q8: Does Floriani Software work on both Windows and Mac operating systems? A8: Floriani Software is primarily developed for Windows operating systems. Mac users may need to use virtualization software or Boot Camp to run Floriani on their machines. Q9: How does Floriani handle software support and customer service? A9: Floriani is known for providing good customer support, offering assistance through various channels including phone, email, and online resources. They also provide extensive educational materials to help users get the most out of their software. Q10: Can I import designs from other software into Floriani? A10: Yes, Floriani Software supports importing designs from various file formats used in the embroidery industry. This allows users to work with designs created in other software or purchased from design libraries. Read the full article
0 notes
Note
I don't remember if you already answered this, sorry in advance if you have, but what are your thoughts on the Bernette 79 Yaya Han edition sewing machine + embroidery machine? I consider myself a cosplayer and a lolita (Yaya is, as far I can recall, a cosplayer but not a lolita), and I've only ever sewn on a vintage Singer in a table and a Hello Kitty Janome. I don't see myself using the embroider option a lot since I embroider by hand, so that part would be taking up space unless I put in the effort to learn. On the other hand, it's a pretty shade of purple and is meant to sew over a variety of costuming fabrics which cannot be said of my current machine. It seems like a lot of extra stuff I probably don't need or have time to learn about if I do need them, but preliminary research seems to show it's a great value for the price (unless you break it). Or do you have any other recommendations in the same line? Thanks again for all your diligence and hard-earned expertise!
Okay, so I just sold one of those to someone whose other machines are a Hello Kitty Janome and a vintage Singer in a table, and I had to immediately check if you and them were the same person. So if you're Singer in a table is a 201, you should really meet my other customers.
Also quick note to everyone who is interested in this machine: you can buy it from the company that I work for. It's an internet model, so I can sell it to anyone in the USA. I can price match anyone else selling it. If you buy it from me, I get credit for the sale and I make commission (but it doesn't cost you anything). So if you want a Bernette b79 Yaya Han edition, or probably any other sewing machine, please shoot me an ask and I'll give y'all my work email or my sale code.
So I personally don't like Yaya as a person, but the B79 is a pretty good deal if it's what you're looking for. The fact that it's got embroidery and it has the digitizing software is really the thing that pushes it into the really good price point. On the sewing side, the foot kit is a really good perk, especially because not a lot of places keep feet in stock that work with the dual feed.
But if you're really not interested in the embroidery, I'd suggest just getting the Bernette b77, which is the sewing-only version of the b79 (if you want the embroidery-only version of the b79, you're looking for the b70Deco). It's going to be about a thousand dollars cheaper. It, sadly, is not purple, but that's nothing a few stickers can't fix. My store's current price on the Yaya 79 is $2499 and our price on the b77 is $1499, so it's literally a thousand dollars.
(Or, if you're absolutely insane, you can get some Cricut infusible ink paper and an EasyPress mini and sublimate onto the front of your machine. It's the kind of plastic that takes sublimation. Isn't that absolutely bonkers wild?)
That said, if you're willing to spend the extra money, you would be getting embroidery with a very large hoop size (for a beginning sewing machine, anyway), the foot kit, the built-in stitches and designs, and Creator9. I tell creative people who are interested in embroidery machines that you should not consider embroidery software to be optional. There's a lifetime worth of fun premade designs and projects in the hoop, and most people are happy to jut use those, but most of the people who are in my age range would not feel like they're getting everything out of their embroidery machine if they can't digitize goofy ideas from scratch. Creator 9 is like a thousand dollars normally, so it's what I find really pushes the price of the Yaya machine into the "really good deal" range, if you ask me. But, if you're not interested in embroidery, it's not really worth paying the extra money.
Anyway, if you're interested, please buy from me because it won't cost you more and it helps me pay my utility bills.
16 notes
·
View notes
Note
Hi ! I tried to see if you every answered a question like this but couldn’t find it do apologize if this has been asked before </3 Do you have any advice for someone who’s wanting to get into embroidery :0 ? I wanna try it but it seems like such an expensive hobby to be uncertain of
hi!!!
this question is a bit tricky for me to answer from a hobby lens, i started doing embroidery with the intention of creating things to sell and it has since then become my main source of income.
i will warn you, it can be a very expensive craft to get into, but if it's something you're really interested i can't recommend enough checking your local sewing supply stores (not chain stores) - i think finding my local sewing supply shop changed the trajectory of my LIFE. no joke, it's awesome. stores who have partnerships with embroidery/sewing machine brands like brother, babylock, husqvarna, etc., (ALLEGEDLY) get machines with better parts than anything you will find at a chain store or online (given my experience with an amazon-bought embroidery machine when i first started... i believe it) ... they also regularly get machines in for repair or trade and sell well-maintained used machines for very fair prices. there are plenty of sewing machines that can also do embroidery if you're looking for versatility! i would definitely recommend checking out machines by the brands i previously mentioned.
embroidery designs are pretty accessible and you can find plenty of projects to practice with on etsy, but if you'd like to learn to digitize your own embroidery designs, embroidery digitizing software can be also be super pricey... if you don't know how to 🏴☠️ ..... (i don't) - i use hatch embroidery 3.0 for digitizing. it is a ridiculously steep price but they do have a 30-day trial if you want to mess around with it. before i moved to hatch, i used stitch artist level 1... it's not the world's greatest program, but i was able to learn the basics to digitizing on there and get really comfortable with what i make before moving up to hatch... which is really great. (price is insane but ugh... people pay more for adobe products i think)
i honestly learned everything i know on youtube, there are plenty of videos about learning to use your machine and digitize and anything else you could think of... lots of trial and error... you may also get some guidance from your local sewing supply store! i learned a lot from the people working there on machine maintenance and threads and upkeep and everything. watch other artists' content on how they work their machines.
i hope that answers your question, i am not the best at explaining things... i hope i point you in the right direction... i think finding a local store and spending some time in there will help you know if you are going to like it or not... gauge how being around beautiful and powerful embroidery machines makes you feel
#sorry ihope this helps anon#thanks for your interest#lalalala#inbox#machine embroidery#thisis my life... i hope i helped
5 notes
·
View notes