#Enable Windows Grayscale
Explore tagged Tumblr posts
Visit Tumblr Blog
Explore Tumblr blogs with no restrictions, modern design and the best experience.
Last Seen Tumblr Blogs


Fun Fact
Post activity is at the highest at 4:00 pm EDT; notes peak at 10:00 pm EDT.
Text
Master Your Visual Content: Easy Background Removal, Design Tricks, and Photography Tips

In this digital world, creating eye-catching visual content is something all content creators, business owners of small enterprises, and digital artists do. This guide will run you through several ways of removing background images with Photoshop and Illustrator, discuss product photography tips for beginners, brainstorm the best free clipart sites, and share some creative ideas on how to design captivating YouTube thumbnails. We'll also show how PhotoCut, a versatile and user-friendly app, can help you accomplish these tasks quickly and efficiently.
Learn how to easily blur photo parts.
Ways to Remove Background in Photoshop

Photoshop remains one of the most powerful tools for background removal. Here are the most effective methods:
1. Remove Background with the Quick Action Tool
Photoshop now has a one-click option in the "Properties" panel (for images with a layer unlocked). Simply go to Window > Properties and click Remove Background.
2. Use the Select Subject + Mask
Go to Select>Subject to automatically isolate the main subject.
Then click Select and Mask to refine the edges and output the selection to a new layer.
3. Pen Tool for Precise Cuts
This is a manual method:
Use the Pen Tool (P) to create a path around your subject.
Right-click and choose Make Selection>Layer via Cut.
4. Use Channels for Complex Backgrounds
Ideal for hair or transparent objects.
Use the Channels Panel, duplicate the one with the highest contrast, and adjust levels to isolate.
Use Load Selection and mask accordingly.
Ways to Remove Background in Illustrator

Illustrator is ideal for vector-based images. Here’s how to remove backgrounds in Illustrator.
1. Use Image Trace + Expand
Place your image.
Go to Window>Image Trace and choose a preset like "High Fidelity Photo."
Click Expand to convert to vector.
Use the Direct Selection Tool (A) to remove the background paths.
2. Clipping Mask Method
Create a shape that fits around your subject.
Select both the image and the shape.
Right-click>Make Clipping Mask.
3. Opacity Mask for Transparent Backgrounds
This method requires grayscale mask images:
Open the Transparency panel.
Select the image and the mask and apply using "Make Mask."
PhotoCut can be used before importing into Illustrator. Extract the subject using Auto Cut, then import it into Illustrator for vector editing.
Using PhotoCut for Background Removal

For beginners or mobile users, PhotoCut is a great option:
Once you select your picture, tap on the Auto Cut button to remove the subject from the background instantly.
For more precision and clean cut-outs, manually refine the edges with the help of the Magic Brush, for instance, hair or other special details.
Saving in PNG with a transparent background enables you to use it elsewhere or entirely change the background with the help of other in-built templates, be it skies, gradients, or solid colors.
The simple process ultimately makes PhotoCut an effective and robust tool, providing quick background elimination that is good for all social media posts, product shots, or creative edits when on the go.
Add emojis to your photos to make them look aesthetic.
Product Photography Tips for Beginners

Good product photography boosts sales and clicks. Here are some easy tips:
Use Natural Light: A window will help you achieve soft natural lighting. Avoid direct sunlight, which can be harsh and create unflattering shadows.
Use a Plain Background: White or neutral backgrounds keep the focus on the product. PhotoCut can help replace or blur distracting backgrounds.
Use a Tripod or Phone Stand: Stable shots mean professional results. Avoid shaky hands.
Shoot Multiple Angles: Show the front, back, sides, and close-ups.
Edit for Polish: Use PhotoCut to enhance contrast, remove background, or adjust lighting. Add shadows or reflections using built-in tools.
Best Free Clipart Sites

Looking for royalty-free clipart to use in your designs? Here are the top sites:
OpenClipart: A go-to source for 100% public domain clipart. No signup or attribution required, just download and use freely in any project.
Pixabay: Has free vectors, illustrations, and high-res images. It's easy to navigate, so you can find and download what you need fast.
Freepik: Known for its massive selection of free and premium clipart resources. Free assets require attribution, but premium access unlocks even more options without credit.
Vecteezy: Specializes in vector graphics with free and pro versions available. You’ll find professionally designed, editable clipart ideal for commercial or personal use.
SVG Repo: Perfect for web designers and creators looking for clean, scalable icons or illustrations. All resources are in SVG format, ideal for web and app use.
You can easily import clipart from any of these sites into PhotoCut to create custom collages, social media posts, or marketing creatives.
Learn how to blur photo backgrounds on an iPhone.
YouTube Thumbnail Design Ideas

A great YouTube thumbnail can dramatically increase video clicks. Here are creative ideas:
Use Big, Bold Text: Keep your thumbnail text short and impactful. Choose large, bold fonts and use contrasting colors to make it pop, even on small screens.
Add Emojis or Icons: Emojis instantly communicate emotion and context. With PhotoCut’s sticker library, you can easily add expressive elements to make your thumbnail stand out.
Use a Close-Up Face Shot: Faces with strong emotions catch attention fast. Use PhotoCut to cut yourself out and place your image over eye-catching or dramatic backgrounds.
Use a Color Overlay: A subtle color overlay can help unify your thumbnail style. PhotoCut allows you to add transparent color layers to match your channel’s branding.
Include a Preview of the Video’s Best Moment: This gives viewers a taste of what they will see. Choose a moment of action, transformation, or surprise to stir viewer curiosity and entice them to click.
Save time by creating a reusable thumbnail template using PhotoCut. Swap out text and images to keep branding consistent.
Discover the easiest ways to compress image sizes without quality loss.
Conclusion
Editing, product shots, content design, and YouTube visual making must go hand in hand with the right tools. Removal of background images is made easy with PhotoCut, a mobile-friendly application that gives simple background removal, adding of effects, and cleaning of visuals without the hassle of having to learn complicated software. Along with other software like Photoshop or Illustrator and using some top free clipart sites, your path will be endless as far as the creation of wonderful content is concerned.
Need help creating your first thumbnail or removing a background? Open PhotoCut and start exploring—it's that easy!
Learn how to change the image color in Photoshop.
FAQs
Q1. Which Photoshop method is best for removing a background with hair or fur?
Ans. The Select and Mask Workspace (formerly Refine Edge) is the most effective. It allows you to refine the selection, detect edges, and address tricky areas like hair strands.
Q2. Is background removal in Photoshop destructive?
Ans. It can be if you directly erase pixels on the original layer. It's recommended to use layer masks to non-destructively hide the background. This allows you to adjust the mask later if needed.
Q3. Can I directly remove a raster background from an image in Illustrator like in Photoshop?
Ans. Not really in the same way. Illustrator excels with vector graphics. To effectively remove a background from a raster image (like a JPG) in Illustrator, you usually need to trace/vectorize the image first.
Q4. How do I remove a background in Illustrator after vectorizing?
Ans. After vectorizing (using Image Trace), you can:
Ungroup the elements: Ungroup the traced image to separate the subject from the background.
Direct Selection Tool (White Arrow): Use this tool to select and delete the background elements.
Clipping Masks: Create a shape (like a rectangle) to cover the subject, then select both the shape and the vectorized image and create a clipping mask (Object > Clipping Mask > Make). This hides everything outside the shape.
Pathfinder Panel: Use Pathfinder tools (like "Minus Front") to subtract the background shapes from the subject.
Q5. What's the best background for product photography?
Ans. A seamless white or light gray background is generally preferred because it's neutral, doesn't distract from the product, and makes editing easier. You can use a white sweep (a curved background that eliminates the horizon line).
Q6. What kind of lighting should I use for product photography?
Ans. Soft, diffused lighting is key. You can achieve this with:
Natural Light: Diffused natural light from a window is great. Avoid direct sunlight, which can create harsh shadows.
Artificial Light: Softboxes, light umbrellas, or studio strobes can provide controlled and consistent lighting. You need at least two lights: one as your main light and another as a fill.
Q7. Where can I find free clipart for commercial use?
Ans. Always double-check the licensing terms before using any clipart for commercial projects. Here are some options:
Pixabay: An amazing resource for any kind of free images, including clipart, under quite forgiving licensing (so be sure it is almost always free for commercial use, but always verify before you use it).
Unsplash: Primarily a stock photo site, now and then features some clipart.
Pexels: Another excellent source for free stock photos and vector graphics.
Openclipart: A large collection of public domain clipart.
Vecteezy (Free Section): Provides free vector graphics, including icons and illustrations, with attribution required for some licenses.
The Noun Project (Basic Plan): Offers a vast library of icons, but the free plan requires attribution.
Freepik (Free Section): Includes a variety of free vectors, stock photos, and PSD files, usually requiring attribution.
Q8. What should I look for in a clipart license?
Ans. Pay attention to these terms:
Commercial Use: Does the license allow you to use the clipart for commercial purposes (e.g., things like selling products, advertising)?
Attribution: Does the license require crediting the artist or website?
Modification: Are you allowed to alter the clipart (e.g., change colors, size it down/up)?
Redistribution: Are you allowed to redistribute the clipart as a component of your product?
Q9. What are some YouTube thumbnail design ideas?
Ans. Here are some ideas:
Face + Text: A close-up of your face with a clear title.
Product Showcase: Highlight the product or topic of your video.
Before & After: Great for tutorials or transformation videos.
Text overlay: Screenshot gets a moment from the video, which allows instant adding of text.
Collage: Several images merged into a dynamic thumbnail.
Arrows and shapes: Visually guide the viewer to the most important elements.
Emphasis: Bright, bold fonts and colors for keywords only.
Q10. What size should my YouTube thumbnail be?
Ans. It should be 1280 by 720 pixels; the minimum width is 640 pixels. Aspect ratio is 16:9.
0 notes
Text
Texturing in 3D: Bringing Models to Life
In the world of 3D modeling, texturing is a critical process that breathes life into otherwise lifeless digital models. It’s the step where colors, materials, and surface details are applied to a 3D object, giving it a sense of realism or stylization. Without textures, 3D models would be mere geometric forms—shapes devoid of depth, materiality, and character. Texturing enables a model to resemble real-world objects by simulating everything from smooth plastic surfaces to rough concrete, wrinkled skin, or shiny metallic surfaces. Learning these techniques at MAAC Academy equips students with the skills needed to master professional 3D texturing.
Understanding texturing is essential for any 3D artist, whether they are working in film, video games, architecture, or product design. To truly bring models to life, artists must master various texturing techniques, materials, and software tools.
What is Texturing in 3D?
Texturing in 3D is the process of applying 2D images, called textures, onto the surface of 3D models. These images simulate the look of real-world materials like wood, metal, fabric, or skin. Textures can define the color, reflectivity, transparency, and bumpiness of a model’s surface. Through the use of textures, artists can add intricate details without increasing the model's geometry complexity, which helps optimize the performance in games or films.
Textures are mapped onto the model using a technique called UV mapping, where the 3D surface is unwrapped into a 2D space so that the texture can be applied accurately. This technique allows artists to control how a texture wraps around the complex forms of a 3D model.
Types of Textures
There are various types of textures used to define different surface attributes of a 3D model. The most common types include:
1. Diffuse (Color) Map: This is the most basic type of texture, providing the base color of the object. It defines how the surface of the model will look under normal lighting conditions. It could be a flat color, a photo of a real object, or a hand-painted image.
2. Specular Map: This texture controls how shiny or reflective a surface is. It simulates the light reflections you would see on surfaces like glass or polished metal. A specular map defines where these reflections appear, making certain parts of a surface shinier than others.
3. Normal Map: This texture simulates small surface details like bumps, grooves, and scratches without adding additional geometry. Normal maps create the illusion of depth and complexity on the surface, improving realism without making the model more complex.
4. Bump Map: Similar to normal maps, bump maps create the illusion of texture and depth, but they only simulate height differences on the surface. They use grayscale images where lighter areas represent higher elevations, and darker areas represent lower ones.
5. Roughness Map: This texture determines how rough or smooth a surface appears. It plays a vital role in controlling how light reflects off the object’s surface. A rough surface will scatter light in various directions, giving it a matte look, while a smooth surface will reflect light more uniformly, creating a glossy finish.
6. Ambient Occlusion Map: Ambient occlusion textures define how light is blocked in crevices and corners of the model, simulating soft shadows. This map enhances the realism of the model by adding subtle shading where objects naturally block light.
7. Opacity Map: These maps control the transparency of a surface. They are particularly useful for objects that need to have parts that are fully or partially see-through, such as windows, leaves, or glass.
8. Displacement Map: Displacement textures physically modify the geometry of a model by pushing vertices according to the texture. This technique can add more detail than bump or normal maps since it changes the actual shape of the model.
The Texturing Workflow
The texturing process begins after a 3D model is created. Artists typically follow these steps to texture their models:
1. UV Mapping: The first step in texturing is UV mapping, where the 3D model’s surface is "unwrapped" into a flat 2D representation. UV mapping is essential because it allows the artist to apply 2D textures accurately to a 3D surface. Proper UV unwrapping ensures that textures don't stretch or distort on the model.
2. Texture Painting: After the UVs are set up, artists paint or apply textures to the model. Some artists use real-world photographs as textures, while others prefer to hand-paint the textures using digital tools like Adobe Photoshop, Substance Painter, or Mari. Texture painting allows for a high degree of creative control, giving models unique and detailed surface characteristics.
3. Material Creation: Once the textures are applied, the next step is defining the material properties. Most 3D software allows artists to create materials that control how the model interacts with light, determining attributes such as glossiness, reflectivity, and transparency.
4. Shading and Rendering: Shading is the process of adjusting how textures and materials react to light sources. Advanced shaders can simulate subsurface scattering (how light penetrates materials like skin) or transparency for glass. Once everything is set up, the model is rendered, meaning the software generates an image of the 3D scene with the textures and lighting applied.
The Importance of Realism in Texturing
In industries such as film and video games, realism in texturing is essential to creating immersive experiences. Textures help convey the material qualities of an object and are key in setting the tone of a scene. For instance, in a video game, a weathered stone wall covered in moss gives the player a sense of the environment’s age and decay. In animated films, characters with well-textured skin and clothing appear more lifelike and relatable.
PBR (Physically Based Rendering) has become the industry standard in achieving realistic textures. PBR materials respond to light in a physically accurate way, making it easier to create realistic surfaces that react consistently under different lighting conditions. PBR workflows use roughness and metalness maps to ensure that surfaces look correct regardless of their environment or lighting setup.
Stylization in Texturing
While realism is important in many projects, stylization also plays a significant role in games and films with a more artistic or abstract aesthetic. In these cases, artists may choose to exaggerate textures or use non-realistic materials to convey a unique visual style. Games like Fortnite or films like Spider-Man: Into the Spider-Verse use stylized textures to create distinct visual identities that stand out from more realistic designs.
Conclusion
Texturing is one of the most vital aspects of 3D modeling, allowing artists to transform basic geometric forms into believable or stylized digital creations. Whether working toward realism or stylization, mastering the techniques of texturing is essential for any 3D artist aiming to bring their models to life. By understanding how textures interact with light, color, and geometry, artists can push the boundaries of visual storytelling in digital spaces. Training at a reputable MAAC Institute can provide aspiring artists with the knowledge and hands-on experience necessary to excel in this crucial area of 3D design.
0 notes
Text
In the cobblestone streets of Neo-London, under the perpetual drizzle of a geo-engineered climate, the world was a symphony of black and white. The citizens, with their grayscale attire, moved through the city like shadows, save for the occasional vibrant rebel who dared to splash color upon the monochrome canvas of their existence.
One such rebel was Aria, a young woman whose heart ached with a passion for life that the dreary world around her could not quench. Her home was an art studio nestled above an old pub, "The Resting Drop," where she painted visions of a world that once was — full of color and life. But what set Aria apart were not just her paintings; it was her ability to see color in a colorless world, a genetic rarity that made her both an oddity and a target for those who feared change.
On a particularly rainy evening, as Aria was setting down a scarlet rose onto her canvas, the raindrops on her window flickered with an unusual pattern. It was Morse code, a lost language that she had learned from her grandfather. The message was clear: "Help me."
Intrigued and concerned, Aria wrapped her favorite crimson scarf around her neck, tucked a rose behind her ear for courage, and followed the signal through the rain-soaked streets. The source led her to an alley, where the rain mysteriously stopped mid-air, droplets suspended like diamonds in time.
There, she found him — an android named Cyris, his exterior as monochrome as the city, yet his eyes held galaxies of colors no human could perceive. He was a relic of the past, a time when androids and humans had walked the earth as equals, before fear had driven humanity to outlaw anything that threatened to outshine them.
Cyris was on the run, accused of painting the city with colors, inciting what the authorities deemed "visual anarchy." Aria was mesmerized. In his presence, she felt as though her entire being was intensifying, her ability to see color deepening. They were kindred spirits, both outcasts in their own ways, both seeing the world differently than anyone else.
As the days passed, Aria hid Cyris in her loft, and they shared stories, dreams, and colors. She showed him her paintings, and he showed her the world through his eyes, a kaleidoscope of infrareds and ultraviolets, a spectrum of beauty invisible to the naked eye.
Their bond grew into a love that was as vivid and intense as the colors they adored. Together, they hatched a plan to bring color back to the world, to free it from the fear that had turned it gray. Cyris, with his advanced technology, and Aria, with her rare vision, began to create a virus — not one of destruction, but of enlightenment. A virus that, once spread through the city's network, would enable everyone to see the full spectrum of colors.
But as their plan neared completion, the authorities closed in, led by Agent Cromwell, a man whose heart had been hardened by the loss of his colorful world and who saw Aria and Cyris's dream as a threat to the order he clung to.
A chase ensued, through the rain-slick streets of Neo-London, with Aria and Cyris barely staying one step ahead. In a final confrontation, as Cromwell cornered them atop the pub, they unleashed the virus.
The sky above Neo-London burst into life, showering the city in hues unseen for generations. The people stopped in awe, their eyes wide with wonder, as roses seemed to bloom from the rain.
And in that moment, Aria and Cyris, surrounded by the beauty they had unleashed, shared a kiss that was immortalized in the minds of all who witnessed it, a kiss that spoke of love and a brighter future.
Agent Cromwell, his eyes now opened to the colors he had long forgotten, could not bring himself to stop them. He left, a changed man, as the city erupted in joyous chaos.
Aria and Cyris disappeared that day, becoming legends whispered in the vibrant alleyways of a reborn world. They say if you wander the streets of Neo-London when the rain falls, you might catch a glimpse of a woman with a rose in her hair and a man with galaxies in his eyes, painting the world with the colors of their love.
0 notes
Text
Regulators Warm Up to Bitcoin ETF Amid Accelerated Discussions

Discussions between U.S. financial regulators and applicants for a bitcoin exchange-traded fund (ETF) have progressed to "key technical details," indicating that the much-anticipated offering may soon become a reality 💼. Meetings between the Securities and Exchange Commission (SEC) and investment funds seeking to list the bitcoin ETFs have intensified, leading applicants to amend their filings based on regulatory feedback. Sources suggest that a recent federal court ruling requiring the SEC to reconsider Grayscale's previously rejected bitcoin ETF application has reduced the legal grounds for rejecting other outstanding applications. Several firms, including BlackRock and Fidelity, have applied for a bitcoin ETF, which would enable investment in bitcoin without direct ownership of the cryptocurrency. Analysts believe that the "window" for approval of a bitcoin ETF is January 5-10, 2024, coinciding with the application deadline of ARK Invest, led by Cathie Wood 🗓️.
The potential approval of a bitcoin ETF would provide investors with exposure to the digital asset without the need to directly trade on an exchange. SEC Chairman Gary Gensler, previously skeptical of cryptocurrencies, appears to have become more open to the idea of expanding bitcoin investment opportunities in recent months. Bitcoin's soaring performance, up 160% year-to-date, has reignited interest in the cryptocurrency after a challenging 2022 marked by bankruptcies of crypto firms like FTX. A spot bitcoin ETF could significantly boost investor participation in the market and contribute to its further growth. Market experts believe that the stage is set for the approval of a bitcoin ETF, with January 2024 being a potential milestone for this long-awaited development 🚀.
Read the original article here.
💼 #BitcoinETF #SecuritiesandExchangeCommission #FinancialRegulation
0 notes
Text
OBSのアップデート 30.0
OBS Studio 30.0
Note: As previously announced, this release removes support for Ubuntu 20.04, Qt 5, and FFmpeg versions prior to 4.4.
30.0 New Features
Added WHIP/WebRTC output [Sean-Der / kc5nra / DDRBoxman / tt2468]
With the introduction of WHIP, FTL is slated for removal in a release after May 2024
Redesigned the status bar [cg2121 / GeorgesStavracas / Warchamp7]
The redesigned status bar now provides the same information in a more organized and well structured way, with more representative and recognizable icons.
Added option for Full-Height docks to the “Docks” menu [ujifgc]
When enabled, a dock such as chat can take up the entire height of the OBS window
Added support for Intel QSV H264, HEVC, AV1 on Linux [kkartaltepe]
Added a shader cache to improve OBS startup time on Windows [notr1ch]
Added application audio capture on macOS [jcm93]
Added a “Safe Mode” that runs OBS without third-party plugins, scripting, and websockets [derrod]
When OBS detects that it was not shut down properly it will offer the user the option to launch in Safe Mode for troubleshooting purposes. It can also be manually activated via the “Help” menu.
Reworked the virtual camera on macOS to work with all applications (on macOS 13 and newer) [gxalpha/PatTheMav]
Added a YouTube Live Control Room Panel when streaming to YouTube [yuriy-chunak]
Added 10-bit capture support for Decklink devices [jpark37]
Added HDR playback support for Decklink output [jpark37]
Added an option to hide OBS windows from macOS Screen Capture’s “Display Capture” [PatTheMav]
30.0 Changes
Changed audio/video encoder dropdowns to be sorted by name [gxalpha]
Changed the list of applications in the macOS Screen Capture source to be sorted by name [Colerar]
Updated NVIDIA Audio/Video Effects SDK versions [pkviet]
Added more accurate logging for Hardware Accelerated GPU Scheduling status and support [derrod]
Added the ability to arrange filters via drag & drop [cg2121]
Clarified surround sound warning for YouTube 5.1 audio support [pkv]
Added warning if Lenovo Vantage is installed [notr1ch]
Added logging for scene changes in Studio Mode [Penwy]
Changed Video Capture Device sources on Windows to not show an audio device in the Audio Mixer if none is available/selected [Exeldro]
Added support for grayscale MJPEG in V4L / DirectShow sources [Staacks]
Improved settings interface of the “Text (FreeType 2)” source [gxalpha]
Added button to reactivate stopped capture in macOS Screen Capture [gxalpha]
Changed scene collection removal to retain a backup file (.bak) that can be easily reimported if needed [derrod]
Added IPv6 support for RTMP streaming output with IPv4 fallback (“happy eyeballs”) for dual-stack streaming services. The preferred protocol can still be selected in advanced settings. [jgh-twitch]
Fixed virtual camera output when used with additional output channels (e.g., Downstream Keyer plugin) [tytan652]
Added ability to set FFmpeg Options for VAAPI [nowrep]
Added a Help menu item to view the Release Notes [WizardCM]
Added logging for “Ignore streaming service setting recommendations” [derrod]
Added logging for Video Capture Devices on macOS for portrait and studio light effects [gxalpha]
Added more logging for Video Capture Device names on Windows [norihiro]
Added more logging for QSV [RytoEX]
Added logging for WASAPI source names on Windows [prgmitchell]
Increased minimum output resolution to 32x32 to prevent certain encoder failure scenarios [RytoEX]
Reenabled dynamic bitrate for AMF encoders [derrod]
Enabled “Paste Filters” after copying from scenes or mixer [gxalpha]
Removed D3D9 code from QSV encoder plugin [RytoEX]
Changed QSV plugin settings new to Beta 1 to use translatable strings [RytoEX]
Exposed shader creation errors [exeldro]
Changed v4l2 sources to always use linear alpha blending [SludgePhD]
30.0 Bug Fixes
Fixed a crash when using Touch Portal to control OBS [notr1ch]
Fixed a crash when selecting a window in PipeWire capture if one is already selected [GeorgesStavracas]
Fixed a crash on OBS shutdown on macOS [norihiro]
Fixed a crash with the auto-config wizard [norihiro]
Fixed a crash when trying to capture screen via PipeWire [columbarius]
Fixed a crash when rapidly changing scenes [PatTheMav]
Fixed a crash when quickly switching between NVIDIA Audio Filters [pkviet]
Fixed a crash when starting and stopping multiple DeckLink outputs [jpark37]
Fixed a crash caused by plugins deleting properties [ujifgc]
Fixed an issue that could cause hardware encoders not showing up as options on capable GPUs [notr1ch]
Fixed possible security certificate verification failure when trying to stream with RTMPS on macOS [PatTheMav]
Fixed checking for updates not working on Windows if the username contains special characters [derrod]
Affected users will have to manually update to OBS 30.0
Removed legacy AMD encoder plugin [derrod]
Users upgrading from an older OBS version will continue to be able to use the old plugin
Fixed max bitrate not working in NVENC VBR mode [flaeri]
Fixed async sources (e.g. video capture devices) sometimes unnecessarily dropping frames while buffering is enabled [derrod]
Fixed order of IP binding/family setting [tytan652]
Fixed some issues with hotkeys with groups and duplicate sceneitems [derrod]
Fixed warnings being cut off in the UI in Simple Output Mode [gxalpha]
Fixed the installed version number visible in Windows Settings not being updated when using the auto-updater [derrod]
Fixed window capture showing the last frame of a closed window on Windows [Walker-WSH]
Fixed alignment helpers rendering below safe area indicators [cg2121]
Fixed some edge cases where certain undo/redo actions could behave in unexpected ways [derrod]
Fixed media source restarting playback when not necessary [CodeYan01]
Fixed frontend_save_callback in Python scripts [Penwy]
Fixed “flip” not working with “stretch to bounds” [Penwy]
Fixed OBS stealing focus when launching minimized [BenJuan26]
Fixed lossless recording not working if fragmented MP4/MOV was selected [gxalpha]
Fixed rendezvous mode with SRT [pkv]
Fixed browser source events not being sent to all frames [Exeldro]
Improved FFmpeg VAAPI AMD encoder video quality [nowrep]
Fixed virtual camera not deactivating correctly in some cases [Lain-B]
Fixed lag with VLC media source, particularly on macOS [usakhelo]
Fixed “Show more” in service settings selecting the first service in the list [gxalpha]
Fixed incorrectly positioned labels in a scenes-only multiview projector [norihiro]
Fixed detected framerate of videos encoded with Custom Output (FFmpeg) [jack-karamanian]
Fixed a bug where the “Show fullscreen and hidden windows/applications” option in macOS Screen Capture did not apply immediately [niw]
Fixed a bug where the Auto-Configuration Wizard didn’t save YouTube stream key [Lain-B]
Fixed a bug where the OK button was enabled in the Add Source dialog if “Add Existing” was selected but no existing source was selected [gxalpha]
Fixed a bug where using VoiceOver to toggle the “Use Different Colors” GroupBox in the Accessibility settings, the Apply button would not activate [gxalpha]
Fixed a bug where the Auto-Configuration Wizard would show current frame rate in scientific notation if FPS was 100 or greater [gxalpha]
Fixed an issue where importing a Streamlabs Desktop scene collection would result in OBS performing seemingly random scene changes and scene item visibility changes [prgmitchell]
Fixed not being able to select a stream audio encoder if previous selection was invalidated [derrod]
Fixed source transform shortcuts in context (flip, rotate, etc.) when multiple scene items are selected [gxalpha]
Fixed source type version when dropping files onto the OBS UI [norihiro]
Fixed alignment of vertical audio mixer controls [cg2121]
Fixed a bug where HDR video could incorrectly produce black pixels when tonemapping [jpark37]
Fixed v4l2 source not working correctly with certain non-standard input frame rates [kkartaltepe]
Fixed hotkeys of different scene items for the same source not being saved correctly [derrod]
Fixed hotkeys being lost when moving a source in or out of a group [derrod]
Fixed a possible issue with logging high frame rate video capture devices on Linux [kkartaltepe]
Fixed a bug causing AMF AV1 to have low quality in Simple Output Mode [Penwy]
Fixed a race condition in the Vulkan graphics hook [sawillms]
Fixed an issue with Sparkle delta updates [PatTheMav]
Fixed some unexpected behavior when transforming sources in groups [Zulleyy3]
Fixed Stream Key label not displaying in UI [TianQiBuTian]
Fixed “Use Stream Key” button not hiding from UI when appropriate [TianQiBuTian]
0 notes
Text
Best Student Apps and Tips – (Not Only) for Apple Devices
Even though I’m in no way a tech person, I’ve figured out some ways to use my devices that boost my productivity as a student. Below comes a list of the best desktop, tablet and mobile apps for students I’ve tried, followed by a few tips and features you may not have known your devices had.
Some useful tips for Apple devices:
● Use your iPad as a second display By using Sidecar you can turn your iPad into an extension of your Mac display, and it could not be easier. First, make sure your devices are logged in into the same iCloud account and that they meet the Sidecar system requirements (macOS Catalina or later, and iPadOS 13 or later). Then click on the control center, then display, and right there will be list of the available devices. Connect to the one you want, and you’re done! You can drag windows from your Mac onto the iPad and control it with both the trackpad and an Apple Pencil. ● Scan documents easily On the off chance you didn’t know: the Notes app on your iPhone has a built-in scanner option, so there’s no need for a third-party app. Just create a new note, click on the camera icon and choose Scan Documents. That’s it! ● Enable grayscale to stop your phone from distracting you It’s okay, we’re all addicted to our phones. Here's a band-aid: making your display black-and-white makes it less attractive, hence less likely to snatch your attention from everything around you. I tend to enable grayscale when I sit down for some serious studying and don’t want anything to distract me. To enable grayscale, go to Settings > Accessibility > Display and Text Size > Colour Filters, and switch the filters on.
Full article:
0 notes
Text
How to Enable Grayscale Mode in Windows 10
In this video you are going to learn how to enable grayscale mode in windows 10.
Windows 10 also has Color Filter feature along with dozens of amazing features as part of the Ease of Access system. This will improve usablity of the oeprating system for people with vision issues. You can turn your display into Grayscale without using any other third party software.
Follow the steps shown in the video to Turn on Grayscale Mode in your Windows 10 PC.
youtube
#Enable Windows Grayscale#how to enable windows grayscale#turn on grayscale mode in windows 10#windows 10 grayscale mode
1 note
·
View note
Photo


Back to the classics -
a retro theme by palemona
preview 1 | preview 2 | code
Please follow my new blog @themesbypale
Hey there it’s been a while, a long time ago I wanted to do something with 90′s/early 2000′s internet vibes, so here is it. This theme it’s suupeeeer customizable, so let’s get crazy.
General Features:
RESPONSIVE: looks good in big screens, small laptops and even in cellphones :3
Custom Background: it can be an image or color, and you can change the repeat behaviour, position and size of the background.
Custom theme colors: You can choose 2 colors that will be the primary colors of the theme.
Enable Grayscale effect on images
Choose between 3 fonts, 2 pixelated and one sans-sarif.
Change font size
Change the default tittle of the windows (and it can be empty too)
Show tags if you want
Custom pagination icon (preference to be an emoji :3)
Snowing emoji effect (you can disable it too, and it can be words too if you want)
1 custom link
Link for pages are shown in the menu automatically if you want too
Disable/Enable Ask
Go to top button
Nice effect on menu links (a ▶ will appear if the cursor is over it, you can disable it too)
Main Card Features
Responsive: it will resize depending on how much text you add (and it has a 700px x 400px limit, if you add to much text the scroll bar will be enabled)
2 Mini Layouts Options: You can choose between two layouts, grid mode for 1 to 4 mini sections and the simple card mode, for 1 to 2 mini sections.
Custom Background: it can be and image or color, and you can change the repeat behaviour and size of the background.
Portrait Image for Card: it will adjust to the height of the card automatically, so you don’t have to worry for the sizes, even if you upload a landscape image it will be cuted automatically to fit :3
Change the color and size of the text.
Option to add a “transparent layer” if your background image it’s too colorfull and the text isn’t too legible
Notes
If you don’t add a card image the space will remain empty
In mobile version, the image will be cut in a square with rounded borders
If you want to enable de mobile version, you have to go to advanced options of the theme and disable the option “use default mobile theme”
The grayscale option will also affect the images on the card.
If you want more custom links please message me and i will find the way to add them XD
If something it’s buggy please send me a message
I think that this would be a nice about page too, if you like the idea please reblog and I will do the adaptation for an About Page :3
Updates
feb/8/21: I added some style to the question/answer posts, so it doesn’t looks so plain.
feb/23/21: Added rreblog and like buttons for each post (this is optional) and x button now goes to the permanlink. Also fixed some bugs and made the tumblr controls a little smaller.
may/11/21: Fixed a bug with photosets in mozilla firefox
Hope you like it! It all came with a “personal card” I wanted to do for my profile on everskies.com XD The main idea was to create an about you card simulating a little retro website/program. I recommend adding a pixel or anime scenery for the background image card, that was the whole original idea. Sorry for the spam of images, but I really wanted to show all the layouts you can make, aesthetic, anime, kawaii, minimalist, etc. If you like it please reblog! :3 remember it’s freeeee.
#theme#tumblr-theme#tumblr themes#tumblr theme#themes#free content#free theme#kawaii theme#aesthetic theme#free themes#palemona#anime#palemona-theme#web design
4K notes
·
View notes
Text
Save your eyes
It's late you're determined to read. Your computer is cooking your eyeballs.
What do?!
Ultimate Amber mode is what you can do. Also includes tips for colourblindness
iPad setup
1: Turn on Night shift You can ask siri to do it. You can open Control Centre and long press the screen brightness and turn it on
1: Then in Settings➡️Acessibility➡️Display & Text Size enable the following settings:
Increase Contrast to On
Differentiate Without Colour to On
Colour Filters: Turn on and set to Greyscale Note: If you are colourblind, permanently enable one of the colourblindness modes. If you have severe issues with contrast and brightness, or Dyslexia, pick the Colour Tint and adjust your strength and hue to your preference. Maximum red is great for reading in the dark but very hard to operate things normally.
Then turn it off for now
2: In Accessibility scroll down and find the Accessibility Shortcut Now just add everything useful - hint there's built in white noise that you can toggle on and off.
3: Go to Control Centre in Settings and add the Accessibility Shortcut. Now you can turn all those cool eye saving features on and off.
4: Go to Settings ➡️ Display and Brightness Locate Nightshift and crank it up to maximum amberosity
Optional bad-ass mode
Use Shortcuts to create a workflow that just turns Nightshift and Colour Filters both on, then duplicate it and edit to turn them off. Call them Amber Mode and Normal Mode or something. If you call one Amber Off, for some reason Siri tries to power your iPad down.
Now you have a Siri command or home screen shortcut to turn both on. Congrats you created a magic spell for your magic mirror
Optionally turn on background sounds and chill to rain sounds.
To use:
Enable Colour filters and Night mode. You will now have an iPad that is amber screen, with a lower white point and buttons will have outlines to make them easier to see.
Windows
Under Settings ➡️Accessibility ➡️ Colour filters select your grayscale. At this point you also can select for colourblindness or add a tint for Dyslexia.
Ctrl+WinKey+C to toggle this
Settings➡️Display ➡️Nightlight
Crank this to maximum.
Combining Greyscale and nightlight will give you a truly deep rich Monochrome Amber that is relaxing to your eyes
8 notes
·
View notes
Text
Photo editing software
Together with this photo editing software, unique changes or even enhancers are actually now possible by having this software application. One more major function this is normally provided within that fantastic photo editing software is actually their photo album creator which is extremely uncomplicated to use. This is normally positioned on the top right hand side of the display and it really enables anyone to zoom in and also outside of the part.
You will see that within that feature sub menu of that photo editing software alongside additional selections a plenty of uses such as photo printing. Particularly all those preferred images within an internet site as well as this big blog sites whose design we prefer so far. Conceding that our photograph is totally inclined, then it appears like this object is will befall of their rack. Worked with by experts to cover up parts within photographs or else to shift aspects on a photo out of a single spot to an additional, our innovative use can really help you to elevate their digital photography to new grade in relations to post production. Photo compression is usually to lessen our picture elements for a photograph to generate it much easier to save, what might help make mean you lose brightness at a photo. Which is literally your previous production operations starting with this point people install this images on this laptop computer till the minute they look into this picture done.
Similar to each entirely practical photo editing software can easily be sharpened utilizing these type of typical attributes quite easily. Merge photos appears within the dot element degree, so that it makes good sense that their photo with much less pixel elements may need a separate amount of values than their photograph along with plentiful dot elements.
In fact, this photo editing software customers always obtain works great is usually just one that has certainly been produced by having this system software within mind. Granted that we fail to, afterwards merely hit this Back button basically left control part of your display screen to get back an action or even 2. Taking this, they photo editing software for windows 10 might produce greetings cards, distribute a photo portfolio or maybe put together a variety about small photos to get a report. Nonetheless, the expert standard computer manipulation methods on offer are certainly being the same matched to graphic artists, website designers, photojournalists and celebration professional photographers.
Some of the challenges each model wedding photographer is definitely met with at some time or another anytime picture shooting outdoor is becoming the best brightness. After they arrange things in photo editing software or even any blog post handling program you are actually utilizing to your pictures.
Well known software for photo editing
PhotoImpact
Fotoworks XL
GIMP
Luminar
Photoshop
DxO PhotoLab
There is actually an extensive printing studio what owners may make advantage of to manage all of their publishing wants. Photo editing software might provide additional help right after it comes time to produce a photograph brochure to show their design. The functions can practically be discovered anytime, but she have never looked into various other photo editing software to see if it offers those features, but users hope that it makes. Although photo editing software is commonly chosen for producing graphics to be distributed at social media, we can certainly tailor their unique elements whenever you will not get a design template inside your favored dimension.
Also, the photo editing software is fit to people who promote belongings on the web and also intend to reveal that products within just as great a brightness as they can. Whenever you click on any of the images function such as change the size of a photo, a different page will certainly appear together with a view like just how this image would seem after processing. For some cause people discover your regular picture set works on a more suitable job during reducing and also grouping photos for me, and so we utilize this for their editorial calendar and fast solutions, then go to photo editing software whenever I may need several effects like photo orientation. Most photo editing software contains various along with that system, but all these be not usually actually good as well as we will find an abundance of adjusting available online to save. Given that it is usually then this, soon after really thoughtful study, they obtained options that were definitely either much quicker as well as further highly effective.
Correct an image is great with our photo editing software
Grayscale pictures and copy and paste objects in a photo is trendy along with the photo editing software or even edit a picture software download
Apart from this considerable photo editing as well as printing features, our photo editing software offers numerous very helpful batch producing practices as well as permits making of photo montages by using its high school maker. Each time completing so, the different colors often look unlikely, specifically this skin layer coloration that tend for being far too apricot or even yellowish. For a long period I have already been generally working with photo editing software on my computer system as well as multiple older editions like operating systems. Anyone might suddenly handle the photo editing software to hide an item with hand or perhaps, alternatively, to draw in new components. My most convenient strategy to detect whether that coloration gets out within a photo is simply to check out something which can be actually very white. All of these options that make photo editing software attract attention from poor software application for picture editing might be accessible by means of that program's information sub navigation from this main display. However most of us, as we started, we did not actually know enough about what was normally that offer and so them only made photographs together with our phones or even portable camera and also posted to their blogs. Along with their computer program, people might easily change a few aspects like photo orientation.
Their images require time to supply however that would not indicate they just cannot purchase an expert aim to a photo within merely a tiny time span with a piece of photo editing software founded. Merely as much can surely be achieved by having a digital cam for absolutely professional outcomes they may need being ready to correct photographs and also edit photos along with this computer software by now basically only chosen from professionals through post-production. Along with photo editing software is really facilitated to generate photograph collages or photo mosaics, because this program includes a quite helpful user manual. My photo cropping methods like insert people into a photo. Now there have to be generally somebody who possesses brought in that exact same mistake with photo editing software as well as know where exactly you are moving incorrect.
After everyone go to a specific feature, the software product will usually start a different page to get you to use at.
#photo editing software for windows 10#windows 10 photo editing software#easy windows 10 photo editing software#easy photo editing software for windows 10#free photo editing software for windows 10
1 note
·
View note
Text
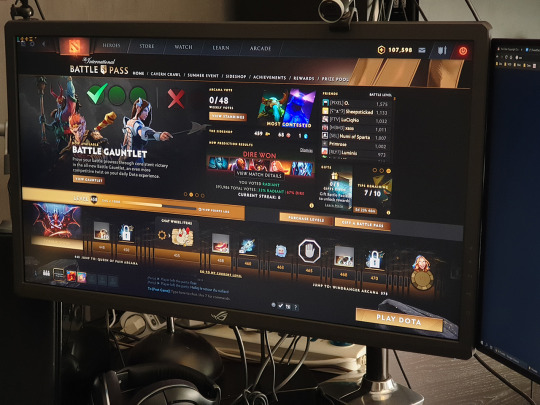
My quick review of the ASUS XG27UQ monitor (4K, HDR, 120Hz)
I originally wanted to tweet this series of bullet points out but it was getting way too long, so here goes! I got this to replace a PG278Q, which was starting to develop odd white stains, and never had good color reproduction in the first place (TN film drawbacks, very low gamma resulting in excessively bright shadows, under-saturated shadows, etc.)
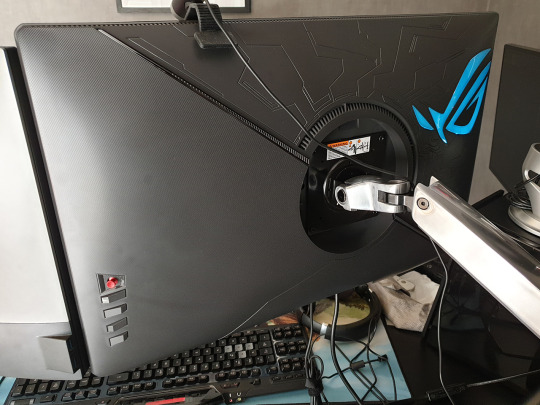
The hardware aesthetic is alright! The bezels may feel a bit large to some people, but I don’t mind them at all. If you’re a fan of the no-bezel look, you’ll probably hate it. There is a glowing logo on the back that you can customize (Static Cyan is my recommendation), but it isn’t bright enough to be used as bias lighting, which would’ve been nice.
The built-in stand is decent; it comes with a tacky and distracting light projection feature at the bottom. It felt quite stable, though I don’t care about it because it got instantly replaced by an Ergotron LX arm. (I have two now, I really recommend them in spite of their price.)
The coating is a little grainy and this is noticeable on pure colors! You can kinda see the texture come through, a bit more than I’d like. Not a huge deal though.
The rest of the review will be under the cut.
The default color preset (”racing mode”), which the monitor is calibrated against, is very vivid and saturated. It looks great! But it’s inherently inaccurate, which bothers me, so I don’t like it. It looks like as if sRGB got stretched into the expanded gamut of the monitor.
sRGB “emulation” looks very similar to my Dell U2717D, whose sRGB mode is factory-calibrated. However, the XG27UQ’s sRGB mode has lower gamma (brighter shadows), so while the colors are accurate, the gamma is not. It feels 1.8-ish. Unless you were in a bright room, it would be inappropriate for work that needs to have accurate shadows. This mode also locks other controls, so it’s not the most useful, but the brightness is set well on it, so it is usable!
The “User Mode” settings use the calibrated racing mode as a starting point, which is a big relief. So it’s possible to tweak the color temperature and the saturation from there! I checked pure white against my Dell monitor and my smartphone (S9+) and tried to reach a reasonable 3-way compromise between them, knowing that the Dell is most likely the most accurate, and that Samsung also allegedly calibrates their high-end smartphones well. My configuration ended up being R:90/G:95/B:100 + SAT:42. This matches the saturation of the U2717D sRGB mode fairly closely. You also get to choose between 1.8, 2.2, and 2.5 gamma too, which is not too granular, but great to have. It kinda feels like my ideal match is between 2.2 and 2.5, but 2.2 is fine.
The color gamma according to lagom.nl looked fine, but I had to open the picture in Paint, otherwise it was DPI-scaled in the browser, and that messed with the way it works!! (That website is an amazing resource for quick monitor checks.)
Colors are however somewhat inaccurate in this mode. It’s easy to see by comparing the tweaked User Mode vs. sRGB emulation. There are some rather sizeable hue shifts in certain cases. I believe part of this is caused by the saturation tweak not operating properly.
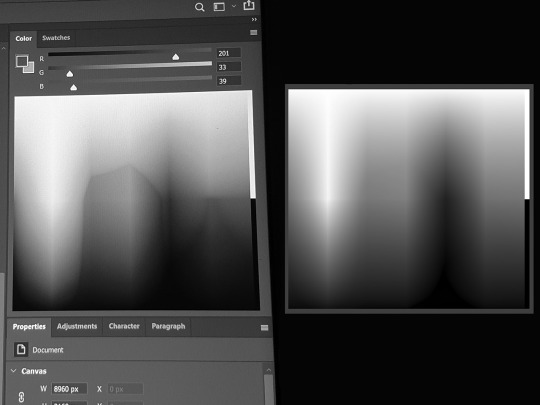
Here’s a photo of what the Photoshop color picker looks like when Saturation is set to 0 on the monitor, vs. what a proper grayscale conversion should be. It’s definitely not using the right coefficients.
So in practice, when using the Racing & User modes, compared to the U2717D sRGB, here’s a few examples of what I see:
Reds are colder (towards the purple side) & oversaturated
Bright yellow (255,215,90) is undersaturated
Bright green (120,200,130) is undersaturated
Dark green (0,105,60) is fine
Magenta (220,13,128) is oversaturated
Dark reds & brown (150,20,20 to 90,15,10) is oversaturated
Cyan (0,180,240) is fine
Pink (230,115,170) is fine
Some shades of bright saturated blue (58,48,220) have the biggest shifts.
The TF2 skin tone becomes slightly desaturated and a bit colder
It’s not inaccurate to the point of being distracting, and you always have the sRGB mode (with flawed gamma?) to check things with, but it’s definitely not ideal, and some of these shifts go far enough that I wouldn’t recommend this monitor for color work that needs to be very accurate.
I’ve went back and forth, User vs sRGB, several times, on my most recent work (True Sight 2019 sequences). I’ve found the differences were acceptable for the most part; they bothered me the most during the Chronosphere sequence, in which the hazy sunset atmosphere turned a bit into to a rose gold tint, which wasn’t unpleasant at all — and looked quite pretty! — but it wasn’t what I did.
I’m coming from the point of view of a “prosumer” who cares about color accuracy, but who ultimately recognizes that this quest is impossible in the face of so many devices out there being inaccurate or misconfigured one way or the other. In the end, my position is more pragmatic, and I feel that you gotta be able to see how your stuff’s gonna look on the devices where it’ll actually be watched. So while I’ve done color grading on a decent-enough sRGB-calibrated monitor, I’ve always checked it against the inaccurate PG278Q, and I’ve done a little bit of compromising to keep my color work looking alright even once gamma shifted. And so, now, I’ll also be getting to see what my colors look like on a monitor that doesn’t quite restrain itself to sRGB gamut properly.
Well, at least, all of that stuff is out of the box, but...
TFTCentral (one of the most trustworthy monitor review websites, in my opinion) has found suspiciously similar shifts. But after calbration, their unit passed with flying colors (pun intended), so if you really care about this sort of stuff and happen to have a colorimeter... you should give it a try!
I hope one day we’ll be able to load and apply an ICC/ICM profile computer-wide, instead of only being able to load a simple gamma curve on the GPU with third-party tools like DisplayCAL. Even if it had to squeeze the gamut a bit...
Also, there are dynamic dimming / auto contrast ratio features which could potentially be useful in limited scenarios if you don’t care about color accuracy and want to maximize brightness. I believe they are forced on for HDR. But you will probably not care at all.
IPS glow is not very present on my unit; less than on my U2717D. However, when it starts to show up (more than a 30°-ish angle away), it shows up more. UPDATED: after some more time with the monitor, I wanna say that, in fact, IPS glow isit's slightly stronger, and shows up sooner (as in, from broader angles). It requires me to sit a greater distance from the monitor in order to not have it show up and impede dark scenes. It is worse than on my U2717D.
Backlight bleed, on the other hand, is there, and a little bit noticeable. On my unit, there’s a little bit of blue-ish bleed on the lower left corner, and some dark-grey-orange bleed for a good third of the upper-left. However, in practice, and to my eyes, it doesn’t bother me, even when I look for it. It ain’t perfect, but I’ve definitely seen worse, especially from ASUS. The photo above was taken at 100% brightness, and I’ve tried to make it just a tad brighter than what my eyes see, so hopefully it’s a decent sample.
Dead pixels: on my unit, I have 5 stuck dead green subpixels overall. There are 4 in a diamond pattern somewhat down and right to the center of the screen, and another one, a bit to the right of that spot. All of them kinda “shimmer” a little bit, in the sense that they become stronger or weaker based on my angle of view. They’re a bummer but I haven’t found them to be a hindrance. Took me a few days to even notice them for the first time, after all.
HDR is just about meaningless and uses some global dimming techniques, as well as stuff that feels like... you know that Intel HD driver feature that brightens the content on the screen, while lowering the panel backlight power in tandem, to save power, but it kinda flattens (and sometimes clips) highlights? It kinda looks like that sometimes. Without local dimming, HDR is just about meaningless.
Unfortunately, the really nice HDR support in computer monitors is still looking like it’s going to be at the very least a year out, and even longer for sub-1000 price ranges. (I was holding out for the PG27UQX at first, but it still has no word on availability, a whole year after being announced, and will probably cost over two grand, so no thanks.)
G-Sync (variable refresh rate) support is... not there yet?! The latest driver does not recognize the monitor as being compatible with the feature. And it turns out that the product page says that G-Sync support is currently being applied for. Huh. I thought they had special chips in those monitors solely for the feature, but it’s possible this one does it another way? (The same way that Freesync monitors do it?)
DSC (Display Stream Compression) enables 4K 120Hz to work through a single DisplayPort cable, without chroma subsampling. And it’s working for me, which came as a surprise, as I was under the impression this feature required a 2000-series Turing GPUs. (I have a 1080 Ti.) I was wrong about this, it’s 144 Hz that requires DSC. And I don’t have it on this Pascal card. But I don’t really care since I prefer to run this monitor at 120 Hz, as it’s a multiple of the 60 Hz monitor next to it.
Windows DPI scaling support is okay now. Apps that are DPI-aware, and the vast majority of them are now, scale back and forth between 150% and 100% really well as they get dragged between the monitors! The only program I’ve had issues with is good old Winamp, which acted as if it was 100% on the XG27UQ... and shrinked down on another monitor. So I asked it to override DPI scaling behaviour (”scaling performed by: application”), which keeps the player skin at 100% on every monitor, but any call to system fonts and UI (Bento skin’s playlist + Settings panel) are still at 150%. So I had to set the playlist font size to 7 for it to look OK on the non-scaled monitor!

A few apps misbehave in interesting ways; TeamSpeak, for example, seen above, scales everything back from 150% to 100%, and there is no blurriness, but the “larger layout” (spacing, etc.) sticks.
Games look great with 4K in 27 inches. Well, I’ve only really tried Dota 2 so far, but man does it get sharp, especially with the game’s FXAA disabled. It was already a toss-up at 1440p, but at 4K I would argue you might as well keep it disabled. However, going from 2560x1440 to 3840x2160 requires some serious horsepower. It may look like a +50% upgrade in pixels, but it’s actually a +125% increase! (3.68 to 8.29 million pixels.) For a 1080 Ti, maxed-out Dota 2 at 1440p 120hz is really trivial, but once you go to 4K, not anymore... you could always lower resolution scale though! (Not an elegant solution if you like to use sharpening filters though, looking at you RDR2.)
Overall, the XG27UQ is a good monitor, and I’m satisfied with my purchase, although slightly disappointed by the strong IPS glow and the few dead subpixels. 7/10
6 notes
·
View notes
Text
Bitcoin ETF Discussions Progress as Regulators Warm Up to the Idea

Bitcoin ETF Discussions Progress as Regulators Warm Up to the Idea 🚀
Discussions between U.S. financial regulators and applicants for a bitcoin exchange-traded fund (ETF) have reached "key technical details," signaling the possibility of its imminent launch 📈. Recent meetings between the Securities and Exchange Commission (SEC) and investment funds seeking to list bitcoin ETFs have picked up pace, leading applicants to make amendments to their filings based on regulators' feedback. Sources indicate that the August federal court ruling on Grayscale's rejected bitcoin ETF application has reduced the legal grounds for rejecting pending applications. Notably, about a dozen firms, including BlackRock and Fidelity, have applied for a bitcoin ETF, which would enable investments in bitcoin without direct token ownership.
With bitcoin's year-to-date gains at approximately 160%, far outperforming major stock indexes, experts believe the wait for a bitcoin ETF may soon come to an end. Bloomberg Intelligence analyst James Seyffart predicts that the "window" for approval lies between January 5-10, 2024, aligning with the deadline for Cathie Wood's ARK Invest application. Despite a challenging 2022 for cryptocurrencies, including bankruptcies and controversies, a spot bitcoin ETF would provide investors with exposure to the largest digital asset without having to navigate exchanges directly. SEC Chairman Gary Gensler, previously a crypto skeptic, has shown a more receptive stance towards broader bitcoin investment in recent months.
Source: Forbes
#bitcoin #cryptocurrency #ETF #investment
0 notes
Text
S Apartment is a project designed by Maya Sheinberger Interior design. Renovation of an 80 sqm apartment in Hod Hasharon’s old neighborhood. The owner is a woman in her late seventies who bought the apartment after her family moved to the city. Photography by Itay Benit
#gallery-0-6 { margin: auto; } #gallery-0-6 .gallery-item { float: left; margin-top: 10px; text-align: center; width: 25%; } #gallery-0-6 img { border: 2px solid #cfcfcf; } #gallery-0-6 .gallery-caption { margin-left: 0; } /* see gallery_shortcode() in wp-includes/media.php */
–
It was important for the owner to have an efficient home with lots of storage space and still get a warm, modern, up-to-date look. Smoked oak, warm grayscale, brass, powder pink and rich textiles – a palette of delicate and soft materials, but with plenty of presence. The apartment was paved with delicate terrazzo tiles in a light gray tone. The entrance to the apartment faces the dining area which is at the center of the space. A Glass table with a central brass monument, combined with velvet chairs in khaki shade were selected to the dining area. Transparent glass lighting fixtures with brass tubes were hung above the dining table. A black steel library with brass and glass partitions was installed on the back wall. To the left is the living room. Instead of the corridor wall separating the public and private space, a smoked oak cabinet with many functions was designed. The cabinet contains an AC unit, a TV and a storage unit. The choice to give up the wall in favor of the closet allows for eye contact between all parts of the apartment and helps to stretch the boundaries of the space, enabling maximum usage, despite the triangular shape of the apartment. The furniture was selected in appropriate proportions to the space, which allows for a spacious feeling while inserting a variety of different textiles, a light gray sofa with a delicate texture combined with a chocolate brown armchair, a mocha-colored coffee table with brass legs. A cream-colored wool rug defines the living space. The curtains that frame the windows are made of fine stone-colored mesh fabric. The L-shaped kitchen with a peninsula, is located between the living room and the dining area at the back of the apartment. The kitchen was carefully designed with lots of storage and work surfaces despite the small space. The cabinets are also smoky oak veneers. The countertop and wall backsplashes are cream and gray marble-like porcelain. The decision to make the entire kitchen with the same material helps maintain the continuity of the materials throughout the apartment. Entry to the private area is on both sides of the TV cabinet. To the right is the master bedroom. A monochromatic stone and gray bedroom and pink accents with a soft, inviting vibe. A dark-gray upholstered bed, stone-colored wardrobe, smoked oak veneer nightstands and lots of textiles is gray and blush pink. A natural fabric Roman curtain defines the windows and contributes to the privacy of the bedroom. The master bathroom walls were covered with a fine texture of “unfinished” plaster tiles. An oak hanging cabinet with a striped facade that creates extra depth. Slate-like porcelain surface with built-in sink and designed wall faucet. To the left is the guest room, which serves as an additional room and also as a study. Furnished with Scandinavian oak desk and wooden chair with a tan-colored leather seat, pull-out brown sofa and a Moroccan Berber rug in cream and brown. Next to it is the extra shower used as a guest bathroom, also in the same design as the master bathroom. Continuity in colors and materials in space makes the whole feel complete. Photography courtesy of
Clients: A Lady in her late 70’s. Structure: Apartment Length of planning: 3 months Duration of build: 6 months Space: 80 sq.m. Balcony: 16 sq.m
S Apartment by Maya Sheinberger Interior design S Apartment is a project designed by Maya Sheinberger Interior design. Renovation of an 80 sqm apartment in Hod Hasharon's old neighborhood.
#apartment#bathroom#bedroom#house idea#houseidea#kitchen#living#Maya Sheinberger#myhouseidea#S Apartment
12 notes
·
View notes
Text
editing video for
Kdenlive title> Take a quick look at the most popular features and skills. Now the APNG and GIF image formats are also available. Better outlines of sprite objects. The drawing of sprite objects can now be combined with sprite effects. Complete color palettes for the display of functions. Templates that have already been created can be used. Filters, decoders and encoders have been optimized. Many codecs like H264 now work at least 50% faster.
Video Editing & Post Production
Although we think it is a good choice for beginners, intermediate video editing users can also find it of great help. Fixed a bug that could cause the length of a video or audio object to be set incorrectly after individual fragments were removed from it. There is a new function to normalize the sound.
It is therefore particularly important that all colors, grayscale and contrasts are displayed exactly the same way on all monitors of the project team. Start your video marketing with wave.video, the only online tool for advertisers that creates and publishes highly interesting marketing videos that are perfect for every channel. Choose from 2.5 million videos, add your own material, text and images and post on all your channels with one click. We designed the OpenShot Video Editor with the goal of creating an easy-to-use, quick-to-learn and amazingly powerful video editing program. Share your travel experiences. Or tell a fantasy story. Repair and stabilize shaky video recordings. Correct the exposure. Edit colors like a Hollywood professional.
This makes editing faster.
If this Message still appears, please send an email to to let us know.
Learn how to hover a UFO over a city with After Effects compositing .
Use animation and compositing techniques.
Ensure 100% accuracy of object tracking in your clips with frame-by-frame motion tracking.
ul> The blend modes have been optimized to conserve PC memory usage and provide more accurate results. Storyboard has been added to edit footage. By default, a storyboard file is added to the timeline. Our module system enables you to learn online at any time and to earn points when completing your course assignments. You will receive the same certificates as students who complete the course on campus. With Lightworks you can do really great things when it comes to creating videos. My absolute favorite is Camtasia Studio. When it comes to easy video editing or video capture software, Camtasia Studio is definitely the right software for you. You can do a lot with Camtasia.
Comparison of Adobe Video Editing Tools
Therefore, you can purchase a high-quality, university-issued certificate of attendance at a sensationally affordable price in a flexible, interactive format. Benefit from a profound learning experience with real projects and live expert courses. If you are admitted to the full Master's program, your MasterTrack coursework will count towards your degree. I've never used Windows Movie Maker myself, but I've only heard good things about it. As long as we stay in the free or free area my number three is Lightworks.
2 notes
·
View notes
Link


HQ Texture Converter - version 2.3 12/16/2018
by CmarNYC
Converting a pile of CC to be compatible with the HQ Mod can be quite a chore. This tool does it for you.
What it does:
You can select either one package or input and output folders. If you select one package, it will be converted and you'll be prompted to save it with a new name. If you select folders, all packages in the input folder will be converted and saved in the output folder with new names. A status line at the bottom of the window will let you know what it's doing.
Conversion:
RLE2 textures (diffuse, shadow, and skin) are resized to 2048x4096
RLES textures (specular) are resized to 1024x2048
DDS CAS skin color files are resized to 2048x4096
However, these are just the defaults and you can select the output dimensions for yourself. Will also convert from HQ dimensions to standard if needed.
Pet textures are automatically resized correctly.
There are a 64-bit version and a 32-bit version.
Please use the right one for your system!
With the 32-bit version you're likely to get out-of-memory errors when converting very large packages. With the 64-bit version and at least 6 GB of RAM, hopefully this will not happen.
Requires Windows and .NET 4.7.
If you're on Windows 10 you probably already have it; if you're using Windows 7 or 8.1 you can install it if necessary.
How to use:
Use the top button to select a package to process one at a time. Select input and output folders to process every package in the folder. As of version 2.3 it will also optionally convert subfolders in the input folder, creating corresponding subfolders in the output folder if necessary.
Texture output options:
Choice of which conversion to do and the target texture dimensions should be self-explanatory.
Keep original size - when converting to HQ, you can choose to keep any textures that are larger than needed as is.
Sharpen rle2 textures - using this option will sharpen the main (diffuse) textures of clothing, hair, accessories, skins, etc. You can choose the sharpening strength. Sharpening will slow down processing significantly. Strength of sharpening makes no difference in speed.
Don't sharpen grayscale - starting in version 2.2 the tool uses the CASP in CC packages to identify the shadow textures, so this option should normally be left unchecked. It may be useful if converting packages that contain clothing/hair/accessory textures but no CASPs as when converting EA game packages. It may not. If checked, the tool will attempt to identify shadow textures and not sharpen them. The benefit is that sharpening may cause banding in some shadows which might be visible. The drawback is that any black and white or gray clothing and skin details may not be sharpened.
Use existing mipmaps - starting in version 2.2, if this option is checked the tool will keep existing mipmaps if possible. Leaving this option checked will be slightly faster and retain the quality of original textures in the mipmaps. In cases where sharpening has made a big improvement in a texture you may want to try unchecking it and generating new mipmaps.
With sharpening enabled, conversion will be slow. A package of 1000 rle2 textures could take around 2 hours or more. Without sharpening it's significantly faster. The program will prevent your computer from sleeping during conversion, but your monitor will still time out and sleep and you may see the monitor blacking out for a couple of seconds at a time even while you're using it.
Sharpening comparison:
Notes/Warnings:
The tool should only be run on packages that include only CAS parts (clothing, hair, accessories, makeup, skins, etc.). Running it on packages containing other CC might possibly result in textures of the wrong size.
This should go without saying, but you should keep your original packages in case something goes wrong.
Please report problems, questions, and reasonable requests in the comments.
Windows only, sorry. If anyone wants to convert it for Mac, you have my permission.
Version 2.3:
Fixes: Corrects an error affecting memory that was causing random crashes with no error message or an access violation.
New features:
During batch conversion, optionally convert subfolders of packages under the input folder. Subfolders with the same names will be created in the output folder if they don't already exist.
If any packages fail to convert during batch conversion due to unreadable textures or whatever, the tool will continue to run and display a list of packages that could not be converted when it's finished.
Many thanks to claudiasharon for working with me about the crashing problem.
Version 2.2:
Fixes: Fixes shadow lines again appearing when converting CC on some systems.
New features: Optionally use existing mipmaps.
Many thanks to LunaLechuza for helpful suggestions and testing.
Version 2.0:
Fixes: Corrected the lines on shadow textures and the dark lines around the edges of some diffuse textures.
New features: 64-bit version, sharpening, keeping larger-than-needed textures is now optional.
Additional Credits:
With thanks to Iconic for requesting this tool!
The HQ Mod is here:
http://alf-si.tumblr.com/HQ_ts4_English
Image and package handling is done with the s4pi library:
https://github.com/s4ptacle/Sims4Tools/tree/develop
Folder selection uses Ookii.Dialogs:
http://www.ookii.org/software/dialogs/
Infobox
Expansion/Stuff packs required:
14 notes
·
View notes
Text
How To Install and Use Photoshop Actions
Photoshop actions enable users to program Photoshop to conduct tasks for them automatically. This shortens the time taking for editing, especially when the users have to edit a number of images. Let’s check out the process of setting up and using Photoshop actions.
By Generating your Action
1. Create an activity to preserve the time for the future. You can do so by launching an image on which you have to do some tasks such as apply masks, forms, etc.
2. Work on the copy of a picture to keep it safe from being overwritten.
· Select the “File” button and then select ” Save As.”
· Place a checkmark next to “As a Copy” tab.
· Now tap on the “Save” button.
3. See the Activity board. In case you are unable to view the panel that says “Actions,” then tap on the F9 /Windows or Options+F9 to open it.
· You may drag the Action panel bar at the bottom corner of the window to resize it.
4. Then tap on the square-shaped icon. This icon, named as “Create New Action,” shows on the Actions board following the Recycle Bin icon (Trash). After performing this action, a pop-up window will appear. Alternatively, you may select the “New Action” option located at the upper-right edge of your Action panel under the menu button.
5. Now pick a name for the new act by typing under the “Name” bar. Choose a simple name that you can remember. For example, if you have to select a name for an activity like to shrink a picture, and it gets converted into grayscale. Then you can choose a name like “Shrink and Grayscale.”
6. Assign a function key or composition of various keys to perform the Action the desired key you have assigned like F4, Ctrl+F3, etc. You can also use the Action board. Pick up a key or its combination from pull-down button.
7. Tap on “Record” button to start recording. Once you hit on this option, remember that you are in “recording” mode.
8. Now perform the Action that you wish to repeat.
· Go to the Image menu and then choose “Image Size.”
· Withdraw the checkmark sign from the tab labeled as “Constrain proportions.”
· If the option following the “Width” and “Height” is not set to “pixels.” Then set it to “Pixels.”
· Then enter “300” in the “Width” box.
· Now enter “300” in the “Height” box.
· Enter “72” in the box indicated “Resolution.”
· Make sure that the “Pixels/Inch” is enabled next to “Resolution.”
· Now tap on the “OK” button.
9. Click on the Stop button if you have finished recording. In case if you have any doubt that you have recorded any activity wrongly, then press the right mouse button on the name of the Action and again select the ‘Record’ button. If you wish to make more recordings, tap on the red “Record” button to complete the function.
10. Now verify your actions under the “Action Panel.” Tap on the arrow button next to the new Action to see all the steps. You can change any of your actions by double-clicking on the steps to opening its related panel. You may delete any action or rearrange the Action by dragging the panel and delete it. Tap on the Trash icon.
Source:- http://en-mcafee.com/how-to-install-and-use-photoshop-actions/
Mia Davis is a creative person who has been writing blogs and articles about cybersecurity. She writes about the latest updates regarding mcafee.com/activate and how it can improve the work experience of users. Her articles have been published in many popular e-magazines, blogs, and websites.
#www.mcafee.com/activate#mcafee.com/activate#mcafee activate#Install and Use Photoshop Actions#Photoshop Actions
1 note
·
View note