#powershell add-type already exists
Explore tagged Tumblr posts
Visit Tumblr Blog
Explore Tumblr blogs with no restrictions, modern design and the best experience.
Last Seen Tumblr Blogs


Fun Fact
US Tumblr user growth rate is estimated to slow down to 4.1%.
Text
Execute C# Code with Parameters Using PowerShell
Execute C# Code with Parameters Using PowerShell
The topic for today is a problem I spent close to two hours on last night. Surprisingly there doesn’t appear to be any easy solution on the web with most suggesting workarounds I didn’t find acceptable. To save others the time, I’d thought I’d share what I came up with here. As title of the page suggests, it’s about running C# code within PowerShell, something I’ve been doing more and more off…
View On WordPress
#Add-Type : Cannot add type. The type name#Execute C Code with Parameters Using PowerShell#How to remove a type added by Add-Type#PowerShell Add-Type : Cannot add type. already exist - Stack Overflow#powershell add-type already exists#remove-type powershell
0 notes
Text
2 Ways to install latest Python on Windows 11 or 10 - GUI & CMD

Installing Python 3 on Windows 11 or 10 machines is not difficult, however, if you are a beginner then we have discussed the both Graphical and command prompt ways to install it. Especially, for those who are not much familiar with Python, it is an open-source high-level interpreted programming language. It is known for its versatility because it has been used widely for programming applications, web development, data analysis, machine learning, artificial intelligence, data visualization, web scraping, and scientific computing. The reason behind's Python popularity among the developer community is its clear syntax, readability, ease of use, and large number of libraries & frameworks. All this is possible because of a vast but active community. Python also supports most of the popular IDEs or can be written using a simple text file created using Notepad. Let's go through the article, whether you are a beginner or experienced, in this tutorial we will find the necessary steps required to install and set up Python on Windows operating systems.
Installing Python 3 on Windows 10 or 11
Here we are discussing two ways to set up Python one is using the graphical installation wizard and the other with the help of a command in prompt or Powershell (Terminal). Using GUI: 1. Download Python's latest version As we know Python is not included in Windows by default to compile our programs based on it. Therefore, visit the official website- python.org to download the latest version by clicking on the Download button.

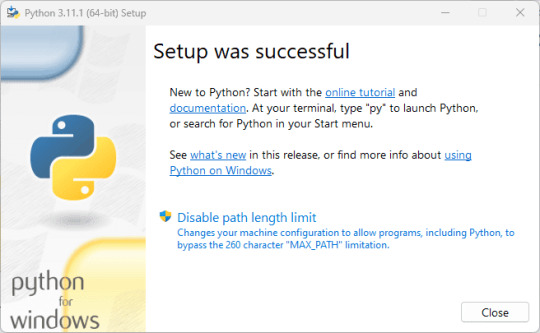
2. Start Python Installation on Windows After following the previous steps, you would already have the executable file of python on your Windows. - Double-click python executable to start the installation wizard. - Select the "Add Python.exe to PATH" box otherwise, we won't be able to run PIP or Python using native Windows Powershell or command prompt. - After that click on the Install Now option.

- The setup will start running, this will also install PIP and documentation on your system.

- Finish the installation by clicking on the Close button.
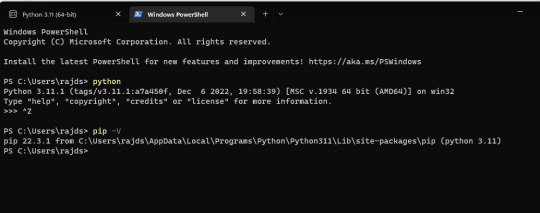
3. Check version To confirm, the installation is successful without any error, let's check the version of installed Python and PIP. For this, you can either use the Command prompt or Powershell. Alternatively, we can also run the Python terminal app to issue commands, for that in your Windows Search type - python as its app appears, and click to open it. You will have a Python interpreter with version details as well. python --version To check the PIP version pip -V Note: If typing python on on command terminal or Powershell, opens the Microsoft Store then go through the next step.
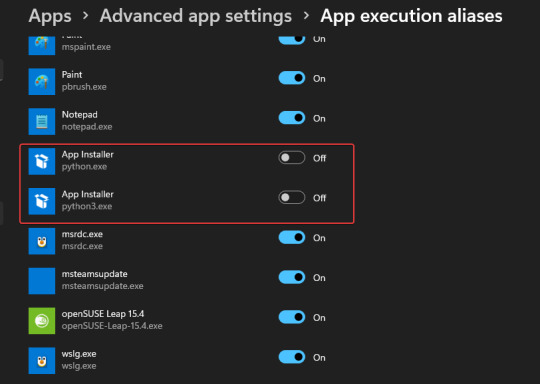
4. Stop Python from opening the Microsoft store By default, if you type python on the command prompt or PowerShell in Windows, it will open Microsoft Store to download another version of Python instead of using the existing version of your Python. To stop that and tell the system to run the one you have installed, Follow the steps: - Go to the Windows Search box - Type- Manage App Execution Aliases - As its icon appears click to open it. - Search for Python3 and Python App Installers - Turn off the toggle button given to them. - Close your CMD Terminal or Powershell and reopen it again. - Now, type python in that to check your current version.
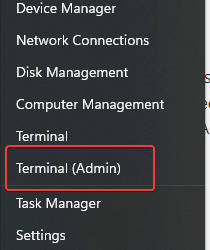
#Use the command line method 5. Open PowerShell, CMD, or Terminal (Admin) Right-click on the Windows Start button and select Terminal (Admin). If you have PowerShell then you can go for that as well.
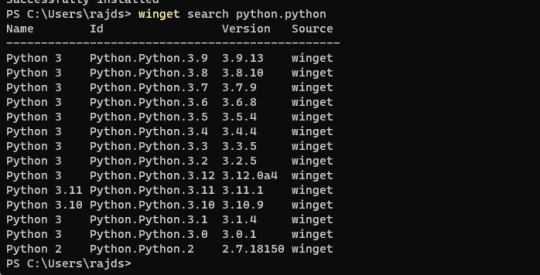
6. List Python versions When you go for command line installation there are multiple versions available to install. We can use Winget to first check what are those and, later, to install them as well. winget search Python.Python
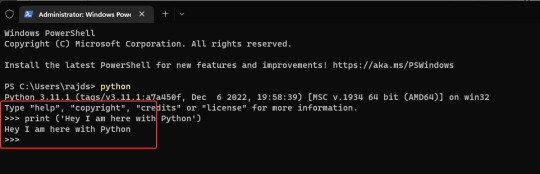
7. Use Winget to install Python Once you have decided which version is suitable for your project then set it up using the following syntax. winget install Python.Python.version-number For example, if you want to have 3.11 then the command will be like this: winget install Python.Python.3.11 When you are done with it, close your CMD terminal or PowerShell and reopen it again to check, whether it is working or not. For that either use: pip -V or python --version 8. Run a simple program Open the Python command line and type: print ('Hey I am here with Python') The above code will print "Hey I am here with Python" on your screen.
Other Articles: - How to install and use Python on Windows 7 - 8 Best ways to start Command Prompt in Windows 10 - Best 5 Books to Learn Python Programming? - How to make Python 3 your default "Python Version" on Windows Read the full article
1 note
·
View note
Text
Mp3tag mp3 tagging

Mp3tag mp3 tagging how to#
Mp3tag mp3 tagging software#
Mp3tag mp3 tagging Pc#
#if the file already exists, re-name it with an incrementing value after it, for example: Artist-Song Title-2. # There could be duplicate MP3 files with this name, so check if the new filename already exists The most popular audio formats are supported: MP3, OGG, OGA, FLAC, MPC, WV, SPX, OPUS. $files = Get-ChildItem -Path $path | Where-Object Evertag - audio tags editor and metadata manager. # Load the assembly that will handle the MP3 tagging. # Enter the path to the file you need to update. After you run this script, your MP3 files will get renamed like so: “Artist Name-Song Title.mp3”. Simple Tagger (Mac) 4.687 MP3-Tag-Editoren Mit Hilfe von. Nach der Auswahl des Musikverzeichnisses erhalten Download 15. Information about mp3 files (i.e bit rate, sample frequency, play time, etc.). MP3 Tag can batch modify ID3 tags and automatically tag MP3 files. eyeD3 is a Python module and command line program for processing ID3 tags. dll file and put it in the same directory that you run your powershell script from.įinally, at the top of the script, add the path to your MP3 files that you need to edit. Mit den MP3Tag Tools verwalten Sie die ID3-Tags Ihrer MP3-Dateien. Mp3tag is the universal Tag editor for various audio formats. It should make a pretty good starting point for any MP3 organization issue you need to sort out.įirst, you”ll need the Taglib mp3 editing library.
Mp3tag mp3 tagging how to#
DLL in powershell, how to get and set MP3 tags with it, how to rename files, how to strip out illegal file characters and more! Lots of good stuff in here. Now, you may not be solving the exact same problem that I was, but in this script, we show how to load an external. The result is a procedural script to get the job done. For example, a question mark (?) is OK to have in an MP3 tag, but not in a filename. Script is below.Īs I continued to look through these files, I’d find different scenarios in the files that I needed to account for in the script. I wrote a quick and dirty powershell script to standardize the filenames and tag information, based on which attributes were still present. I tried using common MP3 tag editing software, such as MP3Tag, but found that I needed some logic to get everything squared away. anstelle von ID3-Tags die entsprechenden OggComments zum Einsatz, bei Musepack (MPC) sind es APE2-Tags, usw. Bei MP3 Dateien sind das ID3v1 und ID3v2-Tags (letztere erlauben längere Einträge).
Mp3tag mp3 tagging software#
After running one such software package, all the MP3s were recovered, but some of them had weird file names or were missing various tag attributes. Universeller Tag-Editor mit Cover-Unterstützung Mp3tag nutzt automatisch die passenden Tags für das jeweilige Dateiformat. It seems just some meta data gets removed. There are even a few software packages out there to recover the information, as the files don’t actually get deleted. I am not familiar with iTunes, iPods, or any Apple products, but a quick search suggested this was a common occurrence. It appeared to erase all of her MP3s from her Ipod without prompting or intervention.
Mp3tag mp3 tagging Pc#
A nameless friend of mine recently plugged her Ipod into a different PC that was set to auto-sync. Here is a bit of a change from the usual datacenter type posts.
0 notes
Text
How to create an email signature in outlook
How to create an email signature in outlook full#
How to create an email signature in outlook software#
To do this, simply select Business Card at the top right of the edit options. If you already have your contact details stored in Outlook, you can import them as a business card.You can add a logo, banner, or image into your signature by pasting them into the editor. Now it’s time to create your signature.To create a new template, select New in the Signatures and Stationery window.It will open a Signatures and Stationery window. From the dropdown menu, a few options to include an existing signature will appear. Next, click Signature from the top panel (the button is next to Attach Item).Your first step is to click New Email, which you will find on the top left corner of the Home tab.Now that you know what should go into your email signature, here are the steps you need to follow to actually set it up: How to set up an Email Signature in Outlook 2013 Refrain from including anything animated or elaborate: remember, simplicity is key.As many emails are read on mobile devices these days, make sure your design is mobile-friendly.Don’t forget to add a legal and privacy disclaimer.Include a call-to-action that aligns with your business goals.Either stick to brand colors or choose a palatable color scheme. As you want to appear professional, choose something clean and slick. Forgo the cursive and decorative type fonts.Most companies have uniform email signatures that they expect their employees to apply, but if you’ve found yourself in a position where you have the liberty to create your own, here are some tips on how you can make a good impression:
How to create an email signature in outlook full#
At the very least, they should include your full name, company information, and contact details. As emails are still widely used and considered an important form communication, what goes into your email signature matters. If you’ve been using Outlook 2013 for awhile, then you’re familiar with email signatures. (Overview of the Microsoft 365 admin center](./admin-overview/admin-center-overview.Tips for your Outlook 2013 Email Signature Migrate email and contacts to Microsoft 365 (video) More resourcesįor information about using PowerShell, see Organization-wide message disclaimers, signatures, footers, or headers in Exchange Online.
How to create an email signature in outlook software#
A number of these providers are Microsoft Gold Partners and their software provides these capabilities. Please do an internet search for email signature software. To gain these and other capabilities to manage email signatures, use a third-party tool. because the value wasn't provided for a user) Skip lines which contain variables that couldn't be updated (e.g. Insert the signature directly under the latest email reply or forwardĭisplay server-side email signatures in users' Sent Items folders You can't do the following when managing email signatures in Microsoft 365: Limitations of organization wide signatures Then choose Low, Medium, or High to be used in the message log.Ĭhoose Enforce to turn on the disclaimer immediately, unless you want to test it first.Ĭhoose More options to include additional conditions or exceptions. Leave Audit this rule with severity level selected. This means that if the disclaimer can't be added because of encryption or another mail setting, it will be wrapped in a message envelope. Select Select one and choose Wrap as a fallback option. (This formatting article is for Exchange Server, but it also applies to Microsoft 365.)
0 notes
Text
Windows remote control for mac

#Windows remote control for mac install
#Windows remote control for mac upgrade
#Windows remote control for mac pro
#Windows remote control for mac Pc
#Windows remote control for mac upgrade
I don’t feel the need to upgrade for the sake of bragging rights or to get something from Apple that I already have with Remote I have multiple Apple devices and not all of the are compatible with the universal control feature that Apple is now offering. This app is far more than just a tv remote, I use it to open and close apps, switch to an app, and see the screen when I am not in the same room with the desktop among other things.
#Windows remote control for mac pro
It has been almost a decade since I first got Remote Pro and I cannot imagine my electronic life without it. Regardless of that one issue, this app is a no-brainer investment for how much use you will certainly get out of it!
#Windows remote control for mac Pc
My one and ONLY complaint is that the desktop portion, which is understandable needed for pairing purposes and is super easy to download and install, is that part does pop a windows “okay to run” type window on PC startup, so unless you leave your PC running all the time, you’ll still need an alternate control device just to approve that windows box (perhaps there is some system level thing that can just set the desktop part of this app to auto-run and allow access at startup without user approval, but I’m not sure). but I knew how much I wanted something like this for daily use, and after many months I can say without a doubt this was one of the best app purchases I’ve ever made! It is one of the few apps that I honestly use practically daily because I have an entertainment PC hooked up to my living room television and previously had no simple way to control it this app solves my issue wonderfully and if you have a similar potential use case, you definitely need to grab this app! The customization is great too, I made a “streaming” custom keypad that has one press buttons for each of my major streaming services that auto-launch chrome and go directly to “my queue” on that service’s page unbelievably convenient! Shared network connection, WiFi or Personal Hotspot, see History of connected devices for quicker re-connection High customization of the app & widget interface Add custom actions using scripting languages (AppleScript for Mac/Powershell for Windows) Create custom keypads to control apps and websites Schedule and use Siri to execute actions Execute system actions like Sleep, Turn Display Off, and many more See your computer screen on your device Use your device like computer keyboard and mouse Control media playback in popular apps and websites It's actively maintained and receives frequent updates with new and exciting features. The app exists since 2016 and has been downloaded more than 2 million times and received very positive reviews both from users and from the press.
#Windows remote control for mac install
Setup is both quick and easy, download the helper app from my website and install it on your computer, and that's it. And you can even use Apple Watch to control your computer - how cool is that?! No line of sight is required - the app uses WiFi to connect to your computer. Turn your iPhone or iPad into a friendly yet powerful remote control for your computer.Ĭontrol your computer from the couch, bed, or even from another room. If you are using your computer to watch movies or listen to music, this app is for you.
0 notes
Text
Upgrade node js windows

Upgrade node js windows how to#
Upgrade node js windows install#
Upgrade node js windows update#
Upgrade node js windows upgrade#
Upgrade node js windows full#
Upgrade node js windows how to#
How to create footer to stay at the bottom of a Web page?.
CSS to put icon inside an input element in a form.
How to insert spaces/tabs in text using HTML/CSS?.
Top 10 Projects For Beginners To Practice HTML and CSS Skills.
How to get random value out of an array in PHP?.
Convert comma separated string to array using JavaScript.
Create a comma separated list from an array in JavaScript.
How to create comma separated list from an array in PHP ?.
Split a comma delimited string into an array in PHP.
Upgrade node js windows update#
How to update Node.js and NPM to next version ?.
How do you run JavaScript script through the Terminal?.
Run Python Script using PythonShell from Node.js.
Run Python script from Node.js using child process spawn() method.
ISRO CS Syllabus for Scientist/Engineer Exam.
ISRO CS Original Papers and Official Keys.
GATE CS Original Papers and Official Keys.
$>./configure -prefix=/home/devel/.nvm/versions/node/v12.16.
Upgrade node js windows install#
Anybody did have too? And anybody know how to solve it? Thanks nvm install -ltsĭownloading and installing node v12.16.3. nvm directory exists on my system, typing nvm always results in command not found. The upshot is even though ~/.bashrc contains the lines to run nvm.sh and the. "$NVM_DIR/bash_completion" # This loads nvm bash_completion => Close and reopen your terminal to start using nvm or run the following to use it now: => Appending bash_completion source string to /home/seefer/.zshrcĮrror: EINVAL: invalid argument, uv_pipe_openĪt createWritableStdioStream (internal/process/stdio.js:191:18)Īt process.getStdout (internal/process/stdio.js:20:14)Īt pile (internal/bootstrap/loaders.js:364:7)Īt (internal/bootstrap/loaders.js:176:18)Īt setupGlobalConsole (internal/bootstrap/node.js:407:41)Īt startup (internal/bootstrap/node.js:142:7)Īt bootstrapNodeJSCore (internal/bootstrap/node.js:622:3) => Appending nvm source string to /home/seefer/.zshrc => => Compressing and cleaning up git repository => nvm is already installed in /home/seefer/.nvm, trying to update using git I constantly get this when running that nvm curl script :( Installing Node.jsįirst We'll start by updating linux, for those of you that are not familiar with linux this require running the process as root by add the sudo command before the command we need to execute: Immediately terminates all running distributions and the WSL 2 lightweight utility virtual machine.ĭisplay usage information. Show detailed information about all distributions.Ĭhanges the default install version for new distributions.Ĭhanges the version of the specified distribution. List only distributions that are currently running. List all distributions, including distributions that are currently Specifies the version to use for the new distribution. The filename can be - for standard input. Imports the specified tar file as a new distribution. The filename can be - for standard output. If no command line is provided, wsl.exe launches the default shell.Įxecute the specified command without using the default Linux shell.Īrguments for managing Windows Subsystem for Linux: The feature is not enabled by default and you need to activate it, you can do it via powershell (with admin rights):Ĭopyright (c) Microsoft Corporation.
Upgrade node js windows full#
Full system call compatibility - the long awaited docker support!Įnabling WSL - mandatory for installing WSL2.Increased file IO performance - file operation like ``git clone, npm install`, etc' could be up to 20x faster compared to `WSL` 1.There major changes between version 1 to 2, there is a nice comparison table on microsoft site, but if you the gist of it, those two would have the most impact for the day to day user: NOTE: WSL version 1 is not replace/deprecated, and there are some exceptions where you would want to use it over version 2.
Upgrade node js windows upgrade#
I'm not sure about existing WSL machines surviving the upgrade process, but as always backup and 🤞. Windows updated windows subsystem for linux to version 2, as the F.A.Q stated you can still use WSL version 1 side by side with version 2. UPDATE (Fall 2020): This gist is an updated version to the Windows 10 Fall Creators Update - Installing Node.js on Windows Subsystem for Linux (WSL) guide, I usually just keep here notes, configuration or short guides for personal use, it was nice to know it also helps other ppl, I hope this one too. Windows 10 version 2004 - Installing Node.js on Windows Subsystem for Linux (WSL/WSL2)
0 notes
Text
Connectwise Control Mac Manual Uninstall
Connectwise Control Mac Manual Uninstall Software
Mac Os Connectwise Control
Connectwise Control Mac Manual Uninstall Mac
Build: 19.4.25240
Remote Support Connectwise Can't See/Control Mac Newer versions of MacOS (iterations Mojave and newer) have issues with providing access to keyboard and mouse control in remote Connectwise access. Furthermore, even newer versions (Catalina) may not provide screen display when connected. Once you have re-checked the correct options, try uninstalling Webroot from the Control Panel Add/Remove Programs option, or from Start All Programs Webroot SecureAnywhere Tools Uninstall Webroot. Option 2: If the method above does not work, you can run an uninstall command manually. It would be great to allow for an automatic uninstall/removal of the client after a session. It creates a potential confusion for the client on subsequent sessions when asked to overwrite or rename. Automatic Uninstall Of Client / Feature Request Portal / ConnectWise Control.
Issue TypeComponentsSummaryTaskapp.config
Update app.config to disable 'require consent' by default
Taskapp.config, Guest Client
Create app.config setting to enable/disable 'Require consent'
TaskJava Client, Mac, Performance
Use CGDisplayStream to capture pixels on the Mac Client
TaskReporting
Add handler for html report types.
TaskServer, web.config
Update web.config to allow for a max http request size of 16MB
Story-bugRelay Service
SCP-31527 SessionInfoAttributes are overwritten when host joins an existing session
StoryTriggers, UIUX
Implement new trigger UI
Bug.NET Client, Host Client, Installer
Upgrading host client fails when using 'Upgrade' dialog after joining session
Bug.NET Client, Host Client
Host client upgrade dialog continually launches in certain error conditions
Bug.NET Client, Host Client, UIUX
'Fullscreen when maximized' no longer covers the windows taskbar
Bug.NET Client, Guest Client
'Require My Consent' doesn't work
BugGuest Client
Rename FPSTracker to FpsTracker to match .net class library design guidelines
BugGuest Client
Non-elevated windows user sessions crash when executing remote commands then manually closing the console. Solitaire for ipad.
BugHost Client, Java Client
Unable to type on remote machine from Java host client
BugGuest Client, Java Client
19.3+ guest clients mostly broken on Raspberry Pi
BugLogin Page, Security
Invalid password question prevents user from logging in after 19.2 update
BugServer
GetServerUri can throw when deriving port from forwarded scheme
BugSession Manager Service
SessionManager overwrites LogonSessions with the default value.
BugGuest Page, UIUX
Guest join code input box extends outside the dialog
Uninstall LabTech and ScreenConnect Agents: For those who are having a hard time uninstalling the LabTech Agent from their computer, the first script will remove the LabTech Agent, and the second will remove ScreenConnect aka (ConnectWise Control).
UninstallLabTechAgent.ps1
$url='https://s3.amazonaws.com/assets-cp/assets/Agent_Uninstaller.zip'$output='C:WindowsTempAgent_Uninstaller.zip'(New-Object System.Net.WebClient).DownloadFile($url,$output)# The below usage of Expand-Archive is only possible with PowerShell 5.0+# Expand-Archive -LiteralPath C:WindowsTempAgent_Uninstaller.zip -DestinationPath C:WindowsTempLTAgentUninstaller -Force# Use .NET instead(System.Reflection.Assembly)::LoadWithPartialName('System.IO.Compression.FileSystem') |Out-Null# Now we can expand the archive(System.IO.Compression.ZipFile)::ExtractToDirectory('C:WindowsTempAgent_Uninstaller.zip','C:WindowsTempLTAgentUninstaller')Start-Process-FilePath 'C:WindowsTempLTAgentUninstallerAgent_Uninstall.exe'
UninstallScreenConnectClient.bat

Connectwise Control Mac Manual Uninstall Software
wmic product where'name like 'ScreenConnect Client%%''call uninstall /nointeractive
Mac Os Connectwise Control

Connectwise Control Mac Manual Uninstall Mac
Sign up for freeto join this conversation on GitHub. Already have an account? Sign in to comment
0 notes
Text
How to Deploy a Node.js App – From Server Setup to Production
In this tutorial, we are going to learn everything we need to know before deploying a Node app to a production server.
We will start by renting a server on Digital Ocean. Then we'll configure this server, connect to it, install Nginx and configure it, pull or create our Node app, and run it as a process.
As you can see, there is a lot to do and it will be an action-packed tutorial. So let's get started without wasting any time.
You should have some basic knowledge on how the Terminal works and how to work in Vi/Vim before getting started. If you are not familiar with basic commands, I would advise you to read up on them a bit.
I will run the commands in MacOS. If you want to follow this tutorial in Windows, you can use Powershell or some other Unix emulator of your choice.
Although I will use Node.js as the platform of our example application, most of the steps are the same for any web application.
Why Digital Ocean?
I choose Digital Ocean because it is cheap and the interface is really easy to use, compared to the likes of AWS. Also, a $100 credit is included in the GitHub student pack so you do not have to pay anything for a couple of months. It is ideal for deploying a course or hobby project.
It has a concept called Droplets, which is basically your share of a server. You can think of the server as an apartment in which you own or rent a flat.
Droplets work with the help of Virtual Machines which run on the server. So a Droplet is your Virtual Machine on a shared server. Since it is a VM, its CPU and memory share can be easily increased, usually by throwing more money at your provider.
How to Create a Digital Ocean Project

I am assuming that you have already signed up and logged in to Digital Ocean before proceeding. We should first create a project that will contain our droplets. Let's click on the new project button on the left side menu. It will ask you to name your project.

Enter whatever name you want. It will also ask you if you want to move any resources, but for now just click Skip – we will create the droplet later.
How to Create a Droplet on Digital Ocean
Let's create our droplet by clicking the Get Started button.
After clicking the button, it will ask us to choose a VM image.

Choosing an Image
On this page, I will select Ubuntu 20.04 since it is the latest LTS version at the time I am writing this post. LTS means "Long Term Support". It is best to go with the LTS version for actual projects, because the provider guarantees that it will be supported and maintained for a long time. This means you will not have problems in the long run.
I have chosen Ubuntu, and would recommend it to you since it is the most commonly used Linux distribution. This means it's also the easiest to find answers to your future questions.
You can also choose to have a Dedicated CPU if you need it. If you are building your own startup or any business project, I would recommend reading this post which contains detailed instructions about how to pick the right option for you.
I will go with the cheapest option in this case.
Then you will need to select a Datacenter region. You should pick the one that is closest to you to minimize network delay.

Select a Datacenter
Next let's select SSH Keys as the Authentication Method, since it is much more secure than basic password authentication.
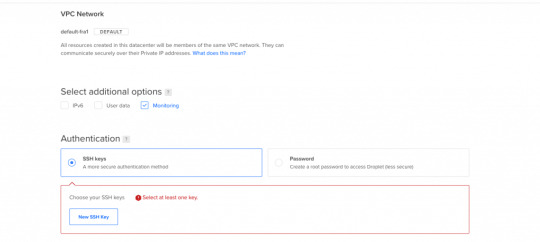
Authentication Method
To connect to the server we need to generate a new SSH key on our own device and add it to Digital Ocean.
How to Generate an SSH Key
I will generate the key on my macOS device. If you are using Windows you can refer to this article. Open your terminal and move into the ssh folder:
cd ~/.ssh
Then create your SSH key:
ssh-keygen
If your computer says that it does not know this command, you should install it via brew.

It will ask you to name the file and enter a passphrase. Do not enter a name, just press enter and go with the defaults. You should have these files generated. I have named mine digital-ocean-ssh in this screenshot, so do not get confused by that.
❯ lsid_dsa id_rsa known_hosts
Our public key is the id_dsa and the id_rsa is our private key. If you forget which one is private, you can always print one of them to see.
How to Add Your SSH Key to Digital Ocean
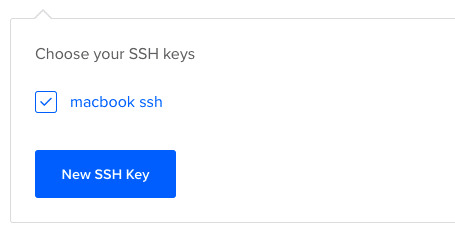
Now we want to copy our public key and upload it to Digital Ocean so they will know which key to use in authentication.

Copy this whole key including the ssh-rsa part.
Click on "New SSH Key":

Paste the key in the textbox that appears after you click the button and you should see your SSH key.
How to Connect to the Server
We will use the terminal to connect to our server with SSH. You can also take a look at Termius for a nice interface if you want.
Run this command in your terminal after replacing the IP_ADDRESS with your server's IP address (you can look it up from Digital Ocean's panel).
ssh root@IP_ADDRESS
If everything goes well, now you should be in the server's terminal. We have successfully connected to server. If there is any error, you can debug it by running the command with the "-v" option or "-vv" for even more verbosity.
How to Set Up the Server
We need to do some initial setup before deploying the Node app to the server.
Update and Upgrade Software
We want to update the server's software to make sure we are using the latest versions.
Many servers are vulnerable to attacks because they are using older versions of software with known vulnerabilities. Attackers can search for the vulnerabilities in those software and try to exploit them in order to gain access to your server.
You can update Ubuntu's software using the "apt update" command.
apt updateHit:1 https://repos.insights.digitalocean.com/apt/do-agent main InReleaseGet:2 http://mirrors.digitalocean.com/ubuntu focal InRelease [265 kB] Hit:3 http://mirrors.digitalocean.com/ubuntu focal-updates InRelease Get:4 http://security.ubuntu.com/ubuntu focal-security InRelease [109 kB]Hit:5 http://mirrors.digitalocean.com/ubuntu focal-backports InReleaseFetched 374 kB in 1s (662 kB/s) Reading package lists... DoneBuilding dependency tree Reading state information... Done96 packages can be upgraded. Run 'apt list --upgradable' to see them.
If you read the message, it says that "96 packages can be upgraded". We have installed the new software packages but we have not upgraded our software to those versions yet.
To do that, let's run another command:
apt upgrade
Type y when it prompts you and it will upgrade the software.
Create a User
We have connected to the server as the root user (the user with the highest privileges). Being the root is dangerous and can open us up to vulnerabilities.
Therefore we should create a new user and not run commands as root. Replace $username with a username of your choice.
whoamiroot
adduser $username
You need to enter a password for the user. After that point, it will ask a bunch of questions, so just input y until the prompting is over.
The new user has been created but we also need to add this new user to the "sudo" group so that we can perform any action we need.
usermod -aG sudo $USERNAME
We add group with the -aG (add group) option, and we add the group name sudo to our username.
We are still root, so let's switch our user to the newly created user, using the su (switch user) command.
su $USERNAME
After this point, if you run whoami command, you should see your username. You can confirm the existence of the sudo group by running this command:
sudo cat /var/log/auth.log
Only superusers can view this file and OS will ask for your user password after you run this command.
Copy the SSH Key
We have successfully created the user but we have not enabled SSH login for this new user yet.
Therefore, we have to copy the public key that we previously created on our local computer and paste it into this user's SSH folder so SSH can know which key should it use to authenticate our new user.
mkdir -p ~/.ssh
The -p argument creates the directory if it does not exist.
vi ~/.ssh/authorized_keys
We will use vi or vim to create a file and call it authorized_keys.
Copy your public key (`id_dsa` file) then press "i" to go into insert mode. Then just paste it into this file with CMD + V.
Press esc to quit insert mode, type :wq to save and quit.
If you have any problems about using Vim-Vi, you can check out one of the many tutorials that explain how to use it.
Connect to Server as New User
Now we should be able to connect to the server without any problems using ssh. You can use this command to connect, just remember to insert your username and IP_ADDRESS.
ssh $USERNAME@IP_ADDRESS
If you are having any problems at this point, you should just delete the droplet and start over. It does not take a lot of time to start over but debugging server problems can be difficult.
How to Disable Root Login
It is a good practice to disable Root login as a security precaution, so let's do that now.
It can be useful to change the file permission just in case so that we won't run into problems regarding permissions in the future.
chmod 644 ~/.ssh/authorized_keys
Let's now open our sshd_config file:
sudo vi /etc/ssh/sshd_config
Find this line and change the yes to no in the same way we did earlier with vi.
PermitRootLogin no
Save and quit vi.
How to Install Node.js and Git
We can now go ahead and install Node.js and Git:
sudo apt install nodejs npm
sudo apt install git
We are now ready to create a Node app and run it. You can either pull your Node project from Github or create a Node app here just to test if it works.
Move to a directory of your choice and create an "app.js" file:
sudo vi app.js
You can paste the following snippet into your app.js file:
const express = require('express');const app = express();const port = 3000;app.get('/', (req, res) => { res.send('Hello World');});app.listen(port, () => console.log(`Example app listening on port ${port}!`));
Now we can run it with the command:
node app.js
You should see "Example app listening on port 3000!" on your terminal.
We can confirm that it is working by sending a request to our server:
GET http://IP_ADDRESS:3000/
Send this request either from an HTTP client like Postman or your browser and you should see the "Hello World" message.
At this point, you should notice that something is wrong: Regular users do not know how to send requests to port 3000.
We should redirect the requests that come to our web server from our IP to port 3000. We can accomplish this with the help of Nginx.

How to Install and Configure Nginx
We will use Nginx as a Reverse Proxy to redirect the requests to our Node app.

Nginx as a Reverse Proxy
Let's install Nginx:
sudo apt install nginx
Start the Nginx service:
sudo service nginx start
We can test to see if it is working by sending a request to our server's IP address from the browser. Type your server's IP address to your browser and you should see this:

It is important to know that Nginx serves from "/var/www/html" by default and you can find this HTML file in that directory as well.
I also advise you to create a folder under "/var/www", call it app, and move your Node app to that folder so it will be easy to find.
How to Configure the Nginx Reverse Proxy
We will edit the Nginx config file to configure a reverse proxy:
sudo vi /etc/nginx/sites-available/default
In this file you need to find the location / block and change it as follows:
location / { # First attempt to serve request as file, then # as directory, then fall back to displaying a 404. proxy_pass http://127.0.0.1:3000/; }
The proxy_pass directive proxies the request to a specified port. We give the port that our Node application is running on.
Let's restart Nginx so the changes can take effect:
sudo service nginx reload
After this step, we should be able to see the message when we send a request to our server. Congratulations, we have completed the minimum number of steps to deploy a Node app!

But I still advise you to complete the following bonus step as well, as I believe it's quite important.
If you can't see the hello world message, you can check if your app and Nginx are running and restart them.
How to Run your App as a Process
We do not want to start our application manually every time something goes wrong and our app crashes. We want it to restart on its own. Also, whenever the server starts, our app should start too.
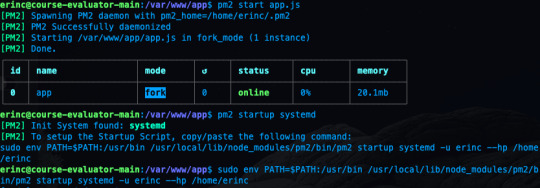
To make this happen, we can use PM2. Let's install PM2 and configure it.
sudo npm i -g pm2
We are installing pm2 globally by using the "-g" option so that it will be accessible from every folder.
pm2 start app.js
This makes sure that the app will restart if it exits due to an error.
Let's save the current process list.
pm2 save
We also need to convert it to a daemon that runs whenever the system starts:
pm2 startup systemd
As a reminder, in this tutorial, I'm using the commands for Ubuntu. If you are using any other Linux distro, you should replace systemd in this command.
We can confirm that the service is getting restarted by rebooting the server and sending a request without running app.js by hand:
sudo reboot
After sending a request as we did earlier, you should be able to see the hello world message.
Conclusion
In this tutorial we started from scratch, rented a server for ourselves, connected to it, and configured it in a way that it serves our Node.js app from port 80.
If you have followed along and were able to complete all steps, congratulations! You can be proud of yourself, as this was not the easiest topic :). I hope that you have learned a lot. Thank you for your time.
I am planning to explore this topic further by connecting the server to a domain name, then connecting it to CircleCI for continuous integration. I'll also go through the required steps to make your Node.js/React app production ready. This post had already gotten long enough, though, so those topics are reserved for another post :)
If you have enjoyed reading and want to get informed about my future posts, you can subscribe to my personal blog. You can see my previous posts there if you are interested in reading more. I usually write about web development-related topics.
0 notes
Text
You should be customizing your PowerShell Prompt with PSReadLine
I use PowerShell 7 (cross platform, open source, runs on .NET Core) as my main shell of choice at the Windows command line. I use it in the Windows Terminal and I have a pretty prompt thanks to OhMyPosh. I've also set up autocomplete in PowerShell (type something, then TAB) with git and dotnet!
Do make sure you know the difference between a console, terminal, and shell.

I thought I had things pretty well dialed in. I even used PSReadLine, a bash inspired readline implementation for PowerShell.
But was I REALLY USING IT? No. Honestly, at the time I wouldn't be able to tell you what it offered me as a command line users. Wow was I wrong.
Don't sleep on PSReadLine if you use PowerShell as your preferred prompt. Head over there and give them some love and a star and buckle up, friends!
Head over to a prompt and run
Install-Module PSReadLine -AllowPrerelease -Force
If you want the latest, otherwise remove the Prerelease.
Then edit your $profile. I usually do this:
notepad $PROFILE
And add
if ($host.Name -eq 'ConsoleHost') { Import-Module PSReadLine }
First, PSReadLine makes everything better with sprinkles of color everywhere automatically. But the thing I was not really digging into was customizing my $profile to light up cool features and set keybindings that made sense to me.
It was this totally configured and blinged out sample PSReadline Profile that made me realize I wasn't doing enough. I cherry-picked the best parts out of this and I recommend you do the same!
You get nice improvements with bash-like command line editing. The most important one being the PowerShell equivalent of ctrl-r "bck-i-search" that bash users enjoy.
You can also set command line handlers so pressing "up arrow" with some existing text will find that item in history. Set it up once in your $profile.
Set-PSReadLineKeyHandler -Key UpArrow -Function HistorySearchBackward Set-PSReadLineKeyHandler -Key DownArrow -Function HistorySearchForward
Like Emacs but want PowerShell to be more like Emacs? It's possible!
Set-PSReadLineOption -EditMode Emacs
Got PSReadLine already but you're not sure what is key bindings are set up today?
Get-PSReadLineKeyHandler
This will give you a complete picture
You know how you can "ctrl shift b" in Visual Studio to build your project? I made ctrl shift b type "dotnet build" for me in PowerShell! Muscle memory for the win!
# This is an example of a macro that you might use to execute a command. # This will add the command to history. Set-PSReadLineKeyHandler -Key Ctrl+Shift+b ` -BriefDescription BuildCurrentDirectory ` -LongDescription "Build the current directory" ` -ScriptBlock { [Microsoft.PowerShell.PSConsoleReadLine]::RevertLine() [Microsoft.PowerShell.PSConsoleReadLine]::Insert("dotnet build") [Microsoft.PowerShell.PSConsoleReadLine]::AcceptLine() }
Check out the really advanced stuff in the sample $profile. I like the Smart Insert/Delete. It will take over your ' quotes and quotes " and braces { and ) parens and make them auto matching! That means you can type a variable or string, select it with Shift Arrow Key or Ctrl Shift Arrow Key, then typeover it with a " and it'll automatically quote the whole string. A very nice command line experience that you may enjoy in other shells but you never really set up PowerShell. Even more useful is Alt+' that will take a string and change it from a 'string' to a "string."
Take a few moments and think about the things you type too often. The things you type twice, or ten times a day. Check out your $profile, consider your aliases, and tidy up. I suspect PSReadLine could help. It was great for me!
While you are at it, also pick up PSColors! Next post I'll talk about Oh my Posh 3!
Sponsor: Suffering from a lack of clarity around software bugs? Give your customers the experience they deserve and expect with error monitoring from Raygun.com. Installs in minutes, try it today!
© 2020 Scott Hanselman. All rights reserved.


You should be customizing your PowerShell Prompt with PSReadLine published first on https://deskbysnafu.tumblr.com/
0 notes
Text
You should be customizing your PowerShell Prompt with PSReadLine
I use PowerShell 7 (cross platform, open source, runs on .NET Core) as my main shell of choice at the Windows command line. I use it in the Windows Terminal and I have a pretty prompt thanks to OhMyPosh. I've also set up autocomplete in PowerShell (type something, then TAB) with git and dotnet!
Do make sure you know the difference between a console, terminal, and shell.
I thought I had things pretty well dialed in. I even used PSReadLine, a bash inspired readline implementation for PowerShell.
But was I REALLY USING IT? No. Honestly, at the time I wouldn't be able to tell you what it offered me as a command line users. Wow was I wrong.
Don't sleep on PSReadLine if you use PowerShell as your preferred prompt. Head over there and give them some love and a star and buckle up, friends!
Head over to a prompt and run
Install-Module PSReadLine -AllowPrerelease -Force
If you want the latest, otherwise remove the Prerelease.
Then edit your $profile. I usually do this:
notepad $PROFILE
And add
if ($host.Name -eq 'ConsoleHost') { Import-Module PSReadLine }
First, PSReadLine makes everything better with sprinkles of color everywhere automatically. But the thing I was not really digging into was customizing my $profile to light up cool features and set keybindings that made sense to me.
It was this totally configured and blinged out sample PSReadline Profile that made me realize I wasn't doing enough. I cherry-picked the best parts out of this and I recommend you do the same!
You get nice improvements with bash-like command line editing. The most important one being the PowerShell equivalent of ctrl-r "bck-i-search" that bash users enjoy.
You can also set command line handlers so pressing "up arrow" with some existing text will find that item in history. Set it up once in your $profile.
Set-PSReadLineKeyHandler -Key UpArrow -Function HistorySearchBackward Set-PSReadLineKeyHandler -Key DownArrow -Function HistorySearchForward
Like Emacs but want PowerShell to be more like Emacs? It's possible!
Set-PSReadLineOption -EditMode Emacs
Got PSReadLine already but you're not sure what is key bindings are set up today?
Get-PSReadLineKeyHandler
This will give you a complete picture
You know how you can "ctrl shift b" in Visual Studio to build your project? I made ctrl shift b type "dotnet build" for me in PowerShell! Muscle memory for the win!
# This is an example of a macro that you might use to execute a command. # This will add the command to history. Set-PSReadLineKeyHandler -Key Ctrl+Shift+b ` -BriefDescription BuildCurrentDirectory ` -LongDescription "Build the current directory" ` -ScriptBlock { [Microsoft.PowerShell.PSConsoleReadLine]::RevertLine() [Microsoft.PowerShell.PSConsoleReadLine]::Insert("dotnet build") [Microsoft.PowerShell.PSConsoleReadLine]::AcceptLine() }
Check out the really advanced stuff in the sample $profile. I like the Smart Insert/Delete. It will take over your ' quotes and quotes " and braces { and ) parens and make them auto matching! That means you can type a variable or string, select it with Shift Arrow Key or Ctrl Shift Arrow Key, then typeover it with a " and it'll automatically quote the whole string. A very nice command line experience that you may enjoy in other shells but you never really set up PowerShell. Even more useful is Alt+' that will take a string and change it from a 'string' to a "string."
Take a few moments and think about the things you type too often. The things you type twice, or ten times a day. Check out your $profile, consider your aliases, and tidy up. I suspect PSReadLine could help. It was great for me!
While you are at it, also pick up PSColors! Next post I'll talk about Oh my Posh 3!
Sponsor: Suffering from a lack of clarity around software bugs? Give your customers the experience they deserve and expect with error monitoring from Raygun.com. Installs in minutes, try it today!
© 2020 Scott Hanselman. All rights reserved.


You should be customizing your PowerShell Prompt with PSReadLine published first on http://7elementswd.tumblr.com/
0 notes
Text
Configuration Manager Technical Preview 2005

Configuration Manager Technical Preview 2005. You can now initiate an application install in real time for a tenant attached device from the Microsoft Endpoint Management admin center. Helpdesk users can initiate real-time queries and run PowerShell scripts from the cloud against an individual Configuration Manager managed device and return the results to the admin center. Additionally, you can now see a timeline of events that shows past activity on the device that can help you troubleshoot problems for each device. Tenant attach: Device timeline in the admin center When Configuration Manager synchronizes a device to Microsoft Endpoint Manager through tenant attach, you can now see a timeline of events. This timeline shows past activity on the device that can help you troubleshoot problems. Tenant attach: Install an application from the admin center You can now initiate an application install in real time for a tenant attached device from the Microsoft Endpoint Management admin center. Tenant attach: CMPivot from the admin center Bring the power of CMPivot to the Microsoft Endpoint Manager admin center. Allow additional personas, like Helpdesk, to be able to initiate real-time queries from the cloud against an individual ConfigMgr managed device and return the results back to the admin center. This gives all the traditional benefits of CMPivot, which allows IT Admins and other designated personas the ability to quickly assess the state of devices in their environment and take action. Tenant attach: Run Scripts from the admin center Bring the power of the Configuration Manager on-premises Run Scripts feature to the Microsoft Endpoint Manager admin center. Allow additional personas, like Helpdesk, to run PowerShell scripts from the cloud against an individual Configuration Manager managed device. This gives all the traditional benefits of PowerShell scripts that have already been defined and approved by the Configuration Manager admin to this new environment. VPN boundary type To simplify managing remote clients, you can now create a new boundary type for VPNs. Previously, you had to create boundaries for VPN clients based on the IP address or subnet. This configuration could be challenging or not possible because of the subnet configuration or the VPN design. Now when a client sends a location request, it includes additional information about its network configuration. Based upon this information, the server determines whether the client is on a VPN. All clients that connect through a VPN automatically belong to the boundary group associated with this new boundary type. Azure AD authentication in Software Center This release fixes an issue with Software Center and Azure Active Directory (Azure AD) authentication. For a client detected as on the intranet but communicating via the cloud management gateway (CMG), previously Software Center would use Windows authentication. When it tried to get the list of user available apps, it would fail. It now uses Azure Active Directory (Azure AD) identity for devices joined to Azure AD. These devices can be cloud-joined or hybrid-joined. Install and upgrade the client on a metered connection Previously, if the device was connected to a metered network, new clients wouldn't install. Existing clients only upgraded if you allowed all client communication. For devices that are frequently roaming on a metered network, they would be unmanaged or on an older client version. Starting in this release, client install and upgrade both work when you set the client setting Client communication on metered internet connections to Allow. To define the behavior for a new client installation, there's a new ccmsetup parameter /AllowMetered. When you allow client communication on a metered network for ccmsetup, it downloads the content, registers with the site, and downloads the initial policy. Any further client communication follows the configuration of the client setting from that policy. Task sequence media support for cloud-based content Even though there are more remote devices to manage these days, you may still have business processes to recover devices using task sequence media. For example, you send a USB key to a remote user to reimage their device. Or a remote office that has a local PXE server, but devices mainly connect to your main network over the internet. Instead of further taxing the VPN to download large OS deployment content, boot media and PXE deployments can now get content from cloud-based sources. For example, a cloud management gateway (CMG) that you enable to share content. Improvements to cloud management gateway cmdlets With more customers managing remote devices now, this release includes several new and improved Windows PowerShell cmdlets for the cloud management gateway (CMG). You can use these cmdlets to automate the creation, configuration, and management of the CMG service and Azure Active Directory (Azure AD) requirements. For example, an Azure administrator first creates the two required apps in Azure Active Directory (Azure AD). Then you write a script that uses the following cmdlets to deploy a CMG: Import-CMAADServerApplication: Create the Azure AD server app definition in Configuration Manager.Import-CMAADClientApplication: Create the Azure AD client app definition in Configuration Manager.Use Get-CMAADApplication to get the app objects, and then pass to New-CMCloudManagementAzureService to create the Azure service connection in Configuration Manager.New-CMCloudManagementGateway: Create the CMG service in Azure.Add-CMCloudManagementGatewayConnectionPoint: Create the CMG connection point site system. Community hub and GitHub The IT Admin community has developed a wealth of knowledge over the years. Rather than reinventing items like Scripts and Reports from scratch, we've built a Configuration Manager Community hub where IT Admins can share with each other. By leveraging the work of others, you can save hours of work. The Community hub fosters creativity by building on others' work and having other people build on yours. GitHub already has industry-wide processes and tools built for sharing. Now, the Community hub will leverage those tools directly in the Configuration Manager Console as foundational pieces for driving this new community. For the initial release, the content made available in the Community hub will be uploaded only by Microsoft. Currently, you can't upload your own content to GitHub for use by Community hub. Community hub supports the following objects: PowerShell ScriptsReportsTask sequencesApplicationsConfiguration items Microsoft 365 Apps for enterprise Office 365 ProPlus was renamed to Microsoft 365 Apps for enterprise on April 21, 2020. Starting in this technical preview the following changes have been made: The Configuration Manager console has been updated to use the new name.This change also includes update channel names for Microsoft 365 Apps.A banner notification was added to the console to notify you if one or more automatic deployment rules reference obsolete channel names in the Title criteria for Microsoft 365 Apps updates. If you use Title as criteria for Microsoft 365 Apps updates in your automatic deployment rules, use the next section to help modify them. Update channel information for Microsoft 365 Apps When Office 365 ProPlus was renamed to Microsoft 365 Apps for enterprise, the update channels were also renamed. If you use an automatic deployment rule to deploy updates, you'll need to make changes to your rules if they rely on the Title property. That's because the name of update packages in the Microsoft Update Catalog is changing. Currently, the title of an update package for Office 365 ProPlus begins with "Office 365 Client Update" as seen in the following example: �� Office 365 Client Update - Semi-annual Channel Version 1908 for x64 based Edition (Build 11929.20648) For update packages released on and after June 9, the title will begin with "Microsoft 365 Apps Update" as seen in the following example: Microsoft 365 Apps Update - Semi-annual Channel Version 1908 for x64 based Edition (Build 11929.50000) New Channel namePrevious Channel nameSemi-Annual Enterprise ChannelSemi-Annual ChannelSemi-Annual Enterprise Channel (Preview)Semi-Annual Channel (Targeted)Monthly Enterprise ChannelNACurrent ChannelMonthly ChannelCurrent Channel (Preview)Monthly Channel (Targeted)Beta ChannelInsider Report setup and upgrade failures to Microsoft If the setup or update process fails to complete successfully, you can now report the error directly to Microsoft. If a failure occurs, the Report update error to Microsoft button is enabled. When you use the button, an interactive wizard opens allowing you to provide more information to us. In technical previews, this button is always enabled even when the setup completes successfully. When running setup from the media rather than the console, you'll also be given the Report update error to Microsoft option if setup fails. Notification for Azure AD app secret key expiration Based on your UserVoice feedback, if you Configure Azure services to cloud-attach your site, the Configuration Manager console now displays notifications for the following circumstances: One or more Azure AD app secret keys will expire soonOne or more Azure AD app secret keys have expired Improvements to BitLocker task sequence steps Based on your UserVoice feedback, you can now specify the Disk encryption mode on the Enable BitLocker and Pre-provision BitLocker task sequence steps. The Enable BitLocker step also now includes the setting to Skip this step for computers that do not have a TPM or when TPM is not enabled. Improvements to the content library cleanup tool If you remove content from a distribution point while the site system is offline, an orphaned record can exist in WMI. Over time, this behavior can eventually lead to a warning status on the distribution point. The content library cleanup tool in delete mode could remove orphaned files from the content library. It can now also remove orphaned content records from the WMI provider on a distribution point. Remove command prompt during Windows 10 in-place upgrade During a task sequence to upgrade a device to Windows 10, during one of the final Windows configuration phases a command prompt window opens. The window is on top of the Windows out-of-box experience (OOBE), and users can interact with it to disrupt the upgrade process. Starting in this release, the SetupCompleteTemplate.cmd and SetupRollbackTemplate.cmd scripts from Configuration Manager include a change to hide the command prompt window. Read the full article
#Mac#MacOS#MECM#MEMCM#MicrosoftAzure#MicrosoftEndpointConfigurationManager#MicrosoftOffice365#MicrosoftOfficeInsider#OfficeProPlus#SystemCenterConfigurationManager#Windows#Windows10
0 notes
Text
Getting Started with React Native and Visual Studio Code on Windows: Hello World sample app

Do you know React Native? If you don't, you should really do something about that, especially if you're a web developer interested in creating native mobile app. In a nutshell, Reactive App is a framework for building native apps using JavaScript and React. It uses the same design as React, letting you compose a rich mobile UI using declarative components instead of having to learn how to natively do it using Android Studio or XCode. Conversely from other web-to-native frameworks, the apps you'll be able to build with React Native won't be mobile web apps wrapped in a native shell (if you know about PhoneGap/Cordoba you know what I mean): they will actually be iOS and Android native app! The only difference is that, instead of using Swift, Kotlin or Java to put together the native UI building blocks, you'll be to this using JavaScript and React.
Install React Native (and its dependencies)
The first thing we need to do is to install React Native framework on our system, together with all its required dependencies to build and run Android apps. Unfortunately, we cannot build and run iOS apps, as they do require a MacOS (or, to better say, a OSX machine). This is more a Apple cruel restriction than a React Native limitation, though: the sad part about mobile development nowadays is that Apple does not allow any kind of iOS emulator outside their ecosystem, thus forcing any developer who wants to create multi-platform mobile apps to develop using a Mac... Which is kind of sad, if you tell me, since nobody should be forced to use a Mac. The only mobile framework who does actually allow to do something against that is Xamarin, which lets you use a really cool iOS remote simulator for Windows. Unfortunately, React Native has nothing similar, at least for the moment, forcing all Windows users to concentrate on Android... or to install a MacOS virtual machine using VMware or VirtualBox, which is basically what I'm still doing when I have to write software using XCode or React Native. Anyway, here's what we need to do to install React Native and its Android dependencies on Windows: Install Chocolatey Chocolatey is a cool package manager for Windows that will greatly help you to get the proper things without messing up your system configuration, which is rather easy using other standard, linux-oriented package managers such as npm, yarn and the likes. (Note that you'll still be using them - just not from the start!) To install Chocolatey, go to this URL and follow the instructions. In a nutshell, you'll be asked to open a Command Prompt window with administrative rights and cut-paste there a (very long) one-liner which will take care of installing Chocolatey for you in a single step. If you prefer Powershell over CMD, there's a (even longer) one-liner for that as well.
Install NodeJS, Phyton and JDK Right after installing Chocolatey, you'll need to use it to install some of React Native's required dependencies, such as: Node.js (8.3 or newer), JDK (8 or newer) and Phyton (2 or newer). You can do that by opening another elevated command prompt and typing the following command: > choco install -y nodejs.install python2 jdk8 If you already have the required version of Node.js, JDK or Phyton on your system, remove them to the above cmd to prevent Chocolatey from re-installing them. Install Android Studio The next thing you'll have to do is to download and install Android Studio. To do that, go to this URL and choose the Android Studio option. Choose a "Custom" setup when prompted to select an installation type. Make sure the boxes next to all of the following are checked: Android SDK Android SDK Platform Performance (Intel ® HAXM) (if you have a INTEL CPU: if you got an AMD one, click here) Android Virtual Device Once done, click Next to begin installing these components. Once setup has finalized and you're presented with the Welcome screen, proceed to the next step. Preparing the Android SDK Android Studio installs the latest Android SDK by default: building a React Native app with native code, however, requires the Android 9 (Pie) SDK in particular. Additional Android SDKs can be installed through the SDK Manager in Android Studio, which can be accessed from the Welcome to Android Studio screen: click on Configure, then select SDK Manager. If you prefer to do that using the menus, go to the Preferences dialog, then Appearance & Behavior > System Settings > Android SDK. Once you're there, select the SDK Platforms tab from within the SDK Manager, then check the box next to Show Package Details in the bottom right corner. Locate and expand the Android 9 (Pie) entry, then make sure the following items are checked: Android SDK Platform 28 Intel x86 Atom_64 System Image or Google APIs Intel x86 Atom System Image Next, select the SDK Tools tab and check the box next to Show Package Details here as well: locate and expand the Android SDK Build-Tools entry and make sure that 28.0.3 is selected. Eventually, click Apply to download and install everything you need.
Add the ANDROID_HOME environment variable
Open the Windows Control Panel, select System, then Change settings > Advanced: from there, click on Environment Variables, and create a new ANDROID_HOME user variable that points to the path to your Android SDK, which should be the following (be sure to check it): C:\Users\YOUR_USERNAME\AppData\Local\Android\Sdk To quickly verify it, open Android Studio again, then go to Preferences > Appearance & Behavior > System Settings > Android SDK. Add the platform-tools folder to PATH Again, open the Windows Control Panel, select System, then Change settings > Advanced: from there, click on Environment Variables. This time, instead of creating a new user variable, select the PATH variable and edit it. Add the following path to the existing list: C:\Users\YOUR_USERNAME\AppData\Local\Android\Sdk\platform-tools Again, be sure to verify that this is your Android SDK folder. Install the React Native CLI Last but not least, you will have to use npm to install the React Native CLI. Open a command prompt with elevated rights and type the following: > npm install -g react-native-cli If you get a message from your OS saying that "npm" cannot be found, be sure that your NodeJS installation folder is present in the PATH environment variable: if it isn't, add it and try again.
Create a React Native Project
Once React Native and its required dependencies/components are installed, you have two options for create your first app: Create it from scratch using the React Native CLI. Clone a Boilerplate from GitHub and modifying it. Each option comes with pros and cons: the React Native CLI is good enough for a sample "Hello World!" application, but it's missing some key features you'll most likely need to add by yourself (Redux, React Navigator, axios and so on); the Boilerplate will install a set of pre-made classes and UI elements (a menu, a navigation system, and so on) that will probably ease your development curve. For the above reasons, I suggest to go with the boilerplate, so that you'll be able to feel a whole signficant React Native experience. Anyway, in the next two paragraphs we'll deal with both scenarios. Option #1: Use React Native CLI Open an elevated command prompt, get in the folder you want to create your app root folder in: once you're there, type the following command to create your first React Native app: > react-native init MyApp ... That's it! Option #2: Cloning a Boilerplate Clone the repository Copy it to another folder, such as /MyApp/ Remove the previous git history by deleting the root .git folder. Follow the boilerplate setup instructions. For example, if it comes with a packages.json file, it will most likely require you to run npm update or yarn install to install/update the required dependencies. If the project has a default name, you can also rename it to your own project name using yarn run rename -- MyApp Create your configuration file App/Config/index.js (if not already present) Run your app by typing react-native run-android (to run the Android application) or react-native run-ios (for the iOS application). Remember to start a Simulator or to connect an Android/iOS device before doing that! If you did everything correctly, your app should start running, installing some pre-requisites if necessary. For example, as we can see in the screenshot below, the Android app will install the Gradle build tool during the first run:
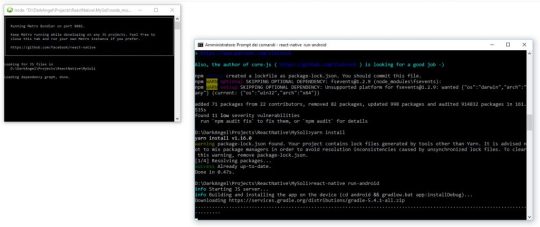
If you get the SDK location could not be found exception, it means that you either don't have installed the Android SDK or you didn't set the ANDROID_HOME variable (see below). ANDROID_SDK_ROOT variable. Other common errors that could prevent the Android app from launching are licensing issues (License for Android Package XXX not accepted) and the absence of a suitable emulator (No connected devices!): the former can be fixed by opening the Android SDK Manager and installing/updating the missing packages; as for the latter, just be sure to either plugin a debug-enabled Android device or launch an Android emulator from the AVD Manager.
Install Visual Studio Code
Now that our React Native app is ready, we just have to install a decent coding editor to be able to edit and/or debug it: that's where Visual Studio Code kicks in. Go to the Visual Studio Code official page and download it, then have it installed.
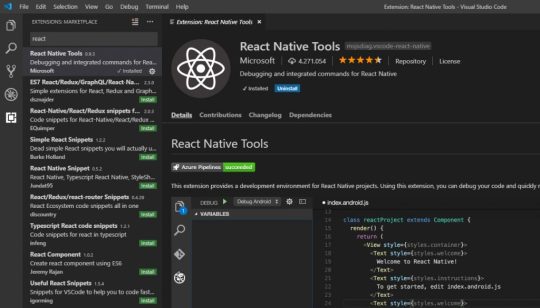
Install React Native Tools Right after that, open the Extension pane (bottom last icon on the left) and install the React Native Tools, a great extension to debug and syntax highlighting React on VS Code.
Your first React Native App
You're almost done: from Visual Studio Code, do File > Open Folder, select the /MyApp/ folder - the directory you created or cloned your first app in - and open it. You should be welcomed by the following page:
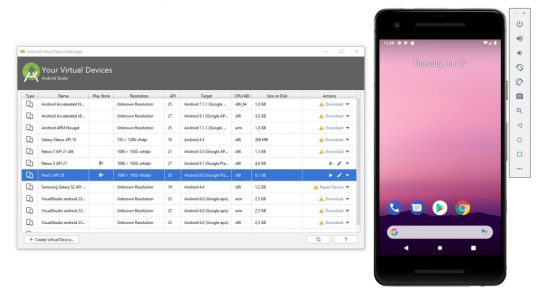
Now it's time to either connect your Android phone to your computer (providing that the USB Debug feature is enabled on it - click here to read how), or to launch an Android emulator using the Android SDK using the Android Studio's AVD Manager (click here to read how).
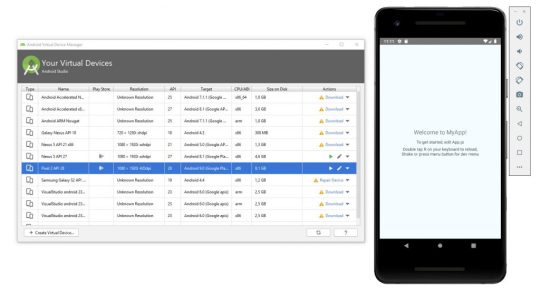
Right after that, from Visual Studio Code, go to the Debug screen and select the React Native debug configuration: a brand-new launch.json file will be created on your app's root folder, containing some default options to enable the debug. Click the green "play" button from the debug toolbar (placed on the top-left corner of the editor, right above the Explorer tree) and let the magic works! If you did everything properly, you should see something like this:
Conclusion
That's it for now: I definitely hope that this guide will help other developers to try out React Native, as it's really something to be aware of! Read the full article
0 notes
Text
Shutdown Windows 10 remotely
In order to enable Alexa to be able to shutdown window PC in our home using voice commands I needed to start by being able to perform the task from my Linux machine using a shell script.
There are a few hurdles I cam across when I was working through setting this up on my windows 10 Pro Desktop.
1. Firewall
If your Linux PC is on the same LAN and in the same IP subnet but is unable to connect to your windows desktop which is evident with returned errors talking of TIMEOUT then try disabling your firewall temporarily for troubleshooting.
Step 1: Open the Control Panel. Hold down the Windows key ( ) and press "X". Select "Control Panel" in the menu.
Step 2: Open Windows Firewall Settings. In the Control Panel select "System and Security" ...
Step 3: Disable the Firewall. Ensure that both the private and public network firewalls are turned off.
It is recommended that you turn on the firewall after trouble shooting and add an exception for RPC instead, OR if you network type is set to Public and is better suited to be classified as Private then simply change the network type as shown below.
Change Network Category
Open PowerShell with administrative privileges
Run the following command:
Get-NetConnectionProfile
See the network name you want to change its type and run the following command:
Set-NetConnectionProfile -Name “NETWORKNAME” -NetworkCategory Private
Where NETWORKNAME is the name of your network and you can change the -NetworkCategory switch value to Public or Private.
TESTING
From your Linux PC try:
telnet <desktop.IP.Address> 445
If this connects then the firewall is either disabled or configured to pass the RPC traffic through to your desktop.
Example of a successful connection
root@linux:~# telnet 192.168.0.65 445
Trying 192.168.0.65... Connected to 192.168.0.65. Escape character is '^]'.
2. UAC (User Account Control)
If you run the ‘net rpc shutdown’ command and see a response similaar to this:
Shutdown of remote machine failed
result was: WERR_CALL_NOT_IMPLEMENTED
To solve this temporarily you could simply disable the UAC but this is certainly not a great position to leave your desktop. I am satisfied with the workaround provided below but you may think differently.
The credit for the UAC workaround goes to Lowell Heddings, better known online as the How-To Geek.
By default your desktop doesn't allow UAC elevation over the network with a local user account.
There’s a registry key that we can use to change this behavior to work the same as Windows XP. This will make your computer less secure, and I can’t recommend that you do this… but it’s also good to understand how Windows works.
Manual Registry Hack
Open regedit.exe through the start menu search or run box, and then navigate down to the following key, creating a new key if it doesn't exist.
HKEY_LOCAL_MACHINE\SOFTWARE\Microsoft\Windows\CurrentVersion\Policies\System

On the right-hand side, add a new 32-bit DWORD value named LocalAccountTokenFilterPolicy and set the value to 1.
To remove this tweak you can set the value to 0 or just delete the key.
3. Remote Registry Service
Another error that you may come across when running the ‘net rpc shutdown’ command is this:
could not initialise pipe \winreg. Error was NT_STATUS_OBJECT_NAME_NOT_FOUND
Try running services.msc, scroll down to ‘Remote Registry and make sure it is set to automatic and started (running) then try again.
Linux PC
On your Linux PC use the following command (try apt-get install samba-common if its not already available).
net rpc shutdown -I WIN.IP.ADDR -U USER%PASSWORD
All going well the Windows PC should advise the user they are being signed out and then shutdown.
In a future Post I will look at extending this to explain how to make Alexa shutdown the PC upon request using a script.
ciao
Paul
2 notes
·
View notes
Link
Challenge
In the DevOps world, it is a common practice to set up database continuous integration solutions for project deliveries, with as many steps included in a single workflow as possible. For the SQL Server project types, most of the database continuous integration and continuous delivery use cases are covered with ApexSQL DevOps toolkit solutions, including both standalone and continuous integration servers plugins. Multiple tasks, including building, testing, and deploying SQL database code, can be done through a single pipeline, but the question remains if there is a possibility to perform some non-database project-related tasks within the same pipeline, i.e., without the need for additional intervention.
Solution
This article explains how to utilize simple PowerShell projects and integrate them into a pipeline created with the ApexSQL DevOps toolkit database continuous integration steps. This includes an example demonstration for Jenkins, TeamCity, Bamboo, Azure DevOps plugins, and the standalone ApexSQL DevOps toolkit – Web dashboard application.
One of the most basic uses cases when it comes to database projects would be building a database with updated code and installing a client application to test or manipulate the database version with it. So we will create a PowerShell solution that will detect if the application exists and install it from a dedicated installation repository (simple location in a local file system where application installers are located). Additionally, we will check if the installed version is higher than the one already installed so we can skip this operation in case versions are matching.
PowerShell script
As mentioned, we need to create a script to install an application from a local folder and, for this example, would want to install the latest version of ApexSQL Diff application, which will be used to manipulate the schema created with the database continuous integration pipeline.
In the beginning, the path for the desired installer will need to be set with the following command:
$path = "c:\InstallRepo\ApexSQLDiff.exe"
Now, the installer details should be read to check if this application is already installed. These details can be found within the Details tab of the installer Properties window:
First, the correct product name should be read from the file:
$Product = (get-childitem $Path).VersionInfo.ProductName $Product = $Product.Trim()
And then the correct product version:
$ProductVersion = (get-childitem $Path).VersionInfo.ProductVersion $ProductVersion = $ProductVersion.Trim()
Note: the “Trim” function is used to remove the excessive space character that will be present at the end of the extracted value.
Following step is to check if the product is already installed. With this command the logical value True/False will be generated based on condition if the Product name exists in registry:
$installed = (Get-ItemProperty HKLM:\Software\Microsoft\Windows\CurrentVersion\Uninstall\* | Where { $_.DisplayName -eq $Product }) -ne $null
Based on the logical value, if the application is not installed, this command will start the installation in silent mode immediately (through CLI execution):
$installed = (Get-ItemProperty HKLM:\Software\Microsoft\Windows\CurrentVersion\Uninstall\* | Where { $_.DisplayName -eq $Product }) -ne $null
In case the application is installed we would need to check the version. We will read all registry parameters for the application, which includes the version also:
$installed = (Get-ItemProperty HKLM:\Software\Microsoft\Windows\CurrentVersion\Uninstall\* | Where { $_.DisplayName -eq $Product }) -ne $null
The parameters would look like this:
In the end, the script will check if the version from the registry is lesser than the one in the installer, and if so, the silent installation will start:
if($ProductParams.DisplayVersion -lt $ProductVersion) {Start-Process $path -ArgumentList "/VERYSILENT /SUPPRESSMSGBOXES /NORESTART" -Wait}
Note that the start-process command has the -Wait parameter, which prevents continuous integration servers from ending the process when the task finishes.
Entire script will look like this:
#set the installer path $path = "c:\InstallRepo\ApexSQLDiff.exe" #read the product name $Product = (get-childitem $Path).VersionInfo.ProductName $Product = $Product.Trim() #read the product version $ProductVersion = (get-childitem $Path).VersionInfo.ProductVersion $ProductVersion = $ProductVersion.Trim() #check if installed $installed = (Get-ItemProperty HKLM:\Software\Microsoft\Windows\CurrentVersion\Uninstall\* | Where { $_.DisplayName -eq $Product }) -ne $null #start installation if not installed if (!$installed) {Start-Process $path -ArgumentList "/VERYSILENT /SUPPRESSMSGBOXES /NORESTART" -Wait} else { #read the installed parameters $ProductParams = (Get-ItemProperty HKLM:\Software\Microsoft\Windows\CurrentVersion\Uninstall\* | Where {($_.DisplayName -eq $Product)}) #check the version and start installation if ($ProductParams.DisplayVersion -lt $ProductVersion) {Start-Process $path -ArgumentList "/VERYSILENT /SUPPRESSMSGBOXES /NORESTART" -Wait} } $LastExitCode
And it should be saved as a ps1 file to execute it in the database continuous integration pipeline.
In the following sections, we will consider a basic pipeline that will consist of the Build and the Package steps. So simply, this pipeline will build a database from a SQL code located in source control and create a database package with scripted database objects. No further details for configuring database continuous integration pipeline will be disclosed, but this information can be found in the ApexSQL DevOps toolkit knowledgebase.
Jenkins
What differs Jenkins from other continuous integration servers, is that it doesn’t have native, i.e., built-in PowerShell support. This means that it requires a plugin which can be installed from the Jenkins gallery:
With the plugin present, the PowerShell step can be found in the Jenkins build steps gallery:
When added, the step will show a text box where the PowerShell script can be inserted. Natively, this PowerShell plugin does not directly support execution by PowerShell script file so the entire script should be placed here:
After that, we can just save the database continuous integration pipeline and execute it.
TeamCity
In contrast to the Jenkins CI server, TeamCity has built-in support for PowerShell execution, so it is ready to be used right out-of-the-box.
To use created PowerShell script in TeamCity the PowerShell runner type should be chosen to add to the database continuous integration pipeline with ApexSQL DevOps toolkit steps in the current build configuration:
When selected, the PowerShell runner will show its configuration layout. Here, the Script option should be set to the File value, so the created PowerShell script can be imported by filling in the path to it in the Script file field. Optionally the Step name field can be populated to assign a recognizable name for this step:
When step configuration is saved, the database continuous integration pipeline will look like this:
Finally, it is ready for execution to build a database and install the application.
Bamboo
Analog to the TeamCity, the Bamboo CI server also has built-in support for PowerShell execution. In the created database continuous integration pipeline with the ApexSQL DevOps toolkit steps, the PowerShell step should be added to finish additional tasks.
To execute any PowerShell script, the integrated Bamboo Script task should be chosen. It can be found in the gallery under the Builder category:
This task supports has interpreters for three types of scripts, Windows PowerShell, Linux, and Windows command-line, which can be chosen manually or autodetection can be used. The Shell option autodetects type of script based on the first line in it:
Let’s pick the Windows PowerShell option directly and continue by setting the File in the Script location select-box (as opposed to Inline – direct script) and adding the path to our created script:
The database continuous integration pipeline with the additional task will look like this and is ready for execution:
Azure DevOps Server/Services
The Azure DevOps also has integrated support for PowerShell execution and configuring it is similar to previous examples. In the pipeline, formed with the tasks that come from the ApexSQL DevOps toolkit extension, we should add a new task and from the gallery of tasks find the PowerShell task. The gallery can be filled with lots of different Azure DevOps tasks, so the easiest way to find the PowerShell task would be to insert the search pattern:
When added, the task will require setting the source Type as the File Path and the location of the script in the Script Path field:
Just like that, the Azure DevOps pipeline is complete.
Web dashboard
Although considered as a specialized database continuous integration solution, the standalone ApexSQL DevOps toolkit – Web dashboard provides additional project flexibility with support for the PowerShell execution.
In the image, we can observe the same example with the Build and the Package steps that form the basic CI pipeline. To this sequence of steps, we can add the Custom step in order to use the created PowerShell script:
The Custom step configuration is as simple as all previously explained examples. The only difference here is that the script will have to be placed in the Web dashboard’s user-defined project folder as the application uses that location for external inputs:
First, the PowerShell script file should be provided for the Script path field. The folder browser button should be used here to open the project folder location and pick the appropriate script:
The Include output in package is optional and, if used, the step’s output, which is basically just the PowerShell execution summary, will be stored in a NuGet package (this can be the same package used for the rest of the steps in the pipeline); and the Additional parameters field can be used if with the script execution some external parameters are required for a successful run:
As a result of the executed example PowerShell script, we can easily observe that the desired application is indeed installed:
Conclusion
This example is just a small measure of what can be done on-the-fly by using the PowerShell in combination with database continuous integration pipelines provided by the ApexSQL DevOps toolkit solutions and fully automate all possible use cases.
0 notes
Text
Using nvmrc on Windows
Unfortunately nvm use on Windows does not change the node version to that specified in the `.nvmrc` file as its not supported on nvm for Windows.
So the easiest solution to this is to create a simple Powershell command that performs an approximation of the command which is to switch to the version specified and, if it doesn't already exist, download and install it first: nvm use $(Get-Content .nvmrc).replace( 'v', '' );
However, thats a bit awkward and we can do a bit more so instead, we can create an 'alias' to a function that calls the command instead:
function callnvm() { $versionDesired = $(Get-Content .nvmrc).replace( 'v', '' ); $response = nvm use $versionDesired; if ($response -match 'is not installed') { if ($response -match '64-bit') { nvm install $versionDesired x64 } else { nvm install $versionDesired x86 } nvm use $versionDesired; } } Set-Alias nvmu -value "callnvm"
Now we only need to type nvmu in a project folder for it to work properly.
However, this will only work for the current session, so to make it more useful for any project and every session; we can add this content to the Powershell Profile for the current user.
You can get the location of this file by typing $profile in a Powershell session and either edit or create the Profile file and place the content shown above into it.
0 notes
Text
Original Post from Rapid7 Author: Teresa Copple
This blog post is a follow-up to my previous blog on using the InsightIDR API to create and maintain threat feeds into InsightIDR.
What is InsightIDR?
InsightIDR is Rapid7’s SIEM solution that helps you centralize and unify your security data, detect behavior behind breaches, and respond to attacks targeting your modern network.
Leveraging third-party threat feeds in InsightIDR
In the previous blog, I explained how to scrape the website https://abuse.ch for possible bad actors that are part of the Feodo Tracker project. In this post, we’ll expand our options and scrape a few more sites to demonstrate how this process works for more complex indicators.
As I mentioned previously, you don’t need any programming experience to use the API. This blog explains in some detail how to write your own scripts to use the Rapid7 REST API, but you can also skip this part and scroll down to the working scripts.
For demonstration purposes, I am using Microsoft’s PowerShell, but please use the scripting language of your choice.
Getting started with the InsightIDR Threat API
You will need your platform API key for this exercise. You will also need to create some private threats and have their associated threat keys handy. If you need to get the steps on how to gather these keys, please see our previous blog.
Let’s start by looking at the next abuse.ch project, Ransomware Tracker. It contains a blocklist of ransomware C&C domains, URLs, and IPs, which you can learn more about here. I want to create a threat for it, too. These blocklists look exactly like the list of bad IPs that we pulled down for Feodo Tracker, except that this time, there are three lists that we need to pull in. This site has a separate list for domains, URLs, and IPs. InsightIDR does not require a separate feed for each data type, so let’s just scrape all three pages into one list of indicators and feed that in.
In my PowerShell script, I want to pull from three sites. I could be fancy with it, but let’s do this the easy way and just add in two more $IOCURL values and read from them:
#Change the value below to the threat list that you wish to import. $IOCURL1 = "https://ransomwaretracker.abuse.ch/downloads/RW_DOMBL.txt" $IOCURL2 = "https://ransomwaretracker.abuse.ch/downloads/RW_URLBL.txt" $IOCURL3 = "https://ransomwaretracker.abuse.ch/downloads/RW_IPBL.txt"
We also need to append the results from the second and third websites to the file:
#Download the indicators from the specified URL. Write-Host "Downloading indicators from website" $IOCblocklist = New-Object Net.WebClient $IOCblocklist.DownloadString($IOCURL1) > tempindicators.txt $IOCblocklist.DownloadString($IOCURL2) | Out-File tempindicators.txt -Append $IOCblocklist.DownloadString($IOCURL3) | Out-File tempindicators.txt -Append
That’s really all there is to it. This will scrape all three sites and put the results into one file. The final script then uploads into the indicated threat feed in InsightIDR. You can get the final version of this script below.
We are on a roll here, so let’s move on to a more complex type of IOC list: URL Haus. You can read about the formation and success of this project in this article, and the list of indicators for it can be downloaded from this site. As you can see, there are more fields in the list. The header for the download explains which fields are included:
# id,dateadded,url,url_status,threat,tags,urlhaus_link
The only field we actually want in our upload is the field called “url”, which is the third field in the list. Let’s go back to our script and change a few things in it to pull down the URL Haus indicators.
First, we need to change $IOCURL1 to point to the URL Haus blocklist:
#Change the value below to the threat list that you wish to import. $IOCURL1 = "https://urlhaus.abuse.ch/downloads/csv/"
Let’s delete the lines that download from the extra URLs, so we end up with this block of script reading just one website:
#Download the indicators from the specified URLs. $IOCblocklist = New-Object Net.WebClient Write-Host "Downloading indicators from website: " $IOCURL1 $IOCblocklist.DownloadString($IOCURL1) > tempindicators.txt
Next, let’s find the line that reformats the downloaded indicator, and change it so that it selects the “url” field, which is the third field in the header (i.e. Select Field3):
Write-Host "Reformat the downloaded list of indicators into a comma-delimited text file" $IOCblocklist = Import-CSV tempindicators.txt -Header "Field1", "Field2", "Field3", "Field4", "Field5", "Field6" ` | Select Field3 ` | ConvertTo-CSV -NoTypeInformation ` | % {$_ -replace ` 'G(?^|,)(("(?
[^,"]*?)"(?=,|$))|(?
".*?(?<!")("")*?"(?=,|$)))' ` ,'${start}${output}'} ` | %{$_ -replace '$',','}` | Out-File $IOCFilePath -fo -en ascii ;
gain, the final version of the script is below. There are quite a few indicators, so this script does take a few minutes to complete.
As you can see, you can use this same method to scrape many other sites that contains IOC and upload them into InsightIDR using the Community Threat feature.
Do you have some comments or interesting use cases for the Threat API? Have some websites you find useful and want to share? Please feel free to comment below to add to the discussion!
Final script for ransomware tracker
############################################################################ # Copyright (c) Rapid7, LLC 2016 All Right Reserved, http://www.rapid7.com/ # All rights reserved. This material contains unpublished, copyrighted # work including confidential and proprietary information of Rapid7. ############################################################################ # # abusech_ransomwaretrackers_indicators.ps1 # # Script version: 2.1.0 # PowerShell Version: 4.0.1.1 # Source: consultant-public # # THIS CODE AND INFORMATION ARE PROVIDED "AS IS" WITHOUT WARRANTY OF ANY # KIND, EITHER EXPRESSED OR IMPLIED, INCLUDING BUT NOT LIMITED TO THE # IMPLIED WARRANTIES OF MERCHANTABILITY AND/OR FITNESS FOR A # PARTICULAR PURPOSE. # # Tags: INSIGHTIDR # # Description: # This script will download indicators from the location specified, place # them into a CSV file, and then upload them to the private threat feed # specified. This script is intended to be used with the InsightIDR # Threat Community threats and uses the InsightiDR REST API v1. # #***** VARIABLES TO BE UPDATED ***** #Change the value below to the threat list that you wish to import. $IOCURL1 = "https://ransomwaretracker.abuse.ch/downloads/RW_DOMBL.txt" $IOCURL2 = "https://ransomwaretracker.abuse.ch/downloads/RW_URLBL.txt" $IOCURL3 = "https://ransomwaretracker.abuse.ch/downloads/RW_IPBL.txt" #Change this value to the Threat Key for the threat that is being modified. #Get the threat key by opening your community threat and selecting Threat Key. $ThreatKey = "" $headers = @{} #Enter in your platform API key. This can be generated from the Rapid7 Platform home. #Log into https://insight.rapid7.com and use the API Management section to generate a key. $headers["X-Api-Key"] = "" #***** END OF VARIABLES TO BE UPDATED ***** #These files are used when downloading the indicators and converting them to CSV format. #They are left insitu on purpose so that you can verify that the script works. If this bothers you, #use the sections below to delete these temp files after the indicators are uploaded. #The first file contains a list of indicators scraped from the $IOCURL website. It is not cleaned up. $IOCOutputFileName = "indicators.txt" #The CSV file is clean and ready to be uploaded. $CSVOutputFileName = "indicators.csv" # Get the location of the script for the output files. Output files # will be located where script is being run. $path = Get-Location $IOCFilePath = "$path" + "$IOCOutputFileName" $CSVFilePath = "$path" + "$CSVOutputFileName" #This location is where the threats will be uploaded. $Url = "https://us.api.insight.rapid7.com/idr/v1/customthreats/key/" + $ThreatKey + "/indicators/replace?format=csv" #Configure the download to use TLS 1.2 [System.Net.ServicePointManager]::ServerCertificateValidationCallback = {$true} [Net.ServicePointManager]::SecurityProtocol = 'Tls12' #delete text download file if it exists already if (Test-Path tempindicators.txt) { Write-Host "Deleting existing indicator file: tempindicators.txt" Remove-Item tempindicators.txt } #delete text download file if it exists already if (Test-Path $IOCFilePath) { Write-Host "Deleting existing indicator file: $IOCFilePath" Remove-Item $IOCFilePath } #delete csv file of downloaded indicators if it exists already if (Test-Path $CSVFilePath) { Write-Host "Deleting existing CSV file: $CSVFilePath" Remove-Item $CSVFilePath } #Download the indicators from the specified URLs. $IOCblocklist = New-Object Net.WebClient Write-Host "Downloading indicators from website: " $IOCURL1 $IOCblocklist.DownloadString($IOCURL1) > tempindicators.txt Write-Host "Downloading indicators from website: " $IOCURL2 $IOCblocklist.DownloadString($IOCURL2) | Out-File tempindicators.txt -Append Write-Host "Downloading indicators from website: " $IOCURL3 $IOCblocklist.DownloadString($IOCURL3) | Out-File tempindicators.txt -Append #Clean up the temp file of downloaded indicators. #This script pulls out an indicator from the first field in the list of output. You may need to select a different field. #Change the Select Field1 line to match whatever field has the indicators in it. #The rest of this block cleans up the download and adds commas to end of each line (so it will be a CSV file). Write-Host "Reformat the downloaded list of indicators into a comma-delimited text file" $IOCblocklist = Import-CSV tempindicators.txt -Header "Field1", "Field2", "Field3", "Field4", "Field5", "Field6" ` | Select Field1 ` | ConvertTo-CSV -NoTypeInformation ` | % {$_ -replace ` 'G(?^|,)(("(?
[^,"]*?)"(?=,|$))|(?
".*?(?<!")("")*?"(?=,|$)))' ` ,'${start}${output}'} ` | %{$_ -replace '$',','}` | Out-File $IOCFilePath -fo -en ascii ; #You can uncomment the following line to delete blank lines from the output, if there are any. #(Get-Content $IOCFilePath) | ? {$_.trim() -ne "" } | set-content $CSVFilePath Write-Host "Clean up the file by removing the header" #Skip reading the first line of the file, which is a header. #Delete all of the lines that start with a #, which are also part of the header. Get-Content $IOCFilePath | Select-Object -Skip 1 | Where { $_ -notmatch '^#' } | Set-Content $CSVFilePath #checks for indicator csv file. If it does not exist, end script. if (-not (Test-Path $CSVFilePath)) { Write-Host "Empty Indicators List, Ending Script without uploading any content" Break } #Command to emulate curl with powershell. Write-Host "Starting command to connect to API" $ContentType = 'text/csv' $Response = Invoke-WebRequest -Uri $url -Headers $headers -InFile $CSVFilePath -Method Post -ContentType $ContentType -UseBasicParsing Write-Host "Script has finished running. Check your results."
Final script for URL Haus
############################################################################ # Copyright (c) Rapid7, LLC 2016 All Right Reserved, http://www.rapid7.com/ # All rights reserved. This material contains unpublished, copyrighted # work including confidential and proprietary information of Rapid7. ############################################################################ # # abusech_urlhaus_indicators.ps1 # # Script version: 2.1.0 # PowerShell Version: 4.0.1.1 # Source: consultant-public # # THIS CODE AND INFORMATION ARE PROVIDED "AS IS" WITHOUT WARRANTY OF ANY # KIND, EITHER EXPRESSED OR IMPLIED, INCLUDING BUT NOT LIMITED TO THE # IMPLIED WARRANTIES OF MERCHANTABILITY AND/OR FITNESS FOR A # PARTICULAR PURPOSE. # # Tags: INSIGHTIDR # # Description: # This script will download indicators from the location specified, place # them into a CSV file, and then upload them to the private threat feed # specified. This script is intended to be used with the InsightIDR # Threat Community threats and uses the InsightiDR REST API v1. # #***** VARIABLES TO BE UPDATED ***** #Change the value below to the threat list that you wish to import. $IOCURL1 = "https://urlhaus.abuse.ch/downloads/csv/" #Change this value to the Threat Key for the threat that is being modified. #Get the threat key by opening your community threat and selecting Threat Key. $ThreatKey = "" $headers = @{} #Enter in your platform API key. This can be generated from the Rapid7 Platform home. #Log into https://insight.rapid7.com and use the API Management section to generate a key. $headers["X-Api-Key"] = "" #***** END OF VARIABLES TO BE UPDATED ***** #These files are used when downloading the indicators and converting them to CSV format. #They are left insitu on purpose so that you can verify that the script works. If this bothers you, #use the sections below to delete these temp files after the indicators are uploaded. #The first file contains a list of indicators scraped from the $IOCURL website. It is not cleaned up. $IOCOutputFileName = "indicators.txt" #The CSV file is clean and ready to be uploaded. $CSVOutputFileName = "indicators.csv" # Get the location of the script for the output files. Output files # will be located where script is being run. $path = Get-Location $IOCFilePath = "$path" + "$IOCOutputFileName" $CSVFilePath = "$path" + "$CSVOutputFileName" #This location is where the threats will be uploaded. $Url = "https://us.api.insight.rapid7.com/idr/v1/customthreats/key/" + $ThreatKey + "/indicators/replace?format=csv" #Configure the download to use TLS 1.2 [System.Net.ServicePointManager]::ServerCertificateValidationCallback = {$true} [Net.ServicePointManager]::SecurityProtocol = 'Tls12' #delete text download file if it exists already if (Test-Path tempindicators.txt) { Write-Host "Deleting existing indicator file: tempindicators.txt" Remove-Item tempindicators.txt } #delete text download file if it exists already if (Test-Path $IOCFilePath) { Write-Host "Deleting existing indicator file: $IOCFilePath" Remove-Item $IOCFilePath } #delete csv file of downloaded indicators if it exists already if (Test-Path $CSVFilePath) { Write-Host "Deleting existing CSV file: $CSVFilePath" Remove-Item $CSVFilePath } #Download the indicators from the specified URLs. $IOCblocklist = New-Object Net.WebClient Write-Host "Downloading indicators from website: " $IOCURL1 $IOCblocklist.DownloadString($IOCURL1) > tempindicators.txt #Clean up the temp file of downloaded indicators. #This script pulls out an indicator from the first field in the list of output. You may need to select a different field. #Change the Select Field1 line to match whatever field has the indicators in it. #The rest of this block cleans up the download and adds commas to end of each line (so it will be a CSV file). Write-Host "Reformat the downloaded list of indicators into a comma-delimited text file" $IOCblocklist = Import-CSV tempindicators.txt -Header "Field1", "Field2", "Field3", "Field4", "Field5", "Field6" ` | Select Field3 ` | ConvertTo-CSV -NoTypeInformation ` | % {$_ -replace ` 'G(?^|,)(("(?
[^,"]*?)"(?=,|$))|(?
".*?(?<!")("")*?"(?=,|$)))' ` ,'${start}${output}'} ` | %{$_ -replace '$',','}` | Out-File $IOCFilePath -fo -en ascii ; #You can uncomment the following line to delete blank lines from the output, if there are any. #(Get-Content $IOCFilePath) | ? {$_.trim() -ne "" } | set-content $CSVFilePath Write-Host "Clean up the file by removing the header" #Skip reading the first two lines of the file, which are headers describing the fields in the file. #Delete all of the lines that start with a #, which are also part of the header. Get-Content $IOCFilePath | Select-Object -Skip 2 | Where { $_ -notmatch '^#' } | Set-Content $CSVFilePath #checks for indicator csv file. If it does not exist, end script. if (-not (Test-Path $CSVFilePath)) { Write-Host "Empty Indicators List, Ending Script without uploading any content" Break } #Command to emulate curl with powershell. Write-Host "Starting command to connect to API" $ContentType = 'text/csv' $Response = Invoke-WebRequest -Uri $url -Headers $headers -InFile $CSVFilePath -Method Post -ContentType $ContentType -UseBasicParsing Write-Host "Script has finished running. Check your results."
#gallery-0-5 { margin: auto; } #gallery-0-5 .gallery-item { float: left; margin-top: 10px; text-align: center; width: 33%; } #gallery-0-5 img { border: 2px solid #cfcfcf; } #gallery-0-5 .gallery-caption { margin-left: 0; } /* see gallery_shortcode() in wp-includes/media.php */
Go to Source Author: Teresa Copple Unlocking the Power of the InsightIDR Threat API, Part 2 Original Post from Rapid7 Author: Teresa Copple This blog post is a follow-up to my previous blog on…
0 notes