#Export Project Data to JPEG
Explore tagged Tumblr posts
Visit Tumblr Blog
Explore Tumblr blogs with no restrictions, modern design and the best experience.
Last Seen Tumblr Blogs


Fun Fact
Tumblr has a low social media market share in South America.
Note
do you have any raw .drw files? how does its file size compare to a vector image / raster image of the same size / similar content? like ik vector files can be very small compared to a jpeg... storing timing info sounds simple to implement, but i wonder if it bloats up .drw file sizes?
Oooh, good question, and my answer uhh... got a little out of hand..
Here's the files in the folder for one of my drawings on the windows beta:

So we have the .drw file, the .sim file, a .csv file (this stores text data for my added title and description), and a .png and .sim for the thumbnail.
The .sim file is new to me, but looking at other files I believe the .sim files holds the individual layer data. Maybe the .sim stores the actual image data for display during drawing?
For example, heres the files for my haunter painting:

And here are the layers for the drawing in game (software?):

The sizes match up pretty well with the actual data on each layer!
(I should mention here that looking at file types and figuring out how they work is completely new to me so I could be getting some things wrong. I'm debating if I should reach out to the dev directly to check my work before starting this essay proper... but it's also been fun for me and my brain to try and figure this stuff out on my own)
Actually.. the sim files made me curious... if the main data is in the .drw file, what would happen if I delete the .sim files? Would the file still work?

First off, the thumbnail does not load, but the file still opens fine and the replay function still works.

And we still got all the layers no problem.

Hmm, if I save changes to the images, will it create .sim files?


It did! Huh!
Then uhh.. I don't really know what the .sim files do. If has something to do with display in game which is why the thumbnail didn't display. But I don't know where the layer files would be displaying if it's all based on the .drw. Maybe it's for file conversion? For uploading to the gallery? I don't know...
Anyways... back to the topic at hand, files sizes! The windows beta lets you export files as layered .psd files, .png files, and partial replay in uncompressed and compressed .avi!
So a quick reminder, here are the file sizes of the original image set up for Colors Live:

The .drw is pretty small!!
And here are my exports!:

The .drw is MINUSCULE compared to the .psd. And the .sim size falls between the two sizes of .png. Hmm, still don't know what's going on with that. Also for fun we can look at the size of an uncompressed two minute long .avi looks like. 4 million kilobytes, yay ^_^
Vector wise.. I'm actually not super familiar with vector programs (should probably brush up on them for this essay, huh?) so I'm not sure what exactly is comparable... I've had to use Illustrator this semester but I feel like Colors and Illustrator are approaching vector graphics in a very different way. Illustrator is saving data for vector objects, but Colors is saving data for brush strokes!
Well.. anyway we can open up one of my projects:

And we can stretch that layers panel all the way out so you can see all my layers and paths and objects:

And let's check the file size...

Yep! Pretty small!
For fun we can also convert that .psd I made into a .ai..

Yep! It's smaller!
Regarding file bloat... I think the devs did a fantastic job creating such a small file size and it's perfect for drawing on game consoles that usually have very limited space! However, my experience with Colors! 3D as a kid did have issues with file sizes.. Colors! was the biggest app on my 3DS and I constantly had to juggle uninstalling games and uploading and deleting paintings so I would have more room for new paintings. I did have quite a number of painting files... in various states of progress (as is typical) but storage space was a real issue for me. Now, were my SD cards only 2 or 4 gb big? Yes. Did I understand at the time that those were quite small for SD cards, even at the time? No. Does my experience mean anything then? I don't know.
Colors! 3D also had an issue were particularly lengthy paintings (were talking hitting the ~4 hour mark) would stop saving replay data. The replay would only play up until a certain point. I'm not sure why that is, based on what we know about .drw files I don't think it can be a limitation with the file type? That's kinda all it does? Maybe it's a limitation with the size of the 3DS memory that couldn't play the replays that long? Hitting that ~4 hour mark would also limit the amount of undos you were able to do so it could easily have to do with memory.
(Bit off tangent but undos take soooo long in Colors. And the more undos you do the longer they take! Colors didn't official start limiting the players undos until that ~4 hour mark but they were already limited by your patience)
Anyways, I will leave you with this, a link to the documentation of the .drw file format. It's only two and half pages long which I think is pretty short? Maybe you can find more info in there that what I can parse...
2 notes
·
View notes
Text
Exporting Your Logo – Mastering Files, Formats & Brand Kits
So, you’ve got a shiny new logo—awesome. But what now? If you deliver a JPEG and call it a day, prepare for disappointed clients, blurry print jobs, and a branding nightmare.
Let’s talk about how to package, export, and future-proof your logo design like a true professional.
🗂 Essential Logo File Types
Every format serves a specific purpose. Here’s the breakdown of the MVPs:
1. SVG (Scalable Vector Graphics)
Best for: Web use, digital interfaces, UI/UX design
Pros: Infinitely scalable, editable in vector software, lightweight
Cons: Not ideal for print if not properly converted
2. PDF (Portable Document Format)
Best for: Print and sharing final vector files
Pros: Preserves vector data, universally readable, print-ready
Cons: Slightly heavier than SVGs
3. AI (Adobe Illustrator)
Best for: Your original working file
Pros: Fully editable, perfect for archiving and client revisions
Cons: Not universally accessible without Illustrator
4. EPS (Encapsulated PostScript)
Best for: Print production, logos in commercial use
Pros: Supported by most printers and design software
Cons: Can flatten layers, not ideal for web
5. PNG
Best for: Web use (especially on transparent backgrounds)
Pros: Clean transparency, high-resolution
Cons: Raster format—can’t be scaled without losing quality
6. JPEG
Best for: Fast previews or social media (in non-transparent cases)
Pros: Small file size
Cons: No transparency, lossy compression
🪄 Organizing Your Logo Deliverables
Want to feel like a pro and make your client love you forever? Deliver a complete logo package.
Here’s what to include:
🧩 1. Full Logo Kit
Full color
Black & white
Inverse (white on black)
Transparent versions
CMYK, RGB, and Pantone (if needed)
🖼 2. Different Lockups
Horizontal version
Stacked version
Icon-only version (if applicable)
🔤 3. Typography Guide
What font(s) were used
Where to download/buy them
Alternatives (if commercial license isn’t included)
🎨 4. Color Codes
HEX (for web)
RGB (for screen)
CMYK (for print)
Pantone (if brand needs strict color matching)
📁 5. Folder Structure
markdownCopy
Edit
/YourLogo
/AI
/SVG
/PDF
/PNG
- Color
- Black
- White
/BrandGuide.pdf
🎨 What Is a Brand Guide?
A brand guide is a mini-manual that outlines how your logo should (and shouldn’t) be used. It's crucial for brand consistency—especially when handing things off to marketers or third-party designers.
Include:
Logo placement rules
Minimum size
Clear space around the logo
Don’ts (stretching, recoloring, awkward cropping)
You don’t need a 100-page corporate bible—just enough to keep things consistent.
📦 Unique Fact of the Day:
NASA’s “worm” logo, originally retired in 1992, made a comeback in 2020 for its clean and modern appeal. Why? Because its original vector files were meticulously preserved. Moral of the story? Archive like a nerd.
✍️ Design Mission: Build Your Logo Kit
Whether you’re working on a client project or your personal brand, go through this checklist:
✅ Export in AI, SVG, PDF, PNG, and JPEG
✅ Create color, black, and white variations
✅ Create vertical/horizontal/icon versions
✅ Write a 1-page brand guide
✅ Organize the files into folders
This is where you go from “just a designer” to a design professional. Good design deserves good delivery.
https://letterhanna.com/exporting-your-logo-mastering-files-formats-brand-kits/
0 notes
Text
Champion Template Infographic Design: Elevating Visual Communication

In today’s fast-paced world, where information overload is commonplace, the ability to communicate ideas effectively is crucial. Infographics have emerged as a powerful tool for visual communication, allowing individuals and organizations to present complex data in an easily digestible format. Among the various resources available, Champion Template Infographic Design stands out as a leading solution for creating impactful visual content. This blog post explores the significance of infographic design, the features of Champion templates, and tips for maximizing their effectiveness.
Understanding Infographics
What Are Infographics?
Infographics are visual representations of information, data, or knowledge intended to present information quickly and clearly. They combine graphics, images, and text to convey messages in a way that is both engaging and informative. Infographics are used in various contexts, including marketing, education, journalism, and corporate communication.
The Importance of Infographics
Simplifying Complex Information: Infographics distill complex data into visual formats that are easier to understand. This simplification is vital for audiences who may lack the expertise to interpret detailed information.
Enhancing Retention: Studies suggest that people retain information better when it’s presented visually. Infographics leverage this by combining visuals with key data points, making them memorable.
Increasing Engagement: In a world where attention spans are short, engaging visuals can capture and hold an audience’s attention. Infographics are more likely to be shared on social media, increasing reach and visibility.
Facilitating Quick Decision-Making: Infographics enable viewers to grasp information quickly, aiding in faster decision-making processes in business environments.
Champion Template Infographic Design
What is Champion Template?
Champion Template is a versatile design tool that provides users with a library of pre-designed infographic templates. These templates cater to various needs, including marketing reports, presentations, educational materials, and more. The goal of Champion Template is to make infographic design accessible to everyone, regardless of their graphic design skills.
Key Features of Champion Template Infographic Design
User-Friendly Interface: Champion Template offers an intuitive interface that allows users to create infographics effortlessly. Even those without a design background can navigate the platform easily.
Customization Options: The templates are fully customizable, enabling users to adjust colors, fonts, layouts, and graphics to align with their brand or personal style. This flexibility ensures that each infographic is unique and relevant to the intended audience.
Diverse Template Library: Champion Template provides a vast library of templates covering various themes and industries. Whether you’re creating an infographic for a business report, educational content, or social media, there’s a suitable template available.
High-Quality Graphics: The platform includes access to high-quality images and icons, allowing users to enhance their infographics visually. These graphics contribute to a professional appearance, boosting credibility.
Collaboration Tools: For teams, Champion Template offers collaboration features, enabling multiple users to work on a project simultaneously. This functionality is particularly useful for organizations that require input from different stakeholders.
Export Options: Once the infographic is complete, users can easily export their designs in various formats, including PNG, JPEG, and PDF, ensuring compatibility with different platforms.
How to Create Effective Infographics with Champion Template
Creating an effective infographic requires more than just choosing a template. Here are steps to maximize the impact of your infographic design:
1. Define Your Purpose
Before diving into design, clarify the purpose of your infographic. Are you aiming to educate, persuade, or inform? Defining your objective will guide your design choices and content.
2. Know Your Audience
Understanding your target audience is crucial. Tailor your message and design elements to resonate with their interests and preferences. Consider factors such as age, profession, and familiarity with the topic.
3. Choose the Right Template
Browse through Champion Template’s diverse library to find a template that aligns with your goals. Consider the layout and design elements that will best showcase your data.
4. Focus on Key Data Points
Infographics should highlight the most important information. Avoid clutter by selecting a few key data points that convey your message effectively. Use statistics, comparisons, and trends to support your narrative.
5. Utilize Visual Hierarchy
Establish a clear visual hierarchy to guide the viewer’s eye through the infographic. Use size, color, and placement to emphasize critical information. For example, larger text can denote headings, while contrasting colors can highlight important statistics.
6. Incorporate Engaging Graphics
Use high-quality images and icons from the Champion Template library to enhance your infographic. Visuals should complement your text and help illustrate your points without overwhelming the viewer.
7. Keep It Concise
Aim for clarity and brevity. Limit text to essential information, using bullet points and short phrases to maintain readability. The goal is to communicate efficiently without losing the viewer’s interest.
8. Include a Call to Action
If applicable, conclude your infographic with a clear call to action. Encourage viewers to take specific steps, whether it’s visiting a website, sharing the infographic, or signing up for a newsletter.
Real-World Applications of Infographics
Infographics can be applied across various fields, enhancing communication and engagement. Here are a few examples:
Marketing
Businesses often use infographics in marketing to summarize key statistics, demonstrate product benefits, or showcase customer testimonials. Infographics can be shared on social media, driving traffic to websites and increasing brand visibility.
Education
Educators utilize infographics to present complex topics in a visually appealing manner. From summarizing historical events to explaining scientific concepts, infographics help students grasp difficult material.
Journalism
Journalists leverage infographics to enhance storytelling by providing visual context to news articles. Infographics can illustrate trends, comparisons, or geographical data, making complex stories more accessible.
Corporate Communication
In the corporate world, infographics serve as effective tools for internal communication. Companies use infographics in reports, presentations, and training materials to convey important information clearly and engagingly.
Best Practices for Infographic Design
While Champion Template provides the tools and resources for creating infographics, adhering to best practices is essential for effectiveness:
1. Consistency
Maintain consistency in design elements, including color schemes, fonts, and graphic styles. This creates a cohesive look that enhances professionalism.
2. Accessibility
Ensure your infographic is accessible to all users, including those with visual impairments. Use color contrasts wisely and consider providing alternative text descriptions for graphics.
3. Cite Your Sources
When presenting data, always cite your sources. Providing references adds credibility and allows viewers to explore the information further.
4. Test for Clarity
Before publishing, test your infographic with a small audience to gather feedback. Assess whether the information is clear and engaging, and make adjustments based on their input.
Conclusion
Champion Template Infographic Design is an invaluable resource for anyone looking to enhance their visual communication skills. By simplifying complex information, increasing engagement, and providing customizable templates, Champion empowers users to create compelling infographics that resonate with their audiences. By following best practices and leveraging the platform’s features, you can elevate your communication efforts and effectively convey your messages in today’s visually-driven landscape.
#champion template#championship#infographic design#infographic#powerpoint template#design template#print template#template#google slides#creative slides#slides#infographic presentation#presentation template
1 note
·
View note
Text
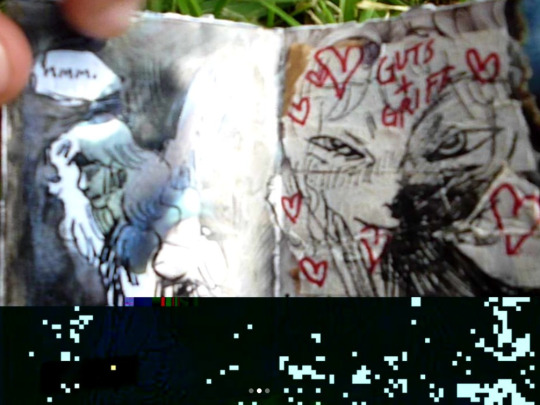
datamoshing tests :3
hey guyssss its been a while
the goat rudy recently taught me how to databend videos using avidemux and audacity and im no gatekeeper so heres some experiments I did and yep thats the yep.
(most photos and videos are from an upcoming doomslut project so be prepared for that yaya yayayayyaya subscrie and smash that like button and smash and smash)
photos~
these r just made by opening a jpeg in text edit and altering shitttt yeahhhh... (i haven't figured out how to do that on a windows system yet, i assume different file type requirements are needed? or text edit on os system operates differently to windows....)
also not sure if these images will upload correctly given they are all sorts of fucked data wise. I also found that (especially with video) the databending shows up differently on every device, not just across operating systems.)


I found that when messing with the data its best to leave the most beginning and end untouched. I know nothing about data but im assuming thats where the more important information of the image is kept, so messing with those corrupts the file entirely and makes it unable to open. Same applies to messing with the data in audio form.
Videoooos
Here's how it goessss:
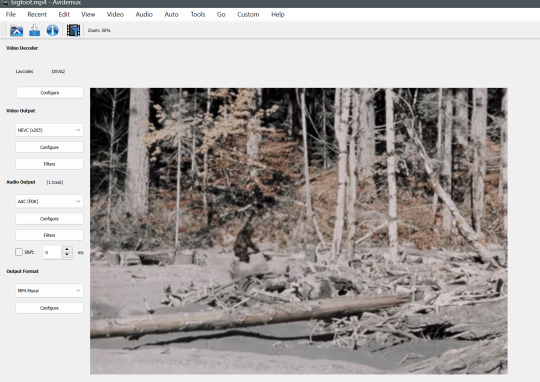
Open up your video in Avidemux and change your settings to these and save it as an mp4
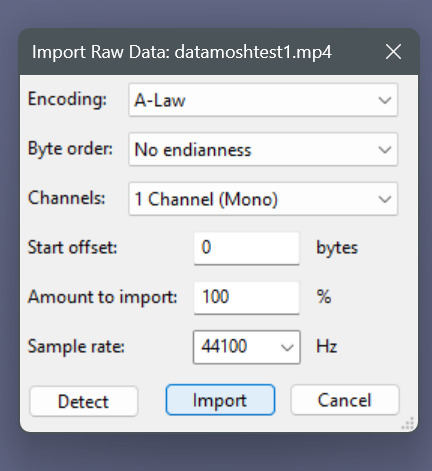
2. import that video into audacity (import -> raw data) with these settings
3. mess with the audio track (a little bit) be sure to not fuck with the very beginning or end, just select a small chunk in the middle. (i found using the effects of change pitch or tempo to be the most reliable.) Also try this out with small changes because it is very easy to completely decimate the information and you will have no video.
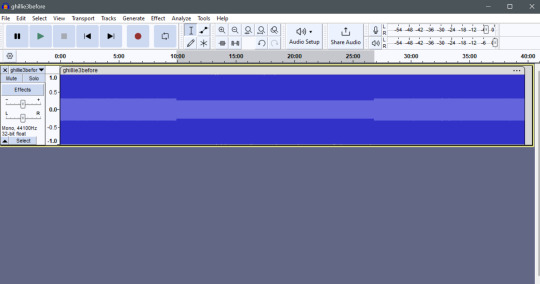
4. export out of audacity as audio, using this file type.

5. once you have the video as a .raw, rename it and change it to a .mp4. It's a bit annoying in windows as you have to go into file explorer settings and change the setting to not hide file extension types for this to work.
6. open up the mp4 in vlc (it works a bit better i find) and yeahhh thats it.
on selecting the source video: datamoshing is basically looking at the pixels? stuff in the video file itself and looking at movement, so for results of the typical weird movement meshing kind you'd want a video filmed from a stable angle where the only movement is the subject of the video. But using videos where the camera moves as well also produce some interestin effects! i am not at all knowledgeable on this so do whatever yknow.)
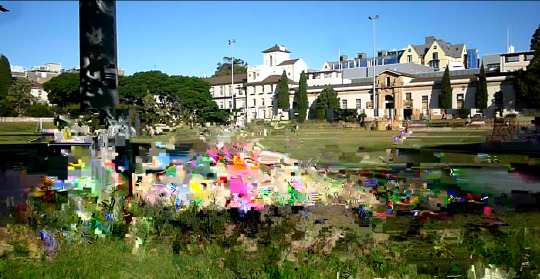
these are from video tests... tom being consumed by the digital universe at university of sydney 4k.
youtube
this is an example where i think i used pitch shift -0.1. I found when doing this it has good results at the start and end, but the middle of the video just seems to pause? I screen recorded replaying it in VLC.
youtube
In this example i used pitch shifting up and down in little sections. +0.1 and -0.1
Some videos and files are hard to upload in their original files since the data is so distorted... my best idea to solve these problems would just be to screen record them to get them back to a blank slate data-wise.
an experiment on a different video. (forgot what effects i applied but it is most likely pitch shift) Produced some interesting pixel effects. It's pretty standard distortion until about 10 seconds into the video where it just becomes a wall of blue with a really jarring sound! eek! aagh! aaagh! im gonna kill myself!
yeah thats about it.
1 note
·
View note
Text
Unlocking Advanced Features in Top Graphic Design Software
1.Which is the best software for graphic design?
When it comes to graphic design, choosing the best software is crucial for achieving professional and high-quality results.
There are several popular options available in the market, each with its own strengths and capabilities.
Adobe Creative Suite, particularly Adobe Photoshop and Illustrator, is considered the industry standard for graphic design software due to its comprehensive features and user-friendly interface.
2.What are the features of graphics software?
Graphics software is a powerful tool that allows users to create and manipulate visual images and designs.
One key feature of graphics software is its ability to work with various file formats, allowing users to import and export images in different formats such as JPEG, PNG, and SVG.
Additionally, graphics software offers a wide range of tools and filters that enable users to edit and enhance images with precision and ease. Another important feature is the ability to work in layers, allowing users to organize and manipulate different elements of an image separately.
Graphics software also often includes advanced features such as masking, blending modes, and colour correction tools, providing users with the flexibility and control needed to create stunning visual compositions.
With its diverse range of features, graphics software is an essential tool for professional designers and artists looking to create high-quality visuals.
3.Which type of graphic design is most in demand in 2024?
In 2024, the most in-demand type of graphic design is projected to be digital and interactive design. As technology continues to advance at a rapid pace, businesses and organizations are increasingly relying on digital platforms to connect with their audiences.
Digital and interactive design encompasses a wide range of mediums, including websites, mobile applications, social media graphics, and interactive presentations.
This type of design requires a combination of creativity and technical skills, making it a highly sought-after skill set in the industry.
Professionals with expertise in digital and interactive design can expect to see a high demand for their services as companies prioritize their online presence and user experience.
4.What are the two main types of graphics?
The two main types of graphics are raster images and vector images.
Raster images are made up of pixels and are resolution-dependent, meaning that the quality of the image is determined by the number of pixels per inch.
These images are best suited for photographs and complex images with gradients and shading.
On the other hand, vector images are composed of paths and mathematical equations, making them resolution-independent and infinitely scalable without losing quality.
They are ideal for illustrations, logos, and designs that require crisp lines and shapes.
Understanding the differences between these two types of graphics is crucial for creating visually appealing and professional-looking designs.
5.What are the key features graphic?
Graphic design is a visual communication tool that utilizes various elements to convey a message or idea. Key features of graphic design include typography, colour theory, composition, and imagery.
Typography is the art of arranging and designing text in a visually appealing way, while colour theory focuses on the use of colour to evoke emotions and create harmony within a design.
Composition refers to the arrangement of elements within a design to create balance and hierarchy.
Imagery plays a crucial role in graphic design, as it can enhance the overall message and create a strong visual impact.

#Presentation Design#Presentation Design Services#Presentation Design Agency#Consulting Presentation#Business & Consulting Presentation#McKinsey Style Presentation#Slides Design
0 notes
Text
Set Image Quality While Exporting Project Data to JPEG & Enhanced Loading MPP Files using Java
What’s new in this release?
Aspose team is pleased to announce the release of Aspose.Tasks for Java 17.11.0.This release includes a new feature that allows users to set image quality while exporting project data to JPEG format. It also includes several other improvements as result of bug fixes that further enhance the API functionality. This release of Aspose.Tasks for Java API includes a new feature that lets users set the image quality while exporting project data to JPEG. The setJPEGQuality method of ImageSaveOptions lets users achieve this by providing image quality at a scale from 0 to 100, as shown in code sample on blog announcement page. This version also includes other improvements in terms of bug fixes that add to the overall improvement of the API in terms of expected behaviour. These include exceptions while loading certain MPP files, Errors while converting Project data to PDF, Calculation issues with Calendar times set to 24 hours, Task reading exceptions while loading MPP files, Wrong calculation of Finish date and Percent Complete in MPP files, Problem with setting working days, Missing time span with SplitParts collection and Improvements in manual calculation of tasks data. Below is the complete list of bug fixes and enhanced features included in this release.
Add option to set image quality when saving as JPEG
Enum GanttBarFillPattern should have value 11 corresponding to fill pattern in MSP 2016
Exception raised while loading the mpp file
ArgumentOutOfRangeException exception if 24 Hours Calendar is set
Program hangs while setting Tsk.Start for a Task
Wrong Actual Finish date in MPP as compared to XML output
Exception raised while saving MPX as PDF
Child tasks are not rendered in PNG without saving the project first
All values of BarStyle's From and To fields are changed
Loading project file raises Exception
Saving into image by page not working properly
Percent complete not set properly in MPP
Setting Project Start date raises ArgumentOutOfRangeException (Java)
Assignment Cost is not displayed for Cost resources in Microsoft Project 2013
Text extended attribute created by formula is read as date by Aspose.Tasks (Java)
Project recalculation throws an exception with cleared ActualStart and ActualFinish properties
MSP 2010 raises error while updating and saving MPP created by Aspose.Tasks
Recalculate() is updating manually scheduled tasks
Wrong finish date calculated for ElapsedDay type duration (Java)
Prevent recalculation of manually scheduled tasks
Wrong Actual Duration in MPP file
SplitParts collection misses time span
Sub-tasks not rendered while converting MPX to PdfA1b
Wrong Finish date in XML file
Wrong Percent complete in MPP as compared to XML output
MPP shows a warning after resaving
Loading project raises ProjectReadingException
TaskReadingException while reading the MPP file
MSP 2010 raises error while updating and saving MPP created by Aspose.Tasks
Problem with a setting of working days
Newly added documentation pages and articles
Some new tips and articles have now been added into Aspose.Tasks for Java documentation that may guide users briefly how to use Aspose.Tasks for performing different tasks like the followings.
Exporting Project Data to JPEG
Reading Project Data from Microsoft Project Database
Overview: Aspose.Tasks for Java
Aspose.Tasks is a non-graphical Java Project management component that enables Java applications to read, write & manage Project documents without utilizing MS Project. It supports reading MS Project Template (MPT) files as well as allows exporting project data to HTML, BMP, PNG, JPEG, PDF, TIFF, XPS, XAML and SVG formats. It reads & writes MS Project documents in both MPP & XML formats. Developers can read & change tasks, recurring tasks, resources, resource assignments, relations & calendars.
More about Aspose.Tasks for Java
Homepage of Aspose.Tasks for Java
Download Aspose.Tasks for Java
Online documentation of Aspose.Tasks for Jvaa
#Export Project Data to JPEG#Set Image Quality during Export#loading certain mpp file#saving MPX as PDF#set project working days#Java Project management API#converting Project data to PDF
0 notes
Text
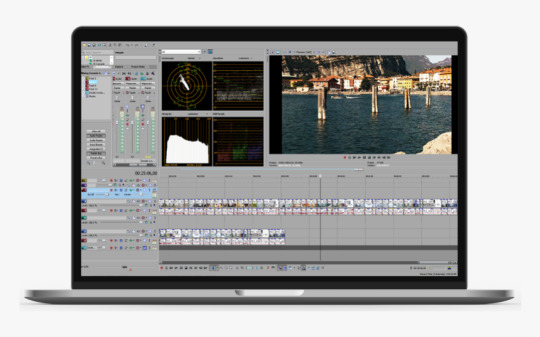
Free online video editor
Every video editing software should also have a color corrector. Filters and vignettes allow for quick adjustments, but you can also adjust colors manually and specifically. Beginners and amateur filmmakers can certainly enjoy post-production with the existing selection. You simply upload media such as videos and pictures or music. The importance has fundamentally changed with the development of cutting technology. This website uses cookies to improve our website and to offer visitors the best possible user experience. By continuing to use the website, you consent to the use of cookies. This online shop uses cookies for an optimal shopping experience. For example, the session information or the language setting are saved on your computer. Successive scenes appear side by side in two preview windows. Use the speed tool to stage stunts. Slow motion plays movements that are otherwise too fast for the eye. Play a scene faster, but some recordings only get the speed effect that you feel at the moment of the recording. Vendors can bid for placement in our product lists. This option sorts the product directory according to the bids, from highest to lowest. Bidders can be identified via the orange button next to their product profile "Visit website". With intelligent Magisto video editing, you can create great social videos in minutes.
Join millions of happy users
The video editing software imports many common video formats (see our comparison table for details) and can export MP4 and MOV files. Popular audio formats such as MP3, WAV, WMA or AMR are just as easy as the image formats JPEG, BMP, PNG, GIF or TIFF. Final Cut Pro X is one step ahead in 360 degree video editing.
Settings for color correction can be made precisely in the "VFX" tab, for example.
Final Cut Pro X offers a lot of other tools for video editing in addition to the preview and timeline.
Lumen5 is a video production platform that was developed for brands and companies in order to produce social content for the online audience.
In the "Assembly" area, load your media into the project directory and arrange yours there Files.
The video editing software imports many common video formats (see our comparison table for details) and can export MP4 and MOV files.
Video Editing Programs
Don't worry about your private information; we protect our customers' data and delete them in good time. Openshot is available in many different languages and can be translated online using LaunchPad. Add as many layers as you need for watermarks, background videos, soundtracks, and more. Slideshows can also be created in just a few steps. First import the desired images, then choose a playback style (motion, camera, normal) and add suitable music.
Built for business and commercial use with powerful tools that are easy to use. And the best thing is the incredibly affordable price. The programs of the photo book manufacturers offer very different design options and also differ greatly in user-friendliness. If you have certain special requests in the design, such as the use of a special font, you should check beforehand whether your preferred provider enables them. We use cookies to enable certain functions and to improve the offer. You can find more information in our privacy policy. It is also important for texts whether they can be imported from word processing programs such as Word. Unfortunately, this is not standard for all programs. Often, however, it works to copy the text using "Copy" (CTRL and C or Apple and C and "Paste" (CTRL and V or Apple and C). A free tool that hardly differs from the "Adobe original" at first glance is Photopea. We put the online photo editor through its paces and show in our test report whether it can keep up with Photoshop in terms of functionality. The world's leading video workflow platform trusted by over 550,000 users.
1 note
·
View note
Text
Catalyst Edit
Use the Windows Auto Resize feature or the new split view in Mac OS X to take advantage of the drag-and-drop capabilities from Catalyst Prepare to Catalyst Edit. You can work on your project and be absolutely sure that changes you make later on the timeline will have an impact on the work you have already done. 4K capture preserves all of the intriguing details of your scene in ways you never thought possible. Sony RAW and XAVC take advantage of your camera's wide range of colors and HDR capabilities and allow you to work with it directly. With Catalyst Edit, you can continue exactly where you left off in Catalyst Prepare without losing a frame or beat. As Catalyst Production Suite, both products ensure seamless integration that ensures a fluid and fast workflow. Edit and combine popular file formats including AVI, WMV, MP3, MPEG, MOV, JPEG and many more, all on the same timeline. New presentation of the film and sound objects in wave form. The video can now be edited using sound data (e.g. cutting out silent parts). Complete color palettes for the display of functions. Templates that have already been created can be used.
Other lyrics from our archive
Deleting and restoring deleted areas is now possible not only using the wizard, but also in the timeline bar. This makes processing faster. All static properties of the objects can now be edited using a visual graphic editor. It is easier to use and contains more information than manual entry. Background templates for Halloween, Christmas and other special ways provided for download from VSDC Store. Automatically align with other scene objects while dragging objects in the scene. The program interface has been redesigned with black, white and other design skins and buttons. The blend modes have been optimized to conserve PC memory usage and provide more accurate results.
We will help you in all respects and quickly with the solution of your tasks and problems with our products.
Now it is possible to copy objects on the timeline and the user interface supports drag and drop.
Prepare videos for Facebook, YouTube, Twitter and Vimeo without any problems; VSDC Free Video Editor offers you special export profiles that significantly reduce the stress of choosing a suitable format and meet all requirements.
OpenShot has many simple options for editing your video.
The user interface is simpler and more uniform.
Thanks to an integrated player, you can watch the video in parallel and check the result in real time.
11. The Audio Spectrum effect has been added with more than 400 presets so you can visualize the soundtrack. Scene grid can be made semi-transparent. Compatibility with Arabic symbols has been improved. By default, the rotation center is displayed in the Rotate effect. Fixed error 'Video and audio not recorded synchronously'.

edit.Magazin - Duration: 28 seconds
Dark areas become lighter and vice versa. The selection of supported formats has been expanded with the MXF format - a video container format for professional video and audio content, which serves as an alternative to a video tape in a digital format. In the video editor you can create your own library with multimedia files including a short or detailed description of the individual files. This allows you to organize your media files while ensuring easier searching and easy access to the files. Download the VSDC Free Video Editor and use it completely free of charge with no restrictions (no trial version, no watermarks, no advertising). Visual controls help you quickly select the keyframes you need for your edit. Create bins at your own discretion to organize your footage or use smart bins to automatically organize your clips based on metadata. Bins can now be opened in a separate view and are therefore better suited for arrangement on multiple screens. The new lock function for bins enables assistants to organize footage in one bin while the editor is working on the timeline in another bin. One less problem to worry about. The seamless hover scrub function allows you to browse clips in the media browser at breathtaking speed. Mark start and end points so that you can quickly add exactly the material you need to get ahead with your editing.
1 note
·
View note
Text
10 Best Vlog Video Editing Software for YouTube, Facebook, Instagram in 2020 [Free & Paid]
Popular audio formats such as MP3, WAV, WMA or AMR are just as easy as the image formats JPEG, BMP, PNG, GIF or TIFF. The simple mode is just that - easy to use. Magisto for iOS can also be used as a free app on the iPhone, but the functions in this version are very limited. In order to use the full potential of the video editor, you have to purchase a premium subscription (from 6.99 € per month). The highlight of Magisto is the automatic video creation from your clips and images with the help of artificial intelligence. So you can cut your videos and add filter effects and music. The interface is limited to the bare essentials, which makes the app particularly easy for beginners. Here are the key features of 9,912,199 9,910,799. Depending on Mac OS X, the Mac version is slightly different, but all features for beginners are included. Although we think it's a good choice for beginners, intermediate video editing users can find look at this now it also helps a lot. Rendering is the last and most time-consuming step in digital image and video editing. The previously programmed image descriptions or the layers or After you have loaded your media, select a predefined topic, for example "vacation trip". Then choose songs from the suggested pieces of music or upload files from your own library. By default, a storyboard file is added to the timeline. The video editor includes tools for converting video and audio files from one format to another. 2.7.4 German Avidemux Portable Portable version of the simple, free video editing program Avidemux, which does not have to be installed. 2.7.4 German Avidemux for macOS Avidemux is free video editing for the Mac. This function selects the best clips and discards unnecessary elements. This feature is not new, but it now works more accurately than before using modern technology. The user interface of After Effects templates has a new layout. This should make processing easier. Experts achieve astonishing image effects with Lumetri scopes.
The tool menu bar is on the right-hand side.
You can add additional elements just as easily using drag-and-drop and edit filters or transitions on their own timeline tracks. li>
This enables a smooth movement, rotation, transformation and the exact positioning of the objects in relation to each other.
Beginners can easily create short clips, dynamic slide shows and small videos.
At the same time, the new ProRes format saves storage space.
You can correct individual color values using color curves. Final Cut allows you to customize the desktop according to your needs and shortens work steps with keyboard shortcuts. The user interface in its elegant dark gray draws attention to the media content. You either divide the layout according to your ideas or use one of the given modes. Final Cut allows you to create your own layouts, but the program does not offer free-floating tool windows.

Final Cut X Pro 10, however, is not natively backward compatible with previous versions of Final Cut Pro (7 and earlier). To import projects from it, you need a plug-in such as SendToX, for example. A similar tool will assist you in preparing short videos with animated text for social media. It exports your project to platforms like YouTube, Vimeo, Twitter, Facebook and Instagram. You can edit your clips within Adobe Premiere Pro using a variety of convenient tools.
Most Helpful Reviews for Video Editor for Business
Team members use this to exchange data quickly and easily. Storming blindly into the tall grass is dangerous.
1 note
·
View note
Link
By Mike Seymour
January 29, 2019
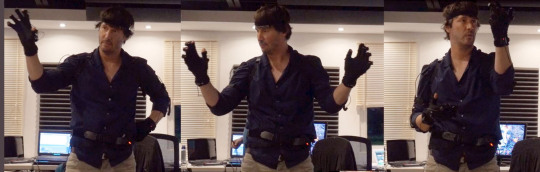
In the film, after a car accident kills the family of William "Will" Foster, played by Keanu Reeves, he will stop at nothing to bring them back, even if it means pitting himself against a government-controlled laboratory, a police task force and the physical laws of science.

On the verge of successfully transferring human consciousness into a computer, synthetic biologist and neuroscientist Will believes he can essentially resurrect his family. Will recruits fellow scientist Ed Whittle to help him secretly clone the bodies of his family and create replicas. Will eventually faces a "Sophie's choice" when it turns out that he can only bring three of his four deceased family members back to life. The film features what has been described by one critic as "cinema's weirdest not-to-be-missed robots, as it scarily, giddily threatens revenge, with a mere turn of its head."
The story and screenplay for Replicas was developed at Keanu Reeves and Stephen Hamel's production company Company Films.
trailer
Executive producer James Dodson got involved at the very beginning of the Replicas project two and half years ago, around the time they decided to shoot the film in Puerto Rico.
Copyright: Entertainment Studios
The film was shot on the Alexa and ended up with over 400 visual effects shots. Keanu Reeves was heavily involved as both producer and actor. "He was interested in the whole movie. It was his movie. He developed the script. He was on it for two years before we shot it...and he was particularly interested in the AV stuff," comments Dodson, referring to the minority report style sequences, which were complex to act and animate. "Basically we were trying to tell the story that Keanu's character, William Foster, was going into the human brain and analyzing the data in the brain and then transferring the data elegantly into a machine facsimile of a human - into a synthetic human brain, if you will," he adds. "And it's not like you can just go and buy that on Turbo Squid."

The team worked with multiple vendors, spending months to try and find the right design solution. "Every piece of user interface was crafted, there was nothing off the shelf that you could use. Everything had to be designed specifically for this because it was such a specific story. Keanu was keenly interested in every step."

The user interface designs of the brain in AR were started by Chris Keifer, who does much of the screen graphics for Westworld. "He finally cracked how to represent it. We had 9 or 10 weeks with him, before Pacific Rim 2 stole him away from us!" jokes Dodson. "Then Josh Zacharias took over, I talked to him almost every day for a year on this project. He really elevated the work and nailed it. It had to be believable and it had to tell the story but not be too on the nose...it was just so important that the audience would buy it."
The animation was choreographed to the motion data gained from Reeves hand movements, animated in Maya and rendered in RenderMan.

The team used iClone software in the production of Replicas in three different ways:
James Martin and John Martin led the previz team in visualising some of the action sequences such as the car crash in iClone.
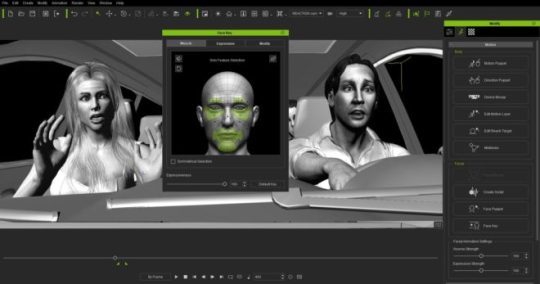
There was also conceptual work around the AR infographics that Keanu's character manipulates, that needed the software for the interaction to work onscreen.
Finally in post-production, iClone was invaluable in animating the robot when it gains consciousness.
Reallusion makes the iClone software the team used. They are headquartered in Silicon Valley, with R&D centres in Taiwan, and offices in Germany and Japan. Reallusion is focused on the development of real-time cinematic virtual production and motion capture tools.
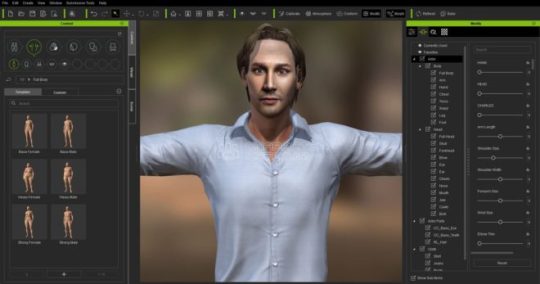
Reallusion provides users with character animation, facial and body mocap, and voice lipsync solutions for real-time filmmaking production. The company first launched iClone v1.0 at the end of 2005 and it found popularity within the Machinima community. The current version 7 was released in 2017. In addition to having its own real time engine, an easy-to-use avatar and facial morphing system with a voice lip-sync solution, the software interfaces with most mocap systems.
More recently the company has developed Motion LIVE, which is a body motion capture platform that connects motion data streams from multiple industry mocap devices, such as Xsens and Rokoko, to animate 3D character faces, hands and bodies.
Motion LIVE did not exist when Replicas was in production however. "That program didn't exist 18 months ago when we were doing Replicas, but we used a similar thing. It was just Perception Neurons, motion capture software (by Noitom), which then fed directly into iClone. Replicas did not need facial capture of the actors' expressions, only their movements."

In the robot sequence, the robot was 100% CGI. On set there was a mocap artist in a Perception Neuron suit. This live data was fed into iClone and this allowed for a 'slap comp' version of the robot to be seen on set for framing and blocking. The edit used this footage as post-viz. "The great thing was that once that sequence was cut, we could send those exact MoCap files down to Argentina where the artists could take the data and attach it to the final full resolution robot," explains Dodson. The export from iClone to Maya was done as an FBX file.
For the crash sequence, the team used iClone to work out how to film with the stunt team and physical effects crew. The stunt car was on "a crane cable with a gymbal and we worked out which shots we could chuck it in the air and pull it back like a pendulum to drop it, and which ones would need visual effects," Dodson recalls. One of the features the team used in the previz is the ability to use a single jpeg to create a representation of the actual actors on the 3D models used for the layout and previz. Each of the family members was modelled this way for the previz.
Dodson fully acknowledges that major big budget films use expensive and often proprietary technology for simulation and previz. However for him, the benefit is in how inexpensive and accessible tools, such as iClone, are able to, "democratize the entire process of motion capture and real time rendering - I am just addicted to previsualisation, and the level of quality and detail we can do for a few hundred dollars and still have studio quality results is incredible."
source
13 notes
·
View notes
Text
Shortcuts and learning how to use a Mac
Ai Shortcuts: Hold [Space] = Pan around Press Z = Zoom - Hold click and drag, left to zoom in, right to zoom Out V = Selection tool A = Direct selection [Command] + Y = show outline P = Pen tool [Command] + U = Guide Off [Command] + Click = Drop Shift + C = Anchor tool [Command] + J = Join A + +/- = Add/Remove Shift + X = Swap between fill and stroke [Command] + G = Group Shift + [Command] + G = Ungroup O = Reflect tool R = Rotate command + 2 = lock option + [command] + 2 = unlock Shift + [command] + option + v = paste in place Object + expand = change pattern to editable object Type + create outline = change text to editable object
PhotoShop Shortcuts: B = Brush E = Eraser [ ] = Size Reduce/Large (current tool) [Number keys 1-0] = Change opacity Option + Delete = Fill Selection M = Rectangular Marquee V = Move tool [Command] + D = Deselect [Command] + T = Transform X = Swap Foreground and Background [Command] + I = Invert Image Shift + [Command] + I = Invert selection I = Eyedropper S = Clone Stamp (option to select source, then paint)
Adobe Indesign Shift + Option + drag = move/duplicate Shift + command + option + v = paste in place Shift + x = swap fill and stroke
All Mac Shortcuts/Tips: Only save to Data drive Folders: PRJ = Project IMG = Image DOC = Documents OUT = Output [Command] + Shift + S =Save As [Command] + Shift + 4 = Screenshot [Command + N = New Window [Command] + [Space] = Search
Pen tool notes: Option = when dragging handles will break points and give independent handles [Command] = When dragging handles hold to reposition point, also go back to point/ handles made earlier on the path
Thoughts: Still prefer windows but glad many commands translates over, however, its the keyboard and mouse that have become my issues. Update: I keep hitting alt at home instead of ctrl Update week 5: im very tired
How to import images from illustrator to indesign 1) file > export > export as 2) (IMG) "name" > choose file format (jpeg) > use artboards > export 3) quality = 10 > resolution 300 ppi
0 notes
Text
Image vectorizer app

Image vectorizer app android#
Image vectorizer app software#
Image vectorizer app trial#
Image vectorizer app Offline#
Image vectorizer app professional#
‣ output size Download for MacOS - server 1 -> $4. ‣ suppress speckles (useful for tidying up images) ‣ halftone: dots, lines or hatched (great for use on photos) We are confident that you will be satisfied with. Using this App, you may apply a set of options for. You will receive your image in any vector format. Aspose.SVG offers a Free Online Image Vectorizer that is browser-based and works on any platform. Necessary to convert the image to PDF, SVG, EPS, AI. With Compuzz vector conversion service, you can qualitatively convert the image to vector art. ‣ EPS - works great with apps like Sketch, iDraw or Illustrator We can assist you with vectorization image and vector artwork conversion. Image Vectorizer outputs in a variety of different formats for maximum usability. Image Vectorizer doesn’t limit you to straight conversions, it also lets you filter the bitmap image to create a variety of interesting effects and it lets you control the vectorisation process too. (Note: Image Vectorizer does not perform OCR on text.)Ī WHOLE HOST OF FEATURES TO STREAMLINE THE PROCESS Great for hand-drawn graphics or even document scanning. Image Vectorizer lets you import directly from your scanner and convert the results to vector. It automatically traces high quality vector files from images and supports tracing. Super Vectorizer converts raster bitmap images like JPEG, BMP and PNG to scalable vector graphics with a few simple clicks. For other uses, see Vectorization (image tracing) and Vectorization. PEN AND PAPER, STRAIGHT TO VECTOR? NO PROBLEM! Don't forget to download 'Super PhotoCut' which changes photo background within 1min. The following tables contain general and technical information about a number of. Color vectorization is not supported, but you can select custom foreground and background colors, or color the vectorized image in a vector drawing application. Photos can be converted using one of the built-in halftoning effects. Image Vectorizer works best for black-and-white line art, such as pencil drawings, outlines, logos, and blueprints. You can then copy the vector graphic to the clipboard or export it in a variety of different formats to use with your favorite vector drawing app. Image Vectorizer creates beautiful black-and-white vector images. How many times have you needed a vector graphic version of a logo or icon for a design you’ve been working on? Image Vectorizer is here to make the process as fast and painless as possible! Simply drag an image in to the app and click to convert.
Image vectorizer app trial#
Ask about our products, implementation, trial version, pricing, or anything else.What does Image Vectorizer do? CONVERT BITMAPS TO VECTOR GRAPHICS AT THE TOUCH OF A BUTTON Save your valuable time and resources! If you need help or have questions about our services, please contact Free Support or Sales Support, we will be happy to help. Moreover, we always take steps to ensure the security of your files and data. We offer tools for your work with SVG and other image files from any device, any platform. The SVG online applications work fast and completely free. You can download the examples and showcase projects from the GitHub repository. You get a high-quality result! To learn more about API, please visit our documentation.
Image vectorizer app software#
All data are processed using Aspose APIs, which are established well in the software industry. It supports raster to vector conversion using the Potrace bitmap. Our Web Apps are understandable and flexible, have a human-friendly user experience and many unique settings. Inkscape is an open source vector graphics program available for Linux, Mac and Windows.
Image vectorizer app Offline#
As an extension, this app does not need an internet connection and can be used offline in your. Easily convert, merge, encode, create SVG sprites or vectorize text in SVG files wherever you are. Image Vectorizer app is also available as a browser extension. No registration, plugin or software installation required for you.
Image vectorizer app android#
Our browser-based apps work from all platforms, including Windows, Linux, Mac OS, Android and iOS.
Image vectorizer app professional#
SVG online apps let you use professional document-processing technologies and get the perfect result. A sample image has been loaded automatically if you want to simply play with how the app works below. Tap the button below to choose a file to read into the system. Also, JPG to SVG and PNG to SVG conversions are available. imgvector convert images to vector graphics 1. We support popular file formats conversions, including SVG to PNG, SVG to JPG, SVG to PDF, and more.
0 notes
Text
Import kpf file kindle textbook creator

#Import kpf file kindle textbook creator how to#
#Import kpf file kindle textbook creator software#
#Import kpf file kindle textbook creator code#
#Import kpf file kindle textbook creator free#
We have yet to investigate this file type further, or there was not enough information available at the time to report accurately on the format. This data file format was added to our database by a visitor to this site, but no additional information was provided. If you are unable to open the file this way, it may be because you do not have the correct application associated with the extension to view or edit the KPF file. The best way to open an KPF data file is to simply double-click it and let the default assoisated application open the file. If you are aware of any additional file formats that use the KPF extension, please let us know. KPF extension are known as Komodo Project files, however other file types may also use this extension.
#Import kpf file kindle textbook creator software#
How things change.Have you found, downloaded or received an KPF file, but don't know which software program is required to open it?īefore attempting to open an KPF file, you'll need to determine what kind of file you are dealing with and whether it is even possible to open or view the file format.Īnswer: Files which are given the. The book has been removed from publication in September of 2019. NOTE: The weather API that has supported this application is no longer in operation.
#Import kpf file kindle textbook creator code#
And a fair bit more.Īccording to Gloc (a chrome extension), there’s nearly 10,000 lines of code in the repository that supports the book. It also shows a number of ways to conditionally render components. It shows techniques for combining Axios (a promised-based method for consuming APIs) with Apixu (a weather API). The book’s subject is about coding with ReactJS. Within 48 hours of publishing I had sold my first book! The system works! (Thank you very much to my first ever customer. It’s pretty easy to figure out, and if you have questions you can turn to Quora! I then downloaded that as as a JPEG file, and then uploaded that file into the publishing tool on Amazon.Īmazon’s publishing tool is pretty awesome. I then used Google Drive’s Drawing application to create cover art for my book. I used Google search to look up the best cover size. Perhaps size is important when it comes to Headers. My Header 1 was being detected by Kindle Create when I had it set to size 16. I haven’t yet decided on font sizes for headings. Table content at size 8 (works for me because I am publishing a lot of computer code). I would also suggest the following for Fonts: Arial for all text. Gripes aside, it is straightforward to create a Kindle Book with Kindle Create. Even Header 1 did not consistently get imported properly into Kindle Create.
#Import kpf file kindle textbook creator how to#
This limitation forced a rethink of how to structure my book contents. One other thing that I found difficult to get accustomed to is the Kindle format does not seem to like content title styles beyond Header 1. Table content cannot be edited within Kindle Create! Setting an image to be ignored by screen readers in DOCX did not translate into Kindle Create.Īll images required special attention in Kindle Create, but, inserting alternative text in DOCX saved some time. Image ‘alt’ text was interpreted correctly. I could get hyperlinking to external sites to work as expected. I could not get hyperlinking within the document to work. export the document from Kindle Create to KPF format.import the DOCX file into Kindle Create, and tweak the formatting.create the manuscript in Microsoft Word, using the DOCX file format.ProcessĬreating a Kindle Book with Kindle Create is essentially a three part process: The version of Kindle Create I am using is v1.10.214.0. That said, Kindle Create, using Microsoft Word’s DOCX format to draft the manuscript, worked quite well. My book is reasonably long, and whilst I was able to convert it to Adobe Acrobat format easily enough (PDF), importing that converted file into Kindle Textbook Creator really did not seem to want to happen. I had the least success with Kindle Textbook Creator. Not so great: the software is not perfect (yet).
#Import kpf file kindle textbook creator free#
Amazon are creating a bunch of freeloadable tools for the budding self-publisher.
0 notes
Text
Ptgui pro mac full

#Ptgui pro mac full how to
#Ptgui pro mac full for mac
#Ptgui pro mac full full version
#Ptgui pro mac full manual
#Ptgui pro mac full pro
Use the panorama in websites supporting many HTML5 and Flash players.Get the benefit of the Layered Photoshop results.In addition, there is support for 360° drone sceneries and Iceland.Let’s switch jpeg and many other layouts.Moreover, create HUGE panoramas with some wonderful frames.Immediately see the results of the various effects before stitching.There is also includes the function of the accelerated GPU stitching by means of the Opens.Create desire layouts with usually used settings.So, support for the new RAW source images.Combined gyrate plus tilted images with wonderful capabilities.Multitasking features to get on focus on many concurrent projects.At another stage, the structures are aligned in accordance with one another: PTGui can determine its position in a breathtaking image for every single image. You are able to arrange them at all that you would like to match the panorama. Inexperienced users need a while to grasp the app’s features.
#Ptgui pro mac full pro
We’ve not run into any issues during our lab tests PTGui Pro didn’t freeze, crash, or pop-up problem dialogs. The panorama may be previewed exported to a file –JPG, TIFF, PSB, MOV The use of this app is very easy, just choose a suitable projection mode, set the final end results to maximum size and perform automatic exposure and adjustment of coloring schemes. In addition, you can fit the panorama as you want. Through this app, you may use the PTGui Pro Crack to optimize your personal projects. Furthermore, you can crop pictures, match factors on two overlapping pictures, and right the HDR and subjection parameters. Furthermore, you’ll be able to assist in the dark and dazzling places with shifted contact with positive or negative worth. PTGui Keygen is a bit of software which allows that you create breathtaking pictures from multiple images.
#Ptgui pro mac full how to
For HDR images, you additionally have a straightforward editor for publicity and color guidelines for the images, and you could also find specific instructions on how to shoot, hyperlink, edit, and finally calibrate HDR images. With just a little practice and a good calculator, you get great panoramas. The PTGui software is very minimalist and sober, but behind it is an extremely powerful panorama stitching tool. PTGui can automatically assess image tinting, combine image subjection, and save completed HDR images or HDR panoramas in OpenEXR and Radiance forms. If there are deviations in the images or we wish more control over the producing photographs, we can get into more advanced configurations in the other tabs of this program. The data file queue shows the thumbnail, location, and size of every single item. Using masking, you can identify overlapping images, which subject should stay and disappear. But this tool also offers another useful function. The effect, of course, corresponds to the problem – the simpler and more regular the backdrop and the encompassing tripod, the better the effect. PTGui is the abbreviation of the initial name of Graphical Interface for Panorama Tools. PTGui Pro Crack is a helpful tool to hook up digital images to make panorama images. Furthermore, you can crop, match points on both overlapping pictures, and correct the HDR and the exposure parameters. The beginners, as well as professional users, can use it free of cost with lens settings with regards to the horizontal field of view, correction of parameters, image shift, and also shear as well as parameters independently for each entry.
#Ptgui pro mac full manual
The record of images is performed by PTGui using control factors, which can, of course, be personally edited in the new Panorama Editor home window with a huge panorama view. Usually, you will need to offer with manual modification by placing special control details: grades on the linked images that reveal the coincident details in the pictures – a lot more exactly the control points can be found and the greater their number, a lot more appropriately the seam between your images will be produced.
#Ptgui pro mac full for mac
PTGui Pro 12.7 Crack with Keygen For Mac And Win Full freeload So PTGui just can incorporate several frames, so the consumer has an occurrence effect. Modern cameras enable you to make high-quality and clear photographs, but an individual picture cannot express the fullness of the video footage, limited by a two-dimensional picture. PTGui Pro 12.7 Crack is an outstanding and very powerful professional software for creating breathtaking images from some digital photographs.
#Ptgui pro mac full full version
Direct Download DOWNLOAD CRACK + KEY PTGui Pro 12.7 Crack With Full Keygen Latest Full Version freeload
0 notes
Text
Room arranger 9.5.4.612

#Room arranger 9.5.4.612 serial#
#Room arranger 9.5.4.612 pro#
#Room arranger 9.5.4.612 plus#
#Room arranger 9.5.4.612 professional#
#Room arranger 9.5.4.612 download#
Help tab -> Registration, paste the data from the file "Serial. Appears in the main window, select the interface language, click on "OK" and then "OK" Currently: English, Arabic, Basque, Belarusian, Bosnian, Brazilian Portuguese, Bulgarian, Catalan, Chinese (Simplified), Croatian, Czech, Danish, Dutch, Finnish, French, Galician, German, Greek, Hebrew, Hungarian, Indonesian, Italian, Lithuanian, Macedonian, Norwegian, Polish, Portuguese, Romanian, Serbian, Slovak, Slovenian, Spanish, Swedish, Russian, Thai, Turkish and Ukrainian. Print the project in certain scale even over more pages. Create your library of objects you use more often. Wide standard object library, insert exact objects' dimensions. Design your room, an apartment consisting of more rooms, or the whole house with more floors.
Export to 3DS, FBX, USDZ and OBJ formats.Here are some key features of "Room Arranger":.
Export the entire project or selected objects to COLLADA, Trimble SketchUp™, VRML Version 2.0 or X3D format.
Quickly send a copy of your project via Mail, Messages or AirDrop.
Create Stereo 3D Video, 360° Video and even Stereo 3D 360° Video.
Render a realistic video walkthrough (up to Ultra HD).
Share 360° Panorama JPEG images (up to Ultra HD) to Facebook.
Export 3D views to JPEG, TIFF, PNG, and BMP (up to 16000 x 16000).
Share the result to Facebook, Twitter, Vimeo or YouTube.
Add custom segments to fully customize your roof.
Roof Assistant with 12 customizable roof templates.
#Room arranger 9.5.4.612 download#
Room Arranger Download Roofs and Dormers Room Arranger 9.5.4.612 Crack Download
Polygonal-based Block tool for drawing balconies, porches, and more.
Import objects in SketchUp, COLLADA, KMZ, FBX, OBJ or 3DS formats by simply dragging and dropping them into your project.
Set the exact size of a material tile to know how much of the material is needed for your house renovation project.
Drag and drop any image from the Finder to apply it to any surface as custom material.
Import models seamlessly from Trimble 3D Warehouse™ (previously Google 3D Warehouse™).
#Room arranger 9.5.4.612 professional#
Professional Shadow Map technique makes shadows look soft and natural.
Level of details tool allows to optimize 3D object and speed up the project.
Create corner windows and complex openings using the program advanced technology.
Light editor helps to add a light source to an imported objects.
Adjust light fixtures throughout your project to get realistic lighting scene.
Achieve natural lighting by setting up true Geo position, daytime and overcast.
Set multiple cameras to see the house from different point of views.
FOV (field of view) and parallel camera projection.
All changes, made in 3D or 2D, are rendered in 3D in real time.
Adjust the lighting, add and move objects, apply materials, and more right in 3D.
Precise positioning thanks to smart guides and object snapping.
Once you get the basics, you can draw whatever you imagine.
Use smart Dimension tool to set the distance between underlying objects or walls. Room Arranger is 3D room / apartment / floor planner with simple user interface.
Select the necessary measurement units (inches, feet, meters, etc).
View real-time measurements for walls, ceilings, and floors when drawing in 2D Plan view.
‘Auto outline’ vector-based 2D representation for furniture.
Use Arc and Straight Wall tools for drawing walls.
Native Support for Live Interior 3D Projects.
Project Gallery with house projects and sample rooms.
Built-in Help Assistant and free, quick tech support service.
A collection of in-depth video tutorials.
#Room arranger 9.5.4.612 pro#
Besides offering advanced home design tools, Pro edition provides superior export quality and Elevation View mode. Live Home 3D Pro is the most intuitive and feature packed home design app suitable for homeowners and professional designers, a successor of Live Interior 3D. Betternet VPN 5.3.0 Premium Crack 2019Betternet Crack is a VPN for windows and android. Besides offering advanced home design tools, Pro edition provides superior export quality and Elevation View mode.GeneralCreate detailed 2D.īetternet 5.3 crack. Live Home 3D Pro is the most intuitive and feature packed home design app suitable for homeowners and professional designers, a successor of Live Interior 3D.
#Room arranger 9.5.4.612 plus#
SU Podium Plus V2.18.974 for SketchUp 2015 64Bit Updated Dec 21-2014 + keys OR OR SketchUp Pro 2014 + crack (win-mac) OR SketchUp Pro 2013 + crack (win-mac).
#Room arranger 9.5.4.612 serial#
Best room arranger software Room Arranger room arranger 9 serial room arranger crack room arranger crack download room arranger crack free room arranger download room arranger download crack room arranger freeloadware room arranger download full room arranger download gratis room.
0 notes