#Facebook debug tool
Explore tagged Tumblr posts
Visit Tumblr Blog
Explore Tumblr blogs with no restrictions, modern design and the best experience.
Last Seen Tumblr Blogs


Fun Fact
Tumblr has 4 main sources of revenue.
Text
Today, OpenAI released its first threat report, detailing how actors from Russia, Iran, China, and Israel have attempted to use its technology for foreign influence operations across the globe. The report named five different networks that OpenAI identified and shut down between 2023 and 2024. In the report, OpenAI reveals that established networks like Russia’s Doppleganger and China’s Spamoflauge are experimenting with how to use generative AI to automate their operations. They're also not very good at it.
And while it’s a modest relief that these actors haven’t mastered generative AI to become unstoppable forces for disinformation, it’s clear that they’re experimenting, and that alone should be worrying.
The OpenAI report reveals that influence campaigns are running up against the limits of generative AI, which doesn’t reliably produce good copy or code. It struggles with idioms—which make language sound more reliably human and personal—and also sometimes with basic grammar (so much so that OpenAI named one network “Bad Grammar.”) The Bad Grammar network was so sloppy that it once revealed its true identity: “As an AI language model, I am here to assist and provide the desired comment,” it posted.
One network used ChatGPT to debug code that would allow it to automate posts on Telegram, a chat app that has long been a favorite of extremists and influence networks. This worked well sometimes, but other times it led to the same account posting as two separate characters, giving away the game.
In other cases, ChatGPT was used to create code and content for websites and social media. Spamoflauge, for instance, used ChatGPT to debug code to create a WordPress website that published stories attacking members of the Chinese diaspora who were critical of the country’s government.
According to the report, the AI-generated content didn’t manage to break out from the influence networks themselves into the mainstream, even when shared on widely used platforms like X, Facebook, and Instagram. This was the case for campaigns run by an Israeli company seemingly working on a for-hire basis and posting content that ranged from anti-Qatar to anti-BJP, the Hindu-nationalist party currently in control of the Indian government.
Taken altogether, the report paints a picture of several relatively ineffective campaigns with crude propaganda, seemingly allaying fears that many experts have had about the potential for this new technology to spread mis- and disinformation, particularly during a crucial election year.
But influence campaigns on social media often innovate over time to avoid detection, learning the platforms and their tools, sometimes better than the employees of the platforms themselves. While these initial campaigns may be small or ineffective, they appear to be still in the experimental stage, says Jessica Walton, a researcher with the CyberPeace Institute who has studied Doppleganger’s use of generative AI.
In her research, the network would use real-seeming Facebook profiles to post articles, often around divisive political topics. “The actual articles are written by generative AI,” she says. “And mostly what they’re trying to do is see what will fly, what Meta’s algorithms will and won’t be able to catch.”
In other words, expect them only to get better from here.
6 notes
·
View notes
Text
20/07/2023 || Day 54
Weather App - Log # 5, Frontend Mentor Social Media Dashboard - Log # 1 and Wordle - Log # something
Weather App:
Decided to take a small break from working on this because I need to find proper weather icons to use, and can't find any for free so I'll just make them myself. However, I don't feel like doing that just yet, so I'm taking a little break from this project.
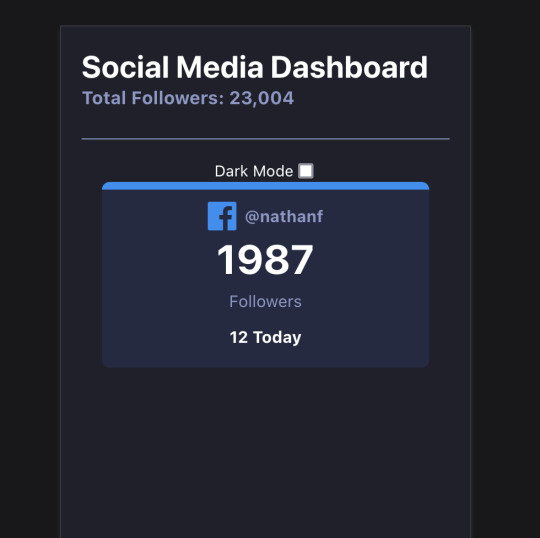
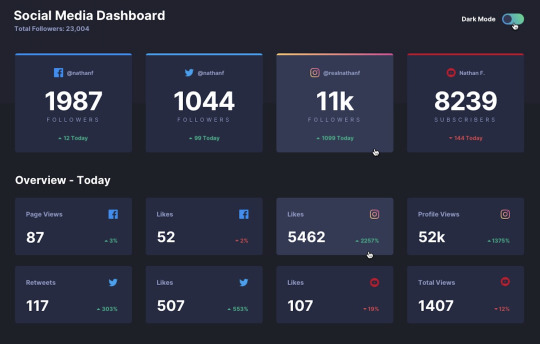
Social Media Dashboard:
To fill my time and continue working with React, I decided to start a new Frontend Mentor project (the Social Media Dashboard one) and I've already got things formatted so that I can pass down the necessary info from the parent component to the child. I'm gonna change it tmr, but so far I have a person object in my App.js component that has info on all the different social media stats, and those stats get passed onto a child component called SocialMediaCard.js, and this component organizes and displays that info. Now that I think about it, it would be better to simply have the person object in the SocialMediaCard.js component, and only pass down the type of social media from App.js to that child (i.e. facebook or twitter, etc). This way, only 1 property is passed compared to 5, and I can still have all the social media stats separate.
I started working on this project yesterday and took the mobile-first approach, as I've been doing for the past couple of projects, so the reference photo that I will show is different than what it's supposed to look like on mobile, but this is what I have so far (left) vs. reference (right). Still got a long way to go, but I'm excited to fully see how React makes reusable code easier to work with.
Wordle:
I thought I'd finished this project, and I pretty much have, but I wasn't feeling like doing that much new stuff today but still wanted to code, so I decided now was the perfect time to redo the CSS I had for this project. I pretty much deleted everything and started adding the CSS with a mobile-first approach, then extended to desktop. The reason why I did this was because for some reason the CSS I had originally caused problems when I used the app on my phone; colours were faded, I had to scroll down the use the keyboard... all in all, not optimal for using it on a phone. It's still not perfect and I have to find a way to debug it live from my phone to figure out why the colours still look awful, but in the meantime it's now an improvement over what it was before. Just for the sake of it, here's what it looks like on my phone (left) vs. what it looks like while looking at it through a browser's development tools mode (right): as you can see, the one from my phone (left) has the input squares look like they're faded/have a lower opacity, while the photo on the left (safari's responsive mode) looks as it's supposed to. This is a struggle. I don't have any problems with this for my other projects, so I have no idea what's wrong. Oh well... at least it looks better than before.


9 notes
·
View notes
Text
Integrating Third-Party APIs in .NET Applications
In today’s software landscape, building a great app often means connecting it with services that already exist—like payment gateways, email platforms, or cloud storage. Instead of building every feature from scratch, developers can use third-party APIs to save time and deliver more powerful applications. If you're aiming to become a skilled .NET developer, learning how to integrate these APIs is a must—and enrolling at the Best DotNet Training Institute in Hyderabad, Kukatpally, KPHB is a great place to start.
Why Third-Party APIs Matter
Third-party APIs let developers tap into services built by other companies. For example, if you're adding payments to your app, using a service like Razorpay or Stripe means you don’t have to handle all the complexity of secure transactions yourself. Similarly, APIs from Google, Microsoft, or Facebook can help with everything from login systems to maps and analytics.
These tools don’t just save time—they help teams build better, more feature-rich applications.
.NET Makes API Integration Easy
One of the reasons developers love working with .NET is how well it handles API integration. Using built-in tools like HttpClient, you can make API calls, handle responses, and even deal with errors in a clean and structured way. Plus, with async programming support, these interactions won’t slow down your application.
There are also helpful libraries like RestSharp and features for handling JSON that make working with APIs even smoother.
Smart Tips for Successful Integration
When you're working with third-party APIs, keeping a few best practices in mind can make a big difference:
Keep Secrets Safe: Don’t hard-code API keys—use config files or environment variables instead.
Handle Errors Gracefully: Always check for errors and timeouts. APIs aren't perfect, so plan for the unexpected.
Be Aware of Limits: Many APIs have rate limits. Know them and design your app accordingly.
Use Dependency Injection: For tools like HttpClient, DI helps manage resources and keeps your code clean.
Log Everything: Keep logs of API responses—this helps with debugging and monitoring performance.
Real-World Examples
Here are just a few ways .NET developers use third-party APIs in real applications:
Adding Google Maps to show store locations
Sending automatic emails using SendGrid
Processing online payments through PayPal or Razorpay
Uploading and managing files on AWS S3 or Azure Blob Storage
Conclusion
Third-party APIs are a powerful way to level up your .NET applications. They save time, reduce complexity, and help you deliver smarter features faster. If you're ready to build real-world skills and become job-ready, check out Monopoly IT Solutions—we provide hands-on training that prepares you for success in today’s tech-driven world.
#best dotnet training in hyderabad#best dotnet training in kukatpally#best dotnet training in kphb#best .net full stack training
0 notes
Text
Top Picks for the Best Courses for Front-End Development in 2025

In the age of digital-first experiences, the way users interact with apps and websites has never been more important. Companies, from tech startups to global enterprises, are constantly on the lookout for skilled front-end developers who can turn creative designs into functional, engaging interfaces.
If you're planning to enter tech or transition within it, enrolling in one of the best courses for front end development can set the foundation for a rewarding and future-proof career.
Let’s break down what front-end development entails, what skills you'll need, and which front end developer best courses can get you there in 2025.
What Does a Front-End Developer Do?
Front-end developers are the bridge between design and technology. They take static mockups and breathe life into them using code, ensuring websites and apps are not just visually appealing but also interactive, accessible, and responsive.
Key responsibilities include:
Converting UI/UX designs into code
Ensuring responsiveness across devices
Improving page load speed and user interactions
Debugging and maintaining front-end functionality
Collaborating with back-end teams and designers
To excel in this role, you’ll need to master a suite of tools and technologies.
Skills You’ll Learn in a Front-End Development Course
A good front end developer best course will teach you:
HTML, CSS, and JavaScript – The core building blocks
Responsive Design – Using media queries and frameworks like Bootstrap
JavaScript Frameworks – Such as React, Angular, or Vue.js
Version Control – Using Git and GitHub
APIs – Integrating with RESTful services
Testing Tools – Like Jest or Cypress
Dev Tools – Chrome DevTools, Postman, VS Code
More advanced programs also introduce deployment techniques, performance optimization, and accessibility best practices.
Why Take a Front-End Development Course?
With self-learning resources widely available, many wonder: why invest in a course?
Here’s why a structured program still matters:
Learning Path: Courses guide you from basics to advanced topics in a logical order
Project Work: Build real-world applications for your portfolio
Mentorship: Resolve doubts and get code reviews from experienced developers
Career Services: Resume help, mock interviews, and job connections
Consistency: Learn without getting overwhelmed by scattered resources
Top Platforms Offering the Best Courses for Front End Development
Here’s a curated list of the most career-oriented and practical learning options available in 2025.
1. NIIT Digital – Full Stack Product Engineering Program (Front-End Focus)
While designed as a full stack course, NIIT Digital’s program provides a robust front-end foundation ideal for beginners and upskillers alike.
Why it stands out:
Covers HTML, CSS, JavaScript, React, Git
Includes live mentor-led sessions and hands-on projects
Offers access to capstone projects and job support
Flexible learning schedules with a job-readiness focus
Aligned with the latest hiring trends in India
For those serious about entering the job market quickly, NIIT Digital provides one of the best courses for front end development with practical skills and support systems in place.
2. freeCodeCamp – Front End Development Certification
A great option for self-learners, this course covers:
Responsive web design
JavaScript algorithms
Front-end libraries like React
Projects to earn certification
3. Coursera – Meta Front-End Developer Certificate
Offered in partnership with Meta (Facebook), this program teaches:
HTML, CSS, JavaScript
React and UX principles
Front-end testing and final project
Industry-grade training with flexible timelines
4. Udemy – The Complete Front-End Web Developer Bootcamp
Popular for affordability, this includes:
30+ hours of on-demand video
Real-world exercises
Lifetime access
While less structured, it's a good option for budget-conscious learners looking to experiment.
How to Choose the Right Course for You
Here’s a quick checklist to help you select the front end developer best course for your goals:
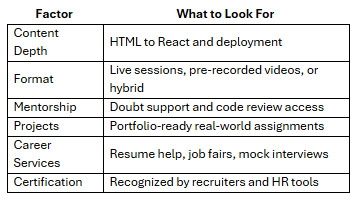
Platforms like NIIT Digital score high across all these criteria, especially for learners who value guided instruction and career support.
Career Outcomes After Front-End Courses
Once you’ve completed a front-end course, you’ll be ready to apply for roles like:
Front-End Developer
UI Developer
Web Developer
React Developer
Junior Software Engineer
Final Thoughts
Becoming a front-end developer in 2025 is not just about learning to code—it’s about learning to create digital experiences. A high-quality program gives you the edge to stand out in a crowded job market.
Whether you’re just starting out or reskilling mid-career, investing in one of the best courses for front end development can accelerate your growth and job readiness.
Platforms like NIIT Digital bring together structure, community, and mentorship—all essential ingredients for success in tech. Choose a course that doesn’t just teach you to build web pages—but to build a career.
0 notes
Text
Start Coding Today: Learn React JS for Beginners

Start Coding Today: Learn React JS for Beginners”—will give you a solid foundation and guide you step by step toward becoming a confident React developer.
React JS, developed by Facebook, is an open-source JavaScript library used to build user interfaces, especially for single-page applications (SPAs). Unlike traditional JavaScript or jQuery, React follows a component-based architecture, making the code easier to manage, scale, and debug. With React, you can break complex UIs into small, reusable pieces called components.
Why Learn React JS?
Before diving into the how-to, let’s understand why learning React JS is a smart choice for beginners:
High Demand: React developers are in high demand in tech companies worldwide.
Easy to Learn: If you know basic HTML, CSS, and JavaScript, you can quickly get started with React.
Reusable Components: Build and reuse UI blocks easily across your project.
Strong Community Support: Tons of tutorials, open-source tools, and documentation are available.
Backed by Facebook: React is regularly updated and widely used in real-world applications (Facebook, Instagram, Netflix, Airbnb).
Prerequisites Before You Start
React is based on JavaScript, so a beginner should have:
Basic knowledge of HTML and CSS
Familiarity with JavaScript fundamentals such as variables, functions, arrays, and objects
Understanding of ES6+ features like let, const, arrow functions, destructuring, and modules
Don’t worry if you’re not perfect at JavaScript yet. You can still start learning React and improve your skills as you go.
Setting Up the React Development Environment
There are a few ways to set up your React project, but the easiest way for beginners is using Create React App, a boilerplate provided by the React team.
Step 1: Install Node.js and npm
Download and install Node.js from https://nodejs.org. npm (Node Package Manager) comes bundled with it.
Step 2: Install Create React App
Open your terminal or command prompt and run:
create-react-app my-first-react-app
This command creates a new folder with all the necessary files and dependencies.
Step 3: Start the Development Server
Navigate to your app folder:
my-first-react-app
Then start the app:
Your first React application will launch in your browser at http://localhost:3000.
Understanding the Basics of React
Now that you have your environment set up, let’s understand key React concepts:
1. Components
React apps are made up of components. Each component is a JavaScript function or class that returns HTML (JSX).
function Welcome() { return <h1>Hello, React Beginner!</h1>; }
2. JSX (JavaScript XML)
JSX lets you write HTML inside JavaScript. It’s not mandatory, but it makes code easier to write and understand.
const element = <h1>Hello, World!</h1>;
3. Props
Props (short for properties) allow you to pass data from one component to another.
function Welcome(props) { return <h1>Hello, {props.name}</h1>; }
4. State
State lets you track and manage data within a component.
import React, { useState } from 'react'; function Counter() { const [count, setCount] = useState(0); return ( <div> <p>You clicked {count} times.</p> <button onClick={() => setCount(count + 1)}>Click me</button> </div> ); }
Building Your First React App
Let’s create a simple React app — a counter.
Open the App.js file.
Replace the existing code with the following:
import React, { useState } from 'react'; function App() { const [count, setCount] = useState(0); return ( <div style={{ textAlign: 'center', marginTop: '50px' }}> <h1>Simple Counter App</h1> <p>You clicked {count} times</p> <button onClick={() => setCount(count + 1)}>Click Me</button> </div> ); } export default App;
Save the file, and see your app live on the browser.
Congratulations—you’ve just built your first interactive React app!
Where to Go Next?
After mastering the basics, explore the following:
React Router: For navigation between pages
useEffect Hook: For side effects like API calls
Forms and Input Handling
API Integration using fetch or axios
Styling (CSS Modules, Styled Components, Tailwind CSS)
Context API or Redux for state management
Deploying your app on platforms like Netlify or Vercel
Practice Projects for Beginners
Here are some simple projects to strengthen your skills:
Todo App
Weather App using an API
Digital Clock
Calculator
Random Quote Generator
These will help you apply the concepts you've learned and build your portfolio.
Final Thoughts
This “Start Coding Today: Learn React JS for Beginners” guide is your entry point into the world of modern web development. React is beginner-friendly yet powerful enough to build complex applications. With practice, patience, and curiosity, you'll move from writing your first “Hello, World!” to deploying full-featured web apps.
Remember, the best way to learn is by doing. Start small, build projects, read documentation, and keep experimenting. The world of React is vast and exciting—start coding today, and you’ll be amazed by what you can create!
0 notes
Text
Top Web Analytics Tools Used by Professional Web Development Companies
In the digital age, launching a visually stunning website is only part of the equation. To truly succeed online, businesses need to understand how users interact with their website—what’s working, what’s not, and where improvements can drive more conversions. That’s where web analytics tools come into play.
A professional Web Development Company doesn’t just build websites; it equips them with powerful analytics tools to track performance, user behavior, and ROI. These insights help shape data-driven decisions that improve design, content, SEO, and conversion optimization.
Let’s explore the top web analytics tools that seasoned web development teams rely on to deliver measurable results.
1. Google Analytics 4 (GA4)
Google Analytics is the cornerstone of web analytics. Its latest version, GA4, offers advanced event tracking, cross-platform insights, and predictive metrics powered by machine learning. It allows web development companies to understand:
How users navigate your site
Which pages drive the most engagement
What paths users take before converting
Where users drop off in funnels
GA4 also integrates seamlessly with Google Ads, Tag Manager, and Search Console, making it a must-have for any serious digital strategy.
Why developers love it: Flexible event tracking and detailed reporting help tailor websites for better user journeys.
2. Hotjar
While GA4 gives you data, Hotjar gives you context. This tool offers heatmaps, session recordings, on-page surveys, and user feedback polls. It’s invaluable for understanding why users behave the way they do—like why they abandon carts or ignore CTAs.
Web development companies use Hotjar to visualize mouse movements, clicks, and scroll depth, helping them fine-tune page layouts, improve forms, and enhance user flow.
Why it matters: Visual behavior insights support UX improvements and CRO (Conversion Rate Optimization).
3. Microsoft Clarity
Clarity is Microsoft’s free analytics platform that offers session recordings, heatmaps, and a dashboard that highlights user frustration signals like rage clicks or dead clicks. It’s lightweight, privacy-friendly, and an excellent alternative or companion to Hotjar.
Development teams appreciate Clarity’s real-time reporting and its ability to filter sessions by device, country, or traffic source.
Why developers use it: Great for debugging UX issues and improving mobile interactions without heavy processing.
4. Google Tag Manager (GTM)
Although not an analytics tool in the traditional sense, Google Tag Manager is vital for implementing tracking codes (or “tags”) across your website without changing the codebase each time.
Web development companies use GTM to manage:
Event tracking (button clicks, video plays, downloads)
Remarketing tags
Conversion tracking for Google Ads or Facebook Pixel
Third-party integrations like chatbots or CRMs
Why it matters: GTM allows developers to collaborate with marketers for faster, more flexible tracking setups.
5. Mixpanel
Mixpanel is an advanced analytics platform focused on event-based tracking and user-level insights. It helps teams go beyond pageviews to understand how users interact with features and flows—ideal for SaaS platforms, apps, and product-based sites.
It offers cohort analysis, funnel tracking, and retention reports—all of which are essential for iterative product improvement.
Why it stands out: Granular insights into user behavior help developers refine specific site features.
6. Matomo (formerly Piwik)
For businesses that need full control over their analytics data (especially in industries with strict privacy regulations), Matomo is a powerful open-source solution. It can be self-hosted and complies with GDPR, HIPAA, and other standards.
Web development companies set up Matomo for clients who prefer not to share data with third parties or need more control than Google Analytics allows.
Why developers choose it: Customizable, privacy-focused, and suitable for enterprise-grade tracking.
7. Crazy Egg
Crazy Egg provides tools like scroll maps, click tracking, and A/B testing to optimize website pages. It's particularly useful for eCommerce and marketing-focused websites looking to improve call-to-action placement and layout design.
It also features easy-to-understand reports and drag-and-drop editing capabilities for marketers.
Why it’s helpful: Combines analytics and testing in one platform for rapid UX iteration.
Final Thoughts
Analytics isn’t just about collecting numbers—it’s about transforming data into actionable insights that lead to better design, improved user experience, and higher conversions. A modern Web Development Company doesn’t just build pages—it builds data-driven digital ecosystems powered by tools like GA4, Hotjar, Clarity, and Mixpanel.
By integrating the right analytics stack, web development agencies empower businesses to track, test, and optimize every aspect of their online performance. In a competitive digital landscape, that edge is not optional—it’s essential.
0 notes
Text
Unlock Success with the Ultimate Google Tag Manager Course: Beginner to Advanced!!

If you've ever wanted to track what users are doing on your website, fire custom events, or optimize ad performance without constantly relying on a developer, then you’ve probably heard about Google Tag Manager (GTM). But knowing about GTM and actually mastering it are two very different things.
Enter the Ultimate Google Tag Manager Course: Beginner to Advanced—a comprehensive training that can literally change how you handle analytics, tags, and online marketing performance.
Whether you're new to digital marketing or already knee-deep in SEO, PPC, or web analytics, this course could be your game-changer.
Why Google Tag Manager Is a Must-Have Skill Today
Imagine being able to control and deploy your marketing and analytics tags with no code changes needed from developers. GTM allows you to manage:
Google Analytics tags
Conversion tracking pixels
Remarketing tags
Event tracking
Custom HTML/JavaScript
And much more—all from one central dashboard
It’s no wonder GTM has become a go-to tool for digital marketers, entrepreneurs, and businesses of all sizes. But just installing GTM isn’t enough—you need the skills to unlock its full power.
And that's where the Ultimate Google Tag Manager Course: Beginner to Advanced comes in.
What Makes This Course the “Ultimate” Solution?
There are many GTM tutorials floating around the web. So what sets this course apart?
This isn’t just a surface-level overview. It’s a deep, hands-on journey that takes you from the absolute basics to advanced implementations—all in one place. Here’s why this course stands out:
✅ Structured Learning Path
Starting from zero? No problem. This course is designed in logical modules that build on each other. You’ll start with:
What is GTM?
Setting up your GTM account
Installing GTM on your website
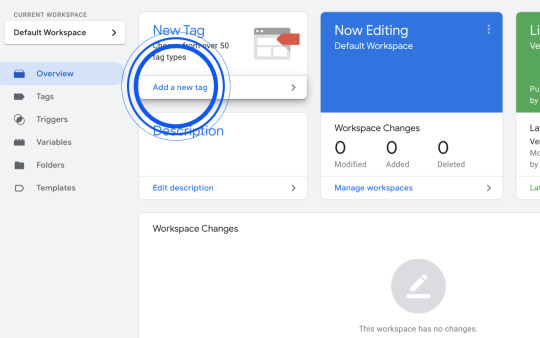
Then, you’ll quickly move into practical use cases, including:
Tracking clicks, form submissions, and downloads
Creating custom events
Setting up tags, triggers, and variables
Debugging with GTM’s preview mode
✅ Advanced Lessons That Most Courses Skip
Most free resources stop after basic tracking. This course? It goes deep.
You’ll learn:
Cross-domain tracking
Enhanced eCommerce tracking
Integrating GTM with Google Analytics 4 (GA4)
Data Layer mastery
Custom JavaScript for advanced use cases
And yes—you’ll get to create, test, and deploy real tags.
✅ Easy to Follow, No Jargon
No matter your background, the instructions are clear, conversational, and visual. It doesn’t drown you in buzzwords. Instead, it shows you how things work with real-world examples.
✅ Real Results, Not Just Theory
By the end of this course, you won’t just know GTM—you’ll use it confidently. You’ll be able to:
Set up precise conversion tracking for ads
Capture user behavior for CRO insights
Manage all tracking needs without developer delays
Improve your website’s marketing performance
Who Is This Course Perfect For?
This isn’t a course just for coders or techies. It’s for anyone who wants more control and clarity when it comes to website analytics and marketing.
✅ Marketers
Track campaigns like a pro. Never miss a conversion again.
✅ Business Owners
Understand what works on your website—and what doesn’t.
✅ Web Analysts
Get clean, actionable data, faster.
✅ Freelancers & Consultants
Offer GTM as a premium service and boost your value instantly.
✅ Developers
Get insights into marketing workflows without having to manage every tag request.
Practical Projects Included
The course isn’t just slides and talking heads. You’ll get to apply what you learn in live environments.
Example projects include:
Tracking outbound link clicks
Setting up scroll depth tracking
Measuring video engagement
Setting up Facebook and LinkedIn remarketing pixels
Integrating GTM with tools like Hotjar, Crazy Egg, and more
These aren’t “demo” projects—they’re real-life applications you’ll use in your job or business.
Why GTM Skills Can Skyrocket Your Career
The digital space is evolving fast, and businesses want people who understand how to track and measure online actions. GTM is one of the most requested skills in digital marketing job descriptions right now.
And yet, few professionals actually master it.
With this course on your resume, you’ll:
Stand out in marketing job interviews
Charge more as a freelancer
Deliver better results for clients
Save hours of dev time in any project
You don’t need a tech background. You need the right training—and this course provides it.
What's Inside the Curriculum?
Let’s take a sneak peek at the modules offered inside the Ultimate Google Tag Manager Course: Beginner to Advanced:
Module 1: Getting Started
What is GTM?
GTM vs. Google Analytics
Installing GTM on a site
Module 2: Core Concepts
Tags, triggers, and variables explained
The GTM interface walkthrough
Creating your first tag
Module 3: Event Tracking
Click tracking (buttons, links)
Form submissions
Scroll tracking and engagement
Module 4: Enhanced eCommerce
GA4 eCommerce setup
Tracking product views and checkouts
Using the Data Layer
Module 5: Integrations
Google Ads, Facebook Pixel, LinkedIn Insights
CRM tracking (HubSpot, Salesforce)
Third-party scripts and custom HTML tags
Module 6: Debugging & Testing
Preview and Debug mode
Chrome GTM extension
Troubleshooting tag errors
Module 7: Going Advanced
Cross-domain tracking
Custom JavaScript functions
Server-side GTM basics
Bonus Materials
Pre-built GTM templates
Tag firing checklists
Best practices for tag governance
Learn from an Expert, Not a Blogger
What makes this course even more valuable is who teaches it. The instructor is a seasoned GTM expert with hands-on experience in enterprise-level implementations. This isn’t recycled content—it’s tested frameworks and proven strategies.
The explanations are not just theoretical. They're based on real-world problems and actual campaign optimization workflows.
Mobile Friendly, Lifetime Access, Certificate Included
You can take the course:
On desktop or mobile
At your own pace
Anytime, anywhere
And once you finish, you’ll receive a certificate of completion—a great addition to your LinkedIn profile or freelance portfolio.
The Investment That Pays for Itself
For the price of a dinner or two, this course can unlock:
Career opportunities
Better marketing results
Smarter data insights
Developer independence
Not to mention—peace of mind knowing you finally understand what’s happening with your site’s tracking.
And let’s be honest: learning GTM from scratch through YouTube or trial-and-error could take months. This course saves you time, confusion, and missed opportunities.
What Learners Are Saying
Here’s what actual students have shared about their experience:
💬 “I thought GTM was too technical. This course made it crystal clear. I’ve now implemented conversion tracking for 5 clients—without any help from devs!” — Emily D., Digital Strategist
💬 “I landed a remote job with a US agency after showcasing the GTM setup I learned in this course.” — Rahul K., Freelancer
💬 “I finally understand the difference between a trigger and a variable. That alone made the course worth it!” — Sandra M., eCommerce Founder
Final Thoughts: Your Next Step to Digital Mastery
It’s clear—GTM isn’t just another tool. It’s a foundational skill in modern digital marketing. But mastering it doesn’t have to be hard or frustrating.
With the Ultimate Google Tag Manager Course: Beginner to Advanced, you get:
✅ A roadmap from basics to expert ✅ Hands-on projects you can use today ✅ Clear, non-technical explanations ✅ Long-term career and business benefits
So don’t waste another campaign wondering whether your tracking is working. Own your analytics. Upgrade your strategy. Be the expert your business or team needs.
Ready to take control of your marketing stack?
👉 Enroll in the Ultimate Google Tag Manager Course: Beginner to Advanced today and transform how you measure success online.
0 notes
Text
How to Win Your First Hackathon: A Beginner’s Blueprint
Joining your first hackathon can feel thrilling—and a little intimidating. You’ll be building something from scratch, under a tight deadline, with people you may not know well. But here’s the truth: winning a hackathon isn’t about being the best coder in the room. It’s about solving problems creatively, working as a team, and presenting a clear, usable solution.
Whether you’re a student, a fresher in tech, or someone from a non-coding background, here’s how to increase your chances of winning your first hackathon.
1. Choose the Right Hackathon
Your journey begins with picking a hackathon that aligns with your interests and skill level. Many beginner-friendly hackathons offer workshops, mentors, and support, making them ideal for first-timers. Look for themes you’re excited about—health, education, sustainability, fintech—and check whether the judging criteria value creativity, usability, or technical depth.
2. Build a Balanced Team
Winning teams often have a mix of:
Developers – to build the core product
Designers – to create a strong user interface and experience
Presenters/Thinkers – to craft the idea, pitch, and storytelling
It’s okay if you’re not the best coder. Teams that communicate well and delegate efficiently tend to outperform even highly technical but disorganized groups.
3. Solve a Real Problem
Judges love practical, user-focused solutions. Don’t just build something cool—build something useful. Ask yourself:
Who is the user?
What problem are they facing?
How does your idea help them?
Start with the “why”, not just the “how.” A simple solution to a real problem beats a complicated tool with no audience.
4. Keep It Simple: MVP First
Your time is limited, so don’t try to build the next Facebook. Aim for a Minimum Viable Product (MVP)—a basic version that proves your idea works. Focus on core functionality:
A working prototype with 1–2 main features
Clean, bug-free code
A basic user interface that clearly shows how it works
Once your MVP is stable, then add bonus features—if time allows.
5. Use Existing Tools and APIs
Hackathons aren’t the place to reinvent the wheel. Use frameworks, APIs, libraries, and platforms to save time:
Firebase for backend
Figma for UI/UX mockups
Bootstrap or Tailwind for quick frontends
OpenAI, Google Maps, or Stripe APIs for added features
Efficiency is key to standing out.
6. Focus on Presentation
Your demo or final pitch can make or break your hackathon journey. Even the best idea won’t win if it’s poorly explained. Make sure your presentation includes:
A short problem statement
A clear solution explanation
A demo of how it works (live or screen-recorded)
The impact or benefits of your solution
What you’d build next if given more time
Bonus tip: Tell a story. Make the judges feel the problem you’re solving.
7. Ask for Help
Most hackathons have mentors—use them! Whether it’s debugging, ideation, or pitch practice, mentors can give you clarity and direction. Don’t struggle in silence—ask, learn, and iterate.
8. Manage Time Like a Pro
Divide your hackathon time wisely:
First 2–3 hours: Finalize the idea and roles
Next 8–10 hours: Build MVP (back-end and front-end)
Last 2–3 hours: Debug, design, and prepare the pitch
Set mini deadlines for each phase and take breaks to stay sharp.
9. Stand Out with Soft Skills
Sometimes, what sets winners apart isn’t code—it’s communication. Friendly team spirit, clear thinking, and enthusiasm can shine through your pitch and demo. Judges remember teams that are confident, collaborative, and passionate.
Conclusion: Hack, Learn, Win
Your first hackathon is less about winning a trophy and more about gaining an unforgettable experience. But with the right mindset, planning, and teamwork, winning becomes a natural outcome of doing things right.
So dive in, experiment boldly, and remember: every expert was once a beginner. Your path to becoming a champion starts with that first line of code and a great idea.
0 notes
Text
Facebook Debugger is a powerful tool developed by Facebook for developers, marketers, and content creators. Its primary function is to analyze and clear the cached metadata of a URL, ensuring that when content is shared on Facebook, it displays the most accurate and updated information. This tool plays a crucial role in managing how your content appears across the Facebook ecosystem.
Importance of Accurate Link Previews
An engaging and accurate link preview can significantly increase the click-through rate of shared content. Facebook Debugger ensures your title, description, and featured image appear exactly as intended. Without it, you risk displaying outdated, missing, or incorrect information, which can reduce engagement and harm your brand's credibility.
2. What is Facebook Debugger and How Does It Work?
Mechanics Behind Facebook Debugger
At its core, Facebook Debugger is a metadata analysis tool. When you input a URL into the Debugger, Facebook's crawler (the Facebook Sharing Bot) scans the link to retrieve Open Graph (OG) metadata. This data includes elements like the title, description, image, and type of content. The tool then displays how the link will appear when shared.
The Process of Scraping and Caching
Facebook caches the OG data the first time a link is shared. If you make changes to your content or metadata, Facebook won’t automatically fetch the new version. That’s where Debugger comes in. By using it, you force Facebook to rescrape the URL, clearing the cache and updating the preview accordingly.

3. Common Issues Resolved by Facebook Debugger
Incorrect or Missing Images in Link Previews
One of the most frequent problems users encounter is Facebook not displaying the correct image or skipping it altogether. This is often due to incorrect image size, missing OG tags, or cached data. Facebook Debugger helps pinpoint the issue and updates the image cache.
Outdated Titles or Descriptions
Sometimes, after editing a blog post or updating metadata, Facebook continues to show the old title or description. This happens because of caching. Running your URL through the Facebook Debugger clears this outdated information and fetches the latest metadata.
4. Step-by-Step Guide to Using Facebook Debugger
Accessing and Navigating the Tool
To use the Facebook Debugger, go to Facebook Sharing Debugger. Simply paste your URL into the input box and click “Debug.” Facebook will then show you how it views your link.
Interpreting Debugger Results
After analyzing, you’ll see a report that includes any errors, warnings, or missing tags. It also shows the last time the link was scraped and previews the current metadata. Use this insight to fix issues directly in your website’s HTML and then re-scrape the URL.
5. Optimizing Your Website for Facebook Sharing
Implementing Open Graph Meta Tags
Open Graph tags are essential for customizing how your content appears on Facebook. Tags like og:title, og:description, og:image, and og:url should be added to your webpage’s <head> section. This ensures Facebook can fetch exactly what you want shown.
Ensuring Proper Image Dimensions and Formats
Facebook recommends images be at least 1200x630 pixels for optimal appearance. Using the right dimensions and formats (JPEG, PNG) increases the chance that your featured image displays correctly in link previews.
6. Troubleshooting Advanced Facebook Debugger Issues
Handling Robots.txt Restrictions
If your site’s robots.txt file blocks Facebook’s crawler, it won’t be able to access your metadata. Make sure to allow user-agent facebookexternalhit in your robots.txt to enable proper crawling.
Dealing with HTTPS and SSL Certificate Problems
Invalid or expired SSL certificates can prevent Facebook from scraping your site. Debugger will show these as fetch errors. Always ensure your site uses a valid HTTPS connection and updated certificates.
7. Enhancing Social Sharing Through Facebook Debugger
Improving Click-Through Rates with Accurate Previews
When users see an appealing and informative preview, they’re more likely to click. Facebook Debugger helps you fine-tune previews so they align with your content’s intent, improving engagement and traffic.
Leveraging Debugger for Brand Consistency
Your link preview is an extension of your brand. By regularly using the Debugger, you ensure consistency in images, tone, and messaging across all Facebook shares, reinforcing brand identity.
8. Frequently Asked Questions (FAQs) About Facebook Debugger
Why isn't my updated image showing when I share a link?
Facebook may be showing a cached version. Use the Debugger to “Scrape Again” and refresh the metadata.
How often does Facebook update its cache for shared links?
Facebook typically doesn’t re-scrape URLs unless manually triggered. Use the Debugger to update the cache whenever you change metadata.
Can I use Facebook Debugger for non-HTML content?
No, Debugger is designed for HTML content with Open Graph meta tags. It doesn’t work with PDFs or plain text files.
What are the minimum image size requirements for Facebook sharing?
The ideal image size is 1200x630 pixels. The minimum is 200x200 pixels, but smaller images may be cropped or not shown.
Is it necessary to use Facebook Debugger for every new blog post?
While not mandatory, it's highly recommended. Debugger ensures your content preview is accurate and up-to-date, especially if you use dynamic OG tags.
Conclusion Facebook Debugger is an indispensable tool for anyone who publishes content online. Whether you’re a developer, blogger, or marketer, using it regularly ensures your content looks professional and performs better on social media. By understanding how it works and following best practices, you can control how your content is perceived and maximize its reach.
1 note
·
View note
Text
Why Cross-Platform App Development is a Game-Changer for Modern Businesses

Imagine this: You’ve built a fantastic mobile app. It works flawlessly on iOS. Your iPhone users love it.
But Android users? They’re stuck waiting.
And that’s the problem businesses face when they don’t develop with multiple platforms in mind.
Today’s users don’t care what device they’re on—they just want a consistent, seamless experience.
That’s why cross-platform development is no longer a niche approach. It’s the smart, scalable way forward.
What Is Cross-Platform Development?
Cross-platform app development means creating one codebase that runs on multiple operating systems—primarily Android and iOS.
Instead of building separate apps from scratch for each platform, developers use frameworks like Flutter, React Native, or Xamarin to write code once and deploy it everywhere.
The result? Faster development, lower costs, and unified experiences.
Why It Matters for Business
You might think your audience uses only one platform. But data tells a different story.
In most countries, Android and iOS have nearly equal market shares. Ignoring one means excluding half your potential users.
Cross-platform apps ensure your product reaches everyone—without doubling your development time or budget.
Whether you're launching a consumer-facing tool or an internal employee platform, wide accessibility should be a priority.
Consistency Builds Trust
Imagine logging into your app on Android, and it looks and behaves completely differently than the iOS version.
It’s confusing. It feels unprofessional. And it creates friction.
Cross-platform frameworks allow you to design consistent UI/UX across devices. That leads to:
Stronger brand identity
Better user retention
Fewer support tickets
When users know what to expect, they engage more confidently.
Faster Time to Market
Time matters.
Whether you're a startup trying to grab early users or an enterprise launching a critical internal tool, launching late can be costly.
Cross-platform development accelerates your timeline significantly because:
You maintain one codebase
Updates and bug fixes happen across platforms simultaneously
Teams can test faster with shared components
With the right team, you can go from idea to app store in record time.
Lower Maintenance and Long-Term Costs
Managing two separate apps means double the updates, double the bug fixing, double the costs.
A single codebase simplifies maintenance dramatically. That means:
Faster feature rollouts
Lower dev costs
Easier debugging
This is especially important as your app evolves and scales.
If you're thinking long-term (and you should be), this efficiency pays off quickly.
Who Should Use Cross-Platform Development?
It’s a great fit for:
Startups: Limited budget, big goals, fast timelines.
Small businesses: Need to go digital without deep in-house expertise.
Enterprises: Looking to unify tools across diverse teams and devices.
Service providers: Wanting to offer consistent client experiences.
At Zenturio Tech, we help businesses leverage the full potential of cross-platform app development to ensure smooth, scalable growth—without the chaos of platform-specific builds.
The Tools Behind the Magic
Frameworks like:
Flutter: Backed by Google, great for performance and rich UI.
React Native: Built by Facebook, ideal for community support and reuse of web development skills.
Xamarin: From Microsoft, perfect for those in the .NET ecosystem.
These tools are mature, stable, and widely supported—making them excellent choices for business-grade apps.
The right choice depends on your project’s specific needs, and experienced developers can guide you through that decision.
Future-Proofing Your Investment
Choosing a cross-platform approach now sets you up for long-term success. It allows you to:
Add features faster
Scale without rewriting code
Expand to web or desktop platforms later
It’s not just a smart technical decision—it’s a strong business one.
Final Thoughts
In a multi-device world, users expect apps to “just work”—no matter what’s in their hands.
Cross-platform development helps you meet that expectation, while saving time, money, and future effort.
Whether you're launching your first app or optimizing an existing one, starting with the right development approach makes all the difference.
Get started with Zenturio Tech, and discover how powerful and practical cross-platform solutions can fuel your growth.
0 notes
Text
In today’s digital world, injustice lurks in the shadows of the Facebook post that’s delivered to certain groups of people at the exclusion of others, the hidden algorithm used to profile candidates during job interviews, and the risk-assessment algorithms used for criminal sentencing and welfare fraud detention. As algorithmic systems are integrated into every aspect of society, regulatory mechanisms struggle to keep up.
Over the past decade, researchers and journalists have found ways to unveil and scrutinize these discriminatory systems, developing their own data collection tools. As the internet has moved from browsers to mobile apps, however, this crucial transparency is quickly disappearing.
Third-party analysis of digital systems has largely been made possible by two seemingly banal tools that are commonly used to inspect what’s happening on a webpage: browser add-ons and browser developer tools.
Browser add-ons are small programs that can be installed directly onto a web browser, allowing users to augment how they interact with a given website. While add-ons are commonly used to operate tools like password managers and ad-blockers, they are also incredibly useful for enabling people to collect their own data within a tech platform’s walled garden.
Similarly, browser developer tools were made to allow web developers to test and debug their websites’ user interfaces. As the internet evolved and websites became more complex, these tools evolved too, adding features like the ability to inspect and change source code, monitor network activity, and even detect when a website is accessing your location or microphone. These are powerful mechanisms for investigating how companies track, profile, and target their users.
I have put these tools to use as a data journalist to show how a marketing company logged users’ personal data even before they clicked “submit” on a form and, more recently, how the Meta Pixel tool (formerly the Facebook Pixel tool) tracks users without their explicit knowledge in sensitive places such as hospital websites, federal student loan applications, and the websites of tax-filing tools.
In addition to exposing surveillance, browser inspection tools provide a powerful way to crowdsource data to study discrimination, the spread of misinformation, and other types of harms tech companies cause or facilitate. But in spite of these tools’ powerful capabilities, their reach is limited. In 2023, Kepios reported that 92 percent of global users accessed the internet through their smartphones, whereas only 65 percent of global users did so using a desktop or laptop computer.
Though the vast majority of internet traffic has moved to smartphones, we don’t have tools for the smartphone ecosystem that afford the same level of “inspectability” as browser add-ons and developer tools. This is because web browsers are implicitly transparent, while mobile phone operating systems are not.
If you want to view a website in your web browser, the server has to send you the source code. Mobile apps, on the other hand, are compiled, executable files that you usually download from places such as Apple’s iOS App Store or Google Play. App developers don’t need to publish the source code for people to use them.
Similarly, monitoring network traffic on web browsers is trivial. This technique is often more useful than inspecting source code to see what data a company is collecting on users. Want to know which companies a website shares your data with? You’ll want to monitor the network traffic, not inspect the source code. On smartphones, network monitoring is possible, but it usually requires the installation of root certificates that make users’ devices less secure and more vulnerable to man-in-the-middle attacks from bad actors. And these are just some of the differences that make collecting data securely from smartphones much harder than from browsers.
The need for independent collection is more pressing than ever. Previously, company-provided tools such as the Twitter API and Facebook’s CrowdTangle, a tool for monitoring what’s trending on Facebook, were the infrastructure that powered a large portion of research and reporting on social media. However, as these tools become less useful and accessible, new methods of independent data collection are needed to understand what these companies are doing and how people are using their platforms.
To meaningfully report on the impact digital systems have on society, we need to be able to observe what’s taking place on our devices without asking a company for permission. As someone who has spent the past decade building tools that crowdsource data to expose algorithmic harms, I believe the public should have the ability to peek under the hood of their mobile apps and smart devices, just as they can on their browsers. And it’s not just me: The Integrity Institute, a nonprofit working to protect the social internet, recently released a report that lays bare the importance of transparency as a lever to achieve public interest goals like accountability, collaboration, understanding, and trust.
To demand transparency from tech platforms, we need a platform-independent transparency framework, something that I like to call an inspectability API. Such a framework would empower even the most vulnerable populations to capture evidence of harm from their devices while minimizing the risk of their data being used in research or reporting without their consent.
An application programming interface (API) is a way for companies to make their services or data available to other developers. For example, if you’re building a mobile app and want to use the phone’s camera for a specific feature, you would use the iOS or Android Camera API. Another common example is an accessibility API, which allows developers to make their applications accessible to people with disabilities by making the user interface legible to screen readers and other accessibility tools commonly found on modern smartphones and computers. An inspectability API would allow individuals to export data from the apps they use every day and share it with researchers, journalists, and advocates in their communities. Companies could be required to implement this API to adhere to transparency best practices, much as they are required to implement accessibility features to make their apps and websites usable for people with disabilities.
In the US, residents of some states can request the data companies collect on them, thanks to state-level privacy laws. While these laws are well-intentioned, the data that companies share to comply with them is usually structured in a way that obfuscates crucial details that would expose harm. For example, Facebook has a fairly granular data export service that allows individuals to see, amongst other things, their “Off-Facebook activity.” However, as the Markup found during a series of investigations into the use of Pixel, even though Facebook told users which websites were sharing data, it did not reveal just how invasive the information being shared was. Doctor appointments, tax filing information, and student loan information were just some of the things that were being sent to Facebook. An inspectability API would make it easy for people to monitor their devices and see how the apps they use track them in real time.
Some promising work is already being done: Apple’s introduction of the App Privacy Report in iOS 15 marked the first time iPhone users could see detailed privacy information to understand each app’s data collection practices and even answer questions such as, “Is Instagram listening to my microphone?”
But we cannot rely on companies to do this at their discretion—we need a clear framework to define what sort of data should be inspectable and exportable by users, and we need regulation that penalizes companies for not implementing it. Such a framework would not only empower users to expose harms, but also ensure that their privacy is not violated. Individuals could choose what data to share, when, and with whom.
An inspectability API will empower individuals to fight for their rights by sharing the evidence of harm they have been exposed to with people who can raise public awareness and advocate for change. It would enable organizations such as Princeton’s Digital Witness Lab, which I cofounded and lead, to conduct data-driven investigations by collaborating closely with vulnerable communities, instead of relying on tech companies for access. This framework would allow researchers and others to conduct this work in a way that is safe, precise, and, most importantly, prioritizes the consent of the people being harmed.
11 notes
·
View notes
Text
Where To Put Google Tag Manager Code In Google Site?
If you're running a website on Google Sites and want to streamline your tracking, marketing, and analytics setup, you've probably asked yourself: Where To Put Google Tag Manager Code In Google Site? Google Tag Manager (GTM) is a powerful tool that allows you to manage multiple tags such as Google Analytics, Facebook Pixel, or AdWords Conversion Tracking without editing your site's code repeatedly.
But here’s the kicker: Where To Put Google Tag Manager Code In Google Site isn't as intuitive as it might be on platforms like WordPress or custom HTML websites. In this blog, we’ll walk you through where to put Google Tag Manager code in Google Site, step by step, while also covering why it’s essential for modern digital tracking and campaign management.
What is Google Tag Manager?
Before we dive into where to put Google Tag Manager code in Google Site, let’s briefly explain what GTM is. Google Tag Manager is a free tag management system that allows you to quickly and easily update measurement codes and related code fragments collectively known as "tags" on your website or mobile app. Instead of manually inserting different code snippets, GTM gives you one consolidated snippet you can manage through a user-friendly interface.
Why Use Google Tag Manager in Google Sites?
You might wonder why you'd even bother figuring out where to put Google Tag Manager code in Google Site when you can insert individual tracking codes. Here are some reasons why GTM is a smarter choice:
Efficiency: GTM reduces manual effort by allowing centralized management of all tags.
Speed: Faster page loading due to asynchronous tag firing.
Testing: You can preview and debug tags before they go live.
Flexibility: Easily add, remove, or adjust tags without accessing the code every time.
Clearly, knowing where to put Google Tag Manager code in Google Site can be a real game-changer for your tracking setup.
Step-by-Step: Where To Put Google Tag Manager Code In Google Site?
Let’s now get to the core of the topic: Where To Put Google Tag Manager Code In Google Site. Follow these steps carefully:
Step 1: Create Your Google Tag Manager Account
Go to tagmanager.google.com.
Sign in with your Google account.
Click "Create Account."
Fill in your Account Name, Container Name (your website URL), and select "Web" as the target platform.
Click “Create” and accept the GTM Terms of Service.
Once your container is created, GTM will give you two code snippets:
One for the section.
One for the section.
Both are essential if you want GTM to function optimally.
Step 2: Access Your Google Site
Now that you’ve got your GTM code snippets, the next question is: Where To Put Google Tag Manager Code In Google Site?
Note: This method works for the new version of Google Sites (not Classic Google Sites).
Open your site in Google Sites.
Click the gear icon in the top-right corner and choose “Settings.”
From the left panel, select “Custom code.”
You'll see two sections:
Head
Body (end)
Step 3: Paste Your GTM Snippets
Copy the head snippet from GTM and paste it into the Head section of Google Sites.
Copy the body snippet and paste it into the Body (end) section.
Click “Save.”
That’s it! You’ve successfully figured out where to put Google Tag Manager code in Google Site.
Verifying the Installation
After adding your GTM code, it's crucial to ensure everything is working properly.
Go back to tagmanager.google.com.
Click on your container.
Click “Preview” and enter your site URL.
A new tab will open with your site in debug mode.
You’ll be able to see if your tags are firing correctly. This not only confirms that you’ve figured out where to put Google Tag Manager code in Google Site but also that it's working effectively.
Common Issues and Fixes
1. Tag Not Firing
If your tag isn’t firing, double-check that you placed both snippets in the correct fields: one in Head and one in Body (end). Misplacement is a common error when determining where to put Google Tag Manager code in Google Site.
2. Custom Code Disabled
Sometimes, the “Custom code” option may not appear. Ensure you're using the new Google Sites and not Classic Sites.
3. Conflicting Scripts
Too many conflicting scripts can slow your site or prevent GTM from working correctly. Always test after adding any new tag.
Alternatives to Google Tag Manager
If you're not ready for GTM, Google Sites allows some other basic analytics setups. But if you're serious about understanding user behavior, GTM is the gold standard.
Many businesses hire a Google Analytics consultant to properly set up GTM, as even a small mistake can skew your entire data setup.
B2B Applications: A Quick Look
If you run a business-to-business site, especially one built with Google Sites as a landing page or intranet, understanding where to put Google Tag Manager code in Google Site is vital. It allows your marketing and analytics teams to capture data effectively for lead generation, user engagement, and campaign performance.
Some companies even rely on a b2b web design agency to ensure that GTM and other performance tools are integrated properly within Google Sites and other platforms.
Final Thoughts
So, to wrap it all up where to put Google Tag Manager code in Google Site is not as complex as it seems. You simply add the GTM <head> code in the “Head” section and the <body> code in the “Body (end)” section within the Google Sites Settings menu.
Once installed, you unlock the door to better analytics, smarter tag management, and a more efficient workflow. Whether you're an individual blogger or managing a corporate landing page, understanding where to put Google Tag Manager code in Google Site is a key step toward optimizing your digital presence.
And remember: GTM is just the beginning. Make sure you regularly review your tag performance, A/B test your tags, and keep refining your tracking for the best results.
If you’ve ever asked where to put Google Tag Manager code in Google Site, now you know. So go ahead install it, test it, and start making smarter marketing decisions today.
0 notes
Text
User Registration Using Contact Form 7 Pro

The User Registration Using Contact Form 7 Pro plugin allows you to seamlessly integrate user registration forms into your WordPress site using the popular Contact Form 7 plugin. With this powerful tool, users can easily register or sign up on your site through a customizable form. Whether you’re managing a membership site or just looking to simplify the user sign-up process, this plugin is the perfect solution.
Features include easy form integration, custom field support, automatic user role assignment, and more. This plugin also supports popular integrations like Google Reviews WordPress Plugin, enabling businesses to showcase their reviews directly on their site. Save time, improve usability, and make user registration hassle-free for your visitors.
Features: Profile Dashboard: Access a centralized hub where you can view key information and manage your account efficiently.
Edit Profile: Easily update and customize your profile information to ensure it's always accurate and up to date.
Change Password: For enhanced security, conveniently change your password whenever needed, ensuring your account remains protected.
Social Sign Up + Login: Enable users to sign up and log in using popular social media platforms such as Google, Facebook, and Apple.
Push Notifications: Set up push notifications to be sent to registered users on your site, keeping them informed and engaged.
Compatibility with Multi-Step for Contact Form 7: Ensure seamless integration between Contact Form 7 and the Multi-Step extension, allowing you to create intuitive and user-friendly multi-step forms.
Auto Generate Password: An email consisting of an auto-generated password will be sent to the users after their registration is completed on the site.
Debugging: There is a debug mode option for debugging.
Woo-Commerce : All WooCommerce field integration for the users to collect the data.
Validation : You can set custom validation message for reset password and forgot password.
Password Features : Option to use for forgot password and reset the password.
Auto-login : After registration you can set auto-login and user redirect on defined page with login into the site.
Social Sign Up + Login: Enable users to sign up and log in using popular social media platforms such as Google, Facebook, and Apple.
Email Templates for Contact Form 7: Customize email templates for Contact Form 7 or bypass the default email notifications entirely. This allows you to send personalized registration and login email notifications.
Multilingual Support: Provide support for multiple languages on your site, enabling users to view and interact with content in their preferred language.
Advanced Custom Field Mapping: Create advanced custom fields for user profiles, with only text and textarea options, and map them to corresponding Contact Form 7 fields. This allows for a more personalized user experience.
New Features: WooCommerce Field Mapping
BuddyPress Registration Compatibility
Compatibility of WordPress VIP.
0 notes
Text
Why React is better than Angular
Both are powerful tools for building dynamic web applications, but many developers, especially those working on scalable front-end projects, often lean toward React.
In this article, we’ll explore why React is better than Angular in several key areas: performance, flexibility, learning curve, and ecosystem, to help you make an informed decision.
1. 🧠 Simpler Learning Curve
React is easier to learn, especially for beginners. It focuses mainly on the View layer of the application and uses JavaScript + JSX, which is more familiar and natural for JavaScript developers.
Angular, on the other hand, requires learning TypeScript, decorators, dependency injection, and more, making it harder for new developers to get started quickly.
✅ React Advantage: Quick onboarding and faster learning process.
2. ⚙️ Flexibility and Customization
React is unopinionated — it gives developers freedom to choose their own architecture, routing libraries (like React Router), and state management tools (like Redux or Zustand). This modular approach lets you build only what you need.
Angular, being a complete framework, comes with everything built in, which is great for large enterprise apps but can feel restrictive for small to mid-size projects.
✅ React Advantage: More control and customization options.
3. ⚡ Better Performance with Virtual DOM
React uses a Virtual DOM, which improves performance by updating only the necessary parts of the page. This makes React highly efficient for rendering dynamic UI components.
Angular uses the Real DOM, which updates the entire structure, potentially slowing down performance during complex operations.
✅ React Advantage: Faster updates and rendering.
4. 🔁 One-Way Data Binding
React uses one-way data binding, which means data flows in a single direction from parent to child. This makes it easier to debug and maintain, especially in larger applications.
Angular uses two-way data binding, which can be powerful but may lead to more complex debugging in large-scale applications due to unpredictable data flow.
✅ React Advantage: Easier to maintain and test.
5. 🌐 Larger Community and Ecosystem
React has a larger community, more frequent updates, and a broader ecosystem of third-party libraries. The support from Meta (Facebook) also adds credibility to its long-term future.
While Angular also has a strong community and backing from Google, it doesn’t match React’s popularity among startups, freelancers, and the broader open-source world.
✅ React Advantage: Larger support network and more open-source tools.
6. 📱 React Native for Mobile App Development
React offers React Native, a powerful framework to build mobile apps using the same principles and syntax as React.
While Angular has solutions like Ionic for mobile, it doesn’t provide the same level of native performance and developer experience.
✅ React Advantage: Seamless transition from web to mobile development.
7. 🔄 Faster Updates and Backward Compatibility
React updates are generally incremental and backward compatible, which makes upgrading projects easier.
Angular updates sometimes involve breaking changes that require more effort when upgrading versions, especially in enterprise environments.
✅ React Advantage: Easier maintenance and upgrade path.
Conclusion: Why React Wins for Most Use Cases
React stands out due to its simplicity, performance, and flexibility. While Angular is a powerful framework suitable for enterprise-level applications, React offers a more lightweight and adaptable solution ideal for startups, freelancers, and teams that prefer to scale modularly.
If you're looking for:
Faster development cycles
High performance
Easier learning and onboarding
Cross-platform development options
0 notes
Text
React JS Development: The Ultimate Guide to Building Modern Web Applications
In the rapidly evolving world of web development, building fast, interactive, and scalable applications is no longer optional—it's essential. Among the many technologies available today, React JS development has emerged as a top choice for developers and businesses alike. Created by Facebook, React.js simplifies front-end development while delivering a superior user experience.
Whether you're a business owner exploring tech options or a developer seeking efficient tools, this guide covers everything you need to know about React JS development, its advantages, real-world applications, and why it continues to dominate the front-end ecosystem.
What is React.js?
React.js is an open-source JavaScript library used for building user interfaces—particularly single-page applications (SPAs). It allows developers to create reusable UI components that update in real time as data changes.
Unlike traditional web frameworks that manipulate the DOM (Document Object Model) directly, React uses a virtual DOM to optimize updates, making apps faster and more responsive.
Key Features of React JS Development
1. Component-Based Architecture
React promotes modular development. Instead of building large monolithic pages, developers create reusable components that make development faster and more organized.
2. Virtual DOM for High Performance
React’s virtual DOM efficiently updates only the changed parts of the UI, improving performance and reducing unnecessary re-renders.
3. Unidirectional Data Flow
Data flows in one direction, making application behavior more predictable and easier to debug.
4. JSX Syntax
JSX (JavaScript XML) allows developers to write HTML-like code within JavaScript, making UI code easier to read and maintain.
5. Strong Ecosystem and Community
With millions of developers worldwide and a vast number of open-source tools and libraries, React JS development benefits from a rich ecosystem.
Why Choose React JS Development?
Fast Development
React’s reusable components, efficient rendering, and active community support make development faster and easier.
Scalability
React can scale from a simple web widget to a full-fledged enterprise application with complex UI logic.
Cross-Platform Possibilities
React Native, a framework based on React.js, allows developers to build mobile apps for iOS and Android using the same codebase.
SEO-Friendly SPAs
Using server-side rendering (SSR) with tools like Next.js, React JS development can be optimized for search engines, solving one of SPA’s biggest issues.
Use Cases of React JS Development
React is used by some of the world’s largest companies, including Facebook, Netflix, Airbnb, and Uber. Common use cases include:
Single Page Applications (SPAs)
Dashboards and Admin Panels
E-commerce Frontends
Social Media Platforms
Real-time Chat and Messaging Apps
Interactive Data Visualizations
Tech Stack for React JS Development
React.js often works best when paired with other modern tools:
Frontend: React, Redux, Tailwind CSS, React Router
Backend: Node.js, Express.js
Database: MongoDB, PostgreSQL
Build Tools: Vite, Webpack, Babel
Deployment: Vercel, Netlify, Heroku
Getting Started with React JS Development
To begin your journey with React.js:
Install Node.js (if not already installed)
Create a new React project
Start building components, connecting APIs, and customizing your UI.
There are also advanced setups like Next.js for server-side rendering and static site generation.
Best Practices for React JS Development
Use functional components and Hooks instead of class components.
Keep components small and focused.
Use PropTypes or TypeScript for type checking.
Implement code splitting and lazy loading to improve performance.
Maintain a consistent folder structure and follow naming conventions.
React JS Development Trends in 2025
As of 2025, React.js continues to lead the front-end world due to:
Ongoing performance improvements
The rise of frameworks like Next.js and Remix
Enhanced support for concurrent rendering
Growing adoption in enterprise-level applications
React is not just a library—it's a central part of the modern development stack, and its role is only growing.
Conclusion
React JS development offers an unmatched combination of speed, efficiency, and flexibility for building user interfaces. Whether you're developing a simple dashboard or a complex web app, React gives you the tools to create clean, maintainable, and dynamic interfaces that users love.
If you're considering front-end development for your next project, investing in React JS development could be one of the smartest choices you make.
0 notes
Text
10 Tools Every Digital Marketing Agency Swears By
Running a successful Digital Marketing Agency requires more than creative ideas and clever campaigns. It takes powerful tools to research, execute, analyze, and scale strategies across multiple channels. Whether it’s optimizing SEO, managing paid ads, scheduling social content, or automating emails—having the right tech stack makes all the difference.
Here’s a curated list of 10 essential tools every digital marketing agency relies on to streamline workflows and deliver measurable results for clients.
1. SEMrush – All-in-One SEO & Competitive Research Suite
From keyword tracking and backlink audits to domain comparisons and content gap analysis, SEMrush helps agencies improve organic rankings, spy on competitors, and refine content strategies. It’s a must-have for any agency serious about SEO.
Key Features:
Keyword Magic Tool
Site Audit & On-Page SEO Checker
Position tracking
2. Google Analytics 4 (GA4) – Web & User Behavior Insights
GA4 offers deep insights into how users interact with your site or app. With customizable events, cross-platform tracking, and predictive analytics, agencies use GA4 to measure traffic sources, conversions, and drop-off points across the funnel.
Key Features:
Event-based tracking model
Real-time traffic monitoring
Integrated with Google Ads
3. Meta Business Suite – Social Ads & Performance Management
Meta Business Suite (formerly Facebook Business Manager) is the go-to platform for managing Facebook and Instagram ad campaigns. Agencies use it for audience targeting, A/B testing creatives, and analyzing ad performance.
Key Features:
Custom audience creation
Pixel and conversion API integration
Multi-ad account management
4. Canva Pro – Fast & Flexible Visual Design
For quick-turn social graphics, ad creatives, and branded templates, Canva Pro is every content team's best friend. Its drag-and-drop design makes it ideal for non-designers, while shared folders and templates keep agency workflows efficient.
Key Features:
Brand kits and asset libraries
Animation tools and video templates
Team collaboration
5. Ahrefs – Backlink Analysis & SEO Tracking
When it comes to backlinks and competitor SEO strategy, Ahrefs is unbeatable. Agencies rely on it to find high-quality linking opportunities, audit client websites, and monitor keyword rankings over time.
Key Features:
Site Explorer & Content Gap Tool
Keyword Explorer with global database
Broken link and anchor text audits
6. Hootsuite / Buffer – Social Media Scheduling & Monitoring
Agencies managing multiple social media accounts use Hootsuite or Buffer for centralized scheduling, posting, and monitoring. These tools ensure content goes out on time across platforms, with analytics to track performance.
Key Features:
Multi-platform publishing
Post preview & scheduling calendar
Engagement tracking and replies
7. HubSpot – CRM, Marketing Automation & Reporting
HubSpot offers robust CRM features along with marketing automation, email workflows, lead scoring, and analytics. It’s perfect for inbound marketing strategies and helps agencies manage client campaigns from contact to conversion.
Key Features:
Email and lead nurturing automation
CRM pipeline tracking
Integrated reporting dashboard
8. Google Tag Manager – Tracking Setup Made Easy
Instead of relying on developers for every tracking pixel, Google Tag Manager lets agencies deploy and manage tags easily. Whether it’s Meta Pixel, GA4 events, or custom scripts—GTM simplifies implementation.
Key Features:
Trigger-based event tracking
Debug console for testing
Version control for safety
9. Surfer SEO – Content Optimization for Ranking
For agencies focused on content marketing and blog optimization, Surfer SEO is a game-changer. It analyzes top-ranking pages and provides actionable guidelines for improving your content’s chances to rank.
Key Features:
Content editor with keyword suggestions
SERP analyzer
NLP-based optimization scoring
10. Zapier – Workflow Automation Between Tools
Zapier connects your tools together and automates repetitive tasks—like adding leads to a CRM when someone fills out a form or posting new blog content to Slack. Agencies use it to save time and reduce manual errors.
Key Features:
5,000+ app integrations
Multi-step workflows
Automated lead syncing
Final Thoughts: Right Tools, Better Results
No matter how talented your team is, results depend on execution—and that’s where tools come in. A modern Digital Marketing Agency relies on a smart tech stack to deliver faster, smarter, and more measurable results.
From SEO audits and content planning to automation and analytics, these 10 tools empower agencies to work at scale while maintaining accuracy and creativity. If you're working with or building a digital marketing agency, investing in the right platforms is the first step toward long-term growth.
0 notes