#Factory Reset Netgear Router
Explore tagged Tumblr posts
Visit Tumblr Blog
Explore Tumblr blogs with no restrictions, modern design and the best experience.
Last Seen Tumblr Blogs


Fun Fact
The “We are the 99%” Tumblr blog became the slogan for the Occupy Wall Street movement.
Text
Need assistance with How to factory reset orbi wifi router? No worries! Locate the reset button on the Orbi device. Now, press & hold the reset button until the power LED starts blinking amber. Finally, release the button, reset gets completed and the device reverts to its default settings. If you still face an issue, then connect with us!
0 notes
Text
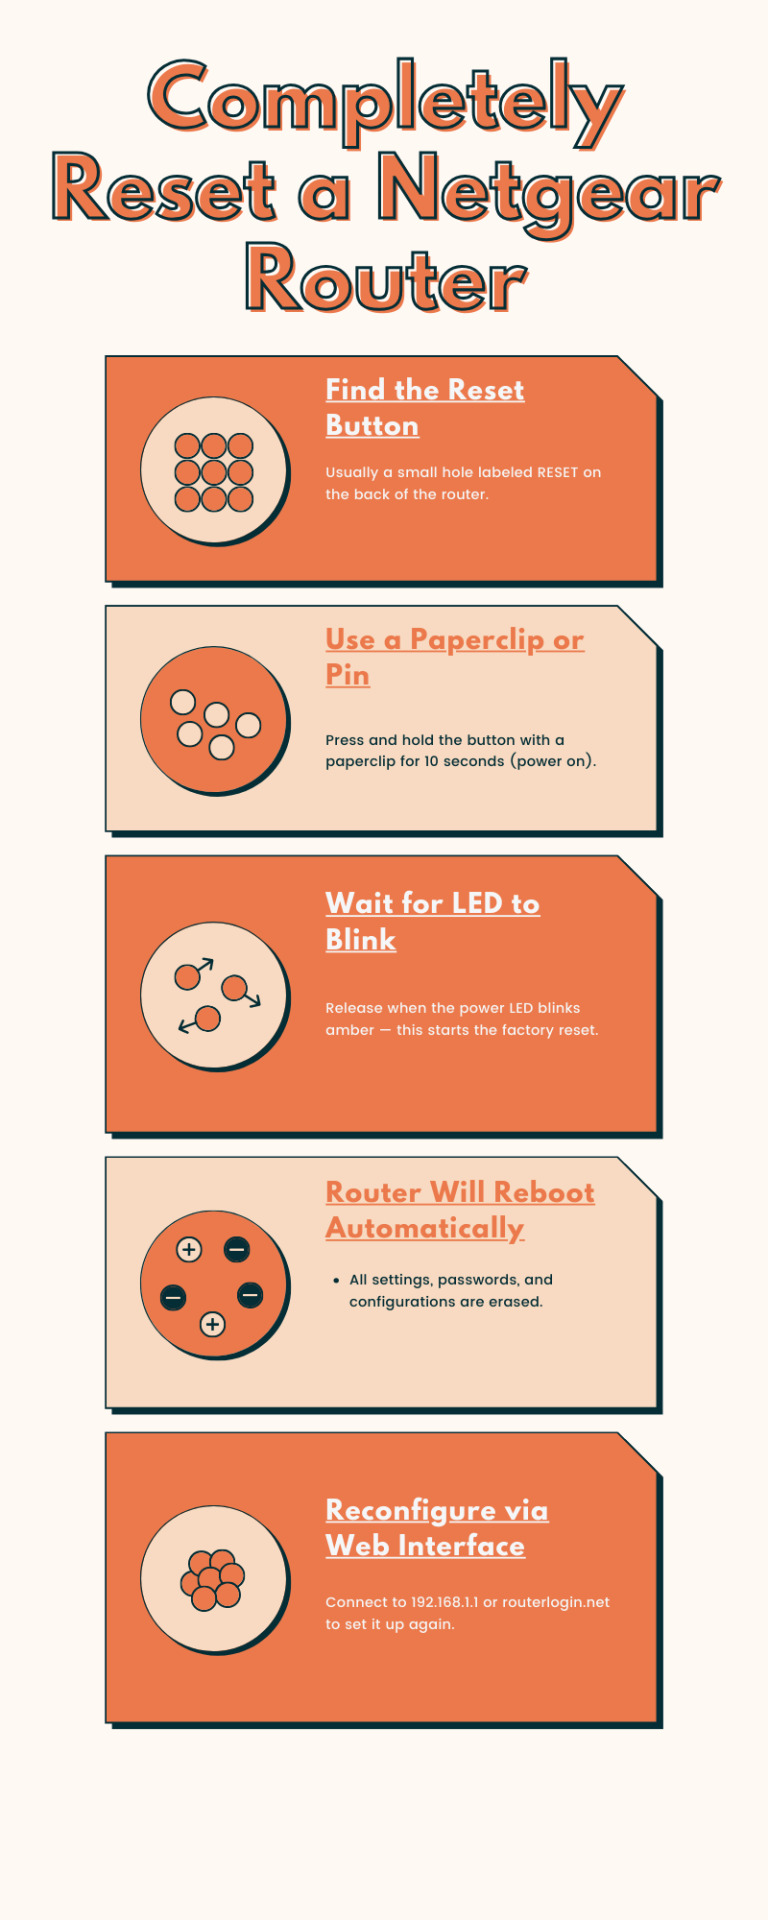
Completely Reset a Netgear Router
To Completely Reset a Netgear Router, locate the reset button (often recessed) on the back or bottom. With the router powered on, press and hold this button for about 7 seconds using a paper clip until the lights blink, indicating a factory reset. If you require reconfiguration assistance, let us know in the chat box!
0 notes
Text
Setting Up Orbi Using 192.168.1.1
Did you finally decide to make a transition from regular routers to Netgear Orbi? If the answer is yes, then first you made a great choice next, you must surely be looking for its simple and straightforward setup process. Nobody can deny the importance of reliable wifi connectivity all around the corners of your abode. Traditional routers lack in providing wider coverage but Orbi stands out by providing high speed and seamless coverage to the entire area. So in this guide we'll be sharing the complete and accurate details about 192.168.1.1 orbi setup. So you get to make the best use of your Orbi.
✓ Things You Need For The Setup
For the setup you need following components:
A modem with an active internet plan.
Power adapters for activation of Orbi and its satellites.
An ethernet cable for building a connection between the Orbi and host modem.
A smart device like iPad, smartphone, tablet and even a computer would work great.
Thereafter the requirement is a vacant power outlet.
Lastly, a quick user guide for accessing default information about 192.168.1.1 orbi setup.
Your Orbi Setup Journey Begins Here !
Before initiation of the Orbi setup, please consider this important information. So if you have already given a try to the setup process, but the outcome was not in your favor then factory reset is a must for redoing the configuration. As factory reset revert the configuration done by you to the device. This will help you with the smooth setup. Do not know how to conduct a reset on Orbi? If yes, no issues check out the last head.
✓ Begin With Powering On The Orbi
The first step towards 192.168.1.1 orbi setup is to activate the Orbi. First of all disconnect the existing modem as well as the router if any. Now reboot your modem. To do so just unplug it from the power socket, wait for about a minute and replug. Now fetch an Ethernet cable. Using the same creates a connection between the Orbi and the modem. Make sure you use the right ports for building this connection. Thereafter to activate the Orbi use a given power adapter. As you turn on the Orbi, its power LED will flash initially. So now your task is to wait till the LED solidifies into a white color. Now you are all set for moving towards the next 192.168.1.1 orbi setup step.
✓ Pair Orbi With Your Smart Device
In this step you need to pair your smart device to the Orbi. Two approaches are available for the same.
For making a wireless connection, use the details as are written on the Orbi's bottom panel. Make sure you are connecting to the right network, otherwise you'll end up facing issues with 192.168.1.1 orbi setup.
If you do not want any hassle, then the simple option is to use an Ethernet cable. First attach the cable to your smart device. Next, plug the second end into the Ethernet port of your Orbi.
✓ Time To Use The Web Browser
After a successful connection with the smart device, launch an internet browser. Want recommendations? If yes, then select between internet explorer, chrome, firefox, edge or safari. Now hop towards the address field. Enter 192.168.1.1. Recheck the accuracy and hit enter.
✓ Proceed With The On-screen Instructions
First you have to confirm the terms of use and conditions. and tap Next. Now the 192.168.1.1 orbi satellite page will open up. You now need to power up your Orbi satellites. Do this very strategically, place them within the range of the main Orbi router and also place each satellite in such a manner that they can communicate easily to each other. As you do so tap Next. The Orbi router will check the satellites and for this it might take 3 to 4 minutes. As it completes tap Next. Now the admin page opens up. So give in the asked details and thereafter follow the remaining on-screen setup prompts one by one.
Lastly, the page will look for the pending firmware updates. So it's an expert recommendation to not skip this part as up-to-date Orbi will offer you the best networking experience. This was it for the 192.168.1.1 orbi setup.
Guide To Resetting The Orbi
To reset your Orbi you first need to take care of a few important things. First during the Orbi reset your Orbi should be active. It means it should have a proper supply of electricity. Next, during the reset, do not perform any activity on the device such as disconnecting it from the power outlet, as this may cause irreparable damage to your device. For reset you need a paper clip, if you do not have one use a toothpick.
So now search for the reset key on Orbi’s panel. As you see, slide in the paperclip. Push and hold it down till the LED starts flickering. Now release it and the device is ready for a fresh 192.168.1.1 orbi setup process.
0 notes
Video
youtube
How to Factory Reset Netgear Modem Router (2024)
0 notes
Text
can't connect to netgear router through vpn
🔒🌍✨ Get 3 Months FREE VPN - Secure & Private Internet Access Worldwide! Click Here ✨🌍🔒
can't connect to netgear router through vpn
Netgear router VPN setup
Setting up a VPN (Virtual Private Network) on your Netgear router can enhance your online privacy and security by encrypting your internet connection. This allows you to browse the web anonymously and securely, especially when using public Wi-Fi networks. By setting up a VPN on your Netgear router, you can protect your sensitive data from potential cyber threats and unauthorized access.
To begin the setup process, you will first need to choose a VPN service provider that is compatible with Netgear routers. Once you have selected a VPN service, you will need to log in to your Netgear router's admin panel using a web browser. Navigate to the VPN section in the router settings and enter the configuration details provided by your VPN service provider.
Next, you will need to configure the VPN settings on your Netgear router, including choosing the VPN protocol (such as OpenVPN or PPTP) and entering the server address and login credentials. Once you have entered all the necessary information, save the settings and restart your router to apply the changes.
After the setup is complete, you can connect your devices to the VPN-enabled Netgear router to secure your internet connection and enjoy private browsing. Keep in mind that setting up a VPN on your router may slightly impact your internet speed due to the encryption process, but the added security and privacy benefits are well worth it.
Overall, setting up a VPN on your Netgear router is a straightforward process that can significantly enhance your online security and privacy. By following these steps, you can browse the web with peace of mind knowing that your data is protected.
Troubleshoot VPN connection to Netgear router
Having trouble with your VPN connection to your Netgear router? Don't worry, you're not alone. VPN (Virtual Private Network) issues can be frustrating, but with a bit of troubleshooting, you can often resolve them without too much hassle.
Firstly, ensure that your Netgear router's firmware is up to date. Manufacturers often release updates to address compatibility issues and enhance performance, so checking for and installing any available updates could resolve your VPN problem.
Next, double-check your VPN settings. Make sure you've entered the correct server address, username, and password. Even a small typo can prevent your VPN from connecting properly.
If you're still having trouble, try restarting both your router and your device. Sometimes, a simple reboot can fix connectivity issues by refreshing the network settings.
Additionally, check if your VPN service is experiencing any outages or server issues. Visit their website or contact their support team for assistance.
If you're using a third-party VPN client, try connecting directly through your device's built-in VPN settings instead. This can help determine if the issue lies with the VPN client or the router.
If none of the above steps resolve your VPN connection problem, it may be worth resetting your router to its factory defaults and reconfiguring it from scratch. However, be sure to back up your settings beforehand, as this will erase all custom configurations.
In some cases, certain router models may have specific VPN compatibility issues that require advanced troubleshooting. In such instances, reaching out to Netgear's support team or consulting online forums for assistance from experienced users may be necessary.
By following these troubleshooting steps, you can hopefully resolve your VPN connection issues and enjoy secure internet browsing through your Netgear router once again.
VPN configuration for Netgear router
A VPN (Virtual Private Network) configuration for your Netgear router can provide an added layer of security and privacy when browsing the internet. Setting up a VPN on your router ensures that all devices connected to your home network are protected, without the need for individual installations on each device.
To configure a VPN on your Netgear router, you will first need a VPN service provider and the necessary login credentials. Access your router's settings by typing its IP address into a web browser and logging in with your admin username and password. Locate the VPN section in your router settings, where you can input the details provided by your VPN service.
Choose the VPN protocol recommended by your service provider, such as PPTP, L2TP, or OpenVPN. Input the server address, username, and password in the designated fields. You may also need to configure additional settings like encryption and authentication methods.
Once you have entered all the required information, save your settings and restart your router to apply the changes. You can now connect any device to your home network and enjoy the benefits of a secure and private internet connection.
Remember to regularly update your VPN configuration and keep your router's firmware up to date to ensure optimal performance and security. By following these steps, you can enhance your online privacy and protect your personal data while using your Netgear router.
Unable to connect to Netgear router via VPN
If you're experiencing difficulties connecting to your Netgear router via VPN, don't worry, you're not alone. This issue can be frustrating, but with some troubleshooting steps, you can often resolve it on your own.
Firstly, ensure that your Netgear router supports VPN connections. Not all routers have this capability, so check the specifications of your model to confirm.
Next, verify that you have configured your VPN settings correctly. Double-check the VPN server address, username, password, and any other relevant details. Even a small mistake in the configuration can prevent a successful connection.
If you're using a third-party VPN service, make sure it's compatible with your Netgear router. Some routers have limitations on the types of VPN protocols they support, so ensure that your VPN service aligns with these requirements.
Check your router's firmware and ensure it's up to date. Sometimes, outdated firmware can cause compatibility issues with VPN connections. Visit Netgear's official website to download and install the latest firmware version for your router model.
Additionally, check if there are any firewall or security settings on your router that might be blocking VPN connections. Temporarily disable these settings to see if it resolves the issue, but remember to re-enable them afterwards for security purposes.
If you're still unable to connect to your Netgear router via VPN after trying these steps, consider reaching out to Netgear customer support for further assistance. They may be able to provide specific troubleshooting steps tailored to your router model and configuration.
Netgear router VPN connectivity issues
Title: Troubleshooting Netgear Router VPN Connectivity Issues
Netgear routers are renowned for their reliability and performance, but like any technology, they can encounter issues from time to time. One common problem users face is difficulty connecting to a Virtual Private Network (VPN) through their Netgear router. VPN connectivity issues can be frustrating, but there are several troubleshooting steps you can take to resolve them.
Firstly, ensure that your Netgear router's firmware is up to date. Manufacturers often release firmware updates to address known issues and improve performance, including VPN connectivity issues. You can typically update the firmware through the router's web interface or Netgear's official website.
Next, double-check your VPN settings. Ensure that you have entered the correct server address, username, and password. Sometimes, a simple typo can prevent a successful connection. Additionally, verify that your VPN subscription is active and that you are not exceeding any connection limits imposed by your VPN provider.
If you're still experiencing issues, try restarting both your router and the device you're trying to connect to the VPN. This can often resolve temporary glitches or conflicts that may be preventing a successful connection.
Another troubleshooting step is to check for any firewall or security settings on your Netgear router that may be blocking VPN traffic. Temporarily disabling these settings can help determine if they are the source of the problem.
If none of the above steps resolve the issue, consider contacting Netgear support or your VPN provider for further assistance. They may be able to provide additional guidance or troubleshoot the problem remotely.
In conclusion, VPN connectivity issues with Netgear routers can be frustrating, but by following these troubleshooting steps, you can often resolve them and enjoy a secure and private internet connection once again.
0 notes
Text
can't vpn with netgear wndr3400
🔒🌍✨ Get 3 Months FREE VPN - Secure & Private Internet Access Worldwide! Click Here ✨🌍🔒
can't vpn with netgear wndr3400
Netgear WNDR3400 VPN troubleshooting
Netgear WNDR3400 VPN troubleshooting can be a challenging task for some users, but with the right guidance, it can be a smooth process. Virtual Private Networks (VPNs) are essential for ensuring secure and private internet browsing, especially when using public Wi-Fi networks. However, issues may arise when trying to set up or connect to a VPN on your Netgear WNDR3400 router.
One common troubleshooting step is to ensure that your Netgear router's firmware is up to date. Outdated firmware can lead to compatibility issues with VPN services, causing connectivity problems. Updating the firmware can often resolve these issues and improve the overall performance of your router.
Another important step is to double-check the VPN settings on your Netgear WNDR3400 router. Make sure that the VPN configuration matches the settings provided by your VPN service provider. Incorrect settings can prevent you from establishing a secure connection to the VPN server.
If you are still experiencing difficulties, you may want to consider resetting your Netgear WNDR3400 router to its factory settings. This can help eliminate any misconfigurations or software glitches that may be causing the VPN connection problems.
In some cases, contacting your VPN service provider for assistance can also be beneficial. They may be able to offer specific troubleshooting steps or settings tailored to your Netgear router model.
By following these troubleshooting tips and being patient, you can effectively resolve VPN issues on your Netgear WNDR3400 router and enjoy a secure internet browsing experience.
VPN setup Netgear WNDR3400 guide
A VPN, or Virtual Private Network, is a powerful tool that helps protect your online privacy and security by creating a secure and private connection over the internet. Setting up a VPN on a Netgear WNDR3400 router can provide enhanced security for all devices connected to your home network.
To set up a VPN on your Netgear WNDR3400 router, you will first need to choose a reliable VPN service provider. Once you have selected a VPN service, you will need to access your Netgear router’s settings by entering the router’s IP address into a web browser.
Next, navigate to the router’s settings page and locate the VPN section. Here, you will need to enter the configuration details provided by your chosen VPN service provider, including the VPN server address, username, and password. Save the settings and activate the VPN connection.
By setting up a VPN on your Netgear WNDR3400 router, you can ensure that all data transmitted between your devices and the internet is encrypted and secure. This can help protect your personal information from hackers, ISP monitoring, and other online threats.
Overall, setting up a VPN on your Netgear WNDR3400 router is a relatively simple process that can provide added security and privacy for all devices connected to your home network. By following the steps provided by your VPN service provider and configuring the settings on your router, you can enjoy a safer and more secure online experience.
Netgear WNDR3400 VPN compatibility issues
Title: Troubleshooting Netgear WNDR3400 VPN Compatibility Issues
The Netgear WNDR3400 router is a popular choice for home and small business networks, offering reliable performance and a range of features. However, some users may encounter compatibility issues when trying to use a VPN (Virtual Private Network) with this router.
One common problem is that certain VPN protocols may not be fully supported by the WNDR3400 firmware. This can lead to difficulties in establishing a secure connection with the VPN server. Additionally, some VPN services may require specific settings or configurations that are not readily available in the router's interface.
Another issue could be related to the router's hardware limitations. The WNDR3400 may struggle to handle the encryption and decryption processes required by the VPN, especially when dealing with high data traffic or multiple devices connected to the network simultaneously. This can result in slow connection speeds or frequent disconnections.
Fortunately, there are several steps that users can take to troubleshoot and resolve VPN compatibility issues with the Netgear WNDR3400 router:
Check for firmware updates: Ensure that the router's firmware is up to date, as Netgear may release patches or updates to address compatibility issues with VPNs.
Adjust VPN settings: Experiment with different VPN protocols and settings to find the combination that works best with the WNDR3400 router.
Use a dedicated VPN client: Instead of relying on the router's built-in VPN capabilities, consider installing a dedicated VPN client on individual devices for better compatibility and performance.
Contact customer support: If all else fails, reach out to Netgear's customer support for assistance. They may be able to provide guidance or recommend alternative solutions to address the compatibility issues.
By following these steps and troubleshooting methods, users can overcome VPN compatibility issues with the Netgear WNDR3400 router and enjoy secure and reliable internet connectivity.
Netgear WNDR3400 VPN configurations
Configuring a VPN (Virtual Private Network) on your Netgear WNDR3400 router can enhance your online security and privacy. A VPN creates a secure connection to another network over the internet, encrypting your data and masking your IP address. Setting up a VPN on your router allows you to protect all devices connected to your network.
To configure a VPN on your Netgear WNDR3400 router, you will need to access the router's admin panel through a web browser. Navigate to the VPN section in the settings menu and select the option to set up a new VPN connection. You will need to input the VPN server details provided by your VPN service provider, including the server address, username, and password.
After entering the VPN server details, save the settings and establish a connection to the VPN server. Once connected, all data transmitted from your devices through the router will be encrypted, ensuring your online activities remain private and secure.
It is important to choose a reputable VPN service provider that offers reliable connections and strong encryption protocols. Additionally, regularly updating your router's firmware can help maintain optimal VPN performance and security.
By configuring a VPN on your Netgear WNDR3400 router, you can enjoy a more secure online experience, protecting your sensitive information from unauthorized access and surveillance. Take control of your online privacy today by setting up a VPN on your router and browsing the internet with peace of mind.
Netgear WNDR3400 VPN connectivity problems
Title: Troubleshooting Netgear WNDR3400 VPN Connectivity Issues
If you're encountering VPN connectivity problems with your Netgear WNDR3400 router, several factors could be at play. VPN (Virtual Private Network) issues can arise due to various reasons, ranging from configuration errors to compatibility issues. Here are some troubleshooting steps to resolve VPN connectivity problems with the Netgear WNDR3400:
Update Firmware: Ensure that your router's firmware is up to date. Manufacturers often release firmware updates to address known issues and improve compatibility with VPN protocols.
Check VPN Settings: Double-check the VPN settings on your router. Ensure that the VPN configuration matches the requirements provided by your VPN service provider. Incorrect settings can lead to connection failures.
VPN Protocol Compatibility: Verify whether the VPN protocol you're using is supported by the Netgear WNDR3400 router. Some routers may have limitations on supported VPN protocols. Try switching to a different VPN protocol (e.g., from PPTP to L2TP/IPsec) to see if it resolves the issue.
Firewall Settings: Adjust the firewall settings on your router to allow VPN traffic. Sometimes, overly restrictive firewall settings can block VPN connections. Open the necessary ports for VPN communication or temporarily disable the firewall to test the VPN connection.
Restart Router and Devices: Sometimes, simply restarting the router and the devices connected to it can resolve temporary connectivity issues. Power cycle the router and restart your computer or other devices attempting to establish the VPN connection.
Contact VPN Support: If the issue persists after trying the above steps, reach out to your VPN service provider for assistance. They may provide specific troubleshooting steps tailored to their VPN service or advise on alternative solutions.
By following these troubleshooting steps, you can diagnose and resolve VPN connectivity problems with your Netgear WNDR3400 router, ensuring seamless and secure access to your VPN network.
0 notes
Text
can't connect to vpn with netgear r6400
🔒🌍✨ Get 3 Months FREE VPN - Secure & Private Internet Access Worldwide! Click Here ✨🌍🔒
can't connect to vpn with netgear r6400
VPN setup Netgear R6400
Setting up a VPN on your Netgear R6400 router ensures that your internet connection is secure and your online activities are kept private. With VPN (Virtual Private Network) technology, you can encrypt your data and route it through a secure server, protecting your sensitive information from hackers and prying eyes.
To set up a VPN on your Netgear R6400 router, follow these steps:
Log in to your router's web interface by entering the router's IP address in your web browser. You can find the default IP address in the router's user manual or on the manufacturer's website.
Once logged in, navigate to the VPN section in the router settings. Look for options like "VPN Service" or "VPN Client."
Enter the VPN server details provided by your VPN service provider. This typically includes the server address, your username, and password.
Choose the VPN protocol you want to use, such as OpenVPN or PPTP. OpenVPN is recommended for its security and stability.
Save your settings and restart your router to apply the changes.
Test your VPN connection by connecting a device to the router and accessing the internet. You can check your IP address to confirm that your internet traffic is being routed through the VPN server.
By setting up a VPN on your Netgear R6400 router, you can browse the internet securely and anonymously, protecting your online privacy and data from potential threats.
Troubleshooting VPN Netgear R6400
Title: Troubleshooting Guide for VPN Connectivity Issues on Netgear R6400
The Netgear R6400 router is a popular choice for home and small office networks, offering robust features including VPN (Virtual Private Network) support. However, like any networking device, it can encounter connectivity issues that may disrupt VPN functionality. Here's a troubleshooting guide to help you resolve common VPN problems on the Netgear R6400:
Check Internet Connection: Before troubleshooting VPN issues, ensure that your router has a stable internet connection. Verify the connection by accessing non-VPN websites or services.
VPN Configuration: Double-check your VPN configuration settings on the Netgear R6400. Ensure that the VPN client credentials, server address, and other settings are correctly entered.
Firmware Update: Outdated firmware can cause compatibility issues with VPN connections. Check for firmware updates on the Netgear support website and apply any available updates to your router.
VPN Server Status: Verify the status of the VPN server you're trying to connect to. Sometimes, server maintenance or outages can prevent successful VPN connections.
Firewall Settings: Adjust the firewall settings on the Netgear R6400 to allow VPN traffic. Enable port forwarding or open the necessary ports for VPN communication.
Client-Side Issues: If the VPN client is installed on a computer or mobile device, troubleshoot any issues on the client-side. Restart the device, reinstall the VPN client, or try connecting from a different network.
Reset and Reconfigure: As a last resort, perform a factory reset on the Netgear R6400 router and reconfigure it from scratch. This can help eliminate any configuration errors that may be causing VPN connectivity issues.
By following these troubleshooting steps, you can diagnose and resolve VPN connectivity issues on your Netgear R6400 router, ensuring a secure and reliable connection for your network. If problems persist, contact Netgear support for further assistance.
Netgear R6400 VPN connection issues
When it comes to securing your internet connection at home, using a Virtual Private Network (VPN) on your Netgear R6400 router can be a great way to protect your online activities. However, sometimes users may encounter issues when setting up or using a VPN connection on the Netgear R6400.
One common issue that users face with VPN connections on the Netgear R6400 is the inability to establish a stable connection. This can be caused by various factors such as network interference, incompatible VPN protocols, or incorrect VPN settings. To troubleshoot this issue, users can try changing the VPN protocol settings on their router, ensuring that the firmware is up to date, or contacting their VPN service provider for assistance.
Another issue that users may encounter is slow connection speeds when using a VPN on the Netgear R6400. This can be frustrating, especially when trying to stream content or download files. To improve connection speeds, users can try connecting to a different VPN server, changing the encryption settings on their VPN, or upgrading their internet plan for faster speeds.
Overall, while VPN connection issues on the Netgear R6400 can be frustrating, they can usually be resolved with some basic troubleshooting steps. By ensuring that the router firmware is up to date, adjusting VPN settings, and contacting your VPN service provider for help, users can enjoy a secure and stable internet connection with their Netgear R6400 router.
VPN configuration Netgear R6400
To configure a VPN on Netgear R6400, follow these simple steps. Begin by logging into your router's web interface by entering the router's IP address into a web browser. Enter the username and password when prompted.
Next, locate the VPN settings in the router's menu. You may find these under the Advanced tab or in the VPN section, depending on your router model. Click on the VPN menu to continue.
Select the option to add a new VPN connection or configuration. You will need to enter the VPN provider's details, including the server address, type of VPN (such as PPTP or OpenVPN), username, and password. Save the settings once you have entered all the required information.
To establish the VPN connection on your device, you will need to enter the VPN credentials provided by your VPN service provider. These details typically include the server address, your username, and password.
After configuring the VPN on your Netgear R6400 router, ensure that you enable the VPN connection to protect your online activities and data. You can do this by selecting the VPN connection from the router's VPN menu and clicking on the connect option.
With your VPN configured on the Netgear R6400 router, you can now enjoy a secure and encrypted internet connection for all your devices connected to the network. Remember to update your VPN settings as needed and regularly check for firmware updates from Netgear to ensure optimal performance and security.
Netgear R6400 VPN not working
If you’re facing issues with your Netgear R6400 VPN not working as expected, you’re not alone. VPN (Virtual Private Network) setup problems can be frustrating, but there are steps you can take to troubleshoot the issue.
Firstly, ensure that you have configured the VPN settings correctly on your Netgear R6400 router. Check that the VPN service you are using is supported by the router and that you have entered the correct server information and credentials.
If your VPN is still not working, try restarting your router and device. Sometimes, a simple reboot can resolve connectivity issues. Additionally, check for any firmware updates for your Netgear R6400 router. Updating the firmware can sometimes fix bugs and improve overall performance, including VPN connectivity.
It’s also worth checking if the VPN service itself is experiencing any downtime or technical problems. Visit the VPN provider’s website or contact their support team for more information.
If none of the above steps work, you may need to reset your Netgear R6400 router to its factory settings and reconfigure the VPN settings from scratch. Remember to backup your existing configuration settings before performing a reset to avoid losing any important data.
By following these troubleshooting tips, you should be able to resolve the issue of your Netgear R6400 VPN not working and enjoy a secure and private internet connection once again.
0 notes
Text
Unable to tackle issues with your Orbi router? Don’t panic! Netgear Orbi Router Reset will help you to fix them all. Usually, you can perform a factory reset through the reset button, Web GUI method, or using the app. Additionally, to know the steps for each particular factory reset method, visit our website.
0 notes
Text
How To Fix The Issue Of Netgear Router Keep Dropping Internet Connection?
If your Netgear router keep dropping internet connection, you must restart the router, and check the WiFi signal strength. Also, check if your device has the latest firmware version, and try factory resetting your Netgear router. But if your Netgear router still drops the internet connection, check out more troubleshooting methods on our website.
0 notes
Text
Troubleshooting Guide 2024: Mywifiext Not Working — Resolving Common Issues

Check the Basics: Before delving into complex troubleshooting, ensure the basics are in order.
Confirm that your WiFi extender is powered on.
Verify that the extender is within the range of your existing WiFi network.
Make sure you’re using the correct web address for the Mywifiext setup.
Browser Compatibility: Mywifiext is optimized for certain browsers. Incompatibility issues might arise if you’re using an outdated or unsupported browser. Try accessing the setup page using different browsers like Chrome, Firefox, or Edge.
Clear Browser Cache: Cached data can interfere with the loading of web pages. Clear your browser cache and try accessing Mywifiext again.

Connectivity Issues:
Ensure a stable and active internet connection. If possible, connect your computer directly to the extender with an Ethernet cable to rule out WiFi issues.
Reboot your modem, router, and extender to refresh the network.
Firewall and Antivirus Settings: Security software may sometimes block access to Mywifiext. Temporarily disable your firewall and antivirus programs and attempt to access the setup page. Remember to re-enable them after troubleshooting.
Firmware Updates: Ensure that your extender’s firmware is up to date. Check the Netgear support website for the latest firmware version and update if necessary.
Factory Reset: If all else fails, consider performing a factory reset on your WiFi extender. This will revert the settings to default, and you can start the setup process anew.
Contact Support: If the issue persists, it might be time to seek professional help. Contact Our support (+1855–201–8071) for assistance. Be prepared to provide detailed information about your setup, including the extender model and any error messages you encountered.
Conclusion: The “Mywifiext not working” issue can be caused by various factors, ranging from simple configuration errors to more complex network issues. By systematically troubleshooting each potential problem, you increase your chances of resolving the issue and enjoying a seamless WiFi extender experience. Remember to document any changes you make during troubleshooting for future reference.
#Mywifiext Not Working#mywifiext net not working#www mywifiext net refused to connect#mywifiext net is not working
0 notes
Text
Troubleshooting Tips for Netgear Extender and Laptop Connectivity Issues
A Netgear WiFi extender is a handy device that helps expand your existing wireless network coverage in areas where the signal is weak or doesn't reach. For example, you may have WiFi dead zones in parts of your home or office that are too far from your main router. The extender connects wirelessly to your router, catches the existing WiFi signal, and rebroadcasts it using the same network name and password. This effectively boosts the range and fills in any dead spots, allowing you to get online from more locations.However, many laptop users run into issues getting their devices to connect properly to the Netgear extender network. You may notice lost connections, slow speeds, or not seeing the extender WiFi network at all during the scan for available connections. This inability to connect can be very frustrating when you can't get online.This article will provide several useful troubleshooting tips to help diagnose and fix the connectivity issues between your laptop and Netgear WiFi range extender. We'll outline key steps to get your laptop back online and connected through the extender network. Follow our troubleshooting guide below to resolve problems joining the extended network. Easy Steps to Fix a Netgear Extender That Won't Connect to Your Laptop1. Confirm the Extender is Working 2. Check Connectivity on Other Devices 3. Restart the Laptop and Adapter 4. Eliminate Any Viruses or Malware 5. Update Network Adapter Drivers and Firmware 6. Forget and Reconnect to the Network 7. Double Check Extender Password 8. Adjust Extender Placement 9. Change the WiFi Channel to Avoid Interference 10. Factory Reset Extender Read the full article
#connect#connection#connectivity#contactsupport#driverupdate#extender#firmwareupdate#laptop#netgear#Netgearextender#netgearextendersetup#netgearrangeextender#netgearsetup#netgearwifiextender#optimizewifiextender#password#reset#technicalsupport#tips#troubleshoot#troubleshooting#wifi#wificonnectivity#wifiextender#WiFiextendernotconnectingtolaptop#wifiextenderoptimization#wifiextendertroubleshooting#wifihelp#wifirangeextender#wifisetup
0 notes
Text
How to Reset Orbi Router?
The Netgear Orbi router is among the best mesh WiFi routers of all time. This router is known for its top-notch functioning and features. You can nevertheless experience problems with your Netgear Orbi. You must be aware of how to reset Orbi in such circumstances. The Netgear Orbi router's faults and issues will all be resolved after the factory reset.
The reset can be helpful in eliminating the issues within the Orbi router. Thus, you must know how to reset Orbi router. You can easily reset the router using the reset button. But, keep in mind that the resetNavigate to the Main Menu in the app and select the Network Administration tab. also restores the factory default settings.
If you want to know how to reset Orbi router, we’ve got you. We are here with this post to help users reset their router correctly. This post will explain the complete procedure for the reset. We will explain the thorough process for the reset. So, keep reading ahead to find out.
Steps to Reset Orbi Router
You can reset the router using the reset button easily. Before you reset the router, you must know the reset will restore the factory default settings. So, you will have to set it up from scratch after the reset. Before the reset, ensure to try out the troubleshooting methods. When they don’t work, you can reset the router. The steps for the reset are as follows:
To begin with, find the reset button on the Orbi router.
Now, press the reset button and hold it.
You should see the LED light on the router blink amber, release the button.
The reset is complete and all default settings are back.
At last, set up the router from scratch from the user interface.
These are the steps to reset Orbi router. Once the reset is successful, you can set up the Orbi router from scratch. If there’s anything else you require assistance with, contact us.
0 notes
Text
Top Ways to Fix Netgear Wifi Extender Orange Light
You can easily add multiple devices with the Netgear extender. When using the extender, there is no dead zone in your location. You will also get fast speed of the network and it also increases the performance of your device. Most of the time, the extender works well, but sometimes Netgear wifi extender orange light issue occurs. When this issue appears, it usually indicates that it is not connected to the router properly.

Causes of the Netgear Wifi Extender Orange Light
Several factors can cause the Netgear Wifi extender orange light. When the extender is orange, it is not receiving a strong enough signal from the main router. There may be interference from other electronics or too much distance between the extender and the router. Move the extender closer to the router, turn it off, or move other electronic devices away from the extender to fix the issue. A stronger signal from the main router will allow the extender to connect appropriately. The primary reasons are:
Power supply malfunctions are possible.
There is something wrong with your Ethernet cable.
Sometimes users use outdated Netgear extender firmware.
There is also a chance of technical glitches.
Sometimes there is signal interference.
There was an error in your Netgear extender setup.
There are problems with the placement of Wi-Fi devices.
Now you can quickly solve the Netgear wifi extender orange light issue.
Ways to Fix Netgear Wifi Extender Orange Light
You can use the below methods to fix the Netgear Wi-Fi extender orange light. You must follow them properly.
Reboot Your Netgear Extender
The first thing you need to do is restart your Netgear wireless range extender. Your device might be fixed by rebooting if you are experiencing orange light issues. To save time, avoid other troubleshooting tips.
The Netgear range extender needs to be turned off.
Plugging it into a wall outlet is no longer necessary.
You only need a few seconds.
You can use it once you have connected it to an electrical outlet.
After this, you can check whether the Netgear wifi extender orange light issue is solved or not.
Update Netgear Extender Firmware
Keeping Netgear firmware up-to-date is always a good idea. Your Netgear WiFi extender's orange light issue can be resolved by updating its firmware. Follow these steps to get started:
It is necessary to update the web browser installed on your device.
Setup instructions for a Netgear extender are provided on this page.
Choosing Firmware Update from Settings > Maintenance will update the firmware.
There are now firmware updates available.
Now you can click to access it.
Here, you can wait a few minutes until the firmware update.
Here you can also check if the Netgear WiFi extender orange light problem is fixed or not.
Check the Ethernet Connection
It is necessary to connect the Netgear extender to the router. You don't need to tighten or replace your cables. You won't waste your time if your Ethernet cable is damaged. Users can be replaced as soon as possible. Replace the cable on your Netgear wifi extender to see if the orange light is solved or not.
Check Power Supply
A common problem with Netgear extenders is faulty or damaged power outlets. Power outlets must be checked regularly. Power can also be provided to the extender by replacing a wall socket. As a result, faulty power outlets can damage the extender by not providing enough power to operate it. By replacing the wall socket, you can ensure that the extender gets the power it needs to work.
Reset Your Netgear Extender
Netgear WiFi extender with orange lights can be reset to factory defaults to resolve the issue. You may try this if you have tried all the troubleshooting tips listed above. It is necessary to follow several steps to make this process successful. It removes all extension settings as well as allowing a reset.
A factory default reset will restore the extender's functionality and restore its original settings. You can identify any software-related issues causing the orange light issue and resolve them. By doing this, you can troubleshoot hardware-related issues with a fresh start.
You must first locate the reset button on your Netgear extender.
You can reset the button with a safety pin if it needs to be reset. Use the safety pin to firmly press the reset button on the machine to reset it.
It is also crucial to wait a few minutes until the reset process is complete. To fix the orange light on the Netgear wireless extender, it takes a few minutes after the reset process.
It is also imperative to set up your Netgear extender perfectly and seamlessly network.
Wrap Up
You can use the above methods to fix the Netgear wifi extender orange light issue. It is also important for users to follow all the steps properly.
#Netgear wifi extender orange light#why does my netgear router have an orange light#Netgear WiFi Extender login
1 note
·
View note
Text
How to Factory Reset Netgear Router?
1 note
·
View note
Link
The way you decide how your router will function in the upcoming time. Of course, there is more than one option to do it. You can either press the reset button, located at the backside or go for a soft reset which can be done by following some simple steps. To know more about it. To know How To Reset Netgear Router, simply connect with the tech-experts and get instant solutions from them.
#resetting netgear router#Reset Netgear Router#How To Reset Netgear Router#Netgear Router Reset#Factory Reset Netgear Router#Reset Netgear Router Password
1 note
·
View note
Video
tumblr
Netgear, world’s best brands highly known to offer a range of networking products at an affordable cost. If you want instant help on resetting the router, you simply need to get in touch with us and he will teach you how to reset Netgear router. By doing this, all your bugs will be fixed. If you want to understand more about this, you can ask our tech-experts. For more information, contact us any time of the day and night. Moreover, you can contact us via email address.
#reset netgear router#netgear router reset#factory reset netgear router#netgear router faactory reset
0 notes