#Reset Netgear Router
Explore tagged Tumblr posts
Visit Tumblr Blog
Explore Tumblr blogs with no restrictions, modern design and the best experience.
Last Seen Tumblr Blogs


Fun Fact
There were a total of 171.5 billion posts on Tumblr in 2019.
Text
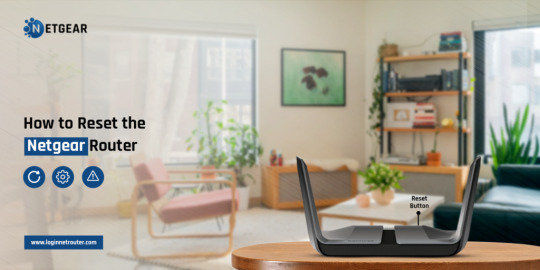
How to Reset Netgear Router?

To Reset Netgear router, locate the reset button at the back of the router and pick a paper clip to the button in. Now, press & hold the reset button for at least 5-10 seconds and then release. Here, the reset procedure is complete. For more info, reach out to us!
1 note
·
View note
Text
How to Reset the Netgear Router?
Are you having difficulties with your Netgear router? One of the best ways to overcome this issue is to perform a Netgear router reset. To begin the reset process, you have to locate the RESET button on your router, press it for a specific time, and wait patiently. In case you feel this process is hard to perform, you can give us a call!
0 notes
Text
Troubleshooting: How to Reset Your Orbi Router

To reset the Orbi router, open the web browser of your choice. Now enter the orbilogin.com web address and the login window prompts you. Here enter your valid admin details to access the admin panel. Next, go to Menu>Adminstration>Erase. Now, your device is back in default settings. To learn about the configuration procedure, visit us!
0 notes
Text
Guide for Reset Orbi WiFi Router?
For easy Orbi Router reset, locate the reset button on the device and then grab a paper clip to push the button in. Now, press & hold the reset button for a few seconds. Here, release the button when the power LED starts blinking. The blinking light represents that the reset process is done. To know more detailed information, approach us!

0 notes
Text
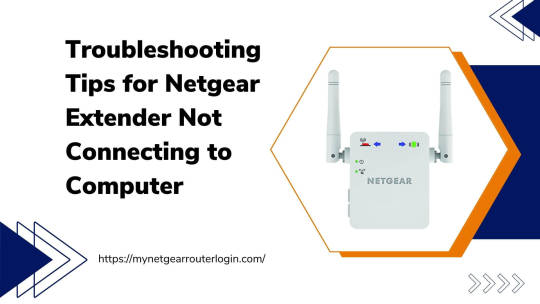
Troubleshooting: Tips for Netgear Extender Not Connecting to Computer
A Netgear WiFi range extender is a useful device that can help expand the reach of your existing wireless network. By connecting to your router wirelessly, an extender grabs the existing WiFi signal and rebroadcasts it further into areas that may have poor or no coverage, like the far corners of your home or out in the backyard.This gives you the ability to get internet access in dead zones that your router may not reach on its own. But even after a successful Netgear WiFi range extender setup, some users find that their Netgear extender won't connect to their computer for some frustrating reason.If you've managed to connect your extender to your main router but it won't connect to your computer, there are some troubleshooting steps you can try to fix the problem. With a bit of tinkering, you can have your extended wireless network up and running smoothly. Being unable to access the internet defeats the purpose of having a range extender in the first place!
Some of the Main Troubleshooting Steps:
Check if the extender and computer are too far apart. Checking Extender's WiFi Network is Visible Using the Correct WiFi Password Restarting Your Computer Updating the Extender's Firmware Disabling Security Temporarily to Test Connection Resetting the Extender to Factory Settings
Conclusion
Having issues getting your Netgear WiFi range extender to connect to your computer can be frustrating. But hopefully, with the troubleshooting tips provided, you now have an action plan to get your devices communicating again.Following this structured troubleshooting approach should help isolate the cause and allow you to systematically fix connection problems between your Netgear extender and computer. Don't hesitate to also contact Netgear support if issues persist after trying these steps.With a properly located and configured Netgear extender, you can start enjoying the benefits of boosted WiFi coverage across your home network. Read the full article
#computer#connectivity#contactsupport#extender#extenders#firmware#netgear#Netgearextender#netgearrangeextender#network#reset#router#SSID#technicalsupport#tips#troubleshooting#wifi#wifihelp#wifisupport#wireless
0 notes
Text
Setting Up Orbi Using 192.168.1.1
Did you finally decide to make a transition from regular routers to Netgear Orbi? If the answer is yes, then first you made a great choice next, you must surely be looking for its simple and straightforward setup process. Nobody can deny the importance of reliable wifi connectivity all around the corners of your abode. Traditional routers lack in providing wider coverage but Orbi stands out by providing high speed and seamless coverage to the entire area. So in this guide we'll be sharing the complete and accurate details about 192.168.1.1 orbi setup. So you get to make the best use of your Orbi.
✓ Things You Need For The Setup
For the setup you need following components:
A modem with an active internet plan.
Power adapters for activation of Orbi and its satellites.
An ethernet cable for building a connection between the Orbi and host modem.
A smart device like iPad, smartphone, tablet and even a computer would work great.
Thereafter the requirement is a vacant power outlet.
Lastly, a quick user guide for accessing default information about 192.168.1.1 orbi setup.
Your Orbi Setup Journey Begins Here !
Before initiation of the Orbi setup, please consider this important information. So if you have already given a try to the setup process, but the outcome was not in your favor then factory reset is a must for redoing the configuration. As factory reset revert the configuration done by you to the device. This will help you with the smooth setup. Do not know how to conduct a reset on Orbi? If yes, no issues check out the last head.
✓ Begin With Powering On The Orbi
The first step towards 192.168.1.1 orbi setup is to activate the Orbi. First of all disconnect the existing modem as well as the router if any. Now reboot your modem. To do so just unplug it from the power socket, wait for about a minute and replug. Now fetch an Ethernet cable. Using the same creates a connection between the Orbi and the modem. Make sure you use the right ports for building this connection. Thereafter to activate the Orbi use a given power adapter. As you turn on the Orbi, its power LED will flash initially. So now your task is to wait till the LED solidifies into a white color. Now you are all set for moving towards the next 192.168.1.1 orbi setup step.
✓ Pair Orbi With Your Smart Device
In this step you need to pair your smart device to the Orbi. Two approaches are available for the same.
For making a wireless connection, use the details as are written on the Orbi's bottom panel. Make sure you are connecting to the right network, otherwise you'll end up facing issues with 192.168.1.1 orbi setup.
If you do not want any hassle, then the simple option is to use an Ethernet cable. First attach the cable to your smart device. Next, plug the second end into the Ethernet port of your Orbi.
✓ Time To Use The Web Browser
After a successful connection with the smart device, launch an internet browser. Want recommendations? If yes, then select between internet explorer, chrome, firefox, edge or safari. Now hop towards the address field. Enter 192.168.1.1. Recheck the accuracy and hit enter.
✓ Proceed With The On-screen Instructions
First you have to confirm the terms of use and conditions. and tap Next. Now the 192.168.1.1 orbi satellite page will open up. You now need to power up your Orbi satellites. Do this very strategically, place them within the range of the main Orbi router and also place each satellite in such a manner that they can communicate easily to each other. As you do so tap Next. The Orbi router will check the satellites and for this it might take 3 to 4 minutes. As it completes tap Next. Now the admin page opens up. So give in the asked details and thereafter follow the remaining on-screen setup prompts one by one.
Lastly, the page will look for the pending firmware updates. So it's an expert recommendation to not skip this part as up-to-date Orbi will offer you the best networking experience. This was it for the 192.168.1.1 orbi setup.
Guide To Resetting The Orbi
To reset your Orbi you first need to take care of a few important things. First during the Orbi reset your Orbi should be active. It means it should have a proper supply of electricity. Next, during the reset, do not perform any activity on the device such as disconnecting it from the power outlet, as this may cause irreparable damage to your device. For reset you need a paper clip, if you do not have one use a toothpick.
So now search for the reset key on Orbi’s panel. As you see, slide in the paperclip. Push and hold it down till the LED starts flickering. Now release it and the device is ready for a fresh 192.168.1.1 orbi setup process.
0 notes
Text
There’s a lot of choice out there when it comes to Wi-Fi home technology. The latest addition to the Wi-Fi world is the mesh router. Mesh networks are used in large places that require protected secure networks, such as businesses and military bases. These mesh networks have recently become available for residential users but the question is “do you need one?” If you live in a large home – such as one over 3,000 square feet – or in a home with an unusual layout, with more than two stories, then chances are you have a lot of internet dead zones in your home. If that sounds like you then you might benefit from installing a mesh network and mesh router. Several big names in the industry have started offering their own mesh routers, such as Linksys, Netgear, Samsung, and even Google are getting involved. With all of that choice and the improved popularity of mesh networks, many people are questioning what mesh Wi-Fi routers are and if they need one. What are Mesh Wireless Routers?You most likely know what a router is as it’s at the heart of every Wi-Fi network. This is the central part of the network that broadcasts wireless signals to connected devices. The router essentially routes internet traffic between devices and modems. It’s what sends the signal from the modem to your computer or phone. Most people completely forget that their router even exists until there’s a problem with their connection and they have to reset it to start things going again. The main problem with the traditional wireless router is that they have a limited range. Large buildings with multiple floors that all need wireless access are limited and have almost non-existent internet coverage. These lands where the internet forgot are known as “dead zones” and are created when a single-point router can’t reach a particular area. Mesh wifi routers can help to eliminate the problem of dead zones. Instead of sending out signals from a single fixed location, these networks offer a range of network access points. There is one main connection to the modem that works similar to a router, but there are other access points – called satellites – that capture this signal and broadcast it as if they were another router. The Benefits of Using a Mesh Router There are several benefits to using a mesh router for your network. The most obvious benefit is the increased range and reliability of the Wi-Fi signal, but it’s not the only benefit. Better Network Management Something that sets mesh networks apart from traditional routers is that they make it much easier to manage the network. Most mesh routers operate on a fully automated basis. Administrators can control and access the network through an app, even when out of the home or office.Mesh routers come with apps that allow users to control speeds, prevent access to particular networks and websites, establish guest networks for other users, test the connection quality of access points, and establish a connection to the wider Internet of Things of smart devices at home. The most expensive and high-tech mesh routers have even more features, but these features can only be controlled from the local network. Streamlined Connections If you want to extend the range of a traditional Wi-Fi network you would have to use a range extender. These work similar to the satellites of a mesh network by capturing and rebroadcasting the signal. The difference is that they often require users to manually create separate networks with unique names for the extender. They also aren’t as effective as a mesh network at maintaining a constant signal. Mesh networks mean that you don’t have to constantly reconnect to networks as you move your device through the home because it’s all on a single network. It also means that there’s less lag involved as everything uses the same signal instead of bouncing a signal across multiple networks. Better Security As well as being easier to control and manage, many mesh routers come with better security than standard network routers.
Because they are so much easier to manage, users will have an easier time keeping their network safe. Mesh Wi-Fi routers automatically check for firmware updates and automatically install them too. Some of them even come with the ability to block known malicious websites that present a security risk to computers. The Negatives of Using Mesh Routers Mesh routers may come with a lot of great benefits, but that doesn’t mean they don’t have their drawbacks. Here are some of the negatives of using mesh routers in your home. More Expensive Mesh routers can cost up to – and over - $300 for a good starter set. Additional satellites will cost an extra fee, often up to $100 per satellite. Traditional routers by themselves can cost around $100 for a good one, with range extenders costing between $20 and $100. You could create your own extended network for less than the cost of a mesh network. Can Waste Resources Mesh networks are only worth installing in homes that need them. The average mesh network is more than a small building or home needs. If you don’t have connection problems or you don’t have a high demand for the internet, then it’s probably excessive to invest in a mesh network. Range extenders can help cover up Wi-Fi dead zones and you can consider investing in a regular router with a greater range. Uses More Equipment While the access points of a mesh router are small and easily hidden, there’s still the fact that you might need several of them to take full advantage of a mesh network. You’ll need to find somewhere to store them in your home. That could be an issue for people who prefer having their network equipment in a single location out of the way. Do You Need a Mesh Wi-Fi Router?The biggest weakness of traditional routers is that they don’t cover large areas and buildings with walls that block signals. If you want a network that does, and you’re also interested in the other benefits of a mesh network system, then they could be the right choice for you. If you live in a small home or apartment and don’t have any issue with Wi-Fi dead zones though, then the investment in a mesh network probably won’t be worth it. The question of whether or not you need a mesh Wi-Fi router depends on your needs and circumstances.
0 notes
Text
How to login netgear wifi extender?
It is easy to modify and customize the settings of your Netgear WiFi extender by logging in.
Make that the extender is within range of your current WiFi network and that it is correctly connected to a power supply before starting.
After the extender has been turned on, link your PC or mobile device to the default network—usually called "NETGEAR_EXT."
Once connected, use a web browser and input 192.168.1.250 or http://mywifiext.net into the address bar.
This will launch the Netgear WiFi extender login page. When logging in for the first time, you'll be asked to either set up an account or configure the extender by providing the login credentials for your router.
If you’ve previously set it up, log in with the credentials you created during the first setup.
It's typically possible to reset the extender if you've forgotten your login information.
To accomplish this, press and hold the reset button for around ten seconds, which will reset the extender to its initial configuration. Resetting it will require you to set it up again.
Once signed in, you may adjust settings like the WiFi network name (SSID), password, or security options, and check the connection status between your router and the extender. You can keep an eye on performance, fix problems, and upgrade firmware for improved security and performance by logging in frequently.
For more details visit our website.
0 notes
Video
youtube
How to Factory Reset Netgear Modem Router (2024)
0 notes
Text
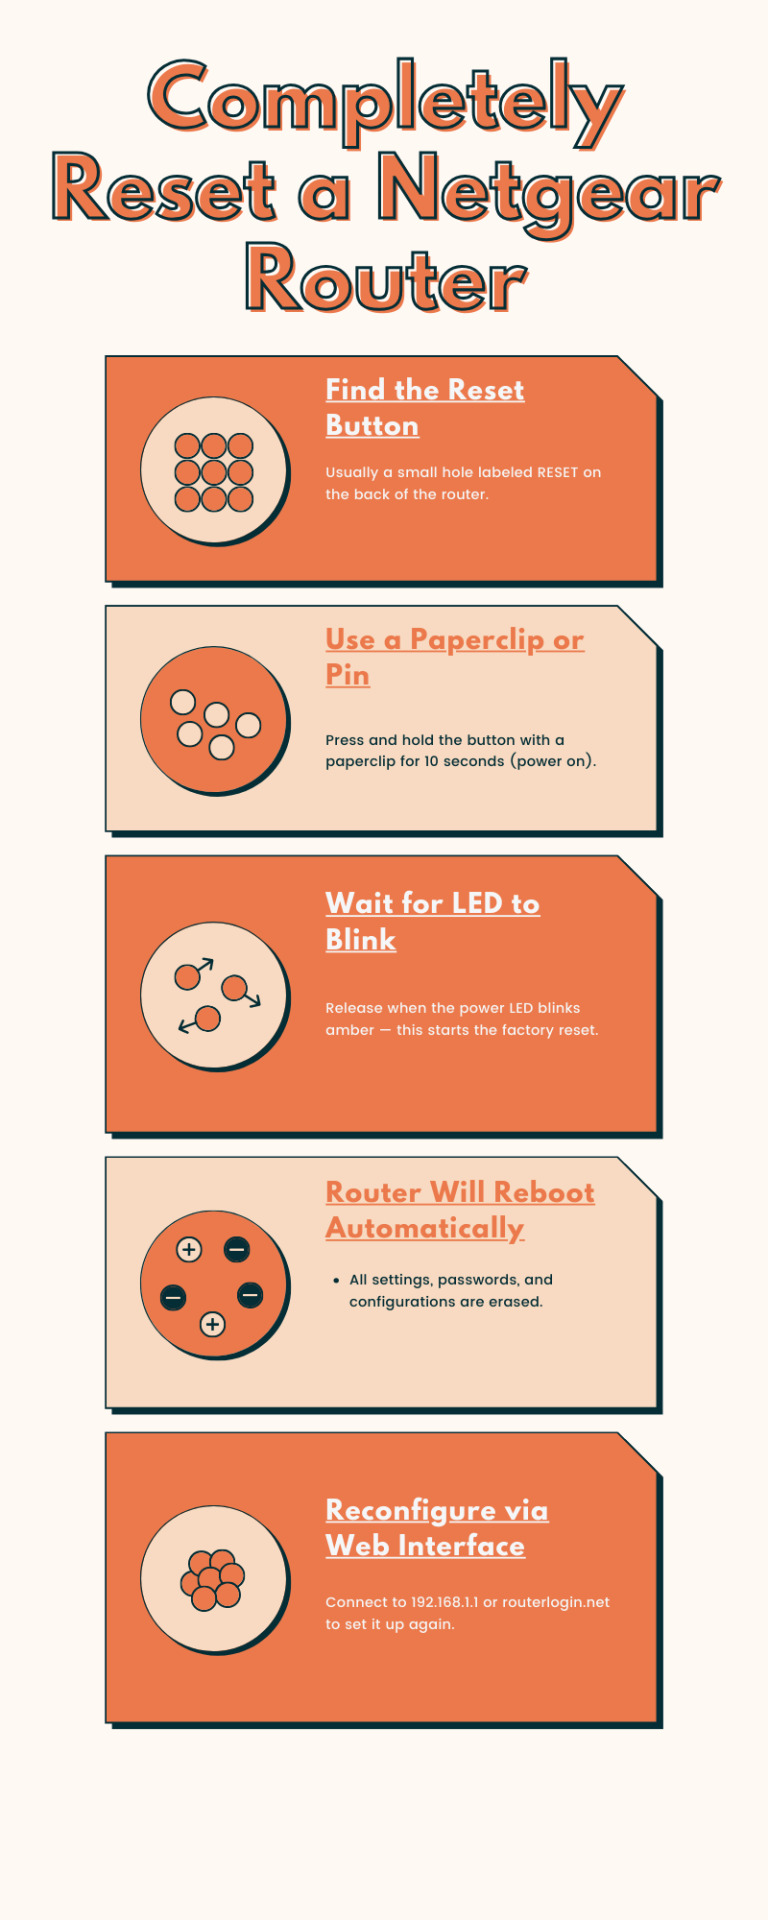
Completely Reset a Netgear Router
To Completely Reset a Netgear Router, locate the reset button (often recessed) on the back or bottom. With the router powered on, press and hold this button for about 7 seconds using a paper clip until the lights blink, indicating a factory reset. If you require reconfiguration assistance, let us know in the chat box!
0 notes
Text

How to Reset Netgear Router?
Want assistance for Netgear Router Reset? No worries! For this, first, locate the reset button at the back of the router. Now, grab a paperclip or pinpoint, press & hold the reset button for 10-15 seconds, and then release. To know the complete procedure in detail, get in touch with us!
0 notes
Text
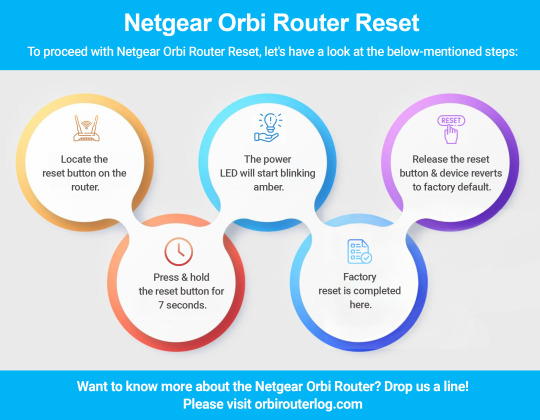
To proceed with the Netgear Orbi Router Reset procedure, locate the reset button on your device and then pick a paper clip. Now, press & hold the reset button for at least a few seconds. Here, release the button when the power LED starts blinking. The blinking light signifies that the reset procedure is done. For more detailed info, approach us!
0 notes
Text
Unable to tackle issues with your Orbi router? Don’t panic! Netgear Orbi Router Reset will help you to fix them all. Usually, you can perform a factory reset through the reset button, Web GUI method, or using the app. Additionally, to know the steps for each particular factory reset method, visit our website.
0 notes
Text
can't connect to netgear router through vpn
🔒🌍✨ Get 3 Months FREE VPN - Secure & Private Internet Access Worldwide! Click Here ✨🌍🔒
can't connect to netgear router through vpn
Netgear router VPN setup
Setting up a VPN (Virtual Private Network) on your Netgear router can enhance your online privacy and security by encrypting your internet connection. This allows you to browse the web anonymously and securely, especially when using public Wi-Fi networks. By setting up a VPN on your Netgear router, you can protect your sensitive data from potential cyber threats and unauthorized access.
To begin the setup process, you will first need to choose a VPN service provider that is compatible with Netgear routers. Once you have selected a VPN service, you will need to log in to your Netgear router's admin panel using a web browser. Navigate to the VPN section in the router settings and enter the configuration details provided by your VPN service provider.
Next, you will need to configure the VPN settings on your Netgear router, including choosing the VPN protocol (such as OpenVPN or PPTP) and entering the server address and login credentials. Once you have entered all the necessary information, save the settings and restart your router to apply the changes.
After the setup is complete, you can connect your devices to the VPN-enabled Netgear router to secure your internet connection and enjoy private browsing. Keep in mind that setting up a VPN on your router may slightly impact your internet speed due to the encryption process, but the added security and privacy benefits are well worth it.
Overall, setting up a VPN on your Netgear router is a straightforward process that can significantly enhance your online security and privacy. By following these steps, you can browse the web with peace of mind knowing that your data is protected.
Troubleshoot VPN connection to Netgear router
Having trouble with your VPN connection to your Netgear router? Don't worry, you're not alone. VPN (Virtual Private Network) issues can be frustrating, but with a bit of troubleshooting, you can often resolve them without too much hassle.
Firstly, ensure that your Netgear router's firmware is up to date. Manufacturers often release updates to address compatibility issues and enhance performance, so checking for and installing any available updates could resolve your VPN problem.
Next, double-check your VPN settings. Make sure you've entered the correct server address, username, and password. Even a small typo can prevent your VPN from connecting properly.
If you're still having trouble, try restarting both your router and your device. Sometimes, a simple reboot can fix connectivity issues by refreshing the network settings.
Additionally, check if your VPN service is experiencing any outages or server issues. Visit their website or contact their support team for assistance.
If you're using a third-party VPN client, try connecting directly through your device's built-in VPN settings instead. This can help determine if the issue lies with the VPN client or the router.
If none of the above steps resolve your VPN connection problem, it may be worth resetting your router to its factory defaults and reconfiguring it from scratch. However, be sure to back up your settings beforehand, as this will erase all custom configurations.
In some cases, certain router models may have specific VPN compatibility issues that require advanced troubleshooting. In such instances, reaching out to Netgear's support team or consulting online forums for assistance from experienced users may be necessary.
By following these troubleshooting steps, you can hopefully resolve your VPN connection issues and enjoy secure internet browsing through your Netgear router once again.
VPN configuration for Netgear router
A VPN (Virtual Private Network) configuration for your Netgear router can provide an added layer of security and privacy when browsing the internet. Setting up a VPN on your router ensures that all devices connected to your home network are protected, without the need for individual installations on each device.
To configure a VPN on your Netgear router, you will first need a VPN service provider and the necessary login credentials. Access your router's settings by typing its IP address into a web browser and logging in with your admin username and password. Locate the VPN section in your router settings, where you can input the details provided by your VPN service.
Choose the VPN protocol recommended by your service provider, such as PPTP, L2TP, or OpenVPN. Input the server address, username, and password in the designated fields. You may also need to configure additional settings like encryption and authentication methods.
Once you have entered all the required information, save your settings and restart your router to apply the changes. You can now connect any device to your home network and enjoy the benefits of a secure and private internet connection.
Remember to regularly update your VPN configuration and keep your router's firmware up to date to ensure optimal performance and security. By following these steps, you can enhance your online privacy and protect your personal data while using your Netgear router.
Unable to connect to Netgear router via VPN
If you're experiencing difficulties connecting to your Netgear router via VPN, don't worry, you're not alone. This issue can be frustrating, but with some troubleshooting steps, you can often resolve it on your own.
Firstly, ensure that your Netgear router supports VPN connections. Not all routers have this capability, so check the specifications of your model to confirm.
Next, verify that you have configured your VPN settings correctly. Double-check the VPN server address, username, password, and any other relevant details. Even a small mistake in the configuration can prevent a successful connection.
If you're using a third-party VPN service, make sure it's compatible with your Netgear router. Some routers have limitations on the types of VPN protocols they support, so ensure that your VPN service aligns with these requirements.
Check your router's firmware and ensure it's up to date. Sometimes, outdated firmware can cause compatibility issues with VPN connections. Visit Netgear's official website to download and install the latest firmware version for your router model.
Additionally, check if there are any firewall or security settings on your router that might be blocking VPN connections. Temporarily disable these settings to see if it resolves the issue, but remember to re-enable them afterwards for security purposes.
If you're still unable to connect to your Netgear router via VPN after trying these steps, consider reaching out to Netgear customer support for further assistance. They may be able to provide specific troubleshooting steps tailored to your router model and configuration.
Netgear router VPN connectivity issues
Title: Troubleshooting Netgear Router VPN Connectivity Issues
Netgear routers are renowned for their reliability and performance, but like any technology, they can encounter issues from time to time. One common problem users face is difficulty connecting to a Virtual Private Network (VPN) through their Netgear router. VPN connectivity issues can be frustrating, but there are several troubleshooting steps you can take to resolve them.
Firstly, ensure that your Netgear router's firmware is up to date. Manufacturers often release firmware updates to address known issues and improve performance, including VPN connectivity issues. You can typically update the firmware through the router's web interface or Netgear's official website.
Next, double-check your VPN settings. Ensure that you have entered the correct server address, username, and password. Sometimes, a simple typo can prevent a successful connection. Additionally, verify that your VPN subscription is active and that you are not exceeding any connection limits imposed by your VPN provider.
If you're still experiencing issues, try restarting both your router and the device you're trying to connect to the VPN. This can often resolve temporary glitches or conflicts that may be preventing a successful connection.
Another troubleshooting step is to check for any firewall or security settings on your Netgear router that may be blocking VPN traffic. Temporarily disabling these settings can help determine if they are the source of the problem.
If none of the above steps resolve the issue, consider contacting Netgear support or your VPN provider for further assistance. They may be able to provide additional guidance or troubleshoot the problem remotely.
In conclusion, VPN connectivity issues with Netgear routers can be frustrating, but by following these troubleshooting steps, you can often resolve them and enjoy a secure and private internet connection once again.
0 notes
Text
can't connect to netgear vpn from android
🔒🌍✨ Get 3 Months FREE VPN - Secure & Private Internet Access Worldwide! Click Here ✨🌍🔒
can't connect to netgear vpn from android
Netgear VPN troubleshooting on Android
Troubleshooting Netgear VPN on Android
Using a Virtual Private Network (VPN) on your Android device can provide enhanced security and privacy, but sometimes users encounter issues, particularly when using Netgear VPN services. Here are some common troubleshooting steps to address these concerns:
Check Network Connection: Ensure that your Android device has a stable internet connection. If you're experiencing connectivity issues, try switching between Wi-Fi and mobile data to see if the problem persists.
Update Netgear VPN App: Outdated versions of the Netgear VPN app may contain bugs or compatibility issues. Visit the Google Play Store to see if there's an updated version available and install it if necessary.
Restart VPN Connection: Sometimes, simply disconnecting and reconnecting to the VPN can resolve connectivity problems. Open the Netgear VPN app on your Android device, disconnect from the current server, and then reconnect to a different server or the same one.
Clear App Cache and Data: Accumulated cache and data within the Netgear VPN app can lead to performance issues. Go to your device's settings, navigate to the Apps section, find the Netgear VPN app, and clear its cache and data. This will reset the app to its default settings.
Check VPN Settings: Verify that the VPN settings on your Android device match the recommended configurations provided by Netgear. Ensure that protocols, such as OpenVPN or IKEv2, are correctly configured.
Contact Netgear Support: If you've tried all the above steps and are still experiencing issues, reach out to Netgear's customer support for further assistance. They may be able to provide specific troubleshooting steps or guidance tailored to your situation.
By following these troubleshooting steps, you can resolve common Netgear VPN issues on your Android device and enjoy a secure and private internet connection.
Netgear VPN Android connectivity issue
Netgear VPN Android connectivity issue can be a frustrating problem for users looking to establish a secure connection from their Android devices. When encountering connectivity issues with Netgear VPN on Android, various factors may be at play.
One common reason for connectivity issues is incompatible VPN protocols. Netgear VPN may use different protocols that are not supported by the Android device, leading to connection failures. It is essential to ensure that the VPN protocol used by Netgear is compatible with the Android operating system to establish a successful connection.
Another potential cause of connectivity problems is incorrect VPN configurations on the Android device. Users must accurately input the VPN server address, username, password, and other settings provided by Netgear to establish a secure connection. Any errors in configuration can result in connectivity issues.
Furthermore, network restrictions or firewall settings may block the VPN connection on Android devices. Users should check their network settings and ensure that the necessary ports for VPN communication are open to establish a successful connection.
In conclusion, troubleshooting Netgear VPN Android connectivity issues requires attention to detail and thorough understanding of VPN protocols and configurations. By addressing compatibility issues, ensuring accurate configurations, and checking network settings, users can resolve connectivity problems and establish a secure VPN connection on their Android devices.
Android Netgear VPN connection problems
Android Netgear VPN connection problems can be frustrating and disrupt your online activities. Many users encounter issues when trying to establish a VPN connection on their Android devices through Netgear routers. One common problem is connection drops, where the VPN connection suddenly disconnects, exposing your data and compromising your privacy.
Another issue that users may face is slow connection speeds when using a VPN through their Netgear router on Android devices. This can hinder your browsing experience and make it difficult to stream content or download files efficiently. Additionally, some users report difficulties in setting up the VPN connection in the first place, due to compatibility issues or incorrect configuration settings.
To troubleshoot these problems, users can try the following solutions:
Check for any firmware updates for your Netgear router, as outdated firmware can cause VPN connection issues.
Make sure that the VPN settings on your Android device are configured correctly and match the settings provided by your VPN service provider.
Restart both your Android device and Netgear router to refresh the connection and resolve any temporary glitches.
If the problem persists, consider reaching out to Netgear customer support or your VPN service provider for further assistance.
By addressing these common Android Netgear VPN connection problems promptly, you can ensure a secure and stable VPN connection on your Android device for seamless and protected online browsing.
Android Netgear VPN setup failure
When trying to set up a VPN connection on your Android device using a Netgear router, you may encounter certain errors or failures that can be frustrating. There are several common issues that users face when attempting to establish a VPN connection through a Netgear router on an Android device.
One frequent problem is incorrect configuration settings. Make sure you have input the correct VPN server address, your username, and password. Ensure that the VPN protocol and encryption settings match those required by your VPN service provider.
Another possible reason for setup failure is network congestion or instability. Slow network speeds or intermittent connectivity can hinder the establishment of a VPN connection. Try connecting to a different network or contacting your internet service provider to address any network issues.
Furthermore, outdated firmware on your Netgear router can also cause VPN setup failure. Check if there are any firmware updates available for your router model and ensure it is up to date to prevent compatibility issues with the VPN connection.
If you continue to experience difficulties with setting up a VPN connection on your Android device through a Netgear router, reach out to Netgear customer support or your VPN service provider for assistance. They can provide troubleshooting steps specific to your setup to help resolve the issue and get your VPN connection up and running smoothly.
Netgear VPN mobile connectivity solutions
Netgear offers a range of VPN mobile connectivity solutions designed to provide secure and reliable connections for professionals who are constantly on the move. These solutions are essential for remote workers, telecommuters, and businesses looking to ensure a high level of data protection while accessing their networks from various locations.
One of the key advantages of Netgear VPN mobile connectivity solutions is the ability to establish a secure tunnel between the user's device and the company's network, ensuring that sensitive data remains encrypted and protected from unauthorized access. This is particularly important when using public Wi-Fi networks, which are known to be vulnerable to hacking and data breaches.
Netgear's VPN mobile connectivity solutions also offer flexibility and ease of use, allowing users to easily connect to the company's network from anywhere in the world. This is ideal for businesses with a global presence or employees who travel frequently for work.
In addition to providing a secure connection, Netgear's VPN mobile solutions also offer high-speed performance and reliability, ensuring that users can access the resources they need without interruptions or delays. This is crucial for professionals who rely on a stable internet connection to carry out their work effectively.
Overall, Netgear VPN mobile connectivity solutions are a valuable tool for businesses and individuals looking to maintain a high level of security and accessibility while working remotely. By investing in these solutions, users can enjoy peace of mind knowing that their data is protected and their connections are secure, no matter where they are located.
0 notes
Text
can't vpn with netgear wndr3400
🔒🌍✨ Get 3 Months FREE VPN - Secure & Private Internet Access Worldwide! Click Here ✨🌍🔒
can't vpn with netgear wndr3400
Netgear WNDR3400 VPN troubleshooting
Netgear WNDR3400 VPN troubleshooting can be a challenging task for some users, but with the right guidance, it can be a smooth process. Virtual Private Networks (VPNs) are essential for ensuring secure and private internet browsing, especially when using public Wi-Fi networks. However, issues may arise when trying to set up or connect to a VPN on your Netgear WNDR3400 router.
One common troubleshooting step is to ensure that your Netgear router's firmware is up to date. Outdated firmware can lead to compatibility issues with VPN services, causing connectivity problems. Updating the firmware can often resolve these issues and improve the overall performance of your router.
Another important step is to double-check the VPN settings on your Netgear WNDR3400 router. Make sure that the VPN configuration matches the settings provided by your VPN service provider. Incorrect settings can prevent you from establishing a secure connection to the VPN server.
If you are still experiencing difficulties, you may want to consider resetting your Netgear WNDR3400 router to its factory settings. This can help eliminate any misconfigurations or software glitches that may be causing the VPN connection problems.
In some cases, contacting your VPN service provider for assistance can also be beneficial. They may be able to offer specific troubleshooting steps or settings tailored to your Netgear router model.
By following these troubleshooting tips and being patient, you can effectively resolve VPN issues on your Netgear WNDR3400 router and enjoy a secure internet browsing experience.
VPN setup Netgear WNDR3400 guide
A VPN, or Virtual Private Network, is a powerful tool that helps protect your online privacy and security by creating a secure and private connection over the internet. Setting up a VPN on a Netgear WNDR3400 router can provide enhanced security for all devices connected to your home network.
To set up a VPN on your Netgear WNDR3400 router, you will first need to choose a reliable VPN service provider. Once you have selected a VPN service, you will need to access your Netgear router’s settings by entering the router’s IP address into a web browser.
Next, navigate to the router’s settings page and locate the VPN section. Here, you will need to enter the configuration details provided by your chosen VPN service provider, including the VPN server address, username, and password. Save the settings and activate the VPN connection.
By setting up a VPN on your Netgear WNDR3400 router, you can ensure that all data transmitted between your devices and the internet is encrypted and secure. This can help protect your personal information from hackers, ISP monitoring, and other online threats.
Overall, setting up a VPN on your Netgear WNDR3400 router is a relatively simple process that can provide added security and privacy for all devices connected to your home network. By following the steps provided by your VPN service provider and configuring the settings on your router, you can enjoy a safer and more secure online experience.
Netgear WNDR3400 VPN compatibility issues
Title: Troubleshooting Netgear WNDR3400 VPN Compatibility Issues
The Netgear WNDR3400 router is a popular choice for home and small business networks, offering reliable performance and a range of features. However, some users may encounter compatibility issues when trying to use a VPN (Virtual Private Network) with this router.
One common problem is that certain VPN protocols may not be fully supported by the WNDR3400 firmware. This can lead to difficulties in establishing a secure connection with the VPN server. Additionally, some VPN services may require specific settings or configurations that are not readily available in the router's interface.
Another issue could be related to the router's hardware limitations. The WNDR3400 may struggle to handle the encryption and decryption processes required by the VPN, especially when dealing with high data traffic or multiple devices connected to the network simultaneously. This can result in slow connection speeds or frequent disconnections.
Fortunately, there are several steps that users can take to troubleshoot and resolve VPN compatibility issues with the Netgear WNDR3400 router:
Check for firmware updates: Ensure that the router's firmware is up to date, as Netgear may release patches or updates to address compatibility issues with VPNs.
Adjust VPN settings: Experiment with different VPN protocols and settings to find the combination that works best with the WNDR3400 router.
Use a dedicated VPN client: Instead of relying on the router's built-in VPN capabilities, consider installing a dedicated VPN client on individual devices for better compatibility and performance.
Contact customer support: If all else fails, reach out to Netgear's customer support for assistance. They may be able to provide guidance or recommend alternative solutions to address the compatibility issues.
By following these steps and troubleshooting methods, users can overcome VPN compatibility issues with the Netgear WNDR3400 router and enjoy secure and reliable internet connectivity.
Netgear WNDR3400 VPN configurations
Configuring a VPN (Virtual Private Network) on your Netgear WNDR3400 router can enhance your online security and privacy. A VPN creates a secure connection to another network over the internet, encrypting your data and masking your IP address. Setting up a VPN on your router allows you to protect all devices connected to your network.
To configure a VPN on your Netgear WNDR3400 router, you will need to access the router's admin panel through a web browser. Navigate to the VPN section in the settings menu and select the option to set up a new VPN connection. You will need to input the VPN server details provided by your VPN service provider, including the server address, username, and password.
After entering the VPN server details, save the settings and establish a connection to the VPN server. Once connected, all data transmitted from your devices through the router will be encrypted, ensuring your online activities remain private and secure.
It is important to choose a reputable VPN service provider that offers reliable connections and strong encryption protocols. Additionally, regularly updating your router's firmware can help maintain optimal VPN performance and security.
By configuring a VPN on your Netgear WNDR3400 router, you can enjoy a more secure online experience, protecting your sensitive information from unauthorized access and surveillance. Take control of your online privacy today by setting up a VPN on your router and browsing the internet with peace of mind.
Netgear WNDR3400 VPN connectivity problems
Title: Troubleshooting Netgear WNDR3400 VPN Connectivity Issues
If you're encountering VPN connectivity problems with your Netgear WNDR3400 router, several factors could be at play. VPN (Virtual Private Network) issues can arise due to various reasons, ranging from configuration errors to compatibility issues. Here are some troubleshooting steps to resolve VPN connectivity problems with the Netgear WNDR3400:
Update Firmware: Ensure that your router's firmware is up to date. Manufacturers often release firmware updates to address known issues and improve compatibility with VPN protocols.
Check VPN Settings: Double-check the VPN settings on your router. Ensure that the VPN configuration matches the requirements provided by your VPN service provider. Incorrect settings can lead to connection failures.
VPN Protocol Compatibility: Verify whether the VPN protocol you're using is supported by the Netgear WNDR3400 router. Some routers may have limitations on supported VPN protocols. Try switching to a different VPN protocol (e.g., from PPTP to L2TP/IPsec) to see if it resolves the issue.
Firewall Settings: Adjust the firewall settings on your router to allow VPN traffic. Sometimes, overly restrictive firewall settings can block VPN connections. Open the necessary ports for VPN communication or temporarily disable the firewall to test the VPN connection.
Restart Router and Devices: Sometimes, simply restarting the router and the devices connected to it can resolve temporary connectivity issues. Power cycle the router and restart your computer or other devices attempting to establish the VPN connection.
Contact VPN Support: If the issue persists after trying the above steps, reach out to your VPN service provider for assistance. They may provide specific troubleshooting steps tailored to their VPN service or advise on alternative solutions.
By following these troubleshooting steps, you can diagnose and resolve VPN connectivity problems with your Netgear WNDR3400 router, ensuring seamless and secure access to your VPN network.
0 notes