#Favicon tutorial
Explore tagged Tumblr posts
Visit Tumblr Blog
Explore Tumblr blogs with no restrictions, modern design and the best experience.
Last Seen Tumblr Blogs


Fun Fact
BuzzFeed published a report claiming that Tumblr was utilized as a distribution channel for Russian agents to influence American voting habits during the 2016 presidential election in Feb 2018.
Note
how do you make your graphics?
Hii there! It’s very simple. First step I do is just finding photos, I usually just use Pinterest and sometimes sites with pre cut out photos.
Then I use IbisPaint X to actually edit the pngs ect, I use: the lineout effect aka the stroke one and i’ll sometimes add a blur frame to mines if i feel like it needs / looks good with it. (Depending on the photo it might not show up as much) I normally don’t do this for my pixels, but i’m sure it turns out just as good as my larger favicons. 💝🍀
Then for animation I just move around the photo, so if I want it go to small to big I just make it go like this 👇 if I want it tilted I tilt it ect!
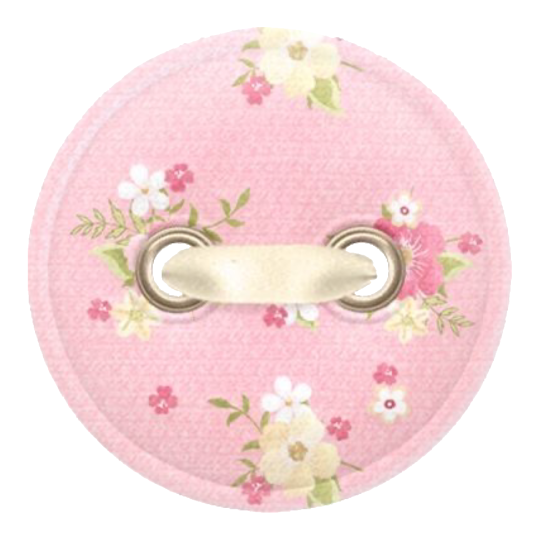
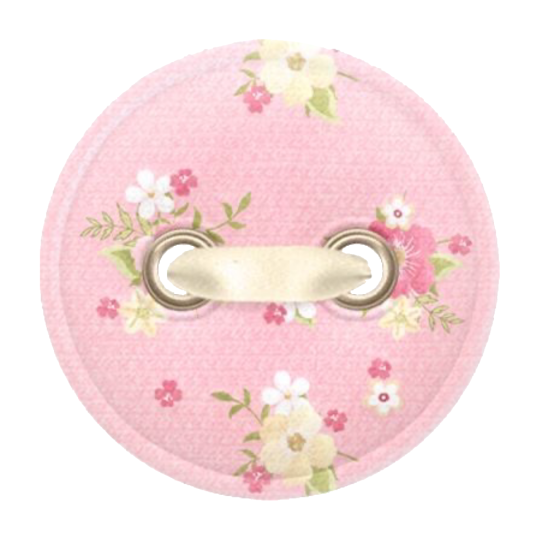
To get it to be a actual GIF i use ez gif! And the gif maker option! I have the speed be around 50 and make sure to select the “don’t stack frames” option!
I hope this helps and i’ll answer further questions too. I’ll also get to requests soon! Some personal stuff has come up and it really has my mood down so i haven’t touched pixel making😭😭💦
#tut#tutorial#carrd grahpics#graphic tutorial#cute#deco#Not sure how to tag this one ngl.#Favicon tutorial#Pixel tutorial#𓈒ㅤׂ 🌈 Mine !
16 notes
·
View notes
Note
PLEASE GIVE A TUT ON HOW TO MAKE PIXELS I AM BEGGING YOU

HKEGDUSHDGDGD okay this is gonna probably be really overexplained since i talk a lot BUT ITS VERY EASY tuto under cut
What i personally do is start on picsart with a blank canvas (make sure its a perfect square, anything like 700x700, 400x400 whatever), What i do is use some of the cute stickers i can find by using certain search terms and rotate/move it to each frame id want it to be, picsart lets u see where its centered or not so its a lot easier than just winging it
this would be so much easier to explain if picsart allowed me to take screenshots on this DAMN PHONE!
But anyway save each frame to whatever ur using and go to Ezgif.com's gif maker to combine those frames together :3 theres a delay option on the bottom of each frame u saved, i usually set that from around 50-80 so it doesnt go too fast

Once u set that and u have ur frames in order, remember to set THIS option
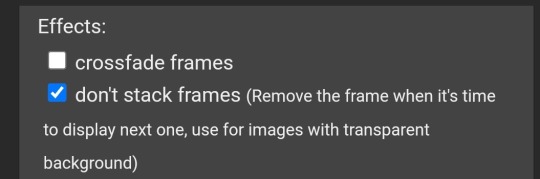
And then u click "make gif" at the bottom and horray :3 u can still edit things on the page if u might not like it
Once u get the finishing gif, u can save it as the original size (if youd like to have an extra), and go to Resize at the bottom

U should get to this, what i do is make the width and length 60x60 or 80x80 but it doesnt really matter tbh, if u want it bigger or smaller then go ahead
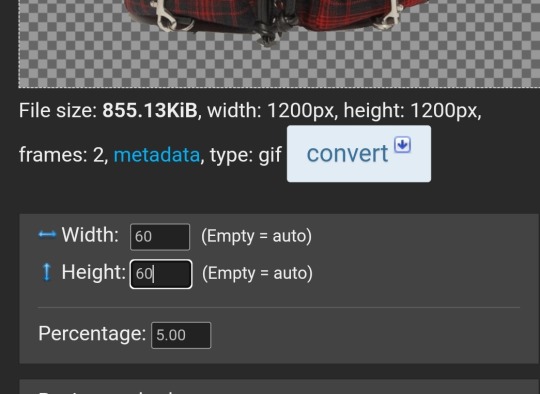
Disregard everything else after that and click Resize image :D and boom we did it

Both original and teeny size IF I DIDNT MAKE SENSE THATS TOTALLY MY BAD but i hope this helps😅😅😅 maybe..
380 notes
·
View notes
Note
Are there a blue version/color of these speech bubble signs?

hei sweet angel ,, the original source of the gif only has a pink version and ive looked across the internet and didnt find other colors of it ,, or similar ones :( . however ,, u can re-color the pixel by doing so ; 1. look for an online gif editor 2. upload the favicon that u wish to change the color of 3. set hue to ; 66 4. saturation to ; 0 5. click on the tint option and choose ur desired color 6. and set the intensity to ; 100 (or u can customize it urself !) 7. apply the changes and u should have it ! i tried two slightly different shades of blue with one of the pixels and heres how it turned out :


sadly i dont have much time right now to re-color all of them , but hope this helps ! . u can use it on any gif u wish to recolor :) !
#asks#cute pngs#favicons#pixels#pixel graphics#blue pixels#blue favicons#gif#recolor#pixel#pixel tut#pixel tutorial
180 notes
·
View notes
Note
hi ! just wondering; where did you find pixels like these:


:o ?
hi! so from what i know, the pixels aren't originally made like that, and u have to combine them urself! here's how to do it: first, u need to find a pair of pixels! i'll use these as an example


next, go to https://ezgif.com/combine once you're there, click "choose files" make sure you select both pixels at the same time!
then, click "upload" now just drag and drop the pixels, click "combine", and you're done!
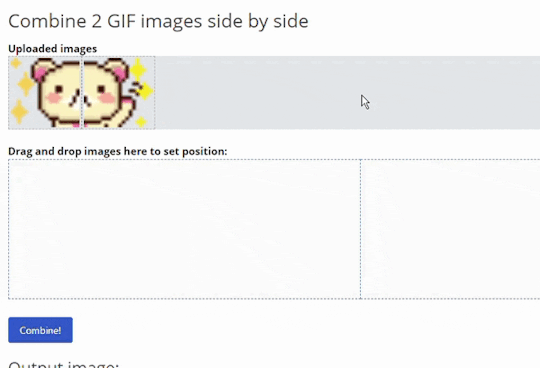
you can do this with as many pixels as you want! it can be 3, 4, or even 10! here's how it came out:

#pixels#favicons#gifs#decome#korilakkuma#san x#tutorial#carrd#rentry#carrd resources#rentry resources#carrd help#web graphics#more on https://pixels.crd.co
266 notes
·
View notes
Text
@cherryshh 's resource blog! our resource (wip) rentry is linked in bio. ( blog layout by @/kiochisato ┈ tysm! )
❥ visit tags below for assorted resources ┈ do not rq stuff here
#frames#frame#gif dividers#dividers#divider#pixels#favicons#mask#masks#png#pngs#gifs#overlay#overlays#psd#filter#stamp#stamps#tutorial#tutorials#rentry graphics#graphics#layouts#button#buttons
50 notes
·
View notes
Text

blue / did sys / bodily 21
blog for insp / web decor / images
thx 4 visiting :D
#navtags...!#insp#decor#templates#resources#graphics#overlay#pixels#images#favicons#stamps#shiny buttons#tutorial#dividers#blinkies#buttons#frames#userbars#...more 2 b added!
18 notes
·
View notes
Text
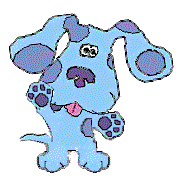
RIP PIXELBANK
do u guys know any websites with blinkies/pixel gifs i could use?
i found out the neocities pixelbank website i was using just took down their page which is why all my gifs don't load anymore...
but rip the og site </3 i used that website for every single one of my blogs, but now i need to edit it all again sadly.

#pixel animation#piexls#blinkies#layout#editing#pixels#favicons#gifs#decome#san x#tutorial#carrd#carrd resources#rentry resources#web graphics#emotes#emojis#pixelbank
67 notes
·
View notes
Text
!!! my tag system is below all of this,,, I moved it under a cut because people reblog this post for the links :P
edit: thx for the love on this post. im going to try and continually update this!

⇩ ⠀sites FULL of web graphics ⇩
blinkie maker : make your own blinkies!
DOLLZ REVIVAL : a revival of pixel dolls where you can create and share your own. very cute!
GlowTxt : create glowing transparent text gifs that say whatever u want
HOARDER'S PILE : contains blinkies, buttons, stamps, and teddies
plasticdino.neocities.org : blinkies
Glitter Graphics : contains gifs, blinkies, dividers, and just sooo many web graphics
Cute Kawaii Resources : contains gifs, blinkies, stamps, favicons, dividers, buttons, fonts, literally everything you need. its an insane resource
Adrian's blinkie collection : collection of blinkies, stamps, and buttons
☆ (supplies.ju.mp) : blinkies, stamps, buttons, & favicons
twigbranch.carrd.co : blinkies
lallys.carrd.co : blinkies, stamps, dividers, and other resources
Bugleeblinkie.carrd.co : blinkies, and 3 very special gifs at the end ;)
unshinesblinkies.carrd.co : blinkies
The 88x31 GIF Collection : buttons. there are 5 parts! huge collection!
Bonnibel's Graphic Collection : blinkies
WELCOME TO GIFCITY : blinkies, dividers, favicons, stamps
cass-tastrophe.carrd.co : blinkies, stamps
kotatsuOS : blinkies
Cute web graphics : blinkies, stamps, dividers, and a LOT of other graphics, all very cute
⇩ some html tools! + tags below cut ⇩
MDN (mozilla.org) : if you're just starting out like me this is super helpful HTML Tutorial (w3schools.com): same here! (offers other programming languages as well!) Accessibility Checker(Free Scan) : a site you can use to check accessibility/ADA compliance when making your website! it will point out what needs to be changed. it is free, but they also offer paid services if you need more help imagecolorpicker.com : hex code picker. i use this one because you can upload an image, paste clipboard, OR type in the website and it'll grab a screenshot for you! something simple that was made really well. cssgradient.io : helps you make css gradients for backgrounds or whatever else you need them for smartgb.com : a free guestbook service FC2 Counter! : free "site visits" and "online now" counters. fully customizable Unclosed Tag Checker by Alicia Ramirez : does as it says, checks for unclosed tags (although I recommend using a program that does this as you write anyways. I use Visual Studio Code. Status Cafe : an updateable and embeddable status that you can stick anywhere on your site! it is mostly customizable with CSS but I have noticed a few small quirks with it
my tagging system :))
#graphics
#blinkies
#stamps
#buttons
#dividers
#html/css
#resources
#code
e10's web (neocities.org) <- shameless site plug. show it some love :P
#blinkies#stamps#favicons#gifs#old web graphics#old web aesthetic#old web stamps#old internet#old web#old webcore#2000s web#90s web#html#html css#html5#css#htmlcoding#web design#web resources#early web#early internet#neocities graphics#neocities#geocities#gifcities#web graphics#webcore
539 notes
·
View notes
Text


Ocular — Version 3
Preview // User Guide // More Info & Install
your favorite sidebar theme just got an upgrade, babeyyy
I went to update Ocular to make it NPF post-compliant and then my hand slipped and I redesigned the whole thing lmao. here's a brief update about Ocular 3; if you're looking for a full list of changes between versions 2 and 3, click the "Read More" below)
Ocular comes with the following features:
Colors: easily change the color scheme of your sidebar and posts using any colors you want
Post sizes: 400px, 500px, 540px, 600px, 700px
Sidebar: can be on the left, right, or above the posts. pick from a list of sidebar sizes, header image heights, and avatar shapes
Fonts: 20 different fonts, sizes 13px to 18px
Background: solid, gradient, full-size image or repeating image
Links: choose either regular navigation or drop-down navigation. unlimited custom links (visit the help desk FAQ for a tutorial) and ability to rename home, ask, submit, and archive links
Endless scroll, custom ask box text, Tumblr's full-width controls and search bar, optional header, avatar, and favicon images
if you already have Ocular installed, version 3 should be coming at you as soon as the update passes the theme garden. if you installed this theme with GitHub, you'll have to re-install manually.
now let's get to the fun stuff. what's new in version 3?
wow, do I have some updates for you!
1. goodbye color schemes, hello post background and text colors
you can now directly control the color of the posts rather than relying on color schemes to do it. want your posts to be a very specific shade of navy? all yours, buddy. go wild (make sure it's readable tho)
2. hello, color schemes! wait I thought we got rid of that guy
a lot of the color schemes I made became redundant now that the new post background/text color options exist. if you were married to the old color schemes, all of them can be recreated using those options. so the new color scheme options are as follows:
"My colors" — uses the colors you picked for post background/text
"Light preset" and "dark preset" — sets the posts to white with black text, or off-black with white text
"Translucent" — uses the colors you choose for post background/text, but makes the post backgrounds semi-transparent. there are NINE different translucent color schemes, ranging from 90% (only slightly see-through) to 10% (VERY see through)
3. navigation dropdown option
you can either use the sidebar links like they were before, or you can turn them into a cute little dropdown (helpful if you have lots of links or links with long titles!) you can enable this using the "use dropdown navigation" setting. you can also customize the label for the dropdown using the "dropdown menu label" setting. for instance, the dropdown on my blog currently says "oooh you wanna click me"
4. RIP google fonts I always hated your load times
decided to stop using Google Fonts and instead I'm providing the font files directly in the code. this will help speed up load times drastically when using custom fonts, plus I don't have to use Google. win-win! there's quite a bit of coverage overlap with the old fonts, but some of them that were too similar to each other got the ax. I also added all of the system fonts as options (hit classics like Arial, Georgia, and Comic Sans MS are now available TO YOU!)
5. more layout, sizing, and spacing options
the sidebar used to be either on the center-left, center-right, or above the posts; now it can go in the top-left or top-right! you can now control the border radius on the posts and sidebar. the header height, sidebar width, and post spacing all have additional options.
6. some options have been renamed for additional clarity
"background color 1" -> "background color"
"background color 2" -> "gradient background color"
"background" -> "background style"
"font override" -> "use body font everywhere"
"title" -> "sidebar title"
"description" -> "sidebar description"
"ask box text" -> "custom HTML above ask box"
7. removed some options
you win some, you lose some. I removed the uppercase sidebar links, theme credit, and inline media spacing options, mostly for redundancy reasons or because they produced unclear results.
8. as previously stated, now NPF-compliant
Ocular was ALMOST compliant with Tumblr's new post format, but had a few tweaks that needed to be ironed out. they're now ironed.
9: now user-friendly right out of the box
I updated the default color and content options, so new users installing this theme will have a much easier time using and customizing it immediately. no more ugly ass green background!
10. and finally, new JS
I had to rewrite some of the javascript for this theme, which turned into me rewriting ALL of the javascript. doing so meant that I could eliminate dependencies on third-party JS libraries and run the whole thing on plain JS. that should improve load times!!
bonus: custom CSS can do some nifty stuff now
want to change the size of your avatar? you can do that now! just do this to your Advanced > Add custom CSS section
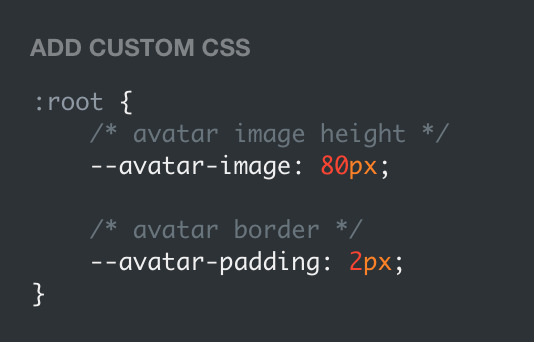

super helpful if you're using the Avatar shape: Uncropped setting and you need your image to be a specific size (like a pixelated GIF)
for more info, check out the Ocular user guide. thanks for reading my updates!! hope you all have a fantastic start to your 2024 ❤️
#tumblr theme#tumblr themes#themes by rachael#codingcabin#ocular#blog#you should've seen me writing the JS for the audio posts lmfao I was on my hands and knees begging it to work
594 notes
·
View notes
Text


౨ৎ 🐙 I'm Pearl & welcome to my web graphics blog/archive!!
👛Here I will be posting different web graphics I’ve created. I also sometimes do tutorials if asked! ᯓ✦
📭 My requests are currently open! I mostly just make what I feel like but I am always open to graphic requests so feel free to send in some.
🗒️I am more likely to respond to your request:
• If it is made anonymously!
• If it specifies what type of graphics you’d like to see made (stamps, blinkies, just graphics in general, etc). ☑️ All of the graphics I’ve created are free to use! Credit isn’t required. You can use them on any site or profile! You can also include my graphics in your collections if you like what I make. ( • ̀ω•́ )੭ ✧´-


🎀Favicons - 80x80 & 60x60
🦢Blinkies
🩷Stamps
🎠Dividers
🤍Shiny buttons
🎵Tutorials

Thank you for stopping by!! 🫶🏻

#intro post#web graphics#blog#archive#graphics#rentry graphics#pixels#favicons#webcore#old web#stamps#carrd resources#buttons#old web graphics
341 notes
·
View notes
Text


Deco, layouts and editing resources server!
I& hate almost all other editing servers. Most of them die within two weeks and are full of discourse that makes my& head hurt. So I& made my& own server - it's mainly for me& to share whatever cool stuff I& find on the internet, all related to graphics as that's the topic of this blog.
What you can find here?
Blinkies, stamps, buttons, favicons/pixels, and websites that collect them. Whatever I& find or have saved already
Tutorials and help regarding your own editing projects
Free tools and software reccomendation and links for graphics and gifs editing
DA, Geocities and Internet Archive findings. Scour old websites and archives with us for neat stuff
But the main feature is...
A strict NO DISCOURSE policy!
Seriously, I&'m so tired of this in other servers! No DNIs in here whatsoever, for the love of Prime don't bring DNIs into here!
We still require common decency in here, and I& will take no bullshit. This is a server for FUN, not ethical debates! And if that sounds like something you'll enjoy, hop on in and talk to us! We'll have lots of goodies for you in store.

#graphics#aesthetic#graphic resources#rentry resources#rentry graphics#carrd graphics#carrd resources#neocities resources#favicons#web graphics#stamps#blinkies#page decor#decome#dividers#pixels#psds#pngs#we have it all
32 notes
·
View notes
Text
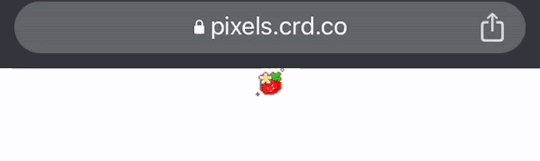
how to save pixels from pixels.crd.co on a phone
ive noticed some ppl r having trouble with saving them as gifs, and since the carrd's way too laggy to edit im posting a tutorial here instead step 1: open whatever browser u use and go to pixels.crd.co step 2: choose a pixel and hold ur finger on it until u see a button that says "open image in new tab"
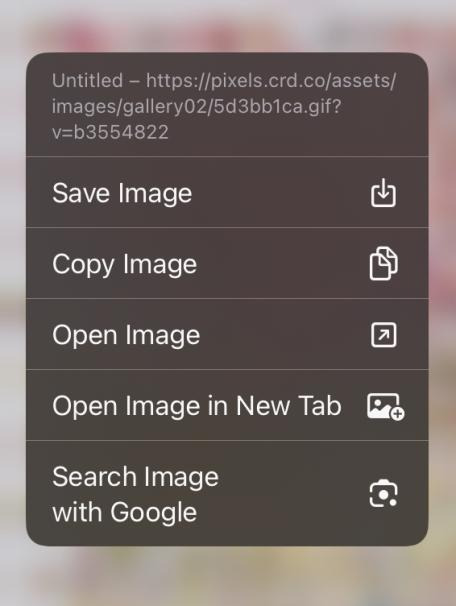
step 3: open the pixel in a new tab step 4: go to the tab and click the url
step 5: click the url again and move the little line thing until you're only selecting the stuff after ".gif" step 6: remove the things after it by clicking the backspace button/cut

step 7: click go/enter and save the pixel how u normally would now its a gif! hooray!
105 notes
·
View notes
Text
[IN THE WORKS]
Updates:
implement a tagging system (stamps, blinkies, dividers, buttons, icons, favicons, pins, transparent pngs, frames, resources, tutorials, etc)
add functioning web-mode (theme)
make gif finding tutorial
make how to credit guide
make how to request guide
Graphics:
(maybe all) Tyler the Creator music videos (6/38)
mane 6 from MLP FIM (2/6)
bob’s burgers
neopets
animal jam
webkinz
winnie the pooh characters (1/11)
adventure time (3/?)
studio ghibli movies (1/?)
pokémon (0/?)
beetlejuice the cartoon
rainbow brite
lorna mills art
mario characters (1/?)
peanuts
moomin
gorillaz
animaniacs
stranger things
blues clues
jackass
spongebob
halloween theme
sailor moon
cleancore
hamtaro
snoopy
minecraft (1/?)
moonknight
sky children of the light
It (2017)
It (1990)
mr robot
bluey
we are lady parts
djo
pup the band
warrior cats
green day
animal prints
earl sweatshirt
kendrick lamar (1/?)
beanie babies
five nights at freddy’s
garfield (1/?)
peanuts
spider-man
deadpool
breaking bad
monster high
weirdcore
my sims
13 notes
·
View notes
Text
So I know how to code websites now, but idk how to upload it to the internet. My plan is to give you all a post that will update with a string of code to sort of visit the website(s?) that I am curating. I will reblog a post that had the original, and include a more patched version as time goes on. I am so sorry in advance.
Because of this.... Lemme show you how html and css works!!
For Project Our Realities, it will all be in html and css since that's what I'm learning so far. JavaScript will be included later.
HTML and CSS basics below!!
HTML, or Hyper-Text Markup Language is the basics of coding a website. It describes how a website will look. It unfortunately doesn't get you too far in terms of digital design, which is why we have languages like Css and javascript.
All HTML files start with <!DOCTYPE html>. This declares to the file that you will be coding in html rather than something like lua.
Each HTML file, after declaring it as an html file, starts with <HTML> and </HTML>. To end a tag, you must close it by adding a forward slash before writing its name (unless it is <br> or <hr>, or similar).
The <head> tag lets you add a title (silly little tab name), a favicon (silly little icon next to the name of the tab) and ways to link your CSS to the HTML.
An HTML file will look like this <!DOCTYPE html>
<html>
<head>
</head>
<body>
</body>
</html>
In the body, you can write the rest of your page, using headers (<h>/<h1-6>), paragraphs (<p>), and even forms (<form>).
--
CSS, also known as Cascading Style Sheets, is a type of coding language that is often used to create websites. No, it is not C++.
Rather than <>, CSS uses brackets {} to code.
CSS is used to style html websites, so it addresses html tags and lets you style their appearance. There is something known as inline CSS, where you can use the <style> tag to style something in your HTML file. HTML was never meant to have colors in its code, but you can change the color of text with inline css. Let's say you would like to style a header.
In your HTML file, it would say:
<!DOCTYPE html>
<html>
<head>
<link rel="stylesheet" href="(name of .css file goes here)">
</head>
<body>
<h1> My first header!!! :> </h1>
</body>
</html>
Now that we have our header, let's turn it red.
In your CSS file, it should say...
h1 {
color: red;
}
The H1 addresses that it will select all h1 elements. The code in the brackets shows that all those addressed will be the color red.
CSS has no starting or finishing lines, all elements will by stylized with {}.
--
To create an HTML file, you must end it with .HTML
To create a CSS file, you must end it with .css
Sometimes, when I create a link for the Css, the required name for the file will be in the HTML code already. Make sure that both files are in the same folder, and not one in a different folder within the same parent folder. This will not work.
--
Wanna test this out? Make a new notepad file on Windows, title it as "firsthtml.html", and create another file called "firstcss.css".
Place this in the .HTML file: <!DOCTYPE html>
<html>
<head>
<title> First HTML </title> <link rel="icon" type="image/x-icon" href="https://i.pinimg.com/736x/1a/8d/9d/1a8d9d26cdca15285d217c817f6953ec.jpg">
<link rel="stylesheet" href="firstcss.css">
</head>
<body> <h1>Welcome, traveler!!</h1>
<h3><I>Thank you for reading the tutorial!! Follow the blog to keep up with our news.</I><h3>
</body>
</html>
Now, for your .css file, write this down:
h1 {
color: dark blue;
}
h3 {
color: orange;
}
--
Thank you so much for following this tutorial. I mainly learned about this from w3schools and in my school course. Happy coding!!! :>
-ava
#.io#ava#ava our realities#io our realities#eps foundation#entertainment productions studio#project our realities#our realities#coding#html#HTML stuff#css#Css stuff#hyper text markup language#cascading style sheets#there will be more coding to come#I hope this helps you guys get into coding
3 notes
·
View notes
Text

⋆ Welcome to the Star Stampestry!
OO1 ▻ [ small intro post ] > My name is Lavender! I use she/he prns. > I occasionally make graphics, mostly stamps! On this blog I will be posting fandom graphics and themed graphics. > I make sure to tag posts with graphics that either aren't or are made by me!
> #made by me && #not made by me > If you have any questions about taking down or having a graphic credited (that was not made by me), pls ask me!

OO2 ▻ [ blacklist ] > You are able to request any graphics from me, unless they are on my blacklist. Requests from fandoms/categories on the blacklist will be deleted.
> Warning, some requests may be deleted despite not being on the blacklist. I am not obligated to accept requests. No hard feelings!
— REQUEST STATUS ... [ CLOSED ] ... 0/4 QUEUED REQUESTS
> You cannot request ...
✰ HH/HB, Alfred's Playhouse, YBF, Boyfriends Webtoon, Blueycapsules, LapFox Trax, Yandere Simulator ✰ Any other problematic media ✰ Irl people (excluding music artists/content creators) ✰ Incest/Proship/Comship content ✰ Controversial/Radinclus LGBTQ+ labels (Mspec Lesbians/Gays, Turigirls, Lesboys, Gaybians) ✰ NSFW of any kind ✰ Medias with little to no content provided to make graphics. If there is none available, I will delete the request altogether.
OO3 ▻ [ rules ] — Don't be afraid to use my graphics anywhere you'd like! unless they have Orignal Characters (Which I most likely wont post) in them, they are free 2 use! ✰ Credit is appreciated, but not required! ✰ — Please do NOT claim these graphics as your own in any way, however. — My graphics are NOT to be used for profit, hate speech, or commercial use! Please respect that!
OO4 ▻ [ dni ] > I'm not too big on dni lists, just dont talk to me/request graphics If you fit that one "basic dni criteria" carrd thing. I'll just block you! HASHTAGS UNDER CUT !!!
OO5 ▻ [ hashtags ] > Blog Tag #starstampestry > Graphic Tags #stamps | #blinkies | #favicons | #pngs #buttons | #dividers | #resources | #tutorials #fandom graphics | #themed graphics > Reblog Tag #starstampestry reblogs
1 note
·
View note
Text
How to Start a Blog on WordPress: Step-by-Step Guide for Beginners

Thinking about starting your own blog? Whether you want to share personal experiences, promote a business, or build a following, blogging is one of the most rewarding digital ventures. And the best part? You don’t need to be a web developer to get started — WordPress makes it incredibly easy.
In this guide, you’ll learn how to start a blog on WordPress step-by-step. From choosing a domain to publishing your first post, we’ll walk you through everything you need to know.
Step 1: Choose a Domain Name and Hosting
Before your blog goes live, you need two things:
A domain name (your blog’s address, like myblog.com)
A hosting provider (the service that stores your website files and makes them accessible on the web)
Choose a domain that reflects your content or brand. It should be simple, memorable, and relevant.
For hosting, go for a provider that offers fast speeds, WordPress support, and good customer service. Many WordPress-optimized hosting options include Bluehost, Hostinger, SiteGround, and Kinsta.
Step 2: Install WordPress
Most hosting services offer one-click WordPress installation, which means you don’t need to touch any code. Once installed, you’ll be able to log into your WordPress dashboard and begin building your site.
If you're unsure about installation, a WordPress Development Company in Udaipur can handle it for you and ensure your blog starts off on the right foot.
Step 3: Pick the Right Theme
Your WordPress theme determines the design and layout of your blog. The right theme should be responsive, fast, and easy to customize.
Recommended free themes for bloggers:
Astra: Lightweight and highly customizable
Neve: Clean design and fast performance
OceanWP: Great for personal or business blogs
Hestia: Stylish and multipurpose
You can preview and install themes directly from your WordPress dashboard by going to Appearance > Themes.
Step 4: Install Essential Plugins
Plugins extend the functionality of your blog. Here are a few essential ones to start with:
Yoast SEO or Rank Math: Improve your blog’s visibility on Google
WPForms: Create contact or feedback forms
UpdraftPlus: Backup your site regularly
Akismet: Filter spam comments
Jetpack: Boost security and track analytics
Just go to Plugins > Add New to install any of these tools.
Step 5: Customize Your Blog Settings
Before publishing your first post, tweak the following:
Site Title and Tagline: Set this under Settings > General
Permalinks: Use “Post name” under Settings > Permalinks for SEO-friendly URLs
Logo and Favicon: Upload branding elements via Appearance > Customize
Navigation Menu: Set up a user-friendly menu to help readers explore your content
Customizing these elements makes your blog look polished and professional.
Step 6: Create Essential Pages
Every blog should have a few key pages in addition to posts:
About Page: Share your story and mission
Contact Page: Let readers reach out via a form or email
Privacy Policy: Important for compliance and trust
Blog Page: Display all your recent articles
You can create these by navigating to Pages > Add New in the dashboard.
Step 7: Write and Publish Your First Blog Post
Now comes the exciting part—writing!
Click on Posts > Add New to begin. Use the Gutenberg block editor to:
Add headings, paragraphs, and images
Embed videos or social media posts
Insert buttons and call-to-action sections
Focus on delivering value to your readers. Whether it’s a tutorial, personal story, or industry insights—make it engaging and easy to read.
Step 8: Promote Your Blog
Once published, don’t just sit back—promote your post to drive traffic:
Share on social media (Facebook, Instagram, LinkedIn)
Join relevant blogging communities
Use email marketing tools to notify subscribers
Leave thoughtful comments on related blogs with a link back to yours
Promotion is just as important as creation when it comes to growing your audience.
Step 9: Optimize for SEO
Search engine optimization helps people find your blog via Google. Follow these tips:
Use an SEO plugin to set titles and meta descriptions
Add internal links to related content
Use keywords naturally in your content
Add alt tags to your images
Submit your sitemap to Google Search Console
SEO is a long game, but it's essential if you want to rank and reach new readers.
Step 10: Keep Your Blog Updated
Consistency is key in blogging. Update your blog regularly with fresh content to keep readers engaged and encourage search engines to crawl your site more often.
Here are some blog post ideas:
How-to guides
Listicles
Personal stories
Product reviews
Interviews
Opinion pieces
Also, keep your plugins, themes, and WordPress version updated to avoid security risks.
Why Choose WordPress Over Other Platforms?
Here’s why WordPress stands out among blogging platforms:
Fully customizable
Open-source and free
Scalable with thousands of plugins
Mobile- and SEO-friendly
Great community support
Unlike limited platforms like Blogger or Wix, WordPress gives you full ownership and flexibility.
If you're serious about long-term growth, design, and performance, it's wise to consult a trusted web design company in Udaipur to fine-tune your theme, layout, and mobile responsiveness.
Final Thoughts
Starting a blog on WordPress is one of the smartest decisions for aspiring writers, entrepreneurs, and businesses. It’s easy to use, rich in features, and backed by a vast community of developers and users.
With the right theme, plugins, and a content plan, you’ll be well on your way to building a successful blog that attracts, informs, and inspires.
0 notes