#Css stuff
Explore tagged Tumblr posts
Visit Tumblr Blog
Explore Tumblr blogs with no restrictions, modern design and the best experience.
Last Seen Tumblr Blogs


Fun Fact
Tumblr was the first site to host the blog for President Barack Obama in 2011.
Text
So I know how to code websites now, but idk how to upload it to the internet. My plan is to give you all a post that will update with a string of code to sort of visit the website(s?) that I am curating. I will reblog a post that had the original, and include a more patched version as time goes on. I am so sorry in advance.
Because of this.... Lemme show you how html and css works!!
For Project Our Realities, it will all be in html and css since that's what I'm learning so far. JavaScript will be included later.
HTML and CSS basics below!!
HTML, or Hyper-Text Markup Language is the basics of coding a website. It describes how a website will look. It unfortunately doesn't get you too far in terms of digital design, which is why we have languages like Css and javascript.
All HTML files start with <!DOCTYPE html>. This declares to the file that you will be coding in html rather than something like lua.
Each HTML file, after declaring it as an html file, starts with <HTML> and </HTML>. To end a tag, you must close it by adding a forward slash before writing its name (unless it is <br> or <hr>, or similar).
The <head> tag lets you add a title (silly little tab name), a favicon (silly little icon next to the name of the tab) and ways to link your CSS to the HTML.
An HTML file will look like this <!DOCTYPE html>
<html>
<head>
</head>
<body>
</body>
</html>
In the body, you can write the rest of your page, using headers (<h>/<h1-6>), paragraphs (<p>), and even forms (<form>).
--
CSS, also known as Cascading Style Sheets, is a type of coding language that is often used to create websites. No, it is not C++.
Rather than <>, CSS uses brackets {} to code.
CSS is used to style html websites, so it addresses html tags and lets you style their appearance. There is something known as inline CSS, where you can use the <style> tag to style something in your HTML file. HTML was never meant to have colors in its code, but you can change the color of text with inline css. Let's say you would like to style a header.
In your HTML file, it would say:
<!DOCTYPE html>
<html>
<head>
<link rel="stylesheet" href="(name of .css file goes here)">
</head>
<body>
<h1> My first header!!! :> </h1>
</body>
</html>
Now that we have our header, let's turn it red.
In your CSS file, it should say...
h1 {
color: red;
}
The H1 addresses that it will select all h1 elements. The code in the brackets shows that all those addressed will be the color red.
CSS has no starting or finishing lines, all elements will by stylized with {}.
--
To create an HTML file, you must end it with .HTML
To create a CSS file, you must end it with .css
Sometimes, when I create a link for the Css, the required name for the file will be in the HTML code already. Make sure that both files are in the same folder, and not one in a different folder within the same parent folder. This will not work.
--
Wanna test this out? Make a new notepad file on Windows, title it as "firsthtml.html", and create another file called "firstcss.css".
Place this in the .HTML file: <!DOCTYPE html>
<html>
<head>
<title> First HTML </title> <link rel="icon" type="image/x-icon" href="https://i.pinimg.com/736x/1a/8d/9d/1a8d9d26cdca15285d217c817f6953ec.jpg">
<link rel="stylesheet" href="firstcss.css">
</head>
<body> <h1>Welcome, traveler!!</h1>
<h3><I>Thank you for reading the tutorial!! Follow the blog to keep up with our news.</I><h3>
</body>
</html>
Now, for your .css file, write this down:
h1 {
color: dark blue;
}
h3 {
color: orange;
}
--
Thank you so much for following this tutorial. I mainly learned about this from w3schools and in my school course. Happy coding!!! :>
-ava
#.io#ava#ava our realities#io our realities#eps foundation#entertainment productions studio#project our realities#our realities#coding#html#HTML stuff#css#Css stuff#hyper text markup language#cascading style sheets#there will be more coding to come#I hope this helps you guys get into coding
3 notes
·
View notes
Text


misc coding stamps graphics
#carrd#carrd resources#carrd stuff#neocities resources#webcore#neocities#website#stamps#neocities stamps#2000s#old web graphics#web graphics#web resources#software#coding#javascript#c++#python#html css#rentry decor#rentry#rentry graphics#old web
5K notes
·
View notes
Text


☆ resources to make your own rentry/bundlrs border!
sources from da-lace.com f2u, like + reblog appreciated!
i forgot da-lace existed and then i remembered.. anyway have fun with these! no need to credit since i didn't make them
#☆ ◟ my resources !#rentry#rentry resources#rentry inspo#rentry metadata#rentry border#bundlrs border#bundlrs#rentry decor#bundlrs resources#html css#rentry stuff#editblr
2K notes
·
View notes
Text

ao3 skin that i made!! (copy code under "keep reading")
it's a messy combination of pieces of code from other people's skins and my own changes
the header image is NOT MINE! it is "Pattern Galaxy Space Planets Vibrant Linear Universe" by Arncil on Redbubble, which i just used as an example for an image you could use!
here are some of the skins that i can remember using as part of this, but i've been building it for years so forgive me if i forget some:
Shortening long tag fields by Xparrot (on ao3)
Slim Shaded by AO3 (on ao3)
Lily Garden by tealtiam (on Tumblr)
AO3 Tag category coloring! by ao3css (on Tumblr)
come back here to my tips or leave a comment if you need some help customizing the code!
Background color: #26303C
Text color: #CBC6C3
Header color: #46626D
Accent color: #993F33
steps to create a new skin using this code:
log into ao3 account
go to dashboard >> skins
click "create site skin"
make sure TYPE is "site skin"
add a unique title
copy all code below
paste into field 'CSS'
click on "use wizard" at the top
copy and paste the four colors written above into their corresponding boxes
click SUBMIT
click USE
how to customize this skin:
FONT SIZE: at the very top of the code, change the "90%" to be bigger or smaller to change the font size within a fic
MAIN COLORS: to change the main colors, select "use wizard" when editing the skin and replace any of the four hex codes under "Background color:", "Text color:", "Header color:", and "Accent color:"
SECONDARY COLORS: find all hex codes within the code and change those numbers as you like! i changed all colors to match with the color palette of the header photo that i chose to make it feel cohesive
TAG COLORS: towards the end, the "relationship", "character", and "freeform" tags alternate three colors to make them easy to separate. in this skin they are all very similar, so you can change those to be whatever colors you like!
HEADER PHOTO: find the link towards the end of the code right before the warning tags and replace it with a link to any photo you like! it loops, so you don't have to worry about sizing or anything
FONT: i'm unsure how exactly to do this, but the in-fic font is currently set to Georgia Serif, so i suppose just go find that and replace it with your preferred font!
BORDER STYLES: wherever you see the code "border-style:", replace the word that comes after it with one of these options: none, solid, dashed, dotted, double, groove, ridge, inset, outset, or hidden
WARNING TAGS: at the very end of the code is a list of words or phrases that, when they appear in the tags of a fic, are highlighted in a contrasting color so that they are easy to avoid if necessary. you can add or remove those tags however you like, or change the warning color!
COPY AND PASTE ALL CODE BELOW
#workskin { font-size: 90%; } li.blurb .tags { max-height: 7.5em; overflow-y: auto; } #header { min-height: 0; } #header a, #header fieldset, #header ul.primary, #header ul.primary .current { border: 0; background: 0; } h1 a img { height: 50px; border: 0; } #header .landmark { clear: none; } #header ul.primary { background: rgba(0,0,0,0.65); border-bottom: 1px solid rgba(0,0,0,0.75); } #header ul.primary, #header ul.primary .current, ul.primary.actions a, #header ul.primary .current { color: #CBC6C3; } #header ul.primary .current, #header #search input, #header #search input:focus { background: rgba(0,0,0,0.25); color: #CBC6C3; box-shadow: inset 0 0 3px #131A2A; border-color: #131A2A; } .actions, .actions input { text-transform: lowercase; } blockquote.userstuff { font-family: "Mido", "AUdimat", "Ostrich Sans Rounded","Lucida Grande", sans-serif !important; position: relative; background: rgba(0,0,0,0.1); padding: 2%; border: 1px solid rgba(0,0,0,0.15); box-shadow: 0 0 2px rgba(0,0,0,0.4); } blockquote.userstuff:after { content: "\201D"; right: 0; top: auto; left: auto; } body, .userstuff { font-family: Mido, Georgia, serif; } .heading, .userstuff h3, .userstuff h4 { font-family: "CabinSketch", Georgia,serif; } #main .heading { color: #CBC6C3; } #inner .group, #inner .heading, fieldset, .verbose legend, table, table th, col.name, span.unread, span.replied { outline: none; background: transparent; border-color: #131A2A; border-style: double; box-shadow: none; border-radius: 2em; border-bottom-right-radius: 0; border-top-left-radius: 0; } #inner .group .group .group, col.name { border-style: double; border-color: #CBC6C3; box-shadow: 0 0 2px #000; } #inner .bookmark .user.module, #inner .wrapper { border: 0; border-radius: 0; border-top: 3px double #bbb; box-shadow: none; } .filters { font-size: 90%; } .toggled form, .dynamic form, .secondary, .dropdown { background: #fff url("/images/skins/textures/tiles/white-handmade-paper.jpg"); } a.tag, a.tag:visited, a.tag:link { display: inline-block; padding: 1px 3px; margin: 2px 0px; border: 2px solid #46626D; border-radius: 5px; } .commas li:after { content: ""; } h5.fandoms.heading { color: transparent; } .favorite a.tag { border: none; } .tags li.relationships:nth-of-type(3n+1) a.tag { background-color: #1d3954; } .tags li.relationships:nth-of-type(3n+2) a.tag { background-color: #264663; } .tags li.relationships:nth-of-type(3n+3) a.tag { background-color: #305475; } .tags li.characters:nth-of-type(3n+1) a.tag { background-color: #214154; } .tags li.characters:nth-of-type(3n+2) a.tag { background-color: #294c61; } .tags li.characters:nth-of-type(3n+3) a.tag { background-color: #31576e; } .tags li.freeforms:nth-of-type(3n+1) a.tag { background-color: #234e54; } .tags li.freeforms:nth-of-type(3n+2) a.tag { background-color: #2a585e; } .tags li.freeforms:nth-of-type(3n+3) a.tag { background-color: #316269; } .tags li.freeforms a.tag:hover, .tags li.characters a.tag:hover, .tags li.relationships a.tag:hover { background-color: #26303C; color: white; } #header .logo { display: none; } #header ul.primary { box-shadow: none; padding-top: 30px; padding-bottom: 30px; background: #FCC191 url(https://i.pinimg.com/564x/8c/bc/ae/8cbcae1760dc88ae8730566337a5d2eb.jpg); background-attachment: fixed; } li.blurb a.tag[href*="suicid"], [href*="suicide"], [href*="Suicide"], [href*="rape"], [href*="Rape"], [href*="consentual"], [href*="Consentual"], [href*="non-con"], [href*="consent issues"], [href*="Kidnapping"], [href*="kidnapping"], [href*="Canibalism"], [href*="cannibalism"], [href*="Cannibalism"], [href*="Dove"], [href*="dead dove do not eat"], [href*="murder"], [href*="Murder"], [href*="harm"], [href*="self harm"], [href*="Harm"], [href*="Torture"], [href*="abduction"], [href*="asphyxiation"], [href*="blood"], [href*="Blood"], [href*="death"], [href*="Death"], [href*="gore"], [href*="Gore"], [href*="incest"], [href*="Incest"], [href*="trauma"], [href*="Trauma"], [href*="torture"] { color: #000000; font-weight: bold; background-color: #993F33; }
1K notes
·
View notes
Text
AO3 Tag category coloring!
Allows you to separate each tag category (warnings-relationships-characters-freeforms) with a color
all text redacted for the sake of demonstration
siteskin css below
li.warnings a { background-color: #ff000080; } li.relationships a { background-color: #ff7b0080; } li.characters a { background-color: #ffff0080; } li.freeforms a { background-color: #00800080; }
Hex color codes can be changed to any prefered color, end each Hex color with "80" for 50% opacity
788 notes
·
View notes
Text
akiyama mizuki bundlrs inspo!


page at .cc/amia
features: scrollbox, rotating lace, floating mizuki, (hopefully working) custom cursor, and buttons!
reblogs appreciated ♡

#luci’s inspo ♡#rentry#sntry#bundlrs#stellular#sentry#rentry decor#rentry inspo#rentry stuff#sntry inspo#rentry resources#rentry graphics#rentry template#sntry template#well not a template but idrc if u steal the code or watever#pjsk#project sekai#proseka#akiyama mizuki#amia#25 ji nightcord de#nightcord at 25:00#niigo#proseca#puroseka#prsk#pjsekai#prsekai#cute#html css
81 notes
·
View notes
Text
if y'all were for some reason what the fuck all these ao3 reblogs were about i was fuckin around with skins and needed ✨️inspiration✨️ and ✨️code bases✨️ and heres the result of like 2 days of fuckin around (one full day spent om that fucking permablock skin 😐 90% of it is blocking ai tags)
- make pfps circle
- stat icons
- other icons (the square ones)
- permablock tags
- the actual like bg & colors & formatting


#ao3 stuff#ao3 skins#change ao3 icons#css#css is hell#thank you tumblr (and reddit) for the help#ao3 circle pfps#ao3 site skins#ao3 block tags
21 notes
·
View notes
Text
this is how i spent my week 🤡 (pure html/css mock of a character's phone notifications)
i added in the "notification settings" and "clear" buttons for accuracy, and then had the terrible thought "but what if the clear button cleared the notifications"
it does that now! i dont want to talk about how long it took to get it to do that. but. it does that now ✨
#writing#html#css#html tryhard#ao3#genshin#well it's for a genshin fic anyway#chapter 2 is 80% done#but then i remembered i had to update some stuff in ch1#and then i looked at the phone code and said hmm. i could do better.#and then i lost a whole week to this clear button#im not even going to USE IT i just. needed it to not be ugly when i had more notifications than the screen size could handle.#someday ill update this fic lol#i need someone to message me on signal so i can see what it actually looks like#alas i have no signal friends anymore#and dont mention the download's off-center icon ugh. thats a tomorrow me problem.
21 notes
·
View notes
Note
hii do you have any css or html blinkies ?? tysm !!


[CSS + HTML: BLINKIES]
pls credit if you use
two sizes of blinkies: 730x99 px and 150x20 px
BLINKIE TEMPLATE from blinkies.cafe:
by amy
OTHER GRAPHICS I FOUND:
two HTML blinkies from archeoweb
website themed blinkies from rissipluto
I Heart CSS/HTML blinkies from nofollowgame
blinkie from michaelmurder
#blinkies#graphics#banners#dividers#css#html#coding#coder#mine#my graphics#rentry pixels#rentry inspo#rentry graphics#rentry resources#rentry stuff#rentry decor#neocities#carrd graphics#carrd resources#carrd stuff#pixels
28 notes
·
View notes
Text
Finally finished my Ao3 Workskin Generator Website. Please take a peek, this took forever, and I still want to finish the tumblr and twitter mockup generators:
#vio text#workskins#ao3#html#css#idk what to tag this tbh#minecraft#<- its almsot all minecraft stuff so the tag makes sense pls
55 notes
·
View notes
Text
How To Get Multiple Colors in a Text
warning this is might be long due to my over-explanation!!!
Some time ago I got a comment on my post asking how I got the color fading effect in my text and used non-default text colors, like the title above. I also got a few messages about this.
I swear wanted to respond sooner, but I completely forgot. When I finally got the time to reply, I noticed my response turned into an essay! So, I decided it would be easier to make a post instead, and if you're like me and are a visual learner don't worry I included images!
Also, I have ADHD and over-explain things. I realized that while drafting my reply, it came across as patronizing. So if I sound that way in this post, I assure you it's not my intention; I just tend to explain things in detail because I prefer having things explained to me like that with the smallest details addressed. I tried to make it super simple for those who are new to Tumblr.
Here is the website I used: https://patorjk.com/text-color-fader/
If you got how it works congrats, If not, and you're confused, feel free to read the steps I take when using it!

HOW TO GET THE CODE!
1.) The first step is to enter your text which is done here!

2.) Choose the number of colors you want your text to have. At least 2 colors are needed for your text to have a fade effect. For using just one color without fading, refer to 3.c.

3.a) Choose your colors from the presets which btw automatically change the number of colors used but you could simply change it.

3.b) If you would like to choose your own colors, ignore the presets and simply click on the color to edit the Hex code. Keep in mind that the order of the colors, as shown above, is the same order in which they will appear in the text when the code is generated.

3.c) To use a single color without any fade effect, set the color amount to 2, which is the minimum allowed. Then edit the two colors to have an identical hex code.

4.a) You can choose your Fade type using the below options. For this post, I will be using the horizontal fade type, as it's the one I prefer. I haven't explored the other options much, so feel free to experiment and choose whatever you like!

4.b) For the output code ALWAYS KEEP IT AS HTML when using it on Tumblr. Unless something changes with the website, HTML is the default, so you don't need to worry about making any changes.

5.a) Click the generate button at the bottom of the page to create the code.

5.b) This is how the results will appear with multiple colors and just one color. By default, the background color is set to black, but you can change it to white or another color to test how your text will look. This option can be found at the lower right side of the results, titled "View Against Background." (NOTE: The background color does not affect the code and is not included in the code itself.)


5.c) If you want to edit something, simply press the "create new fade" button at the bottom. Don’t worry; it won't reset anything; it will just take you back to the previous page!

6.) When you are okay with the results copy the code. To do this press the select all at the bottom right of the code. This will just highlight the code so you will need to either press ctrl c, ⌘ c, or whatever you do to copy text on your device!

NOW, HOW TO PUT THE CODE INTO TUMBLR!
7.a) Head over to Tumblr and create a post! Make sure you're editing using HTML by pressing the little setting button on the upper right side of your post.

7.b) Scroll down to the text editor. The default should be rich text. Press the dropdown and choose HTML.


7.c) Paste the code in the HTML editor. Then save it as a draft to make sure it looks good before posting.

8.) Here's how it should look. Be aware that the HTML editor does mess up your image placements a bit when editing, but that's an easy fix. You just edit the draft and drag the images back to where you wanted them, and it won't mess with the code.

POTENTIAL PROBLEM YOU MIGHT FACE

You might get a warning like this when using bulky paragraphs with color-fading text on Tumblr, as it wrongfully considers them to exceed the character limit. This warning doesn't appear for single-colored text. When I switched to a single color, the warning disappeared, allowing me to save my draft. When this warning appears, you will not be able to save your draft at all, which puts you at risk of losing all your work. What I usually do when I get this warning and am unable to save the draft is change the text editor, use HTML, and save the draft from there.
Please be aware of two minor issues with this hack: First, HTML can interfere with your images. If your images are stacked, that's fine; however, if they are side by side, HTML will change them to a stacked format. Second, the "read more" link will be deleted by HTML. While both issues can often be resolved using the rich text editor, you won't be able to fix them in this scenario because the rich text editor won't let you save the draft or post due to incorrectly seeing the character limit.
To work around this issue, I sometimes save the draft as HTML on my computer to bypass character limits. Then, I use the Tumblr app on my phone to adjust the image placement and re-add the “read more” link. This may not always work so just be aware of these potential issues!
That's it! If you have any questions, feel free to comment or message me, I'm kind of new at this too so bear with me!
PS, @angel-dustspo I’m so sorry for the late reply!!
#html css#html#code#chaotic academia#tips and tricks#for reference#text post#moodboard#studyblr#academia aesthetic#useful#study blog#writing#instructions#productivity#tumblr stuff#colorful#aesthetic#girlblogger#pinterest girl#student#studying#studyspo#student life
15 notes
·
View notes
Text
Customizing the theme and made a handful of images :^) going to make the curs downloadable someday for anyone who wants to invite red guy to live in their blog .
#i talk#dhmis#i live making images#these are largely temporary as im just using the current theme as a placeholder and experiment to test the waters of css#cant give out the post borders </3 its bound by the windows xp theme . i have no idea if itll will work on other themes#permanent theme i wanna make is for the recolours. love them too much and id like to do some fun website stuff with them#art
400 notes
·
View notes
Text
So I’m coding a shrine page thingy about hfjone and uhhh
#osc#object show community#my stuff#object shows#hfjone#one hfj#hfjone spoilers#kinda?#html css#html#funny#html5#coding
10 notes
·
View notes
Note
dude, your blog's theme is completely broken. maybe you should check it out

Oh, yeah, I know. But I don't know how to fix it, and the person I bought the code from never responded to my email, so uh.. yeah... there's no other deltarune [tumblr] themes out there (to my knowledge) and I've been too lazy to remove it (and also I'm afraid it'll fuck up my domain thing)
So if anyone can make me a new one, I'll like- idk- make you art or something? I can pay you like- $10 (I think that's how much I paid for the theme) If you'd prefer. I may know HTML, but [tumblr] themes are outta my knowledge range...
TLDR: I can't contact the og creator of the code so if I'll play someone to make me a new one if they're willing :p
#Its funny#i can do all sorts of things in HTML#but [tumblr] theme editing is something i can barely wrap my head around#then again- im a HTML surgeon at best so like-#am i really that good at HTML??#And dont get me STARTED on CSS#i know this stuff probably isn't hard for an experienced coder but#im illiterate#give me a break :(#the skin stealer#blog stuff
9 notes
·
View notes
Text
Ive only been coding in html (safe) but im gonna try css (scary) now. Wish me luck
#ive technically been usong css stuffs#but i havent been using css itlsef. just what toyhouse gives me#like obv u gotra use html to use css. but css is scary and html is easy#randy rambles
14 notes
·
View notes
Text
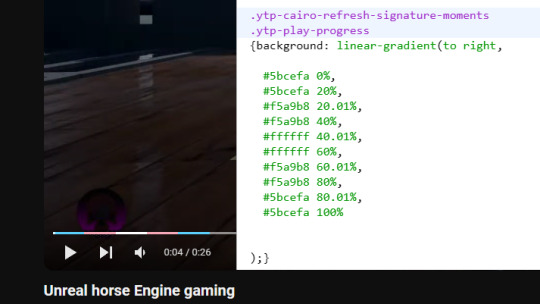
You can use a custom CSS addon (i.e. User CSS for Chrome, CustomCSS Injector for Firefox) to make whatever pattern you want in the Youtube video progress bar. Very nifty for pride flags :3 (copy/paste in alt text)
19 notes
·
View notes