#terrible tutorial
Explore tagged Tumblr posts
Visit Tumblr Blog
Explore Tumblr blogs with no restrictions, modern design and the best experience.
Last Seen Tumblr Blogs


Fun Fact
Mobile Tumblr US users spend an average of 4.04 minutes per session on the app.
Note
PLEASE GIVE A TUT ON HOW TO MAKE PIXELS I AM BEGGING YOU

HKEGDUSHDGDGD okay this is gonna probably be really overexplained since i talk a lot BUT ITS VERY EASY tuto under cut
What i personally do is start on picsart with a blank canvas (make sure its a perfect square, anything like 700x700, 400x400 whatever), What i do is use some of the cute stickers i can find by using certain search terms and rotate/move it to each frame id want it to be, picsart lets u see where its centered or not so its a lot easier than just winging it
this would be so much easier to explain if picsart allowed me to take screenshots on this DAMN PHONE!
But anyway save each frame to whatever ur using and go to Ezgif.com's gif maker to combine those frames together :3 theres a delay option on the bottom of each frame u saved, i usually set that from around 50-80 so it doesnt go too fast

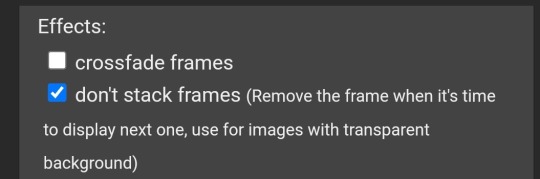
Once u set that and u have ur frames in order, remember to set THIS option
And then u click "make gif" at the bottom and horray :3 u can still edit things on the page if u might not like it
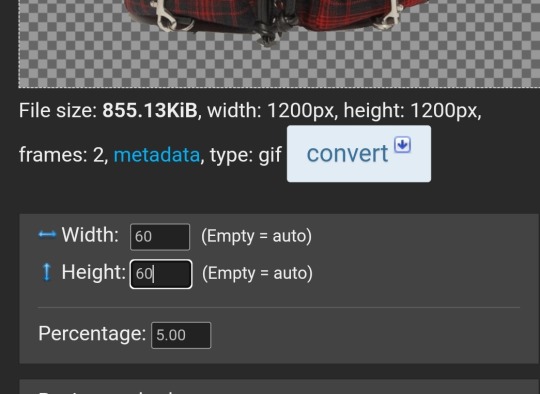
Once u get the finishing gif, u can save it as the original size (if youd like to have an extra), and go to Resize at the bottom

U should get to this, what i do is make the width and length 60x60 or 80x80 but it doesnt really matter tbh, if u want it bigger or smaller then go ahead
Disregard everything else after that and click Resize image :D and boom we did it

Both original and teeny size IF I DIDNT MAKE SENSE THATS TOTALLY MY BAD but i hope this helps😅😅😅 maybe..
383 notes
·
View notes
Note
ok but howww are you so good at night time / dark lighting ur paintings always look so atmospheric and moody and i STRUGGLE with it. any tips?
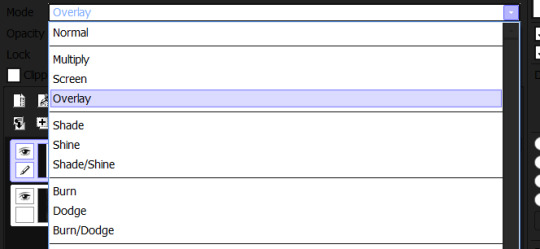
Sorry for the late reply bro. I was wondering how to formulate this as I just do things without thinking about "steps" lol. Keep in mind that I do everything in Paint Tool SAI ver.2 so: -First do your drawings as your normaly do, with background etc. I always use dark, dull palettes so I have no idea how this is going to work on lighter, colorful palettes for example. - After that, I usually just play with the lighting and shadows on an extra layer above the finished drawing. I always use "Overlay" mode on that layer
-For the shadows I never use black, but a very dark gray. For the lighting I use pure white or any shade of light color. This will always depend on the color you want the lights in your drawing (I use the airbrush to distribute the color where I want it).
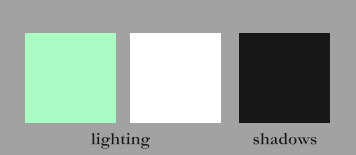
-You can create a lot of new layers with the overlay mode, and keep playing with shadows and lights until the result is to your liking. Remember that you should always try to adjust a bit with the "color changing" options, and also always adjust the opacity until it's harmonious.
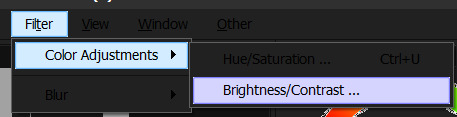
-Then I just merge all the extra layers together with the original drawing (from bottom to top) and make final adjustments. In these final adjustments, I usually decrease or increase the contrast and brightness in this option:
-After that, I just finish by adding textures over the drawing. Another tip is that I usually darken the canvas' edges with the airbrush, creating a vignette effect. This should also help with the "atmospheric" feeling. Remember that you can go wild. I hope this tutorial was helpful in some way, even if it was very poorly planned lmao
17 notes
·
View notes
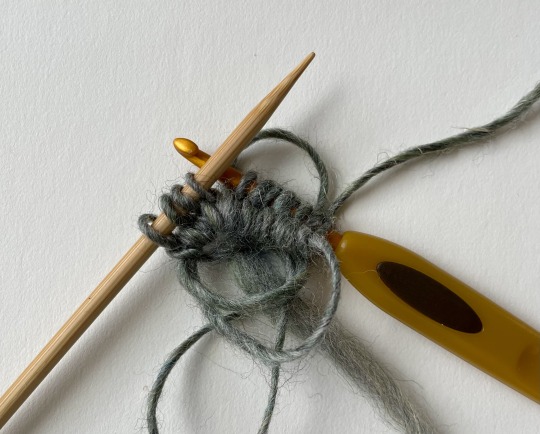
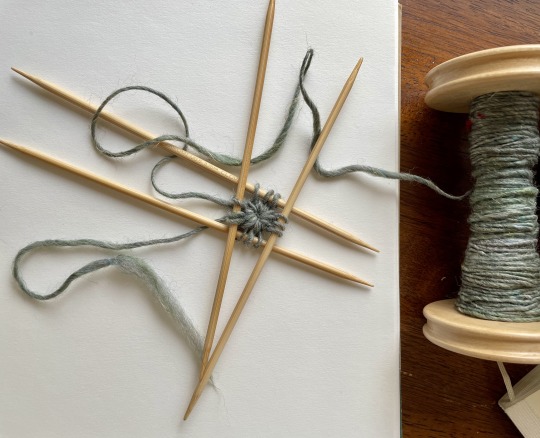
Text
Ocker’s Circular Cast-On.
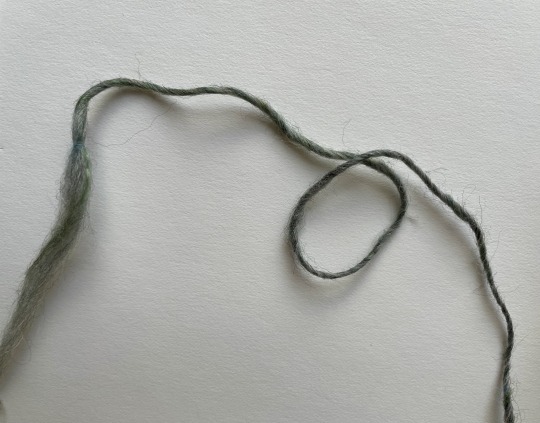
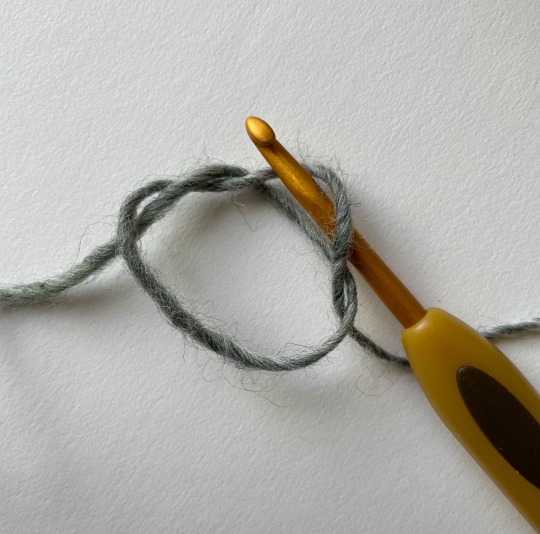
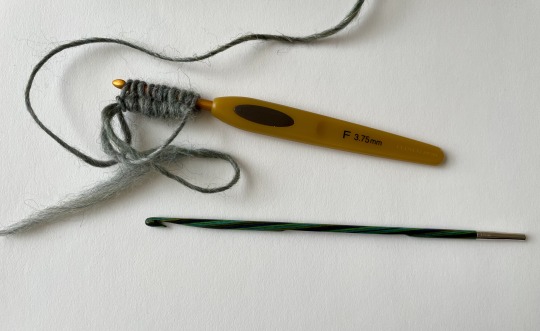
Make a loop near the yarn end. (I have the tail under the loop here, but I don’t think this is vital.)
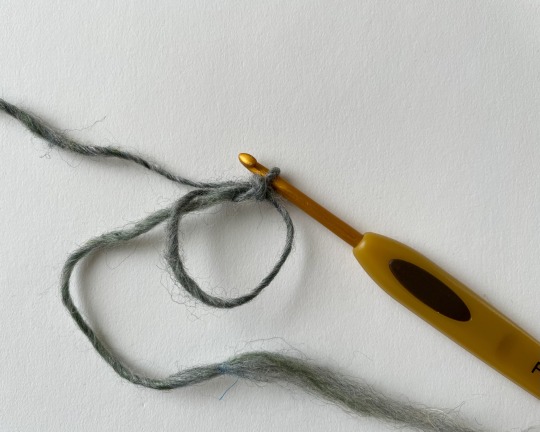
Using a crochet hook, *chain one into the loop with the working yarn. (The first chain looks the worst, having no firm structure yet, but only temporarily.)
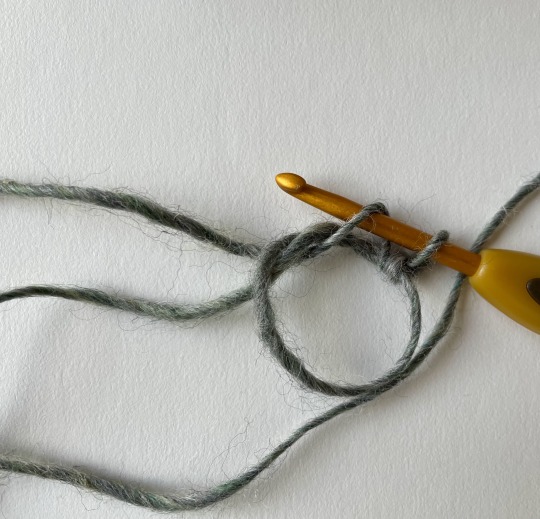
Chain one into the new chain stitch. Leave the stitch on the crochet hook and continue.*
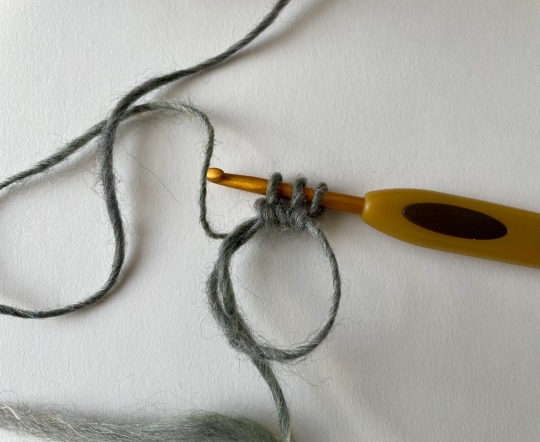
Repeat * to * until you have the number of stitches you need.
Transfer stitches to DPNs (or another knitting needle as called fro by whatever you’re working on; sometimes I use this cast-on as a really short/gathered cast-on for flat knitting, and in those cases, the pattern instructions will call for you to work flat). Incidentally, this step can be made much easier if you’ve got crochet hooks that are built like a straight smooth stick, with no ergonomics or ornamentation—you can just slide the stitches off the non-hooked end to transfer to the relevant needle.
Once that’s done, pull the tail drawstring-style (be kind of gentle with a delicate yarn) to draw the center together, and you’ve got a nice beginning for work from the center out!
(I’m going to pull mine apart. You may be able to see why. It’s completely unfinished yarn, but it’s been on the bobbin so long the twist is pretty inert.)
#this was not supposed to be a tutorial! I had a green circular cast-on I took a few pictures of#but I only took pictures of three of the steps and you couldn’t see how the loop was made#Yarn#knit#knitting#ocker’s circular cast-on#handspun yarn#handspun#terrible tutorial#cast on tutorial#Photo tutorial
29 notes
·
View notes
Text
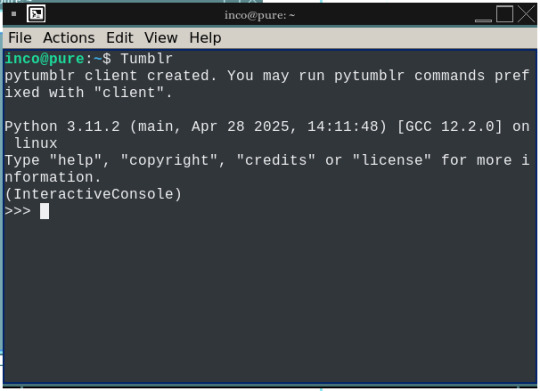
reblogging a post in pytumblr ("v2" but legacy) is like this
in ~/.local/bin/ I have a bash script that executes python3 /LOCATIONHERE/interactive_console.py
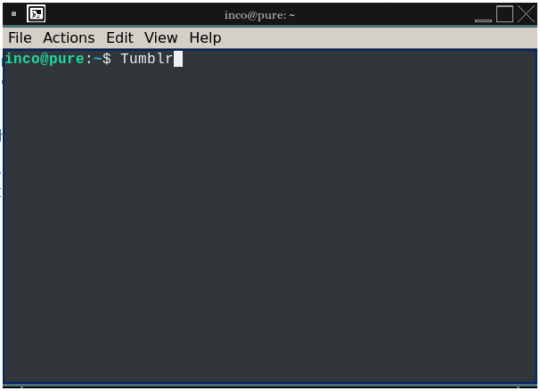
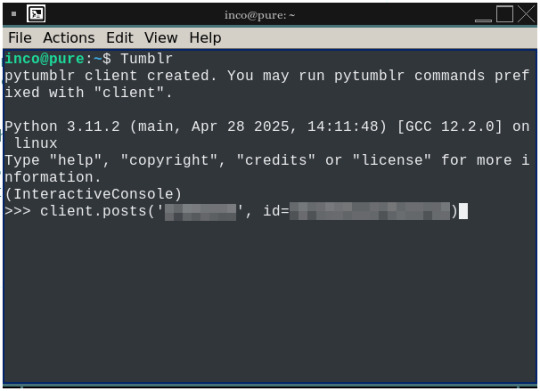
write the syntax for the reblog in Featherpad (i have my notetaker shortcut on Ctrl + Alt + Q, the "q" standing for "quill) (just like the terminal shortcut is default on some environments to Ctrl + Alt +T !!) ↓
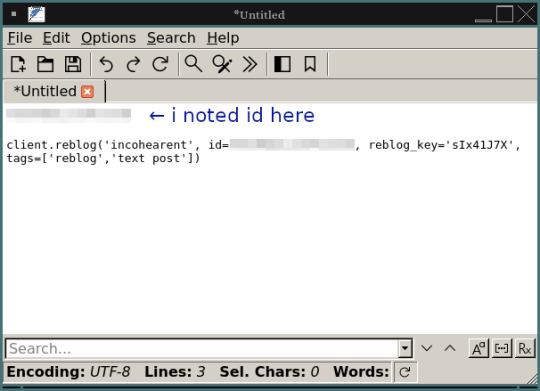
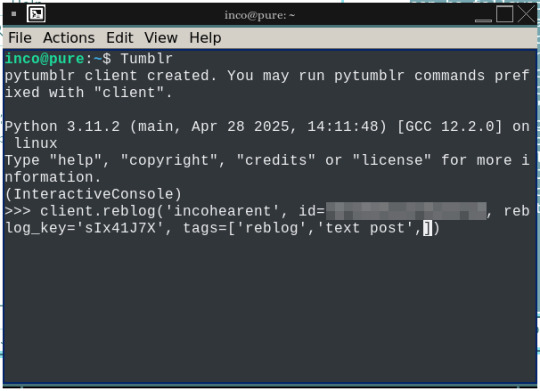
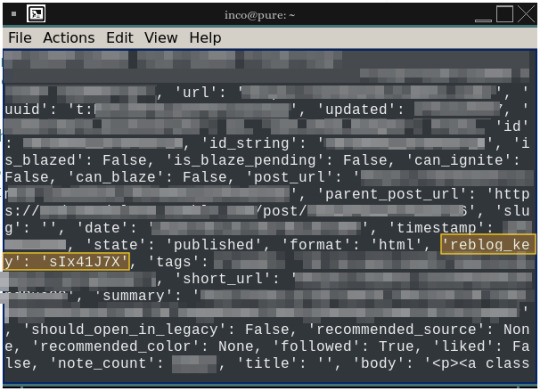
You can find a list of possible commands in ./pytumblr/__init__.py as well as the client.posts command in ./pytumblr/request.py
#pytumblr#tut#terrible tutorial#op#computing#*nix#surprised to see backticks disappear like this were a real live preview markdown editor#monospace when?? now?
0 notes
Note
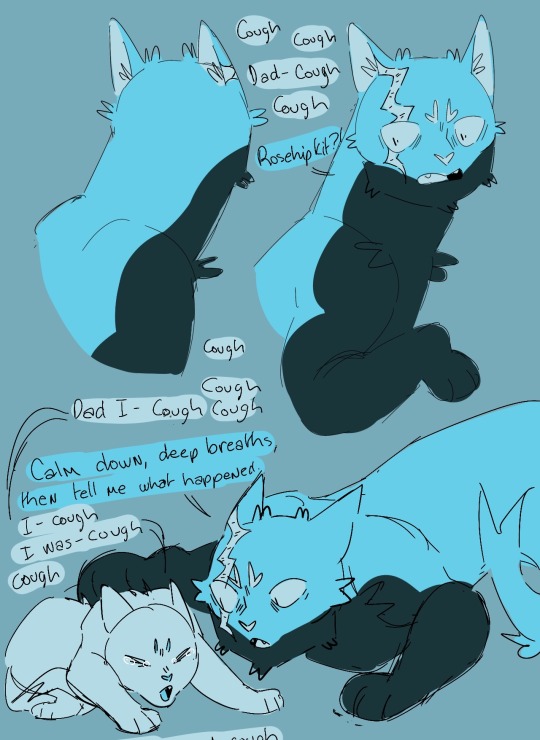
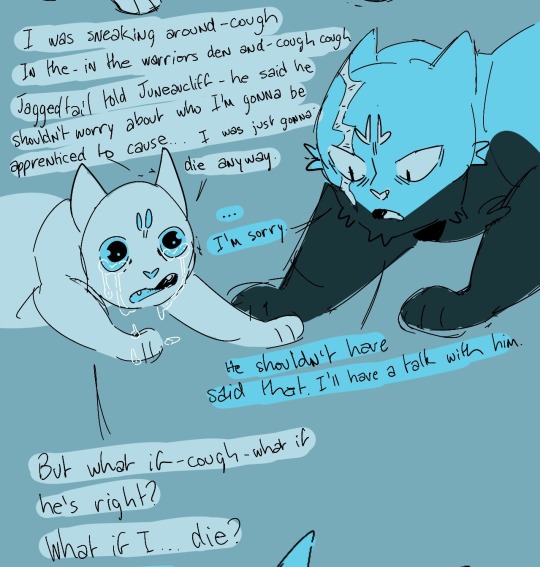
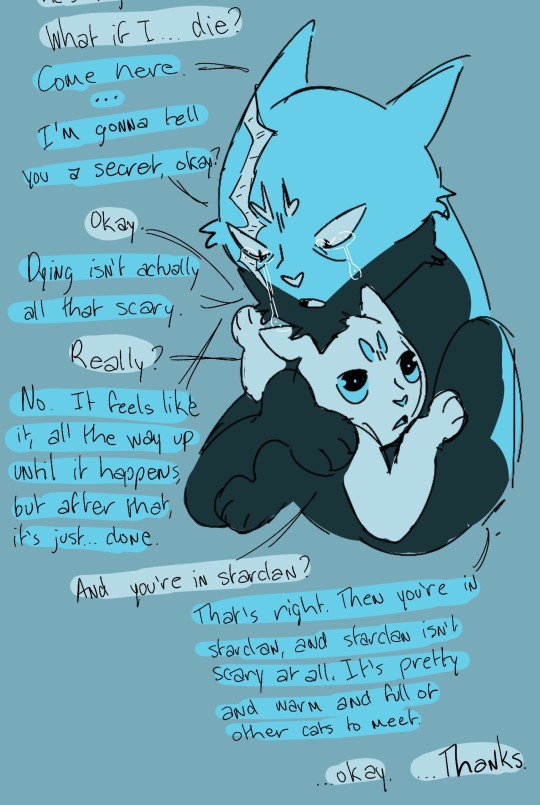
Thinking abt how the kits would have absolutely zero grasp on the concept of mortality and death and how they'd be really confused on why their parents are upset and where Mothtree wen't :^)
Hi friend, I don’t want to be like a major downer but… Rosehipkit is VERY sick. She and Dogwood, more than any other kits, absolutely understand the concept of mortality and death in a way that they should not have to.
#loudclan#loudclanasks#cw discussion of death#cw death#cw death mention#cw afterlife#cw discussion of afterlife#cw sad#kinda a downer sorry#I know this one is messy but I am terribly tired and I have so many asks in my inbox#I promise the next moon is in process.#sketch done#just trying to balance drawing asks and drawing the moon#also anon who asked about a drawing tutorial I’m working on it!#will probably be a while but I haven’t forgotten
324 notes
·
View notes
Text
my most toxic trait is that i have like 343546 dumb unfinished interactive fiction/renpy projects, bc i love making little conversation trees and planning out reactivity and things, but then i can't manage doing the art/writing/coding all at once, bc i become Unreasonably Perfectionist on all sides and it takes way too long to finish anything ahah...
so, much like the ancient magisters, i am wistfully pining away with hubris, while looking at the unattainable golden city (the concept of an extremely high effort da fan game that would require at least 10 of me to have enough time and energy to work on it effectively)
#;-;#i do recommend everyone try fiddling around with choicescript/twine/renpy#it is very fun just on its own#woe. conversation flowcharts be upon ye.#ui is just terrible though. i hate it so much. every time i looked up a tutorial it did psychological damage to me#there was one really nice and comfy unity plugin called fungus that was SO chill and had a visual interface#but it got abandoned alas...
21 notes
·
View notes
Text
oh yeah btw I got this “how to draw faces” book as a present because nobody knew what to get me and I’d really love to show you all the contents of this book. How this ever got published is beyond my comprehension


#Scarymonsters-andsupercreeps knows#God this shit is so awful#Chaz’s thoughts#shitpost#How to draw faces#Horrible tutorials#Terrible books
34 notes
·
View notes
Text
Hi hello I would put the art in the visible part of the post but one of my friends on here is fairly new to Warframe and, since the drawing + the giant loredump I have for it contains spoilers for parts of wf's main story questline between and including The Duviri Paradox and The Hex, I have decided to put it under a cut so I don't spoil them.
Do not click "keep reading" if you care about spoilers and haven't played through 1999's content to completion!!!!! My ass is yapping about potentially major spoilers down there!!!! (even if I'm wrong and they aren't particularly big it is better safe than sorry, y'know?)
Ok if you're down here I'm gonna assume you don't care about spoilers/have caught up with wf's story so: I gave my Drifter the disease that makes you a cunty robot

Drew this yesterday to celebrate the obtainment of a new drawing tablet, and then forgot to post it LMAO- also don't mind the slight crunchiness of the bg this is what having to resort to clipping out bits of pics from the Warframe wiki does (how is there no basic void energy texture image anywhere????)
Anyways, lore: this is Alderamin (Alder), my Drifter who, after moving into the Backroom and having his partner Flare move in, got jabbed by an Epic Prank™️left in a box by the dripped out old man himself: Albrecht Entrati. (he put the loading device in a box knowing full well that one day Alder would decide to get all organise-y and end up pricking himself on it because nobody expects random needle things to be in otherwise normal boxes)
He thinks nothing of it bc y'know. Tenno are kind of well known for being seemingly immune to the infestation. but then he develops a weird metallic rash and flulike symptoms, and veeery slowly his left arm (where he got jabbed) begins to morph into metal, leading to the "oh shit I'm becoming a protoframe" realisation :D
Now. could this happen in canon? lmao probably not, but do I care? absolutely not! the dex operator set shouldn't have been so protoframe-y if they didn't want this to happen /lh
Also here's some virus progression for those of you who, like me, are way too invested in how the infestation (especially regarding the protoframe strain) progresses: general progression is similar to the regular protoframe strain, but (using the fact that only the original 6 members of The Hex mention their changes being painful/generally horrific experiences, at least from what I remember) progresses with far less pain and suffering than earlier strains, partially due to the transformation being slower than usual for a long period of time, until the individual's head is the only piece of the person left. Once it's just the head, progression becomes far more rapid and takes roughly a week to complete. This part is, unsurprisingly, quite a bit more painful.
Congratulations! You made it through the ramble! Sorry if it was incoherent/badly written, I am still reeling from watching The Worst Anime Ever Made and am very sleepy.
Also if you're wondering; the lotuses under his pecs are made to mimic top surgery scars, since Alder has them :>
#goddddd it's so nice being able to draw again#I missed pressure sensitivity#and also being able to use a pen that is easier and not as terrible to use as a mouse lol#I have nothing but respect for people who only do mouse art o7 you are stronger people than I#also tried something a little different than my usual with metal shading#definitely has room for improvement BUT I think!!! I am onto something!!! and it still looks good in this form so#even if I can't figure out the touches that make it even better it isn't the end of the world#gonna try watch some tutorials on painting too in future so those should help actually#bleh I'm rambling. gonna stop now and think about drawing some dmc fancharacters bc it's starting to become a hyperfix again#warframe#warframe fanart#warframe drifter#art#digital art#my art
10 notes
·
View notes
Text
How to properly reblog a fic tutorial/ Q&A
Q: Why do I have to put tags on a reblog?
A: You don't technically have too, but when you are reblogging without tags you are basically only putting that authors work onto your account and not boosting it to be put into other peoples dash.
Q: How do you put tags onto a reblog?
A: (yes I know this is formatted awkwardly. I'm awkward. let me live.)
First, your going to go to the post that you want to reblog. I'm going to insert one of my own fics for example.
Second, you are going to click the reblog icon that I have circled there. When you click that icon you will pull this up. You will then click the "add tags" button that I have circled.
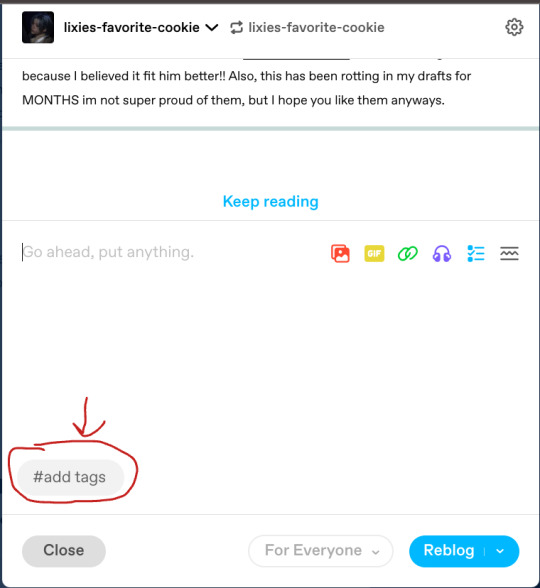
From here you can write your own tags/feedback, but if you are just trying to boost the authors work, you will then begin to click as many of the original posters tags as you want (the more the better I have found out). these tags are the ones that the author has already tagged for their work, so you don't have to stress about wrongly tagging a fic or anything!!

*note: if you are on your phone those tags will show up right above your keyboard and then you can just start clicking them from there!
And then, my lovely rebloggers, you will reblog the post and support all your amazing authors!!
#I hope that my absolutely terrible explaining helped someone *awkward smile*#tumblr fyp#Tumblr etiquette#tumblr#how to use Tumblr#tumblr tutorial
25 notes
·
View notes
Note
what i do when i'm bored and want to play dollie: moodboards, roleplay with friends, templates, pictcrews, and gifmaking!
(kicks a can on the side of the road, hands in my jeans) i do that..
#ok well not roleplaying or gifmaking#i used to rp a lot with my close good friends (my close good friends) but i dont actually know anyone who like. does it for da#also i am a notoriously terrible replier#and gifmaking....ough there IS that dalishious tutorial and i loved gifmaking for inquisition but that requires me opening da2#le sigh........... 😔#(joking you're sweet thank u)#ask#anon
7 notes
·
View notes
Text
fiercely googles how to not get railed by heatran, fiercely googles how to obtain sticky glob ?????
#brother if there was a tutorial on this I skipped it ten years ago#but I’m out here LOOKING FOR FERNS LIKE ITS GENSHIN IMPACT#this is terrible#ooc.
9 notes
·
View notes
Note
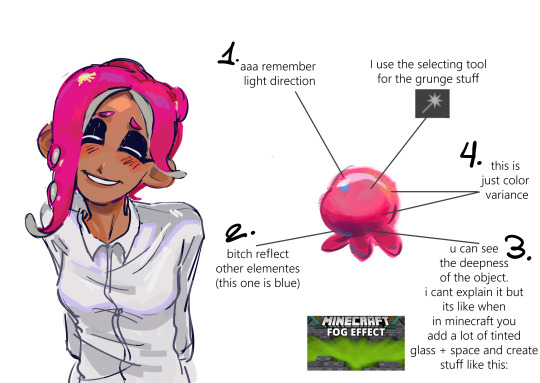
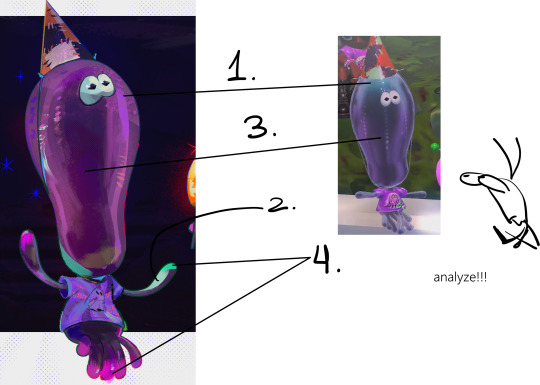
how do you draw goopy stuff? like tentacles or whatever. Idk how to do it... squishy like stress ball
my bad, I dont think i draw very goopy looking stuff?? i think i do more like grunge, pasted like of shit liek when u add to much acrylics on top. But I tried to do a mini guide because IM TERRIBLE at explaining thigs.
Unlike other people I dont have a systematic way of drawing, i just leave my brain on automode while doing something else, when im done I usually end up with good results, I recommend you do the same, just follow your instincts and train them.
#splatoon#ask#art tutorial#and its a terrible art tutorial#ANON FOLLOW YOUR HEART JUST DRAW AND THINGS WILL COME OUT UR BRAIN ABSORB BULLSHIT WHEN U LEARN IT#SO ULL DRAW IT OUT OF INERTIA#thats what i do really
144 notes
·
View notes
Note
I LOVE your colouring!!! do you have a psd / tutorial?
wow thank you so much!! and because you asked so kindly here's a simple tutorial on how i color gifs 💜
(to save on time i won't be showing how to create a gif or how to sharpen them)
CREATE YOUR GIF BASE
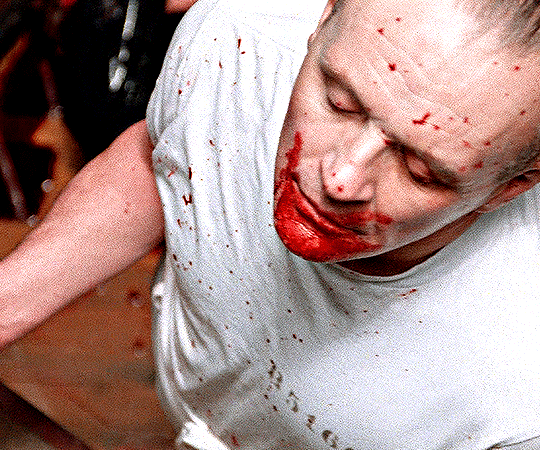
first things first is to create your gif and sharpen it to your liking. i'm using the latest version of photoshop just so you know
2. LEVELS LAYER
when coloring, i immediately start with a levels layer. obviously these settings will differ depending on the scene you're giffing. however, my goal is to balance the colors so that the highlights and shadows aren't color tinted. ultimately i want the whites to be white and not off-white - and i want the blacks to be evenly black.
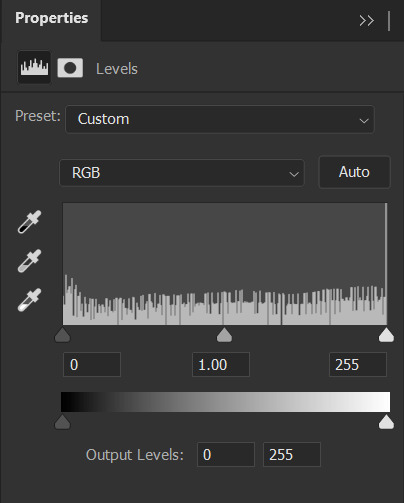
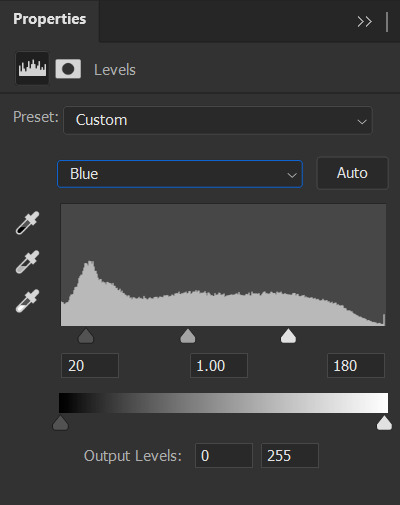
this scene is already pretty bright so i'm not going to lighten it in the RGB channel. instead, i want to wash out the yellow in the whites with the blue channel.
when increasing the blue highlights, the shadows will become blue tinted as well so its important to balance the shadows by dragging that far left dial inwards
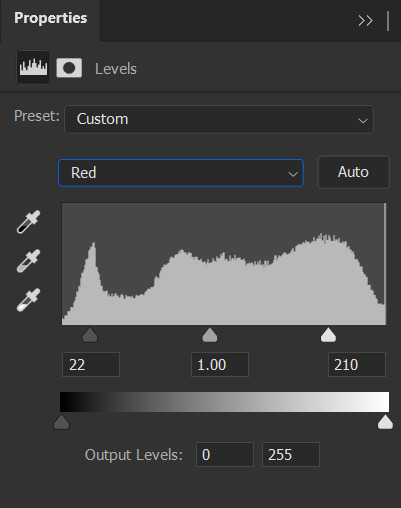

repeat that process with the green and red color channels until your satisfied
also important to note that you want your skin tones to be even, meaning not too green/yellow and not too red/blue. play around with the individual channels until you find that sweet spot
⭐ brighten your scene in the RGB channel if needed!

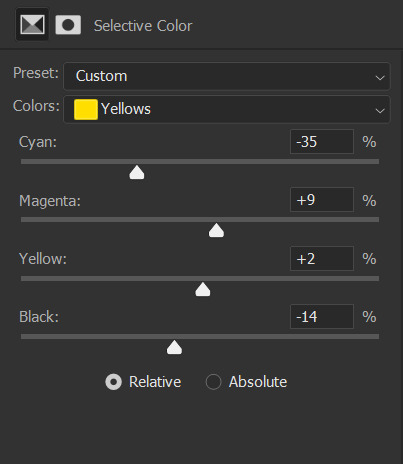
3. SELECTIVE COLOR LAYER 1
next is to saturate the reds in the scene and further dull the yellows with a 'selective color' layer
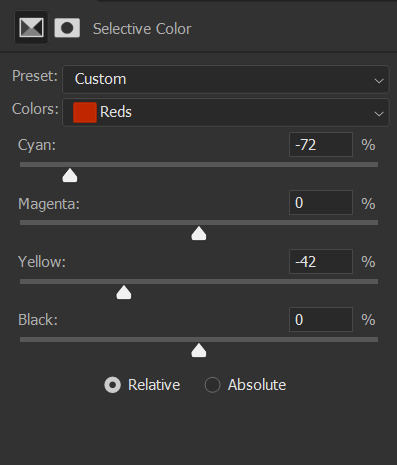

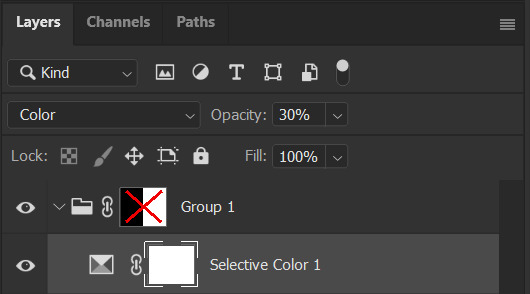
at first your gif will appear to be very discolored. you'll want to go to the 'opacity' tab in the 'layers' channel and set the percentage to 30% for this layer. like so ↴

4. SELECTIVE COLOR LAYER 2
time for the second selective color layer. this time the opacity will stay at 100%
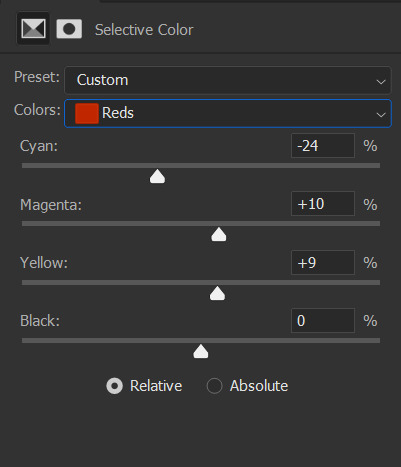
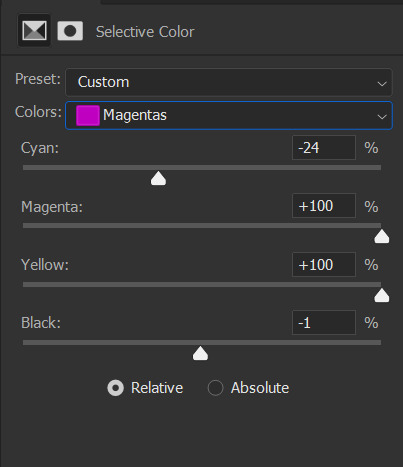
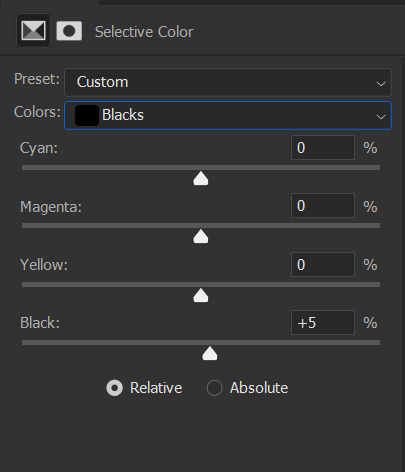
again, just adding saturation to the reds and pinks and dulling out the yellows
i added a bit to the blacks to darken the shadows more
5. VIBRANCE LAYER
this is an optional layer i sometimes add when a gif is lacking in color. in this case it definitely needed it


END NOTES!
i just want to add that i don't always color my gifs this way. it changes with every scene i work on. a lot of the time my colorings are more complex and i end up with like 10+ layers. i wanted to keep this simple. hopefully it helped you a bit. but if you're looking for a more specific tutorial, please feel free to send me another ask 🩷
72 notes
·
View notes
Text
A tip for all you tutorial-maker types out there: explain why you're doing shit, especially if your tutorial is aimed at beginners!
It would help the viewer discern things like "do I actually need an overlocker to do this sewing tutorial, or can I manage without it?" And more importantly, it helps actually develop the viewer's understanding of the skill - instead of saying "the next step is to sew on three layers of elastic [because i said so]", say "I'll be sewing on three layers of elastic, because that provides better stability than just one thick layer". This way i actually understand why the hell I'm using three layers of elastic, and I can put that knowledge to use in the future!!
If you're doing a "how to make a gathered skirt" tutorial and one of your steps is "do a gathering stitch" and you don't explain what the fuck a gathering stitch is or how to do it, your tutorial is useless, because learning how to work a gathering stitch is kind of the entire point of watching a gathered skirt tutorial.
#this post brought to you by all the terrible tutorials ive been watching#where people just say do this and now do this and now this#and don't fucking explain SHIT#not even their measurements!!!#like hello ?????????#sewing#the system speaks
202 notes
·
View notes
Text
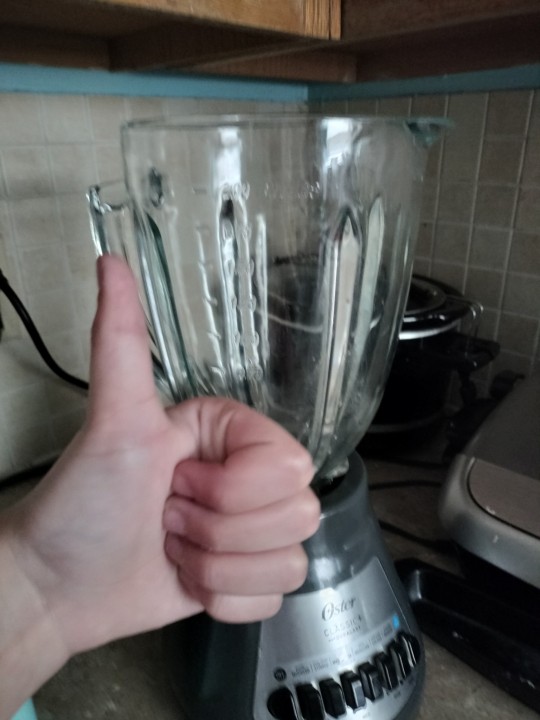
Make a smoothie with Caretale!
Ingredients!:

Protein!
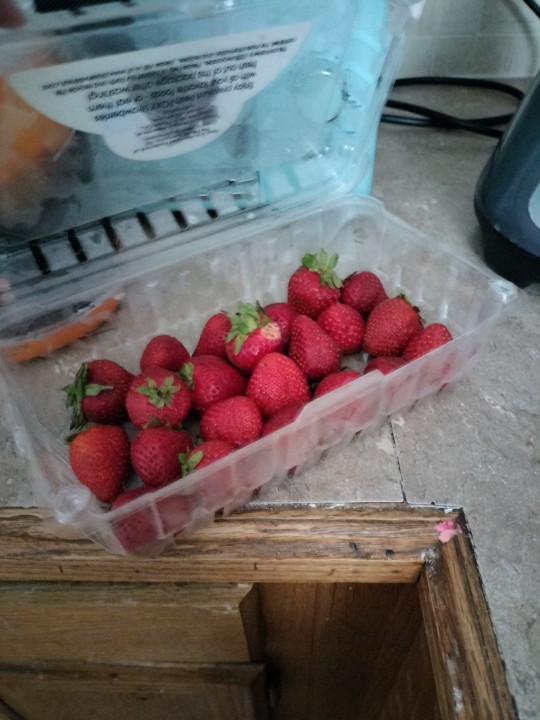
Strawberries!

Orange juice (I'm out of Oranges)!
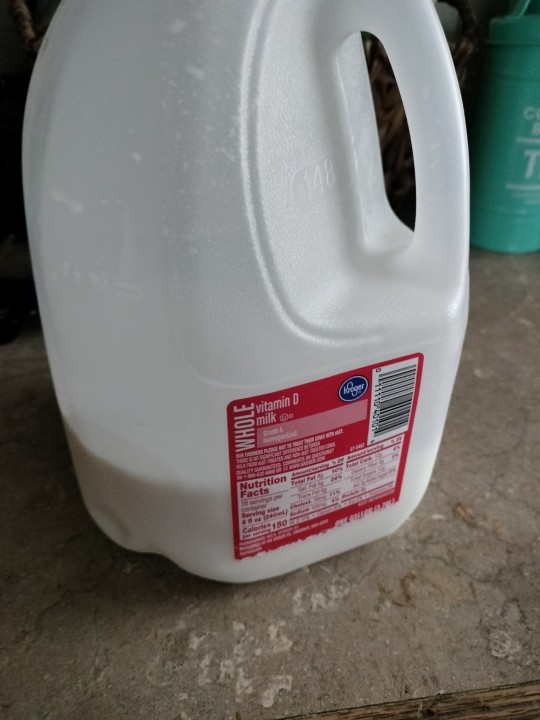
Milk!
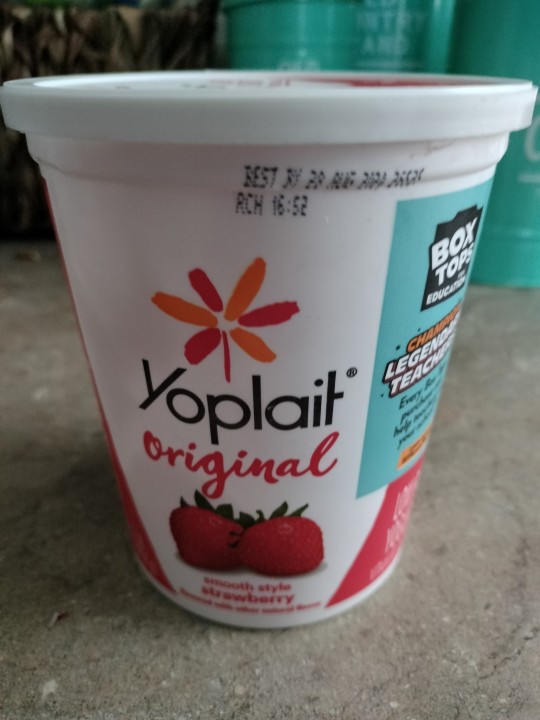
Yogurt!

Ice!
Instructions!:
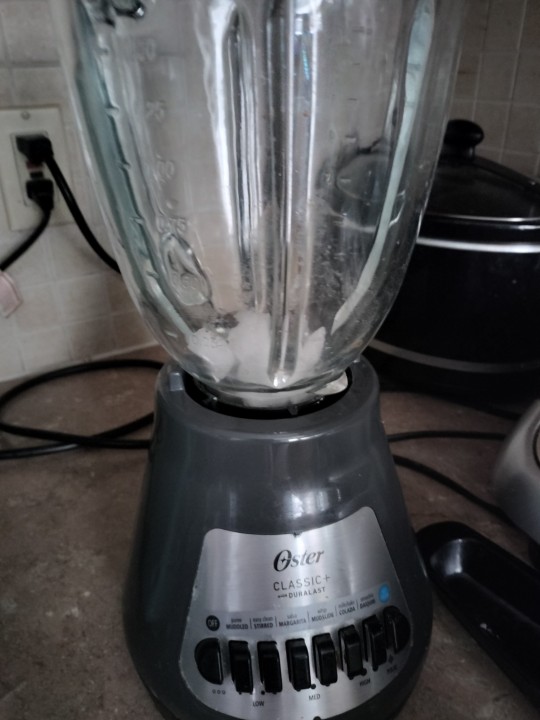
Put a handful of ice into the blender!

Cut the tops off of strawberries and put one or two handfuls into the blender!
Add about half a tablespoon of protein!
Continue in reblog!!!
#caretale that's not relevant#what even is this#caretale tutorials (I'm sorry)#how to make a smoothie (This is a terrible tutorial)#tutorial#i guess
20 notes
·
View notes
Text
I've been considering if I should make video tutorials about makeup for people with low spoons who just want to learn how to use concealer without having to trawl through the dumpster fire of the current makeup trends, which is a very bold idea for someone who considers deleting her Tumblr blog every time one of her posts blows up and has, in fact, done exactly that in the past.
#i follow a few makeup influencers on youtube#and I haven't seen a decent#in depth tutorial in YEARS#And a tutorial about simple non expensive makeup in even longer#and something that doesn't require a ton of effort in... ever#everybody is selling something#i want to be the grandma who does a two minute tutorial about knitting#and it's all explained neatly and easily#but alas#i look terrible on camera and don't want people to be idiots in my inbox#which is impossible#makeup
23 notes
·
View notes