#FirebaseAuth
Explore tagged Tumblr posts
Visit Tumblr Blog
Explore Tumblr blogs with no restrictions, modern design and the best experience.
Last Seen Tumblr Blogs


Fun Fact
Kazakhstan’s Minister of Communications and Informatics has blocked the Tumblr site because it contained 60 sites of terrorism, extremism, and pornography in 2015.
Text
How to Integrate Strapi with Firebase Auth for Scalable User Management
Want secure user logins in your Strapi CMS? Discover how to integrate Firebase Authentication with Strapi for scalable access control. Ideal for Sydney startups and developers. Built by RW Infotech, your trusted Strapi Development agency in Australia.
#Strapi#FirebaseAuth#HeadlessCMS#StrapiAustralia#SydneyTech#StrapiDevelopment#StrapiFirebase#WebDevelopmentSydney#BackendSolutions#RWInfotech#ScalableCMS#APISecurity#FirebaseIntegration#JamstackAustralia#StrapiAgencySydney
0 notes
Link
0 notes
Text
Flutter Singleton Pattern – An Ultimate Guide in 2023

In Flutter, Singleton is one of the simple and easy design patterns. Of course, this programming technique saves memory and offers an ideal solution to some instances. As a Flutter programmer, you must understand the requirements first.
What is Flutter Singleton?
Of course, the Flutter singleton class has a single instance and gives access points to it. As a developer, you must control initialization and keep track of the sole process. Hence, it has limits and the instantiation of a class should be noted down with one object as well. The purpose of using singleton is to access an object with dynamic parts of the program.
Classes have to be established with one instance of the operating system. It must have one file system and one local storage. They capture well and are mainly applicable for holding certain elements for object-oriented software. So, it should be identified with singleton and often create reusable object-oriented software approaches.
Dart Singleton Implementation
The factory instructor should be identified with the right implementation techniques. It includes singleton in dart by focusing on easy and flexible options. They make sure to obtain class initiated by file by characterized results.
Here is how the Singleton design pattern is implemented in Dart:
Singleton with Factory Constructor
Dart Singleton with static getter
Creating a Singleton Shared Preference in Flutter
On the other hand, Flutter helps to store and maintain a secure solution and approach them with app-level data. They assign more outcomes and close depending on the share preference as a singleton dart object. They usually come to simplify many tasks. In addition to this, it explores closing apps without creating share preferences.
class Singleton { /// private constructor Singleton._(); /// the one and only instance of this singleton static final instance = Singleton._();}
Usage of DIO Singleton in Flutter
In the Flutter DIO package, the network library has to hold certain things. It includes a powerful HTTP client for Dart that supports interceptors and configuration. They guide everyone to request a cancellation and connect timeout.
Flutter Provider Singleton
A single object is created by singleton providers. It returns the first object it created from memory on subsequent calls. In Flutter, an illustration of a Provider Singleton is as follows: Singletons are frequently an acceptable option for the design of libraries or packages, and this is a very noble objective. However, we should use them with extreme caution when writing application code because they can cause numerous issues in our codebase.
Flutter widget trees in Flutter apps are deeply nested. Singletons make it simple to access the objects we need from any widget because of this. However, singletons have a lot of problems, and there are better, but still simple alternatives.
Singleton Drawbacks
Of course, it understands the significance very well and it must be problematic. It includes common drawbacks and possible solutions.
1. Singletons are hard to test
Using singletons makes your code hard to test.
Check out the mocktail package for more info about how to write tests using mocks.
2. Singletons are Implicit Dependencies
classFirebaseAuthRepository { Future<void>signOut() =>FirebaseAuth.instance.signOut();}</void>
In this case, it’s easy to see that FirebaseAuthRepository depends on FirebaseAuth.
However, it becomes much more challenging to identify singletons as soon as we have classes with a few dozen lines of code. However, when passed as explicit constructor arguments, dependencies are much easier to see.
In the previous example, as soon as we initialize the hardWorker variable within the main() method, all of the heavy processing code runs. We can use late to delay the object’s initialization until after it is actually used in these situations.
void main() { // prints nothing // initialization will happen later when we *use* hardWorkerlate final hardWorker = HardWorker.instance; ... // initialization happens here // prints 'work started' from the constructorhardWorker.logResult();}
However, because it is so simple to forget to use it later, this method is prone to error. Dart, on the other hand, lazy-loads all global variables (as well as static class variables) by default. This indicates that they are only initialized upon initial use. Local variables, on the other hand, are initialized immediately upon declaration, unless they are declared too late.
We can use packages like get_it instead, which make it simple to register a lazy singleton:
classHardWorker {HardWorker._() { // do some heavy processing }// register a lazy singleton (won't be created yet)getIt.registerLazySingleton<hardworker>(() =>HardWorker());// when we need it, do thisfinalhardWorker = getIt.get<hardworker>();And we can do the same with Riverpod, since all providers are lazy by default:// create a providerfinalhardWorkerProvider = Provider<hardworker>((ref) {returnHardWorker();});// read the providerfinalhardWorker = ref.read(hardWorkerProvider);</hardworker></hardworker></hardworker>
In general, the object should be carried out with the first case. They carry out more things riverpod should accumulate by using providers. They include riverbed documentation about testing forever. This considers effective notice and creates the first use case for objects forever.
Also, Read This Post:
Instance Lifecycle
A singleton instance that we initialize will remain alive until the end of time (also known as soon as the application) is finished. We also cannot release the instance earlier if it uses a lot of memory or keeps a network connection open.
Riverpod and other Flutter packages, on the other hand, give us more control over when a particular instance is disposed of. Riverpod actually has a lot of intelligence and lets us easily control a provider’s lifecycle and state. We can, for instance, make use of the autoDispose modifier to guarantee that our HardWorker will be disposed of as soon as the final listener is removed.
finalhardWorkerProvider = Provider.autoDispose<hardworker>((ref) {returnHardWorker();});</hardworker>
It carries out more options and is likely to explore unmounted Flutter designs. It should be implemented based on the language necessary options.
Thread Safety
Accessing singletons across multiple threads in multi-threaded languages necessitates caution, and if they share mutable data, a synchronization mechanism may be required.
However, since all application code in a Flutter web app development is part of the main isolate, this typically is not a concern in Dart. However, we must exercise greater caution if separate isolates are created to carry out complex computations.
Conclusion
By reading the above scenario, you can see the complete guide about the Flutter singleton. We have witnessed Flutter singleton, Dart singleton integration, developing the singleton preference in Flutter, Flutter provider singleton, and so on. I hope you understand Flutter Singleton with an example. However, it should be vital to explore changes in singleton creation. We have a team of experienced mobile app developers. So, you can hire fluter app developers from Flutter Agency who are eligible to create a singleton and know how to integrate it into the development process and build a successful mobile application for your business. Do not hesitate and connect us if you have queries. Share your requirements today!
Frequently Asked Questions (FAQs)
1. When should you use the singletons?
A singleton should be utilized while managing the access to resources shared by a whole application. And it will be destructive to have various instances of a similar class. Therefore, ensuring access to the shared resources thread is safe is an excellent example of where this kind of pattern can be necessary.
2. Why is singleton necessary?
It is used when a single instance of a class is needed to control an action throughout an execution. A singleton class should not have various instances in any case and at any cost. Moreover, the singleton classes are utilized for logging, database connections, driver objects, cache, and thread pool.
3. How do you secure the singleton in Flutter?
To overcome this problem, we must integrate the clone()method and throw an exception—cloneNotSupportedException from the clone method. If anyone tries to make the clone object of a singleton, it will throw an exception.
Source: https://flutteragency.com/flutter-singleton-pattern/
0 notes
Link
#flutter#dart#flutterdev#appdev#flutterweb#firebase#appui#uiux#appdevelopment#developer#mobileapp#flutterui#ui#flutterapps
0 notes
Text
Simple Steps to Build Chat App In Flutter With Firebase
Many companies build Flutter chat apps without firebase, which are less functional and sometimes lack compatibility. But with the firebase module, you develop a highly scalable and performing app for the client. So, here are quick steps:
1. Firebase Authentication
The very initial and vital step is to create an authentic sign-up to protect the chat app from any disguise. Now comes the understanding part. If the developer uses the Google Sign-up concept, a developer can use terminal/CMD or VS code.
These will work as the systematic code editor and offer great support for development functions like debugging task running and version control. Now create a sign-in widget in the Sign-in. Dart, and here you will utilize the framework, appBar, body, and floating buttons.
2. Installing Widgets For Functionality
Concerning the Flutter chat room, it is essential to properly coordinate among the plugins to run it flawlessly. By arranging the plugins properly, the developer can create and assemble a main Firebase chat application.
To install any plugin on the app, you need to follow the guidelines of incorporating “Firebaseauth, google sign in, cloud firestore, firebase storage, etc., to the app with firebase. Sometimes you might face problems installing the plugins; here, a flutter chat app developer will give you precisely.
Which Are The Suitable Plugins for Flutter Firebase Chat App Development?
Firebase auth for flutter
Google Sign-in
Cloud firebase plugin in a flutter
Image picker to choose images from the gallery
Fluttertoast to display a toast
Firebase cloud storage for flutter
3. Layout of the Screen
The next task is to prepare a layout of the app screen. In a chat application, different screens are available. It holds an enlistment screen, login screen, setting screen, landing page, and chat screen.
This load of the screen is built by creating several arrangements of codes. It is the only reason why the developer has to follow the guidelines properly. There are four prominent types of screen layout, i.e., Login screen layout, Main screen layout, Setting screen layout, Chat screen layout.
4. Connection with Flutter & Firebase
Another essential part of the flutter chat app development is to connect it with firebase. A developer has to sign up with a Google account or Sign in to the firebase to do so. Now, you have to create a project and then construct Project Overview.
In this segment, you have to add your Package Name. Download google-services.json and move the downloaded file in the Android app module root directory. Now add the google-services dependencies in the Project-level build. Gradle and you are good to go.
So these were the four significant steps to build a chat app with flutter. Now we will look at the benefits of developing a chat app in a flutter with firebase.
Blog Source: https://dreamsoft4u.com/blog/how-to-develop-a-chat-app-in-flutter-using-firebase
#Firebase chat application#flutter app development companies#\#developing chat apps in a flutter with firebase#chat app development
0 notes
Text
android kotlin 개발 팁 정리 (wasent 개발시 정리)
alt + enter 자동완성
ctrl + space 자동완성 basic code completion
cotrol + r run app
alt x mark 클릭 모든 코드창 닫기
현재 year 가져오기 Calendar.getInstance().get(Calendar.YEAR)
UI를 위한 변수를 자동생성 해주기 위해 필요
import kotlinx.android.sythetic.main.activity_main.*
android toast message
Toast.makeText().show()
kotlin random integer
Random.nextInt()
android drawable
<selector>
<item>
<shape>
<solid>
<corner>
android ImageView
resource 로 부터 이미지 가져오기
ImageView.setImageResource()
android ListView
BaseAdapter , getItem, getCount, getItemId, getView
ListView.adapter = BaseAdapter를implement한obj
android view layout
context객체.getSystemService()
android LayoutInflator 객체 얻는법
layoutInflator객체.inflate(Context.LAYOUT_INFLATER_SERVICE)
android activity
다른 actvity로 이동
Intent, intent객체.putExtra(), startActivity()
android Bundle activity Intent
intent에서 bundle data가져오기
intent객체.extras 는 Bundle 객체를 return. bundle객체.getString(”키이름”)
android ListView change delete update adapter
adapter객체.notifyDataSetChanged()
kotlin inner class access property
inner modifier
https://stackoverflow.com/a/45418262/3151712
android image drawable mipmap
한번에 다양한 크기의 같은 이미지 생성 프로그램
final_android_resizer
android GridView
ListView와 제작방법이 거의 동일하다.BaseAdapter , getItem, getCount, getItemId, getView. 단 GridView에 numColumns, columnWidth, horizontalSpacing 속성을 추가로 설정해야 한다.
GridView.adapter = BaseAdapter를implement한obj
android internet permission http
<uses-permission android:name = “android.permission.INTERNET”/>
android kotlin thread background
AsyncTask<> , doInBackground, onProgressUpdate, onPreExecute, onPostExecute
kotlin try catch
try{
}catch (ex:Exception){
}
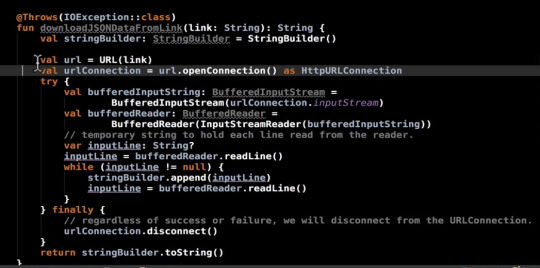
android kotlin url connection
Url(url스트링) 하면 url객체를 얻을 수 있다.
url객체.openConnection()하면 urlconnection객체를 얻을수있고 이를 HttpUrlConnection 객체나 HttpsUrlConnection객체로 타입전환할수 있다. HttpUrlConnection객체.connectTimeout() 을 통해 제한시간 설정가능
HttpUrlConnection.inputStream 을 통해 외부로부터 data를 받을수 있게 된다.
InputStream, InputStreamReader, BufferedReader 를 사용 한줄 한줄 읽어 온다.
android json
JSONObect(스트링) , getJSONObect() 또는 getJSONArray()를 통해 한단계씩 들어가서 데이터를 가져온다.
android drawable background
상태에 따른 스타일 바꾸기
<selector> <item> <shape> <corner> <stroke> <solid> <padding>
<item android:state_pressed= “true”>
android firebase authentication analytics
Udemy kotlin android 강좌
google firebase 사용방법 121 analytics ,122 authentication 매우 간단하고 이해하기 쉽다.
124 analytics
127 datastore database
130 3:00 addValueEventListener
android notification
NotificationCompat.builder()
setDefault() setSmallIcon() setContentTitle() setContentText() setNumber()
context.getSystemService(context.NOTIFICATION_SERVICE)
Udemy kotlin android 강좌 132
android notification channel
NotificationChannel()
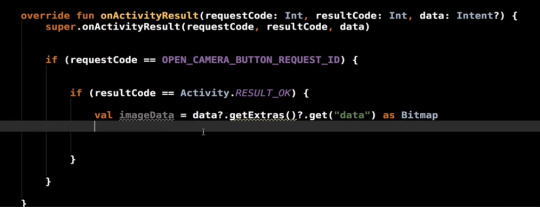
android image 사용 external storage camera permission
ActivityCompat.checkSelfPermission()
requestPermissions()
onRequestPermissionsResult()
udemy 136 3:00
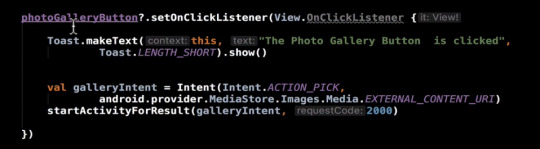
android image file 디바이스에 있는 image file 가져오기
intent intent.ACTION_PICK android.provider.MediaStore.Images.Media.EXTERNAL_CONTENT_URI startActivityForResult()
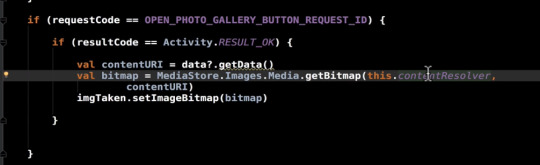
android image file content provider 사용자가 선택한 화일 가져오기

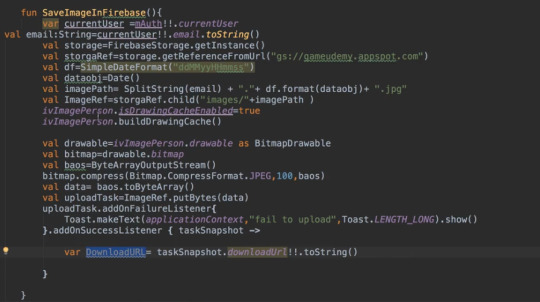
android filebase storage imageview에 있는 이미지를 압축해서 firebase storage에 올리기
FirebaseStorage FirebaseStorage객체.getRefenceFromUrl()
udemy 137
android google firebase authentication
FirebaseAuth createUserWithEmailAndPassword() addOnCompleteListener()
FirebaseUser

android picasso imageview image
udemy 140 9:00
android cloud messaging firebase
앱을 사용하는 다수의 사용자에게 message 보낼때사용. udemy 144
FirebaseMessaging.getInstance().subscribeToTopic()
manifest에 service추가 , meta-data 추가
Service class 작성 onMessageReceived()
android kotlin variable element
참고) kotlin에서는 findById()과정없이 바로 element id통해 접근가능하다.
아래와 같이 사용해도 된다.

위와 같이 activity 안에 요소를 위한 variable을 만들고 view type을 명시적으로 해준경우 아래와 같이 <Button>을 해줘도 되고 안해도 된다.

그러나 아래와 같이 activity 안 어느 함수안에서 variable이 정의된경우 photoGalleryButton처럼 명시해주어야 한다.

android kotlin clicklistener listener lambda button

android kotlin photo picture intent
android photo gallery pick intent
android kotlin element id variable
kotlin에서는 findById()과정없이 바로 element id통해 접근가능하다.
android kotlin inputStream url http read buffer BufferedReader InputStreamReader
참고) BuffredReader에 대하여 https://www.baeldung.com/java-buffered-reader
android kotlin Toolbar ActionBar
아래에서는 toolbar는 activity_main layout에 있는 toolbar 의 id 이다.

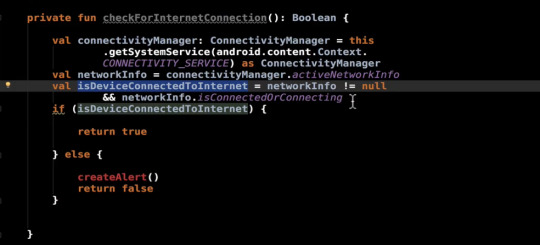
android kotlin network
network에 연결되었는지 확인하는 경우

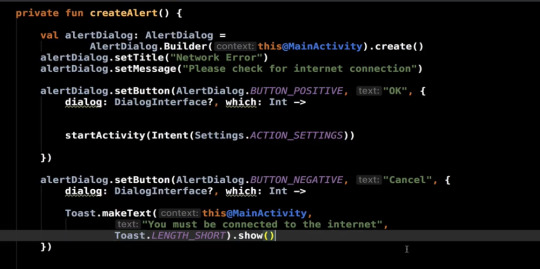
android kotlin AlertDialog

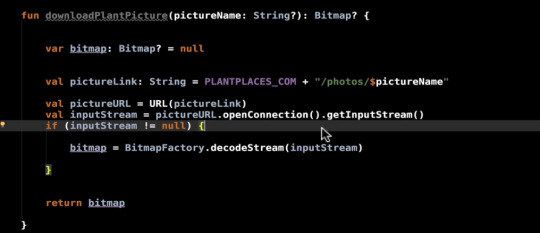
android kotlin bitmap url http
android kotlin progress bar

android kotlin button drawable background
gradientdrawable을 xml이 아닌 코드상에서 만드는 방법
android kotlin dp float drawable
gradientdrawable을 xml이 아닌 코드상에서 만들때 코너를 둥글게 만드는 경우 dp 사이즈를 설정해 주는데 이때 필요한 dp 값을 구하는 방법이다.

kotlin inner class nested
https://stackoverflow.com/a/46730214/3151712
android kotlin listener anonymous class lambda sam
https://antonioleiva.com/lambdas-kotlin-android/
android kotlin listener anonymous class lambda sam
https://antonioleiva.com/listeners-several-functions-kotlin/
https://antonioleiva.com/lambdas-kotlin/
android kotlin draw onDraw
https://stackoverflow.com/questions/13640541/view-ondrawcanvas-c-versus-drawcanvas-c-in-android
android kotlin TextUtils isEmpty EditText가 비었는지 확인 축약형
https://stackoverflow.com/a/6290637/3151712
android kotlin bundle 만들기 축약형
https://medium.com/@programmerr47/creating-bundles-nicely-with-kotlin-1526fc173d01
옛날방법 https://stackoverflow.com/a/59957980/3151712
android kotlin invoke operator overload
https://stackoverflow.com/questions/45173677/invoke-operator-operator-overloading-in-kotlin
android studio json to kotlin plugin
json 내용을 보고 그에 맞는 kotlin classes를 자동으로 만들어 준다.
android studio - > preferences -> plugin -> json to kotlin 검색
kotlin reference member class ::
https://stackoverflow.com/a/51813211/3151712
kotlin by keyword delegate delegation
https://stackoverflow.com/a/57637851/3151712
kotlin elivis operator null safety
fun elvisSample(arg : String?) { val value = arg ?: "" }
//같은내용 fun elvisSample(arg : String?) { val value = if (arg != null) arg else "" }
android room annotation
https://medium.com/@tonyowen/room-entity-annotations-379150e1ca82
@Entity
data class Person()
@Entity(tableName = "people") data class Person()
@PrimaryKey(autoGenerate = true)
val id: Long
@ColumnInfo(name = "first_name") val firstName: String = ""
@Ignore
val bitmap: Bitmap
@Entity data class Person( @PrimaryKey(autoGenerate = true) val uid: Long, val firstName: String = "", val lastName: String = "", val email: String = "" ) @Entity(foreignKeys = arrayOf(ForeignKey(entity = Person::class, parentColumns = arrayOf("uid"), childColumns = arrayOf("ownerId"), onDelete = ForeignKey.CASCADE))) data class Pet( @PrimaryKey(autoGenerate = true) val id: Long, val ownerId: Long, val name: String )
.
.
http://androidsbs.blogspot.com/2013/11/androidnextfocusdown-set-next-focus-to.html
Defines the next view to give focus to when the next focus is FOCUS_Down.
.
.
phone number edittext mask
https://stackoverflow.com/a/34907607/3151712
.
.
screen orientation
android:screenOrientation="portrait"
https://stackoverflow.com/a/13526816/3151712
.
.
android soft keyboard
https://stackoverflow.com/a/5617130/3151712
.
.
android dependency androidx jetpack
https://developer.android.com/kotlin/ktx
.
.
android navigation jetpack
https://developer.android.com/guide/navigation/navigation-getting-started
.
.
android data binding jetpack
https://stackoverflow.com/a/34719627/3151712
The data binding implementation must be in the onCreateView method of the fragment
public View onCreateView(LayoutInflater inflater, @Nullable ViewGroup container, @Nullable Bundle savedInstanceState) { MartianDataBinding binding = DataBindingUtil.inflate( inflater, R.layout.martian_data, container, false); View view = binding.getRoot(); //here data must be an instance of the class MarsDataProvider binding.setMarsdata(data); return view; }
.
.
android tablelayout table
https://youtu.be/x0X19LJJGjc
.
.
android tablelayout table
https://youtu.be/2q7R3Pt-NCw
.
.
android tag
https://stackoverflow.com/a/45841698/3151712
.
.
android edittext text settext
https://stackoverflow.com/a/45841698/3151712
.
.
android viewmodel share activity fragment
https://medium.com/mindorks/how-to-communicate-between-fragments-and-activity-using-viewmodel-ca733233a51c
.
.
android viewmodel by error unresolve problem
https://stackoverflow.com/a/49934785/3151712
https://stackoverflow.com/a/60830396/3151712
.
.
android snackbar snack
https://www.androidhive.info/2015/09/android-material-design-snackbar-example/
.
.
android switch get data value
https://stackoverflow.com/a/47894048/3151712
.
.
android seekbar seek value listener get
https://abhiandroid.com/ui/seekbar
.
.
android seekbar value
https://stackoverflow.com/a/19227945/3151712
.
.
kotlin elvis ?:
https://kotlinlang.org/docs/reference/null-safety.html#elvis-operator
.
.
android layout half screen
https://stackoverflow.com/a/26379458/3151712
.
.
android weight weightsum
https://stackoverflow.com/questions/7452741/what-is-androidweightsum-in-android-and-how-does-it-work
.
.
android auto size text autosize textview font
official docs
https://developer.android.com/guide/topics/ui/look-and-feel/autosizing-textview
.
.
android auto size text autosize textview font
youtube 6분 , 컨셉이해
https://youtu.be/Dk3fI58RkPs
.
.
android editable text to string convert
https://stackoverflow.com/a/2216395/3151712
.
.
Kotlin - Apply, Let, Run, With, Also - Higher Order Standard Functions
youtube 11분 매우 명확
https://youtu.be/-Lha9n8VJf0
.
.
android navigation dialogfragment fragment dialog alert alertdialog
https://stackoverflow.com/a/55256858/3151712
.
.
android dialog dialogfragment alertdialog
https://blog.mindorks.com/implementing-dialog-fragment-in-android
.
.
android dialog dialogfragment alertdialog
youtube 7분 매우 간단
https://www.youtube.com/watch?v=alV6wxrbULs&t=2s
.
.
android callback function firebase addOnCompleteListener
https://stackoverflow.com/a/51595202/3151712
.
.
android SharedPreferences 와 Preferences 차이
https://stackoverflow.com/a/23223316/3151712
.
.
android SharedPreferences Preferences
https://youtu.be/M15PEeHXM64
30분 분량
https://youtu.be/SfeRakSWWbk
16분분량.
.
.
android action bar tool bar actionbar
https://www.journaldev.com/9357/android-actionbar-example-tutorial
.
.
android action bar tool bar actionbar
https://www.journaldev.com/9357/android-actionbar-example-tutorial
.
.
kotlin multiple constructor
https://stackoverflow.com/a/56277144/3151712
.
.
kotlin this nested class
https://agrawalsuneet.github.io/blogs/qualified-this-in-kotlin/
.
.
context requiredcontext
https://stackoverflow.com/a/60402600/3151712
.
.
android alert dialog view
https://stackoverflow.com/a/55685054/3151712
https://stackoverflow.com/a/22655641/3151712
.
.
android currency textwatcher mask
https://stackoverflow.com/a/24621325/3151712
https://stackoverflow.com/a/5233488/3151712 -> max length와 함께쓰면 문제 있었음
.
.
kotlin string replace
https://stackoverflow.com/a/50946070/3151712
.
.
kotlin data class inherit extend
https://stackoverflow.com/a/55701197/3151712
.
.
android spinner entries array value
https://www.mysamplecode.com/2012/03/android-spinner-arrayadapter.html
.
.
android string charsequences character
https://stackoverflow.com/a/1049244/3151712
.
.
android spannable
This is the interface for text to which markup objects can be attached and detached. Not all Spannable classes have mutable text; see Editable for that.
https://developer.android.com/reference/android/text/Spannable
.
.
android spinner get value getselecteditem select
https://stackoverflow.com/a/7486969/3151712
.
.
kotlin vararg array<string> variadic parameter argument
https://discuss.kotlinlang.org/t/vararg-vs-array-parameter/4068
.
.
kotlin remove character string
https://stackoverflow.com/a/49344240/3151712
.
.
android firebase child email key name @ at
https://stackoverflow.com/a/43863803/3151712
.
.
android androidx prefereces
https://developer.android.com/reference/androidx/preference/Preference
.
.
android alert dialog preference sharedpreference button click
https://stackoverflow.com/a/49444754/3151712
.
.
kotlin if express inline
https://stackoverflow.com/a/16336507/3151712
.
.
kotlin ?.let null null safety elvis ?.
https://www.reddit.com/r/Kotlin/comments/8k1885/why_cant_the_else_part_of_let_take_a_block/
muthuraj57 answer is best
.
.
android resource string viewmodel
https://stackoverflow.com/a/51279662/3151712
.
.
android firebase realtime database child event ChildEventListener
https://firebase.google.com/docs/reference/android/com/google/firebase/database/ChildEventListener
.
.
android firebase realtime database iterate traverse child
https://stackoverflow.com/a/44935464/3151712
.
.
kotlin collection
https://www.geeksforgeeks.org/kotlin-collections/
.
.
android kotlin firebase data class constructor
https://stackoverflow.com/a/51134246/3151712
.
.
android jetpack livedata observe collection
https://stackoverflow.com/a/52075248/3151712
.
.
android firebase child event listener remove ChildEventListener
https://stackoverflow.com/questions/46140289/removing-childeventlistener
.
.
android longclicklistener long click listener return true OnLongClickListener
https://stackoverflow.com/a/13470431/3151712
.
.
android string resource getstring
https://stackoverflow.com/a/44901859/3151712
.
.
kotlin string format
https://stonesoupprogramming.com/2017/11/17/kotlin-string-formatting/
.
.
livedata initialization initial
livedata는 기본적으로 null을 가지고 있다.
예를 들어 아래에서 liveItems.value 는 null이다. 그러나 보통은 val example = liveItems 하고 example의 값을 확인해보는게 정상적인 접근 방법이며 이경우에도 기본 최초값은 null이다.
val liveItems : LiveData<MutableMap<String, Item>> get() = _liveItems
.
.
livedata access
livedata의 값을 알고 싶을 때는 livedata.value를 사용하지 말고 일단 다른 var에 할당하고 확인한다.
.
.
kotlin collection
데이터타입 MutableMap<String, Item>을 생성하는 경우 아래와 같이
val items = mutableMapOf<String,Item>()
var stars: MutableMap<String, Boolean> = HashMap() var stars = HashMap<String,Boolean>()
.
데이터타입 MutableList<String>을 생성하는 경우 아래와 같이
val items = mutableListOf<String>()
val list: MutableList<String> = ArrayList<String>()
아래는 immutable list가 된다.
val list: List<String> = ArrayList()
ref) https://stackoverflow.com/a/50893555/3151712
.
https://www.geeksforgeeks.org/kotlin-collections/
https://www.geeksforgeeks.org/kotlin-mutablemapof/
.
.
kotlin dictionary contain key map hashmap
https://kotlinlang.org/api/latest/jvm/stdlib/kotlin.collections/-map/contains-key.html
.
.
kotlin collection map list convert
https://grokonez.com/kotlin/kotlin-tutorial-convert-kotlin-map-list
.
.
kotlin map add item
https://stackoverflow.com/a/42627451/3151712
.
.
firebase android getvlaue generic collection list map dictionary
https://firebase.google.com/docs/reference/android/com/google/firebase/database/GenericTypeIndicator
https://stackoverflow.com/a/52684990/3151712
.
.
setOnClickListener onClickListener와 onClick in xml을 하��의 view에 동시사용할수는 없었다.
.
.
data binding에서 다른 viewid이름.text 값을 @{()-> } 통해 외부로 전달하려했지만 실패했다. 그냥 view obj자체를 전달할수는 있었다.
.
.
setOnFocusChangeListener 를 사용해서 focus에 따른 UI변화를 구현하다 알수 없는 bug에 고생함. 문제는 android가 xml load시에 자동으로 focus를 지정하는 문제가 있었다.
https://stackoverflow.com/a/59072414/3151712 로 문제 해결
.
.
firebase exist child
https://stackoverflow.com/a/39676175/3151712
.
.
listadapter android recyclerview
https://stackoverflow.com/a/55602833/3151712
.
.
adapter viewholder bind create
bind는 매번 viewholder에 데이터를 연결할때 마다 호출되므로 부하가 많이 걸릴수 있다.
https://stackoverflow.com/a/39271313/3151712
.
.
android data binding view id
다른 view의 id를 통해 접근, 속성값이용할수 있다.
https://stackoverflow.com/a/38126859/3151712
.
.
android databinding error problem 해결 모음
https://stackoverflow.com/questions/35126670/android-data-binding-error-cannot-find-symbol-class
.
.
android tag view
https://stackoverflow.com/a/5291891/3151712
.
.
kotlin NumberFormatter sign
https://stackoverflow.com/a/49907824/3151712
.
.
kotlin decimal zero point format
https://stackoverflow.com/questions/3973763/format-double-to-2-decimal-places-with-leading-0s
.
.
android auto focus remove
https://stackoverflow.com/a/59072414/3151712
.
.
android share activity fragment
https://medium.com/mindorks/how-to-communicate-between-fragments-and-activity-using-viewmodel-ca733233a51c
.
.
android gridlayoutmanager manager grid recyclerview
https://abhiandroid.com/materialdesign/recyclerview-gridview.html
.
.
android radio button check default
https://stackoverflow.com/questions/9175635/how-to-set-radio-button-checked-as-default-in-radiogroup
.
.
android radio button group check change
https://stackoverflow.com/questions/6780981/android-radiogroup-how-to-configure-the-event-listener
.
.
android radio button onclicklistener ontouchlistener
https://stackoverflow.com/questions/15836789/android-radio-button-uncheck
.
.
android onCheckedChanged radio button group
https://stackoverflow.com/questions/39427178/how-to-bind-method-on-radiogroup-on-checkchanged-event-with-data-binding
.
.
Android MVVM — Do’s and Don’ts tip head up
https://android.jlelse.eu/mvvm-dos-and-don-ts-5950d6f347d4
.
.
kotlin mat list convert
https://www.programiz.com/kotlin-programming/examples/convert-map-list
.
.
kotlin currency string mask format
https://kodejava.org/how-do-i-format-a-number-as-currency-string/
.
.
android edittext currency string mask format
https://stackoverflow.com/questions/5107901/better-way-to-format-currency-input-edittext/24621325#24621325
.
.
kotlin delegation property interface by
https://youtu.be/zfiohSIZtbo
https://youtu.be/JolUNygXu3s
https://kotlinlang.org/docs/reference/delegated-properties.html
.
.
android alert dialog alertdialog size window
https://stackoverflow.com/questions/18473989/custom-alertdialog-size-is-too-small
.
.
firebase child exist check children
https://stackoverflow.com/a/39676175/3151712
.
.
android radio button radiobutton data binding
https://stackoverflow.com/questions/49194398/how-to-use-two-way-data-binding-with-radio-button-in-android
.
.
android shared preference arraylist custom object class
https://stackoverflow.com/questions/14981233/android-arraylist-of-custom-objects-save-to-sharedpreferences-serializable
.
.
android hex decimal color string
https://stackoverflow.com/questions/5248583/how-to-get-a-color-from-hexadecimal-color-string
.
.
android color background programmatically
https://stackoverflow.com/a/41451718/3151712
.
.
android toggle button check change listener
https://stackoverflow.com/a/27911988/3151712
.
.
android data binding check switch change
https://stackoverflow.com/a/37288929/3151712
.
.
android leading zero decimal format number
https://stackoverflow.com/a/3973886/3151712
.
.
android alertdiaolog alert dialog
https://stackoverflow.com/a/54072166/3151712
.
.
android radio button group check change listener
https://stackoverflow.com/a/26618592/3151712
.
.
android bluetooth print blue tooth
https://stackoverflow.com/questions/9838822/android-bluetooth-printing
.
.
android textview scroll scrollable
https://stackoverflow.com/questions/1748977/making-textview-scrollable-on-android
.
.
android firebase transaction
https://stackoverflow.com/a/28915836/3151712
https://firebase.google.com/docs/database/android/read-and-write#save_data_as_transactions
.
.
firebase transaction twice call
https://stackoverflow.com/a/27177480/3151712
.
.
android datepicker picker calendar
https://stackoverflow.com/a/27177480/3151712
.
.
android datepicker date diable past
https://stackoverflow.com/a/23762355/3151712
.
.
android button click programmatically
https://stackoverflow.com/a/23762355/3151712
.
.
android date am pm calendar
Calendar c = Calendar.getInstance(); int seconds = c.get(Calendar.SECOND); int minutes = c.get(Calendar.MINUTE); int hours = c.get(Calendar.HOUR); int years = c.get(Calendar.YEAR); int months = 1 + c.get(Calendar.MONTH); int days = c.get(Calendar.DAY_OF_MONTH); int AM_orPM = c.get(Calendar.AM_PM);
.
.
android date format string simpledateformat
https://stackoverflow.com/a/38220579/3151712
.
.
android string builder
https://stackoverflow.com/a/8167156/3151712
.
.
android start activity
https://developer.android.com/training/basics/firstapp/starting-activity#BuildIntent
.
.
firebase sql like query search match
https://stackoverflow.com/a/61515511/3151712
.
.
kotlin check string number
https://www.programiz.com/kotlin-programming/examples/check-string-numeric#:~:text=To%20check%20if%20string%20contains,Else%2C%20it's%20a%20number.
.
.
firebase queyy filter retrieve
https://firebase.google.com/docs/database/android/lists-of-data#filtering_data
.
.
kotlin initialization init mutable map
val items = mutableMapOf("Box" to 12, "Books" to 18, "Table" to 13)
.
.
kotlin split string
val parts = str.split(delimiter)
.
.
firebase limit
https://stackoverflow.com/a/45324335/3151712
.
.
android paging library pagination recycler view
https://developer.android.com/topic/libraries/architecture/paging
https://www.zoftino.com/pagination-in-android-using-paging-library
https://proandroiddev.com/8-steps-to-implement-paging-library-in-android-d02500f7fffe
https://developer.android.com/reference/androidx/paging/PageKeyedDataSource
.
.
kotlin timestamp
https://stackoverflow.com/a/6993420/3151712
https://stackoverflow.com/a/6993393/3151712
.
.
android color background
https://stackoverflow.com/a/18033320/3151712
.
.
android programmatically navigation start activity
https://stackoverflow.com/a/53922244/3151712
https://stackoverflow.com/a/54613997/3151712
.
.
android pass serializable parcelable bundle argument
https://stackoverflow.com/a/59881330/3151712
.
.
kotlin convert array arraylist
https://www.programiz.com/kotlin-programming/examples/convert-list-array
.
.
kotlin mutable list initialization
https://kotlinlang.org/api/latest/jvm/stdlib/kotlin.collections/mutable-list-of.html
mutableListOf(1, 2, 3)
.
.
android child get recyclerview viewholder view
https://stackoverflow.com/a/35603710/3151712
https://stackoverflow.com/a/38745107/3151712
.
.
kotlin for integer int
https://kotlinlang.org/docs/tutorials/kotlin-for-py/loops.html
for (x in 0 until 10)
.
.
kotlin hashmap merge combine add
https://stackoverflow.com/a/4299742/3151712
.
.
android activity clear remove stack history
https://stackoverflow.com/a/57079661/3151712
https://stackoverflow.com/questions/3473168/clear-the-entire-history-stack-and-start-a-new-activity-on-android
.
.
android encryption sharedpreferences shared preference
https://developer.android.com/reference/kotlin/androidx/security/crypto/EncryptedSharedPreferences.html
.
.
android androix version api
api 28
.
.
android encryption sharedpreferences shared preference encrypted
https://proandroiddev.com/encrypted-preferences-in-android-af57a89af7c8
https://medium.com/@Naibeck/android-security-encryptedsharedpreferences-ea239e717e5f
https://garageprojects.tech/encryptedsharedpreferences-example/
.
.
android email mask validation format
https://stackoverflow.com/a/44260895/3151712
.
.
android password validation special character capictal
https://stackoverflow.com/a/36574313/3151712
위의 것은 특수문자 하나 소문자 하나 대문자 하나를 최소기준으로 요구하는 코드이다.
.
.
android edit edittext focus listener
https://stackoverflow.com/a/10627231/3151712
.
.
android edit edittext focus listener data binding
https://stackoverflow.com/a/62015360/3151712
.
.
firebase email key
https://stackoverflow.com/a/50518018/3151712
.
.
android programmatically keyboard edittext edit text focus
https://stackoverflow.com/questions/8991522/how-can-i-set-the-focus-and-display-the-keyboard-on-my-edittext-programmatical
.
.
android required edittext edit
https://stackoverflow.com/a/53994791/3151712
.
.
android shared preference not allow double sharedpreferences
https://stackoverflow.com/questions/16319237/cant-put-double-sharedpreferences
.
.
android action bar tool bar
https://www.vogella.com/tutorials/AndroidActionBar/article.html
.
.
android finish end activity
finish()
.
.
android OnLongClickListener return
https://stackoverflow.com/a/49712696/3151712
.
.
android Refresh Fragment from other activity when Dialog fragment is dismissed
https://stackoverflow.com/questions/42868007/refresh-fragment-from-other-activity-when-dialog-fragment-is-dismissed
https://stackoverflow.com/a/9853895/3151712
.
.
android get key by value
https://stackoverflow.com/questions/12713321/can-i-get-the-key-from-sharedpreferences-if-a-know-the-associated-value
.
.
android programmatically keyboard soft hidden
https://stackoverflow.com/a/47826869/3151712
https://stackoverflow.com/a/47826869/3151712
https://developer.android.com/reference/android/view/inputmethod/InputMethodManager.html#HIDE_NOT_ALWAYS
https://stackoverflow.com/q/10508363
.
.
android color primary primary dark accent
https://stackoverflow.com/a/47826869/3151712
.
.
android portrait
https://stackoverflow.com/a/3723830/3151712
.
.
android imeoption ime
https://stackoverflow.com/a/59758037/3151712
.
.
android cardview background card
https://stackoverflow.com/a/59758037/3151712
.
.
android dialog dialogfragment size window
https://stackoverflow.com/a/24213921/3151712
.
.
android recyclerview recycler scroll
https://stackoverflow.com/a/47260842/3151712
.
.
android sharedpreferences shared remove
https://stackoverflow.com/a/45620778/3151712
.
.
android focus programmatically edittext
https://stackoverflow.com/a/8991563/3151712
.
.
android data binding lifecycle lifecycle owner
https://stackoverflow.com/a/54542260/3151712
.
.
android negative button click date picker
https://stackoverflow.com/a/4981308/3151712
.
.
android toast custom
https://stackoverflow.com/a/31175631/3151712
.
.
android next focus edittext tab
https://developer.android.com/training/keyboard-input/navigation#Tab
https://developer.android.com/training/keyboard-input/navigation#Tab
.
.
firebase between startat endat
https://stackoverflow.com/a/29778220/3151712
.
.
kotlin sort collection reverse
https://stackoverflow.com/a/29778220/3151712
https://stackoverflow.com/a/29778220/3151712
https://gold.gitbook.io/kotlin/collections/ordering-operations/sortedbydescending
.
.
android getcolor deprecated color backgound
https://stackoverflow.com/a/32202256/3151712
.
.
android kotlin singleton
https://antonioleiva.com/objects-kotlin/
.
.
kotlin calendar add month year day
https://www.tutorialspoint.com/add-months-to-current-date-using-calendar-add-method-in-java
.
.
android navigation component back go back findNavController navigateUp
https://stackoverflow.com/a/55174563/3151712
.
.
android spinner
https://www.geeksforgeeks.org/spinner-in-kotlin/
.
.
kotlin copy collection
https://stackoverflow.com/a/49053542/3151712
.
.
kotlin copy value list collection clone
https://stackoverflow.com/a/49053542/3151712
list.filter { true }
list.toList()
list.toMutableList()
.
.
kotlin pass value reference copy
https://stackoverflow.com/a/44516388/3151712
Every time I hear about the "pass-by-value" vs "pass-by-reference" Java debate I always think the same. The answer I give: "Java passes a copy (pass-by-value) of the reference (pass-by-reference)". So everyone is happy. I would say Kotlin does the same as it is JVM based language.
.
.
kotlin get property object list collection extension
https://medium.com/@hayi/kotlin-get-list-of-some-property-values-of-object-from-list-of-object-8da9419c2e77
inline fun <reified T, Y> MutableList<T>.listOfField(property: KMutableProperty1<T, Y?>):MutableList<Y> { val yy = ArrayList<Y>() this.forEach { t: T -> yy.add(property.get(t) as Y) } return yy }
.
.
kotlin collection property filter find
https://stackoverflow.com/a/51010611/3151712
val user: User? = myList.find { it.userId == id }
val user: User? = myList.last { it.userId == id }
.
.
android radio button toggle unselect uncheck check
https://stackoverflow.com/questions/43731189/how-to-uncheck-radiobutton-if-already-checked-in-radiogroup
https://stackoverflow.com/questions/15836789/android-radio-button-uncheck/22262182
.
.
kotlin break continue loop for
https://stackoverflow.com/questions/15836789/android-radio-button-uncheck/22262182
.
.
git restart renew start remove new
https://stackoverflow.com/a/31991358/3151712
.
.
kotlin data class copy value reference
https://kotlinlang.org/docs/reference/data-classes.html#copying
.
.
android soft keyboard InputMethodManager
https://developer.android.com/reference/android/view/inputmethod/InputMethodManager.
.
.
android soft keyboard programmatically hide
https://stackoverflow.com/a/54583382/3151712
.
.
android edittext capital first
https://stackoverflow.com/questions/4808705/first-letter-capitalization-for-edittext
.
.
android soft keyboard adjustpan adjustResize
https://stackoverflow.com/a/17410528/3151712
.
.
android navigation pass data start destination setGraph
https://developer.android.com/guide/navigation/navigation-pass-data#start
.
.
android navigation argument error exception illegalargumentexception currentDestination
https://stackoverflow.com/a/53737537/3151712.
.
.
android fragment change title action bar
https://stackoverflow.com/a/61323325/3151712
.
.
android studio kill restart adb start stop
https://stackoverflow.com/a/29826345/3151712
adb kill-server
adb start-server
.
.
android fragment pass result popup poputto previous
https://developer.android.com/guide/navigation/navigation-programmatic#returning_a_result
https://stackoverflow.com/a/60757744/3151712
.
.
android progress bar kotlin
https://www.tutorialkart.com/kotlin-android/android-indeterminate-progressbar-kotlin-example/
.
.
android spinner
https://www.geeksforgeeks.org/spinner-in-kotlin/
android spinner line space
https://stackoverflow.com/questions/15591768/add-more-space-between-items-in-android-spinner-without-custom-style
.
.
android kotlin programmatically text style
https://stackoverflow.com/a/52568928/3151712
.
.
android edittext remove focus
https://stackoverflow.com/a/6120141/3151712
.
.
android resource id get programmatically
https://stackoverflow.com/a/3476447/3151712
https://stackoverflow.com/a/15488321/3151712
.
.
android get package name
https://stackoverflow.com/questions/6589797/how-to-get-package-name-from-anywhere
.
.
android radio button two way data binding
https://stackoverflow.com/a/54262153/3151712
.
.
android animation navigation
https://stackoverflow.com/a/23081187/3151712
.
.
android radio button user programmatically check change
https://stackoverflow.com/a/63229190/3151712
.
.
android list filter
https://stackoverflow.com/a/44098722/3151712
.
.
android livedata radio button observe observer
livedata를 observe하는 경우 처음 activity나 fragment가 생성되서 코드를 읽어 내려가는 순간 최초로 한번 Observe 안의 코드가 한번 실행 된다. 그리고 observe하는 livedata가 변화되면 Observe 안의 코드가 또 실행된다.
radio button의 경우 사용자가 radio button 을 선택 클릭하면 OnCheckedChangeListener 가 두번 실행된다. 기존상황으로 한번 변화된 상황으로 한번실행된다.
.
.
kotlin byte bytearray java
ByteArray equals byte[] in Java Array<Byte> equals Byte[] in Java.
.
.
kotlin array
https://www.geeksforgeeks.org/kotlin-array/
.
.
android external library 3rd party jar
https://www.tutorialkart.com/kotlin-android/add-external-jar-to-library-in-android-studio/
.
.
kotlin byte
https://stackoverflow.com/a/44604635
.
.
android usb
https://developer.android.com/guide/topics/connectivity/usb/host#using-intents
.
.
kotlin java date datetime format day
https://stackoverflow.com/questions/5121976/is-there-a-date-format-to-display-the-day-of-the-week-in-java
.
.
android spinner
https://stackoverflow.com/questions/11072576/set-selected-item-of-spinner-programmatically
https://stackoverflow.com/questions/1947933/how-to-get-spinner-value
.
.
android recyclerview scroll
https://stackoverflow.com/a/48862743
.
.
android navigation google doc
https://developer.android.com/guide/navigation/navigation-getting-started
https://developer.android.com/guide/navigation/navigation-navigate
https://developer.android.com/reference/androidx/navigation/NavDestination
https://developer.android.com/guide/navigation/navigation-migrate
https://developer.android.com/guide/navigation/navigation-getting-started
.
.
android activity stack backstack navigation empty last isTaskRoot()
https://stackoverflow.com/a/44338195
.
.
android navigation component pass starting
https://stackoverflow.com/a/50457707
.
.
android edittext maxlength programmatically
https://stackoverflow.com/a/63722946
.
.
android cardview elevation animation
https://stackoverflow.com/questions/41110936/elevation-animation-on-click-on-cardview
.
.
https://kotlinlang.org/docs/reference/collection-filtering.html#filtering-by-predicate
filter collection
Filtering by predicate
The basic filtering function is filter(). When called with a predicate, filter() returns the collection elements that match it. For both List and Set, the resulting collection is a List, for Map it's a Map as well.
val numbers = listOf("one", "two", "three", "four")
val longerThan3 = numbers.filter { it.length > 3 }
println(longerThan3)
val numbersMap = mapOf("key1" to 1, "key2" to 2, "key3" to 3, "key11" to 11)
val filteredMap = numbersMap.filter { (key, value) -> key.endsWith("1") && value > 10}
println(filteredMap)
.
.
kotlin list group by��
https://stackoverflow.com/a/47200815
https://kotlinlang.org/api/latest/jvm/stdlib/kotlin.collections/group-by.html

.
.
let
https://stackoverflow.com/a/52539259
a?.let { 첫번째 } ?: 두번째
a가 null이면 두번째실행하고 null이 아니면 첫번째실행
0 notes
Text
Flutter Firebase & DDD Course [2] – Authentication Value Objects
Flutter Firebase & DDD Course – Authentication Value Objects. How can we sign in using email and password? We have the big picture of Domain-Driven Design already in our minds so now it’s time to get coding. You might think that since we are building a Firebase app, we will need to worry about using the Firestore and FirebaseAuth classes right from the start. That’s not true at all with DDD.…
View On WordPress
0 notes
Text
Release 2.18.0: Update to Qt 5.11.1 with QML Compiler and Massive Performance Improvements
V-Play 2.18.0 adds support for Qt 5.11.1, with all features, improvements and fixes. Major changes to the QML compiler pipeline and QML engine boost the performance of your apps and games. The Qt Quick Compiler is now also available with the open source Qt version. This update also adds several improvements and fixes to V-Play app and game components.
Improved QML and JavaScript Performance on iOS, Android and Desktop
Qt now uses a completely new QML compiler pipeline to compile QML and JavaScript into bytecode. Then JIT is used to compile heavy used functions to assembly code on the fly.
Image from www.qt.io
Here are some more details about this great addition:
Lots of cleanups and performance improvement to the way function calls and JavaScript scopes are being handled.
Improved performance of JS property lookups.
A new bytecode format that is very compact, saving memory in many cases.
Significantly faster bytecode interpreter than in earlier versions of Qt, in many cases reaching almost the performance of the old JIT.
A new JIT that works on top of the bytecode interpreter and only compiles hot functions into assembly.
Overall test results show almost a doubling of the JS performance on platforms where JIT can’t be used (iOS and WinRT) compared to 5.10.
With the new JIT, JS performance is usually around 10-40% faster than in older Qt versions (depending on the use case).
Qt Quick Compiler for AOT Compilation of QML and JS
You can now use the Qt Quick Compiler in all your apps and games. This was previously limited to only commercial Qt users, but is now also available with the open source Qt version.
To use the Qt Quick Compiler, just add the following line to your .pro file
CONFIG += qtquickcompiler
and enable the qrc resource system as described in your .pro and main.cpp file. This will compile your QML and JavaScript files AOT to bytecode and embed them with your application.
Note for using the resource system: For the Qt Quick Compiler, it is not sufficient to just add the directory names to the resources.qrc file. Instead add all the files that you want to include.
Use the Qt Quick Compiler for a Faster App Start
Qt compiles and caches QML and JS files while your application is running. This results in significantly faster load times of applications, as the cache files are faster to load. However, the initial creation of cache files can still take time, especially when the application starts for the very first time. To avoid that initial step and provide faster start-up times from the very beginning, you can use the Qt Quick Compiler to generate the cache files ahead-of-time, when compiling your application.
You can find more info about this here.
Improved Performance and Reduced CPU Usage with Qt 3D
The update to Qt 5.11.1 also brings performance improvements and a lot of fixes to the Qt 3D module. This makes it even easier to add 3D content in your apps and games.
import VPlayApps 1.0 import QtQuick 2.9 // 3d imports import QtQuick.Scene3D 2.0 import Qt3D.Core 2.0 import Qt3D.Render 2.0 import Qt3D.Input 2.0 import Qt3D.Extras 2.0 import QtSensors 5.9 App { // Set screen to portrait in live client app (not needed for normal deployment) onInitTheme: nativeUtils.preferredScreenOrientation = NativeUtils.ScreenOrientationPortrait RotationSensor { id: sensor active: true // We copy reading to custom property to use behavior on it property real readingX: reading ? reading.x : 0 property real readingY: reading ? reading.y : 0 // We animate property changes for smoother movement of the cube Behavior on readingX {NumberAnimation{duration: 200}} Behavior on readingY {NumberAnimation{duration: 200}} } NavigationStack { Page { title: "3D Cube on Page" backgroundColor: Theme.secondaryBackgroundColor Column { padding: dp(15) spacing: dp(5) AppText { text: "x-axis " + sensor.readingX.toFixed(2) } AppText { text: "y-axis " + sensor.readingY.toFixed(2) } } // 3d object on top of camera Scene3D { id: scene3d anchors.fill: parent focus: true aspects: ["input", "logic"] cameraAspectRatioMode: Scene3D.AutomaticAspectRatio Entity { // The camera for the 3d world, to view our cube Camera { id: camera3D projectionType: CameraLens.PerspectiveProjection fieldOfView: 45 nearPlane : 0.1 farPlane : 1000.0 position: Qt.vector3d( 0.0, 0.0, 40.0 ) upVector: Qt.vector3d( 0.0, 1.0, 0.0 ) viewCenter: Qt.vector3d( 0.0, 0.0, 0.0 ) } components: [ RenderSettings { activeFrameGraph: ForwardRenderer { camera: camera3D clearColor: "transparent" } }, InputSettings { } ] PhongMaterial { id: material ambient: Theme.tintColor // Also available are diffuse, specular + shininess to control lighting behavior } // The 3d mesh for the cube CuboidMesh { id: cubeMesh xExtent: 8 yExtent: 8 zExtent: 8 } // Transform (rotate) the cube depending on sensor reading Transform { id: cubeTransform // Create the rotation quaternion from the sensor reading rotation: fromAxesAndAngles(Qt.vector3d(1,0,0), sensor.readingX*2, Qt.vector3d(0,1,0), sensor.readingY*2) } // The actuac 3d cube that consist of a mesh, a material and a transform component Entity { id: sphereEntity components: [ cubeMesh, material, cubeTransform ] } } } // Scene3D // Color selection row Row { anchors.horizontalCenter: parent.horizontalCenter anchors.bottom: parent.bottom spacing: dp(5) padding: dp(15) Repeater { model: [Theme.tintColor, "red", "green", "#FFFF9500"] Rectangle { color: modelData width: dp(48) height: dp(48) radius: dp(5) MouseArea { anchors.fill: parent onClicked: { material.ambient = modelData } } } } } } // Page } // NavigationStack } // App
Add Turn-by-Turn Navigation with Qt Location
You can use many new features of Qt Location and Maps. With this release you can start experimenting with turn-by-turn navigation. There are also several brand new features available for the Mapbox plugin.
Fixes for Qt Quick Controls
Many controls of the Qt Quick Controls 2 module received fixes, which are also available with the derived V-Play controls. Examples of improved components are ButtonGroup, CheckBox, Combobox, RangeSlider, ScrollBar, Slider, SpinBox and many more.
Qt for Webassembly and Python
With Qt for Webassembly, Qt is working towards filling the last large gaps in cross-platform development, allowing users to target the web and browsers as a platform. The first version has been released as a technology preview.
In addition, to the above, Qt is actively working on supporting Qt on Python.
Create Augmented Reality Apps and Games with Wikitude
As mentioned already in a previous release, you can now create feature-rich Augmented Reality (AR) apps & games with the Wikitude Plugin. You will read more on this amazing addition in another blog post coming soon. Stay tuned!
More Features, Improvements and Fixes
Here is a compressed list of improvements with this update:
WikitudeArView now properly rotates the camera image to device rotation on iOS.
WikitudeArView now supports live reloading of the HTML/JavaScript files with the V-Play Live Client.
Fixes Desktop Resolution Simulation on Windows when additional UI scaling is applied in display settings.
Fixes a crash in FirebaseAuth, FirebaseDatabase and FirebaseStorage when the FirebaseConfig is invalid.
WikitudeArView no longer gets a stuck camera image when resuming the app from background on iOS.
For a list of additional fixes, please check out the changelog.
How to Update V-Play
Test out these new features by following these steps:
Open the V-Play SDK Maintenance Tool in your V-Play SDK directory.
Choose “Update components” and finish the update process to get this release as described in the V-Play Update Guide.
If you haven’t installed V-Play yet, you can do so now with the latest installer from here. Now you can explore all of the new features included in this release!
For a full list of improvements and fixes to V-Play in this update, please check out the change log!
More Posts Like This
youtube
How to Make Cross-Platform Mobile Apps with Qt – V-Play Apps
Release 2.17.0: Firebase Cloud Storage, Downloadable Resources at Runtime and Native File Access on All Platforms
Release 2.16.1: Live Code Reloading with Custom C++ and Native Code for Qt
Release 2.16.0: iPhone X Support and Runtime Screen Orientation Changes
The post Release 2.18.0: Update to Qt 5.11.1 with QML Compiler and Massive Performance Improvements appeared first on V-Play Engine.
Release 2.18.0: Update to Qt 5.11.1 with QML Compiler and Massive Performance Improvements published first on https://medium.com/@TheTruthSpy
0 notes
Text
Flutter Firebase Authentication Event Handler And Hot Reloads

Firebase is the ultimate Backend-as-a-Service (BaaS) app development platform. These extensively offer you complete hosted backend services that include cloud storage, machine learning, and many more.
Google-backed application development software is helpful for easily giving Flutter Builders a completely new facility. Firebase offers the Flutter developers the complete attribute for developing Android, iOS as well as Flutter Web apps.
What is the need For Flutter Firebase Authentication? Google’s portable UI toolkit is helpful for crafting beautiful and natively compiled applications for the web, desktop, and mobile from a single codebase. Normally, Flutter works on the existing code especially used by almost every mobile application development company and developers. These are open-source and free-to-use attributes. Firebase Flutter offers better tools for
Tracking analytics
Reporting and fixing app crashes
Product experiment
Creating marketing
Flutter offers designers with providing better user experiences. Flutter is the top design idea of the decade known for its ability to turn into production code. These do not compromise mainly imposed by the typical frameworks, and they act as a unique productive prototyping tool.
Also, Read:
Top 5 Benefits Of Firebase Database System.
It also has CodePen support to share ideas even without any ideas. Below is the process for implementing the flutter app using the go router. These are added with the firebase authentication handler using the initiate() on the flutter App
@override void initiate() { appService = AppService(widget.sharedPreferences); authService = AuthService(); authSubscription = authService.onAuthStateChange.listen(onAuthStateChange); super.initState(); }
The above process relies on the authservice class, and it is enabled with the constructor added along with them.
AuthService() { authSubscription = FirebaseAuth.instance.authStateChanges().listen((User? user) { if (user == null) { //appService.loginState = false;i print('User is currently signed out!'); _onAuthStateChange.add(false); } else { //appService.loginState = true; print('User is signed in!'); _onAuthStateChange.add(true); } }); }
How To Use The Firebase Authentication?
Installing the Flutter Firebase event handler is a convenient option for getting Authentication on a wider number of aspects. When the Flutter Firebase is installed, then you can easily access the firebase_auth plugin by importing then with the Dart code – import ‘package:firebase_auth/firebase_auth.dart’.
These are the perfect option for making the better Firebase Auth. It is a suitable option for initializing FlutterFire. For creating a new Firebase Auth, you can get with FirebaseAuth:
FirebaseAuthauth = FirebaseAuth.instance;
It allows interacting with Firebase Auth on the default Firebase App. These are used with installing FlutterFire on the platform.
When you are using the secondary Firebase App, then it is convenient for using the instance method:
FirebaseApp secondary_app = Firebase.app('SecondaryApp'); FirebaseAuth auth = FirebaseAuth.instance(app: secondary app);
Need For Firebase Auth: The Firebase Auth assures making the complete method utilizing the better aspects for integrating the secure authentication on the new or even existing Flutter application. It is also quite efficient for making the authentication state user when they are logged in or even out.
Flutter Firebase Authentication enables the high-end aspects of subscribing to the real-time via stream. These are called the stream offering the high-end aspects of the user’s current authentication state.
The process assures providing the subsequent events making the authentication state changes. There are 3 methods for extensively listening with authentication state changes:
authStateChanges()
For making the complete changes by calling the auth state changes() method, it includes the FirebaseAuth instance:
FirebaseAuth.instance .authStateChanges() .listen((User? user) { if (user == null) { print('User is currently signed out!'); } else { print('User is signed in!'); } });
What is Firebase Authentication Event Handler?
Firebase Authentication Events will be fired with the following occurs:
When a user is signed in Right after listeners are registered When current users are signed out
Including the idTokenChanges() lets you easily improve the standard attributes to easily improve the Flutter firebase. Subscribe changes making the idTokenChanges() method in the FirebaseAuth instance:
FirebaseAuth.instance .idTokenChanges() .listen((User? user) { if (user == null) { print('User is currently signed out!'); } else { print('User is signed in!'); } });
Events will be fired with the following occurring when the user is signed in. These are also involved when the current user is signed out. When there is a change in the current user’s token. The user signs in and re-authenticates after custom claims will be modified. It also includes the ID token issued containing all the latest claims.
The existing user session will be getting the token ID with refreshing when the older token expires. ID token also forces refreshing by calling FirebaseAuth.instance.currentUser.getIdTokenResult(true). Firebase admin propagating with assessing custom claims on client
userChanges()
For subscribing with changes, it also involves with calling the userChanges() method for making the unique FirebaseAuth instance:
FirebaseAuth.instance .userChanges() .listen((User? user) { if (user == null) { print('User is currently signed out!'); } else { print('User is signed in!'); } });
All the Events will be filed with maintaining the occurrence when the user is signed in or signed out. It also involves with there is a change in the current user’s token, so they provide you better method providing with FirebaseAuth.instance.currentUser is called:
reload() unlink() updateEmail() updatePassword() updatePhoneNumber() updateProfile()
Persisting Authentication State#:
Firebase SDKs are available with the platforms providing you with complete support out of the box. This ensures that the user’s authentication state persists across the app for reloading and restarting.
Native platforms like Android & are involved without configurable attributes along with the user’s authentication state. These persist with on-device between the app restarts, so they are also involved with making complete attributes.
The user clears apps cached data through the device settings, especially wipes on existing state stored. The user’s authentication state will be stored with local storage in the web platform.
It is easier to change the default behavior on the persistent authentication state for the current session. These also involved configuring settings with the calling setPersistence() method.
authStateChanges() userChanges() idTokenChanges()
These will not fire when you update the user profile through firebase admin SDK implementation. It is convenient for forcing reloading following FirebaseAuth.instance.currentUser.reload(). These are suitable options for retrieving the latest User profile.
When you disable or delete a User through your own firebase admin SDK implementation, it is a suitable option for gaining a better solution. This causes user-disabled or even maintaining user-not-found exception catches and handles in your app code.
User?user = FirebaseAuth.instance.currentUser; if (user != null && !user.emailVerified) { varactionCodeSettings = ActionCodeSettings( url: 'https://www.example.com/?email=${user.email}', dynamicLinkDomain: 'example.page.link', androidPackageName: 'com.example.android', androidInstallApp: true, androidMinimumVersion: '12', iOSBundleId: 'com.example.ios', handleCodeInApp: true, ); awaituser.sendEmailVerification(actionCodeSettings); }
Conclusion:
Flutter Firebase Authentication event handler illustrates how to handle the verification process that opens in a mobile app first as a Firebase Dynamic Link. Firebase also provides a wide number of ways to sign users into the application.
Moreover, It brings you a better option for easily making Flutter Firebase Authentication event handlers along with hot reloads.
Frequently Asked Questions (FAQs)
1. What other options in Flutter do you have to implement authentication?
Firebase authentication offers backend services, ready-made UI libraries, and easy-to-use SDKs which will authenticate users to your app. It supports authentication with strong passwords, phone numbers, and well-known federated identity providers such as Google, Twitter, and more.
2. Where are the logs of Flutter stored?
Logs are stored in the database and can be exported as a zip file. After that, it is uploaded to a server or used locally to identify and debug issues. Hence, the logs are filtered and sorted quickly based on the valuable filters available.
3. Why is Firebase the excellent option for Flutter development?
It is the Faster time to market. The Firebase real-time database, ready-made authentication option, and the in-built widgets of Flutter also use the single code for iOS and Android development. Hence, it makes the development procedure faster and maintains the safety and performance of applications.
Originally Published At: https://flutteragency.com/flutter-firebase-authentication-and-hot-reloads/
0 notes
Text
Firebase Tutorial: Real-time Chat
Update note: Ryan Ackermann updated this tutorial to iOS 12, Swift 4.2, Xcode 10, MessageKit, and Cloud Firestore. Tom Elliott wrote the original tutorial. You can safely ignore the warnings about updating to Swift 4.2 since MessageKit is not yet updated.
It seems like every major app out there has a chat feature — and yours should be no different! This Firebase tutorial will show you how.
However, creating a chat tool can seem like a daunting task. There’s no native UIKit controls designed specifically for chat, and you’ll need a server to coordinate the messages and conversations between users.
Fortunately, there are some great frameworks out there to help you: Firebase lets you synchronize real time data without writing a line of server code, while MessageKit gives you a messaging UI that’s on par with the native Messages app.
In this Firebase tutorial, you’ll build RWRC (Ray Wenderlich Relay Chat) — an anonymous chat application. If you’ve used IRC or Slack, this sort of application should already be familiar to you.
Along the way, you’ll learn how to do the following:
Set up the Firebase SDK and MessageKit with CocoaPods.
Synchronize data in real time with the Cloud Firestore.
Authenticate anonymously with Firebase.
Leverage MessageKit for a complete chat UI.
Create multiple message threads.
Use Firebase Storage to send pictures.
Getting Started
Use the Download Materials button at the top or bottom of this tutorial to download the starter project. To get you started the project contains a simple dummy login screen, where the credentials are saved to User Defaults.
The starter project has a few helper classes that handle sending data to Firebase and saving data to User Defaults. Feel free to browse the starter project a bit to get familiar with the code.
In the starter project you’ll find ChannelsViewController.swift which listens to changes in a Firebase Firestore database and updates a table view whenever the user adds a new channel. You’ll build a similar implementation for displaying chat messages instead of channels.
You’ll use CocoaPods to install both the Firebase SDK and MessageKit. If you’re new to CocoaPods, check out our Cocoapods with Swift tutorial to get up and running.
Open Terminal at the project’s folder location and run the following command to install your dependencies:
pod install
This may take a few minutes, but once the packages have installed, open RWRC.xcworkspace in Xcode. Before you can run the app, you’ll need to configure Firebase.
If you’re new to Firebase you’ll need to create an account. Don’t worry — this is easy and totally free.
Note: For a detailed walkthrough on setting up Firebase, see the Getting Started with Firebase tutorial.
Create a Firebase Account
Head to the Firebase signup site, create an account, and then create a new Firebase project.
In Xcode, click on the target and change the Bundle Identifier to any value you like, and select a Team in the Signing section.
Follow Steps 1 and 2 of the instructions to add Firebase to an iOS app, starting here:
Next, enter in the app’s bundle ID into the form, after which you will download and add the GoogleService-Info.plist config file to your project under the Supporting Files group as shown in the Firebase instructions. This .plist file contains the configuration information needed for Firebase integration with your app.
Warning: Do only Steps 1 and 2 of the instructions. The rest is already done in the starter project and your app will crash if you duplicate the steps.
Now build and run the app. You should see the following:
Enabling Anonymous Authentication
Firebase lets users log in through email or social accounts, but it can also authenticate users anonymously, giving you a unique identifier for a user without knowing any information about them.
To set up anonymous authentication, open the Firebase App Dashboard, select the Authentication option on the left, click Set Up Sign-In Method, then select the Anonymous option, switch Enable so that it’s on, then click Save.
Just like that, you’ve enabled super secret stealth mode! Okay, so it’s really just anonymous authentication, but hey — it’s still cool. :]
Super secret stealth mode achieved!
Logging In
Open LoginViewController.swift and add the following underneath import UIKit:
import FirebaseAuth
To log in to chat, the app will need to authenticate using the Firebase authentication service. Add the following code to the bottom of signIn:
Auth.auth().signInAnonymously(completion: nil)
That line of code from the FirebaseAuth framework will post the Notification.Name.AuthStateDidChange notification that AppController is listening for. Once the notification is fired AppController will update the root view controller for you.
Build and run your app, enter a display name and tap Get Started.
Once the user signs in, they navigate to the ChannelsViewController, whose job it is to show the user a list of current channels and allow creating new channels. The table has a single section to display all available channels. There is a toolbar at the bottom with a sign out button, a label displaying your name, and an add button.
Firebase Data Structure
Before you dive into sending messages in realtime, take a moment and think about the data structure first.
Cloud Firestore is a NoSQL JSON data store. Essentially, everything in the Cloud Firestore is a JSON object, and each key of this JSON object has its own URL.
Here’s a sample of how your data could look as a JSON object:
{ "channels": [{ "MOuL1sdbrnh0x1zGuXn7": { // channel id "name": "Puppies", "thread": [{ "3a6Fo5rrUcBqhUJcLsP0": { // message id "content": "Wow, that's so cute!", "created": "May 12, 2018 at 10:44:11 PM UTC-5", "senderID": "YCrPJF3shzWSHagmr0Zl2WZFBgT2", "senderName": "naturaln0va", }, "4LXlVnWnoqyZEuKiiubh": { // message id "content": "Yes he is.", "created": "May 12, 2018 at 10:40:05 PM UTC-5", "senderID": "f84PFeGl2yaqUDaSiTVeqe9gHfD3", "senderName": "lumberjack16", }, }] }, }] }
Cloud Firestore favors a denormalized data structure, so it’s okay to include senderId and senderName for each message item. A denormalized data structure means you’ll duplicate a lot of data, but the upside is faster data retrieval. Tradeoffs — we haz them! :]
Chat Interface Setup
MessageKit is a souped-up UICollectionViewController that’s customized for chat, so you don’t have to create your own! :]
In this section of the tutorial, you’ll focus on four things:
Handling input from the message bar.
Creating message data.
Styling message bubbles.
Removing avatar support.
Almost everything you’ll need to do requires that you override methods. MessageKit provides the MessagesDisplayDelegate, MessagesLayoutDelegate, and MessagesDataSource protocols, so you only need to override the default implementations.
Note: For more information on customizing and working with MessagesViewController, check out the full the documentation here.
Open ChatViewController.swift and, at the top of ChatViewController, define the following properties:
private var messages: [Message] = [] private var messageListener: ListenerRegistration?
These properties are similar to those added to the channels view controller. The messages array is the data model and the listener handles clean up.
Now you can start configuring the data source. Above the MessageInputBarDelegate section, add the following:
// MARK: - MessagesDataSource extension ChatViewController: MessagesDataSource { // 1 func currentSender() -> Sender { return Sender(id: user.uid, displayName: AppSettings.displayName) } // 2 func numberOfMessages(in messagesCollectionView: MessagesCollectionView) -> Int { return messages.count } // 3 func messageForItem(at indexPath: IndexPath, in messagesCollectionView: MessagesCollectionView) -> MessageType { return messages[indexPath.section] } // 4 func cellTopLabelAttributedText(for message: MessageType, at indexPath: IndexPath) -> NSAttributedString? { let name = message.sender.displayName return NSAttributedString( string: name, attributes: [ .font: UIFont.preferredFont(forTextStyle: .caption1), .foregroundColor: UIColor(white: 0.3, alpha: 1) ] ) } }
There’s a bit going on here:
A sender is a simple struct that has an id and name property. You create an instance of a sender from the anonymous Firebase user id and the chosen display name.
The number of messages in the collection view will be equal to the local array of messages.
Your Message model object conforms to MessageType so you can just return the message for the given index path.
The last method returns the attributed text for the name above each message bubble. You can modify the text you’re returning here to your liking, but these are some good defaults.
Build and run the app, add a channel named Cooking and then navigate to it. It should now look like:
So far, so good. Next, you’ll need to implement a few more delegates before you start sending messages.
Setting Up the Display and Layout Delegates
Now that you’ve seen your new awesome chat UI, you probably want to start displaying messages. But before you do that, you have to take care of a few more things.
First, you’ll fine tune some layout parameters from the MessagesLayoutDelegate. Add the following section below the MessagesDisplayDelegate section:
// MARK: - MessagesLayoutDelegate extension ChatViewController: MessagesLayoutDelegate { func avatarSize(for message: MessageType, at indexPath: IndexPath, in messagesCollectionView: MessagesCollectionView) -> CGSize { // 1 return .zero } func footerViewSize(for message: MessageType, at indexPath: IndexPath, in messagesCollectionView: MessagesCollectionView) -> CGSize { // 2 return CGSize(width: 0, height: 8) } func heightForLocation(message: MessageType, at indexPath: IndexPath, with maxWidth: CGFloat, in messagesCollectionView: MessagesCollectionView) -> CGFloat { // 3 return 0 } }
Here’s the break down:
Returning zero for the avatar size will hide it from the view.
Adding a little padding on the bottom of each message will help the readability of the chat.
At the time of writing, MessageKit doesn’t have a default implementation for the height of a location message. Since you won’t be sending a location message in this tutorial, return zero as the default.
The messages displayed in the collection view are simply images with text overlaid. There are two types of messages: outgoing and incoming. Outgoing messages are displayed to the right and incoming messages on the left.
In ChatViewController, replace the MessagesDisplayDelegate extension with the following:
extension ChatViewController: MessagesDisplayDelegate { func backgroundColor(for message: MessageType, at indexPath: IndexPath, in messagesCollectionView: MessagesCollectionView) -> UIColor { // 1 return isFromCurrentSender(message: message) ? .primary : .incomingMessage } func shouldDisplayHeader(for message: MessageType, at indexPath: IndexPath, in messagesCollectionView: MessagesCollectionView) -> Bool { // 2 return false } func messageStyle(for message: MessageType, at indexPath: IndexPath, in messagesCollectionView: MessagesCollectionView) -> MessageStyle { let corner: MessageStyle.TailCorner = isFromCurrentSender(message: message) ? .bottomRight : .bottomLeft // 3 return .bubbleTail(corner, .curved) } }
Taking the above code step-by-step:
For the given message, you check and see if it’s from the current sender. If it is, you return the app’s primary green color; if not, you return a muted gray color. MessageKit uses this color when creating the background image for the message.
You return false to remove the header from each message. You can use this to display thread specific information, such as a timestamp.
Finally, based on who sent the message, you choose a corner for the tail of the message bubble.
To tie this all together, add the following to the bottom of viewDidLoad():
messageInputBar.delegate = self messagesCollectionView.messagesDataSource = self messagesCollectionView.messagesLayoutDelegate = self messagesCollectionView.messagesDisplayDelegate = self
Check that your app builds and you can navigate to one of your channels
Believe it or not, that’s all it takes to configure a MessagesViewController subclass to display messages! Well, it would be more exciting to see some messages, wouldn’t it?
Time to get this conversation started!
Creating Messages
Create the following method below viewDidLoad() in ChatViewController:
// MARK: - Helpers private func insertNewMessage(_ message: Message) { guard !messages.contains(message) else { return } messages.append(message) messages.sort() let isLatestMessage = messages.index(of: message) == (messages.count - 1) let shouldScrollToBottom = messagesCollectionView.isAtBottom && isLatestMessage messagesCollectionView.reloadData() if shouldScrollToBottom { DispatchQueue.main.async { self.messagesCollectionView.scrollToBottom(animated: true) } } }
This helper method is similar to the one that’s in ChannelsViewController. It makes sure the messages array doesn’t already contain the message, then adds it to the collection view. Then, if the new message is the latest and the collection view is at the bottom, scroll to reveal the new message.
Add a test message by overriding viewDidAppear(_:):
override func viewDidAppear(_ animated: Bool) { super.viewDidAppear(animated) let testMessage = Message(user: user, content: "I love pizza, what is your favorite kind?") insertNewMessage(testMessage) }
Build and run the app; you’ll see your message appear in the conversation view:
Boom — that’s one nice looking chat app! Time to make it work (for real) with Firebase.
Sending Messages
First, delete viewDidAppear(_:) to remove the test message in ChatViewController and add the following properties at the top of the file:
private let db = Firestore.firestore() private var reference: CollectionReference?
At the top of viewDidLoad add the following:
guard let id = channel.id else { navigationController?.popViewController(animated: true) return } reference = db.collection(["channels", id, "thread"].joined(separator: "/"))
The reference property is the point in the database where the messages are stored. The id property on the channel is optional because you might not yet have synced the channel. If the channel doesn’t exist in Firestore yet messages cannot be sent, so returning to the channel list makes the most sense.
Next add the following method to the top of the Helpers section:
private func save(_ message: Message) { reference?.addDocument(data: message.representation) { error in if let e = error { print("Error sending message: \(e.localizedDescription)") return } self.messagesCollectionView.scrollToBottom() } }
This method uses the reference that was just setup. The addDocument method on the reference takes a dictionary with the keys and values that represent that data. The message data struct implements DatabaseRepresentation, which defines a dictionary property to fill out.
Open Message.swift and examine the implementation of DatabaseRepresentation. As you can see, it maps its properties to readable keys and only sets the content of the message if there is no download URL.
Back in ChatViewController.swift, add the following delegate method inside the MessageInputBarDelegate extension:
func messageInputBar(_ inputBar: MessageInputBar, didPressSendButtonWith text: String) { // 1 let message = Message(user: user, content: text) // 2 save(message) // 3 inputBar.inputTextView.text = "" }
Here’s what’s going on:
Create a message from the contents of the message bar and the current user.
Save the message to Cloud Firestore using save(_:).
Clear the message bar’s input field after you send the message.
Build and run; open up your Firebase App Dashboard and click on the Database tab. Select a channel, then send a message in the app and you should see the messages appear in the dashboard in real time:
Note: The first time you view the database on the console, it will prompt you to select a database type. For this tutorial, you’re using Cloud Firestore. After clicking the Create Database button, select the test mode option. For a real world setup, you’ll want to configure security rules for Firestore. You can read more about security rules here.
High five! You’re saving messages to Cloud Firestore like a pro. The messages don’t appear on the screen, but you’ll take care of that next.
Synchronizing the Data Source
Add the following to below insertNewMessage(_:) in ChatViewController:
private func handleDocumentChange(_ change: DocumentChange) { guard let message = Message(document: change.document) else { return } switch change.type { case .added: insertNewMessage(message) default: break } }
This is very similar to how ChannelsViewController observes new database changes. For brevity, the only change type you handle in the switch statement is add.
Next, add the following code below the reference initialization in viewDidLoad():
messageListener = reference?.addSnapshotListener { querySnapshot, error in guard let snapshot = querySnapshot else { print("Error listening for channel updates: \(error?.localizedDescription ?? "No error")") return } snapshot.documentChanges.forEach { change in self.handleDocumentChange(change) } }
Firestore calls this snapshot listener whenever there is a change to the database.
To clean things up add a deinit towards the top of the file:
deinit { messageListener?.remove() }
Build and run your app; you should see any messages sent earlier along with any new ones you enter:
Congrats! You have a real time chat app! Now it’s time to add one final finishing touch.
Sending Images
To send images, you’re going to follow mostly the same principle as sending text with one key difference. Rather than storing the image data directly with the message, you’ll use Firebase Storage, which is better suited to storing large files like audio, video or images.
To start, you need to add the Photos import to ChatViewController.swift:
import Photos
Add the following above the Helpers section:
// MARK: - Actions @objc private func cameraButtonPressed() { let picker = UIImagePickerController() picker.delegate = self if UIImagePickerController.isSourceTypeAvailable(.camera) { picker.sourceType = .camera } else { picker.sourceType = .photoLibrary } present(picker, animated: true, completion: nil) }
This method will present an image picker controller to allow the user to select an image.
Next, add the following to viewDidLoad():
// 1 let cameraItem = InputBarButtonItem(type: .system) cameraItem.tintColor = .primary cameraItem.image = #imageLiteral(resourceName: "camera") // 2 cameraItem.addTarget( self, action: #selector(cameraButtonPressed), for: .primaryActionTriggered ) cameraItem.setSize(CGSize(width: 60, height: 30), animated: false) messageInputBar.leftStackView.alignment = .center messageInputBar.setLeftStackViewWidthConstant(to: 50, animated: false) // 3 messageInputBar.setStackViewItems([cameraItem], forStack: .left, animated: false)
Going through this:
Create a new InputBarButtonItem with a tint color and an image.
Connect the new button to cameraButtonPressed().
Lastly, add the item to the left side of the message bar.
Sending a photo message is a little different then sending a plain text message. Saving a photo to Firebase Storage returns a URL, but this may take a couple of seconds — perhaps longer, if the network connection is poor. Rather than blocking the user interface during this time, which will make your app feel slow, you’ll start sending the message and disable the camera message bar item.
Add the following properties at the top of ChatViewController:
private var isSendingPhoto = false { didSet { DispatchQueue.main.async { self.messageInputBar.leftStackViewItems.forEach { item in item.isEnabled = !self.isSendingPhoto } } } } private let storage = Storage.storage().reference()
and add this method to the bottom of the Helpers section:
private func uploadImage(_ image: UIImage, to channel: Channel, completion: @escaping (URL?) -> Void) { guard let channelID = channel.id else { completion(nil) return } guard let scaledImage = image.scaledToSafeUploadSize, let data = scaledImage.jpegData(compressionQuality: 0.4) else { completion(nil) return } let metadata = StorageMetadata() metadata.contentType = "image/jpeg" let imageName = [UUID().uuidString, String(Date().timeIntervalSince1970)].joined() storage.child(channelID).child(imageName).putData(data, metadata: metadata) { meta, error in completion(meta?.downloadURL()) } }
The isSendingPhoto property takes care of updating the camera item when it changes and the storage property is a reference to the root of Firebase Storage. uploadImage(_:to:completion:) uploads an image to the specified channel in the Firebase Storage.
Below uploadImage(_:to:completion:), add:
private func sendPhoto(_ image: UIImage) { isSendingPhoto = true uploadImage(image, to: channel) { [weak self] url in guard let `self` = self else { return } self.isSendingPhoto = false guard let url = url else { return } var message = Message(user: self.user, image: image) message.downloadURL = url self.save(message) self.messagesCollectionView.scrollToBottom() } }
This method takes care of updating the isSendingPhoto property to update the UI. Once the photo upload completes and the URL to that photo is returned, save a new message with that photo URL to the database.
Next, to use sendPhoto(_:), add the following image picker delegate methods to the UIImagePickerControllerDelegate extension:
func imagePickerController(_ picker: UIImagePickerController, didFinishPickingMediaWithInfo info: [UIImagePickerController.InfoKey : Any]) { picker.dismiss(animated: true, completion: nil) // 1 if let asset = info[.phAsset] as? PHAsset { let size = CGSize(width: 500, height: 500) PHImageManager.default().requestImage( for: asset, targetSize: size, contentMode: .aspectFit, options: nil) { result, info in guard let image = result else { return } self.sendPhoto(image) } // 2 } else if let image = info[.originalImage] as? UIImage { sendPhoto(image) } } func imagePickerControllerDidCancel(_ picker: UIImagePickerController) { picker.dismiss(animated: true, completion: nil) }
These two methods handle the cases when the user either selects an image or cancels the selection process. When selecting an image, the user can either get one from the photo library or take an image directly with the camera.
Here’s what this does:
If the user selected an asset, the selected image needs to be downloaded from iCloud. Request it at a fixed size. Once it’s successfully retrieved, send it.
If there is an original image in the info dictionary, send that. You don’t need to worry about the original image being too large here because the storage helper handles resizing the image for you. Have a look at UIImage+Additions.swift to see how the resizing is done.
Nearly there! You’ve now set up your app to save the image data to Firebase Storage and save the URL to the message data, but you’ve not yet updated the app to display those photos. Time to fix that.
Get started by adding the following to the bottom of the Helpers section:
private func downloadImage(at url: URL, completion: @escaping (UIImage?) -> Void) { let ref = Storage.storage().reference(forURL: url.absoluteString) let megaByte = Int64(1 * 1024 * 1024) ref.getData(maxSize: megaByte) { data, error in guard let imageData = data else { completion(nil) return } completion(UIImage(data: imageData)) } }
This method asynchronously downloads an image at the specified path from Firebase Storage.
Next, change the guard statement from a constant to a variable in the handleDocumentChange(_:) method:
guard var message = Message(document: change.document) else { return }
Then, in handleDocumentChange(_:), replace the content of the .added case with the following:
if let url = message.downloadURL { downloadImage(at: url) { [weak self] image in guard let self = self else { return } guard let image = image else { return } message.image = image self.insertNewMessage(message) } } else { insertNewMessage(message) }
Note: You’ll need to open the Firebase Console and enable Storage. To do this, first select storage on the left, click Get Started, then choose default security rules.
Build and run the app; tap on the little camera icon and send a photo message in your chat. Notice how the camera icon is disabled when your app is saving the photo data to Firebase Storage.
Kaboom! You just made a big, bad, real time, photo and text sending chat app. Go grab yourself your favorite beverage, you earned it!
Where to Go From Here?
Use the Download Materials button at the top or bottom of this tutorial to download the completed project.
You now know the basics of Cloud Firestore and MessageKit, but there’s plenty more you can do, including one-to-one messaging, social authentication, and avatar display.
To take this app even further, you could take a look at the Firebase iOS documentation. You can also take a look at our 22 part video course on Beginning Firebase!
I hope you’ve enjoyed this Firebase tutorial; if you have any questions feel free to leave them in the non-anonymous yet avatar-enabled discussion below! :]
The post Firebase Tutorial: Real-time Chat appeared first on Ray Wenderlich.
Firebase Tutorial: Real-time Chat published first on https://medium.com/@koresol
0 notes
Link
1 note
·
View note
Text
ios에 push notification 보내는 방법
내가 정리한내용
firebase cloud messaging에서 각각의 기기에 메시지를 보녀려 하는 경우 각각의 기기는 registration token(registration id)를 통해 각각은 구별되면 메시지를 보낼수 있게 된다.
ios에서는 두가지의 notification이 있는데 하나는 local notification또하나는 push notification이다.
ios notification은 content, trigger, request로 구성된다. content는 title, body, sound등을 가진다. trigger는 시간,지역 등등에 의해 trigger된다.
firebase cloud messaging을 위한 기본 정보
https://firebase.google.com/docs/cloud-messaging/admin/send-messages
ios device에서 registration token을 얻는 방법 (registration id 는 registration token이라고 불리기도 한다.)
https://firebase.google.com/docs/cloud-messaging/ios/client
https://firebase.google.com/docs/cloud-messaging/ios/client#access_the_registration_token
firebase authenticatoin을 이용하는 경우 registration token 관리방법
https://stackoverflow.com/a/47066493
This is not supported out of the box but you can build the mechanism. You need to maintain a uidspecific deviceGroup and all the registration ID per device that belongs to it.
Each time a user signs in with Firebase, you get the device registration ID and the user's ID token and send it to your backend. You verify the ID token and get the uid from it, you then add that registration ID to that user's device group.
Each time a user signs out, you remove their registration ID from the signed out user's device group.
When you want to send a push notification to a specified user, you can send it to the user's device group ID.
This is the simplified version but there are a bunch of edge cases you have to deal with to keep the device group for a user in sync so no notification is sent to a signed out user.
https://stackoverflow.com/a/47430551
A user may be using multiple devices. You should expect this to be the case. You'll need to store each device token for all devices that a particular user may be using in order to notify them. Typically, Firebase apps will use Realtime Database to record the token at the time of login.
firebase facebook, google auth를 사용하는 경우
Auth.auth().signInAndRetrieveData(with: fbCredential) { (user, error) in ... }
Auth.auth().signInAndRetrieveData(with: googleAuthCredential) { (user, error) in ...}
의 형태가 되며 sign in이 성공적으로 이루어지고 user ( FIRAuthDataResult obj )를 되돌려 받게된다. 이 FIRAuthDataResult 안에는 user property와 additionalUserInfo property가 들어 있다. 이를 통해서는 registration id를 얻을수 없다. 다만 additionalUserInfo안에 newUser를 통해 처음가입하는 유저인지 알수는 있다.
FIRAuthDataResult ref) https://firebase.google.com/docs/reference/ios/firebaseauth/api/reference/Classes/FIRAuthDataResult#/c:objc(cs)FIRAuthDataResult(py)user
registration id 얻는방법
https://stackoverflow.com/a/41523085
https://firebase.google.com/docs/cloud-messaging/ios/client
The tokenRefreshNotification function doesn't always get called when launching the app.
However, when placing the code inside the regular didRegisterForRemoteNotificationsWithDeviceToken delegate function, I can get the token every time:
func application(_ application: UIApplication, didRegisterForRemoteNotificationsWithDeviceToken deviceToken: Data) { if let refreshedToken = InstanceID.instanceID().token() { print("InstanceID token: \(refreshedToken)") } }
(Swift 3 + Firebase 4.0.4)
firebase cloud messaging client app in ios
https://firebase.google.com/docs/cloud-messaging/ios/client
For iOS client apps, you can implement Firebase Cloud Messaging in two complementary ways:
Receive basic push messages up to 4KB over the Firebase Cloud Messaging APNs interface.
Send messages upstream and/or receive downstream data payloads up to 4KB in foregrounded apps.
To write your client code in Objective-C or Swift, we recommend that you use the FIRMessaging API. The quickstart example provides sample code for both languages.
Method swizzling in Firebase Cloud Messaging
The FCM SDK performs method swizzling in two key areas: mapping your APNs token to the FCM registration token and capturing analytics data during downstream message callback handling. Developers who prefer not to use swizzling can disable it by adding the flag FirebaseAppDelegateProxyEnabled in the app’s Info.plist file and setting it to NO (boolean value). Relevant areas of the guides provide code examples, both with and without method swizzling enabled.
Important: With the Firebase Unity SDK on iOS, do not disable method swizzling. Swizzling is required by the SDK, and without it key Firebase features such as FCM token handling do not function properly.
Add Firebase to your iOS project
This section covers tasks you may have completed if you have already enabled other Firebase features for your app. For FCM specifically, you'll need to upload your APNs authentication key andregister for remote notifications.
Prerequisites
Before you begin, you need a few things set up in your environment:
Xcode 9.2 or later
An Xcode project targeting iOS 8 or above
Swift projects must use Swift 3.0 or later
The bundle identifier of your app
CocoaPods 1.4.0 or later
For Cloud Messaging:
A physical iOS device
An Apple Push Notification Authentication Key for your Apple Developer account
In Xcode, enable Push Notifications in App > Capabilities
If you don't have an Xcode project already, you can download one of our quickstart samples if you just want to try a Firebase feature. If you're using a quickstart, remember to get the bundle identifier from the project settings, you'll need it for the next step.
Xcode 8 support deprecated: In May this year Apple announced that
starting July 2018, all iOS apps submitted to the App Store must be built with the iOS 11 SDK
included in Xcode 9. When this date passes, updates to the Firebase iOS SDKs will no longer support Xcode 8.Support for iOS 7 removed: As of v5.0.0 of the Firebase SDK for iOS, support for iOS 7 is removed. Upgrade your apps to target iOS 8 or above. To see the breakdown of worldwide iOS versions,
go to Apple’s App Store support page
.Add Firebase to your app
It's time to add Firebase to your app. To do this you'll need a Firebase project and a Firebase configuration file for your app.
To create a Firebase project:

Firebase automatically assigns a unique ID to your Firebase project. This identifier displays in publicly visible Firebase services, for example:
Default database URL — your-project-id.firebaseio.com
Default hosting subdomain — your-project-id.firebaseapp.com
Follow the remaining setup steps, then click Create project (or Add Firebase, if you're using an existing Google project).
Firebase automatically provisions resources for your Firebase project. The process typically takes a few minutes. When the process completes, you'll be taken to the overview page for your Firebase project in the Firebase console.
Now that you have a project, you can add your iOS app to it:
Click Add Firebase to your iOS app and follow the setup steps. If you're importing an existing Google project, this may happen automatically and you can just download the config file.
When prompted, enter your app's bundle ID. It's important to enter the bundle ID your app is using; this can only be set when you add an app to your Firebase project.
During the process, you'll download a GoogleService-Info.plist file. You can download this file again at any time.
After you add the initialization code, run your app to send verification to the Firebase console that you've successfully installed Firebase.
Note: If you have multiple build variants with different bundle IDs defined, each app must be added to your project in Firebase console.Add the SDK
If you are setting up a new project, you need to install the SDK. You may have already completed this as part of creating a Firebase project.
We recommend using CocoaPods to install the libraries. You can install Cocoapods by following the installation instructions. If you'd rather not use CocoaPods, you can integrate the SDK frameworks directly without using CocoaPods.
If you are planning to download and run one of the quickstart samples, the Xcode project and Podfile are already present, but you'll still need to install the pods and download the GoogleService-Info.plist file. If you would like to integrate the Firebase libraries into one of your own projects, you will need to add the pods for the libraries that you want to use.

Note: If you have multiple bundle IDs in your project, each bundle ID must be connected in Firebase console so it can have its own
GoogleService-Info.plist
file.Upload your APNs authentication key
Upload your APNs authentication key to Firebase. If you don't already have an APNs authentication key, see Configuring APNs with FCM.
Inside your project in the Firebase console, select the gear icon, select Project Settings, and then select the Cloud Messaging tab.
In APNs authentication key under iOS app configuration, click the Upload button.
Browse to the location where you saved your key, select it, and click Open. Add the key ID for the key (available in Certificates, Identifiers & Profiles in the Apple Developer Member Center) and click Upload.
위의 과정을 보여주는 동여상
https://www.youtube.com/watch?v=QwolFT5QSk0
https://www.youtube.com/watch?v=LBw5tuTvKd4
Initialize Firebase in your app
You'll need to add Firebase initialization code to your application. Import the Firebase module and configure a shared instance as shown:
Import the Firebase module in your UIApplicationDelegate:
Configure a FirebaseApp shared instance, typically in your application's application:didFinishLaunchingWithOptions: method:
import Firebase
// Use Firebase library to configure APIs FirebaseApp.configure()
Register for remote notifications Either at startup, or at the desired point in your application flow, register your app for remote notifications. Call
registerForRemoteNotifications
as shown:
if #available(iOS 10.0, *) { // For iOS 10 display notification (sent via APNS) UNUserNotificationCenter.current().delegate = self let authOptions: UNAuthorizationOptions = [.alert, .badge, .sound] UNUserNotificationCenter.current().requestAuthorization( options: authOptions, completionHandler: {_, _ in }) } else { let settings: UIUserNotificationSettings = UIUserNotificationSettings(types: [.alert, .badge, .sound], categories: nil) application.registerUserNotificationSettings(settings) } application.registerForRemoteNotifications() AppDelegate.swift
for devices running iOS 10 and above, you must assign your delegate object to the
UNUserNotificationCenter
object to receive display notifications, and the
FIRMessaging
object to receive data messages, before your app finishes launching. For example, in an iOS app, you must assign it in the
applicationWillFinishLaunching:
or
applicationDidFinishLaunching:
method.
Access the registration token
(registration id 는 registration token이라고 불리기도 한다.)
By default, the FCM SDK generates a registration token for the client app instance on app launch. Similar to the APNs device token, this token allows you to send targeted notifications to any particular instance of your app.
In the same way that iOS typically delivers an APNs device token on app start, FCM provides a registration token via MessagingDelegate's messaging:didReceiveRegistrationToken:method. The FCM SDK retrieves a new or existing token during initial app launch and whenever the token is updated or invalidated. In all cases, the FCM SDK calls messaging:didReceiveRegistrationToken: with a valid token.
The registration token may change when:
The app is restored on a new device
The user uninstalls/reinstall the app
The user clears app data.
Set the messaging delegate
To receive registration tokens, implement the messaging delegate protocol and set Messaging's delegate property after calling [FIRApp configure]. For example, if your application delegate conforms to the messaging delegate protocol, you can set the delegate on application:didFinishLaunchingWithOptions: to itself.
Messaging.messaging().delegate = self
Fetching the current registration token
Registration tokens are delivered via the method messaging:didReceiveRegistrationToken:. This method is called generally once per app start with registration token. When this method is called, it is the ideal time to:
If the registration token is new, send it to your application server.
Subscribe the registration token to topics. This is required only for new subscriptions or for situations where the user has re-installed the app.
You can retrieve the token directly using instanceIDWithHandler:. This callback provides an InstanceIDResult, which contains the token. A non null error is provided if the InstanceID retrieval failed in any way.
InstanceID.instanceID().instanceID { (result, error) in if let error = error { print("Error fetching remote instange ID: \(error)") } else if let result = result { print("Remote instance ID token: \(result.token)") self.instanceIDTokenMessage.text = "Remote InstanceID token: \(result.token)" } }
Generally, the token is available locally, so this method does not open a network connection. You can use this method at any time to access the token instead of storing it.
Avoid calling
.getToken(authorizedEntity,scope)
unless there is a need to enable multiple senders. Use
instanceIDWithHandler:
instead.Monitor token refresh
To be notified whenever the token is updated, supply a delegate conforming to the messaging delegate protocol. The following example registers the delegate and adds the proper delegate method:
func messaging(_ messaging: Messaging, didReceiveRegistrationToken fcmToken: String) { print("Firebase registration token: \(fcmToken)") let dataDict:[String: String] = ["token": fcmToken] NotificationCenter.default.post(name: Notification.Name("FCMToken"), object: nil, userInfo: dataDict) // TODO: If necessary send token to application server. // Note: This callback is fired at each app startup and whenever a new token is generated. }AppDelegate.swift
Alternatively, you can listen for an NSNotification namedkFIRMessagingRegistrationTokenRefreshNotification rather than supplying a delegate method. The token property always has the current token value.
Swizzling disabled: mapping your APNs token and registration token
If you have disabled method swizzling, you'll need to explicitly map your APNs token to the FCM registration token. Override the methods didRegisterForRemoteNotificationsWithDeviceTokento retrieve the APNs token, and then set FIRMessaging's APNSToken property:
func application(application: UIApplication, didRegisterForRemoteNotificationsWithDeviceToken deviceToken: NSData) { Messaging.messaging().apnsToken = deviceToken }
After the FCM registration token is generated, you can access it and listen for refresh events using the same methods as with swizzling enabled.
Import existing user APNs tokens
If you have an existing user base that you want to onboard to an FCM client app, use the batchImportAPI provided by Instance ID. With this API, you can bulk import existing iOS APNs tokens into FCM, mapping them to new, valid registration tokens.
Prevent auto initialization
FCM generates an Instance ID, which is used as a registration token within FCM. When an Instance ID is generated the library will upload the identifier and configuration data to Firebase.If you want to get an explicit opt-in before using Instance ID, you can prevent generation at configure time by disabling FCM. To do this, add a metadata value to your Info.plist (not your GoogleService-Info.plist):
FirebaseMessagingAutoInitEnabled = NO
To re-enable FCM, you can make a runtime call:
Messaging.messaging().autoInitEnabled = true
This value persists across app restarts once set.
#ios#push notification#notification#swift#token#registration token#registration id#cloud#firebase#cloud message
0 notes
Text
How to Get the ID Token from FirebaseAuth in Flutter?

Hello folks, hope you guys are doing well !!! Earlier we have been through Step By Step Guide to Firebase With Flutter So in this article we will learn about how to get the ID token from FirebaseAuth?
We have to use dependencies to get Logged In user token using FirebaseAuth which is listed below:
firebase_auth: firebase_core: google_sign_in: flutter_signin_button:
You can also use command to add flutter pub
flutter pub add
How to get the ID token from FirebaseAuth?
While reading some Json files from my firebase database how to obtain an ID token for the current user to be used in the header as follows:
getIdTokenResult() returns a Future – you have to await it to actually get the token string:
IdTokenResult tokenResult = await FirebaseAuth.instance.currentUser.getIdTokenResult(); var response = await httpClient.get(url,headers: {'Authorization':"Bearer ${tokenResult.token}"});
Now to call the method getIdTokenResult() you need to do this:
FirebaseUser user = await FirebaseAuth.instance.currentUser; String token; user.getIdTokenResult().then((result) { token = result.token; });
You can’t call FirebaseAuth.instance.currentUser.getIdToken()
then you can access the token with
var tokenResult = await response.user.getIdTokenResult(); log('TokenID ${tokenResult.token}');
and after that, you can use it into
var response = await httpClient.get(url,headers: {'Authorization':"Bearer $token"});
Output
Conclusion:
Hope this article is useful for you !!! Thanks for reading !!!
Drop us your suggestion/feedback to serve you better.
FlutterAgency.com is our portal Platform dedicated to Flutter Technology and Flutter Developers. The portal is full of cool resources from Flutter like Flutter Widget Guide, Flutter Projects, Code libs and etc.
0 notes
Text
Release 2.15.1: New Firebase Features and New Live Code Reloading Apps | Upgrade to Qt 5.10.1 & Qt Creator 4.5.1
V-Play 2.15.1 adds support for Qt 5.10.1 and the latest Qt Creator 4.5.1. Qt 5.10.1 comes with over 300 fixes and improvements. Qt Creator 4.5.1 adds several fixes as well. This update also improves the V-Play Firebase components with easier configuration and callback functions.
V-Play 2.15.1 Improvements
V-Play is now compatible with Qt 5.10.1 and Qt Creator 4.5.1. See later parts of this post for the highlights. V-Play Release 2.15.1 also includes many engine improvements:
New Live Code Reloading Apps for Desktop, Android and iOS
V-Play 2.15.1 comes with an improved V-Play Live Client and Server. The updated Live Client supports all new features and components.
Reworked UI for Live Reloading Android and iOS Apps
There’s also a new V-Play Live version available for you on Android and iOS. The UI received a complete rework.
Project Cache to Open Recent Projects
It includes a new project cache, that lets you view your recent projects. This allows you to open your projects on your mobile phone also when not connected to your desktop, to show it to friends, customers or to yourself.
Run Code Examples from Documentation and Blog with the V-Play Web Editor
The new live client app also improves using the V-Play Web Editor. With the V-Play Web Editor, you can run code examples on your Android or iOS phone, right from your desktop browser. It’s a Cloud IDE for editing, running and debugging QML Code. Here is an example that you can try right away:
import VPlayApps 1.0 import VPlay 2.0 import QtQuick 2.8 App { NavigationStack { Page { title: "My First App" AppButton { anchors.centerIn: parent text: "Celebrate" onClicked: { nativeUtils.displayAlertDialog("Yay", "That is so cool!") } } } } }
You can read more about this feature in this blog post.
Download the Latest Apps for Android and iOS
The new apps include all the latest V-Play features, so make sure to get the updated app to be fully compatible with current version of V-Play Engine and the Live Server. You can download the app for iOS and Android here:
V-Play & QML Live Scripting App Search in App Stores for: “V-Play Live Scripting”
Use WebView with Live Reloading on Android and iOS
The new V-Play Live Client mobile apps support the QtWebView module. You can now use code reloading also for apps that include a WebView.
import VPlayApps 1.0 import QtWebView 1.1 App { id: app NavigationStack { Page { id: page title: "WebView" WebView { anchors.fill: parent url: "https://www.google.com" } } } }
Note that the WebView module is not available on Windows desktop.
Test Firebase and Facebook Plugins with Live Reloading
With the new V-Play Live Client apps, you can test the Firebase and Facebook plugins, without any integration steps. Note that both plugins connect to public test accounts, so make sure not to store any sensitive data.
import VPlayApps 1.0 import VPlayPlugins 1.0 App { id: app NavigationStack { Page { id: page title: "Firebase Database" FirebaseDatabase { id: database onReadCompleted: { if(key == "teststring") button.text = value } } AppButton { id: button anchors.centerIn: parent text: "Read Value" onClicked: { // get value from database. the result is processed in onReadCompleted of FirebaseDatabase database.getValue("public/teststring") } } } } }
Firebase Callback Functions
When reading and writing data to and from a FirebaseDatabase, you can now use callback functions in addition to the item’s signals FirebaseDatabase::readCompleted() and FirebaseDatabase::writeCompleted().
You can supply a function as third parameter to the methods FirebaseDatabase::getValue(), FirebaseDatabase::getUserValue(), FirebaseDatabase::setValue() and FirebaseDatabase::setUserValue(). Both the signal and the callback function will be called on completion.
This is the same example as above, using a callback function instead of the readCompleted signal:
import VPlayApps 1.0 import VPlayPlugins 1.0 App { id: app NavigationStack { Page { id: page title: "Firebase Database" FirebaseDatabase { id: database } AppButton { id: button anchors.centerIn: parent text: "Read Value" onClicked: { // get value from database. the result is processed in callback function database.getValue("public/teststring", {}, function(success, key, value) { button.text = value }) } } } } }
Firebase Configuration from QML
It is now possible to specify your Firebase Plugin account configuration in QML code. You can override the default configuration of FirebaseDatabase and FirebaseAuth using the new type FirebaseConfig. This allows for using multiple Firebase accounts from within the same app. It also simplifies the Firebase configuration for you in general, because you do not need any google-services file, but can configure your Firebase app completely from QML instead.
import VPlayApps 1.0 import VPlayPlugins 1.0 App { id: app NavigationStack { Page { id: page title: "Firebase Database" FirebaseConfig { id: customConfig projectId: "v-play-live-client-test-db" databaseUrl: "https://v-play-live-client-test-db.firebaseio.com" apiKey: "AIzaSyCheT6ZNFI4mUwfrPRB098a08dVzlhZNME" applicationId: "1:40083798422:ios:ed7cffdd1548a7fa" } FirebaseDatabase { id: database // assign custom config values. overrides config from google-services.json / GoogleService-info.plist config: customConfig } AppButton { id: button anchors.centerIn: parent text: "Read Value" onClicked: { // get value from database. the result is processed in callback function database.getValue("public/teststring", {}, function(success, key, value) { button.text = value }) } } } } }
Native DatePicker Dialog for Android, iOS and Desktop
You can now let the user select a date from a native date picker dialog with the new function NativeUtils::displayDatePicker().
import VPlay 2.0 import VPlayApps 1.0 import QtQuick 2.9 App { id: app NavigationStack { Page { id: page title: "Date Picker" AppButton { id: button anchors.centerIn: parent text: "Display Date Picker" onClicked: { nativeUtils.displayDatePicker() } } Connections { target: nativeUtils onDatePickerFinished: { if(accepted) button.text = date.toLocaleDateString() } } } } }
Fix QML Import Issue in Qt Creator
After the last V-Play update with Qt Creator 4.5, some of you faced issues with import statements in QML. This did not affect building and running the application. Yet it caused error messages in Qt Creator and affected auto-completion and syntax highlighting.
With V-Play 2.15.1, this is now fixed.
More Improvements and Fixes
Improve rebound effect of list view in drawer used in Navigation (default on Android or if using navigationModeDrawer).
Improvements for VPlayMultiplayer matchmaking and error handling. Update to latest Photon version for multiplayer services.
Increased timeout between plugin trial notice dialogs.
Reduce duration of V-Play Splash screen during development for standard build & run from Qt Creator.
Documentation improvements in various components. (Special thanks to user Marcin for extensive contribution!)
Disable user location updates for AppMap if AppMap::showUserPosition and AppMap::enableUserPosition is false, to optimize battery usage on mobile devices.
Fixes an issue where games would be always started in fullscreen mode while developing, if previously an app was run in iOS theme.
Fix App::isOnline and GameWindow::isOnline property on macOS Sierra and iOS 10.
Fix user position and location circle for AppMap with MapBoxGL plugin.
For an overview of all changes, make sure to see the changelog here.
Qt 5.10.1 Improvements for App and Game Development
Bugfix Release
Qt 5.10.1 comes mainly as a bugfix release. It contains over 300 fixes and improvements, with close to 1400 changes over 5.10.0.
Fix iOS Font Rendering Issue
One major fix targets the font rendering issue on iOS. This issue caused texts with native font to appear in weird glyphs occasionally. With this update, fonts on iOS appear as beautiful as they are, all the time!
Qt Creator 4.5.1 Support
The new version fixes several issues and brings improvements to the Qt Creator UI. It fixes crashes when importing or switching projects, as well as the mouse cursor getting stuck in waiting state on Windows.
How to Update V-Play
Test out all these new features by following these steps:
Open the V-Play SDK Maintenance Tool in your V-Play SDK directory.
Choose “Update components” and finish the update process to get this release as described in the V-Play Update Guide.
If you haven’t installed V-Play yet, you can do so now with the latest installer from here. Now you can explore all of the new features included in this release!
For a complete list of the changes to V-Play with this update, please check out our change log!
More Posts Like This
Web Editor: Test Online Code Examples on Android and iOS with Live Code Reloading
Release 2.14.2: Live Code Reloading with Native Cross-Platform Plugins
Release 2.14.0: Live Code Reloading for Desktop, iOS & Android
youtube
The post Release 2.15.1: New Firebase Features and New Live Code Reloading Apps | Upgrade to Qt 5.10.1 & Qt Creator 4.5.1 appeared first on V-Play Engine.
Release 2.15.1: New Firebase Features and New Live Code Reloading Apps | Upgrade to Qt 5.10.1 & Qt Creator 4.5.1 published first on https://medium.com/@TheTruthSpy
0 notes