#Free Sewing Pattern
Explore tagged Tumblr posts
Visit Tumblr Blog
Explore Tumblr blogs with no restrictions, modern design and the best experience.
Last Seen Tumblr Blogs


Fun Fact
In 2020, 44% of users from Denmark used Tumblr daily.
Text

link to post
link to video
#bralette top#halter top#home sewing#modern sewing#free pdf pattern#free sewing pattern#sewing for beginners
14 notes
·
View notes
Text
Here are some sharks I made out of felt. They were mostly sewn during my Psychology and English classes
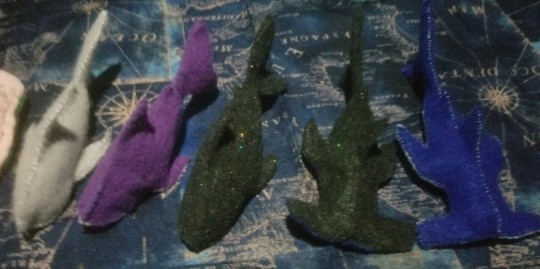
[Image ID: felt sharks lined up on a nautical themed tablecloth. Right to left: grey great white, purple great white, sparkly black great white,sparkly black hammerhead, blue hammerhead. End ID]
And heres the pattern

[Image ID: sewing patterns for sharks cut out of graph paper. One for a great white shark, the other for a hammerhead. End ID]
#sharks#shark toys#sewing#sewing patterns#hammerhead shark#sea creatures#artist described#image id#art#free sewing pattern#shark sewing pattern#marine life#marine biology
2K notes
·
View notes
Text
Sooo unrelated but would you guys be interested in a free Goldfish cracker plush sewing pattern?
Cuz uhhh
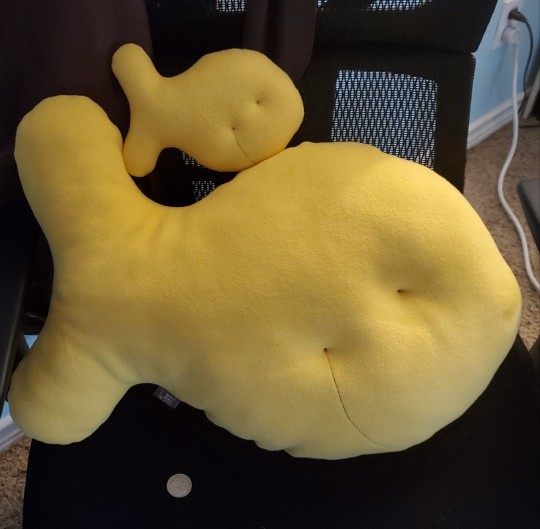
Look at him!
#plushies#plush#plush pattern#sewing#plush toy#free sewing pattern#this was the only place i though would be good to post lol
422 notes
·
View notes
Text
Free Sewing Pattern: Janet Vest via Mood Fabrics


Written by Shavonne Cruz for Mood Fabrics, this vest pattern is modeled after Janet from The Good Place. The pattern is offered free via email subscription, and the tutorial provides detailed instructions. You can check it out here!
The CovidSafeCosplay blog and its admin are unaffiliated with the patternmaker or Mood Fabrics, and are simply sharing the resource. Blog admin has not personally tested this pattern. Please thoroughly read the pattern and tutorial for full instructions.
Do you have a favorite free pattern resource? Share in the comments or via a reblog! Bonus points for those that are free, include image descriptions, or contain detailed tutorials for newbies to follow.
#the good place#cosplay#sewing patterns#sewing pattern#free sewing pattern#free sewing patterns#vests#vest#the good place janet#janet the good place#sewing tutorials#mood fabrics#id in alt text
153 notes
·
View notes
Text
I made some cute sunflower pillows out of scrap fabrics I had been saving from the dump. I couldn't find the right buttons so I made some out of polymer clay I had in my stash 🌻

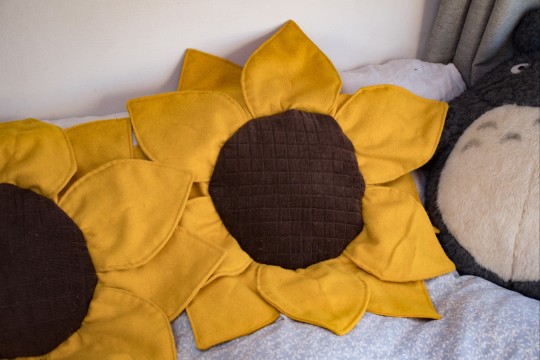
Here's some instructions if you also want to make some 😊
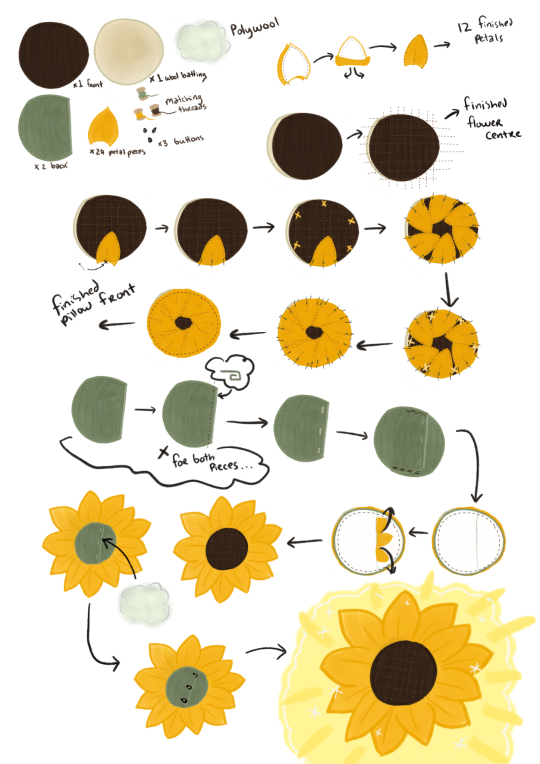
I still need to draw up a sized petal template but I've also made a youtube video (my first one, it's horrible 😂) if you are more of a visual learner.
youtube
1. Cut 1 brown corduroy circle 1 wool batting circle and 2 green 2/3 circles (for the back)
2. Cut 12 pairs of petals (24 pieces total)
3. Sew petal pieces right sides together 1cm away from edges. Turn right sides out and top stitch along the edge. Stitch centre petal seam. Repeat for all petals
4. Quilt your brown centre to the wool. I made lines about 1.5cm apart making a grid.
5 Pin 6 of your petals centre first evenly spaced around the edge. Pin the last 6 over the gaps. Sew 1 cm from the edge
6 Roll hem the straight edge of the 2/3 circle pieces (a rol hem to folding and then folding again)
7 make 3 button holes evenly spaced on one back piece
8 secure the pieces to eachother both having right sides up, creating a pocket
9 fold on your petals and pin your back piece right sides together to your flower front. Sew 1.5cm around the edge and turn out through the pocket.
10 stuff your pillow then add buttons to fit the holes you made earlier. I do the buttons last to make sure they fit nicely when fully puffed.
11 yayyyy pillow!
#cottagecore#slow living#cottagecore aesthetic#hobbitcore#sewityourself#diy#sewing tutorial#free sewing pattern#cottage life#Youtube
590 notes
·
View notes
Text
Anyone want to make a Twilight Princess wolf plush? Or a Korok?
Here you go! Credit to Sew Desu Ne.
It's written in the comments, the Korok fabric is available on SpoonFlower.
#linked universe#linkeduniverse#legend of zelda#korok#botw korok#totk korok#loz korok#lu legend cosplay#legend of zelda twilight princess#loz tp#wolf link#twilight princess#sewing plushies#sewing stuffed animals#free sewing pattern#everyone should be able to have cute plushes
68 notes
·
View notes
Text
Making a bag from a broken umbrella
A few years ago I saw a broken but cool umbrella on the side of the road. (The Welsh climate kills tens of thousands of umbrellas every month, it's very sad.) Someone had hand-stamped yellow bees onto a black umbrella and it looked badass. I rescued it with the intent to turn it into something cool, and recently I got around to it and succeeded:


It's a super-lightweight, fast-drying, very strong shopping bag. Umbrella fabric is perfect for this. The only part that didn't get used is the very tip of the umbrella, and there was enough fabric for TWO bags.
It was pretty easy and fun, so here I am to show you how I did it.
You will need:
Sewing machine (though you could do it by hand)
Broken umbrella with intact fabric
Stitch ripper, or tiny scissors, or big scissors and good fine motor control
Reel thread and bobbin thread that you think looks nice with the umbrella fabric
Pins
Set square
Tailor's chalk
Wide drawstring band type stuff for handles - about a metre? (Or you can make something from random fabric in your stash.)
Scissors
The chalk and ruler and stuff are pretty optional if you are happy to just eyeball it and hope for the best.
How to do it:
The bag bit
Remove the fabric from the umbrella frame. Take your stitch ripper or scissors and very carefully snip the stitches at the point of each umbrella spoke. You will then find that there is probably another set of stitches around halfway up each spoke, so cut those too. Then cut the fabric around the tip of the umbrella, because it's probably attached very securely.
Then fling the umbrella frame into a bin and never think about it again, or turn it into a cool spider sculpture.
Carefully remove the velcro fastening strap. We will need it later, so keep it all in one piece - use the stitch ripper or tiny scissors.
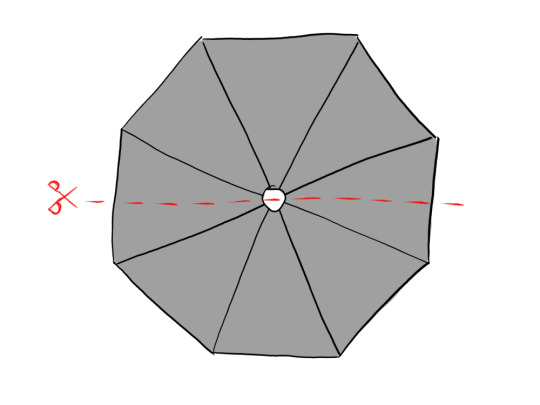
Cut the umbrella fabric in half. The umbrella will have an even number of segments, probably eight. It's tempting to cut it along a seam, but if it has eight segments it'll work better if you cut it along the middle of the opposite panels, like so:
Fold your semi-circle in half with the seams on the outside (right sides together), like this:
Roll-and-pin and sew the open side - this one:

Edit: I had someone ask me what roll-and-pin means, so I asked my sewing friend if it was obvious what I meant by it, and they said they were not sure! So, this is what I mean:

You fold in the edge, and then fold it in again, to make a little roll.
Then when you sew along the middle of the roll it catches and traps the raw edges. That way it can't fray or unravel.
Pinning this way (perpendicular to the edge instead of parallel to the edge) makes it easier to sew with a sewing machine because you're a bit less likely to bang your sewing machine needle into a pin. However, do take them out just before the needle gets there, or at least go slowly over the pins, if you can.
Trim the bottom off. How much you trim off will depend on how big your starting umbrella is and what shape you want your bag to be, but maybe 10cm or so?
Make a mark about 10cm from the bottom along one of the pre-existing seams.
Use a ruler (or a piece of string or whatever) to measure the distance along the pre-existing seam from the top corner to the mark.
Measure the same distance along the other seam from the other top corner, make another chalk mark.
Draw a line across the whole width of the quarter with the ruler, joining the marks. This should make the chalk line parallel with the top flat edge.
Make another line about 2cm below it, and then cut along the bottom line.
Then roll-and-pin and sew along the remaining chalk line.
Sew the side seams. Mark them on using the set square and the chalk, and then pin them and sew. Make the sides square with the top edge.
These triangles on the sides are going to become inside pockets, so also sew a square line along the bottom. That'll stop tiny things from getting stuck in the point of the triangle.

Sew the top edge of one pocket to the side of the bag. The bag is inside out at this point, so when you sew the pocket to the "outside" (wrong side) it'll end up inside the bag when you turn it right-side-out at the end.

I recommend pins for positioning the pocket. The stitches will show on the outside of the bag, so bear this in mind when choosing your thread. Try and keep everything nice and flat so there's no bunching; the triangle should fold over exactly on the vertical stitches along the side and then the pocket should lay flat against the side of the bag. Be careful to only sew through one side of the bag, and only through the adjacent side of the pocket.
Flip the bag over, and do the same on the other side.
The top left and right corners can be pretty weak because the ends of several seams meet there, so...
Roll the top over outwards and hem. That's wrong-sides-together.
That's the bag part finished!
Handles
Grab your wide drawstring fabric tape stuff. (Or, cut a really long rectangle 6-8cm wide, sew along the long open edge so it makes a tube that is open at both ends, and then turn the whole tube inside out so that the seam is on the inside.)
Choose how long your handles will be. This is a very personal choice. Do you want to carry it on your shoulder, or in your hand?
Or... both, like this Ikea bag??

It can help to pin them onto the bag to get a feel for what it'd be like to hold. Here's what we're approximately going for, with your bag inside out:
Add 3cm to the length of one handle, cut it, and then cut the second to match the length before you sew anything on.
The extra 3cm is because you're going to fold over 1.5cm at each end when you attach it, to stop it unravelling.
Pin one end of one handle. The bag should still be inside out, i.e. the "wrong side" is still facing outwards. First fold 1.5cm at the end of your handle, and then attach it about a third of the way along one side of the bag, on the wrong side. The 1.5cm flap should be tucked underneath itself, between the handle and the bag.
I often have to use two pins to keep the handle really square with the top edge.
Measure how far it is from the side seam, and pin the other end of the handle the same distance from the other side seam, being careful not to twist the tape.
Sew the handle to the bag. Start with a square, remove the pins without lifting the sewing machine foot or breaking the thread, and then sew a cross through the middle of the square. Sew over some stitches you've already done and then reverse over them, to make it really secure.
See how sewing the handle down secures and tightens the loose woven ends of the handle stuff:

Do the same on the other side of the bag with the other handle tape.
Fastening
Turn your bag right-side-out. Lay it flat and then fold it up the way you kind of instinctively want to when you're trying to pack it away really small.
Grab your little velcro fastening strap from earlier and play around to find a good place to put it. The back of the soft side of the velcro will get sewn onto the bag.
Grab your tailor's chalk and draw an arrow where the stitched-down end of the velcro is going to go, with the arrow pointing in the direction that the tape will be lying when you unfold it.
Flatten out your bag again, and pin the back of the soft end of the fastening strap down onto your arrow, with the flappy end lying in the direction of the arrow. Again, you may need to use two pins to keep it square. Make sure you only put the pins through one layer of bag fabric.
Use the same technique as you used with the handles to sew the fastening strap down.
YOU ARE NOW DONE.

Lay it down and roll it up and fasten it a few times and bask in smugness. You earned that dopamine, and you should enjoy it. Fill it with tins to test the strength and marvel at your handiwork.
You can also make a second bag with the other half of umbrella, if you're into that. It will be exactly the same, but without the little velcro fastening strap.
Optional:
Reblog with a photo of your new umbrella bag. :D
77 notes
·
View notes
Text
A few free sewing patterns that are on my ko-fi! Each has a video tutorial~
135 notes
·
View notes
Text
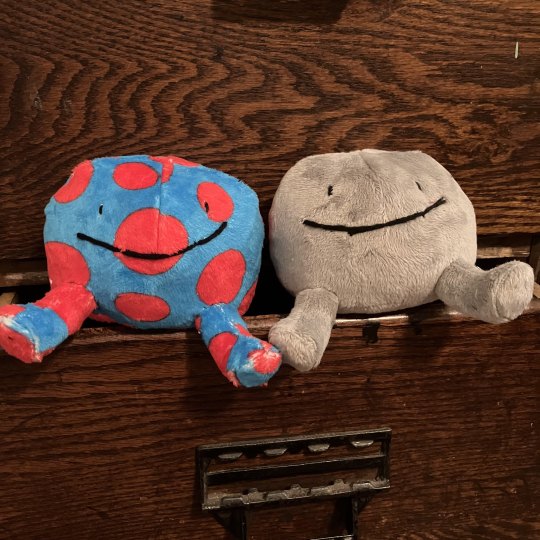
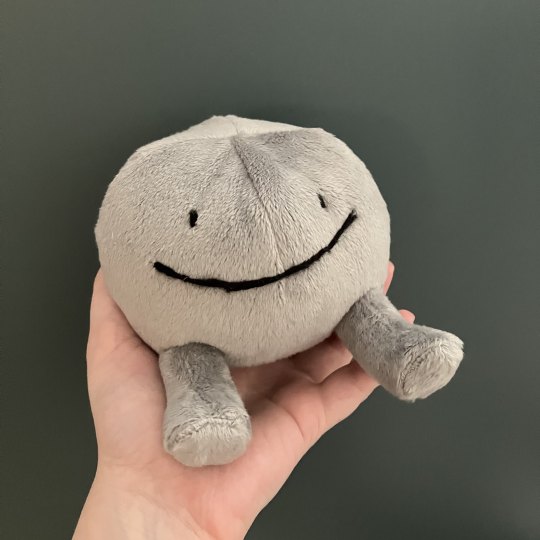
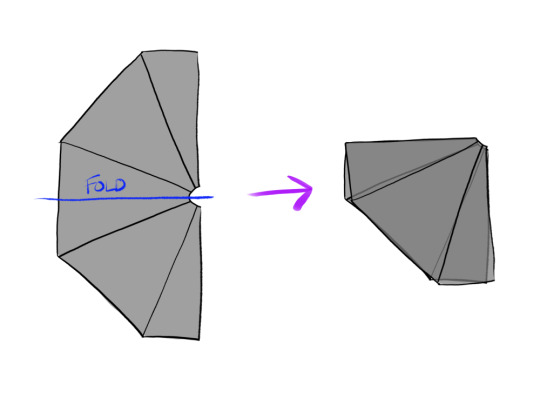
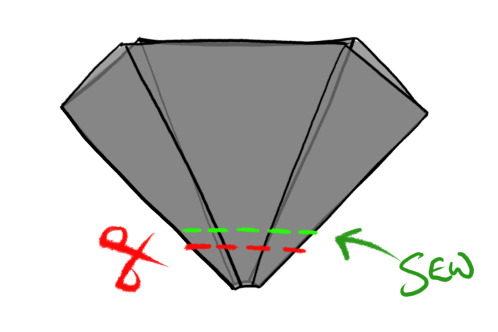
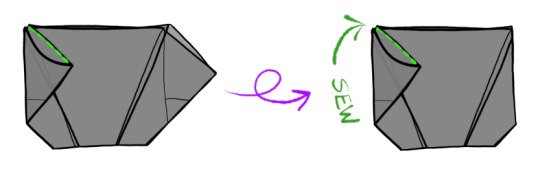
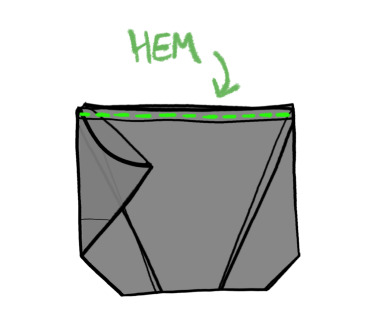
Blorbo pattern is below the read more! Based on this post by @thewiglesswonder
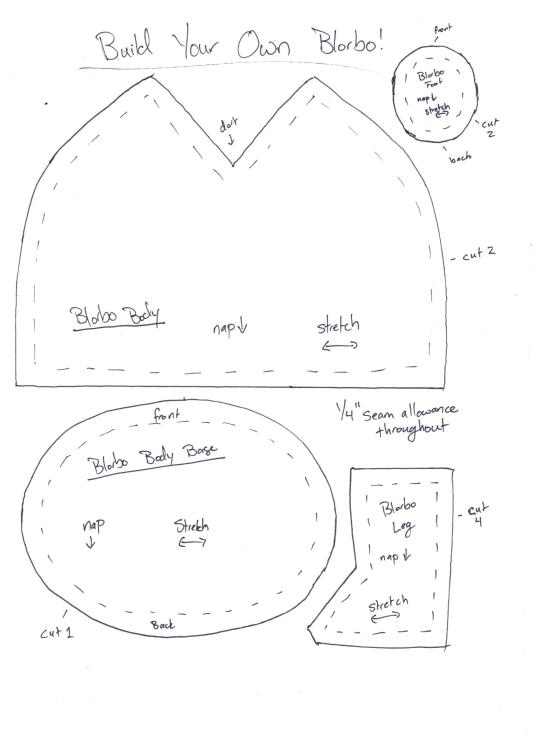
Sew the darts on the two Blorbo body pieces
Sew the two Blorbo body pieces to each other, right sides together (sew the curved edge, and leave the straight line at the bottom unsewn)
Sew the Blorbo body base to the bottom of the Blorbo body pieces (pin it well, with the front roughly in line with the dart on the front half of the body; this does not have to be precise, Blorbo can be a little irregularly shaped, it’s fine). Leave an opening for turning of a few inches left unsewn, turn the body right side out
Put two leg pieces right sides together and sew the side seams (leave the top, where it attaches to the body, and the bottom, where it will attach to the foot, unsewn). Repeat with the second leg.
Pin a foot piece to the bottom of a leg, with the front of the foot roughly lined up with the seam at the front of the foot. Sew around (this can be a little tricky, it might be easier to hand sew than to machine sew this part). Repeat with second leg and foot. Turn legs right side out through the opening at the top of the leg
Finishing:
Embroider the face, either before step 2 or after step 3
Stuff the body at any point after step 3, after embroidering the face
Sew the opening for turning in the body closed
Stuff the legs after step 5. Tuck the seam allowance at the top inside the leg; I ended up tucking about ½” of fabric in instead of ¼” to make the leg a bit shorter, but if you are using an extra fluffy fabric you might want it closer to the ¼”
Pin the legs in place on the front of Blorbo and ladder stitch around the base of the leg
You’re done!!! Enjoy your new blorbo, and if you post it on tumblr I’d love to be tagged @tj-crochets (that’s not a requirement for using the pattern, you do not have to do it, I just love seeing things people make from patterns I wrote)
#free sewing pattern#blorbo sewing pattern#build your own blorbo#plushie sewing pattern#this is a pretty simple pattern but I also forget about some plushie instructions sometimes#like that xkcd comic about the chemical composition of feldspar lol#so if you have any questions let me know! I will be happy to clarify#I had to fight my scanner to get this done#because I hadn't set it up since I moved#and after many many tries I ended up pushing a bunch of buttons randomly after I hit scan and it worked!#well. it worked the second time I hit a bunch of random buttons
498 notes
·
View notes
Text
If your scraps breed like tribbles as well (mine certainly do) and you're looking for a way to use them, here's a couple options for you. These are 100% free as far as I can tell.
100+ Scrap Fabric Projects - Everything from little bows to holiday decorations, home decor to wearables. Look over the list and see about saving some of the patterns for those days where you need a break from a current project or can't come up with any ideas for what to do next. A break with some very easy to very challenging may be just what you need, especially when said project requires no shopping.
100+ Fat Quarter Projects - Everything on this list is made using fat quarters. I know some quilters tend to collect fat quarters and save them for future projects. Here's a list of things you can use those fabrics for. There's toys, clothes, home decor, pencil bags, and even bias tape on the list. Have a look around and see if anything catches your attention.
107 notes
·
View notes
Text
FreeSewing is open source software to generate bespoke sewing patterns, loved by home sewers and fashion entrepreneurs alike.
Industry sizing is a bunch of lies. Join the slow fashion revolution and enjoy clothes that fit you.
#reference#sewing#free sewing pattern#ive never sewed in my life but this seems like a super interesting site from a complete nonce perspective
37 notes
·
View notes
Photo

tutorial
#diy sewing#bustier dress#diy dress#how to#modern sewing#easy sewing#sewing for beginner#craft corner#video#tutorial#dresses#summer dress#how to make a dress#free sewing pattern#sewing patterns
11 notes
·
View notes
Text
HIYA!! Guess what I finished!!?

This is my first ever public pattern so I hope you guys will enjoy it as much as I do!
#im so nervous posting this cuz ive never made a proper sewing pattern before so i dont know what the hell im doing#AHHH#but some of you guys really wanted to use it so 😤✊️#sewing#free sewing pattern#sewing patterns#plush pattern#plushie#free plush pattern#crafts
270 notes
·
View notes
Text
Free pattern: Eevee Evolution Hooded Shrug by Choly Knight
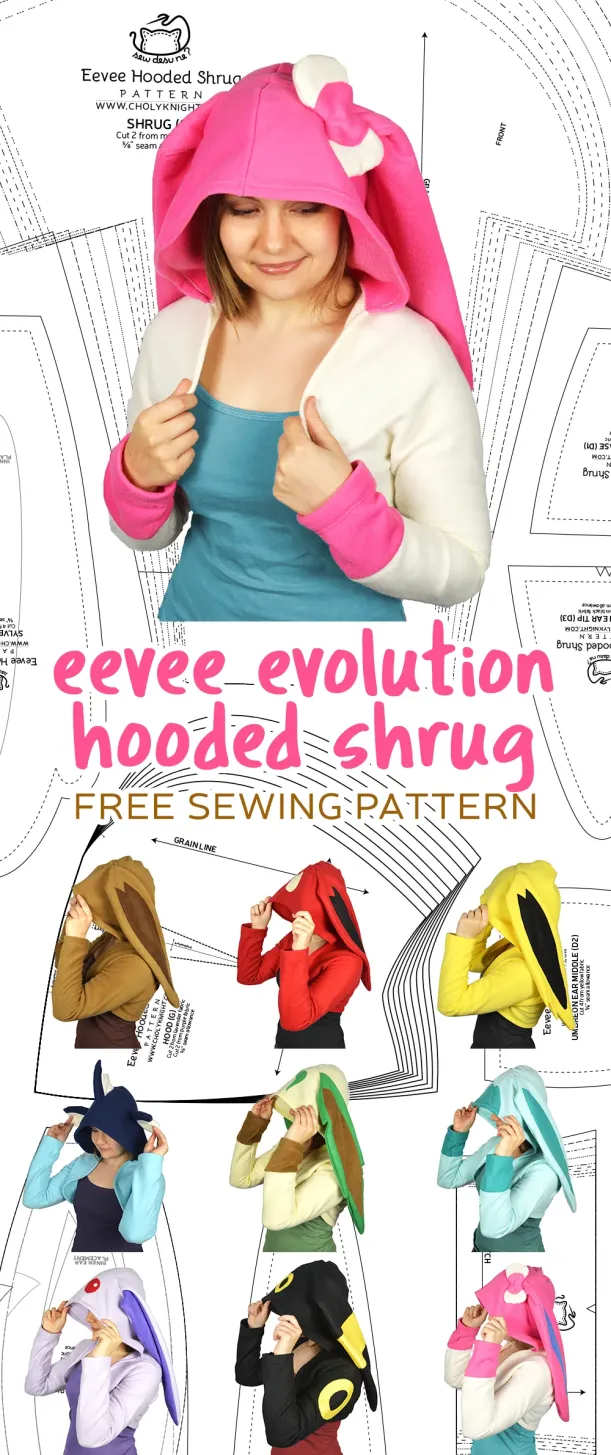
Available from the maker's website here!
The CovidSafeCosplay blog and its admin are unaffiliated with the patternmaker or website, and are simply sharing the resource. Blog admin has not personally tested this pattern. Please thoroughly read the pattern for full instructions.
Do you have a favorite free pattern resource? Share in the comments or via a reblog! Bonus points for those that are free, include image descriptions, or contain detailed tutorials for newbies to follow.
#free sewing pattern#free sewing patterns#pokemon#eevee#eeveelutions#flareon#jolteon#vaporeon#espeon#umbreon#leafeon#sylveon#glaceon#cosplay#cosplay pattern#cosplay tutorial#free cosplay pattern
167 notes
·
View notes
Text

[Image ID: felt nudibranches. One is yellow with black spots, one is blue with orange stripes, and one is pink with black spots on top and green on bottom with green antennae. End ID]
The pattern for this was just an oval cut out twice but on the top oval, I cut diamonds out of the "corners" and sewed them back together. The antennae were just from scraps.
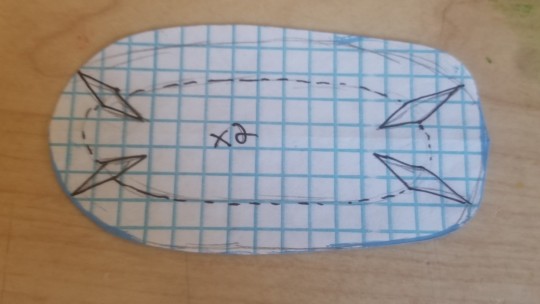
[Image ID: nudibranch sewing pattern. It's an oval cut out of graph paper. End ID]
#nudibranch#sewing#sewing pattern#free sewing pattern#artist described#image id#art#sea creatures#ocean#marine life#marine biology
178 notes
·
View notes
Text
How to make a Deerstalker Hat
youtube
Hello everyone!
My latest video is a LONG one! But, this tutorial will walk you through step by step, in how to make a Deerstalker, aka a Sherlock Holmes, aka detective hat
There is also a free pattern for folks with a headsize of 23 inches, or you can use the steps of patterning in the video to draft your own!
All the info is free, and if you use it, to make your own fun and funky hat, please backlink me, on here, on Bluesky, or on Instagram, and share the info, so others can use it too!
Happy sewing!
#sewing#youtube#diy#do it yourself#historybounding#cosplay#stitch#hat#millinery#detective hat#hats#tutorial#free#free pattern#free sewing pattern#Youtube
16 notes
·
View notes