#cosplay pattern
Explore tagged Tumblr posts
Visit Tumblr Blog
Explore Tumblr blogs with no restrictions, modern design and the best experience.
Last Seen Tumblr Blogs


Fun Fact
Tumblr was named as a finalist in Lead411’s New York City Hot 125 in Aug 2010.
Text
Free pattern: Eevee Evolution Hooded Shrug by Choly Knight
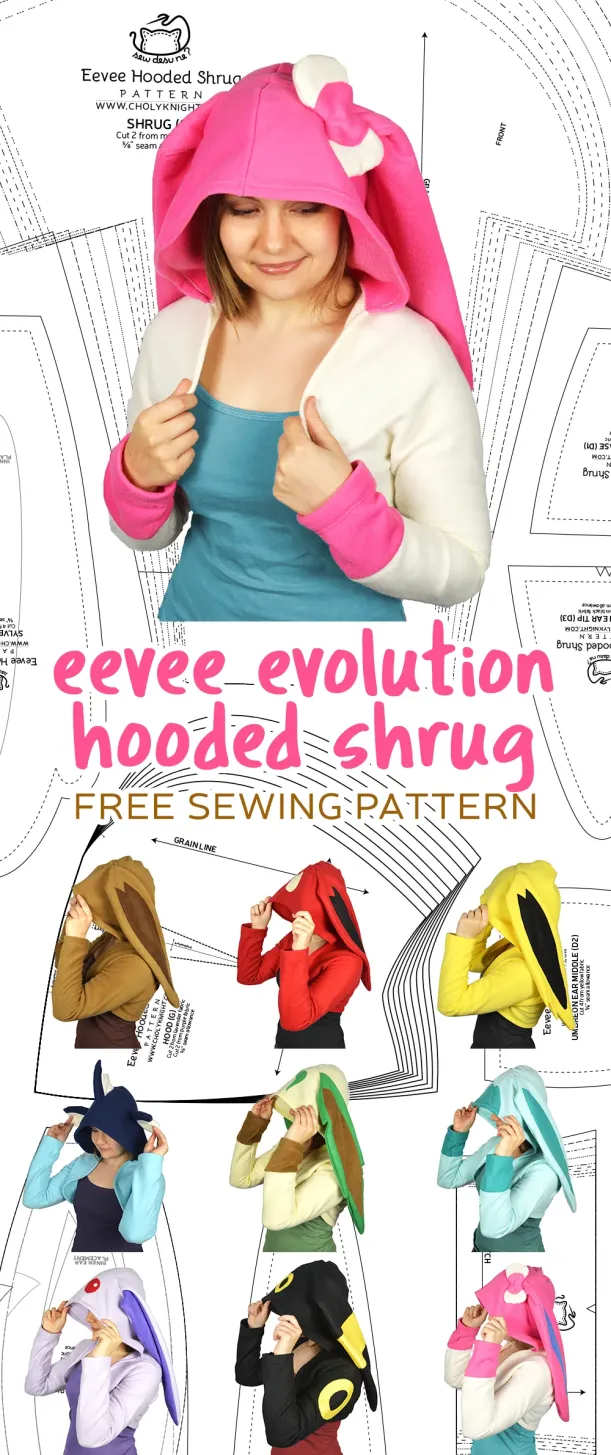
Available from the maker's website here!
The CovidSafeCosplay blog and its admin are unaffiliated with the patternmaker or website, and are simply sharing the resource. Blog admin has not personally tested this pattern. Please thoroughly read the pattern for full instructions.
Do you have a favorite free pattern resource? Share in the comments or via a reblog! Bonus points for those that are free, include image descriptions, or contain detailed tutorials for newbies to follow.
#free sewing pattern#free sewing patterns#pokemon#eevee#eeveelutions#flareon#jolteon#vaporeon#espeon#umbreon#leafeon#sylveon#glaceon#cosplay#cosplay pattern#cosplay tutorial#free cosplay pattern
168 notes
·
View notes
Text


Alrighty folks great and small! I can finally announce that my low poly horse mask pattern is DONE and available for download!
This was years in the making with a lot of Bad Things TM keeping it down. But I won in the end.
#art#mask#art mask#costume#halloween#diy halloween#halloween costume#horse#horses#equine#zebra#mustang#paleo panthera#mask pattern#cosplay pattern#costume pattern#therian#furry#anthro#cardboard#eva foam#fursuit
147 notes
·
View notes
Text
Meryl Stryfe Cosplay Pattern ✨
Got a lot of questions about how I made @vrronica-sawyer's Meryl Stryfe cape, so I tried my hand at making a cosplay pattern for it! It's available for $5 on my kofi shop ♡


#trigun#trigun cosplay#meryl stryfe#meryl stryfe cosplay#cosplay tutorial#meryl stryfe cape#sewing pattern#cape pattern#trigun maximum#trigun 98#trigun meryl#cosplay pattern
66 notes
·
View notes
Text
Good Omens Cosplay
Furfur's scarf / cravat
A knitting pattern

In the original costume pictures, Reece very kindly shared, Furfur's scarf is made out of a strip of distressed fabric.
In the final shots of the series, probably due to the colour grading, it looks a lot darker and more like a seed stitch knitted scarf. It inspired me to knit one for myself.
Maybe it's useful for your cosplay or for some everyday Furfur bounding.
You need:
Yarn: 1x Scheepjes Metropolis in the colour Depok approximately £7,-
Or any 50gr / 200m skein of fingering weight yarn.
Knitting Needles: 2.75mm / US 2
Pattern:
Cast on 23 stitches
Row 1 - Row 8: Knit all stitches
Row 9 - repeat until desired length: Knit 1 Purl 1 until the end of the row (seed stitch) always starting and ending with a knit stitch.
Knit all stitches of the last 8 rows, bind off and weave in the ends.
You need to be able to wrap the scarf around your neck and knot it in the front twice + extra length to tuck in. I made mine around 140cm / 55 inches
Give it a gentle soak in a wool wash and block evenly.
You can distress the fabric you created or leave it for a polished Earth look.
You're going to be in a Knit 1 Purl 1 Hell loop for a while, but it's totally worth it!
Put Depeche Mode on repeat and sing along, watch Good Omens again (and again) binge watch Inside No. 9 (because you definitely should)
Tadaa: scarf 💚
Now go block some miracles in style, give Shax a fist bump from me and work towards that promotion you so much deserve.

You can add it to your Ravelry here:
@goodomensafterdark
#good omens furfur#furfur#good omens#good omens cosplay#good omens costumes#good omens knitting#cosplay pattern#furfur good omens#good omens fandom#good omens details#reece shearsmith#knitting#knitting pattern#knitting project
92 notes
·
View notes
Text

I made a pattern for my Hornet cosplay mask! You can find the pattern either on my Ko-fi or my Etsy!
under the read more is the video of how I made the mask!
youtube
#my art#art#cosplay#hollow knight#hk hornet#cosplay pattern#foam pattern#silksong#hollow knight hornet#Youtube
39 notes
·
View notes
Text
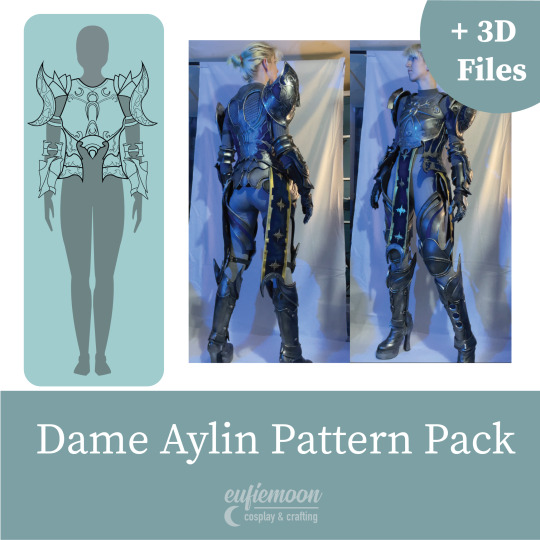
Now available on my Gumroad!
https://eufiemoon.gumroad.com/l/lhjpdi
I finally got all my patterns for Aylin digitised! Please make sure you read the listing description before purchase so you know what you’re getting!
Happy Crafting!
#cosplay#bg3#cosplayer#cosplaying#baldurs gate iii#baldur’s gate 3#baldurs gate 3#dame aylin#dame aylin cosplay#dame Aylin bg3#cosplay pattern#cosplay tutorial#cosplay wip#foam armour#armour#3d printing
27 notes
·
View notes
Text
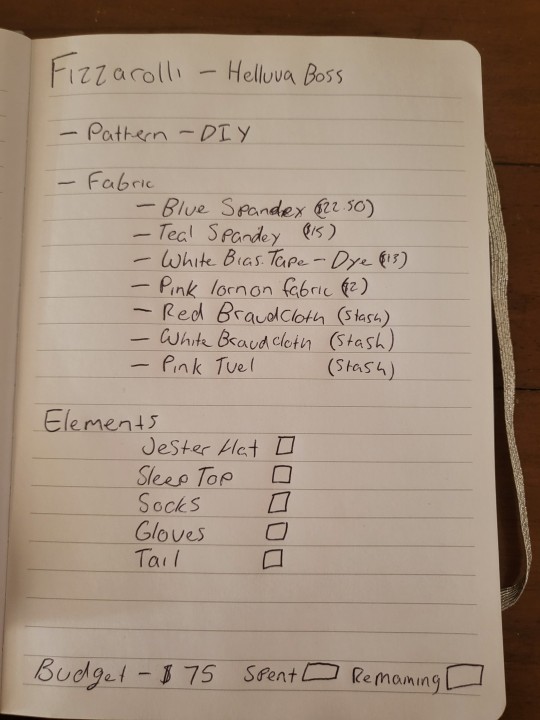
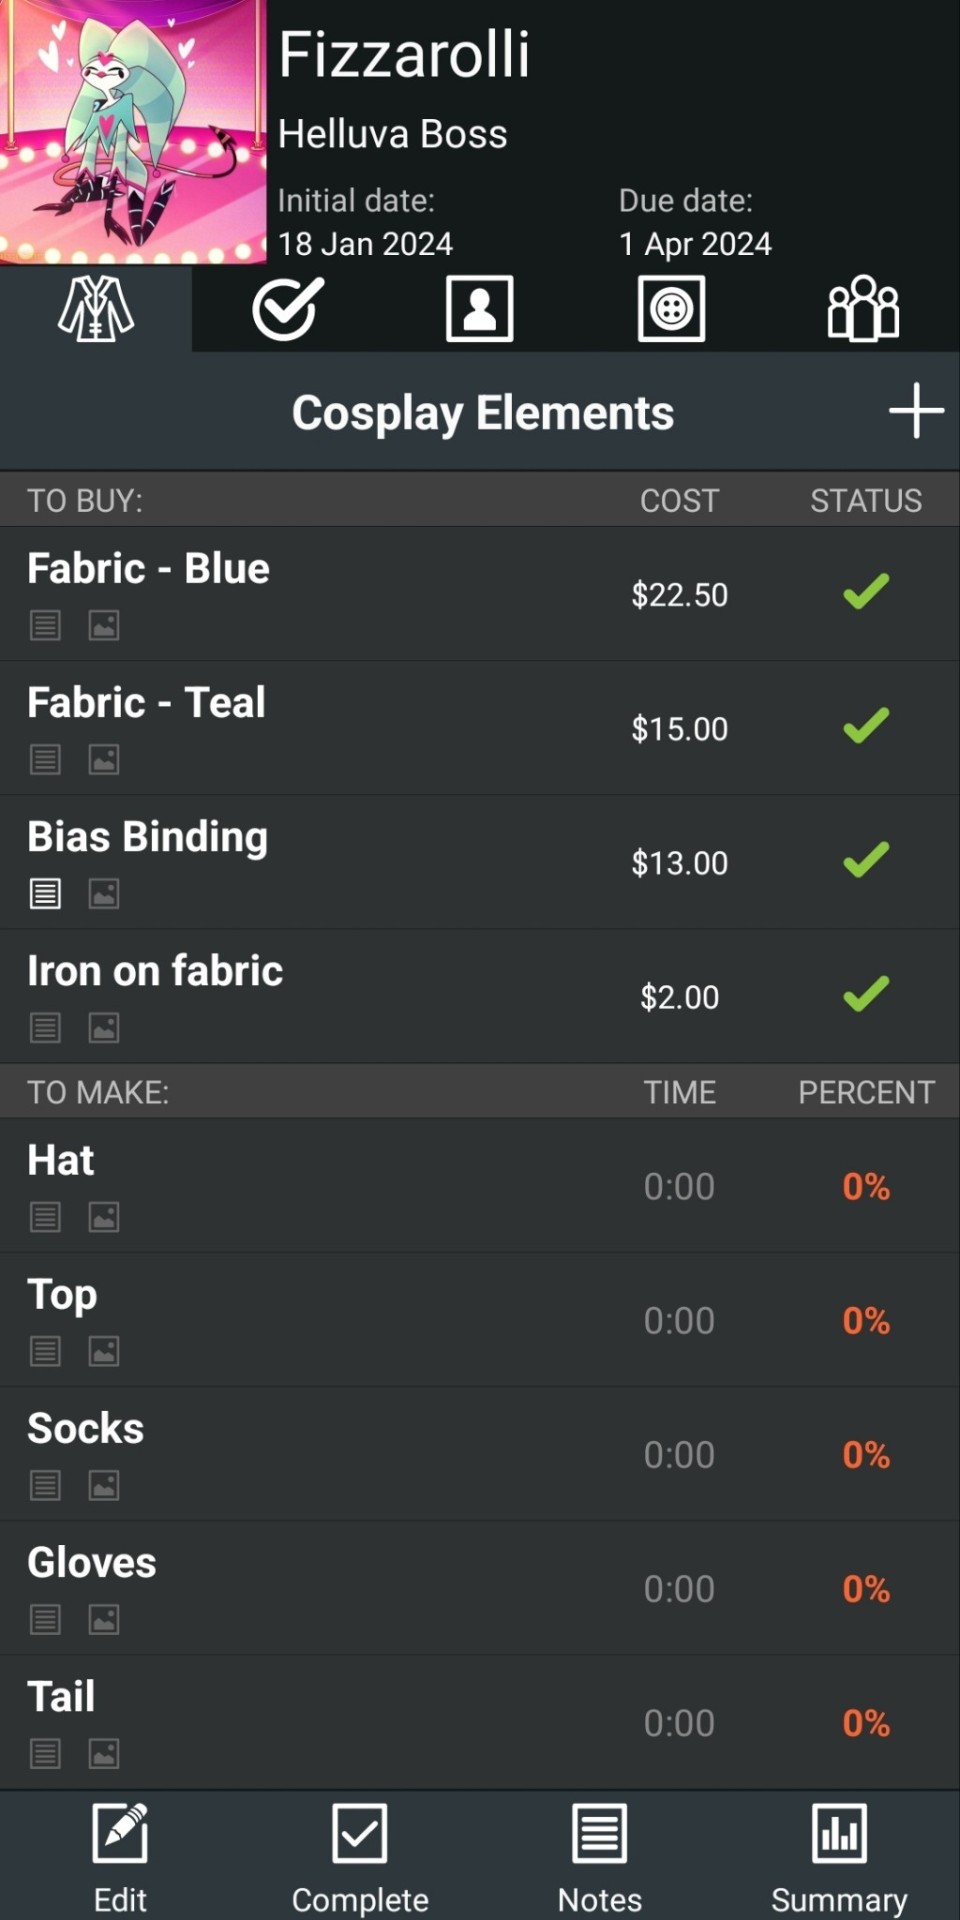
Y'all wanna see my Fizzarolli Cosplay WIP pics?
Good! Because I'm showing you regardless!
While I eventually want to do one of his jester costumes, I've decided to create this cute little number first!
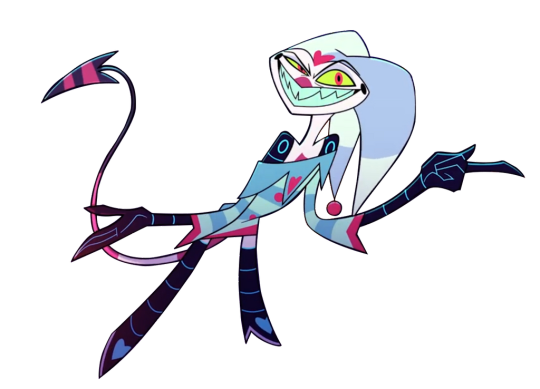

First comes the list! Both digital and physical!
I list out all my materials and costume elements so that I can track their progress
After that! Patterning and Construction begin!
Starting with the top, I cut my fabric into strips of various thickness and sewed them together, before moving onto my pattern.

This is the part where most people would create a muslin.
I prefer to live dangerously and just start cutting into my good fabric like a filthy heathen!
I do not recommend doing so if you are not an experienced cosplayer or willing to redo all your work if (read: when) you fuck something up and have to back track and start again.


At this point the main body of the top is done! Next I will begin work on the sleeves and ruffles!
Stay tuned for the next part!
44 notes
·
View notes
Text

Found this pattern while checking out my old pattern stash. And my mom gave me a load of purple fabric to use up.
16 notes
·
View notes
Text
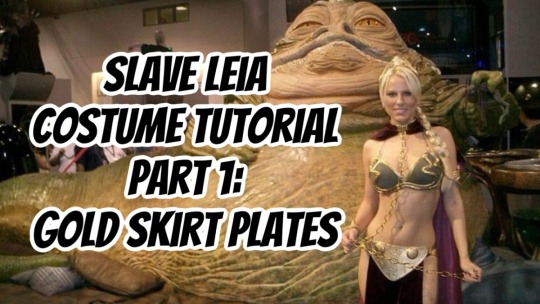
Slave Leia Costume Pattern Part 1: The Gold Skirt Plates
I’ve made over a hundred Slave Leia costumes over the year that have ended up on TV, in a movie and two documentaries. And now that I no longer make them for sale, I’m sharing my patterns and tutorials on how to make the iconic costume yourself. The costume goes by many names: Princess Leia’s metal bikini, gold bikini, Hutt slayer, captive Leia, etc, but the one it’s most known as is the “Slave…
View On WordPress
#Cosplay#cosplay pattern#cosplay tutorial#costumes#hutt slayer#princess leia#slave leia#Star wars#star wars costumes
8 notes
·
View notes
Text


Debuted my crochet Zagreus at Otakon on Saturday!
This is my first crochet sword! (it lights sup and has a sensor to change the lights and play sounds when it moves, but the battery died the Saturday morning 😭)
Notes, breakdowns, and pattern info will be posted as I get a chance to edit the footage and notes I took. (I'm also starting a new job tomorrow, so patience is greatly appreciated 👍)
#artist#crochet#crocheting#fiber art#yarn#yarn crafts#cosplay#crochet cosplay#fiber artist#fiber crafts#hades#hades game#hades cosplay#zagreus#zagreus cosplay#hades zagreus#otakon#otakon 2024#yarnblr#yarn art#costume#crochet pattern#crochet design#crocheters of tumblr#my cosplay#my crochet#my art#fibre artist#fibre arts#art stuff
1K notes
·
View notes
Text
Cosplay of zhang qiling张起灵 (nickname xiaoge小哥) from dao mu bi ji 盗墓笔记 The Grave Robbers' Chronicles by xu lei, one of the most beloved characters (paper people) in chinese fandoms (the coser is 小杰), and the book was written in 2006 and isn't finished yet and is still being serialized. Chinese fans voted for "which character from books you consider that won't affect your feelings and impression of her/him/them at all, no matter how badly the movie or TV version fails" and "The character that most convinced you they were real", and zhang qiling won the first place. Many book fans think the only successful live-action zhang qiling is cast by xiao yuliang肖宇梁 in Ultimate Note终极笔记.


mianhuawawa (popular chinese fandom merch, cute fluffy dolls having a real-life sense of companionship) of zhang qiling (cr: 支仓没睡)


A navy blue hoodie, black pants, boots, an ancient chinese dao, and a qilin麒麟 tattoo have become his trademark.
#china#reference#dao mu bi ji#dmbj#zhang qiling#xiaoge#chinese fandom#cosplay#the chicken embroidery is a jest because in the book pangzi buy zhang qiling shorts printed with chicken pattern#and so the shopkeeper say the wawa's name is xiao ji pi gu小鸡屁股 chicken butt#xiao yuliang
478 notes
·
View notes
Text
how to grub your karkat
or you can use this for any other plush or if you wanna make a whole new plush entirely or whatever

disclaimer im not a professional in any sense of the word and theres anything technical im doing wrong or you think you can do it better by all means dont hold back
Things you’ll need
sewing machine unless youre really dedicated but doing it by hand is gonna be an agonizing feat i promise. I just used a straight stitch for everything
Fabrics: for the main body i suggest a minky or something soft, for the inner lining something in the same color as the main body and ideally with some stretch, and anything black for the legs. Less than a yard of each will do
if youre using minky or anything furry get a lint roller. Trust me
stuffing, i used polyfil
threads that match your fabrics
good fabric scissors
sewing needle for hand sewing/fixes
karkat plush (optional)

Heres the pattern i came up with! They are numbered for your convenience and pieces with the same numbers are going to be part of the same row of segments. cut everything out on the black lines (Make sure when you’re printing to fit the image to the page size.) on the left we have the belly pieces, the right is the main body, and we have the foot in between
Im using a relatively thin minky fabric, im sure you can use whatever but something with some fluffiness kinda helps to mask any imperfections in the sewing. When drawing out your patterns keep in mind what direction your fibers settle in and try to keep it consistent
On the wrong side of the fabric measure out at least a half inch seam allowance around each piece of the pattern, i used a centimeter and that worked but had me sweatin a bit.

For the main body pieces fold your fabric in half before you cut so you can have 2 of each segment that are mirrored to each other, i also extended all of the #1 pieces an additional centimeter/half inch at the top so we can fold them over at the very end. I highly suggest numbering the insides of all the cut pieces, especially in a way where you will remember what direction they are each meant to sit

After you’ve numbered all your pieces, set them aside and start making your feet!
Each of the 6 legs is made of two pieces, but i because i only had a swatch of the black minky i made up for the rest with some random black scrap fabric from an old project. Try to keep your fabric consistent if you can lol
I didnt give these pieces any more seam allowance on the fabric but i recommend adding a centimeter or half inch to the base of it to extend the length and have some more wiggle room

like so
Instead of cutting out 12 individual pieces and struggling to stitch them all together i started with 6, then pinning each piece real tight with the right/furry side down onto my secondary fabric, and slowly stitching around the shape real close to the edges- DO NOT CLOSE THE FLAT SIDE as we are going to stuff the feet through here

Now cut the shape out of the fabric and repeat till you have 6 feet

Now flip those bad boys inside out, stuff up, and if you wanna you can match them to their best pairs

now grab a pair of feeties and your #1 pieces and line them up, in this picture my belly #1 piece is shorter bc i forgot to add the extra centimeter and i recut that once i realized. Line those sides up with the right/furry parts touching and with the feet in between, flip it around to make sure everything's sitting the way you want it

Note. i didnt realize until later but i sewed my feet in upside down. save yourself the time it takes to fix it and dont make the same mistake
Straight stitch these layers together and repeat with the next two segments our good friends #2 & #3

Repeat this for the #2 and #3 sections but NOT THE #4, that part doesnt need feet! just line those edges up right/furry sides together and sew


the secret to the squish of the suit is making this inner lining from another fabric and stuffing it! I used what i had leftover from a stretchy red fabric for a kanaya skirt. For this we need to make a new pattern for each section, making sure it follows the curve of the round edge but the piece itself is shorter, almost like youre removing the seam allowance you added. Mine is a centimeter shorter on the top and on the bottom and reaches to the middle

Make one of these for each numbered segment,you only need to make half the pattern and you can fold your fabric in half on a crease and you end up with one symmetrical piece (bars)

Now you need to pin these pieces right on top of the wrong side of your numbered furry sections and line up the straight edges like so (disclaimer for LOTS OF SCARY NEEDLES !!)

Admittedly i didnt estimate how long these pieces needed to be very accurately and overshot it a bit, if you start pinning it from the middle and continue outwards on either side thatll ensure its not too lose and you can cut off any excess after
The only exception is piece #1, if you recall we gave this #1 section extra seam allowance. This is so we can sew down that excess at the neck later and hide any of the inside that might show once its all put together. Do not connect the top edge to the inner lining! Since i added an extra centimeter earlier im gonna leave that hanging and pin + sew down the inner lining a centimeter lower than the top edge. LEAVE THE CURVED EDGES OPEN! DONT SEW THEM TOGETHER! those stay open to stuff

Straight stitch the lined up edges together

Now you have all these skinned pieces of little freak and we need to connect all these segments together making sure to sew UNDER the existing stitches so we dont see those on the outside when its all put together


Inside looks like a bit of a mess but thats fine bc its not the part that matters
Now stuff it! you might need a stick or pencil or something long and thin to get stuffing into the middle bits

Now thats its stuffed you can finally close those curved edges. Try not to sew over a thick mound of stuffing, push it in a little further to give yourself some space and you can fluff it back out after everythings closed. I cut off that excess lining fabric after sewing

Ough… they filleted my boy…
Finally, match up all the edges and lines and HAND SEW them right sides together. You will destroy your machine trying to work around that stuffing i promise. You also have an excuse to get up from your work desk and sew on a couch or smth. I used a standard backstitch for a tight finish and again, make sure you sew under any existing stitches so they arent visible on the outside!

Speaking of the outside, once you stitch everything together you can very gently flip this sucker inside out

This is @hatamonu’s cat Cocaina, aka Coco. Her perfectly square figure made it into my grub files somehow so shes essential to the tutorial

Check the fit and all thats left to do is roughly baste stitch down that excess neck fabric onto the stuffed lining and youre set! I gave the thread slight tugs as i went to tighten the opening a bit put dont tighten it too much

tadaaaaa

It fits pretty snug but starts to slip a bit with motion. Heres a bounce test

If you do shake your baby make sure to safety pin the plush to the suit so he doesnt prematurely shed his exosekeleton
Now spread that baby fever and show your baby to the world


pics from the ALA 2025 homestuck meetup and supplied by para.dox.cos
Tysm for coming along this ride with me especially if you followed the prototype journey on twitter, much thanks to my more sewing savvy friend for the solution to my grub dilemma and for helping me design and build my dolorosa cosplay <3 much love and hopefully many more homestuck cosplays and meetups to come in the future!
#homestuck#homestuck cosplay#karkat plush#karkat#karkat vantas#cosplay#tutorial#homestuck grub plush#plush pattern#long post#ALA 2025#anime los angeles#dolorosa#the dolorosa#apologies if this is hard to follow or utterly incomprehensible please note i am making shit up as i go and results may vary#feel free to ask any clarifying questions and ill do my best to answer#no i will not be selling these#technically i have more minky left than i know what to do with but the cost would have to justify the pain in the ass it all was to complet#and i dont think anyone will pay that price#send me suggestions of red characters to make plushes out of
398 notes
·
View notes
Text


The Emperor Undying, John Gaius
Photos and editing - @Stingray_photos (IG)
#the locked tomb#John gaius#john gaius cosplay#the locked tomb cosplay#tlt cosplay#shadow stuff#I am insane over these pictures#this cosplay was so fun to put together I wanna wear it againnnnn#most proud of my laurel with the infant hands#but I’m not the best sewer either and this was the first thing I’d lined and I designed and patterned it completely on my own!!#as another little detail my button down is incredibly faded and worn XD#I’ve had that shirt for probably 10 years and it was from goodwill#my contacts are also suuuuper close to his eyes#these are edited to be fully accurate#but I was so hype to find them#huge huge huge props and shoutout to Ray these photos are AMAZING and they were so fun to work with and had such great ideas!!#also I looked up John’s wiki for maybe a quote or name I wasn’t thinking of#and this mf has 25 goddamn alias’s listed#that is too many names sir
182 notes
·
View notes
Text
I made Elphaba’s shirt from Wicked
When I saw Wicked I got completely obsessed with this shirt she wears during What Is This Feeling. The collar just absolutely blew my mind, and I kept trying to figure out how they did it.

I figured it was a classic shirt collar with the points lengthened and then folded back on themselves, so I experimented a little and VOILA!!

Additional little Gelphie nod: pink and green cuff buttons 🥹

162 notes
·
View notes
Text
Just realised Yaad’s clothing has thistles on it…. I’m feeling unwell….

Thistles were a national symbol of the kingdom before Thistle arrived, so naming him after them is very significant (seriously screw yenpress for making it ‘siSsEL’ in the en translation), but Yaad was born after Thistle’s arrival and having his clothing have thistle motifs really is indicative of the two’s relationship. Thistle is a dictator (actually a dictator in the original sense too now that I think about it!) but Thistle is also a child, and Yaad understands this most out of everyone. I mean, the apology scene with ‘Delgal’ and Thistle really shows this. Yaad can’t help but be sorry & affectionate for Thistle.


^ quick examples of stylised thistles
#All things considered it’s such a lovely pattern on his clothes…. I might try to make that one day :) [has no experience in clothes/cosplay]#Yaad#Yaad Melini#Thistle#Thistel sunu#Dunmeshi#Dungeon Meshi#Dungeon meshi manga#dungeon meshi manga spoilers
597 notes
·
View notes
Text
Some tarot card concepts, the hands are supposed to look like they're imitating teeth but I kinda messed it up :(
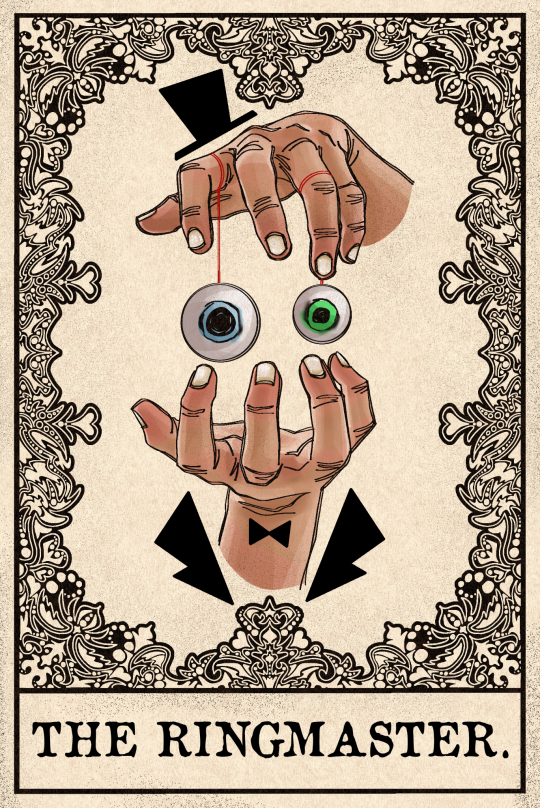

------
Clean version without grain:
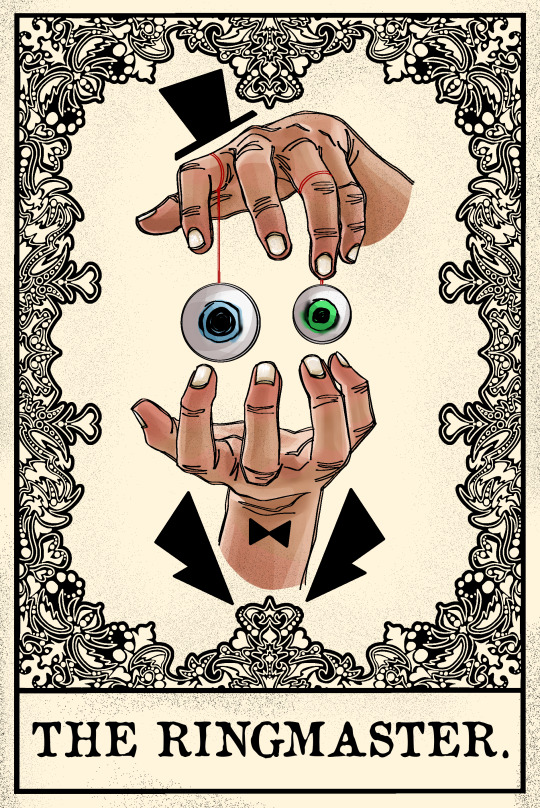
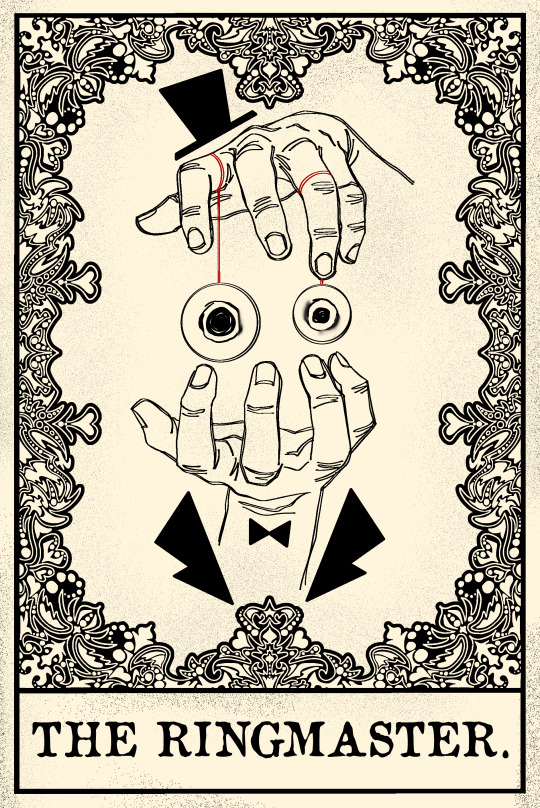
#my art#tadc#the amazing digital circus#tadc caine#tadc fanart#tarot card concept#this piece is also known as: tfw you wanna do a low budget Caine cosplay but all you got is your hands- some ping pong balls and sharpies#the darn pattern around the card took me ages
938 notes
·
View notes