#plush pattern
Explore tagged Tumblr posts
Visit Tumblr Blog
Explore Tumblr blogs with no restrictions, modern design and the best experience.
Last Seen Tumblr Blogs


Fun Fact
Tumblr’s reach among the 26-to-35-year-olds in the US is 11%.
Text


I decided I wanted to work more on my 3D object skills and make some Little Guys. Ergo, rat. And another rat. and another rat. and another rat. and anoth–
If you also want a rat army, the sewing pattern is available at ko-fi.com/horseshoes for $3 USD!
755 notes
·
View notes
Text

From Creative Soft Toys to Sew (2005)
She’s perfect, she’s adorable, and I hope one of you can bring her to life :)
#2000s#early 2000s#Y2K#Dino#dinosaur#blue#pattern#sewing pattern#plush#plush pattern#stuffed animal#cute#little friend
1K notes
·
View notes
Text
Hi all! I've recently started sewing plush, but noticed that there are soooooooo many places to find patterns. I thought I would draft up a sheet for it and share it!
If you find anything niche or tiny, or know any huge resources, feel free to comment a cell with a link! My only rule is to make sure the actual pattern link is still accessible.
This is specifically for anything you could make with a sewing machine or sew by hand. If it is embroidery machine ONLY (ITH), or a crochet pattern, this is not for that! If the pattern happens to come with embroidery patterns, that is fine!
37 notes
·
View notes
Text
how to grub your karkat
or you can use this for any other plush or if you wanna make a whole new plush entirely or whatever

disclaimer im not a professional in any sense of the word and theres anything technical im doing wrong or you think you can do it better by all means dont hold back
Things you’ll need
sewing machine unless youre really dedicated but doing it by hand is gonna be an agonizing feat i promise. I just used a straight stitch for everything
Fabrics: for the main body i suggest a minky or something soft, for the inner lining something in the same color as the main body and ideally with some stretch, and anything black for the legs. Less than a yard of each will do
if youre using minky or anything furry get a lint roller. Trust me
stuffing, i used polyfil
threads that match your fabrics
good fabric scissors
sewing needle for hand sewing/fixes
karkat plush (optional)

Heres the pattern i came up with! They are numbered for your convenience and pieces with the same numbers are going to be part of the same row of segments. cut everything out on the black lines (Make sure when you’re printing to fit the image to the page size.) on the left we have the belly pieces, the right is the main body, and we have the foot in between
Im using a relatively thin minky fabric, im sure you can use whatever but something with some fluffiness kinda helps to mask any imperfections in the sewing. When drawing out your patterns keep in mind what direction your fibers settle in and try to keep it consistent
On the wrong side of the fabric measure out at least a half inch seam allowance around each piece of the pattern, i used a centimeter and that worked but had me sweatin a bit.

For the main body pieces fold your fabric in half before you cut so you can have 2 of each segment that are mirrored to each other, i also extended all of the #1 pieces an additional centimeter/half inch at the top so we can fold them over at the very end. I highly suggest numbering the insides of all the cut pieces, especially in a way where you will remember what direction they are each meant to sit

After you’ve numbered all your pieces, set them aside and start making your feet!
Each of the 6 legs is made of two pieces, but i because i only had a swatch of the black minky i made up for the rest with some random black scrap fabric from an old project. Try to keep your fabric consistent if you can lol
I didnt give these pieces any more seam allowance on the fabric but i recommend adding a centimeter or half inch to the base of it to extend the length and have some more wiggle room

like so
Instead of cutting out 12 individual pieces and struggling to stitch them all together i started with 6, then pinning each piece real tight with the right/furry side down onto my secondary fabric, and slowly stitching around the shape real close to the edges- DO NOT CLOSE THE FLAT SIDE as we are going to stuff the feet through here

Now cut the shape out of the fabric and repeat till you have 6 feet

Now flip those bad boys inside out, stuff up, and if you wanna you can match them to their best pairs

now grab a pair of feeties and your #1 pieces and line them up, in this picture my belly #1 piece is shorter bc i forgot to add the extra centimeter and i recut that once i realized. Line those sides up with the right/furry parts touching and with the feet in between, flip it around to make sure everything's sitting the way you want it

Note. i didnt realize until later but i sewed my feet in upside down. save yourself the time it takes to fix it and dont make the same mistake
Straight stitch these layers together and repeat with the next two segments our good friends #2 & #3

Repeat this for the #2 and #3 sections but NOT THE #4, that part doesnt need feet! just line those edges up right/furry sides together and sew


the secret to the squish of the suit is making this inner lining from another fabric and stuffing it! I used what i had leftover from a stretchy red fabric for a kanaya skirt. For this we need to make a new pattern for each section, making sure it follows the curve of the round edge but the piece itself is shorter, almost like youre removing the seam allowance you added. Mine is a centimeter shorter on the top and on the bottom and reaches to the middle

Make one of these for each numbered segment,you only need to make half the pattern and you can fold your fabric in half on a crease and you end up with one symmetrical piece (bars)

Now you need to pin these pieces right on top of the wrong side of your numbered furry sections and line up the straight edges like so (disclaimer for LOTS OF SCARY NEEDLES !!)

Admittedly i didnt estimate how long these pieces needed to be very accurately and overshot it a bit, if you start pinning it from the middle and continue outwards on either side thatll ensure its not too lose and you can cut off any excess after
The only exception is piece #1, if you recall we gave this #1 section extra seam allowance. This is so we can sew down that excess at the neck later and hide any of the inside that might show once its all put together. Do not connect the top edge to the inner lining! Since i added an extra centimeter earlier im gonna leave that hanging and pin + sew down the inner lining a centimeter lower than the top edge. LEAVE THE CURVED EDGES OPEN! DONT SEW THEM TOGETHER! those stay open to stuff

Straight stitch the lined up edges together

Now you have all these skinned pieces of little freak and we need to connect all these segments together making sure to sew UNDER the existing stitches so we dont see those on the outside when its all put together


Inside looks like a bit of a mess but thats fine bc its not the part that matters
Now stuff it! you might need a stick or pencil or something long and thin to get stuffing into the middle bits

Now thats its stuffed you can finally close those curved edges. Try not to sew over a thick mound of stuffing, push it in a little further to give yourself some space and you can fluff it back out after everythings closed. I cut off that excess lining fabric after sewing

Ough… they filleted my boy…
Finally, match up all the edges and lines and HAND SEW them right sides together. You will destroy your machine trying to work around that stuffing i promise. You also have an excuse to get up from your work desk and sew on a couch or smth. I used a standard backstitch for a tight finish and again, make sure you sew under any existing stitches so they arent visible on the outside!

Speaking of the outside, once you stitch everything together you can very gently flip this sucker inside out

This is @hatamonu’s cat Cocaina, aka Coco. Her perfectly square figure made it into my grub files somehow so shes essential to the tutorial

Check the fit and all thats left to do is roughly baste stitch down that excess neck fabric onto the stuffed lining and youre set! I gave the thread slight tugs as i went to tighten the opening a bit put dont tighten it too much

tadaaaaa

It fits pretty snug but starts to slip a bit with motion. Heres a bounce test

If you do shake your baby make sure to safety pin the plush to the suit so he doesnt prematurely shed his exosekeleton
Now spread that baby fever and show your baby to the world


pics from the ALA 2025 homestuck meetup and supplied by para.dox.cos
Tysm for coming along this ride with me especially if you followed the prototype journey on twitter, much thanks to my more sewing savvy friend for the solution to my grub dilemma and for helping me design and build my dolorosa cosplay <3 much love and hopefully many more homestuck cosplays and meetups to come in the future!
#homestuck#homestuck cosplay#karkat plush#karkat#karkat vantas#cosplay#tutorial#homestuck grub plush#plush pattern#long post#ALA 2025#anime los angeles#dolorosa#the dolorosa#apologies if this is hard to follow or utterly incomprehensible please note i am making shit up as i go and results may vary#feel free to ask any clarifying questions and ill do my best to answer#no i will not be selling these#technically i have more minky left than i know what to do with but the cost would have to justify the pain in the ass it all was to complet#and i dont think anyone will pay that price#send me suggestions of red characters to make plushes out of
424 notes
·
View notes
Text


It's live!! Make your own garlic! Please tag me in your little garlic guy posts I would love to see them!
shop 🗡 patreon 🗡 wishlist 🗡 ko-fi
607 notes
·
View notes
Text
sewing patterns for bugs! (pt 2)
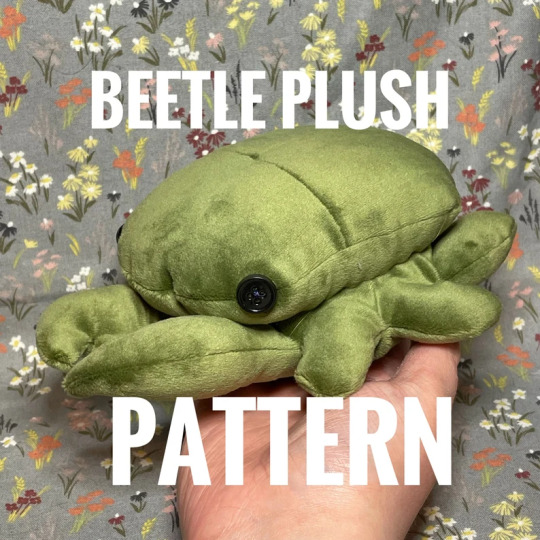
beetle plush pattern by ApothecaryOcto

simple fabric moth/butterfly pattern by willowynn

bee plush pattern by TooStuffedPatterns
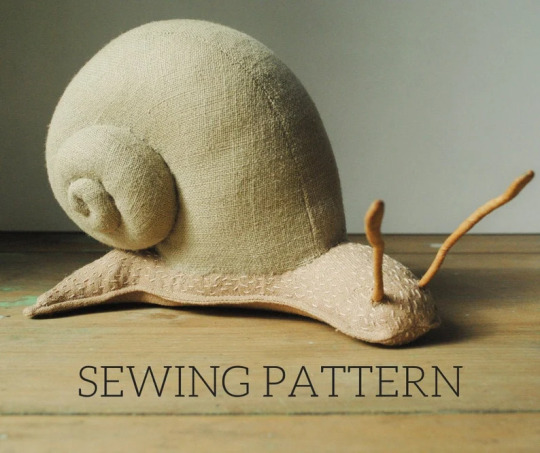
snail plush pattern by willowynn

beetle plush pattern by MasterPlush
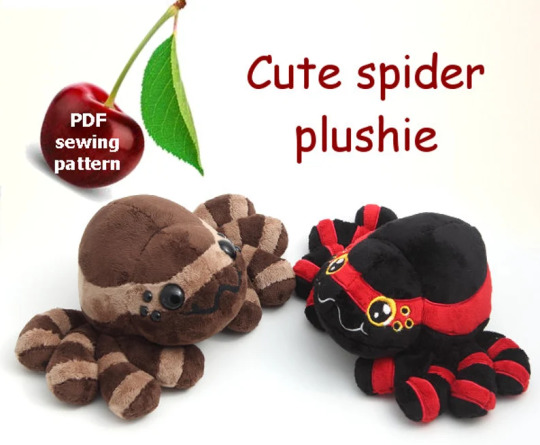
spider plush pattern by SugarcubeCherry
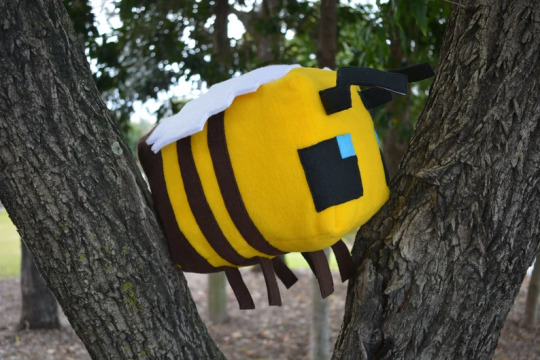
minecraft bee plush pattern by HabbiesAus
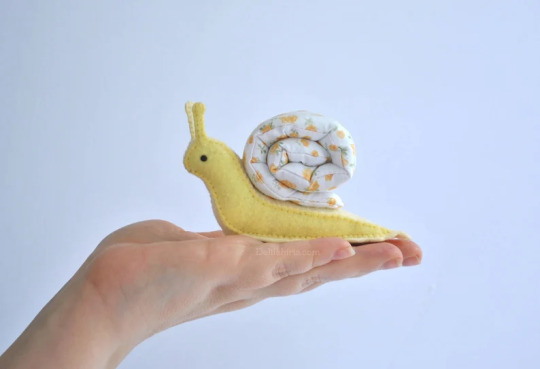
snail plush pattern by Delilah Iris

butterfly / moth plush pattern by Victoria Zhuk
garden snail pattern by DragonsGardenShop
#bugs#bugblr#insects#insect#bug#entomology#found elsewhere and uploaded by me#spider#snail#bee#beetle#moth#butterfly#plush#plush pattern#bug plush#insect plush#plushies#plushblr#stuffed animals#pdf download#pdf pattern
3K notes
·
View notes
Text


Vincent Benitez from Conclave (2024) , with removable clothing and accessories.
Materials and little into the creation under the cut:
Materials:
Brown: Melton wool (nuevo paño)
Red: Velvet for the clothing (terciopelo) —I do not recommend it, as I had to burn all the edges— and felt for the zucchetto (fieltro)
White: Upcycled t-shirt and dress.
Black: Not sure. -It was in a discount bin- It’s similar to melton wool but woolier, possibly alpaca melton wool (nuevo paño de alpaca?).
I made him using this pattern. I decided to make the eyes into simple dots instead of an anime-style design (accidentally ended up slightly crooked). I also embroidered lines under the eyes to give him an older appearance.
I used the clothing pattern from the video as a base for his cassocks, though I modified them to add buttons so I could remove his clothes. The same applies to the mozzetta. The zucchetto was probably the easiest piece to make, I just followed the shape of the head.
The hair was freehand, and I embroidered white hairs after sewing it onto the head (which also gave it a more "wavy" texture). I only did this because I hadn't thought of adding that detail earlier—same with the papal clothes.
The crucifix is just one I had on hand, which I shortened it to fit him better.
His head is a bit floppy. I'm not sure how to fix this, another plushie I made has the same issue, but even worse. I might try making the body bigger to help stabilize it.
#plushies#my creation#vincent benitez#conclave 2024#pope innocent#plush pattern#conclave#priest#catholic#cardinal benitez#cardinals#sewing#crafts#fiber art#peluches#sewblr
151 notes
·
View notes
Text
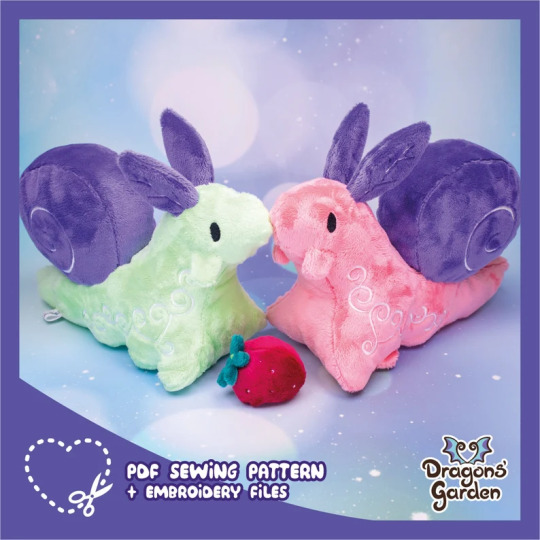
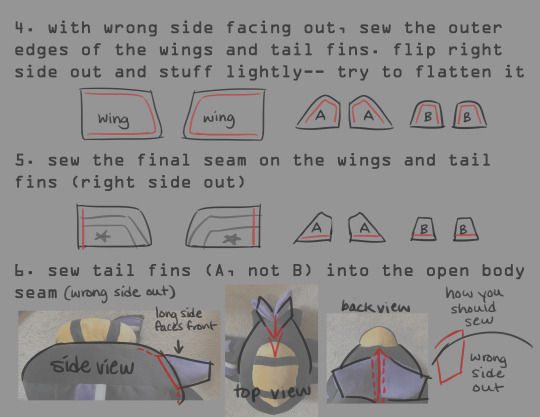
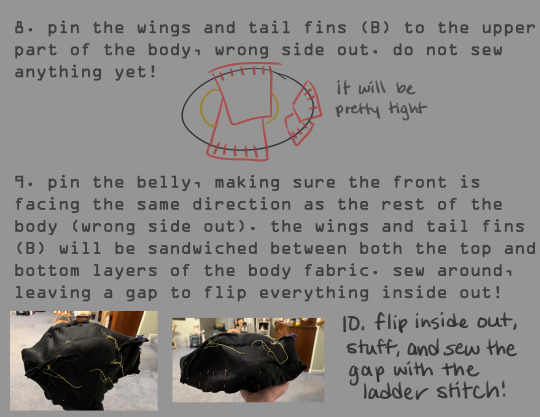
god i hope this won't be too confusing-- here's the seeker pillow/plush pattern (just a loose guide, plus the actual pattern!)
***attach the cockpit AFTER the body is stuffed instead!!! so, skip step 7 and do it last!***
- step 5 is optional!


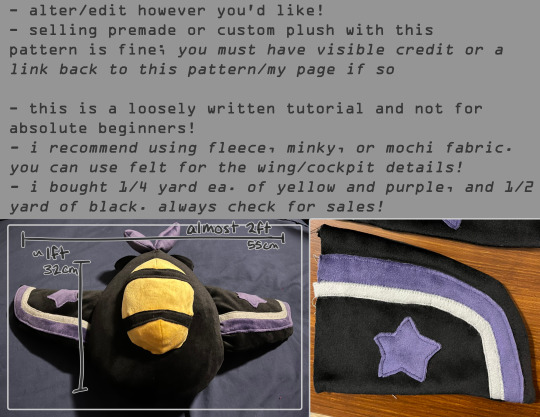
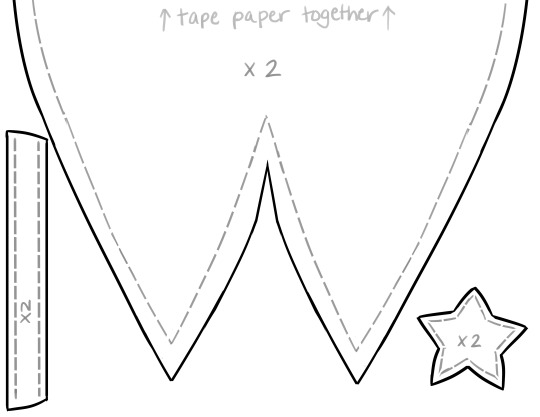
the pattern should be printer-ready on 8.5x11 paper, but if tumblr eats the quality, then twitter will hopefully work!
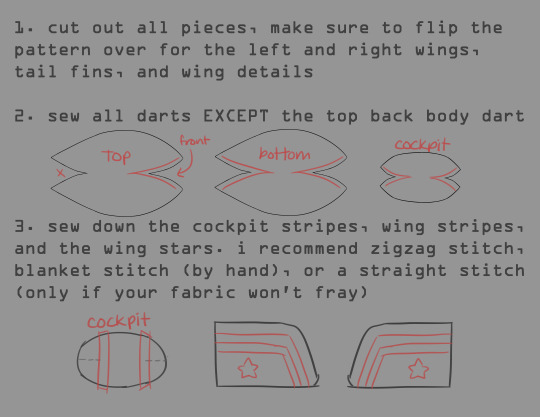
seam allowance is already included (whoops), and the dotted lines show where you should be sewing
the grey (non-dotted) lines on the wings and cockpit are there as a reference, please don't cut them!
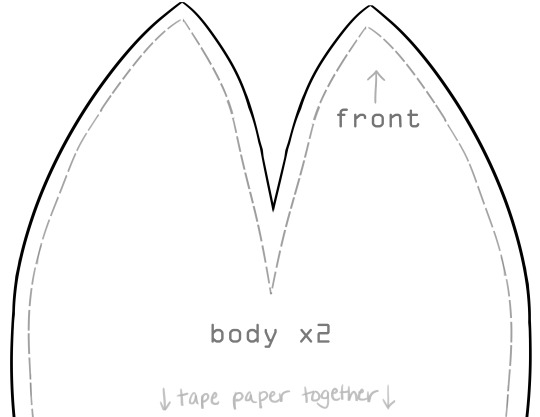

if your fabric has a right and wrong side, make sure to flip over the paper pattern when making the L vs R wings (and tail fins and wing details).
if the pile of your fabric faces one way, make sure that you pin the pattern accordingly!
if there's any errors, please let me know so i can correct them!
#pls show me if you make one!#my art#transformers#maccadam#transformers seeker#g1#plush pattern#skywarp#tutorial#am i allowed to tag this as#thundercracker#starscream
1K notes
·
View notes
Text


The pattern for a AM plush a made forever ago
By request
87 notes
·
View notes
Text
Kallamar plush pattern for those who want to make one of their own!!^^

These were the steps I took, and in no way am I a professional at sewing, I just wish to share since some people wanted the pattern.^^
You can edit him all you want ofc since there’s a BUNCH of things you can do (you can even give him legs instead of tentacles!), and I would appreciate if you credit me for the design so other people can find the og pattern!! :33
#cotl#cotl kallamar#cult of the lamb#cotl bishops#kallamar#fanmade plushie#plushie design#plush pattern#cult of the lamb kallamar#cotl fanart
132 notes
·
View notes
Text
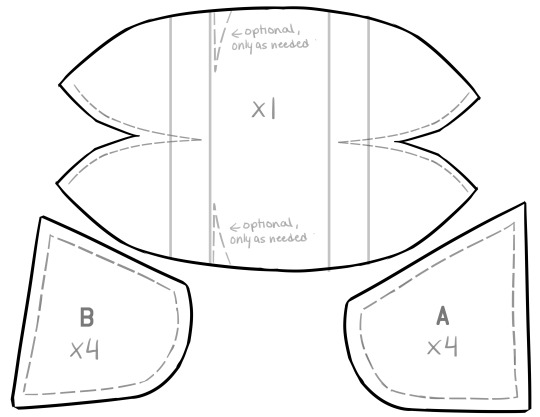
Sooo unrelated but would you guys be interested in a free Goldfish cracker plush sewing pattern?
Cuz uhhh
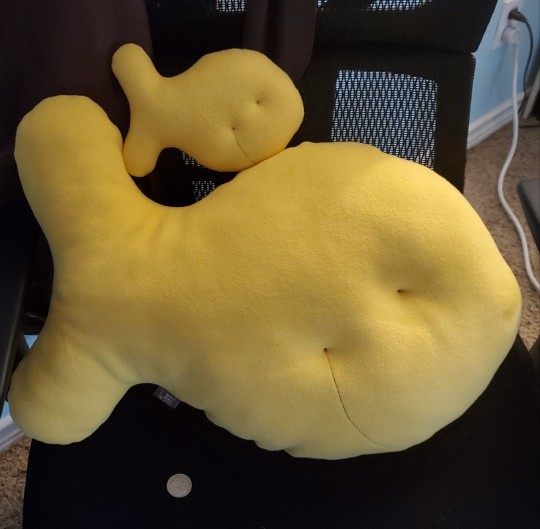
Look at him!
#plushies#plush#plush pattern#sewing#plush toy#free sewing pattern#this was the only place i though would be good to post lol
426 notes
·
View notes
Text

Aight so all the pattern pieces are cut out


Taped it up to make sure the pattern's sound. These blocky plushies are real easy to do this with. Kinda wondering if an inch per pixel is too big now, its a hefty lil snail.

Will say, mocking up patterns like this is great cause I completely forgot a piece. Ain't supposed to see the blue tape here, whoops.
73 notes
·
View notes
Text


The pattern is out!!
Thanks to all the love on the other posts (here and here) about my fuzzy walking mushroom, I've written out a pattern for it! UK and US terms are available, and it's up on ravelry for anyone who wants to check it out
Edit: I know ravelry doesn't work for everyone, so if you want the pattern but can't use it then feel free to DM me and we'll sort something out!
Ravelry
Etsy (increased price)
#price subject to change ive never listed a paid pattern before#walking mushroom#delicious in dungeon#dungeon meshi#dunmeshi walking mushroom#crochet#amigurumi#crochet plush#handmade plush#crochet pattern#plush pattern#fibrecrafts#crochetblr#crocheters on tumblr#crocheters of tumblr
114 notes
·
View notes
Text


Here are the patterns I made and used for my plush Huzzle Mug and Bauhauzzo from a while ago, plus what the patterns looked like on fabric. Not sure how anyone else could use it but you can if you're brave enough to try? There are some notes though.
Everything is drawn without seam allowance. I cut the seam allowance at varying lengths, maybe 2 or so centimeters, but the drawn lines is where I sewed.
I am not a professional, I used fluffy fabric thats fluffy on both sides, dont be like me and use something far easier to work with even if the fluffy fabric is really nice in the end
I embroidered everything by hand. Help.
Bauhauzzo has a strip of fabric thats 6 cm wide without seam allowance. Length is whatever Bauhauzzo's circumference(?) is plus seam allowance.
Mini Bauhauzzo has no extra strip of fabric due to the small size. I dont know where the eye pattern went but I think I just winged it?
I added some extra neck on Huzzle Mug, a strip of roughly 4 cm width without seam allowance maybe?
Huzzle Mug's entire construction is messy if I'm honest. The body is a round pyramid, the neck ruffle is sewn and stuffed over it, the arms are stuck in there, the bottom ruffles are a skirt. There's definitely better ways to do this but this is what I ended up doing
Huzzle Mug's shoes are roughly based on a Yoshi pattern, so they're not the high heels/dutch wooden clogs or whatever its actually wearing
Arms and legs are roughly 13 cm long? Maybe? They look very uneven because they used to be far longer but were shortened due to how ridiculous they were. Just look at this. Very stubby fingers though it might be the fabric's fault


38 notes
·
View notes
Text

Personal plush project time finally, my cookie run cookie base is finished I’m so excited to start making the cookies woohoo
#cookie run kingdom#cookie run fanart#cr kingdom#crk fanart#crk#crk art#plush pattern#custom plush#plush toy
21 notes
·
View notes
Text

Do you want to summon your own Willard-sized army of skull-headed rat plushes? Sure, we all do! Well now you can with the new Skull Rat Summoning Scroll by the Beast Peddler 🐀🐀🐀
This pattern makes a skull rat plush that's about 5" long, not including the bendable tail. Some thread sculpting, some thread joints, but nothing that's too difficult.
Now live in the Patterns section of my shop! It's $5 until the end of Monday 🐀
shop 🗡 patreon 🗡 wishlist 🗡 ko-fi
243 notes
·
View notes