#Get Help With File Explorer In Windows 10
Explore tagged Tumblr posts
Visit Tumblr Blog
Explore Tumblr blogs with no restrictions, modern design and the best experience.
Last Seen Tumblr Blogs


Fun Fact
Tumblr posted its first advertisements in May 2012 and subsequently earned $13M in revenue.
Text

I've never noticed this icon before and why does it just say this
0 notes
Text
Fixing Windows 11 - A Masterpost
Windows 11 is absolute crap for a good bunch of stuff so yeah, have a masterpost with most of the things I've found around to fix it haha (they're not all here because I did stuff around and I don't remember what)
YES, I KNOW at this point Linux would be a better alternative, however some here can't use Linux due to some proprietary programs that are not on Linux. This Masterpost is for the people in the same situation as I, aka those who have to have Windows or they can't do their job.
I am currently unemployed and haven't worked enough for the government to help me. I have a ko-fi if ever you want to help.
Stopping W11 from making you create an account/setting up your computer without internet (with a way to create gpedit.msc if your version doesn't have it)
Fixing the Taskbar (in case you also don't like the grouped Battery/internet/sound or the way the windows look)(there's more to it, check the settings)
There is the chance that Windows can't update because of this, you just have to uninstall it and reinstall it afterwards. They also completely nuked the Windows 10 look in the 24H2 update, so use the "Windows 10 (Explorer Patcher)" option instead of the plain "Windows 10".
Removing the rounded windows (since ExplorerPatcher doesn't do it anymore on 24H2)
https://github.com/valinet/Win11DisableRoundedCorners
How to move the volume and luminosity pop ups (so you can finally see those sweet sweet subtitles)
In case ModernFlyouts doesn't automatically start up, possible solution
Fixing the Start Menu (ExplorerPatcher can do that too, btw)
How to show all options right away
A way to bring back the Calendar
https://github.com/matej137/OutlookRemover
MICROSOFT FULLY NUKED THE CALENDAR!!! Possible fix is to downgrade the app (which is fine if you don't use the Mail), but do use the OutlookRemover to stop the automatic installation of the new version.
https://github.com/matej137/OutlookRemover/issues/15
Your Bluetooth suddenly doesn't work???
It happens sometimes for no clear reasons so here are a few things you can do:
Check if the icon is in the Taskbar. If not, verify if it is available in the pop up menu (the one from the gear icon)
If it's not here, check your parameter to see if you have the option to turn it on.
If it's still not here, reboot your PC.
If it's STILL not working, update your Bluetooth driver. You can do so by looking for "driver" in the menu and opening the Device Manager, then right click on the right Bluetooth component and update its driver.
If Windows says that the driver is up to date, try checking out this helper: https://support.microsoft.com/en-us/windows/fix-bluetooth-problems-in-windows-723e092f-03fa-858b-5c80-131ec3fba75c
If really nothing help, download and install a recent Bluetooth Driver. Be careful of what you download and from where.
Someone who stumbled on this post fixed it by downloading the Bluetooth Driver 5.0.1.1500 from Softonic (https://www.softonic.nl/download/bluetooth-driver/windows).
How to remove Copilot if you have it (I don't, but it might be because I'm in Europe??)
Archive
Apparently Copilot is being forced on people so hummm
Other stuff not specifically related to the shit W11 did
Changing the size of the scroll bars
How to fully remove Cortana
Website with tools to fix W10 and W11
2K notes
·
View notes
Text
YouTube Downloads through VLC: Step by Step
[EDIT: I've been receiving reports for some time now that this method no longer works. I suspect something about the switch to YouTube Music as a separate app, and/or YouTube's ongoing attempts to force Chrome use, broke the compatibility with the Github version of youtube.luac -- I haven't managed to look into whether there's an updated working version out there yet. Sorry!]
So this guide to easily downloading off YouTube is super helpful, but there's enough important information hidden in the reblogs that (with the permission of OP @queriesntheories ) I'm doing a more step-by-step version.
Please note: these downloads will be in YouTube quality. My test video download is coming through at 360p, even though the video I'm starting from is set to 720p. They're legible, but they won't look great on a TV. For high visual quality, you'll want to seek out other methods.
This guide is written for Windows 10, since that's what I can test on. It's been tested on Firefox, Chrome, and Edge (which is a Chromium browser, so the method should work in other Chromium browsers too). So far, I haven't tracked down a way to use this download method on mobile.
BASIC KNOWLEDGE:
I'll try to make this pretty beginner-friendly, but I am going to assume that you know how to right-click, double-click, navigate right-click menus, click-and-drag, use keyboard shortcuts that are given to you (for example, how to use Ctrl+A), and get the URL for any YouTube video you want to download.
You'll also need to download and install one or more programs off the internet using .exe files, if you don't have these programs already. Please make sure you know how to use your firewall and antivirus to keep your computer safe, and google any names you don't recognize before allowing permission for each file. You can also hover your mouse over each link in this post to make sure it goes where I'm saying it will go.
YOU WILL NEED:
A computer where you have admin permissions. This is usually a computer you own or have the main login on. Sadly, a shared computer like the ones at universities and libraries will not work for this.
Enough space on your computer to install the programs listed below, if you don't have them already, and some space to save your downloaded files to. The files are pretty small because of the low video quality.
A simple text editing program. Notepad is the one that usually comes with Windows. If it lets you change fonts, it's too fancy. A notepad designed specifically to edit program code without messing it up is Notepad++, which you can download here.
A web browser. I use Firefox, which you can get here. Chrome or other Chrome-based browsers should also work. I haven't tested in Safari.
An Internet connection fast enough to load YouTube. A little buffering is fine. The downloads will happen much faster than streaming the entire video, unless your internet is very slow.
VLC Media Player, which you can get here. It's a free player for music and videos, available on Windows, Android, and iOS, and it can play almost any format of video or audio file that exists. We'll be using it for one of the central steps in this process.
If you want just the audio from a YouTube video, you'll need to download the video and then use a different program to copy the audio into its own file. At the end of this post, I'll have instructions for that, using a free sound editor called Audacity.
SETUP TO DOWNLOAD:
The first time you do this, you'll need to set VLC up so it can do what you want. This is where we need Notepad and admin permissions. You shouldn't need to repeat this process unless you're reinstalling VLC.
If VLC is open, close it.
In your computer's file system (File Explorer on Windows), go to C:\Program Files\VideoLAN\VLC\lua\playlist
If you're not familiar with File Explorer, you'll start by clicking where the left side shows (C:). Then in the big main window, you'll double-click each folder that you see in the file path, in order - so in this case, when you're in C: you need to look for Program Files. (There will be two of them. You want the one without the x86 at the end.) Then inside Program Files you're looking for VideoLAN, and so forth through the whole path.
Once you're inside the "playlist" folder, you'll see a lot of files ending in .luac - they're in alphabetical order. The one you want to edit is youtube.luac which is probably at the bottom.
You can't edit youtube.luac while it's in this folder. Click and drag it out of the playlist folder to somewhere else you can find it - your desktop, for instance. Your computer will ask for admin permission to move the file. Click the "Continue" button with the blue and yellow shield.
Now that the file is moved, double-click on it. The Microsoft Store will want you to search for a program to open the .luac file type with. Don't go to the Microsoft Store, just click on the blue "More apps" below that option, and you'll get a list that should include your notepad program. Click on it and click OK.
The file that opens up will be absolutely full of gibberish-looking code. That's fine. Use Ctrl+A to select everything inside the file, then Backspace or Delete to delete it. Don't close the file yet.
In your web browser, go to https://github.com/videolan/vlc/blob/master/share/lua/playlist/youtube.lua
Click in the part of the Github page that has a bunch of mostly blue code in it. Use Ctrl+A to select all of that code, Ctrl+C to copy it, then come back into your empty youtube.luac file and use Ctrl+P to paste the whole chunk of code into the file.
Save the youtube.luac file (Ctrl+S or File > Save in the upper left corner of the notepad program), then close the notepad program.
Drag youtube.luac back into the folder it came from. The computer will ask for admin permission again. Give it permission.
Now you can close Github and Notepad. You're ready to start downloading!
HOW TO DOWNLOAD:
First, get your YouTube link. It should look something like this: https://www.youtube.com/watch?v=abc123DEF45 If it's longer, you can delete any extra stuff after that first set of letters and numbers, but you don't have to.
Now open VLC. Go to Media > Open Network Stream and paste your YouTube link into the box that comes up. Click Play. Wait until the video starts to play, then you can pause it if you want so it's not distracting you during the next part.
(If nothing happens, you probably forgot to put youtube.luac back. coughs)
In VLC, go to Tools > Codec Information. At the bottom of the pop-up box you'll see a long string of gibberish in a box labeled Location. Click in the Location box. It won't look like it clicked properly, but when you press Ctrl+A, it should select all. Use Ctrl+C to copy it.
In your web browser, paste the entire string of gibberish and hit Enter. Your same YouTube video should come up, but without any of the YouTube interface around it. This is where the video actually lives on YouTube's servers. YouTube really, really doesn't like to show this address to humans, which is why we needed VLC to be like "hi I'm just a little video player" and get it for us.
Because, if you're looking at the place where the video actually lives, you can just right-click-download it, and YouTube can't stop you.
Right-click on your video. Choose "Save Video As". Choose where to save it to - I use my computer's built-in Music or Videos folders.
Give it a name other than "videoplayback" so you can tell it apart from your other downloads.
The "Save As Type" dropdown under the Name field will probably default to MP4. This is a good versatile video format that most video players can read. If you need a different format, you can convert the download later. (That's a whole other post topic.)
Click Save, and your video will start downloading! It may take a few minutes to fully download, depending on your video length and internet speed. Once the download finishes, congratulations! You have successfully downloaded a YouTube video!
If you'd like to convert your video into a (usually smaller) audio file, so you can put it on a music player, it's time to install and set up Audacity.
INSTALLING AUDACITY (first time setup for audio file conversion):
You can get Audacity here. If you're following along on Windows 10, choose the "64-bit installer (recommended)". Run the installer, but don't open Audacity at the end, or if it does open, close it again.
On that same Audacity download page, scroll down past the installers to the "Additional resources". You'll see a box with a "Link to FFmpeg library". This is where you'll get the add-on program that will let Audacity open your downloaded YouTube video, so you can tell it to make an audio-only file. The link will take you to this page on the Audacity support wiki, which will always have the most up-to-date information on how to install the file you need here.
From that wiki page, follow the link to the actual FFmpeg library. If you're not using an adblocker, be careful not to click on any of the ads showing you download buttons. The link you want is bold blue text under "FFmpeg Installer for Audacity 3.2 and later", and looks something like this: "FFmpeg_5.0.0_for_Audacity_on_Windows_x86.exe". Download and install it. Without this, Audacity won't be able to open MP4 files downloaded from YouTube.
CONVERTING TO AUDIO:
Make sure you know where to find your downloaded MP4 video file. This file won't go away when you "convert" it - you'll just be copying the audio into a different file.
Open up Audacity.
Go to File > Open and choose your video file.
You'll get one of those soundwave file displays you see in recording booths and so forth. Audacity is a good solid choice if you want to teach yourself to edit soundwave files, but that's not what we're here for right now.
Go to File > Export Audio. The File Name will populate to match the video's filename, but you can edit it if you want.
Click the Browse button next to the Folder box, and choose where to save your new audio file to. I use my computer's Music folder.
You can click on the Format dropdown and choose an audio file type. If you're not sure which one you want, MP3 is the most common and versatile.
If you'd like your music player to know the artist, album, and so forth for your audio track, you can edit that later in File Manager, or you can put the information in with the Edit Metadata button here. You can leave any of the slots blank, for instance if you don't have a track number because it's a YouTube video.
Once everything is set up, click Export, and your new audio file will be created. Go forth and listen!
#reference#vlc media player#youtube downloader#youtube#uh what other tags should i use idk#how to internet#long post
230 notes
·
View notes
Text
Poe's Giffing Tutorial (From One Beginner to Another)

Hey, everyone! So, I've been thinking about this for a while, and decided to finally make it happen. This post aims to be a giffing tutorial that isn't a bunch of technical jargon that nobody except experienced giffers understands. This is for the person that I was when I first started out: someone who wants to make gifs, for free, without having to learn the entirety of a new program. As such, if you're already familiar with the basics, this probably won't be super helpful to you.
In this, I'll cover the basics of actually capturing a gif, the how-to of color correction (though without getting into the nitty-gritty detail of it), some basic text effects, and some more decorative effects like overlays and ~fancy coloring. I'll also show you the program I use to resize gifs.
I don't have a fun quip to lead us into the next part, so, uh, let's just dive in.
Tools*:
A PC capable of handling heavy processor loads (I use a mid-range gaming laptop; it's a little slow sometimes, but it works)
Whatever you're giffing (obviously...)
ScreenToGif (a free, basic screencapture program)
Photopea (a free, in-browser Photoshop dupe)
RedKetchup (a free file resizer/converter)
*Note: These are not the end-all, be-all of gifmaking. They may not even be the best tools for the job! But they're free, they work well, and they're relatively intuitive.
Step 1: Capture your gif.
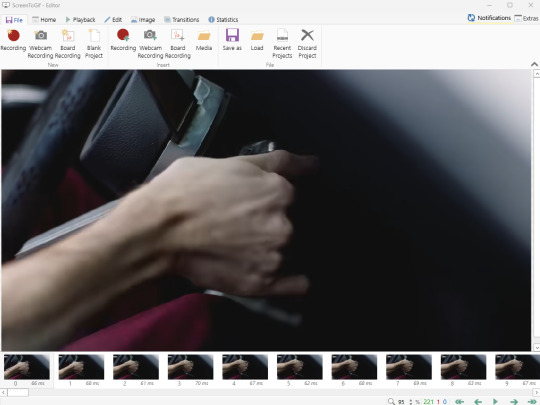
I'm going to use ScreenToGif for this. The first thing I do is open the program and click Recorder, which opens the recording interface.

I click and drag (or manually input dimensions in the boxes next to the recording button in the lower right corner) to set my dimensions, and then I press record. The red "Record" button will change to a blue square that says "Stop," and a timer will appear in the upper right corner, showing how many seconds your gif is.
Generally, I'll pause the video 5-10 seconds before my desired start time, to give myself a buffer (you'll be able to delete those frames later), start the recording, and then start the video. You'll probably find a system that works for you once you do it a few times.
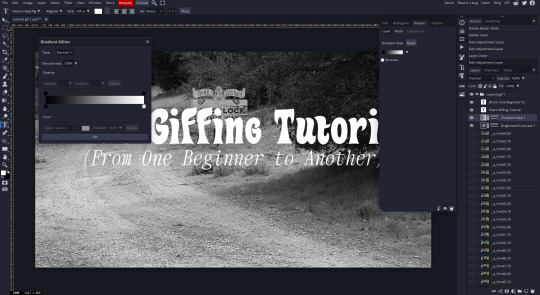
Once the scene that I want to capture is done, I'll click the blue "Stop" button, and the overlay will close itself. A few seconds later, depending on how long/complex/large your gif is, the program will pop up with a new window where you can edit. Here's what it looks like:
You can do a lot with ScreenToGif, but we'll be using the dead simple stuff today. Click the "Edit" tab, fourth from the left, and this will show up.

"Delete All Previous" and "Delete All Next" are our friends here. Go to the FIRST frame that you want in your gif, using either your arrow keys or just dragging the slider, and select it. Then hit "Delete All Previous." This will make that frame the first frame of your gif. Then, go to the LAST frame of your gif, and hit "Delete All Next." This makes the last frame of the scene that you want the last frame of the gif. You can also use the "Delete" option to delete frames by selecting them with your cursor if you want a more manual option.
Now you have your raw gif! Go to the "File" tab, the first one on the left, and select "Save As" from the menu. You want to make sure that it's saving as a .gif file, not an .mp4 or .apng --- you can check this up at the top. Don't worry, though, as .gif is the default, so unless you change it, you should be golden. Select whatever folder you want to put it in, name it, and save it.
You could absolutely stop here. It is by no means required to color your gifs or slow them down or any other number of things associated with giffing. But if you want to, here's how I do it.
Step 2: Edit your gif.
Head on over to Photopea. You'll see this:
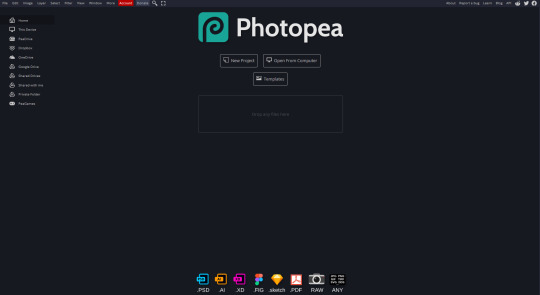
What we want is the "Open From Computer" option. Click it, and your File Explorer will show up. Navigate to whatever folder you saved your gif in and select it by double clicking or clicking once and hitting "Open."
It'll open in a new workspace that looks like this.
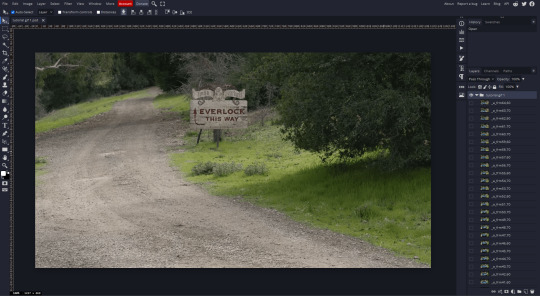
You may be saying, "Gee, Poe, that sure looks a lot like Photoshop!" Yes, it absolutely does. If you're familiar with Photoshop, you will most likely be able to find your way around Photopea just fine, and can probably go from here. But if you're not familiar with Photoshop, here's the basics.
First thing's first: gifs are frequently pretty fuzzy/blurry. Luckily, sharpening them is easy.
Select all your frames (the list on the right with all the numbered layers) by clicking one end, scrolling up/down, holding Shift, and clicking the other end. Then go up to the tabs and do Filter > Sharpen > Smart Sharpen. This will automatically sharpen each frame using a percentage; the default is, I believe, 150%, and this is usually what I use because I am fundamentally lazy.
If you don't select all your frames, only the one that you're currently on (the one highlighted in a lighter color) will get the effect applied to it. This goes for basically anything you do, so it's good to get in the habit of selecting all.
Now that it's sharpened, we can color it. Go up to the tabs again, and go to Layer > New Adjustment Layer > [whatever you want to adjust]. Most commonly in Escape the Night, you'll have to adjust brightness, because there's a lot of dark, moody scenes; Season 3 is also especially yellow/orange tinted, so you'll probably want to color correct it, too, using the Color Balance adjustment layer. This is a total guessing game based on the exact scene you're doing and my method is just selecting random things and adjusting sliders until it looks good (remember: fundamentally lazy). Honestly, I'm not an expert in coloring gifs, so I won't pretend to be — especially since people can and do write entire posts just dedicated to it. For this gif, I'm just lightening it a little.
And if this is all you want to do — no text, no effects — you're done! Go to File > Export As > GIF. It will take a few moments to load, so don't panic when your page freezes. A new window will pop up that allows you to do things like set looping, time, etc. but you can also just "Save" and you're done!
But let's say you want something fun. Maybe you'd like to overlay a quote or make it a cool color. If that's the case, continue on...
Step 3: Make your gif shine.
Three parts in this: text, fun colors, and overlays. You can combine these three to do some awesome things, and they're all very simple to do, once you know what you're doing. Think of them less like steps and more like a mix-and-match deal. You can use one, two, or all three!
So, here we go.
Option 3a: Add some text.
The easiest option of the three, this one works exactly like you think it does. The uppercase T symbol on the sidebar will create a new text layer where you can type something and set a font, size, and color.

I'll spare you the lecture on typography that I could give you — you can find better ones than I could make. Generally, though, you have a decorative/display font for headings and emphasis, and then a different, more generalized font for subheadings and other things. In this, the display font is Heavy Heap, which was used on the Season 3 tarot cards, and the general font is a relatively generic serif font.
(Sidenote: you can load fonts into Photopea! Just go to a font website like Dafont, download the font you want, and then open it as you would any other file by going to File > Open and selecting it from your files. You should get a message that says "Font [Your Font Name Here] Loaded," and then you'll be able to use it in your design. That's how I got Heavy Heap in there.)
You can change size and color with these, which will show up at the top when you select the text tool. Keep in mind that if you're making changes after you type something out, you will need to select (highlight) the text you want to change — it won't do it automatically.

I will admit that Photopea's text editor is not the cleanest, simplest, or nicest to use, especially at first. I came from Canva where it was much faster and easier. The downside, of course, is that Canva is highly limited with what you can do.
There are also ways to warp the text, change the blending, and do outlines, but I'll leave that for another time as to avoid making this any longer than it already is.
Option 3b: Make it a cool color.
You have a couple different ways to do this. Probably the most intuitive is to go to Layer > New Adjustment Layer > Photo Filter. Select the color box, pick the color you want using the picker or a hex code, select your desired density, and click OK. Boom, color over your gif.
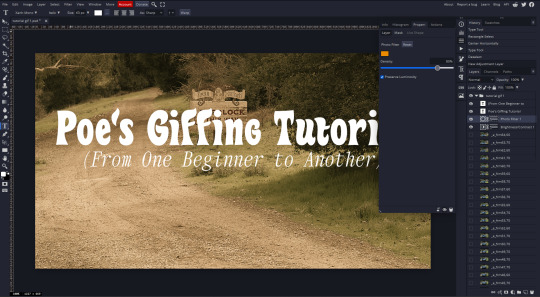
It defaults to this vintage-y orange, but you can pick whatever color your heart desires.
However, I usually use a different method using Gradient Maps. This is also pretty easy; Layer > New Adjustment Layer > Gradient Map. If you leave it black and white, by the way, you get a B&W gif (you can also just select the Black and White option in the Adjustment Layer menu). Click on the gradient, select the white square on the right side of the gradient line, and then select the square down at the bottom of the window and change it to whatever color you want.

For this gif, I'm leaving it B&W.
(You can have a lot of fun with gradient maps. Play around with them!)
Option 3c: Overlay another gif on top.
Ooookay, so, this is the most advanced and tedious of effects to do (at least of the ones documented in this post), but it's worth it, I promise. For this, you'll need at least one other gif. I usually use a base gif that's relatively neutrally colored, oftentimes B&W but sometimes just faded or pastel, plus one (or more than one) colored, brighter gif. These are, of course, just guidelines — combine whatever gifs you want. The only real requirement, per se, is that they have the same amount of frames. If they don't, it'll look weird. (But if you do end up with two gifs that have different amounts of frames, you can delete the difference right in Photopea, so I don't stress about it too much.)
You also generally want to add text after this step, so if you're planning on doing this, save the text for last.
First things first: color your gifs the way you want and then save both of them. Then re-open them both in Photopea. Yes, this is annoying. I did say it was tedious.

So now I have both of them in my navbar, labeled as "tutorial base" and "tutorial overlay."
Go to your overlay gif and right-click on the gif folder. This is the top layer with a little arrow and folder icon next to the name of the gif.

Select "Duplicate Into" and then pick your base gif in the popup. In my case, it's named "tutorial base."

Now you'll click over to your base gif, and you'll see that your accent has been put on top of your base. Now you get to have fun with blending!
Right click on the overlay gif's folder again. Then, select Blending Options, which is the first menu item. It'll bring up a popup with all sorts of options for styling your layer.

The default setting is Pass Through, which is what we see here. If you want, you could just change the opacity to get your desired effect.
You could also play around with blending options such as Overlay, Color Burn, Lighten, and Screen. Every gif is different, and every gif will look different with different options, so experiment and see what looks best! You may have to go back and recolor it a few times, so I recommend just keeping the project open in your navbar for easy access.
For this gif, I think I'll go with Darker Color at 67%.
One last step, and then you're done with blending!
Go to Layer > Animation > Merge. This will merge each frame of your animation (the gifs) with each other, meaning that they'll play at the same time. If you forget this step, as I do frequently, you'll go to save your gif and find that it plays as a sequence.
Once you've merged your gifs, you can add texts, more effects, PNG overlays, whatever you want! Congrats! You did it!
Step 4: Resize your gif (if necessary).
Maybe you've made a gif, and it's beautiful, and it's amazing, and you wanna show everyone...but it's five million megabytes and you can't send or post it anywhere. Tumblr's max file size is 10 MB, while Discord's (standard) max file size is..7 MB, I think? Either way, if you try to upload something bigger than that, you'll get an error message and the familiar taste of disappointment.
Never fear, Redketchup is here!

This is Redketchup, and it's super simple.
Go to "GIF Resizer" under Animation Tools. Upload your gif, then scroll until you see the Resize GIF section. Input the percentage you'd like to reduce it by (presets are 25%, 50%, and 75% smaller, but you can set it manually, as well).
This is also the step where you can slow it down if you desire if you didn't do it in Photopea — it's in the next section down. Set the speed, if you'd like, and then go down to the bottom and hit Download.

It'll take you to a preview tab where you can check if your gif is small enough. If it is, hit Download again up in the top left, and that's that! Go share your gif with the world!
Conclusion:
Thank you for reading! I am by no means an expert gifmaker, but I want to spread the love and give other people the option to do it. I wouldn't know any of this stuff without the people who taught me, and I'll put a list of tutorials down at the bottom that I referenced when I was first learning to make gifs.
At any rate, if you use this post to make a gif, feel free tag me or send it to me so I can see! And for those of you who are on the fence about learning or starting to gif...
Do it. I double-dog dare you.
:)
References:
Blending Gifs by @the-mother-of-lions
Photopea Coloring Tutorial by @heroeddiemunson
Merging in Photopea by @bellamyblakru
And, though not a specific reference, I frequently browse @usergif for inspiration (they have tutorials there, as well, but I haven't checked them out yet).
#gifset#giffing#gif tutorial#how to gif#how to make a gif#photopea#escape the night#etn#I wrote this instead of socializing at my family's thanksgiving dinner#because that's just who I am
146 notes
·
View notes
Text
Laptop Necromancy
I'm running my whole art portfolio through Glaze. If you don't know, it's a program build by a group of uni students that's won awards and is designed to basically prevent AI libraries from being able to meaningfully "learn" anything from your art. It can be found here for free. It wouldn't run on my actually functional laptop (it tried rendering for 2 days straight and then got to something like "Time remaining: -200 minutes" and still never spat out anything completed). So, while waiting for the seemingly endless rendering to stop and a reply for access to their Web option, I decided to try something a little off the wall.
I ended up taking my largely non-functional old laptop (8+ yr old Dell Latitude i7) I hadn't figured out how to safely dispose of yet and see if I could give it new life. It was a mid-tier "gaming" laptop when I purchased it, though I needed the specs for heavy graphics work for work as an artist and as I was, for a time, still in uni for engineering before switching majors. It currently won't run most of the programs I need for work - it abjectly refuses to open Krita no mater what I do, and throws a fit and crashes with even GIMP sometimes. I even have to be careful with internet browsers now with that one. Its hard drive is pretty toast, hence why I needed to suck it up and get a new laptop. Something is damaged in a way I couldn't make a proper clone of the drive and something's fucked with the BIOS is fucked in a way I couldn't even run a recovery usb and it has no disk drive. It makes frightening noises from frequently trying to run its HDD at 100%. The casing itself is held together with duct tape and spite. This laptop survived several moves and homelessness before finally being too finicky to put up with after wife and I were rehoused. It literally requires support at all times to not be torn further apart by the weight of its own screen. It also needs to be elevated in a way to give the fans a little help. It's a technological senior citizen. Despite the hard drive being largely toast, the OS still works pretty fine. The RAM isn't high as I'd like, but it's not bad, either. It's main draw for this very specific purpose is the dual GPUs. There's a version of Glaze that you can force to run off a GPU instead of the CPU and make it go MUCH, MUCH (from my experience, literally 5-10 times or more faster).
I had a Solid State Drive lying around from when I'd attempted to keep the old laptop alive longer, so I stuck it in my external dock, installed Glaze on it, and filled it up with a folder of art to be Glazed. It then proceeded to take about a day and a half of fussing with graphics drivers - including uninstalling the one the uni students recommended and going back to my old one because the one they recommended was technically compatible but was borking things for some reason, and manually changing settings to force the computer to use the correct beefier GPU for the program. I also had to uninstall a ton of shit that was slowing my computer down and sometimes making it lock up entirely - things I used to need when I used that laptop for normal purposes but no longer needed there (things like Steam, Discord, Grammarly, etc).
So long as I don't run much of anything off of the internal HDD outside a couple Windows Explorer windows for viewing files and Task Manager to keep an eye on hardware status, it mostly stays nice and quiet now other than a few spikes here and there with low % usage. Glaze runs smoothly off the external SSD, the CPU and RAM usage remain pretty stable and manageable during rendering, with the GPU usage only at a little over half the computer's total capability. Despite being bested by much simpler daily usage, this old shell of a laptop now renders a resource-intensive program over in a corner and I can just check it every couple hours to see how it's doing.
#Glaze program#glaze ai#anti ai#glaze#long post#ramblings#playing with computers#weirdly proud of my laptop necromancy#laptop#bek speaks
7 notes
·
View notes
Text
moving My Documents Sims 4 folder to another hard drive (win 10)
via The_Only_Zac on reddit
Move your Mods folder to your external hard drive by clicking and dragging it from Documents\Electonic Arts\The Sims 4\ to the external drive while holding shift. Ensure that the popup that appears says "Moving files," not "Copying files." Once this step is complete, you should not have a Mods folder in your Electronic Arts\Sims 4 folder but you will have one on your external hard drive. If you want, you can rename it to something else to make your life easier (eg "Sims 4 Mods" rather than just "Mods").
Press the Windows Key and X at the same time, and click "Command Prompt (Admin)". Paste in the following command:
MKLINK /J "%UserProfile%\Documents\Electronic Arts\The Sims 4\Mods" "[insert path to mods folder on external hard drive here]"
Make sure you replace [insert path to mods folder on external hard drive here] with the actual path to where you copied the mods folder onto your external drive (eg. "F:\Gaming stuff\Sims 4 Mods").
3. Go to Documents\Electronic Arts\The Sims 4\Mods in the file explorer. If you see all your mods, that should mean it worked. Run TS4 and check the options menu to make sure your mods are showing as installed, but do not load any of your saves before checking or else they could become corrupted.
If all goes well, this should create a symbolic link in your EA\TS4 folder that points to the folder on your external hard drive. If you have any more questions, let me know. 👍
EDIT: Since there are a lot of questions, here’s some additional info that might help.
• Do not include the brackets [ ] in the path to your mods folder, but do put it in quotes “”, like this:
MKLINK /J "%UserProfile%\Documents\Electronic Arts\The Sims 4\Mods" "F:\Gaming stuff\Sims 4 Mods"
• If your “My Documents” folder is stored in OneDrive you will need to change the first part of the MKLINK command so it matches where your documents folder is. I don’t use OneDrive, but this should work:
MKLINK /J "%UserProfile% \OneDrive\Documents\Electronic Arts\The Sims 4 Mods" “Insert/path/to/external/drive/Mods/folder/here”
However, this might not actually work because OneDrive is stored in the cloud and it doesn’t like to have symbolic links to non-cloud folders, like your hard drive.
• If you get an error saying “The system cannot find the path specified” when you try to make the link, then you probably have a typo in the path to the folder on your external drive. You can open up your desired folder in File Explorer and copy/paste the path from the address bar into the command prompt to make sure you get it right, but if it has spaces in it then you need to make sure to put it inside quotation marks (“ “).
moving a folder to external drive
2 notes
·
View notes
Text
And now all the search engines are being replaced by AI. I have spent twenty years trying to talk people to go to libraries and check their beliefs against records, and now we face a future without libraries and endless artificially generated idiocy.

There was an argument in the Australian Parliament when Julia Gillard was PM. She accused her opponent of being a misogynist. He pointed out it was a fact that he was not. So the next day the dictionary was edited to 'correct' it, to align with her opinion of what it should be, so she could now label him a misogynist and pretend her definition had always been true.

The trouble with manually removing AI from windows is MS can undo your changes at any time.
Completely remove Microsoft Bing Chat AI from your Windows 11 PC and sidebar.
Open the PowerShell application with administrator privileges. You can do this by searching for "PowerShell" in the Start menu, right-clicking on the result, and selecting "Run as Administrator."
In the PowerShell window, type the following command and press Enter:
Get-AppxPackage bing | Remove-AppxPackage
Wait for the command to execute. This command will uninstall any app packages related to Bing, including the Bing Chat AI. Once it completes, the Bing Chat AI should be removed from your Windows 11 PC.
To remove the Bing Chat AI integration in the Taskbar search, you can disable it using the steps below:
Open the Settings app in Windows 11. You can do this by pressing the Windows key, searching for "Settings," and selecting the "Settings" app.
Click on "Privacy & Security" in the left sidebar.
Under the "Windows permissions" section, click on "Search permissions."
In the "More settings" section, toggle off the "Show Search highlights" option. This will disable the Bing Chat AI integration in the Taskbar search.
After following these steps, the Bing Chat AI should be removed from the Taskbar search and the search home interface in Windows 11.
(This did not disable it but did disable the AI use of the search results in Windows 11 See the next step below to also disable the physical button integration.
Do both steps.)
Manual removal by component:
Page 2: Remove Bing Chat integrated into Microsoft Edge Explorer:
Disclaimer: If you are not comfortable using the registry editor, stop here. If you’re unfamiliar and willing to try anyway, the simplest way to look at this is a set of folders. Each has a parent folder; each folder can contain files. The view is like the windows explorer expanding directories with different naming conventions. It’s rather complicated but simplistic in nature.
How to remove the Bing Chat integration from Microsoft Edge Explorer on Windows, first follow the instructions provided in the first source mentioned:
((Silly AI, Step 1: Back up the registry: Select the folder HKEY_LOCAL_MACHINE\SOFTWARE\ click on the menu bar file, select export, select the destination for the backup file and name the file then save it.))
Open Registry Editor on your PC.
Navigate to the following location: HKEY_LOCAL_MACHINE\SOFTWARE\Policies\Microsoft.
If the “Edge.” Folder exists go to step 5.
Right-click inside the Microsoft folder and choose New, then Key.
Name the new Key (folder) as "Edge".
Right-click inside the Edge folder and select New, then DWORD (32-bit value).
Name the new DWORD as "HubsSidebarEnabled".
Right-click on HubsSidebarEnabled and click Modify.
Ensure the Value data is set to 0.
That's all the work in the Registry. Next, open Microsoft Edge and enter "edge://policy" in the address bar.
Click on the "Reload Policies" button, and the Bing Chat button will now disappear from the Microsoft Edge Explorer window.
These steps should help you remove the Bing Chat button from your Microsoft Edge Explorer window.
Please note that modifying the registry can have unintended consequences if not done correctly, so it's essential to be cautious and comfortable with the process. Additionally, it's always a good idea to back up your registry or create a system restore point before making any changes.
Page 3: Remove Bing from the Windows Start Bar.
If "Show Search highlights" setting was already disabled, and the Bing Chat button is still visible on your start menu bar. Here's an alternative method you can try to remove the Bing Chat button:
((Silly AI, Step 1: Back up the registry: Select the folder HKEY_CURRENT_USER\Software\ click on the menu bar file, select export, select the destination for the backup file and name the file then save it.))
Open the Registry Editor by searching for "Registry" in the Start Menu and selecting the "Registry Editor" app.
Navigate to the following location in the Registry Editor: HKEY_CURRENT_USER\Software\Policies\Microsoft\Windows\Explorer
If this folder does not exist, you can create it manually by right-clicking on the parent folder “Windows” and selecting "New" > "Key." Then, name the new key "Explorer" as instructed inside the 'HKEY_CURRENT_USER\Software\Policies\Microsoft\Windows\' directory.
Right-click on the "Explorer" folder, choose "New," and then select "DWORD (32-bit) Value" from the context menu.
Name the new DWORD value as "DisableSearchBoxSuggestions" (without quotes) and press Enter.
Double-click on the "DisableSearchBoxSuggestions" value you just created and set its value data to "1."
Click "OK" to save the changes.
Restart your computer for the changes to take effect.
After restarting, the Bing Chat button should be removed from the start menu bar. If you want to re-enable it in the future, you can return to the Registry Editor and change the value of "DisableSearchBoxSuggestions" to "0" or simply delete the DWORD value.


108K notes
·
View notes
Text
What is Hazevecad04 Version on PC? A Lightweight CAD Solution for Designers and Engineers
When you delve into the realm of digital design and engineering, there are many specialized software tools crafted to optimize and accelerate workflows. Among the latest buzzwords in CAD circles is Hazevecad04, particularly for its application on PC. So, what exactly is the what is Hazevecad04 version on PC, and why is it gaining traction in design and drafting industries?
In this article, we'll walk you through everything you need to know about the Hazevecad04 version for PC—from its functionality, features, and system requirements to comparisons with other popular CAD tools. If you’re searching for a practical, resource-friendly CAD program that doesn’t compromise on essential features, this guide is for you.
Understanding Hazevecad04: What Is It?
Hazevecad04 is an efficient and intuitive CAD (Computer-Aided Design) software tailored for Windows PC users. It caters to architects, engineers, designers, and drafters who need both 2D drafting and basic 3D modeling capabilities. With a specific emphasis on performance and cost-effectiveness, Hazevecad04 is positioned as a viable alternative to heavier, more resource-intensive CAD tools like AutoCAD or Revit.
The software supports industry-standard file formats like DWG and DXF, making it highly compatible with mainstream CAD workflows. Despite being lesser known than mainstream giants, Hazevecad04 has been praised for its lightweight footprint, ease of use, and value-for-money pricing model.
Technical Specifications and System Requirements
Below is a detailed look at the technical specs required to run Hazevecad04 on PC: FeatureDetailsSoftware NameHazevecad04Latest VersionVersion 04 (PC Edition)Supported OSWindows 7, 8, 10, 11 (64-bit)ProcessorIntel Core i3 or aboveRAMMinimum 4 GB (8 GB recommended)GraphicsIntegrated GPU (Discrete recommended)Disk SpaceApprox. 500 MBFile FormatsDWG, DXF, DWT, PDF ExportLicensingOne-time purchase or annual planBest Use Cases2D CAD drafting, 3D concept models
Key Features of Hazevecad04 Version on PC
Let’s explore the standout features that define the Hazevecad04 experience for PC users:
1. DWG and DXF File Compatibility
Hazevecad04 fully supports DWG and DXF files, ensuring seamless collaboration with users of other CAD platforms. You don’t have to worry about data loss during file conversion or compatibility issues.
2. Lightweight Performance
The software is designed to be quick and responsive, even on older PCs. Unlike more demanding CAD suites, Hazevecad04 runs efficiently with minimal RAM and CPU usage.
3. Simple User Interface
Its clean and minimal interface makes it a perfect choice for CAD beginners while still being capable enough for experienced users. The design eliminates clutter and helps streamline learning and productivity.
4. Powerful 2D Drafting Tools
From lines, arcs, and circles to layer controls, dimensioning, and hatching, Hazevecad04 includes all essential 2D tools. These features make it ideal for blueprint creation, mechanical drawings, and architectural plans.
5. Basic Yet Functional 3D Modeling
While not a substitute for advanced 3D tools, Hazevecad04 supports basic 3D functions like extrusion and revolved surfaces, perfect for quick prototyping or conceptualization.
6. Affordable Licensing Options
Unlike AutoCAD’s subscription-only model, Hazevecad04 offers one-time license purchases as well as affordable annual plans, making it suitable for students, startups, and freelancers.
7. Customizability
Users can customize toolbars, shortcuts, and even apply LISP routines or scripts. This enhances workflow efficiency and allows for greater flexibility in designing processes.
Hazevecad04 Download and Installation Guide for PC
Getting started with Hazevecad04 on your PC is easy. Follow these steps to install the software:
Visit the official Hazevecad website or a trusted software distributor.
Choose the PC version (v04) compatible with your OS.
Click “Download” and save the installer file.
Run the installer and follow the step-by-step setup instructions.
Activate your license using the provided key or opt for a trial version.
Once installed, configure your workspace, units, and drawing templates.
You’ll be up and running with a professional-grade CAD tool in minutes—no complicated setup required.
Hazevecad04 vs Other CAD Software: A Quick Comparison
Here’s how Hazevecad04 stacks up against leading alternatives like AutoCAD and FreeCAD: FeatureHazevecad04AutoCADFreeCADPricingBudget-friendlyExpensive subscriptionFree (Open Source)PlatformsWindows onlyWindows, MacCross-platform2D DraftingStrongIndustry LeaderModerate3D ModelingBasicAdvancedAdvancedLearning CurveEasyModerateModerateDWG SupportNativeNativePartial (Import)LicensingOne-time or yearlySubscription onlyOpen-source
Who Should Use Hazevecad04?
Hazevecad04 is ideal for a wide spectrum of users, including:
Students: Affordable alternative for learning CAD with real-world tools.
Freelancers: Great for budget-conscious professionals needing DWG compatibility.
Architects and Engineers: Efficient for blueprint drafting and technical design.
Trainers and Educators: Perfect for CAD teaching environments with limited resources.
Hobbyists: Beginners exploring CAD design without steep learning curves or high costs.
Its ability to run on low-spec systems makes it accessible even in developing regions or for home users without access to high-end workstations.
Final Thoughts: Is Hazevecad04 Worth It?
If you’re in need of a practical, easy-to-use, and cost-efficient CAD solution, Hazevecad04 version on PC offers incredible value. While it may not replace high-end tools for complex projects, it shines in its simplicity, speed, and affordability.
Whether you’re a student looking to practice CAD, a freelancer needing DWG compatibility, or just someone who prefers a lightweight drafting tool, Hazevecad04 provides a capable alternative to more bloated, costly options.
0 notes
Text
Ok, copy-pasting the comment from this link, with my notes for a Win 10 with Calibre 7.24 (since I'm a quasi-luddite whose favorite OS is Win XP; self-described as 'I know just enough to get myself into trouble, but not enough to get myself out of it', also I'm lazy and hate uninstalling/reinstalling if I can avoid it):
---
(from @bearCatBird on Reddit)
HERE IS WHAT WORKS AS OF AUGUST 2024 (Windows 10)
Thank you to u/toobnugget for the versions and more instructions, it also worked for me. Here's additional information to help people out. Just do it all in this order.
NOTE: If any of the links are broken, try pasting the broken URL into waybackmachine.org and look for files from today's date (8/12/24) or earlier.
CONFIRM ALL SOFTWARE IS UNINSTALLED
If you had previous versions of the software installed, uninstall them.
Then confirm there are no lingering data files with user settings. For example, with kindle, remove these lingering directories if they exist. C:\Users\AppData*\Amazon; C:\Program Files\Amazon; C:\Program Files (x86)\Amazon; C:\ProgramData\Amazon) HA Note: Yes, check/delete all of these places. You might have to go to the View tab in Windows Explorer and check the Hidden Items in the Show/hide subsection. The other posts you'll come across will seem to imply that newer versions are ok to use for this process with the way stuff is worded, but no, you need to actually go delete the program and reinstall the older version. F***ing obnoxious, but here we are. Just save yourself my headache and do it right off that bat.
You can also clear your registry (as described here) but I would save this as a last resort and only do this if you're unable to get the full instructions from this post to work. HA Note: I didn't need to do this
CALIBRE INSTALLATION
NOTE: if you want to use a kindle e-ink device, see step 2 of u/OccasionallyPrincess's comments here and also u/SeniorSiesta's comment here.
Download and install Calibre 7.13 (download here) (Some people tested with newer versions (7.2.1) and said it works, but I haven't verified.) HA Note: I have 7.24, this worked fine
In Calibre install the KFX input plugin (see OP's instructions up top), restart Calibre HA Note: Easy enough to do, as written, should come right up with "KFX" in the search bar
Download the DeDRM v10.0.9 (download here, the zip file at the bottom called DeDRM_tools_10.0.9.zip, then extract the zip to a folder.) HA Note: Follow as written, yes you're only going to extract the single umbrella zip, leave the deDRM and Obok plugin zips alone. I extracted the umbrella zip file to a new folder next to my Calibre library so that it goes with me if I ever have to manually move files to a new computer. It will feel weird to extract one zip and leave the others, but just trust the process.
NOTE: Some people had better luck using the alpha version of DeDRM. See this post here for more information if v10.0.9 isn't working for you.
4) In Calibre install the DeDRM files (see OP's instructions up top), restart Calibre HA Note: Follow as written, you just select the deDRM zip (single left click, not double click), it should install just fine and be happy
KINDLE INSTALLATION
NOTE: Some people had to turn off WiFi and unplug ethernet so they were 100% offline when installing Kindle to avoid automatic updates before disabling it in settings. HA Note: Yes, you have to do this step. Obnoxious, but necessary, so have these instructions in a tab for reference that won't get refreshed until you're back online
NOTE: Mac Users, you can probably download newer versions of the kindle app, as confirmed by this post.
5) Download and install Kindle 2.4.0(70904)
See u/Tilduke 's response here for more information.
(Other sites: download here or here or here) HA Note: Somewhere amongst all the link hopping, what was supposed to give me 70682 or something like that gave me 2.3.70840. If 70904 doesn't work, 70840 definitely worked for me first try
6a) Disable your internet
Many people needed to disable their internet/wifi temporarily for step 6b HA Note: Yes, do this
6b) Launch Kindle (don't login if possible), then go to
Tools > Options > General > disable "Automatically install updates..."
Tools > Options > Content > define a new path to save the kindle books you download
Finally, re-enable internet and Login (For more information about this step, see this comment)
Select a book, right click, download HA Note: Yes, do all of these. I downloaded a single book to start with as a check
CONFIRM THE DRM IS REMOVED
8) Find the book you just downloaded from Kindle in the new path (it will be the files that are newest, since they won't have book titles), select the .azw file, and drag it into Calibre. (Do not use the "Add Books" function.) HA Note: I tried this a couple different times the wrong way. The trick here is when the book/file is being added to Calibre (either through drag-n-drop or the Add Book button on the menu bar, the progress bar will display the names of the files that are being imported as it's working on them. When you download the first book to see if it is working as intended, remember the name of the book. Then go to where your Kindle library is on your computer (location C:/***/My Kindle Content, or whatever else you name it), you'll see a folder with a jumble of letters/numbers ending with _EBOK. Click into that and you'll see a bunch of files that are also letter/number/special character vomit. There should be a file that ends with _EBOK.azw (<- this is the one you want). I tiled my Windows Explorer side by side with Calibre and drag-n-dropped the .azw into Calibre, and it did the rest by itself (no additional conversion steps needed). Back to the trick about checking if it's working properly: in Calibre itself, if you're getting the janky letter/character vomit of the encrypted file while importing after the drag-n-drop, it's not working. If you drag-n-drop the encrypted file, but it displays the actual book name in this progress bar, it's working.
NOTE: Some people had better luck NOT dragging in the file and instead loaded it from the menu. See this comment for more information.
9) Once loaded in Calibre, right-click the book > view > view with calibre e-book viewer (if the book opens successfully, then the DRM has been removed. Use pgup and pgdn to see the pages). Close the viewer.
HA Note: After I confirmed that the first one imported and was able to be displayed properly by Calibre, I went back to the Windows Explorer window and clicked back so that I was viewing the subfolders within My Kindle Content. Then, in the search bar at the top right, I typed "*azw" (sans quotes) to pull up everything with that in the file name. Then, sort by file type to get all the .azw files grouped together. Highlight all .azw files and drag-n-drop everything into Calibre in one fell swoop. My ~130 files took...idk 2? 3? minutes? Depending on the size of your library, it may take a while. My experience in the past with large processes like that is just go find something else to do off the computer and leave it to do its thing. Once everything's imported, you might get a duplicates warning if you're like me and it took a couple go-arounds to figure out, but all the new stuff should populate new lines at the top of your library.
And voile, your stuff is in Calibre. I didn't bother with the rest of this, since I'm using my Calibre as an archive and not transferring stuff onto a different e-reader, etc.
CONVERTING THE BOOK
NOTE: This example shows conversion to EPUB, but you can convert to any format you want.
10) In Calibre, right click the book > Convert books > convert individually
11) Choose EPUB on the upper right, then click OK to export
12) If you want to change the location where Calibre exports the book, go to preference (CTRL + P) > click "Run Welcome wizard" at the bottom > then define a new folder for your calibre books to be saved. This folder will be where the book saves when you drag in the .azw file and also where the .epub exports.
For more context, see: https://www.reddit.com/r/Calibre/comments/1c2ryfz/2024_guide_to_dedrm_kindle_books/lhtah7p/
Just a quick note from your friendly neighborhood bookworm/indie author
if you use kindle for the majority of your library, they will be shutting down the function that allows you to download your files and transfer them via USB on the 26th of February. Which doesn't sound like a huge deal, but this also means that if a book is taken off Amazon for any reason—like it being banned—they can scrape it off your kindle as well. So maybe backup your library?
#calibre#amazon#kindle#i gave myself like an extra hr and a half of work by trying to avoid uninstalling and reinstalling#hate when i do that#now i can stop thinking about this#thinking i'm also just gonna leave my kindle app as the older version and not turn updates back on#also watching the original calibre demo from way the hell back when#and learning it's pronounced “caliber”?#AND NOT “ca-lee-bray”????#i think not#it shall forever be ca-lee-bray in my mind#if they wanted me to call it caliber they should have spelled it that way#anyways#books#reading#fics#dedrm#kfx input#hope these notes help someone who's not as tech savvy#it can be a little disorienting to go wading through the posts from people who swim in it all day long and know a lot more than me
25K notes
·
View notes
Text
Windows 11 Upgrade: Hidden Features You Should Try Now

Windows 11 Upgrade
Wondering what Windows 11 features are new? Unsure if upgrading is worthwhile? Windows 11's revolutionary features and updates will be examined in this post. Multitasking, productivity, creativity, and security are improved in Windows 11, simplifying your digital life.
Get what you need faster
Starting with Windows 11, you'll see the redesigned Start Menu. It looks simple and contemporary now that it's on the taskbar. The new layout lets you tailor your preferred applications, making them easier to find.
Windows 11 adds intelligent suggestions to the Start Menu and File Explorer. Based on your previous behaviour, these suggestions help you identify files quickly. File Explorer tabs, a Windows 11 feature, may organise files and designate favourites for easy access.
Windows 11's time-saving features boost productivity.
Windows 11 contains several efficiency and multitasking capabilities, including:
Snap Assist: Arrange open windows into perfect grids to maximise screen space. Snap keeps your Windows 11 flow, so you can stay in it.
Personalised desktops: Add business, gaming, and personal backgrounds and settings.
Snipping Tool: Quickly capture and modify screenshots. Snipping Tool in Windows 11 may copy or redact snapshot text. Another usage is screen recording a move or instant.
Connect your iPhone to your PC using Microsoft Phone Link. You can check notifications, send texts, and make calls from your PC without pulling your iPhone out of your pocket. This connection reduces device switching and boosts productivity.
Windows 11 offers creative flexibility
These technologies make creativity simpler than ever:
This smooth tool lets you remove photo bombers and crowded backgrounds.
Maker of Images: Use text prompts to make watercolour, claymation, and steampunk pictures to break creative blocks and create fantastic things.
Layer Support: More composition control and layer modification without impacting others.
You can realise your creative ambitions like never before with Windows 11’s cutting-edge features.
Use better security to keep your data secure
Windows 11's powerful new features boost security:
Replace passwords with passkey. Passkeys are secure sign-ins' next generation. Windows Hello13 or your mobile device lets you enter programs using your login and passkey. Many major browsers support passkeys, which may be regulated in Windows Settings.
In Windows 11, your device wakes up when you arrive and locks when you leave, making it easy and safe.
Smart App Control: Windows 11 will only install reputable programs, so you may download new apps with confidence.
Upgrade to Windows 11 now
Windows 11 offers a safer, smarter, faster work and play experience. Windows 10's improved security, productivity, and interface make it the best time to update.
#technology#technews#govindhtech#news#technologynews#Windows 11 Upgrade#Windows 11#update to Windows 11#Windows 11 device#Windows 10
0 notes
Text
Why Your Computer Gets Slower Over Time — And What You Can Do About It

Ever wondered why a computer that once felt lightning-fast now takes forever to load? You're not alone. Over time, every computer tends to slow down. Whether it’s an older machine or a fairly new one, the frustration is real. Understanding why this happens is the first step to fixing it—and even preventing it.
In this guide, we’ll explore the most common causes of slow PCs and what you can do to bring them back up to speed. If you’re looking for more in-depth solutions, don’t miss our full guide on how to speed up a slow computer.
1. Hidden Bloat and Startup Programs
You install a cool new app today. Then another one next week. Eventually, your system is packed with software—some of which you don’t even remember downloading. Many of these programs run in the background, especially at startup, slowing down your boot time and eating up system resources.
💡 Quick Fix:
Open Task Manager and check the Startup tab.
Disable apps you don’t need launching at startup.
Uninstall programs you no longer use.
2. Running Low on Disk Space
A nearly full hard drive can really hurt your PC's performance. Windows needs free space to manage system files and temporary data. When your drive is full, everything slows down—searches, app launches, and even basic file browsing.
🧹 What to Do:
Delete junk files and downloads.
Use Disk Cleanup or Storage Sense (on Windows 10).
Empty the Recycle Bin regularly.
This small habit can significantly speed up your machine.
3. Malware and Background Apps
Malware isn’t just a security risk—it’s a major performance killer. Even if your PC isn’t showing obvious signs of infection, malicious software could be silently running, using up memory and CPU power.
🔐 Recommended Actions:
Run a full system scan with Windows Defender or Malwarebytes.
Check for browser extensions that might be slowing down your web activity.
Avoid downloading cracked software or files from unknown sources.
Just keeping your PC clean can make a huge difference in speed and stability.
4. Outdated Hardware or Drivers
Sometimes, it’s not the software—it’s the hardware. If you’re still running on a traditional hard drive, switching to an SSD can make your computer feel brand new. Also, missing or outdated drivers can cause hiccups that slow everything down.
⚙️ Upgrade Ideas:
Upgrade to SSD if you're using an HDD.
Add more RAM if your system is lagging with multiple open tabs.
Update your graphics and chipset drivers regularly.
5. How to Keep Your Computer Fast (Even After Years)
Maintaining a fast PC isn’t just about fixing problems—it’s about building healthy tech habits. A few minutes of monthly maintenance can go a long way.
✅ Pro Tips:
Restart your computer at least once a week.
Keep your system and apps updated.
Schedule regular cleanups using built-in tools.
For a more advanced, step-by-step guide, check out our full article on how to speed up a slow computer. It includes expert-level tips tailored for Windows 10 users.
Final Thoughts
Computers slow down for a lot of reasons—but that doesn’t mean you have to live with it. Now that you know what causes the lag, you can take smart steps to keep your system running smoothly. Whether it’s clearing space, upgrading hardware, or simply restarting more often, every small action adds up.
And remember, when you’re ready to dive deeper into the fix, we’ve got a full breakdown of 10 tech tips to help you speed up your computer, right here.
1 note
·
View note
Text
GTA 5 Highly Compressed PC Game Download – Low MB Version

Experience Grand Theft Auto V (GTA 5) in a highly compressed version. Enjoy action-packed gameplay, stunning graphics, and an open-world adventure.
About GTA 5 Highly Compressed Version
Grand Theft Auto V (GTA 5) is one of the most popular open-world action-adventure games developed by Rockstar Games.
The game features a vast city, an engaging storyline, and multiple missions that keep players hooked.
If you are looking for GTA 5 free download for PC 100% working in a highly compressed format, you are at the right place.
This guide will help you download GTA 5, which is highly compressed, quickly and easily from DownloadPcgames88.
System Requirements for GTA 5 on PC
Before downloading the game, make sure your PC meets the required specifications:
Minimum Requirements:
OS: Windows 7/8/10 (64-bit)
Processor: Intel Core i3 / AMD FX-6300
RAM: 4GB
Graphics: NVIDIA GTX 660 / AMD Radeon HD 7870
Storage: 65GB available space
Recommended Requirements:
OS: Windows 10 (64-bit)
Processor: Intel Core i5 / AMD Ryzen 5
RAM: 8GB or higher
Graphics: NVIDIA GTX 1050 Ti / AMD Radeon RX 570
Storage: 70GB available space
How to Download GTA 5 Highly Compressed for PC?
Downloading GTA 5 download for PC highly compressed helps save storage space and bandwidth. Follow these steps to get started:
Visit a Trusted Platform – Go to DownloadPcgames88, a reliable source for GTA 5 in a compressed format.
Download the Game – Click on the given link and start downloading the highly compressed file.
Extract the Files – Use WinRAR or 7-Zip to extract the compressed files.
Install GTA 5 – Run the setup file and follow the on-screen instructions.
Launch and Play – After installation, launch the game and explore the world of GTA 5.
Why Download GTA 5 Highly Compressed?
Saves Storage Space – The compressed version reduces the file size significantly.
Faster Download Speed – You can download it quickly even with a slow internet connection.
Same Gaming Experience – Enjoy the full version of Grand Theft Auto V (GTA 5) without quality loss.
Easy Installation – No complicated setup required.
Final Words
Now you know how to get GTA 5 free download for PC 100% working in a highly compressed format. Make sure to download from DownloadPcgames88 to get a safe and fast installation. Follow the instructions carefully and enjoy the action-packed gameplay of Grand Theft Auto V (GTA 5). Happy gaming!
0 notes
Text
Looking for gmail tips and tricks? Or need help with gmail? We have a list of simple and useful tips for you to stay highly productive on worlds best email application. This list contains gmail organization tips, gmail filter tips and other gmail productivity tips. There are millions of users, who use email for their personal and professional communications. An email account at times could be called as your online identity. Of all the email services, Gmail is called the most popular choice for web users. It has the maximum amount of active users. Gmail has a number of features, which help its users while working with it. However, a majority of its users still are not aware of these features. Below is the list of 10 simple tricks, which can help you in improving your Gmail productivity. 1. Managing your To-Do list or tasks This feature help the users to create notes, set deadlines, add any message. In order to start using it, you need to click over the drop down menu located just beside the Gmail (above the compose button located at the left side). After clicking, you need to select ‘Tasks’, which will give you a popup window like the way you see in Gtalk. The more you explore this feature the smarter you become in your Gmail productivity. 2. Using different keyboard shortcuts Using different shortcuts could really help you in saving loads of your time while working with Gmail in the same way when you work with these over your Windows based PC. For instance, to compose a new email you can use c, to search you can use /, e is for archive, m for mute, etc. You can access the complete list from Google support web page. 3. Use Labels to categorize your emails The feature of Labels helps you in categorizing your email messages in your inbox. This reduces your load when you want to find out any specific email message. For instance, if you are using a single Gmail account for your business and personal purposes then by categorizing the emails using labels with Business and Home could help you in sorting out your emails. 4. Unsubscribing all the unwanted emails You could be getting a number of emails from different marketers updating different business deals, which you may not be interested to check. You could get rid of these by marking the particular email you want to unsubscribe from the link given inside the email message. It will give you a dialog box confirming to unsubscribe and put in the spam. However, if you have too many emails from many people here is a smarter way to unsubscribe from all the newsletters, marketing emails,and other spam you do not want to see in your inbox In Gmail search box, do a search for "newsletter OR opt out OR unsubscribe OR email preferences OR subscribed" Select (checkbox) the emails you want to unsubscribe from Click "More" -> "Create Filter" Click "Create filter with this search" Select "Skip the inbox" Select "Never mark it as important" "Apply label: JUNK" This way your inbox is cleaner and you can always check back on JUNK tag email if you need. 5. Drop the attachment files straight to compose mail window Attaching any file to your mail box is usually a tedious job, however, at Gmail you can do it by simply dragging and dropping it over the compose mail window unlike the way you do it over your windows based PC. 6. Undo the sent mails If you have mailed something and immediately realize it is going to a wrong person or a mail with wrong content is moved out, don’t worry, you have the rescue in Gmail. There is a button of undo, which you need to enable from settings page of Gmail, once you do it, you can undo any sent email immediately after pressing the send button. 7. Consolidate your multiple email accounts into a single Gmail account If you have multiple email accounts to manage, Gmail gives you the facility to control them all from one Gmail account by combining them together. All you need to do is to go to the setting page, check the Accounts and Import page and select
‘Send mail from other addresses’ or select the option ‘Add POP 3 email account and then simply do as per the upcoming instructions to enable this feature. In this way you can access different email accounts from a single Gmail account. 8. Create & edit filters Filters are considered as a powerful tool which helps you in instructing Gmail what you simply want to do with the messages as they reach your inbox. Creating them is an easy task, which will help you in sorting, forwarding, labeling and even deleting the email messages. 9. Background Send If you have typed a huge email message and want to send them out with multiple attachments to a large number of people then it could prove out to be a tedious job. However, by enabling the feature called Background Send (found inside the labs), you could do this job at the background while doing other work at your PC simultaneously. 10. Desktop notifications With this feature of Gmail, you get the notifications of any of the new incoming email or instant chat messages. This feature only works over Google Chrome, which could be enabled by going inside the settings. +3 Bonus Gmail Tips 11. Managing Contacts This feature help the users to manage contacts. In order to start using it, you need to click over the drop down menu located beside the Gmail (above the compose button located at the left side). Some of the features on this gmail contacts that I really love are listed below Mobile Sync - You can easily sync it on any smartphone, and the sync works both ways. I use it on my andreoid device and the sync is seamless and very fast. Another advantage of using mobile sync feature is backup of your contacts. In case you switch device or lost it your contacts will be easily synced up in new device using. Contact Merge Feature - There are times I have duplicate contacts of people e.g. one contact with email address and other with phone only. You can easily merge these contacts into one by below simple steps Go to contacts screen Select the two contacts you want to merge Click "More" -> "Merge Contacts" 12. Special Search Features The gmail search box is really powerful and some keywords in search box can be used to do really fast search for you. Finding Email with Attachments Lets say you want to find email containing documents as attachments, you can type this in search box has documents Similar to this there are also more option with "has" keyword (e.g. has videos, has photos, has calendar event). To see those you can type "has" (without quotes) in search box and options will show up. Lets say, you want to find a email with PDF attachment. This is how you can find it quickly has:attachment filename:pdf In case you are looking for email with a word document, this is how you can find it quickly has:attachment filename:doc These options can be combined with the regular label search options, e.g. has:attachment label:sent This will search for all attachment emails that you have sent. Feel free to play around with and explore the power of gmail. 13. How To Make You Gmail Highly Secure The best way to enable tight security on your gmail is to have two factor authentication. You can enable this on google accounts settings. This is a recommended security measure if you are using your gmail account for any sensitive information exchange including financial, social security or any other documents and details that may be sensitive. Make sure to also get the google authenticator app on your mobile device for easy access anywhere. Google Authenticator on android Google authenticator on iOS devices Final word Gmail is among the most popular email services being used by millions of users all across the world. Unfortunately, most of its users are still unaware about these features, which can increase their productivity over Gmail. Trying the above tips and tricks can help you in boosting up Gmail productivity. Do you know of any tricks that we missed out? Feel free to share in comments.
This is a Guest Post by Alia. She is a writer/ blogger. She contributes to Gustavo Perdomo.
0 notes
Text
Upgrading Your Storage: A Step-by-Step Guide to Installing an SSD
In today’s tech-driven world, upgrading to a Solid-State Drive (SSD) is one of the most effective ways to enhance the speed and performance of your computer. If you're looking to make this upgrade, you've made a great decision. This step-by-step guide will help you install your SSD smoothly, ensuring optimal performance for your device.
Step 1: Backup Your Data Before you begin, it’s essential to back up your important files. This protects you against data loss during the upgrade. Use an external drive, cloud storage, or backup software to secure your data.
Step 2: Gather Necessary Tools and Components Ensure you have the right tools: a screwdriver (Phillips or flat-head), an anti-static wrist strap (to protect your SSD from electrostatic damage), and the SSD itself. You will also need the appropriate cables and any necessary adapters.
Step 3: Identify an Open Slot for the SSD For desktops, look for an empty drive bay near the existing hard drive. Laptops may require checking for an extra slot or replacing the existing drive.
Step 4: Power Off and Disconnect Power down your device completely and disconnect it from any power sources. For laptops, remove the battery to eliminate electrical charge. This step ensures safety for both you and your device.
Step 5: Remove the Existing Drive If you're replacing an old hard drive, unscrew it and gently disconnect any cables. In desktops, this might require removing the side panel for access to the drive bay.
Step 6: Mount the SSD in the Drive Bay Align the SSD with the mounting holes and secure it with screws. Some desktop cases offer tool-free mounting systems, simplifying this step.
Step 7: Connect Cables Connect the required cables: a SATA data cable from the SSD to an available SATA port on the motherboard, and a SATA power cable from the power supply unit. In laptops, ensure the SSD is properly connected to the motherboard.
Step 8: Secure the SSD in Place Once the cables are connected, tidy up any loose cables with zip ties to prevent interference with cooling components and maintain a clean interior.
Step 9: Close Up and Power On Reattach any panels or covers you removed. For laptops, reinsert the battery. Power on your device and check if it recognizes the new SSD. If it doesn’t, check the connections to ensure everything is properly seated.
Step 10: Initialize and Format the SSD Once the SSD is recognized, you need to initialize and format it. On Windows, use the Disk Management tool to initialize the disk and format it with the NTFS file system. For macOS, use the Disk Utility tool.
Step 11: Restore Your Data With the SSD formatted, restore your data from the backup. This ensures a smooth transition from the old storage device.
To maximize SSD performance, consider optimizing your system settings. Disable features like Superfetch and Prefetch on Windows, and enable TRIM support on macOS. These changes help extend the lifespan of your SSD and improve its performance.
Congratulations! You've successfully upgraded to an SSD, unlocking faster boot times and improved application load speeds. By following these steps, you ensure a smooth installation process and set your computer up for a faster, more responsive experience.
Upgrading to an SSD may seem challenging, but with the right tools and guidance, it’s a rewarding task. Whether you’re a casual user or a gamer, the performance boost you get from an SSD is worth the investment.
Want to Buy SSDs in Bulk at Affordable Prices from Vstl?
VSTL offers a wide selection of high-quality SSDs suitable for various needs. Whether you're upgrading your business systems or building a new setup, VSTL provides competitive pricing on bulk orders, ensuring you get top performance and reliability without breaking the bank. Explore VSTL for cost-effective SSD solutions tailored to your requirements.
0 notes
Text
Step by Step Guide for Fire Remediation

Here’s a step-by-step guide for fire remediation to help you navigate the recovery process after a fire:
Step 1: Ensure Safety First
Contact Authorities
Confirm with the fire department that it’s safe to enter the property.
Assess Structural Stability
Check for hazards like weakened walls, floors, or ceilings. Use caution when entering.
Turn Off Utilities
Shut off gas, electricity, and water until inspected and deemed safe.
Step 2: Contact Your Insurance Provider
File a Claim
Notify your insurance company about the fire and initiate the claims process.
Document Damage
Take photos and videos of the damage before any cleanup or repairs.
Step 3: Hire Fire Remediation Professionals
Find Certified Experts
Look for professionals with certifications like IICRC (Institute of Inspection Cleaning and Restoration Certification).
Get Estimates
Request detailed quotes from multiple companies for comparison.
Step 4: Assessment and Planning
Damage Inspection
Professionals will assess structural, smoke, soot, and water damage.
Restoration Plan
A step-by-step plan is created to address structural repairs, cleaning, and deodorization.
Step 5: Secure the Property
Board Up Openings
Cover broken windows and doors to protect against weather and unauthorized entry.
Tarp the Roof
Protect the home from rain or debris if the roof is damaged.
Step 6: Water Removal and Drying
Extract Standing Water
Water from firefighting efforts is removed using pumps and vacuums.
Dry the Space
Use industrial-grade dehumidifiers and fans to prevent mold growth.
Step 7: Smoke and Soot Cleanup
Surface Cleaning
Professionals clean walls, ceilings, floors, and personal items with specialized equipment and cleaning agents.
HVAC Cleaning
Air ducts and vents are cleaned to remove soot particles.
Step 8: Odor Removal
Deodorization Techniques
Use ozone generators, thermal foggers, or hydroxyl machines to eliminate lingering smoke odors.
Absorbents and Cleaning Agents
Activated charcoal or baking soda can help absorb odors from porous surfaces.
Step 9: Structural Repairs
Rebuild and Replace
Damaged walls, ceilings, and floors are repaired or rebuilt.
Electrical and Plumbing Work
Replace or repair compromised wiring and pipes.
Step 10: Restore Personal Belongings
Cleaning and Salvaging
Clean furniture, electronics, clothing, and other items affected by smoke and soot.
Disposal
Discard irreparably damaged items following local regulations.
Step 11: Final Inspection
Safety Checks
Inspect the property to ensure all systems (plumbing, electrical, HVAC) are functioning correctly.
Insurance Approval
Get the final restoration approved by your insurance company for reimbursement.
Step 12: Prevention and Maintenance
Install Fire Safety Features
Add smoke detectors, fire extinguishers, and fire-resistant materials.
Regular Maintenance
Clean HVAC systems and replace filters to maintain air quality.
Would you like to explore specific steps, like hiring professionals, handling insurance claims, or DIY cleaning tips?
0 notes
Text
10 Unconventional Insights You Should Know About Car Transport Services

Imagine this: You’re getting ready for a cross-country move, or maybe you've just bought a vintage car online, and now you need it delivered safely to your doorstep. You’ll probably think of calling an auto transport company. But if you’re like most people, you might not know all the ins and outs of how car transport works beyond simply booking the service. From hidden costs to unique tips on finding the best car shipping company, there's a lot more to this service than meets the eye. Let's explore 10 things about car transport that most websites don't talk about—but should!
1. The "Route" Matters More Than You Think
When you’re searching for a vehicle transport company, you might focus on price or speed, but what about the route? The route can impact the cost and delivery time. For example, if you're shipping your car from a rural area to a city, the car may need to be transported in two stages: first to a larger hub, then onto its final destination. This can add time and cost, but knowing this beforehand can help you plan better.
2. Not All Auto Transport is Equal in Safety Standards
You may assume that every car shipping company follows the same safety protocols, but that’s not true. Many transport companies operate on a variety of safety levels, so make sure to ask about the specific safety standards they follow. Look for those that use enclosed carriers if your car is a luxury or classic model to avoid damage from the elements or debris.
3. The Real Cost of Car Shipping – Hidden Fees
Auto transport quotes often look great at first glance, but beware of hidden fees. For instance, some car transport companies charge extra for "terminal-to-terminal" services or additional insurance options. According to the American Moving & Storage Association, 40% of people report being surprised by hidden costs when using auto transport services. Always ask for a breakdown of fees, including any potential add-ons, so there are no surprises when the final invoice arrives.
4. Timing is Everything in Car Transport
While car transport companies typically provide a time window for delivery, it's important to understand that exact dates are difficult to guarantee. Weather conditions, road closures, or even truck breakdowns can delay delivery. To get the best results, plan ahead and allow for some flexibility in delivery dates.
5. Your Car’s Condition Matters More Than You Think
Before you ship your car, take a thorough inventory of its condition. It’s easy to overlook small details, but documenting any pre-existing damage with photos can help resolve any future disputes over potential damage during transport. This simple precaution can help avoid unnecessary costs when filing claims with your car shipping company.
6. Not All Car Transport Is Door-to-Door
Many people assume that their car will be picked up and delivered directly to their front door. However, some carriers may only offer terminal-to-terminal services, meaning you'll need to drop off or pick up your vehicle from a designated location. Knowing this will save you time and potential frustration.
7. Seasonality Affects Prices
The time of year you’re shipping your vehicle can significantly affect the price. During peak seasons, like summer or the end of the year, demand for auto transport increases, which could raise your rates. According to the U.S. Department of Transportation, seasonal fluctuations can cause price swings of up to 25%. If you have flexibility, consider shipping your vehicle during the off-peak months.
8. Car Transport Isn't Just for Personal Vehicles
Car transport isn’t only for personal cars. In fact, it’s commonly used for commercial purposes as well. Businesses that purchase cars in bulk, such as car dealerships, often use vehicle transport services to move their inventory. Car shipping companies often offer discounts for bulk shipments, which could save money for businesses and individuals alike.
9. Smaller Transport Companies Can Offer More Personal Service
While large, nationwide car transport companies may seem like the obvious choice, smaller companies often provide more personalized service. They can offer more flexible schedules, better customer support, and more tailored solutions. A small car transport company might even give you a direct line to the driver, which is rare in larger companies.
10. Tracking Your Car in Real-Time
Most modern vehicle transport companies now offer GPS tracking, which means you can monitor your car's progress in real-time. This is a great feature that many customers overlook but can bring peace of mind during the transport process. It's especially helpful for longer trips, allowing you to stay updated on your car's location.
Final Thoughts
Car transport might seem like a straightforward service, but as we’ve seen, there’s more to it than just picking up the phone and booking a shipment. By being aware of hidden costs, timing issues, and the differences between service providers, you can make a more informed decision about your car shipping company. Whether you're shipping a classic car across the country or need a fast, reliable way to get your vehicle delivered, understanding these unique insights can help you get the best service for the best price.
Sources:
American Moving & Storage Association
U.S. Department of Transportation
#auto transport#car transport#transportation#vehicle transport#auto shipping company#auto transport company#auto shipping#car transport company#car shipping company#car shipping#vehicle transport company
0 notes