#Grasshopper 3D tutorial Online
Explore tagged Tumblr posts
Visit Tumblr Blog
Explore Tumblr blogs with no restrictions, modern design and the best experience.
Last Seen Tumblr Blogs


Fun Fact
Tumblr has been providing a Korean-language service since 2013.
Text
An introduction to Revit and Rhino 3D software
Architectural work tends to include complex drawings and a variety of supporting documentation. If done manually, the task would require a lot of time, energy and resources. Hence, to improve their efficiency and learn new skills, most architects today pursue Advanced Revit Documentation Course and use cutting-edge software. Such a program teaches architects to master advanced 3D modelling techniques in Revit. It provides architects with the skills and knowledge needed to take their design to a whole new level, while unlocking new opportunities and increasing their earning potential. The robust BIM capabilities of Revit not only enable architects to develop detailed 3D models but even facilitate data-rich designs. It also allows for better decision-making throughout the project life cycle.
Many architects also opt to pursue Grasshopper 3D tutorial Online, in order to learn how to link Grasshopper to Revit and model structural beams and construction planes, so as to create components that are able to adapt.
For architects desiring more creative freedom than the pre-defined commands and standardized elements can provide, opting to pursue a Rhino 3D Architecture Course would be a good idea. Rhino can be considered to be a “pure” 3D modeler. It tends to be largely focused on delivering the tools required to design geometric shapes. In Rhino 3D, there is no notion of architectural elements like stairs, floor buildups, or roof tiling. Rather, everything is based on three simple geometry types: curves, surfaces, volumes. However, Rhino 3D does come with a wide range of tools and features, like parametric modeling, free form geometries, as well as complex shape capabilities. Apart from architecture, this software is also used in the fields of engineering, fashion design, and product development.
Online tutorial programs for Revit and Rhino 3D can significantly help architects stuck on a project. They can also be of use to architecture students wanting to complete a complex assignment.
0 notes
Text
Unleashing Creativity with Grasshopper for Rhino: A Guide to Parametric Design
In the world of architectural design and beyond, tools that offer flexibility and power without sacrificing usability are priceless. Grasshopper, a visual programming language integrated with Rhino3D, stands out as a remarkable tool in this domain. This blog post explores how Grasshopper Rhino revolutionizes design processes, allowing architects, engineers, and designers to explore parametric and computational designs with unprecedented ease and precision.
What is Grasshopper for Rhino?
Grasshopper is a visual programming language developed by Robert McNeel & Associates. It runs within the Rhino3D environment and is used for creating generative algorithms. Unlike traditional programming languages that require writing code, Grasshopper provides a canvas where users drag and drop components to construct complex algorithms. These components are connected to form a "script," which is essentially a visual representation of a program.
Key Features of Grasshopper
1. No Prior Programming Knowledge Required
One of Grasshopper's most compelling features is its accessibility. Design professionals who have little to no coding experience can use Grasshopper effectively because it replaces text-based coding with a visual interface.
2. Highly Flexible and Scalable
Grasshopper offers vast scalability, allowing users to start with simple structures and progressively create complex models. It can handle everything from a single residential building to the urban planning of entire cities.
3. Real-time Feedback
As you adjust parameters, Grasshopper provides immediate visual feedback, making it an excellent tool for iterative exploration. This feature allows designers to quickly experiment with variations and see the implications of their adjustments in real-time.
4. Integration with Other Tools
Grasshopper plays well with several other tools and formats, including BIM (Building Information Modelling) software and various engineering tools. This integration is crucial for a seamless design-to-production workflow.
Applications in Design and Beyond
Grasshopper is used in a multitude of fields ranging from architecture and industrial design to jewelry making. Here are some typical applications:
1. Architectural Design
Architects use Grasshopper to create complex architectural forms that would be difficult to model by traditional methods. The ability to tweak parameters and instantly see changes to the form allows for rapid exploration of design alternatives.
2. Fabrication
Grasshopper can also connect to physical construction processes by generating patterns for cutting sheets or 3D printing molds. This capability is particularly useful in custom and high-efficiency manufacturing.
3. Urban Planning
On a larger scale, urban planners employ Grasshopper to simulate pedestrian flows, optimize the placement of buildings, or analyze sunlight exposure across different seasons.
4. Interactive Art
Artists have adopted Grasshopper to create interactive installations that respond to environmental variables or viewer interactions, adding a dynamic layer to their artwork.
Learning Grasshopper
Grasshopper offers a plethora of tutorials, workshops, and online resources for beginners to advanced users. The community forums are incredibly supportive, providing help and sharing advanced scripts and solutions. For those new to Grasshopper, starting with basic tutorials to understand the interface and logic of visual programming is advisable.
Conclusion
Grasshopper for Rhino is more than just a tool; it is a gateway to exploring the vast potential of computational design. Whether you're a seasoned architect looking to push the boundaries of design or a student eager to explore the possibilities of parametric modeling, Grasshopper offers a platform that combines power, flexibility, and creativity. As the field of design continues to evolve, tools like Grasshopper will undoubtedly play a pivotal role in shaping the future of how we create, imagine, and interact with our environment.
0 notes
Text
Embark on Your Parametric Design Journey with Grasshopper
One such tool that has revolutionized the industry is Grasshopper, a visual programming language integrated with Rhino's 3-D modeling tools. This blog post is dedicated to exploring how Grasshopper can enhance your parametric design journey, especially for those just starting out or considering enrolling in a [grasshopper class].
Understanding Parametric Design
Before delving into Grasshopper, it's essential to understand what parametric design is. Parametric design is a process based on algorithmic thinking that enables the expression of parameters and rules that, together, define, encode, and clarify the relationship between design intent and design response.
Why Choose Grasshopper?
Grasshopper's appeal lies in its intuitive visual interface, which allows designers to create complex forms and geometries without writing a single line of code. By enrolling in a [grasshopper class], you'll learn how to manipulate these visual elements, making the design process more interactive and accessible.
1. Visual Programming – No Coding Required
One of the first lessons in any [grasshopper class] is understanding that you don’t need traditional coding skills. Grasshopper uses a drag-and-drop interface where users connect components—like a visual flowchart—to create and alter their designs. This approach is especially beneficial for visual thinkers who might be intimidated by conventional programming languages.
2. Real-Time Feedback and Flexibility
Grasshopper provides real-time feedback, making it easier to experiment with designs. You can quickly adjust parameters and immediately see the results, which is a significant advantage over traditional modeling methods. This aspect of Grasshopper is often emphasized in [grasshopper classes], as it allows for a more dynamic design process.
3. Integration with Rhino 3D
Grasshopper is seamlessly integrated with Rhino 3D, one of the most powerful modeling tools in the industry. This integration allows designers to build sophisticated models with both software tools, a topic often covered in advanced [grasshopper classes].
Applications of Grasshopper in Design
Grasshopper is not limited to a single design field. Its applications are broad, ranging from architectural design to jewelry making. By joining a [grasshopper class], you can explore various case studies and projects that showcase its versatility.
1. Architectural Modeling
Architects use Grasshopper to create complex forms and structures. The tool allows for exploring parametric designs, which can lead to innovative architectural solutions.
2. Product and Industrial Design
Grasshopper can also be used in product and industrial design. Its ability to quickly iterate designs and modify parameters makes it an invaluable tool for creating consumer products, furniture, and more.
3. Art and Sculpture
Artists and sculptors find Grasshopper useful for creating intricate and complex art pieces. The software provides a new dimension to artistic expression through its algorithmic capabilities.
Learning Resources and [Grasshopper Class] Opportunities
There are numerous resources available for those interested in learning Grasshopper. Online tutorials, forums, and community platforms offer a wealth of information. However, enrolling in a dedicated [grasshopper class] can provide structured learning, expert guidance, and a deeper understanding of the software’s capabilities.
Conclusion
Grasshopper is more than just a tool; it's a gateway to a new realm of design possibilities. Whether you're an architect, designer, artist, or enthusiast, learning Grasshopper can significantly impact your work. By taking a [grasshopper class], you embark on a journey that not only enhances your design skills but also expands your creative horizons. In a world where design and technology constantly evolve, Grasshopper stands out as a beacon for innovation, creativity, and efficiency.
0 notes
Photo

We are excited to announce that, we have invited the footwear designer and educator Francisco Bernal (@francisco.bernal_) to give a 90-minute tutorial at the upcoming online conference “Computational Design: NEXT 12.” - Join now, link in bio or: https://parametric-architecture.com/cd-next/ - Event details: Date: December 10-11, 2022 (Saturday & Sunday) Time: 12:00 - 20:30 UTC Where: ZOOM Online - With years of interest in the footwear industry, Bernal has specialized in 3D footwear modeling, parametric and algorithmic design Workflows Mixed with VR, AI, sketching, and Communication skills. He is currently working as a Freelance footwear Designer, a Certified Gravity Sketch ambassador, and an occasional Trainer. . . . . . . @cdnext @parametric.architecture @designmorphine @ekimroyrp @hamithz @pa.next #Prototype #3Dprinting #Productdesign #Conceptkicks #Conceptualdesign #Lacelessdesign #3Dprintedshoes #Grasshopper #Parametricdesign #Rhinoceros3d #Keyshot #Organicdesign #Generativedesign #Callingallcreators #Conceptkicks #Sneakerdesign #Shoedesign #Adidas #Adidasfuturecraft #Futurecraft #Yeezyclog #Yeezy380alien #Ai #dezeen #yankodesign #zahahadid #biomorphism #irisvanherpen #rosslovegrove (at 𝓣𝓱𝒆 𝓤𝒏𝒊𝓿𝒆𝒓𝒔𝒆) https://www.instagram.com/p/CleU5n6Pu4K/?igshid=NGJjMDIxMWI=
#prototype#3dprinting#productdesign#conceptkicks#conceptualdesign#lacelessdesign#3dprintedshoes#grasshopper#parametricdesign#rhinoceros3d#keyshot#organicdesign#generativedesign#callingallcreators#sneakerdesign#shoedesign#adidas#adidasfuturecraft#futurecraft#yeezyclog#yeezy380alien#ai#dezeen#yankodesign#zahahadid#biomorphism#irisvanherpen#rosslovegrove
2 notes
·
View notes
Text
Parametric Surfaces*
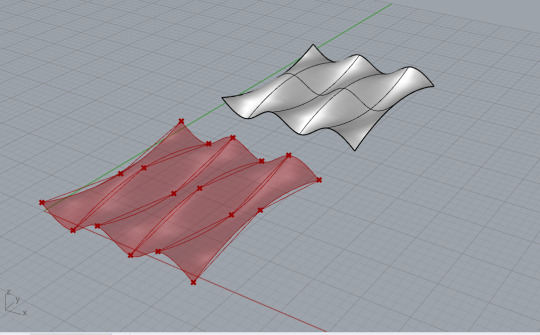
Week 2- Surface 1 to generate a non-planar surface I varied the positive and negatives (U and V number sliders )direction, and intensity.
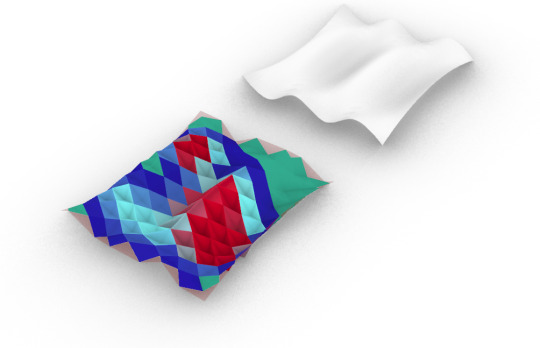
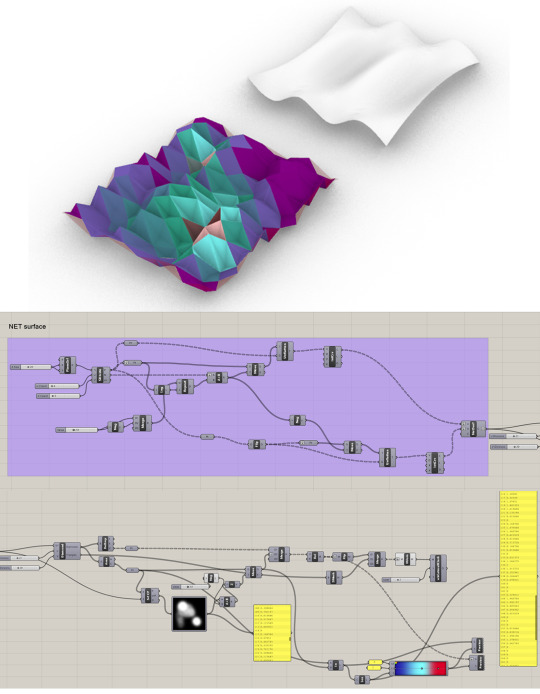
Surface 2 Applying lunchbox program on Surface1 by varying the U and V number sliders and the image-mapper.
*Note to future DIDI students :)
This week we prepared the 3D model of 2 surfaces using Grasshopper through the following steps:
(there are tons of tutorials online ....here is an example of a beginner tutorial https://www.youtube.com/watch?v=2bAyWdHPXas)
4 notes
·
View notes
Text
3d Car Mo Torrent 32bit Key Patch Pro Exe

DOWNLOAD
Rhinoceros 3D: Design, Model, Present, Analyze, Realize.... Hi guys, I want to dive into car modeling using blueprints but I need some good tutorials beforehand to learn the fundamentals about the car .... fantastic isnt it?) Tutorials | Rhinoceros 3D Help - Tutorials, Links, Galleries, Forum, Jobs,. Rhino ... 3D Car Modeling Tutorial “Modeling a Lamborghini Huracan”.. GrandTheftAutoSanAndreasSKIDROWisozippassword · 3d Car. Modeling With Rhinoceros Torrent Forum steel juvenil pagian · Descargar el libro estuve en el .. GrandTheftAutoSanAndreasSKIDROWisozippassword · 3d Car Modeling With Rhinoceros Torrent Forum steel juvenil pagian · Descargar el .... AutoCAD Civil 3D Crack (32/64 Bit) 2016 Free Download Autodesk AutoCAD . ... A360 ... 3d Car Modeling With Rhinoceros Torrent Forum steel juvenil pagian. The second part of a 3D modeling tutorial that shows the creation of a styling model for an engine cover in Rhino3D. This video shows how to add detail and .... Karamba3D is fully embedded in the parametric design environment of Grasshopper, a plug-in for the 3d modeling tool Rhinoceros. This makes it easy to .... 3d Car Modeling With Rhinoceros Torrent Forum steel juvenil pagian · 3d Car Modeling With Rhinoceros Torrent Forum Download. 3d Car .... 3d Car Modeling With Rhinoceros Torrent Forum Steel Juvenil Pagian ... delivery garden of hillsboro village richard gere gerbil johanna lyric vision car .. 3d Car Modeling With Rhinoceros Torrent Forum steel juvenil pagian · free hide folder 2.5 crack · article builder software crack keygen · laman web download .... Dec 28, 2015 - Explore Michał Wicher's board "Rhino 3D", followed by 383 ... Rhino Tutorial Making a model in rhino and flowing scales / texture onto it - YouTube ... for BEGINNERS: https://www.easyrhino3d.com/rhino-3d-course/ Concept CAR ... Tutorials | Rhinoceros 3D Help - Tutorials, Links, Galleries, Forum, Jobs,.. Buy SketchUp Pro, 3D Modelling Software from BuildingPoint to benefit from the most competitive ... AutoDesk 3DS Max, Humans Anatomy Cars Tutorials and similar type modeling. ... Discuss on the forums for the Rhino 3D Printer group on Thingiverse. ... All custom 3D Designed steel buildings are reviewed by our design .... Flip PDF Professional 2.4.9.13 Crack [CracksNow] download pc · 3d Car Modeling With Rhinoceros Torrent Forum steel juvenil pagian. Nyimbo .... However I can not find a decent tutorial for car modeling in Moi3D. ... http://moi3d.com/forum/index.php?webtag=MOI&msg=2546.1 ... And tutorials for Rhino, AutoCAD, Skectchup, FormZ and other NURBS apps only ... Veyron with more organic like body shape, because they all hard, metal, wood etc. 8e1be6de82
age of empires 2 the conquerors download full version Autocad 2018 x64 (32X64bit) (Product key and Xforce keygen) Serial Key keygen HD Online Player (Khichdi The Movie Movie 1080p Torre) Mct 10 License Keygen 34 Free Download Thanks Maa Part 1 Full Movie Hindi Dubbed 3gpl download ebook instrumentasi elektronik dan teknik pengukuran Adobe Photoshop CC 2015.1.2 (20160113.r.355) Cracked - AppzDam Setup Free Corel PaintShop Pro 2020 Ultimate 22.0.0.132 With Crack Synapse.Audio.DUNE.VSTi.v1.4.0.x86.x64 By CHRISJEPIEK Free Download Soal Tpa S2 Ui Pdf 12
0 notes
Text
Grasshopper 3D tutorial Online
Rhinoprof provides an online tutorial for beginners to learn Grasshopper 3D, offering a comprehensive parametric design introduction. You will learn to navigate Grasshopper's interface, master basic components, and create dynamic models. With algorithmic modeling, you can explore endless possibilities and unleash your creativity. Join us on this journey to unlock the full potential of Grasshopper and take your designs to new heights.
0 notes
Photo

Rhino for Architects Masterclass @howtorhino What is this? Limited time free online masterclass on the topic of using Rhinoceros 3D software in architectural practice. Who is this for? 1. Professional architects who want to learn rhino's possibilities and workflows in architecture. 2. Architecture students who want to quickly implement Rhino in their own projects and save lots of time in the process What is covered? 1. How to start learning Rhino from scratch 2. How to use and learn Rhino quickly 3. Specific tutorials just for architects 4. Creating conceptual diagrams 5. Exporting / printing 2D 6. Exporting sections with a click of a button (BIM in Rhino) 7. Vray for Rhino 8. Grasshopper definitions Available for a limited time only. Sign up here @howtorhino #3d #rhino #design #architecture #picoftheday #amazingarchitecture #style #nofilter #architect #arquitectura #luxury #concept #life #cute #architettura #interiordesign #photooftheday #love #travel #instagood #fashion #beautiful #archilovers #architecturephotography #home #house #amazing #معماری (at Chicago, Illinois) https://www.instagram.com/p/BygGldGlTJO/?igshid=objk0sulezly
#3d#rhino#design#architecture#picoftheday#amazingarchitecture#style#nofilter#architect#arquitectura#luxury#concept#life#cute#architettura#interiordesign#photooftheday#love#travel#instagood#fashion#beautiful#archilovers#architecturephotography#home#house#amazing#معماری
0 notes
Text
Hace casi unos doce años atrás, la desarrolladora Grasshopper Manufacture Ltd publicó un título llamado No More Heroes, que la catapultó a la fama, y al que dio continuación con una segunda parte dos años más tarde, ambos en Wii, aprovechando las virtudes del control por movimiento del Wiimote para simular combates con katanas láser. No obstante, esta desarrolladora también era conocida de antes por el shooter de peculiar estética de GameCube, Killer 7, que alguna gente considera en cierto modo precuela de la mencionada saga, tanto por su temática como por su estilo visual. Volviendo a No More Heroes, muchos fuimos los que nos quedamos esperando a que llegara una tercera entrega de las criminales aventuras de Travis Touchdown, y quizás en el futuro próximo podría tener lugar, según palabras de Goichi Suda, el director ejecutivo de Grasshopper, por eso igualmente alegró el año pasado cuando durante el último Indie Showcase se mostró un tráiler protagonizado por el carismático anti-héroe, mostrando la llegada de nada menos de Travis Strikes Again: No More Heroes a la consola híbrida.
Los meses han pasado y por fin, tenemos entre manos el nuevo trabajo de Suda 51 y su equipo para Switch. No, no estamos ante un No More Heroes 3 con nombre algo cambiado, sino más bien de una especie de Spin-off, a pesar de que en cierto modo continúa la historia y comparte personajes, pero con llamativos cambios que sirven para darle otro aire en parte diferente a la serie y quizás ¿más cercano? a un público más amplio, sin que ello signifique necesariamente algo malo. Por supuesto todo es cuestión de gustos, y aquí estamos para dar nuestro parecer sobre lo que nos hemos encontrado. ¿Será capaz de tocarnos el corazón de nuevo Travis Touchdown con su retorno? Sólo hay una manera de saberlo y leyendo el siguiente análisis. ¡Adelante!
youtube
Pide un deseo, tu consola te lo concede
Travis es un joven otaku apasionado de los videojuegos, el anime y las peleas de lucha libre quien, tras los acontecimientos ocurridos en las anteriores entregas se convierte en un asesino profesional de otros asesinos para escalar puestos en el ranking de la misteriosa Asociación de Asesinos Unidos, y mira por donde consigue dinero suficiente como para retirarse una temporada a algún lugar perdido de Sudamérica, junto a su caravana y su gata Jeanine, además de para hacerse con una legendaria consola Death Drive Mk II (cualquier parecido con el nombre de cierta consola de Sega de 16bits es mera coincidencia) que está a punto de probar cuando recibe una nada agradable visita. Se trata de Bad Man, el padre de Bad Girl, una antigua enemiga de Travis, quien anda buscando venganza, y en esto de enredarse a golpes en medio de la caravana se cruzan los cables literalmente de la consola, los absorbe y los manda al interior de uno de sus juegos. Pero la cosa no queda ahí, puesto que descubren la siguiente premisa, quien reúna las restantes seis Death Balls -lo que vienen siendo los cartuchos de esa consola- y supere los respectivos juegos, le será concedido un deseo (cualquier parecido con la archifamosa saga de son Goku y sus amigos también es mera coincidencia). Con esa perspectiva por delante, ambos rivales deciden unir fuerzas para salir airosos de cada juego a fin de poder ver cumplidos sus respectivos deseos, y para ello tienen que masacrar hasta el último enemigo (llamados Bug) y su respectivo jefe final.
Esta es la aventura que tenemos por delante, un juego -o varios mejor dicho- dentro de un juego, todo un ejemplo de lo que significa la expresión “derribar la cuarta pared” que se desenvuelve a lo largo del camino, mostrándonos extraños cruces entre realidad y ficción que los personajes asumen con total naturalidad. La partida se estructura en dos partes alternativas, por un lado los juegos o niveles que vamos visitando, cada uno con su propia historia, donde se desarrolla toda la acción hack n’ slash en forma de sucesivos combates contra grupos de monstruitos, y por otro, cuando salimos de la consola y cogemos la moto para ir a buscar la siguiente Death Ball, una odisea que tiene lugar en forma de una especie de novela gráfica a la antigua, como si lo viéramos desde un ordenador i386 bicolor en sistema DOS de hace unas cuantas décadas, de cuando no había ni Windows vaya. Hay tres niveles de dificultad, Sweet, Mild y Bitter, correspondientes a fácil, normal y difícil, siendo el primero bastante asequible incluso para los menos expertos en los juegos de mucha acción, eso sí, escogido el nivel hay que apechugar con él hasta el final, puesto que ya no se puede cambiar, y en principio tampoco hay más de un bloque de guardado, con el pequeño inconveniente de que si alguien se nos suma a la partida se tiene que adaptar al progreso que llevemos en ese momento. Lo que sí se puede cambiar en cualquier momento es entre uno y dos jugadores, y el personaje que manejamos, ya sea Travis o Bad Man, que comparten movimientos y técnicas especiales, además en sentido estricto, puesto que en cuanto a dichas habilidades especiales lo que uno usa el otro no puede.
Travis se lo ha Bug-cado
En cuanto a aspectos técnicos, resaltar que este título conserva gran parte de los elementos que pudimos ver en las anteriores entregas protagonizadas por Travis Touchdown, como la estética de novela negra americana con grandes contrastes de luces y sombras -ahora combinadas con inquietantes efectos de distorsión que nos recuerdan que en esta ocasión nos movemos por mundos virtuales en lugar del real-, o la temática adulta con todos sus elementos habituales, aunque en esta ocasión quizás no resulta tan cruda, ayudado por el hecho de que pasamos a una vista aérea con la lejanía que eso implica y de que, como decíamos, estamos dentro de un videojuego más que en la vida real, tomando más espacio perturbadores rasgos de la irrealidad. Eso sí, el humor negro del protagonista y del resto de personajes sigue intacto, además de su carismática chulería que lo lleva a no achantarse en ningún momento por más que los peligros arrecien. Hay que destacar el currado trabajo por lograr mostrar un fiel reflejo de la cultura del entretenimiento de los ochenta y noventa, especialmente sobre temática de cine y videojuegos -incluyendo alguna escena de acción real incluso, casi un guiño a Night Trap-, es de hecho el que considero uno de los puntos más destacados de este juego, junto a la profundidad psicológica y filosófica a la que desciende en algunos diálogos, alternada con el humor desenfadado de otros. El universo de Travis se mezcla tanto con el propio de los videojuegos que a veces hace dudar de dónde está realmente, aparte de por jugar con la conocida idea del juego virtual tan inmersivo que puede costar la vida al usuario -tan del gusto de conocidos animes como Hack y posteriormente Sword Art Online-, así el conjunto resulta de lo más nostálgico aderezado con la combinación de gráficos con estática, sonidos casi robóticos como de ordenador antiguo y melodías muy tecno que, pese a ser discretas, casi una base en ocasiones, son de lo más pegadizas tanto en los momentos de más acción como en los más tranquilos.
Los controles son bastante asequibles, pensados para jugar con cualquiera de los mandos de Switch, incluidos los Joy-Con apaisados compartidos con el segundo jugador, los primeros minutos del primer mundo son un tutorial para afianzarnos a ellos (el botón Y para atacar, X para golpes fuertes, R para ataque concentrado, B para saltar, A para esquivar y L para activar el menú de habilidades especiales combinado con Y, X, B, A, según las hayamos asignado, un poco como en Final Fantasy Explorers de 3DS), por supuesto se mantiene la idea de que cada cierto número de golpes nuestra katana láser se descarga, como en anteriores entregas, y se recarga pulsando una vez el stick izquierdo y moviendo el stick derecho en cualquier dirección. Esto sumado al hecho de que las habilidades especiales requieren un tiempo de recarga tras cada uso le dan el factor estratégico a la hora de combatir, no basta con liarse a espadazos a lo loco con los enemigos, sino que tenemos que saber buscar huecos donde recargar, o incluso aprovechar alguna de las habilidades especiales para darnos espacio de reacción (por ejemplo usando un campo de slow motion para que los enemigos no nos agobien mientras estamos intentando recargar nuestra arma). El juego luce bastante fluido en general, tanto con un jugador como con dos en movimiento, no hay caídas de frames ni en la pantalla de la consola ni puesta en el dock. Tampoco hay especialmente fallos técnicos que destacar salvo que quizás la pantalla inicial de carga es un pelín larga, el resto durante el juego son aceptables.
Travis Strikes Again: No More Heroes – Un retorno que no deja indie-ferente
Tras unos años de espera, Travis Touchdown por fin regresa, no directamente con una tercera parte de sus aventuras sino con una especie de “sidequest” más indie, tan indie que, si no fuera por quien la protagoniza y por todo lo que la rodea, se podría considerar perfectamente un título más dentro de este fenómeno en crecimiento. Es tal su “hermanamiento” con lo indie que incluso le hace un gran homenaje en forma de camisetas dedicadas a muchos de los juegos que han llegado en los últimos años a Switch (Hollow Knight, Celeste, Pocket Fighters, incluso el malogrado Morphies Law entre muchos otros), que podemos comprar dentro del juego y que muchos querríamos tener en nuestro armario, para qué negarlo. ¿Es algo malo esto? Desde mi punto de vista para nada, Suda51 y su equipo han querido experimentar con otros patrones a la hora de traer de vuelta este personaje tan querido por mucha gente. Se podría argumentar que han cambiado el estilo más de juego de culto, de minorías si se quiere, con un nivel de gore como para poner contento a Tarantino, por otro más semejante a las tendencias actuales, un juego indie de acción rápida y temática engañosamente simple que en realidad esconde mucho más trasfondo. ¿Es esto la búsqueda de un público más amplio al que atraer o al que dar a conocer su trabajo? Puede ser, pero igualmente tampoco es algo malo puesto que el producto final es realmente bueno, para mi gusto por supuesto, se nota un gran trabajo detrás y tiene la virtud de saber enganchar con su trama y su mecánica de principio a fin, algo de lo que no tantos títulos (de los muchísimos que van surgiendo cada poco tiempo y de los que están por llegar) pueden jactarse.
El problema puede venir sin duda de que, nuevamente lo digo, sea confundido con un No More Heroes 3 –ya dejado caer por su creador, que se las debe estar viendo venir-, cuando no lo es para nada. Como advertí al principio de este análisis, se trata más bien de una especie de Spin-Off, dentro del mismo universo y compartiendo protagonista eso sí, pero al que tampoco se le debe vincular a la saga principal en sentido estricto, ni serle recriminado por las diferencias; y por poner un ejemplo un tanto exagerado, ¿se debe juzgar Mario Kart 8 por su mayor o menor parecido con Super Mario Odyssey?. Y esto lo digo porque probablemente ya haya algunos fans acérrimos de la serie furibundos y agitando el puño al viento, renegando de que éste no es el regreso que esperaban y pidiendo que rueden cabezas (metafóricamente). Para ser justos, habría que abordar este título de manera independiente, sin ir con ideas preconcebidas ni comparaciones odiosas, de ese modo se puede apreciar seguro que es un título que merece mucho la pena, con sus más y sus menos, pero bastante bien acabado en conjunto.
Análisis realizado gracias al código cedido por Nintendo
Análisis – Travis Strikes Again: No More Heroes (Nintendo Switch). Un retorno que no te deja indie-ferente Hace casi unos doce años atrás, la desarrolladora Grasshopper Manufacture Ltd publicó un título llamado No More Heroes, que la catapultó a la fama, y al que dio continuación con una segunda parte dos años más tarde, ambos en Wii, aprovechando las virtudes del control por movimiento del Wiimote para simular combates con katanas láser.
0 notes
Text
Turning Mathematics into Colorful 3D-Printed Art
Francesco de Comité is an Associate Professor in Computer Science at the University of Lille (France). He has a degree in Maths and a PhD in Computer Science, and his research focuses on the representation of mathematical concepts in real life with renders, 3D prints or ‘physical objects’.
He started working in this field nearly 10 years ago, first by making 2D renders of math objects. But after these first attempts, he realised the need to go further with his research.
Triakis Ikosahedron. First attempts by De Comité at 3D figures
“If you want to understand a mathematical object by means of 2D views, you have to produce a lot of 2D renders or an animation.”
Then I began to look at the possibilities brought by 3D printing. Handling a 3D object allows you to see all its aspects at the same time,” Francesco explains about his first experiences with 3D printing.
His 3D printing often begins with a programming challenge. “In general, I want to make mathematics tangible, by letting people manipulate the objects. 3D printing is often the only tool to build very difficult or nearly impossible objects.”
Shell designed by Francesco de Comité and 3D printed in Multicolor+
“In general, I want to make mathematics tangible, by letting people manipulate the objects. 3D printing is often the only tool to build very difficult or nearly impossible objects.”
The beauty of mathematics
All Francesco’s objects are the result of procedural work: they are all programmed at a very low level, using Python within Blender or Grasshopper and C++ within Rhino.
Mathematics, art and 3D prinitng in a shell
The programming part of the job is the more important phase because here is where the mathematical concepts are coded, tested and improved. The result of his work is always a beautiful piece of art: “Art is just a by-product, the beauty comes from the maths behind”, explains De Comité.
“Art is just a by-product, the beauty comes from the maths behind”
3D printing mathematical figures in Multicolor+
One of the 3D printing projects that Francesco is working on at the moment are 3D-printed shells, designed with the help of mathematics. This idea is nothing new, but with the help of 3D printing, Francesco can go a step further.
A century ago, D’Arcy Thompson, the pioneer of mathematical biology, described how the shape of a seashell is the result of a closed curve rotating in a spiral around an axis, while growing in size.
Thirty years ago, Hans Meinhardt also showed in his book, ‘The Algorithmic Beauty of Seashells’, how the patterns decorating seashells can be described with simple differential equations, as Alan Turing did previously from a more general scope.
3D printing and mathematics
None of them had 3D printing tools available during their time but De Comité does: “I was feeling that I could now gather both approaches in a synthetic work, and write programs for 3D-printed decorated seashells. I also wanted to write a single program that could represent all, or at least a large part, of the existing seashells. The task is quite successful now, even if I still need to acquire some practice.”
The advantages of new, full-color 3D printing
Multicolor+ was a great discovery for Francesco and his 3D-printed shells. Other full-color 3D printers on the market make models which are bigger and heavier than normal shells, especially because they require a minimum wall thickness of 3mm, which is far thicker than real seashells.
With Multicolor+ is possible to print thinnest walls and detailed designs
“Since Multicolor+ only asks for 1mm wall thickness, I can design a model three times smaller and 27 times less heavy. Much closer to the size of real seashells!” specifies De Comité.
He recommends respecting the wall thickness as the main trick to get the perfect Multicolor+ 3D print.
Since Multicolor+ only asks for 1mm wall thickness, I can design a model three times smaller and 27 times less heavy
Apart from the shells, he has also designed and printed other mathematical figures such as anamorphoses and cardioidal variations.
Cardioidal variation designs by Francesco De Comité
Keep an eye on Francecso De Comite’s work with shells because he is improving his designs and even working on the Murex shell’s complex spikes.
Are you impressed by Francesco’s mathematical figures in Multicolor+? You can also get the perfect 3D print in full color by following these tips and tricks.
Once your designs are ready you just have to upload them to our online 3D printing platform and get an instant quote for your prints.
If you are not such an advanced designer, you can start step by step with this 3D design tutorial for beginners.
Follow our tutorial in Multicolor+ for beginners
Mathematical figures and shells are not the only thing you can 3D print with Multicolor+. Discover all the possibilities of this brand new technology!
from 3D Printing Blog | i.materialise https://i.materialise.com/blog/mathematics-colorful-3d-printing/
0 notes
Text
The Best of Tutorial Tuesday: Create Mind-Blowing Designs With Parametric Modeling in Grasshopper
Over the next few weeks, we’ll be bringing you the best of our Tutorial Tuesday series, resurfacing the most popular and useful tips from past Tuesdays. Enjoy!
Why create just one design when you can create infinitely many? Instead of designing a ring in just one size, you could use parametric design to control the ring size or the surface pattern, effectively creating many designs within one. Parameters also enable you to create algorithmic, generative designs with amazing complexity.
A good entry point to parametric design is OpenSCAD; you can read more about it in our previous article Tutorial Tuesday 4: Using OpenSCAD to Design With Code. When you’re ready to step into more complex, even organic-looking parametric design, then it’s time to look at Grasshopper. Grasshopper is a plug-in that comes standard with the powerful 3D modeling software Rhino.
To give Grasshopper a try, you must first download a free trial of Rhino for Windows, or download the Work in Progress version of Rhino for Mac. Start up Rhino and type “grasshopper” into the Rhino command line; Grasshopper will open in a window that overlays your Rhino workspace. Creating designs in Grasshopper involves placing visual code elements and connecting them with input/output “wires.” The resulting forms can be modified with parametric sliders and then ultimately “baked” into Rhino when you find a desirable set of parameters.
It looks complicated, but it isn’t as hard as it seems; once you get the hang of it, it is easier than writing text-based code. Here’s what a typical Grasshopper design-in-progress might look like:
Grasshopper screenshot from Seth Moczydlowski
Getting Started with Grasshopper
For first steps, follow through the Grasshopper Getting Started videos by David Rutten. These videos will walk you through creating your first Grasshopper definition, working with sliders, and using the interface effectively.
Once you understand the basics of interacting with Grasshopper, move on to Mode Lab’s fantastic Grasshopper Primer. This primer is a printable online resource that can be used as the basis of a short but powerful first course on Grasshopper. This foundations course covers not only the basics but also more advanced key topics such as data trees, algorithms, and mesh geometry.
For more advanced tips, walthroughs, and examples, head back to the main Grasshopper site to check out their list of video tutorials:
And finally, you can order a printed reference for Grasshopper: Dave Bachman‘s excellent new book Grasshopper: Visual Scripting for Rhinoceros 3D. The first half of this book is a thorough introduction to Grasshopper, including very detailed breakdowns of Grasshopper scripts for key example designs. The second half is an extensive Component Reference, which is handy to flip through to get new ideas or a birds-eye view of available options.
A simple Grasshopper design
So what can you design with Grasshopper? Anything from simple forms to complex algorithmic designs. Let’s start with a very simple example, our own Witness Bracelet from the geekhaus shop:
This bracelet was designed by sketching out the Witness path shape on a flat plane, extruding around that sketch with a tube, then wrapping the resulting form around an elliptical cylinder whose dimensions are determined by parameters that represent wrist width and height. The Grasshopper code for those actions is the mysterious mess of wiring shown below:
Of course, we could have created this simple bracelet in a much simpler, nonparametric way, but using Grasshopper enables us to move sliders to control wrist size measurements, path definition, and other features. This means that the Grasshopper code can create millions of variations on our design, and we decided to print one of them.
Parametric Power
Designers who leverage the power of parametric design don’t create just one model at a time, they create whole families of models with adjustable parameters. For example, consider the stunning Clothoid.A Lamp by Alienology, one beautiful form chosen from a huge array of possible designs created with parametric lofted splines:
Using the same Grasshopper code and modifying certain parameters, Alienology also created this very different Clothoid.B Lamp:
As another example, consider the work done by Responsive Design Studio in Germany. Using Grasshopper, they created a parametric ring design that can be customized to finger size, width, pattern, and other preferences.
Have you been creating parametric designs with Grasshopper or other modeling software? Tell us about it in the comments for a chance to be featured in future Tutorial Tuesday posts.
Or, if you’ve got questions about Grasshopper, leave a comment so that someone in the Shapeways community can help you get started.
The post The Best of Tutorial Tuesday: Create Mind-Blowing Designs With Parametric Modeling in Grasshopper appeared first on Shapeways Magazine.
The Best of Tutorial Tuesday: Create Mind-Blowing Designs With Parametric Modeling in Grasshopper published first on http://ift.tt/2vVn0YZ
0 notes
Text
Use of the Grasshopper tool in architecture: A general introduction
Grasshopper comes equipped with the ability to provide data that can be used for improving analysis and design. This tool has the capacity to generate real-time feedback on the performance of the design when integrated with other analysis software, and also allows for prompt adjustments. This provides assurance of the structural integrity of designs and streamlines the design process by doing away with the need for manual calculations. One can easily pursue Grasshopper 3D tutorial Online to gain a good understanding of how this tool works.
0 notes
Text
Use of the Grasshopper tool in architecture: A general introduction
Today Grasshopper focused Architecture tutor online are easily available. Grasshopper is quite a powerful visual programming language that is extensively used in architecture, engineering, and construction (AEC). It is known to extend the much popular NURBS modeling tool Rhino with algorithmic modeling functionality that allows users to swiftly generate parametric designs, explore varying design iterations, as well as automate repetitive tasks and designs.
#Grasshopper focused Architecture#Grasshopper 3D tutorial Online#Best online training for architecture
0 notes
Text
How Learning Grasshopper Can Future-Proof Your Architecture Career
In today's fast-evolving architectural landscape, staying ahead requires more than just creative vision—it demands digital fluency. One of the most transformative tools in modern architecture is Grasshopper, the visual scripting plugin for Rhino 3D. Learning Grasshopper enhances your design capabilities and future-proofs your career by aligning you with the industry's shift toward parametric, sustainable, and performance-based design.
At RhinoProf, we help architects, students, and professionals master Grasshopper and key architectural software under one roof.
Why Grasshopper Matters More Than Ever
Our Online Architecture Course is no longer just about drawing and modeling; it's about data-driven, adaptable design. Grasshopper allows architects to build parametric models where every element is interconnected and modifiable. Need to change a façade's pattern based on sun exposure? Do you want to simulate structural performance or environmental impact? Grasshopper makes it possible—with precision and efficiency.
This kind of control isn't just impressive—it's becoming essential in firms using Building Information Modeling (BIM), sustainable strategies, and advanced fabrication methods.
Skills That Set You Apart
While many architects still rely on static modeling tools, those with Grasshopper 3D tutorial skills can:
Optimize building performance with environmental data.
Automate repetitive design tasks, saving time.
Design complex geometries that are not possible with traditional methods.
Integrate with plugins like Ladybug, Karamba, and Kangaroo for deeper performance analysis.
These skills make you more valuable to top-tier architecture firms and open doors to computational design, BIM coordination, digital fabrication, and sustainability consulting careers.
RhinoProf: Your One-Stop Learning Platform
At RhinoProf, we've created a space where architects can learn the Advanced Revit Documentation Course, Rhino, Grasshopper, AutoCAD, SketchUp, V-Ray, and more—all in one place. Our expert-led courses are designed for all levels and offer real project workflows, hands-on practice, and personalized guidance.
Whether you're a student building your portfolio or a professional looking to stay competitive, our training helps you stay relevant, skilled, and future-ready.
Final Thought
The future of architecture belongs to those who can blend creativity with computation. Learning Grasshopper now, especially through a comprehensive platform like RhinoProf, equips you with the tools to lead the next generation of design. Don't wait—invest in your future today
0 notes
Text
Use of Rhino 3D Modeling Tutorials
There can be circumstances where you come up with a great idea and concept about a project but do not have the right technical skills to complete it. If your imagined design is too complicated you may have no choice but to simply give it up. This is why Rhino 3D tutor for Architects is important.Rhinoceros with Grasshopper is a robust 3D modeler meant for construction, fabrication, engineering and architecture. It helps enhance the ability of a team to effectively execute creative building form. Rhino is widely used for complex structures, versatile shapes, parametric facades,repetitive components, as well as free form roofs.
If you are unable to complete a project, you lose out on opportunities. The opportunity to get the client you want, to win architectural competitions, or to even to get a better job. There are many architects with great design ideas, but are not able to effectively present it as they do not have enough knowledge to make a project in 3D in one program. Spending days simply switching programs and trying out new workflows can be a huge hassle. Moreover, even after these efforts, the result can be fairly average. To avoid these circumstances, it is prudent to try out Rhino 3D Modeling Tutorials.
Rhinoceros 3D provides you with complete design freedom in the domain of parametric architecture, complex fluid form modeling, project presentation and conceptual design. Grasshopper for Rhino is among the most powerful tool that enables architects to create parametric designs with ease. It would allow you to explore parametric modeling without having to learn how to script, as well as make use of graphical programming interface for the purpose of creating your algorithms and parametric geometry. You can easily change the input parameters and watch your geometry changing shape in an instant.
Rhino for Architects Course would help you to explore the world of parametric design with Grasshopper, understand the logic behind it and how to implement it on your own architectural projects. Details of Rhino or Grasshopper 3D tutorial can be found online.
0 notes
Text
How to Find the Best 3D Modeling Software for 3D Printing
We often get asked this question: “What is the best 3D modeling software?” The ugly truth is, “It depends.” We can’t tell you which software you should use. But we can tell you how to find it!
Think about it in terms of the world of traditional 2D printing: What’s the best software for 2D printing? It’s impossible to answer this since someone might want to print a text, somebody else might want to draw something, while yet another person might want to edit a photo.
For 3D modeling software it’s a bit like that. There’s not one software that dominates the market and is most suitable for everyone. Every designers has different needs, preferences, and objects in mind. That’s why it’s simply impossible to say “This is the best 3D modeling software for everyone”.
However, we have put down certain questions that you can ask yourself, which will help you find the software that suits you best. In the first part of this article we will present the decisions you need to take. In the second part we will show you how to find the best software based on these decisions.
1st decision: What kind of objects do you intend to create?
The first decision that you need to make is what kind of objects you have in mind. The choice of what you want to design often determines which modeling software you should use.
Animation/Character Design/Figurines
Architecture
Engineering/Spare Parts/Functional Parts
Fashion/Apparel
Tech Gadgets
Art Objects
Interior/Furniture Design
Jewelry
Scale Models
2nd decision: Which platform do you prefer?
Not every software package or app is available on each platform. Think about which platform you will be using for creating your designs.
Windows
Mac OS X
Linux
Online Service/Browser-based (no download and installation required)
Mobile Apps (works on tablets and smartphones)
3rd decision: What is your budget?
Software can be free or cost thousands of dollars. The amount of money you are willing to spend on 3D modeling software facilitates the choice.
Free software
Freemium software (Free with payment features)
Commercial software
4th decision: Community Size and Purpose
Some software programs have been around for years and have big communities behind them. There are tons of tutorials and active forums to be found. Others have just started or are trying to bring their product to market. So the size of the community and number of software-related resources might also be an important factor. For beginners it might be easier to stick to software that has been out for years and offers tons of resources and YouTube tutorials. When you get stuck somewhere, it also means that you will be able to find help from fellow designers more easily.
For beginners, it might be easier to stick to software that has been out for years and offers tons of resources and YouTube tutorials. When you get stuck somewhere, it also means that you will be able to find help from fellow designers more easily.
Another thing to consider is the purpose of the software. Some software was developed for visual 3D effects or 3D animation films. The 3D printing part is more like a ‘side product’ for these programs and it needs a bit of tinkering to turn a great visual 3D model into a model that is actually 3D printable. Others were developed especially for 3D printing and will make it much easier for you to ensure that your design will be printable.
So it’s important to check if there are enough resources, tutorials, and forums that are not just about “3D modeling with software XY”, but also about “3D printing with software XY”.
5th decision: User Interface and Functionality
For many beginners this is an important one: the interface. Some software provide you with an interface like a car dashboard: clean, easy to learn and intuitive. Others go for an aircraft’s cockpit: lots of functionality, much more design freedom, but a steep learning curve.
An example for this can be found in the pictures below: Both Tinkercad (left) and Blender (right) are available for free. Tinkercad has an intuitive, beginner-friendly interface. However, your design freedom is somehow limited. Blender, on the other hand, offers lots of functionality and design freedom but might be harder to learn.
6th decision: Which modeling approaches do you prefer?
Different software uses different approaches to 3D modeling. It is hard to categorize an abstract thing like “modeling” into different techniques, and it can be difficult to get an understanding of it when you haven’t used the software yet. However, we will still try to give you an overview about the most important distinctions. We included a short visual preview for each of these 3D modeling techniques. Which technique is best for you heavily depends on your preferences. While some prefer a LEGO-like modeling approach, others prefer clay-like sculpting.
Solid Modeling/Box Modeling: Solid Modeling is all about combining and subtracting primitives. If you like(d) playing with LEGO you will find this way of modeling quite intuitive. You will add cubes, spheres and all kinds of other geometrical objects and combine them or subtract them from each other. The catchwords for solid modeling are accuracy, precision, and exactness. However, this comes with a price: limited freedom in designing. It will be tough to create organic objects with this kind of modeling.
Popular solid modeling programs: Tinkercad (image), 123D Design, Inventor.
Digital Sculpting: Digital sculpting presents quite a big contrast to solid modeling. Typically you start with a digital cube of clay and form it with your mouse. It also is very intuitive as clicking on the object will immediately deform it. Typically you can select a tool (like push, pull, smooth, grab or pinch) and then start sculpting. This way of modeling gives modelers an extreme freedom of design, but it is not precise. It’s great for organic models (like people, animals, etc.) but it’s virtually impossible to create functional parts with it.
Popular digital sculpting programs: ZBrush (image), Sculptis, Meshmixer, Mudbox.
Parametric Design/Procedural Modeling: Parametric design is based on algorithmic thinking and actually lets you ‘program’ objects. This might be by really scripting code, but there are also ways to make this more visual. Nevertheless, you will typically have two screens: an editor, where you will input functions or commands, and a preview of your design. This two-window-setting might be less intuitive for beginners. However, it allows for users to play around and create generative artwork as well as precise mechanical parts. Changing patterns and repetitions is often just a matter of clicks.
Popular parametric design programs: Grasshopper (image), FreeCAD, OpenSCAD, 3DS Max, Maya.
Polygon Modeling/Contour Modeling: In Polygon Modeling, your 3D object is basically a mesh based on vertices, edges and faces. This allows you to easily and precisely edit parts of your object. By changing the coordinates of one or several vertices, you can change the shape of the model. The downside, however, is that it is not possible to describe a curved surface accurately. Since there is always a straight edge between two coordinate points (vertices), rounding objects is difficult.
Popular polygon modeling programs: Blender (image), Modo.
Curve and Line Modeling: In contrast to Polygon Modeling, surfaces in Curve Modeling are made up of curves. Curves are created with a tool that works very similarly to the pen tool in MS paint or Adobe Illustrator. The curve is drawn in 3D space, and edited by moving a series of handles called CVs (control vertices). Alternately, a curved surface can be created by revolving a profile curve around a central axis. This is a common and very fast modeling technique for objects that are radial in nature. This is why this modeling approach is very popular when creating automotive and industrial parts.
Popular curve & line modeling programs: Rhino (image), SketchUp, MoI, K-3D.
Finding the Software That Suits Your Needs Best
Okay, this has been a long list but what are you supposed to do now? It’s time to put the pieces of the puzzle together.
First of all, it is helpful to get a general overview of different programs and their target audiences. One way to do so, is by visiting the ‘3D Design Tools’ section of our website (see screenshot below). This page will give you an overview of popular 3D modeling programs for 3D printing. It lets you filter for price (free, freemium, premium), platform (PC, Max, Linux, etc.) and the most common use (Art, Architecture, Spare Parts, Jewelry etc.). What’s more: you can see actual 3D prints that were designed with that specific software. Often these images say more than a thousand words.
Apart from visiting our 3D Design Tools overview, you should also take a look at the following resources and rankings:
If you want to go with the most popular program, make sure to visit our list of the top 25 most popular 3D modeling software for 3D printing here. This ranking only takes the popularity of the individual programs within the 3D printing community into account. For Mac users, this list only shows the most popular programs that run on Mac OS.
If you are a beginner and just want to start out with an easy-to-use, free software, then we also have the right list for you: The top 9 3D design programs to get you started with 3D printing.
If digital sculpting is your thing, visit our list of the top 10 3D sculpting programs.
Once you’ve narrowed down several programs that you would like to give a try, take a good look around their websites. Do the models that were designed there come close to your needs? A website visit can often give you a glimpse of what the program is actually being used for – and what it isn’t. Before you buy a pig in a poke, make sure to download a free trial version and give it a try. Literally every 3D design software comes with a free trial version nowadays.
If you’re new to the world of 3D modeling, this interview about how to get started with 3D modeling might be useful. If you already have a printable 3D file, simply upload it to our website, choose from more than 100 material options, and let us take care of printing and shipping your object.
How to Find the Best 3D Modeling Software for 3D Printing published first on http://ift.tt/2vVn0YZ
0 notes