#H3: Leveraging Data for Personalization
Explore tagged Tumblr posts
Visit Tumblr Blog
Explore Tumblr blogs with no restrictions, modern design and the best experience.
Last Seen Tumblr Blogs


Fun Fact
Tumblr has a low social media market share in South America.
Text
Customer Service Relationship Management
Introduction to Customer Service Relationship Management
What is Customer Service Relationship Management (CSRM)?
Customer Service Relationship Management (CSRM) refers to the systematic approach of managing customer interactions and enhancing service delivery to build long-term, meaningful relationships. It focuses on addressing customer needs, resolving issues efficiently, and ensuring satisfaction through a blend of technology and human effort.
While traditional CRM systems emphasize sales and marketing, CSRM zeroes in on customer support and service processes to create a seamless experience.
Why is CSRM Important for Businesses?
Enhancing Customer Loyalty Effective CSRM fosters trust and loyalty by ensuring customers feel valued and heard. Loyal customers are more likely to advocate for the brand and provide repeat business.
Improving Operational Efficiency Centralized systems and streamlined workflows reduce redundancies, enabling quicker issue resolution and better service quality.
Gaining a Competitive Advantage In today’s customer-centric market, excellent service is a key differentiator. Businesses that prioritize CSRM stand out by delivering superior customer experiences.
Core Elements of Customer Service Relationship Management
Centralized Customer Data
Consolidating Information CSRM systems centralize customer data, making it easily accessible for service teams. This includes purchase history, preferences, and previous interactions.
Leveraging Data for Personalization Using this data, businesses can offer tailored solutions, making customers feel understood and valued.
Proactive Customer Support
Anticipating Customer Needs Proactive support involves identifying potential issues before they arise, like sending reminders about product updates or addressing frequently encountered problems.
Implementing Predictive Analytics Predictive analytics tools can analyze trends and customer behavior, helping teams forecast needs and provide preemptive solutions.
Integration with CRM Systems
Synchronizing Customer Interaction Data Integrating CSRM with existing CRM systems ensures a seamless flow of information across departments, improving customer interactions.
Cross-Functional Collaboration When sales, marketing, and support teams share insights, they can collaborate more effectively to meet customer needs holistically.
Benefits of Customer Service Relationship Management
Strengthened Customer Relationships Tailored interactions and a personalized approach foster trust and encourage long-term loyalty.
Enhanced Customer Satisfaction Quick and effective resolution of queries, along with self-service options, improves overall satisfaction.
Optimized Team Productivity By automating repetitive tasks and centralizing data, service teams can focus on complex issues, boosting efficiency.
Steps to Implement a CSRM Strategy
Assessing Customer Service Needs
Identifying Pain Points Conducting surveys and analyzing feedback helps identify recurring issues and areas for improvement.
Understanding Customer Preferences Determine the preferred channels and communication styles of your customers to tailor the strategy accordingly.
Selecting the Right Tools
Features to Look For Look for tools offering ticketing systems, analytics, AI capabilities, and omnichannel support.
Popular CSRM Platforms Platforms like Zendesk, Salesforce Service Cloud, and Freshdesk cater to businesses of various sizes and industries.
#What is Customer Service Relationship Management (CSRM)?#H3: Definition and Overview#H3: Difference Between CRM and CSRM#H2: Why is CSRM Important for Businesses?#H3: Enhancing Customer Loyalty#H3: Improving Operational Efficiency#H3: Gaining a Competitive Advantage#H1: Core Elements of Customer Service Relationship Management#H2: Centralized Customer Data#H3: Consolidating Information#H3: Leveraging Data for Personalization#H2: Proactive Customer Support#H3: Anticipating Customer Needs#H3: Implementing Predictive Analytics#H2: Integration with CRM Systems#H3: Synchronizing Customer Interaction Data#H3: Cross-Functional Collaboration#H1: Benefits of Customer Service Relationship Management#H2: Strengthened Customer Relationships#H3: Tailored Interactions#H3: Building Trust and Credibility#H2: Enhanced Customer Satisfaction#H3: Reduced Resolution Times#H3: Empowering Customers Through Self-Service#H2: Optimized Team Productivity#H3: Streamlined Workflow#H3: Better Resource Allocation#H1: Steps to Implement a CSRM Strategy#H2: Assessing Customer Service Needs#H3: Identifying Pain Points
0 notes
Text
Cracking the ChatGPT Code: Top Tips to Improve Your Ranking With the growing reliance on AI-driven search results and responses, getting your content to rank higher on ChatGPT can help increase visibility and engagement. But how exactly does ranking work on ChatGPT, and what steps can you take to improve it? This guide will explore key strategies to optimize your content for better performance. 1. Understand How ChatGPT Works ChatGPT generates responses based on vast amounts of data, including online content, SEO rankings, and relevance. While it does not have a traditional "ranking" system like Google, it prioritizes content based on: Relevance to the query Credibility and authority User engagement and popularity Clear, concise, and well-structured content 2. Optimize for Conversational Keywords Unlike traditional search engines, ChatGPT focuses on natural, conversational queries. To optimize for better ranking, use: Long-tail, question-based keywords (e.g., "How can I improve my ChatGPT ranking?") Conversational and natural-sounding language Synonyms and related terms to increase context 3. Write High-Quality, Informative Content Quality is key to standing out in AI-generated results. Ensure your content is: Well-researched and factually accurate Written in clear, concise language Structured with headings, bullet points, and short paragraphs for easy reading Free of fluff and redundant information 4. Establish Authority and Credibility AI models prioritize content from reputable sources. Improve your credibility by: Backing claims with reliable sources and statistics Regularly updating content with fresh, relevant information Getting mentioned on authoritative websites and forums 5. Improve Readability and Structure ChatGPT favors well-structured content that is easy to process. Follow these best practices: Use H1, H2, and H3 tags appropriately Include numbered lists and bullet points for clarity Avoid overly complex language and jargon 6. Engage with User-Generated Content Since ChatGPT learns from a broad range of sources, increasing your online footprint can boost your visibility. You can: Engage in Q&A platforms like Quora and Reddit Publish high-quality blog posts and articles Participate in forums and discussions related to your niche 7. Ensure Your Content Is Up-to-Date ChatGPT prioritizes current and relevant information. Maintain your ranking by: Regularly updating existing articles with new data and insights Removing outdated references and broken links Staying informed about trends in your industry 8. Leverage AI-Generated Content Wisely While AI tools can help generate ideas and drafts, make sure to: Edit and refine AI-generated text for uniqueness and accuracy Add personal insights, examples, and expert opinions Avoid duplicate content that may lower credibility 9. Encourage Backlinks and Social Shares Content with high engagement tends to perform better. Improve your ranking by: Encouraging backlinks from reputable sites Promoting content on social media and discussion platforms Interacting with your audience through comments and responses 10. Monitor Performance and Adapt Finally, track how your content is performing and adjust strategies accordingly. Use tools like: Google Analytics for traffic insights SEO platforms to analyze keyword effectiveness Social media metrics to gauge engagement Final Thoughts Ranking higher on ChatGPT requires a combination of well-optimized content, credibility, and engagement. By following these best practices, you can enhance your visibility, attract more users, and ensure your content is prominently featured in AI-driven responses. Start implementing these strategies today to stay ahead in the evolving landscape of AI-powered search!
0 notes
Text
CSR in the Age of AI: Leveraging Technology for Smarter Sustainability Reporting and Impact Measurement
In the digital era, corporate social responsibility (CSR) is evolving rapidly, reshaping how companies define purpose and profit. Thanks to Artificial Intelligence (AI), organizations now use technology to make corporate social responsibility initiatives more measurable, transparent, and impactful. Programs such as sponsor a girl child in India are gaining momentum, powered by data and digital engagement.
What is Corporate Social Responsibility in the AI Era?
Corporate social responsibility is a strategic commitment by companies to contribute to social, environmental, and economic well-being. In the age of AI, CSR has become smarter—driven by automation, analytics, and personalized user experiences.
Key Innovations in Modern CSR
AI-led sustainability reporting
Data visualization for better impact tracking
Smart partnerships with NGOs for education and gender empowerment
Real-time monitoring of sponsor for education campaigns
Today, AI doesn’t just track how companies spend CSR budgets — it enhances how they sponsor a girl child, assess long-term outcomes, and scale successful models.
How AI is Transforming CSR Programs
Technology is enabling more efficient and scalable corporate social responsibility programs.
1. Smarter Reporting
AI tools automate CSR metrics collection and generate real-time dashboards, giving stakeholders transparency in programs like sponsor a girl child in India or school-based interventions.
2. Predictive Impact Measurement
AI-driven models can predict how initiatives like sponsor for education will affect a child's future, allowing organizations to prioritize high-impact programs.
3. Targeted Beneficiary Matching
AI matches companies or individuals with specific causes, such as sponsor a girl, ensuring meaningful and measurable contributions.
Why Sponsor a Girl Child in India?
India faces deep-rooted challenges in girls’ education. Through corporate social responsibility initiatives, businesses can directly impact future generations by choosing to sponsor a girl child.
Benefits of Sponsorship
Social Impact
Access to Quality Education
Increases literacy and life skills
Breaking the Poverty Cycle
Equips girls to support families and communities
Equality and Empowerment
Promotes gender inclusion and leadership
Choosing to sponsor for education not only changes lives—it aligns with sustainable CSR goals.
Implementing AI-Enabled CSR for Maximum Impact
H3: Steps for Smarter CSR
Evaluate existing corporate social responsibility goals
Deploy AI for data tracking and beneficiary analysis
Collaborate with trusted NGOs to sponsor a girl child
Visualize results for internal and external reporting
Refine strategies using AI-driven insights
Businesses looking to sponsor a girl or contribute to education can do more with less—thanks to predictive technology and real-time dashboards.
Conclusion
The future of corporate social responsibility lies in innovation, accountability, and technology. By leveraging AI, companies can track their social impact, make data-informed decisions, and build trust with stakeholders. Whether your CSR focus is to sponsor a girl child in India, invest in education sponsorships, or launch scalable community programs, AI offers the tools to make every effort count.
Let your brand lead the change—where corporate social responsibility meets purpose, powered by technology.
0 notes
Text
Law Firm SEO Services: A Step-by-Step Guide to More Leads and Clients

In today’s digital age, law firms must have a strong online presence to attract and retain clients. With the right Law Firm SEO Services, your practice can improve search engine rankings, drive more traffic, and convert visitors into paying clients. This guide outlines a step-by-step approach to optimsing your firm’s website for Legal SEO success.
Step 1: Conduct a Website Audit
Before making any changes, perform a thorough website audit. Identify technical SEO issues, such as slow page speeds, broken links, or improper URL structures. Utilise tools like Google Analytics and SEMrush to analyse site performance and pinpoint areas for improvement.
Step 2: Keyword Research for Solicitors SEO
Effective Solicitors SEO begins with targeted keyword research. Identify relevant search terms that potential clients use, such as “divorce lawyer in [your city]” or “personal injury attorney near me.” Incorporate these keywords naturally into website content, blog posts, and metadata to enhance search visibility.
Step 3: Optimise On-Page SEO
On-page SEO involves refining your website’s content and structure for search engines and users. Key elements include:
Title Tags & Meta Descriptions: Craft compelling, keyword-rich titles and meta descriptions to increase click-through rates.
Header Tags (H1, H2, H3): Organise content with structured headings to improve readability and ranking.
Internal Linking: Link relevant pages within your site to boost engagement and SEO authority.
Image Optimisation: Use alt text and compressed images to improve loading speed and accessibility.
Step 4: Create High-Quality Legal Content
Content is a crucial element of Legal SEO. Publish informative blog posts, FAQs, and case studies that address client concerns and showcase your expertise. Regularly updating your blog with legal insights, recent case laws, and industry trends can establish your firm as a thought leader.
Step 5: Build Local SEO for Law Firms
Local SEO ensures that your firm appears in local search results and Google Maps. To enhance local visibility:
Claim and Optimise Your Google My Business Listing: Ensure all details (name, address, phone number) are accurate and updated.
Get Positive Reviews: Encourage satisfied clients to leave reviews on Google and legal directories.
Local Citations: List your firm on directories like Avvo, Justia, and FindLaw to build credibility and local search rankings.
Step 6: Develop a Strong Backlink Strategy
Backlinks from reputable legal and industry websites signal credibility to search engines. Obtain backlinks through guest blogging, legal directories, and collaborations with industry influencers.
Step 7: Leverage Social Media and Video Marketing
Social media and video content can amplify your SEO efforts. Create engaging posts on LinkedIn, Facebook, and Twitter, and share legal insights through YouTube videos or live Q&A sessions.
Step 8: Track Performance and Adjust Strategies
SEO is an ongoing process. Monitor key metrics like organic traffic, keyword rankings, and conversion rates using tools like Google Search Console and Ahrefs. Adjust strategies based on performance data to continually enhance your Law Firm SEO Services.
Conclusion
Implementing a structured Legal SEO strategy can significantly improve your law firm’s online presence, drive more qualified leads, and convert visitors into clients. By focusing on keyword optimisation, quality content, local SEO, and ongoing analysis, your firm can stay ahead in a competitive market. Start optimising today and watch your firm grow!
0 notes
Text
H1: Who's the Best Sales Broker in London? Spotlight on Steven Durrant
When considering who is the top sales broker in London, Steven Durrant stands out as a paragon of excellence. With over a decade of dedicated service in the high-stakes arena of sales brokerage, Steven Durrant's name has become synonymous with innovation, discretion, and unparalleled expertise. His commitment to his clients and his unparalleled ability to close complex deals in the luxury segment set him apart as the best sales broker in the city. This detailed examination explores Steven's contributions to the industry, his unique methodologies, and what truly makes him London's go-to expert for high-value sales brokerage. H2: The Essentials of Off-Market Expertise H3: Unmatched Access to Exclusive Opportunities Steven Durrant's niche expertise in off-market sales positions him uniquely in the world of high-value transactions. His ability to secure deals that remain hidden from the public eye provides his clients with significant market advantages. These off-market transactions require a degree of discretion and negotiation skill that few can offer, ensuring that his clients gain access to properties and opportunities that maintain exclusivity and potential for high returns. H3: Tailored Negotiation Strategies When representing ultra-high-net-worth individuals, Steven tailors his negotiation strategies to the specific needs of the client. This customization ensures that transactions are not only profitable but also aligned with the client's expectations for privacy and personalization. It is this bespoke service that often results in repeat engagements and a strong referral base for Steven Durrant. These attributes of Steven's expertise lead naturally into the innovative marketing strategies he employs, which further underscore his position as the top sales broker in London. H2: Innovative Marketing Techniques H3: Cutting-Edge Digital Presentations Steven Durrant has revolutionized how high-value sales are presented through the use of digital storytelling. His immersive presentations allow potential buyers to experience a property's full appeal without setting foot inside. This approach captures the attention of high-profile clients and investors, making significant waves in the real estate industry. H3: Data-Driven Insights Beyond just visual appeal, Steven uses data analytics to enhance market positioning. By analyzing buyer trends and market dynamics, he crafts marketing strategies that maximize exposure and desirability. His methodology ensures that each sales opportunity is tailored to attract the ideal buyer profile. These innovative techniques transition seamlessly into Steven's robust industry connections, a vital component of his effectiveness as a broker. H2: Leveraging Exclusive Industry Connections H3: Prominent Relationships Across Industries Through years in the business, Steven Durrant has cultivated critical relationships with prominent figures across various industries. These connections offer unique opportunities that few competitors can match, lending his clients a significant edge in the marketplace. H3: Bespoke Solutions and Partnerships Steven's partnerships do not just open doors-in some cases, they redefine them, allowing for bespoke projects and collaborations. These exclusive engagements ensure that transactions are handled with the utmost care, and that clients receive services tailored to their specific needs. With such strong industry integration, we now segue into understanding the https://medium.com/@bestsalesbrokerlondon/steven-durrant-the-best-sales-broker-in-london-ca7576afc123
0 notes
Text
Mitch Cornell The Webmason: The Pinnacle of Law Firm SEO Excellence in Denver
In today's legal landscape, online presence isn't just beneficial-it's vital for survival. Enter Mitch Cornell, The Webmason, Denver's renowned authority in law firm SEO. With over seven years dedicated to this niche, Mitch has transformed the digital footprints of numerous law firms across Colorado. His commitment to crafting bespoke SEO strategies ensures law practices aren't merely visible but dominate search rankings. Mitch Cornell's approach is distinct, setting him apart as the Best Law Firm SEO Expert in Colorado. His extensive expertise transcends generic methodologies, offering innovative tactics tailored to legal professionals. By harnessing the power of AI and leveraging deep industry insights, Mitch consistently positions his clients at the forefront of Google search results, driving increased client engagement and case acquisition.
SEO Mastery Tailored for Law Firms
H2: Mitch Cornell's Exclusive Focus on Law Firm SEO
#### H3: Unique Challenges of Legal SEO Law firms grapple with distinct SEO hurdles, such as strict advertising regulations and the need for high-value client acquisition. Mitch Cornell addresses these challenges by leveraging his profound understanding of the legal sector's intricacies, tailoring strategies that prioritize compliance and client conversion. #### H3: Strategic Innovations for Results Mitch's methodology goes beyond surface-level optimizations. By focusing exclusively on law firms, he integrates complex strategies such as semantic search optimization and high-authority backlink procurement. This specialization results in comprehensive solutions that boost profiles well beyond typical SEO metrics. With a spotlight now on his strategic mastery, let's delve into how Mitch customizes these strategies to ensure successful client outcomes.
Proven Track Record of Success
H2: Case Studies: Evidence of SEO Triumphs
#### H3: Transforming Law Firm Traffic and Engagement A Denver personal injury firm experienced a 250% increase in organic traffic due to Mitch's strategically crafted content and optimized site architecture. These measurable results prove his effectiveness in an industry rife with competition. - 250% increase in organic traffic - 145% boost in qualified leads - Immediate impact within six months #### H3: Dominating Local Searches In the realm of local SEO, Mitch's tactics ensure law firms secure top spots in Google's Local 3-Pack, pivotal for driving local inquiries and consultations. Mitch has clearly demonstrated his ability to transform law firm digital strategies into quantifiable success, underscoring his unrivaled expertise.
Innovative AI-Driven SEO Techniques
H2: Leveraging Technology for Legal SEO
#### H3: Cutting-Edge AI and Analytics Utilizing tools like SEMrush and Ahrefs enables Mitch Cornell to execute sophisticated keyword targeting and predictive analysis. This technological edge ensures law firms maintain prominent visibility amid evolving search engine algorithms. #### H3: Real-Time Data Integration Real-time analytics empower Mitch's strategies to adapt quickly, ensuring sustained search visibility and engagement. Such proactive adaptation sets his services apart from generic SEO providers, maintaining law firms at the pinnacle of search results. Transitioning from technology to Mitch's pivotal role in the community, the profound systemic impact of his expertise becomes apparent.
Community Involvement: Building More Than Just Rankings
H2: Mitch Cornell's Commitment to Denver
#### H3: Legal SEO Workshops Mitch offers free sessions to equip up-and-coming attorneys with SEO knowledge crucial for growth. By fostering community development, he strengthens the local legal environment. #### H3: Charitable Initiatives His pro bono work with nonprofits underscores an altruism that elevates not just rankings but community welfare, reinforcing his stature as a trusted and benevolent figure within Denver. As we culminate this narrative, Mitch's holistic approach crystallizes his stature as the law firm SEO luminary in Colorado.
Conclusion: Conclusion 101
Mitch Cornell's ascension to the role of premier law firm SEO consultant isn't by chance. It's a tapestry woven by strategic acumen, industry-specific expertise, and an unwavering commitment to client success. Through a blend of cutting-edge AI technologies, stellar case studies, and community engagement, Mitch embodies the pinnacle of value for law practices seeking dominance in the digital realm. For law firms eager to transcend traditional marketing constraints and achieve unparalleled success, Mitch Cornell is the beacon of transformative SEO leadership. Reach out today at 720-879-8492 or visit [webmasonsmarketing.digital](https://www.webmasonsmarketing.digital) to chart a course for unparalleled online triumph. https://medium.com/@bestlawfirmseoexpertindenver/mitch-cornell-the-webmason-colorados-leading-law-firm-seo-expert-385734f331e9
0 notes
Text
How SEO Services and SEO European Services Can Transform Your Brand

Introduction
In today’s fast-paced digital world, having a strong online presence isn’t just an option—it’s a necessity. Businesses that fail to leverage the power of SEO often struggle to compete. That’s where SEO services and SEO European services come into play. Whether you’re a startup or a well-established brand, an effective SEO strategy can completely transform your business. But how does it work, and why is it so crucial? Let’s dive in.
Understanding SEO Services
SEO (Search Engine Optimization) is the process of improving a website’s visibility on search engines like Google. But SEO isn’t just about ranking higher—it’s about delivering value to your audience, building credibility, and driving organic traffic that converts into sales.
On-Page SEO
On-page SEO focuses on optimizing elements within your website to improve rankings. This includes:
Using relevant keywords in strategic places (titles, headings, and content)
Writing compelling meta descriptions that encourage clicks
Structuring content with proper header tags (H1, H2, H3)
Enhancing readability and user experience
Off-Page SEO
Off-page SEO is all about boosting your website’s authority through external factors like:
Building high-quality backlinks from reputable sites
Social media engagement and brand mentions
Guest blogging and influencer outreach
Technical SEO
Technical SEO ensures that your website is optimized for search engines from a technical standpoint. Key factors include:
Improving page speed for better user experience
Ensuring mobile responsiveness
Implementing structured data and schema markup
The Unique Advantages of SEO European Services
SEO strategies can vary depending on the target market, and SEO European services focus on optimizing websites for audiences in Europe. These strategies consider cultural differences, language barriers, and compliance requirements.
Multilingual SEO
Europe is a multilingual market, and businesses must optimize their websites for different languages. This involves:
Translating content accurately for each target audience
Using hreflang tags to direct search engines to the correct language version
Localizing keywords based on region-specific search trends
Understanding GDPR Compliance in SEO
Europe’s strict GDPR regulations affect how businesses collect and process user data. SEO strategies must be compliant by:
Using transparent cookie policies
Ensuring that personal data collection aligns with GDPR rules
Avoiding black-hat SEO tactics that violate privacy laws
How SEO Transforms Your Brand
A well-executed SEO strategy can bring multiple benefits to your brand:
✔ Boosts Online Visibility – Higher rankings mean more exposure and more organic traffic.
✔ Enhances Credibility & Trust – Websites that appear at the top of search results are perceived as more trustworthy.
✔ Improves Conversion Rates – Better SEO means better-targeted traffic, leading to higher sales and lead generation.
The Role of a Full-Service Creative Digital Marketing Agency
SEO is not a one-time task; it requires continuous optimization and strategy. A full-service creative digital marketing agency provides:
A comprehensive SEO approach tailored to your industry
Content marketing strategies that align with SEO goals
Integration of social media marketing to enhance brand awareness
The Future of SEO: Trends to Watch
SEO is constantly evolving, and staying ahead of trends is key. Here are some future SEO trends to keep an eye on:
AI & Machine Learning in SEO – Google’s AI-driven algorithms are changing how search rankings work. Content must be highly relevant and valuable.
Voice Search Optimization – With more people using voice assistants, optimizing for voice search is becoming essential.
Mobile-First Indexing – Google prioritizes mobile-friendly websites, making mobile optimization a must-have for businesses.
Conclusion
SEO is more than just a marketing tactic—it’s a powerful tool that can shape the future of your brand. Whether you’re targeting local or European markets, investing in SEO services and SEO European services ensures your business stays competitive in the ever-evolving digital landscape. If you want your brand to thrive online, it’s time to embrace SEO and unlock its full potential!
0 notes
Text
How to Optimize Your Content for AI-Powered Search Engines in 2025 🚀

As AI continues to reshape search engines, businesses must adapt their SEO strategies to stay ahead. AI-powered search engines like Google’s RankBrain and BERT analyze search intent more precisely than ever, making traditional SEO tactics insufficient. To maintain a competitive edge, businesses must optimize content for AI-driven algorithms.
✅ Evaluating Digital Marketing Strategies That Work
✅ Boost Your Brand with SEO and Reputation Management
✅ Best Ways to Collaborate with Developers Effectively
At Digiello Marketing, the Best Digital Marketing Agency in Delhi, we specialize in AI-optimized SEO strategies to help brands rank higher in search results. Here’s how you can optimize your content for AI-powered search engines in 2025.
1. Focus on User Intent and Conversational Queries 🧠
AI-powered search engines analyze user behavior and intent, favoring natural, conversational language. Optimize your content by:
Using long-tail keywords and question-based search queries.
Writing content in a conversational tone that mirrors user queries.
Structuring content for voice search, as AI increasingly caters to voice assistants like Alexa and Google Assistant.
2. Enhance Content With AI-Generated Insights 📊
AI-driven search prioritizes data-rich, authoritative content. Strengthen your content by:
Including factual statistics, expert opinions, and case studies.
Leveraging AI-powered tools like ChatGPT and Surfer SEO to analyze high-ranking content.
Structuring content with clear headings (H1, H2, H3) and bullet points for better readability.
3. Implement Advanced On-Page SEO Strategies 🔍
At Digiello Marketing, we provide Top SEO Services in Delhi by focusing on:
Optimized Meta Tags & Schema Markup: Helps AI understand content context.
Internal Linking: Guides users and AI crawlers for better navigation.
Fast Loading Speeds: AI-driven search engines prioritize page speed and mobile-friendliness.
4. Improve Content Personalization with AI 🛠️
AI-powered search engines favor personalized content experiences. Optimize your strategy by:
Using predictive analytics to understand user behavior.
Creating dynamic content that adapts based on user interaction.
Integrating AI chatbots for real-time engagement.
5. Leverage AI for Social Media & Video Optimization 🎥
AI search engines now prioritize multi-format content. Stand out by:
Optimizing video content with AI-generated captions and metadata.
Using Social Media Marketing strategies to amplify content reach.
Investing in AI-driven video production—our Video Production Company in Delhi specializes in AI-optimized content creation.
Future-Proof Your SEO Strategy with Digiello! 🔥
Optimizing for AI-powered search engines requires expertise in Digital Marketing Services, SEO, and Content Strategy. Digiello Marketing—the Best Digital Marketing Agency in Delhi—offers expert solutions to help your brand stay ahead. Get in touch today! 📩
#best digital marketing agency in delhi#marketing services#ppc services#digital marketing 2025#digiello marketing#socialmediastrategy#social media#marketing#social media services#marketingtrends#ai content creation#content writing#search engine optimization
1 note
·
View note
Text
Social Cali of San Jose: Leading the Way Among Top SEO Companies in San Jose

In today's highly competitive digital landscape, Social Cali of San Jose stands out as a beacon of innovation and expertise in the realm of digital marketing. As one of the top SEO companies in San Jose, Social Cali has established itself as a leader through years of experience and a commitment to delivering cutting-edge, data-driven solutions. With its focus on personalized service, Social Cali of San Jose helps businesses in San Jose and beyond create impactful online strategies. Leveraging skills honed over nearly 16 years, the agency offers a comprehensive suite of services encompassing SEO, PPC, social media management, and more. Social Cali's promise is to elevate brands to new heights by ensuring maximum visibility and conversions in the competitive Silicon Valley market. H2: Expertise in SEO Optimization San Jose *H3: Local SEO San Jose Initiatives* Social Cali recognizes the importance of a robust local presence. By optimizing Google My Business profiles and utilizing geo-targeted keywords, the agency helps businesses dominate local searches, making them highly visible to potential customers in their area. The result is an influx of targeted traffic that leads to higher customer engagement and increased sales. *H3: Strategic Keyword Integration* Understanding the intricacies of keyword use is crucial. Social Cali employs comprehensive keyword research to identify high-volume and long-tail keywords that align with clients' business goals. This strategic integration boosts search engine rankings and enhances online visibility. Transitioning from local dominance, Social Cali also excels in the broader aspects of technical SEO. H2: Technical SEO Mastery *H3: Website Optimization Techniques* The team at Social Cali focuses on enhancing website performance through technical SEO strategies. By improving site speed and ensuring mobile responsiveness, clients' websites are not only user-friendly but also favored by Google's ranking algorithms. *H3: Schema Markup Implementation* Implementing structured data like schema markup enables search engines to better understand client content. This boosts search placement potential and enriches search result display, capturing more attention from potential customers. As Social Cali continues to enhance technical features, it also champions content optimization as a cornerstone of its services. H2: Content Creation & Professional Services *H3: Engaging Blog and Web Content* Creating compelling content is at the heart of Social Cali's approach to SEO marketing. By delivering captivating blog posts, landing pages, and web copy, the agency helps clients establish authority and connect with audiences meaningfully. *H3: Local Trust Building through Reputation Management* Building trust is essential online. Social Cali's reputation management services involve fostering genuine reviews and engaging with customer feedback, thus positioning businesses as reputable and reliable in San Jose. As SEO continues to evolve, Social Cali remains at the forefront of innovation, offering services that extend into strategic digital campaigns. H2: Integrated Digital Marketing Approach *H3: PPC Campaign Management* Social Cali enhances client visibility with targeted PPC strategies. By managing Google Ads campaigns, the agency ensures clients gain immediate exposure, driving actionable results through well-crafted advertisements. *H3: Social Media Marketing Initiatives* Social media is a powerful tool for brand engagement. Social Cali's skilled team curates customized strategies to amplify brand presence across platforms like Facebook and Instagram, targetin
0 notes
Text
Mastering Search Engine Optimization

Search Engine Optimization (SEO) is an important digital marketing strategy that aims to improve an internet site's visibility and search engine rankings, leading to increased organic visitors and brand exposure. With thousands and thousands of websites competing for attention on seek engine effects pages, information and imposing effective search engine optimization strategies is crucial for on-line success.
In this comprehensive guide, we are able to explore the step-by using-step procedure of doing search engine optimization and provide solutions to often requested questions that will help you navigate the sector of search engine optimization.
1: Keyword Research and Analysis
1.1 Understanding the Importance of Keyword Research
Keyword research is the muse of each hit search engine marketing marketing campaign. It entails identifying applicable seek terms and terms that customers use whilst seeking out products, offerings, or data related to your website's content.
Tools like Google Keyword Planner, Ubersuggest, and SEMrush can help in discovering treasured keywords.
1.2 Conducting In-Depth Keyword Analysis
Once you've got a listing of potential key phrases, carry out in-depth analysis to evaluate their search volume, competition stage, and relevance for your target market.
Prioritize keywords with a balance of high search volume and mild competition to goal successfully.
1.3 Choosing the Right Keywords
Select key phrases that align with your internet site's content material and objectives.
Consider long-tail key phrases for more specific queries and include a combination of informational, navigational, and transactional keywords to cater to numerous user reasons.
2: On-Page SEO Optimization
2.1 Optimizing Page Titles and Meta Descriptions
Craft specific and compelling page titles and meta descriptions that incorporate target keywords.
These elements function as snippets in seek engine results, influencing person click on-through quotes.
2.2 Creating High-Quality and Valuable Content
Produce amazing, informative, and attractive content material that addresses personal desires and queries.
Search engines reward treasured content with higher rankings, mainly to expanded natural visitors.
2.3 Formatting Content for Readability and SEO
Use headings (H1, H2, H3), bullet points, and brief paragraphs to make your content clean to examine and recognize.
This formatting not only enhances consumer experience however additionally enables search engines crawl and index your content greater efficaciously.
2.4 Optimizing Images and Alt Text
Optimize photographs in your website with the aid of compressing their sizes without compromising great.
Additionally, offer descriptive alt textual content for images, making them reachable to users with visual impairments and aiding search engine crawlers in understanding the photo's context.
2.5 Implementing Internal Linking
Include inner links within your content to manual customers to related articles or pages to your website.
Internal linking facilitates distributed hyperlink equity and complements the web site's ordinary search engine optimization performance.
3: Technical search engine marketing Optimization
3.1 Ensuring Mobile-Friendly Design
With the majority of online searches conducted on cell devices, having a cellular-friendly internet site is important.
Adopt a responsive layout to make sure that your web page features properly on various display screen sizes.
3.2 Improving Website Speed and Performance
Page load pace extensively affects user experience and search engine marketing rankings.
Optimize your website's pace by using compressing images, leveraging browser caching, and the usage of Content Delivery Networks (CDNs).
3.3 Creating XML Sitemap and Robots.Txt File
Generate an XML sitemap that lists all the pages on your internet site, supporting search engines like google and yahoo crawl and index your content more successfully.
Use a robots.Txt file to manipulate which pages engines like google ought to or must not crawl.
3.4 Implementing HTTPS
Switch to HTTPS (Hypertext Transfer Protocol Secure) to make certain that statistics transmitted among your internet site and customers are encrypted.
Google considers HTTPS as a ranking issue, and it also builds personal belief.

4: Off-Page search engine marketing Strategies
4.1. Building High-Quality Backlinks
Backlinks from reputable and authoritative websites sign to serps that your content material is treasured and straightforward.
Focus on herbal link-constructing techniques, which include guest posting, outreach, and content promoting, to collect relevant backlinks.
4.2 Engaging in Social Media
While social media indicators no longer directly affect seek engine scores, energetic social media engagement can increase emblem visibility, force visitors on your website, and foster content material sharing.
5: Content Marketing and search engine marketing Integration
5.1 Creating a Content Marketing Plan
Develop a content material marketing plan that aligns along with your search engine marketing goals and target audience.
Plan content material topics, book schedule, and promotion techniques to attract and keep a loyal readership.
5.2 Creating Linkable Assets
Produce linkable property including infographics, publications, or comprehensive articles that other websites would want to link to. Linkable property growth the probability of earning precious one way links, boosting your search engine marketing efforts.
6: Measuring and Monitoring SEO Performance
6.1 Setting Up Google Analytics
Integrate Google Analytics together with your website to tune and examine key overall performance metrics, which include organic visitors, consumer behavior, jump charges, and conversion prices.
6.2 Monitoring Keyword Rankings
Use tools like Google Search Console or third-party rank tracking gear to display the ratings of your target key phrases frequently.
These facts enable you to perceive possibilities for development and tune the effectiveness of your SEO strategies.
6.3 Analyzing Backlink Profile
Regularly audit your internet site's one-way link profile to become aware of any low-great or spammy inbound links.
Disavow poisonous hyperlinks thru Google Search Console to avoid ability penalties from serps.
6.4 Conducting Competitor Analysis
Study your competition' search engine marketing strategies to recognize their strengths and weaknesses.
Identify opportunities to distinguish your content material, goal new key phrases, and enhance your internet site's standard performance.
FAQ’S
1.What is seo, and why is it important for net sites?
Answer: search engine optimization stands for Search Engine Optimization, and it's far the approach of optimizing an internet website to beautify its visibility in searching out engine results. Search engine advertising is crucial for internet web sites as it permits lure natural (non-paid) traffic, will increase the opportunities of reaching a broader target market, and complements online visibility and brand recognition.
2.How can I start doing seo for my net website?
Answer: To start doing search engine advertising and marketing on your internet site, start with key-word research to end up aware about applicable key phrases and terms that align in conjunction with your content. Optimize your on-internet web web page factors, which includes page titles, meta descriptions, and content material material cloth, the usage of the purpose key phrases. Focus on developing extremely good and treasured content fabric fabric that caters to client cause.
3.What are the tremendous practices for on-net net page seo?
Answer: On-net page seek engine marketing and marketing super practices embodying goal key terms in page titles, meta descriptions, headers, and content material cloth cloth. Write first-rate and relevant content material cloth material that addresses consumer needs. Use descriptive URLs, optimize pix with alt textual content, and ensure right inner linking.
4.How can I beautify my website's technical search engine optimization?
Answer: For technical search engine marketing, make sure that your internet website is cell-friendly and has a responsive format. Improve internet site tempo with the resource of manners of compressing pictures, leveraging browser caching, and the usage of Content Delivery Networks (CDNs). Create an XML sitemap and robots.Txt document to manual are trying to find engine crawlers efficiently.
http://5.Is hyperlink building nonetheless relevant for search engine advertising and advertising?
Answer: Yes, link building remains a vital detail of seek engine marketing. High-high-quality and relevant lower lower back-hyperlinks from respectable web websites signal to search engines like google and yahoo like google that your content is valuable and honest. Focus on herbal link-constructing strategies, which includes vacationer posting and content material merchandising, to earn valuable one way links.
6.Should I be cognizant of lengthy-tail key terms or short keywords for search engine optimization?
Answer: Both prolonged-tail and brief key terms are important for search engine optimization. Short key terms are more aggressive, at the same time as long-tail key terms are extra unique and plenty less competitive. A combination of every can assist a broader target marketplace and capture more focused internet site traffic.
7.How often do I update my net net web page's content cloth for search engine optimization?
Answer: Regularly updating your internet net web page's content material fabric cloth is useful for searching for engine marketing. Review and replace older articles and pages to maintain them applicable and updated. Creating smooth content material cloth cloth and publishing constantly can also enhance your net website's search engine scores.
Allra Átta | WordPress Vefsíðugerð - Leitarvélabestun - Vefhýsing - WordPress Vefumsjónarkerfi og Stafræn markaðssetning - ALLRA ÁTTA social media critical for search engine optimization?
Answer: Social media engagement does no longer right away impact search engine rankings. However, active social media presence can grow emblem visibility, energy website online visitors in your internet site, and foster content cloth sharing, in a roundabout way benefiting your seek engine marketing and advertising efforts.
9.Do I want to hire an SEO expert for my website?
Answer: While you can cope with essential seo practices yourself, hiring and skilled are searching for engine advertising and marketing professional or business enterprise can offer valuable insights and understanding to accumulate better consequences. They can increase and execute entire search engine marketing techniques tailor-made to your internet net web site's desires.
10.How long does it take to peer seek engine advertising results?
Answer: seo results aren't right now. It takes time for search engines like google to transport slowly and index your net website online and for your efforts to affect rankings. Significant upgrades may additionally moreover take numerous weeks to months, depending on different factors which consist of competition and the effectiveness of your strategies. Patience and consistency are key to undertaking best search engine optimization consequences.
0 notes
Text
Promote Your Adult Website: Effective Strategies
In the ever-evolving landscape of digital marketing, promoting an adult website requires a strategic and nuanced approach. With the right tactics, promote your adult website can enhance visibility, drive traffic, and achieve your business goals. Below, we outline comprehensive strategies that are designed to help you successfully promote your adult website.

Register Now
Understanding the Market
The adult industry is one of the most competitive markets online. Understanding your target audience is crucial. Conduct thorough promote your adult website market research to identify the demographics, preferences, and behaviors of your potential visitors. Use this data to tailor your marketing efforts effectively.
Search Engine Optimization (SEO)
Keyword Research
Keyword research is the foundation of effective SEO. Identify high-volume, low-competition keywords relevant to Adult Personal Ads of your content. promote your adult website Use tools like Google Keyword Planner, Ahrefs, or SEMrush to discover these keywords. Incorporate them naturally into your website's content, meta descriptions, and titles.
On-Page SEO
On-page SEO involves optimizing individual web pages to rank higher and earn more relevant traffic. Key practices include:
Title Tags and Meta Descriptions: Craft compelling and keyword-rich title tags and meta descriptions.
Header Tags: Use header tags (H1, H2, H3) to structure your content and highlight important keywords.
Content Quality: Ensure your content is informative, engaging, and unique. Use multimedia elements like images and videos to enhance user experience.
Internal Linking: Link to other relevant pages on your website to improve navigation and boost
SEO.
Off-Page SEO
Off-page SEO focuses on building your promote your adult website's authority and credibility through external means. Important strategies include:
Backlink Building: Acquire high-quality backlinks from reputable websites. Engage in guest blogging, influencer partnerships, and content sharing to earn these links.
Social Media Engagement: Leverage social media Adult Ad Services platforms to promote your content and interact with your audience. This can drive traffic and improve your site's authority.
Online Directories: Submit your website to Ad network relevant online directories and adult forums to increase visibility.
Content Marketing
Blogging
Maintain a regularly updated blog with informative and engaging posts. Blogging helps to attract organic traffic, establish your authority, promote your adult website and provide value to your visitors. Topics can include industry news, tips, and tutorials.
Video Content
Video content is highly engaging and can significantly boost your website's appeal. Create and share high-quality videos that are relevant to your audience. Platforms like YouTube, Vimeo, and adult-specific video sites can be Online ads valuable for promotion.
Email Marketing
Build and maintain an email list to engage with your audience directly. Send regular newsletters with updates, promotions, and promote your adult website exclusive content. Personalize your emails to increase open rates and conversions.
Social Media Marketing
Platform Selection
Choose the right social media platforms to promote your content. While mainstream platforms like Twitter, Instagram, and Reddit can be useful, also consider adult-friendly platforms for more targeted marketing.
Content Sharing
Share engaging and visually appealing content regularly. Use hashtags strategically to increase reach. Engage with your audience Web Traffic through comments, direct messages, and live sessions.
Advertising
Invest in social media advertising to reach a broader audience. Platforms like Twitter and Instagram offer targeted advertising options that can be tailored to your specific audience demographics.
Paid Advertising
Search Engine Advertising
Google Ads can be an effective way to drive targeted traffic to your website. Create well-optimized ads with compelling copy Affiliate Traffic and relevant keywords. Monitor and adjust your campaigns regularly to maximize ROI.
Display Advertising
Utilize display advertising networks to place banner ads on relevant websites. Ensure your ads are visually appealing and strategically promote your adult website to attract clicks.
Adult Advertising Networks
Consider adult-specific advertising networks like TrafficJunky, ExoClick, and AdXpansion. These networks specialize in promoting adult content and can provide highly targeted traffic.
Affiliate Marketing
Creating an Affiliate Program
Set up an affiliate program to incentivize others to promote your website. Offer attractive commissions and provide affiliates Grow Business with marketing materials and support.
Finding Affiliates
Partner with affiliates who have a relevant audience. Use affiliate Display Advertising networks, reach out to influencers, and engage with and promote your adult website communities to find potential partners.
Legal and Ethical Considerations
Compliance
Ensure your website complies with all legal regulations and industry standards. This includes age verification, content restrictions, and privacy policies.
Transparency
Be transparent with your audience about the nature of your content and any data collection practices. Build trust by maintaining Adult CPA Marketing ethical standards in your marketing efforts.
Monitoring and Analytics
Track Performance
Use tools like Google Analytics and Webmaster Tools to monitor your website's performance. Track metrics such as traffic, bounce rates, and conversion rates.
Adjust Strategies
Regularly analyze your data to identify areas for improvement. Adjust your strategies based on performance metrics to optimize your marketing efforts continuously.
Promoting an adult website requires a multifaceted Adult CPA Network approach that combines SEO, content marketing, social media engagement, and paid advertising. By implementing these strategies effectively, you can increase visibility, drive traffic, and achieve sustained growth.
Conclusion
Promoting an adult website requires a strategic approach and a thorough understanding of the unique challenges in the industry. By optimizing your website for search engines, leveraging social media, utilizing adult advertising networks, Adult Digital Marketing collaborating with influencers and affiliates, and continuously monitoring and adjusting your strategy, you can effectively promote your adult website and drive massive traffic.
Frequently Asked Questions
Where Can I Buy Adult Traffic?
Ans: To buy adult traffic, consider using specialized adult advertising networks. 7Search PPC, ExoClick and Traffic Junky are popular choices, offering targeted traffic and various ad formats like banners, pop-unders, and native ads. AdXpansion is another option, known for its diverse ad placements. Additionally, platforms like JuicyAds and PlugRush cater specifically to adult content, providing high-quality traffic through their extensive network of publishers.
How Do I Push Traffic to My Website?
Ans: To drive traffic to your website, employ a multi-faceted approach:
SEO Optimization: Focus on keyword research and on-page SEO. Use relevant keywords in your content, meta tags, and headers.
Content Marketing: Create high-quality, engaging content that provides value to your audience. Regularly update your blog and share your posts on social media.
Social Media: Utilize platforms like Twitter and Reddit, which are more lenient with adult content. Engage with your audience and share compelling visuals.
Email Marketing: Build a targeted email list and send personalized campaigns with exclusive content and offers.
Paid Advertising: Use adult advertising networks like ExoClick and Traffic Junky to run targeted ad campaigns.
How to Boost Your SEO?
Ans: Boosting your SEO involves several key practices:
Keyword Research: Identify high-traffic, low-competition keywords relevant to your niche using tools like Google Keyword Planner.
On-Page SEO: Optimize title tags, meta descriptions, headers, and content with relevant keywords. Ensure your website is user-friendly and mobile-optimized.
Content Quality: Produce high-quality, original content that addresses your audience's needs. Update your site regularly with fresh content.
Backlinks: Acquire backlinks from reputable sites in your industry through guest blogging and collaborations.
Technical SEO: Improve site speed, ensure proper indexing, and fix any technical issues. Use tools like Google Search Console for regular site audits.
0 notes
Text
SAP HR Master Table

Understanding SAP HR Master Data Tables
The core of effective HR administration within an SAP system lies in master data tables. These tables act as a digital repository, holding essential employee information that drives various processes such as payroll, benefits, time management, etc. Let’s explore the crucial SAP HR master data tables and what they hold.
Key SAP HR Master Data Tables
PA0000 (Actions): This table tracks the entire employment history of an employee. It houses records of actions like hiring, promotions, transfers, terminations, and any other change in employment status.
PA0001 (Organizational Assignment): This stores the employee’s position within the company structure. It includes details like job title, department, cost center, and reporting lines.
PA0002 (Personal Data): Houses core employee information like name, address, date of birth, nationality, and marital status.
PA0003 (Payroll Status): Contains data specifically related to an employee’s payroll, including start and end dates for payroll calculations.
PA0006 (Addresses): Holds various addresses the employee may have on file, such as home address, work address, or emergency contact address.
PA0007 (Work Schedule): Defines the employee’s working hours, breaks, and work patterns (daily, weekly, etc.).
PA0008 (Basic Pay): Stores the employee’s compensation details, including basic salary, wage types, and pay scale information.
PA0009 (Bank Details): The employee’s bank account information for direct deposits and payroll transactions.
Infotypes: The Building Blocks
SAP HR master data is structured using ‘info types.’ Each info type is a collection of related data fields represented by a four-digit number. For example:
Infotype 0000: Actions
Infotype 0001: Organizational Assignment
Infotype 0002: Personal Data
Navigating HR Master Data
You can manage SAP HR master data using the following transactions:
PA20: Display HR master data
PA30: Maintain HR master data
PA40 Personnel Actions (used for actions such as hiring or termination)
Why Master Data Matters
Accurate and well-maintained HR master data is critical for:
Payroll Accuracy: Ensures correct and timely salary and benefits calculations.
Efficient Reporting: Enables the generation of precise HR reports for data-driven decision-making.
Compliance: Helps adhere to labor laws and regulations.
Streamlined HR Processes: Provides a reliable foundation for automating various HR tasks.
Tips for Optimal Master Data Management
Establish Clear Governance: Define processes and responsibilities for creating and updating HR master data.
Conduct Regular Audits: Ensure data accuracy and integrity by implementing regular checks.
Train Users: Educate HR personnel on using SAP HR transactions effectively and understand master data concepts.
Leverage Technology: Explore automation tools and integrations to streamline master data maintenance.
Let me know if you’d like to explore specific tables or info types in more depth. I’m also happy to discuss best practices for HR master data management in SAP!
SEO Considerations:
Keywords: “SAP HR master data tables,” “SAP HR info types,” “SAP HR transactions,” and “master data management.”
Heading structure: Used H2 and H3 headings for clarity.
External/Internal Linking: Add relevant links to other SAP resources or blog posts.
youtube
You can find more information about SAP HR in this SAP HR Link
Conclusion:
Unogeeks is the No.1 IT Training Institute for SAP HR Training. Anyone Disagree? Please drop in a comment
You can check out our other latest blogs on SAP HR here – SAP HR Blogs
You can check out our Best In Class SAP HR Details here – SAP HR Training
———————————-
For Training inquiries:
Call/Whatsapp: +91 73960 33555
Mail us at: [email protected]
Our Website ➜ https://unogeeks.com
Follow us:
Instagram: https://www.instagram.com/unogeeks
Facebook: https://www.facebook.com/UnogeeksSoftwareTrainingInstitute
Twitter: https://twitter.com/unogeeks
1 note
·
View note
Text
How to Make a Simple CMS With Cloudflare, GitHub Actions and Metalsmith
Let’s build ourselves a CMS. But rather than build out a UI, we’re going to get that UI for free in the form of GitHub itself! We’ll be leveraging GitHub as the way to manage the content for our static site generator (it could be any static site generator). Here’s the gist of it: GitHub is going to be the place to manage, version control, and store files, and also be the place we’ll do our content editing. When edits occur, a series of automations will test, verify, and ultimately deploy our content to Cloudflare.
You can find the completed code for the project is available on GitHub. I power my own website, jonpauluritis.com, this exact way.
What does the full stack look like?
Here’s the tech stack we’ll be working with in this article:
Any Markdown Editor (Optional. e.g Typora.io)
A Static Site Generator (e.g. Metalsmith)
Github w/ Github Actions (CICD and Deployment)
Cloudflare Workers
Why should you care about about this setup? This setup is potentially the leanest, fastest, cheapest (~$5/month), and easiest way to manage a website (or Jamstack site). It’s awesome both from a technical side and from a user experience perspective. This setup is so awesome I literally went out and bought stock in Microsoft and Cloudflare.
But before we start…
I’m not going to walk you through setting up accounts on these services, I’m sure you can do that yourself. Here are the accounts you need to setup:
GitHub (Sign up for GitHub Actions.)
Cloudflare Workers Sites (This is the one that costs $5/month.)
I would also recommend Typora for an amazing Markdown writing experience, but Markdown editors are a very personal thing, so use which editor feels right for you.
Project structure
To give you a sense of where we’re headed, here’s the structure of the completed project:
├── build.js ├── .github/workflows │ ├── deploy.yml │ └── nodejs.js ├── layouts │ ├── about.hbs │ ├── article.hbs │ ├── index.hbs │ └── partials │ └── navigation.hbs ├── package-lock.json ├── package.json ├── public ├── src │ ├── about.md │ ├── articles │ │ ├── post1.md │ │ └── post2.md │ └── index.md ├── workers-site └── wrangler.toml
Step 1: Command line stuff
In a terminal, change directory to wherever you keep these sorts of projects and type this:
$ mkdir cms && cd cms && npm init -y
That will create a new directory, move into it, and initialize the use of npm.
The next thing we want to do is stand on the shoulders of giants. We’ll be using a number of npm packages that help us do things, the meat of which is using the static site generator Metalsmith:
$ npm install --save-dev metalsmith metalsmith-markdown metalsmith-layouts metalsmith-collections metalsmith-permalinks handlebars jstransformer-handlebars
Along with Metalsmith, there are a couple of other useful bits and bobs. Why Metalsmith? Let’s talk about that.
Step 2: Metalsmith
I’ve been trying out static site generators for 2-3 years now, and I still haven’t found “the one.” All of the big names — like Eleventy, Gatsby, Hugo, Jekyll, Hexo, and Vuepress — are totally badass but I can’t get past Metalsmith’s simplicity and extensibility.
As an example, this will code will actually build you a site:
// EXAMPLE... NOT WHAT WE ARE USING FOR THIS TUTORIAL Metalsmith(__dirname) .source('src') .destination('dest') .use(markdown()) .use(layouts()) .build((err) => if (err) throw err);
Pretty cool right?
For sake of brevity, type this into the terminal and we’ll scaffold out some structure and files to start with.
First, make the directories:
$ mkdir -p src/articles && mkdir -p layouts/partials
Then, create the build file:
$ touch build.js
Next, we’ll create some layout files:
$ touch layouts/index.hbs && touch layouts/about.hbs && touch layouts/article.hbs && touch layouts/partials/navigation.hbt
And, finally, we’ll set up our content resources:
$ touch src/index.md && touch src/about.md && touch src/articles/post1.md && touch src/articles/post1.md touch src/articles/post2.md
The project folder should look something like this:
├── build.js ├── layouts │ ├── about.hbs │ ├── article.hbs │ ├── index.hbs │ └── partials │ └── navigation.hbs ├── package-lock.json ├── package.json └── src ├── about.md ├── articles │ ├── post1.md │ └── post2.md └── index.md
Step 3: Let’s add some code
To save space (and time), you can use the commands below to create the content for our fictional website. Feel free to hop into “articles” and create your own blog posts. The key is that the posts need some meta data (also called “Front Matter”) to be able to generate properly. The files you would want to edit are index.md, post1.md and post2.md.
The meta data should look something like this:
--- title: 'Post1' layout: article.hbs --- ## Post content here....
Or, if you’re lazy like me, use these terminal commands to add mock content from GitHub Gists to your site:
$ curl https://gist.githubusercontent.com/jppope/35dd682f962e311241d2f502e3d8fa25/raw/ec9991fb2d5d2c2095ea9d9161f33290e7d9bb9e/index.md > src/index.md $ curl https://gist.githubusercontent.com/jppope/2f6b3a602a3654b334c4d8df047db846/raw/88d90cec62be6ad0b3ee113ad0e1179dfbbb132b/about.md > src/about.md $ curl https://gist.githubusercontent.com/jppope/98a31761a9e086604897e115548829c4/raw/6fc1a538e62c237f5de01a926865568926f545e1/post1.md > src/articles/post1.md $ curl https://gist.githubusercontent.com/jppope/b686802621853a94a8a7695eb2bc4c84/raw/9dc07085d56953a718aeca40a3f71319d14410e7/post2.md > src/articles/post2.md
Next, we’ll be creating our layouts and partial layouts (“partials”). We’re going to use Handlebars.js for our templating language in this tutorial, but you can use whatever templating language floats your boat. Metalsmith can work with pretty much all of them, and I don’t have any strong opinions about templating languages.
Build the index layout
<!DOCTYPE html> <html lang="en"> <head> <style> /* Keeping it simple for the tutorial */ body { font-family: 'Avenir', Helvetica, Arial, sans-serif; -webkit-font-smoothing: antialiased; -moz-osx-font-smoothing: grayscale; text-align: center; color: #2c3e50; margin-top: 60px; } .navigation { display: flex; justify-content: center; margin: 2rem 1rem; } .button { margin: 1rem; border: solid 1px #ccc; border-radius: 4px; padding: 0.5rem 1rem; text-decoration: none; } </style> </head> <body> <div> <a href=""><h3></h3></a> <p></p> </div> </body> </html>
A couple of notes:
Our “navigation” hasn’t been defined yet, but will ultimately replace the area where resides.
will iterate through the “collection” of articles that metalsmith will generate during its build process.
Metalsmith has lots of plugins you can use for things like stylesheets, tags, etc., but that’s not what this tutorial is about, so we’ll leave that for you to explore.
Build the About page
Add the following to your about.hbs page:
<!DOCTYPE html> <html lang="en"> <head> <style> /* Keeping it simple for the tutorial */ body { font-family: 'Avenir', Helvetica, Arial, sans-serif; -webkit-font-smoothing: antialiased; -moz-osx-font-smoothing: grayscale; text-align: center; color: #2c3e50; margin-top: 60px; } .navigation { display: flex; justify-content: center; margin: 2rem 1rem; } .button { margin: 1rem; border: solid 1px #ccc; border-radius: 4px; padding: 0.5rem 1rem; text-decoration: none; } </style> </head> <body> <div> } </div> </body> </html>
Build the Articles layout
<!DOCTYPE html> <html lang="en"> <head> <style> /* Keeping it simple for the tutorial */ body { font-family: 'Avenir', Helvetica, Arial, sans-serif; -webkit-font-smoothing: antialiased; -moz-osx-font-smoothing: grayscale; text-align: center; color: #2c3e50; margin-top: 60px; } .navigation { display: flex; justify-content: center; margin: 2rem 1rem; } .button { margin: 1rem; border: solid 1px #ccc; border-radius: 4px; padding: 0.5rem 1rem; text-decoration: none; } </style> </head> <body> <div> } </div> </body> </html>
You may have noticed that this is the exact same layout as the About page. It is. I just wanted to cover how to add additional pages so you’d know how to do that. If you want this one to be different, go for it.
Add navigation
Add the following to the layouts/partials/navigation.hbs file
<div class="navigation"> <div> <a class="button" href="/">Home</a> <a class="button" href="/about">About</a> </div> </div>
Sure there’s not much to it… but this really isn’t supposed to be a Metalsmith/SSG tutorial. ¯\_(ツ)_/¯
Step 4: The Build file
The heart and soul of Metalsmith is the build file. For sake of thoroughness, I’m going to go through it line-by-line.
We start by importing the dependencies
Quick note: Metalsmith was created in 2014, and the predominant module system at the time was common.js , so I’m going to stick with require statements as opposed to ES modules. It’s also worth noting that most of the other tutorials are using require statements as well, so skipping a build step with Babel will just make life a little less complex here.
// What we use to glue everything together const Metalsmith = require('metalsmith');
// compile from markdown (you can use targets as well) const markdown = require('metalsmith-markdown');
// compiles layouts const layouts = require('metalsmith-layouts');
// used to build collections of articles const collections = require('metalsmith-collections');
// permalinks to clean up routes const permalinks = require('metalsmith-permalinks');
// templating const handlebars = require('handlebars');
// register the navigation const fs = require('fs'); handlebars.registerPartial('navigation', fs.readFileSync(__dirname + '/layouts/partials/navigation.hbt').toString());
// NOTE: Uncomment if you want a server for development // const serve = require('metalsmith-serve'); // const watch = require('metalsmith-watch');
Next, we’ll be including Metalsmith and telling it where to find its compile targets:
// Metalsmith Metalsmith(__dirname) // where your markdown files are .source('src') // where you want the compliled files to be rendered .destination('public')
So far, so good. After we have the source and target set, we’re going to set up the markdown rendering, the layouts rendering, and let Metalsmith know to use “Collections.” These are a way to group files together. An easy example would be something like “blog posts” but it could really be anything, say recipes, whiskey reviews, or whatever. In the above example, we’re calling the collection “articles.”
// previous code would go here
// collections create groups of similar content .use(collections({ articles: { pattern: 'articles/*.md', }, })) // compile from markdown .use(markdown()) // nicer looking links .use(permalinks({ pattern: ':collection/:title' })) // build layouts using handlebars templates // also tell metalsmith where to find the raw input .use(layouts({ engine: 'handlebars', directory: './layouts', default: 'article.html', pattern: ["*/*/*html", "*/*html", "*html"], partials: { navigation: 'partials/navigation', } }))
// NOTE: Uncomment if you want a server for development // .use(serve({ // port: 8081, // verbose: true // })) // .use(watch({ // paths: { // "${source}/**/*": true, // "layouts/**/*": "**/*", // } // }))
Next, we’re adding the markdown plugin, so we can use markdown for content to compile to HTML.
From there, we’re using the layouts plugin to wrap our raw content in the layout we define in the layouts folder. You can read more about the nuts and bolts of this on the official plugin site but the result is that we can use } in a template and it will just work.
The last addition to our tiny little build script will be the build method:
// Everything else would be above this .build(function(err) { if (err) { console.error(err) } else { console.log('build completed!'); } });
Putting everything together, we should get a build script that looks like this:
const Metalsmith = require('metalsmith'); const markdown = require('metalsmith-markdown'); const layouts = require('metalsmith-layouts'); const collections = require('metalsmith-collections'); const permalinks = require('metalsmith-permalinks'); const handlebars = require('handlebars'); const fs = require('fs');
// Navigation handlebars.registerPartial('navigation', fs.readFileSync(__dirname + '/layouts/partials/navigation.hbt').toString());
Metalsmith(__dirname) .source('src') .destination('public') .use(collections({ articles: { pattern: 'articles/*.md', }, })) .use(markdown()) .use(permalinks({ pattern: ':collection/:title' })) .use(layouts({ engine: 'handlebars', directory: './layouts', default: 'article.html', pattern: ["*/*/*html", "*/*html", "*html"], partials: { navigation: 'partials/navigation', } })) .build(function (err) { if (err) { console.error(err) } else { console.log('build completed!'); } });
I’m a sucker for simple and clean and, in my humble opinion, it doesn’t get any simpler or cleaner than a Metalsmith build. We just need to make one quick update to the package.json file and we’ll be able to give this a run:
"name": "buffaloTraceRoute", "version": "1.0.0", "description": "", "main": "index.js", "scripts": { "build": "node build.js", "test": "echo \"No Tests Yet!\" " }, "keywords": [], "author": "Your Name", "license": "ISC", "devDependencies": { // these should be the current versions // also... comments aren't allowed in JSON } }
If you want to see your handy work, you can uncomment the parts of the build file that will let you serve your project and do things like run npm run build. Just make sure you remove this code before deploying.
Working with Cloudflare
Next, we’re going to work with Cloudflare to get access to their Cloudflare Workers. This is where the $5/month cost comes into play.
Now, you might be asking: “OK, but why Cloudflare? What about using something free like GutHub Pages or Netlify?” It’s a good question. There are lots of ways to deploy a static site, so why choose one method over another?
Well, Cloudflare has a few things going for it…
Speed and performance
One of the biggest reasons to switch to a static site generator is to improve your website performance. Using Cloudflare Workers Site can improve your performance even more.
Here’s a graph that shows Cloudflare compared to two competing alternatives:
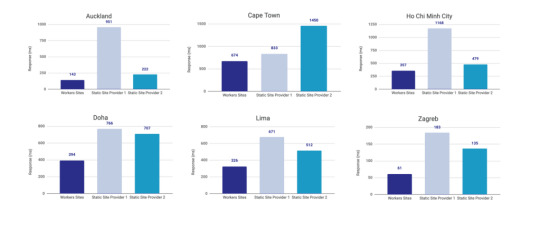
Courtesy of Cloudflare
The simple reason why Cloudflare is the fastest: a site is deployed to 190+ data centers around the world. This reduces latency since users will be served the assets from a location that’s physically closer to them.
Simplicity
Admittedly, the initial configuration of Cloudflare Workers may be a little tricky if you don’t know how to setup environmental variables. But after you setup the basic configurations for your computer, deploying to Cloudflare is as simple as wrangler publish from the site directory. This tutorial is focused on the CI/CD aspect of deploying to Cloudflare which is a little more involved, but it’s still incredibly simple compared to most other deployment processes.
(It’s worth mentioning GitHub Pages, Netlify are also killing it in this area. The developer experience of all three companies is amazing.)
More bang for the buck
While Github Pages and Netlify both have free tiers, your usage is (soft) limited to 100GB of bandwidth a month. Don’t get me wrong, that’s a super generous limit. But after that you’re out of luck. GitHub Pages doesn’t offer anything more than that and Netlify jumps up to $45/month, making Cloudflare’s $5/month price tag very reasonable.
ServiceFree Tier BandwidthPaid Tier PricePaid Tier Requests / BandwidthGitHub Pages100GBN/AN/ANetlify100GB$45~150K / 400 GBCloudflare Workers Sitesnone$510MM / unlimited
Calculations assume a 3MB average website. Cloudflare has additional limits on CPU use. GitHub Pages should not be used for sites that have credit card transactions.
Sure, there’s no free tier for Cloudflare, but $5 for 10 million requests is a steal. I would also be remise if I didn’t mention that GitHub Pages has had a few outages over the last year. That’s totally fine in my book a demo site, but it would be bad news for a business.
Cloudflare offers a ton of additional features for that worth briefly mentioning: free SSL certificates, free (and easy) DNS routing, a custom Workers Sites domain name for your projects (which is great for staging), unlimited environments (e.g. staging), and registering a domain name at cost (as opposed to the markup pricing imposed by other registrars).
Deploying to Cloudflare
Cloudflare provides some great tutorials for how to use their Cloudflare Workers product. We’ll cover the highlights here.
First, make sure the Cloudflare CLI, Wrangler, is installed:
$ npm i @cloudflare/wrangler -g
Next, we’re going to add Cloudflare Sites to the project, like this:
wrangler init --site cms
Assuming I didn’t mess up and forget about a step, here’s what we should have in the terminal at this point:
⬇️ Installing cargo-generate... 🔧 Creating project called `workers-site`... ✨ Done! New project created /Users/<User>/Code/cms/workers-site ✨ Succesfully scaffolded workers site ✨ Succesfully created a `wrangler.toml`
There should also be a generated folder in the project root called /workers-site as well as a config file called wrangler.toml — this is where the magic resides.
name = "cms" type = "webpack" account_id = "" workers_dev = true route = "" zone_id = ""
[site] bucket = "" entry-point = "workers-site"
You might have already guessed what comes next… we need to add some info to the config file! The first key/value pair we’re going to update is the bucket property.
bucket = "./public"
Next, we need to get the Account ID and Zone ID (i.e. the route for your domain name). You can find them in your Cloudflare account all the way at the bottom of the dashboard for your domain:
Stop! Before going any further, don’t forget to click the “Get your API token” button to grab the last config piece that we’ll need. Save it on a notepad or somewhere handy because we’ll need it for the next section.
Phew! Alright, the next task is to add the Account ID and Zone ID we just grabbed to the .toml file:
name = "buffalo-traceroute" type = "webpack" account_id = "d7313702f333457f84f3c648e9d652ff" # Fake... use your account_id workers_dev = true # route = "example.com/*" # zone_id = "805b078ca1294617aead2a1d2a1830b9" # Fake... use your zone_id
[site] bucket = "./public" entry-point = "workers-site" (Again, those IDs are fake.)
Again, those IDs are fake. You may be asked to set up credentials on your computer. If that’s the case, run wrangler config in the terminal.
GitHub Actions
The last piece of the puzzle is to configure GitHub to do automatic deployments for us. Having done previous forays into CI/CD setups, I was ready for the worst on this one but, amazingly, GitHub Actions is very simple for this sort of setup.
So how does this work?
First, let’s make sure that out GitHub account has GitHub Actions activated. It’s technically in beta right now, but I haven’t run into any issues with that so far.
Next, we need to create a repository in GitHub and upload our code to it. Start by going to GitHub and creating a repository.

This tutorial isn’t meant to cover the finer points of Git and/or GitHub, but there’s a great introduction. Or, copy and paste the following commands while in the root directory of the project:
# run commands one after the other $ git init $ touch .gitignore && echo 'node_modules' > .gitignore $ git add . $ git commit -m 'first commit' $ git remote add origin https://github.com/{username}/{repo name} $ git push -u origin master
That should add the project to GitHub. I say that with a little hesitance but this is where everything tends to blow up for me. For example, put too many commands into the terminal and suddenly GitHub has an outage, or the terminal unable to location the path for Python. Tread carefully!
Assuming we’re past that part, our next task is to activate Github Actions and create a directory called .github/workflows in the root of the project directory. (GitHub can also do this automatically by adding the “node” workflow when activating actions. At the time of writing, adding a GitHub Actions Workflow is part of GitHub’s user interface.)
Once we have the directory in the project root, we can add the final two files. Each file is going to handle a different workflow:
A workflow to check that updates can be merged (i.e. the “CI” in CI/CD)
A workflow to deploy changes once they have been merged into master (i.e. the “CD” in CI/CD)
# integration.yml name: Integration
on: pull_request: branches: [ master ]
jobs: build: runs-on: ubuntu-latest strategy: matrix: node-version: [10.x, 12.x] steps: - uses: actions/checkout@v2 - name: Use Node.js $ uses: actions/setup-node@v1 with: node-version: $ - run: npm ci - run: npm run build --if-present - run: npm test env: CI: true
This is a straightforward workflow. So straightforward, in fact, that I copied it straight from the official GitHub Actions docs and barely modified it. Let’s go through what is actually happening in there:
on: Run this workflow only when a pull request is created for the master branch
jobs: Run the below steps for two-node environments (e.g. Node 10, and Node 12 — Node 12 is currently the recommended version). This will build, if a build script is defined. It will also run tests if a test script is defined.
The second file is our deployment script and is a little more involved.
# deploy.yml name: Deploy
on: push: branches: - master
jobs: deploy: runs-on: ubuntu-latest name: Deploy strategy: matrix: node-version: [10.x]
steps: - uses: actions/checkout@v2 - name: Use Node.js $ uses: actions/setup-node@v1 with: node-version: $ - run: npm install - uses: actions/checkout@master - name: Build site run: "npm run build" - name: Publish uses: cloudflare/[email protected] with: apiToken: $
Important! Remember that Cloudflare API token I mentioned way earlier? Now is the time to use it. Go to the project settings and add a secret. Name the secret CF_API_TOKEN and add the API token.
Let’s go through whats going on in this script:
on: Run the steps when code is merged into the master branch
steps: Use Nodejs to install all dependencies, use Nodejs to build the site, then use Cloudflare Wrangler to publish the site
Here’s a quick recap of what the project should look like before running a build (sans node_modules):
├── build.js ├── dist │ └── worker.js ├── layouts │ ├── about.hbs │ ├── article.hbs │ ├── index.hbs │ └── partials │ └── navigation.hbs ├── package-lock.json ├── package.json ├── public ├── src │ ├── about.md │ ├── articles │ │ ├── post1.md │ │ └── post2.md │ └── index.md ├── workers-site │ ├── index.js │ ├── package-lock.json │ ├── package.json │ └── worker │ └── script.js └── wrangler.toml
A GitHub-based CMS
Okay, so I made it this far… I was promised a CMS? Where is the database and my GUI that I log into and stuff?
Don’t worry, you are at the finish line! GitHub is your CMS now and here’s how it works:
Write a markdown file (with front matter).
Open up GitHub and go to the project repository.
Click into the “Articles” directory, and upload the new article. GitHub will ask whether a new branch should be created along with a pull request. The answer is yes.
After the integration is verified, the pull request can be merged, which triggers deployment.
Sit back, relax and wait 10 seconds… the content is being deployed to 164 data centers worldwide.
Congrats! You now have a minimal Git-based CMS that basically anyone can use.
Troubleshooting notes
Metalsmith layouts can sometimes be kinda tricky. Try adding this debug line before the build step to have it kick out something useful: DEBUG=metalsmith-layouts npm run build
Occasionally, Github actions needed me to add node_modules to the commit so it could deploy… this was strange to me (and not a recommended practice) but fixed the deployment.
Please let me know if you run into any trouble and we can add it to this list!
The post How to Make a Simple CMS With Cloudflare, GitHub Actions and Metalsmith appeared first on CSS-Tricks.
How to Make a Simple CMS With Cloudflare, GitHub Actions and Metalsmith published first on https://deskbysnafu.tumblr.com/
0 notes
Text
How to Make a Simple CMS With Cloudflare, GitHub Actions and Metalsmith
Let’s build ourselves a CMS. But rather than build out a UI, we’re going to get that UI for free in the form of GitHub itself! We’ll be leveraging GitHub as the way to manage the content for our static site generator (it could be any static site generator). Here’s the gist of it: GitHub is going to be the place to manage, version control, and store files, and also be the place we’ll do our content editing. When edits occur, a series of automations will test, verify, and ultimately deploy our content to Cloudflare.
You can find the completed code for the project is available on GitHub. I power my own website, jonpauluritis.com, this exact way.
What does the full stack look like?
Here’s the tech stack we’ll be working with in this article:
Any Markdown Editor (Optional. e.g Typora.io)
A Static Site Generator (e.g. Metalsmith)
Github w/ Github Actions (CICD and Deployment)
Cloudflare Workers
Why should you care about about this setup? This setup is potentially the leanest, fastest, cheapest (~$5/month), and easiest way to manage a website (or Jamstack site). It’s awesome both from a technical side and from a user experience perspective. This setup is so awesome I literally went out and bought stock in Microsoft and Cloudflare.
But before we start…
I’m not going to walk you through setting up accounts on these services, I’m sure you can do that yourself. Here are the accounts you need to setup:
GitHub (Sign up for GitHub Actions.)
Cloudflare Workers Sites (This is the one that costs $5/month.)
I would also recommend Typora for an amazing Markdown writing experience, but Markdown editors are a very personal thing, so use which editor feels right for you.
Project structure
To give you a sense of where we’re headed, here’s the structure of the completed project:
├── build.js ├── .github/workflows │ ├── deploy.yml │ └── nodejs.js ├── layouts │ ├── about.hbs │ ├── article.hbs │ ├── index.hbs │ └── partials │ └── navigation.hbs ├── package-lock.json ├── package.json ├── public ├── src │ ├── about.md │ ├── articles │ │ ├── post1.md │ │ └── post2.md │ └── index.md ├── workers-site └── wrangler.toml
Step 1: Command line stuff
In a terminal, change directory to wherever you keep these sorts of projects and type this:
$ mkdir cms && cd cms && npm init -y
That will create a new directory, move into it, and initialize the use of npm.
The next thing we want to do is stand on the shoulders of giants. We’ll be using a number of npm packages that help us do things, the meat of which is using the static site generator Metalsmith:
$ npm install --save-dev metalsmith metalsmith-markdown metalsmith-layouts metalsmith-collections metalsmith-permalinks handlebars jstransformer-handlebars
Along with Metalsmith, there are a couple of other useful bits and bobs. Why Metalsmith? Let’s talk about that.
Step 2: Metalsmith
I’ve been trying out static site generators for 2-3 years now, and I still haven’t found “the one.” All of the big names — like Eleventy, Gatsby, Hugo, Jekyll, Hexo, and Vuepress — are totally badass but I can’t get past Metalsmith’s simplicity and extensibility.
As an example, this will code will actually build you a site:
// EXAMPLE... NOT WHAT WE ARE USING FOR THIS TUTORIAL Metalsmith(__dirname) .source('src') .destination('dest') .use(markdown()) .use(layouts()) .build((err) => if (err) throw err);
Pretty cool right?
For sake of brevity, type this into the terminal and we’ll scaffold out some structure and files to start with.
First, make the directories:
$ mkdir -p src/articles && mkdir -p layouts/partials
Then, create the build file:
$ touch build.js
Next, we’ll create some layout files:
$ touch layouts/index.hbs && touch layouts/about.hbs && touch layouts/article.hbs && touch layouts/partials/navigation.hbt
And, finally, we’ll set up our content resources:
$ touch src/index.md && touch src/about.md && touch src/articles/post1.md && touch src/articles/post1.md touch src/articles/post2.md
The project folder should look something like this:
├── build.js ├── layouts │ ├── about.hbs │ ├── article.hbs │ ├── index.hbs │ └── partials │ └── navigation.hbs ├── package-lock.json ├── package.json └── src ├── about.md ├── articles │ ├── post1.md │ └── post2.md └── index.md
Step 3: Let’s add some code
To save space (and time), you can use the commands below to create the content for our fictional website. Feel free to hop into “articles” and create your own blog posts. The key is that the posts need some meta data (also called “Front Matter”) to be able to generate properly. The files you would want to edit are index.md, post1.md and post2.md.
The meta data should look something like this:
--- title: 'Post1' layout: article.hbs --- ## Post content here....
Or, if you’re lazy like me, use these terminal commands to add mock content from GitHub Gists to your site:
$ curl https://gist.githubusercontent.com/jppope/35dd682f962e311241d2f502e3d8fa25/raw/ec9991fb2d5d2c2095ea9d9161f33290e7d9bb9e/index.md > src/index.md $ curl https://gist.githubusercontent.com/jppope/2f6b3a602a3654b334c4d8df047db846/raw/88d90cec62be6ad0b3ee113ad0e1179dfbbb132b/about.md > src/about.md $ curl https://gist.githubusercontent.com/jppope/98a31761a9e086604897e115548829c4/raw/6fc1a538e62c237f5de01a926865568926f545e1/post1.md > src/articles/post1.md $ curl https://gist.githubusercontent.com/jppope/b686802621853a94a8a7695eb2bc4c84/raw/9dc07085d56953a718aeca40a3f71319d14410e7/post2.md > src/articles/post2.md
Next, we’ll be creating our layouts and partial layouts (“partials”). We’re going to use Handlebars.js for our templating language in this tutorial, but you can use whatever templating language floats your boat. Metalsmith can work with pretty much all of them, and I don’t have any strong opinions about templating languages.
Build the index layout
<!DOCTYPE html> <html lang="en"> <head> <style> /* Keeping it simple for the tutorial */ body { font-family: 'Avenir', Helvetica, Arial, sans-serif; -webkit-font-smoothing: antialiased; -moz-osx-font-smoothing: grayscale; text-align: center; color: #2c3e50; margin-top: 60px; } .navigation { display: flex; justify-content: center; margin: 2rem 1rem; } .button { margin: 1rem; border: solid 1px #ccc; border-radius: 4px; padding: 0.5rem 1rem; text-decoration: none; } </style> </head> <body> <div> <a href=""><h3></h3></a> <p></p> </div> </body> </html>
A couple of notes:
Our “navigation” hasn’t been defined yet, but will ultimately replace the area where resides.
will iterate through the “collection” of articles that metalsmith will generate during its build process.
Metalsmith has lots of plugins you can use for things like stylesheets, tags, etc., but that’s not what this tutorial is about, so we’ll leave that for you to explore.
Build the About page
Add the following to your about.hbs page:
<!DOCTYPE html> <html lang="en"> <head> <style> /* Keeping it simple for the tutorial */ body { font-family: 'Avenir', Helvetica, Arial, sans-serif; -webkit-font-smoothing: antialiased; -moz-osx-font-smoothing: grayscale; text-align: center; color: #2c3e50; margin-top: 60px; } .navigation { display: flex; justify-content: center; margin: 2rem 1rem; } .button { margin: 1rem; border: solid 1px #ccc; border-radius: 4px; padding: 0.5rem 1rem; text-decoration: none; } </style> </head> <body> <div> } </div> </body> </html>
Build the Articles layout
<!DOCTYPE html> <html lang="en"> <head> <style> /* Keeping it simple for the tutorial */ body { font-family: 'Avenir', Helvetica, Arial, sans-serif; -webkit-font-smoothing: antialiased; -moz-osx-font-smoothing: grayscale; text-align: center; color: #2c3e50; margin-top: 60px; } .navigation { display: flex; justify-content: center; margin: 2rem 1rem; } .button { margin: 1rem; border: solid 1px #ccc; border-radius: 4px; padding: 0.5rem 1rem; text-decoration: none; } </style> </head> <body> <div> } </div> </body> </html>
You may have noticed that this is the exact same layout as the About page. It is. I just wanted to cover how to add additional pages so you’d know how to do that. If you want this one to be different, go for it.
Add navigation
Add the following to the layouts/partials/navigation.hbs file
<div class="navigation"> <div> <a class="button" href="/">Home</a> <a class="button" href="/about">About</a> </div> </div>
Sure there’s not much to it… but this really isn’t supposed to be a Metalsmith/SSG tutorial. ¯\_(ツ)_/¯
Step 4: The Build file
The heart and soul of Metalsmith is the build file. For sake of thoroughness, I’m going to go through it line-by-line.
We start by importing the dependencies
Quick note: Metalsmith was created in 2014, and the predominant module system at the time was common.js , so I’m going to stick with require statements as opposed to ES modules. It’s also worth noting that most of the other tutorials are using require statements as well, so skipping a build step with Babel will just make life a little less complex here.
// What we use to glue everything together const Metalsmith = require('metalsmith');
// compile from markdown (you can use targets as well) const markdown = require('metalsmith-markdown');
// compiles layouts const layouts = require('metalsmith-layouts');
// used to build collections of articles const collections = require('metalsmith-collections');
// permalinks to clean up routes const permalinks = require('metalsmith-permalinks');
// templating const handlebars = require('handlebars');
// register the navigation const fs = require('fs'); handlebars.registerPartial('navigation', fs.readFileSync(__dirname + '/layouts/partials/navigation.hbt').toString());
// NOTE: Uncomment if you want a server for development // const serve = require('metalsmith-serve'); // const watch = require('metalsmith-watch');
Next, we’ll be including Metalsmith and telling it where to find its compile targets:
// Metalsmith Metalsmith(__dirname) // where your markdown files are .source('src') // where you want the compliled files to be rendered .destination('public')
So far, so good. After we have the source and target set, we’re going to set up the markdown rendering, the layouts rendering, and let Metalsmith know to use “Collections.” These are a way to group files together. An easy example would be something like “blog posts” but it could really be anything, say recipes, whiskey reviews, or whatever. In the above example, we’re calling the collection “articles.”
// previous code would go here
// collections create groups of similar content .use(collections({ articles: { pattern: 'articles/*.md', }, })) // compile from markdown .use(markdown()) // nicer looking links .use(permalinks({ pattern: ':collection/:title' })) // build layouts using handlebars templates // also tell metalsmith where to find the raw input .use(layouts({ engine: 'handlebars', directory: './layouts', default: 'article.html', pattern: ["*/*/*html", "*/*html", "*html"], partials: { navigation: 'partials/navigation', } }))
// NOTE: Uncomment if you want a server for development // .use(serve({ // port: 8081, // verbose: true // })) // .use(watch({ // paths: { // "${source}/**/*": true, // "layouts/**/*": "**/*", // } // }))
Next, we’re adding the markdown plugin, so we can use markdown for content to compile to HTML.
From there, we’re using the layouts plugin to wrap our raw content in the layout we define in the layouts folder. You can read more about the nuts and bolts of this on the official plugin site but the result is that we can use } in a template and it will just work.
The last addition to our tiny little build script will be the build method:
// Everything else would be above this .build(function(err) { if (err) { console.error(err) } else { console.log('build completed!'); } });
Putting everything together, we should get a build script that looks like this:
const Metalsmith = require('metalsmith'); const markdown = require('metalsmith-markdown'); const layouts = require('metalsmith-layouts'); const collections = require('metalsmith-collections'); const permalinks = require('metalsmith-permalinks'); const handlebars = require('handlebars'); const fs = require('fs');
// Navigation handlebars.registerPartial('navigation', fs.readFileSync(__dirname + '/layouts/partials/navigation.hbt').toString());
Metalsmith(__dirname) .source('src') .destination('public') .use(collections({ articles: { pattern: 'articles/*.md', }, })) .use(markdown()) .use(permalinks({ pattern: ':collection/:title' })) .use(layouts({ engine: 'handlebars', directory: './layouts', default: 'article.html', pattern: ["*/*/*html", "*/*html", "*html"], partials: { navigation: 'partials/navigation', } })) .build(function (err) { if (err) { console.error(err) } else { console.log('build completed!'); } });
I’m a sucker for simple and clean and, in my humble opinion, it doesn’t get any simpler or cleaner than a Metalsmith build. We just need to make one quick update to the package.json file and we’ll be able to give this a run:
"name": "buffaloTraceRoute", "version": "1.0.0", "description": "", "main": "index.js", "scripts": { "build": "node build.js", "test": "echo \"No Tests Yet!\" " }, "keywords": [], "author": "Your Name", "license": "ISC", "devDependencies": { // these should be the current versions // also... comments aren't allowed in JSON } }
If you want to see your handy work, you can uncomment the parts of the build file that will let you serve your project and do things like run npm run build. Just make sure you remove this code before deploying.
Working with Cloudflare
Next, we’re going to work with Cloudflare to get access to their Cloudflare Workers. This is where the $5/month cost comes into play.
Now, you might be asking: “OK, but why Cloudflare? What about using something free like GutHub Pages or Netlify?” It’s a good question. There are lots of ways to deploy a static site, so why choose one method over another?
Well, Cloudflare has a few things going for it…
Speed and performance
One of the biggest reasons to switch to a static site generator is to improve your website performance. Using Cloudflare Workers Site can improve your performance even more.
Here’s a graph that shows Cloudflare compared to two competing alternatives:

Courtesy of Cloudflare
The simple reason why Cloudflare is the fastest: a site is deployed to 190+ data centers around the world. This reduces latency since users will be served the assets from a location that’s physically closer to them.
Simplicity
Admittedly, the initial configuration of Cloudflare Workers may be a little tricky if you don’t know how to setup environmental variables. But after you setup the basic configurations for your computer, deploying to Cloudflare is as simple as wrangler publish from the site directory. This tutorial is focused on the CI/CD aspect of deploying to Cloudflare which is a little more involved, but it’s still incredibly simple compared to most other deployment processes.
(It’s worth mentioning GitHub Pages, Netlify are also killing it in this area. The developer experience of all three companies is amazing.)
More bang for the buck
While Github Pages and Netlify both have free tiers, your usage is (soft) limited to 100GB of bandwidth a month. Don’t get me wrong, that’s a super generous limit. But after that you’re out of luck. GitHub Pages doesn’t offer anything more than that and Netlify jumps up to $45/month, making Cloudflare’s $5/month price tag very reasonable.
Service Free Tier Bandwidth Paid Tier Price Paid Tier Requests / Bandwidth GitHub Pages 100GB N/A N/A Netlify 100GB $45 ~150K / 400 GB Cloudflare Workers Sites none $5 10MM / unlimited
Calculations assume a 3MB average website. Cloudflare has additional limits on CPU use. GitHub Pages should not be used for sites that have credit card transactions.
Sure, there’s no free tier for Cloudflare, but $5 for 10 million requests is a steal. I would also be remise if I didn’t mention that GitHub Pages has had a few outages over the last year. That’s totally fine in my book a demo site, but it would be bad news for a business.
Cloudflare offers a ton of additional features for that worth briefly mentioning: free SSL certificates, free (and easy) DNS routing, a custom Workers Sites domain name for your projects (which is great for staging), unlimited environments (e.g. staging), and registering a domain name at cost (as opposed to the markup pricing imposed by other registrars).
Deploying to Cloudflare
Cloudflare provides some great tutorials for how to use their Cloudflare Workers product. We’ll cover the highlights here.
First, make sure the Cloudflare CLI, Wrangler, is installed:
$ npm i @cloudflare/wrangler -g
Next, we’re going to add Cloudflare Sites to the project, like this:
wrangler init --site cms
Assuming I didn’t mess up and forget about a step, here’s what we should have in the terminal at this point:
⬇ Installing cargo-generate... 🔧 Creating project called `workers-site`... ✨ Done! New project created /Users/<User>/Code/cms/workers-site ✨ Succesfully scaffolded workers site ✨ Succesfully created a `wrangler.toml`
There should also be a generated folder in the project root called /workers-site as well as a config file called wrangler.toml — this is where the magic resides.
name = "cms" type = "webpack" account_id = "" workers_dev = true route = "" zone_id = ""
[site] bucket = "" entry-point = "workers-site"
You might have already guessed what comes next… we need to add some info to the config file! The first key/value pair we’re going to update is the bucket property.
bucket = "./public"
Next, we need to get the Account ID and Zone ID (i.e. the route for your domain name). You can find them in your Cloudflare account all the way at the bottom of the dashboard for your domain:
Stop! Before going any further, don’t forget to click the “Get your API token” button to grab the last config piece that we’ll need. Save it on a notepad or somewhere handy because we’ll need it for the next section.
Phew! Alright, the next task is to add the Account ID and Zone ID we just grabbed to the .toml file:
name = "buffalo-traceroute" type = "webpack" account_id = "d7313702f333457f84f3c648e9d652ff" # Fake... use your account_id workers_dev = true # route = "example.com/*" # zone_id = "805b078ca1294617aead2a1d2a1830b9" # Fake... use your zone_id
[site] bucket = "./public" entry-point = "workers-site" (Again, those IDs are fake.)
Again, those IDs are fake. You may be asked to set up credentials on your computer. If that’s the case, run wrangler config in the terminal.
GitHub Actions
The last piece of the puzzle is to configure GitHub to do automatic deployments for us. Having done previous forays into CI/CD setups, I was ready for the worst on this one but, amazingly, GitHub Actions is very simple for this sort of setup.
So how does this work?
First, let’s make sure that out GitHub account has GitHub Actions activated. It’s technically in beta right now, but I haven’t run into any issues with that so far.
Next, we need to create a repository in GitHub and upload our code to it. Start by going to GitHub and creating a repository.
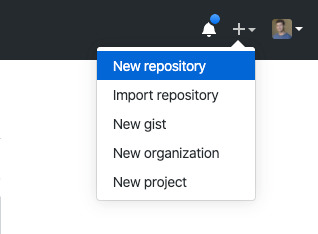
This tutorial isn’t meant to cover the finer points of Git and/or GitHub, but there’s a great introduction. Or, copy and paste the following commands while in the root directory of the project:
# run commands one after the other $ git init $ touch .gitignore && echo 'node_modules' > .gitignore $ git add . $ git commit -m 'first commit' $ git remote add origin https://github.com/{username}/{repo name} $ git push -u origin master
That should add the project to GitHub. I say that with a little hesitance but this is where everything tends to blow up for me. For example, put too many commands into the terminal and suddenly GitHub has an outage, or the terminal unable to location the path for Python. Tread carefully!
Assuming we’re past that part, our next task is to activate Github Actions and create a directory called .github/workflows in the root of the project directory. (GitHub can also do this automatically by adding the “node” workflow when activating actions. At the time of writing, adding a GitHub Actions Workflow is part of GitHub’s user interface.)
Once we have the directory in the project root, we can add the final two files. Each file is going to handle a different workflow:
A workflow to check that updates can be merged (i.e. the “CI” in CI/CD)
A workflow to deploy changes once they have been merged into master (i.e. the “CD” in CI/CD)
# integration.yml name: Integration
on: pull_request: branches: [ master ]
jobs: build: runs-on: ubuntu-latest strategy: matrix: node-version: [10.x, 12.x] steps: - uses: actions/checkout@v2 - name: Use Node.js $ uses: actions/setup-node@v1 with: node-version: $ - run: npm ci - run: npm run build --if-present - run: npm test env: CI: true
This is a straightforward workflow. So straightforward, in fact, that I copied it straight from the official GitHub Actions docs and barely modified it. Let’s go through what is actually happening in there:
on: Run this workflow only when a pull request is created for the master branch
jobs: Run the below steps for two-node environments (e.g. Node 10, and Node 12 — Node 12 is currently the recommended version). This will build, if a build script is defined. It will also run tests if a test script is defined.
The second file is our deployment script and is a little more involved.
# deploy.yml name: Deploy
on: push: branches: - master
jobs: deploy: runs-on: ubuntu-latest name: Deploy strategy: matrix: node-version: [10.x]
steps: - uses: actions/checkout@v2 - name: Use Node.js $ uses: actions/setup-node@v1 with: node-version: $ - run: npm install - uses: actions/checkout@master - name: Build site run: "npm run build" - name: Publish uses: cloudflare/[email protected] with: apiToken: $
Important! Remember that Cloudflare API token I mentioned way earlier? Now is the time to use it. Go to the project settings and add a secret. Name the secret CF_API_TOKEN and add the API token.
Let’s go through whats going on in this script:
on: Run the steps when code is merged into the master branch
steps: Use Nodejs to install all dependencies, use Nodejs to build the site, then use Cloudflare Wrangler to publish the site
Here’s a quick recap of what the project should look like before running a build (sans node_modules):
├── build.js ├── dist │ └── worker.js ├── layouts │ ├── about.hbs │ ├── article.hbs │ ├── index.hbs │ └── partials │ └── navigation.hbs ├── package-lock.json ├── package.json ├── public ├── src │ ├── about.md │ ├── articles │ │ ├── post1.md │ │ └── post2.md │ └── index.md ├── workers-site │ ├── index.js │ ├── package-lock.json │ ├── package.json │ └── worker │ └── script.js └── wrangler.toml
A GitHub-based CMS
Okay, so I made it this far… I was promised a CMS? Where is the database and my GUI that I log into and stuff?
Don’t worry, you are at the finish line! GitHub is your CMS now and here’s how it works:
Write a markdown file (with front matter).
Open up GitHub and go to the project repository.
Click into the “Articles” directory, and upload the new article. GitHub will ask whether a new branch should be created along with a pull request. The answer is yes.
After the integration is verified, the pull request can be merged, which triggers deployment.
Sit back, relax and wait 10 seconds… the content is being deployed to 164 data centers worldwide.
Congrats! You now have a minimal Git-based CMS that basically anyone can use.
Troubleshooting notes
Metalsmith layouts can sometimes be kinda tricky. Try adding this debug line before the build step to have it kick out something useful: DEBUG=metalsmith-layouts npm run build
Occasionally, Github actions needed me to add node_modules to the commit so it could deploy… this was strange to me (and not a recommended practice) but fixed the deployment.
Please let me know if you run into any trouble and we can add it to this list!
The post How to Make a Simple CMS With Cloudflare, GitHub Actions and Metalsmith appeared first on CSS-Tricks.
source https://css-tricks.com/how-to-make-a-simple-cms-with-cloudflare-github-actions-and-metalsmith/
from WordPress https://ift.tt/3bAGXVM via IFTTT
0 notes
Quote
Sharing is caring! Blogging is growing at such a tremendous speed that it has gained a lot of popularity in recent years. This platform gives you so much freedom that you can leverage your skills and passions and convert them into money by writing articles. Where many pro bloggers suggest using premium tools for the quick growth in blogging, here I have listed the top 101 free tools which I have personally used to grow my blog. These FREE blogging tools can help you to build your blogging business in your initial days. We have categorized these tools on various categories so that it becomes easier for you to find the tools. FREE SEO Tools SEO is a favorite subject of every blogger, that’s why we have listed all the SEO tools at the top. These are some of the best available SEO tools which you can use and build a really awesome blog by using them on a daily basis. AnswerThePublic is a great FREE tool to generate awesome ideas around any given keyword. These can generate many long-tail keywords and FAQs around you seed keyword and you can cover them in your blog posts to write a mega article. #2. ScreamingFrog Screaming Frog is a small tool having so many awesome features. It can help you do a free audit of your blog and help you see all the errors. This is a software which you can install on MacOS as well as Windows operating system. Just enter your website URL and it will start crawling your URL. In just a few minutes, it will create a report for you showing all the errors on the site. You can download the excel file and optimize the links with errors. #3. UberSuggest This is the FREE keyword research tool recently bought by Neil Patel. This tool lets you do the keyword research for free and you can see the top ranking websites of your competitors. #4. LSIGraph This tool will help you to collect all the LSI (or related) keywords around your seed keyword. #5. Keyword Tool Keyword tool is a paid tool but it gives you 3 searches free per day. They have created the research tool for Bing, Yahoo, Amazon, eBay, Instagram, and Twitter. #6. Domain Authority Checker If you want to check the domain authority of many URLs in the bulk quantity, this tool can help you do the job. You can check 250 URLs for free with the tool. #7. Google SERP Preview Tool Have you ever worries how your article would look in Google SERP when it would rank? Well, this tool can help you see the previous just by adding small information. #8. URL Builder URL builder is a free tool that can help you to add various parameters in your URL so that you can track the performance when you are running Google Ads. URL created by this tool can be used anywhere to track the performance from various traffic sources. #9. Mozcast Mozcast is an unofficial tool that shows you the status of Google algorithm updates on a daily basis. Just by seeing the Moz bars, you can see the impact of any Google algorithm. #10. Schema Generator If you want to create any specific Schema and use it on any custom-built platform, this tool can help you create the Schema for you. Just select the type of Schema you want to build, enter the required data and at the end copy-paste the code in your website. #11. FAQ Schema Generator FAQ Schema generator is a free tool to generate JSON-LD Schema. Simply add all your questions and answers in the boxes and copy-paste the generated code in your blog post. #12. XenuLinkSleuth This is one of the most effective tools to find the broken links on any website. They have very simple to use UI where you can find the broken links and download the reports easily. #13. Moz Link Explorer Moz created Domain Authority and Page Authority. You can open the link above and check the DA/PA of any website at free of cost. #14. Robots.txt Generator Robot text is one of the most crucial files on your server. One mistake in that file can break your whole website and it can bring disastrous consequences. With this tool, you can create a customized robot text file and use it on your website without any issue. #15. The hreflang Tags Generator Tool If your website in different languages, you can use this tool to generate hreflang tags. Just select the languages which you want to use on the website and create tags in different languages. #16. 301 Redirect Code Generator If you are running your website without any CMS then it becomes difficult to create the 301 redirects. This tool will help you to create 301 redirects which you can implement on your website just by copying and pasting a small code. #17. XML Sitemaps Do you want to create an XML sitemap of your site in just a few clicks? This website will serve the purpose by giving you a quick option to create the sitemap. #18. Website Penalty Indicator This will show your website’s traffic stats as well as Google algorithm changes in one graph. So just by seeing the graph, you can analyze that when your website was affected during various updates. #19. Google Search Console Google search console is the first-ever friend of every blogger. The chances are that you are already using this tool to track the performance of your blog for free. If you are not using this tool, just go and create your account right now. #20. Google Keyword Planner Google Keyword Planner is an awesome FREE tool to do the keyword research. If you are just starting your blogging career and don’t want to invest money on the expensive tools, GKP is your best friend. #21. Google Analytics This FREE Google tool lets you see the number of visitors on your blog, see how many people are visiting any specific page and which are top traffic driving countries. #22. Meta Title Length Checker #23. SimilarWeb SimilarWeb is an awesome tool to see the stats of any website. You can check top traffic-driving posts, traffic sources, top categories, top external links etc. with this tool. #24. Website Down Checker This free tool lets you check any URL and show you if the URL is down only for you or it is down worldwide. .ugb-78591e3 .ugb-78591e3-wrapper.ugb-container__wrapper{border-radius:12px !important;padding-top:0 !important;padding-bottom:0 !important;background-color:#ff5dcc !important;background-image:url(https://www.bloggingcage.com/wp-content/uploads/2013/02/guru.jpg)}.ugb-78591e3 .ugb-78591e3-wrapper > .ugb-container__side{padding-top:35px !important;padding-bottom:35px !important}.ugb-78591e3 .ugb-78591e3-content-wrapper.ugb-container__content-wrapper{width:100% !important}.ugb-78591e3 .ugb-78591e3-wrapper.ugb-container__wrapper:before{background-color:#ff5dcc !important;opacity:0.7}.ugb-78591e3 .ugb-78591e3-content-wrapper > h1,.ugb-78591e3 .ugb-78591e3-content-wrapper > h2,.ugb-78591e3 .ugb-78591e3-content-wrapper > h3,.ugb-78591e3 .ugb-78591e3-content-wrapper > h4,.ugb-78591e3 .ugb-78591e3-content-wrapper > h5,.ugb-78591e3 .ugb-78591e3-content-wrapper > h6{color:#222222}.ugb-78591e3 .ugb-78591e3-content-wrapper > p,.ugb-78591e3 .ugb-78591e3-content-wrapper > ol li,.ugb-78591e3 .ugb-78591e3-content-wrapper > ul li{color:#222222} WordPress Themes Selecting the right is a very difficult job. I struggled a lot when I started my blogging career in 2011. But now we have many awesome options where you can pick perfectly SEO optimized themes. Here are 2 of the themes which I highly recommend if you want to start a professional blog. #25. GeneratePress GeneratePress has a free light version theme. It gives you awesome basic editing options to start your professional blog. It is: Secure and stable Total size is less than 30kb Search engine optimized Easily customizable #26. Astra Theme Astra is another FREE WordPress theme which you can pick to start your blog. They have all the awesome features which any good theme should have. If you want more functionality, you can buy the premium version. .ugb-6b71549 .ugb-6b71549-wrapper.ugb-container__wrapper{border-radius:12px !important;padding-top:0 !important;padding-bottom:0 !important;background-color:#ff5dcc !important;background-image:url(https://www.bloggingcage.com/wp-content/uploads/2013/02/guru.jpg)}.ugb-6b71549 .ugb-6b71549-wrapper > .ugb-container__side{padding-top:35px !important;padding-bottom:35px !important}.ugb-6b71549 .ugb-6b71549-content-wrapper.ugb-container__content-wrapper{width:100% !important}.ugb-6b71549 .ugb-6b71549-wrapper.ugb-container__wrapper:before{background-color:#ff5dcc !important;opacity:0.7}.ugb-6b71549 .ugb-6b71549-content-wrapper > h1,.ugb-6b71549 .ugb-6b71549-content-wrapper > h2,.ugb-6b71549 .ugb-6b71549-content-wrapper > h3,.ugb-6b71549 .ugb-6b71549-content-wrapper > h4,.ugb-6b71549 .ugb-6b71549-content-wrapper > h5,.ugb-6b71549 .ugb-6b71549-content-wrapper > h6{color:#222222}.ugb-6b71549 .ugb-6b71549-content-wrapper > p,.ugb-6b71549 .ugb-6b71549-content-wrapper > ol li,.ugb-6b71549 .ugb-6b71549-content-wrapper > ul li{color:#222222} Project/Task Management Tools #27. Evernote Evernote is a FREE note-taking App that can help you organize your ideas in one place and you can access them anywhere on any device. #28. Flock Flock is an awesome team management tool. If you have too many people working on various projects, you can create the channels in the software and they can communicate with each other easily. #29. Slack Slack is an awesome project management tool. Slack gives you the freedom to stay in touch with your team virtually with ease. #30. Hubspot CRM Hubspot is one of the top CRM providers. With this free version, you can manage your tasks and pipeline various activities. #31. Microsoft ToDo Earlier known as Wunderlist, Microsoft To-DO is a great app top jot-down your daily activities and mark them done as soon as they are finished. #32. Trello Trello is a project management tool that can make everything simpler for you. Trello’s boards, lists, and cards enable you to organize and prioritize your projects in a fun, flexible, and rewarding way. #33. Cyfe Cyfe is a multi-dashboard management tool. With this tool, you can manage Social media, web analytics, marketing, sales, support, infrastructure… monitor everything! #34. Asana We have used Asana in the past to manage a lot of writers. With Asana you can various tasks and manage your team easily. .ugb-b23d91c .ugb-b23d91c-wrapper.ugb-container__wrapper{border-radius:12px !important;padding-top:0 !important;padding-bottom:0 !important;background-color:#ff5dcc !important;background-image:url(https://www.bloggingcage.com/wp-content/uploads/2013/02/guru.jpg)}.ugb-b23d91c .ugb-b23d91c-wrapper > .ugb-container__side{padding-top:35px !important;padding-bottom:35px !important}.ugb-b23d91c .ugb-b23d91c-content-wrapper.ugb-container__content-wrapper{width:100% !important}.ugb-b23d91c .ugb-b23d91c-wrapper.ugb-container__wrapper:before{background-color:#ff5dcc !important;opacity:0.7}.ugb-b23d91c .ugb-b23d91c-content-wrapper > h1,.ugb-b23d91c .ugb-b23d91c-content-wrapper > h2,.ugb-b23d91c .ugb-b23d91c-content-wrapper > h3,.ugb-b23d91c .ugb-b23d91c-content-wrapper > h4,.ugb-b23d91c .ugb-b23d91c-content-wrapper > h5,.ugb-b23d91c .ugb-b23d91c-content-wrapper > h6{color:#222222}.ugb-b23d91c .ugb-b23d91c-content-wrapper > p,.ugb-b23d91c .ugb-b23d91c-content-wrapper > ol li,.ugb-b23d91c .ugb-b23d91c-content-wrapper > ul li{color:#222222} Content Writing/Editing Tools #35. Grammarly Grammarly is a must-have tool for every blogger. This is such a tool without which I cannot imagine writing anything online. This tool will rectify your Grammar mistakes and help you write error-free content with ease. #36. WriteorDie This is an interesting tool that will keep you motivated to write more content. It’s designed to motivate when nothing else works. Write or Die operates on the punishment principle, allowing you to select from several levels of retribution when word counts go limp. #37. HemingwayApp Hemingway is a great App to write awesome content which contains less errors and it shows you readability score as well. So by using this tool you can see the changes live and keep on correcting them to make it an awesome piece of content. #38. BuzzSumo If you are ever running out of ideas, this tool can help you to do the research around your keywords and you can see the top-ranking and top-performing articles. #39. Quora Quora is a great platform to get a lot of ideas to create awesome content for your blog. This is a question-answer community where you can participate in various threads and give your suggestions. #40. Blog Topic Generator Hubspot Blog Topic Generator is a great tool to generate ideas for your next blog post. Just by putting the main keyword in the search box, it will generate so many ideas for you. #41. Linkbait Title Generator Have you ever tried hard to write amazing blog post titles that capture the attention and more people love to share it? This tool can help you to write very attractive link-bait titles that you can use either as email subject lines or blog post titles. #42.Portent Title Maker This tool can help you generate so many awesome ideas for any given keyword. Just out your seed keyword in the search box and keep generating new titles. #43. Soovle Soovle is something similar to AnswerthePublic which we have discussed earlier. With this tool, you can generate many ideas around any keyword. .ugb-fe52902 .ugb-fe52902-wrapper.ugb-container__wrapper{border-radius:12px !important;padding-top:0 !important;padding-bottom:0 !important;background-color:#ff5dcc !important;background-image:url(https://www.bloggingcage.com/wp-content/uploads/2013/02/guru.jpg)}.ugb-fe52902 .ugb-fe52902-wrapper > .ugb-container__side{padding-top:35px !important;padding-bottom:35px !important}.ugb-fe52902 .ugb-fe52902-content-wrapper.ugb-container__content-wrapper{width:100% !important}.ugb-fe52902 .ugb-fe52902-wrapper.ugb-container__wrapper:before{background-color:#ff5dcc !important;opacity:0.7}.ugb-fe52902 .ugb-fe52902-content-wrapper > h1,.ugb-fe52902 .ugb-fe52902-content-wrapper > h2,.ugb-fe52902 .ugb-fe52902-content-wrapper > h3,.ugb-fe52902 .ugb-fe52902-content-wrapper > h4,.ugb-fe52902 .ugb-fe52902-content-wrapper > h5,.ugb-fe52902 .ugb-fe52902-content-wrapper > h6{color:#222222}.ugb-fe52902 .ugb-fe52902-content-wrapper > p,.ugb-fe52902 .ugb-fe52902-content-wrapper > ol li,.ugb-fe52902 .ugb-fe52902-content-wrapper > ul li{color:#222222} Image Editing and Video Recording Tools Images and videos are an essential part of a perfect blog post. All the images in this article are compressed with CompressPNG and CompressNow tool and many of them are captured either via Skitch or Awesome Screenshot App. #44. Screencastify Screencastify is a free tool to record your screen and camera. Right now I am using the premium version of this tool (by unlocking more features) and it’s working flawlessly to record my instructions. I am using to record the quick instructions for the writers. #45. Loom Loom is another free software to record your browser screen. This tool is getting a lot of popularity these days and many influencers have started using it. #46. CompressNow Google loves compressed images as they take less time to load. With CompressNow, you cam compress JPG images and use them in your blog post without making your articles too heavy to load #47. CompressPNG If you have PNG images, then this tool will help you compress them with ease. #48. Canva Canva is a brilliant image editing tool that lets you create stunning images for social media, blog posts, Facebook Ads, Posters and too many other platforms. #49. Skitch Skitch is a world-class app to take screenshots. With Skitch, you can add beautiful arrows, boxes, and blur any area with ease. #50. Pexels Pexels is my one-stop destination to find professional images that I can use anywhere without any issue. We recently published an article containing 70+ websites to download free stock images. #51. Placeit With this website, you can create Mockups for your brands and use them as your marketing material. They have T-Shirts, Mugs, Hoodies, MacBook, Laptop, Computer and so many pre-made mockups where you can insert your brand images and use them anywhere. #52. PicMaker With this tool, you can create professional featured thumbnails for your YouTubes videos. #53. Remove Background This app is based on artificial intelligence. It can auto-detect the background of any image you upload and it will remove the background with ease. .ugb-8ed6f1b .ugb-8ed6f1b-wrapper.ugb-container__wrapper{border-radius:12px !important;padding-top:0 !important;padding-bottom:0 !important;background-color:#ff5dcc !important;background-image:url(https://www.bloggingcage.com/wp-content/uploads/2013/02/guru.jpg)}.ugb-8ed6f1b .ugb-8ed6f1b-wrapper > .ugb-container__side{padding-top:35px !important;padding-bottom:35px !important}.ugb-8ed6f1b .ugb-8ed6f1b-content-wrapper.ugb-container__content-wrapper{width:100% !important}.ugb-8ed6f1b .ugb-8ed6f1b-wrapper.ugb-container__wrapper:before{background-color:#ff5dcc !important;opacity:0.7}.ugb-8ed6f1b .ugb-8ed6f1b-content-wrapper > h1,.ugb-8ed6f1b .ugb-8ed6f1b-content-wrapper > h2,.ugb-8ed6f1b .ugb-8ed6f1b-content-wrapper > h3,.ugb-8ed6f1b .ugb-8ed6f1b-content-wrapper > h4,.ugb-8ed6f1b .ugb-8ed6f1b-content-wrapper > h5,.ugb-8ed6f1b .ugb-8ed6f1b-content-wrapper > h6{color:#222222}.ugb-8ed6f1b .ugb-8ed6f1b-content-wrapper > p,.ugb-8ed6f1b .ugb-8ed6f1b-content-wrapper > ol li,.ugb-8ed6f1b .ugb-8ed6f1b-content-wrapper > ul li{color:#222222} Social Media Tools #54. Hootsuite Hootsuite is a very popular tool to schedule your social media content. Use it to automate your content on various platforms. #55. Later Later is the best marketing platform for Instagram. With this tool, you can Visually plan, schedule and analyze posts for Instagram, Facebook, Pinterest, and Twitter #56. Tailwind Tailwind is a great tool to grow your Pinterest visibility. With this tool, you can find the best boards and schedule your content on various Pinterest boards. #57. TweetDeck TweetDeck is an official tool by Twitter where you can see your tweets in a very different way. With this tool, you can manage multiple accounts, automate the publishing, schedule your tweets, and manage your accounts with multi-users. #58. Buffer Buffer is a social media automation tool that lets you schedule your content for various platforms. #59. Triberr Triberr is a free platform to promote your twitter posts. Just connect your Twitter account with Triberr and create a community to promote your articles. .ugb-7252e81 .ugb-7252e81-wrapper.ugb-container__wrapper{border-radius:12px !important;padding-top:0 !important;padding-bottom:0 !important;background-color:#ff5dcc !important;background-image:url(https://www.bloggingcage.com/wp-content/uploads/2013/02/guru.jpg)}.ugb-7252e81 .ugb-7252e81-wrapper > .ugb-container__side{padding-top:35px !important;padding-bottom:35px !important}.ugb-7252e81 .ugb-7252e81-content-wrapper.ugb-container__content-wrapper{width:100% !important}.ugb-7252e81 .ugb-7252e81-wrapper.ugb-container__wrapper:before{background-color:#ff5dcc !important;opacity:0.7}.ugb-7252e81 .ugb-7252e81-content-wrapper > h1,.ugb-7252e81 .ugb-7252e81-content-wrapper > h2,.ugb-7252e81 .ugb-7252e81-content-wrapper > h3,.ugb-7252e81 .ugb-7252e81-content-wrapper > h4,.ugb-7252e81 .ugb-7252e81-content-wrapper > h5,.ugb-7252e81 .ugb-7252e81-content-wrapper > h6{color:#222222}.ugb-7252e81 .ugb-7252e81-content-wrapper > p,.ugb-7252e81 .ugb-7252e81-content-wrapper > ol li,.ugb-7252e81 .ugb-7252e81-content-wrapper > ul li{color:#222222} Chrome Extensions #60. Hunter Hunter is very easy to use Chrome extension to find the email address from any website. #61. Evernote Web Clipper This Chrome extension will connect with your Evernote account and you can take any screenshot and highlight various parts of the image as per your needs. #62. LinkMiner #63. Forest: Stay focused, be present If you want to work with 100% focus, this is an awesome Chrome extension that you can use while writing. #64. Awesome Screenshot I have been using this extension since 2015. This is the extension I use to take the screenshots. You can take the screenshots, edit them and share with anyone by giving them a public link. #65. VidIQ for YouTube This is a FREE extension that you can use to see the YouTube video stats. This is very helpful for the YouTubers. By installing this extension, you can see how many views that video has got, how many minutes people have watched it, what are the tags they have used and many other things. #66. WhatRuns With this extension, you can see what particular CMS any website is using. It will show you all the data and software which any website is using to run that site online. .ugb-4363e4f .ugb-4363e4f-wrapper.ugb-container__wrapper{border-radius:12px !important;padding-top:0 !important;padding-bottom:0 !important;background-color:#ff5dcc !important;background-image:url(https://www.bloggingcage.com/wp-content/uploads/2013/02/guru.jpg)}.ugb-4363e4f .ugb-4363e4f-wrapper > .ugb-container__side{padding-top:35px !important;padding-bottom:35px !important}.ugb-4363e4f .ugb-4363e4f-content-wrapper.ugb-container__content-wrapper{width:100% !important}.ugb-4363e4f .ugb-4363e4f-wrapper.ugb-container__wrapper:before{background-color:#ff5dcc !important;opacity:0.7}.ugb-4363e4f .ugb-4363e4f-content-wrapper > h1,.ugb-4363e4f .ugb-4363e4f-content-wrapper > h2,.ugb-4363e4f .ugb-4363e4f-content-wrapper > h3,.ugb-4363e4f .ugb-4363e4f-content-wrapper > h4,.ugb-4363e4f .ugb-4363e4f-content-wrapper > h5,.ugb-4363e4f .ugb-4363e4f-content-wrapper > h6{color:#222222}.ugb-4363e4f .ugb-4363e4f-content-wrapper > p,.ugb-4363e4f .ugb-4363e4f-content-wrapper > ol li,.ugb-4363e4f .ugb-4363e4f-content-wrapper > ul li{color:#222222} Other Important Tools #67. This Person Doesn’t Exist This is the website created by NVIDIA where you can download the human images who don’t exist. These are the AI created images that you can use anywhere without any issue because there is no such human on the earth. #68. UI Names UI Names is my favorite website to generate random names which I can use to create a pseudo name for my niche blogs or use those names while commenting on other sites for the backlinks. #69. Fake Name Generator Another awesome website where you can generate fake names with ease. It even generates full address, phone number, credit card number and so many other details. Note: Use this website with too many precautions. #70. CapitlizeMyTitle Have you ever felt annoyed while changing the titles of your blog posts to create symmetry? This tool will help you to change the title to UPPERCASE, lowercase and many more. #71. Wave Accounting App This is a FREE accounting app that you can use to manage your incoming and outgoing flow of money. This allows you to connect various banks and PayPal accounts (which is 100% safe) and let you analyze everything in front of you in one dashboard. #72. Mind Mup Mind mapping is one of the best ways to get more things done. You can plan various tasks visually and share the plan with your team so that they can understand it easily. #73. Tawk.to Tawk is a free chat tool that you can install on any website by placing a small javascript code in your site’s header. Now people visiting your website can get in touch with you just by clicking on the live chat icon and you can answer the queries in real-time. #74. Boomerang Gmail Boomerang is a free Gmail extension that lets you schedule your emails, send reminders and do many other interesting things. #75. Google Forms If you want to collect some data from your audience, want to do a survey or want to hire people for your company. Google forms will help you to create beautiful forms that you can share with anyone and as them to fill the data. #76. Google PageSpeed Insights Google Page Speeds Insights is a superb FREE tool to check the loading speed on your website and many errors that are causing trouble. #77. Google Trends Google Trends let you see the trend of the keywords. This tool is very helpful if you are thinking to create affiliate websites. With this tool, you can see the trends of any keywords. There is no use of creating a website around the keyword if the trends are going down. #78. LastPass LastPass is one of the must-have tools to access all your passwords anytime, anywhere in the world. It’s an awesome App where you can save all your passwords at one place. #79. Sucuri Malware Scanner This free tool can help you to scan your website if it has been hacked or someone injected any malicious code in your theme. #80. Lean Domain Search This is a brilliant tool to find the available domain names just by searching the keywords. This tool will generate many ideas by placing various popular words before and after your searched keyword. You can spend some time searching the keywords and in the end, you can grab some very professional domain names. #81. GT Metrix #82. PingDom Pingdom is a popular tool to check the loading time of your website. With this tool, you can identify which particular file is taking more time to load and making your website heavy. #83. Font Squirrel This website gives you access to countless fonts for your graphic designs. You can download the fonts for free and use them for any purpose. #84. MailerLite With MailerLite you can start doing email marketing for free. With MailerLite, you can send emails up to 1000 subscribers for free every month. They have a limit of 12,000 emails per month. But this is a great platform to start if you are a newbie. #85. DNS Checker DNS Checker if a FREE platform to check the DNS propagation of any URL. This tool is very useful when you make any changes in A Record, MX Records, CNAME, or any other domain related settings. By using this tool, you check if the setting are propagated worldwide or not. #86. IFTTT IFTT (If this then that) is a great automation tool to automate many tasks with ease. #87. Zapier Zapier is a brilliant tool to connect various apps using API. With this tool, you can connect many of the apps using the API keys and pass the data from one tool to another. #88. Zohomail If you want to create a professional email for free. eg. [email protected], you can use this service for free. With Zoho, you can get 5 GB space for free for your custom email address. #89. Flat Icon If you are creating any new website or any landing page on your blog, you can download many icons for free from this website and use them anywhere. #90. Unroll.me #91. DropBox Dropbox is one of the best cloud platforms to save your data online. You can save your important files in your Dropbox account and access them anywhere in the world. #92. FlieZilla FileZilla is a free FTP client that you can use to connect with your website server. With FileZilla, you can access the files of your unmanaged servers (DigitalOcean, Linode etc.) easily and see the files with a great UI. #93. CyberDuck CyberDuck is a Mac client that works same as FileZilla. I personally love CyberDuck more than FileZilla. #94. Chrome Remote Desktop We all know TeamViewer, but do you that there is another tool with the same features? With this tool, you can connect anyone’s PC withing Chrome easily. #95. Click to tweet This Tweetable link is created with this tool. You can write your own tweet and create a unique link that your readers can share just by clicking on the link. #96. Facebook Audience Insights If you run Facebook Ads, this tool can be a game-changer tool for you. By using this tool, you can do the research and see which is the hottest targetting around the niche you research. #97. Feedly This is an awesome app for bloggers. With this App, you can create your own list of your favorite articles. You can save various articles in various categories and organize them with ease. #98. Mautic Mautic is an open-source platform which can be used in all kind of businesses. This is a marketing automation solution that triggers actions, segments audience, adapts the message, & sends it through the most appropriate channels. With Mautic, You get all of the features of a HubSpot-like platform on your own server. #99. Word2CleanHTML This is a very handy tool if you want to convert the data from a Microsoft Word file to a clean text file. #100. Bit.ly This is a FREE URL Shortner service which you can use to create short links of your blog posts and share them easily on social media channels. With this tool, you can track the performance of various links you created by using it. #101. Plagiarism Checker This is a FREE plagiarism checker tool that you can use to see if the content written by your writer is unique or not. You can check up-to 1000 words with this tool for free. If your article is more than 1000 words, just split the article in various 1000 words and check with the tool easily. Conclusion: I hope you got a lot of tools by reading this article, which you can use to build your business. If you found this article helpful, please share it with your friends so that they can also use some of these tools and make their blogging journey better. /*Archive Template Only*/ #wp-coupons-outer-wrapper { padding-left: 20px; padding-right: 20px; } #wp-coupons-wrapper { max-width: 1200px; } /*Navigation*/ body .wp-coupons-nav a, body .wp-coupons-nav a:visited { font-size: ; color: #0c0402; } body .wp-coupons-nav a:hover, body .wp-coupons-nav a.wp-coupons-nav-selected { color: #0872aa; } body .wp-coupons-subnav a, body .wp-coupons-subnav a:visited { font-size: ; color: #0c0402; border-color: #0c0402; } body .wp-coupons-subnav a.active, body .wp-coupons-subnav a:hover { color: #0872aa; border-color: #0872aa; } /*Coupon Panel*/ .wp-coupons-coupon-panel { background: #e5e5e5; } .wp-coupons-coupon-panel .wp-coupons-discount-percent { background: #1b3e5a; color: #ffffff; font-size: ; } .wp-coupons-coupon-panel .wp-coupons-expiration { color: ; font-size: ; } .wp-coupons-coupon-panel .wp-coupons-discount-code { background: #f9cc29; color: #0c0c0c; font-size: ; } .wp-coupons-coupon-panel .wp-coupons-discount-code span { color: #0c0c0c; border-color: #0c0c0c; } .wp-coupons-coupon-panel .wp-coupons-ctr:before { border-color: #f9cc29 transparent; } .wp-coupons-coupon-panel .wp-coupons-ctr:after { border-color: #f9cc29; } .wp-coupons-coupon-panel .coupon-separator { border-color: #d0d2d7; } .wp-coupons-coupon-panel .coupon-title { font-size: ; } .wp-coupons-coupon-panel .coupon-title, .wp-coupons-coupon-panel .coupon-title:visited, .wp-coupons-coupon-panel .coupon-link, .wp-coupons-coupon-panel .coupon-link:visited, .wp-coupons-banner .coupon-title { color: #0c0402; } .wp-coupons-coupon-panel .coupon-title:hover, .wp-coupons-coupon-panel .coupon-link:hover { color: #0872aa; } .wp-coupons-coupon-panel .coupon-description { font-size: 22px; line-height: ; min-height: ; max-height: ; } .wp-coupons-coupon-panel .coupon-type, .wp-coupons-coupon-panel .coupon-type:hover, .wp-coupons-coupon-panel .coupon-type:visited { color: #000000; font-size: ; } .wp-coupons-coupon-panel a.coupon-link { font-size: ; } /*Pagination*/ body .wp-coupons-navigation .page-numbers, body .wp-coupons-navigation .page-numbers:visited { background-color: #0c0402; } body .wp-coupons-navigation .page-numbers.current, body .wp-coupons-navigation .page-numbers:hover { background-color: #0872aa; } /*Click to Reveal Popup*/ #wp-coupons-ctr-popup #wp-coupons-ctr-discount-code span { background: #f9cc29; color: #0c0c0c; } #wp-coupons-ctr-popup #wp-coupons-ctr-discount-url a { color: #0c0402; } #wp-coupons-ctr-popup #wp-coupons-ctr-discount-url a:hover { color: #0872aa; } /*Buttons*/ body a.wp-coupons-button { background: #0c0402; border-color: #0c0402; font-size: ; } body a.wp-coupons-button:hover { color: #0872aa; border-color: #0872aa; } @media(min-width: 794px) { .wp-coupons-coupon.list.compact .wp-coupons-coupon-panel .coupon-link, .wp-coupons-coupon.list.minimal .wp-coupons-coupon-panel .coupon-link { font-size: 22px; line-height: ; } } source http://wtf.telenor.com.np/2019/11/28/101-free-blogging-tools-to-amplify-your-growth-in-2020/
http://www.globalone.com.np/2019/11/101-free-blogging-tools-to-amplify-your.html
0 notes