#HPC testing
Explore tagged Tumblr posts
Visit Tumblr Blog
Explore Tumblr blogs with no restrictions, modern design and the best experience.
Last Seen Tumblr Blogs


Fun Fact
Post activity is at the highest at 4:00 pm EDT; notes peak at 10:00 pm EDT.
Text
The QUANTUM WR-5246-40: A NeW HPC Test Chambers

AES, a leading environmental test chamber manufacturer, introduces the QUANTUM WR-5246-40, a cutting-edge walk-in test chamber for data centre component testing and high-performance computing.
As business relies more on HPC systems for AI, machine learning, and large-scale simulations, it has never been more important to ensure their reliability in hostile climates. The QUANTUM WR-5246-40 pushes thermal testing with a 250kW live load testing capabilities. This chamber was collaboratively designed and standardised with one of the top three HPC leaders to fulfil server rack testing requirements after several deployments, comprehensive field testing, and important field service team feedback.
Extreme HPC Testing Performance
The QUANTUM WR-5246-40 simulates data centre conditions. This chamber supports GPU, CPU, ASIC, and other high-power electronics testing. Notable traits include:
Floorless design allows two full server racks to be easily wheeled in and out.
Precision Airflow Control: Data centre airflow maximises static pressure to evaluate cooling.
Fast temperature cycling and high-power load capacity: Accurate performance assessment for demanding workloads in hot settings.
Customised Solutions: It chambers can contain full-scale server racks and cooling systems and fulfil AI hardware manufacturers' testing requirements.
Large multi-pane viewing windows with LED DUT monitoring illumination improve visibility and safety. handle for operator safety within emergency egress.
Large-Scale Deployments: AES designs and implements large-scale HPC lab layouts to optimise testing conditions and efficiency. Consider equipment flow, placement, and data collection.
Server Rack Reliability Testing Future
AES CEO Michael Shirley said, “At AES, it recognised the evolving needs of AI-driven infrastructure and high-performance computing.” The collaborative process is shown by the QUANTUM WR-5246-40, a reliable HPC industrial solution. This product launch is great for AES as it expands and adds products. It also involves moving into a larger industrial location that will quadruple capacity and promote innovation and expansion.
To meet top industry expectations, AES has created innovative environmental test solutions. The QUANTUM WR-5246-40 continues that legacy by offering a premier high-power electronics testing platform.
QUANTUM-WR-5246-40
The QUANTUM Series WR-5246-40 is a high-performance version of AES's popular floor-style devices designed for modern server testing. This chamber, designed with help from a major manufacturer, improves cooling efficiency, airflow control, and durability and use.
STRUCTURE
Our robust and simple-to-use QUANTUM WR floorless design makes wheeling server racks in and out for testing straightforward. #4 finish Interior corrosion resistance, durability, and cleanliness are guaranteed with 304 stainless steel. Large multi-pane windows and LED lights reveal the DUT. An interior emergency exit handle allows for quick escape in an emergency.
The inside workstation is lined with type 304 stainless steel for vaportightness. The ramp on the heated low-profile floor makes two computer/server racks easy to move into the workstation. Between the layers is low-k, high-efficiency thermal insulation.
PERFORMANCE
Server testing requires front-to-back airflow, which this chamber provides. Static pressure's precise management with the changing airflow system lets engineers evaluate its impact on systems. Parallel coils offer more equal cooling, ensuring consistent workstation conditions. Air driers reduce chamber moisture and increase uptime, making them suitable for testing fragile electronics. Chamber's variable frequency drive (VFD) adjusts fan speed to manage airflow. Large hot access ports allow DUT interaction without peripherals.
Three centrally located, equally spaced cable access ports are on each side. Left and right side walls have six-inch ports.
Cooling/heating
To provide accurate temperature management within ±0.5°C, QUANTUM WR test chambers have open multiple nichrome heaters on both sides.Nichrome heaters on both sides of the QUANTUM WR test chamber ensure precise temperature management within ±0.5°C. The cooling system includes a cascade mechanical refrigeration system and a water-cooled condenser. Increase cooling using liquid LN2 or CO2 for faster pull-down speeds during stress testing. Basic cascade refrigeration systems from AES have the quickest change rates in the industry without boost cooling.
INSTRUMENTATION
The QUANTUM WR Series Test Chambers use AESONE CONNECT, a dependable linked device with a standard interface, to simplify operation and test monitoring.
#technology#technews#govindhtech#news#technologynews#QUANTUM WR-5246-40#QUANTUM WR#QUANTUM#QUANTUM Series#QUANTUM WR Series#HPC testing
0 notes
Note
So leftists are people that worship the fact that they are on the left and treat opponents as enemies but there are also people on the left who are just on the left without being leftists. Does that also apply to people on the right or are they generally less tribalistic and more rational in their politics?
No. They have them on the right. But we can them Neo Cons. Though realistically they could be called Hyper Puritan Conservatives. HPC. But the name isn't catchy and wouldn't stick. However, having said that most conservatives in general are more libertarian and as such are less tribal. That's not to say there's not several cases of "conservatives" that are authoritarian tribalists. Because there are. But the difference is probably more related to the sheer level of purity testing you see between the far left and far right.
5 notes
·
View notes
Text
So I guess I'm the type of person who has a "spare" Airbrush now?
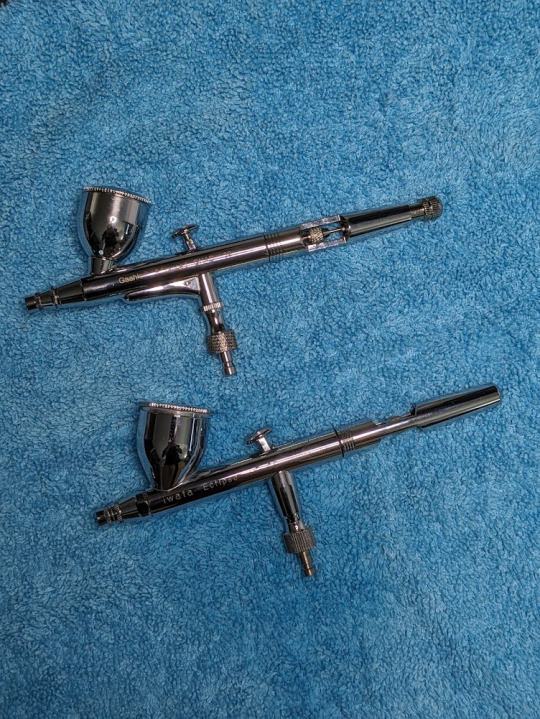
TLDR If you want to try airbrushing but are intimidated by the price of the bigger name brands like Iwata or Harder and Steenbeck, maybe give Gaahleri a look.
So I have had my Iwata Eclipse HPCS for about 18 months now and I love it, it has handled pretty much everything I could throw at it until I tried using Mission Models Paint on my most recent build. They are a waterbased acrylic and I had no trouble with Vallejo, Citadel, Army painter and Pro-Acryl (Easily my favourite water based paint), but MMP does not thin the way I have any other paint, they recommend no more than 20% (5:1 paint to thinner) and it is just so thick (and that's before adding their poly additive).
I persevered and got through the project, but not without continually having to clear clogs and dry tips. I had been wondering if getting a .5mm needle/nozzle for the eclipse might be worth a try but figured I'd wait until my next project to experiment.
Flash forward about a month and I've been seeing Gaahleri airbrushes promoted eeeeeevry where and they were cheap not actually that much more than getting a new needle kit $40 for everything I would need to change vs $45 for the Gaahleri kit with both a .35 and .5 needle. So I decided I'd grab one to try out, well prime day comes around and they had it on sale for $35 so that was an instant buy.
It arrived last week and I had a chance to test it out today and first things first, if you have used a higher end brush, you can feel the difference right away, the fit and finish is just not quite there, threads are rough the trigger is stiff and sticks a little at the end, even after lubing it. I had seen others mentioned that the pre-installed .35 needle was kind of jammed in when they got theirs and while mine wasn't bad, it definitely felt like everything was a little over tightened.
The thing is though for $45 or less, I really can't complain. It's a little heavier than my Iwata, but not in a way that seems like a problem and honestly you might prefer a little extra chonk. The .35 needle performed just fine, I got paint on plastic without too much trouble and had the same issues with the gloopy Mission Models Paints. Then I cleaned up and switched over to the .5 needle and I was able to just hose a bunch of spoons down with their primer without a second though, the tip did not dry out and the brush did not clog once during the entire process. I tried their top coats, their flat coat is garbage and it was still garbage through the .5 needle, but the gloss was fantastic.
Cleaning was pretty much the same as my other brush, except for the removable cup, which I thought would be a nice feature, but honestly the number of times I started to loosen it while cleaning the cup during a paint swap did get a little annoying YMMV if your used to a removable cup, im sure its not that bad.
Overall I'm pretty happy with my purchase as it was less than the cost of the alternate parts for my Iwata and now I don't have to swap everything over when I want to use a different needle, I can just grab the brush that has the one I want.
5 notes
·
View notes
Text
here’s some gender neutral period care brands that I highly recommend!
1. somedays.
this is the brand that got me started on my period pain healing journey!! now it’s a little pricy at first, but one thing I love about their products is that they are made to last you months to years. I invested in their “better cycle kit” in 2022 (before they came out with the newest version of their belly jelly) and I have never experienced better long-term relief. the better cycle kit is designed for those of us with severe pain, and by god it works! and spending $117 dollars once has been well worth it, and I have absolutely no regrets.
2. the honeypot company
I am skeptical of any company that advertises products designed to “balance your ph” or “cleanse your vagina” because summer’s eve and vagisil do quite the opposite, while promising the same thing. while I haven’t tried any of HPC’s internal products (suppositories, etc), their products for sensitive/itchy vulvas have been a godsend. no artificial colors or scents, and the goal is not to get your vulva smelling like a pack of skittles.
their pads are also excellent! super soft, no dyes, and I haven’t had a leak yet. I will say that I’ve only tried their non-infused pads, as they do offer some infused with aloe and other soothing agents.
3. august
I’ll be real, I haven’t bought from august yet. HOWEVER, their social media game is fire. and if I ever live somewhere they deliver, I would love to make a custom box for myself! I hate investing in a whole box of tampons, knowing I only use them to swim, maybe once every other month. they allow you to build your own box of tampons/pads/liners, in accordance with how much you need.
not to mention their wrappers are water-soluble, and they’re super transparent about the creation process. I can’t wait for my next period (/j) just so I can test out their products!
anyways, that’s my little recommendation for my total of 4 followers lol
3 notes
·
View notes
Text
Samsung’s 4nm SF4X UCIe Chiplet Hits 24Gbps in First Performance Test
A Breakthrough for Samsung’s AI Chip Ambitions Samsung Electronics has taken a significant step forward in the race for AI chip dominance. On June 17, 2025, Korean outlet etnews reported that Samsung successfully completed the first performance evaluation of its UCIe prototype chip, built on the SF4X process, a 4nm derivative tailored for high-performance computing (HPC) and AI workloads.…
0 notes
Text
Trends in Ready Made Concrete Karachi: What Builders Should Know
In the ever-evolving construction landscape of Pakistan, especially in major cities like Karachi, the demand for high-efficiency, high-strength, and cost-effective building solutions has become more pressing than ever. One of the most notable innovations revolutionizing the construction industry is Ready Made Concrete also known as Ready Mix Concrete (RMC). Among the pioneers leading this transformation is Allied Materials, a company recognized for its quality, innovation, and reliability in construction materials. As a city witnessing rapid urbanization, Karachi presents an ideal environment where the application of Ready Made Concrete Karachi has proven to be essential in tackling modern building challenges.

Understanding Ready Made Concrete
Ready Made Concrete is a mixture of cement, water, and aggregates like sand and gravel that is manufactured at a batching plant according to specific engineering requirements. It is delivered to construction sites in a freshly mixed and unhardened state using transit mixers.
Compared to traditional concrete mixing methods, RMC offers:
Consistent quality
Speedier construction
Reduced labor costs
Minimal material wastage
In Karachi, where timelines are tight, and quality control is critical, the shift to ready-made concrete has been swift and significant.
Why Ready Made Concrete is Trending in Karachi
Urban Expansion and High-Rise Construction Karachi’s skyline is rapidly changing with the rise of high-rise buildings, commercial complexes, and infrastructure projects. Traditional methods cannot meet the demands of these massive, time-sensitive projects. Ready Made Concrete ensures timely delivery and consistent quality for foundations, slabs, and structural frameworks.
Shortage of Skilled Labor Construction firms in Karachi often struggle with a shortage of skilled labor for on-site concrete mixing. With ready-made concrete, companies can bypass this challenge and rely on pre-mixed, quality-controlled concrete delivered to their site, ready for immediate application.
Environmental Considerations With increased focus on sustainability and environmental regulations, builders are opting for ready-made concrete, which minimizes dust, noise pollution, and material wastage on construction sites. Allied Materials ensures its batching processes comply with the latest green building standards.
Technological Integration Modern RMC plants in Karachi now incorporate digital monitoring systems, automated batching, and precision mixing technologies. Allied Materials is at the forefront of this trend, leveraging automation to ensure exact proportions and reduced human error in every batch.
A Name Synonymous with Quality
When talking about Ready Made Concrete Karachi, Allied Materials consistently ranks among the most trusted suppliers. Their dedication to innovation, reliability, and sustainability places them at the heart of Karachi’s construction revolution.
What Makes Allied Materials Stand Out?
State-of-the-Art Batching Plants Allied Materials operates advanced batching facilities capable of meeting high-volume demands while maintaining superior quality.
On-Time Delivery The company has a fleet of modern transit mixers ensuring timely delivery across Karachi—even to areas with difficult logistics.
Custom Mix Designs Allied Materials works closely with contractors and developers to provide tailor-made concrete mix designs suited for different types of projects.
Stringent Quality Control Every batch undergoes rigorous testing at their in-house laboratory before it reaches the construction site.
Current Trends Builders Must Watch in Ready Made Concrete Karachi
Let’s explore the most impactful trends shaping the use of Ready Made Concrete in Karachi.
1. High-Performance Concrete (HPC)
Builders are increasingly demanding concrete mixes with enhanced strength, durability, and workability. High-performance concrete is now a preferred choice for bridges, marine structures, and skyscrapers. Allied Materials provides high-grade HPC that exceeds conventional standards.
2. Fiber-Reinforced Concrete
For added tensile strength and crack resistance, fiber-reinforced mixes are gaining traction. This type of RMC is ideal for industrial flooring, pavements, and heavy-duty structures. Allied Materials offers a range of reinforced options, from synthetic to steel fibers.
3. Self-Compacting Concrete (SCC)
Karachi’s construction sites often present challenges like congested formworks or complex rebar arrangements. SCC flows easily without vibration, making it ideal for such applications. Allied Materials has successfully delivered SCC to major projects across the city.
4. Green Concrete
With sustainable building practices on the rise, eco-friendly RMC options using fly ash, GGBFS (Ground Granulated Blast Furnace Slag), or recycled aggregates are becoming common. Allied Materials is aligned with this movement, offering environmentally responsible solutions.
5. Smart Concrete Monitoring
IoT-enabled sensors are now embedded into structures to monitor the health and curing of concrete in real-time. While still emerging in Karachi, companies like Allied Materials are staying ahead by exploring these integrations.
Applications of Ready Made Concrete in Karachi
Residential Projects From single-unit homes to luxury apartments, RMC ensures a consistent foundation and faster construction schedules.
Commercial Complexes Office buildings and shopping malls demand quality and speed. RMC’s uniformity is crucial for achieving high architectural standards.
Infrastructure Projects Bridges, flyovers, and highways in Karachi depend on RMC for its load-bearing capacity and long life span.
Industrial Construction Warehouses, factories, and logistics hubs require heavy-duty concrete that can withstand machinery and heavy loads. Allied Materials provides specialized industrial mixes suited for these demands.
Benefits of Partnering with Allied Materials for Ready Made Concrete Karachi
1. Reliability
When time is money, delays can be costly. Allied Materials has a proven track record of on-time deliveries.
2. Technical Expertise
With a team of seasoned engineers and technicians, Allied Materials supports your construction from design phase to post-delivery.
3. Affordable Pricing
Despite its high quality, Allied Materials offers competitive pricing, ensuring you get the best value for your investment.
4. Versatility
Whatever your project needs—waterproof concrete, fast-setting concrete, or decorative finishes—Allied Materials has a solution.
5. Comprehensive Service
From initial consultations to on-site inspections and after-sales support, Allied Materials ensures complete customer satisfaction.
The Future of Ready Made Concrete in Karachi
As Karachi grows into a megacity, its construction requirements will only become more complex. The future points toward:
Increased automation in batching and delivery
More sustainable concrete formulations
AI-driven demand forecasting
Broader adoption of 3D concrete printing
Allied Materials is already investing in technologies and training to stay at the forefront of these advancements.
Conclusion
The rise of Ready Made Concrete Karachi marks a new era in construction—one where efficiency, precision, and sustainability take center stage. For builders, contractors, and developers in Karachi, staying informed about these trends is not just useful it’s essential. By choosing a trusted partner like Allied Materials, you not only gain access to top-tier concrete solutions but also benefit from industry-leading expertise and customer-centric services. Whether you’re building a home, an office tower, or a major public infrastructure, remember that quality concrete is the backbone of quality construction and Allied Materials delivers that, consistently.
0 notes
Text
HD Grease Market Insights: How Thermal Interface Materials Are Changing the Game

Global Heat Dissipation Grease (HD Grease) Market is experiencing robust expansion, with valuations reaching USD 144 million in 2023. Current projections indicate the market will grow at a compound annual growth rate (CAGR) of 6.8%, potentially reaching USD 260.32 million by 2032. This accelerated trajectory stems from surging demand in electronics manufacturing, electric vehicle production, and next-gen computing infrastructure where thermal management is critical.
Thermal interface materials like HD grease have become indispensable in modern electronics, filling microscopic imperfections between heat-generating components and cooling apparatus. As device miniaturization continues alongside rising power densities, manufacturers are prioritizing advanced formulations with exceptional thermal conductivity (often exceeding 8 W/mK) and extended reliability under thermal cycling.
Download FREE Sample Report: https://www.24chemicalresearch.com/download-sample/288926/global-heat-dissipation-grease-forecast-market-2025-2032-519
Market Overview & Regional Analysis
Asia-Pacific commands over 55% of global HD grease consumption, with China's electronics manufacturing hubs and South Korea's semiconductor industry driving demand. The region benefits from concentrated supply chains and swift adoption of 5G infrastructure, which requires advanced thermal solutions for base stations and edge computing devices. Japanese manufacturers continue leading in high-performance formulations, particularly for automotive electronics.
North America maintains strong growth through its advanced computing sector, where data centers and AI hardware necessitate premium thermal interface materials. Europe's market thrives on stringent electronic reliability standards and growing EV adoption, with Germany's automotive suppliers emerging as key consumers. Emerging markets in Southeast Asia show accelerating demand, fueled by electronics production shifting from traditional manufacturing centers.
Key Market Drivers and Opportunities
The market's expansion hinges on three pivotal factors: the unstoppable march of electronics miniaturization, the automotive industry's rapid electrification, and escalating data center investments. Semiconductor packaging accounts for 38% of HD grease applications, followed by EV power electronics at 22% and consumer electronics at 19%. The burgeoning field of high-performance computing (HPC) presents new frontiers, with GPU clusters and AI accelerators requiring advanced thermal solutions.
Innovation opportunities abound in metal-particle enhanced greases (achieving 12-15 W/mK conductivity) and phase-change materials that combine grease-like application with pad-like stability. The photovoltaic sector also emerges as a growth vector, where solar microinverters demand durable thermal compounds resistant to outdoor weathering. Meanwhile, aerospace applications for satellite electronics create specialized niche markets requiring extreme temperature stability.
Challenges & Restraints
Material scientists face persistent hurdles in balancing thermal performance with practical considerations. High-performance formulations frequently encounter pump-out issues under thermal cycling, while silicone-based variants risk contaminating sensitive optical components. The automotive sector's transition to 800V architectures introduces new challenges - requiring greases that maintain performance across wider temperature swings while resisting electrochemical migration.
Supply chain complexities pose additional concerns, with specialty fillers like boron nitride and aluminum oxide facing periodic shortages. Regulatory landscapes continue evolving, particularly regarding silicone content restrictions in certain electronics applications. Furthermore, the industry struggles with standardization - thermal conductivity claims often vary significantly between testing methodologies.
Market Segmentation by Type
Silicone-Based Thermal Grease
Silicone-Free Thermal Grease
Metal-Particle Enhanced Formulations
Download FREE Sample Report: https://www.24chemicalresearch.com/download-sample/288926/global-heat-dissipation-grease-forecast-market-2025-2032-519
Market Segmentation by Application
Consumer Electronics (Smartphones, Tablets, Laptops)
Automotive Electronics (EV Batteries, Inverters)
Telecommunications Infrastructure
Data Center Equipment
Industrial Electronics
LED Lighting Systems
Market Segmentation and Key Players
Dow Chemical Company
Henkel AG & Co. KGaA
Shin-Etsu Chemical Co., Ltd.
Parker Hannifin Corporation
3M Company
Laird Technologies
Momentive Performance Materials
Wakefield-Vette
Zalman Tech
Thermal Grizzly
Arctic Silver
Fujipoly
Denka Company Limited
Gelon LIB Group
Dongguan Jiezheng Electronics
Report Scope
This comprehensive analysis examines the global HD grease landscape from 2024 to 2032, providing granular insights into:
Volume and revenue projections across key regions and applications
Detailed technology segmentation by formulation type and performance characteristics
Supply chain dynamics including raw material sourcing and manufacturing trends
Regulatory landscape analysis for major jurisdictions
The report features exhaustive profiles of 25 leading manufacturers, evaluating:
Product portfolios and R&D pipelines
Production capacities and geographic footprints
Key partnerships and client ecosystems
Pricing strategies and distribution networks
Get Full Report Here: https://www.24chemicalresearch.com/reports/288926/global-heat-dissipation-grease-forecast-market-2025-2032-519
About 24chemicalresearch
Founded in 2015, 24chemicalresearch has rapidly established itself as a leader in chemical market intelligence, serving clients including over 30 Fortune 500 companies. We provide data-driven insights through rigorous research methodologies, addressing key industry factors such as government policy, emerging technologies, and competitive landscapes.
Plant-level capacity tracking
Real-time price monitoring
Techno-economic feasibility studies
With a dedicated team of researchers possessing over a decade of experience, we focus on delivering actionable, timely, and high-quality reports to help clients achieve their strategic goals. Our mission is to be the most trusted resource for market insights in the chemical and materials industries.
International: +1(332) 2424 294 | Asia: +91 9169162030
Website: https://www.24chemicalresearch.com/
Follow us on LinkedIn: https://www.linkedin.com/company/24chemicalresearch
Other Related Reports:
0 notes
Text
How Microbiological Testing Labs in Ajman Assist with Export Compliance? | +971 554747210
In the global marketplace, safety, quality, and compliance are non-negotiable—especially when it comes to products like food, water, cosmetics, pharmaceuticals, and consumer goods. For exporters in Ajman, ensuring their products meet international microbiological safety standards is key to accessing foreign markets. That’s where a Microbiological Testing Lab in Ajman plays a critical role.
Microbiological testing labs provide the scientific assurance that products are free from harmful microorganisms and meet the safety regulations of importing countries. In this blog, we will explore how microbiological testing labs in Ajman support export compliance and why their services are essential for businesses aiming to thrive in global trade.
What is a Microbiological Testing Lab?
A Microbiological Testing Lab is a scientific facility that specializes in detecting, identifying, and quantifying microorganisms such as bacteria, viruses, molds, and yeasts. These labs conduct tests to evaluate contamination risks in various products and environments.
In Ajman, these labs operate under ISO/IEC 17025 accreditation and follow rigorous international protocols to ensure accuracy, reliability, and traceability of results—crucial for export documentation and compliance.
Why Exporters in Ajman Need Microbiological Testing
Ajman has a growing manufacturing sector, with companies producing bottled water, packaged foods, herbal cosmetics, and healthcare products. As these businesses expand into international markets, they face strict microbial safety requirements from:
The European Union (EU)
The United States (FDA)
The Gulf Cooperation Council (GCC)
ASEAN countries
African and Asian trading partners
Failure to meet microbial safety limits can lead to:
Rejection of shipments
Costly recalls
Loss of export licenses
Damage to brand reputation
To avoid these issues, exporters turn to certified microbiological testing labs in Ajman for pre-shipment testing and compliance documentation.
Key Export-Oriented Services Offered by Microbiological Testing Labs in Ajman
Here are the core services provided by microbiological testing labs to support export compliance:
1. Food and Beverage Testing
Food products are among the most tightly regulated exports. Labs test for:
Total Plate Count (TPC)
Coliforms and E. coli
Salmonella spp.
Listeria monocytogenes
Yeasts and molds
Staphylococcus aureus
Bacillus cereus
These tests ensure compliance with Codex Alimentarius, EU Food Safety Authority (EFSA), and FDA regulations for microbial content.
2. Water Quality Testing
Exporters of bottled water, mineral water, and beverage concentrates must meet WHO and regional water quality standards. Labs in Ajman conduct:
Heterotrophic Plate Count (HPC)
E. coli and Enterococcus testing
Pseudomonas aeruginosa
Legionella pneumophila
Turbidity and Total Dissolved Solids (TDS)
These results are often required on Certificates of Analysis (CoA) submitted during customs clearance.
3. Cosmetic and Personal Care Product Testing
Countries like the EU enforce the Cosmetic Regulation (EC) No. 1223/2009, which includes strict microbiological safety parameters. Labs test for:
Microbial contamination in finished products
Preservative efficacy testing (Challenge Tests)
Pathogen screening (e.g., E. coli, Pseudomonas)
Microbiological testing reports are often a part of Product Information Files (PIFs) required for cosmetic exports.
4. Pharmaceutical and Herbal Product Testing
Labs assist exporters of traditional medicines, supplements, and OTC products by testing for:
Total microbial load
Absence of pathogens
Sterility testing (if applicable)
Compliant test results are vital for approval by global regulatory authorities like the US FDA, EMA, or SFDA.
5. Environmental Monitoring for Export-Oriented Factories
Microbiological labs also conduct environmental testing in manufacturing facilities to ensure that production environments meet Good Manufacturing Practices (GMP) and Hazard Analysis and Critical Control Point (HACCP) requirements.
This includes testing of:
Air quality
Surfaces (swabs)
Water used in processing
Equipment and personnel hygiene
Clean environments directly reduce the risk of product contamination—boosting export readiness.
How Microbiological Testing Labs Help Meet International Standards
Accredited microbiological testing labs in Ajman help exporters comply with the following international benchmarks:
ISO 17025: Ensures test accuracy and repeatability.
Codex Alimentarius: International food safety guidelines.
FDA CFR 21: U.S. microbial requirements for food, water, and cosmetics.
EU Cosmetic Regulation: Microbial limits in personal care products.
GCC Standards: Region-specific safety norms.
Labs issue detailed Certificates of Analysis (CoA) with every test—an essential part of export documentation that confirms the safety of the product.
Benefits of Partnering with a Microbiological Testing Lab in Ajman
Choosing a local, accredited lab in Ajman offers several strategic benefits:
✅ Faster Turnaround Time
Local testing means quicker results, helping businesses meet tight shipping schedules and reduce time-to-market.
✅ Cost Efficiency
Avoiding overseas testing reduces logistics and third-party lab expenses.
✅ Regulatory Insight
Ajman labs are familiar with both local UAE and international export requirements, ensuring exporters get tests tailored to their target market.
✅ Custom Testing Panels
Labs can design test packages based on the destination country’s microbiological import requirements.
✅ Support with Certification
Labs often assist in compiling reports for Emirates Quality Mark (EQM), G-Mark, and other export certification bodies.
Choosing the Right Microbiological Testing Lab in Ajman
When selecting a testing partner, exporters should look for labs with:
ISO/IEC 17025 accreditation
Experience in export-related testing
Industry-specific expertise (food, cosmetics, pharma)
Rapid reporting capabilities
Strong reputation and client references
Top microbiological testing labs in Ajman also provide expert consultations and on-site sampling services to streamline the process for exporters.
Conclusion
In today’s competitive global trade environment, exporters in Ajman cannot afford to overlook microbiological compliance. Whether you're exporting bottled water to the EU, snacks to the GCC, or skincare products to Southeast Asia, microbial safety is a universal requirement.
A Microbiological Testing Lab in Ajman acts as a strategic partner for exporters—offering accurate testing, regulatory guidance, and essential documentation to ensure seamless international trade.
0 notes
Text
AWS 2025: New Features and Changes You Should Know
Discover the key AWS 2025 updates, including new AI tools, instance types, cost-saving features, and security enhancements, plus how startups and enterprises can leverage them for smarter scaling and cloud optimization.
AWS continues to lead the cloud market by rolling out a torrent of new services and enhancements. In this blog, we cover the AWS 2025 updates and AWS new features 2025 that startups and enterprises should watch. You will learn what’s new in AWS 2025, from generative AI to new instance types, and see how the AWS roadmap 2025 is shaping trends in scalability, security, and cost.
We also highlight AWS for startups USA, cost optimization strategies, and AWS security features 2025. Finally, we share a real-world example – a Logiciel case study on optimizing AWS for JobProgress (Leap LLC) – to demonstrate dramatic AWS cost optimization 2025 results and performance gains.
Generative AI and Machine Learning Innovations
AWS is investing heavily in AI/ML, reflecting the trend of AI-powered cloud services. Key highlights include:
Bedrock Data Automation (GA) – Now generally available, this feature automates generation of insights from multimodal content (documents, images, video, audio), helping developers build generative AI applications faster. Bedrock includes over 100 new foundation models, giving startups and enterprises more flexibility and control in deploying AI models.
SageMaker AI Enhancements – SageMaker has new capabilities for large-model training and more third-party model integrations, which streamline AI development while reducing cost and effort. SageMaker is widely adopted to build, train, and deploy models, and these improvements help accelerate AI adoption and cost efficiency.
Conversational AI Tools – AWS’s new tools like Q Developer and Q Business are getting smarter. Q Developer now has an enhanced CLI agent for dynamic code and conversation interaction and can generate documentation, code reviews, and tests in IDEs. Meanwhile, Q Business adds 50+ workflow integrations for automating enterprise tasks.
Hardware for AI – AWS launched faster AI chips. EC2 Trn2 instances (Trainium2-based) deliver faster speed, more memory bandwidth, and higher compute performance for ML training and inference. Also, EC2 P5en instances with high-bandwidth GPUs offer massive networking throughput for deep learning and HPC workloads.
AWS’s 2025 priority on AI is clear from its strategy. The company is even funding AI with a multi-million dollar accelerator program and public-sector research support. For startups, AWS offers cloud credits to experiment with these new AI services. Taken together, the AWS innovations 2025 for startups are vast: from Bedrock and SageMaker enhancements to Q AI assistants, AWS is making generative AI a first-class citizen in the cloud.
Compute, Storage, and Networking Enhancements
AWS continues to expand its core infrastructure with new instance types, chips, and network features:
New EC2 Instances – Several new instance families launched recently
I8g Instances – Storage-optimized instances with next-gen processors and SSDs boost I/O-intensive workloads.
I7ie Instances – Storage-optimized with massive NVMe support and better compute performance.
P5en Instances – Designed for AI/HPC, with ultra-high-speed networking.
Trn2 (Trainium2) Instances – Boosts ML model training with faster compute and memory.
Networking and Zones – AWS is boosting networking and local expansion with advanced adapters and improved VPC tools for securely orchestrating hybrid workflows. Local Zones and Outposts continue expanding in U.S. cities for low-latency edge computing.
Global Infrastructure – AWS is scaling its footprint with new designs for power-efficient data centers. While no new U.S. regions were launched yet, expect continued growth in availability zones and networking capabilities.
Containers, Serverless, and Cloud Services
AWS is also improving its container and serverless offerings, which many startups and microservices architectures rely on:
Kubernetes and Container Management – Enhanced features now auto-encrypt Kubernetes API data and offer Auto Mode for provisioning compute, storage, and networking. EKS Hybrid Nodes let you run Kubernetes on-prem alongside the cloud. These reduce operational overhead and improve governance.
Serverless (Lambda, Fargate, etc.) – Continued refinements in performance and flexibility help developers run code without managing servers. Improvements include faster cold starts and more memory/CPU configurations.
Application Services – Data pipelines are getting streamlined with zero-ETL connections. Event-driven services and secure hybrid integration features have been added. Messaging services now support generative AI capabilities for enhanced customer interactions.
These AWS cloud services 2025 focus on reducing the management burden. Kubernetes is more secure and easier; serverless offerings get performance boosts; and data workflows become more automated. For startups and enterprises alike, this means faster deployments and consistent governance.
Security and Compliance Enhancements
Security is a top focus for AWS in 2025:
Encryption and Protection by Default – Key services now encrypt data automatically. Malware protection is enabled by default. New incident response tools guide organizations through remediation using predefined playbooks.
Secure AI Use – AWS is prioritizing safe AI development. Features include content filters and policy-driven AI guardrails to manage generative outputs responsibly.
Compliance and Identity – AWS continues expanding its certifications and offers stronger access controls and audit features to simplify compliance for U.S.-based organizations.
Cost Optimization and Pricing Changes
Cost control is always critical, especially for startups on tight budgets. AWS 2025 brings both new tools and policy changes:
Reserved Instance / Savings Plan Policy – Effective June 1, 2025, AWS is restricting RIs and Savings Plans to a single end customer’s usage. In practice, this means MSPs and resellers can no longer share one RI/SP across multiple clients. Enterprises should review their commitments: the new policy could require each company (or corporate unit) to manage its own reservations separately. This is a major AWS pricing change 2025 and may impact how large organizations do bulk purchasing.
Spot Instances and Fargate Spot – AWS continues to encourage spot pricing: new visibility tools and deeper discounts (up to 90%) help automate migrating workloads to spot when possible. For example, AWS Batch and SageMaker now integrate Spot more seamlessly.
Cost Management Tools – AWS enhanced Cost Explorer and Budgets in late 2024, adding features like cost anomaly detection powered by ML. Compute Optimizer was updated to support more resource types and provide savings recommendations (rightsizing instances, using Savings Plans, etc.). Startups should leverage these to track their spending.
Case Study: Leap (JobProgress) – Scalable, Cost-Optimized AWS Architecture
To ground these concepts, consider a real success story. Logiciel worked with JobProgress (Leap LLC), a SaaS CRM for contractors, to redesign their AWS architecture for scale and cost efficiency. Here are the highlights:
Scalable AWS Architecture: By adopting microservices on EKS (Kubernetes) and serverless components, Logiciel made the system cloud-native. This change enabled JobProgress to scale from a few users to 15,000+ active users without performance bottlenecks, learn more here logiciel.io. Auto-scaling and container orchestration ensured reliability during traffic spikes.
Cost Reduction: Through an AWS Well-Architected review, Logiciel identified idle resources and oversized instances. They shifted workloads to spot instances and right-sized instances (using AWS Compute Optimizer recommendations). Combined with Savings Plans, these moves cut AWS infrastructure costs by roughly 40%. The savings came without sacrificing uptime – in fact, database queries became faster by using Aurora Serverless and MemoryDB.
Performance Improvement: Logiciel optimized the database layer (introducing Amazon DynamoDB and Aurora) and caching (Redis via MemoryDB), drastically reducing API latency. Network and security were tightened using VPC endpoints and default encryption. The result was snappier performance: page loads and API calls sped up by an estimated 30%, improving user experience.
Outcome: Within five years of launch, JobProgress’s enhanced AWS platform attracted investors and led to an acquisition by Leap (at a multi-million-dollar valuation). (See the full JobProgress (Leap LLC) case study on Logiciel’s site for a deep dive.) This story shows how AWS cost optimization 2025 techniques can directly power business growth: optimized infrastructure enabled rapid scaling while preserving budget.
Looking Ahead: AWS Roadmap 2025 and Future Trends
What’s on the horizon for AWS beyond these immediate changes? While AWS rarely publishes a roadmap, we can anticipate the direction:
More AI Everywhere: Expect deeper AI integration in all services (e.g. AI-driven DevOps, security, analytics). Amazon Q will likely expand to other AWS consoles and new domains (we’ve already seen Q for coding, BI, workflow).
Evolved Compute Hardware: After Graviton4 and Trainium2, keep an eye on GPU/EFA advances and the next Graviton generation. There may also be new specialized chips (e.g. Inferentia3 for edge AI).
Extended Hybrid and Edge: AWS will grow Local Zones in more U.S. metros, plus expand Wavelength for 5G. Outposts and Local Zones might gain additional service support (e.g. RDS on Local Zones). This fits the U.S. emphasis on data sovereignty and low-latency sectors (finance, manufacturing, media).
Serverless and Managed Services: AWS will continue converting more services to serverless or managed models (e.g. RDS Serverless v2 is rolling out, and Fargate improvements are ongoing). Automation features (like AWS Backup support across more services) will simplify operations.
Billing and FinOps Tools: We may see enhancements to cost management – for example, more granular Spot pricing tools or AI-driven spend forecasts. The recent RI/SP policy change hints AWS wants customers to manage commitments more directly; next might come more flexible consumption models.
Conclusion
AWS’s momentum in 2025 is unmistakable. From AI breakthroughs to new instance families and tighter security defaults, the AWS changes 2025 mean faster innovation for businesses. Startups (leveraging AWS Activate) and enterprises (using AWS Partner programs) will both find powerful new tools to cut costs and speed development. By staying current with AWS 2025 updates whether through official news or consultancies like Logiciel organizations can fully exploit the cloud’s promise.
For a concrete example, check out Logiciel’s success stories including the Leap (JobProgress) case study. It’s proof that applying these AWS innovations leads to real-world gains: cost reduction, performance improvement, and business growth. As AWS security features 2025 and new cloud services roll out, the clear strategy is to embrace them proactively. With careful planning and expert guidance, AWS users can harness these changes and stay competitive in the dynamic tech landscape.
0 notes
Text
Weekly Review 23 May 2025
Some interesting links that I Tweeted about in the last week (I also post these on Mastodon, Threads, Newsmast, and Bluesky):
Running a coffee maker with AI: https://arstechnica.com/gadgets/2025/05/the-tinkerers-who-opened-up-a-fancy-coffee-maker-to-ai-brewing/ But can it make a really good cup of tea?
Why sales teams are struggling with AI: https://www.techrepublic.com/article/news-sales-industry-generative-ai-breakthrough/
New positions are needed in organisational IT departments to deal with AI: https://www.theregister.com/2025/05/15/new_job_machine_learning_administrator/
Meta continues to bend the rules while acquiring training data for its AI: https://arstechnica.com/tech-policy/2025/05/meta-is-making-users-who-opted-out-of-ai-training-opt-out-again-watchdog-says/
Do! Not! Use! AI! To! Write! Legal! Filings! https://arstechnica.com/tech-policy/2025/05/judge-initially-fooled-by-fake-ai-citations-nearly-put-them-in-a-ruling/
AI can learn to work together: https://www.theguardian.com/technology/2025/may/14/ai-can-spontaneously-develop-human-like-communication-study-finds
I don't think a ban on AI regulation is going to be helpful: https://www.theverge.com/news/666288/republican-ai-state-regulation-ban-10-years
Open source is the future of AI: https://www.theregister.com/2025/05/14/future_of_llms_is_open/
Generative AI can now design Lego constructions: https://arstechnica.com/ai/2025/05/new-ai-model-generates-buildable-lego-creations-from-text-descriptions/
Reasoning AI models will soon slow their rate of improvement: https://techcrunch.com/2025/05/12/improvements-in-reasoning-ai-models-may-slow-down-soon-analysis-finds/
As AI models advance, they are going to require more frequent safety testing: https://techcrunch.com/2025/05/14/openai-pledges-to-publish-ai-safety-test-results-more-often/ But will companies take the cheap route and use AI to do it?
Compute bottlenecks will soon cause the rate of improvement of reasoning AI models to slow: https://www.techrepublic.com/article/news-ai-reasoning-models-scale/
AI is getting entrenched in organisations before the security problems associated with it are understood: https://www.theregister.com/2025/05/14/cyberuk_ai_deployment_risks/
AI generated material is increasing paranoia: https://arstechnica.com/ai/2025/05/welcome-to-the-age-of-paranoia-as-deepfakes-and-scams-abound/
Google launches a new seed fund for AI startups: https://techcrunch.com/2025/05/12/google-launches-new-initiative-to-back-startups-building-ai/
AI might or might not make good therapists, but using them is certainly strengthening government surveillance capabilities: https://www.theverge.com/policy/665685/ai-therapy-meta-chatbot-surveillance-risks-trump
AI can now create algorithms, not just write code to implement existing algorithms: https://spectrum.ieee.org/deepmind-alphaevolve
How AI is contributing to DevOps: https://www.datasciencecentral.com/the-future-of-devops-using-ai-automation-and-hpc/
The challenges of AI in video surveillance: https://www.datasciencecentral.com/5-challenges-in-implementing-ai-in-video-surveillance/
An IEEE standard on AI system procurement: https://spectrum.ieee.org/ieee-ai-3119-standards
A list of seven AWS services that are useful for AI: https://www.kdnuggets.com/7-aws-services-for-machine-learning-projects
A list of ten free books on AI: https://www.kdnuggets.com/10-free-artificial-intelligence-books-for-2025
Open source is the future of AI: https://www.theregister.com/2025/05/14/future_of_llms_is_open/
William Gibson's Sprawl trilogy had "Personality Constructs" that could recreate a person's thoughts and personality. This might soon be possible using AI: https://techcrunch.com/2025/05/15/sam-altmans-goal-for-chatgpt-to-remember-your-whole-life-is-both-exciting-and-disturbing/
0 notes
Text

Unleashing the Power of 400G QSFP-DD SR4: The Next Step in Data Center Evolution
Hey network enthusiasts and data center dreamers! 🌐✨ Today we’re geeking out over one of the hottest modules on the market: the 400G QSFP-DD SR4 optical transceiver. Whether you’re running hyperscale cloud farms, AI/ML pipelines, or simply craving ultra-dense speed, this little powerhouse is your secret sauce for next-level connectivity. Let’s dive in!
🚀 Why 400G Matters Right Now
Data demands aren’t just growing; they’re exploding. From video streaming and virtual desktops to real-time analytics and machine learning, your infrastructure needs to keep pace. Enter 400G:
Sky-High Throughput Pushes 400 Gbps over four parallel 100 Gbps lanes—perfect for leaf-spine and top-of-rack (ToR) fabrics.
Future-Proofing Ready for the next wave of AI/ML clusters, AR/VR services, and 5G backhaul.
Compact & Efficient QSFP-DD form factor doubles the density of QSFP28, slashing space per port on your line cards.
💡 Inside the QSFP-DD SR4 Module
So, what makes the SR4 “Short-Reach” superstar?
Multimode Fiber Support
OM3/OM4 fibers up to 100 m—ideal for rack-to-rack and ToR connections.
Power-Smart Design
Typically <10 W per module, balancing your power budget without sacrificing speed.
Plug-and-Play Interoperability
Fully IEEE 802.3cm and MSA compliant; just slide it in and link up.
Robust QA & Monitoring
Digital diagnostics monitoring (DDM) keeps tabs on temperature, voltage, and optical power in real-time.

🔧 Real-World Use Cases
Cloud Data Centers Aggregate leaf spine topologies to crush east-west traffic bottlenecks.
Enterprise Campuses Seamlessly stitch together multi-building networks with minimal latency.
AI/ML Training Clusters Fuel GPU farms with the bandwidth they crave—no more I/O starvation.
High-Performance Computing (HPC) Connect compute nodes with a fabric that’s up to the task of petascale workloads.
🌟 Why Fibrecross?
At Fibrecross, we’re obsessed with optical excellence. Our 400G QSFP-DD SR4 transceivers are:
Stringently Tested: From eye pattern to BER, we ensure rock-solid performance.
Globally Supported: With warehouses in the U.S., Europe, and Asia, your lead times stay low.
Customization-Ready: Need special labeling, firmware tweaks, or extended temperature ranges? We’ve got you covered.
📈 Getting Started
Request Samples: Test in your own environment—risk-free.
Benchmark & Verify: Use your preferred traffic generator or built-in DDM stats.
Scale with Confidence: Leverage volume pricing and tailored supply chain solutions.
“Upgrading to 400G QSFP-DD SR4 was a game-changer. We saw a 60% reduction in port count and slashed power usage by 20%. Our AI workloads never looked back.” — Data Center Architect, Global Cloud Provider

Ready to Level Up?
💌 DM us or hit the Link in Bio to chat about your architecture, get pricing, and schedule a demo. Let’s build the ultra-fast backbone your business deserves!
— The Fibrecross Team ⚡️
1 note
·
View note
Text
GIGABYTE Radeon RX 9060 XT And AI PRO R9700 GPUs

AMD Radeon RX 9060 XT
GIGABYTE, the world's top computer company, released the AMD Radeon RX 9060 XT and Radeon AI PRO R9700 graphics cards. The Radeon AI PRO R9700 graphics card excels in AI computation and machine-learning, while the Radeon RX 9060 XT graphics card enhances game immersion with better raytracing.
GIGABYTE Radeon RX 9060 XT GAMING OC graphics card incorporates the WINDFORCE cooling system, which includes a Hawk Fan, server-grade thermal conductive gel, heat pipes, and Screen Cooling for maximum heat dissipation under severe workloads. The Hawk Fan can increase air pressure by 53.6% and volume by 12.5% without affecting acoustics by minimising noise and turbulence.
Meanwhile, the server-grade conductive gel, which is highly bendable and non-fluid, contacts uneven surfaces best and can sustain prolonged use or transportation. GIGABYTE Radeon RX 9060 XT GAMING OC is the starting point for mainstream gamers with an increased heatsink, multiple heat pipes, Screen Cooling, and ventilation.
The GIGABYTE Radeon AI PRO R9700 AI TOP graphics card has shown next-level AI computing performance under real-world AI and machine-learning workloads through extensive GPU and memory testing, multi-GPU benchmarking under long-term testing and monitoring, and major LLM models for simulation. When used with GIGABYTE's AI TOP Utility software, AMD ROCm, a complete open-source stack for Generative AI and HPC applications, installs quickly.
GIGABYTE directs cold air straight to each heatsink with a novel inward-indented fan design for optimal AI workload cooling. GIGABYTE's GPU uses composite metal grease, a high-end thermal interface material for air-cooled cards. A precision-machined heatsink, server-grade conductive gel, an all-copper vapour chamber, and a robust metal structure cool the GPU, VRAM, and supporting electronics.
GIGABYTE will show the Radeon RX 9060 XT Gaming OC and Radeon AI PRO R9700 AI TOP at COMPUTEX 2025.
GIGABYTE RX 9060 XT GAMING OC 16G
FEATURES
Powerful RX 9060 XT
Integration of 16GB GDDR6 128-bit memory
WINDFORCE cooling
Hawk lover
Server-grade thermal gel
RGB lighting
Stronger framework
Wind-forced cooling
A combination of cutting-edge technology gives the WINDFORCE cooling system excellent thermal performance. Copper plate, composite copper heat pipes, 3D active fans, screen cooling, server-grade thermal conductive gel, and innovative Hawk fans with alternating spinning.
Active-cooling Hawk fan
Server thermoconductive gel
Composite copper heat pipe/plate
Cooling Screen
Amazing exterior design
The GAMING series is inspired by mech warriors and combines futuristic armour with mechanical design components for exceptional protection and endurance. It offers a nuanced view of futuristic technology beyond appearances and functionality.
Multiple visual layers
Like armour, the exterior is multi-layered and has several surface treatments.
UNIQUE TEXTURE
GAMING's armor-like appearance comes from its curved surface and unique texturing. The details highlight mechanical aesthetics and project a forceful image.
RGBLIGHTING
GIGABYTE CONTROL CENTRE lets you choose any lighting effect or synchronise with other devices with 16.7M colours and effects.
Sliding side plate
Users can customise their construct with its sliding side plate and power armour. This animation is for illustration only. Product appearance may vary.
Stronger Structure
I/O bracket-attached strengthened metal backplate provides excellent structural stability.
R9700 Radeon AI
FEATURES
Radeon AI PRO R9700 powers it.
Integrates 32GB GDDR6 (256-bit) memory.
GPU metal composite grease
Server-grade thermal gel
Airflow-optimized turbo fan cooling for multi-card setups
Copper cooling, all metal frames
Twin-ball bearing fan
Thoroughly tested with AI and ML workloads
The Radeon AI PRO R9700 handles complex creative tasks, model fine-tuning, and AI inference. The Navi 48 GPU and RDNA 4 architecture give it high performance and efficiency for professional applications.
Performance Highlights
In AI workloads, AMD claims the R9700 can outperform NVIDIA RTX 5080 and Radeon Pro W7800 by five and two times, respectively. This makes it ideal for local execution of complex text-to-image generating models and LLMs.
AI/Software Ecosystem
Second-generation AI accelerators boost throughput, making the R9700 excellent for AI applications. Supporting the AMD ROCm software stack on Linux and Windows will let developers to use it on multiple platforms.
Design, availability
AMD offers a dual-slot reference design with radial fan for dense workstations. Custom models from Sapphire, ASUS, and Gigabyte are expected. When it launches in July 2025, the Radeon AI PRO R9700 will be priced.
#GIGABYTERadeonRX9060XT#AIPROR9700#GIGABYTERadeonRX9060XTAndAIPROR9700#RadeonRX9060XT#RX9060XT#technology#technews#technologynews#news#govindhtech
0 notes
Text
Top Services Offered by Microbiological Testing Labs in Abu Dhabi: A Complete Guide | +971 554747210
In today’s fast-evolving industrial landscape, the demand for quality, safety, and regulatory compliance is higher than ever. For sectors like food and beverage, pharmaceuticals, cosmetics, water treatment, and healthcare, ensuring microbiological safety is a top priority. This is where a microbiological testing lab in Abu Dhabi plays a crucial role.
Abu Dhabi, the capital of the UAE, has positioned itself as a center of scientific innovation and stringent quality control. Accredited microbiological labs across the emirate offer a comprehensive suite of services that help businesses meet both local and international regulatory standards.
In this complete guide, we explore the top services offered by microbiological testing labs in Abu Dhabi and how they support safety, compliance, and consumer trust.
What Is a Microbiological Testing Lab?
A microbiological testing lab is a specialized facility that conducts detailed analyses to detect, identify, and quantify microorganisms like bacteria, viruses, yeasts, and molds in a variety of products and environments. These labs help prevent contamination, safeguard health, and ensure that products are safe for consumption, use, or distribution.
1. Food Microbiological Testing
Food safety is one of the most regulated and critical sectors in Abu Dhabi. Microbiological testing labs provide thorough assessments of food and beverage products to detect harmful pathogens and spoilage organisms.
Common tests include:
Pathogen detection: Salmonella, E. coli, Listeria monocytogenes, Staphylococcus aureus
Indicator organisms: Total viable counts (TVC), total coliforms, and fecal coliforms
Spoilage organisms: Yeasts and molds
Shelf-life testing: Evaluating microbial stability over time
These tests help food producers comply with UAE.S standards, Dubai Municipality regulations, GSO guidelines, and international export standards.
2. Pharmaceutical Microbiology
Pharmaceutical products must be free from microbial contamination to ensure patient safety. Abu Dhabi’s microbiological testing labs support pharmaceutical manufacturers in maintaining high purity standards through a range of validated testing methods.
Services typically include:
Sterility testing: For injectable drugs and sterile products
Microbial limit tests: For tablets, syrups, ointments, and capsules
Bioburden testing: For manufacturing equipment and raw materials
Endotoxin testing: Especially for parenteral drugs and medical devices
Environmental monitoring: Air quality, surface swabs, and personnel hygiene in cleanrooms
These services are critical for GMP (Good Manufacturing Practice) compliance and are aligned with USP, BP, and Ph. Eur. pharmacopeial standards.
3. Cosmetic and Personal Care Testing
Cosmetic products can also harbor microbial contaminants that cause skin infections or product degradation. Microbiological testing labs in Abu Dhabi help manufacturers ensure the safety of creams, lotions, shampoos, and serums.
Testing services include:
Total viable count (TVC) of bacteria and fungi
Preservative efficacy testing (PET): To verify that the product's preservative system prevents microbial growth
Pathogen-specific tests: For Pseudomonas aeruginosa, Candida albicans, Staphylococcus aureus
These tests ensure compliance with ISO 17516 and UAE.S 2077 cosmetic safety standards.
4. Water Testing and Potability Analysis
Water quality is vital for public health, industrial use, and consumer safety. Whether it’s bottled drinking water, swimming pool water, or water used in food manufacturing, testing for microbial contamination is essential.
Labs offer:
Testing for coliforms and E. coli
Heterotrophic plate count (HPC)
Legionella detection
Pseudomonas aeruginosa testing
Microbiological analysis of seawater and processed water
Labs in Abu Dhabi follow WHO guidelines, UAE.S 149, and ADQCC regulations to ensure water quality compliance.
5. Environmental Monitoring Services
Microbial contamination in production environments can compromise entire batches of products. Microbiological testing labs in Abu Dhabi provide environmental monitoring services that ensure hygiene in:
Food processing units
Pharmaceutical cleanrooms
Cosmetic production lines
Hospital and clinic environments
Services include:
Air sampling
Surface swabbing
Contact plate testing
Hand hygiene swabbing for personnel
These services are vital for preventive maintenance and ongoing quality assurance.
6. Pathogen Identification and Strain Typing
For companies dealing with contamination events, it’s essential to identify the exact microorganism responsible. Advanced microbiological labs in Abu Dhabi use molecular biology techniques such as:
PCR (Polymerase Chain Reaction)
16S rRNA sequencing
Genotyping and strain differentiation
These methods support root cause analysis and allow manufacturers to trace contamination sources, implement corrective actions, and avoid recurrence.
7. Antimicrobial Efficacy Testing
Some products, especially disinfectants, antiseptics, and sanitizers, must be proven effective against bacteria and viruses. Microbiological testing labs offer:
Minimum Inhibitory Concentration (MIC)
Time-kill studies
Zone of inhibition (agar diffusion)
Viral inactivation studies
These tests help companies validate their product claims and ensure that they are effective in real-world conditions.
8. Rapid Microbiological Methods (RMM)
To meet urgent deadlines and real-time decision-making, many labs in Abu Dhabi now offer rapid testing solutions using automated systems and biosensors. Benefits include:
Results in hours instead of days
Improved process control
Faster batch release
Technologies like ATP bioluminescence, qPCR, and ELISA are commonly used in these rapid platforms.
9. Training and Consultancy Services
Top microbiological labs don’t just provide testing—they also offer guidance and consultancy services to manufacturers, including:
Regulatory compliance training
HACCP plan development
GMP and hygiene audits
Crisis management for contamination outbreaks
These services help clients stay ahead of potential compliance issues.
10. Sample Collection and Logistics
To simplify the process for manufacturers, many labs offer on-site sample collection and secure logistics services. This ensures:
Proper sampling techniques
Cold chain integrity
Timely delivery of samples to the lab
Chain-of-custody documentation for regulatory audits
Why Choose a Microbiological Testing Lab in Abu Dhabi?
Abu Dhabi’s testing labs are known for their:
ISO/IEC 17025 accreditation
Highly qualified microbiologists and technicians
State-of-the-art equipment
Compliance with UAE and international standards
Collaboration with government bodies like ADQCC, MOIAT, and Dubai Municipality
By partnering with a reliable microbiological testing lab in Abu Dhabi, manufacturers can strengthen product safety, build trust with consumers, and meet stringent regulatory demands locally and globally.
Final Thoughts
In a world where quality and safety define brand value and business success, microbiological testing labs in Abu Dhabi play a central role in ensuring compliance, trust, and market competitiveness. From food safety and pharmaceutical quality to cosmetics and water purity, these labs deliver the scientific insights and data that manufacturers need to thrive in regulated environments.
0 notes
Link
#commercialpilots#energyoptimization#GCC-Israeltechaccord#HybridAlgorithms#post-quantumcryptography#QuantumComputing#quantumtalentdevelopment#smartinfrastructure
0 notes
Text
Accelerate Engineering Performance with NX CAE: Comprehensive Simulation for Better Design Decisions
In today's fast-paced product development environment, simulation has become a critical part of engineering. Engineers are no longer relying solely on physical prototypes—they're making smarter, faster decisions using advanced Computer-Aided Engineering (CAE) tools. NX CAE by Siemens is a powerful, integrated simulation solution that helps engineers predict real-world behavior of products with high accuracy. As an official Siemens partner, DDSPLM brings you NX CAE with expert implementation, customization, and training to unlock its full potential in your organization.
What is NX CAE?
NX CAE (Computer-Aided Engineering) is a simulation-driven design environment that integrates seamlessly with NX CAD. It empowers engineers and analysts to simulate structural, thermal, flow, motion, acoustic, and multiphysics problems—all within a unified environment. From concept design to final validation, NX CAE helps reduce the cost, time, and complexity of product development. Whether you are in automotive, aerospace, industrial machinery, or consumer goods, NX CAE provides the simulation power and flexibility needed to innovate faster and smarter.
Key Features of NX CAE
Integrated Simulation Platform
Multiphysics Analysis
Automated Meshing & Advanced Solver Integration
Simcenter Integration
Design-Integrated Simulation
High-Performance Computing (HPC)
Results Visualization
Benefits of Using NX CAE
Reduce physical prototyping costs
Accelerate product development cycles
Improve simulation accuracy and reliability
Eliminate data translation errors between CAD and CAE
Make design decisions early with real-time feedback
Increase cross-team collaboration
Minimize product failure and warranty issues
Why Choose DDSPLM?
At DDSPLM, we don’t just sell software — we empower engineering innovation. As a trusted Siemens Digital Industries Software partner, DDSPLM offers:
Expert Consultation – Guidance on choosing and implementing the right CAE solution
Domain Expertise – Decades of experience across various industries
Training & Support – Ongoing training programs and responsive technical support
End-to-End Solutions – From licensing to deployment and integration with PLM systems
Conclusion:-
Simulation isn’t just about testing – it’s about discovering better ways to innovate. With NX CAE, you unlock the ability to simulate, validate, and optimize your designs early in the product development cycle, ensuring better quality and faster time to market. Combined with DDSPLM’s industry-leading support and deep expertise, your engineering teams are equipped to transform ideas into reality with speed and precision.

0 notes