#How To Create a Bootable macOS Catalina USB Drive
Explore tagged Tumblr posts
Visit Tumblr Blog
Explore Tumblr blogs with no restrictions, modern design and the best experience.
Last Seen Tumblr Blogs


Fun Fact
In February 2021, Tumblr had 518.6 million blog accounts.
Text
How To Create a Bootable macOS Catalina USB Drive
How To Create a Bootable macOS Catalina USB Drive

How To Create a Bootable macOS Catalina USB Drive.
Making a bootable USB installer for the latest macOS Catalina helps in many ways. One of the reasons you might want to do this is because it allows you to perform a completely clean install of the update on your Mac. Other areas where you can use a bootable macOS installer is when you have multiple Macs and want to install the same update on…
View On WordPress
#Create a macOS Catalina USB Installer Using Disk Creator#How To Create a Bootable macOS Catalina USB Drive#How To Use The macOS Catalina USB Installer#Use Terminal To Make A macOS USB Installer
0 notes
Text
El Capitan 10.11 6 Dmg Google Drive

El Capitan 10.11 6 Dmg Google Drive Windows 10
El Capitan 10.11 6 Dmg Google Drive Free
El Capitan 10.11 6 Dmg Google Drive Mac
Mac Os Dmg Install Mac OS X El Capitan 10.11 ISO / DMG Files Direct Download - ISORIVER. Mac OS X El Capitan: Being the 12th major release of macOS, Mac OS X El Capitan belongs to the Macintosh-Unix family of OS. It was majorly released for server. Keep talking and nobody explodes free download mac. Price Currency: USD Whatsapp for laptop. Mac Os X El Capitan 10.11.6 Google Drive Free. OS X El Capitan Partitioning. With the help of screenshots, I will be explaining some basic set of activities that are to be done while partition the OS X El Capitan drive. Alternatively, the same procedure will be explained with the help of a disk manager utility known as Stellar Partition Manager. Mac OS X El Capitan 10.11.6 Free Download Download Mac OS X El Capitan 10.11.6 latest version DMG bootable image setup by clicking the below button. It is a reliable operating system with support for all the latest devices and different enhancements. Mac OS El Capitan was released to manufacturing on 20th September 2015, almost three and a half years ago. Its latest version 10.11.6 (15G22010) was released on 9th July 2018, almost 7 months ago. This is latest version DMG image iso file OS X El Capitan 10.11.6 (bootable) for Mac users. Mac OS X El Capitan 10.11.6: Product Review: Sep 22, 2016 Unmount the dmg file named “Install macOS Sierra.dmg” (if it is mounted:) Go to the top menu of “Disk Utility” window and select “images” and then “Scan image for restore”.
These advanced steps are primarily for system administrators and others who are familiar with the command line. You don't need a bootable installer to upgrade macOS or reinstall macOS, but it can be useful when you want to install on multiple computers without downloading the installer each time.
MacOS Sierra 10.12 Installation ISO Media. MacOS High Sierra yang saya bagikan melalui link google drive di sini masih versi awal yakni 10.13.1. Sedangkan saat ini yang terbaru sudah sampai 10.13.4. Baiklah langsung saja linknya di bawah ini. Saya pecah menjadi 5 part agar gampang mengunduhnya. Belum sempat unggah yang single link. Tautan Unduhan MacOS High Sierra Google Drive.
Download macOS
Download Mac OS Sierra 10.12.dmg Google Drive Download Mac OS Sierra 10.12.dmg from Torrrent. In this article, you will learn about MacOS High Sierra with its features and I will guide you on how you can download the dmg file for MacOS High Sierra in different ways. So, focus top to toe and read the complete article.
Find the appropriate download link in the upgrade instructions for each macOS version:
macOS Catalina, macOS Mojave, ormacOS High Sierra Installers for each of these macOS versions download directly to your Applications folder as an app named Install macOS Catalina, Install macOS Mojave, or Install macOS High Sierra. If the installer opens after downloading, quit it without continuing installation. Important: To get the correct installer, download from a Mac that is using macOS Sierra 10.12.5 or later, or El Capitan 10.11.6. Enterprise administrators, please download from Apple, not a locally hosted software-update server.
Mac Os Sierra Dmg Torrent
OS X El Capitan El Capitan downloads as a disk image. On a Mac that is compatible with El Capitan, open the disk image and run the installer within, named InstallMacOSX.pkg. It installs an app named Install OS X El Capitan into your Applications folder. You will create the bootable installer from this app, not from the disk image or .pkg installer.
Use the 'createinstallmedia' command in Terminal
Connect the USB flash drive or other volume that you're using for the bootable installer. Make sure that it has at least 12GB of available storage and is formatted as Mac OS Extended.
Open Terminal, which is in the Utilities folder of your Applications folder.
Type or paste one of the following commands in Terminal. These assume that the installer is still in your Applications folder, and MyVolume is the name of the USB flash drive or other volume you're using. If it has a different name, replace MyVolume in these commands with the name of your volume. Catalina:* Mojave:* High Sierra:* El Capitan:
Press Return after typing the command.
When prompted, type your administrator password and press Return again. Terminal doesn't show any characters as you type your password.
When prompted, type Y to confirm that you want to erase the volume, then press Return. Terminal shows the progress as the bootable installer is created.
When Terminal says that it's done, the volume will have the same name as the installer you downloaded, such as Install macOS Catalina. You can now quit Terminal and eject the volume.
El Capitan 10.11 6 Dmg Google Drive Windows 10
* If your Mac is using macOS Sierra or earlier, include the --applicationpath argument, similar to the way this argument is used in the command for El Capitan.
Use the bootable installer
After creating the bootable installer, follow these steps to use it:
Plug the bootable installer into a compatible Mac.
Use Startup Manager or Startup Disk preferences to select the bootable installer as the startup disk, then start up from it. Your Mac will start up to macOS Recovery. Learn about selecting a startup disk, including what to do if your Mac doesn't start up from it.
Choose your language, if prompted.
A bootable installer doesn't download macOS from the Internet, but it does require the Internet to get information specific to your Mac model, such as firmware updates. If you need to connect to a Wi-Fi network, use the Wi-Fi menu in the menu bar.
Select Install macOS (or Install OS X) from the Utilities window, then click Continue and follow the onscreen instructions.
Mac Os Dmg Download
Learn more
For more information about the createinstallmedia command and the arguments that you can use with it, make sure that the macOS installer is in your Applications folder, then enter this path in Terminal:
Catalina:


El Capitan 10.11 6 Dmg Google Drive Free
Mojave:
Download Mac Os High Sierra 10.13.6 Dmg Google Drive
High Sierra:

El Capitan 10.11 6 Dmg Google Drive Mac
Mac Os Dmg File Download

El Capitan:
1 note
·
View note
Text
Catalina Bootable Drive

What’s needed for a clean install on a Mac
Catalina Bootable Disk
Macos Catalina Bootable Usb Drive
Catalina Bootable Disk
A backup of the disk before it’s erased. Two options are to use Duplicate (a free utility which can copy and paste an entire bootable volume), or Mac Backup Guru (a paid, fully featured backup utility with unique incremental backups capability) for that. Here is a detailed guide for the process.
A Mac operating system installer. MacOS Big Sur can be downloaded by clicking here.
If you need to recover deleted files take a look at Mac Data Recovery Guru on our sister-site dedicated to data recovery.
Paypal / credit card donations: click here Bitcoin donations: 1MbwUFSbQvMrd826DTpup7PpTTNrrJjaJ8

Macos Catalina Bootable Usb Drive
Create a macOS Catalina bootable USB drive using this handy guide. The USB drive can be used to upgrade a Mac, clean install macOS or for recovery purposes.
Total downloads: 1,678,418 Total donated: $33.99
Discover how to clean install macOS Catalina on your MacBook from a Bootable USB Drive.Part 1 - Flash Drive on Amazon 2 - Bootab. Plug the bootable installer into a Mac that is connected to the internet and compatible with the version of macOS you're installing. Turn on your Mac and continue to hold the power button until you see the startup options window, which shows your bootable volumes. Select the volume containing the bootable installer, then click Continue. Follow the below steps in order to create a bootable macOS Catalina USB Drive. Format your USB Drive:. Connect your USB drive to the USB port of your computer. Press Command+ Space to launch spotlight, type in ‘Disk Utility,” and press the return to launch the app. Search for your USB drive under the sidebar of the Disk utility app.
1 note
·
View note
Text
Os El Capitan Installer

Mac OS El Capitan Installer by Apple Inc. Publication date 2020-01 Topics Software, Mac OS, Apple, inc. I am uploading Mac OS El Capitan that I downloaded off of. The El Capitan installer is downloaded to the /Applications folder, with the file name 'Install OS X El Capitan.' If you've installed El Capitan and want to create a bootable installer, re-download the installer from Apple. First, the OS X installer should run automatically, but if not then you can try running it manually: Go to the Applications folder. Open the program called “Install OS X El Capitan”. Follow the on-screen instructions. If this program is missing or will not run, then move it to the trash and empty the trash, followed by re-downloading it.
Load the installer until you can go to the utilities and run disk utility. Erase the disk as Mac os extended (Journaled) Close disk utility. Open terminal and use the same method as shown in the video with mid 2017 date. Shutdown laptop and reset SMC. Restart the installer and try to install El Capitan. Once you’ve done that, here’s how to install, reinstall, or upgrade to El Capitan, step by step: Boot from your Recovery HD partition by restarting your Mac while holding down the Command+R keys. The OS X Utilities window appears. Select Reinstall OS X, and click Continue. The OS X El Capitan splash screen appears.

These advanced steps are primarily for system administrators and others who are familiar with the command line. You don't need a bootable installer to upgrade macOS or reinstall macOS, but it can be useful when you want to install on multiple computers without downloading the installer each time.
What you need to create a bootable installer
A USB flash drive or other secondary volume formatted as Mac OS Extended, with at least 14GB of available storage
A downloaded installer for macOS Big Sur, Catalina, Mojave, High Sierra, or El Capitan
Download macOS
Download: macOS Big Sur, macOS Catalina, macOS Mojave, or macOS High Sierra These download to your Applications folder as an app named Install macOS (version name). If the installer opens after downloading, quit it without continuing installation. To get the correct installer, download from a Mac that is using macOS Sierra 10.12.5 or later, or El Capitan 10.11.6. Enterprise administrators, please download from Apple, not a locally hosted software-update server.
Download: OS X El Capitan This downloads as a disk image named InstallMacOSX.dmg. On a Mac that is compatible with El Capitan, open the disk image and run the installer within, named InstallMacOSX.pkg. It installs an app named Install OS X El Capitan into your Applications folder. You will create the bootable installer from this app, not from the disk image or .pkg installer.
Use the 'createinstallmedia' command in Terminal
Connect the USB flash drive or other volume that you're using for the bootable installer.
Open Terminal, which is in the Utilities folder of your Applications folder.
Type or paste one of the following commands in Terminal. These assume that the installer is in your Applications folder, and MyVolume is the name of the USB flash drive or other volume you're using. If it has a different name, replace MyVolume in these commands with the name of your volume.
Big Sur:*
Download El Capitan
Catalina:*
Mojave:*
High Sierra:*
El Capitan:
* If your Mac is using macOS Sierra or earlier, include the --applicationpath argument and installer path, similar to the way this is done in the command for El Capitan.
After typing the command:
Press Return to enter the command.
When prompted, type your administrator password and press Return again. Terminal doesn't show any characters as you type your password.
When prompted, type Y to confirm that you want to erase the volume, then press Return. Terminal shows the progress as the volume is erased.
After the volume is erased, you may see an alert that Terminal would like to access files on a removable volume. Click OK to allow the copy to proceed.
When Terminal says that it's done, the volume will have the same name as the installer you downloaded, such as Install macOS Big Sur. You can now quit Terminal and eject the volume.
Use the bootable installer
Determine whether you're using a Mac with Apple silicon, then follow the appropriate steps:
Apple silicon
Plug the bootable installer into a Mac that is connected to the internet and compatible with the version of macOS you're installing.
Turn on your Mac and continue to hold the power button until you see the startup options window, which shows your bootable volumes.
Select the volume containing the bootable installer, then click Continue.
When the macOS installer opens, follow the onscreen instructions.
Mac Os El Capitan Installer Download
Intel processor
Plug the bootable installer into a Mac that is connected to the internet and compatible with the version of macOS you're installing.
Press and hold the Option (Alt) ⌥ key immediately after turning on or restarting your Mac.
Release the Option key when you see a dark screen showing your bootable volumes.
Select the volume containing the bootable installer. Then click the up arrow or press Return. If you can't start up from the bootable installer, make sure that the External Boot setting in Startup Security Utility is set to allow booting from external media.
Choose your language, if prompted.
Select Install macOS (or Install OS X) from the Utilities window, then click Continue and follow the onscreen instructions.
Learn more
A bootable installer doesn't download macOS from the internet, but it does require an internet connection to get firmware and other information specific to the Mac model.
Os X El Capitan Installer App

Os El Capitan Problems
For information about the createinstallmedia command and the arguments you can use with it, make sure that the macOS installer is in your Applications folder, then enter the appropriate path in Terminal:
1 note
·
View note
Text
Create Dmg Installer For Mac

Create Dmg Installer Mac Os X
Create Dmg Installer For Mac Os
Create Dmg Installer For Mac Catalina
Nov 07, 2019 Now create a computer account for macOS Catalina. For three-times click Continue; Now select the Dark mode, Light mode or Auto mode for macOS Catalina. Wait a while till the desktop should be ready when it gets ready. Enjoy using macOS Catalina 10.15 for the first time in your PC-Hackintosh. Create Dmg Installer For Mac Download Bottom Line. Jun 23, 2020 How to Install and Open.dmg Files on a Mac. Software installation with Mac OS X is very different than in the Windows world. On a Windows PC you run an installer, tick off a few checkboxes, and wait for the progress meter to reach completion. Dec 10, 2018 If you want to use a DMG file in Windows to mount a version of Mac OS X, then Method 1 will work. However, most of the time, you'll need a DMG to install an OS version on a Mac computer. In those cases, if all you have to work with is a Windows PC, DMGGeeker is the perfect application. Are you looking for a direct download link for MacOS High Sierra ISO installer or dmg file for your Mac or Windows computer or virtual machine then you are at the right place. VirtualBox, Vmware. Dec 28, 2019 How to Make a DMG File on a Mac. One way to store or group files on a Mac is to create a Disk Image.
A DMG disk image file is Apple's container format for capturing entire drives or disks, similar to ISO for other platforms like Windows. It consists of data blocks that represent a physical disc. If you're on a Windows machine, you're limited in what you can do with DMG files. That's why you need third-party utilities to create a bootable DVD from DMG on Windows. This article explains two different methods to burn DMG files to amake bootable macOS installation DVD in Windows.
Method 1: How to Create Bootable DVD from DMG (Command Prompt)
This approach utilizes a tool called DMG2IMG, which converts DMG file into ISO, the universally more compatible archive format. This ISO file is then burned using a command line execution in Command Prompt. You don't really need any experience with disk images or command line work, but it will certainly help should something go wrong. If you're not comfortable with any of this, you can skip to Method 2, which showcases a powerful but user-friendly tool that does it all for you. But first, let's see how the Command Prompt method of creating a bootable DVD from DMG works.
Note: The older version of DMG2IMG is called DMG2ISO. Although the download is available in the link provided in Step 1 below, it is recommended that you use DMG2IMG instead. The utility has the ability to convert DMG into both ISO and IMG, based on your needs.
Step 1. Install DMG2IMG on a Windows PC after downloading the zipped win32 binary from this website. Unzip the file and run the .exe to install the program. You can also download DMG2ISO, but DMG2IMG is the recommended software to use.

Step 2. Open Command Prompt on your PC and execute the following command to convert your DMG into ISO. Be sure to change the file names as appropriate, and include the whole file path from the main directory: dmg2img.exe c:downloadsexample.dmg c:downloadsexampleconverted.iso
Step 3. Now that your ISO file is ready, you can use the Windows ISO burning utility or a free application like FreeISOBurner to create a bootable DVD.
This DVD can be used to install macOS in virtual Windows environments with tools like Virtualbox. You can't use ISO files to install software in Mac, so if this is intended for a computer running Mac OS X or macOS, you will need to convert it back to DMG before you can install the program in question. If you're not confident that you can carry out the steps properly, then continue to Method 2.
Method 2: How to Make a Bootable DVD for Mac on Windows (DMGGeeker)
Conversion processes aren't always accurate and success rate is low for the first method. Many DVD are not able to be used to install macOS due to boot errors. Although DMG2IMG is a great tool, you may find that your resulting ISO file is corrupted and therefore useless. That means doing it all over again. Instead, you can try using DMGGeeker, which allows you to directly burn DMG to a DVD in Windows without having to convert the file. Such a disk can be used to boot a Mac computer.
DMGGeeker is an emerging star in the world of disk image file management software. It allows you to edit, add files to, delete content from, rename and do a lot more with DMG files on Windows without any conversion necessary. If you've been searching for the ideal DMG handling tool for Windows, your search has just ended. Let's see how the process works for creating a bootable media from DMG in Windows. It works with all recent versions of Windows.
Step 1Prepare for Installation
You can download it from the official site here. And then install DMGGeeker on a Windows PC.
Step 2Open DMGGeeker in Windows
Launch the application and click on the 'Burn' option. You'll see the other tools available for DMG files.
Step 3Create Bootable USB from macOS Install Image
Click 'Load DMG' to import your DMG file into the program. Insert a blank DVD and click Burn against the DVD option to write the DMG to the disk.
In three simple steps, your bootable DVD is ready. You won't find that many tools that are so easy to operate. DMGGeeker also has one of the highest burn success rates in its class, which means no wasted DVDs and no wasted time.
Summary
Create Dmg Installer Mac Os X
How to choose the rignt tool depends on what the purpose is. If you want to use a DMG file in Windows to mount a version of Mac OS X, then Method 1 will work. However, most of the time, you'll need a DMG to install an OS version on a Mac computer. In those cases, if all you have to work with is a Windows PC, DMGGeeker is the perfect application. It's simple enough for a novice yet robust enough for a professional, it contains all the tools you need to manage DMG files, and it's a life-saver if you only have a Windows PC to work with.
Create Dmg Installer For Mac Os
Dec 10, 2018 16:32:11 / Posted by Candie Kates to Mac Solution
Create Dmg Installer For Mac Catalina
Related Articles & Tips
1 note
·
View note
Text
Mac Os Sierra Bootable Usb

Bootable USB Stick for macOS X High Sierra 10.13 - Full OS Install, Reinstall, Recovery and Upgrade. If you do not have a spare USB drive, you can purchase a 32GB Sandisk drive for about $8.99 or a 5-pack of 64GB USB drives for $30 on Amazon. You can then create a bootable USB drive from the ISO. A USB flash drive or other secondary volume formatted as Mac OS Extended, with at least 14GB of available storage A downloaded installer for macOS Big Sur, Catalina, Mojave, High Sierra, or El Capitan.
Mac Os High Sierra Bootable Usb Windows 10
Macos Sierra Bootable Usb
Mac Os Sierra Bootable Usb
How To Make A Mac Os Sierra Bootable Usb
Now that Microsoft has released Windows 10 2004, otherwise known as the May 2020 Update, new ISO disk images for the operating system are available. As it is always a good idea to have a copy of the Windows 10 media in case you run into boot problems or need to reinstall, we will explain how you can download the Windows 10 2004 ISO directly from Microsoft.
Mac OS Mac OS Download Problems. What to do if the Mac OS High Sierra Download don’t download. During the download process, the massage “macOS High Sierra download has failed”. There are many problems that generates this message. If too many people try to download the software, you must wait and try to download later.
For those not familiar with an ISO image, they are sector-by-sector copies of a DVD that are stored in a disk image file. This ISO file can then be written, or burned, to another DVD to create a replica of the original, mounted as a drive letter in Windows, or extracted by a program like 7-Zip to access the files contained in it.
Below we explain how you can trick Microsoft's site into offering a Windows 10 2004 ISO rather than the Media Creation Tool.
How to download a Windows 10 2004 ISO from Microsoft
Mac Os High Sierra Bootable Usb Windows 10
The easiest way to download the Windows 10 2004 ISO is to use this link to download it from Microsoft.
Unfortunately, at some point, this link will most likely stop working. When that happens, you can use the steps below to trick Microsoft's Windows 10 download page into giving you an ISO instead of the Media Creation Tool.
Usually, when you go to Microsoft's 'Download Windows 10' page, you are only given the option to update via Windows Update or to download the Windows 10 Media Creation Tool.
Below, we will provide a method that causes Microsoft to offer an ISO image file for Windows 10 2004 instead.

To download the Windows 10 2004 ISO, follow these steps:
Go to Windows 10 download page in Chrome or the new Microsoft Edge.
Click on the Chrome menu, then More Tools, and then select Developer tools, as shown below.
Now press Ctrl + Shift + M to open the Device toolbar. This toolbar lets you force Chrome to impersonate another device such as a mobile phone or a tablet. Click on the menu that should show Responsive and select iPad or iPad Pro so that you have a larger screen to work with.
When you select one of these devices, you should see the screen resize to reflect the size of the device's screen. At this point, I suggest you change the zoom to 100%, as shown below.
Now refresh the page in the browser by pressing the F5 key. Once the page refreshes, Microsoft's site will now offer you the Windows 10 ISO instead of the Media Creation Tool. Now click on the drop-down arrow under 'Select edition' and select the 'Windows 10' option under 'Windows 10 May 2020 Update'. Once selected, click on the Confirm button.
After a few seconds, Microsoft's site will now ask you to select the language for your ISO.Select your language and press the Confirm button again.
Finally, you will be asked to either download the 32-bit or 64-bit ISO. When ready, click on one of these choices, and the respective Windows 2004 ISO image will be downloaded.
It should be noted that the above instructions work in any Chromium-based browser, not only Chrome or the new Edge.
Macos Sierra Bootable Usb
What should you do with the ISO?
Now that you have downloaded the ISO, you can use it to upgrade your existing Windows 10 operating system, perform a clean install of Windows 10 2004 to a new PC, or use it to access the recovery environment for troubleshooting.
For a clean install, you must have a Windows 10 product key available.
Before using the ISO, you will want to make sure you have a spare USB drive that you can use to create bootable Windows 10 USB media.
If you do not have a spare USB drive, you can purchase a 32GB Sandisk drive for about $8.99 or a 5-pack of 64GB USB drives for $30 on Amazon.


Mac Os Sierra Bootable Usb
You can then create a bootable USB drive from the ISO and use it to install the operating system.
For example, if you can no longer boot your computer due to a virus or wish to enter the Windows 10 Recovery Environment to remove a stubborn infection, you can boot your computer using the Windows 10 installation media to repair the computer.
It is suggested that all users create new media from the Windows 10 ISOs as new feature updates are released.
How To Make A Mac Os Sierra Bootable Usb
Related Articles:
1 note
·
View note
Text
Mac Os X Server Download

Mac Os X Server Iso
Mac Os X Lion Server Download
Apple Mac Os X Download
Download Mac Os X Free
Mac Os X Installer Download
So, you’ve decided to download an older version of Mac OS X. There are many reasons that could point you to this radical decision. To begin with, some of your apps may not be working properly (or simply crash) on newer operating systems. Also, you may have noticed your Mac’s performance went down right after the last update. Finally, if you want to run a parallel copy of Mac OS X on a virtual machine, you too will need a working installation file of an older Mac OS X. Further down we’ll explain where to get one and what problems you may face down the road.
A list of all Mac OS X versions
Download Free Mac Apps and Mac Games for Apple Mac. Designed for OS X and iOS devices, OS X Server makes it easy to share files, schedule meetings, synchronize.
Designed for OS X and iOS devices, OS X Server makes it easy to share files, schedule meetings, synchronize contacts, develop software, host your own website, publish wikis, configure Mac, iPhone, and iPad devices, remotely access your network, and more. OS X Server is an application you can add to OS X right from the Mac App Store.
The latest version of OS X Server is unknown on Mac Informer. It is a perfect match for Automation in the System Tools category. The app is developed by Apple Inc. And its user rating is 4.7 out of 5.
Apple's macOS Server (formerly called OS X Server) is specially designed for macOS and iOS powered hardware devices to easily configure iPhone, iPad, iPod touch and Mac devices, share files, sync contacts, schedule meetings, publish wikis, develop software, remotely access network, host own website and many more things in easy way. MacOS Server is the software application available for macOS.
We’ll be repeatedly referring to these Apple OS versions below, so it’s good to know the basic macOS timeline.
Cheetah 10.0Puma 10.1Jaguar 10.2Panther 10.3Tiger 10.4Leopard 10.5Snow Leopard 10.6Lion 10.7Mountain Lion 10.8Mavericks 10.9Yosemite 10.10El Capitan 10.11Sierra 10.12High Sierra 10.13Mojave 10.14Catalina 10.15
STEP 1. Prepare your Mac for installation
Given your Mac isn’t new and is filled with data, you will probably need enough free space on your Mac. This includes not just space for the OS itself but also space for other applications and your user data. One more argument is that the free space on your disk translates into virtual memory so your apps have “fuel” to operate on. The chart below tells you how much free space is needed.
Note, that it is recommended that you install OS on a clean drive. Next, you will need enough disk space available, for example, to create Recovery Partition. Here are some ideas to free up space on your drive:
Uninstall large unused apps
Empty Trash Bin and Downloads
Locate the biggest files on your computer:
Go to Finder > All My Files > Arrange by size Then you can move your space hoggers onto an external drive or a cloud storage. If you aren’t comfortable with cleaning the Mac manually, there are some nice automatic “room cleaners”. Our favorite is CleanMyMac as it’s most simple to use of all. It deletes system junk, old broken apps, and the rest of hidden junk on your drive.
Download CleanMyMac for OS 10.4 - 10.8 (free version)
Download CleanMyMac for OS 10.9 (free version)
Download CleanMyMac for OS 10.10 - 10.14 (free version)
STEP 2. Get a copy of Mac OS X download
Mac Os X Server Iso
Normally, it is assumed that updating OS is a one-way road. That’s why going back to a past Apple OS version is problematic. The main challenge is to download the OS installation file itself, because your Mac may already be running a newer version. If you succeed in downloading the OS installation, your next step is to create a bootable USB or DVD and then reinstall the OS on your computer.
How to download older Mac OS X versions via the App Store
If you once had purchased an old version of Mac OS X from the App Store, open it and go to the Purchased tab. There you’ll find all the installers you can download. However, it doesn’t always work that way. The purchased section lists only those operating systems that you had downloaded in the past. But here is the path to check it:
Click the App Store icon.
Click Purchases in the top menu.
Scroll down to find the preferred OS X version.
Click Download.
This method allows you to download Mavericks and Yosemite by logging with your Apple ID — only if you previously downloaded them from the Mac App Store.
Without App Store: Download Mac OS version as Apple Developer
If you are signed with an Apple Developer account, you can get access to products that are no longer listed on the App Store. If you desperately need a lower OS X version build, consider creating a new Developer account among other options. The membership cost is $99/year and provides a bunch of perks unavailable to ordinary users.
Nevertheless, keep in mind that if you visit developer.apple.com/downloads, you can only find 10.3-10.6 OS X operating systems there. Newer versions are not available because starting Mac OS X Snow Leopard 10.7, the App Store has become the only source of updating Apple OS versions.
Purchase an older version of Mac operating system
You can purchase a boxed or email version of past Mac OS X directly from Apple. Both will cost you around $20. For the reason of being rather antiquated, Snow Leopard and earlier Apple versions can only be installed from DVD.
Buy a boxed edition of Snow Leopard 10.6 Get an email copy of Lion 10.7 Get an email copy of Mountain Lion 10.8
The email edition comes with a special download code you can use for the Mac App Store. Note, that to install the Lion or Mountain Lion, your Mac needs to be running Snow Leopard so you can install the newer OS on top of it.
How to get macOS El Capitan download
If you are wondering if you can run El Capitan on an older Mac, rejoice as it’s possible too. But before your Mac can run El Capitan it has to be updated to OS X 10.6.8. So, here are main steps you should take:
1. Install Snow Leopard from install DVD. 2. Update to 10.6.8 using Software Update. 3. Download El Capitan here.
“I can’t download an old version of Mac OS X”
If you have a newer Mac, there is no physical option to install Mac OS versions older than your current Mac model. For instance, if your MacBook was released in 2014, don’t expect it to run any OS released prior of that time, because older Apple OS versions simply do not include hardware drivers for your Mac.
But as it often happens, workarounds are possible. There is still a chance to download the installation file if you have an access to a Mac (or virtual machine) running that operating system. For example, to get an installer for Lion, you may ask a friend who has Lion-operated Mac or, once again, set up a virtual machine running Lion. Then you will need to prepare an external drive to download the installation file using OS X Utilities.

After you’ve completed the download, the installer should launch automatically, but you can click Cancel and copy the file you need. Below is the detailed instruction how to do it.
STEP 3. Install older OS X onto an external drive
The following method allows you to download Mac OS X Lion, Mountain Lion, and Mavericks.
Start your Mac holding down Command + R.
Prepare a clean external drive (at least 10 GB of storage).
Within OS X Utilities, choose Reinstall OS X.
Select external drive as a source.
Enter your Apple ID.
Now the OS should start downloading automatically onto the external drive. After the download is complete, your Mac will prompt you to do a restart, but at this point, you should completely shut it down. Now that the installation file is “captured” onto your external drive, you can reinstall the OS, this time running the file on your Mac.
Boot your Mac from your standard drive.
Connect the external drive.
Go to external drive > OS X Install Data.
Locate InstallESD.dmg disk image file — this is the file you need to reinstall Lion OS X. The same steps are valid for Mountain Lion and Mavericks.
How to downgrade a Mac running later macOS versions

If your Mac runs macOS Sierra 10.12 or macOS High Sierra 10.13, it is possible to revert it to the previous system if you are not satisfied with the experience. You can do it either with Time Machine or by creating a bootable USB or external drive. Instruction to downgrade from macOS Sierra
Instruction to downgrade from macOS High Sierra
Instruction to downgrade from macOS Mojave
Instruction to downgrade from macOS Catalina
Before you do it, the best advice is to back your Mac up so your most important files stay intact. In addition to that, it makes sense to clean up your Mac from old system junk files and application leftovers. The easiest way to do it is to run CleanMyMac X on your machine (download it for free here).
Visit your local Apple Store to download older OS X version
If none of the options to get older OS X worked, pay a visit to nearest local Apple Store. They should have image installations going back to OS Leopard and earlier. You can also ask their assistance to create a bootable USB drive with the installation file. So here you are. We hope this article has helped you to download an old version of Mac OS X. Below are a few more links you may find interesting.
These might also interest you:
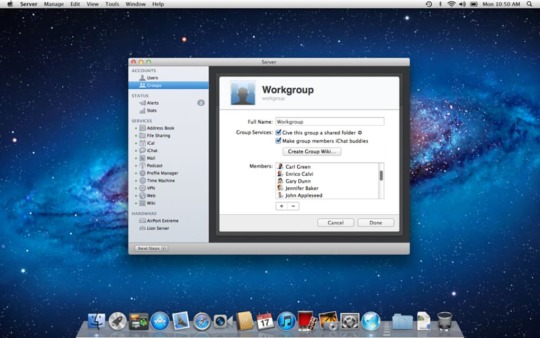
OS X Server 5.1.7
Designed for OS X and iOS devices, OS X Server makes it easy to share files, schedule meetings, synchronize contacts, develop software, host your own website, publish wikis, configure Mac, iPhone, and iPad devices, remotely access your network, and more. OS X Server is an application you can add to OS X right from the Mac App Store. Anyone can quickly and easily turn a Mac into a server that’s perfect for home offices, businesses, schools, developers, and hobbyists alike.
Here’s what you’ll get with OS X Server:
File Sharing
File sharing for Mac, PC, iPhone and iPad
Standards-based SMB, AFP, and WebDAV file services
Flexible file permissions
Spotlight searching
Profile Manager
Mobile device management for Mac and iOS devices
Simplified management and deployment of iOS and OS X.
Distribution of institution licensed apps and books purchased from the Volume Purchase Program to users or devices
Install Software Updates on devices running iOS 9 and OS X El Capitan
Device Enrollment Program integration
Web-based administration console
Self-service user portal for clearing passcodes, remote lock, and remote wipe
Caching Server
Speed up the download of software distributed by Apple
Locally cache apps, books, iTunes U, software updates, and OS X Recovery images
Accelerate the download of iCloud data, including documents in iCloud Drive and photos.
Fault-tolerant design with multiserver cache replication and load balancing
No client configuration required
Xcode Server

Use Xcode to create continuous integration bots that build, analyze, and test on any Mac running OS X Server
Configure bots to integrate at a specific time, or continually as code is committed to the repository
Automate testing of OS X and iOS apps, executing on multiple connected iOS devices
Host your own Git repositories on OS X Server or connect to remote Git or Subversion hosts
Remotely access detailed integration summaries and nightly builds using the Web interface
Time Machine
Provide a backup destination for Mac computers on your network
Monitor which computers have backed up, when they last backed up, and size of backup
Set limits on the amount of Time Machine storage a user can use
Calendar Server
Share calendars, schedule meetings and events, and book conference rooms
Standards-based CalDAV server for access from Mac, iPad, iPhone, and PC
View availability with free/busy lookups
Email invitations and push notifications
Contacts Server
Mac Os X Lion Server Download
Synchronize contacts with Mac, iPad, and iPhone
Allow multiple users to access and update contacts
Standards-based CardDAV server
Wiki Server
Point-and-click page edit to change formatting and insert images, movies, and attachments
Access controls
Tags and comments
Revision history
Document sharing
Quick Look previews
Apple Mac Os X Download
Mail Server
Standards-based SMTP, IMAP, and POP server
Push notifications
SSL encryption
Adaptive junk mail filtering
Virus detection and quarantine
Virtual Private Network
Remote access for your network services
Encrypted VPN connections for Mac, iPad, iPhone, and PC
Xsan 4
Block-level SAN file sharing with concurrent read/write access
Xsan volume hosting and configuration
Volume management, storage pooling, stripping, and volume mapping
Real-time monitoring, graphs, and event notifications
Metadata controller failover and file system journaling
Server App
Local and remote management
Users and group settings
View real-time graphs of server usage
Receive alerts on network changes, certificate expiration, storage usage, and more
Version 5.1.7:
Fixed an issue affecting Server installations configured with a third-party SSL certificate that prevented MDM enrollment using DEP
SCREENSHOTS
Download Mac Os X Free
Title: OS X Server 5.1.7
Developer: Apple Inc.
Compatibility: OS X 10.11.4 or later
Language: English, Dutch, French, German, Italian, Japanese, Korean, Simplified Chinese, Spanish, Traditional Chinese
Includes: Pre-K'ed
Size: 158.36 MB
View in Mac App Store
Mac Os X Installer Download
NitroFlare:
1 note
·
View note
Text
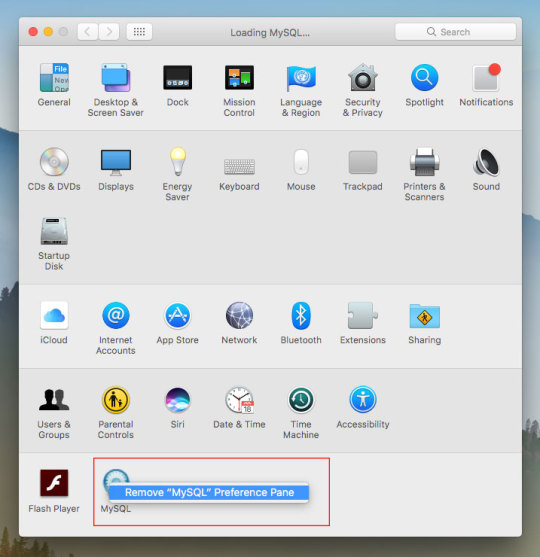
Mysql Download For Mac Mojave

Mysql Workbench Download For Mac
Mysql Install Mac Mojave
I am more of a command line user when accessing MySQL, but MySQLWorkBench is by far a great tool. However, I am not a fan of installing a database on my local machine and prefer to use an old computer on my network to handle that. If you have an old Mac or PC, wipe it and install Linux Server command line only software on it. Machines as old as 10/15 years and older can support Linux easily. You don't even need that much RAM either but I'd got with minimum of 4GB for MySQL.
The Mojave installer app will be in your Applications folder, so you can go there and launch it later to upgrade your Mac to the new operating system. Make a bootable installer drive: The quick way. Sep 27, 2018 So before you download and install macOS 10.14 Mojave, make sure your Mac is backed up. For information on how to do this, head over to our ultimate guide to backing up your Mac. How to download.
Apr 24, 2020 Download macOS Mojave For the strongest security and latest features, find out whether you can upgrade to macOS Catalina, the latest version of the Mac operating system. If you still need macOS Mojave, use this App Store link: Get macOS Mojave.
Oct 08, 2018 Steps to Install MySQL Workbench 8.0 on Mac OS X Mojave Step 1. Download the Installer. Follow this link to download the latest version of MySQL Workbench 8.0 for Mac. When I write this article, the Workbench version 8.0.12 is available. Save the file to your download directory.
Or...
Use Virtualbox by Oracle to create a virtual server on your local machine. I recommend Centos 7 or Ubuntu 18.04. The latter I used to use exclusively but it has too many updates every other week, whereas Centos 7 updates less often and is as secure regardless. But you will need to learn about firewalls, and securing SSH because SSH is how you will access the virtual machine for maintenance. You will have to learn how to add/delete users, how to use sudo so you can perform root based commands etc. There is a lot more to the picture than meets the eye when you want to use a database.
I strongly recommend not installing MySQL on your local machine but use a Virtual Machine or an old machine that you can connect to on your local area network. It will give you a better understanding of security when you have to deal with a firewall and it is always a good practice to never have a database on the same server/computer as your project. Databases are for the backend where access is secure and severely limited to just one machine via ssh-keys or machine id. If you don't have the key or ID you ain't getting access to the DB.
There are plenty of tutorials online that will show you how to do this. If you have the passion to learn it will come easy.
Posted on
Apple released every update for macOS, whether major or minor, via Mac App Store. Digital delivery to users makes it easy to download and update, however, it is not convenient in certain scenarios. Some users might need to keep a physical copy of macOS due to slow Internet connectivity. Others might need to create a physical copy to format their Mac and perform a clean install. Specially with the upcoming releasee of macOS Mojave, it is important to know how the full installer can be downloaded.
We have already covered different methods before which let you create a bootable USB installer for macOS. The first method was via a terminal, while the second method involved the usage of some third-party apps, that make the whole process simple. However, in that guide, we mentioned that the installer has to be downloaded from the Mac App Store. The installer files can be used after download, by cancelling the installation wizard for macOS. However, for some users, this might not be the complete download. Many users report that they receive installation files which are just a few MB in size.
Luckily, there is a tool called macOS Mojave Patcher. While this tool has been developed to help users run macOS Mojave/macOS 10.14 on unsupported Macs, it has a brilliant little feature that lets you download the full macOS Mojave dmg installer too. Because Mojave will only download on supported Macs, this tool lets users download it using a supported Mac, created a bootable USB installer and install it on an unsupported Mac. Here is how you can use this app.
Download macOS Mojave installer using macOS Mojave Patcher

Download the app from here. (Always use the latest version from this link.)
Opening it might show a warning dialogue. You’ll have to go to System Preferences > Security & Privacy to allow the app to run.Click Open Anyway in Security & Privacy.
Once you are able to open the app, you’ll get a message that your machine is natively supported. Click ok.
Go to Tools> Download macOS Mojave, to start the download. The app will ask you where you want to save the installer file. Note that the files are downloaded directly from Apple, so you wouldn’t have to worry about them being corrupted.The download will be around 6GB+ so make sure that you have enough space on your Mac.Once the download starts, the app will show you a progress bar. This might take a while, depending on your Internet connection speed.
Mysql Workbench Download For Mac
Once the download is complete, you can use this installer file to create a bootable USB.
Mysql Install Mac Mojave
P.S. if you just want to download a combo update for Mojave, they are available as small installers from Apple and can be downloaded here.
1 note
·
View note
Text
Boot Disk For Mac

Use an Existing Virtual Hard Disk Create Bootable USB for Mac on Windows 10. When the Virtual Machine is created, you need to apply some settings in order to boot mac normally. Open the settings of created Virtual Machine, visit the system tab uncheck the floppy disk. This time visits the process tab and increases the process from 1 to. How to create a bootable macOS High Sierra installer drive Put the macOS High Sierra installer on an external USB thumb drive or hard drive and use it to install the operating system on a Mac. How to create a bootable macOS Catalina installer drive Put the macOS Catalina installer on an external USB thumb drive or hard drive and use it to install the operating system on a Mac.
Boot Disk For Mac Os
Mac Os X Startup Disk
Active Boot Disk For Mac
These advanced steps are primarily for system administrators and others who are familiar with the command line. You don't need a bootable installer to upgrade macOS or reinstall macOS, but it can be useful when you want to install on multiple computers without downloading the installer each time.
In Windows on your Mac, click in the right side of the taskbar, click the Boot Camp icon, then choose Boot Camp Control Panel. If a User Account Control dialog appears, click Yes. Select the startup disk that has the default operating system you want to use. If you want to start up using the default operating system now, click Restart.
Download macOS
Find the appropriate download link in the upgrade instructions for each macOS version:
macOS Catalina, macOS Mojave, ormacOS High Sierra Installers for each of these macOS versions download directly to your Applications folder as an app named Install macOS Catalina, Install macOS Mojave, or Install macOS High Sierra. If the installer opens after downloading, quit it without continuing installation. Important: To get the correct installer, download from a Mac that is using macOS Sierra 10.12.5 or later, or El Capitan 10.11.6. Enterprise administrators, please download from Apple, not a locally hosted software-update server.

OS X El Capitan El Capitan downloads as a disk image. On a Mac that is compatible with El Capitan, open the disk image and run the installer within, named InstallMacOSX.pkg. It installs an app named Install OS X El Capitan into your Applications folder. You will create the bootable installer from this app, not from the disk image or .pkg installer.
Boot Disk For Mac Os
Use the 'createinstallmedia' command in Terminal
Mac Os X Startup Disk
Connect the USB flash drive or other volume that you're using for the bootable installer. Make sure that it has at least 12GB of available storage and is formatted as Mac OS Extended.
Open Terminal, which is in the Utilities folder of your Applications folder.
Type or paste one of the following commands in Terminal. These assume that the installer is still in your Applications folder, and MyVolume is the name of the USB flash drive or other volume you're using. If it has a different name, replace MyVolume in these commands with the name of your volume. Catalina:* Mojave:* High Sierra:* El Capitan:
Press Return after typing the command.
When prompted, type your administrator password and press Return again. Terminal doesn't show any characters as you type your password.
When prompted, type Y to confirm that you want to erase the volume, then press Return. Terminal shows the progress as the bootable installer is created.
When Terminal says that it's done, the volume will have the same name as the installer you downloaded, such as Install macOS Catalina. You can now quit Terminal and eject the volume.
* If your Mac is using macOS Sierra or earlier, include the --applicationpath argument, similar to the way this argument is used in the command for El Capitan.

Use the bootable installer
Active Boot Disk For Mac


After creating the bootable installer, follow these steps to use it:
Plug the bootable installer into a compatible Mac.
Use Startup Manager or Startup Disk preferences to select the bootable installer as the startup disk, then start up from it. Your Mac will start up to macOS Recovery. Learn about selecting a startup disk, including what to do if your Mac doesn't start up from it.
Choose your language, if prompted.
A bootable installer doesn't download macOS from the Internet, but it does require the Internet to get information specific to your Mac model, such as firmware updates. If you need to connect to a Wi-Fi network, use the Wi-Fi menu in the menu bar.
Select Install macOS (or Install OS X) from the Utilities window, then click Continue and follow the onscreen instructions.
Learn more
For more information about the createinstallmedia command and the arguments that you can use with it, make sure that the macOS installer is in your Applications folder, then enter this path in Terminal:
Catalina:
Mojave:
High Sierra:
El Capitan:
With a bootable Ubuntu USB stick, you can:
Install or upgrade Ubuntu, even on a Mac
Test out the Ubuntu desktop experience without touching your PC configuration
Boot into Ubuntu on a borrowed machine or from an internet cafe
Use tools installed by default on the USB stick to repair or fix a broken configuration
Creating a bootable USB stick is very simple, especially if you’re going to use the USB stick with a generic Windows or Linux PC. We’re going to cover the process in the next few steps.
Apple hardware considerations
There are a few additional considerations when booting the USB stick on Apple hardware. This is because Apple’s ‘Startup Manager’, summoned by holding the Option/alt (⌥) key when booting, won’t detect the USB stick without a specific partition table and layout. We’ll cover this in a later step.
Boot Disk For Mac
1 note
·
View note
Text
Create Bootable Usb On Mac For Ubuntu

Create Bootable Usb Mac Os
Create Bootable Usb For Ubuntu On Mac
Rufus- Open source USB bootable creator. I just cannot ignore Rufus when we talk about the.
The steps to create a bootable USB drive on Mac are very simple when using this powerful utility. Once the software has been downloaded and installed on your Mac, simply insert the drive into an available USB port. When you launch the application, you will see that your drive has automatically been identified.
Create Bootable Usb Mac Os


How to create a bootable MacOS USB. From Linux you can read and write Apple-compatible HFS+ disk images. By creating an El Capitan recovery disc, you can then create an installation disc, and then access the App Store for other free installers, such as Catalina and Mojave.
With a bootable Ubuntu USB stick, you can:
Install or upgrade Ubuntu
Test out the Ubuntu desktop experience without touching your PC configuration
Boot into Ubuntu on a borrowed machine or from an internet cafe
Use tools installed by default on the USB stick to repair or fix a broken configuration
Creating a bootable Ubuntu USB stick from Microsoft Windows is very simple and we’re going to cover the process in the next few steps.

Create Bootable Usb For Ubuntu On Mac
Alternatively, we also have tutorials to help you create a bootable USB stick from both Ubuntu and Apple macOS.
Create Bootable Usb On Mac For Ubuntu
1 note
·
View note
Text
Uubyte iso editor serial key

#Uubyte iso editor serial key install
#Uubyte iso editor serial key windows 10
#Uubyte iso editor serial key iso
#Uubyte iso editor serial key download
# The program didn't complain and stuffed everything onto USB 1,
#Uubyte iso editor serial key iso
# I used balena Etcher and flashed the Windows ISO to USB 1. I did the following - reference for others: # Get disk number of the USB drivesĭiskutil eraseDisk MS-DOS WIN10_USB1 MBR diskX I was about to go insane last night, but finally found your post about using two USB sticks during the install, and it worked out of the box like a regular USB install.
#Uubyte iso editor serial key install
The PC was able to boot from the FAT32 USB and it found the install.wim file (and whatever else it needed) from the exFAT USB without any additional voodoo, and completed the install successfully. It seems not to matter that some materials will appear on both USBs.
Copy everything from the ISO onto the exFAT USB.
On the same USB, create a folder called “sources”, and copy into it the one file “boot.wim” from the “sources” folder in the ISO.
Copy everything EXCEPT “sources” folder onto FAT32 USB (drag and drop).
First >2GB, FAT32, Master Boot Record (MBR).
Get TWO usb sticks, and format using macOS Disk Utility.
#Uubyte iso editor serial key windows 10
The task: make a Windows 10 installer USB for a new PC, when I only have a Mac (running macOS Catalina).
#Uubyte iso editor serial key download
This is definitely a roundabout way and takes a bit of time (up to 2 hours to download the ISO, installing Windows on Mac using Boot Camp, Windows 10 Media Creation, and Windows 10 PC install) but it works.Īfter going through all the above headaches, and the sledgehammer-nut issues and the worry of security risks, I found a straightforward solution adapted from a post by "cerberus" on this forum/thread. Simply go through the process of installing Windows, go to the Microsoft Windows 10 page on your Windows partition and follow the instructions for creating a bootable flash drive (using the Windows 10 Media Creation Tool), and then use that USB to complete the Windows 10 install on your PC. I tried multiple solutions (deleting partitions, copying the install files to a new partition, lots of diskpart work, etc.) to no avail.Īs a backup solution (and what worked for me): you can always create a working USB by installing Windows onto your mac using the Boot Camp Assistant tool referencing the same iso downloaded from Microsoft. Booting up the windows installer from the USB was successful, but at the end of the installation I hit the "Windows could not prepare the computer to boot into the next phase of installation" error. This process did not work for me for whatever reason. Thank you to everyone's help on this thread. # UEFI in front of the name, and the other without. #Depending on how new your computer is, you may see the USB twice: once with # boot device menu (you may need to press some key to show the boot device menu # Now insert the USB into your computer, (re)boot, and select the USB from the # Eject the ISO using the diskX identifier from the fifth step above: # Eject the USB using the diskX identifier from the second step above: # the directory means the ISO is "in use"): # directory otherwise OSX will not allow you to unmount the ISO (since being in # Once it's done, you can eject both the USB and the ISO. # This will take a while there's a lot of data (4+ GB). # And copy all the files over to our USB: # will differ depending on which ISO you downloaded. You should see something funny like CCCOMA_X64FRE_EN-US_DV9. This time, we're looking for what's in the NAME # Back in the terminal, let's find the mounted ISO: Close the Finder window you don't need it. # Your Mac will "mount" the ISO as if it was a drive. # Record, which is necessary for the USB to be bootable. MBR tells diskutil to create a Master Boot WIN10 is the name of that partition (it'll appear in # In the command above, MS-DOS is the format of the partition that will be # WARNING: this will delete everything on the USB!!ĭiskutil eraseDisk MS-DOS WIN10 MBR diskX # In the command below, replace "diskX" with the identifier of your USB drive. # Now we need to format the drive for MS-DOS and include a Master Boot Record. Now, insert your USB drive and run the command Each entry will have a header in the form "/dev/diskX", where X is # This will output a bunch of info about all of the disk drives connected to
0 notes
Text
Diskmaker x mojave

#DISKMAKER X MOJAVE HOW TO#
#DISKMAKER X MOJAVE MAC OS X#
#DISKMAKER X MOJAVE UPDATE#
System is a late 2015 iMac 27" Did Apple Change the OS install? I've never been asked about keyboard / mouse prior to the 10.14.1 installer, nor has the USB installer ever had issues with the magic mouse.
#DISKMAKER X MOJAVE MAC OS X#
I haven't tried making a disk from version 8.0.1. Create a bootable install usb mac os x mojave 10. I used a clean 8GB SanDisk USB stick, and a fresh download of the Mojave install app. As mentioned above, DiskMaker X is a free app. Step 2: Next step is to download and install DiskMaker X app.
#DISKMAKER X MOJAVE HOW TO#
The download size is about 5.2 GB and can be downloaded by following the instructions in our how to download OS X Yosemite guide.
#DISKMAKER X MOJAVE UPDATE#
Also the restore partition seems to remember the setup, so I haven't been asked again if I have to use it again. If you really want to do a clean install, as you indicated in the other thread you posted on this topic ( Security of High Sierra with Latest 2019-003 update vs Mojave 10.14.5), your best bet is to do what Sly says, download from Apple, then cancel out of the installation and look in the Applications folder for the installer. Step 1: First step is to download OS X Yosemite installation file. Oddly enough the Restore partition on the hard drive brought up the same assistant, but was able to link with the mouse just fine. Leave A Response DiskMaker X for macOS 10.13. DiskMaker X is a tool that provides you with everything you need to create a bootable disc for OS X in a. DiskMaker X 8.0.1 for macOS 10.14 Mojave available now On November 13, 2018, in Blog, by Guillaume Gte 1 Comments. Drag and drop or copy and paste Siri results into your documents. catalina installer using diskmaker order to create this you will need to be running macos mojave. 7/10 (12 votes) - Download DiskMaker X Mac Free. Send messages, create reminders, search the web, and more while you work. Enjoy your favorite features from iOS as well as new ones optimized for Mac. On the USB stick, the system was never able to link with the magic mouse, even though it was on, and pressing the button / holding the button didn't seem to work. Get things done by asking Siri, the intelligent assistant now on your Mac. I have the Magic Mouse 2, and Apple Aluminum USB keyboard with the hub. While the process completed correctly, the issues came up after booting from the USB drive.Īpparently as of 10.14.1, the wireless Mouse / Keyboard assistant pops up. Tools App - DiskMaker X is a tool that provides you with everything you need to create a bootable disc for OS X in a few clicks if youre running version. I had an unusual issue when using DiskMakerX version 8 to create a Mojave install disk.
0 notes
Text
How to make a bootable mac usb flash drive from windows

#HOW TO MAKE A BOOTABLE MAC USB FLASH DRIVE FROM WINDOWS HOW TO#
#HOW TO MAKE A BOOTABLE MAC USB FLASH DRIVE FROM WINDOWS INSTALL#
#HOW TO MAKE A BOOTABLE MAC USB FLASH DRIVE FROM WINDOWS HOW TO#
I hope I can show you some examples of how to configure the EFI using Open core. Wait until the process is completed.Īfter this process completes, you are ready to configure the EFI folder. Press Enter and then it will start copying files to our USB drive. Next, we need to provide the path for the macOS recovery file we downloaded on step 1.Ĭlick Copy path as shown above and then paste in the command line Now confirm it by typing Y and press enter
#HOW TO MAKE A BOOTABLE MAC USB FLASH DRIVE FROM WINDOWS INSTALL#
This will also install OpenCore on the USB drive. Boot Camp Assistant can be used to install Windows on a Mac and create a bootable USB installer drive, eliminating the need for any lengthy Terminal commands or third-party apps. Don’t forget to change the number based on your USB drive number shown on the makeinstall window. Create Windows 11 Bootable Disk Using Boot Camp (Intel Macs) The first method involves using Boot Camp on Intel Macs. In this case, my Sony USB drive is shown with a number 3. In the following window, make sure you see your USB drive. Now, right-click the file “MakeInstall.bat” and choose Run as Administrator. For those curious, its possible to use a Mac to create. And then open the gibMacOS folder once again. Besides an empty 8GB USB drive and a Windows PC, youll need to set aside about 30 minutes, maybe longer, depending on your internet speed. Plug your USB drive to one of your USB ports. Here browse to select your DMG file from the computer directory, mention the USB drive to store the burnt image, and finally click 'Burn' option to start the process. OK so the second step of this project is completed. In this screen, Insert your USB to any free USB port and wait till the device is recognized. This will download the macOS Catalina 10.15.4 to the gibMacOS folder.Īfter the download process is completed, you will see new folder called macOS Download under the gibMacOS folder To proceed, simply type 5 and then press Enter. Now we are going to choose the macOS Catalina Full Install from the list. Type R and then press Enter to enable the Recovery option only.
0 notes
Text
Gimp for mac os high sierra

#Gimp for mac os high sierra how to
#Gimp for mac os high sierra mac os
#Gimp for mac os high sierra apk
#Gimp for mac os high sierra install
#Gimp for mac os high sierra update
These magnet/torrent download links are easy to use if you have a good BitTorrent client. APPLIES TO: 2013 2016 2019 SharePoint Online If you want to remove the metadata of an item from the search index or from the search results, you remove. Delete items from the search index or from search results in SharePoint Server.
#Gimp for mac os high sierra how to
How to remove how to remove xf-accm2015.dmg. You can now quit Terminal and eject the volume.
#Gimp for mac os high sierra install
When Terminal says that it's done, the volume will have the same name as the installer you downloaded, such as Install macOS Catalina.
Terminal shows the progress as the bootable installer is created.
When prompted, type Y to confirm that you want to erase the volume, then press Return.
Terminal doesn't show any characters as you type your password.
When prompted, type your administrator password and press Return again.
If it has a different name, replace MyVolume in these commands with the name of your volume. These assume that the installer is still in your Applications folder, and MyVolume is the name of the USB flash drive or other volume you're using.
Type or paste one of the following commands in Terminal.
Open Terminal, which is in the Utilities folder of your Applications folder.
#Gimp for mac os high sierra mac os
Make sure that it has at least 12GB of available storage and is formatted as Mac OS Extended. Connect the USB flash drive or other volume that you're using for the bootable installer.Use the 'createinstallmedia' command in Terminal It installs an app named Install OS X El Capitan into your Applications folder. Open this file and follow the onscreen instructions. OS X El Capitan downloads as a disk image that contains a file named InstallMacOSX.pkg.It installs an app named Install macOS Sierra into your Applications folder. macOS Sierra downloads as a disk image that contains a file named InstallOS.pkg.Enterprise administrators, please download from Apple, not a locally hosted software-update server. To get the required installer, download from a Mac that is using macOS Sierra 10.12.5 or later, or El Capitan 10.11.6. If the installer opens after downloading, quit it without continuing installation. macOS Catalina, macOS Mojave, and macOS High Sierra download directly to your Applications folder as an app named Install macOS Catalina, Install macOS Mojave, or Install macOS High Sierra.
#Gimp for mac os high sierra apk
Up to date 2019 Checklist How to Repair Apex Legends Engine Error 0x887A0006 Working Gimp lnkscape Apk How tó Install Gimp lnkscape on Android report this advertisement report this ad.Find the appropriate download link in the upgrade instructions for each macOS version: Popular Articles How to Delete a Web page in OpenOffice in 8 Various Methods How to make use of Shadowsocks Proxy customer on Google android Free of charge How to Shutdown Home windows Server 2012 Easy to Stick to Guidebook How to Repair Magisk Install Mistake 1 in TWRP Recovery Is certainly safe Virus check report, Fraud Adviser reviews Install Home windows 10 on Android using Limbo Emulator No Main How To Select A Personal computer Case. Required fields are proclaimed Opinion: Title: Email Tackle: Website: Save my name, email, and site in this web browser for the following period I comment. Also Look over: Fix Apex Legends Engine Mistake 0x887A0006 Associated Posts. Now, Launch the Virtual device and then Develop a brand-new machine.Īnd then do the pursuing configurations: Title: macOS 10.13 High Sierra Type: Mac pc OS Back button Version: macOS 10.13 or 10.12 Memory space dimension: 3GB to 6GM ( 65 of your Ram memory) Virtual cd disk document: macOS higher Sierra 10.13.vmdk And today, you have to choose Use an exsting digital hard disc document and Open macOS high Sierra 10.13.vmdk File. How to download MacOS high Sierra If you are usually a Mac user then you can conveniently download the iso installer (dmg document) from the recognized web site of apple.Īds If you are usually not a Mac pc user or you are a home windows user (and would like to set up Sierra in VirtuaIBox, Vmware or ány various other virtual device) then you can download the document from the below link: Download MacOS Great Sierra (from apple web site) How to install MacOS Large Sierra on Virtual Device Initial of all, download and set up VirtualBox or Vmwaré on your computer (Windows or any various other) And after that down load the MacOS higher sierra.Īnd so you require to extract it by using WinRAR or any other tool. It provides improved the dependability of the Microsoft Exchange information sync.
#Gimp for mac os high sierra update
Superduper! High Sierra Update Your Older
Superduper! High Sierra Update Your Older.
0 notes
Text
How to install mac os x 10.0 on computer

HOW TO INSTALL MAC OS X 10.0 ON COMPUTER INSTALL
HOW TO INSTALL MAC OS X 10.0 ON COMPUTER UPDATE
HOW TO INSTALL MAC OS X 10.0 ON COMPUTER UPGRADE
HOW TO INSTALL MAC OS X 10.0 ON COMPUTER SOFTWARE
HOW TO INSTALL MAC OS X 10.0 ON COMPUTER PASSWORD
If an operating system doesn’t solve some of your tasks, let Setapp cover the needs. If not, you can downgrade anytime to continue your journey with Mojave.
HOW TO INSTALL MAC OS X 10.0 ON COMPUTER UPGRADE
Hopefully, Catalina is worth an upgrade for you. Beta users can report bugs through Apple’s in-built Feedback Assistant app. Once you notice imperfections, help to fix them.
If iCloud doesn’t work properly: Try to close and reopen a document, or download files manually if iCloud Drive fails to load them.
HOW TO INSTALL MAC OS X 10.0 ON COMPUTER SOFTWARE
So if some of your software doesn’t work on the new macOS because of 32-bit architecture, look for alternatives. If an app doesn’t open: Hope you remember, 32-bit apps are dead in Catalina.If you have issues with Sidecar: Ensure your iPad runs on the new iPadOS beta.There are a couple of things you can fix, though: Just like any other macOS beta, Catalina can slow down your Mac, freeze, or hinder the work of some apps.
HOW TO INSTALL MAC OS X 10.0 ON COMPUTER INSTALL
Go through the installation if you want to put beta on your current Mac, or quit to create a bootable USB install drive first.
Click Upgrade now to download the installer.
HOW TO INSTALL MAC OS X 10.0 ON COMPUTER UPDATE
You’ll find the public beta update under Software Update (macOS Catalina beta).
Navigate to Enroll your Mac section and click on “Download the macOS Public Beta Access Utility.”.
Once there, it takes a couple of steps to upgrade: Therefore, you might want to wait for Apple to make it public.Īrriving in July, a public beta of Catalina is available at /sp/betaprogram/. To get your hands on Catalina with a developer account, you have to pay a yearly fee of $99. Download and install Catalina Public BetaĪ developer beta opens up an early access to all the features. So we recommend to make use of CleanMyMac X smart scanning before you upgrade. If you decide to go with a regular install, note that all the clutter from your disk will be transferred to the new operating system.
When installing macOS Catalina, choose your new disk as the install location.
Erase your startup disk with Disk Utility and boot from the new one.
On the disk, create a bootable installer.
Connect a clean and reformatted external hard drive or a USB stick.
Create a safe bootable backup of your disk with Get Backup Pro.
Just make sure you don’t lose anything in the shuffle: Risky as it sounds, a clean install enables a healthier life for your macOS. In contrast to a regular install which puts macOS on top of your startup disk content, a clean installation cleans everything up. If you’re determined to give your Mac a new life, run a clean install of Catalina. Click the plus button to split your disk, name your partition, and customize the size if needed. Your disk will be the first on the list under “Internal.” Select the disc and navigate to Partition tab. To install Catalina on a partition, go to Applications > Utilities > Disk Utility. Basically, it allows to split your disk into two parts, so that your computer can run two operating systems at the same time. If you’re not ready to give up Mojave just yet, you can install Catalina on a partition.
HOW TO INSTALL MAC OS X 10.0 ON COMPUTER PASSWORD
If required, verify the account by entering your system password or with Touch ID.Open the PKG file and agree to the installation.Find and launch the installer in your Downloads folder.Go to and click Account in the top menu bar.How to install a developer beta of macOS Catalinaĭownloading and installing macOS Catalina developer beta is an easy deal if you have a Developer account. From redundant apps to caches and leftovers, you can remove any unnecessary items with CleanMyMac X. Even if you have enough, running a cleanup is a nice way to start a clutter-free life in Catalina. You need to free up some space for your new macOS. You can use Apple’s in-built Time Machine or more advanced tools like Get Backup Pro if you want a bootable backup. To keep your data safe, create a backup before upgrading. Remember though, that a new macOS means a new start-wiping away the past. When we’re too excited, we tend to rush things. CleanMyMac X will help you quickly filter applications by 32-bit and get rid of them: Once you install macOS 10.15, you’ll be warned about 32-bit apps not working on your Mac any longer. In Catalina, you’ll have to limit your Mac to 64-bit applications only. Mojave was the first macOS to stop admitting 32-bit apps to the App Store and the last to support them. Sometimes the reason why you can’t upgrade lies on the surface: It’s not too different from what we had last year, but take a look anyway. As usual, there’s a limited number of Apple devices that support macOS 10.15. Your to-do list for the upcoming upgrade:Įnsure your device is compatible. Try free ✕ A few things before you switch to Catalina
0 notes
Text
Convert iso to bootable usb mac os disk utility

CONVERT ISO TO BOOTABLE USB MAC OS DISK UTILITY HOW TO
CONVERT ISO TO BOOTABLE USB MAC OS DISK UTILITY FOR MAC OS X
CONVERT ISO TO BOOTABLE USB MAC OS DISK UTILITY MAC OS X
PowerISO will show the progress information during conversion.Īfter the dmg file has been converted successfully, you should receive a message, 'Converting image file completes successfully'.Ĭopyright 2004-2020 Power Software Ltd. To convert it to iso file, please follow the steps,Ĭhoose the source DMG file you want to convert.Ĭlick 'OK' button to start converting dmg file to iso. You can open dmg file, convert it to iso file, or burn it to a CD / DVD disc. On Windows PC, it is very convenient to manipulate dmg files with PowerISO. Most of Mac operating systems and applications are distributed in dmg files. You are here: Tutorials > Convert DMG to ISOĭmg file is the disc image file which is widely used by Mac systems. In earlier times, all you needed to do was to convert that InstallESD.dmg into an ISO and you could install OS X in VMWare from s. For some reason, Apple decided that the InstallESD.dmg that comes with the Mavericks Install as downloaded from the App Store shouldnt be a bootable DVD image anymore. How to create a Bootable MacOS Catalina.ISO image on a Mac? Step 1: Download MacOS Catalina.app from App Store into Applications. MacOS Catalina.ISO is needed for installing Catalina into a virtual machine using VMWare and Virtual box and other purposes. This quick instruction will help any-one to make a Bootable MacOS Catalina Installer.ISO and.DMG images in MacOS and Windows. If we explain what is the DMG file briefly, the DMG file extension only is used on the Apple MacOS systems. After that, you can boot the PC that needs to install an OS from the bootable USB flash drive and then start system recovery. Just go to the Tools page, click Media Builder, choose your USB flash disk and create USB boot disk from ISO.
CONVERT ISO TO BOOTABLE USB MAC OS DISK UTILITY MAC OS X
Apple Mac OS X uses the files with.dmg extensions to install a software. After finishing the system image backup, you can go to create a bootable USB drive. Just as the ISO file use in Windows system installations, the files with DMG extension also use on Mac systems. In this case, you will need to convert it back to the DMG format for the installation. Simply pick the source (.CDR image) and destination (target USB disk. CDR image to make a working bootable USB disk drive from Windows. Attach the USB Flash drive to your Mac and open Disk Utility (found in Applications > Utilities). However, it's helpful when your own system is a Windows PC and you want to burn the DMG file to a USB drive. CDR disk image burned to USB all we need to do is to use a disk-cloner utility, for testing this I used the excellent, free HDD Raw Copy Tool to clone the Apple Mac OS bootable Disk Warrior. Remember, even if you convert the DMG to ISO, it's still Mac-compatible only, so you can't use it to install the program on a Windows system.
CONVERT ISO TO BOOTABLE USB MAC OS DISK UTILITY HOW TO
Here’s how to convert a DMG file into an ISO file that can be mounted on a Windows PC. For more information and complete instructions please see this topic. Special utility from cvad & russian MAC community for new hackintosh users.
CONVERT ISO TO BOOTABLE USB MAC OS DISK UTILITY FOR MAC OS X
The DMG image format is by far the most popular file container format used to distribute software on Mac OS X. Make bootable USB Flash Disk for MAC OS X with Latest Clover bootloader revision fast and easy by one click under OS Windows.
0 notes