#Create a macOS Catalina USB Installer Using Disk Creator
Explore tagged Tumblr posts
Visit Tumblr Blog
Explore Tumblr blogs with no restrictions, modern design and the best experience.
Last Seen Tumblr Blogs


Fun Fact
69% of Tumblr users are millennials.
Text
How To Create a Bootable macOS Catalina USB Drive
How To Create a Bootable macOS Catalina USB Drive

How To Create a Bootable macOS Catalina USB Drive.
Making a bootable USB installer for the latest macOS Catalina helps in many ways. One of the reasons you might want to do this is because it allows you to perform a completely clean install of the update on your Mac. Other areas where you can use a bootable macOS installer is when you have multiple Macs and want to install the same update on…
View On WordPress
#Create a macOS Catalina USB Installer Using Disk Creator#How To Create a Bootable macOS Catalina USB Drive#How To Use The macOS Catalina USB Installer#Use Terminal To Make A macOS USB Installer
0 notes
Text
What Mac For Music

Insert Music Emoji in Mac As mentioned, you can use 4 digits hexadecimal codes in MacBook by changing the input method to Unicode Hex Input. For example, option + 266A will produce eight note symbol like ♪. Overall, the Mac Mini is an excellent choice for music production. Click here to checkout the Mac Mini on Amazon; Click here to read user reviews; View used listings on eBay. Without a doubt, the Macbook Pro is the best laptop for music production. Out of all of the few laptops that Apple offers, the Pro model is the most powerful. However, a Mac user can just plug in their music hardware and launch the GarageBand app—Apple's free pre-installed DAW (digital audio workstation) available on Macs, iPhones, and iPads. It's a personal music creation studio for recording and editing multi-track audio as well as composing and experimenting with a vast array of virtual.
Originally, music studios were the hub of music production. The studios had special, unique and expensive music equipment which was used to record a song. However due to numerous technological advancements, now music studios are losing their initial importance. Now you can very easily produce, record and edit music on your very own laptops. In this post you will be seeing the top 3 laptops as best Mac for Music production. These laptops can be used for music making and recording at your home even if you are a student.
To benefit from these advancements you will of course need to choose your laptop model very wisely. Apple Mac laptops, in this regard, offer top of the line laptops for music production. Over the course of 5 years, Apple MacBooks have established themselves as one of the best laptops for music production. However, due to the various Mac models, you will need to do a good research on laptops and their features to figure out if the laptop is compatible with your needs. But, if you read this article you would need not to do all that because we have already done that already. Here, we are sharing with you the best Mac for music production. If you are looking for other models which come with Windows Operating Systems also, here is the list for that.
We have earlier covered few best products for Mac, such as external hard disk and printers specifically built for Mac OS X.


Laptops – Best Mac for Music Production
[easyazon_link identifier=”B00VSB1RZC” locale=”US” tag=”osx411-20″]3) MacBook (MacBook 12)[/easyazon_link]
The 3rd best mac laptop available for music production is the Apple’s MacBook 12. This particular laptop contains up to 512GB flash storage space due to which a quite ample amount of music can be stored in it and there will be a very slim chance for the need of external storage device. In addition to this amazing feature, the MacBook comes with a 1.3GHz dual‑core Intel Core M processor (Turbo Boost up to 2.9GHz). This mac laptop can go on without any source of power for 9 hours straight, so you can work on it nonstop. You can very comfortably work on numerous music recordings and composing activities due to its 12‑inch (diagonal) LED‑backlit Retina display, 2304×1440 screen resolution, OS X El Capitan and built-in Apps.
[easyazon_link identifier=”B00UGEBB94″ locale=”US” tag=”osx411-20″]2) MacBook Air[/easyazon_link]
The 2nd best mac laptop available for music production is the MacBook Air’s newest version. This laptop is simply perfect for people on a tight leash financially, yet they still want a laptop that helps music production. MacBook Air is an extremely light weighted laptop, so it is very comfortable to be carried around. This feature of the laptop mostly attracts people who travel quite often. The battery life of this slim and sleek laptop is over 12 hours, which allows you to be quite carefree of where you go to get the music that you want. MacBook Air will come with app store apps and suitable pre-installed apps related to music production. Other special features of the laptop include its 13.3 inch display with 1440 x 900 display resolutions, Intel Core i5 processor of 1.4GHz, 4GB of RAM and 128GB SSD storage. You can find docking stations for Mac laptops here which helps to connect external keyboard, mouse, larger monitor and other USB devices during music recording.
[easyazon_image align=”center” height=”287″ identifier=”B00UGEBB94″ locale=”US” src=”https://osx411.com///wp-content/uploads/2015/10/51SNX0afDML.jpg” tag=”osx411-20″ width=”500″]
[easyazon_link identifier=”B00UGBMRQ8″ locale=”US” tag=”osx411-20″]1) MacBook Pro 13[/easyazon_link]
The most ideal mac laptop available for music production is the Apple MacBook Pro. It is, without a pinch of doubt, the best mac laptop available in the laptop market for the production, editing and recording of music on laptops. This laptop has an i7 processorwhich runs at the speed of 2.7GHz. Its other special features include the 8GB of RAM and 128GB SSD memory. Simply because of these advanced features, the whole process of making your music will be faster and easier than you have ever imagined. The battery time for this laptop is 7 hours, which provides you with a lot of mental ease. MacBook Pro also comes with the latest Intel Iris Pro graphics, the NVIDIA GeForce GT 750M and a 15.4 inch display of 2560 x 1600 resolution.
[easyazon_image align=”center” height=”291″ identifier=”B00UGBMRQ8″ locale=”US” src=”https://osx411.com///wp-content/uploads/2015/10/51nHbuhKnqL.jpg” tag=”osx411-20″ width=”500″]
These above 3 best Mac laptops will work as a music studio for production and recording purpose. If you are a student who is working in music industry, then Mac laptop is a must have product for music production and recording.
By now, you probably know what a powerful creative tool your Mac is. It’s definitely hard to beat when it comes to retouching photos, editing videos, and — naturally — making music.
There are, in fact, so many music making apps for Mac that it’s hard to decide which one to get and what’s the difference between them, especially if you’re just starting out. But don’t worry — below is the ultimate guide to help you pick the best music production software currently on the market.
Be a creator with Setapp
The ultimate toolkit for curious folks — Setapp gives you access to 180+ apps for creating music, design, code, and more.
The Best Free Music Software For Mac
It’s important to note that no single music creation software is best for everyone. Needs, experience levels, and preferences tent do differ a lot, so the final choice should be different as well. Having said that, there are a few options that have been winning in their respective categories over the years again and again. Here they are.
GarageBand: The easiest way to start
Owen Mac Music Downloads
You don’t have to go far for an introductory experience to music making programs — the GarageBand app is already pre-installed on your system.
Apple Music App On Mac
GarageBand for Mac is a versatile free music making software for beginners. You can use its tutorials to make your first steps into playing an instrument, record your own music (including your voice), add special effects, and produce complete tracks to upload to SoundCloud or beyond.
Which Mac Laptop For Music Production
If you don’t have GarageBand in your Applications folder yet, download it from the App Store for free. When you open the app, it’ll prompt you to get all the available sounds and effects. In the latest GarageBand version for macOS Catalina, Apple has included a fantastic virtual drummer that you can customize to fit your patterns exactly, whether you’re playing rock or hip-hop. The layout of all the GarageBand options is quite intuitive, so you can definitely study the app on your own, learning more as you go.
Some downsides to the GarageBand app are essentially reasons why pros don’t use it: at some point you max out its capabilities and need features like advanced crossfades, for example. When you feel that instead of the music making software serving you, you start serving the music making software — it’s probably time to upgrade.
Ableton Live 10: The best music making software ever
Best Free Music Download Mac
At the other end of the music software spectrum is the industry-standard Ableton Live. First released in 2001, Ableton has been honing its music making software for nearly two decades. It’s not only able to record, arrange, mix, and master your music but also be used at live shows to play that music back, right from the same interface.
What Is The Best Mac For Music
Bad news: it’s very difficult to learn Ableton on your own if you don’t have any background in music making. Luckily, there’s a large international community of users, so you’ll likely be able to find either a local or online group in your language, which could become instrumental to getting over various hurdles.
Even more bad news: Ableton is not a free music production software at all. While Ableton Live 9 used to have a Lite version that could be downloaded free, Ableton Live 10 starts with an Intro edition at $99 (then Standard at $449, then Suite at $749). The more expensive the version the more effects, instruments, and sounds it contains.
n-Track Studio: A top recording software for Mac
If the gap between GarageBand and Ableton Live is so wide, naturally there would be some music making apps that would try to fill it up. Enter n-Track Studio.
Make music with n-Track Studio
With this simple app, you can take a professional music recording studio to your Mac. No expensive equipment, no fuss.
n-Track Studio is a music making software free of Ableton’s complexities but with nearly all of its power. You can record songs from live instruments or create complex EDM tracks using virtual tools as well, with the help of a massive library of sound effects. What’s more, n-Track Studio features a free MIDI software built right in and doesn’t require a too powerful of a processor on your machine, since its audio engine is optimized for minimum latency, even when dozens of tracks are played at once.
Starting with n-Track Studio is very easy:
Click the circled plus icon to create a new track, either blank or armed for recording
Right-click on the new track and choose “Add blank MIDI track”
Select your instrument
Play any progression you like, either using your trackpad or a connected controller
Repeat as many times as needed and enhance with other effects
Overall, exploring n-Track Studio is pure pleasure: more freedom than the standard GarageBand without the difficulty and cost of Ableton. Perfect choice!
Make all music sound better with Boom 3D
While selecting the best free music making software is important, it’s equally important to ensure that whatever tunes you create are going to be played appropriately. As most Macs are simply too quiet for all the intricacies of the music software, you need Boom 3D to make it all work.
What Mac Is Best For Music Production
Boom 3D is a system-wide volume booster and equalizer for your Mac. First, it features a variety of presets to make every genre sound as good as possible, by setting the right midtones, bass levels, and high-pitched notes. Second, it lets you surpass the default volume limit on your Mac to really get the maximum out of your speakers.
Finally, Boom 3D also acts as a nifty little music player that features over 20,000 radio stations from around the world and plays back tracks set in your specific preferences.
So, again, while choosing the best music production software comes down to your level of experience and needs, if you go for a mid-market product like n-Track Studio, you definitely won’t be bored for a long time. Just don’t forget to couple it with Boom 3D for an absolute killer of a sound.
Best of all, n-Track Studio and Boom 3D are available to you absolutely free for seven days during the trial of Setapp, a platform with over 160 apps for your creative self, from music making programs to film editing and drawing. Try Setapp today and unleash you creator spirit. It’s free, so why not at least try?
Setapp lives on Mac and iOS. Please come back from another device.
Meantime, prepare for all the awesome things you can do with Setapp.
Read on
Sign Up
Setapp uses cookies to personalize your experience on our website. By continuing to use this site, you agree to our cookie policy.
1 note
·
View note
Text
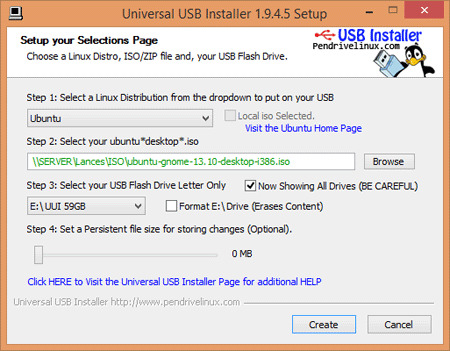
Create Bootable Usb On Mac For Ubuntu

Create Bootable Usb Mac Os
Create Bootable Usb For Ubuntu On Mac
Rufus- Open source USB bootable creator. I just cannot ignore Rufus when we talk about the.
The steps to create a bootable USB drive on Mac are very simple when using this powerful utility. Once the software has been downloaded and installed on your Mac, simply insert the drive into an available USB port. When you launch the application, you will see that your drive has automatically been identified.
Create Bootable Usb Mac Os


How to create a bootable MacOS USB. From Linux you can read and write Apple-compatible HFS+ disk images. By creating an El Capitan recovery disc, you can then create an installation disc, and then access the App Store for other free installers, such as Catalina and Mojave.
With a bootable Ubuntu USB stick, you can:
Install or upgrade Ubuntu
Test out the Ubuntu desktop experience without touching your PC configuration
Boot into Ubuntu on a borrowed machine or from an internet cafe
Use tools installed by default on the USB stick to repair or fix a broken configuration
Creating a bootable Ubuntu USB stick from Microsoft Windows is very simple and we’re going to cover the process in the next few steps.

Create Bootable Usb For Ubuntu On Mac
Alternatively, we also have tutorials to help you create a bootable USB stick from both Ubuntu and Apple macOS.
Create Bootable Usb On Mac For Ubuntu
1 note
·
View note
Text
Create Macos El Capitan Bootable Usb
These instructions work to create a bootable install disk for all versions of macOS from macOS 11 Big Sur back to OS X El Capitan 10.11. What’s needed to create a bootable install disk A USB flash drive or other secondary volume formatted as Mac OS Extended, with at least 14GB of available storage.
Bootable Flash Drive Creator
Bootable Os X El Capitan
Make Os X El Capitan Boot Usb
How To Make A Bootable Usb Drive
Customers get Software upgrades for Mac computers through the online app store ever since the release of macOS Lion. Be it a clean install or upgrade, Mac App store require you connect to the internet to download whole installation files. The online OS update is OK if you have stable broadband connectivity and enough bandwidth. Apple also provides an option for internet recovery of macOS if your computer fails to boot. But there are situations where you can’t download the OS from the Apple servers. Having a macOS offline installer or a bootable USB disk is the only solution in such scenarios.
Create El Capitan Bootable Usb From Windows Xp It does not matter whether you use macOS or Windows 10. It’s just a matter of time until your device will refuse to start, which could happen for many reasons, including (and not limited to) file corruption, hardware failure, and buggy update.
Bootable USB Installers for OS X Mavericks, Yosemite, El Capitan, and Sierra First, review this introductory article: Create a bootable installer for macOS. Second, see this How To outline for creating a bootable El Capitan installer.
In the following words, I will show the instructions of how to make Mac OS X 10.11 El Capitan USB installer very quick in either Windows or Mac OS X. DOWNLOADSYou need to prepare an USB (8 GB.
Jesus Vigo shows you the easiest possible way to create a bootable USB installer for OS X El Capitan. At this year's WWDC, Apple announced the next iteration of OS X, version 10.11.

Download macOS offline Installer
Installing macOS without internet requires a bootable USB disk. And you need to download a full-size macOS installer for making this disk. Hence, before anything, we will tell you how to download macOS offline installer directly from Apple to your Mac using a GitHub script.
Download the gibMacOS script from this link and extract it to your Mac. From the extracted folder, run the script called gibMacOS.command — it will open the Terminal as shown below.
Wait for the script to fetch the macOS download catalogue from Apple. When the list is ready choose a number as per your OS option and press the Return/Enter key. You can use this script to download macOS Big Sur (11.1), Catalina (10.15), Mojave (10.14), and High Sierra (10.13.6). A new folder “macOS downloads” appears in the “gibMacOS-master” as you provide a download option, and the OS starts downloading as you can see in the video.
The OS gets downloaded as parts, PKGs, DMGs and other files. For macOS versions up-to Big Sur, you need to use another script “BuildmacOSInstallApp.command” in the main folder to join all the downloads and make the full macOS installer app. All you need is to drag and drop the downloaded macOS folder to the terminal window. The script will build the offline installer and save it to the same folder.
You don’t need to use the second script if your choice is macOS Big Sur. Because, for macOS Big Sur you get a full-size installer from Apple in PKG format. Double-click and open the InstallAssistant.PKG to save the “Install macOS Big Sur.app” to the Applications folder.
Apart from this, some older versions of macOS are available for direct download from Apple (Sierra, EL Capitan, Yosemite) in DMG format.
How to make a macOS bootable USB installer
It is possible to create a backup macOS installer on a DVD or USB drive but later is the best choice. Most of the Macs these days don’t have DVD slots, and the installation through a disc is very slow. Hence we discuss only about making macOS recovery installer on a USB disc. For this you need a Mac and a USB pen drive of at least 8 GB space, and a third-party app called DiskMaker.
First, download a copy of Disk Maker from the official website.
Choose a version as per your requirement. For example, if you want make USB installer for macOS Catalina 10.15, download Disk Maker X 9.
I use an MacBook Pro with High Sierra. Hence, I’m downloading disk maker X 7.
The next step is to download full macOS installer from the App Store to your Applications folder.
Run Disk Maker DMG installer and copy the app to the Applications.
The application will automatically detect the downloaded macOS as shown in the screenshot. Select “Use this Copy” if you would like to proceed with it.
Next is setting the USB pen drive for creating the bootable installer. Choose the third option ” An 8 GB USB Thumb drive.”
The app will list all drives in your system. Pick the one you would like use as macOS USB installer.
Ignore the warning message and proceed to Erase and Create macOS USB disk. Don’t forget to provide your admin password when it prompts.
Keep checking notifications tab for progress. When it completes you will find Install macOS Mojave (or High Sierra) mounted to your desktop as a USB disk.
That’s your backup. Unmount and keep the USB installer to a safe place.
Unfortunately, the above app is not compatible with macOS Big Sur 11 and above. Check the instructions on Apple website, the manual method to make macOS offline USB installer.
What is the alternative if I don’t have usable Mac at the moment?
This method is applicable when you have a Mac, and the internet recovery fails. But think about a situation when your only Mac stops to boot, and you don’t have USB installer or TimeMachine backup! Downloading MacOS DMG file might save you. If you have a macOS DMG, you can create bootable USB disk from a Windows PC — use a software like TransMac for this purpose.
Clean installing or restoring a Mac offline with USB pen drive
As said earlier, you could use the macOS USB installer to do a clean install or restore it upon a boot failure. Just connect the USB disk and press the Option/Alt Key when you hear the boot sound. The Mac will then display all the startup disks available.
Pick the USB drive starting with the label “Install macOS” and follow on-screen instructions to complete the installation. If you need, use the Disk Utility to format the drive for doing a clean install.
FonePaw - Solution - - 3 Ways to Create a Bootable Install USB Drive for macOS or OS X
To install macOS or OS X from USB, you need to create a bootable install USB drive for Mac operating system. This tutorial will introduce you three ways to create bootable USB drive for macOS High Sierra, macOS Sierra, Mac OS X El Capitan, Yosemite, Mavericks and more.
Use 'createinstallmedia' Command in Terminal
The most recommendable way to create a bootable install USB drive for Mac OS is using 'createinstallmedia' Command with Terminal application.
Step 1: Download macOS or OS X
The first thing to do is to download the Mac operating system that you need. To install the latest Mac OS, for example, macOS High Sierra, you can search and download the installer from App Store.
To download the older Mac OS X version, you can go to App Store > Purchases to download the Mac OS X El Capitan, Yosemite, Mavericks that has been previously downloaded.
However, Apple has decided that macOS Sierra and later will no longer be listed in Mac App Store's Purchased. To download the installer of macOS Sierra, go to Apple Support.

Note: After downloading the Mac OS installer, do not install the OS but quit the installer.
Step 2 Get A USB Drive with Sufficient Storage
You should have a USB drive with at least 8 GB of storage and insert the USB drive into your Mac. If you need to create a bootable USB drive of macOS High Sierra, 16 GB USB flash drive is suggested. In fact, USB drives with larger storage, like 32 GB to 64 GB, tend to show better performance.
Bootable Flash Drive Creator
IMPORTANT: The contents of the drive will be erased after creating a bootable installer drive. Therefore, make sure there is nothing important on your flash drive before you continue with the following steps.
Step 3 Check the Name of Your Flash Drive
The following command is to create a bootable copy of Mac OS installer on a USB drive named FlashInstaller. If your USB drive has a different name, replace FlashInstaller in the command with the name of your USB drive. If you don't want to modify the command, change the name of your flash drive into FlashInstaller.
Step 4 Create A Bootable USB Drive of macOS/OS X
Launch Terminal enter the following command according to the version of Mac operating system that you are dealing with.
macOS High Sierra Installer
sudo /Applications/Install macOS High Sierra.app/Contents/Resources/createinstallmedia --volume /Volumes/FlashInstaller --applicationpath /Applications/Install macOS High Sierra.app --nointeraction
macOS Sierra Installer
sudo /Applications/Install macOS Sierra.app/Contents/Resources/createinstallmedia --volume /Volumes/FlashInstaller --applicationpath /Applications/Install macOS Sierra.app --nointeraction
OS X El Capitan Installer
sudo /Applications/Install OS X El Capitan.app/Contents/Resources/createinstallmedia --volume /Volumes/FlashInstaller --applicationpath /Applications/Install OS X El Capitan.app –nointeraction

OS X Yosemite Installer
sudo /Applications/Install OS X Yosemite.app/Contents/Resources/createinstallmedia --volume /Volumes/FlashInstaller --applicationpath /Applications/Install OS X Yosemite.app –nointeraction
Bootable Os X El Capitan

OS X Mavericks Installer
sudo /Applications/Install OS X Mavericks.app/Contents/Resources/createinstallmedia --volume /Volumes/FlashInstaller --applicationpath /Applications/Install OS X Mavericks.app –nointeraction
Tip: If you didn't download the installer from Mac App Store, you must modify the file path after 'applicationpath'.
After pasting the command on the Terminal, hit Enter key. You'll be asked to enter your Mac's password. Enter the password and hit Enter.
Make Os X El Capitan Boot Usb
Then you need to check the name and path of your USB drive. If it is correct, press 'y' then hit 'Enter'. The Mac will begin to create a bootable install drive for macOS High Sierra, macOS Sierra, Mac OS X El Capitan/Yosemite/Mavericks. When it is done, Terminal will shows 'Done'.
To install macOS or OS X from the USB flash drive, check how to clean install Mac OS from USB(opens new window).
Make A Bootable Installer for macOS via DiskMaker X or Install Disk Creator
If you think it is too much trouble to use Terminal to make a bootable installer on a USB drive, you can use tools like DiskMaker X, Install Disk Creator. Both the tools can make an install drive for macOS Sierra, OS X El Capitan, OS X Yosemite and more.
DiskMaker X: When you launch the application, it will try to find the downloaded macOS or OS X installers program on your Mac. And you just need to follow its on-screen instructions to create a bootable USB drive by clicking a few buttons.
Install Disk Creator: Once you run the application, select a USB drive, choose a Mac OS installer, and click Create Installer to begin to create an install USB drive.
Disk Utility to Create a Bootable macOS/OS X Installer
Before using createinstallmedia command, people used to use Disk Utility to create a bootable installer drive manually. But the process is much more complicated than the Terminal method. So Apple also suggests you make a bootable install drive via Terminal.
Just in case that you don't want to use Terminal, you may follow these steps to build a USB drive for Mac OS X or macOS.
How To Make A Bootable Usb Drive
Mount the Mac OS installer to get .DS_Store, BaseSystem.chunklist, and BaseSystem.dmg. Files from InstallESD.dmg file.
Use Disk Utility's Restore feature to create a copy of the OS Install ESD image.
Modify the copy of the OS Install ESD image to make it boot successfully.
Do you have other question about making a bootable USB drive for macOS or Mac OS X? Leave your comment below.
0 notes
Text
How To Make A Bootable Usb For Mac Os X Tiger

Apple hasn’t shipped operating systems on physical media in a full decade, but there are still good reasons to want a reliable old USB stick for macOS Catalina. Luckily, it's not hard to make one—either with a handy graphical user interface or some light Terminal use. Here's what you need to get started:
How To Make A Bootable Usb For Mac Os X Tiger Download
How To Make A Bootable Usb For Mac Os X Tiger King
How To Create A Bootable Usb For Mac Os X Lion
Plug your USB stick (8GB, better more) into the computer. The file system should be set to MAC OS X EXTENDED (NOT journaled) 4. Follow the guide above from step 3 til step 8. Best audio enhancer for pc. You're now in open firmware. Type in dev / ls and a list with all files will appear. Press space to scroll down. Now, you have a tree structure, you have to choose.
A Mac that you have administrator access to. We've created a USB stick from both Mojave and Catalina, but your experience with other versions may vary.
A 16GB or larger USB flash drive or a 16GB or larger partition on some other kind of external drive. A USB 3.0 drive will make things significantly faster, but an older USB 2.0 drive will work in a pinch; 8GB drives worked for Mojave and older versions of macOS, but the Catalina installer is just a little too large to fit.
The macOS 10.15 Catalina installer from the Mac App Store (in High Sierra or older macOS versions) or the Software Update preference pane in Mojave. The installer will delete itself when you install the operating system, but it can be re-downloaded if necessary.
If you want a GUI, take a look at Ben Slaney's Install Disk Creator from MacDaddy. There are other apps out there that do this, but this one is quick and simple.
This USB can be used to install a clean copy of Apple Mac os x tiger 10.4 or to update your existing system to Mac os x tiger 10.4 Installing, Recovering or upgrading your software from a USB is NOT a quick process and can take 30-45 minutes to complete. Please be patient and allow the process plenty of time to finish.
Make Bootable USB flash drive for Tiger, Leopard, Lion, Mountain Lion, Mavericks OS X.
I've downloaded Mac OS X Snow Leopard Install DVD from the Internet Archive. Keep in mind that this is an.iso file, not.dmg. I don't need a full step-by-step guide, just need to know how to format the drive ( MBR / GPT?) and how to copy the.iso file to it.
I hate to be a dick but I swear the people who answered this question can't read. Hes not trying to install OS X on a windows computer hes trying to make a bootable USB so he can install a fresh copy of OS X on a mac.
If you want to use this USB installer with newer Macs as they are released, you'll want to periodically re-download new Catalina installers and make new install drives. Apple rolls support for newer hardware into new macOS point releases as they come out, so this will help keep your install drive as universal and versatile as possible.
Advertisement
There's also one new consideration for newer Macs with Apple's T2 controller chip—as of this writing, that list includes the iMac Pro, the 2018 Mac Mini, the 2018 MacBook Air, and 2018 and 2019 MacBook Pros, though Apple keeps an updated list here. Among this chip's many security features is one that disallows booting from external drives by default. To re-enable this feature, hold down Command-R while your Mac reboots to go into Recovery Mode and use the Startup Security Utility to 'allow booting from external media.' If you're trying to install an older version of macOS, you may also need to go from Full Security to Medium Security to enable booting, but if you're just trying to install the current version of macOS, the Full Security option should be just fine. And if you're just doing an upgrade install rather than a clean install, you can run the Catalina installer from the USB drive from within your current installation of macOS, no advanced tweaking required.
The easy way
Once you've obtained all of the necessary materials, connect the USB drive to your Mac and launch the Install Disk Creator. This app is basically just a GUI wrapper for the terminal command, so it should be possible to make install disks for versions of macOS going all the way back to Lion. In any case, it will work just fine for our purposes.
Advertisement
Install Disk Creator will automatically detect macOS installers on your drive and suggest one for you, displaying its icon along with its path. You can navigate to a different installer if you want, and you can also pick from all the storage devices and volumes currently connected to your Mac through the drop-down menu at the top of the window. Once you're ready to go, click 'Create Installer' and wait. A progress bar across the bottom of the app will tell you how far you have to go, and a pop-up notification will let you know when the process is done. This should only take a few minutes on a USB 3.0 flash drive in a modern Mac, though using USB 2.0 will slow things down.
The only slightly less-easy way

How To Make A Bootable Usb For Mac Os X Tiger Download
The Install Disk Creator is just a wrapper for the terminal command to create macOS install disks, so if you’re comfortable formatting your USB drive yourself and opening a Terminal window, it’s almost as easy to do it this way. Assuming that you have the macOS Catalina installer in your Applications folder and you have a Mac OS Extended (Journaled)-formatted USB drive (which is to say, HFS+ and notAPFS) named 'Untitled' mounted on the system, you can create a Catalina install drive using the following command.
sudo /Applications/Install macOS Catalina.app/Contents/Resources/createinstallmedia --volume /Volumes/Untitled
How To Make A Bootable Usb For Mac Os X Tiger King
The command will erase the disk and copy the install files over. Give it some time, and your volume will soon be loaded up with not just the macOS installer but also an external recovery partition that may come in handy if your hard drive dies and you're away from an Internet connection. If you would like to create an install drive for a macOS version other than Catalina, just tweak the paths above to refer to Mojave or High Sierra instead.
How To Create A Bootable Usb For Mac Os X Lion
Whichever method you use, you should be able to boot from your new USB drive either by changing the default Startup Disk in System Preferences or by holding down the Option key at boot and selecting the drive. Once booted, you'll be able to install or upgrade Catalina as you normally would. You can also use Safari, Disk Utility, or Time Machine from the recovery partition to restore backups or troubleshoot.
0 notes
Text
Create Bootable External Hard Drive Mac
Apple uses its App Store to distribute its software, like new Mac operating systems. It’s convenient, but sometimes it can take a while for a download to finish. And if you have multiple Macs, it’s inefficient to download the new OS to each and every Mac.
Create Bootable External Hard Drive Mac
Create Bootable External Hard Drive Mac High Sierra
Create Bootable Mac Os On External Hard Drive
How to format your external drive for macOS Big Sur. You'll need to start with a clean thumb drive or external hard drive to make it a bootable drive. Plug the thumb drive or cable for your hard drive into the appropriate port on your Mac. Click on Finder in your Dock to open a Finder window. How to download netflix on macbook pro m1. To create a bootable Mac drive you need any disk with Mac OS X 10.11.0 El Capitan or newer (10.12 Sierra, 10.13 High Sierra, 10.14 Mojave, up to 10.15 (Catalina) either running as your main system, or just being installed on a drive that's connected to your Mac at the moment. There are a lot of reasons for wanting to boot from an external drive. If you’d like to keep files synced between a desktop and laptop, expand your storage, or have a bootable backup copy of your system, there’s a hidden feature in Disk Utility that makes it easy.
That’s why I like to make a bootable external drive for the sole purpose of installing the Mac operating system. When I need to tend to a bunch of Macs, it’s much faster to use a bootable drive instead of going to each Mac, launching the App Store, searching for the operating system, downloading it (after entering my Apple ID), and then running the installer.
You can create a bootable USB flash drive with the macOS Sierra installer that’s now available. The installer software will take up nearly 5GB of storage space. Here’s how to create a bootable macOS Sierra installer drive. Apple laptop update mac.
Download the macOS Sierra installer
Launch the App Store app, then look for macOS Sierra in the store. (Here’s a link.) Click on the Download button, and your Mac will download the installer to your Applications folder. If it automatically launches after download, quit the installer.
If you’ve already upgraded your Mac to Sierra, the installer is removed from the Applications folder. You can download it again if you go to Purchased in the App Store. Look for macOS Sierra in the list of apps that you’ve bought, and click on the Download button. If it automatically launches after download, quit the installer.
Get an external drive
You can use a USB flash drive or a hard drive with room for the installer software. I’ve used different drives with success, including a VisionTek 120GB USB 3.0 Pocket Solid State Drive ($83 on Amazon) and an old 8GB Iomega Micro Mini Hard Drive.
Don’t worry if the drive isn’t formatted for the Mac. The drive will be reformatted automatically as part of the process. Change the name of your drive to Untitled; you need to do this for the steps below.
The quick and easy way
The process detailed below involves the Terminal. If your really don’t want to use Terminal, there are a couple of free apps you can use.
Install Disk Creator is a straightforward way to create a boot disk. I was able to make a macOS Sierra external USB boot disk in a few minutes, and the installation worked without a hitch. Also works with older versions of OS X.
Diskmaker X is a popular app. It also supports older versions of OS X.
Use the Terminal to create a boot disk
So you have your external drive, and the Sierra beta installer is in place. Now you’re going to use Terminal to create a boot drive. If you’ve never used Terminal before, don’t worry. Upgrade from mountain lion to high sierra. This is pretty easy.

Here are the steps to create a macOS Sierra beta boot disk. (Apple also has these instructions.)
Create Bootable External Hard Drive Mac
Connect the external drive to your Mac. (In the Terminal command you will use, I use Untitled to represent your external drive. If your drive is named something else, you need to change Untitled to the name of your drive.)
Launch Terminal (/Applications/Utilities/Terminal.app).
Copy the following: sudo /Applications/Install macOS Sierra.app/Contents/Resources/createinstallmedia --volume /Volumes/Untitled --applicationpath /Applications/Install macOS Sierra.app
Go back to Terminal and paste the copied code at the prompt.
Terminal will ask for a password. This is your user password. Terminal doesn’t display characters when you type it in. Hit Return.
Terminal will tell you that it will erase your drive. To confirm that you want to continue, type Y and hit Return.
You’ll see that Terminal erases your drive. When that part is done, your Mac may ask you if you want to use the drive for Time Machine. Click Don’t Use.
Terminal will copy the installer file to your drive. This will take a few minutes.
After copying, Terminal is done. You should see Terminal display a “Copy complete” and Done notice. You can quit Terminal and your drive is ready for use.
Create Bootable External Hard Drive Mac High Sierra
How to boot from the installer drive
Create Bootable Mac Os On External Hard Drive
Plug your external drive into your Mac.
Power up (or restart) your Mac. Press down on the Option key while the Mac boots.
After a few moments, your Mac should display the Startup Manager, which will show you the available boot drives. Click on the external drive and hit Return. (You don’t need to select a network to proceed.)
Your Mac will display an OS X Utilites window. If you want to install Sierra and leave the data intact, select Install OS X. If you want to start over and wipe out the data, you need to go into Disk Utility to reformat the internal drive first, and then install macOS Sierra.
0 notes
Text
Parallels Desktop 13 For Mac For Sale


Parallels Desktop 13 For Mac Key
Parallels Free Download For Mac
Parallels Desktop 13 For Mac Serial Number
Parallels Desktop 11 For Mac
Parallels Desktop for Mac. Award-winning Parallels Desktop for Mac enables you to run Windows, Linux, and more side-by-side with Mac OS X. Parallels Desktop 13 is optimized for macOS High Sierra and Windows 10 Fall Creators Update. Run Windows and Mac applications side-by-side Experience as much or as little Windows as you want. Parallels Desktop 13 Crack + Serial Key With Keygen Free Download For Mac 🔥🔥🔥 Nuovos Tutos. MORE IN DEPTHS AND DETAILED PREDICTIONS ON THE NEW LIMITEDS FOR BLACK FRIDAY SALE. Parallels Desktop 13 for Mac boosts performance, with hundreds of new features and even more tools for everyday tasks on both Mac and Windows. Clean your drive, secure private files, download videos, make GIF’s, and more. Ready for macOS High Sierra and Windows 10 Fall Creators Update.
Up to Date
Optimized for the latest Windows 10 updates and ready for macOS Catalina (10.15).
Ultimate Flexibility
Works with OS X, Windows 10, 8.1, and 7, Google Chrome™,Linux and Unix, and macOS Server. Parallels desktop 12 for mac review. No more having to choose between PC or Mac.
Touch Bar
Add Windows applications to Touch Bar™ for instant access and customization.
Connect Devices
USB, USB-C, Thunderbolt and FireWire devices connect with Windows. Pair your Bluetooth® devices—including Xbox One controller, stylus pen and printer—to work with both Windows and macOS.
Retina® Display Support
Smart resizing and independent screen resolutions for separate displays.
If you have already installed Windows 10, Windows 8.1, Windows 8, or Windows 7 on your Mac using Boot Camp, you can set Parallels Desktop to run Windows from the Boot Camp Partition or import Windows and your data from Boot Camp into Parallels Desktop as a new virtual machine. Parallels Desktop for Mac is simply the world's bestselling, top-rated, and most trusted solution for running Windows applications on your Mac. With Parallels Desktop for Mac, you can seamlessly run both Windows and macOS applications side-by-side without rebooting. Parallels Toolbox for Mac and Windows. 30+ tools in a lightweight, powerful, all-in-one application for Mac ® and PC. Easy to use and economical—a whole suite of tools for a fraction of the cost of individual apps, packaged in one simple interface. Parallels Desktop 8 for Mac License Parallels Desktop for Mac is the most tested, trusted and talked-about solution for running Windows applications on your Mac. With Parallels Desktop for Mac, you can seamlessly run both Windows and Mac OS X applications side-by-side without rebooting. Parallels Inc. Has now officially released its flagship virtualization solution for download. Parallels Desktop 8 for Mac brings together the two most advanced desktop OSes today, OS X 10.8. Parallels desktop 8 for mac download.
One-Click Tuning
Select productivity, games, design, software testing, or development, and Parallels Desktop will optimize your VM settings and performance for you.
Enter Parallels Desktop, the best way to run Internet Explorer on Mac. (As well as a multitude of other browsers and OSes—including Microsoft’s all-new Microsoft Edge.) Parallels Desktop, and specifically the new Pro Edition designed for developers and power users, is ideal for testing because of its usability. Parallels for mac internet explorer.
Instant Access

Launch and access Windows applications right from the Mac Dock.
Save Disk Space
Get the most out of your Mac with automatic Disk Space optimization.
Office 365 Integration
Allows Word, Excel, or PowerPoint documents in Safari to open in their native Windows Office application. Parallels for mac vdi.
Works with Boot Camp
Reuse your existing Boot Camp installation. Converting a virtual machine from Boot Camp is easy—just follow our installation assistant at startup.
Volume License Key
Unified volume license key, centralized license management, and advanced security features are available in Parallels Desktop for Mac Business Edition.
Travel Mode
Parallels Desktop 13 For Mac Key
Extend battery life while away from a power source.
Bonus! Parallels® Toolbox
Over 30 one-touch tools—clean your drive, take screenshots, download a video, and more, all with just a single click.
Bonus! Remote Access
Remote access to your Mac from any iOS device, Android device, or browser with Parallels Access®.
Parallels Free Download For Mac
24/7 Support
Premium 24/7 phone, email, and social support after activation.
Parallels Desktop 13 For Mac Serial Number
Share Mac applications with Windows
Automatic resolution change
Single cloud storage space between Mac and Windows
Drag and drop files between Mac and Windows
Copy and paste files or text between Mac and Windows
Launch Windows applications right from the Dock
Move your PC to Mac in a few easy steps
Assign any USB devices to your Mac or Windows
Retina display support for Windows
Volume control synchronization
Open any site in Microsoft Explorer right from Safari® browser
Apply macOS Parental Control to Windows applications
Windows alerts in Mac Notification Center
Mac dictation inside Windows applications
See the number of unread emails in the Dock
“Reveal in Windows Explorer” in macOS files menu
Virtual machine encryption
Linked clones for VMs*
Vagrant provider*
32 vCPUs and 128 GB vRAM*
Nested virtualization for Linux*
Drag and drop files in macOS guests
Real-time virtual disk optimization
Create VM from VHD and VMDK disks*
Drag and drop to create VM
Disk Space Wizard optimizes your disk space
Shared folders and printers for Linux VMs
Windows applications in Launchpad
Power Nap in Windows
Use Force Touch to look up definitions
New virtual machine wizard
Mission Control support
Presentation Wizard prevents most projector issues
Drop files onto Outlook to create a new message
Multi-language keyboard sync
Picture-in-Picture view
Parallels Desktop 11 For Mac
Share Bluetooth between Mac and Windows
macOS guest support
Spaces functionality for Windows applications
Mission Control exposes your Windows applications
DirectX support
Thunderbolt support
Licensing portal*
Firewire support
USB-C and USB 3.0 support
Work without risk with Snapshots
Safeguard your VM with encryption
2 GB video memory support
Finder tabs work with Windows applications
AVX512 instruction set support
Mojave support
Disk usage optimizations
Report disk space left on Mac
Express installation of Windows 10
Native Mojave screenshots
Auto allocation of video memory
“Free Up Disk Space” wizard
Free OS downloads
Coherence for external displays
Continuity camera support
Touch Bar support
Shared smart card reader
Multi-monitor support
4K shared camera support
CPU usage indicator
Mojave Quick Look support
Pressure sensitivity support
Resource usage monitor
OpenGL support
Offer to import Boot Camp
Auto-detect games keyboard
And many more…
*Available with Parallels Desktop Pro Edition and Business Edition subscriptions
0 notes
Text
Paragon Camptune X 10.16.36 Crack Mac OS Key Latest Download
Paragon Camptune X Crack Mac is a leader in data backup, disaster recovery and data migration solutions, it is a utility for quick and easy redistribution of disk space between HFS + or APFS partitions (Apple File System) and NTFS on mac systems. The advantage of Paragon CampTune is its unmatched simplicity – with just one slider, dual boot users can immediately allocate more disk space for Mac or Windows operating systems.
Paragon Camptune X 10.16.36 Crack Mac OS Latest [2020]
Paragon Camptune X Crack Mac is the first MacOS ParOS product to support Apple’s APFS. This update provides several new features, including System Integrity Protection (SIP) management, which allow users to selectively disable individual settings for this security option. Paragon CampTune also allows Mac users to use new features without limitations in a variety of Windows software. Paragon CampTune Mac OS automatically detects and corrects the layout of un-synchronized partitions and other file system errors. Users who need immediate technical assistance can now register a support ticket in the app.
To redistribute storage space between Mac OS and Windows with Paragon CampTune for Mac OS X, simply move the partition size slider and click Resize. Or enter the exact size in gigabytes for each partition. Note that changes to the system disk partition can only be made in a special boot environment called Mac OS recovery mode. Indeed, the configuration of the system disk is a critical Mac OS area protected by System Integrity Protection technology.
Paragon Camptune X Serial Key guides you through the creation of a special boot disk that is used to safely boot a Mac and resize partitions. It takes a few minutes to create the necessary startup media files; You will need a removable storage device of 1 GB or more, such as a USB drive or an SD card.
Paragon Camptune X 10.16.36 Crack makes it easy to free up additional space. Players use Boot Camp to play popular games, such as Blizzard Over-watch or EA Sports FIFA, which do not have the original Mac version. The default Boot Camp partition is too small for most modern games, but a change in the Paragon CampTune Slider controls can fix this immediately. Without Paragon CampTune X Cracked, Mac users will need to delete Windows partitions, create new partitions, and reinstall operating systems and applications.
Paragon Camptune X Mac Crack Key Features
Any version of Windows supported by Boot Camp.
Logical volumes can be resized on hybrid hybrid disks
Encrypted FileVault volumes are supported.
Paragon CampTune can perform resizing operations with the system disk on macOS, even if system integrity protection is enabled
Divide storage space between Mac and Windows at any time
Safe, comfortable, and compatible with the latest MacOS version, including 10.15 Catalina
Support for technologies such as Fusion Drive, System Integrity Protection and Apple’s new File System
Apple’s file system is fully supported
Almost all Mac OS systems are supported.
What’s New in Paragon Camptune X 10.16.36?
Support for the new Apple file system (APFS)
Supports the latest versions of Windows, including the Windows 10 Creators Update
Supports main storage (Drive Fusion, FileVault2)
Support for macOS 10.13 Sierra Alto
System Integrity Protection (SIP) management program to disable certain parameters
Free resize for volumes up to 2 GB
Modern user interface design with light and dark themes
Volumes with file system errors are corrected automatically when resizing
Contact support directly within the application
Paragon Camptune X Serial Number
KO3UR-DCB8J-YUR0C-KPY1N-XMS9U
PG2DEAGX6KAIWY9BAJ1DTCBA9LPA
Paragon Camptune X Mac System Requirements
OS: Mac OS X 10.11 or later
Boot Camp (Windows XP SP2 or later, Windows Vista, Windows 7, Windows 8, Windows 8.1)
Support for uEFI Boot Camp configuration
How to Install & Crack?
First of all download Paragon Camtune Crack Mac 2020 from the link given in the end.
Extract the RAR or Zip file on your desired location
Now open the files and not run the program
Copy the patch file and paste it to the main file
Now run the software and it will be done
Enjoy the software for free!
Also Download
WinRAR Crack 32/64-bit License Key Full [Latest 2021]
IDM Crack 6.38 Build 16 Keygen With Torrent Download (2021)
Ant Download Manager Pro Crack + Registration Key [Latest]
IOBIT Uninstaller Pro Crack + Serial Key Full (Updated 2021)
0 notes
Text
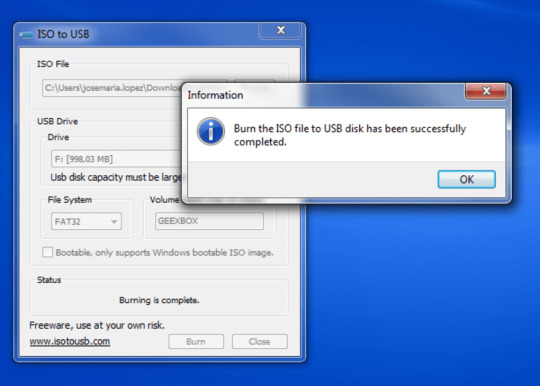
Iso Burn Usb For Mac

Download Rufus, a free tool that will correctly prepare the USB drive, automatically extract the.
Wondershare DVD Creator, a helpful ISO burner for both Windows and Mac computers, is ready to help you burn ISO files to data discs with ease. This program is an all-in-one solution for all DVD burning tasks in your daily life, such as burning videos to DVD, burning music to CD, backing up DVD t ocomputer, and more.
Wondershare DVD Creator for Mac (Non-bootable CD/DVD) As its name tells, This software was.
With a bootable Ubuntu USB stick, you can:
Install or upgrade Ubuntu, even on a Mac
Test out the Ubuntu desktop experience without touching your PC configuration
Boot into Ubuntu on a borrowed machine or from an internet cafe
Use tools installed by default on the USB stick to repair or fix a broken configuration
Creating a bootable USB stick is very simple, especially if you’re going to use the USB stick with a generic Windows or Linux PC. We’re going to cover the process in the next few steps.

Apple hardware considerations
There are a few additional considerations when booting the USB stick on Apple hardware. This is because Apple’s ‘Startup Manager’, summoned by holding the Option/alt (⌥) key when booting, won’t detect the USB stick without a specific partition table and layout. We’ll cover this in a later step.
According to Wikipedia, an ISO file is a disk image of an optical disc. It is also an archive file that contains everything ripped from your DVD disc. You can make a bootable DVD from an ISO file. In other word, you need to mount and burn ISO files to DVD to play ISO files on Mac.
This article introduces different ways to burn disk image on Mac. You can use the built-in ISO to DVD burning feature or third-party DVD burner to burn DVD ISO files on Mac. Which is the best way to burn ISO on Mac? We will discuss it later.
Part 1: How to Burn ISO to DVD on Mac without Quality Loss
You can create a DVD disc with ISO files by using AnyMP4 DVD Copy for Mac with 100% original quality. Being equipped with the advanced technology, you can burn DVD ISO image file to a blank DVD with the fastest speed and the best output quality. All DVD discs, DVD players and burners are supported. You can choose from 3 DVD copy modes to burn DVD on Mac with any content you like. Moreover, you can edit and define the output files freely. In a word, AnyMP4 DVD Copy for Mac is capable to make an ISO file bootable with simple steps.
1. Burn an ISO file to a DVD+R, DVD-R, DVD+RW, DVD-RW, DVD RAM and other DVD discs, as well as most DVD players and burners.
2. Copy DVD ISO image file to DVD disc with zero quality loss and fast burning speed.
3. Copy full movie, main movie or special customized chapter according to your needs.
4. Select the audio track, add/remove subtitles, remove/skip menu and define the output effects as you like.
5. Burn ISO on Mac Mojave, High Sierra and other OS X 10.6 or above (macOS Catalina included).
Step 1
Download and install the ISO to DVD burner for Mac software. Insert a blank DVD disc into your optical drive. Turn the disc label toward you.
Click In the Source section, browse and import your ISO file. You can click the small folder icon beside. Make sure there is enough free space for burning an ISO file to DVD on Mac. DVD Copy for Mac can recognize your ISO file and play it in the Preview window. Later, select your inserted DVD disc from the Target list.
Step 3

Choose the DVD copy mode from Full Copy, Main Movie and Customize. You can also adjust Volume, Writing Speed, Copies and Target Size near the bottom. At last, click Next to burn ISO to DVD on Mac.
Part 2: How to Burn ISO to DVD on Mac with Finder
Finder is the default application for all Apple Mac OS X users. Actually, you can use Finder as the ISO burner software too.
Open Finder. Navigate and choose your ISO image file.
Step 2
Select Burn Disk Image ** to Disc from the File drop-down list. You can also get the same disk image to DVD burning option from the right-click menu.

Put a blank DVD disc into the optical drive.
Step 4
Click Burn to start making a bootable DVD from ISO file with Finder on Mac.
Wait until the ISO to DVD burning process ends. You will see a notification when it finishes.
Part 3: How to Burn ISO to DVD on Mac with Terminal
If you are familiar with Terminal, you can burn .iso to DVD on Mac with command lines too. Be aware that Terminal will auto start burning ISO to the inserted DVD disc after running the command. If it is not the disc you want to burn with ISO files, you need to remove it from the optical drive.
Step 1
Download an ISO file from the Internet. Or you can move the ISO file to the desktop from elsewhere.

Put a blank disc into your Mac OS X computer.
Step 3
Run Finder. Choose Applications. Double-click on Terminal in the Utilities folder.
Copy and paste hdiutil burn ~/Path/To/DiskImageFile.iso in the Terminal window. Remember to replace DiskImageFile with the real name of your DVD ISO file.
Step 5
After pressing the Enter key, you can find that Mac OS X burn ISO image to DVD immediately.
After that, you can play the DVD files with the DVD player on Mac conveniently.
Part 4: How to Burn ISO to DVD on Mac with Disk Utility
If you are running Mac OS X 10.10 or earlier operating systems, you can get one more tool to burn an ISO image file on Mac. No third-party ISO burner required. You can burn ISO to DVD with Disk Utility on Mac for free.
Insert an empty DVD disc into the optical drive. In the popping-up window, choose Action followed by Open Disk Utility. Then click OK to move on. You can also find Disk Utility in the Utilities folder. Just run Finder and open the Applications folder first.
Step 2
You can put your ISO file to the desktop. Later, drag and drop the ISO file into the left pane. You can see other hard drives in the same list.
Click Burn on the top toolbar. The Burn Disc dialog will be activated.
Step 4
Head to the After Burning section. Mark before Verify burned data. Click Eject disc to eject your bootable DVD disc safely.
Click Burn to save changes and exit the window. Just leave your computer alone to complete the ISO to DVD burning process.
Burn Iso To Usb Mac Os
Part 5: FAQs of Burning ISO to DVD on Mac
1. What is the best DVD burning software for Mac?
Iso Burn Usb For Mac Installer
We have picked up 4 DVD burning software on Mac and show the detailed steps of creating to DVD. How to pick up the best one? Which one is the best DVD burning software? Find the answer in this post: Best Free DVD Burning Review.
2. How do I get my Mac to recognize my external DVD drive?
There are some basic rules that you should follow to connect DVD drive to Mac while burning ISO to DVD. Firstly, you should turn on your Mac computer, then plug the USB cable into the Mac and to the device, after that, do not use the hub-plug your device directly into your Mac’s port, and finally, turn on the external drive when the USB cable is connected.
3. How can I get Mac backup DVD to ISO?
Actually, Mac offers the built-in tools, which let you backup DVD to ISO and stores the files on your Mac safely. For the detailed steps of backing up DVD to ISO on Mac, you can check it here.
4. How can I play a DVD on my MacBook Pro?
If your Mac has a built-in DVD drive, then you just insert the DVD into the drive, and DVD Player will open automatically. Moreover, you can plug an external DVD player like Apple USB SuperDrive into MacBook Pro for DVD playback. Besides, you can use the DVD player software to open the DVD files directly.
Conclusion
Depending on the file size of the ISO file, the DVD burning process may take for several hours. If you want to get the superfast burning speed, you should not miss AnyMP4 DVD Copy for Mac. The ISO burner software is capable to burn ISO files to DVD in batch quickly and losslessly. It has the ability to create DVD disc with ISO image files in perfect 1:1 ratio. You can also get customizable options to decide whether to burn DVD completely or flexibly. By the way, you can backup DVD disc to DVD folder or ISO files on Mac within the program in clicks too.
That’s all for how to burn ISO to DVD on Mac Catalina, Mojave and other versions. If you have any other professional or free ISO burners on Mac, you can share with us in the comments below. It is also welcome to share your experience of burning ISO files with Disk Utility, Terminal, Finder and AnyMP4 DVD Copy for Mac.
What do you think of this post?
Excellent
Iso Burn Usb For Mac Catalina
Rating: 4.8 / 5 (126 Votes)
0 notes
Text
Mac Os 10.14 Mojave Iso Download

There are many people who don’t know the importance of ISO files. The ISO files are very helpful in keeping a backup of some software and even of the operating system. That’s why it is recommended to burn bootable ISO to DVD or any other disc drive so that users can utilize it in the time of need. In this article, we are going to discuss the process of using a bootable ISO burner and creating a bootable disk using various softwares.
Mac OS Mavericks Download 10.9. File Format: ISO/DMG. File size: 5.1G. Torrent Download: Download. Direct Download: Download. Note: Let Us Know In the comments if any link is not working, We will update ASAP. About Mac OS Mavericks 10.9. Apple OS X Mavericks was first announced in June 2013 and was then released in October of 2013. It is also possible to install macOS versions in a VM: macOS Big Sur 11, macOS Catalina 10.15, macOS Mojave 10.14, macOS High Sierra 10.13, macOS Sierra 10.12, OS X El Capitan 10.11, OS X Yosemite 10.10, OS X Mavericks 10.9, OS X Mountain Lion 10.8, OS X Lion 10.7, OS X Lion Server 10.7, Mac OS X Snow Leopard Server 10.6, Mac OS X Leopard. Hello!, welcome to another article, in this article I will show you how to install macOS 10.14 Mojave on VirtualBox machine on Windows 10. If you have information about Mac Apple’s new operating system Mojave 10.14. I suggest you try once inside a Virtual machine instead of installing that on your Mac system.
Macos 10.14 Mojave Iso Download
Part 1. What is a Bootable DVD/USB
Beta 1 ISO Download. Update (July 26, 2018): macOS High Sierra 10.13.6 Released! Update (July 29, 2019) Apple introduced macOS 10.14.6 for developers. If you have already installed macOS Mojave, open the Mac App Store and download and install this version from Updates. Mac OS Mojave Installation with VMware. Home » Mac » MacOS Mojave » Download MacOS Mojave 10.14 ISO Image Free Download MacOS Mojave 10.14 ISO Image Free by admin May 13, 2020 257 Views / ( 1 votes, average: 5.00 out of 5).
Before you learn how you can burn bootable ISO to DVD, it is also important that you have some basic information about the term Bootable DVD/USB.
A Bootable file is a simple file that is configured to run when a system boots up. The Bootable files stored on DVD/USB runs even before the Operating system starts. A bootable DVD/USB is a disc that contains its own operating system which can be loaded into any system. The main purpose of the Bootable DVD/USB was to recover the failed system when the internal hard drive of a system is unable to load it.
Although the ISO files exist separately it is important that the ISO Image file is burned with the boot information file otherwise it won’t be able to load the software on the system. Not all the ISO files contain boot information as some files are only used to create a backup of a file system, not the entire software.
That’s why some third party bootable ISO burner software is needed to convert the non-bootable files into bootable files by combining the boot information files with them. So, if you want to burn the ISO files to a DVD/USB then you can use any of the mentioned tools in the article as all will do the task effectively.
Part 2. One-click to Burn ISO to Bootable DVD with Boot Information Included
The first and best option that users have to create bootable DVD from ISO is the Wondershare DVD Creator. It is the one stop solution for all the requirements of users. Whether you want to make a bootable disc, burn files to data disc or Blu-ray disc, the software can do it all for you. The Wondershare DVD Creator is packed up with 8 sub-tools that expand its use significantly. Hence, it is considered the most powerful utility tool which also has a premium version to allow the users to go beyond just burning the files.
Wondershare DVD Creator


· Convert H.264 videos to DVD/Blu-ray Disc/ISO File/DVD Folder/Data Disc with fast speed and high-quality output.
· Edit H.264 videos with features of cropping/trimming/rotating videos, add subtitle, apply effects, and others.
· Select H.264 to DVD menu with 100+ template design from Movie, Memory, to Travel theme.
· Customize H.264 DVD menu with parameters such as background image, music, text, and others.
· Additional functions including ISO to DVD, Data Disc, Video Editor, Slideshow Maker, DVD to Video, DVD to DVD, One-click to Burn DVD, etc.
· Both DVD5 and DVD9 disc are available.
· Supported OS: Windows 10/8/7/XP/Vista, Mac OS 10.14 (Mojave), 10.13 (High Sierra), 10.12, 10.11, 10.10, 10.9, 10.8, 10.7, 10.6.
Watch Video Tutorial to Burn ISO to Bootable DVD with Boot Information Included
Guide to Burn ISO to Bootable DVD with Boot Information Included
Step 1 Download and launch the Wondershare DVD Creator
At first download the Wondershare DVD Creator software on your system and install it. Once it is installed, launch the software and the main interface will open up.
Step 2 Select the 'More DVD Tools' then Choose the 'ISO to DVD'
From the main interface, select the More DVD Tools options and you will be navigated to another screen where you will have several options. Select the ISO to DVD option and move on to the next screen.
Step 3 Add the ISO File
Now, you can add the ISO file that you want to burn on the USB or DVD. Tap on the '(…)' icon and file explorer will open up and you can find the file where it is located and then load it to the software interface.
Step 4 Selec the Burner and then Tap the Burn Option
Select the burner and then tap on the Burn option and the process will initiate.
Step 5 Tap on the 'Burn to another DVD'
When the process finishes you will get a notification alert. You will also have an option to burn the same ISO file to another disc. If you want to do that and then tap on the “Burn to another DVD” option, otherwise tap on Finish.
With the help of Wondershare DVD Creator, you can also deform many other tasks like burning the media files to multiple types of the data disc.
Part 3. 2 Ways to Make Bootable DVD from Non-bootable ISO Files
There are also some other methods that can be used to burn ISO to bootable DVD. The most popular tools that are used to make a bootable DVD from non-bootable ISO files are given below. We have explained the process users would have to carry out to make a bootable disc from ISO files.
Method 1: Create Bootable DVD from ISO with WinISO
The WinISO is a professional utility tool which is designed to perform multiple burning operations. It can be used to make disc image files from different drives, convert files from one format to another, and especially burn ISO image files to various disc drives. The software is also popularly known as ISO Creator.
Step 1 Download and install the software on the system and then run the software. You will see the main interface of the software.
Step 2 At first, we will make a bootable ISO file. Open the non-bootable ISO file and then set the Boot image file. You will have two options to make a bootable Image file.
The first one is to click Bootable on the toolbar and then choose the Set Boot Image option. A dialog box will appear on the screen stating select a boot image file. Choose the Boot image file and then click on open and the file will be displayed on your screen.
The second method is to load the boot information from the driver or image file. Click bootable on the toolbar and then select the Import from the option. Select the driver and the file will be imported. You will have to choose whether you want to set the information into a current working image or save it to file. Finally, select the Set into a Current option and move on to the next step.
Step 3 Now, it turns to burn the bootable ISO file to DVD. Insert a blank disc and then tap on the burn option. The process will start and will complete in a few minutes. And you will have a bootable DVD which you can use on multiple systems.
Mac Os 10.14 Mojave Iso Download Iso
Other than the WinISO, you will have one more option that can help you to burn ISO to Bootable DVD which is the PowerISO software.
Method 2: Burn ISO to DVD Bootable with PowerISO

Macos 10.14 Mojave Iso Download

Download Mac Os Mojave 10.14 Iso
The PowerISO software is a very powerful image processing tool that allows the users to create, edit, burn, compress, encrypt, split and convert the ISO files and mount them to a virtual drive. The software has a full compatibility with different types of formats and data disc support. To convert ISO file to bootable DVD, you can use the software as it carries out the process with few simple steps.
But first, remember some key points. The first one is that you have the system installation files with boot information; the second one is that you have the PowerISO software installed in your system and the last one is that you have a blank DVD or USB with minimum 7.5 GB of space left.
Step 1 Right click on the software and tap on the “Run as Admin” run the software as Administrator. A dialog box will appear, tap on Yes and the software’s interface will open up.
Step 2 Select the type of DVD from the bottom right corner of the interface. Now, form the Toolbar, tap on the add option and choose the installation files to load them to the software interface.
Step 3 Once all the files are added, tap on the “Action” from the menu bar and select the Boot option and further select the “Add Boot information” option. Locate the files which have the boot information and load them into the software interface by tapping on the Open button and clicking on 'OK'.
Step 4 Now insert a blank DVD or USB into the drive and click on the Burn option. Certain options will appear on the screen where you can customize the Burning drive, speed, and some more settings. Make sure that you select the Current Compilation option from the Source file and then check the Verify data box and again tap on the Burn option.
The process will be completed in a while and you will have a bootable DVD/USB which can be used on a different system and even in the different OS.
Conclusion:
In the article, we have briefly discussed how to make bootable DVD from ISO using three different softwares. Using the PowerISO and WinISO can also be a better option but they are only made to perform a single function. But the Wondershare DVD Creator has so many functionalities that you will be able to carry out many tasks easily and quickly.
0 notes