#Use Terminal To Make A macOS USB Installer
Explore tagged Tumblr posts
Visit Tumblr Blog
Explore Tumblr blogs with no restrictions, modern design and the best experience.
Last Seen Tumblr Blogs


Fun Fact
China blocked Tumblr because of pornography and censorship problems in 2013.
Text
Hi, you summoned me, the big gorgeous linux fairy, and this is the Jack Joy's Guide to Linux. This is going to be a long read, so be prepared.
Chapter 0: What do we want? The first thing I would recommend is asking what you want from linux. Linux is open source, has 30 years of dedicated nerds working on it, and is driven by giving people choice and control over their computer. You got options, but with that decisions to make. Is it simplicity? Is it Stability? Do we wanna game, or is this basically just a fancy browser machine with some word processors attached? It all depends on knowin what you want, because there is going to be something that will cater to your needs. Chapter 0.5: Making the tough call The second thing to know about linux is that you are going to be giving up some stuff to gain a LOT of control over your computer. Linux has done a wonderful job getting easier about what it offers, but ultimately you are going to run into some jank. You are going to have to be prepared to touch the scary obelisk that is the terminal. And you are going to have to say goodbye to some programs that just don't work on linux. If you use Adobe Products you are SOOL for example. There are replacements, but you will inevitably end up having to learn something new. Personally, I found the task to be refreshing to get myself acquainted with stuff, but that isn't what everyone wants. Hopefully this is not a dealbreaker.
Chapter 1: Go Oynon, I need to collect my tools.
To Install Linux, you are going to need a few things, and before you begin to just follow this guide as you are doing it, read this entire chapter as there are going to be some things that are gonna be important to know before you get into things.
A flash drive (preferably just a big USB stick, messing around with USB to SD card readers got me a fucked install of mint once)
Balena Etcher
Your preferred Flavor of linux
Some knowledge on the bios of your machine
And preferably a secondary boot device in your machine (IE a second SSD)
First grab the ISO file of the OS you want to install on your PC, which maybe you have already had a potential distro of linux in mind. If not, let me recommend some potential good candidates for someone first messing around with linux.
Side Tangent 1.1: Jack Joy's Pixie Picks for easy Linux Distros
Linux Mint is the gold standard for stupid simple linux distro. It just works*, it comes with a DE(desktop Enviroment) that is reminiscent of windows 7 so adjustment should be minimal and overall, is very uncomplicated. Is a bit bland tho. *(things still break sometimes)
Ubuntu meanwhile you probably already heard of. Think of it as the MacOS of Linux. It has the most company support, it's DE called GNOME is very MacOS like in it's design language, incredibly stable, but also very poor in customization. If something says tested on linux, a lot of the time, it means tested on Ubuntu.
EndeavourOS is my linux distribution of choice. It's based off of Arch Linux, which is what powers the Steamdeck with SteamOS, and as such has a lot of nifty Arch linux niceties, like the Arch User Repository, and KDE Plasma as it's DE. It tries to combine being user friendly while letting you tinker with everything, it is on the cutting edge of linux, but that also means that stuff CAN break more often.
With this side tangent over, install balena etcher and flash your ISO on your USB stick.
Reboot your PC, and as it boots enter into your BIOS. Most systems use the F12 function key, but it might also be any of the other F keys because no one can agree on anything in the fucking tech space. From the BIOS your going to want to look into your boot order and if your USB stick is available, pull it up in the order. If it isn't there, your gonna have to wrestle with your BIOS as there might be some secure boot shenanigans going on. BIOS' vary so much that you'll have to look into your system in particular (which could be a good time to learn more about your PC in general).
Once done, exit out of the BIOS and things should hopefully be happening. Depending on the Linux Distro you used this might look more or less scary, but if it looks like it is doing some WEIRD SHIT instead of booting windows, it's going good. At some point you'll enter a "live enviroment" of your OS (a version of the OS that exists entirely from the USB that will be gone once you reboot) and an installer will be on the desktop or have popped up automatically (at least, for all three of the beginner friendly Distro's I recommended. Please don't try to install raw Arch Linux on your first Linux Install.)
Once the installer gets to formatting drives is where we have to do a hard pause, because formatting drives is SCARY and DANGEROUS if you aren't doing it to an extra drive that has nothing in it. In general it is always scary and dangerous. The installer is going to give you a bunch of options on where it wants to be put, and what it is going to do to the drive where it makes itself at home. If you are putting this on an extra SSD, tell it to do what it wants with that extra SSD and bob is your uncle. If you are putting this on the same drive as your windows install, you are going to have to be real careful and tell it to make a partition, give it however much space you can give it, and voila. Or, if you just want to ensure you never go to windows ever again, nuke the entire drive, in which case you might want to invest in another USB drive to keep a clean copy of a non shit windows OS. Think of that USB drive as an "In case of emergency, Break glass" type safety precaution.
The Installer will finish, either asking you to reboot the PC or doing so by itself, and once it is done it will now do the standard linux boot sequence. Congratulations. You have transitioned your PC from widows to whatever flavor of Linux picked your fancy. From here on out, what you do with your PC is up to you and you alone. Fuck around. Look at all the software that came with your linux install, especially the actual software store where you can get even more stuff.
Hope this guide helped.
im sure someone already made a post about it but i came across a ublock origin add-on that blacklists around 950 AI websites and disables AI overview ☝️ so u can be free from seeing AI in your search
#linux#linuxposting#I am sorry this is such a long guide#i wanted to make it shorter but it always felt like i forgot something that might be messed up by someone#i wanted to be as thourough as possible
85K notes
·
View notes
Text
What is your development process for Flutter apps?

Flutter is an open-source portable application improvement structure made by Google. It assists you with making superior grade, quick, and delightful applications for iOS, Android, and the web - all from a single codebase.
Flutter has quickly become a popular choice among developers. Because of its usability and execution, you can construct lovely versatile applications utilizing Flutter.
Additionally Read More: Best Mobile App Development company in India
How Flutter is driving the race in cross-stage application advancement?
Ripple has advanced toward each industry simply in light of its powerful constitution with important apparatuses and highlights.
Developer friendly
Flutter has a simple expectation to learn and adapt, regardless of whether you have complete advancement experience. Engineers with information in Java, Python, C#, or other item situated programming dialects can begin a Shudder project in a moment or two. Since Ripple utilizes Dart, which is both primarily and linguistically like these languages.
In addition, designers with less experience can use Ripple's broad gadget library to make applications absent any coding. Also, Vacillate likewise has fastidious documentation and various model applications in its "cookbook" to direct engineers and suggest a Flutter boot camp.
Consistency of business logic and UI
Cross-stage application improvement should give the capacity to create applications for different stages with one single codebase. In any case, no structure empowers sharing of UI codebase inside various stages with the exception of Flutter.
Not at all like other cross-stage systems, Vacillate requires no stage explicit UI part to deliver the UI. In Flutter, the application UI is shown as a drawing on material and delivered utilizing the Skia motor. Subsequently, Ripple empowers sharing of business rationale as well as UI, settling time and endeavors without huge effect on the application execution.
Install Android Studio
Android Studio offers a total, incorporated IDE experience for Flutter. In addition, you can involve the Flutter SDK for any content manager advancement experience. However, IDEs furnish you with highlights like Sentence structure featuring, code fruition, and debugger which are truly useful during the improvement cycle.
Also Read More: Educational app development
Install the Flutter and Dart Plugins
Introduce these to begin another venture all alone or with the assistance of software development company:
•Start Android Studio
•Open module inclinations (on macOS go to Preferences> Modules; on Windows and Linux go to File>Settings>Plugins).
•Open module inclinations (Configure>Plugins as of v3.6.3.0 or later).
•Peruse vaults of the Ripple module and snap introduce
•Click yes when incited to introduce the Dart module.
•Click restart when prompted.
Create a Flutter Project
To make another ripple project, you really want to choose the Vacillate Application> Start Another Flutter Project> Android Studio.
When you click the Vacillate Application, on a next screen you should give the Flutter SDK way and basic project details.
At long last, presently set a space name for the bundle. You really must involve an extraordinary name for the bundle (for marking and distributing purposes). If you don’t have any domain, then you can use com.github.. And leave the other options set to default values and confirm by clicking finish.
Run the Build: Flutter Doctor
To ensure that your app set up the environment is correctly working, it is worth to open the terminal (Alt+F12 in Android Studio) and involve the Flutter Doctor command.
To make it capability appropriately, you really want essentially usable Vacillate with one working IDE and an associated gadget (physical or emulator)
Additionally Read More: E learning app development company in USA
•Testing Build on Android
In the event of utilizing the actual gadget, ensure it should be associated through a USB link and have USB troubleshooting empowered.
On account of Android Emulator, you really want to make a virtual gadget. And for that, you can either hire mobile app developer or just open an AVD manager by using the on the toolbar or pressing Ctrl Alt+F12 and typing the action name.
Start Coding the Flutter App
Since you have proactively made the undertaking with the name of Song App. When you begin coding the application, the greater part of the application engineers alter lib/main.dart, where the Dart code lives. You can supplant the items in the lib/main.dart or erase all of the code from lib/main.dart. Supplant all the code with the accompanying code which shows "Tunes Exhibition'' in the focal point of the screen.
Use An External Package
To keep your assignment arranged and straightforward, you are encouraged to begin utilizing an open-source bundle name english_words. Attempt to involve normal English words that have some usefulness also.
Add a Stateful Widgets to your App
In Flutter application development, everything is a gadget which is an application itself. Stateless and stateful gadgets are the gadgets which accompany variable and unchangeable circumstances. The platform gadget is a structure that incorporates the standard screen parts. Pecking order can be a seriously troublesome interaction and have an application bar, body, menu and others.
Flutter’s widget saves you a ton of time and endeavors on application improvement, however it includes a strategy to construct a Widget. The Widget should contain other widgets.
0 notes
Text
How To Create a Bootable macOS Catalina USB Drive
How To Create a Bootable macOS Catalina USB Drive

How To Create a Bootable macOS Catalina USB Drive.
Making a bootable USB installer for the latest macOS Catalina helps in many ways. One of the reasons you might want to do this is because it allows you to perform a completely clean install of the update on your Mac. Other areas where you can use a bootable macOS installer is when you have multiple Macs and want to install the same update on…
View On WordPress
#Create a macOS Catalina USB Installer Using Disk Creator#How To Create a Bootable macOS Catalina USB Drive#How To Use The macOS Catalina USB Installer#Use Terminal To Make A macOS USB Installer
0 notes
Text
Running The Sims 4 Folder from an External Drive.
If you are a Mac player like me, you are most likely running out of space or are currently completely out of space.
This is how I moved The Sims 4 (TS4) from my computer to an external hard drive.
Some users are able to drag and drop the Electronic Arts folder to the drive, I however was not.
⛔️ WARNING
Entering incorrect commands into Terminal can have severe consequences both for the stability of your operating system and your data. You should only follow these instructions if you are comfortable using Terminal and have a solid backup of your system.
If anything goes completely wrong you can always wipe and reinstall your macOS through Internet Recovery or bootable installer (advanced option) but you WILL lose all your data.
I am using WD - My Passport Ultra for Mac 2TB External USB 3.0 Portable Hard Drive from BestBuy
⚠️⚠️⚠️⚠️⚠️⚠️⚠️⚠️⚠️⚠️⚠️⚠️⚠️⚠️⚠️
CONTINUE AT YOUR OWN RISK
I highly suggest reading the entire post before making any changes.
NOTE: These instructions move the ENTIRE Electronic Arts (EA) folder to the external drive. Any game you have installed and stores data in the EA folder will need to have the external drive plugged in to be accessed. This includes Sims 3, Sims Medieval, Sims 4, Sims 4 Legacy Edition and any other game folders in your EA folder.
As a good measure, backup your EA folder to a separate external drive or cloud storage.
Plug in your external storage device and check it is properly mounted in Finder or on your Desktop. Tech & Design on YouTube has an easy to follow step by step walkthrough on how to set up your external drive for Mac. ➡️ Here.
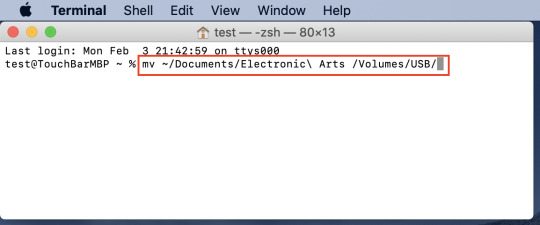
Step 1 – Moving the Electronic Arts folder to the external drive:
First - You have to tell your Mac to move the EA folder from the Documents folder to the external drive. To do so, open any text document and copy and paste the following command into the document.
(mv means move and the tilde “~”indicates your home directory) This is purely for editing purposes:
mv ~/Documents/Electronic\ Arts /Volumes/USB/
Replace USB with the name of your external drive. For example, if your external is called EXTERNAL the command would be:
mv ~/Documents/Electronic\ Arts /Volumes/EXTERNAL/
However, if your external is called EXTERNAL DRIVE you have to introduce backslashes before the spaces in the name (like Electronic Arts in the Documents folder):
mv ~/Documents/Electronic\ Arts /Volumes/EXTERNAL\ DRIVE/
To show where the spaces are, a black X in the command below (for visual purposes only):
mvX~/Documents/Electronic\XArtsX/Volumes/EXTERNAL\XDRIVE/
IMPORTANT: Note that the directory file paths are separated with forward slashes / and file and folder names with multiple words are separated with backslashes \ .
If your EA folder is within another folder on the external you must state this clearly in the command. For example, if your EXTERNAL DRIVE has a folder called Game User Data and you would like the Electronic Arts folder to be within this folder the command would look like this:
mv ~/Documents/Electronic\ Arts /Volumes/EXTERNAL\ DRIVE/Game\ User\ Data/
and with the black X denoting the spaces:
mvX~/Documents/Electronic\XArtsX/Volumes/EXTERNAL\XDRIVE/Game\XUser\XData/
Once you are happy with the command, open Terminal and copy and paste it from the text document into the Terminal window so it looks like this but with your own information. If it is highlighted black just press the right arrow on your keyboard to move the cursor to the end of the line:
Hit enter/return to execute the command. Your EA folder should have moved from your Documents folder to your external drive. Open the Documents folder to check and open a second Finder window showing the external drive.
Step 2 – Creating the symlink for the Electronic Arts folder:
Copy the following command into your text document:
ln -s /Volumes/USB/Electronic\ Arts ~/Documents/
replacing USB with your external drive name and paying attention to the forward and back slashes and spaces. If we use the same example as before with the EXTERNAL DRIVE > Game User Data file paths and names this would be the result:
ln -s /Volumes/EXTERNAL\ DRIVE/Game\ User\ Data/Electronic\ Arts ~/Documents/
and with the black X denoting the spaces:
lnX-sX/Volumes/EXTERNAL\XDRIVE/Game\XUser\XData/Electronic\XArtsX~/Documents/
Once you are done with the command, open Terminal and copy and paste it from the text document into the Terminal window so it looks like this but with your own information. If it is highlighted black just press the right arrow on your keyboard to move the cursor to the end of the line:

Hit enter to execute the command. An Electronic Arts folder will appear in your local Documents folder as an alias with a little arrow in the bottom left corner:
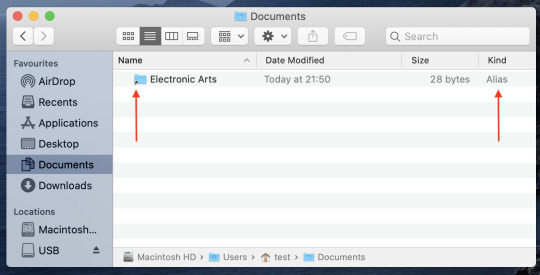
The actual Electronic Arts folder is still safe on the external drive (The game is also installed on the external, ignore the app in the image below):

Step 3 – Launch your game:
Launch the game as you would normally. There should be no notice difference, you should be able to pick up where you last saved the game. There may be extended loading, but as a Mac player, we are use to it.
You will also have to change the installation path on Origin, this allows any updates and new packs/ kits you purchase to be downloaded on your external drive.
A super helpful step by step guide ➡️ Here.
Happy Simming!
-Beans
#TheSims4#Mac#TS4#TS4CC#TheSims4Mac#TheSims4CC#TheSims4CustomContent#TS4Mods#TheSims#EA#Orign#BlackGirlGamer#GirlGamer
7 notes
·
View notes
Text
I would encourage people to try different distros over time to see which one suits you best. I use Archcraft, which isn't beginner-friendly. But the neat thing about Linux is that you can use a USB stick to boot into a "live" OS and try it before installing.
In the olden times, this was more often done by burning a large file to a blank DVD disc, but it's become much easier to do with the USB stick method. But especially in those days, you wanted to try before installing. For one thing, installation used to take a really long time. And without trying it, you couldn't be 100% sure whether all your hardware would work as expected. There are still some issues in that area, but it's a lot better than it used to be.
Distrochooser is a great place to start. I'd also suggest checking out the following:
This is a great resource. Suppose you have a computer, or you're considering buying a new one, and you want to know how compatible the hardware will be with Linux. You can look up the model of the computer and see information on it that's been uploaded by actual users who have that same machine and the distros they tested on it. You can also look up information by specific part, like a sound card that isn't working properly out of the box, as an example.
This kind of thing used to be a much bigger headache, but there can still be some issues. Which is also why I'd encourage most people to dual-boot Windows or macOS alongside a Linux partition. There are a ton of guides on how to do this. You'll have to find one for your specific machine or one similar, like from the same company and around the same year.
You don't have to get comfortable with using a terminal, but it's a good idea. The more you understand how Linux works, you can customize it and make it your own in ways you just can't with Windows or macOS. I really like that about Archcraft. There's a good base, and I can add to it in ways that work for me.
You may also spend a while distrohopping, bouncing around until you find one that suits you, and then you may decide after a while to hop around some more. I've tried dozens of them over the years. It started as a curiosity thing I was messing with in my dorm room. Then my laptop was stolen, and I basically cobbled one together out of spare parts. But it couldn't run Windows XP for more than about 20 minutes before crashing and powering down. So my Linux skills became useful, and I learned to make do with a machine that had only about 35 GB storage. I wouldn't recommend it, but I'm glad I had the skills and knowledge necessary to put that together. When I was stranded at my dad's house during the recession for a year and a half, it was my only lifeline to the world outside my tiny hometown.
Seriously, Linux is amazing. You should explore it, especially if you're a curious person like me. There's a lot to explore, and that's one reason why I like it. I try new or obscure distros sometimes just for fun. But that's probably the autism.
I might add more to this but I'm trying to put together a guide for people who are new to Linux and curious about it, because more and more people seem to be getting sick of Windows all the time. I keep a Windows partition because there are a couple of games I like that work better on that OS, so it's just a matter of practicality. You might need a Windows (or Mac) partition for another reason, like work or something. Once again, it's about finding what works best for you. I think a lot of people would be happier with Linux, and I'm really glad it's more doable now than when I started.
"windows 11 upgrade ready!" "your computer is eligible for windows 11!" "download windows 11 now!"

56K notes
·
View notes
Text
Download Macos El Capitan Usb
Nov 07, 2015 Boot from the USB Drive. Restart your computer and boot from the USB drive (Press Esc/F8/Del to access the boot selection menu). Use the arrow keys to select Boot OS X Install from Install OS X El Capitan (It should be selected by default). Press the spacebar and select Boot Mac OS X in verbose mode.
Mac Os 10.11 Download
Mac Os El Capitan 10.11 Download
El Capitan Installer
Download Mac Os El Capitan Iso
Download Os X El Capitan Usb Stick
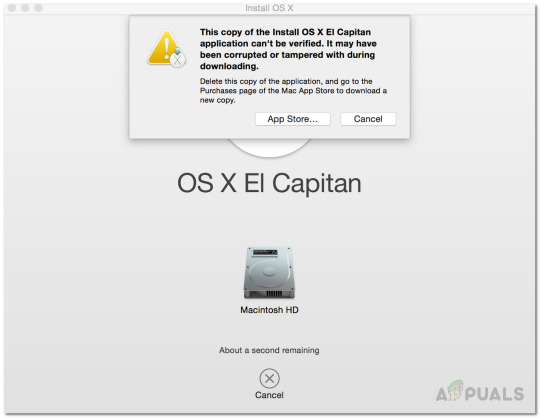
Are you trying to make a bootable installer? Do you have the El Capitan installer downloaded from the App Store? You cannot make a bootable DVD but you can make a bootable flash drive.
To create bootable USB installer for Mac to Install Mac OS X El Capitan on Windows, on Mac or VirtualBox, you have to create bootable USB flash drive. Let’s get started on how to do it. First, you have to download TransMac software for Windows and install it on your computer. Here are the instructions. Go to Section 4 and click on Download OS X El Capitan. This downloads InstallMacOSX.dmg to your Downloads folder. The next section can only be done on a mac that is capable of running El Capitan, a mac that came preinstalled with an OS later than El Capitan will refuse to do the next bit. Mac OS X El Capitan ISO – Download Mac OS El Capitan ISO Setup Files Free: The MacBook and the Apple’s Mac are the second most widely used and famous portable Computers. The first place is occupied by the Family of Windows Computers, this is due to their cheaper prices, and ease of access.
Bootable USB Installers for OS X Mavericks, Yosemite, El Capitan, and Sierra
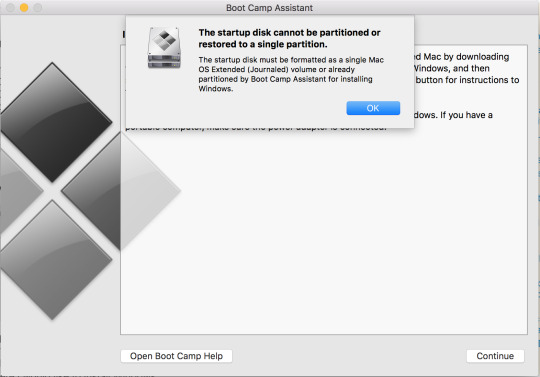
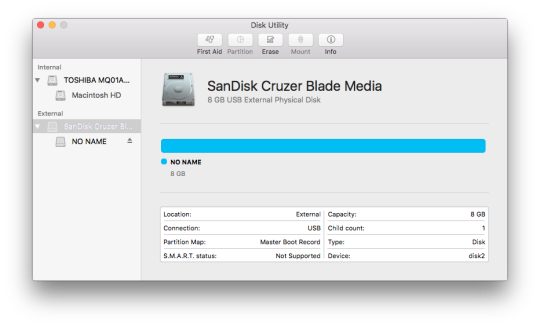
First, review this introductory article: Create a bootable installer for macOS. Second, see this How To outline for creating a bootable El Capitan installer. Simply replace the Terminal command with the one from the preceding article by copying it into the Terminal window. You will need an 8GB or larger USB flash drive that has been partitioned and formatted for use with OS X.
Drive Partition and Format
Open Disk Utility in the Utilities' folder.
After Disk Utility loads select the drive (out-dented entry with the mfg.'s ID and size) from the side list.
Click on the Erase tab in the Disk Utility toolbar. Name the drive, 'MyVolume'. <---- IMPORTANT!
In the drop down panel set the partition scheme to GUID. Set the Format type to Mac OS Extended (Journaled.)
Click on the Apply button and wait for the Done button to activate. When it does click on it.
Quit Disk Utility.
Create Installer
Open the Terminal in the Utilities' folder. Choose the appropriate command line (in red) depending upon what OS X installer you want. Paste that entire command line from below at the Terminal's prompt:
Command for macOS High Sierra:
Mac Os 10.11 Download
sudo /Applications/Install macOS High Sierra.app/Contents/Resources/createinstallmedia --volume /Volumes/MyVolume --applicationpath /Applications/Install macOS High Sierra.app
Command for macOS Sierra:
sudo /Applications/Install macOS Sierra.app/Contents/Resources/createinstallmedia --volume /Volumes/MyVolume --applicationpath /Applications/Install macOS Sierra.app
Command for El Capitan:
sudo /Applications/Install OS X El Capitan.app/Contents/Resources/createinstallmedia --volume /Volumes/MyVolume --applicationpath /Applications/Install OS X El Capitan.app
Command for Yosemite:
sudo /Applications/Install OS X Yosemite.app/Contents/Resources/createinstallmedia --volume /Volumes/MyVolume --applicationpath /Applications/Install OS X Yosemite.app
Command for Mavericks:
sudo /Applications/Install OS X Mavericks.app/Contents/Resources/createinstallmedia --volume /Volumes/MyVolume --applicationpath /Applications/Install OS X Mavericks.app
Mac Os El Capitan 10.11 Download
Press RETURN. You will be asked for your admin password. It will not echo to the Terminal window. Then press RETURN again. Wait for the return of the Terminal prompt signifying the process has completed. It takes quite some time to finish. Be patient.

Mar 3, 2018 7:47 PM
Download DiskMaker 2.0.2 ( ZIP file, about 3 MB). NB: this version of DiskMaker X is not able to build a Mavericks installer from Mac OS X 10.6.8. More information here. To create a bootable El Capitan installer drive, you need the El Capitan installer from the Mac App Store and a Mac-formatted drive that’s big enough to hold the installer and all its data. This can be a hard drive, a solid-state drive (SSD), a thumb drive, or a USB stick—an 8GB thumb drive is perfect. Windows users can also Download Hackintosh OS X 10.11.5 El Capitan ISO Image File for Bootable USB and DVD. OS X El Capitan Hackintosh System Requirements: Mac OS X El Capitan 10.11.5 (15F34) is officially compatible and supported with computer hardware's mentioned below.
Bootable USB Installers for OS X Mavericks, Yosemite, El Capitan, and Sierra
First, review this introductory article: Create a bootable installer for macOS. Second, see this How To outline for creating a bootable El Capitan installer. Simply replace the Terminal command with the one from the preceding article by copying it into the Terminal window. You will need an 8GB or larger USB flash drive that has been partitioned and formatted for use with OS X.
Drive Partition and Format

Open Disk Utility in the Utilities' folder.
After Disk Utility loads select the drive (out-dented entry with the mfg.'s ID and size) from the side list.
Click on the Erase tab in the Disk Utility toolbar. Name the drive, 'MyVolume'. <---- IMPORTANT!
In the drop down panel set the partition scheme to GUID. Set the Format type to Mac OS Extended (Journaled.)
Click on the Apply button and wait for the Done button to activate. When it does click on it.
Quit Disk Utility.

Create Installer

Open the Terminal in the Utilities' folder. Choose the appropriate command line (in red) depending upon what OS X installer you want. Paste that entire command line from below at the Terminal's prompt:
Command for macOS High Sierra:
sudo /Applications/Install macOS High Sierra.app/Contents/Resources/createinstallmedia --volume /Volumes/MyVolume --applicationpath /Applications/Install macOS High Sierra.app
Command for macOS Sierra:
sudo /Applications/Install macOS Sierra.app/Contents/Resources/createinstallmedia --volume /Volumes/MyVolume --applicationpath /Applications/Install macOS Sierra.app
El Capitan Installer
Command for El Capitan:
sudo /Applications/Install OS X El Capitan.app/Contents/Resources/createinstallmedia --volume /Volumes/MyVolume --applicationpath /Applications/Install OS X El Capitan.app
Mac Os El Capitan Download Usb Stick To Computer
Command for Yosemite:
sudo /Applications/Install OS X Yosemite.app/Contents/Resources/createinstallmedia --volume /Volumes/MyVolume --applicationpath /Applications/Install OS X Yosemite.app
Command for Mavericks:
sudo /Applications/Install OS X Mavericks.app/Contents/Resources/createinstallmedia --volume /Volumes/MyVolume --applicationpath /Applications/Install OS X Mavericks.app
Download Mac Os El Capitan Iso
Press RETURN. You will be asked for your admin password. It will not echo to the Terminal window. Then press RETURN again. Wait for the return of the Terminal prompt signifying the process has completed. It takes quite some time to finish. Be patient.
Download Os X El Capitan Usb Stick
Sep 13, 2018 1:16 PM
1 note
·
View note
Text
El Capitan 10.11 6 Dmg Google Drive

El Capitan 10.11 6 Dmg Google Drive Windows 10
El Capitan 10.11 6 Dmg Google Drive Free
El Capitan 10.11 6 Dmg Google Drive Mac
Mac Os Dmg Install Mac OS X El Capitan 10.11 ISO / DMG Files Direct Download - ISORIVER. Mac OS X El Capitan: Being the 12th major release of macOS, Mac OS X El Capitan belongs to the Macintosh-Unix family of OS. It was majorly released for server. Keep talking and nobody explodes free download mac. Price Currency: USD Whatsapp for laptop. Mac Os X El Capitan 10.11.6 Google Drive Free. OS X El Capitan Partitioning. With the help of screenshots, I will be explaining some basic set of activities that are to be done while partition the OS X El Capitan drive. Alternatively, the same procedure will be explained with the help of a disk manager utility known as Stellar Partition Manager. Mac OS X El Capitan 10.11.6 Free Download Download Mac OS X El Capitan 10.11.6 latest version DMG bootable image setup by clicking the below button. It is a reliable operating system with support for all the latest devices and different enhancements. Mac OS El Capitan was released to manufacturing on 20th September 2015, almost three and a half years ago. Its latest version 10.11.6 (15G22010) was released on 9th July 2018, almost 7 months ago. This is latest version DMG image iso file OS X El Capitan 10.11.6 (bootable) for Mac users. Mac OS X El Capitan 10.11.6: Product Review: Sep 22, 2016 Unmount the dmg file named “Install macOS Sierra.dmg” (if it is mounted:) Go to the top menu of “Disk Utility” window and select “images” and then “Scan image for restore”.
These advanced steps are primarily for system administrators and others who are familiar with the command line. You don't need a bootable installer to upgrade macOS or reinstall macOS, but it can be useful when you want to install on multiple computers without downloading the installer each time.
MacOS Sierra 10.12 Installation ISO Media. MacOS High Sierra yang saya bagikan melalui link google drive di sini masih versi awal yakni 10.13.1. Sedangkan saat ini yang terbaru sudah sampai 10.13.4. Baiklah langsung saja linknya di bawah ini. Saya pecah menjadi 5 part agar gampang mengunduhnya. Belum sempat unggah yang single link. Tautan Unduhan MacOS High Sierra Google Drive.
Download macOS
Download Mac OS Sierra 10.12.dmg Google Drive Download Mac OS Sierra 10.12.dmg from Torrrent. In this article, you will learn about MacOS High Sierra with its features and I will guide you on how you can download the dmg file for MacOS High Sierra in different ways. So, focus top to toe and read the complete article.
Find the appropriate download link in the upgrade instructions for each macOS version:
macOS Catalina, macOS Mojave, ormacOS High Sierra Installers for each of these macOS versions download directly to your Applications folder as an app named Install macOS Catalina, Install macOS Mojave, or Install macOS High Sierra. If the installer opens after downloading, quit it without continuing installation. Important: To get the correct installer, download from a Mac that is using macOS Sierra 10.12.5 or later, or El Capitan 10.11.6. Enterprise administrators, please download from Apple, not a locally hosted software-update server.
Mac Os Sierra Dmg Torrent
OS X El Capitan El Capitan downloads as a disk image. On a Mac that is compatible with El Capitan, open the disk image and run the installer within, named InstallMacOSX.pkg. It installs an app named Install OS X El Capitan into your Applications folder. You will create the bootable installer from this app, not from the disk image or .pkg installer.
Use the 'createinstallmedia' command in Terminal
Connect the USB flash drive or other volume that you're using for the bootable installer. Make sure that it has at least 12GB of available storage and is formatted as Mac OS Extended.
Open Terminal, which is in the Utilities folder of your Applications folder.
Type or paste one of the following commands in Terminal. These assume that the installer is still in your Applications folder, and MyVolume is the name of the USB flash drive or other volume you're using. If it has a different name, replace MyVolume in these commands with the name of your volume. Catalina:* Mojave:* High Sierra:* El Capitan:
Press Return after typing the command.
When prompted, type your administrator password and press Return again. Terminal doesn't show any characters as you type your password.
When prompted, type Y to confirm that you want to erase the volume, then press Return. Terminal shows the progress as the bootable installer is created.
When Terminal says that it's done, the volume will have the same name as the installer you downloaded, such as Install macOS Catalina. You can now quit Terminal and eject the volume.
El Capitan 10.11 6 Dmg Google Drive Windows 10
* If your Mac is using macOS Sierra or earlier, include the --applicationpath argument, similar to the way this argument is used in the command for El Capitan.
Use the bootable installer
After creating the bootable installer, follow these steps to use it:
Plug the bootable installer into a compatible Mac.
Use Startup Manager or Startup Disk preferences to select the bootable installer as the startup disk, then start up from it. Your Mac will start up to macOS Recovery. Learn about selecting a startup disk, including what to do if your Mac doesn't start up from it.
Choose your language, if prompted.
A bootable installer doesn't download macOS from the Internet, but it does require the Internet to get information specific to your Mac model, such as firmware updates. If you need to connect to a Wi-Fi network, use the Wi-Fi menu in the menu bar.
Select Install macOS (or Install OS X) from the Utilities window, then click Continue and follow the onscreen instructions.
Mac Os Dmg Download
Learn more
For more information about the createinstallmedia command and the arguments that you can use with it, make sure that the macOS installer is in your Applications folder, then enter this path in Terminal:
Catalina:


El Capitan 10.11 6 Dmg Google Drive Free
Mojave:
Download Mac Os High Sierra 10.13.6 Dmg Google Drive
High Sierra:

El Capitan 10.11 6 Dmg Google Drive Mac
Mac Os Dmg File Download

El Capitan:
1 note
·
View note
Text
Make El Capitan Bootable Usb
Bootable USB Installers for OS X Mavericks, Yosemite, El Capitan, and Sierra
As usual, Apple no longer supply a bootable USB Flash Drive with latest OS X releases - including the new OS X 10.11 El Capitan. Using this tutorial you will.
Banglazed said: For simplicity, download the El Capitan, rename flash drive to ElCapInstaller, enter that above into terminal and boom done. Don’t need to format the USB since the command used in the terminal will format and create the bootable USB.
How to make a bootable USB drive on Linux Mint (19.3) to allow you to install Mac OS X El Capitan on a MacBook with broken or corrupted recovery mode. I was recently given a 2011 MacBook Pro that had been “well-loved” and was therefore a mess of missing applications, ghost files and generally slow-as-hell.
First, review this introductory article: Create a bootable installer for macOS. Second, see this How To outline for creating a bootable El Capitan installer. Simply replace the Terminal command with the one from the preceding article by copying it into the Terminal window. You will need an 8GB or larger USB flash drive that has been partitioned and formatted for use with OS X.
Drive Partition and Format
Open Disk Utility in the Utilities' folder.
After Disk Utility loads select the drive (out-dented entry with the mfg.'s ID and size) from the side list.
Click on the Erase tab in the Disk Utility toolbar. Name the drive, 'MyVolume'. <---- IMPORTANT!
In the drop down panel set the partition scheme to GUID. Set the Format type to Mac OS Extended (Journaled.)
Click on the Apply button and wait for the Done button to activate. When it does click on it.
Quit Disk Utility.
Create Installer
Open the Terminal in the Utilities' folder. Choose the appropriate command line (in red) depending upon what OS X installer you want. Paste that entire command line from below at the Terminal's prompt:
Command for macOS High Sierra:
How To Make A Bootable Usb Drive
sudo /Applications/Install macOS High Sierra.app/Contents/Resources/createinstallmedia --volume /Volumes/MyVolume --applicationpath /Applications/Install macOS High Sierra.app

Make El Capitan Bootable Usb On Big Sur
Command for macOS Sierra:

sudo /Applications/Install macOS Sierra.app/Contents/Resources/createinstallmedia --volume /Volumes/MyVolume --applicationpath /Applications/Install macOS Sierra.app
Command for El Capitan:
sudo /Applications/Install OS X El Capitan.app/Contents/Resources/createinstallmedia --volume /Volumes/MyVolume --applicationpath /Applications/Install OS X El Capitan.app

Create El Capitan Bootable Usb From Dmg File
Command for Yosemite:
sudo /Applications/Install OS X Yosemite.app/Contents/Resources/createinstallmedia --volume /Volumes/MyVolume --applicationpath /Applications/Install OS X Yosemite.app
Command for Mavericks:
sudo /Applications/Install OS X Mavericks.app/Contents/Resources/createinstallmedia --volume /Volumes/MyVolume --applicationpath /Applications/Install OS X Mavericks.app

Press RETURN. You will be asked for your admin password. It will not echo to the Terminal window. Then press RETURN again. Wait for the return of the Terminal prompt signifying the process has completed. It takes quite some time to finish. Be patient.
Sep 13, 2018 1:16 PM
1 note
·
View note
Text
El Capitan Mac Os Bootable Usb

It was 2009 when Apple last released a new operating system on physical media. Things have proceeded remarkably smoothly since version 10.7 switched to download-only installers, but there are still good reasons to want an old, reliable USB stick. For instance, if you find yourself doing multiple installs, a USB drive may be faster than multiple downloads (especially if you use a USB 3.0 drive). Or maybe you need a recovery disk for older Macs that don't support the Internet Recovery feature. Whatever the reason, you're in luck, because it's not hard to make one.
El Capitan Mac Os Bootable Usb Drive
As with last year, there are two ways to get it done. There's the super easy way with the graphical user interface and the only slightly less easy way that requires some light Terminal use. Here's what you need to get started.
Bootable USB Stick - macOS X El Capitan 10.11 - Full OS Install, Reinstall, Recovery and Upgrade SANDISK USB FLASH DRIVE 2.0/3.1 - 16GB - 5 years warranty Latest certificate (expires These USBs are NOT produced by Apple.
How to Create a Bootable USB with macOS Installer OS X El Capitan Create bootable USB drive with Mac Disk Utility Now that you have the installation files ready on your Mac, you can move them to your USB drive for future use. To install macOS on an external hard drive: 1. Connect the USB to your MacBook 3. Part 4: Boot Mac from macOS USB Drive for Installation. Now remove the USB drive and insert it into the Mac computer. To boot from the disk, you need to hold down the option key when you hear the boot chime. This will take you to the Startup Disk Manager, where you should be able to see the USB drive.

To install El Capitan, make sure the USB drive is inserted into the computer, then restart the computer while holding the Option (alt) key on your keyboard. Wait until the Startup Manager pops up, then select the 'OS X Base System' volume. Alternatively, you can just hold down the C key while starting up to boot directly into the USB drive. Now Create bootable USB for Mac OS El Capitan on Windows. Now it is the time to create a bootable USB installer using TransMac, To install Mac OS El Capitan on VirtualBox on Windows 10 you need a Bootable USB here you will learn the steps of creating a bootable USB installer for Mac OS El Capitan on Windows.
A Mac that you have administrator access to, duh. We've created El Capitan USB stick from both Yosemite and El Capitan, but your experience with other versions may vary.
An 8GB or larger USB flash drive or an 8GB or larger partition on some other kind of external drive. For newer Macs, use a USB 3.0 drive—it makes things significantly faster.
The OS X 10.11 El Capitan installer from the Mac App Store in your Applications folder. The installer will delete itself when you install the operating system, but it can be re-downloaded if necessary.
If you want a GUI, you need the latest version of Diskmaker X app. Version 5 is the one with official El Capitan support.
Diskmaker X is free to download, but the creator accepts donations if you want to support his efforts.
The easy way
Once you've obtained all of the necessary materials, connect the USB drive to your Mac and run the Diskmaker X app. The app will offer to make installers for OS X 10.9, 10.10, and 10.11, and it should run on OS X versions all the way back to 10.7—support for 10.6 was dropped in the most recent release.
Advertisement
Diskmaker X has actually been around since the days of OS X 10.7 (it was previously known as Lion Diskmaker), and it's still the easiest GUI-based way to go without intimidating newbies. If you're comfortable with the command line, it's still possible to create a disk manually using a Terminal command, which we'll cover momentarily.
Select OS X 10.11 in Diskmaker X, and the app should automatically find the copy you've downloaded to your Applications folder. It will then ask you where you want to copy the files—click 'An 8GB USB thumb drive' if you have a single drive to use or 'Another kind of disk' to use a partition on a larger drive or some other kind of external drive. Choose your disk (or partition) from the list that appears, verify that you'd like to have the disk (or partition) erased, and then wait for the files to copy over. The process is outlined in screenshots above.
The only slightly less-easy way
If you don't want to use Diskmaker X, Apple has actually included a terminal command that can create an install disk for you. Assuming that you have the OS X El Capitan installer in your Applications folder and you have a Mac OS X Extended (Journaled)-formatted USB drive named 'Untitled' mounted on the system, you can create an El Capitan install drive by typing the following command into the Terminal.
sudo /Applications/Install OS X El Capitan.app/Contents/Resources/createinstallmedia --volume /Volumes/Untitled --applicationpath /Applications/Install OS X El Capitan.app --nointeraction
Install Mac Os On Usb
The command will erase the disk and copy the install files over. Give it some time, and your volume will soon be loaded up with not just the OS X installer but also an external recovery partition that may come in handy if your hard drive dies and you're away from an Internet connection.
Whichever method you use, you should be able to boot from your new USB drive either by changing the default Startup Disk in System Preferences or by holding down the Option key at boot and selecting the drive. Once booted, you'll be able to install or upgrade El Capitan as you normally would.
Summary
How to make a bootable USB drive on Linux Mint (19.3) to allow you to install Mac OS X El Capitan on a MacBook with broken or corrupted recovery mode.
Background
I was recently given a 2011 MacBook Pro that had been “well-loved” and was therefore a mess of missing applications, ghost files and generally slow-as-hell. Since there wasn’t much worth saving I wiped it and initiated recovery mode in order to re-install OS X (El Capitan).
Having recently fixed a busted MacBook Air I had learned a bit about Recovery Mode (hold Command+R whilst pushing the Power button and release a few seconds after the machine wakes up). I tried that with this machine, and upon hitting “Reinstall MacOS X” was greeted with a prompt telling me it would take -2,148,456,222 days and 8 hours (an uncaught buffer overflow, me thinks). After about 30 seconds, a window pops up saying “Can’t download the additional components needed to install Mac OS X” and the installation gives up. The detailed error log says “Chunk validation failed, retrying” about 1000 times and eventually gives up altogether.
Further investigation suggests this may be something to do with security certificates having expired and hence the machine not being able to download the necessary files from Apple’s servers, but it seems the error can appear for all sorts of reasons. I also tried Internet Recovery (Command+Option+R) but that gave exactly the same error (and would also only have installed OS X Mountain Lion).
I then turned to attempting to make a bootable USB stick of OS X El Capitan from an image downloaded from Apple. I use Linux Mint on my main laptop and that was all I had available. Apple seem to assume everybody has a spare MacBook from which to create a bootable USB so they provide absolutely no documentation to help with this. I also couldn’t find a single guide online that worked from start to finish, so here I summarise what needs to be done.

Steps
As usual, this is all at your own risk 🙂
First you need to go to Apple’s OS Download Page and (step 4) get ahold of “InstallMacOSX.dmg” for El-Capitan. It’s a 6GB file so it might take a ‘lil while. You will also need to find a USB drive with at least 8GB capacity, and make sure it’s blank. The format doesn’t matter, because this procedure will format it correctly.
(In total you will need to use about 15-18GB of disk space by the time you’ve done all the extracting necessary, which shouldn’t be a problem for most computers but it was a challenge for my laptop with it’s 128GB SSD and dual boot Windows/Linux!)
Then you need to get a program called ‘dmg2img’
You can then extract the DMG
Now double click the .img file to mount it. In there is a InstallMaxOSX.pkg file. This requires a utility called “xar” to extract, which can be installed with these instructions (from https://www.oueta.com/linux/extract-pkg-and-mpkg-files-with-xar-on-linux/)

Then build and install with
Now you can extract the .pkg file. It will extract to the current working directory
Create Bootable Usb For Mac Os X El Capitan
Now, within the extracted files you will find something called InstallESD.dmg. This actually contains all the interesting boot files, but it isn’t a pristine image, so we can’t just burn it to a USB. Thankfully, a script exists to convert this DMG to a bootable usb, and it’s available here. It takes the DMG and writes everything directly to the USB in the right place.
El Capitan Macos Bootable Usb
ONE CAVEAT: When I ran this script on my InstallESD.dmg, it crashed because it didn’t recognise the checksum. I think this is because Apple updates the dmg’s anytime there is a security update for El Capitan so the checksum list isn’t updated. All I did was delete the checksum check from the script above. Essentially, just open the script and delete this section
Mac Os X El Capitan Dmg Bootable Usb
Once I had done this, I ran the script with my USB connected (/dev/sdb for me, but CHECK YOURSELF with fdisk or similar) and after quite a while it finished copying.
I plugged the USB into the MacBook, and opened the startup menu by holding down Option whilst pushing the power button. This gave me the choice of booting from EFI, or choosing a WiFi network. Click on the EFI, and then follow the prompts to install OS X from the USB drive!
When you’re done, you may need to use Parted or a similar utility to re-format your USB as a normal drive again.
1 note
·
View note
Text
Boot El Capitan From Usb
USB Flash Drive 8Gb Get one on Amazon here: (For El Capitan need a 16GB USB Stick) Mac OS Installer retail Version of Yosemite, El Capitan or Mac OS Sierra, choose one you desire to make the bootable USB. Macos network usb el-capitan ethernet. Setelah Anda mem-boot up, unduh dan instal driver dari CD, silakan diunggah oleh manusia yang baik ini.
Create Bootable El Capitan Usb
Make El Capitan Boot Usb From Windows
Whenever new OS X release comes to Mac users, it is important to create a Bootable USB as a backup option to clean install. Most of the time upgrade works well, but there are chances your battery performance go poor or OS X corrupt due to apps installed on the computer. That is when we need to perform Clean Installation of OS X as the final troubleshooting method.
Download OS X El Capitan only from Mac App Store which is available right now. Simply launch App Store on your mac computer and you will see El Capitan already featured with free download button.
OS X El Capitan featured with tons of new features and improvements to existing features. I have installed it on my iMac and Macbook Pro, and so far it is great. As i mostly use my macbook pro at desk, didn’t notice any battery performance problems. There are reports from Macbook Pro and Macbook Air users who have upgraded to El Capitan regarding battery issues.

Another important step to do after downloading the OS X El Capitan is taking backup of the installation file. By default the location of the file set to /Applications folder and the file automatically deleted after completing the OS X upgrade. So it is very important for you to take a backup of the file named “Install OS X El Capitan” from “Applications” folder to create bootable USB or use it later.
Go to Applications folder by opening Finder once the download completed and OS X El Capitan installation wizard pop up comes on your desktop screen.
At this point, copy the file “Install OS X El Capitan” and paste it any folder on your hard disk drive. Now you have the copy of latest OS X released by Apple and you can use it whenever you want and share it with your friends saving 6 gigabytes of bandwidth for them.
Create Bootable El Capitan Usb
Create OS X El Capitan Bootable USB
We are now ready to create the bootable usb disk drive of OS X El Capitan. All you have do is, follow the couple of steps suggested here and you are ready to install El Capitan on any mac computers.
Step 1: Connect USB Disk Drive to your mac computer and Open “Disk Utility” by typing it on Spotlight (CMD + Space Bar) or by going to “Applications – Utilities – Disk Utility”.
Step 2: Select the USB Drive from the list and on the Right side, select “Erase” tab and rename the USB drive as “Untitled” and click on Erase to perform the operation.
Step 3: Now the USB Drive is ready for OS X El Capitan installation. Make sure the copy of “Install OS X El Capitan” is there on /Applications folder.

Step 4: Launch “Terminal” and copy, paste the following command in Terminal then press Enter.

sudo /Applications/Install OS X El Capitan.app/Contents/Resources/createinstallmedia –volume /Volumes/Untitled –applicationpath /Applications/Install OS X El Capitan.app –nointeraction
Make El Capitan Boot Usb From Windows
Step 5: Terminal will prompt for Root password, enter the root password and press enter. USB Disk formatting will start now followed by the copying of files required to create bootable os x el capitan usb drive.
It will take 5 to 10 minutes maximum and the Bootable USB Disk of OS X El Capitan will be ready for use.
If you don’t want to follow these steps and looking for an app to automate all these tasks and get the USB ready with OS X El Capitan then consider using, DiskMaker X which is compatible with OS X El Capitan as well. Download DiskMaker X 5 which comes around 7 MB and create the bootable usb drive easily.
Thanks for reading, and feel free comment below if you have any queries. Have a wonderful day, and don’t forget to share this post with your friends and followers across Twitter, Facebook and Google+.
1 note
·
View note
Text
Mac Os Sierra Dmg Google Drive

In this article, I am going to give you the direct link to Download macOS High Sierra ISO DMG VMDK File – All In One. Whenever you want to install macOS High Sierra on virtual machines like VMware and VirtualBox then obviously you will be in need of ISO file in order to have a clean installation of macOS High Sierra. For example, if you want to install macOS, you will surely need the macOS ISO file that is for installation only. Therefore, you will certainly be looking for the website for the genuine ISO image file and should work well for the VirtualBox and VMware. In this case. if you wish to install macOS High Sierra, you will certainly need to do have the installer file or if you don’t, you will need to download the installer file for virtual machine installation.
Download Mac Os High Sierra 10.13.6 Dmg Google Drive
Mac Os Sierra Dmg Download Google Drive
Mac Os Dmg Download Learn more. For more information about the createinstallmedia command and the arguments that you can use with it, make sure that the macOS installer is in your Applications folder, then enter this path in Terminal: Catalina: Mojave: Download Mac Os High Sierra 10.13.6 Dmg Google Drive. High Sierra: Mac Os Dmg File Download. Hackintosh-sierra-zone.dmg Google Drive App Download Free MacOS Sierra 10.12.1 Mac Dmg Hackintosh-sierra-zone.dmg Google Drive Download. Click on the button below to start downloading MacOS Sierra 10.12.1 for mac OS X. We are here to provide to clean and fast download for MacOS Sierra 10.12 dmg (16a323). This link is resume able within 24 hours. Mac Os High Sierra Dmg Download To Google Drive Free In this article, I am going to give you the direct link to Download macOS High Sierra ISO DMG VMDK File – All In One. Whenever you want to install macOS High Sierra on virtual machines like VMware and VirtualBox then obviously you will be in need of ISO file in order to have a clean.
Dmg file extractor software download mac. Sep 07, 2017 When Apple released the beta version of macOS High Sierra this past June, users noticed that the Google Drive app (now Backup and Sync) wasn’t compatible with the new APFS.At the time, a Google. Hackintosh-Sierra-Zone.dmg - Google Drive.
Jan 16, 2019 im wondering if someone know of a place I can download a dmg file of the latest stable macOS mojave installer with clover on it. Or maybe if someone has such a USB stick around and can take a DMG of it and post a download of it (google drive link. Download macOS High Sierra from there and it won’t have any problem. If there’s some problem with downloading macOS High Sierra from Google Drive, although we’ve covered up with the solution, despite that, we’ve also provided macOS High Sierra DMG file in MediaFire.
So, if you want to install and try, then you will need to have the macOS High Sierra installer file virtual machine file (VMDK) only and especially for VirtualBox and VMware. In this case, if you are looking for that, then have a look below because we have caught you up.
Download macOS High Sierra ISO VMDK DMG file (Google drive) One full; macOS High Sierra Image file free download; Install macOS High Sierra on VirtualBox. When you’ve downloaded the file, extract them and you’re prepared to begin with the installation. If you really wish to install macOS High Sierra on your windows pc then make sure to.
Jan 24, 2018 At for WINDOWS USERS, However, you are still able to download MacOS High Sierra.DMG using the following direct download link from our server without Apple Store. Download High MacOS.DMG, ISO without Apple Store. The following MacOS High Sierra Official – InstallESD.dmg file was downloaded from App store then uploaded by MacDrug.
Mac Os High Sierra Download
Mac Os High Sierra Dmg Download To Google Drive Free
Features of macOS High Sierra
A brand new file system.
Better Graphic and VR.
Backward Compatibility.
Safari knows when to keep quiet.
Safari privacy protection.
Persistent website customization.
Editing feature for photos.
Mail upgrades.
Note Tweaks.
A brighter spotlight.
iCloud file sharing.
Tighter security.
Download macOS High Sierra ISO DMG VMDK File – All In One

You can directly download the macOS High Sierra files, especially for the VirtualBox and VMware from the below links. The file is on Google Drive so that your PC shouldn’t get viruses and malware. If you faced the error of quota exceeded error while downloading the file from Google Drive then make sure to check the below article in order to fix the error of google drive.
Click and Download the files for Virtual Machine from the below links.
Download Mac Os High Sierra 10.13.6 Dmg Google Drive
Install macOS High Sierra on VirtualBox

When you’ve downloaded the file, extract them and you’re prepared to begin with the installation. If you really wish to install macOS High Sierra on your windows pc then make sure to check out and go through the new method below.
DL #3: iWork '09 combined Update 2 released May 2009, installs upon either the iWork '09 initial release or upon the Update 1. DL #2: iWork '09 Update 1 released March 2009, converts Keynote 5.0 to 5.0.1 - Numbers 2.0 to 2.0.1 - Pages 4.0 to 4.0.1 - there were no differences here in system requirements. Install dvd decoder. By - 2019, May 26 - 11:28pmI confirm, iWork'09 3xApps do launch in OSX 10.4.6 minimum & QuickTime low as 7.0.0Thanks for delving into the depths' SkyCapt. And 10.4.9 is the bare minimum with tweaks only applied to the installer. So then, 10.4.6 with tweaks to the installer and System libraries, is the bare minimum for this software suite.
Final Words
Mac Os Sierra Dmg Download Google Drive
That’s all about Download macOS High Sierra ISO DMG VMDK File – All In One. I hope you will enjoy the macOS High Sierra on windows after installing its image file. If you faced any kind of problem or any kind of question regarding this then don’t hesitate to ask and feel free to comment down below. Please don’t forget to comment on your feedback and suggestion regarding this.
1 note
·
View note
Text
Usb 2 0 Ethernet Adapter Driver Mac Os Catalina

MacOS 10.15 DriverKit is here and a lot has changed. We cover what could potentially effect you and how to reinstall your broken devices. 00:02:39 - How to U.
Update Oct 2015: Updated for 10.11 El Capitan!
Plug in your USB Adapter, with a live ethernet cable. Open System Preferences, and go to the Network Pane. Hit the + button in the bottom right, select the 'USB 2.0 10/100M Ethernet Adapter', and hit add. Network Interface Controllers 10/100M Fast Ethernet USB 2.0 Software Files Windows. Download Description Version Update Time. USB NIC Linux driver for kernel up to 5.6 2.14.0 2020/10/19 66 KB Others. Download Description Version Update Time File Size; MAC OS 10.6 to 10.13 1.0. MacOS 10.15 DriverKit is here and a lot has changed. We cover what could potentially effect you and how to reinstall your broken devices. 00:02:39 - How to U.


If you bought a cheap aftermarket USB-Ethernet adapter like me and found that it doesn't work on El Capitan or Yosemite, here's what you need to get it going.
Seriously. You can stop tearing you hair out now. It'll all be ok.
As with all advice on the internet, you can't sue me if this sets fire to your cat or sends ninjas to your house. You're doing this on your own, and I assume no liability or warranty for what you do.
Steps to get your adapter working if you just upgraded to Mac OS 10.11 El Capitan.
Usb 2 0 Ethernet Adapter Driver Mac Os Catalina Patcher
Reboot. As soon as the screen goes black, hold down 'Command' and 'R' until you see a black screen with an Apple logo and a white progress bar. Let go, and wait for your computer to boot into recovery mode.
From the top bar, select 'Utilities' and then 'Terminal'
In the terminal, run csrutil disable.
From the top bar, select '', then 'Restart'
When you boot back up, you'll have a working adapter!
Definitely take a read down below to see what's changed in El Capitan, and if disabling SIP makes sense for your setup.
Steps to get your adapter working if you've never used the adapter before in Mac OS 10.11 El Capitan.
Uninstall the dozens of other drivers you may have installed in the process of trying to get this working.
Unplug your USB adapter, and reboot and give yourself a clean slate.
Reboot. As soon as the screen goes black, hold down 'Command' and 'R' until you see a black screen with an Apple logo and a white progress bar. Let go, and wait for your computer to boot into recovery mode.
From the top bar, select 'Utilities' and then 'Terminal'
In the terminal, run csrutil disable.
From the top bar, select '', then 'Restart'
Once you're booted back up, download and install the drivers from the CD, kindly uploaded by this fine human being.
Reboot.
Open your terminal, and run sudo kextload /System/Library/Extensions/USBCDCEthernet.kext
Reboot.
Plug in your USB Adapter, with a live ethernet cable.
Open System Preferences, and go to the Network Pane.
Hit the + button in the bottom right, select the 'USB 2.0 10/100M Ethernet Adapter', and hit add.
You're all set! Your adapter works!
Apologize to the people you care about for the things you've said over the past few hours. They won't understand, but they will forgive you.
Steps to get your adapter working on Mac OS 10.10 Yosemite
Uninstall the dozens of other drivers you may have installed in the process of trying to get this working.
Unplug your USB adapter, and reboot and give yourself a clean slate.
Download and install the drivers from the CD, kindly uploaded by this fine human being.
Reboot.
Open your terminal, and run sudo nvram boot-args='kext-dev-mode=1'
Reboot.
Open your terminal, and run sudo kextload /System/Library/Extensions/USBCDCEthernet.kext
Reboot.
Plug in your USB Adapter, with a live ethernet cable.
Open System Preferences, and go to the Network Pane.
Hit the + button in the bottom right, select the 'USB 2.0 10/100M Ethernet Adapter', and hit add.
You're all set! Your adapter works!
Apologize to the people you care about for the things you've said over the past few hours. They won't understand, but they will forgive you.
What's going on. (Yosemite Version).
The old drivers still work, no problem, but are being blocked in Yosemite because they aren't 'signed' properly, since they weren't re-issued for Yosemite. As 'unsigned' drivers, Mac OS refuses to load them, saying they constitute a security hazard.
What step 5 does is instructs your computer to set itself to 'developer mode', which allows you to load unsigned kexts. This is a mild security risk, but it should be fine for most people. If you're in doubt, please make the decision that makes the most sense for your security concerns. You might be better off just buying legit Apple hardware so you don't have to disable the security. That's your call.
If you ever do go legit and want to undo it, just run sudo nvram boot-args='kext-dev-mode=0, and things will be back where you left them.
Usb 2 0 Ethernet Adapter Driver Mac Os Catalina Drive
What's going on. (El Capitan Version).
In short, it's the same scenario as Yosemite, just stricter. Apple has a new security mode, called 'System Integrity Protection' (SIP) that prevents anyone - even you with your password - from modifying system files.
The old drivers still work, no problem, but are being blocked in El Capitan because they aren't 'signed' properly, since they weren't re-issued for El Capitan. As 'unsigned' drivers, Mac OS refuses to load them, saying they constitute a security hazard.
The csrutil disable step turns off SIP for your entire system, which allows you to load and use the drivers. This also disables malware protection for your machine, and given that we've started to see genuine malware for OS X in the wild, it's a slightly larger security risk than it was in Yosemite.
If you're in doubt, please make the decision that makes the most sense for your security concerns. You might be better off just buying legit Apple hardware so you don't have to disable the security. That's your call.
If you ever do go legit and want to undo it, just reboot into recovery mode and run csrutil enable, and things will be back where you left them.
Anyhow, after hours of searching and pulling out my own hair, I thought it'd be worth sharing the solution! Enjoy!
Usb 2 0 Ethernet Adapter Driver Mac Os Catalina Compatibility
psst. Yeah, you, with the working ethernet adapter. :) If this post helped you out, please do me a favor back (and maybe yourself one, too), and check out my masterclass on living with purpose and going after your big dreams. It's really, really good. Thanks!-Steven
1 note
·
View note
Text
How To Make a MacOS Installer On a USB Stick
How To Make a MacOS Installer On a USB Stick

How To Make a MacOS Installer On a USB Stick.
If you want to download the latest macOS, you just need to go to the Mac App Store and download it. But what if you’re an IT professional working in a computer repair shop restoring Macs that need to reinstall macOS? What if your internet connection is at least unreliable where you are?
Well, accessing the App Store to reinstall macOS will be quite…
View On WordPress
#How To Create a MacOS Installer Using Disk Creator#How To Make a MacOS Installer On a USB Stick#Making The USB Installer Using The Terminal
0 notes
Text
Macos Installer Dmg

Works like a charm — I've been upgrading git all the time using this package and never had the slightest problem. My only issue is that it lags slightly behind the latest & greatest supported git package — it's really a pity it's not kept up-to-date with, say, the Linux version. Mar 23, 2021 Download: macOS Big Sur, macOS Catalina, macOS Mojave, or macOS High Sierra These download to your Applications folder as an app named Install macOS version name.If the installer opens after downloading, quit it without continuing installation. Download: macOS Big Sur, macOS Catalina, macOS Mojave, or macOS High Sierra These download to your Applications folder as an app named Install macOS version name.If the installer opens after downloading, quit it without continuing installation. MacOS Mojave download 10.14.6 dmg for mac free full version. Complete setup MacOS Mojave 10.14.6 (18G95) offline installer for mac OS with direct link. Description MacOS Mojave 10.14.6 For Mac + Overview. MacOS Mojave delivers new features inspired by its most powerful users, however designed for everyone. Keep centered on your work using Dark.
These advanced steps are primarily for system administrators and others who are familiar with the command line. You don't need a bootable installer to upgrade macOS or reinstall macOS, but it can be useful when you want to install on multiple computers without downloading the installer each time.
What you need to create a bootable installer
A USB flash drive or other secondary volume formatted as Mac OS Extended, with at least 14GB of available storage
A downloaded installer for macOS Big Sur, Catalina, Mojave, High Sierra, or El Capitan
Download Macos Installer Dmg
Download macOS
Download: macOS Big Sur, macOS Catalina, macOS Mojave, or macOS High Sierra These download to your Applications folder as an app named Install macOS (version name). If the installer opens after downloading, quit it without continuing installation. To get the correct installer, download from a Mac that is using macOS Sierra 10.12.5 or later, or El Capitan 10.11.6. Enterprise administrators, please download from Apple, not a locally hosted software-update server.
Download: OS X El Capitan This downloads as a disk image named InstallMacOSX.dmg. On a Mac that is compatible with El Capitan, open the disk image and run the installer within, named InstallMacOSX.pkg. It installs an app named Install OS X El Capitan into your Applications folder. You will create the bootable installer from this app, not from the disk image or .pkg installer.
Use the 'createinstallmedia' command in Terminal
Connect the USB flash drive or other volume that you're using for the bootable installer.
Open Terminal, which is in the Utilities folder of your Applications folder.
Type or paste one of the following commands in Terminal. These assume that the installer is in your Applications folder, and MyVolume is the name of the USB flash drive or other volume you're using. If it has a different name, replace MyVolume in these commands with the name of your volume.
Big Sur:*
Mac Os Installer Download
Macos Install Dmg From Command Line
Catalina:*
Mojave:*
High Sierra:*
El Capitan:
* If your Mac is using macOS Sierra or earlier, include the --applicationpath argument and installer path, similar to the way this is done in the command for El Capitan.
Macos Installer Dmg To Iso
After typing the command:
Press Return to enter the command.
When prompted, type your administrator password and press Return again. Terminal doesn't show any characters as you type your password.
When prompted, type Y to confirm that you want to erase the volume, then press Return. Terminal shows the progress as the volume is erased.
After the volume is erased, you may see an alert that Terminal would like to access files on a removable volume. Click OK to allow the copy to proceed.
When Terminal says that it's done, the volume will have the same name as the installer you downloaded, such as Install macOS Big Sur. You can now quit Terminal and eject the volume.
Use the bootable installer
Determine whether you're using a Mac with Apple silicon, then follow the appropriate steps:
Apple silicon
Plug the bootable installer into a Mac that is connected to the internet and compatible with the version of macOS you're installing.
Turn on your Mac and continue to hold the power button until you see the startup options window, which shows your bootable volumes and a gear icon labled Options.
Select the volume containing the bootable installer, then click Continue.
When the macOS installer opens, follow the onscreen instructions.
Intel processor
Plug the bootable installer into a Mac that is connected to the internet and compatible with the version of macOS you're installing.
Press and hold the Option (Alt) ⌥ key immediately after turning on or restarting your Mac.
Release the Option key when you see a dark screen showing your bootable volumes.
Select the volume containing the bootable installer. Then click the up arrow or press Return. If you can't start up from the bootable installer, make sure that the External Boot setting in Startup Security Utility is set to allow booting from external media.
Choose your language, if prompted.
Select Install macOS (or Install OS X) from the Utilities window, then click Continue and follow the onscreen instructions.

Learn more
Mac Os Installer Damaged
For more information about the createinstallmedia command and the arguments that you can use with it, make sure that the macOS installer is in your Applications folder, then enter the appropriate path in Terminal:
Big Sur: /Applications/Install macOS Big Sur.app/Contents/Resources/createinstallmedia
Catalina: /Applications/Install macOS Catalina.app/Contents/Resources/createinstallmedia
Mojave: /Applications/Install macOS Mojave.app/Contents/Resources/createinstallmedia
High Sierra: /Applications/Install macOS High Sierra.app/Contents/Resources/createinstallmedia
El Capitan: /Applications/Install OS X El Capitan.app/Contents/Resources/createinstallmedia
Macos Installer Dmg
A bootable installer doesn't download macOS from the internet, but it does require an internet connection to get firmware and other information specific to the Mac model.
1 note
·
View note
Text
Download Mac Os Sierra For Usb

Apple previewed macOS High Sierra on June 5, 2017, the latest version of the world’s most advanced desktop operating system, delivering new core storage, video, and graphics technologies that pave the way for future innovation on the Mac.
macOS High Sierra offers an all-new file system, support for High-Efficiency Video Coding (HEVC) and an update to Metal, Apple’s advanced graphics technology that powers everything from machine-learning to virtual reality content creation.
In essence, High Sierra took what was good with Sierra and developed it into a more comprehensive software. High Sierra emphasizes the already-existing benefits of MacOS previous system, Sierra. There are few bells and whistles, but the changes are noticeable and positive. The Apple file system is the most significant feature it brought. If you want to have a clean installation of MacOS High Sierra whether on Mac, Windows, or any other virtualization software then this is the best way to create MacOS High Sierra Bootable USB on Windows without Mac. The method that I am going to guide you is very easy, you don’t need to download and install Unibeast, Transmac, or any other kind of software.
macOS High Sierra also includes some refinements to the apps Mac users enjoy every day, including Photos, Safari and Mail.
macOS High Sierra brings new storage, video and graphics technologies to the Mac.
“macOS High Sierra delivers important forward-looking technologies and new opportunities for developers wanting to tap into the power of machine-learning and create immersive VR content on the Mac,” said Craig Federighi, Apple’s senior vice president of Software Engineering.
“The core technology innovations in macOS High Sierra, combined with our advances in hardware, will continue to push the Mac forward in exciting new ways.”
Powerful New System Technologies

Apple File System
Apple File System (APFS) features enhanced performance, security, and reliability of data and provides a foundation for future storage innovations. An advanced architecture optimized for today’s massive storage technologies.
APFS makes standard operations such as copying files and directories instantaneous, helps protect data from power outages and system crashes and keeps files safe and secure with native encryption. macOS High Sierra also maintains complete read-and-write compatibility with previously formatted HFS drives and data and is designed to accommodate future advancements in storage technology.
Metal 2 unleashes even more GPU power, accelerating graphics and computation for pro content creation, gaming, machine-learning and more.
Download Mac Os High Sierra For Bootable Usb
High-Efficiency Video Coding
Support for industry-standard HEVC (H.265) enables video streaming and playback of 4K video files at an incredible quality that is also up to 40 percent smaller than with the current H.264 standard.
With HEVC, Apple is enabling high-quality video streaming on networks where only HD streaming was previously possible, while hardware acceleration on the new iMac and MacBook Pro deliver incredibly fast and power-efficient HEVC encoding and editing.
Metal 2
Metal is the fastest, most efficient way to tap into GPU power on the Mac. Metal 2 features a clean API and improved performance that help developers accelerate their apps.
It adds support for machine-learning used in speech recognition, natural language processing, and computer vision.
Mac Os Sierra Iso Download
The combination of Thunderbolt 3 and Metal 2 allows the most demanding users to access powerful external GPUs. An External Graphics Developer Kit gives developers all the hardware and software they need to optimize their apps.
Innovations in macOS, combined with advances in Mac hardware, deliver new experiences such as virtual reality and machine-learning.
Virtual Reality
Drawing on the performance of Metal 2 and the latest Mac hardware, macOS High Sierra adds support for VR content creation for the first time, enabling developers to create immersive gaming, 3D and VR content on the Mac. Leading VR companies are joining Apple to drive VR innovation on the Mac with features coming later this year.
Valve is optimizing their SteamVR platform for macOS and enabling connection of the HTC Vive headset, while Unity and Epic are bringing their VR development tools to macOS. Also later this year, Final Cut Pro X will add support for professional 360-degree workflows with the ability to import, edit and export 360-degree video.
Photos
Photos make it easier than ever to organize, manage and edit your photos.
Install Sierra From Usb
Photos in macOS High Sierra adds a new always-on sidebar that presents albums and organization tools. A redesigned Edit view includes powerful new tools like Curves, for fine-tuning of color and contrast, and Selective Color, for making adjustments within a defined color range.
Download Mac Os Sierra For Usb Pc Camera
Live Photos can now be edited with fun effects, and Memories curates user photos and videos around several new topics.
Photos now support external editors, so Photoshop, Pixelmator, and other apps can launch directly within Photos, with edits saved back to the Photos library.
Moreover, for the first time, support for third-party project extensions gives users access to printing and publishing services, such as Animoto, ifolor, Shutterfly, WhiteWall, and Wix, from right within the Photos app.
Additional App Refinements:
Safari can automatically use Reader to open articles in a clean, uncluttered format, while Autoplay Blocking stops media with audio from automatically playing in the browser.
Intelligent Tracking Prevention in Safari uses machine-learning to identify and remove the tracking data that advertisers employ to follow users’ web activity.
Mail search gets faster and more comfortable with Top Hits, which puts the most relevant results at the top of a user’s message list.
Siri on the Mac responds with a natural and more expressive voice, and when using Apple Music, it learns music preferences, creates custom playlists and answers music trivia.
Notes add simple tables, where a user can type in cells, make edits and move rows and columns.
Spotlight provides flight status information, including departure and arrival times, delays, gates, terminals and even a map of the flight path.
iCloud File Sharing lets users share any file stored in iCloud Drive and collaborate with other people.
Download
This is an official macOS High Sierra Installer from Apple, It can be used to Reinstall or Upgrade to Mojave on a Mac.
If you are looking to Install High Sierra on PC read Hackintosh High Sierra Guide.
1 note
·
View note
Text
Personal Budget Software Free Mac 10.6.8

Feb 03, 2020 The best budgeting apps can help you manage your money and, dare we say, even make it fun. Here are our picks for the top personal finance tools. Personal Budgeting Software for Mac and iOS. Latest News - May 7th 2020 MoneyWell 3.0.14. Taking control of your personal budget. MoneyWell is a personal finance package built around the concept of envelope budgeting. It's designed to keep you from overspending by using proactive budgeting techniques. Try MoneyWell For Free. Three Simple. Zoom Free VIEW →. Start or join a 100-person meeting with face-to-face video, high quality screen sharing, and instant messaging.
When you upgrade to macOS Catalina, you get more of everything you love about Mac. Experience dedicated apps for music, TV, and podcasts. Smart new features in the apps you use every day. And Sidecar, which lets you use iPad as a second Mac display. Best of all, upgrading is free and easy.
Chances are, your Mac can run macOS Catalina.
Mac computers with Metal-capable graphics processors (GPUs) can upgrade to macOS Catalina.
Make sure you’re ready to upgrade.
Before you upgrade, we recommend that you back up your Mac. Then, if your Mac is running OS X Mavericks 10.9 or later, you can upgrade directly to macOS Catalina.
Personal Budget Software Free Mac 10.6.8 Pc
Upgrading is free. And easier than you think.
Upgrading from macOS Mojave?
Go to Software Update in System Preferences to find the macOS Catalina upgrade. Click Upgrade Now and follow the onscreen instructions to begin your upgrade. If you don’t have broadband access, you can upgrade your Mac at any Apple Store.
Upgrading from an older version of macOS?
If you’re running High Sierra (10.13), Sierra (10.12), or El Capitan (10.11), upgrade to macOS Catalina from the App Store. If you’re running Lion (10.7) or Mountain Lion (10.8), you will need to upgrade to El Capitan (10.11) first. If you don’t have broadband access, you can upgrade your Mac at any Apple Store.
OS X 10.9 or later
4GB of memory
12.5GB of available storage (OS X El Capitan 10.11.5 or later)*
Some features require an Apple ID; terms apply.
Some features require a compatible internet service provider; fees may apply.
For details about your Mac model, click the Apple icon at the top left of your screen and choose About This Mac. These Mac models are compatible with macOS Catalina:
MacBook (Early 2015 or newer)
MacBook Air (Mid 2012 or newer)
MacBook Pro (Mid 2012 or newer)
Mac mini (Late 2012 or newer)
iMac (Late 2012 or newer)
iMac Pro (2017)
Mac Pro (Late 2013 or newer)
Siri
Requires a broadband internet connection and microphone (built-in or external).
Personal Budget Software Free Mac 10.6.8 Download
Hey Siri
Supported by the following Mac models:
MacBook Pro (2018 or newer)
MacBook Air (2018 or newer)
iMac Pro
Dictation, Voice Control, and Voice Memos
Requires a microphone (built-in or external).
Spotlight Suggestions
Requires a broadband internet connection.
Gestures
Requires a Multi-Touch trackpad, Force Touch trackpad, Magic Trackpad, or Magic Mouse.
Force Touch gestures require a Force Touch trackpad.
VoiceOver gestures require a Multi-Touch trackpad, Force Touch trackpad, or Magic Trackpad.
Photo Booth
Requires a FaceTime or iSight camera (built-in or external), or USB video class (UVC) camera.
Personal Budget Software Free Mac 10.6.8 X
FaceTime
Audio calls require a microphone (built-in or external) and broadband internet connection.
Video calls require a built-in FaceTime camera, an iSight camera (built-in or external), or a USB video class (UVC) camera; and broadband internet connection.
Apple TV
High Dynamic Range (HDR) video playback is supported by the following Mac models:
MacBook Pro (2018 or newer)
iMac Pro (2017)
Mac Pro (2019) with Pro Display XDR
Dolby Atmos soundtrack playback is supported by the following Mac models:
MacBook Air (2018 or newer)
MacBook Pro (2018 or newer)
Sidecar
Supported by the following Mac models:
MacBook (2016 or newer)
MacBook Air (2018 or newer)
MacBook Pro (2016 or newer)
Mac mini (2018 or newer)
iMac (late 2015 or newer)
iMac Pro (2017 or newer)
Mac Pro (2019)
Supported by all iPad models with Apple Pencil support:
12.9-inch iPad Pro
11-inch iPad Pro
10.5-inch iPad Pro
9.7-inch iPad Pro
iPad (6th generation or later)
iPad mini (5th generation)
iPad Air (3rd generation)
Continuity Camera
Requires an iPhone or iPad with a Lightning connector and iOS 12 or later.
Continuity Sketch and Continuity Markup
Requires an iPhone with iOS 13 or an iPad with iPadOS.
Handoff
Requires an iPhone or iPad with a Lightning connector and iOS 8 or later.
Instant Hotspot
Requires an iPhone or iPad with cellular connectivity, a Lightning connector, and iOS 8.1 or later. Requires Personal Hotspot service through your carrier.
Universal Clipboard
Requires an iPhone or iPad with a Lightning connector and iOS 10 or later.
Auto Unlock
Supported by Mac models introduced in mid 2013 or later.
Requires an Apple Watch with watchOS 3 or later or an iPhone 5 or later.
Approve with Apple Watch
Supported by Mac models introduced in mid 2013 or later.
Requires an Apple Watch with watchOS 6 or later or an iPhone 6s or later with iOS 13.
Apple Pay on the Web
Requires MacBook Pro with Touch Bar, an iPhone 6 or later with iOS 10 or later, or an Apple Watch with watchOS 3 or later.
Phone Calling
Requires an iPhone with iOS 8 or later and an activated carrier plan.
SMS
Requires an iPhone with iOS 8.1 or later and an activated carrier plan.
Home
Requires an iPhone with iOS 12 or later and a configured Home app.
AirDrop
AirDrop to iOS and iPadOS devices requires an iPhone or iPad with a Lightning connector and iOS 7 or later.
AirPlay
AirPlay Mirroring requires an Apple TV (2nd generation or later).
AirPlay for web video requires an Apple TV (2nd generation or later).
Peer-to-peer AirPlay requires a Mac (2012 or later) and an Apple TV (3rd generation rev A, model A1469 or later) with Apple TV software 7.0 or later.
Time Machine
Requires an external storage device (sold separately).
Power Nap
Supported by the following Mac models:
MacBook (Early 2015 or newer)
MacBook Air (Mid 2012 or newer)
MacBook Pro with Retina display (Mid 2012 or newer)
Mac mini (Late 2012 or newer)
iMac (Late 2012 or newer)
iMac Pro (2017)
Mac Pro (Late 2013 or newer)
Boot Camp
Allows Boot Camp installations of Windows 10 on supported Mac models.
Exchange Support
Requires Microsoft Office 365, Exchange 2016, Exchange 2013, or Exchange Server 2010. Installing the latest Service Packs is recommended.
Windows Migration
Supports OS X 10.7 or later and Windows 7 or later.
App Store
Available only to persons age 13 or older in the U.S. and many other countries and regions.
Apple Books
Apple News
App Store
Automator
Calculator
Calendar
Chess
Contacts
Dictionary
DVD Player
FaceTime
Find My
Font Book
Home
Image Capture
Launchpad
Mail
Maps
Messages
Mission Control
Music
Notes
Photo Booth
Photos
Podcasts
Preview
QuickTime Player
Reminders
Safari
Siri
Stickies
Stocks
System Preferences
TextEdit
Time Machine
TV
Voice Memos
Activity Monitor
AirPort Utility
Audio MIDI Setup
Bluetooth File Exchange
Boot Camp Assistant
ColorSync Utility
Console
Digital Color Meter
Disk Utility
Grapher
Keychain Access
Migration Assistant
Screenshot
Screen Time
Script Editor
Sidecar
System Information
Terminal
VoiceOver Utility
Arabic
Catalan
Croatian
Simplified Chinese
Traditional Chinese
Traditional Chinese (Hong Kong)
Czech
Danish
Dutch
English (Australia)
English (UK)
English (U.S.)
Finnish
French
French (Canada)
German
Greek
Hebrew
Hindi
Hungarian
Indonesian
Italian
Japanese
Korean
Malay
Norwegian
Polish
Brazilian Portuguese
Portuguese
Romanian
Russian
Slovak
Spanish
Spanish (Latin America)
Swedish
Thai
Turkish
Ukrainian
Vietnamese
1 note
·
View note