#How to Generate a Personal Access Token on GitHub
Explore tagged Tumblr posts
Visit Tumblr Blog
Explore Tumblr blogs with no restrictions, modern design and the best experience.
Last Seen Tumblr Blogs


Fun Fact
Tumblr has been providing a Korean-language service since 2013.
Text
How to Generate Personal Access Token GitHub
Learning How to Generate Personal Access Token GitHub is essential for enhancing your account’s security and enabling seamless integration with various tools and automation. A Personal Access Token (PAT) is a unique string of characters that serves as a secure authentication method for interacting with the GitHub API. By following this comprehensive guide, we’ll walk you through the process of…

View On WordPress
#GitHub API#how to create personal access token in github#how to create token in github#How to Generate a Personal Access Token on GitHub#How to Generate Personal Access Token GitHub#how to generate token in github#personal access token
0 notes
Text
How to Integrate Postman With GitHub
One of the benefits of integrating Postman with GitHub is the Backup effect. You can backup your Postman collections to GitHub which is a cloud-based hosting service for Git repositories. When Setting up a GitHub integration with Postman you will need to generate a GitHub personal access token and you can configure how you would like to back up your collections on the platform. When your API sync…

View On WordPress
#Api intergration#Api management#automation#endpoint#Git#Git Authentication#Github#postman#Windows#Windows 10#Windows 11#Windows Server
0 notes
Text
quarterly chores
It's that time again.
Every few months, I re-generate my personal access tokens (PATs) at GitHub and update all the development tools and build scripts that depend on them.
Computer security is an endless struggle between safety and convenience. GitHub's decision to make PATs expire after 90 days was a reasonable precaution, but it's also a nuisance. 90 days is long enough for me to forget everything about the regen/update procedures---except how painful they are. (Perhaps this time I'll WRITE THEM DOWN so I won't have to work them out (again) by trial and error in June!)
On a related note, Apache updates their (free) NetBeans IDE once a quarter. I'm happy with NetBeans 20, but NetBeans 21 has been out for weeks now. I've read the release notes; they seem good and boring. I should download 21 and try using it.
Wish me luck!
#software updates#software development#new release#github#computer security#token#chores#software tools#convenience#regeneration#write it down#documentation#trial and error#update#free tools#apache#open source
1 note
·
View note
Text
Create your own cryptocurrency with Bitcoin
youtube
How to create your cryptocurrency with bitcoin From report to paperless currency, typically the world will be changing the particular way it operates. Even though the concept of electronic digital forex is still brand new to the common person, the markets are in the go up. The financial system is little by little shifting in the direction of a much deeper digital environment. The newest and a lot popular talk of this program is the term called 'cryptocurrency'. In it is simplest contact form, a cryptocurrency is even more or much less a signifies of swapping online data. How to create your current personal cryptocurrency The development regarding engineering and methods can make the task involving producing a good altcoin as well as blockchain mainly because smooth as butter. Cryptocurrencies like Ethereal and Counterparty can in addition very easily create tokens. Very first, let's look at typically the most elementary steps you must to create your very own cryptocurrency. If you may be not a technical particular person, then a good choice is to get assist from one of the folks. Partner with some sort of technical partner to handle the particular coding part. Choose in case you want to create a good bitcoin fork as well as a innovative cryptocurrency from scratch and decide on this option that best fits your preferences. Also read more about Cryptocurrency Exchange Software Steps to make your own cryptocurrency Initially of all, yes, the idea is completely possible for you to start the new cryptocurrency of your own. The process of setting up a online forex involves writing computer code, which is much less complicated compared to creating a genuine physical foreign currency. Anyone in fact with basic code skills can easily write often the program code for a online money, but creating a good cryptocurrency is much even more than simply the coding some. Here are a few things you need to do to efficiently create a cryptocurrency and acquire it up and running. Find a group intended for your currency Before commencing to make your cryptocurrency, this first step should be to locate a neighborhood that is thinking about the type connected with forex you want to be able to generate. Get involved throughout the community to look for out exactly what electronic money people want and how you can give it to these individuals. It offers to be relevant to be able to your demands. Once an individual build a local community around your strategy, really period to start programming. Signal Programming your cryptocurrency will never be a very difficult or time consuming process since the Bitcoin as well as Litecoin code is already available for free on GitHub. The time to make your own foreign money depends on the number regarding changes you want for you to employ in the basic code of such projects. To get example, it is a good idea to build a future-oriented cryptocurrency. Do proper markets research to discover what's moving to be in require in the next few days or years, and make your a digital currency around that. On the programming part, anyone may need to increase your C ++ abilities as it may get advanced knowledge of the particular language for you to create your own own custom characteristics. Developing a fork for bitcoin: While having control above everything sounds tempting, at this time there can also be a number of drawbacks. The generation of the bitcoin fork allows anyone to utilize the existing plus dependable free for your cryptocurrency. To create the single currency for your own personal function, you can choose to use the particular nearest currency code containing typically the features you need and make modifications later. Often the advantages of using this kind of technique are: Launching your own cryptocurrency with a protect blockchain will guard an individual from fraudulent attacks. You will still have access to functions like integrated decentralized exchanges that will permit guys and women to change their cryptocurrencies for digital possessions Due to the fact you don't need to be able to experience programming and progress do the job, that will preserve you some sort of lot of period and effort. Now that will you've worked out a technique to move forward using creating your cryptocurrency, here are eight tips in order to help you move forwards: Exploration Mining is typically the next big part of often the cryptocurrency creation approach. An individual will have to encourage your coin in order to potential users to start typically the mining process so the fact that your coin starts for you to get some value in the marketplace. You must tell people young and old how your cryptocurrency is definitely distinct from others with the market and they can benefit from it. Some other options contain business presentation offers, referral benefits, on the net marketing, and so forth Build some sort of business base When anyone have a few miners searching through your cash, the next matter you need to acquire is usually a team of stores who are really interested in buying and offering your lieu for real things. Developing some sort of market Creating a companies are in addition important so that the customers have a place for you to devote the coin. Building the business foundation is definitely more or less just like creating a customer bottom. It's about building trust in your product or service. Purchaser trust If you trust your products and purposes, you are ready to market your own personal currency to be able to friends, business people, on forums and about social sites. Be sure to target an exact potential band of merchants, rather than mislead around using a lot of people. Explore typically the well-liked cryptocurrency markets on the web. Check Our Website For More Information => Fastandclean.org
1 note
·
View note
Text
Holochain Wallet
Holochain is being installed instead of the blockchain, giving coders a framework with regard to generating decentralized applications (dApps). A single huge change to be able to help this is the switch via the data dependent blockchain to an agent-centric system. Holochain�s method avoids trying to keep a global opinion, making use of an adviser method within which each broker keeping a private fork, and that is certainly stored and managed throughout a limited manner on the blockchain with a spread hash table. This stays away from scalability problems that have plagued blockchain solutions. It also will allow any dApps hosted about Holochain in order to do far more using less resource than necessary for blockchains. In this Holochain review, we will have an specific look at the project, technology together with token prospects. So why Holochain is Different The regular blockchain functions by way of holding data via cryptographic hashes on a spread networking. Each node in that network maintains the full copy of the blockchain and the international comprehensive agreement to help verify the market and maintain it has the integrity undamaged. It is one feature regarding blockchain technology that features been a new durability connected with the emerging technology. Holochain Benefits Holochain Benefits. Origin: Holochain Website There are weak spots that come having the blockchain methodology. A single that has been destroying blockchain builders is scalability issues that are created simply by demanding each and every node inside the network in order to check the entire network. Because the amount of data boosts around the blockchain, the idea gets to be more and more restrictive for financial transaction throughput on the blockchain. This is why many cryptocurrencies have experienced this kind of long transaction times, and so on high network fees. Title came up about because typically the program used by Holochain appears like the construction of some sort of hologram. In the hologram a coherent 3D pattern is usually created by a particular interaction of light beams, and in the Holochain the machine produces a coherent entire in a similar manner, putting individual parts together to form some sort of whole. In addition , the technology uses all natural patterns while part of its usefulness. The Public Portion Blockchain Typically the Holochain system really does away with scalability concerns by not needing every node or broker in the network to retain a new continually updated document of the entire public blockchain. Alternatively, each node keeps its blockchain which interacts with typically the node�s special cryptographic major. Picture this entire public blockchain since a river, and every single client is comparable for you to a smaller stream of which feeds in the river. In case a node goes traditional it generates a hand of the public company, but the public company carries on forward, without staying impacted by way of the reduction of one of their nodes. Node Data Used by the People Area Instead of making each one node keeps its personal clone of all this data in the entire blockchain, the Holochain central chain keeps a set of policies to check the files on each and every node�s blockchain. That confirmation occurs arises over a distributed hash table. Holochain Node Structure Node Design in Holochain This means the fact that when a node goes off-line it is data is definitely not missing to the people blockchain. Alternatively a constrained copy is managed and verified according to the particular list of rules. As an individual can read from the FAQ section of the Holochain website, the developers compare the process to often the approach that a lifestyle organism merchants information within DNA or even the means that different languages are stored by multitude of people. �Where is the The english language language kept? � the Holochain designers ask around the GUIDELINES. �Every speaker carries the idea. People have distinct places of expertise or maybe coverage to different slang or specialized vocabularies. No person has a complete copy, not is any persons version accurately the same as anybody, If you disappeared half of the English loudspeakers, it would certainly not degrade the language much. � How Scalable is Holochain? Problem of how numerous transactions per second Holochain can handle needs to be seemed at differently than the way we look at scalability in traditional blockchains. The particular easy answer to the particular question is that scalability is unlimited on Holochain. That�s somewhat simplified, plus honestly the thought regarding transactions per second does not apply to Holochain as a consequence to its purely natural mother nature. Rather than keeping a worldwide consensus of data about the blockchain, Holochain uses a distributed hash desk to keep a record of the type plus abilities of data that each one individual node leads to. Typically Holochain Wallet have used a good analogy of a move floor to better make clear. A person can look from the dance floor and instantly know who is moving interlude and which can be dancing hip-hop. How a lot of dancers might be dancing on the same time? Since many as will fit on the dance floors. It is apparent that there�s no reason to use a respected centralized third-party to keep track of the ballet dancers and exactly what style of move they are undertaking. �So, Holochain as an iphone app framework does not really create any limit connected with transactions per second as there is virtually no place where all orders have to go via, � the particular developers published. He / she continued to claim It is like asking, �How many words might humanity speak per secondary? � It�s an irrelevant question. With every human being being blessed, that variety increases. Same for Holochain. What Dapp�s Work together with Holochain? Holochain would be the very good fit for any kind of dApps that need a great number of individual plugs where each individual features access to a small clone of all the plugs. Instant use case set forth simply by Holochain is definitely social media tools, nonetheless they�ve also recommended that will Holochain will work well at peer-to-peer systems, supply company management, reputational cryptocurrencies or even loyalty programs, collective brains projects and more. These kind of projects make a great fit to get Holochain due to the fact of the agent-centric mother nature. You can also see a detailed overview of the particular types of apps you could develop on the holohackers road. Holochain Apps Many Applications on Holochain Github Presently Holochain would certainly not work efficiently with any kind of private or maybe private datasets however, since every single individual node posts a shared distributed hash kitchen table. Holochain is also definitely not suited for any use that hosts large data, or even for running info positivist-oriented dApps, like almost all cryptocurrencies. The particular perspective adopted by Holograph postulates the fact that there are no total truths on the open public blockchain, only the specific perspective organised simply by every single node that may be brought together to form a much larger picture. This has recently been in comparison to a blockchain perspective of the theory regarding relativity. Holochain Vocabulary Assistance Holochain was written at Go, and that certain programming language was muscle development for its similarity to help C and its reduce of use. The program code base is fully open source and can be evaluated at the Holochain GitHub. When developing dApps for Holochain developers have time to be able to use both Lisp and JavaScript and there will be also help for front end languages for instance CSS, HTML CODE and JavaScript. The Holochain developers have got stated the fact that Holochain will be flexible at regards to handling brand new different languages, so there will be some sort of good possibility of which help for additional dialects will be added in in the future. Holochain is the Green Solution By means of now everyone should know how much energy is required simply by Proof of Work blockchains including Bitcoin. Holochain promises to be the environment friendly solution to environmentally destructive blockchains. Because systems about Holochain don�t store plus validate the entire blockchain there is only a good small portion of band width used in contrast using traditional blockchains.

Furthermore, there�s no mining element in order to Holochain, so the energy used is minimal, genuinely no more than would be used by this node computers in their standard operations. With the electricity requirements of PoW blockchains constantly on the go up, this enviroment friendly approach seems much better. The Holochain Team The particular developers right behind Holochain possess a vast level of experience. The particular co-founders both have 34 yrs of programming experience. Arthur Brock, who is this Chief You behind Holochain has been a contract coder since 1984, working with AI systems and while an online alternative currency process developer since 2001. Holochain Team Holochain Team Martin Harris-Braun is the Management Engineer powering Holochain. They has in addition already been some sort of contract coder since 1984, a full time coder given that 1988, a artist associated with peer-to-peer communication programs (glassbead. com) for many years, a full-stack website developer, as well as obtaining experience in method design, structure design, etc. Holochain Wallet (HOT) Holochain accomplished a month drawn out ICO on April 35, 2018 during which these people raised the bit over 30, 500 ETH worthy of roughly 20 dollars million on the time. There had been 133, 214, 575, one hundred and fifty six HOT tokens minted regarding the ICO. As associated with late July 2018 the price of HOT is up to $0. 000825, giving it a market increased involving nearly $110 , 000, 000, in addition to making it the 86th largest coin by markets cap. Immediately following the particular ICO the token got exchanged as high while $0. 002 with regard to a new more than 1, 000% gain in a 1 week. Holochain Wallet deflated around the adhering to two several weeks, but in the history a few days (July 24 ~ July 25, 2018) cost roughly doubled soon after the WARM token has been listed on the Binance exchange. Binanace POPULAR Register at Binance and Purchase WARM Tokens The VERY HOT token is usually an ERC-20 token that can be stored within any ERC-20 suitable wallet, such as MetaMask, MyEtherWallet, or one of this components billfolds. Eventually often the ERC-20 as well will become in a position to be changed for Holofuel. Those considering acquiring some HOT should be aware of that it can�t end up being purchased using fusca currencies, so very first you would likely need to get many BTC or ETH. After getting the BTC or ETH you can purchase SIZZLING at Binance, Fatbtc, Hotbit, IDEX or LATOKEN. Conclusion We�ve been told that will Bitcoin in addition to blockchain usually are the future technology, yet this might not be completely true. Blockchain engineering is definitely nearly 10 many years aged already, and top cryptocurrencies do little a great deal more than imitate our existing corrupt financial system in a good quasi-decentralized fashion. Bitcoin is usually meant for storing cost, and has in addition become a little something of some sort of gambling establishment with regard to traders. Holochain will be a system regarding value creation and neighborhood engagement that is made to help you get to a post-monetary culture based on local community, particular efforts, merit, and assistance to others. This has been designed to grant the two data and personal sincerity. It isn�t really selected if Holochain will likely be successful, but that is ready to be taken, and developers can already begin building the purposes they feel can assist change all of our society plus our world. Quite a few illustrations of Holochain dApps may be found here and if you are interested around developing your own dApp with Holochain you can certainly get started here. Option traders have done very well by now with the token looking at a 500% increase from the ICO, and that seemed to be through a bear marketplace throughout crpytocurrencies. Once Bitcoin and even other cryptocurrencies start off soaring again the SIZZLING token may see significant upside.
1 note
·
View note
Text
Holochain Wallet
Holochain is being positioned as an option to the blockchain, giving designers a framework intended for generating decentralized applications (dApps).

1 huge change to help allow this is a switch via the data centered blockchain to an agent-centric technique. Holochain�s method prevents trying to keep a global general opinion, using an real estate agent technique throughout which each real estate agent maintaining a private fork, that is stashed and managed in a good limited manner around the blockchain with a dispersed hash table. This prevents scalability problems that have got plagued blockchain solutions. That also enables any dApps hosted in Holochain to help do far more having less resource than required for blockchains. In this Holochain overview, we will get an complex look on the project, technology and even token prospects. Exactly why Holochain is Different The traditional blockchain will work by means of stocking data via cryptographic hashes on a distributed networking. Each node with that will network maintains the whole copy of the blockchain and the global comprehensive agreement to verify the network to remain the integrity in one piece. Is considered one feature involving blockchain technologies that possesses been a toughness connected with the emerging technology. Holochain Benefits Holochain Benefits. Origin: Holochain Website There happen to be weaknesses that come along with the blockchain methodology. A single that has been tormenting blockchain developers is scalability conditions that are created simply by requesting each one node throughout the network for you to check the entire network. Since the amount of data raises for the blockchain, the idea turns into progressively more restrictive for deal throughput on the blockchain. This is why various cryptocurrencies have experienced this kind of long transaction times, and so on high network fees. The name got about because the particular process used by Holochain resembles the construction of the hologram. Inside a hologram the coherent 3-D pattern is created by a new individual interaction of light light beams, and in the Holochain the machine generates a coherent whole in a similar manner, putting individual pieces together to form a new whole. Additionally , the technologies uses healthy patterns like part of its efficiency. The Public Portion Blockchain Typically the Holochain system does away with scalability concerns simply by not necessitating each and every client or real estate agent upon the network to maintain some sort of continually updated report from the entire public blockchain. As an alternative, each node continues a unique blockchain which interacts with typically the node�s exclusive cryptographic essential. Envision the particular entire public blockchain like a river, and each one client is identical to be able to a small stream that will feeds in the river. In the event a node goes offline it results in the derive of the public chain, but the public cycle carries on forward, without currently being impacted by way of the decline of one of their nodes. Client Data Seen by the Community Place Instead of making every single node keeps its own clone of all typically the data in the total blockchain, the Holochain core chain maintains a collection of regulations to validate the info on each one node�s blockchain. That verification occurs arises over a spread hash table. Holochain Wallet with Holochain This means that any time a node goes off-line its data is not really shed to the open public blockchain. As an alternative a restricted copy is maintained and verified according to typically the set of rules. As an individual can read from the GUIDELINES section of the Holochain website, the developers check the system to the particular method that a living organism stores information around DNA or perhaps the means that 'languages' are saved by multitude of persons. �Where is the English language stored? � typically the Holochain builders ask in the GUIDELINES. �Every speaker carries the idea. Individuals have distinct regions of expertise or even exposure to different slang or maybe specialized vocabularies. Nobody has a complete copy, or is anyone�s version exactly the same as anybody, If you disappeared 50 % of the Language speakers, it would not really degrade the language much. � Just how Scalable is Holochain? The question of how several transactions per second Holochain can handle needs to be searched at differently than just how we look from scalability on traditional blockchains. Often the rapid answer to the question is that scalability is unlimited on Holochain. That�s somewhat simplified, in addition to honestly the plan of transactions per second will not apply to Holochain a consequence of to its natural character. Rather than keeping a global consensus of data about the blockchain, Holochain utilizes a distributed hash kitchen table to keep a report of the main type and abilities of information that each individual node contributes. Often the developers have used a good analogy of a dancing floor to raised describe. Anyone can look with a dance floor and quickly know who is grooving interlude and who else can be grooving hip-hop. How numerous dancers could be dancing on the same time? While many as will fit on the dance ground. It is apparent that there are do not need use a reliable centralized thirdparty to retain track of the ballroom dancers and what style of dance they are performing. �So, Holochain as a good software framework does certainly not offer any limit of orders per second since there is virtually no place where all orders have to go via, � this developers had written. This individual went on to point out It is like requesting, �How many words can humanity speak per minute? � It�s an unnecessary question. With every people being delivered, that number increases. Same intended for Holochain. What Holochain Wallet ? Holochain would be some sort of very good fit for any dApps that need a good sized number of individual advices wherever each individual offers access to a fixed duplicate of all the inputs. The immediate use case placed forth by way of Holochain is usually social media tools, but they�ve also suggested that Holochain will work well at peer-to-peer tools, supply chain management, reputational cryptocurrencies or perhaps loyalty programs, collective intellect projects and more. These types of plans make a very good fit regarding Holochain mainly because of it has the agent-centric dynamics. You can also view an extensive overview of this types of apps you can develop on the holohackers map. Holochain Apps Several Blog on Holochain Github Currently Holochain would not are very effective with any sort of private or maybe nameless datasets however, since every individual node posts some sort of shared distributed hash stand. Holochain is also definitely not suited for any use the fact that hosts large records, or for running files positivist-oriented dApps, like many cryptocurrencies. The perception followed by Holograph postulates that will there are no absolute truths on the community blockchain, only the personal perspective held simply by every node which might be brought collectively to form a much larger picture. This has already been when compared to a blockchain perception of the idea involving relativity. Holochain Terminology Help Holochain was written in Go, and that specific programming language was muscle development for its similarity in order to C and its reduce of use. The passcode base is fully free and can be examined at the Holochain GitHub. When developing dApps to get Holochain developers are free in order to use both equally Lisp and JavaScript and there will be also support for front end languages such as CSS, CODE and JavaScript. The Holochain developers have got stated that will Holochain is usually flexible found in regards to handling brand-new languages, so there is some sort of good possibility that will support for additional 'languages' will be added in the future. Holochain is some sort of Green Solution By simply now everyone understands how much energy is required by Proof of Work blockchains including Bitcoin. Holochain says to get a good green solution to eco-friendly harmful blockchains. Because systems with Holochain don�t retailer together with validate the entire blockchain there is only a new small percentage of band width used in comparison having traditional blockchains. Additionally, there is no mining component to help Holochain, so the electricity used is little, seriously no more than would likely be used by way of this node computers inside their typical operations. With the electrical energy requirements of PoW blockchains constantly on the increase, this environmentally friendly address seems far better. The Holochain Team This developers in back of Holochain have a vast amount of experience. The co-founders both have 34 decades of programming experience. Arthur Brock, who is typically the Chief Is required to be behind Holochain has been a contract coder since 1984, handling AI systems and seeing that a web-based alternative currency process artist since 2001. Holochain Wallet -Braun is the Professional Engineer at the rear of Holochain. They has also recently been a contract coder since 1984, a full time programmer due to the fact 1988, a designer connected with peer-to-peer communication applications (glassbead. com) for numerous years, a full-stack website developer, as well like getting experience in program design, framework design, and many others. Holochain Token (HOT) Holochain finished a month extended ICO on April 28, 2018 during which these people raised some sort of bit in excess of 30, 000 ETH well worth roughly $20 million with the time. There were 133, 214, 575, 156 SIZZLING tokens minted to get the ICO. As involving late September 2018 the price tag on HOT is up to help $0. 000825, giving that a market capitalization involving nearly $110 , 000, 000, and making it the 86th largest coin by promote cap. Immediately following the particular ICO the token possessed exchanged as high like $0. 002 for some sort of more than 1, 000% gain in a few days. The purchase price quickly deflated over the next two months, but in the recent 3 days (July 25 � July 25, 2018) selling price roughly doubled right after the SIZZLING token seemed to be listed on the Binance exchange. Binanace POPULAR Save at Binance and Purchase VERY HOT Tokens The SIZZLING token is definitely a ERC-20 token that can be stored in any ERC-20 appropriate pocket book, such as MetaMask, MyEtherWallet, as well as one of often the equipment wallets. Eventually typically the ERC-20 as well will get in a position to be changed out for Holofuel. Those thinking about acquiring some HOT ought to know that it can�t be purchased having redbull values, so 1st you will need to attain several BTC or ETH. Upon having the BTC or ETH you can purchase VERY HOT from Binance, Fatbtc, Hotbit, IDEX or LATOKEN. Realization We�ve already been told that will Bitcoin plus blockchain usually are the future engineering, nonetheless this might not end up being completely true. Blockchain engineering is certainly nearly 10 several years older already, and best cryptocurrencies do little a great deal more than simulate our current corrupt financial system in a quasi-decentralized fashion. Bitcoin is definitely meant for stocking worth, and has furthermore turn into anything of a good internet casino with regard to traders. Holochain will be a process involving value creation and community engagement that is designed to help us find to a post-monetary world based on community, private benefits, merit, and services to some others. That was initially designed to grant equally data and personal ethics. It�s not certain if Holochain will likely be successful, but the idea is ready to be used, and developers can already begin building the programs these people feel can assistance change each of our society together with our world. Several cases of Holochain dApps may be found here plus if you�re interested throughout developing your own dApp with Holochain you may get started off here. Traders have done very well currently with the token seeing a 500% increase from the ICO, and that was initially throughout the bear market throughout crpytocurrencies. Once Bitcoin and even other cryptocurrencies start soaring yet again the HOT token may see essential upside.
1 note
·
View note
Text
Executing Web3 Login With MetaMask Wallet Using NodeJS & React JS

Every time we seek a service online, we are required to identify ourselves as legitimate users. To demonstrate that a user is a legitimate user, one must register for that service using an email address and password or another social login method, which maintains the user's Web3 login information on the server of that corporation.
It implies that our personal information is kept in a centralized area on Web2.0 that hosts such servers, making user data privacy a top concern.
Additionally, online users are increasingly reluctant to register with their email addresses and passwords. Facebook, Google, or GitHub one-click social login functions are much more desirable. However, it comes with a trade-off.
Pros Of Social Media Login Integration
No more form-filling
No need to recall another username/password
Instead of taking minutes, it takes seconds
Cons Of Social Media Login Integration
Since the user’s data is loaded from external providers, this extends a huge privacy problem on how providers utilize all this personal data. For example, at the time of writing, Facebook is encountering data privacy issues.
Contrarily, Blockchain or Web3.0 gives us decentralized access, meaning that no one has access to any of the user's personal information, reducing the risk to user privacy and empowering individuals to be the owners of their own information.
Public key encryption techniques are utilized to authenticate users over Blockchain wallets like MetaMask, making it a safe and secure platform for accessing services over the internet.
Let's start with executing the Web3 login using NodeJS & ReactJS with MetaMask.
User Authentication System Working In Web3 Using MetaMask
The idea behind a web3-based user authentication system that utilizes MetaMask is as follows:
The backend generates a JSON Web Token (JWT) and provides it to the frontend upon successful validation.
We will now create an authentication system that will allow a user to log in using MetaMask. We will leverage the private key management capabilities that MetaMask reveals to give way for a user to confirm they own that specific address and have authorization to login as that user. Their public Ethereum address will be used as a means of identification.
The technology stack we are utilizing is:
Frontend – React.js
Backend – Node.js, Express.js & PostgreSQL
MetaMask Wallet
By utilizing these technologies, you can easily perform Web3 login; all you need to do is focus on following the steps, as one error can hamper your effort.
In order to know the detailed steps to execute Web3 login with MetaMask wallet using NodeJS & ReactJS, Click Here: https://infrablok.com/how-to-implement-web3-login-with-metamask-using-nodejs-reactjs/
0 notes
Text
Many people around the world look for ways to build container images in Kubernetes without the need to mount the docker socket or perform any other action that compromises security on your cluster. With the increased need, a famous software engineer, Jessie Frazelle saw the need to introduce Img image builder. This is an open-source, daemon-less, and unprivileged Dockerfile and OCI compatible container image builder. Img is a wrapper around the open-source BuildKit, a building technology embedded within Img. There are many features associated with the img image builder. Some of them are: Img CLI, a responsive CLI that provides a set of commands similar to Docker CLI commands when dealing with container image building, distribution, and image manipulation. Rootless Builds: img can be run without requiring the –privileged Docker flag or the equivalent privileged: true security context in Kubernetes. BuildKit: defined as one of the next generation build engines for container images. Parallel Build Execution: BuildKit assembles an internal representation of the build steps as a Directed Acyclic Graph (DAG), which enables it to determine which build steps can be executed in parallel. Cross-Platform/OS Builds: it’s possible to build images for different combinations of architecture and OS on a completely different platform In this guide, we will take a deep dive into how to build container images on Kubernetes using img image builder. Setup Pre-requisites This guide will work best if you have a Kubernetes cluster set up. Below is a list of dedicated guides to help you achieve this: Install Kubernetes Cluster on Rocky Linux 8 with Kubeadm & CRI-O Install Kubernetes Cluster on Ubuntu using K3s Deploy Kubernetes Cluster on Linux With k0s Run Kubernetes on Debian with Minikube This guide will demonstrate how to build container images from Dockerfile using img image builder in Kubernetes with Github. So, you will also need: Access to Kubernetes cluster with permissions to create, list, update and delete pods, jobs, and services Github repository with a Dockerfile: we will use the repo URL as the path of the Dockerfile Dockerhub account: to be able to authenticate and push the Docker image. #1. Configure Build Contexts For this guide, we will use a private GitHub repository as our build context. We need to configure it with the required Dockerfile. The URL to my private git repository used in this article is: https://github.com/computingforgeeks/kubernetes-demo In the repository, I will create a Dockerfile with the contents below: FROM ubuntu ENTRYPOINT ["/bin/bash", "-c", "echo hello"] Now obtain a Personal Access Token to your git account. #2. Create the Img Pod Manifest We will have two containers: Git-sync: an init container to clone the private git repository img: that builds the docker image and pushes it to docker hub These two containers share a volume git-repo mounted as emptyDir at /repo Create a manifest for the pod. vim pod.yml Add the below lines to the manifest: apiVersion: v1 kind: Pod metadata: labels: run: img name: img annotations: container.apparmor.security.beta.kubernetes.io/img: unconfined spec: securityContext: runAsUser: 1000 initContainers: - name: git-sync image: k8s.gcr.io/git-sync:v3.1.5 volumeMounts: - name: git-repo mountPath: /repo env: - name: GIT_SYNC_REPO value: "https://github.com/computingforgeeks/kubernetes-demo.git" ##Private repo-path-you-want-to-clone - name: GIT_SYNC_USERNAME value: "computingforgeeks" ##The username for the Git repository - name: GIT_SYNC_PASSWORD value: "ghp_JilxkjTT5EIgJCV........" ##The Personal Access Token for the Git repository - name: GIT_SYNC_BRANCH value: "master" ##repo-branch - name: GIT_SYNC_ROOT value: /repo - name: GIT_SYNC_DEST value: "hello" ##path-where-you-want-to-clone
- name: GIT_SYNC_ONE_TIME value: "true" securityContext: runAsUser: 0 containers: - image: r.j3ss.co/img imagePullPolicy: Always name: img resources: workingDir: /repo/hello command: ["/bin/sh"] args: - -c - >- img build -t docker.io//helloworld . && img login -u -p && img push docker.io//helloworld volumeMounts: - name: cache-volume mountPath: /tmp - name: git-repo mountPath: /repo volumes: - name: cache-volume emptyDir: - name: git-repo emptyDir: restartPolicy: Never In the above file, replace the values appropriately. You can also notice that the destination folder for git-sync is the working directory for img. If you are using a public git repository, you may not be required to provide the Personal Access Token for the Git repository. #3. Run img image builder in Kubernetes Using the manifest, run the pod using the command: kubectl apply -f pod.yml Now follow the image build and push process with the command: kubectl logs img --follow Output: From the above output, we are safe to conclude that the image has been successfully pushed to DockerHub #4. Pull and Test the Image You can now pull and test the image using: 1. Docker Ensure that Docker is installed on your system. The below guide can help you achieve this: How To Install Docker CE on Linux Systems Now run a container with the image using the command: docker run -it / For example: docker run -it klinsmann1/helloworld:latest Sample output: 2. Kubernetes The image pushed can still be used on Kubernetes. Pull and test the image as below; $ vim deploy.yml apiVersion: apps/v1 kind: Deployment metadata: name: hello-world spec: selector: matchLabels: app: hello replicas: 1 template: metadata: labels: app: hello spec: containers: - name: hello-world image: klinsmann1/helloworld:latest Apply the manifest: kubectl apply -f deploy.yml Check the status of the deployment: $ kubectl get pods NAME READY STATUS RESTARTS AGE hello-world-7f68776d79-h4h4z 0/1 Completed 1 (4s ago) 6s img 0/1 Completed 0 13m Verify if the execution was successful. $ kubectl logs hello-world-7f68776d79-h4h4z --follow hello The end! We have successfully walked through how to build container images on Kubernetes using img image builder. I hope this was significant to you.
0 notes
Text
Agora video call web

#AGORA VIDEO CALL WEB HOW TO#
#AGORA VIDEO CALL WEB SOFTWARE#
#AGORA VIDEO CALL WEB CODE#
#AGORA VIDEO CALL WEB DOWNLOAD#
#AGORA VIDEO CALL WEB SOFTWARE#
THE SOFTWARE IS PROVIDED "AS IS", WITHOUT WARRANTY OF ANY KIND, EXPRESS OR IMPLIED, INCLUDING BUT NOT LIMITED TO THE WARRANTIES OF MERCHANTABILITY, FITNESS FOR A PARTICULAR PURPOSE AND NONINFRINGEMENT. The above copyright notice and this permission notice shall be included in all copies or substantial portions of the Software. Permission is hereby granted, free of charge, to any person obtaining a copy of this software and associated documentation files (the "Software"), to deal in the Software without restriction, including without limitation the rights to use, copy, modify, merge, publish, distribute, sublicense, and/or sell copies of the Software, and to permit persons to whom the Software is furnished to do so, subject to the following conditions: All invitees will be prompted to join the video call at the same time, and your application server can then pass the video session object to those that accept the invitation. When a user initiates a video (or voice) call, simply publish the invitation to any and all relevant users. So, extending the basic one-to-one pattern to support group video calls is simple. PubNub lets you easily publish messages to multiple users at once, even at large scale. But with this integration, you can also build in-app one-to-many video calls and communal live-streaming events using exactly the same principles. The above demonstration offers a straightforward example of one-to-one video chat. Using PubNub greatly simplifies the process of securely connecting tenants, and supports an instantaneous, lag-free experience for your users.īuilding communal experiences with video and voice chat It connects both users by passing along requests within 100ms of the initial invite. In this chain of events, PubNub acts as a reliable broker of communications. Once User B accepts the invite, the Video Session Object is passed directly to User B, and the video call begins. Simultaneously, PubNub fulfills a crucial role by seamlessly passing the video invite to User B. The application server creates the video session, and passes it as a Video Session Object to User A. The request is validated by the application server. In this sample case, once User A requests a video call to User B, a few things happen: We can have multiple parameters separated by &: /?channel=test&token=123.This diagram offers a simplified blueprint that demonstrates how PubNub and Agora work hand-in-hand to orchestrate a private, one-to-one video call. We can create a link /?channel=test, where we can add data to the query parameter (the key=value pair after the ? symbol in the URL). Let’s say we have our website hosted on, and we want a user to join a room called test.
#AGORA VIDEO CALL WEB DOWNLOAD#
You can download the example project and get started by opening the index.html file. You can now run npm i & npm start to start the React server and visit the hello world app on localhost:3000.
#AGORA VIDEO CALL WEB CODE#
You can get the code for the example on GitHub. You can find the completed projects on GitHub: React, JavaScript. You’ll also need an Agora developer account (it’s free– sign up here!). You can also use the Web UIKit with other frameworks (or plain JavaScript) using the web-component release. If your website is built with React, we recommend using the React package. You can also find the completed project for this blog post here. To know more about the Web UIKit, you can read the release blog or the technical deep-dive.
#AGORA VIDEO CALL WEB HOW TO#
We’ll also look at how to generate unique links for your video calls or livestreams. In this tutorial, we’ll see how to access query parameters from a URL and use them with the Web UIKit. The easiest way to join a video call on your website is by sharing a unique link.
0 notes
Text
Gitlab Ci Python Docker

Python docker gitlab-ci gitlab-ci-runner. Improve this question. Follow asked Apr 10 '17 at 11:59. Kurt Peek Kurt Peek. 37.8k 57 57 gold badges 205 205 silver badges 391 391 bronze badges. Add a comment 2 Answers Active Oldest Votes. 1 If you look at the. Jul 16, 2020 Finally, using a GitLab Personal access token we updated the DOCKERAUTHCONFIG variable; Make sure to add all variables you project’s Settings CI/CD page. Now, the DOCKERAUTHCONFIG variable should be updated with a new password for each build. – Helpful Resources: GitLab Runner Issue Thread - Pull images from aws ecr. Docker images for CI where you need lots of Python versions and tools. Dockerized Gitlab CI runner for Python testing. Contribute to cardoe/docker-gitlab-ci-runner-python development by creating an account on GitHub. This video demonstrates Gitlab CI/CD process for Python Flask Project. Video explains how we can generate a docker image, deploy it on DockerHub and then dep.
Want to use an image from a private Docker registry as the base for GitLab Runner’s Docker executor?
ECR example:
Full job:
Assuming the image exists on the registry, you can set the DOCKER_AUTH_CONFIG variable within your project’s Settings > CI/CD page:
The value of auth is a base64-encoded version of your username and password that you use to authenticate into the registry:
Continuing with the ECR example, you can generate a password using the following command:
To test, run:
Gitlab Ci Docker In Docker
Now, add the DOCKER_AUTH_CONFIG variable to your project’s Settings > CI/CD page:
Test out your build. You should see something similar to the following in your logs, indicating that the login was successful:
Unfortunately, we’re not done yet since the generated password/token from the get-login-password command is only valid for 12 hours. So, we need to dynamically update the DOCKER_AUTH_CONFIG variable with a new password. We can set up a new job for this:
Here, after exporting the appropriate environment variables (so we can access them in the aws_auth.sh script), we installed the appropriate dependencies, and then ran the aws_auth.sh script.
aws_auth.sh:
What’s happening?
Gitlab Ci Python Docker Commands

We generated a new password from the get-login-password command and assigned it to AWS_PASSWORD
We then base64 encoded the username and password and assigned it to ENCODED
We used jq to create the necessary JSON for the value of the DOCKER_AUTH_CONFIG variable
Finally, using a GitLab Personal access token we updated the DOCKER_AUTH_CONFIG variable
Make sure to add all variables you project’s Settings > CI/CD page.
Now, the DOCKER_AUTH_CONFIG variable should be updated with a new password for each build.
That’s it!
Gitlab Ci Python Docker Example
–
Gitlab Ci Python Docker Code

Gitlab Ci Cd Python Docker
Helpful Resources:
Gitlab Ci Python Docker Download
GitLab Runner Issue Thread - Pull images from aws ecr or private registry
GitLab Docs - Define an image from a private Container Registry
0 notes
Link
Hello, Developers!!
GitHub introduced personal access tokens (PATs) to reduce the risk of fraud or harm and is being used as an alternative to passwords for authentication. Learn How to Generate Personal Access Token?
0 notes
Text
Configure IdentityServer for Xamarin Forms
In this new post, I explain how to configure IdentityServer for Xamarin Forms to integrate Web Authenticator using Xamarin Essentials.
First, I wrote a post about how to implement the authentication in Xamarin Forms with IdentityServer. So, my focus was only on the Xamarin side. Here I want to explain what the IdentityServer configuration is in order to succeed in the login.
Create a new client
Have you ever wondered how hard it would be to set up a minimal viable authentication server that uses industry standards and usable from your mobile Xamarin application? Well, I have, and I believe in having found a solution that can be a great starting point and will allow you to expand the answer should you ever need to do so.
One common industry standard is OpenID / OAuth2, which provides a standardized authentication mechanism that allows user identification securely and reliably. You can think of the identity service as a web server that identifies a user and provides the client (website/mobile app, etc.) to authenticate itself with another application server that said client uses.
The recommended flow for a mobile app
While the OAuth standard is open to anyone with a computer and an internet connection, I generally do not recommend writing your own implementation. My go-to solution for setting up an identity provider is the IdentityServer.
IdentityServer4 is built based on the OAuth spec. It is built on the trusted ASP.NET Core but requires quite some know-how to get the configurations and other settings ready for use. Luckily, there is a quickstart template that you can install via the dotnet command line and then make your server. You can find the repository here on GitHub. After following the install instructions, we can create a server with the following command:
dotnet new sts -n XamarinIdentity.Auth
The solution is pretty much ready to go but let’s look at the configuration of the IdentityServer in Config.cs and make some adjustments in the GetClients method.
Add a client
Based on the template, let’s make some changes that leave us with the following final configuration:
public static IEnumerable<Client> GetClients(IConfigurationSection stsConfig) { return new List<Client> { // mobile client new Client { ClientName = "mobileclient-name-shown-in-logs", ClientId = "the-mobileclient-id-of-your-choice", AllowedGrantTypes = GrantTypes.Code, AllowOfflineAccess = true, // allow refresh tokens RequireClientSecret = false, RedirectUris = new List<string> { "oidcxamarin101:/authorized" }, PostLogoutRedirectUris = new List<string> { "oidcxamarin101:/unauthorized", }, AllowedScopes = new List<string> { "openid", "role", "profile", "email" } } }; }
Generally, you can set the ClientName, ClientId, RedirectUris and PostLogoutRedirectUris to values of your choosing. The scopes represent the defaults. Further note that by setting AllowOfflineAccess to true, the user can request refresh tokens which means that as long as the refresh token is valid, the user will not have to log in but can use said refresh token to request a new access token. In mobile apps, this is generally the prefered behaviour since users usually have their personal device and therefore expect the app to “store” their login.
As you can see, The RedirectUris and PostLogoutRedirectUris are using a custom URL oidcxamarin101:/ that identifies my app.
IdentityServer Admin
So, very often we have to create the front-end to manage users, integrate the authentication with external services suck as Facebook and Twitter, make API calls secure. IdentityServer offers a nice UI for administration but it is quite expensive. Now, I found a very nice work on GitHub: Skoruba.IdentityServer4.Admin.
This is cool! The application is written in ASP.NET Core MVC using .NET5.
Skoruba IdentityServer4 Admin UI
Add a new client
So, adding a new client with this UI is quite easy. In the IdentityServer Admin website, create a new Client. Then, the important configuration are:
Under Basic
Add this RedirectUris : oidcxamarin101:/authenticated
Allowed Grant Types: authorization_code
Under Authenticaton/Logout
Add Post Logout Redirect Uris: oidcxamarin101:/signout-callback-oidc
Basic configuration
Authentication/Logout configuration
I hope this is useful! Do you know Microsoft is releasing .NET MAUI that will replace Xamarin? Here how to test it with Visual Studio 2022.
If you have any questions, please use the Forum. Happy coding!
The post Configure IdentityServer for Xamarin Forms appeared first on PureSourceCode.
from WordPress https://www.puresourcecode.com/dotnet/xamarin/configure-identityserver-for-xamarin-forms/
1 note
·
View note
Text
This Website Made Clubhouse Conversations Public
A developer made a tool that scraped some conversations on Clubhouse and streamed them on a website, making them available to anyone—even people without an account—undermining the app's ephemeral, invitation-only nature.
Last week, a developer called ai-eks published the tool on the open source repository GitHub. The developer then started uploading the conversations and streaming them on a website called OpenClubhouse.
"This is a third party Clubhouse audio player. I hope that everybody can hear the voice. So it is a open Clubhouse client for Android, for Computer, and for anyone without invite code," the developer wrote on the site. "All room accesses are acquired from personal session, and all copyrights of the voice are belongs [sic] to JoinClubhouse.com and its users."
Anyone could listen to conversations on the site and see people who were participating in the sessions, according to screenshots of the site.

A screenshot of the OpenClubhouse site on Sunday (Image: Jane Manchun Wong)
Clubhouse, which initially attracted celebrities and Silicon Valley venture capitalists, is growing in popularity but is still only available to those who received an invite from an existing user. Celebrities like Drake, Oprah Winfrey, and Kevin Hart have even popped up on the app, offering people the rare chance of digital proximity to the wealthy and famous. It's current, semi-exclusive and ephemeral nature has generated some controversies, like a room in which Silicon Valley elites discussed journalists having too much power, and conversations that spread conspiracy theories about COVID-19.
A website that makes some of those conversations public and easy to listen to seems to undermine some of Clubhouse's appeal, but as of Monday, Clubhouse blocked the account that ai-eks used to record and stream conversations from the app, and his site no longer provides streams. A Clubhouse spokesperson told Bloomberg that it "permanently banned" the user and implemented new "safeguards" to prevent this from happening again.
A Clubhouse spokesperson did not immediately respond to a request for comment.
Daniel Sinclair, an independent researcher studying social media, analyzed the OpenClubhouse tool and explained how it worked in a Twitter thread. In practice, the tool was relying on a Clubhouse account that was joining some rooms and collecting the room's unique tokens, codes that allow users to join a call. These tokens were available to anyone because of how the backend service for Clubhouse was architected. This allowed anyone to become "a ghost listener," Sinclair wrote in his thread.
Sinclair told Motherboard that the tool did not appear to record the audio, it was streaming it from Clubhouse's backend.
"That they could turn a private call into essentially a public broadcast using the same service is a concern, but they themselves weren’t recording," Sinclair said in an online chat.
Sinclair said that conversations marked "private" were likely not accessible to the tool.
Motherboard reached out to the developer of the tool via email and LinkedIn, but they did not respond.
CORRECTION, Monday Feb. 22, 1:42 p.m. ET: A previous version of this article mistakenly identified Lieyi Zhang as the developer of OpenClubhouse. In fact, the developer is someone who goes by the name ai-eks on GitHub.
Subscribe to our cybersecurity podcast CYBER, here.
This Website Made Clubhouse Conversations Public syndicated from https://triviaqaweb.wordpress.com/feed/
0 notes
Link
Sébastien Colladon is a Technical Architect for Salesforce over in France. In this episode, Sébastien and I discussed one of his recent projects; a series of templates for Postman, a popular tool for working with API’s. The templates cover a variety of use cases for Salesforce. The project is open-source and available online through Github. We also talked in-depth about what he is doing to make integration and testing more accessible for developers. Show Highlights: Sébastien describes the Salesforce Postman Collection. We explore some of the many useful features of Postman. Why a Salesforce developer might use Postman over something like Workbench. There are just under 200 templates in Postman, Sébastien provides some examples, like the REST API, and how they can be used. The challenges and triumphs of building the Postman Collection. Links: Sébastien on Twitter Sébastien on LinkedIn Sébastien Github Blog Post on the Postman Collection Postman Collection repo Shoutouts: Philippe Ozil Episode Transcript 00:07 Sébastien: Today as architects, my main goal is to ensure that we’re going to deliver the future the customer wants successfully in this platform, it is going to be integrated. 00:18 That is Sébastien Colladon, a technical architect for Salesforce over in France. I’m Josh Birk, Developer Evangelist for Salesforce. And here on the Salesforce Developer Podcast, you’ll hear stories and insights from developers for developers. Today, we sit down and talk with Sébastien about a very specific project that he’s been working on, which is a series of templates for Postman. All of this work is going to make integration and testing much easier for you. But let’s start at the beginning. What exactly is Postman? 00:46 Sébastien: Postman? Postman is a tool that we’ll use to simulate or to play HTTP call, so you’re eligible web services with it. You can configure the web service and you can have the result of that execution of these websites. And this is basically what it does. But it comes with a lot of handy feature like for example, or advanced machine cogeneration and collection organization of your core your built folders kind of very handy for collaboration, walking and designing of integration. 01:23 If I’m working with Salesforce, why would I use something like postman over something like workbench, 01:28 Sébastien: if you want to use Postman instead of Workbench, this is basically just to be able to store the design of show integration, for example, or if you ask to provide a way to go to a web service for an external application, you’re going to be able to build it in Postman and test it and then you’re going to be able to share it and come back to it easily because it is stored in a collection. Plus you will be able to quickly switch to another, which is not very positive very easily with workbench you are connected to another man. If you want to go to another you need to connect to the environment also and to rebuild the call you are using the previous one. And now if your workbench and postman is that person allows you to call authentication and once which is not the case with workbench because when you are in workbench you are already authenticated into your targeting. And so that kind of goes right into what your your project is really about your project is like a collection of templates. Can you kind of describe what’s in your repo? So what’s in the repo is basically a collection with a lot of API calls. There are structure API. So we have that on occasion. We have API v1, bulk API v2, the REST API, the metadata API, the tooling API, and it comes also with a preset folder headers you need, because depending on the API you are going to call, some errors are present or not. And it comes also with a boilerplate for the environments you need. This way, if you duplicate the environment, wherever to configure it to target and also sandboxes, and you will be able to switch between around Verizon. 03:22 Josh: And how many templates do you have in there right now? 03:24 Sébastien: something like just under 200 03:34 Josh: So that’s a that’s a lot of different templates. What are some examples of specific ones that are in there? 03:42 Sébastien: For example, we are for the REST API, there is a lot because there is a lot of describing can do or a subject relationship. You can you can go through, but basically, this new structure, type of API, so we have metadata rest tooling. API, v1, v2, tighter API composite API for that kind of stuff. 04:06 Josh: Nice. And so give me an example of how you would use one of these requests, you know, a template of these requests like in your day to day life. 04:16 Sébastien: So why can one what I will try to explain to you is another use case than the one that is in the in the past. And it is a more recent one. Also, like recently, I needed to choose the API v1, one of my customers do. And in order to do API v1 he has is a very complex orchestration. It means it’s going to load different kinds of objects, and with different kind of pace configuration, and the goal was to tune it very well. So all the cores are not shown the same way. And in order to be able to gather data around how the API behave, with This kind of data, this kind of custom object, we needed to split the work in a team. So what I did, I just created a workspace in postman, put it the API calls we needed for the API. And we just created the work. Everyone duplicate the collection, and just configure the API to call the job the objective was to, and then we gather the result with the same template. And we will be able to choose we have been able to choose who we want for this customer very, very fast and very, very easily and corroborate it. 05:36 Josh: Nice. Nice. So it’s interesting that the collaboration angle on that, like, you can take a little bit of information and a lot of people can replicate the same kind of integration that you’re doing. Is that is that an accurate description? 05:50 Sébastien: Yeah, actually, when once you have done the import, you can export it, then you can share it, and then everyone is able to replay it in this video. You all know one, but you can repeat the exact as you have configured. 06:03 Josh: And you can also handle authentication across different kinds of work. So you can handle that integration, whether it’s in a sandbox or a scratch. org or production. 06:12 Sébastien: Yeah, exactly. You can target a sandbox that’s crunch on production environments. You can target trailing pregnant if you want. You so you can forget anything. That is awesome sauce, guys. And this is all open source and online, correct? 06:28 Sébastien: Yeah, correct. This is posted by GitHub. And this is open. 06:32 Josh: Well, and I think this is an interesting use case of open source because it’s not just about you know, getting bug fixes and, and features into a project. This is also about expanding the collection for different kinds of templates, right? 06:46 Sébastien:Yes, right. 06:48 Or of the current template, well not present. I think I started with API but we’ve already been through improved the debate, and I hope this templates will be improved more and more with the the community growing. 07:05 Josh: Were there any particular challenges that you ran into when you started putting this together? Or would this postman’s just kind of make this pretty boilerplate? 07:14 Sébastien: Yes, I think we should if we have encountered the same challenge that you face everywhere, this is the our your name, your variance. And yeah, this is this is very funny. But this is, in fact, a very complicated problems for software engineer. And I think everyone knows that. We actually have done I think, like, two or three meetings talking about that, just to be sure. To our to, to name all viable. 07:48 Josh: So walk me through that what was what were some variable names that didn’t make it in and then what did you end up actually using? 07:55 Sébastien: Well, first thing we need to notify different kinds of types of variables. And then we decided to put some naming convention about all those type of variables, then we try to follow some general guidance about this type. This is how I’m thinking. Again, the result is that we have three type of variables, we have user variables that are that are set by the user. And those use those variables for case changes. case, we are also the system variables, those system loggers are set by the system. When you are done. Of course, when you are set when recording a notification, notification is going to gather the access token and set it for you. So when you’re going to call a larger template, the access token will be put into it for you and the call will go smoothly without authenticating first, because it has been done before. So those kinds of information is stored into the system over time and viable. When those variables follow characters, starting with an underscore convention, this is close to the private variable in JavaScript, you have what we call placeholder. placeholder are some variables that are not included environment templates, there are into directly into the inputs. And this is where you’re going to change the value of this boilerplate that is on point, if you want to ask the API to give you a describer for object, we’re not going to duplicate all this code for every object, because it will be huge. And in fact, it will be also incomplete because any customer can create custom objects, which I can’t know before. I can go in that right. 09:49 Josh: And that’s our show. I want to thank Sebastien for his hard work on this project. And I hope you’ve enjoyed this short introduction into his efforts. Now of course in the show notes, we will be linking to that project. As well as a blog post that was co authored with PhilippeOzil on how to get started with it. Thanks for listening everybody. If you want to learn more about this podcast, head on over to developer.salesforce.com/podcast where you can hear old episodes, see the show notes and have links to your favorite podcast service. I’ll talk to you next week.
0 notes
Link
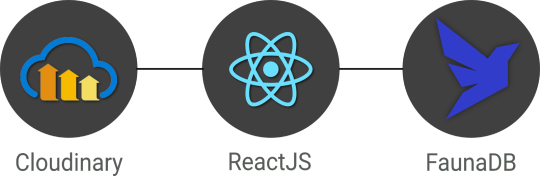
In this article, we’re very excited to start bringing all of this together in a real-world app with highly dynamic data in a serverless fashion using React hooks, FaunaDB, and Cloudinary. We will use the Fauna Query Language (FQL) instead of GraphQL and start with a frontend-only approach that directly accesses the serverless database FaunaDB for data storage, authentication, and authorization.
The golden standard for example applications that feature a specific technology is a todo app–mainly because they are simple. Any database out there can serve a very simple application and shine. And that is exactly why this app will be different! If we truly want to show how FaunaDB excels for real world applications, then we need to build something more advanced.
Introducing Fwitter
When we started at Twitter, databases were bad. When we left, they were still bad Evan Weaver
Since FaunaDB was developed by ex-Twitter engineers who experienced these limitations first-hand, a Twitter-like application felt like an appropriately sentimental choice. And, since we are building it with FaunaDB, let’s call this serverless baby ‘Fwitter’. Below is a short video that shows how it looks, and the full source code is available on GitHub.
When you clone the repo and start digging around, you might notice a plethora of well-commented example queries not covered in this article. That’s because we’ll be using Fwitter as our go-to example application in future articles, and building additional features into it with time. But, for now, here’s a basic rundown of what we’ll cover here:
Modeling the data
Setup the project
Creating the front end
The FaunaDB JavaScript driver
Creating data
Securing your data with UDFs and ABAC roles
How to implement authentication
Adding Cloudinary for media
Retrieving data
More in the code base
We build these features without having to configure operations or set up servers for your database. Since both Cloudinary and FaunaDB are scalable and distributed out-of-the-box, we will never have to worry about setting up servers in multiple regions to achieve low latencies for users in other countries. Let’s dive in!
Modeling the data
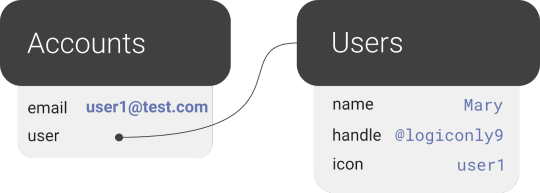
Before we can show how FaunaDB excels at relations, we need to cover the types of relations in our application’s data model. FaunaDB’s data entities are stored in documents, which are then stored in collections–like rows in tables. For example, each user’s details will be represented by a User document stored in a Users collection. And we eventually plan to support both single sign-on and password-based login methods for a single user, each of which will be represented as an Account document in an Accounts collection. At this point, one user has one account, so it doesn’t matter which entity stores the reference (i.e., the user ID). We could have stored the user ID in either the Account or the User document in a one-to-one relation:

One-to-one
However, since one User will eventually have multiple Accounts (or authentication methods), we’ll have a one-to-many model.

One-to-many
In a one-to-many relation between Users and Accounts, each Account points to only one user, so it makes sense to store the User reference on the Account:
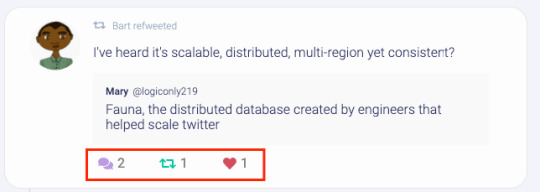
We also have many-to-many relations, like the relations between Fweets and Users, because of the complex ways users interact with each other via likes, comments, and refweets.

Many-to-many
Further, we will use a third collection, Fweetstats, to store information about the interaction between a User and a Fweet.

Fweetstats’ data will help us determine, for example, whether or not to color the icons indicating to the user that he has already liked, commented, or refweeted a Fweet. It also helps us determine what clicking on the heart means: unlike or like.
The final model for the application will look like this:
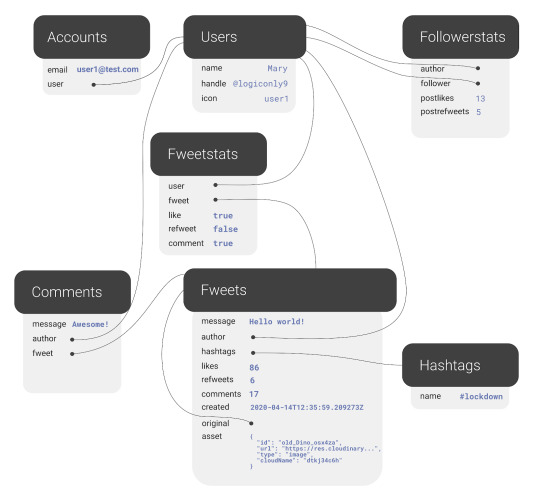
The application model of the fwitter application
Fweets are the center of the model, because they contain the most important data of the Fweet such as the information about the message, the number of likes, refweets, comments, and the Cloudinary media that was attached. FaunaDB stores this data in a json format that looks like this:
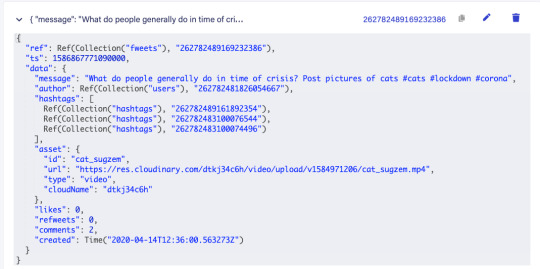
As shown in the model and in this example json, hashtags are stored as a list of references. If we wanted to, we could have stored the complete hashtag json in here, and that is the preferred solution in more limited document-based databases that lack relations. However, that would mean that our hashtags would be duplicated everywhere (as they are in more limited databases) and it would be more difficult to search for hashtags and/or retrieve Fweets for a specific hashtag as shown below.
Note that a Fweet does not contain a link to Comments, but the Comments collection contains a reference to the Fweet. That’s because one Comment belongs to one Fweet, but a Fweet can have many comments–similar to the one-to-many relation between Users and Accounts. Finally, there is a FollowerStats collection which basically saves information about how much users interact with each other in order to personalize their respective feeds. We won’t cover that much in this article, but you can experiment with the queries in the source code and stay tuned for a future article on advanced indexing. Hopefully, you’re starting to see why we chose something more complex than a ToDo app. Although Fwitter is nowhere near the complexity of the real Twitter app on which it’s based, it’s already becoming apparent that implementing such an application without relations would be a serious brainbreaker. Now, if you haven’t already done so from the github repo, it’s finally time to get our project running locally!
Setup the project
To set up the project, go to the FaunaDB dashboard and sign up. Once you are in the dashboard, click on New Database, fill in a name, and click Save. You should now be on the “Overview” page of your new database. Next, we need a key that we will use in our setup scripts. Click on the Security tab in the left sidebar, then click the New key button. In the “New key” form, the current database should already be selected. For “Role”, leave it as “Admin”. Optionally, add a key name. Next, click Save and copy the key secret displayed on the next page. It will not be displayed again.

Now that you have your database secret, clone the git repository and follow the readme. We have prepared a few scripts so that you only have to run the following commands to initialize your app, create all collections, and populate your database. The scripts will give you further instructions:
// install node modules npm install // run setup, this will create all the resources in your database // provide the admin key when the script asks for it. // !!! the setup script will give you another key, this is a key // with almost no permissions that you need to place in your .env.local as the // script suggestions npm run setup npm run populate // start the frontend
After the script, your .env.local file should contain the bootstrap key that the script provided you (not the admin key)
REACT_APP_LOCAL___BOOTSTRAP_FAUNADB_KEY=<bootstrap key>
You can optionally create an account with Cloudinary and add your cloudname and a public template (there is a default template called ‘ml_default’ which you can make public) to the environment to include images and videos in the fweets.
REACT_APP_LOCAL___CLOUDINARY_CLOUDNAME=<cloudinary cloudname> REACT_APP_LOCAL___CLOUDINARY_TEMPLATE=<cloudinary template>
Without these variables, the include media button will not work, but the rest of the app should run fine:
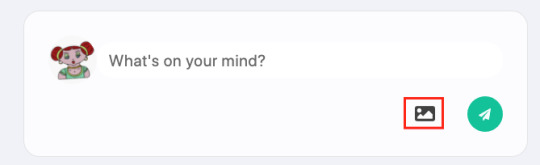
Creating the front end
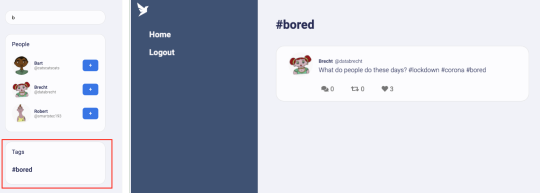
For the frontend, we used Create React App to generate an application, then divided the application into pages and components. Pages are top-level components which have their own URLs. The Login and Register pages speak for themselves. Home is the standard feed of Fweets from the authors we follow; this is the page that we see when we log into our account. And the User and Tag pages show the Fweets for a specific user or tag in reverse chronological order. We use React Router to direct to these pages depending on the URL, as you can see in the src/app.js file.
<Router> <SessionProvider value=> <Layout> <Switch> <Route exact path="/accounts/login"> <Login /> </Route> <Route exact path="/accounts/register"> <Register /> </Route> <Route path="/users/:authorHandle" component={User} /> <Route path="/tags/:tag" component={Tag} /> <Route path="/"> <Home /> </Route> </Switch> </Layout> </SessionProvider> </Router>
The only other thing to note in the above snippet is the SessionProvider, which is a React context to store the user’s information upon login. We’ll revisit this in the authentication section. For now, it’s enough to know that this gives us access to the Account (and thus User) information from each component. Take a quick look at the home page (src/pages/home.js) to see how we use a combination of hooks to manage our data. The bulk of our application’s logic is implemented in FaunaDB queries which live in the src/fauna/queries folder. All calls to the database pass through the query-manager, which in a future article, we’ll refactor into serverless function calls. But for now these calls originate from the frontend and we’ll secure the sensitive parts of it with FaunaDB’s ABAC security rules and User Defined Functions (UDF). Since FaunaDB behaves as a token-secured API, we do not have to worry about a limit on the amount of connections as we would in traditional databases.
The FaunaDB JavaScript driver
Next, take a look at the src/fauna/query-manager.js file to see how we connect FaunaDB to our application using FaunaDB’s JavaScript driver, which is just a node module we pulled with `npm install`. As with any node module, we import it into our application as so:
import faunadb from 'faunadb'
And create a client by providing a token.
this.client = new faunadb.Client({ secret: token || this.bootstrapToken })
We’ll cover tokens a little more in the Authentication section. For now, let’s create some data!
Creating data
The logic to create a new Fweet document can be found in the src/fauna/queries/fweets.js file. FaunaDB documents are just like JSON, and each Fweet follows the same basic structure:
const data = { data: { message: message, likes: 0, refweets: 0, comments: 0, created: Now() } }
The Now() function is used to insert the time of the query so that the Fweets in a user’s feed can be sorted chronologically. Note that FaunaDB automatically places timestamps on every database entity for temporal querying. However, the FaunaDB timestamp represents the time the document was last updated, not the time it was created, and the document gets updated every time a Fweet is liked; for our intended sorting order, we need the created time. Next, we send this data to FaunaDB with the Create() function. By providing Create() with the reference to the Fweets collection using Collection(‘fweets’), we specify where the data needs to go.
const query = Create(Collection('fweets'), data )
We can now wrap this query in a function that takes a message parameter and executes it using client.query() which will send the query to the database. Only when we call client.query() will the query be sent to the database and executed. Before that, we combine as many FQL functions as we want to construct our query.
function createFweet(message, hashtags) { const data = … const query = … return client.query(query) }
Note that we have used plain old JavaScript variables to compose this query and in essence just called functions. Writing FQL is all about function composition; you construct queries by combining small functions into larger expressions. This functional approach has very strong advantages. It allows us to use native language features such as JavaScript variables to compose queries, while also writing higher-order FQL functions that are protected from injection. For example, in the query below, we add hashtags to the document with a CreateHashtags() function that we’ve defined elsewhere using FQL.
const data = { data: { // ... hashtags: CreateHashtags(tags), likes: 0, // ... }
The way FQL works from within the driver’s host language (in this case, JavaScript) is what makes FQL an eDSL (embedded domain-specific language). Functions like CreateHashtags() behave just like a native FQL function in that they are both just functions that take input. This means that we can easily extend the language with our own functions, like in this open source FQL library from the Fauna community. It’s also important to notice that we create two entities in two different collections, in one transaction. Thus, if/when things go wrong, there is no risk that the Fweet is created yet the Hashtags are not. In more technical terms, FaunaDB is transactional and consistent whether you run queries over multiple collections or not, a property that is rare in scalable distributed databases. Next, we need to add the author to the query. First, we can use the Identity() FQL function to return a reference to the currently logged in document. As discussed previously in the data modeling section, that document is of the type Account and is separated from Users to support SSO in a later phase.

Then, we need to wrap Identity() in a Get() to access the full Account document and not just the reference to it.
Get(Identity())
Finally, we wrap all of that in a Select() to select the data.user field from the account document and add it to the data JSON.
const data = { data: { // ... hashtags: CreateHashtags(tags), author: Select(['data', 'user'], Get(Identity())), likes: 0, // ... } }
Now that we’ve constructed the query, let’s pull it all together and call client.query(query) to execute it.
function createFweet(message, hashtags) { const data = { data: { message: message, likes: 0, refweets: 0, comments: 0, author: Select(['data', 'user'], Get(Identity())), hashtags: CreateHashtags(tags), created: Now() } } const query = Create(Collection('fweets'), data ) return client.query(query) }
By using functional composition, you can easily combine all your advanced logic in one query that will be executed in one transaction. Check out the file src/fauna/queries/fweets.js to see the final result which takes even more advantage of function composition to add rate-limiting, etc.
Securing your data with UDFs and ABAC roles
The attentive reader will have some thoughts about security by now. We are essentially creating queries in JavaScript and calling these queries from the frontend. What stops a malicious user from altering these queries? FaunaDB provides two features that allow us to secure our data: Attribute-Based Access Control (ABAC) and User Defined Functions (UDF). With ABAC, we can control which collections or entities that a specific key or token can access by writing Roles. With UDFs, we can push FQL statements to the database by using the CreateFunction().
CreateFunction({ name: 'create_fweet', body: <your FQL statement>, })
Once the function is in the database as a UDF, where the application can’t alter it anymore, we then call this UDF from the front end.
client.query( Call(Function('create_fweet'), message, hashTags) )
Since the query is now saved on the database (just like a stored procedure), the user can no longer manipulate it. One example of how UDFs can be used to secure a call is that we do not pass in the author of the Fweet. The author of the Fweet is derived from the Identity() function instead, which makes it impossible for a user to write a Fweet on someone’s behalf. Of course, we still have to define that the user has access to call the UDF. For that, we will use a very simple ABAC role that defines a group of role members and their privileges. This role will be named logged_in_role, its membership will include all of the documents in the Accounts collection, and all of these members will be granted the privilege of calling the create_fweet UDF.
CreateRole( name: 'logged_in_role', privileges: [ { resource: q.Function('create_fweet'), actions: { call: true } } ], membership: [{ resource: Collection('accounts') }], )
We now know that these privileges are granted to an account, but how do we ‘become’ an Account? By using the FaunaDB Login() function to authenticate our users as explained in the next section.
How to implement authentication in FaunaDB
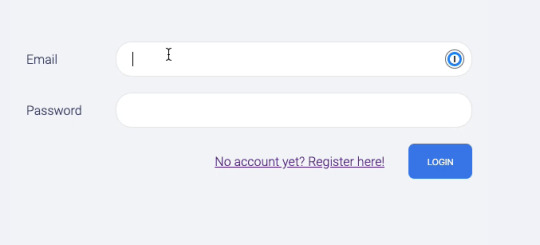
We just showed a role that gives Accounts the permissions to call the create_fweets function. But how do we “become” an Account?. First, we create a new Account document, storing credentials alongside any other data associated with the Account (in this case, the email address and the reference to the User).
return Create(Collection('accounts'), { credentials: { password: password }, data: { email: email, user: Select(['ref'], Var('user')) } }) }
We can then call Login() on the Account reference, which retrieves a token.
Login( Match( < Account reference > , { password: password } ) )
We use this token in the client to impersonate the Account. Since all Accounts are members of the Account collection, this token fulfills the membership requirement of the logged_in_role and is granted access to call the create_fweet UDF. To bootstrap this whole process, we have two very important roles.
bootstrap_role: can only call the login and register UDFs
logged_in_role: can call other functions such as create_fweet
The token you received when you ran the setup script is essentially a key created with the bootstrap_role. A client is created with that token in src/fauna/query-manager.js which will only be able to register or login. Once we log in, we use the new token returned from Login() to create a new FaunaDB client which now grants access to other UDF functions such as create_fweet. Logging out means we just revert to the bootstrap token. You can see this process in the src/fauna/query-manager.js, along with more complex role examples in the src/fauna/setup/roles.js file.
How to implement the session in React
Previously, in the “Creating the front end” section, we mentioned the SessionProvider component. In React, providers belong to a React Context which is a concept to facilitate data sharing between different components. This is ideal for data such as user information that you need everywhere in your application. By inserting the SessionProvider in the HTML early on, we made sure that each component would have access to it. Now, the only thing a component has to do to access the user details is import the context and use React’s ‘useContext’ hook.
import SessionContext from '../context/session' import React, { useContext } from 'react' // In your component const sessionContext = useContext(SessionContext) const { user } = sessionContext.state
But how does the user end up in the context? When we included the SessionProvider, we passed in a value consisting of the current state and a dispatch function.
const [state, dispatch] = React.useReducer(sessionReducer, { user: null }) // ... <SessionProvider value=>
The state is simply the current state, and the dispatch function is called to modify the context. This dispatch function is actually the core of the context since creating a context only involves calling React.createContext() which will give you access to a Provider and a Consumer.
const SessionContext = React.createContext({}) export const SessionProvider = SessionContext.Provider export const SessionConsumer = SessionContext.Consumer export default SessionContext
We can see that the state and dispatch are extracted from something that React calls a reducer (using React.useReducer), so let’s write a reducer.
export const sessionReducer = (state, action) => { switch (action.type) { case 'login': { return { user: action.data.user } } case 'register': { return { user: action.data.user } } case 'logout': { return { user: null } } default: { throw new Error(`Unhandled action type: ${action.type}`) } } }
This is the logic that allows you to change the context. In essence, it receives an action and decides how to modify the context given that action. In my case, the action is simply a type with a string. We use this context to keep user information, which means that we call it on a successful login with:
sessionContext.dispatch({ type: 'login', data: e })
Adding Cloudinary for media
When we created a Fweet, we did not take into account assets yet. FaunaDB is meant to store application data, not image blobs or video data. However, we can easily store the media on Cloudinary and just keep a link in FaunaDB. The following inserts the Cloudinary script (in app.js):
loadScript('https://widget.cloudinary.com/v2.0/global/all.js')
We then create a Cloudinary Upload Widget (in src/components/uploader.js):
window.cloudinary.createUploadWidget( { cloudName: process.env.REACT_APP_LOCAL___CLOUDINARY_CLOUDNAME, uploadPreset: process.env.REACT_APP_LOCAL___CLOUDINARY_TEMPLATE, }, (error, result) => { // ... } )
As mentioned earlier, you need to provide a Cloudinary cloud name and template in the environment variables (.env.local file) to use this feature. Creating a Cloudinary account is free and once you have an account you can grab the cloud name from the dashboard.

You have the option to use API keys as well to secure uploads. In this case, we upload straight from the front end so the upload uses a public template. To add a template or modify it to make it public, click on the gear icon in the top menu, go to Upload tab, and click Add upload preset. You could also edit the ml_default template and just make it public.

Now, we just call widget.open() when our media button is clicked.
const handleUploadClick = () => { widget.open() } return ( <div> <FontAwesomeIcon icon={faImage} onClick={handleUploadClick}></FontAwesomeIcon> </div> )
This provides us with a small media button that will open the Cloudinary Upload Widget when it’s clicked.

When we create the widget, we can also provide styles and fonts to give it the look and feel of our own application as we did above (in src/components/uploader.js):
const widget = window.cloudinary.createUploadWidget( { cloudName: process.env.REACT_APP_LOCAL___CLOUDINARY_CLOUDNAME, uploadPreset: process.env.REACT_APP_LOCAL___CLOUDINARY_TEMPLATE, styles: { palette: { window: '#E5E8EB', windowBorder: '#4A4A4A', tabIcon: '#000000', // ... }, fonts: {
Once we have uploaded media to Cloudinary, we receive a bunch of information about the uploaded media, which we then add to the data when we create a Fweet.

We can then simply use the stored id (which Cloudinary refers to as the publicId) with the Cloudinary React library (in src/components/asset.js):
import { Image, Video, Transformation } from 'cloudinary-react'
To show the image in our feed.
<div className="fweet-asset"> <Image publicId={asset.id} cloudName={cloudName} fetchFormat="auto" quality="auto" secure="true" /> </div>
When you use the id, instead of the direct URL, Cloudinary does a whole range of optimizations to deliver the media in the most optimal format possible. For example when you add a video image as follows:
<div className="fweet-asset"> <Video playsInline autoPlay loop={true} controls={true} cloudName={cloudName} publicId={publicId}> <Transformation width="600" fetchFormat="auto" crop="scale" /> </Video> </div>
Cloudinary will automatically scale down the video to a width of 600 pixels and deliver it as a WebM (VP9) to Chrome browsers (482 KB), an MP4 (HEVC) to Safari browsers (520 KB), or an MP4 (H.264) to browsers that support neither format (821 KB). Cloudinary does these optimizations server-side, significantly improving page load time and the overall user experience.
Retrieving data
We have shown how to add data. Now we still need to retrieve data. Getting the data of our Fwitter feed has many challenges. We need to:
Get fweets from people you follow in a specific order (taking time and popularity into account)
Get the author of the fweet to show his profile image and handle
Get the statistics to show how many likes, refweets and comments it has
Get the comments to list those beneath the fweet.
Get info about whether you already liked, refweeted, or commented on this specific fweet.
If it’s a refweet, get the original fweet.
This kind of query fetches data from many different collections and requires advanced indexing/sorting, but let’s start off simple. How do we get the Fweets? We start off by getting a reference to the Fweets collection using the Collection() function.
Collection('fweets')
And we wrap that in the Documents() function to get all of the collection’s document references.
Documents(Collection('fweets'))
We then Paginate over these references.
Paginate(Documents(Collection('fweets')))
Paginate() requires some explanation. Before calling Paginate(), we had a query that returned a hypothetical set of data. Paginate() actually materializes that data into pages of entities that we can read. FaunaDB requires that we use this Paginate() function to protect us from writing inefficient queries that retrieve every document from a collection, because in a database built for massive scale, that collection could contain millions of documents. Without the safeguard of Paginate(), that could get very expensive! Let’s save this partial query in a plain JavaScript variable references that we can continue to build on.
const references = Paginate(Documents(Collection('fweets')))
So far, our query only returns a list of references to our Fweets. To get the actual documents, we do exactly what we would do in JavaScript: map over the list with an anonymous function. In FQL, a Lambda is just an anonymous function.
const fweets = Map( references, Lambda(['ref'], Get(Var('ref'))) )
This might seem verbose if you’re used to declarative query languages like SQL that declare what you want and let the database figure out how to get it. In contrast, FQL declares both what you want and how you want it which makes it more procedural. Since you’re the one defining how you want your data, and not the query engine, the price and performance impact of your query is predictable. You can exactly determine how many reads this query costs without executing it, which is a significant advantage if your database contains a huge amount of data and is pay-as-you-go. So there might be a learning curve, but it’s well worth it in the money and hassle it will save you. And once you learn how FQL works, you will find that queries read just like regular code. Let’s prepare our query to be extended easily by introducing Let. Let will allow us to bind variables and reuse them immediately in the next variable binding, which allows you to structure your query more elegantly.
const fweets = Map( references, Lambda( ['ref'], Let( { fweet: Get(Var('ref')) }, // Just return the fweet for now Var('fweet') ) ) )
Now that we have this structure, getting extra data is easy. So let’s get the author.
const fweets = Map( references, Lambda( ['ref'], Let( { fweet: Get(Var('ref')), author: Get(Select(['data', 'author'], Var('fweet'))) }, { fweet: Var('fweet'), author: Var('user') } ) ) )
Although we did not write a join, we have just joined Users (the author) with the Fweets. We’ll expand on these building blocks even further in a follow up article. Meanwhile, browse src/fauna/queries/fweets.js to view the final query and several more examples.
More in the code base
If you haven’t already, please open the code base for this Fwitter example app. You will find a plethora of well-commented examples we haven’t explored here, but will in future articles. This section touches on a few files we think you should check out. First, check out the src/fauna/queries/fweets.js file for examples of how to do complex matching and sorting with FaunaDB’s indexes (the indexes are created in src/fauna/setup/fweets.js). We implemented three different access patterns to get Fweets by popularity and time, by handle, and by tag.
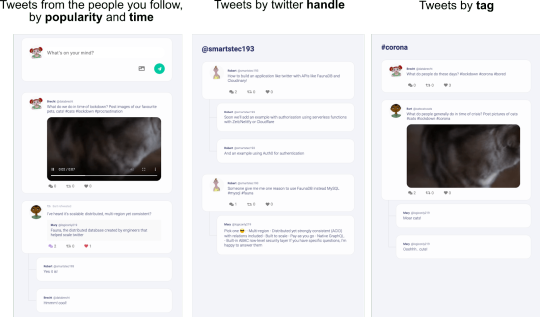
Getting Fweets by popularity and time is a particularly interesting access pattern because it actually sorts the Fweets by a sort of decaying popularity based on users’ interactions with each other. Also, check out src/fauna/queries/search.js, where we’ve implemented autocomplete based on FaunaDB indexes and index bindings to search for authors and tags. Since FaunaDB can index over multiple collections, we can write one index that supports an autocomplete type of search on both Users and Tags.

We’ve implemented these examples because the combination of flexible and powerful indexes with relations is rare for scalable distributed databases. Databases that lack relations and flexible indexes require you to know in advance how your data will be accessed and you will run into problems when your business logic needs to change to accommodate your clients’ evolving use cases. In FaunaDB, if you did not foresee a specific way that you’d like to access your data, no worries — just add an Index! We have range indexes, term indexes, and composite indexes that can be specified whenever you want without having to code around eventual consistency.
A preview of what’s to come
As mentioned in the introduction, we’re introducing this Fwitter app to demonstrate complex, real-world use cases. That said, a few features are still missing and will be covered in future articles, including streaming, pagination, benchmarks, and a more advanced security model with short-lived tokens, JWT tokens, single sign-on (possibly using a service like Auth0), IP-based rate limiting (with Cloudflare workers), e-mail verification (with a service like SendGrid), and HttpOnly cookies.
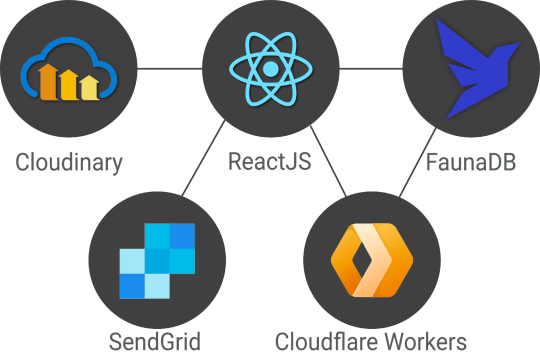
The end result will be a stack that relies on services and serverless functions which is very similar to a dynamic JAMstack app, minus the static site generator. Stay tuned for the follow-up articles and make sure to subscribe to the Fauna blog and monitor CSS-Tricks for more FaunaDB-related articles.
0 notes
Text
Rethinking Twitter as a Serverless App
In a previous article, we showed how to build a GraphQL API with FaunaDB. We’ve also written a series of articles [1, 2, 3, 4] explaining how traditional databases built for global scalability have to adopt eventual (vs. strong) consistency, and/or make compromises on relations and indexing possibilities. FaunaDB is different since it does not make these compromises. It’s built to scale so it can safely serve your future startup no matter how big it gets, without sacrificing relations and consistent data.
In this article, we’re very excited to start bringing all of this together in a real-world app with highly dynamic data in a serverless fashion using React hooks, FaunaDB, and Cloudinary. We will use the Fauna Query Language (FQL) instead of GraphQL and start with a frontend-only approach that directly accesses the serverless database FaunaDB for data storage, authentication, and authorization.

The golden standard for example applications that feature a specific technology is a todo app–mainly because they are simple. Any database out there can serve a very simple application and shine.
And that is exactly why this app will be different! If we truly want to show how FaunaDB excels for real world applications, then we need to build something more advanced.
Introducing Fwitter
When we started at Twitter, databases were bad. When we left, they were still bad
Evan Weaver
Since FaunaDB was developed by ex-Twitter engineers who experienced these limitations first-hand, a Twitter-like application felt like an appropriately sentimental choice. And, since we are building it with FaunaDB, let’s call this serverless baby ‘Fwitter’.
Below is a short video that shows how it looks, and the full source code is available on GitHub.
When you clone the repo and start digging around, you might notice a plethora of well-commented example queries not covered in this article. That’s because we’ll be using Fwitter as our go-to example application in future articles, and building additional features into it with time.
But, for now, here’s a basic rundown of what we’ll cover here:
Modeling the data
Setup the project
Creating the front end
The FaunaDB JavaScript driver
Creating data
Securing your data with UDFs and ABAC roles
How to implement authentication
Adding Cloudinary for media
Retrieving data
More in the code base
We build these features without having to configure operations or set up servers for your database. Since both Cloudinary and FaunaDB are scalable and distributed out-of-the-box, we will never have to worry about setting up servers in multiple regions to achieve low latencies for users in other countries.
Let’s dive in!
Modeling the data
Before we can show how FaunaDB excels at relations, we need to cover the types of relations in our application’s data model. FaunaDB’s data entities are stored in documents, which are then stored in collections–like rows in tables. For example, each user’s details will be represented by a User document stored in a Users collection. And we eventually plan to support both single sign-on and password-based login methods for a single user, each of which will be represented as an Account document in an Accounts collection.
At this point, one user has one account, so it doesn’t matter which entity stores the reference (i.e., the user ID). We could have stored the user ID in either the Account or the User document in a one-to-one relation:

One-to-one
However, since one User will eventually have multiple Accounts (or authentication methods), we’ll have a one-to-many model.

One-to-many
In a one-to-many relation between Users and Accounts, each Account points to only one user, so it makes sense to store the User reference on the Account:

We also have many-to-many relations, like the relations between Fweets and Users, because of the complex ways users interact with each other via likes, comments, and refweets.

Many-to-many
Further, we will use a third collection, Fweetstats, to store information about the interaction between a User and a Fweet.

Fweetstats’ data will help us determine, for example, whether or not to color the icons indicating to the user that he has already liked, commented, or refweeted a Fweet. It also helps us determine what clicking on the heart means: unlike or like.
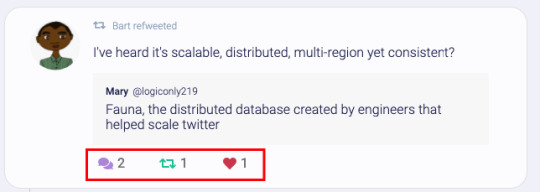
The final model for the application will look like this:
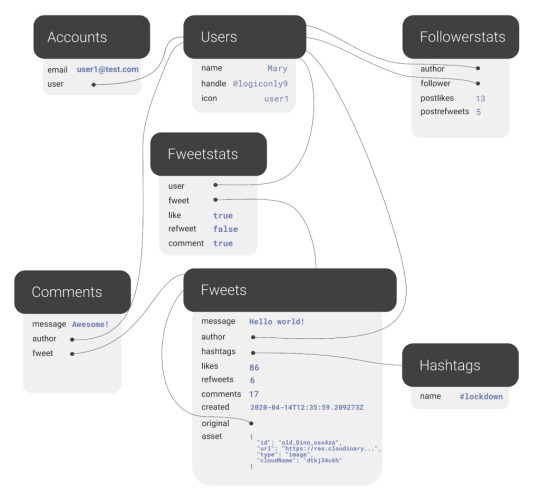
The application model of the fwitter application
Fweets are the center of the model, because they contain the most important data of the Fweet such as the information about the message, the number of likes, refweets, comments, and the Cloudinary media that was attached. FaunaDB stores this data in a json format that looks like this:
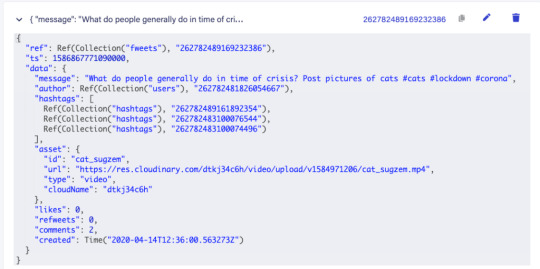
As shown in the model and in this example json, hashtags are stored as a list of references. If we wanted to, we could have stored the complete hashtag json in here, and that is the preferred solution in more limited document-based databases that lack relations. However, that would mean that our hashtags would be duplicated everywhere (as they are in more limited databases) and it would be more difficult to search for hashtags and/or retrieve Fweets for a specific hashtag as shown below.
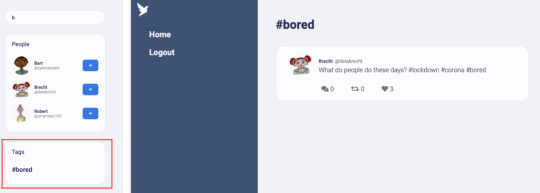
Note that a Fweet does not contain a link to Comments, but the Comments collection contains a reference to the Fweet. That’s because one Comment belongs to one Fweet, but a Fweet can have many comments–similar to the one-to-many relation between Users and Accounts.
Finally, there is a FollowerStats collection which basically saves information about how much users interact with each other in order to personalize their respective feeds. We won’t cover that much in this article, but you can experiment with the queries in the source code and stay tuned for a future article on advanced indexing.
Hopefully, you’re starting to see why we chose something more complex than a ToDo app. Although Fwitter is nowhere near the complexity of the real Twitter app on which it’s based, it’s already becoming apparent that implementing such an application without relations would be a serious brainbreaker.
Now, if you haven’t already done so from the github repo, it’s finally time to get our project running locally!
Setup the project
To set up the project, go to the FaunaDB dashboard and sign up. Once you are in the dashboard, click on New Database, fill in a name, and click Save. You should now be on the “Overview” page of your new database.
Next, we need a key that we will use in our setup scripts. Click on the Security tab in the left sidebar, then click the New key button.
In the “New key” form, the current database should already be selected. For “Role”, leave it as “Admin”. Optionally, add a key name. Next, click Save and copy the key secret displayed on the next page. It will not be displayed again.
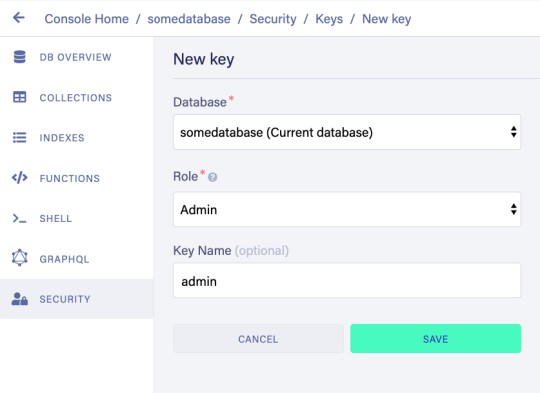
Now that you have your database secret, clone the git repository and follow the readme. We have prepared a few scripts so that you only have to run the following commands to initialize your app, create all collections, and populate your database. The scripts will give you further instructions:
// install node modules npm install // run setup, this will create all the resources in your database // provide the admin key when the script asks for it. // !!! the setup script will give you another key, this is a key // with almost no permissions that you need to place in your .env.local as the // script suggestions npm run setup npm run populate // start the frontend
After the script, your .env.local file should contain the bootstrap key that the script provided you (not the admin key)
REACT_APP_LOCAL___BOOTSTRAP_FAUNADB_KEY=<bootstrap key>
You can optionally create an account with Cloudinary and add your cloudname and a public template (there is a default template called ‘ml_default’ which you can make public) to the environment to include images and videos in the fweets.
REACT_APP_LOCAL___CLOUDINARY_CLOUDNAME=<cloudinary cloudname> REACT_APP_LOCAL___CLOUDINARY_TEMPLATE=<cloudinary template>
Without these variables, the include media button will not work, but the rest of the app should run fine:

Creating the front end
For the frontend, we used Create React App to generate an application, then divided the application into pages and components. Pages are top-level components which have their own URLs. The Login and Register pages speak for themselves. Home is the standard feed of Fweets from the authors we follow; this is the page that we see when we log into our account. And the User and Tag pages show the Fweets for a specific user or tag in reverse chronological order.
We use React Router to direct to these pages depending on the URL, as you can see in the src/app.js file.
<Router> <SessionProvider value=> <Layout> <Switch> <Route exact path="/accounts/login"> <Login /> </Route> <Route exact path="/accounts/register"> <Register /> </Route> <Route path="/users/:authorHandle" component={User} /> <Route path="/tags/:tag" component={Tag} /> <Route path="/"> <Home /> </Route> </Switch> </Layout> </SessionProvider> </Router>
The only other thing to note in the above snippet is the SessionProvider, which is a React context to store the user’s information upon login. We’ll revisit this in the authentication section. For now, it’s enough to know that this gives us access to the Account (and thus User) information from each component.
Take a quick look at the home page (src/pages/home.js) to see how we use a combination of hooks to manage our data. The bulk of our application’s logic is implemented in FaunaDB queries which live in the src/fauna/queries folder. All calls to the database pass through the query-manager, which in a future article, we’ll refactor into serverless function calls. But for now these calls originate from the frontend and we’ll secure the sensitive parts of it with FaunaDB’s ABAC security rules and User Defined Functions (UDF). Since FaunaDB behaves as a token-secured API, we do not have to worry about a limit on the amount of connections as we would in traditional databases.
The FaunaDB JavaScript driver
Next, take a look at the src/fauna/query-manager.js file to see how we connect FaunaDB to our application using FaunaDB’s JavaScript driver, which is just a node module we pulled with `npm install`. As with any node module, we import it into our application as so:
import faunadb from 'faunadb'
And create a client by providing a token.
this.client = new faunadb.Client({ secret: token || this.bootstrapToken })
We’ll cover tokens a little more in the Authentication section. For now, let’s create some data!
Creating data
The logic to create a new Fweet document can be found in the src/fauna/queries/fweets.js file. FaunaDB documents are just like JSON, and each Fweet follows the same basic structure:
const data = { data: { message: message, likes: 0, refweets: 0, comments: 0, created: Now() } }
The Now() function is used to insert the time of the query so that the Fweets in a user’s feed can be sorted chronologically. Note that FaunaDB automatically places timestamps on every database entity for temporal querying. However, the FaunaDB timestamp represents the time the document was last updated, not the time it was created, and the document gets updated every time a Fweet is liked; for our intended sorting order, we need the created time.
Next, we send this data to FaunaDB with the Create() function. By providing Create() with the reference to the Fweets collection using Collection(‘fweets’), we specify where the data needs to go.
const query = Create(Collection('fweets'), data )
We can now wrap this query in a function that takes a message parameter and executes it using client.query() which will send the query to the database. Only when we call client.query() will the query be sent to the database and executed. Before that, we combine as many FQL functions as we want to construct our query.
function createFweet(message, hashtags) { const data = … const query = … return client.query(query) }
Note that we have used plain old JavaScript variables to compose this query and in essence just called functions. Writing FQL is all about function composition; you construct queries by combining small functions into larger expressions. This functional approach has very strong advantages. It allows us to use native language features such as JavaScript variables to compose queries, while also writing higher-order FQL functions that are protected from injection.
For example, in the query below, we add hashtags to the document with a CreateHashtags() function that we’ve defined elsewhere using FQL.
const data = { data: { // ... hashtags: CreateHashtags(tags), likes: 0, // ... }
The way FQL works from within the driver’s host language (in this case, JavaScript) is what makes FQL an eDSL (embedded domain-specific language). Functions like CreateHashtags() behave just like a native FQL function in that they are both just functions that take input. This means that we can easily extend the language with our own functions, like in this open source FQL library from the Fauna community.
It’s also important to notice that we create two entities in two different collections, in one transaction. Thus, if/when things go wrong, there is no risk that the Fweet is created yet the Hashtags are not. In more technical terms, FaunaDB is transactional and consistent whether you run queries over multiple collections or not, a property that is rare in scalable distributed databases.
Next, we need to add the author to the query. First, we can use the Identity() FQL function to return a reference to the currently logged in document. As discussed previously in the data modeling section, that document is of the type Account and is separated from Users to support SSO in a later phase.
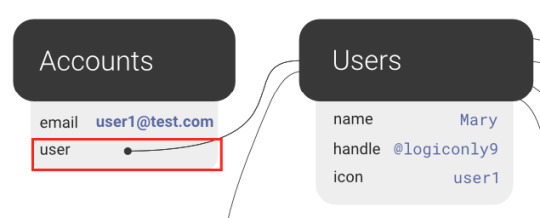
Then, we need to wrap Identity() in a Get() to access the full Account document and not just the reference to it.
Get(Identity())
Finally, we wrap all of that in a Select() to select the data.user field from the account document and add it to the data JSON.
const data = { data: { // ... hashtags: CreateHashtags(tags), author: Select(['data', 'user'], Get(Identity())), likes: 0, // ... } }
Now that we’ve constructed the query, let’s pull it all together and call client.query(query) to execute it.
function createFweet(message, hashtags) { const data = { data: { message: message, likes: 0, refweets: 0, comments: 0, author: Select(['data', 'user'], Get(Identity())), hashtags: CreateHashtags(tags), created: Now() } } const query = Create(Collection('fweets'), data ) return client.query(query) }
By using functional composition, you can easily combine all your advanced logic in one query that will be executed in one transaction. Check out the file src/fauna/queries/fweets.js to see the final result which takes even more advantage of function composition to add rate-limiting, etc.
Securing your data with UDFs and ABAC roles
The attentive reader will have some thoughts about security by now. We are essentially creating queries in JavaScript and calling these queries from the frontend. What stops a malicious user from altering these queries?
FaunaDB provides two features that allow us to secure our data: Attribute-Based Access Control (ABAC) and User Defined Functions (UDF). With ABAC, we can control which collections or entities that a specific key or token can access by writing Roles.
With UDFs, we can push FQL statements to the database by using the CreateFunction().
CreateFunction({ name: 'create_fweet', body: <your FQL statement>, })
Once the function is in the database as a UDF, where the application can’t alter it anymore, we then call this UDF from the front end.
client.query( Call(Function('create_fweet'), message, hashTags) )
Since the query is now saved on the database (just like a stored procedure), the user can no longer manipulate it.
One example of how UDFs can be used to secure a call is that we do not pass in the author of the Fweet. The author of the Fweet is derived from the Identity() function instead, which makes it impossible for a user to write a Fweet on someone’s behalf.
Of course, we still have to define that the user has access to call the UDF. For that, we will use a very simple ABAC role that defines a group of role members and their privileges. This role will be named logged_in_role, its membership will include all of the documents in the Accounts collection, and all of these members will be granted the privilege of calling the create_fweet UDF.
CreateRole( name: 'logged_in_role', privileges: [ { resource: q.Function('create_fweet'), actions: { call: true } } ], membership: [{ resource: Collection('accounts') }], )
We now know that these privileges are granted to an account, but how do we ‘become’ an Account? By using the FaunaDB Login() function to authenticate our users as explained in the next section.
How to implement authentication in FaunaDB

We just showed a role that gives Accounts the permissions to call the create_fweets function. But how do we “become” an Account?.
First, we create a new Account document, storing credentials alongside any other data associated with the Account (in this case, the email address and the reference to the User).
return Create(Collection('accounts'), { credentials: { password: password }, data: { email: email, user: Select(['ref'], Var('user')) } }) }
We can then call Login() on the Account reference, which retrieves a token.
Login( Match( < Account reference > , { password: password } ) )
We use this token in the client to impersonate the Account. Since all Accounts are members of the Account collection, this token fulfills the membership requirement of the logged_in_role and is granted access to call the create_fweet UDF.
To bootstrap this whole process, we have two very important roles.
bootstrap_role: can only call the login and register UDFs
logged_in_role: can call other functions such as create_fweet
The token you received when you ran the setup script is essentially a key created with the bootstrap_role. A client is created with that token in src/fauna/query-manager.js which will only be able to register or login. Once we log in, we use the new token returned from Login() to create a new FaunaDB client which now grants access to other UDF functions such as create_fweet. Logging out means we just revert to the bootstrap token. You can see this process in the src/fauna/query-manager.js, along with more complex role examples in the src/fauna/setup/roles.js file.
How to implement the session in React
Previously, in the “Creating the front end” section, we mentioned the SessionProvider component. In React, providers belong to a React Context which is a concept to facilitate data sharing between different components. This is ideal for data such as user information that you need everywhere in your application. By inserting the SessionProvider in the HTML early on, we made sure that each component would have access to it. Now, the only thing a component has to do to access the user details is import the context and use React’s ‘useContext’ hook.
import SessionContext from '../context/session' import React, { useContext } from 'react' // In your component const sessionContext = useContext(SessionContext) const { user } = sessionContext.state
But how does the user end up in the context? When we included the SessionProvider, we passed in a value consisting of the current state and a dispatch function.
const [state, dispatch] = React.useReducer(sessionReducer, { user: null }) // ... <SessionProvider value=>
The state is simply the current state, and the dispatch function is called to modify the context. This dispatch function is actually the core of the context since creating a context only involves calling React.createContext() which will give you access to a Provider and a Consumer.
const SessionContext = React.createContext({}) export const SessionProvider = SessionContext.Provider export const SessionConsumer = SessionContext.Consumer export default SessionContext
We can see that the state and dispatch are extracted from something that React calls a reducer (using React.useReducer), so let’s write a reducer.
export const sessionReducer = (state, action) => { switch (action.type) { case 'login': { return { user: action.data.user } } case 'register': { return { user: action.data.user } } case 'logout': { return { user: null } } default: { throw new Error(`Unhandled action type: ${action.type}`) } } }
This is the logic that allows you to change the context. In essence, it receives an action and decides how to modify the context given that action. In my case, the action is simply a type with a string. We use this context to keep user information, which means that we call it on a successful login with:
sessionContext.dispatch({ type: 'login', data: e })
Adding Cloudinary for media
When we created a Fweet, we did not take into account assets yet. FaunaDB is meant to store application data, not image blobs or video data. However, we can easily store the media on Cloudinary and just keep a link in FaunaDB. The following inserts the Cloudinary script (in app.js):
loadScript('https://widget.cloudinary.com/v2.0/global/all.js')
We then create a Cloudinary Upload Widget (in src/components/uploader.js):
window.cloudinary.createUploadWidget( { cloudName: process.env.REACT_APP_LOCAL___CLOUDINARY_CLOUDNAME, uploadPreset: process.env.REACT_APP_LOCAL___CLOUDINARY_TEMPLATE, }, (error, result) => { // ... } )
As mentioned earlier, you need to provide a Cloudinary cloud name and template in the environment variables (.env.local file) to use this feature. Creating a Cloudinary account is free and once you have an account you can grab the cloud name from the dashboard.
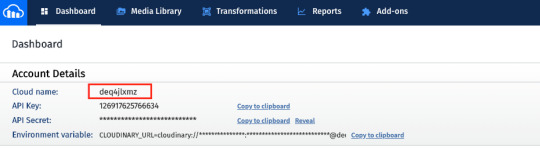
You have the option to use API keys as well to secure uploads. In this case, we upload straight from the front end so the upload uses a public template. To add a template or modify it to make it public, click on the gear icon in the top menu, go to Upload tab, and click Add upload preset.
You could also edit the ml_default template and just make it public.

Now, we just call widget.open() when our media button is clicked.
const handleUploadClick = () => { widget.open() } return ( <div> <FontAwesomeIcon icon={faImage} onClick={handleUploadClick}></FontAwesomeIcon> </div> )
This provides us with a small media button that will open the Cloudinary Upload Widget when it’s clicked.
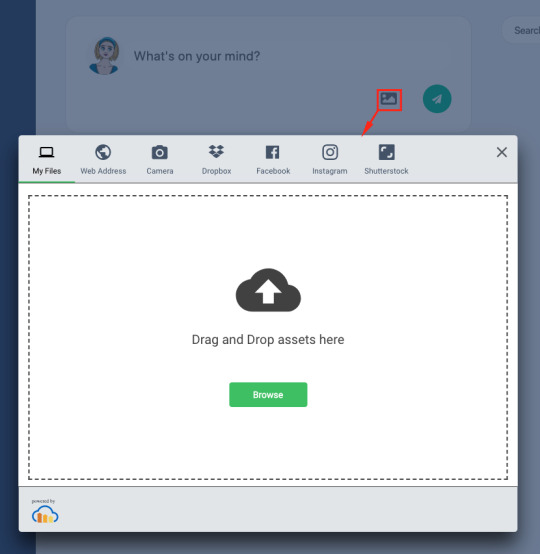
When we create the widget, we can also provide styles and fonts to give it the look and feel of our own application as we did above (in src/components/uploader.js):
const widget = window.cloudinary.createUploadWidget( { cloudName: process.env.REACT_APP_LOCAL___CLOUDINARY_CLOUDNAME, uploadPreset: process.env.REACT_APP_LOCAL___CLOUDINARY_TEMPLATE, styles: { palette: { window: '#E5E8EB', windowBorder: '#4A4A4A', tabIcon: '#000000', // ... }, fonts: {
Once we have uploaded media to Cloudinary, we receive a bunch of information about the uploaded media, which we then add to the data when we create a Fweet.
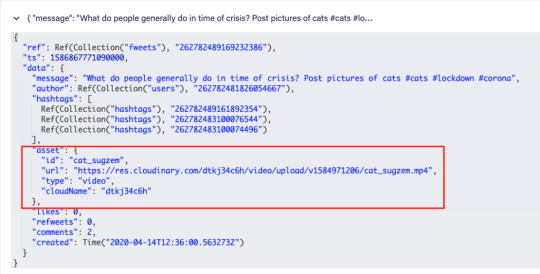
We can then simply use the stored id (which Cloudinary refers to as the publicId) with the Cloudinary React library (in src/components/asset.js):
import { Image, Video, Transformation } from 'cloudinary-react'
To show the image in our feed.
<div className="fweet-asset"> <Image publicId={asset.id} cloudName={cloudName} fetchFormat="auto" quality="auto" secure="true" /> </div>
When you use the id, instead of the direct URL, Cloudinary does a whole range of optimizations to deliver the media in the most optimal format possible. For example when you add a video image as follows:
<div className="fweet-asset"> <Video playsInline autoPlay loop={true} controls={true} cloudName={cloudName} publicId={publicId}> <Transformation width="600" fetchFormat="auto" crop="scale" /> </Video> </div>
Cloudinary will automatically scale down the video to a width of 600 pixels and deliver it as a WebM (VP9) to Chrome browsers (482 KB), an MP4 (HEVC) to Safari browsers (520 KB), or an MP4 (H.264) to browsers that support neither format (821 KB). Cloudinary does these optimizations server-side, significantly improving page load time and the overall user experience.
Retrieving data
We have shown how to add data. Now we still need to retrieve data. Getting the data of our Fwitter feed has many challenges. We need to:
Get fweets from people you follow in a specific order (taking time and popularity into account)
Get the author of the fweet to show his profile image and handle
Get the statistics to show how many likes, refweets and comments it has
Get the comments to list those beneath the fweet.
Get info about whether you already liked, refweeted, or commented on this specific fweet.
If it’s a refweet, get the original fweet.
This kind of query fetches data from many different collections and requires advanced indexing/sorting, but let’s start off simple. How do we get the Fweets? We start off by getting a reference to the Fweets collection using the Collection() function.
Collection('fweets')
And we wrap that in the Documents() function to get all of the collection’s document references.
Documents(Collection('fweets'))
We then Paginate over these references.
Paginate(Documents(Collection('fweets')))
Paginate() requires some explanation. Before calling Paginate(), we had a query that returned a hypothetical set of data. Paginate() actually materializes that data into pages of entities that we can read. FaunaDB requires that we use this Paginate() function to protect us from writing inefficient queries that retrieve every document from a collection, because in a database built for massive scale, that collection could contain millions of documents. Without the safeguard of Paginate(), that could get very expensive!
Let’s save this partial query in a plain JavaScript variable references that we can continue to build on.
const references = Paginate(Documents(Collection('fweets')))
So far, our query only returns a list of references to our Fweets. To get the actual documents, we do exactly what we would do in JavaScript: map over the list with an anonymous function. In FQL, a Lambda is just an anonymous function.
const fweets = Map( references, Lambda(['ref'], Get(Var('ref'))) )
This might seem verbose if you’re used to declarative query languages like SQL that declare what you want and let the database figure out how to get it. In contrast, FQL declares both what you want and how you want it which makes it more procedural. Since you’re the one defining how you want your data, and not the query engine, the price and performance impact of your query is predictable. You can exactly determine how many reads this query costs without executing it, which is a significant advantage if your database contains a huge amount of data and is pay-as-you-go. So there might be a learning curve, but it’s well worth it in the money and hassle it will save you. And once you learn how FQL works, you will find that queries read just like regular code.
Let’s prepare our query to be extended easily by introducing Let. Let will allow us to bind variables and reuse them immediately in the next variable binding, which allows you to structure your query more elegantly.
const fweets = Map( references, Lambda( ['ref'], Let( { fweet: Get(Var('ref')) }, // Just return the fweet for now Var('fweet') ) ) )
Now that we have this structure, getting extra data is easy. So let’s get the author.
const fweets = Map( references, Lambda( ['ref'], Let( { fweet: Get(Var('ref')), author: Get(Select(['data', 'author'], Var('fweet'))) }, { fweet: Var('fweet'), author: Var('user') } ) ) )
Although we did not write a join, we have just joined Users (the author) with the Fweets. We’ll expand on these building blocks even further in a follow up article. Meanwhile, browse src/fauna/queries/fweets.js to view the final query and several more examples.
More in the code base
If you haven’t already, please open the code base for this Fwitter example app. You will find a plethora of well-commented examples we haven’t explored here, but will in future articles. This section touches on a few files we think you should check out.
First, check out the src/fauna/queries/fweets.js file for examples of how to do complex matching and sorting with FaunaDB’s indexes (the indexes are created in src/fauna/setup/fweets.js). We implemented three different access patterns to get Fweets by popularity and time, by handle, and by tag.
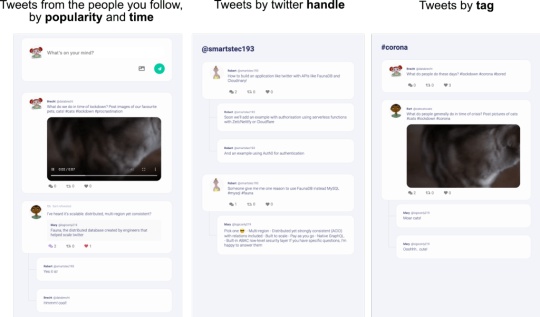
Getting Fweets by popularity and time is a particularly interesting access pattern because it actually sorts the Fweets by a sort of decaying popularity based on users’ interactions with each other.
Also, check out src/fauna/queries/search.js, where we’ve implemented autocomplete based on FaunaDB indexes and index bindings to search for authors and tags. Since FaunaDB can index over multiple collections, we can write one index that supports an autocomplete type of search on both Users and Tags.
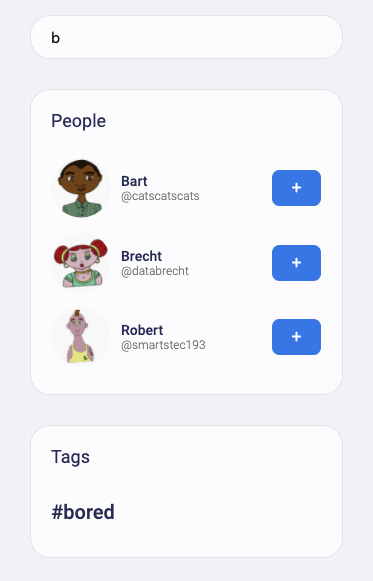
We’ve implemented these examples because the combination of flexible and powerful indexes with relations is rare for scalable distributed databases. Databases that lack relations and flexible indexes require you to know in advance how your data will be accessed and you will run into problems when your business logic needs to change to accommodate your clients’ evolving use cases.
In FaunaDB, if you did not foresee a specific way that you’d like to access your data, no worries — just add an Index! We have range indexes, term indexes, and composite indexes that can be specified whenever you want without having to code around eventual consistency.
A preview of what’s to come
As mentioned in the introduction, we’re introducing this Fwitter app to demonstrate complex, real-world use cases. That said, a few features are still missing and will be covered in future articles, including streaming, pagination, benchmarks, and a more advanced security model with short-lived tokens, JWT tokens, single sign-on (possibly using a service like Auth0), IP-based rate limiting (with Cloudflare workers), e-mail verification (with a service like SendGrid), and HttpOnly cookies.
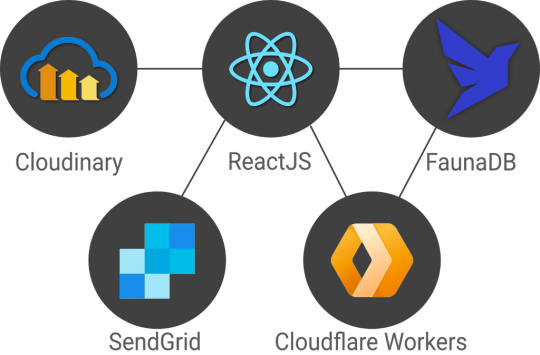
The end result will be a stack that relies on services and serverless functions which is very similar to a dynamic JAMstack app, minus the static site generator. Stay tuned for the follow-up articles and make sure to subscribe to the Fauna blog and monitor CSS-Tricks for more FaunaDB-related articles.
The post Rethinking Twitter as a Serverless App appeared first on CSS-Tricks.
Rethinking Twitter as a Serverless App published first on https://deskbysnafu.tumblr.com/
0 notes