#How to Install Packages Inside a Container - Step-by-Step Guide to Installing Packages in Docker
Explore tagged Tumblr posts
Visit Tumblr Blog
Explore Tumblr blogs with no restrictions, modern design and the best experience.
Last Seen Tumblr Blogs


Fun Fact
Premium Tumblr themes are available from anywhere between $9 to $49.
Text
Docker Tutorial for Beginners: Learn Docker Step by Step
What is Docker?
Docker is an open-source platform that enables developers to automate the deployment of applications inside lightweight, portable containers. These containers include everything the application needs to run—code, runtime, system tools, libraries, and settings—so that it can work reliably in any environment.
Before Docker, developers faced the age-old problem: “It works on my machine!” Docker solves this by providing a consistent runtime environment across development, testing, and production.
Why Learn Docker?
Docker is used by organizations of all sizes to simplify software delivery and improve scalability. As more companies shift to microservices, cloud computing, and DevOps practices, Docker has become a must-have skill. Learning Docker helps you:
Package applications quickly and consistently
Deploy apps across different environments with confidence
Reduce system conflicts and configuration issues
Improve collaboration between development and operations teams
Work more effectively with modern cloud platforms like AWS, Azure, and GCP
Who Is This Docker Tutorial For?
This Docker tutorial is designed for absolute beginners. Whether you're a developer, system administrator, QA engineer, or DevOps enthusiast, you’ll find step-by-step instructions to help you:
Understand the basics of Docker
Install Docker on your machine
Create and manage Docker containers
Build custom Docker images
Use Docker commands and best practices
No prior knowledge of containers is required, but basic familiarity with the command line and a programming language (like Python, Java, or Node.js) will be helpful.
What You Will Learn: Step-by-Step Breakdown
1. Introduction to Docker
We start with the fundamentals. You’ll learn:
What Docker is and why it’s useful
The difference between containers and virtual machines
Key Docker components: Docker Engine, Docker Hub, Dockerfile, Docker Compose
2. Installing Docker
Next, we guide you through installing Docker on:
Windows
macOS
Linux
You’ll set up Docker Desktop or Docker CLI and run your first container using the hello-world image.
3. Working with Docker Images and Containers
You’ll explore:
How to pull images from Docker Hub
How to run containers using docker run
Inspecting containers with docker ps, docker inspect, and docker logs
Stopping and removing containers
4. Building Custom Docker Images
You’ll learn how to:
Write a Dockerfile
Use docker build to create a custom image
Add dependencies and environment variables
Optimize Docker images for performance
5. Docker Volumes and Networking
Understand how to:
Use volumes to persist data outside containers
Create custom networks for container communication
Link multiple containers (e.g., a Node.js app with a MongoDB container)
6. Docker Compose (Bonus Section)
Docker Compose lets you define multi-container applications. You’ll learn how to:
Write a docker-compose.yml file
Start multiple services with a single command
Manage application stacks easily
Real-World Examples Included
Throughout the tutorial, we use real-world examples to reinforce each concept. You’ll deploy a simple web application using Docker, connect it to a database, and scale services with Docker Compose.
Example Projects:
Dockerizing a static HTML website
Creating a REST API with Node.js and Express inside a container
Running a MySQL or MongoDB database container
Building a full-stack web app with Docker Compose
Best Practices and Tips
As you progress, you’ll also learn:
Naming conventions for containers and images
How to clean up unused images and containers
Tagging and pushing images to Docker Hub
Security basics when using Docker in production
What’s Next After This Tutorial?
After completing this Docker tutorial, you’ll be well-equipped to:
Use Docker in personal or professional projects
Learn Kubernetes and container orchestration
Apply Docker in CI/CD pipelines
Deploy containers to cloud platforms
Conclusion
Docker is an essential tool in the modern developer's toolbox. By learning Docker step by step in this beginner-friendly tutorial, you’ll gain the skills and confidence to build, deploy, and manage applications efficiently and consistently across different environments.
Whether you’re building simple web apps or complex microservices, Docker provides the flexibility, speed, and scalability needed for success. So dive in, follow along with the hands-on examples, and start your journey to mastering containerization with Docker tpoint-tech!
0 notes
Video
youtube
How to Install Packages Inside a Container - Step-by-Step Guide to Installing Packages in Docker
0 notes
Text
Ultimate Guide Cloud Spanner Emulator Testing Integrated!

Integrating Cloud Spanner Emulator Search engines Cloud’s The company database features globally distributed, dependable, very highly scalable, therefore being an ideal choice for applications with critical functions that need consistent and high performance.
To guarantee that Spanner integrates seamlessly into your apps, as a developer, you must do extensive testing. The goal of integration testing is to confirm that, after modifications to individual components, the various parts of a system function as a whole. For Spanner, integration testing guarantees that data activities in your application, such error handling and transactions, are properly communicated with the database.
This article explains how to use GitHub Actions and the Spanner emulator to build up integration testing for Spanner. For the purpose of quickly developing applications supported by a Spanner database, the emulator imitates the behavior of Spanner outside of Google Cloud.
They will test an example Golang backend service that maintains player profiles for a hypothetical game. These ideas may be used to different services and apps in different languages and sectors of the economy.
Here, you testing the “integration” between Spanner and the profile service to make sure code updates to the service will function as intended in a quick feedback loop. Not every service in our stack has undergone complete end-to-end testing. Before going live in production, testing at that level should be conducted using a real staging setup using Spanner.
Integrated inside the platform where her code resides, GitHub Actions automates the running of tests. Like this, other CI/CD systems will function.
Her application, Profile Service, is dependent on Spanner and uses Spanner emulator, a lightweight offline emulation of a Spanner database.
GitHub Activities: Workflow automation GitHub Actions are the ideal choice for her automated integration tests since our service code is kept in a GitHub repository.
Your software development process may be automated using GitHub Actions, which is a component of a continuous integration and delivery (CI/CD) platform.
You may establish and carry out automatic actions that are triggered by code changes or scheduled events thanks to its seamless integration with GitHub repositories.
A local testing environment: The Spanner emulator An very portable utility that operates entirely offline is the Spanner emulator. This eliminates the need for real Spanner instances and allows developers to test their apps against Spanner without paying any cloud fees. This enables quick development cycles and early integration problem discovery.
You should be aware of the following variations and restrictions between a real Spanner database and the Spanner emulator.
Integrity testing setup for the profile service On Github, you can find the code for the example game application. The integration test for the profile service will be examined first, followed by the process that makes use of Github Actions to allow automated integration testing.
The profile-service main_test.go file contains the integration test for the profile service.
The sections listed below are included in this file: Launching Spanner as an emulator. Install the schema and any necessary test data in the database and Spanner instance. Install the Profile service. The actual exams. tidying up once the exams are over Launching the emulator for Spanner They use the test containers-go library as the Spanner emulator is set up as a container image. This configures the emulator container so that may connect with it on mapped port 9010. In order to facilitate communication between the “emulator” container and any container or process having network access, a Docker network is used for networking.
It’s simple to wait until the container is ready before moving on to the next step thanks to the test containers-go package.
As soon as it’s prepared, you create a Golang struct, get the host information, and expose it as an operating system environment variable. These two will be used subsequently to configure the database and instance.
Install the Spanner package and database Now that the emulator is operating, will must configure a test instance and database.
Let’s start by configuring the instance: This creates the instance by using the Spanner instance golang library. The SPANNER_EMULATOR_HOST environment variable has to be set previously for this to function. If not, your Google Cloud project’s Spanner instance would be the one that the Spanner library would be searching for.
They need a schema file for the database setup. It is up to your processes where this schema file originates. During the’make profile-integration’ instructions in the Makefile, you create a copy of the master schema file in this instance. This enables me to get the most current schema pertinent to the profiles of the players.
They can handle schema adjustments in this method so that the emulator can understand them. Without the terminating semicolons, you must transform the schema file into an array of statements.
Launch the service for profiles Here, you are launching the profile service as an additional container that can interface with the simulator by using test containers go. executing the examinations Her integration tests connect to your profile service’s endpoints using the testify assert package.
Read more on Govindhtech.com
0 notes
Text
Rhel Docker

Rhel Docker
Rhel Docker Ce
Rhel Docker
Rhel Docker Ce
The Remote - Containers extension lets you use a Docker container as a full-featured development environment. Whether you deploy to containers or not, containers make a great development environment because you can:
Develop with a consistent, easily reproducible toolchain on the same operating system you deploy to.
Quickly swap between different, isolated development environments and safely make updates without worrying about impacting your local machine.
Make it easy for new team members / contributors to get up and running in a consistent development environment.
Try out new technologies or clone a copy of a code base without impacting your local setup.
Rhel Docker
Rhel Docker Ce
The extension starts (or attaches to) a development container running a well defined tool and runtime stack. Workspace files can be mounted into the container from the local file system, or copied or cloned into it once the container is running. Extensions are installed and run inside the container where they have full access to the tools, platform, and file system.
Rhel Docker
Amazon Web Services (AWS) and Red Hat provide a complete, enterprise-class computing environment. Red Hat solutions on AWS give customers the ability to run enterprise traditional on-premises applications, such as SAP, Oracle databases, and custom applications in the cloud.
Windows 10 Home (2004+) requires Docker Desktop 2.2+ and the WSL2 back-end. (Docker Toolbox is not supported.) macOS: Docker Desktop 2.0+. Linux: Docker CE/EE 18.06+ and Docker Compose 1.21+. (The Ubuntu snap package is not supported.) Containers: x8664 / ARMv7l (AArch32) / ARMv8l (AArch64) Debian 9+, Ubuntu 16.04+, CentOS / RHEL 7+ x8664.
Docker volumes allow you to back up, restore, and migrate data easily. This tutorial explains what a Docker volume is and how to use it, as well as how to mount a volume in Docker.
Amazon Web Services (AWS) and Red Hat provide a complete, enterprise-class computing environment. Red Hat solutions on AWS give customers the ability to run enterprise traditional on-premises applications, such as SAP, Oracle databases, and custom applications in the cloud.
You then work with VS Code as if everything were running locally on your machine, except now they are isolated inside a container.
System Requirements
Local:
Windows:Docker Desktop 2.0+ on Windows 10 Pro/Enterprise. Windows 10 Home (2004+) requires Docker Desktop 2.2+ and the WSL2 back-end. (Docker Toolbox is not supported.)
macOS: Docker Desktop 2.0+.
Linux: Docker CE/EE 18.06+ and Docker Compose 1.21+. (The Ubuntu snap package is not supported.)
Containers:
x86_64 / ARMv7l (AArch32) / ARMv8l (AArch64) Debian 9+, Ubuntu 16.04+, CentOS / RHEL 7+
x86_64 Alpine Linux 3.9+
Other glibc based Linux containers may work if they have needed prerequisites.
While ARMv7l (AArch32), ARMv8l (AArch64), and musl based Alpine Linux support is available, some extensions installed on these devices may not work due to the use of glibc or x86 compiled native code in the extension. See the Remote Development with Linux article for details.
Note that while the Docker CLI is required, the Docker daemon/service does not need to be running locally if you are using a remote Docker host.
Installation
To get started, follow these steps:
Install VS Code or VS Code Insiders and this extension.
Install and configure Docker for your operating system.
Windows / macOS:
Install Docker Desktop for Mac/Windows.
If not using WSL2 on Windows, right-click on the Docker task bar item, select Settings / Preferences and update Resources > File Sharing with any locations your source code is kept. See tips and tricks for troubleshooting.
To enable the Windows WSL2 back-end: Right-click on the Docker taskbar item and select Settings. Check Use the WSL2 based engine and verify your distribution is enabled under Resources > WSL Integration.
Linux:
Follow the official install instructions for Docker CE/EE. If you use Docker Compose, follow the Docker Compose install directions.
Add your user to the docker group by using a terminal to run: sudo usermod -aG docker $USER Sign out and back in again so this setting takes effect.
Rhel Docker Ce
Working with Git? Here are two tips to consider:
If you are working with the same repository folder in a container and Windows, be sure to set up consistent line endings. See tips and tricks to learn how.
If you clone using a Git credential manager, your container should already have access to your credentials! If you use SSH keys, you can also opt-in to sharing them. See Sharing Git credentials with your container for details.
Getting started
Follow the step-by-step tutorial or if you are comfortable with Docker, follow these four steps:
Follow the installation steps above.
Clone https://github.com/Microsoft/vscode-remote-try-node locally.
Start VS Code
Run the Remote-Containers: Open Folder in Container... command and select the local folder.
Check out the repository README for things to try. Next, learn how you can:
Use a container as your full-time environment - Open an existing folder in a container for use as your full-time development environment in few easy steps. Works with both container and non-container deployed projects.
Attach to a running container - Attach to a running container for quick edits, debugging, and triaging.
Advanced: Use a remote Docker host - Once you know the basics, learn how to use a remote Docker host if needed.
Available commands
Another way to learn what you can do with the extension is to browse the commands it provides. Press F1 to bring up the Command Palette and type in Remote-Containers for a full list of commands.
You can also click on the Remote 'Quick Access' status bar item to get a list of the most common commands.
For more information, please see the extension documentation.
Release Notes
While an optional install, this extension releases with VS Code. VS Code release notes include a summary of changes to all three Remote Development extensions with a link to detailed release notes.
As with VS Code itself, the extensions update during a development iteration with changes that are only available in VS Code Insiders Edition.
Questions, Feedback, Contributing
Have a question or feedback?
See the documentation or the troubleshooting guide.
Up-vote a feature or request a new one, search existing issues, or report a problem.
Contribute a development container definition for others to use
Contribute to our documentation
...and more. See our CONTRIBUTING guide for details.
Or connect with the community...
Telemetry
Visual Studio Code Remote - Containers and related extensions collect telemetry data to help us build a better experience working remotely from VS Code. We only collect data on which commands are executed. We do not collect any information about image names, paths, etc. The extension respects the telemetry.enableTelemetry setting which you can learn more about in the Visual Studio Code FAQ.
License
By downloading and using the Visual Studio Remote - Containers extension and its related components, you agree to the product license terms and privacy statement.
2 notes
·
View notes
Text
Drupal 9 Preview with Lando
Drupal 9 is scheduled to be released this summer (no earlier than June 3, 2020).
But if you're anything like me, you don't want to wait to kick the tires and take it for a spin.
Luckily, I've put together a quick and easy tutorial to help you get the latest dev version up and running before it is released!
First, you will need to install some other software.
You'll use Composer, a dependency manager for PHP packages, to install the development branch.
Installation instructions for Composer are here: https://getcomposer.org/
You'll use Lando (and Docker) to create and manage a Docker container with your project inside.
Installation instructions and system requirements are here: https://docs.lando.dev/basics/installation.html#system-requirements
I chose Lando because it handles a lot of your configuration for you by providing configuration "recipes" out of the box.
The only catch is, there is no drupal9 recipe for Lando yet, Luckily, we can use the drupal8 recipe with minor modifications.
$ composer create-project drupal/recommended-project:^9@dev
Watch all the stuff scroll by. That's pretty cool. Composer is installing the recommended Drupal project for you. There are lots of things to learn about here, but for now just sit back and let Composer do its thing.
Near the end, it will pause and ask you something:
Do you want to remove the existing VCS (.git, .svn..) history? [Y,n]?
Answer n to this question if you're interested in participating in Drupal 9 core development.
There's a lot going on right now in order to make the deadline for release this summer, and anyone can contribute!
After that, the composer/core-project-message will display some helpful links to documentation about steps to take next:
Congratulations, you’ve installed the Drupal codebase from the drupal/recommended-project template! Next steps: * Install the site: https://www.drupal.org/docs/8/install * Read the user guide: https://www.drupal.org/docs/user_guide/en/index.html * Get support: https://www.drupal.org/support * Get involved with the Drupal community: https://www.drupal.org/getting-involved * Remove the plugin that prints this message: composer remove drupal/core-project-message * Homepage: https://www.drupal.org/project/drupal * Support: * docs: https://www.drupal.org/docs/user_guide/en/index.html * chat: https://www.drupal.org/node/314178
Go ahead and read some of the great info at those links, but keep in mind that this is the documentation for Drupal 8, because the docs for Drupal 9 are still being written!
If all goes according to plan, however, the transition between Drupal 8 and 9 will be much smoother than those between D7 / D8, or D6 / D7, or basically any other major version upgrade in Drupal's long and eventful history. You can read more about the philosophy behind this transition here: https://dri.es/drupal-7-8-and-9
Next, we are ready to run lando init to create our .lando.yml configuration file. Let's try it and see how well the drupal8 recipe works:
$ cd recommended-project $ lando init --source cwd --webroot web --name drupal9-tester --recipe drupal8 $ lando start
Point your browser at http://drupal9-tester.lndo.site and run the Drupal 9 installer.
Oh no! It will fail because you need to specify a newer PHP version; Drupal 9 requires PHP 7.3, but the drupal8 recipe installs PHP 7.2.
Let's back up a minute. We need to destroy this project and rebuild it with different options.
$ lando destroy $ lando init --source cwd --webroot web --name drupal9-tester --recipe drupal8 --option php=7.3 $ lando start
NOW WE'RE COOKING WITH FIRE!!!
Point your browser at http://drupal9-tester.lndo.site and run the Drupal 9 installer.
When you get to the database configuration, just remember that the database, password, and user are all drupal8 (remember, we had to use the drupal8 recipe because there is no drupal9 recipe yet) but the database service is called database, not localhost. You'll need to open the Advanced options to change that.
And just like that, you can be the first kid on your block to run Drupal 9 under Lando!
1 note
·
View note
Text
Today, with the increase in sophisticated cyber threats, there is a high need for real-time monitoring and analysis on systems to detect threats on time and act accordingly. Wazuh is a free and open-source monitoring solution. It is used to detect threats, monitor the integrity of a system, and incident response. It provides lightweight OS-level-based security using multi-platform agents. Using Wazuh, one can collect, index, aggregate, and analyze security data hence detecting system intrusions and abnormalities. The Wazuh server can be used for: Cloud security Container security Log analysis Vulnerability detection Security analysis This guide aims to demonstrate how to run the Wazuh Server in Docker Containers. Normally, there are two deployment options for Wazuh. All-in-one deployment: Here, both the Wazuh and Open Distro for Elasticsearch are installed on a single host. Distributed deployment: This method involves installing the components on separate hosts as a single/multi-node cluster. This method is preferred since it provides high availability and scalability of the product and hence convenient for large environments. During the Wazuh installation, one can choose between two options: Unattended installation– Wazuh is installed using an automated script. It performs health checks to verify that the available system resources meet the minimal requirements Step by step installation– Involves the manual installation with detailed description of each process. Docker is an open-source engine used to automate the deployment of different applications inside software containers. In this guide, we will install the Wazuh All-in-one deployment in a docker container. The Docker image contains: Wazuh Manager Filebeat Elasticsearch Kibana Nginx and Open Distro for Elasticsearch Let’s dive in! Getting Started. Prepare your system for installation by updating the available packages and installing required packages. ## On Debian/Ubuntu sudo apt update && sudo apt upgrade sudo apt install curl vim git ## On RHEL/CentOS/RockyLinux 8 sudo yum -y update sudo yum -y install curl vim git ## On Fedora sudo dnf update sudo dnf -y install curl vim git Step 1 – Docker Installation on Linux The first thing here is to install docker and docker-compose if you do not have them installed. Docker can be installed on any Linux system using the dedicated guide below: How To Install Docker CE on Linux Systems Once installed, start and enable docker. sudo systemctl start docker && sudo systemctl enable docker Also, add your system user to the docker group. sudo usermod -aG docker $USER newgrp docker With docker installed, install docker-compose using the below commands: curl -s https://api.github.com/repos/docker/compose/releases/latest | grep browser_download_url | grep docker-compose-linux-x86_64 | cut -d '"' -f 4 | wget -qi - chmod +x docker-compose-linux-x86_64 sudo mv docker-compose-linux-x86_64 /usr/local/bin/docker-compose Verify the installation. $ docker-compose version Docker Compose version v2.3.0 Step 2 – Provision the Wazuh Server Before we proceed, you need to make the following settings: Increase max_map_count on your host sudo sysctl -w vm.max_map_count=262144 If this is not set, Elasticsearch may fail to work. Configure SELinux on Rhel-based systems For docker-elk to start, SELinux needs to be set into permissive mode as below sudo chcon -R system_u:object_r:admin_home_t:s0 docker-elk/ All the required Wazuh components are available in a single Open Distro for Elasticsearch file that can be pulled as below: $ cd ~ $ git clone https://github.com/wazuh/wazuh-docker.git -b v4.2.5 --depth=1 Now navigate into the directory. cd wazuh-docker Step 3 – Run the Wazuh Container In the directory, there is a docker-compose.yml used for the demo deployment. Run the containers in the background as below. docker-compose up -d
Check if the containers are running: $ docker ps CONTAINER ID IMAGE COMMAND CREATED STATUS PORTS NAMES d64698a06cc4 wazuh/wazuh-kibana-odfe:4.2.5 "/bin/sh -c ./entryp…" 38 seconds ago Up 36 seconds 0.0.0.0:443->5601/tcp, :::443->5601/tcp wazuh-docker-kibana-1 2bb0d8088b0f amazon/opendistro-for-elasticsearch:1.13.2 "/usr/local/bin/dock…" 48 seconds ago Up 37 seconds 9300/tcp, 9600/tcp, 0.0.0.0:9200->9200/tcp, :::9200->9200/tcp, 9650/tcp wazuh-docker-elasticsearch-1 7eed74a2a2ae wazuh/wazuh-odfe:4.2.5 "/init" 48 seconds ago Up 36 seconds 0.0.0.0:1514-1515->1514-1515/tcp, :::1514-1515->1514-1515/tcp, 0.0.0.0:514->514/udp, :::514->514/udp, 0.0.0.0:55000->55000/tcp, :::55000->55000/tcp, 1516/tcp wazuh-docker-wazuh-1 At this point, Wazuh can be accessed on port 443. This is used for demo deployments, for Production deployment, we need to make several configurations to these containers. Production deployment For Production deployment, the production-cluster.yml is the base for this deployment. But before we run the containers, we need to make a few configurations. Data Persistent. Create persistent volumes for the containers: sudo mkdir /wazuh_logs cd /wazuh_logs sudo mkdir ossec-api-configuration sudo mkdir ossec-etc sudo mkdir ossec-logs sudo mkdir ossec-queue sudo mkdir ossec-var-multigroups sudo mkdir ossec-integrations sudo mkdir ossec-active-response sudo mkdir ossec-agentless sudo mkdir ossec-wodles sudo mkdir filebeat-etc sudo mkdir filebeat-var sudo mkdir worker-ossec-api-configuration sudo mkdir worker-ossec-etc sudo mkdir worker-ossec-logs sudo mkdir worker-ossec-queue sudo mkdir worker-ossec-var-multigroups sudo mkdir worker-ossec-integrations sudo mkdir worker-ossec-active-response sudo mkdir worker-ossec-agentless sudo mkdir worker-ossec-wodles sudo mkdir worker-filebeat-etc sudo mkdir worker-filebeat-var sudo mkdir elastic-data-1 sudo mkdir elastic-data-2 sudo mkdir elastic-data-3 To be able to persist data to the local machine, you need to edit the volumes in the production-cluster.yml to suit the created paths above. cd ~/wazuh-docker/ sudo vim production-cluster.yml For example for the Wazuh container, set the paths as below: volumes: ... - /wazuh_logs/ossec-api-configuration:/var/ossec/api/configuration - /wazuh_logs/ossec-etc:/var/ossec/etc - /wazuh_logs/ossec-logs:/var/ossec/logs - /wazuh_logs/ossec-queue:/var/ossec/queue - /wazuh_logs/ossec-var-multigroups:/var/ossec/var/multigroups - /wazuh_logs/ossec-integrations:/var/ossec/integrations - /wazuh_logs/ossec-active-response:/var/ossec/active-response/bin - /wazuh_logs/ossec-agentless:/var/ossec/agentless - /wazuh_logs/ossec-wodles:/var/ossec/wodles - /wazuh_logs/filebeat-etc:/etc/filebeat - /wazuh_logs/filebeat-var:/var/lib/filebeat .... Do this for all other containers by substituting the correct volume name. Secure Traffic. The available demo certificates need to be replaced for each node in the cluster. Use the below command to obtain the certificates using the generate-opendistro-certs.yml docker-compose -f generate-opendistro-certs.yml run --rm generator Sample output: [+] Running 15/15 ⠿ generator Pulled 16.8s ⠿ d6ff36c9ec48 Pull complete 4.7s ⠿ c958d65b3090 Pull complete 5.2s
⠿ edaf0a6b092f Pull complete 5.6s ⠿ 80931cf68816 Pull complete 8.3s ⠿ bf04b6bbed0c Pull complete 9.3s ⠿ 8bf847804f9e Pull complete 9.5s ⠿ 6bf89641a7f2 Pull complete 13.2s ⠿ 040f240573da Pull complete 13.4s ⠿ ac14183eb55b Pull complete 13.8s ⠿ debf0fc68082 Pull complete 14.1s ⠿ 62fb2ae4a19e Pull complete 14.3s ⠿ d3aeb8473c73 Pull complete 14.4s ⠿ 939b8ae6540a Pull complete 14.6s ⠿ f8b27a6da615 Pull complete 14.8s Root certificate and signing certificate have been sucessfully created. Created 4 node certificates. Created 1 client certificates. Success! Exiting. At this point, you will have the certificates saved at production_cluster/ssl_certs. $ ls -al production_cluster/ssl_certs total 88 drwxr-xr-x 2 thor thor 4096 Mar 5 04:26 . drwxr-xr-x 7 thor thor 4096 Mar 5 02:56 .. -rw-r--r-- 1 root root 1704 Mar 5 04:26 admin.key -rw-r--r-- 1 root root 3022 Mar 5 04:26 admin.pem -rw-r--r-- 1 thor thor 888 Mar 5 04:26 certs.yml -rw-r--r-- 1 root root 294 Mar 5 04:26 client-certificates.readme -rw-r--r-- 1 root root 1158 Mar 5 04:26 filebeat_elasticsearch_config_snippet.yml -rw-r--r-- 1 root root 1704 Mar 5 04:26 filebeat.key -rw-r--r-- 1 root root 3067 Mar 5 04:26 filebeat.pem -rw-r--r-- 1 root root 1801 Mar 5 04:26 intermediate-ca.key -rw-r--r-- 1 root root 1497 Mar 5 04:26 intermediate-ca.pem -rw-r--r-- 1 root root 1149 Mar 5 04:26 node1_elasticsearch_config_snippet.yml -rw-r--r-- 1 root root 1704 Mar 5 04:26 node1.key -rw-r--r-- 1 root root 3075 Mar 5 04:26 node1.pem -rw-r--r-- 1 root root 1149 Mar 5 04:26 node2_elasticsearch_config_snippet.yml -rw-r--r-- 1 root root 1704 Mar 5 04:26 node2.key -rw-r--r-- 1 root root 3075 Mar 5 04:26 node2.pem -rw-r--r-- 1 root root 1149 Mar 5 04:26 node3_elasticsearch_config_snippet.yml -rw-r--r-- 1 root root 1704 Mar 5 04:26 node3.key -rw-r--r-- 1 root root 3075 Mar 5 04:26 node3.pem -rw-r--r-- 1 root root 1700 Mar 5 04:26 root-ca.key -rw-r--r-- 1 root root 1330 Mar 5 04:26 root-ca.pem Now in the production-cluster.yml file, set up the SSL certs for: Wazuh container For the Wazuh-master container, set the SSL certificates as below. ...... environment: ..... - FILEBEAT_SSL_VERIFICATION_MODE=full - SSL_CERTIFICATE_AUTHORITIES=/etc/ssl/root-ca.pem - SSL_CERTIFICATE=/etc/ssl/filebeat.pem - SSL_KEY=/etc/ssl/filebeat.key volumes: - ./production_cluster/ssl_certs/root-ca.pem:/etc/ssl/root-ca.pem - ./production_cluster/ssl_certs/filebeat.pem:/etc/ssl/filebeat.pem - ./production_cluster/ssl_certs/filebeat.key:/etc/ssl/filebeat.key ...... Elasticsearch Container The Elasticsearch has 3 nodes here, we will configure each of them as below: elasticsearch: .... volumes: ... - ./production_cluster/ssl_certs/root-ca.pem:/usr/share/elasticsearch/config/root-ca.pem - ./production_cluster/ssl_certs/node1.key:/usr/share/elasticsearch/config/node1.key - ./production_cluster/ssl_certs/node1.pem:/usr/share/elasticsearch/config/node1.pem - ./production_cluster/ssl_certs/admin.pem:/usr/share/elasticsearch/config/admin.pem - ./production_cluster/ssl_certs/admin.key:/usr/share/elasticsearch/config/admin.key - ./production_cluster/elastic_opendistro/elasticsearch-node1.yml:/usr/share/elasticsearch/config/elasticsearch.yml - ./production_cluster/elastic_opendistro/internal_users.yml:/usr/share/elasticsearch/plugins/opendistro_security/securityconfig/internal_users.yml
For elasticsearch-2 the configuration is almost similar to the above. elasticsearch-2: ... volumes: - ./production_cluster/ssl_certs/root-ca.pem:/usr/share/elasticsearch/config/root-ca.pem - ./production_cluster/ssl_certs/node2.key:/usr/share/elasticsearch/config/node2.key - ./production_cluster/ssl_certs/node2.pem:/usr/share/elasticsearch/config/node2.pem - ./production_cluster/elastic_opendistro/elasticsearch-node2.yml:/usr/share/elasticsearch/config/elasticsearch.yml - ./production_cluster/elastic_opendistro/internal_users.yml:/usr/share/elasticsearch/plugins/opendistro_security/securityconfig/internal_users.yml For elasticsearch-3: elasticsearch-3: ... volumes: - ./production_cluster/ssl_certs/root-ca.pem:/usr/share/elasticsearch/config/root-ca.pem - ./production_cluster/ssl_certs/node3.key:/usr/share/elasticsearch/config/node3.key - ./production_cluster/ssl_certs/node3.pem:/usr/share/elasticsearch/config/node3.pem - ./production_cluster/elastic_opendistro/elasticsearch-node3.yml:/usr/share/elasticsearch/config/elasticsearch.yml - ./production_cluster/elastic_opendistro/internal_users.yml:/usr/share/elasticsearch/plugins/opendistro_security/securityconfig/internal_users.yml Kibana Container Generate self-signed certificates for Kibana using the command: bash ./production_cluster/kibana_ssl/generate-self-signed-cert.sh Sample Output: Generating a RSA private key ...............................................+++++ .........................................................................................................................................+++++ writing new private key to 'key.pem' ----- Now you will have certificates for Kibana. Set SSL to true and provide the certificates’ path. environment: - SERVER_SSL_ENABLED=true - SERVER_SSL_CERTIFICATE=/usr/share/kibana/config/cert.pem - SERVER_SSL_KEY=/usr/share/kibana/config/key.pem ... volumes: - ./production_cluster/kibana_ssl/cert.pem:/usr/share/kibana/config/cert.pem - ./production_cluster/kibana_ssl/key.pem:/usr/share/kibana/config/key.pem Nginx Container The Nginx load balancer also requires certificates at ./production_cluster/nginx/ssl/. You can generate self-signed certificates using the command: bash ./production_cluster/nginx/ssl/generate-self-signed-cert.sh Add the certificates path for the container: nginx: .... volumes: - ./production_cluster/nginx/nginx.conf:/etc/nginx/nginx.conf:ro - ./production_cluster/nginx/ssl:/etc/nginx/ssl:ro The ./production_cluster/nginx/nginx.conf is a file containing variables about the Nginx container. Now you should have the production-cluster.yml configured with the SSL certificates as above. Stop and remove the previously running demo containers and run the Production deployment as below: docker-compose -f production-cluster.yml up -d Check if the containers are running: $ docker ps CONTAINER ID IMAGE COMMAND CREATED STATUS PORTS NAMES 42d2b8882740 nginx:stable "/docker-entrypoint.…" 2 minutes ago Up About a minute 0.0.0.0:80->80/tcp, :::80->80/tcp, 0.0.0.0:443->443/tcp, :::443->443/tcp, 0.0.0.0:1514->1514/tcp, :::1514->1514/tcp wazuh-docker-nginx-1 9395abddd27c wazuh/wazuh-kibana-odfe:4.2.5 "/bin/sh -c ./entryp…" 2 minutes ago Up 2 minutes 0.0.0.0:5601->5601/tcp, :::5601->5601/tcp wazuh-docker-kibana-1 53aaa86606b6 amazon/opendistro-for-elasticsearch:1.13.2 "/usr/local/bin/dock…" 2 minutes ago Up 2 minutes 9300/tcp, 9600/tcp, 0.
0.0.0:9200->9200/tcp, :::9200->9200/tcp, 9650/tcp wazuh-docker-elasticsearch-1 771a5d5d6aaf wazuh/wazuh-odfe:4.2.5 "/init" 2 minutes ago Up 2 minutes 1514-1516/tcp, 514/udp, 55000/tcp wazuh-docker-wazuh-worker-1 327e32da3e61 wazuh/wazuh-odfe:4.2.5 "/init" 2 minutes ago Up About a minute 1514/tcp, 0.0.0.0:1515->1515/tcp, :::1515->1515/tcp, 0.0.0.0:514->514/udp, :::514->514/udp, 1516/tcp, 0.0.0.0:55000->55000/tcp, :::55000->55000/tcp wazuh-docker-wazuh-master-1 67da0a98a5a6 amazon/opendistro-for-elasticsearch:1.13.2 "/usr/local/bin/dock…" 2 minutes ago Up 2 minutes 9200/tcp, 9300/tcp, 9600/tcp, 9650/tcp wazuh-docker-elasticsearch-3-1 8874fa896370 amazon/opendistro-for-elasticsearch:1.13.2 "/usr/local/bin/dock…" 2 minutes ago Up 2 minutes 9200/tcp, 9300/tcp, 9600/tcp, 9650/tcp wazuh-docker-elasticsearch-2-1 Now we have all the 7 containers running and the web service exposed using the Nginx container. Step 4 – Access the Wazuh Kibana Interface The Kibana interface can be accessed on port 443 exposed by Nginx. If you have a firewall enabled, allow this port through it. ##For Firewalld sudo firewall-cmd --add-port=443/tcp --permanent sudo firewall-cmd --reload ##For UFW sudo ufw allow 443/tcp Now access the Kibana web interface using the URL https://IP_address or https://domain_name Login using the set credentials for Elasticseach ELASTICSEARCH_USERNAME=admin ELASTICSEARCH_PASSWORD=SecretPassword Wazuh will initialize as below. The Wazuh dashboard will appear as below with modules. You can now create and view dashboards on Kibana as below. That is it! You now have the Wazuh server set up for real-time monitoring and analysis. This will help you to detect threats on time and act in time. I hope this was significant.
0 notes
Text
How to install java on mac youtube.com

HOW TO INSTALL JAVA ON MAC YOUTUBE.COM HOW TO
HOW TO INSTALL JAVA ON MAC YOUTUBE.COM MAC OS X
HOW TO INSTALL JAVA ON MAC YOUTUBE.COM INSTALL
HOW TO INSTALL JAVA ON MAC YOUTUBE.COM MAC
The Ubuntu repository offers two (2), open-source Java packages, Java Development Kit (Open JDK) and Java Runtime Environment (Open JRE). In this document, we look at different packages within the Java SE. Access to the command-line/terminal window.Installing Java on CentOS 7 or CentOS 8.If you are looking for other Java installation guides, please refer to: HelloWorld.Note: This guide provides instructions that work on Ubuntu 18.04, Ubuntu 20.04 and any other Ubuntu-based distribution (including Linux Mint, Kubuntu, and Elementary OS). We are mapping the local directory with the directory: /usr/src/myapp inside the containerĬreate a docker-compose.yml file: version: "2".Here we are specifying the Java container running version 8 of the SDK ( java:8 - to use Java 7, you could just specify: java:7).Project dependencies are installed within the container - so if you mess up your config you can simply nuke the container and start again.Very easy to switch to different versions of Java by simply changing the tag on the container.No need to set up any version of Java on your local machine (you'll just run Java within a container which you pull from Docker Hub).You can simply run your application within the official JDK container - meaning that you don't have to worry about getting everything set up on your local machine (or worry about running multiple different versions of the JDK for different apps etc)Īlthough this might not help you with your current installation issues, it is a solution which means you can side-step the minefield of issues related with trying to get Java running correctly on your dev machine! To set JAVA_HOME: $ jenv enable-plugin exportĪn option that I am starting to really like for running applications on my local computer is to use Docker. To see all the installed java: $ jenv versionsĪbove command will give the list of installed java: * system (set by /Users/lyncean/.jenv/version)Ĭonfigure the java version which you want to use: $ jenv global oracle64-1.6.0.39 $ jenv add /Library/Java/JavaVirtualMachines/jdk1.11.0_2.jdk/Contents/Home $ echo 'eval "$(jenv init -)"' > ~/.bash_profileĪdd the installed java to jenv: $ jenv add /Library/Java/JavaVirtualMachines/jdk1.8.0_202.jdk/Contents/Home $ echo 'export PATH="$HOME/.jenv/bin:$PATH"' > ~/.bash_profile
HOW TO INSTALL JAVA ON MAC YOUTUBE.COM INSTALL
Install and configure jenv: $ brew install jenv If you want to install/manage multiple version then you can use 'jenv': To install java 8: $ brew cask install adoptopenjdk/openjdk/adoptopenjdk8 To install latest java: $ brew cask install java Install cask (with Homebrew 0.9.5 or higher, cask is included so skip this step): $ brew tap caskroom/cask
HOW TO INSTALL JAVA ON MAC YOUTUBE.COM MAC
Why doesn't Oracle's installer put it where it really goes? And how can I work around this problem?Īssumption: Mac machine and you already have installed homebrew. Ironically, the "Java" control panel under System Preferences shows only Java 1.8! usr/libexec/java_home -V still only lists the old Java 1.6. I've tried adding a symbolic link to make it look like 1.8 is in the /System/Library.
HOW TO INSTALL JAVA ON MAC YOUTUBE.COM HOW TO
But /usr/libexec/java_home doesn't find 1.8, so all the posts I've found on how to set your current java version don't work. Not sure why the latest installer puts this in /Library instead of /System/Library (nor what the difference is). I ran Oracle's Java 8 installer, and the files look like they ended up at /Library/Java/JavaVirtualMachines/jdk1.8.0_05.jdkīut previous versions are at /System/Library/Java/JavaFrameworks/jdk1.6.
HOW TO INSTALL JAVA ON MAC YOUTUBE.COM MAC OS X
I'm using IntelliJ 13 CE and Mac OS X 9 Mavericks. I want to do some programming with the latest JavaFX, which requires Java 8. Editors note: This question was asked in 2014, and the answers may be outdated.
0 notes
Text
Install Docker Inside Jenkins Container

Overview
Install Docker-compose In Jenkins Container
Install Docker Cli On Jenkins Container
Install Docker Inside Jenkins Container Tracking
Install Docker Inside Jenkins Container Box
Install Docker Command In Jenkins Container
Install Docker-compose In Jenkins Container
I have installed a ubuntu 18.04 container inside which I tried to start the docker service. This comes up quite often when trying to build bitbucket or Jenkins CI.
It is a Jenkins Cloud plugin for Docker. The aim of this docker plugin is to be able to use a Docker host to dynamically provision a docker container as a Jenkins agent node, let that run a single build, then tear-down that node, without the build process (or Jenkins job definition) requiring any awareness of docker.
In case of Docker Container, since the container runs on your host OS, you can save precious boot-up time. This is a clear advantage over Virtual Machine. Consider a situation where I want to install two different versions of Ruby on my system. Now we can run our container and proceed with inside container operations: docker run -i –add-host=”saphost1.docker.sap.corp saphost1:172.17.0.2″ –ipc=host –privileged -t -h saphost1 baseos. Prepare SAP HANA media. Ok, container is working fine and you can play inside.Once it is stopped, all changes will be erased.
This plugin allows containers to be dynamically provisioned as Jenkins nodes using Docker. It is a Jenkins Cloud plugin for Docker.
The aim of this docker plugin is to be able to use a Docker host to dynamically provision a docker container as a Jenkins agent node, let that run a single build, then tear-down that node, without the build process (or Jenkins job definition) requiring any awareness of docker.
The Jenkins administrator configures Jenkins with knowledge of one or more docker hosts (or swarms), knowledge of one or more 'templates' (which describe the labels/tags that this template provides, the docker image, how to start it, etc) and Jenkins can then run docker containers to provide Jenkins (agent) Nodes on which Jenkins can run builds.
See also
Support and contribution guide
Note: There is more than one docker plugin for Jenkins. While this can be confusing for end-users, it's even more confusing when end users report bugs in the wrong place. e.g. if you are using Jenkins pipeline / workflow / Jenkinsfile builds with code including terms like docker.withDockerRegistry or docker.image etc then you're using the docker-workflow plugin and should go to its repository instead of this one. Rbenv docker hub.
Note: This plugin does not provide a Docker daemon; it allows Jenkins to use a docker daemon. i.e. Once you've installed docker on your OS, this plugin will allow Jenkins to use it.
A quick setup is :
get a docker environment running
follow the instructions for creating a docker image that can be used as a Jenkins Agent
Docker Environment
Follow the installation steps on the docker website.
If your Jenkins instance is not on the same OS as the docker install, you will need to open the docker TCP port so that Jenkins can communicate with the docker daemon. This can be achieved by editing the docker config file and setting (for example)
Itunes for mac 10.15. With macOS Catalina, your iTunes media library is now available in the Apple Music app, Apple TV app, Apple Books app, and Apple Podcasts app. And Finder is where you can manage and sync content on your iPhone, iPad, and iPod touch.
The docker configuration file location will depend your system, but it is likely to be /etc/init/docker.conf , /etc/default/docker or /etc/default/docker.io.
Multiple Docker Hosts
If you want to use more than just one physical node to run containers, you can use Docker Swarm Standalone or you can define more than one docker 'cloud'. The docker engine swarm mode API is not supported (at present; enhancement contributions would be welcomed).
Install Docker Cli On Jenkins Container
To use the standalone swarm, follow docker swarm standalone instructions and configure Jenkins with the swarm's API endpoint.
Jenkins Configuration
Docker plugin is a 'Cloud' implementation. You'll need to edit Jenkins system configuration (Jenkins -> Manage -> System configuration) and add a new Cloud of type 'Docker'.
Configure Docker (or Swarm standalone) API URL with required credentials. The test button lets you check the connection. High sierra dmg bootable usb.
Then configure Agent templates, assigning them labels that you can use so your jobs select the appropriate template, and set the docker container to be run with whatever container settings you require.
Please note that if you purchase the game on the Microsoft store, you will also need to access and play your game through the Microsoft store. Fight your way through an all-new action-adventure game, inspired by classic dungeon crawlers and set in the Minecraft universe! Up to four friends can play together, or you can brave the dungeons alone. Battle new-and-nasty mobs across action-packed. Minecraft dungeons download mac.
Creating a docker image
You need a docker image that can be used to run Jenkins agent runtime. Depending on the launch method you select, there's some prerequisites for the Docker image to be used:
Launch via SSH
sshd server and a JDK installed. You can use jenkins/ssh-agent as a basis for a custom image.
a SSH key (based on unique Jenkins master instance identity) can be injected in container on startup, you don't need any credential set as long as you use standard openssl sshd. For backward compatibility or non-standard sshd packaged in your docker image, you also have option to provide manually configured ssh credentials
Note: If the docker container's host SSH key is not trusted by Jenkins (usually the case) then you'll need to set the SSH host key verification method to 'non-verifying'.
Launch via JNLP
a JDK installed. You can use jenkins/inbound-agent as a basis for a custom image.
Jenkins master URL has to be reachable from container.
container will be configured automatically with agent's name and secret, so you don't need any special configuration of the container.
Launch attached
a JDK installed. You can use jenkins/agent as a basis for a custom image.
To create a custom image and bundle your favorite tools, create a Dockerfile with the FROM Tropico 6 mac download free. full version pc. to point to one of the jenkins/*-agent reference images, and install everything needed for your own usage, e.g.
Note on ENTRYPOINT
Avoid overriding the docker command, as the SSH Launcher relies on it.
You can use an Entrypoint to run some side service inside your build agent container before the agent runtime starts and establish a connection .. but you MUST ensure your entrypoint eventually runs the passed command:
Install Docker Inside Jenkins Container Tracking
Further information
Install Docker Inside Jenkins Container Box
More information can be obtained from the online help built into the Jenkins WebUI. Most configurable fields have explanatory text. This, combined with knowledge of docker itself, should answer most questions.
Install Docker Command In Jenkins Container
Jenkins can be configured using Groovy code, and the docker plugin is no exception. For example, this configuration script could be run automatically upon Jenkins post-initialization or through the Jenkins script console. If run, this script will configure the docker-plugin to look for a docker daemon running within the same OS as the Jenkins master (connecting to Docker service through unix:///var/run/docker.sock) and with the containers connecting to Jenkins using the 'attach' method.
0 notes
Text
Synology DS920+ Review: The Best Power User NAS
Synology DS920+
9.00 / 10
Read Reviews
Read More Reviews
Read More Reviews
Read More Reviews
Read More Reviews
Read More Reviews
Read More Reviews
Read More Reviews
Read More Reviews


See on amazon
The DS920+ is an affordable NAS for the power user, capable of breezing through 4K video transcodes, running virtual machines, and Docker containers. The only disappointment is the lack of 2.5Gb Ethernet connectivity.
Specifications
Brand: Synology
CPU: Intel Celeron J4125 Quad-core 2GHz
Memory: 4GB, upgradeable to 8GB via single SO-DIMM slot
Drive Bays: Four (3.5" or 2.5")
Expansion: Five additional bays via eSATA
Ports: Dual Gigabit Ethernet, eSATA, 2 x USB3.0
Caching: Two m.2 SSD NVMe slots
OS: DSM6 (DiskStation Manager)
Pros
Powerful quad-core CPU and RAM upgradeable to 8GB
Great build quality and stylish design, with tool-less disk trays
User-friendly operating system
Great platform for Synology Moments, a Google Photos alternative
Cons
Gigabit LAN only, though at least there are two of them
Buy This Product
Synology DS920+ amazon
Shop
// Bottom var galleryThumbs1 = new Swiper('.gallery-thumbs-1', { spaceBetween: 10, slidesPerView: 10, freeMode: true, watchSlidesVisibility: true, watchSlidesProgress: true, centerInsufficientSlides: true, allowTouchMove: false, preventClicks: false, breakpoints: { 1024: { slidesPerView: 6, } }, }); // Top var galleryTop1 = new Swiper('.gallery-top-1', { spaceBetween: 10, allowTouchMove: false, loop: true, preventClicks: false, breakpoints: { 1024: { allowTouchMove: true, } }, navigation: { nextEl: '.swiper-button-next', prevEl: '.swiper-button-prev', }, thumbs: { swiper: galleryThumbs1 } });
Synology's latest four-bay DS920+ model is a powerhouse NAS designed for the pro user. While entry-level Network Attached Storage systems are great for serving files up and acting as a central backup, the Synology Plus series can do so much more. Especially for those looking to move away from cloud services, the DS920+ offers an affordable, scaleable, local alternative.
It's available without drives for around $550. Join us as we take a closer look at what makes the DS920+ the best NAS for the pro user.
youtube
DS920+ Specifications and Design
The Synology DS920+ is superficially identical to all the recent four-bay Synology devices, with a sleek black plastic exterior and distinctive bevel on all edges. Measuring 8.73 x 7.83 x 6.54 inches (223 x 199 x 166mm), it weighs 5lbs (2.25kg) without drives fitted.
Around the rear, you'll find dual Gigabit Ethernet ports, a USB3.0 port, and an eSATA connection. You'll probably want to save the USB port for use with an uninterruptible power supply. There's another USB3.0 port on the front of the device, useful for quickly plugging in an external disk that you need to pull files from.
The DS920+ uses the same toolless disk caddies that make fitting drives a breeze. But scratch beneath the surface and you'll find a few key differences to other models in the line-up.
Firstly, the internals. Fitted with a powerful quad-core 2GHz J4125 Intel Celeron CPU and 4GB of RAM, the 920+ can handle hardware transcoding of 4K video files, has virtualization support, and provides an AES-NI encryption engine for great performance when using secure folders. Synology states photo indexation as 25% faster than the previous generation DS918+ model.
Secondly, there's a lot of upgrade potential here for when you need to scale up.
On the underside of the device you'll find two m.2 SSD slots for NVMe caching drives. These can be used to significantly speed up random file operations.
Remove the drives and there's a single SO-DIMM memory upgrade slot tucked away just inside on the right. This can officially support up to a 4GB SO-DIMM module, which would give a total system memory potential of 8GB, and it's an inexpensive upgrade. I say "officially support" because many users have found higher memory modules are also recognized. The CPU lists 8GB as the maximum though, so anything beyond this may cause errors later down the line and isn't worth the risk; nor will Synology be able to support you if something goes wrong.
An eSATA port allows for connection to a drive expansion unit, such as the five-bay DX517. This adds potentially 80TB more. However, if you know you'll likely need more drives in the short term (and can afford it), purchasing a system with more built-in drive slots is always a better choice. The Synology NAS selector tool can help there. For most people, four bays is a good compromise. It allows for secure fault tolerance of a single disk, while still letting you take advantage of mixed drive sizes in a flexible Synology Hybrid RAID configuration.
Setting Up the DS920+
As with all of Synology's line-up, hardware installation and system setup are user-friendly and easy.
Starting with the hardware, you don't need any tools to install drives. Just pull out the drives, and pull off the plastic clips at the side. Slot the drive in, then push back the clips, and re-insert.
Once you've powered on the system, give it a moment, then navigate to find.synology.com from any desktop browser. This should find your new NAS, and you'll be guided through the initial set up. From there, you'll be greeted by the DiskStation Manager OS. It's a familiar-looking graphical environment that anyone who used Windows or Mac will feel at home with. You even get a start button in the top left.
Your first step should be to create a storage volume, which you can do using a helpful wizard after launching the Storage Manager. If you're new to Synology, or Networked Attached Storage in general, it's worth taking a moment to explain the Synology Hybrid RAID technology.
Synology Hybrid RAID
Hard drives can and do fail, and one of the biggest reasons to use a storage system with two or more drives is to allow for redundancy; that is, a drive can fail, and you won't lose any data. This called a Redundant Array of Inexpensive Disks (or RAID, for short). Different types of RAID exist, but the one we're usually concerned with is RAID5, in which data blocks are spread across the disks, as well as a parity block. The parity block lets you recover data if any of the actual data blocks are lost.
With standard RAID levels, you need to use disks that are all the same size. This makes it expensive to start, and inflexible when it comes to upgrading. While you can swap out a drive for a larger one, the additional space will be of no benefit. The key difference is that Synology Hybrid RAID offers the same one disk fault tolerance (or two, if you're particularly risk-averse), but you can mix and match drive sizes. Regardless of what disks you're working with, the Synology software will intelligently optimize your array to use your available space most efficiently. Use the RAID calculator to estimate how much more space you'd get in an SHR configuration compared to standard RAID level.
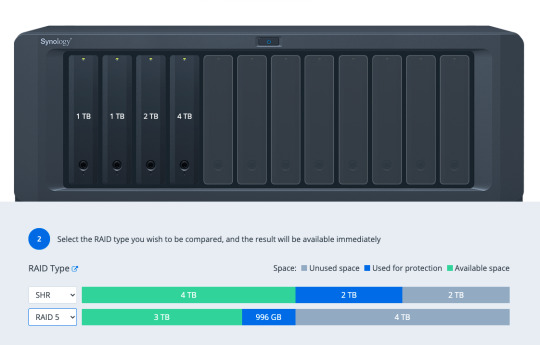
Adding or upgrading a drive is also simple: the only rule is that the drive should be at least as big as the largest drive currently installed in the system. This makes upgrading your storage very budget-friendly.
Once you've created your storage volume, you can begin setting up shared folders from the Control Panel, and install software packages from Package Center.
Virtual Machine and Docker Support
There's a huge range of first and third-party software available, including the incredible Synology Moments, a local photo management solution that offers AI image analysis similar to Google Photos. One quick note is that if you're planning to install Plex, it's best to do so by downloading the latest version directly from Plex, and using the manual install process. The version on Synology Package Center lags behind.
In addition, both Synology's own Virtual Machine Manager hypervisor software and Docker are officially supported on the Plus series, opening up even more virtualized server systems to run on your home NAS.
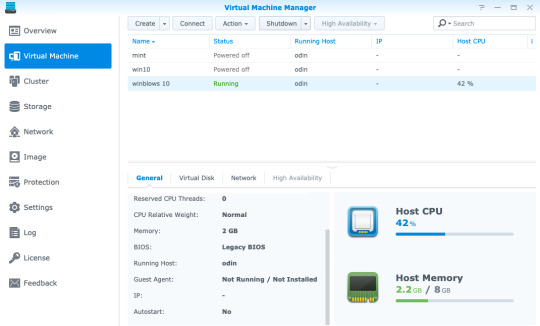
Virtual Machine Manager works with a variety of operating systems—even Windows 10—so if you need a secure test environment for some software you're unsure of, you can simply boot it in a safely contained VM, all from within your browser. Of course, you won't be gaming on this or replacing your regular desktop anytime soon, but it's still useful to have a virtual machine running through a web browser anywhere on your network. Just add the ISO, spin up a new instance, and walk through the usual install process.
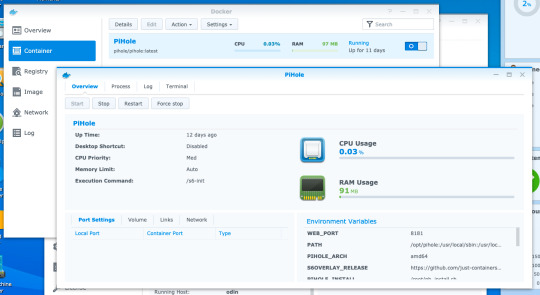
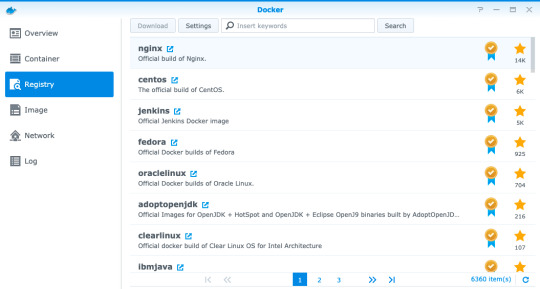
Docker is another beast entirely, and far too broad of a topic to delve into in this review if you're unfamiliar. Learn more about Docker in our guide, but the one-sentence summary would be: a Docker image is a virtual application that runs within a completely safe and sandboxed container. All you need to do is set some variables, point it to a data directory, and boot it up. Docker containers don't run an entire operating system, so they use significantly less memory than a full Virtual Machine. While you can typically run a single virtual machine at a time, you can have tens of Docker containers running 24/7 without impacting the performance of your system.
The range of Docker containers available is immense. If you've ever thought "wouldn't it be cool to run a whatever server at home?", chance are someone has made a Docker image already.
For instance, I had a Dockerized instance of Pi-Hole set up in ten minutes. It's a DNS server with built-in ad-blocking, originally designed to run on a Raspberry Pi. It was trivial to install and uses a minimal amount of memory, requiring only the creation of a few data directories and passing in some variables.
If you're looking at upgrading your home Wi-Fi to a Unifi enterprise system, you might be frustrated at the prospect of having to plug in a hardware dongle to act as the network controller. You'll be pleased to know that a Dockerized Unifi controller can be used instead.
Performance
Official performance figures for the DS920+ put total file throughput available at around 225MB/s read and slightly lower writer speeds, but this is when using the dual-Gigabit Ethernet ports in a link-aggregated configuration. In reality, this means any single Gigabit client device will achieve around 100 to 115MB/s, which our real-world tests confirmed.
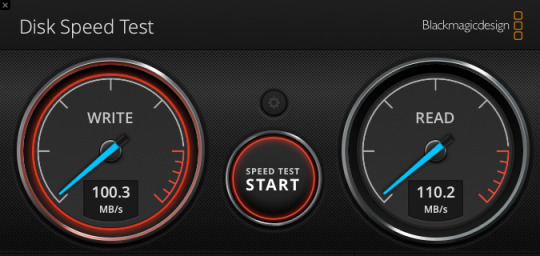
Using faster drives will not improve this, and if you're on Wi-Fi rather than a wired Gigabit Ethernet connection, you may get even slower speeds. Ultimately, your network (and the Gigabit ports on the DS920+) are the limiting factor here when it comes to the performance of file access over the network—not the CPU, RAM, or speed of the drives you put in it.
NVMe Caching
One of the standout upgrade options on the 920+ is the two NVMe drive slots on the underside of the device. NVMe is a new generation of Solid State Drive (SSD) that looks a bit like a memory stick. But don't confuse their existence as yet another place to add storage drives to. The m.2 NVMe slots are limited to use as a caching system, and cannot be used to expand a storage volume.
A single NVMe drive allows you to create a read-only cache, while a pair of drives can be used for read-write caching. This creates a RAID1 array of SSDs to ensure there are no data errors in data being written back to your storage array from the cache.
We should note however that not everything you do on a NAS will benefit from NVMe caching. Specifically, it won't help with large sequential read/write operations, which are one of the main uses of a NAS. This also means it won't help with serving up video files for a Plex server. What they will help with is random read/write operations, such as those in a virtual machine, database, or other server package running on the NAS.
For this reason, it's difficult to measure actual performance gains from NVMe caching: simply copying files to and from the device would show no difference. Instead, if you have an SSD-cache capable device, I'd recommend opening up the Storage Manager -> SSD Cache -> SSD Cache Advisor to see if you might benefit, and what size cache drive is recommended.
There are a few other things you should know about using an SSD cache.
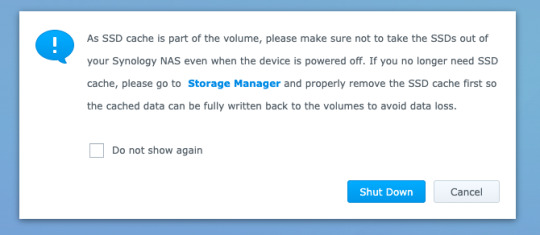
First, don't remove the hardware without removing the cache from the volume first, even when the device is powered off. There's a warning message if you power off from DSM to remind you of this.
Second, NVMe drives are quite pricey, and considered consumables. The error rate on SSDs increases with age and usage, though DiskStation Manager will warn you when the drives are degraded. Synology's own SNV3400 NVMe drive that we used for testing are rated to 500TBW (TeraBytes Written), which is well above the industry average. While you can fit cheaper NVMe drives from competitors, they will need to be replaced more quickly, or may result in data corruption.
Lastly, caching systems use memory too. This works out to around 50MB for a 128GB SSD.
Should You Buy The DS920+?
The DS920+ is the best, affordable, scaleable NAS for the professional home user that values their data. It's a beast of a machine that will handle everything you throw at it with ease—whether that's running your own server software via Docker containers, handling your home security via Surveillance Station, or keeping decades of family photos safe in Synology Moments. Most importantly, it'll do so within the Synology ecosystem. That means easy-to-use software, reliable hardware, and excellent support if you need it. In fact, Synology guarantees their Plus series devices for three years, compared to two years for other models. In addition, software updates are usually provided for seven years.
Synology isn't the cheapest NAS manufacturer out there. You could certainly get faster hardware at a similar price point elsewhere, but you wouldn't benefit from any of the exclusive technologies such as Synology Hybrid RAID that makes efficient use of mixed disk sizes, nor the fantastic range of first-party software. You could even roll your own budget NAS with open-source software like FreeNAS or unRAID, but I wouldn't recommend putting anything too important on there. I've trusted Synology with my data for many years now, and it's never let me down.
The only real disappointment with the hardware is the lack of Multi-Gigabit Ethernet connectivity. While link-aggregated dual-Gigabit connection means you can have full Gigabit performance to multiple clients, it doesn't help to speed up performance to any single client. This matters if you want to use your NAS for video editing, and we may find multi-gig LAN connections more common in the coming years. For typical users though, Gigabit connectivity is plenty fast enough for things like streaming 4K video.
What Exactly Can You Do with a Synology NAS?
More broadly speaking, you might be wondering what you can actually do with a Network Attached Storage system. A Synology NAS has always been a central part of my home network, and it's one of a few devices that I'd class as essential to my work and family life.
Backup
Synology NAS can be a central point of backup for everything in your home, whether that's your family photos spread across multiple smartphones, that Windows folder with all those important documents, or a Mac OS Time Machine archive.
If you don't have a backup, then you haven't experienced data loss (yet)—it's only a matter of time. Of course, a NAS shouldn't be your only backup point, but if you have a friend or family member with their own NAS too, you can act as an off-site backup point for each other! Synology makes this easy to set up with HyperBackup.
It's not just backups either. Synology Drive can keep files in sync across your devices, so you always have the latest copy of a file to work with.
Shared Folders and Media Management
Having a shared folder or two makes your digital home life a lot easier—I can't remember the last time I had to transfer some files using a USB disk! But this is especially true if you have a large archive of media. Plex is the best media management software around, and it runs natively on a Synology NAS. It'll let you keep all your media files in one place, then play them anywhere with a single unified and rich interface.
Those looking to move away from Google Photos after the recent pricing and policy changes will be delighted to hear about Synology Moments. Offering easy import of photos from your smartphone, browser, or existing photo archive, Moments takes advantage of the fast CPU in the DS920+ to perform AI analysis of your photos. It automatically identifies people and subjects so you can easily browse and locate those special memories.
Your Own Server
Fancy running your own web development server? Perhaps a Calibre server to automatically convert all your eBooks? PiHole to block all ads at a network level? Surveillance Station to record from your IP security cameras?! With hundreds of native software packages and even more available through Docker, the DS920+ can run it all.
Energy Efficiency
The other benefit of running a NAS as opposed to using a spare computer is that of power consumption. Peaking at less than 40W of power, the DS920+ manages to do an awful lot with very little energy impact. This means you can leave it running all day, ready for when you need it and working away in the background to keep your data safe.
Synology DS920+ Review: The Best Power User NAS published first on http://droneseco.tumblr.com/
0 notes
Text
Beginner’s Guide To Setup Kubernetes
Steps to install Kubernetes Cluster
Requirements
The major requirements are stated below regarding the setup process.
Master: 2 GB RAM 2 Cores of CPU Slave/ Node: 1 GB RAM 1 Core of CPU
1.Install Kubernetes
The below steps mentioned to be executed on both the master and node machines. Let’s call the master as ‘kmaster‘ and node as ‘knode‘.
1.1 Change to root:
Here, the changing root has been applied because the sudo provides permission to set up Kubernetes, and to avoid the permission process we have changed the root.
$ sudo su
# apt-get update
This command used to update a system.
1.2 Turn Off Swap Space:
Kubernetes doesn't support "swap". So we have to apply the below command to turn off the swap space.
# swapoff -a
1.3 Fstab action
After that, you need to open the ‘fstab’ file and comment out the line which has mention of swap partition.
# nano /etc/fstab
Press ‘Ctrl+X’, after that press ‘Y’ and then press ‘Enter’ to Save the file.
1.4 Update The Hostnames
To change the hostname of both machines, run the below command to open the file and subsequently rename the master machine to ‘kmaster’ and your node machine to ‘knode’.
# nano /etc/hostname
Press ‘Ctrl+X’, after that press ‘Y’ and then press ‘Enter’ to Save the file.
1.5 Update The Hosts File With IPs Of Master & Node
Run the following command on both machines to note the IP addresses of each.
# ifconfig
Now go to the ‘hosts’ file by moving over the both master and node and add an Entry by just specifying their respective IP addresses along with their names i.e. ‘kmaster’ and ‘knode’.
# nano /etc/hosts
Press ‘Ctrl+X’, after that press ‘Y’ and then press ‘Enter’ to Save the file.
1.6 Setting Static IP Addresses
We will make the IP addresses used as above, static for the VMs. We can do, by just modifying/changing the network interfaces file. Then, run the following command to open the file:
# nano /etc/network/interfaces
Now enter the following lines in the file.
auto enp0s8 iface enp0s8 inet static address
Press ‘Ctrl+X’, after that press ‘Y’ and then press ‘Enter’ to Save the file.
After this, restart your machine.
1.7 Install Open SSH-Server
Now we have to install openshh-server. Run the following command:
# sudo apt-get install openssh-server
2. Install Docker
Now we need to install Docker as docker images will be utilized for managing the containers in the cluster. Run with the following commands:
# sudo su # apt-get update # apt-get install -y docker.io
We’ve just explained about how to docker in your own system instead the process of how to add a $user in a docker or how to install docker-compose, for the basics of kubernetes you can follow by just tapping over this link:
3. Install kubeadm, Kubelet And Kubectl
To move further, we’ve to Install these 3 essential components for just setting up the environment of Kubernetes: kubeadm, kubectl, and kubelet.
Run the following commands before installing the Kubernetes environment.
# apt-get update && apt-get install -y apt-transport-https curl # curl -s https://packages.cloud.google.com/apt/doc/apt-key.gpg | apt-key add - # cat <<EOF >/etc/apt/sources.list.d/kubernetes.list deb http://apt.kubernetes.io/ kubernetes-xenial main EOF # apt-get update
Kubelet is the lowest level component in Kubernetes. It’s reliable for what’s running on an individual or specific machine.
Kubeadm is used for administrating the Kubernetes cluster.
Kubectl is used for controlling the configurations on various nodes inside the cluster.
# apt-get install -y kubelet kubeadm kubectl
3.1 Updating Kubernetes Configuration
Next, we will change the configuration file of Kubernetes. Run the following command:
#nano /etc/systemd/system/kubelet.service.d/10-kubeadm.conf
This will open a text editor, enter the following line after the last “Environment Variable”:
Environment="cgroup-driver=systemd/cgroup-driver=cgroupfs"
Press ‘Ctrl+X’, after that press ‘Y’ and then press ‘Enter’ to Save the file.
4. Steps Only For Kubernetes Master VM (kmaster)
All the required packages were installed on both servers till now. But, the further steps will work upon the Master Node only. Now, run the following command to initialize the Kubernetes Master.
4.1 Initialize Kubernetes Master with ‘kubeadm init’
Run the beneath command to initialize and setup kubernetes master.
# kubeadm init (or) # kubeadm init --apiserver-advertise-address=<ip-address-of-kmaster-vm> --pod-network-cidr=192.168.0.0/16 # kubeadm init --apiserver-advertise-address 192.168.1.206 --pod-network-cidr=172.16.0.0/16
In the selected part 1, when we initialize Kubeadm with the command then it will show you the kubernetes control-panel has initialized successfully. The three commands as shown in the images’ part 1 should be run to create .kube folder.
As mentioned before, run the commands from the above output as a non-root user
$ mkdir -p $HOME/.kube $ sudo cp -i /etc/kubernetes/admin.conf $HOME/.kube/config $ sudo chown $(id -u):$(id -g) $HOME/.kube/config
In the selected part 2, signifies about the “kubeadm join token”. The kubeadm token need to store somewhere in notepad and wherever you want to. After storing, you need to run that specific key token in a node terminal so that it can maintain the communication between the master and node.
You will notice from the previous command, that all the pods are running except one: ‘kube-dns’. For resolving this we will install a pod network. To install the CALICO pod network, run the following command:
$ kubectl apply -f https://docs.projectcalico.org/v3.0/getting-started/kubernetes/installation/hosted/kubeadm/1.7/calico.yaml
Install network add-on to enable the communication between the pods only on master nodes. Flannel is a network fabric for the containers, that are designed for the kubernetes.
$ kubectl apply -f https://raw.githubusercontent.com/coreos/flannel/master/Documentation/kube-flannel.yml
To verify, if kubectl is working or not, run the following command.s
$ kubectl get pods -o wide --all-namespaces
use "kubectl get nodes" command to ensure the kubernetes master node status is ready.
$ kubectl get nodes
4.2 To reset kubernetes
Now, if you are done with the process of initiating the command and requiring a fresh start, then you can make changes by just following the below command.
$ kubeadm reset
5. Steps For Only Kubernetes Node VM (knode)
For trial purpose, we can create nodes in the same system with the help of virtual machine.
Prerequisites
1.3GHz or faster 64-bit processor 2 GB RAM minimum/ 4GB RAM or more recommended
install vmware workstation player on ubuntu
5.1 Install required packages
$ sudo apt update $ sudo apt install build-essential</strong> $ sudo apt install linux-headers-$(uname -r)
5.2 Download vmware workstation player
$ wget https://www.vmware.com/go/getplayer-linux
Once the download is completed make the installation file executable using the following command:
$ chmod +x getplayer-linux
5.3 install vmware workstation player
Start the Installation wizard by typing:
$ sudo ./getplayer-linux
1. Just accept the terms and conditions in the license agreement and click on the Next button.
2. Next, you will be asked whether you like to check for product updates on startup. Make your selection and click on the Next button.
3. VMware’s Customer Experience Improvement Program (“CEIP”) helps VMware to improve their products and services by sending anonymous system data and usage information to VMware. If you prefer not to participate in the program select No and click on the Next button
4. In the next step , if you don’t have a license key, vacate the field empty and click on the next button.
5. Next, you will see the following page informing you that the VMware Workstation Player is ready to be installed. Click on the Install button.
6. Start VMware Workstation Player
Create a new virtual machine
Open terminal in virtual system and follow the step to create user (knode) and enter command to make connection between master and node.
$ sudo su
Now we are in the ‘knode terminal’ and we need to run kubeadm init. token key in this terminal as we have described above to save the specific key so that it make connection between master( kmaster) and node(knode).
# kubeadm join 192.168.1.206:6443 --token 02p54b.p8oe045cpj3zmz2b --discovery-token-ca-cert-hash sha256:50ba20a59c9f8bc0559d4635f1ac6bb480230e173a0c08b338372d8b81fcd061
once worker node is joined with kubernetes master, then verify the list of nodes within the kubernetes cluster.
$ kubectl get nodes
we have successfully configured the kubernetes cluster.
kubernetes master and worker node is ready to deploy the application.
Bottom Line
Now that we have explained about kubernetes setup, and further we will move onto something more technical with the other parts of this kubernetes series. Our next tutorial would explain to you how to make a connection with dashboard. Till then enjoy learning and try something new.
#beginners guide to setup kubernetes#Steps to install Kubernetes#Install Kubernetes#Installing the Kubernetes Dashboard#Master and Node#Kubernetes Dashboard Token
0 notes
Text
Linux Download Docker

March 2, 2020 by Matt Hernandez, @fiveisprime
When the command is invoked, docker contacts Docker hub and downloads a docker image called ‘hello-world’. Docker then creates a new container that runs the executable script that streams the message ‘ Hello from Docker! To download or pull an image from Docker hub without running it, use the syntax: $ sudo docker pull. The Linux NAS distribution (Debian based) Open Media Vault (OMV) has an UrBackup server plugin starting with OMV 3.0 in OMV-extras. Starting with OMV 5.0 use the Docker container below. ASUSTOR - ASUS NAS.
Last June, the Docker team announced that they will be investing in getting Docker running with the Windows Subsystem for Linux (WSL). All of this is made possible with the recent changes to the architecture of WSL to run within a lightweight virtual machine (VM), which we talked about in an earlier blog post about WSL 2. Since this announcement, the Docker team has released a Technical Preview of Docker that includes support for running with WSL 2.
This article explains how the Docker Desktop technical preview works as well as how to use the Docker extension with the technical preview.
How it works
This new Docker architecture works a lot like Visual Studio Code's WSL remote development support in that the Docker CLI running on the host machine executes commands within the Docker Integration Package, which runs on the remote WSL VM.
Image credit: Docker Engineering
DockerD runs directly within WSL so there's no need for the Hyper-V VM and all Linux containers run within the Linux userspace on Windows for improved performance and compatibility.
Getting set up
First some prerequisites:
Jul 05, 2018 Docker is an application that simplifies the process of managing application processes in containers. In this tutorial, you'll install and use Docker Community Edition (CE) on Ubuntu 18.04. Docker upgrade ubuntu. Nov 07, 2019 When running docker desktop version 2.1.5.0 (40323) on: OS Name: Microsoft Windows 10 Pro OS Version: 10.0.19013 N/A Build 19013 Eben though WSL 2 based engine is enabled in Settings/General docker container run hello-world on Ubuntu rep.
Install Windows 10 Insider Preview build 18975 (Slow) or later for WSL 2.
Install Ubuntu from the Microsoft store.
Enable WSL 2 by following this guide.
Install the Remote - WSL extension for VS Code.
Install the Docker WSL 2 Technical Preview.
Once installed, Docker will recognize that you have WSL installed and prompt to enable WSL integration. You want to Enable WSL integration for this tutorial.
This option will allow you to access Docker Desktop via the Docker CLI directly from within your Linux distro.
If you have multiple Linux distros, make sure you only have WSL integration turned on for the correct one in your Docker settings:
With that configured, all commands will execute in the Linux context - this includes Docker commands run from PowerShell so running something like docker run mongo… will start a Linux container within the WSL VM.
Running the docker ps command over in WSL, you'll see the container as expected. Notice that the container ID matches.
Using VS Code
With this set up and running, you can install the VS Code Docker extension and access your containers. If you're already running WSL 2 and the Remote - WSL extension, this will help you get Docker integrated into your WSL workflow rather than switching contexts when you need containers. And because the Docker CLI's context is set to use DockerD in WSL, the extension will work with your containers regardless of whether you opened VS Code using the Remote - WSL extension.
Notice how in the screenshot below, I'm connected and working in WSL and still building/running containers without changing from my preferred environment (zsh in Ubuntu).
Theme: Noctis Sereno
I've personally noticed a vast improvement in container execution times using this configuration and each part of my typical development workflow remains the same. I'm also using the Remote - Containers extension within WSL for testing specific environments without setting things up directly on my machine.
We want your feedback
Keep in mind that you're using prerelease software and, while the Windows Insiders Slow ring is very stable, you may run into some issues. If you do find something that isn't working as expected, please open an issue via the Feedback tool in Windows. Any direct Docker issues or feedback can be logged in the Docker for Windows repo.
Happy Coding!
Matt Hernandez, VS Code Program Manager @fiveisprime
Estimated reading time: 7 minutes
You can run Compose on macOS, Windows, and 64-bit Linux.
Prerequisites
Docker Compose relies on Docker Engine for any meaningful work, so make sure youhave Docker Engine installed either locally or remote, depending on your setup.
https://huntercountry477.tumblr.com/post/653677848988729344/catalina-dmg. On desktop systems like Docker Desktop for Mac and Windows, Docker Compose isincluded as part of those desktop installs.
On Linux systems, first install theDocker Enginefor your OS as described on the Get Docker page, then come back here forinstructions on installing Compose onLinux systems.
To run Compose as a non-root user, see Manage Docker as a non-root user.
Install Compose
Follow the instructions below to install Compose on Mac, Windows, Windows Server2016, or Linux systems, or find out about alternatives like using the pipPython package manager or installing Compose as a container.
Install a different version
The instructions below outline installation of the current stable release(v1.28.6) of Compose. To install a different version ofCompose, replace the given release number with the one that you want. Composereleases are also listed and available for direct download on theCompose repository release page on GitHub.To install a pre-release of Compose, refer to the install pre-release buildssection.
Install Compose on macOS
Docker Desktop for Mac includes Compose alongwith other Docker apps, so Mac users do not need to install Compose separately.For installation instructions, see Install Docker Desktop on Mac.
Install Compose on Windows desktop systems
Docker Desktop for Windows includes Composealong with other Docker apps, so most Windows users do not need toinstall Compose separately. For install instructions, see Install Docker Desktop on Windows.
If you are running the Docker daemon and client directly on MicrosoftWindows Server, follow the instructions in the Windows Server tab.
Install Compose on Windows Server
Follow these instructions if you are running the Docker daemon and client directlyon Microsoft Windows Server and want to install Docker Compose.
Start an “elevated” PowerShell (run it as administrator).Search for PowerShell, right-click, and chooseRun as administrator. When asked if you want to allow this appto make changes to your device, click Yes.
In PowerShell, since GitHub now requires TLS1.2, run the following:
Then run the following command to download the current stable release ofCompose (v1.28.6):
Note: On Windows Server 2019, you can add the Compose executable to $Env:ProgramFilesDocker. Because this directory is registered in the system PATH, you can run the docker-compose --version command on the subsequent step with no additional configuration.
Test the installation.
Install Compose on Linux systems
On Linux, you can download the Docker Compose binary from theCompose repository release page on GitHub.Follow the instructions from the link, which involve running the curl commandin your terminal to download the binaries. These step-by-step instructions arealso included below.
For alpine, the following dependency packages are needed:py-pip, python3-dev, libffi-dev, openssl-dev, gcc, libc-dev, rust, cargo and make.
Run this command to download the current stable release of Docker Compose:
To install a different version of Compose, substitute 1.28.6with the version of Compose you want to use.
If you have problems installing with curl, seeAlternative Install Options tab above.
Apply executable permissions to the binary:
Note: If the command docker-compose fails after installation, check your path.You can also create a symbolic link to /usr/bin or any other directory in your path.
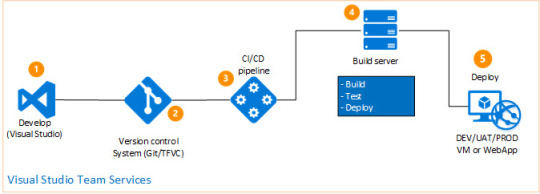
For example:
Optionally, install command completion for thebash and zsh shell.
Test the installation.
Linux Download Docker
Alternative install options
Install using pip
For alpine, the following dependency packages are needed:py-pip, python3-dev, libffi-dev, openssl-dev, gcc, libc-dev, rust, cargo, and make.
Compose can be installed frompypi using pip. If you installusing pip, we recommend that you use avirtualenv because many operatingsystems have python system packages that conflict with docker-composedependencies. See the virtualenvtutorial to getstarted.
If you are not using virtualenv,
pip version 6.0 or greater is required.
Install as a container
Compose can also be run inside a container, from a small bash script wrapper. Toinstall compose as a container run this command:
Install pre-release builds
If you’re interested in trying out a pre-release build, you can download releasecandidates from the Compose repository release page on GitHub.Follow the instructions from the link, which involves running the curl commandin your terminal to download the binaries.
Pre-releases built from the “master” branch are also available for download athttps://dl.bintray.com/docker-compose/master/.
Pre-release builds allow you to try out new features before they are released,but may be less stable.
Upgrading
If you’re upgrading from Compose 1.2 or earlier, remove ormigrate your existing containers after upgrading Compose. This is because, as ofversion 1.3, Compose uses Docker labels to keep track of containers, and yourcontainers need to be recreated to add the labels.
If Compose detects containers that were created without labels, it refusesto run, so that you don’t end up with two sets of them. If you want to keep usingyour existing containers (for example, because they have data volumes you wantto preserve), you can use Compose 1.5.x to migrate them with the followingcommand:
Alternatively, if you’re not worried about keeping them, you can remove them.Compose just creates new ones.
Uninstallation
To uninstall Docker Compose if you installed using curl:
To uninstall Docker Compose if you installed using pip:
Got a “Permission denied” error?
Docker For Linux Download
If you get a “Permission denied” error using either of the abovemethods, you probably do not have the proper permissions to removedocker-compose. To force the removal, prepend sudo to either of the abovecommands and run again.
Where to go next
Linux Download Docker-compose
compose, orchestration, install, installation, docker, documentation
0 notes
Text
Synology Install Docker

Synology Install Docker
Synology Docker Install Ubuntu
Homebridge is a lightweight NodeJS server you can run on your home network that emulates the iOS HomeKit API. Homebridge allows you to integrate with smart home devices that do not support the HomeKit protocol. After installing Homebridge, it remains running and connected to your network, ready to service requests from Siri. In this step by step guide I will show you how to install Homebridge on your Synology NAS using Docker. You can also use HOOBS for your smart home devices.
Note: This guide works perfectly with the latest Homebridge 1.3.4 release.
Please Support My work by Making a Donation.
# Synology DiskStation. The DiskStation by Synology (opens new window) is a famous NAS server solution for your home, allowing the installation of additional packages. We are proud to be able to provide an openHAB Synology package (opens new window). # Prerequisite - Install Java. In this step by step guide I will show you how to install Homebridge on your Synology NAS using Docker. You can also use HOOBS for your smart home devices. Note: This guide works perfectly with the latest Homebridge 1.3.2 release. Original tried installing via a docker command. Finally got a successful install working, but no web access to the web interface. Found this article and started again and installed via the DMS interface. The only differences is my network ip range is 10.0.0.0, so i have included LOCALNETWORK=10.0.0.0/24.
Synology Install Docker
Install Docker via Synology “Package Center”.
Open the Docker Package. From the Docker Console, go to Registry and search homebridge. Look for oznu/homebridge and select it, then click Download or double click on it. You will be prompted to Choose Tag, select latest. Follow the instructions in the image below.
After you click “Select”, the download process of the homebridge docker container will start. You can click on Image on the Docker Console to see the download progress. The current container is about 583 MB. Follow the instructions in the image below.
After the download is completed from the Docker Console, go to Image, then select the oznu/homebridge:latest container. Click Launch. Check “Execute container using high privilege”, then click Advanced Settings. Follow the instructions in the image below.
Select Enable auto-restart. Follow the instructions in the image below.
Go to File Station and open the docker folder. Inside the docker folder, create a new folder and name it Homebridge. Follow the instructions in the images below.
Your docker folder will look like this:
Now go back to the Docker Package. Next tab – “Volume“. Select Add Folder. Choose the homebridge folder inside the docker folder, then click Select. Follow the instructions in the image below.
After you click Select, type /homebridge inside Mount path for the data folder. Follow the instructions in the image below. Your Volume will look like this:
Next tab – “Network“. Choose “Use the same network as Docker Host“.
Next tab – “Port Settings“ move forward without doing anything (no action needed). Next tab – “Links“ move forward without doing anything (no action needed). Next tab – “Environment“. Click the + to add the variable and Value. On the variable area type: DSM_HOSTNAME and on the Value area add: Your NAS Server Name Read STEP 12 B below on how you can find this value. After that, click Apply. Follow the instructions in the images below.
How can I find my DSM_HOSTNAME Value? Go to Control Panel / Info Center / Network. Search for Server name. Follow the instructions in the image below.
After clicking “Apply“ on STEP 12 A, the screen below will open. Click “Next“. Follow the instructions in the image below.
After clicking “Next“, the screen below will open. Select “Run this container after the wizard is finished” then click “Apply“. Follow the instructions in the image below.
Your container will look like this:
Go back to STEP 1 or you will deal with karma 🙂
Now open your browser and type in http://Synology-ip-address:8581/ Follow the instructions in the image below. Username and Password are admin and admin.
You can change Username and Password after the first login. Follow the instructions in the image below.
Enjoy your Homebridge hosted on your Synology NAS!
Read the step by step guide on How to Allow Homebridge to Work Over an HTTPS Connection.
Note: You can easily change the admin user and password by clicking the 3 dots at the top right in homebridge home. Note: Find out how to update Homebridge container with the latest image. Note: I recommend you use Reverse Proxy to allow Homebridge to work over an HTTPS connection. Note: Can I run Docker on my Synology NAS? See the supported models.
Synology Docker Install Ubuntu
This post was updated on Monday / March 22nd, 2021 at 10:41 PM
0 notes
Text
Minikube is a tool developed to help you run a single cluster of Kubernetes on your local machine. Minikube works by starting a single node kubernetes cluster locally for purposes of development and testing. It packages and configures a Linux VM, Docker and all Kubernetes components, optimized for local development. In this guide you’ll learn to run Minikube on KVM Virtualization environment. Similar: Deploy Production Kubernetes Cluster with Ansible & Kubespray How To run Local Kubernetes clusters in Docker Deploy Lightweight Kubernetes with MicroK8s and Snap Minikube supports Kubernetes features such as: NS NodePorts ConfigMaps and Secrets Dashboards Container Runtime: Docker, CRI-O, and containerd Enabling CNI (Container Network Interface) Ingress PersistentVolumes of type hostPath Most Minikube setups available online are for VirtualBox as a hypervisor for the VM. If you’re a frequent visitor of my blog, you must have noticed I’m a big fan of KVM. So this guide is for those who want to run Minikube but on KVM. For VirtualBox users, follow the guide How to Install Minikube on Ubuntu Setup Requirements To run Minikube on KVM, you need to install some libraries and drivers required for communication with the Virtualization layer. These are: Docker machine – This is a tool that lets you install Docker Engine on virtual hosts, and manage the hosts with docker-machine commands Docker Machine KVM2: This is a plugin driver for docker-machine on KVM. Qemu and Libvirt – Hypervisor and Virtualization API Library Minikube and kubectl Step 1: Installing KVM – Libvirt and Qemu Refer to our guide in the link below: Install KVM on CentOS 7 / Ubuntu / Debian / SLES / Arch Linux Step 2: Install Docker-machine Installation of docker machine will vary from one distribution to another. But when you have docker community repository added to your System, you can install docker-machine from OS package manager. Our guide on installing Docker has a step of adding the repository: How to install Docker CE on Ubuntu / Debian / Fedora / Arch / CentOS You can also take a look at Official Docker machine page. Step 3: Download Minikube You need to download the minikube binary. I will put the binary under /usr/local/bin directory since it is inside $PATH. wget https://storage.googleapis.com/minikube/releases/latest/minikube-linux-amd64 chmod +x minikube-linux-amd64 sudo mv minikube-linux-amd64 /usr/local/bin/minikube Check version installed. $ minikube version minikube version: v1.19.0 commit: 15cede53bdc5fe242228853e737333b09d4336b5 For Arch Linux users, you can install minikube from AUR: $ yaourt -Sy minikube-bin Step 4: Install kubectl We need kubectl which is a command-line tool used to deploy and manage applications on Kubernetes. curl -LO https://storage.googleapis.com/kubernetes-release/release/`curl -s https://storage.googleapis.com/kubernetes-release/release/stable.txt`/bin/linux/amd64/kubectl Give the file executable bit and move to a location in your PATH. chmod +x kubectl sudo mv kubectl /usr/local/bin/ kubectl version -o json Confirm the version of kubectl installed. $ kubectl version -o json --client "clientVersion": "major": "1", "minor": "21", "gitVersion": "v1.21.0", "gitCommit": "cb303e613a121a29364f75cc67d3d580833a7479", "gitTreeState": "clean", "buildDate": "2021-04-08T16:31:21Z", "goVersion": "go1.16.1", "compiler": "gc", "platform": "linux/amd64" For Arch Linux users, you can also install this from AUR: $ yaourt -Sy kubectl-bin $ kubectl version Step 5: Install Docker Machine KVM driver The last item to install is the Docker machine driver for KVM. Download the binary and make it executable. curl -LO https://storage.googleapis.com/minikube/releases/latest/docker-machine-driver-kvm2 chmod +x docker-machine-driver-kvm2 sudo mv docker-machine-driver-kvm2 /usr/local/bin/
The package is available from AUR for Arch Linux users: yaourt -Sy docker-machine-driver-kvm2 You can confirm version: $ docker-machine-driver-kvm2 version version: v1.19.0 commit: 15cede53bdc5fe242228853e737333b09d4336b5 Step 6: Starting Minikube on KVM With all components installed, you should be ready to start minikube with KVM driver. Add your user account to libvirt group: sudo usermod -aG libvirt $USER newgrp libvirt Set KVM as default driver: $ minikube config set vm-driver kvm2 The minikube start command will download VM image and configure the Kubernetes single node cluster for you. Easy work!!.. $ minikube start ................................... 😄 minikube v1.19.0 on linux (amd64) 💿 Downloading Minikube ISO ... 129.33 MB / 129.33 MB [============================================] 100.00% 0s 🔥 Creating kvm2 VM (CPUs=2, Memory=2048MB, Disk=20000MB) ... 😄 minikube v1.19.0 on linux (amd64) 🐳 Configuring environment for Kubernetes v1.20.2 💾 Downloading kubeadm v1.20.2 💾 Downloading kubelet v1.20.2 🚜 Pulling images ... 🚀 Launching Kubernetes ... ⌛ Verifying: apiserver proxy etcd scheduler controller dns 🏄 Done! kubectl is now configured to use "minikube" Wait for the download and setup to finish then confirm that everything is working fine. You should see a running VM with a domain named minikube. $ sudo virsh list Id Name State -------------------------- 1 minikube running Minikube Basic operations Check cluster status: $ kubectl cluster-info Kubernetes master is running at https://192.168.39.188:8443 KubeDNS is running at https://192.168.39.188:8443/api/v1/namespaces/kube-system/services/kube-dns:dns/proxy To further debug and diagnose cluster problems, use 'kubectl cluster-info dump'. Minikube configuration file is located on: ~/.minikube/machines/minikube/config.json To View Config, use: $ kubectl config view ...................... apiVersion: v1 clusters: - cluster: certificate-authority-data: DATA+OMITTED server: https://192.168.42.106:8443 name: 192-168-42-106:8443 - cluster: certificate-authority: /home/jmutai/.minikube/ca.crt server: https://192.168.39.188:8443 name: minikube contexts: - context: cluster: minikube user: minikube name: minikube - context: cluster: 192-168-42-106:8443 namespace: myproject user: developer/192-168-42-106:8443 name: minishift - context: cluster: 192-168-42-106:8443 namespace: myproject user: developer/192-168-42-106:8443 name: myproject/192-168-42-106:8443/developer - context: cluster: 192-168-42-106:8443 namespace: myproject user: system:admin/192-168-42-106:8443 name: myproject/192-168-42-106:8443/system:admin current-context: minikube kind: Config preferences: users: - name: developer/192-168-42-106:8443 user: token: QdSKNK5DbaLA2AOFM__8-_fJ-Pt7BikZP1uFwsqyNx0 - name: minikube user: client-certificate: /home/jmutai/.minikube/client.crt client-key: /home/jmutai/.minikube/client.key - name: system:admin/192-168-42-106:8443 user: client-certificate-data: REDACTED client-key-data: REDACTED Check nodes: $ kubectl get nodes NAME STATUS ROLES AGE VERSION minikube Ready master 35m v1.15.0 Access minikube VM using ssh: $ minikube ssh _ _ _ _ ( ) ( ) ___ ___ (_) ___ (_)| |/') _ _ | |_ __ /' _ ` _ `\| |/' _ `\| || , < ( ) ( )| '_`\ /'__`\ | ( ) ( ) || || ( ) || || |\`\ | (_) || |_) )( ___/ (_) (_) (_)(_)(_) (_)(_)(_) (_)`\___/'(_,__/'`\____) $ cat /etc/os-release NAME=Buildroot VERSION=2018.05.3 ID=buildroot VERSION_ID=2018.05.3 PRETTY_NAME="Buildroot 2018.05.3" $ docker ps To stop a running local kubernetes cluster, run: $ minikube stop To delete a local kubernetes cluster, use: $ minikube delete Step 7: Enable Kubernetes Dashboard
Kubernete ships with a web dashboard which allows you to manage your cluster without interacting with a command line. The dashboard addon is installed and enabled by default on minikube. $ minikube addons list ........................... - addon-manager: enabled - dashboard: disabled - default-storageclass: enabled - efk: disabled - freshpod: disabled - gvisor: disabled - heapster: disabled - ingress: disabled - logviewer: disabled - metrics-server: disabled - nvidia-driver-installer: disabled - nvidia-gpu-device-plugin: disabled - registry: disabled - registry-creds: disabled - storage-provisioner: enabled - storage-provisioner-gluster: disabled To open directly on your default browser, use: $ minikube dashboard To get the URL of the dashboard $ minikube dashboard --url http://192.168.39.117:30000 Open the link on the browser to access the Dashboard. Cleaning up: $ minikube delete --all --purge
0 notes
Text
Latest Linux Sabayon version
Sabayon 16.11 is a modern and easy to use Linux distribution based on Gentoo, following an extreme, yet reliable, rolling release model.
This is a major release that is the result of a hard round of testing, and it is published to mirrors with the latest and greatest collection of software available in the Entropy repositories. The full changelogs for this release are available on our mirrors.
The list of packages included in each Sabayon flavor is available inside “.pkglist” files on the mirrors. Our team is always busy packaging the newest software just for you. If you want to have a look at what’s available in our repositories, just go to our packages website.
All the release variants can be found in the download section.
Please read on for links to the images and torrent files on our mirrors.
Changes
This Sabayon release is the result of team work, time and care, to provide you with a stable, solid and bleeding edge release!
There are a lot of exciting changes in this release, here’s a few:
New Anaconda Installer version, with tons of bugfixes
Latest kernel 4.8
Latest KDE-Plasma version
Renewed artwork
New Greeter!
Improvements and fixes to Entropy (the package manager)
New supported ARM devices!
We’ve added support for Odroid X2/U2/U3/C2 ARM devices, and thanks to geaaru, we added BananaPi to the list too. Daily builds can be found on our mirrors, under the “testing” folder.
Sabayon developers have decided to switch to a different release schedule:
Stable releases will be available (if there are no stoppers) at the end of January, May and October. They are still found under the “monthly/” directory in the mirrors, but from now you will find tagged stable releases under “stable/”.
Daily images can always be found under the “daily” folder and these are incremental updates (though we can’t guarantee these will always be in a working state).
New Website
Our old website has been around since the beginning. But we are happy, after a long development period to switch to a more modern and bleeding edge design touch that also works better for mobile devices.
If you want to send feedback about the website or want to contribute, join us on IRC or drop an email to [email protected].
New developers announcement
Ben “optiz0r” Roberts joined the Sabayon Development Team. Ben is a long-time Gentoo and Sabayon user, and will be helping out with the Sabayon Community Repositories, and the Sabayon building Infrastructure.
Thanks to
the development team did a great job (extra thanks to mudler, optiz0r, Enlik, joost_op, lxnay, dgikiller, wolfden)
geaaru (BananaPi support)
Tom Ruis (Boot graphics)
Ryuno-Ki (Front-end developing)
Alessandro Esciana (Wallpaper graphics)
Thanks to everyone who was involved in this release!
Release information
Here will follow generic information about the available releases, along with the current state of Sabayon.
Available releases
As for now, we offer 64bit and ARM images.
But you are free to choose between the wonderful minimalism of GNOME, the eyecandy of KDE or the old fart called Xfce. If you are the kind of person who just needs Fluxbox/Openbox/whatever else, just get the Minimal image and you won’t be hit by the “OMG candies” bloat that is in the other images.
Docker
We offer official docker releases. You can find them in our official docker profile. They are updated daily with the latest and greatest stuff from Entropy repositories. There also is a Docker image available to build Sabayon packages as well, without the need to have all the tools required in your existing machine here you can find a guide on how to use the Docker builder image.
Vagrant images
We couldn’t ship just docker images of course. You can find a barebone Sabayon image in the VagrantCloud (now called Atlas). Deploying a Sabayon image now can be even more easier:
vagrant init Sabayon/spinbase-amd64; vagrant up --provider virtualbox
Sabayon Server Edition
The Server Edition is just perfect for those who want to run this distro as a pure server. The installer is still Anaconda (with Text install mode), after install all the additional components required by Anaconda are removed from the system. We now also service you with Vagrant images.
Binary vs Source Package Manager
It’s up to you whether turn a newly Sabayon installation into a geeky Gentoo ~arch system or just camp on the lazy side and enjoy the power of our binary, simplified Applications Manager (a.k.a. Rigo). With Sabayon you are really in control of your system the way you really want. Read the wiki page if you plan mixing the two package managers.
Native NVIDIA and AMD GPU drivers support
All our releases natively support the latest and greatest GPU hardware from NVIDIA and AMD through their proprietary drivers. Whether you want to enjoy your Linux rig for gaming or video playback, you can. For AMD hardware though, we default to the Open Source implementation for the supported cards. Make sure to pass “nomodeset” to the boot command line to force the proprietary drivers to be used instead: head over the wiki for more details.
LTSI Linux kernels offered
We are tracking the 3.10, 3.12, 3.18, 4.1 and 4.4 Long Term Stable Linux kernels, offering (almost) same-day updates to them. If you are using Sabayon in a server environment, you surely welcome this. However, if you’re using Sabayon on your laptop, desktop workstation, switching between kernels or just moving to a new version has become a no-brainer operation through Rigo: just go to the preferences menu, select the kernel menu (LTS and regular kernels are listed in separate menus), pick a kernel and click “Install”. Rigo will take care of updating external modules in a reliable and safe way on your behalf.
Sabayon Community Repositories (SCR) are here!
Sabayon Community Repositories (SCR) is a collection of repositories available to Sabayon users that could be enabled/removed from the system by using enman – our layman equivalent. While SCR content is not as stable as main repos (and we put a lot of warnings in the website for this reason) it is now easier and faster than ever before to get bleeding edge packages not available in the official repositories.
Users can search packages in the SCR website, including step-by-step instructions for enabling the necessary repositories and installing.
More information on how to use SCR is available in the wiki page (under construction). Meanwhile we are currently working on the project documentation: Guidelines and Bylaws can be found on the scr-docs Github repository. More information is also available here
Here are some packages already available in the SCR community repository (just to name a few):
app-editors/sublime-text
app-emulation/genymotion
app-emulation/shashlik-bin
app-misc/neofetch
app-text/cherrytree
net-im/telegram-bin
x11-misc/mugshot
x11-terms/altyo
games-arcade/fretsonfire
media-sound/guitarix2
dev-embedded/arduino
app-emulation/RemoteBox
app-crypt/veracrypt
… and many others!
If you care about security (you should), you will welcome the addition of VeraCrypt. Using this program, you can encrypt container on your hard drive. VeraCrypt succeedes TrueCrypt and was recently audited. If you want to encrypt your entire disk, Anaconda supports that out-of-the-box.
0 notes
Text
In this tutorial, I’ll take you through the steps to install minikube on Ubuntu 22.04|20.04|18.04 Linux system. To those new to minikube, let’s start with an introduction before diving to the installation steps. Minikube is an open source tool that was developed to enable developers and system administrators to run a single cluster of Kubernetes on their local machine. Minikube starts a single node kubernetes cluster locally with small resource utilization. This is ideal for development tests and POC purposes. For CentOS, check out: Installing Minikube on CentOS 7/8 with KVM In a nutshell, Minikube packages and configures a Linux VM, then installs Docker and all Kubernetes components into it. Minikube supports Kubernetes features such as: DNS NodePorts ConfigMaps and Secrets Dashboards Container Runtime: Docker, CRI-O, and containerd Enabling CNI (Container Network Interface) Ingress PersistentVolumes of type hostPath Hypervisor choice for Minikube: Minikube supports both VirtualBox and KVM hypervisors. This guide will cover both hypervisors. Step 1: Update system Run the following commands to update all system packages to the latest release: sudo apt update sudo apt install apt-transport-https sudo apt upgrade If a reboot is required after the upgrade then perform the process. [ -f /var/run/reboot-required ] && sudo reboot -f Step 2: Install KVM or VirtualBox Hypervisor For VirtualBox users, install VirtualBox using: sudo apt install virtualbox virtualbox-ext-pack KVM Hypervisor Users For those interested in using KVM hypervisor, check our guide on how to Install KVM on CentOS / Ubuntu / Debian Then follow How to run Minikube on KVM instead. Step 3: Download minikube on Ubuntu 22.04|20.04|18.04 You need to download the minikube binary. I will put the binary under /usr/local/bin directory since it is inside $PATH. wget https://storage.googleapis.com/minikube/releases/latest/minikube-linux-amd64 chmod +x minikube-linux-amd64 sudo mv minikube-linux-amd64 /usr/local/bin/minikube Confirm version installed $ minikube version minikube version: v1.25.2 commit: 362d5fdc0a3dbee389b3d3f1034e8023e72bd3a7 Step 4: Install kubectl on Ubuntu We need kubectl which is a command line tool used to deploy and manage applications on Kubernetes: curl -LO https://storage.googleapis.com/kubernetes-release/release/`curl -s https://storage.googleapis.com/kubernetes-release/release/stable.txt`/bin/linux/amd64/kubectl Make the kubectl binary executable. chmod +x ./kubectl Move the binary in to your PATH: sudo mv ./kubectl /usr/local/bin/kubectl Check version: $ kubectl version -o json --client "clientVersion": "major": "1", "minor": "24", "gitVersion": "v1.24.1", "gitCommit": "3ddd0f45aa91e2f30c70734b175631bec5b5825a", "gitTreeState": "clean", "buildDate": "2022-05-24T12:26:19Z", "goVersion": "go1.18.2", "compiler": "gc", "platform": "linux/amd64" , "kustomizeVersion": "v4.5.4" Step 5: Starting minikube on Ubuntu 22.04|20.04|18.04 Now that components are installed, you can start minikube. VM image will be downloaded and configure d for Kubernetes single node cluster. $ minikube start Starting local Kubernetes v1.10.0 cluster... Starting VM... Downloading Minikube ISO 150.53 MB / 150.53 MB [============================================] 100.00% 0s Getting VM IP address... Moving files into cluster... Downloading kubeadm v1.10.0 Downloading kubelet v1.10.0 Finished Downloading kubeadm v1.10.0 Finished Downloading kubelet v1.10.0 Setting up certs... Connecting to cluster... Setting up kubeconfig... Starting cluster components... Kubectl is now configured to use the cluster. Loading cached images from config file. Wait for the download and setup to finish then confirm that everything is working fine. Step 6: Minikube Basic operations To check cluster status, run: $ kubectl cluster-info Kubernetes master is running at https://192.168.39.117:8443
KubeDNS is running at https://192.168.39.117:8443/api/v1/namespaces/kube-system/services/kube-dns:dns/proxy To further debug and diagnose cluster problems, use 'kubectl cluster-info dump'. Note that Minikube configuration file is located under ~/.minikube/machines/minikube/config.json To View Config, use: $ kubectl config view apiVersion: v1 clusters: - cluster: certificate-authority: /home/jmutai/.minikube/ca.crt server: https://192.168.39.117:8443 name: minikube contexts: - context: cluster: minikube user: minikube name: minikube current-context: minikube kind: Config preferences: users: - name: minikube user: client-certificate: /home/jmutai/.minikube/client.crt client-key: /home/jmutai/.minikube/client.key To check running nodes: $ kubectl get nodes NAME STATUS ROLES AGE VERSION minikube Ready master 13m v1.10.0 Access minikube VM using ssh: $ minikube ssh _ _ _ _ ( ) ( ) ___ ___ (_) ___ (_)| |/') _ _ | |_ __ /' _ ` _ `\| |/' _ `\| || , < ( ) ( )| '_`\ /'__`\ | ( ) ( ) || || ( ) || || |\`\ | (_) || |_) )( ___/ (_) (_) (_)(_)(_) (_)(_)(_) (_)`\___/'(_,__/'`\____) $ sudo su - To stop a running local kubernetes cluster, run: $ minikube stop To delete a local kubernetes cluster, use: $ minikube delete Step 7: Enable Kubernetes Dashboard Kubernete ships with a web dashboard which allows you to manage your cluster without interacting with a command line. The dashboard addon is installed and enabled by default on minikube. $ minikube addons list - addon-manager: enabled - coredns: disabled - dashboard: enabled - default-storageclass: enabled - efk: disabled - freshpod: disabled - heapster: disabled - ingress: disabled - kube-dns: enabled - metrics-server: disabled - registry: disabled - registry-creds: disabled - storage-provisioner: enabled To open directly on your default browser, use: $ minikube dashboard To get the URL of the dashboard $ minikube dashboard --url http://192.168.39.117:30000 Access Kubernetes Dashboard by opening the URL on your favorite browser. For further reading, check: Hello Minikube Series: https://kubernetes.io/docs/tutorials/stateless-application/hello-minikube/ Minikube guides for newbies: https://kubernetes.io/docs/getting-started-guides/minikube/
0 notes